#blender 2.9
Explore tagged Tumblr posts
Visit Tumblr Blog
Explore Tumblr blogs with no restrictions, modern design and the best experience.
Last Seen Tumblr Blogs


Fun Fact
Tumblr was attacked by a cross-site scripting worm deployed by the Internet troll group GNAA on Dec 3, 2012.
Text


New SIMS 4 NAILS
Bear Junky
Short junky set
6 swatches
Made in Blender 2.9
Look for Custom Thumbnail
All hand painted
Mesh 100% me
Tag me @vexsims2000
#youtube#sims 4#the sims community#sims 4 screenshots#sims 4 cc#sims 4 gameplay#blacksimscommunity#showyoursims#showusyourbuilds#shortvideo#sims 4 nails
135 notes
·
View notes
Text
INDIGESTION • [FNAF: Help Wanted 2 Blender Animation]
youtube
''Soo banned.. I should just turn off the lights myself'' HELP WANTED 2 IS GROOVY And sassy sun lives rent free in my head so why not make one of those groove-tacularitarily voice lines come to life Today's lesson: INDIGESTION :), keep eating those art supplies to find out what it is! Also happy late birthday to Security Breach! See this as a half-sb-birthday animation

Credits - Daycare attendant models were made by Coolioart This animation was made in Blender 2.9 by me The FNaF Franchise was originally created by Scott Cawthon (And this game obviously by Steelwool Studios) Epic and amazing voice acting as always by Kellen Goff (Must've had alotta fun with this game) donut steel
#fnaf#groove-tacular artstuff#digital art#help wanted#fnaf help wanted 2#help wanted 2#fnaf daycare attendant#fnaf sb#sun fnaf#daycare attendant#fnaf help wanted#sundrop fnaf#fnaf vr#sundrop#fnaf hw 2#fnaf moon#five nights at freddy's#sunrise#3d animation#fnaf animation#fnaf meme#fnaf fanart#digital artist#artist#artists on tumblr#fnaf hw fanart#fnaf hw 2 fanart#fnaf hw 2 spoilers#3d#groovy
207 notes
·
View notes
Text
Since I was recently tagged on making CC in milkshape, I figured I'd copy and paste what I know from my other blog, rather than just forwarding the page here for ease of viewing. It’s the FAQ page for creating CC under the read more.
What do you use to make mods?
S3PE is used to export snippets of the code to edit to make tuning mods. If you wanna make some yourself, HERE is the tutorial to learn how.
What do you use to make objects/clothing/hair?
This one has a few answers depending on what you mean specifically.
TSRW mainly for cloning and editing objects. It also lets me export the files in simpack and package formats.
If you want the version of TSRW BEFORE the sims 4 versions, you can get that HERE. This is important to note because some other programs used for CC creation aren’t fully compatible with the newer version of the TSRW’s WSO files.
If it’s an object that needs a fourth channel added, but it isn’t supported, Texture tweaker by Ignes Jones is what gives the object that channel to work with.
For meshing I use milkshape, and I’m currently working on learning how to use blender instead, since it’s freeware and has a lot more that can be done with it. However, it seems like the plugins from TSRW no longer work with blender, but there are plugins to have blender import geoms HERE that are best used with blender version 2.8-2.9.
There are some additional plugins for Milkshape that makes working in it much easier. There is an align normals plugin set by Demon 432 HERE, and the Unimesh plugins by Wes Howe found HERE. Lastly, to make UV editing easier in Milkshape there’s the CatofEvilGenius UV plugin HERE. They also have a UV flipper too.
For editing textures I personally use Photoshop and here’s how to add DDS usage to it with a link already there in it to download the necessary files. If you use Gimp instead, you can get the DDS files for it HERE. Installation should be similar to PS’s, just look for the file formats.
HERE is a link to the faces and scalps for when I need to model hair or jewelry, since doing it right on the head is much easier. Teens and elders aren’t in here because they aren’t that much different from the adult head.
Is that everything you use?
No there’s also:
Delphy’s Dashboard – Used to make sure my package files aren’t corrupt and won’t make sims implode. It’s also good for checking if anything you already have may be corrupted (a lot of it out there sadly is through no fault of the creator. It just happens during creation sometimes)
S3OC – Another program that lets you clone files, save unlike TSRW it can clone interaction objects, like toothbrushes, game controllers, bowls, plates, and other things that only appear for certain situations. The downside is everything mostly appears in strings with few images, but most of the names make sense for the items. Just sort by name and get to scrollin.
Compressorizer – This compresses simpack and package files in order to help keep the game running smooth. Due to some of its functions, remember to back up your CC and games before using the program.
MeshToolKit – This one is indispensable for creating custom content if you’re adjusting meshes just a bit, or using it to give completely new weight assignments (what makes it move and work like a sim body part) and morphs (the thin to thick range, pregnancies included). Thornowl also made an updated version that can be downloaded HERE.
Normal/Bump map plugins – They’re necessary for any CC you make, as most art programs don’t natively have the ability to make them. Now there are a couple different sets you can download and use depending on your art program of choice.
You can get the ones for GIMP HERE, with the link to the downloads on that page.
The ones for Photoshop can be gotten HERE, and this is a mediafire link because I personally had difficulty using NVIDIA’s newer exporter
And I THINK that’s everything, if I think of or get asked anything else I’ll edit this as needed.
#thesims 3#sims 3#the sims 3#s3cc#ts3 cc#least I think that's everything#If there's anything anyone thinks should be added let me know
34 notes
·
View notes
Text
Crisps' Basic Blender Plugins
I made two basic Blender plugins, one to easily center objects in the scene, and the other to easily remove and re-add numbering from bone names.
Both plugins require Blender 2.8 or above. They were tested in Blender 2.9, 3.6 and 4.0 on Windows. (Please report if anything explodes so that I can fix it. I've not coded much for Blender before so these are probably wonky.)
Both are found in the Item tab in Object mode.
Basic Move Tool
Save a few clicks sitting objects’ asses on the scene origin.

Sit Selected at Scene Origin Moves all selected Mesh, Curve and Text/Font objects to the scene’s origin, their lowest points at height zero. The objects’ own origins (pivot points) move with them, but keep their relative positions in object space. Sit Selected & its Origin(s) at Scene Origin Moves all selected objects to the scene’s origin, their lowest points at height zero. Their origins (pivot points) are also moved there. ! Apply -> Rotation to your objects before use if they’ve been rotated. I use bounding box information to calculate objects’ lowest points. Bounding boxes are automatically updated when an object is translated or scaled, but not on rotation 🤔
Bone Name Manager
Remove a substring/pattern from bones’ names; save and restore the originals via save file. The default pattern is “#\d+$”: “#” followed by numbers at the end of the name string.
I created this one because the GMDC Import/Export plugin requires the bones to be numbered, but that breaks the symmetry mode for weight painting. I wanted an easy alternative to renaming and re-renaming them by hand.

Use Custom Regex? If ticked, the plugin will use the specified regular expression instead of its default pattern. Only the first match found in a name will be taken into account. Strip Bone Names Removes elements matching the pattern from bones’ names. The original names are not saved. Save Bone Names to File Creates a json file listing and mapping stripped and original bone names to each other. Uses the Save Path. The bones are not renamed. Strip Bone Names and Save to File Creates a json file listing and mapping stripped and original bone names to each other. Uses the Save Path. Removes elements matching the pattern from bones’ names. Restore Bone Names from File From a valid json file, loads the mapping of stripped to original names and renames bones accordingly. Uses the Load Path. Will fail if the current pattern is different from the one used by the file.
-> Download both at Box or SimFileShare
(I'm not sure about the ethics of putting non-sims stuff on SimFileShare, so I may remove that link.)
43 notes
·
View notes
Text
Adding extra details to your sim!
So any fans of @kikovanitysimmer ‘s renders know that she adds a lot of extra detail to her sim’s skin. Her process has changed since then, but she still hosts her old tutorials on her discord!
We’ve been getting a lot of talk about how hard it can be to follow so I’m providing a text-based step by step tutorial!
Requirements
TheSims4Ripper
Blender 2.9+ (I’ll be using 4.0.0)
Any photo editing software (I’ll be using Ibis Paint) that has these features:
Multiple layers
Adding noise
Changing brightness/contrast and Hue/Saturation/Value
Inverting colours
Sims4studio (optional)
First things first:
You do not need to export a custom skin. Using the _diffuse.png you got from exporting your sim works just fine!
It’s preferable that you export your sim naked. Not a requirement, but makes it a lot easier. Here’s a video tutorial about dressing your sim in blender.
Onto the tutorial!
Displacement Map (Pores and the like)
Import your texture. Here, I’m using Kiegross’s Kiera Skin, edited for personal use.

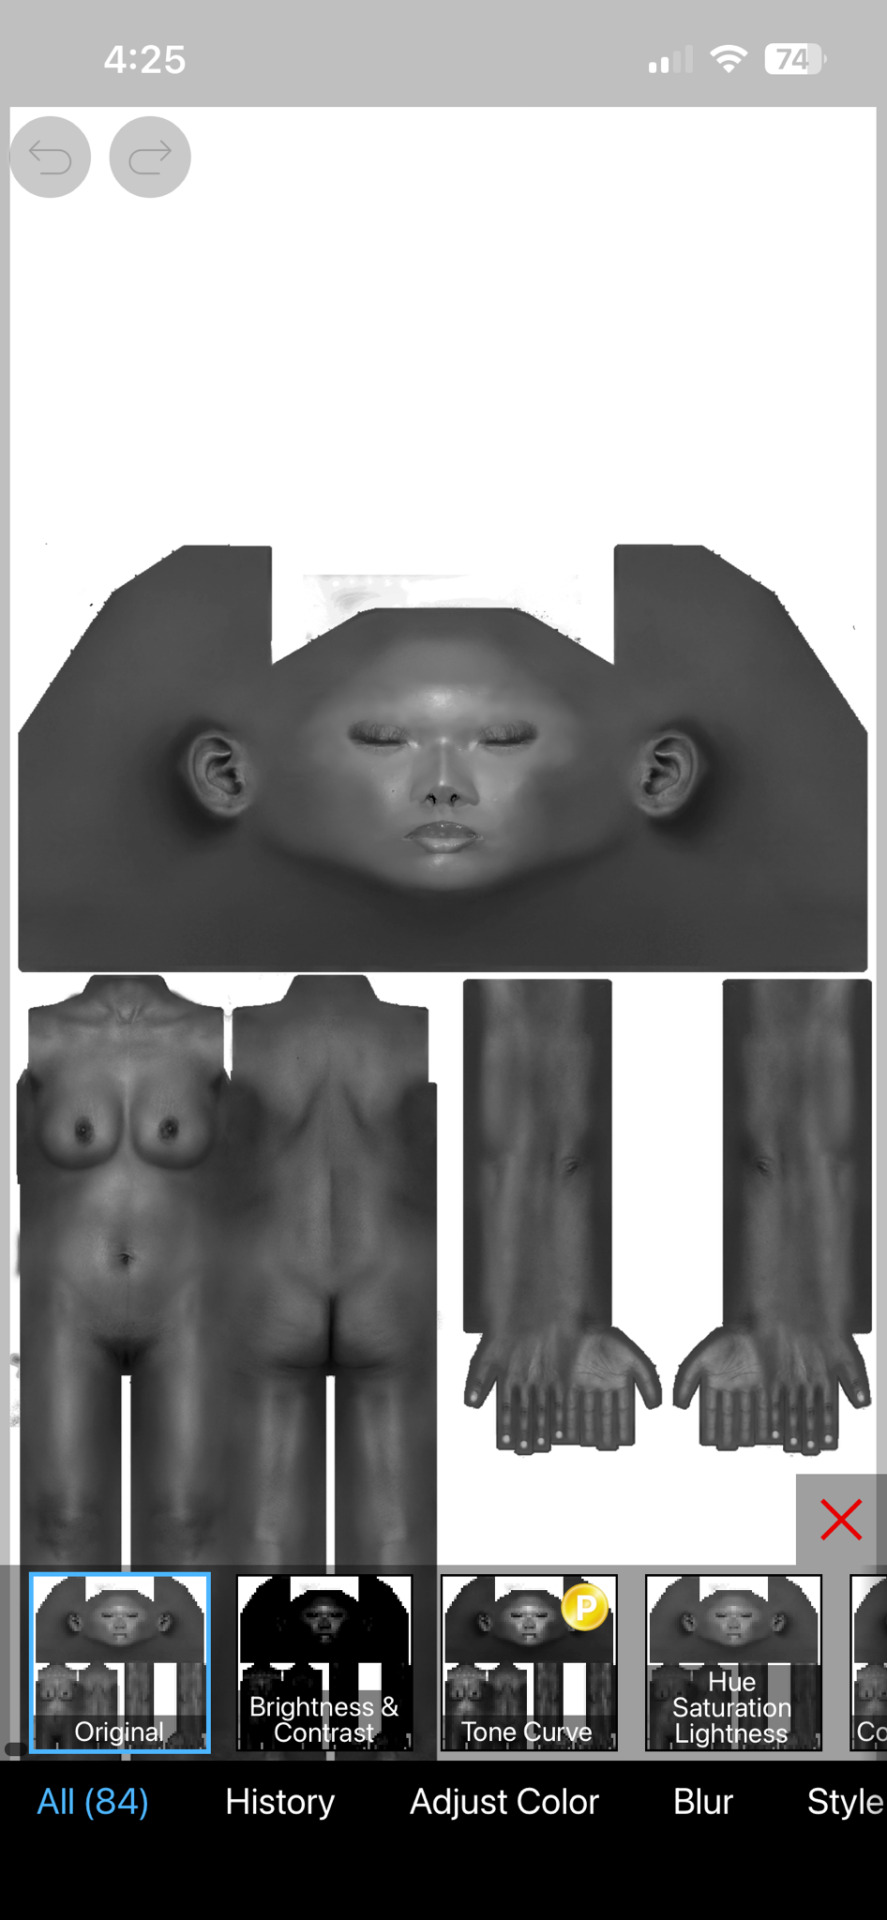
2. Change the texture to black and white
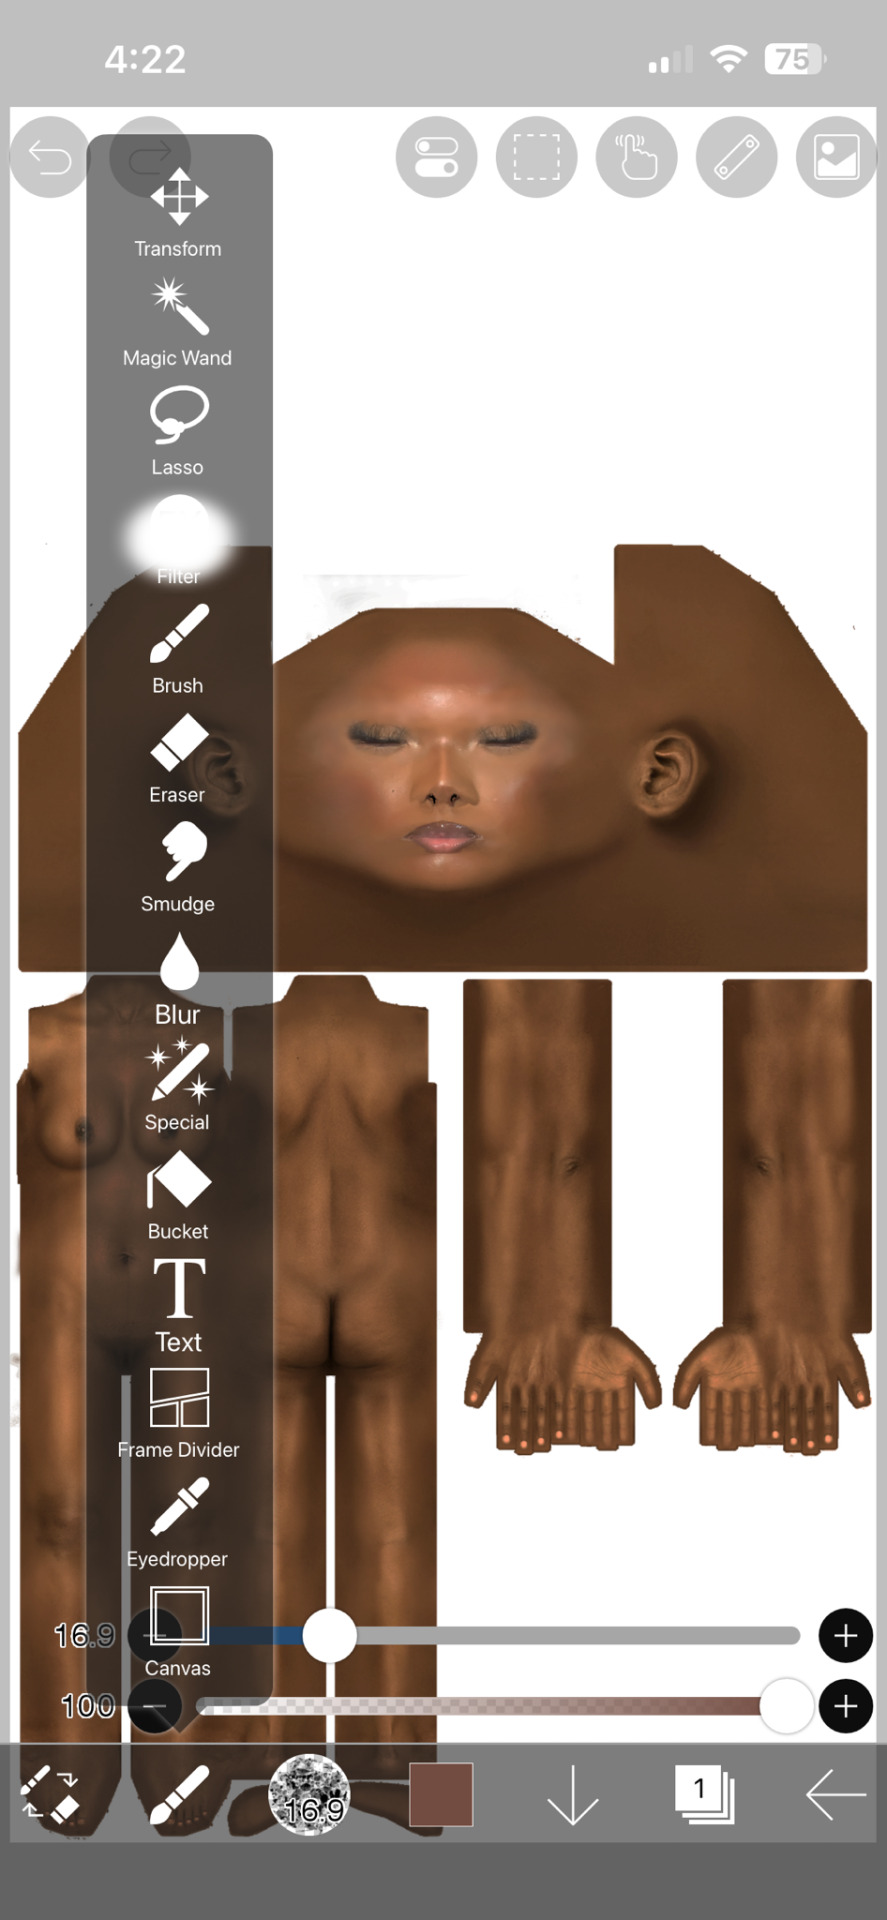


3. Duplicate the layer

4. Edit the Brightness and Contrast to your liking

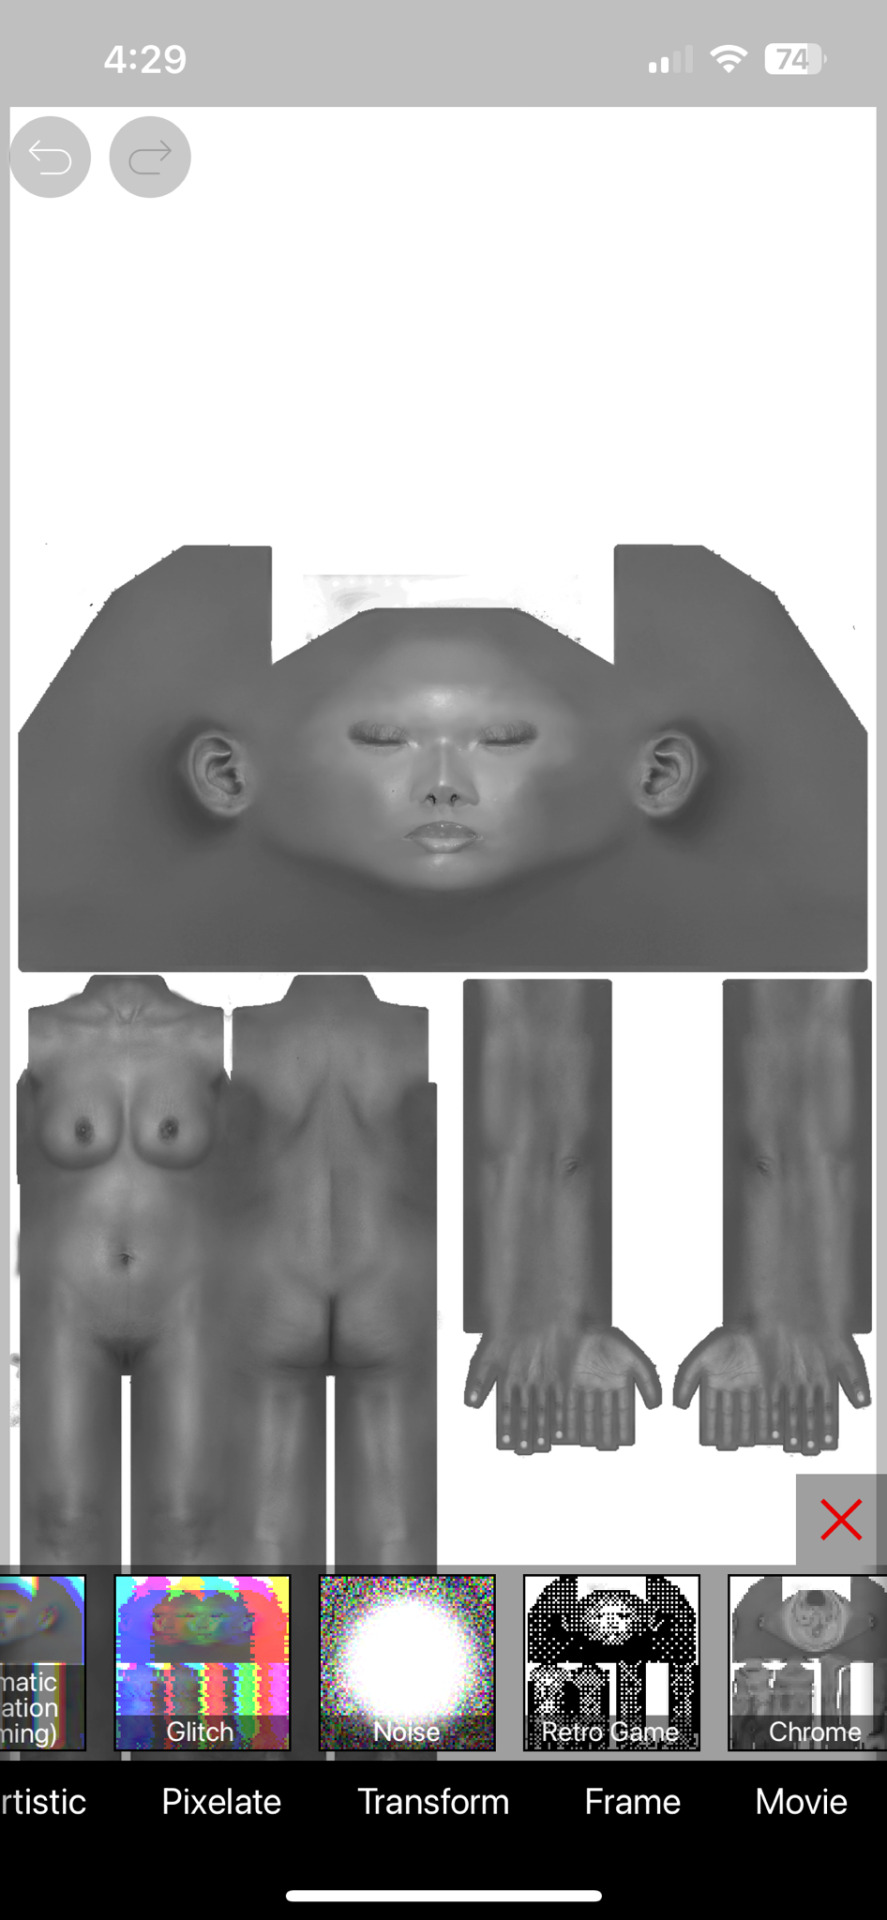
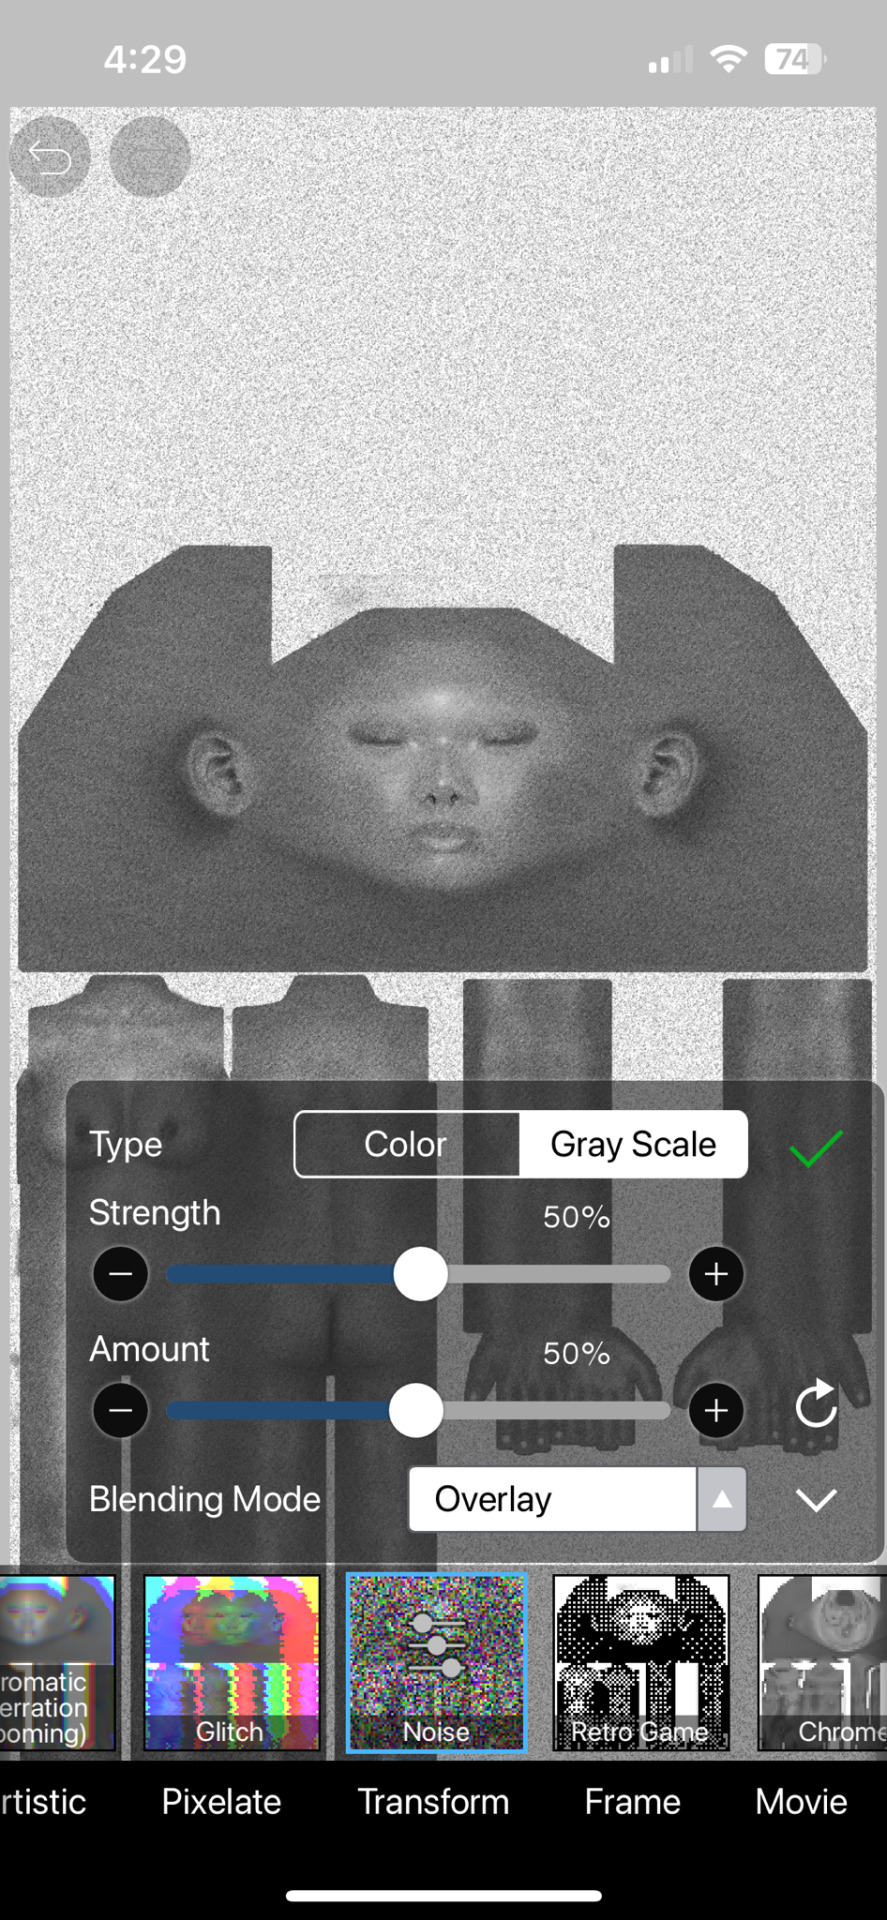
5. Add noise. Pictured here are my personal settings
6. Erase parts that realistically would not have a lot of pores, ex. Lips, hands and feet. Kiko suggests putting your eraser hardness or opacity lower as these areas still have texture to them.
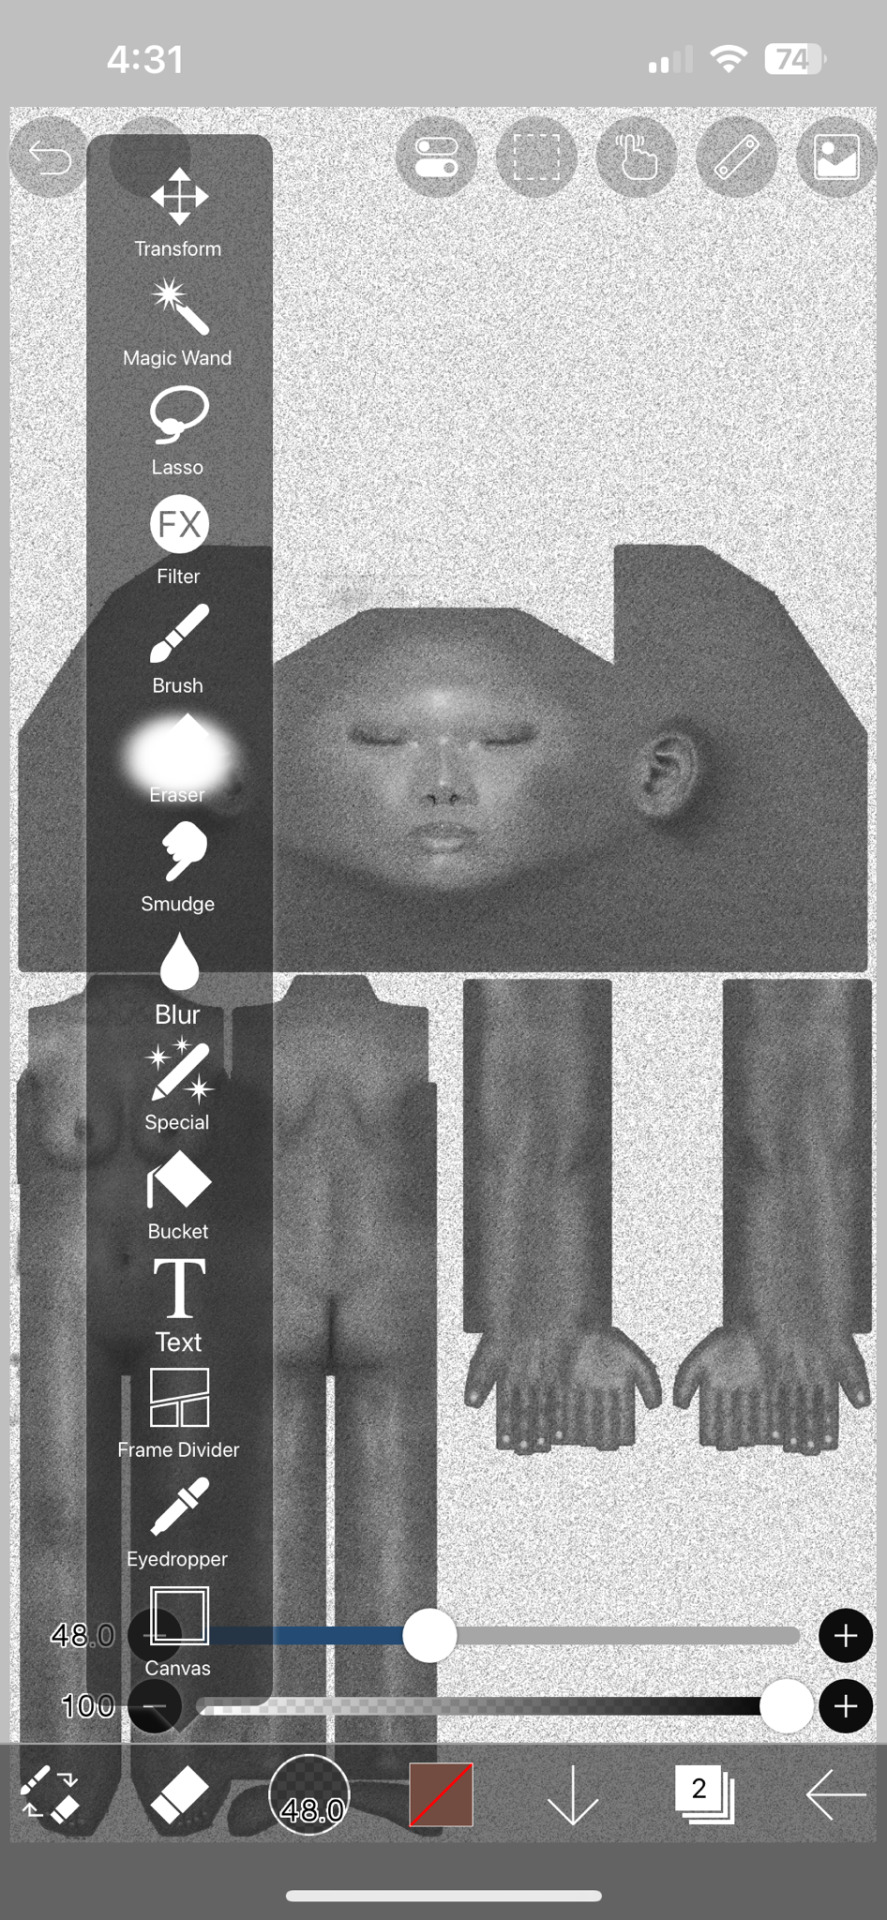

7. Save picture as is! You can delete the noisy layer if you wish, but we will need the original black and white layer for everything else.
Specular and Roughness Map (Shine)
Creating a new layer is highly recommended so you can backtrack
Using the original layer, edit the brightness and contrast. Pictured here are my preferred settings


2. Take a black brush and colour in areas you don’t want to shine. Realistically, these are the palms of your hands and the soles of your feet and their respective nails. You may also want to take a white brush to the areas you do want to shine, like lips, chest or thighs.
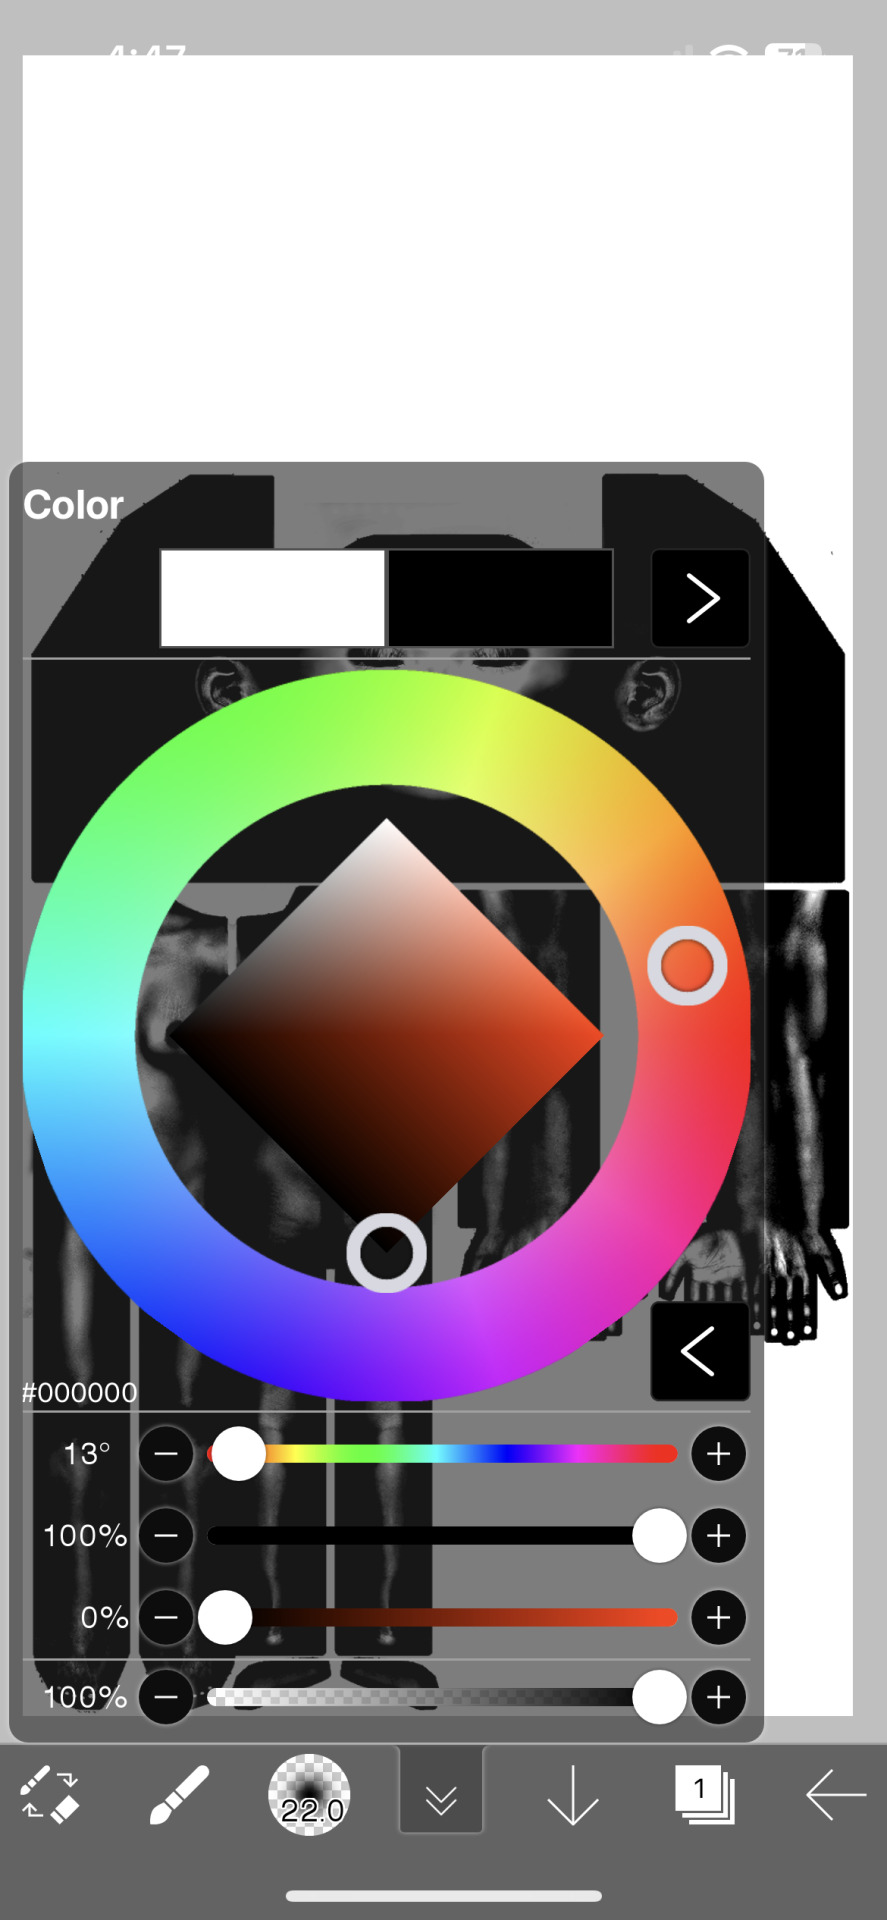
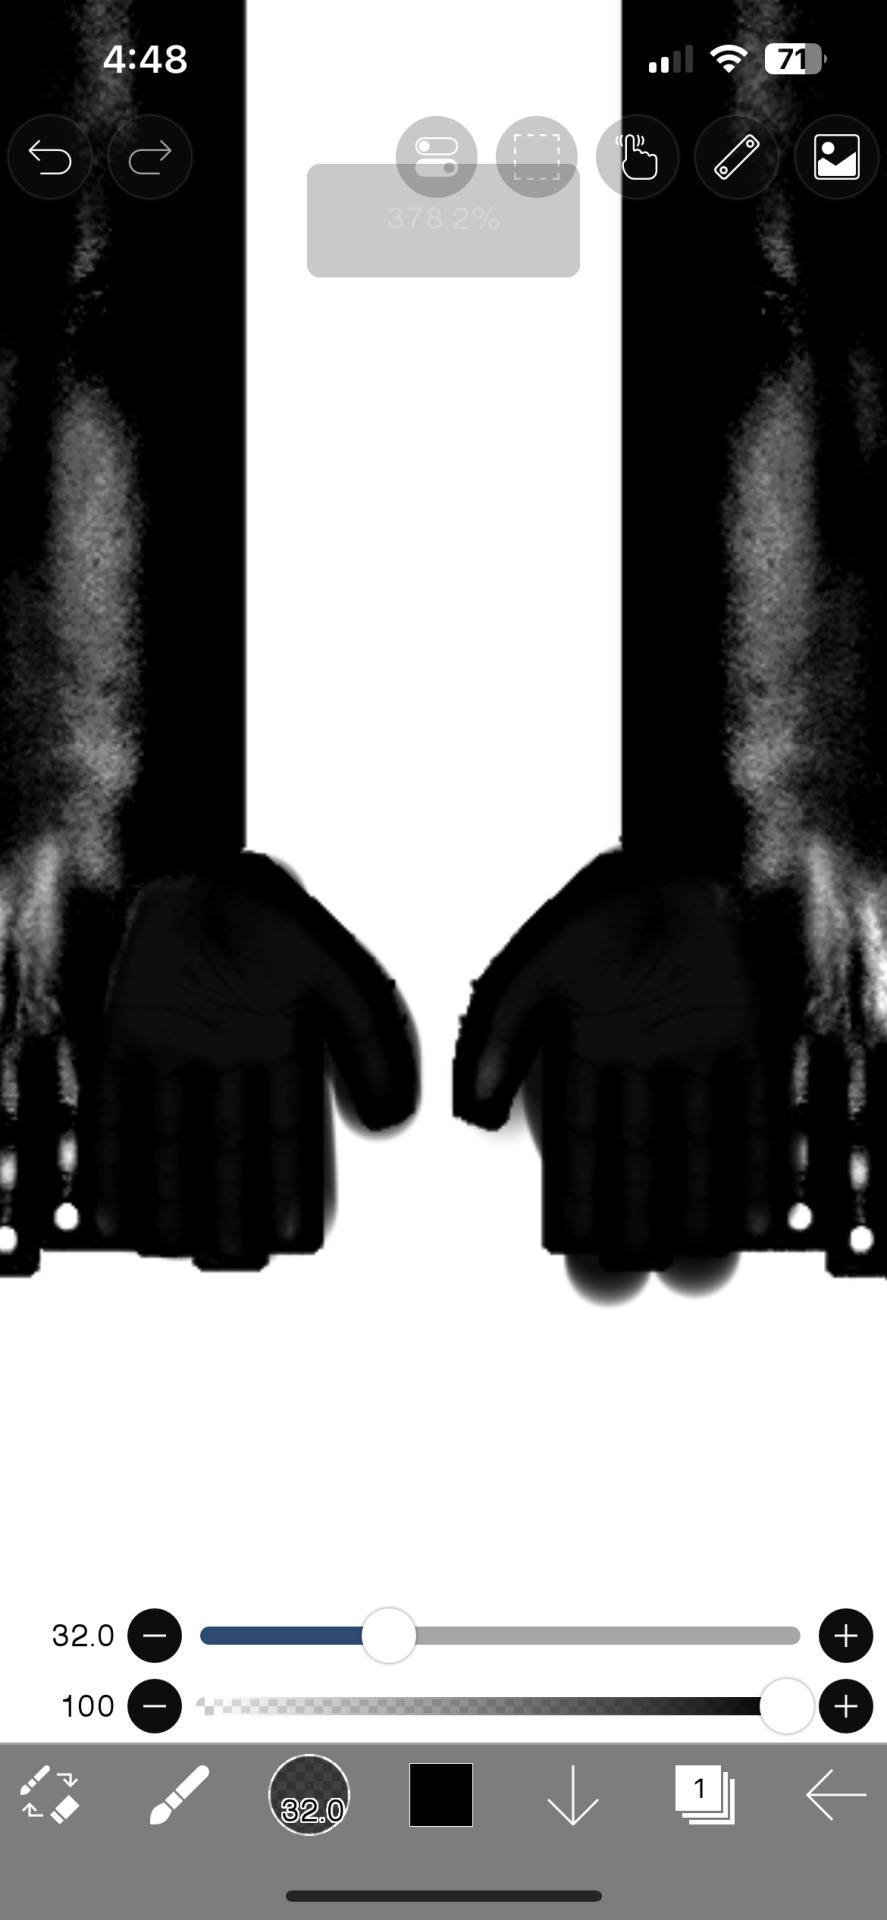
3. Save as is!
Adding to Blender
First things first: Go into the Shading tab. Link your sim's materials using Ctrl+L to make it easier on yourself!

Add your new Displacement and Roughness Map to your material
2. Add a Displacement Node

3. Plug the Displacement Map's colour into the Height. Change the scale to whatever you like (I chose 0.0005)

4. Add two Color Ramp Nodes to your material
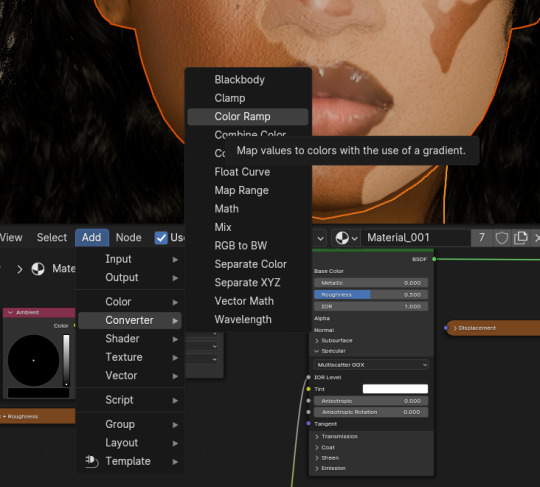

5. Plug the Spec + Roughness Map's colour into each Color Ramps' Fac

6. Plug one Color Ramp into the Roughness and another into the Specular/IQR (you may need to roll out the Specular tab to find it)

7. Drag tabs on the Color Ramp to change the strength of them. For the Roughness Color Ramp, you'll need to swap them around to have the desired effect.
And that's how you get the details! There are other ways to get the details, but for beginner renderers, you can start with this!
32 notes
·
View notes
Note
Hello, if it's not a bother, could you explain to me how you create CC in the sims 3, I want to start in the world of CC and Blender I already know how to use, but I don't know how to transfer the blender file to one for the game. Thank you. 💜
Hi! Those are the tutorials that are helping me with creating CC:
Completely avoiding Milkshape (Blender 2.79-2.8+) / Manually editing bone assignments and morphs (Blender 2.8-2.9)
Hair Creation Start to Finish: Part 1 and Part 2
Smooth Hair Bone Assignments In Blender (written version) - It's a Sims 2 tutorial but the logic is the same for Sims 3
The Sims 4 to The Sims 3 Clothing Conversion Tutorial: A Complete Beginner’s Guide - useful to learn how to port your mesh for Sims 3
Polycount guide - A guide for beginners and advanced creators! - because it's all fun and games to make a pretty high poly mesh in Blender, but both the game and mostly PCs just can't handle meshes with absurdly high polycount
28 notes
·
View notes
Text


Blender 2.9 Re-release

You can find us on | Tumblr • Instagram • Twitter • Simsfinds
Be sure to tag us using our scenes so we can see it and share!

Original File Info:
Romantic Garden • Old Motel Room • European Port • Art Block

DOWNLOAD | PATREON [Available Now]

@blender4sims @blendedz0nes
#blender#blender sims#blender scene#blacksims#sims 4 render#ts4#black simblr#simblr#sims#sims4 blender#blacksims4#black sims 4#blender render#sims4 render#sims render#ts4 download#ts4 simblr#ts4cc#ts4 custom content#the sims#sims 4#sim#simmer#ts4 rp#sims 4 rp#sims rp#rp#ts4 roleplay#sims 4 roleplay#sims roleplay
7 notes
·
View notes
Text

𝕆𝔾'𝕊 ℝ𝕖𝕕𝕦𝕩 ℙ𝕠𝕤𝕖𝕡𝕒𝕔𝕜 [𝔼𝕒𝕣𝕝𝕪 𝔸𝕔𝕔𝕖𝕤𝕤]
Created in Blender 2.9 (compatible with 3.4 + 3.5)
These are old male poses formerly known as the "OG Males Posepack" that I've redone and altered.
- 4 Single Poses [IN-GAME + BLENDER]
- In case of clipping, you can alter the pose slightly (Blender only)
What You Need: Phone of your choice
DOWNLOAD
Check out my 20 Days of Content tag for more downloads
Tag me @soledadgri on IG or @solethesimmer on Tumblr - I want to see your posts!
DM'S ARE ALWAYS OPEN IF YOU'RE HAVING ISSUES❤️
TOU:
Do not alter/change poses
Do not claim as your own
Do not reupload on other platforms
Do not put behind paywall
ℙ𝕦𝕓𝕝𝕚𝕔 𝟘𝟟/𝟙𝟘
#sims 4#ts4cc#ts4 custom content#the sims 4#ts4ccfinds#s4ccfinds#ts4 poses#sims 4 poses#sims custom content#simblr#s4poses#s4 download#s4 gameplay#ts4 download#ts4#ts4 simblr#ts4pose
58 notes
·
View notes
Text

I FIXED IT AND NOW IT'S TIME FOR ACTUAL TEXTURING Y'ALL
Okay so, actually what happened was:
I resculpted the lapel and collar and attached them to a whole clean new mesh (that suit from Moschino) in Blender 3 and because I HATE texturing in that version I ported it back to Blender 2.9 as an .obj file and just re-added the textures and did it CLEAN this time.
Now I just have to make the textures pretty, and then......................weights.
19 notes
·
View notes
Text
Feeling Myself Animation
Comes with 1 animation
You will need:
Blender preferably 2.9 and up I used 3.5.0
If you want to use in game ⬇️
Andrew Poseplayer or WonderfulWhims & Teleport Any Sim
T.O.U
Do NOT Steal/Claim as Your Own!
Do NOT Reupload or Put Behind Paywall!
Feeling Myself Animation

#sims4cc urbancc#sims 4 download#sims4 sims4urbuncc#custom content sims 4#black simmer#sims 4#blender animation
9 notes
·
View notes
Text


C Curved Tips
7 Swatches
XXL C Curved Tips
Super shine & High Gloss
Made in Blender 2.9
Happy New Year!
https://www.patreon.com/posts/c-curved-tips-119261682
#youtube#sims 4#sims 4 screenshots#the sims community#blacksimscommunity#sims 4 cc#sims 4 gameplay#showyoursims#showusyourbuilds#shortvideo#sims 4 nails#sims 4 finds#ts4cc#ts4 alpha#the sims cc#the sims 4
20 notes
·
View notes
Text
youtube
He's had enough of you • [The AMAZING DIGITAL CIRCUS Jax Animation]
Im sure he's had enough of all the fanart
You knew it was coming, i knew it was coming. It's just too inevitable of a topic to show up on my channel as the next target of my animation skills: The DIGITAL CIRCUS! Because i absolutely love it
Getting straight to the point here now: I made this because i also love Billie Bust Up and the song is sung by the same person that voiced Jax So enjoy this kind-of-serious kind-of-memey animation!

Credits - Song: https://www.youtube.com/watch?v=D_uRUbq7z7I Jax Model by CyberChimp on Sketchfab This animation was made in Blender 2.9 by me TADC was created by Gooseworx and the GLITCH team

#groove-tacular artstuff#the amazing digital circus#tadc#tadc jax#jax#tadc fanart#digital circus#amazing digital circus#rabbit#ourple#digital art#groovy#artists on tumblr#digital artist#small artist#gooseworx#the digital circus#glitch productions#animation#3d animation#3d animator#animator#blender animation#animators on tumblr#billie bust up#billie bust up song#billie bust up fantoccio#Youtube
26 notes
·
View notes
Text
just realised ive been on blender 2.9 this whole time,,forgot how long ago i downloaded it and now there a 3.6 version, that would explain why the tutorials i follow tend to be not match up with what i have most times
#like i know about different versions of applications you gotta download but i didnt realise how long ago i actually downloaded blender#because only recently i actually started..using it#i downloaded it 2 years ago
2 notes
·
View notes
Text

youtube
'New look of face?' [Model showcase + DL]
Circus Lady is finally here and ready to shine in your artwork!
Model download link(Blender 2.9+)
#3d#3d modeling#blender#fnaf#sister location#fnaf sister location#circus baby#fnaf fandom#fnaf fanart#cycles#blender3d#render#3dartist#3d animation#Youtube
2 notes
·
View notes
Text
Selected Assignment 2-Designing Happy Accidents
The black background is because I make it into transparent background, so that I can put it in Artivive. I also add the sound effect into blender afterward, because I try to put it in Artivive directly but it doesn't match with the animation.
youtube
youtube
Artist (2021) ‘🎵 How to Import Audio in Blender’, YouTube video, 10 January. Available at: https://www.youtube.com/watch?v=SL2KrUj3byA (Accessed: 3 January 2025).
Blender Made Easy (2024) ‘How to Render Your Scene with Audio - Blender 2.9 Tutorial’, YouTube video, 10 February. Available at: https://www.youtube.com/watch?v=Lii0fDHM7Ak (Accessed: 3 January 2025).
0 notes
Text
Looking for the best Black Friday deals on small appliances this year? Let’s break down the top products so you can make an informed choice. First up, the Keurig K-Mini Plus. At $59.99, it’s $30 off its regular price of $89.99, available at Target. This compact coffee maker is perfect for small kitchens, with features like a removable reservoir, height-adjustable drip tray, and auto-shutoff. It’s easy to use, easy to clean, and a reliable choice for consistent cup sizes. Keep in mind, you’ll need a Target Circle membership to snag this deal. Next, the Silonn Icemaker SLIM01B, priced at $88.22, down from $109.98 on Amazon. This countertop icemaker can make nine bullet-shaped ice cubes in just six minutes. It features self-cleaning functionality and offers options for large or small ice cubes. Available in seven colors, it’s perfect for anyone wanting fresh ice on demand. It’s just $5 more than the lowest price seen this year, making it a solid deal. The Keurig K-Slim is priced at $79.99, marked down from $129.99 on Amazon. It’s a sleek, 5-inch-wide single-serve coffee maker, offering four brew sizes, a removable reservoir, and an adjustable drip tray. While it delivers speed and ease of use, its temperature consistency can be a bit off. Still, a great choice for compact spaces. For air fryer enthusiasts, the NuWave Brio Plus 37401 is $89.99, a $10 discount from its usual $99.99 price on Amazon. With a 2.9-quart capacity, it’s perfect for small portions or meals for one or two people. It features 100 programmed cook settings, 50 memory slots for preferences, and is dishwasher-safe. It’s also a quiet operator with easy-to-use controls. At $59.95, the Cuisinart CPT-415 Countdown Metal 2-Slice Toaster is a great deal, down from $110.00, and available on Wayfair. It features settings for bagels, defrost, and reheat, with exceptional precision in toasting. Plus, it comes with a longer-than-average three-year warranty. Finally, there’s the Ninja BN701 Professional Plus Blender, priced at $99.99, $20 off its regular price of $119.99 on Amazon. This 1,400-watt blender offers seven speeds and presets for smoothies, ice crush, and ice cream. It’s great for large portions, meal prep, and comes with a removable blade and recipe guide. Just note, it was priced $10 lower recently, so it may drop again. Whether you’re looking for a compact coffee maker, an ice maker for entertaining, or a versatile blender, these Black Friday deals cover a range of needs and budgets. Happy shopping!
0 notes