#blender beginner project
Explore tagged Tumblr posts
Visit Tumblr Blog
Explore Tumblr blogs with no restrictions, modern design and the best experience.
Last Seen Tumblr Blogs


Fun Fact
Tumblr posted its first advertisements in May 2012 and subsequently earned $13M in revenue.
Text
THE TARDIS
I picked up Blender last week and it's the funniest thing I've ever learned. This is my first project. Next step: Colors, Materials and Lights.
🔊🔊🔊 Volume Up
#tardis#blender project#blender beginner project#3D model#doctor who#david tennant#10th is my fav#the doctor#TARDIS#Is bigger on the inside#proud of myself#good job me#you finish something
20 notes
·
View notes
Text
Slapping the table so hard
Reject MSPaint RETURN TO 3D! Long and short of it, with the fun of Blender I wanted to remake my little profile guy as a model I can pose and shiz. Also in a SHOCKING(not really) turn of events, the thing people say (setting up rough shapes first) REALLY HELPS lol
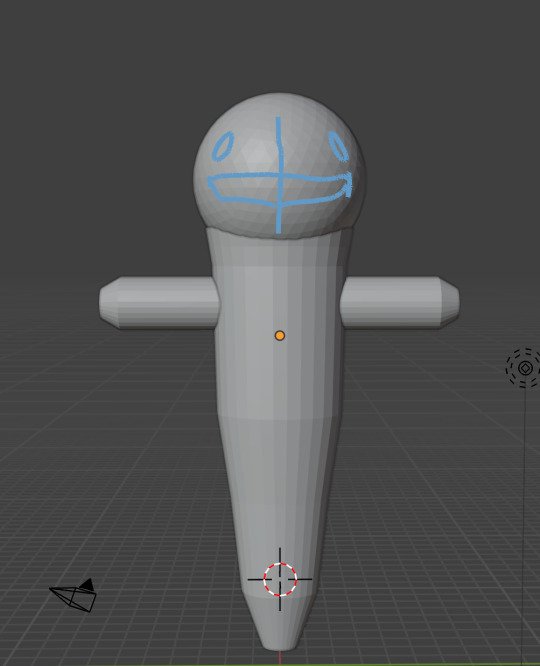
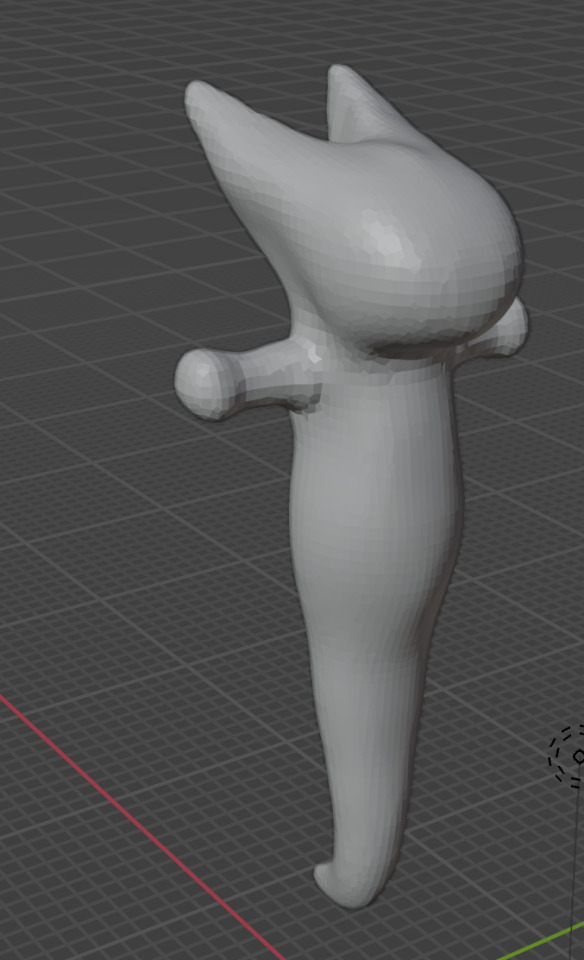
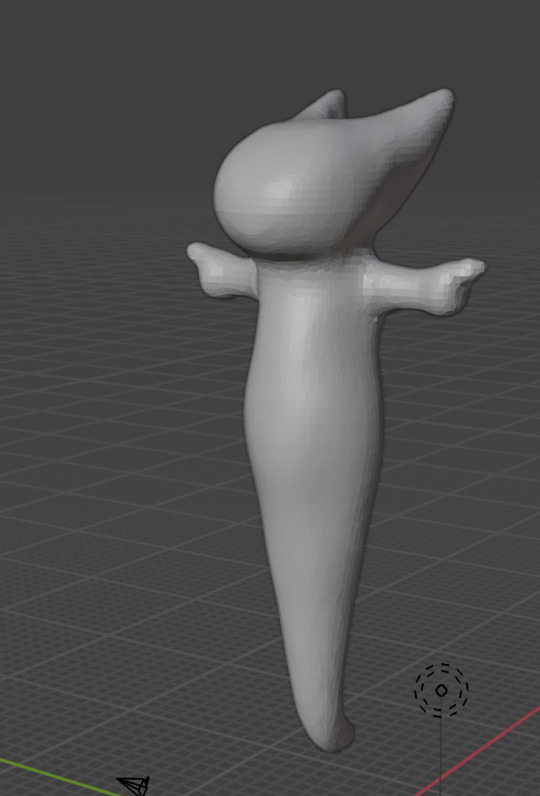
Still a work in progress but already pleased as punch with it
I let the thought win for a second and did cake him out (which I then got rid of lol)
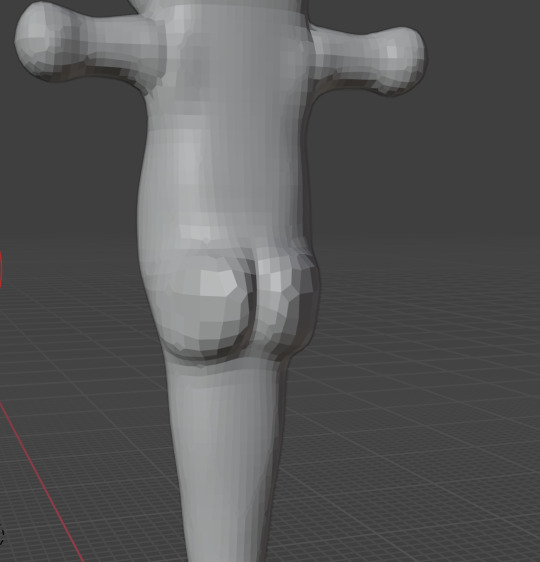
#blender#beginner render#3d modeling#I can't believe it took me this long to get blender#like man I seriously intimidated myself out of projects
5 notes
·
View notes
Text
I will never learn to cut my losses with an animation because I would simply rather spend two hours re-learning blender just to get a 5 second shot
#I say ‘re-learning’ but I’m pretty sure it’s physically impossible to be ‘done learning’ blender#it’s by far the LEAST beginner-friendly software I’ve ever used#but like it can do pretty much anything lmao#high key feels like it’s made less for artists and more for programmers#like the thing I was doing wasn’t even that difficult it’s just that everything I needed was buried in like 20 layers of UI#I needed like 6 different tutorial videos#if you wanna learn blender really you just think of a project and then off to YouTube you go#i use it for video editing and the kind of videos I make has an upper limit on the shit you need to know how to do lol
8 notes
·
View notes
Text
Very rough wing test. Dont mind the blue outline between each parts too much.
0 notes
Text

Home Bizz Babe - Custom Content Collection
Hi lovelies! I am so excited to release my very very very first cc collection! I have been working on the past few weeks and I've found myself falling in love with blender and the creativity you can put out with it, and I'm so happy that my first set turned out better than I had hoped!
I saw this cute shipping box on pinterest and I wanted to recreate it and as I went along it turned into a set focused on the home business aspect, but can (of course) be used for daily tasks or cluttering as well!
This set contains 7 new meshes, all made by me! (BGC)
All LODS & Low Poly
All Tags & Custom Thumbnails
All objects are decorative
Multiple swatches for the different objects, but I tried to keep them matching!
NOTE It's not perfect! Even though I wanted it to be, I feel like this set was finished and done and I want to continue on to more projects in the hopes of getting better as I go. I am very much a beginner at blender and cc creation in general, which is why I would also love some constructive critisism (but please be kind I am only human).
All items can be found by searching either 'Passiberri' or 'HBB' in game!
TOU: - Please don't re-upload or claim as your own - Please don't put my items behind paywalls or include my meshes in your builds - Recolors are allowed but please don't laugh at my UV maps HAHA
Please let me know if there is any issues and I'll try my best to solve it!
More info & download on Patreon (free) Love, Passie ♡
#ts4#sims 4#the sims 4#ts4 simblr#simblr#sims#the sims#the sims community#sims 4 cc#ts4 cc#sims 4 custom content#ts4 custom content#mydl#ts4 build buy#ts4 clutter#sims 4 clutter#ts4 download#sims 4 download#sims 4 aesthetic
2K notes
·
View notes
Text
youtube
NEW VIDEO TUTORIAL 🩷
After almost two years it's time for a new and improved version of my "How to make CAS CC" video. This time I will explain how to create a frankenmesh out of a jumpsuit and a dress for adult Sims! It's VERY beginner friendly so if you weren't successful yet with starting to make CC, maybe this one will give you the help you need!
All the topics I cover in this video below the cut:
00:00 Intro
01:00 Software
01:36 Downloading & Installing Sims 4 Studio
01:56 Downloading & Installing Blender 4.2
02:10 Downloading & Installing GIMP
02:20 Introducing Sims 4 Studio
03:03 S4S | Gathering assets to work with
04:09 S4S | Textures
05:12 Project Folder
05:34 S4S | Gathering assets to work with
07:10 Introducing Blender
10:17 Blender | Edit mode (Select, Delete, Wireframe)
12:38 Blender | Append second mesh (Proportional Editing, UV overlapping)
18:23 Blender | Join two meshes (Material, Merge)
20:03 Blender | Cleaning up the mesh (UV editing, Merge, Rip)
22:14 Blender | Cut number
22:43 GIMP | Making a texture (Select, Delete, Healing, Smudge)
24:52 Photoshop | Making a texture (but make it easy)
25:15 GIMP & Blender | Preview of the texture
25:43 GIMP | Making color swatches (Layers, Lighting, Fill tool)
28:33 S4S | Introducing the CAS area
29:15 S4S | Creating a package file
30:25 S4S | Importing all our assets
31:17 GIMP | Creating a shadow texture
32:24 S4S | The specular map
32:39 GIMP & Browser | Creating a normal map
35:58 S4S | Vertices & Polygons, LODs
37:02 Blender | Creating LODs
38:20 S4S | Categories (Tags, Allow for random, Gender restrictions)
39:36 S4S | Tuning tab (not covered)
39:47 Sims 4 | Results & Outro
434 notes
·
View notes
Text
AI continues to be useful, annoying everyone
Okay, look - as much as I've been fairly on the side of "this is actually a pretty incredible technology that does have lots of actual practical uses if used correctly and with knowledge of its shortfalls" throughout the ongoing "AI era", I must admit - I don't use it as a tool too much myself.
I am all too aware of how small errors can slip in here and there, even in output that seems above the level, and, perhaps more importantly, I still have a bit of that personal pride in being able to do things myself! I like the feeling that I have learned a skill, done research on how to do a thing and then deployed that knowledge to get the result I want. It's the bread and butter of working in tech, after all.
But here's the thing, once you move beyond beginner level Python courses and well-documented windows applications. There will often be times when you will want to achieve a very particular thing, which involves working with a specialist application. This will usually be an application written for domain experts of this specialization, and so it will not be user-friendly, and it will certainly not be "outsider-friendly".
So you will download the application. Maybe it's on the command line, has some light scripting involved in a language you've never used, or just has a byzantine shorthand command structure. There is a reference document - thankfully the authors are not that insane - but there are very few examples, and none doing exactly what you want. In order to do the useful thing you want to do, they expect you to understand how the application/platform/scripting language works, to the extent that you can apply it in a novel context.
Which is all fine and well, and normally I would not recommend anybody use a tool at length unless they have taken the time to understand it to the degree at which they know what they are doing. Except I do not wish to use the tool at length, I wish to do one, singular operation, as part of a larger project, and then never touch it again. It is unfortunately not worth my time for me to sink a few hours into learning a technology that you will use once for twenty seconds and then never again.
So you spend time scouring the specialist forums, pulling up a few syntax examples you find randomly of their code and trying to string together the example commands in the docs. If you're lucky, and the syntax has enough in common with something you're familiar with, you should be able to bodge together something that works in 15-20 minutes.
But if you're not lucky, the next step would have been signing up to that forum, or making a post on that subreddit, creating a thread called "Hey, newbie here, needing help with..." and then waiting 24-48 hours to hear back from somebody probably some years-deep veteran looking down on you with scorn for not having put in the effort to learn their Thing, setting aside the fact that you have no reason to normally. It's annoying, disruptive, and takes time.
Now I can ask ChatGPT, and it will have ingested all those docs, all those forums, and it will give you a correct answer in 20 seconds about what you were doing wrong. Because friends, this is where a powerful attention model excels, because you are not asking it to manage a complex system, but to collate complex sources into a simple synthesis. The LLM has already trained in this inference, and it can reproduce it in the blink of an eye, and then deliver information about this inference in the form of a user dialog.
When people say that AI is the future of tutoring, this is what it means. Instead of waiting days to get a reply from a bored human expert, the machine knowledge blender has already got it ready to retrieve via a natural language query, with all the followup Q&A to expand your own knowledge you could desire. And the great thing about applying this to code or scripting syntax is that you can immediately verify whether the output is correct but running it and seeing if it performs as expected, so a lot of the danger is reduced (not that any modern mainstream attention model is likely to make a mistake on something as simple a single line command unless it's something barely documented online, that is).
It's incredibly useful, and it outdoes the capacity of any individual human researcher, as well as the latency of existing human experts. That's something you can't argue we've ever had better before, in any context, and it's something you can actively make use of today. And I will, because it's too good not to - despite my pride.
130 notes
·
View notes
Text
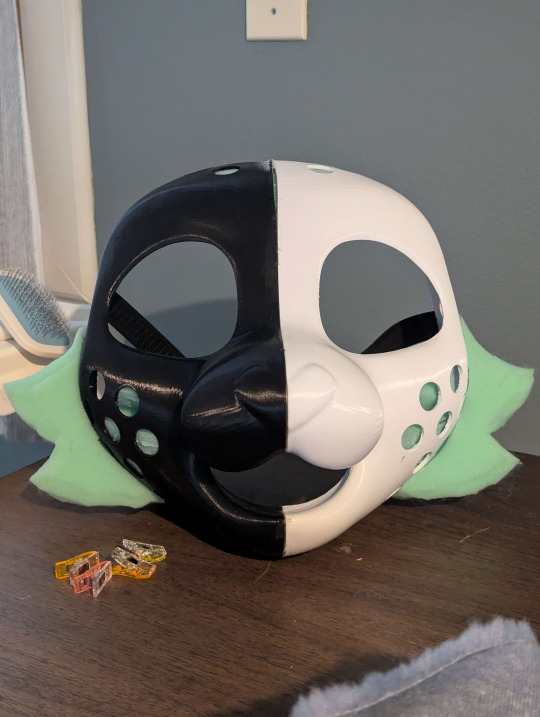
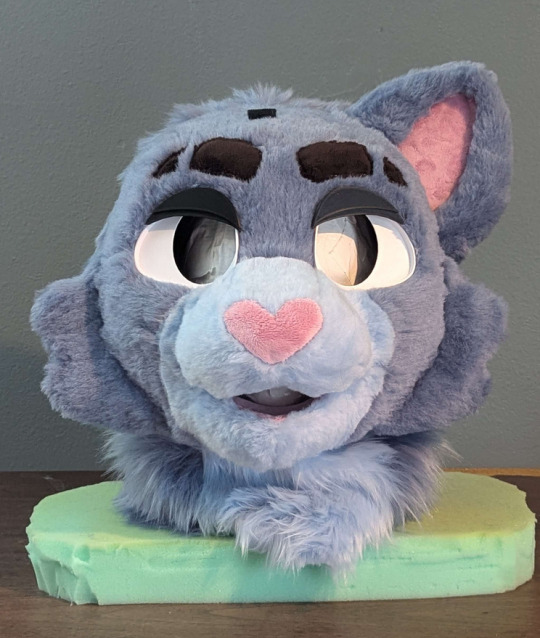
What I've learned from making 2 fursuits!
I've learned a TON from the process of both of these suits, making my 2nd suit I improved on a lot of stuff I had learned from the first! Here's stuff I would've liked to know before I started either of these
For reference, the white cat suit's name is Sophie and she was made first. The blue one is Raine, and she was made second! I'll be referring to them throughout this.
I've learned nearly everything I know about sewing and these types of craft projects from making these 2 suits, I haven't had any prior experience. This is all very much advice From a beginner TO beginners, experienced makers may say some of this is wrong, this is just my lived experience written down. I figured I'd write all this now while it's fresh in my mind! When you get experienced at doing stuff, you tend to forget what problems you faced as a beginner.
Fur Bulk
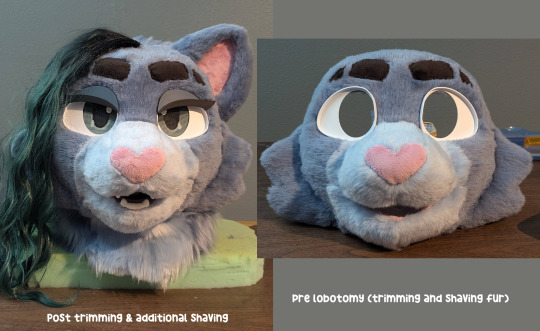
Fur bulk is REAL and a MASSIVE PROBLEM when making your sculpt. Regardless of what method you use to make your base, 3D printed or foam. Depending on how short you can shave your fur, fur bulk will add about 1cm - 0.5cm of thickness to your base
Look how much her mouth closed up from the base sculpt! I ended up still loving the end result, but it was a bit unexpected. (Despite learning about fur bulk from my first suit, and ALSO testing fur bulk in Blender with a fur particle system when I was making the sculpt for this head.)
Raine's ear is an unfortunate victim of fur bulk still, but I didn't have time to remake it how I wanted it. I even tried to make it slimmer on purpose since Sophie's ear ended up so stupidly thick 😭

Seam Allowance & Stitches
(Talking PURELY about hand sewing, I've never used a sewing machine, I cannot give any advice for that)
You should be using a blanket or whip stitch for most of your fursuit, in terms of speed and seams, they are the most effective! Whip stitch for most of your face, it's going to be glued down.. so truly you just need the fabric together and not SECURE since it'll be glued. Use the blanket stitch for things like paws or stuff that's more likely to pop a seam (ears? tails? etc)
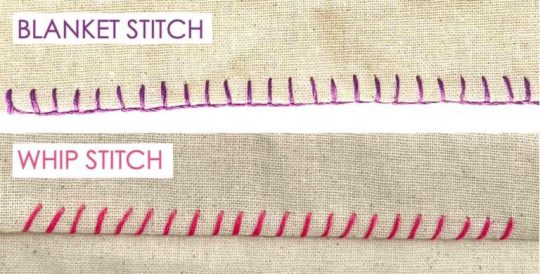
More experienced suit makers might say use blanket for everything, that may be more correct 🤷♀️ Whip/Blanket are nearly the same stitch, blanket is just more secure than a whip stitch, takes a little longer, and uses slightly more thread. I haven't timed other stitches, but the blanket takes me about 5 minutes per inch to do.
On Sophie, I had made up my own bizarre version of a backstitch that was stupidly strong.. but also took a million years to do. It also made my paws near IMPOSSIBLE to turn inside out. Sewing raines face together with a whip stitch was way quicker!
For your face pattern, use next to no seam allowance for the cleanest look. The areas that I added seam allowance on Raine, I really regretted the bulged out look they had. If you aren't confident in your pattern making ability, some seam allowance does give you some wiggle room in terms of how easily your pattern fits onto your base
Designing your suit for airflow
This wasn't actually a problem for me, I did this from the start. But I've worn suits that weren't designed for proper ventilation, and it really just makes suiting a very unpleasant experience. You want to have a mouth hole that is right in front of your own mouth, so you can easily get fresh air in your suit. I'm not saying you HAVE to do this, as not all designs can accommodate this, but it's absolutely something to think about for your comfort!
Another thing I've learned, is the roomier your suit is around the mouth hole, the more overall airflow you get! I tried on my friends head which I sculpted, and they printed in TPU, significantly roomier than Raine, and much more breathable! Raine is still comfortable for me to wear even masked underneath, since I made her ventilation so good!


My future suits I make, I'm going to be looking into TPU due to the sheer weight and breathability difference from my PLA suit!
Non-Fur Supplies
I highly recommend getting hand sewing needles and EVA foam at Daiso if you have one! Daiso has lots of little sewing kits, and I got both of my main needles there. The little circle disks of needles you can find at other stores didn't have needles that were the right size and shape for my hands to comfortably use. Daiso also sells EVA foam in the smaller amounts that you'd need for a suit, unlike hardware stores which usually sell giant square packs of 5
For handsewing, I noticed going for the slightly thicker thread lead to stronger seams overall.
For what you should have in a sewing kit for fursuit, here's what I have (ranked by importance)
Multiple handsewing needles you're comfortable with, just in case you lose one
Pins
Wonder clips (the little plastic rainbow clips) ABSOLUTELY necessary for suit making honestly, they work better than pins in most situations
Seam ripper
Soft measuring tape
Some generic white and/or black thread, as well as your fursuits thread
Safety pins
Overall helpful fursuit supplies
Velcro patches
Masking tape
Duck/Duct Tape
Have garbage shitty scissors, and separate scissors JUST for fabric. Your fabric scissors will remain sharp for much longer if you don't use them on other stuff. (3rd pair of scissors that's not used on tape/sticky stuff, but thread and paper also is helpful. The garbage scissors can get gunky when cutting tape, and your medium scissors remain sharp enough to easily cut other stuff)
Xacto knife + LOTS of new blades. The blades go dull FAST when cutting fur and foam. If you're having to use a lot of pressure to cut through your fur's backing, that means you need a new blade
Box cutter + LOTS of new blades for box cutter. I have a Kobalt box cutter, it's nearly as sharp as my xactos. I use it for cutting out big sections of fur and foam.
I get my eye mesh from Curlworks! I love the visibility on it ^_^
Fur Brands
In terms of my fur company quality rankings, it would be this (I've tried fur from a million different companies on my sample hunt for Raine)
1. Howl Fabrics 2. BigZFabrics 3. MofuMofu.shop
Howl overall is the most dense, relatively soft, and best to shave out of all 3. (Canfur is of very similar quality to Howl, except it has a mild crayon or carpet smell. The smell wears off completely after around 6-7 months, at least on the small sample I got)
BigZ is kind of like a middle ground, but shaves HIGHLY powdery compared to the other 2. As well as shaves a little worse/choppy compared to better quality fur.
MofuMofu is the least dense out of the 3, but I would consider the softest. Best if they have a niche color you need. The fur tends to clump together when it is shaved like sheep wool, and is less powdery than BigZ.
Random furs from etsy are usually LQ/MQ and patchy on their density, not great for shaving super short
Fur Shaving / Length
If you're going for a high quality look on your suit, you want SHORT fur for the face, full-stop. Every suit I've seen that's truly made me go WOW has always had VERY short face fur. Shorter fur shows the look of your sculpt better, instead of hiding it all behind any lumpy fur bulk or unbrushed sections. (Brushing fur doesn't last very long after a suit's been put on haha)
If you can buy your fur in shorter lengths like teddy/beaver, ABSOLUTELY do so. It'll make your shaves much shorter and cleaner. The longer your fur is, is the harder it is to get it to a "HQ" shave length. I personally couldn't get Raine as short as I wanted her to be 😩 But her colors are niche, so I couldn't locate them in shorter fur lengths
Once your suit is complete, don't be afraid to go in there with scissors and your clippers to clean up the fur+markings as well! Raine's mouth opened up a LOT more when i trimmed it down to shape with my scissors
Pattern Making
Avoid putting any seams down the middle of your face, it is noticeable! This is roughly how my pattern for Raine worked, I think the eyebrows helped disguise that horizontal middle seam really well! (the fur from the "eyebrow" piece covers the seam to the forehead piece as it is brushed over it!) I also made the nose bridge it's own piece, to utilize the visible seam to create a crease for it.

I also recommend avoid making any + shaped intersections on your seams if you can avoid it, it's really hard to sew cleanly😭 Sometimes they're unavoidable, but I try my best to avoid doing them.
Wearability
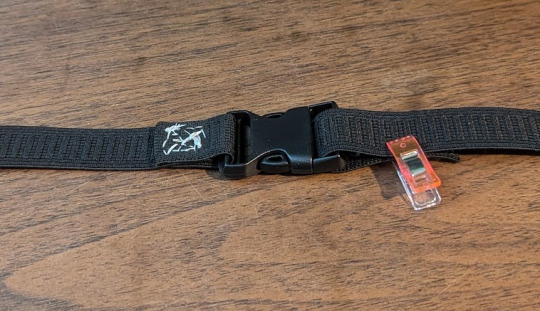
I'm not sure how much this applies to foam suits, but I really recommend using some elastic, a parachute clip, and some velcro to make an adjustable strap to keep your suit on your head! I tried to use foam on Sophie to get a snug fit, it did not work and made her struggle to stay on. The elastic strap on Raine is way better and more secure.

Misc / Random
When making your ears, you don't necessarily need to sew the minky/inner ear onto the fur parts! You can get a much flatter look on your minky if you just glue it on seperate, and have the fur not connected to it
(Specifically for beginner suit makers making personal projects) Not everything has to be perfect! No one will notice your little imperfections, and you don't have to make a nice product for a client. You can leave some things unsewn, you can have tiny bits of foam show from weird angles. You can hot glue some things instead of sewing them to save time. You can have small accidental bald spots. You can have little unsewn holes in corners if it's too hard to sew around those parts. Take it easy on yourself!
You may spring for fleece to save some money on buying minky, I honestly recommend not doing this. Minky feels significantly nicer, and minky from Howl is really not that much more than some fleece, for small pieces like inner mouths, noses, ears, etc, all you need is a "Fat Quarter" sized piece. It's more than enough! And only $6.50 (if you want fleece specifically, ignore this haha. I just regret going for fleece instead of minky on Sophie!)
Carving a foam base, to me, is the hardest part of suit making. So much so, that I never plan to do it again :P It's some people's thing, definitely not mine. If you've been frustrated with how your foam results turn out, consider 3D printing! Or buying a base from someone.
When looking for fursuit advice and tutorials, beyond the obvious places to look (matrices, youtube, google), I genuinely recommend Tiktok! A lot gets posted there for small niche problems you may have
Use this method for tying a knot on your thread when hand sewing, it's extremely fast https://youtu.be/LWWhRtxl6eE?si=AEt2HDiwp09AigOS
When making a 3D printed base, do not go too thin. I'd do test prints to see what thickness feels right to you, raine was about 0.5-0.7 cm but I wish she was a bit thicker because I worry a lot about her shattering 😨
Removeable eyes are very useful, if i get hair in my face I'm able to pop out Raine's eyes to move it out of my way x)
169 notes
·
View notes
Text

TAUVE SIMS - BEGINNERS CC COURSE (LEARN HOW TO MAKLE CC IN 45 MINUTES)
Hey everyone!! I’ve seen many of you asking for a course on how to make CC, so I’ve been working hard to make that happen for you.
In this course, you’ll learn all the basics you need to create (for starters) a shirt but the same method can be used to make pants, dresses, and much more.
3D CLOTHING MASTER STARTER KIT
One-time purchase – USD 42
46-minute video tutorial (with everything written down, no guessing what I just said).
Includes all project files, base models for Marvelous Designer and Blender.
Premium brushes to start designing right away.
Tips that took me over a year to figure out.
Direct links to the exact tools and resources I actually use.
Checklist of all key steps so you don’t get lost during the video.
Everything is explained step by step, assuming you know nothing. yes, even how to operate Blender. (This is the shortcut I wish I had when I started.)
Not for resale or redistribution. All files are for personal use only.
BUY HERE
#sims4cc#sims4#sims 4#sims#my sims#simscas#simslookbook#simdump#download#ccfinds#ts4 download#ts4 cas#ts4 custom content#ts4 lookbook#ts4#ts4 sim download#ts4cc#ts4 simblr#ts4 screenshots#ts4 legacy#ts4 gameplay#the sims 4#sims 4 cc#thesims4#sims4ccfinds#the sims4#sims4clothes#sims 4 build#sims 4 cc finds#sims 4 cas
82 notes
·
View notes
Text
Self-use Sims 3 CC Tutorials List
Here is a list of tutorials from which I learn to convert/create sims 3 cc in a few months (and as a poor English speaker). I think it might help someone who also wants to try making things for sims 3 but doesn't know where to start, though it's been 15 years from the game release and even Inzoi is coming hahah.
The list covers objects, clothes, hairs and eyes. I know there're lots of tutorials not listed here, that's because I haven't tried them in my projects by hand. But The list will be updated with new things I learn. Most tutorials are in English. Thanks to all these creators for sharing their precious knowledge!
Sorry for the miserable format, cuz I wrote them in Patreon and paste here. You can also read it there, free of course.
Where I find tutorials
sims 3 tutorial hub
ts3 creators cave and its discord
Mod the sims tutorial wiki and the forum
pis3update tutorials tag
General
CC basic concepts by nightosphere (for clothes, most knowledge is shared with objects)
Tools
TSRW guide by apple (for objects, most knowledge is shared with clothes)
Blender
shortcut by Blender Guru
beginner tutorial for version 2.5, 2.8, 3.0, 4.0
3.5入门教程 (youtube / bilibili)
设置切换语言快捷键 change language shortcut settings
图片取色器网站
Mesh ToolKit with Seam Fixer for all ages
Topaz gigapixel AI guide / higher quality texture
Texture
Nicer bake / bake in blender 2.78
Bake in blender 2.93
Make normal map
small size blank texture
Reasons for black blocks on baked image
Adjust texture color without losing quality
Object
clone obejcts with S3OC
4t3
Functional Objects
Functional bed
TSRW setting
Combining Textures for Objects with Multiple Textures
Add normal map to objects
Introduction to slot categories
Add slots in TSRW
Edit in-door shadow or occluders in TSRW / Talks about 3 kinds of in-game shadow by Pocci
Clothes
4t3 by nightosphere
Reduce polycount / fix seams, holes, shadows or normals
Bone reference rule
Avoid milkshape workflow / adjust bone assignment and morphs in blender
Manually fix bone in blender
Convert between ages/body meshes
TSRW check list
Fix long clothes clip with body
Fix holes on morphs (easier in blender)
Extrude collars
Create texture in PS
Avoid TSRW workflow / CTU tutorial
Hairs
Avoid milkshape and TSRW workflow / delete backfaces / handmade morphs / DABOOBS guide
Keys pointing to in-game blank textures to save file size (for DABOOBS not TSRW)
Reduce polycount
4t3
Fix weird seam lines on hairs from s4s
Fix pigtail issue
Eyes
Convert contacts to default eyes
244 notes
·
View notes
Text
I sure did! And thank you, we have an insane lineup and I wouldn't have it any other way.
woo yeahh woo yeah MAP part where he gives himself Every Disease
#i got fed up with the fact there were no beginner friendly anything goes MAPs so I made my own.#because i dug through warriors MAPs for like. 5 hours looking for one...... ):#the things i will do in order to put my favorite characters into a blender! hosting a project.#actually a bonus spicy tags theory. points at the X being a big ascension thing and then rot also being covered in X's.#and the rot predating what happened with five pebbles according to iterator logs. hey what's up with that?
636 notes
·
View notes
Text
Building a VR world
I'm no expert! I'm just sharing what I did to build my first one. Which I still need to fix.
If you want to make a world for android users too (the headset), then switch it to Android first on Unity. VRchat takes for Unity only 100MB! I did PC first and had to delete and replace a lot of stuff.
Copy the project folders of Unity, because most likely, there will be errors and loose your progress. (Which happened to me twice)
The first tutorial video I found was from Spookyghostboo, a wonderful creator who made many wonderful VR worlds (please go support her) If you check her channel, there are many more tutorials:
(37) How To Make A VRChat World From Scratch Start to Finish | Blender to Unity Tutorial | Beginner - YouTube
How to make clickable doors, I used doors I made in Blender, keep an eye on where its origin point is placed, it needs to be at the corner of the door:
Simple Clickable Door - Udon / VRChat Scripting SDK3.0
How to make a button to switch skyboxes:
Create a Skybox Switcher Button - Udon/ VRChat SDK3.0
How to make less MB:
How to Optimize your VRChat World INSTANTLY
Assets and Materials:
If you are poor like me, there are free assets. You can, of course, make your own assets in Blender or your own materials if you want to.
For assets like furniture, there are Booth and Sketchfab. There are more pages, but I preferred those. Though Sketchfab doesn't have many assets who have less MB.
Here are two I used the most from:
mobubbler - BOOTH
spookyghostboo - BOOTH
Here you can download free materials and Textures:
ambientCG - Free Textures, HDRIs and Models
I can't help you with errors, I'm still working on them myself. But you can Google like I do.
37 notes
·
View notes
Note
Hi, when you say your thesis is a new pipeline for a 3D short, does that mean the actual thesis, the thing that gets you graduated, is a paper with a hypothesis and a conclusion, and making the film is just the means to test your proposals???
We started working on the film in January and it's 75% done ! This month we also wrote a 53-page project report detailing the process of our animation pipeline, as well as some usability testing for 3D modelling. The paper largely explored which modelling software is best for beginners (Blender, VR, etc) Together with an exam in mid-June all three things (project report, oral exam and finished animation) form the basis for our final grade 👍 so basically the film came first and the paper is a delineation of our process making it
32 notes
·
View notes
Text
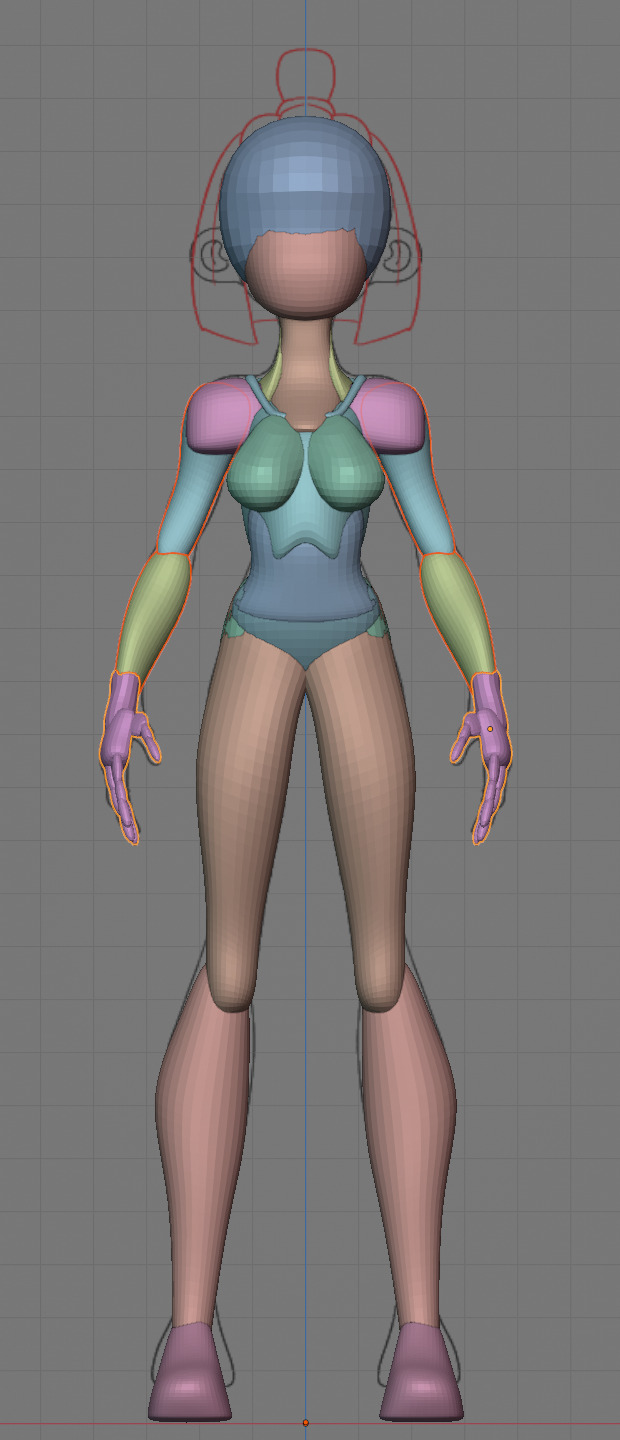
Road to 3D- Sam Manson (Part 2):
Character Modeling


Part 1: Model Sheet
Welcome to the second and final part of this project. Since people have asked how I do my models, I decided to make a write-up on how I approach these things using the example of a model of Sam Manson. The first part focused on how I make a model sheet fo a 3d model the second part focus just on the modeling. There are many more things about how to create a fully realized 3d character that I could make whole other chapters for, like UV unwrapping, texturing, shading and rigging, but I don't have enough knowledge past the fundamentals on these topics that could warrant their own seperate posts.
Additional stuff before I continue:
I use Blender for all my model
This not a beginners guide or something similar, it would be helpful to already know the general workflow of a modeling, how to use Blender and know different terminology like edgeflow, retopology etc.
If you are a beginner and want to learn more about character modeling I recommend the videoseries "Modeling for Animation" by Dikko on Youtube
Maybe I make some reference some tricks from this videoseries
That's it, let's go!


My first step is always the block-out phase. The block-out phase is what the construction lines and the first sketch in a drawing are. I align the frontview and sideview from the model sheet I made in part 1 with the z-axis (the blue line in the images above) and roughly shape out the forms with primitive forms. For this I mostly use a cube with a subdivide modifier.


Having a modelsheet without the clothes obscuring the body makes it much easier the get the form right. The block-out phase is one of the most important steps, if it looks good than I have practically half the work done. This is also a good opportunity to practice anatomy.
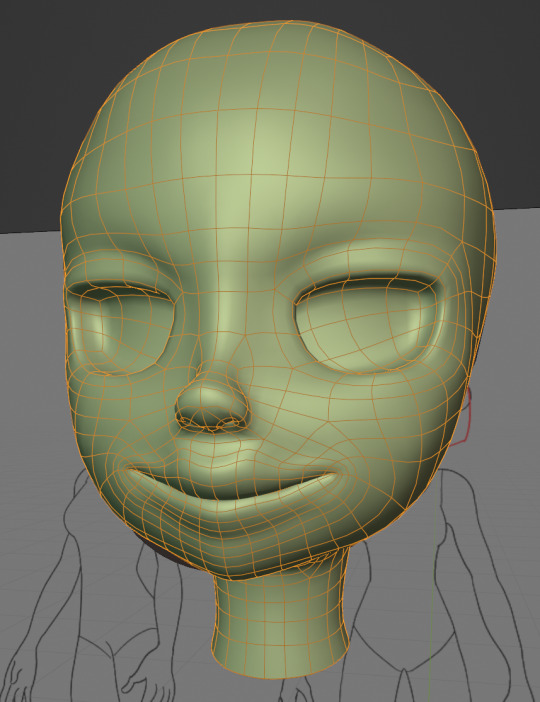

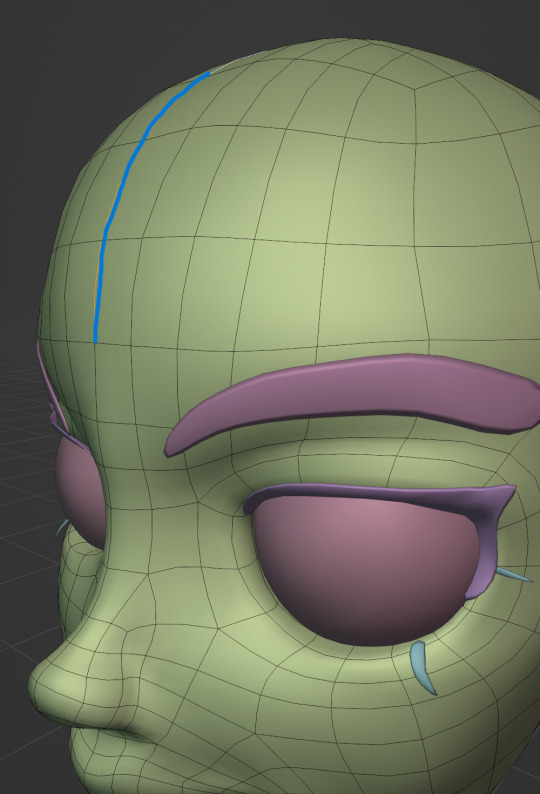
After this stage I continue with the head. First of all, don't forget to add the mirror modifier so I just need to model half of the model. There are different methods to approach modeling the head, like sculpt the head first, retopologize and than bake all the deatails onto the retopologized head. I actually prefer to polymodel the head especially when I have a good model sheet. I practially trace the lineart from the model sheet by extruding vertices, once from the frontview and once from the sideview. The most important points are the form of the eyes, the mouth, the form of the face and the jawline. The head block-out is used as an anchor point for the shrinkwrap modifier so that the traced forms actually look like they belong to a 3d form and not 2d lines floating space. From this point on it's just connecting everything, pull and push vertices so it looks like a 3d head and make sure the edgeflow is good. (It's also helpful to know how the planes of the head look like) After that I add the eyelashes, eyebrow, eyes and the ears, now it looks like something!
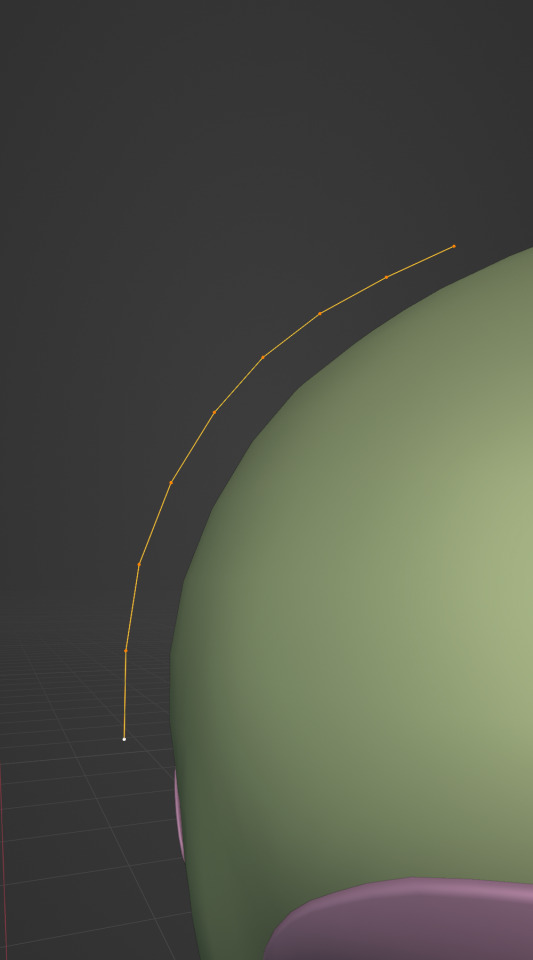
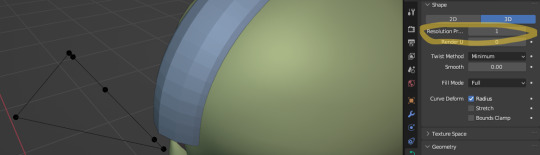
Now comes the hair. For the hair I used the "curve trick" like mentioned in the video series I recommended. Here is a tip to save time: I choose some edges from the head, duplicate and seperate it from the mesh. I convert this seperated line into a curve and choose a beziercircle as a bevel geometry. This is now the perfect foundation to model the hair further. One thing I needed a long time to notice: To get the beziercircle to a perfect square or in this case a triangle lower the Resolution U to 1 in the shape options. Now I just convert the curves into a mesh and add details and the head is done!
With the head finished I continue with the body. Remember how I wrote with a good block-out half of the work ist finished? Well, for this step I practically just use the smooth brush in sculpt mode and smooth everything out so everything looks connected. Then I retopologize the body and that's it. Well, ok there is a little bit more to it: Before smoothing things out I join the block-out part to a single mesh and remesh it with the remash modifier expept for the hands. I prefer to polymodel the hands seperatly without worrying about the rest of the body because they are difficult to model. I reattach them later. Speaking of reattaching, I make sure that the connection points have the same number of vertices while I retopologize/polymodel. To ensure that, I often use the following trick visualized with a simple example ( which is also described in the video series):

I want to reduce the amount of edges at the bottom of this plane, for this I merge 3 vertices from the middle into 1 vertice seen in the left image. After that I can select the blue marked edges from the center image and dissolve them. The result, which you can see on the right, is a nice clean edgeflow with a reduction in the number of edges.

After modeling every part I attach them together and I have a finished bodymesh the work with.
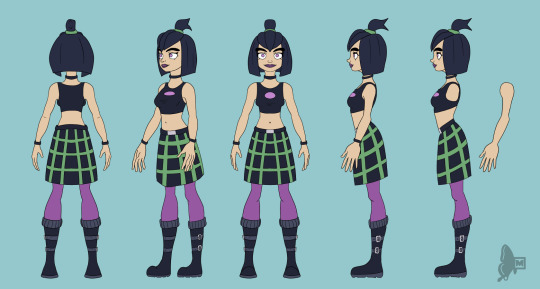

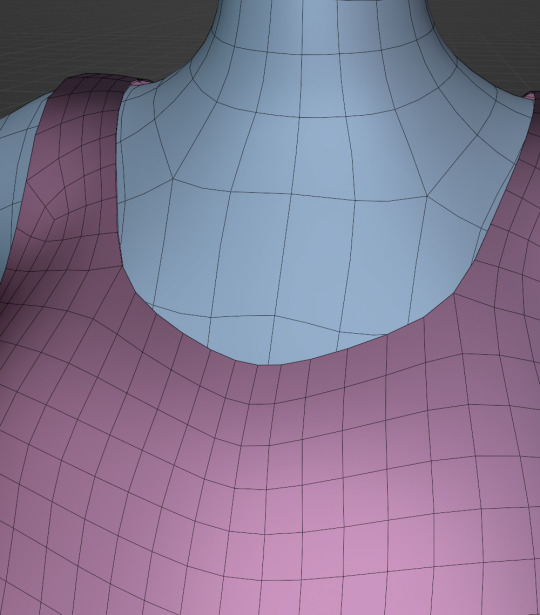
Now onto the clothes, for this I use the model sheet with clothes as reference. Having a retopologized body makes it easier to model simple stuff like e.g. Sam's shirt. On the left image the marked faces of the the bodymesh already looks like a shirt. I just need to duplicate and seperate this area, clean it up a little and the shirt is basically finished. The more complex stuff like the boots I need to polymodel around the bodymesh.
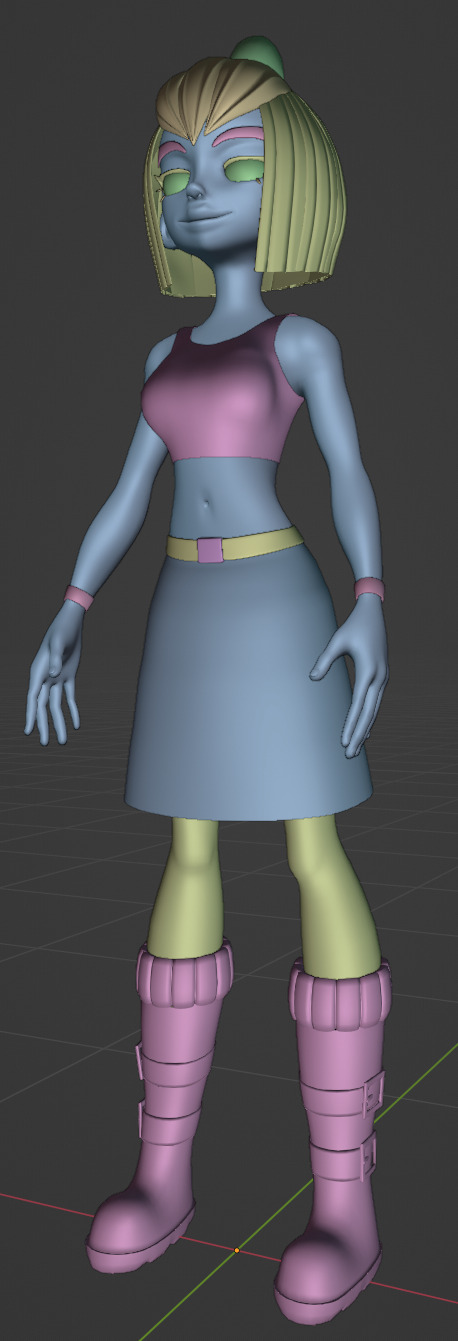

With that the modeling part is done! Now comes the things I said above: uv unwrapping, texture painting, rigging and shading. These are whole other topics I cannot go deeper because I'm still learning how to do these things but I hope my little write-up about how I appoach character modeling was enough to learn one thing or two.
Thank you for your time and thank for reading!
#3d modeling process#3d model#blender#danny phantom#sam manson#long post#my animation#my art#art resources
239 notes
·
View notes
Text
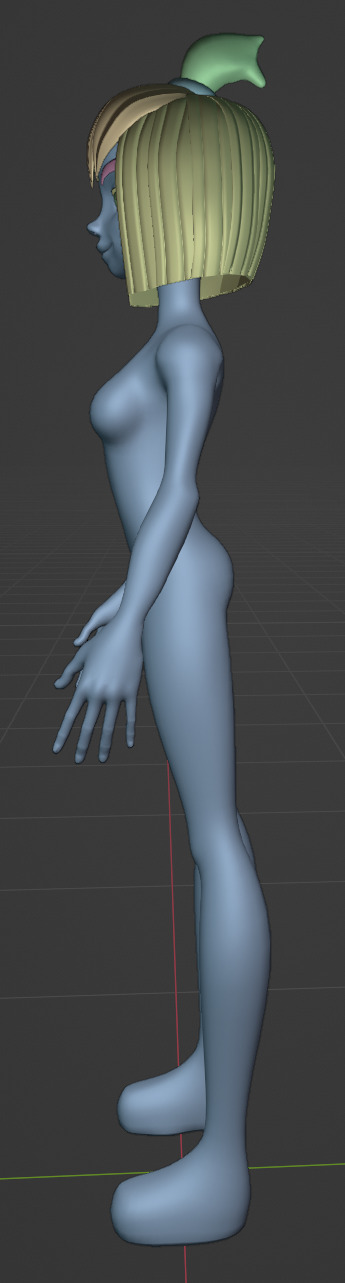
Rabbit model test~ I adjusted a bit compared to initial design
1 note
·
View note
Note
do you have any tutorials you used to learn Blender? It breaks my brain every time I try it or even Feather 3D but those models look soooo good.
thank you!!! the stargazer head model is technically a model ripped from Baldur's Gate 3 that i'm just modifying, but i am super proud of how the edits are coming out 😭
for tutorials, it depends on what you wanna learn to do with it!!
the classic donut tutorial is designed to show you all aspects of the program and I found it really helpful (but did not technically finish it)
if you wanna learn character modeling specifically, the most helpful thing for me was following a tutorial series for making a low poly character! i found that working on low poly styles first was really good for teaching me the basics of modeling, rigging, and posing without getting bogged down with worrying about details
these were the two low poly tutorials i followed and found the most helpful:
youtube
these aren't specifically low poly, but i also enjoyed working alongside a couple of Joey Carlino's tutorials for character modeling! they teach some tricks the other low poly tutorials didn't cover
youtube
youtube
and if anything's ever confusing while you're working on any 3D projects, guaranteed someone somewhere online will have an explanation for it. anything i don't know how to do or that seemingly fucks up "for no reason" while i'm working, it doesn't take me longer than 10-15 minutes for me to use either Google or Youtube to figure it out.
MY BIG TIP FOR ANY SORT OF BLENDER PROJECT get in the habit of using incremental saves instead of normal ones
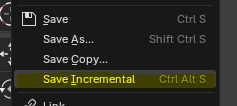
keep a few incremental saves at a time and you can start clearing them out once you're sure you don't have to go back to them. saving like this means if you accidentally get rid of or completely destroy something half an hour ago that it turns out you needed, instead of redoing it all over again you can just. retrieve it from the older save.
20 notes
·
View notes