#bluetooth based home automation using arduino
Explore tagged Tumblr posts
Visit Tumblr Blog
Explore Tumblr blogs with no restrictions, modern design and the best experience.
Last Seen Tumblr Blogs


Fun Fact
The KCSC sent more than 20K requests to delete posts related to prostitution and porn to Tumblr from January to June 2017.
Text
Top 10 Projects for BE Electrical Engineering Students
Embarking on a Bachelor of Engineering (BE) in Electrical Engineering opens up a world of innovation and creativity. One of the best ways to apply theoretical knowledge is through practical projects that not only enhance your skills but also boost your resume. Here are the top 10 projects for BE Electrical Engineering students, designed to challenge you and showcase your talents.
1. Smart Home Automation System
Overview: Develop a system that allows users to control home appliances remotely using a smartphone app or voice commands.
Key Components:
Microcontroller (Arduino or Raspberry Pi)
Wi-Fi or Bluetooth module
Sensors (temperature, motion, light)
Learning Outcome: Understand IoT concepts and the integration of hardware and software.
2. Solar Power Generation System
Overview: Create a solar panel system that converts sunlight into electricity, suitable for powering small devices or homes.
Key Components:
Solar panels
Charge controller
Inverter
Battery storage
Learning Outcome: Gain insights into renewable energy sources and energy conversion.
3. Automated Irrigation System
Overview: Design a system that automates the watering of plants based on soil moisture levels.
Key Components:
Soil moisture sensor
Water pump
Microcontroller
Relay module
Learning Outcome: Learn about sensor integration and automation in agriculture.
4. Electric Vehicle Charging Station
Overview: Build a prototype for an electric vehicle (EV) charging station that monitors and controls charging processes.
Key Components:
Power electronics (rectifier, inverter)
Microcontroller
LCD display
Safety features (fuses, circuit breakers)
Learning Outcome: Explore the fundamentals of electric vehicles and charging technologies.
5. Gesture-Controlled Robot
Overview: Develop a robot that can be controlled using hand gestures via sensors or cameras.
Key Components:
Microcontroller (Arduino)
Motors and wheels
Ultrasonic or infrared sensors
Gesture recognition module
Learning Outcome: Understand robotics, programming, and sensor technologies.
6. Power Factor Correction System
Overview: Create a system that improves the power factor in electrical circuits to enhance efficiency.
Key Components:
Capacitors
Microcontroller
Current and voltage sensors
Relay for switching
Learning Outcome: Learn about power quality and its importance in electrical systems.
7. Wireless Power Transmission
Overview: Experiment with transmitting power wirelessly over short distances.
Key Components:
Resonant inductive coupling setup
Power source
Load (LED, small motor)
Learning Outcome: Explore concepts of electromagnetic fields and energy transfer.
8. Voice-Controlled Home Assistant
Overview: Build a home assistant that can respond to voice commands to control devices or provide information.
Key Components:
Microcontroller (Raspberry Pi preferred)
Voice recognition module
Wi-Fi module
Connected devices (lights, speakers)
Learning Outcome: Gain experience in natural language processing and AI integration.
9. Traffic Light Control System Using Microcontroller
Overview: Design a smart traffic light system that optimizes traffic flow based on real-time data.
Key Components:
Microcontroller (Arduino)
LED lights
Sensors (for vehicle detection)
Timer module
Learning Outcome: Understand traffic management systems and embedded programming.
10. Data Acquisition System
Overview: Develop a system that collects and analyzes data from various sensors (temperature, humidity, etc.).
Key Components:
Microcontroller (Arduino or Raspberry Pi)
Multiple sensors
Data logging software
Display (LCD or web interface)
Learning Outcome: Learn about data collection, processing, and analysis.
Conclusion
Engaging in these projects not only enhances your practical skills but also reinforces your theoretical knowledge. Whether you aim to develop sustainable technologies, innovate in robotics, or contribute to smart cities, these projects can serve as stepping stones in your journey as an electrical engineer. Choose a project that aligns with your interests, and don’t hesitate to seek guidance from your professors and peers. Happy engineering!
5 notes
·
View notes
Video
youtube
Hand Talk Using Flex Sensor With Voice Output | Sign Language to Speech Conversion using Arduino With Flex Sensor | Sign Language to Speech Conversion using Arduino with 4 flux Sensors | SMART GLOVE - Translate Gestures to Text and Text to speech through Bluetooth | Sign Language To Text Conversion With Flex Sensor | Arduino Projects | Gesture vocalizer | sign language to speech converter using Arduino | best Arduino project | Arduino | Arduino and Flex Sensor Based Hand Gesture to Speech Conversion | Sign Language To Speech Conversion | Hand Gesture Convert in Voice Speech | Home Automation Arduino.***********************************************************If You Want To Purchase the Full Working Project KITMail Us: [email protected] Name Along With You-Tube Video LinkWe are Located at Telangana, Hyderabad, Boduppal. Project Changes also Made according to Student Requirementshttp://svsembedded.com/ https://www.svskits.in/ http://svsembedded.in/ http://www.svskit.com/M1: 91 9491535690 M2: 91 7842358459 We Will Send Working Model Project KIT through DTDC / India Post / Blue Dart We Will Provide Project Soft Data through Google Drive1. Project Abstract / Synopsis 2. Project Related Datasheets of Each Component3. Project Sample Report / Documentation4. Project Kit Circuit / Schematic Diagram 5. Project Kit Working Software Code6. Project Related Software Compilers7. Project Related Sample PPT’s8. Project Kit Photos9. Project Kit Working Video linksLatest Projects with Year Wise YouTube video Links152 Projects https://svsembedded.com/ieee_2024.php133 Projects https://svsembedded.com/ieee_2023.php157 Projects https://svsembedded.com/ieee_2022.php135 Projects https://svsembedded.com/ieee_2021.php 151 Projects https://svsembedded.com/ieee_2020.php103 Projects https://svsembedded.com/ieee_2019.php61 Projects https://svsembedded.com/ieee_2018.php171 Projects https://svsembedded.com/ieee_2017.php170 Projects https://svsembedded.com/ieee_2016.php67 Projects https://svsembedded.com/ieee_2015.php55 Projects https://svsembedded.com/ieee_2014.php43 Projects https://svsembedded.com/ieee_2013.php1600 Projects https://www.svskit.com/2025/01/1500-f...***********************************************************1. Gesture vocalizer | Sign language to speech conversation for deaf and dumb | using arduino Uno,2. SMART GLOVE - Translate Gestures to Text and Text to speech through Bluetooth,3. SMART GLOVE : Hand Gesture Detection and Conversion to Speech and Text for Dumb and Deaf,4. Smart Gloves To Convert Sign To Speech For The Mute Community,5. Sign Language To Speech Conversion | Hand Gesture Convert in Voice Speech,6. Sign Language To Speech Conversion | Hand Gesture Convert in Voice Speech | Home Automation Arduino,7. B.E/B.TECH Final Year Project Presentation| Smart Glove for Deaf and Dumb peoples || SVSEMBEDDED,8. SIGN TO SPEECH CONVERSION USING ANDROID PHONE FOR DUMP PEOPLE,9. Hand Talk Assistive Technology for Deaf
0 notes
Text
Introduction to Internet of Things (IoT) Programming

The Internet of Things (IoT) is revolutionizing the way we interact with devices, allowing everyday objects to connect to the internet and share data. From smart homes and wearables to industrial automation, IoT is reshaping the world. In this post, we'll dive into the basics of IoT programming and how you can start creating your own smart applications.
What is IoT?
IoT refers to a network of physical devices embedded with sensors, software, and other technologies to connect and exchange data with other devices and systems over the internet.
Key Components of IoT Systems
Devices/Sensors: Physical components that collect data (e.g., temperature sensors, motion detectors).
Connectivity: Wi-Fi, Bluetooth, Zigbee, LoRa, or cellular networks to transmit data.
Data Processing: Microcontrollers or cloud services process the incoming data.
User Interface: Web/mobile applications to monitor and control devices.
Popular IoT Hardware Platforms
Arduino: An open-source electronics platform based on simple microcontrollers.
Raspberry Pi: A small, affordable computer ideal for more powerful IoT applications.
ESP8266/ESP32: Low-cost Wi-Fi-enabled microchips widely used in IoT projects.
Languages Used in IoT Programming
C/C++: Commonly used for low-level programming on microcontrollers like Arduino.
Python: Popular for Raspberry Pi and edge computing due to its simplicity.
JavaScript (Node.js): Useful for IoT dashboards and server-side applications.
MicroPython: A lightweight version of Python optimized for microcontrollers.
Example: Blinking an LED with Arduino
void setup() { pinMode(13, OUTPUT); // Set digital pin 13 as output } void loop() { digitalWrite(13, HIGH); // Turn the LED on delay(1000); // Wait for 1 second digitalWrite(13, LOW); // Turn the LED off delay(1000); // Wait for 1 second }
IoT Data Handling and Cloud Integration
Once your devices are collecting data, you'll need to store and analyze it. Here are some common platforms:
ThingSpeak: A simple platform for IoT data logging and visualization.
Firebase: Real-time database ideal for mobile IoT applications.
AWS IoT Core: Scalable cloud service for managing IoT devices.
MQTT Protocol: Lightweight messaging protocol used for IoT device communication.
Popular IoT Projects to Try
Smart door lock controlled by a mobile app
Home temperature monitor with alerts
Motion detection security camera
Plant watering system based on soil moisture levels
Fitness tracker using accelerometers
Best Practices for IoT Programming
Use lightweight protocols and efficient code to conserve resources.
Secure your devices with strong authentication and encryption.
Plan for over-the-air (OTA) updates to patch software bugs.
Reduce power consumption for battery-powered devices.
Test in real-world conditions to ensure reliability.
Conclusion
IoT programming opens the door to endless possibilities for innovation and automation. Whether you're just blinking LEDs or building a smart home system, learning IoT programming will give you the skills to bring physical objects to life through code. Start simple, keep exploring, and gradually build smarter and more connected projects.
0 notes
Text
How to Choose the Right Electronics Starter Kit for Your Needs

Getting started in electronics can be exciting, but picking the right electronics starter kit is essential for a smooth and enjoyable learning experience. Whether you’re just beginning or already have some experience, the right kit can help you understand the basics and dive deeper into more advanced projects. But with so many options available, how do you choose the one that’s right for you? In this article, we’ll walk you through how to select the perfect electronics starter kit based on your needs.
1. Understand Your Skill Level
Before you buy a kit, think about your current knowledge of electronics. Are you completely new to it, or do you have some experience? This will help you decide which kit is best for you.
If you’re a beginner, you’ll want a kit that focuses on the basics, such as learning how circuits work. A good starter kit will include:
Breadboard: A simple tool to build circuits without soldering.
Basic components: Items like resistors, capacitors, and diodes that are easy to work with.
LEDs and transistors: Basic components to help you understand how electrical signals flow.
If you already know a bit about electronics, you might want a more advanced kit with items like microcontrollers (Arduino or Raspberry Pi), sensors, and motors. These kits are for creating projects like robots or smart home devices, which can be more complex and interactive.
2. Think About What You Want to Build
Next, think about the types of projects you want to create. Your goals will help you choose the right kit. There are many different types of kits designed for different purposes. Here are some examples:
Basic Electronics Learning: If your goal is to understand how electronics work, look for a kit that teaches you the fundamentals of building circuits. These kits should have easy-to-follow guides for simple projects.
Arduino or Raspberry Pi Projects: If you want to build interactive projects, look for kits that include an Arduino or Raspberry Pi. These kits often come with microcontrollers, sensors, and other parts for creating cool projects like robots or home automation systems.
Robotics: If you’re interested in building robots, look for a robotics starter kit. These kits usually include motors, sensors, and sometimes even wheels and servos to help you create a robot.
Home Automation: Some kits are designed for smart home projects, such as controlling lights, locks, or even your thermostat. These kits typically include sensors, microcontrollers, and other components that connect to your home devices.
Wireless Projects: If you want to work on wireless electronics like Bluetooth or Wi-Fi, look for kits that include components for these kinds of projects. Wireless communication is becoming more popular, and you can use these kits to build things like remote-controlled gadgets.
Knowing what you want to build will help you choose a kit that gives you the right components and instructions for your projects.
3. Consider the Complexity of the Kit
Some kits are simple and easy for beginners, while others are made for people who already know a lot about electronics. Make sure the kit matches your skill level.
If you're new to electronics, choose a kit that includes basic components and clear instructions. A beginner kit should come with:
Easy-to-follow project guides: These will explain how to build simple circuits and understand basic concepts.
Basic components: Things like resistors, capacitors, and LEDs that you can easily experiment with.
If you’re more experienced, you might prefer a kit with more complex projects. These could involve soldering, using microcontrollers, or designing advanced circuits. More advanced kits allow you to create unique projects and experiment with a variety of components.
4. Check for Quality and Compatibility
Not all electronics kits are the same. Some kits may include low-quality components that break easily or don’t work as expected. To avoid frustration, make sure you choose a kit that has good reviews and is made with quality parts.
Also, make sure the components in the kit are compatible with each other. For example, if the kit includes an Arduino board, make sure the sensors and other parts work well with it. Check the product description and reviews to ensure everything in the kit is easy to use together.
5. Look for Good Documentation and Support
When you’re learning about electronics, good instructions can make a big difference. A high-quality starter kit should include clear guides that explain how to build and troubleshoot your projects. Look for kits that offer:
Step-by-step guides: These will help you understand how to build circuits and what each component does.
Troubleshooting tips: These can be especially helpful if something goes wrong in your project.
Online support or communities: Some kits come with online resources or communities where you can ask questions and get help from others.
For kits that involve programming, like those with Arduino or Raspberry Pi, make sure the kit includes software and guides for coding.
6. Consider Your Budget
Electronics kits come in a range of prices. While it might be tempting to choose the cheapest option, it’s important to remember that you often get what you pay for. Very inexpensive kits might have lower-quality components, or they might be missing key parts.
That said, you don’t have to spend a lot to get a good kit. Many affordable options offer solid components and instructions for beginners. Make sure to balance cost with quality so you can get the most value for your money.
7. Choose a Well-Known Brand
When selecting a kit, consider the brand. Some companies, like Arduino, SparkFun, and Adafruit, are known for making reliable kits with excellent support. These brands offer kits for beginners and more advanced users, and they often have large communities where you can get help, find tutorials, and share projects.
Choosing a well-known brand can also ensure that the components in your kit are high-quality and will work well together. Plus, these brands often provide lots of resources to help you get the most out of your kit.
Conclusion
Choosing the right electronics starter kit is an important step toward learning and exploring electronics. By understanding your skill level, defining your goals, and considering the complexity, quality, support, and price of the kit, you can select one that fits your needs. Whether you’re a beginner or already have some experience, the right electronics starter kit can set you up for success and inspire you to create amazing projects. Take your time, do some research, and pick the kit that will help you build your knowledge and skills in electronics. Happy building!
0 notes
Text
Arduino Projects
The Arduino platform, which is based on microcontrollers, makes it easier to create and execute electronic projects. A physical programmable circuit board serves as the hardware component, and an Integrated Development Environment, or IDE, is the software that is used to write and upload code to the board. You can select the board that best fits your project requirements from a range of options, including Arduino Uno, Mega, and Nano.
Top Arduino Projects to Try
Automation System for Smart Homes
Use an automation system driven by Arduino to turn your house into a smart home. Voice commands or your smartphone can be used to operate lights, fans, and other appliances. You may increase the efficiency and intelligence of your house by incorporating sensors and modules like the ESP8266 Wi-Fi module or the HC-05 Bluetooth module.
The weather station
To keep an eye on the temperature, humidity, and air pressure, build your own weather station. In addition to improving your knowledge of sensors, this project offers real-time data collecting, which may be helpful for practical or instructional reasons.
Line-Following Robot
An excellent project to start learning robotics is a line-following robot. The robot detects and follows a predetermined course using infrared sensors. The fundamentals of sensor integration and motor control are covered in this project.
Arduino-Based LED Cube
Programming patterns and animations into a 3D matrix of LEDs creates the visually beautiful LED cube. This project is ideal for teaching 3D coordinate systems and multiplexing.
Smart Plant Watering System
A smart watering system that employs soil moisture sensors to water your plants automatically when necessary will help you keep them healthy. For people who travel regularly or are busy, this project is ideal.
Gesture-Controlled Robot
Create a robot that can be directed by gestures to advance robotics. Simple hand gestures can be used to control the robot's motions utilizing an accelerometer and two Arduino boards.
Arduino projects are a great way to realize your imaginative ideas and gain useful programming and electronics skills. Whether you're a professional, student, or enthusiast, Arduino offers countless opportunities. Use this strong and flexible platform to dive in, try things out, and see your ideas come to life!
To know more, click here.
0 notes
Text
Controlling Multiple Relays with Arduino: A Comprehensive Guide
Introduction
Relay modules are essential components in the world of electronics, allowing you to control high-power devices with low-voltage signals. When combined with the versatility of Arduino, you can create a wide range of automated systems. In this blog post, we'll explore how to control multiple relay modules using an Arduino board.
Understanding Relay Modules
A relay module typically consists of one or more relays, each with a control pin and a pair of output terminals. By applying a low voltage (usually 5V) to the control pin, you can switch the relay, connecting or disconnecting the output terminals. This allows you to control devices that require higher voltages and currents than the Arduino can directly provide.
Required Components
Arduino board (e.g., Uno, Nano)
Relay module (2-channel or more)
Jumper wires
Breadboard (optional)
Power supply (5V DC)
Circuit Diagram
Power Supply: Connect the 5V and GND pins of the relay module to the 5V and GND pins of the Arduino, respectively.
Relay Control: Connect the control pins of the relays to digital pins on the Arduino (e.g., pins 2, 3, 4, and 5).
Arduino Code
const int relayPins[] = {2, 3, 4, 5}; // Array to store relay pin numbers
void setup() {
for (int i = 0; i < 4; i++) {
pinMode(relayPins[i], OUTPUT);
}
}
void loop() {
// Control the relays as needed
digitalWrite(relayPins[0], HIGH); // Turn relay 1 ON
digitalWrite(relayPins[1], LOW); // Turn relay 2 OFF
// ... and so on
}
Explanation
Pin Definition: An array relayPins is used to store the pin numbers connected to the relay control pins.
Setup:
pinMode(relayPins[i], OUTPUT): This line sets each pin in the array as an output pin.
Loop:
digitalWrite(relayPins[i], HIGH/LOW): This line controls the state of a specific relay by setting the corresponding pin to HIGH (ON) or LOW (OFF).
Expanding the Functionality
Sensor-Based Control: Use sensors (e.g., temperature, light, motion) to trigger relay actions based on specific conditions.
Timer-Based Control: Employ the millis() function to implement time-based switching.
Remote Control: Combine with wireless modules (e.g., Bluetooth, Wi-Fi) to control the relays remotely.
Multiple Relay Modules: Connect multiple relay modules to the Arduino to control more devices.
Safety Considerations
Voltage and Current Ratings: Ensure that the relay module's voltage and current ratings are suitable for the load you're controlling.
Heat Dissipation: If controlling high-power loads, consider using heat sinks or other cooling measures.
Proper Wiring: Double-check all connections to avoid short circuits and potential damage.
By mastering the art of controlling multiple relay modules with Arduino, you can create a wide range of innovative projects, from home automation systems to industrial control applications.
Would you like to delve deeper into a specific application or have any other questions about relay module control with Arduino?
0 notes
Text
Real-World Internet Of Things Solutions That Are Changing The World

The Internet of things is the next phase of the internet revolution. IoT solutions allow bringing physical devices into the digital realm. Even though the prevalence of IoT solutions is rampant in the world many people are still in the dark about what IoT is.
Even though IoT has been around since the 1980s it was recognized as a distinct technology in 1999. Over the next few years, IoT diversified and was used in a multitude of ways. From wireless communication, embedded systems, to micro-electromechanical systems.
Corporate spending on technology is supposed to cross 1 trillion dollars in 2020 and 745 billion of it is supposed to be in the internet of things solutions. IoT based solutions have allowed for the automation of daily tasks and enable effective monitoring and control of the connected devices.
Since most people are in the dark about IoT. So we here at Solutionery created a list of the most impactful real-world IoT solutions that are changing the world. Before we dive into the list let’s answer some commonly asked questions about IoT solutions.
Commonly Asked Questions About IoT Solutions
Nowadays whenever you look up tech you see a lot of stuff about the internet of solutions and its wonders. However, most people are still confused about what it is. Here are some commonly asked questions about IoT:
What Is The Simplest Definition Of IoT?
Answer: Internet of things is simply a network of connected devices that interact and exchange information with each other. IoT allows for two or more devices to send and receive information over the internet.
What Are Some IoT Applications?
Answer: Internet of things solutions have been applied in plenty of fields. IoT solutions have been applied in process automation, home automation, smart cars, decision analytics, and smart grids. As the years go by IoT solutions are going to diversify as well with many industries adopting IoT already.
How Does IoT Devices Communicate?
Answer: IoT devices communicate through an IP network over the internet. You can connect the devices either through the ethernet, wired, or wireless or via Bluetooth.
Is There Any Difference Between IoT And Machine To Machine?
Answer: Machine to machine or M2M data transfer means the transfer of data from one device to another. It is simple point-to-point communication between the two devices. Whereas, IoT is a broader term where a network of connected devices supports data integration with a specific application over a shared IP network. It is much more flexible and involves multi-level communication.
What Is The Future Of IoT?
Answer: IoT is already being used in tandem with many other new tech trends. IoT solutions work with artificial intelligence (AI), machine learning, and automated things to deliver integrated smart solutions. As time passes the integration will be much deeper and cause industry-wide disruptions.
Real-World IoT Solutions
Internet of things solutions are everywhere now and here are some of the best real-world IoT solutions that are changing the world:

IoT Sensors
There are plenty of manual or digital sensors connected to circuit boards such as Arduino Uno or Raspberry Pi 2. These sensors can record data like carbon monoxide, temperature, humidity, pressure, vibration, and motion.
These sensors will then send data to connected devices. IoT sensors allow for control of data through automation delivering actionable insights. With these sensors, businesses can make predictive maintenance, enhance efficiency, and reduce costs.
IoT Data Analytics
So this is where businesses utilize IoT data analytics is used to identify trends and patterns. They do this by analyzing big and small data. IoT analytics apps usually analyze structured, unstructured, and semi-structured to uncover meaningful insights into the industry that helps businesses grow.
Businesses use IoT analytics data to do a predictive and descriptive analysis that helps them to improve customer knowledge, enhance operational efficiency, and ensure business growth.
IoT In Tracking and Monitoring
Businesses that have a lot of real-world assets are utilizing IoT in tracking and monitoring assets and systems. IoT asset tracking devices usually use GPS or radio frequency (RF) to track and monitor properties and smart devices are usually used to long-range identification and verification of assets.
IoT In Factory Connectivity
Businesses all over the world are utilizing IoT connected factory solutions to increase their efficiency and productivity. Often companies use IoT solutions like Azure IoT management for industrial IoT devices. These are usually cloud software solutions where you can populate the system with different resources that allow for control of a range of devices.
These sorts of connected factory solutions usually report key metrics data including equipment efficiency and telemetry data that can gather data from assets in different locations as well.
IoT solutions like that have allowed factories to have greater control in connecting, monitoring, and controlling remote industrial devices across multiple locations for a smoother supply chain.
IoT In Supply Chain Management
Supply chain managers are utilizing IoT solutions to make smart predictions through smart routing and rerouting algorithms.
Smart devices connected to packages will send instant after-the-incident facts via GPS and RFID signals that ensure informed supply chain decisions.
IoT application is helping managers mitigate uncertain risks in supply chain management. With IoT solutions implemented businesses are minimizing variance, reducing costs, and improving profitability.
Businesses all over the world are making inventory management, vendor relationship, fleet management, and scheduled maintenance better by introducing IoT solutions.
Smart Grids
Smart grids are a type of industrial application of IoT that allows cities and countries to monitor data in real-time regarding data regarding supply and demand of electricity. Utility companies use computer intelligence to manage efficiency.
Companies integrate the IoT smart grid technologies to ensure that they can manage outages efficiently. IoT smart grids also help companies in fault detection and repairs. IoT smart grid solutions are allowing utility companies to better manage power infrastructure and resources to provide consumers better quality power.
IoT In Health Care Systems
IoT in health care systems is often called the Internet of Medical Things (IoMT). These solutions allow for medical personnel to monitor and track vital medical data for patients remotely. Along with that, they also allow doctors to make important decisions based on real-time monitoring outputs by smart medical devices.
IoT devices report emergency information to doctors immediately. From things like an asthma attack to heart failure, etc immediate notifications ensure that lives are saved.
IoT devices continuously monitor blood pressure, sugar levels, oxygen, and weight and store the data for easy anytime access. This not only automates the workflow but also ensures that the physicians are always aware of the patient’s health.
IoT In Farming
Smart IoT solutions are changing the farming landscape by optimizing the process. IoT smart devices let farmers know the optimal time to do things like harvest plants, creating fertilizer profiles based on the chemistry of soil, and sensing soil nutrients and moisture levels.
Many companies like Smart Elements, AllMETOE, and Pynco are already providing IoT solutions in farming. The sector is one of the fastest-growing sectors in the world revolutionizing the agriculture and farming landscape.
IoT Changing The World For The Better
So these are some real-world IoT implementations that are completely changing the industry. More and more sectors are integrating IoT solutions within their businesses to make sure they provide efficient service while maintaining quality throughout.
From small businesses to large enterprises everyone is looking at IoT as a solution for growth. So make sure you too look into the viability of IoT in your business.
If you need expert IoT consultation then you can contact us here at Solutionery so that you can make an informed decision. Until next time, see ya!
Originally posted in: https://solutionery.com/internet-of-things-solutions/
1 note
·
View note
Text
UNINTERRUPTED AND REMOTE CONTROLLING OF SMART DEVICES
UNINTERRUPTED AND REMOTE CONTROLLING OF SMART DEVICES
Uninterrupted and Remote controlling of smart devices
How many of us wondered if we had turned off the gas or switched off the heater after leaving our houses? It is likely that the number in affirmation is going to be pretty high. While these little mind tricks are common to us all, in today’s modern, technologised households, the dilemma has taken a novel turn.
Many of us are dependent on the…
View On WordPress
#advantages and disadvantages of smart homes#app control switch#arduino thesis pdf#arduino uno project documentation#benefits of smart homes#bluetooth based home automation using arduino#electric wifi#home automation switches india#home automation using arduino and android pdf#home automation using arduino and wifi pdf#home depot home security#home security blogs uk#how do smart homes work#introduction to home automation#iot smart home project#login vector#residential lighting control systems#security vector#smart hd wifi camera#smart home doorbell#smart home introduction#smart homes technology#smart lighting products#smart switch amazon#switch with wifi#UNINTERRUPTED AND REMOTE CONTROLLING OF SMART DEVICES#vector security blog#vector tech support#wifi electrical switch india#wireless ceiling light home depot
0 notes
Text
Can confirm, Home Assistant is amazing; I transitioned everything I could for it to control and right now that’s literally everything. It can also be integrated with other voice-activated smart speakers than Alexa as well as Alexa. It also comes WITH an Add-on called Ada for voice. So far, there is very goddamn little on the market that isn’t either officially supported or community supported and stuff is being added at the rate of literally weekly. If you do scripting and have a taste for diy, you can be Dr. Doom and your home is your supervillain lair.
Because of the market, most smart appliances and devices are Alexa enabled, but unless they’re made by Amazon, that doesn’t mean they’re Alexa exclusive and even then, someone is hacking their way into the API and pulling the endpoints. Right now, the only thing I can’t work in here (yet) is my Nest Thermostat and HA is working on adding that back in right now.
Home Assistant is fully compatible with the zwave and zigbee standards as well as wifi and bluetooth; you can directly control zwave and zigbee items or link up your existing hubs for it to control like SmartThings.
https://www.home-assistant.io/
It can be run in several ways; I’ve done it on a Pi 4 both 4G and 8G and a VM on my Ubuntu server and while the Pi is recommended--I recommend it too for convenience--it’s one of several possibilites. Currently I’m using a Raspberry Pi 4b 8G with a solid state hard drive instead of SD card. You can purchase z-wave and zigbee modules to add to it for direct control of z-wave and zigbee devices or use your existing hubs (or both). Beneath the HA umbrella is also links to the blueprints of building your own zigbee and zwave devices with Arduino just to start that HA can also control. I’m not saying you’re going to be building your own smart thermostat on the weekend, but apparently, some people are doing just that.
This does not require a high tech start value; most integrations are automatic, you just say yes and login and let it happen, it even creates your Dr. Doom dashboard with TABS.
Again, you DO NOT NEED TO KNOW ANYTHING BUT COMPUTERS EXIST AND HOW TO CLICK YES AND NO TO USE THIS. For me, it was actually easier than a lot of setups with shit I had to pay money for that said they were easy. This is open source, but that is not synonymous with user unfriendly; a lot of work was done to make this accessible to the casual automation user. The UI is card based; when you first start, HA does it all for you and creates discrete cards that control different things on your dashboard; no effort on your part, you can turn on and off any light in here or turn them red while someone is in the bathroom because that’s fucking funny. But as you get more comfortable, you can start to create your own configurtions, take direct control of the UI, and mix it up; it’s up to you.
But.
If you are a DIYer or just want to be or never knew you wanted to be but feel the vibes and need a place to start, this is the perfect sandbox for learning and escalating. There are a metric ton of tutorials, community add-ins, and message boards to consult. If you can imagine it, it can be done and its likely someone is working on version eight right now. The primary languages are python and javascript with yaml for configuration files for DIY. You can create your own layouts, your own sensors, and your own cards if you don’t like what they have. If you’re like me, you may also go in to community addins and add new stuff to their code so it runs like you want it to; it’s all up to you.
I am not a dev pro, I’m a QC analyst with a scripting hobby; I do this quite literally for fun on weekends or when I’m bored or anxious and need to soothe myself with coding.
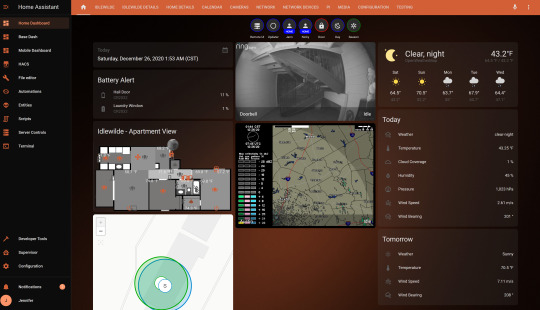
Here is the home page of my MULTI-TAB dashboard. Yes, that is a floorplan of my apartment and those glowy orange and dark grey bits are things that I can turn on and off from the comfort of my bed. It’s fun.
I seriously would kill to get more people into this and have someone to play with and enjoy the feeling of controlling all within my (apartment) kingdom with but a single command. Dear God tell me if you’re into it; we’ll be best friends and hopefully you’ll be okay with that.
Here’s an intro to Home Assistant I wrote back in September in DW when I first started, with screenshots. You’ll also be able to see my Dash when I first started compared to the dash above. Feel free to ask me anything from the perspective of someone not a dev professional, an engineer, or even has a degree in anything, much less anything like this, and yet is a QC lead who codes their own testing tools and for whom this is just something cool and fun.
Home Assistant: An Introduction
I said it in the notes on the last post but I’m gonna say it again.
I’m married to someone with severe memory problems. Automation of household appliances & systems helps him a lot and helps me a lot because it reduces the number of things I have to keep in my brain at all times. I love doors that lock themselves, being able to schedule dog food being delivered, a thermostat I can manipulate from wherever. Beyond my little bubble it should be noted that voice controlled appliances can be really good for people with mobility concerns. Appliances that can measure and talk and remember little tasks can be such a blessing for people.
I will never forgive Amazon and Google for taking technologies that could be really helpful and weaponizing them, and fuck everybody who acts like its some kind of conspiracy theory that those devices are spying on you. You absolutely should be distrustful of those devices but just make sure you’re getting angry at the right people.
118K notes
·
View notes
Video
youtube
Voice Controlled Home Automation | Building a Voice Controlled Home Automation with Arduino | Home Automation: Control your home with voice | Voice-Controlled Smart Home Automation | Voice recognition based wireless home automation system | DIY Voice Controlled Home Automation with Arduino.***********************************************************If You Want To Purchase the Full Working Project KITMail Us: [email protected] Name Along With You-Tube Video LinkWe are Located at Telangana, Hyderabad, Boduppal. Project Changes also Made according to Student Requirementshttp://svsembedded.com/ https://www.svskits.in/ http://svsembedded.in/ http://www.svskit.com/M1: 91 9491535690 M2: 91 7842358459 We Will Send Working Model Project KIT through DTDC / DHL / Blue Dart / First Flight Courier ServiceWe Will Provide Project Soft Data through Google Drive1. Project Abstract / Synopsis 2. Project Related Datasheets of Each Component3. Project Sample Report / Documentation4. Project Kit Circuit / Schematic Diagram 5. Project Kit Working Software Code6. Project Related Software Compilers7. Project Related Sample PPT’s8. Project Kit Photos9. Project Kit Working Video linksLatest Projects with Year Wise YouTube video Links157 Projects https://svsembedded.com/ieee_2022.php135 Projects https://svsembedded.com/ieee_2021.php 151 Projects https://svsembedded.com/ieee_2020.php103 Projects https://svsembedded.com/ieee_2019.php61 Projects https://svsembedded.com/ieee_2018.php171 Projects https://svsembedded.com/ieee_2017.php170 Projects https://svsembedded.com/ieee_2016.php67 Projects https://svsembedded.com/ieee_2015.php55 Projects https://svsembedded.com/ieee_2014.php43 Projects https://svsembedded.com/ieee_2013.php1100 Projects https://www.svskit.com/2022/02/900-pr...***********************************************************1. Voice Controlled Home Automation System | App Based,2. Voice Recognition System Home Automation,3. Voice Controlled Home Automation using Raspberry Pi,4. Voice Control Home Automation: 5 Steps,5. Voice recognition based wireless home automation system,6. Voice Controlled Home Automation Using Arduino (Android App Bluetooth),7. Voice Recognition System Home Automation Using Arduino (Android App Bluetooth),8. Voice Recognition Based Wireless Home Automation Using Arduino (Bluetooth Android App),9. Control Home Appliance From Internet Using Arduino and WiFi,10. Home Automation Using Arduino With Wifi, Bluetooth and IR,11. voice controlled home automation ieee paper,12. voice controlled home automation ppt,13. voice controlled home automation using arduino circuit diagram,14. voice controlled home automation using arduino and bluetooth,15. voice controlled home automation using arduino project report pdf,16. voice controlled home automation using arduino code,17. voice activated home automation using arduino,18. voice activated home automation using arduino (bluetooth android),19. wireless home automation project,20. best home automation system 2020,21. best home automation system 2019,22. home automation using iot ppt,23. wifi based home automation using arduino,24. home automation using iot project,25. iot based home automation using nodemcu,26. home automation using iot block diagram,27. Voice Control Home Automation System Using Arduino and,28. Voice Controlled Home Automation - Nevon Projects,29. Voice Controlled Home Automation System - Electronics,30. Voice Control Home Automation: 5 Steps,31. How to make voice control home automation system using,32. Voice Controlled Home Automation,33. Voice controlled home automation project,34. How to Make Voice Control Home Automation System using,35. Voice Controlled Home Automation - Nevon Projects,36. Simple Voice Controlled Home Automation,37. Home Automation Voice Control Using Arduino Uno and,38. 5 of the best voice controlled home automation software,39. Voice Recognition Based Wireless Home Automation System,40. Voice Activated Home Automation Using Arduino (Bluetooth ,41. voice controlled home automation system using arduino,42. Design of an Intelligent Voice Controlled Home Automation,43. Voice controlled home automation using Arduino - Gadgetronicx,44. Voice Controlled Home Automation Using Arduino,45. How to make Voice Controlled Home Automation System | DIY,46. Voice Controlled Home Automation,47. How To: Voice Controlled Home Automation | Electronics For,48. Voice Recognition Based Home Automation,49. Build Your Own Voice-Activated Home Automation System,50. voice based home appliance control,
0 notes
Text
Top 5 Home Automation Electronics Kits for Beginners in 2025

Home automation is changing the way we live, making everyday tasks easier and more efficient. From controlling lights to setting up security systems, smart technology is transforming our homes. If you're just starting to explore this exciting field, one of the best ways to dive in is with a home automation electronics kit. These kits give you the chance to learn and create your own smart home solutions.
In this article, we will explore the top 5 home automation electronics kits for beginners in 2025. Whether you’re new to electronics or just starting to get into home automation, these kits offer a great introduction to the world of DIY smart homes.
1. Arduino Starter Kit for Home Automation
What It Is:
Arduino is one of the most popular platforms for creating home automation projects. The Arduino Starter Kit includes an Arduino board, a variety of sensors, and all the necessary components to start building your first smart home devices.
Features:
Complete Kit: Includes the Arduino Uno board, wires, LEDs, temperature sensors, and more.
Easy Tutorials: Many beginner-friendly guides and projects are available online.
Open-Source: You can freely modify and improve your projects as you gain more experience.
Large Community: Lots of support and advice from other users.
Why It’s Great for Beginners:
Affordable: It’s one of the cheaper options for home automation kits.
Simple Programming: The programming language (C++) is beginner-friendly and well-documented.
Expandable: As you learn, you can add more sensors and devices to your projects.
Example Projects:
Automate lights with motion sensors.
Control a fan based on temperature.
Build a smart lock system using an RFID sensor.
2. Raspberry Pi 4 Home Automation Kit
What It Is:
The Raspberry Pi 4 is a small but powerful computer that can be used to control and manage your home automation system. With this kit, you’ll have the tools to run automation software and integrate smart devices.
Features:
Powerful Processor: The Raspberry Pi 4 has strong performance for handling complex tasks.
Versatile Software: It runs Raspberry Pi OS, which supports different home automation programs.
Connectivity: It includes Wi-Fi, Bluetooth, and Ethernet options to connect to your devices.
Complete Kit: Comes with a Raspberry Pi 4, power supply, pre-loaded SD card, and cooling accessories.
Why It’s Great for Beginners:
User-Friendly: Despite its power, the Raspberry Pi is beginner-friendly with lots of helpful tutorials.
Affordable: A powerful option that doesn’t cost a lot.
Expandable: You can add extra sensors, cameras, and devices as you go.
Example Projects:
Build a smart home dashboard to control all your devices.
Create a home security system using cameras and motion sensors.
Design a smart thermostat that adjusts the temperature based on the weather.
3. Sonoff DIY Smart Home Kit
What It Is:
Sonoff is known for offering simple and affordable home automation solutions. The Sonoff DIY Smart Home Kit includes smart plugs, switches, and a hub that can be easily controlled using a smartphone app.
Features:
Smart Plugs & Switches: Control your home appliances remotely through the eWeLink app.
Voice Control: Works with Alexa and Google Assistant for voice commands.
Cloud Control: Control devices from anywhere using the internet.
Wide Compatibility: It works with most home appliances.
Why It’s Great for Beginners:
Simple Setup: You don’t need to deal with complicated wiring—just plug in your devices and start using them.
No Programming Required: The app makes it easy to control devices without any technical skills.
Affordable: The kit is budget-friendly, making it an excellent entry point for beginners.
Example Projects:
Set up a lighting system that turns on based on motion or time.
Automate appliances like coffee makers and fans.
Use a motion sensor to trigger a lamp to turn on when someone enters the room.
4. Makeblock mBot Ultimate 2.0 Robotics Kit (with Home Automation Projects)
What It Is:
The Makeblock mBot Ultimate 2.0 is primarily a robotics kit but can also be used to create home automation projects. It’s a great option for beginners who want to learn both robotics and automation.
Features:
Includes Sensors: Comes with motion, temperature, and light sensors.
Visual Programming: Uses mBlock, a drag-and-drop programming tool based on Scratch, making it easy to learn coding.
Modular Design: You can add different parts to customize your projects.
App Control: The mBot can be controlled using a mobile app, allowing you to set up automated routines.
Why It’s Great for Beginners:
Educational: Combines fun robotics with practical home automation skills.
Easy to Program: The visual programming interface is beginner-friendly.
Customizable: You can build different types of projects, including home automation systems.
Example Projects:
Set up a security system with motion detection and video.
Build a smart pet feeder that can be controlled from your phone.
Create a lighting system that turns on or off based on occupancy.
5. Tinkr Home Automation Kit
What It Is:
The Tinkr Home Automation Kit is a beginner-friendly kit designed for easy setup and control of smart home devices. It comes with various sensors, smart plugs, and a user-friendly app.
Features:
Complete Kit: Includes motion, light, and temperature sensors, as well as smart plugs and switches.
Easy-to-Use App: The Tinkr app makes it simple to control your devices and set up automation routines.
Cloud Control: Allows you to control your devices from anywhere using the internet.
Wireless: Uses Wi-Fi or Zigbee for easy connections with smart devices.
Why It’s Great for Beginners:
Plug-and-Play: No complex wiring—just follow the instructions in the app.
Simple Interface: The app’s interface is designed to be easy for beginners.
Affordable: It’s a great value for those just getting into home automation.
Example Projects:
Set up smart lighting that adjusts based on room occupancy.
Automate your air conditioning system to turn on when the temperature reaches a certain level.
Build a smart garden irrigation system that activates when the soil is dry.
Conclusion
As home automation becomes more popular, there are plenty of options for beginners to explore. The kits listed here offer an accessible and hands-on way to learn about smart technology and electronics. Whether you choose a simple option like the Sonoff DIY Smart Home Kit or a more powerful solution like the Raspberry Pi 4, each of these home automation electronics kits provides a great starting point for your smart home projects.
By diving into home automation, you’ll not only be able to make your home smarter and more efficient, but you’ll also gain valuable skills in electronics, programming, and problem-solving. So, pick your favorite kit, get started, and enjoy the process of creating your own smart home!
0 notes
Text
Arduino Projects
Arduino is a microcontroller platform made to facilitate hardware integration and programming. Each of its boards, including the Arduino Uno, Nano, and Mega, is designed to meet a distinct set of requirements. When used in conjunction with the Arduino IDE, users may easily write, upload, and execute code.
Users can design projects ranging from basic LED blinkers to intricate robotics and Internet of Things systems thanks to the platform's extensive library of sensors, modules, and components.
Top Arduino Project Ideas
System for Home Automation
An Arduino with a smartphone app can be used to control lights, fans, and other appliances. Your system can become more intelligent and energy-efficient by integrating sensors like temperature or motion detectors.
The weather station
Construct a personal weather station to track air pressure, temperature, and humidity. You can gather data using sensors like the DHT11 and BMP180, show it on an LCD screen, or post it online for remote access.
Robot That Avoids Obstacles
This well-liked project for robotics novices is teaching a robot to use ultrasonic sensors to navigate around obstacles.
Intelligent Plant Monitoring System
An Arduino-based monitoring system that measures temperature, light intensity, and soil moisture can help you keep your plants healthy. Even when it's time to water your plants, it may let you know.
Alarm System with Arduino
Create an Arduino-powered alarm system with a buzzer, keypad, and motion sensors to increase security. For workplace or home security, this project is perfect.
Pet Feeder with Automation
Construct a pet feeder that automatically delivers food depending on a weight sensor reading or at predetermined intervals.
Internet of Things Door Lock
Create a smart door lock that you can operate from a distance using Bluetooth or Wi-Fi by integrating an Arduino with an RFID scanner or fingerprint sensor.
Make Your Own Game Console
Convert an Arduino board with basic buttons and a display into a vintage game console.
How to Get Started with Arduino Projects
Select the appropriate board:
Choose an Arduino board based on the needs of your project. The Arduino Uno is an excellent place to start for the majority of novices.
Assemble the parts:
Determine the sensors, actuators, and other parts your project needs. A wide range of Arduino-compatible components are available on websites like Adafruit, SparkFun, and Amazon.
Set up the Arduino IDE:
Install the Arduino IDE by downloading it from Arduino.cc. You can develop code and upload it to your board using this software.
The universe of creativity and invention is unlocked by Arduino projects. Arduino offers the resources and network to realize your ideas, whether you want to study robotics, automate your house, or develop a ground-breaking technology.
Explore the world of Arduino now and unleash your creative side! Do you have a favorite idea for an Arduino project? Tell us about it in the comments section below.
To know more, click here.
0 notes
Text
IoT Standards & Protocols Guide - Arya College

The essence of IoT is networking that students of information technology college should be followed. In other words, technologies will use in IoT with a set protocol that they will use for communications. In Communication, a protocol is basically a set of rules and guidelines for transferring data. Rules defined for every step and process during communication between two or more computers. Networks must follow certain rules to successfully transmit data.
While working on a project, there are some requirements that must be completed like speed, range, utility, power, discoverability, etc. and a protocol can easily help them find a way to understand and solve the problem. Some of them includes the following:
The List
There are some most popular IoT protocols that the engineers of Top Engineering Colleges in India should know. These are primarily wireless network IoT protocols.
Bluetooth
Bluetooth is a wireless technology standard for exchanging data over some short distances ranges from fixed and mobile devices, and building personal area networks (PANs). It invented by Dutch electrical engineer, that is, Jaap Haartsen who is working for telecom vendor Ericsson in 1994. It was originally developed as a wireless alternative to RS-232 data cables.
ZigBee
ZigBee is an IEEE 802.15.4-based specification for a suite of high-level communication protocols that are used by the students of best engineering colleges to create personal area networks. It includes small, low-power digital radios like medical device data collection, home automation, and other low-power low-bandwidth needs, designed for small scale projects which need wireless connection. Hence, ZigBee is a low data rate, low-power, and close proximity wireless ad hoc network.
Z-wave
Z-Wave – a wireless communications protocol used by the students of Top Information Technology Colleges primarily for home automation. It is a mesh network using low-energy radio waves to communicate from appliance to appliance which allows wireless control of residential appliances and other devices like lighting control, thermostats, security systems, windows, locks, swimming pools and garage door openers.
Thread
A very new IP-based IPv6 networking protocols aims at the home automation environment is Thread. It is based on 6LowPAN and also like it; it is not an IoT protocols like Bluetooth or ZigBee. However, it primarily designed as a complement to Wi-Fi and recognises that Wi-Fi is good for many consumer devices with limitations for use in a home automation setup.
Wi-Fi
Wi-Fi is a technology for wireless local area networking with devices according to the IEEE 802.11 standards. The Wi-Fi is a trademark of the Wi-Fi Alliance which prohibits the use of the term Wi-Fi Certified to products that can successfully complete interoperability certification testing.
Devices that can use Wi-Fi technology mainly include personal computers, digital cameras, video-game consoles, smartphones and tablets, smart TVs, digital audio players and modern printers. Wi-Fi compatible devices can connect to the Internet through WLAN and a wireless access point. Such an access point has a range of about 20 meters indoors with a greater range outdoors. Hotspot coverage can be as small as a single room with walls that restricts radio waves, or as large as many square kilometres that is achieved by using multiple overlapping access points.
LoRaWAN
LoRaWAN a media access control protocol mainly used for wide area networks. It designed to enable students of private engineering colleges in India to communicate through low-powered devices with Internet-connected applications over long-range wireless connections. LoRaWAN can be mapped to the second and third layer of the OSI model. It also implemented on top of LoRa or FSK modulation in industrial, scientific and medical (ISM) radio bands.
NFC
Near-field communication is a set of communication protocols that enable students of best engineering colleges in India two electronic devices. One of them is usually a portable device like a smartphone, to establish communication by bringing them within 4cm (1.6 in) of each other.
These devices used in contactless payment systems like to those used in credit cards and electronic ticket smartcards and enable mobile payment to replace/supplement these systems. Sometimes, this referred to as NFC/CTLS (Contactless) or CTLS NFC. NFC used for social networking, for sharing contacts, videos, photos,or files. NFC-enabled devices can act as electronic identity both documents and keycards. NFC also offers a low-speed connection with simple setup that can be used by the students of top btech colleges in India to bootstrap more capable wireless connections.
Cellular
IoT application that requires operation over longer distances can take benefits of GSM/3G/4G cellular communication capabilities. While cellular is clearly capable of sending high quantities of data. Especially for 4G with the expense and also power consumption will be too high for many applications. Also, it can ideal for sensor-based low-bandwidth-data projects that will send very low amounts of data over the Internet. A key product in this area is the SparqEE range of products including the original tiny CELLv1.0 low-cost development board and a series of shield connecting boards for use with the Raspberry Pi and Arduino platforms.
Sigfox
This unique approach in the world of wireless connectivity; where there is no signalling overhead, a compact and optimized protocol; and where objects not attached to the network. So, Sigfox offers a software-based communications solution to the students of top engineering colleges in India. Where all the network and computing complexity managed in the Cloud, rather than on the devices. All that together, it drastically reduces energy consumption and costs of connected devices.
SigFox wireless technology is based on LTN (Low Throughput Network). A wide area network-based technology which supports low data rate communication over larger distances. However, it mainly used for M2M and IoT applications which transmits only few bytes per day.
0 notes
Text
Something about iBeacon SDK
Possible use cases and business models for a beacon that enables location-dependent user interaction even inside buildings are currently being hotly debated. In-store advertising and discounts, mobile payments, navigation, public transport, localization in public buildings and museums and home automation are just the tips of the iceberg. And of course the omnipresent collection of data – now new and with precise location information. Before learning more about ibeacon technology, we will also mention ibeacon SDK in the article.
What is the hype?
The iBeacon protocol developed by Apple based on Bluetooth Low Energy is supported by a variety of devices. The article explains iBeacons and Bluetooth Low Energy and uses the example of developing an Android app for location-dependent shopping lists to show the location-dependent interaction of an app with iBeacons. The implementation is based on MOKOSmart ibeacon SDK.
iBeacon, Bluetooth 4.0, BLE, SMART. Wot?
The basic technology for iBeacon is Bluetooth. Bluetooth Low Energy (BLE), which is often referred to as the Bluetooth Smart marketing label, has been included in version 4.0 of the Bluetooth standard. BLE is not backward compatible with previous versions called Bluetooth Classic. Bluetooth 4.0 specifies that standard-compliant devices must implement one or both variants, i.e. Low Energy or Classic.
BLE is implemented on almost all current smartphones such as the iPhone 4+ and the Samsung Galaxy 3+. An iPhone can function both as a receiver of iBeacon signals and – unlike Android – as a beacon itself. Android includes BLE drivers from API version 18, i.e. Android 4.3. Incidentally, current computers are also BLE-capable. In Windows, however, the drivers are only on board from Windows 8 and since around mid-2011, BLE has been available on Apple computers.
BLE continues to support a variety of peripheral devices such as heart rate monitors and toy helicopters, thermometers, fitness equipment and toothbrushes, yes, toothbrushes and sneakers.
Interesting in connection with iBeacons is the Sensor
Tag from Texas Instruments, which in addition to its function as an iBeacon can also measure temperature, humidity, pressure and acceleration. The Sensor Tag also comes with a gyroscope, a magnetometer and two hardware buttons. The ideal device to remotely control presentations while transmitting and displaying the moisture and temperature of the speaker’s hands. I think my next sandpit project will be stage fright-o-mat. You can find a detailed list of devices on the official Bluetooth website.
GATT ready

The communication model used by devices to exchange data is called the GATT – Generic Attribute Profile. GATT defines the roles of the client and server. The client requests data from the server via services. A service groups several atomic key/value pairs, which are called characteristics. Both services and characteristics are identified via UUIDs and can also contain further descriptions. Services and their characteristics are cataloged in the form of profiles; the specification defines a whole range of them from the fields of healthcare, sport and fitness and – in our case interesting – proximity sensing. The individual profiles and their services and characteristics can be found in the Bluetooth developer portal under GATT Specifications.
Get to the beacon
So what are iBeacons? iBeacon is a very simple technology (and a trademark of Apple that enables location-dependent interaction with applications. A beacon sends out a signal that can be received with BLE-compatible devices and processed by applications installed on it Signal contains the identification of the beacon and the reception strength. Ibeacons themselves are, therefore – contrary to inaccurate statements in the press – unable to deliver content or track customer behavior. This is the responsibility of the receiving applications and therefore developers.
iBeacon IRL
Larger deployments of iBeacons in Germany will probably be a long time coming, but there are some examples from the USA and the Netherlands. For example, Major League Baseball has equipped 28 stadiums with iBeacons and uses them, among other things, for check-ins in the MLB app “At the Ballpark”.
A showcase was implemented in the Rubens House in Antwerp, which offers background information such as X-rays of paintings and geocaching games for visitors.
The prime example in terms of size comes from Apple itself. Over 250 Apple Stores have been equipped with iBeacons. In combination with the Apple Store app, location-dependent messages are sent to buyers who are in the store. However, the possible interactions currently seem to be quite limited: First reviews report only two different (and quite generic) messages that they would have received. Special offers or specific information about individual products nearby were not offered.
Functionality
iBeacon SDK does not use a separate BLE profile, but rather Bluetooth advertising packages, i.e. broadcast packages, which are used to discover Bluetooth devices. If you are interested in the exact structure of the package, you can read this, for example, on Adam Warski’s blog.
Such a package is sent at regular intervals that can be configured via GATT. It contains the UUID of the beacon, which is typically preconfigured by the manufacturer. So all MOKOSmart beacons send the same UUID. Major and minor IDs are also used to identify the individual beacons. Major IDs can represent, for example, a branch of a shop or a restaurant in a franchise chain, the minor IDs a single shelf or a table.
Furthermore, the signal strength is included in the advertising package, which can be used to measure the distance of the receiver from the beacon. However, you cannot expect high accuracy here, since the signal can be obstructed by spatial obstacles such as furniture or people.
IBeacon SDK offers two concepts for the interaction of an app with this information: ranging and region monitoring. When ranging, the distance to the beacon is determined. Due to the inaccuracy mentioned above, this takes place in only three stages. “Immediate” is a distance of a few centimeters, “Near” is a few meters and “Far” is a distance of over ten meters. Ranging is only possible if the receiving app is active.
This is not necessary for region monitoring. In this mode, an inactive app can also be notified when entering or leaving a region defined by one or more beacons. At the latest now it is becoming clear what makes this technology attractive for advertising and retail. In addition, for most beacons, the transmission strength and the interval can be configured in order to optimize the battery life based on local conditions.
“Most beacons” implies that there is more than one manufacturer of iBeacons on the market. In fact, there are quite a few: MOKOSmart, Kontakt.io, Gelo, Estimote and Gimbal. In addition to the hardware, these manufacturers also offer iBeacon SDK service and cloud solutions for the management of beacons. The hobbyists among us can set up iBeacon transmitters themselves with relatively little effort using Raspberry Pi or Arduino.
Flashing list
Let us assume the following situation for the implementation example: The developer is in the supermarket on Saturday morning. Hungry children are waiting at home and in the afternoon there is a bake sale at school. Only then will the weekend really start. So good reasons to hurry up. Unfortunately, the shopping list is long and not adapted to the layout of the supermarket. If the supermarket were equipped with iBeacons in the different departments, a shopping list app could highlight the appropriate entries and significantly reduce the stress level of the (of course completely fictional) developer.
Since our app has to communicate with Bluetooth, we first require BLUETOOTH and BLUETOOTH_ADMIN authorizations in the Android manifest. In order to be able to use the service offered by the Estimote API to interact with iBeacons, we must also make it known and place the downloaded API in our libs/directory.
Our prototype consists of a simple, pre-filled list and pre-defined regions, i.e. departments in our supermarket. A list entry knows which region it is assigned to. In our example, we only assign one beacon to each region. It is also possible to combine a list of beacons into one region. The main activity is responsible for recognizing the current region and forwards this information to an adapter, which is responsible for highlighting the list entries. In addition, we add the option to select the active region without beacons to make our UI testable without additional hardware.
In the activity’s on Create method, we instantiate a Beacon Manager from MOKOSmart for our app. We use a listener for the region monitoring by making the current region known to our adapter and defining the interval for the beacon scans. In the example, we define that one second should be scanned and then 250 ms should have waited. These values are chosen relatively aggressively to get quick results in tests. In reality, the difficult balance between responsiveness vs. To meet Battery Life. In this prototype, we also fill our shopping list with dummy values. We start or stop monitoring in the on () Start or onStop () method of the main activity.
The ItemList
Adapter is implemented as a derivative of android.widget.Array Adapter and overrides the get View () method, which is called for each line to be displayed. The title of the item is written in the first line of the review defined in the layout, in the second the assigned region.
As can be seen in Listing 1, the entered region is transferred to the adapter in the on Entered Region () callback of the MonitoringListener, which is assigned to our BeaconManager: itemListAdapter.setRegion (region). When calling getView (), this checks whether the region of the entry in the line matches the current region. If this is the case, it colors the background of the line. Additionally or alternatively, one could also put the entries for the current zone at the beginning by sorting the list.
The code of the application is clear; it doesn’t take many implementations effort to receive iBeacon signals and handle them in the app. The iBeacon concepts ranging and monitoring are mapped in the MOKOSmart iBeacon SDK so that they can be used intuitively. The full source code of the app can be found on GitHub.
Conclusion and outlook
We saw that interacting with iBeacons using the MOKOSmart iBeacon SDK is easy to do. So I don’t expect major hurdles in the technology of implementation, but rather in the deployment of the beacons and the tuning of transmission power. These parameters have a direct impact on the responsiveness of the application when the location changes. In any case, the balancing should be difficult.
For particularly interesting, e.g. B. in the area of home automation, I consider the combination of iBeacons with sensors, as in the Sensor Tag from Texas Instruments mentioned above. Estimote will also launch mobile beacons with motion and temperature sensors on the market with Estimote Stickers. The first developer previews should have been delivered at the end of October 2014, but no kits were shipped by the end of 2014.
It remains to be seen whether the “Indoor Navigation” application area can be mapped robustly with this technology. Due to the susceptibility of the Bluetooth signal to interference factors, strong illumination with iBeacon signals of the corresponding area and position calculations using triangulation with room plans would be necessary. Appropriate solutions are offered by MOKOSmart (Indoor Navigation ibeacon SDK) and various other manufacturers such as LabWerk, but the author is not aware of any practical reports.
With the development of an app interacting with iBeacons, security and data protection aspects must also be taken into account. Due to the simplicity of the signal, iBeacon is prone to spoofing, which should not be forgotten during development. Data such as the current location and the movement profile that can be collected based on user behavior also have a high need for protection.
0 notes
Text
IOT - Glossary - A
New Post has been published on https://www.ukbitsolutions.com/blog/iot_glossary_a/
IOT - Glossary - A

IoT
Introduction
IoT has taken over our lives. As you have come to this blog you already know about it.
Whether you are interested in smart homes, smart cities, cutting edge computing, or IIoT, We’ve compiled a list of devices, protocols, and IoT-centric phrases that you should know while you dive into our connected future. If we missed something, let us know in the comments and provide us with new terminologies and what should be a good definition. In a way its your dictionary.
IT being part of new era of devices with endless list of terms. Thus we showcase here only Glossary starting with alphabet “A”. Keep following our blog for updated list.
Glossary A
AAA
AAA meaning is its full form only i.e. Authentication, Authorization & Accounting.
AAL – Ambient Assisted Living
AAL are Intelligent systems that are to assist the elderly and others with care activities daily, mostly through IoT technology. Where application fields are mainly security (for example, observation), functionality (such as automated light switches), and entertainment.
ACaaS – Access Control as a Service
A recurring fee-based system where a facility manager outsources electronic access control to a third party. Each facility need not maintain a dedicated server.
Acceleration Sensing
It’s a concept referring to the increase in movement of an object from one point to another that should be along a straight line or axis. Typical application includes remote control, pointing devices, fitness monitoring equipment, gesture recognition etc.
Accelerometer
A tool that measures changes in gravitational acceleration in the unit it may be installed in. Accelerometers are mainly used to measure acceleration, tilt or vibration in many devices.
Access Control
It’s a system that is to determine who, when, and where one (people) is allowed to enter or exit a facility or area. Door locks is the traditional form of access control, however modern access control may include electronic systems or wireless locks. Access control may also apply to cyber security.
Access Point
A Wi-Fi node that allows users entry to a network, typically a LAN.
Active Sensor
It’s a sensing device that mainly requires external source of power to operate.
Actuator
A device that creates motion by converting electrical energy into mechanical energy in an electromechanical system. (An actuator can also stop motion by clamping or locking.) A dynamo as such is an example of actuator.
ADAS – Advanced Driver Assistance Systems
Digital features incorporated into vehicles to enhance driver safety and performance. ADAS functionality includes blind spot detection, digital vision for lane departure warnings, radar for collision avoidance, and Vehicle to vehicle (V2V) communication for multiple vehicles to operate near each other. The data and connectivity integral to ADAS transforms vehicles into IoT devices.
Additive Manufacturing
Industry-specific term for 3D printing, involves building products by adding layers instead of the traditional technique of removing material via milling.
Address-ability
The scope for an entity to be targeted and found. To be addressable, entity must be uniquely identifiable, meaning that it must be linked with something — typically an alpha-numeric string — and it should not be associated with anything else in that system.
AES – Advanced Encryption Standard
Electronic data encryption specification was established in year 2001. Concept operates on public/private key system. Planning for key management and implementation is important when setting AES. This is the standard protocol for setting transport layer security in IoT devices.
AIM – Automated Identification and Mobility Technologies
Group of technologies that are used to identify, store and to communicate data. For example – barcoding. Though there are many technologies in this area which are used for different services or are often used in combination.
AML – Ambient Intelligence
An environment that is sensor-filled which not only interpret, react to human events but also activity & learning to adapt over time. Operation of environment and services change based on that activity.
AMPS – Advanced Mobile Phone System
Its an analogue based cellular mobile system using FDMA technology.
AQMP – Advanced Message Queuing Protocol
An open application layer protocol for message-oriented middle-ware with a focus on queuing, routing (P2P, PubSub), security, and reliability.
It’s an open-source standard works as application layer protocol for business message communications. Its features include message style, queuing, routing, stability, and security.
Android Wear
When an open-source platform extends the Android system to wearables with help of the SDK includes that includes an emulator too.
Anomaly Detection
Its a statistical technique that determines which patterns are normal and then examines items that don’t conform to those patterns. Unlike simple classification, in anomaly detection of data, users don’t know what they are looking for.
ANSI-136
Standard 41 – American National Standards Institute, Its for TDMA cellular.
ANSI-2000
Standard 41 – American National Standards Institute, Its for CDMA2000 cellular.
ANSI-41
Standard 41 – American National Standards Institute, Its for control signal messaging on SS7.
ANSI-95
Standard 41 – American National Standards Institute, its for CDMA cellular.
AP – Access Point (Wireless)
A Wi-Fi node that allows users entry to a network, typically a LAN.
API – Application Programming Interface .
It’s a set of commands and related protocols to interact with an operating system, device, or specific software part. In IoT, an API lets the developer access framework externally without going deep in software programming at server end. The functionality of a device or sensor can be accessed for reports or changed based on API permissions related to public or specific users.
Application Agents
Its helps to address the lack of overheads for an end-to-end, peer-to-peer networking in IoT architecture, this is achieved by their presence in propagator nodes in an enterprise. They move intelligent command data to the edge of the network, this is to help manage traffic, allow a real-time response to dynamic IoT conditions, and provide local client services.
Application Software
These are programs that enables specific, end-user actions. This means that software uses the potential provided by computers to become an application. Examples – Microsoft Word (i.e. for text editing), Adobe Photoshop (i.e. for image editing), and other programs.
Arduino
A single-board micro-controller used for prototyping without having to deal with breadboards or soldering. The software that is used to operate an Arduino is absolutely free and open source.
ARP – Address Resolution Protocol.
It’s a communication protocol that is used to convert an IP address into a physical address. This way, computers can communicate with each other, despite only knowing each other’s IP addresses, by sending an ARP request that informs them about the other computer’s MAC address.
ASSN – Application Specific Sensor Nodes
Integrating sensors and sensor fusion in a single device. It has a built-in intelligence to overcome the complexity of using multiple sensors to a specific problem. Example – augmented reality, navigation, positioning, and more.
AT Commands
Attention commands, developed by Dennis Hayes, that are used to set data connections. The set of short string commands allow developers to set up calls with a modem, as well as perform far more complex tasks. For an example of an AT command set, take a look at Telit’s 3G module, the HE910, AT command directory.
Audio Profile
Hardware profile used with the Bluetooth applications that is to include custom AT commands and functionality is dedicated to wireless streaming of audio. Examples include A2DP, which allows streaming of audio to speakers. Where as, an audio gateway profile allows two-way audio communication used in devices like headsets.
Augmented Entity
A physical entity that is represented by virtual entity on digital level. An augmented entity combines the two and represents as an combination of the two entities.
AWS – Amazon Web Services
Brand Name given to collection of remote computing services which are offered by Amazon.com. In all it combines to make a cloud computing platform.
0 notes
Text
DIY Bluetooth Phone Controlled BB-8 Droid with Arduino

DIY Bluetooth Phone Controlled BB-8 Droid with Arduino
This BB-8 model can be controlled with a smartphone using an application. What you'll learn DIY Bluetooth Phone Controlled BB-8 Droid with Arduino Learn to program the SD card adapter to play music How to deploy program into Arduino and use it wirelessly Build functional BB-8 droids Requirements A basic understanding of electricity and electronics A hands-on projects-based approach with step by step instructions will be used to build BB-8 Droid to control Wireless using a mobile application All theory will be explained so you understand all aspects of a project and how/why it works Line-By-Line Code Reviews so you will understand exactly how the software and hardware to play together in a project 1 x Arduino UNO, 1 x Arduino Mega, 1 x HC-06 Bluetooth module, 1 x Mini speaker 3 x DC gear motors, 1 x SD card adapter module, 1 x SD card, Lithium-Ion Batteries 1 x Hamster ball, 1 x Plastic Globe, Screws, and Zip Ties, Acrylic sheets, Magnets Essential tools: Jumper wires, Multimeter, Soldering iron, Wirecutter, Glue gun, Screw Terminals Description Hello, learners! Greeting from Makerdemy. In this course, you will learn how to program to build your “DIY Bluetooth Phone Controlled BB-8 Droid with Arduino Mega”. Arduino is one of the cost-effective boards you can purchase & start programming with to interact with physical elements using logic & create results the way you want it. It can be used in your Engineering Projects, Industrial Projects, and Home Automation related projects. The course lesson will explain to you, “How to work on your own DIY Bluetooth Phone Controlled BB-8 Droid with Arduino Mega" using Arduino programming language. This course works best for you if you own an Arduino UNO and Arduino Mega. This course is for anyone who is interested in building a functional BB-8 droid robot to control remotely via mobile application with Arduino boards. And also you will learn to play the music using an SD card adapter module. The course requires basic knowledge of Arduino programming language. It is designed to introduce the Arduino hardware and programming environment to get you started on building projects. This BB-8 model can control with a smartphone using an application downloaded from the Play Store and App Store, for both the devices. It can be controlled even with voice commands using the Android application. Some features: Phone controlled Voice controlled Arduino-based Realistic body motion Light effects Sound effects I will also teach you how to configure the Bluetooth and SD card modules, and you can control it wirelessly. If you are a technology enthusiast and want to learn cutting-edge technology, then this is the right course for you. I will guide you step by step how to go about building this project. I will also share the source code with you so that you can replicate the project by yourself. Let’s dive in to learn the concept one by one. What are you waiting for? Enroll now! Who this course is for: People who want to try Arduino and learn more about micro-controllers Makers who have an existing intermediate or better understanding of electronics Engineering Students - Electronics, Electrical & Computer Science Electronic Geeks, Hobbyist & Art Students High School Science Students Created by Venkatesh Varadachari, Kamesh Dkr Last updated 7/2017 English English Google Drive https://www.udemy.com/diy-bluetooth-phone-controlled-bb-8-droid-with-arduino/ Read the full article
#application#Arduino#Bluetooth#Controlled#Course#hardware#language#music#phone#physical#Program#Project#Smartphone#software#speaker
0 notes