#bluetooth module
Explore tagged Tumblr posts
Visit Tumblr Blog
Explore Tumblr blogs with no restrictions, modern design and the best experience.
Last Seen Tumblr Blogs


Fun Fact
Tumblr was named as a finalist in Lead411’s New York City Hot 125 in Aug 2010.
Text
Learn how to choose the right Bluetooth module for your Smart TV. Fix pairing issues and ensure compatibility with our expert tips. Get the right module today.
1 note
·
View note
Text
Bluetooth Module, GPS Module, proprietary GPS module, Proprietary RF Module
Bluetooth, WiFi 802.11a/b/g/n/ac, Bluetooth v5.0 Transceiver Module 2.4GHz, 5GHz
0 notes
Text
https://www.futureelectronics.com/p/semiconductors--wireless-rf--rf-modules-solutions--bluetooth/da14531mod-00f01002-dialog-semiconductor-8189021
Proprietary RF Module, wireless technology, Transceiver ICs, Bluetooth device
DA14531MOD Series 3.6 V -93 dBm Sensitivity Surface Mount Bluetooth LE Module
#Dialog Semiconductor#DA14531MOD-00F01002#Wireless & RF#RF Modules#Bluetooth#USB Bluetooth Adapter#GPS Module#Bluetooth Module#Proprietary RF Module#wireless technology#Transceiver ICs#Bluetooth device#RF Transceiver#Wireless detectors
1 note
·
View note
Text
https://www.futureelectronics.com/p/semiconductors--wireless-rf--rf-modules-solutions--gps/zed-f9h-01b-u-blox-7168460
Bluetooth Module, UHF Module, F Modules, UHF Module, Bluetooth Accessories
ZED-F9P Series 3.6 V 159 dBm Surface Mount U-Blox F9 High Precision GNSS Module
#Wireless & RF#RF Modules & Solutions#GPS#ZED-F9P-01B#u-blox#Bluetooth Module#UHF Module#Bluetooth Accessories#Uhf serial#Zigbee Module#Proprietary RF Module#RFID Module solutions
1 note
·
View note
Text
A Comprehensive Comparison of Bluetooth and UWB (Ultra-Wideband) Technologies: A Guide to Precise Positioning
The rapid development of the indoor positioning industry and the quick expansion of the market are closely related to the diversification of positioning technologies. Common indoor positioning technologies include Bluetooth positioning, WiFi positioning, UWB (Ultra-Wideband) positioning, and ZigBee positioning, among others. In recent years, indoor navigation and positioning have become increasingly common, such as in underground parking lot vehicle location, smart guide systems in hospitals and nursing homes, and asset and item tracking in warehouses. Currently, the most common positioning technologies on the market are Bluetooth-based and UWB-based (Ultra-Wideband) technologies. Today, we will mainly introduce the differences between NiceRF's Bluetooth positioning and UWB positioning.

What are the differences between Bluetooth positioning and UWB positioning, and what are the main distinctions?
Supported wireless protocols
Bluetooth positioning is based on the standard Bluetooth 4.0-5.2 protocols
UWB (Ultra-Wideband) positioning uses UWB wireless communication technology, which supports extremely wide bandwidth (typically over 500 MHz). This protocol is designed for high precision and low latency communication, providing reliable performance in complex environments.
UWB3000F27 and UWB3000F00 adhere to IEEE802.15.4-2015 and IEEE802.15.4z (BPRF mode) standards, while UWB650 follows the IEEE 802.15.4-2020 Standard protocol.
Positioning Principles and Accuracy
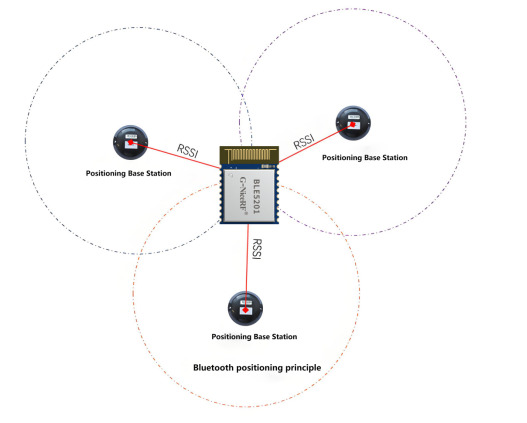
Bluetooth Positioning: Bluetooth positioning primarily relies on RSSI (Received Signal Strength Indicator) measurements to estimate the distance between devices by measuring signal strength. NiceRF uses more advanced positioning methods, employing Bluetooth Angle of Arrival (AoA) and Angle of Departure (AoD) technologies to enhance positioning accuracy. The accuracy of Bluetooth positioning typically ranges from 1 to 5 meters, depending on the environment, the number of devices, and their configuration.
UWB Positioning: UWB positioning typically uses ToF (Time of Flight) and TDoA (Time Difference of Arrival) measurement principles. It determines distance by accurately measuring the signal propagation time. UWB positioning accuracy can reach within 10 centimeters and, under ideal conditions, can even achieve accuracy of a few centimeters. This high precision makes UWB highly advantageous in applications requiring exact positioning.
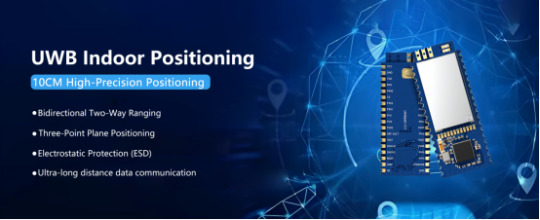
UWB3000F27 and UWB3000F00: These modules are used for two-way long-distance ranging, TDoA (Time Difference of Arrival), and PDoA (Phase Difference of Arrival) systems, with positioning accuracy up to 10 centimeters.
UWB650 Module: This module integrates data communication, double-sided two-way ranging (DS-TWR), and three-point planar positioning functions using UWB technology. It supports communication distances of over 1 KM in open environments, making it suitable for long-distance ranging applications.
Anti-Interference Capability
Bluetooth Positioning: Bluetooth technology operates in the 2.4 GHz frequency band, making it susceptible to interference from other devices such as Wi-Fi and microwave ovens, which can affect positioning accuracy and stability.
NiceRF Bluetooth 5.2 protocol utilizes Silicon Labs' EFR32BG22C224 SOC chip. It features low power consumption, small size, long transmission distance, and strong anti-interference capabilities.
UWB Positioning: UWB technology uses an ultra-wide frequency band, offering strong anti-interference capabilities. It can provide stable positioning services in complex environments and is less likely to be affected by other wireless devices.
Data Transmission Speed
Bluetooth Positioning: Bluetooth Low Energy (BLE) is primarily designed for low power consumption, typically resulting in lower data transmission rates.
UWB Positioning: UWB technology not only provides high-precision positioning but also supports high data transmission rates, making it suitable for applications that require the simultaneous transmission of large amounts of data and precise location tracking.
Synchronization Mechanism
Bluetooth Positioning: Synchronization between Bluetooth devices typically relies on communication between the master and slave devices, which may introduce some time delay.
UWB Positioning: UWB uses a time synchronization mechanism, achieving precise synchronization between devices through high-precision timestamps of ultra-wideband signals.
Deployment Density
Bluetooth Positioning: Due to the accuracy of Bluetooth positioning being significantly affected by signal strength and interference, a high number of Bluetooth beacons (Beacons) are needed to cover the target area. This can lead to high-density deployment, especially in large or complex environments.
UWB Positioning: UWB positioning systems typically require less infrastructure to cover the same area because their high precision and strong anti-interference capabilities can provide stable positioning services over a larger range. This makes UWB systems more cost-effective for large-scale deployments.
Standby Duration
Bluetooth Positioning: A significant advantage of Bluetooth technology is its low power consumption. Devices using BLE can typically operate for extended periods, with standby times reaching several months or even years, making it well-suited for scenarios requiring long-term continuous operation.
UWB Positioning: UWB generally involves high power consumption for ultra-long-distance modules, making it less advantageous in terms of standby duration. UWB modules are better suited for high-precision positioning tasks of shorter duration.
Application Scenarios
Bluetooth Positioning: Widely used in indoor navigation, personnel tracking, asset management, smart homes, and customer behavior analysis in retail stores. This is mainly due to its low cost, low power consumption, and convenient deployment characteristics.
UWB Positioning: Due to its high precision and reliability, UWB is widely used in industrial automation, robotic navigation, drone positioning, sports and medical tracking, and high-precision asset management, among other fields requiring accurate positioning.
How to Choose the Right Indoor Positioning Solution
When choosing an indoor positioning solution, it is recommended to first clarify your positioning needs, including the required indoor positioning accuracy and the functional requirements of the positioning solution. Next, consider the budget you can allocate for the indoor positioning solution and the complexity of setting up the positioning environment.
The need for indoor positioning accuracy
Bluetooth Positioning: Bluetooth positioning accuracy is typically around 3 to 5 meters, making it suitable for applications where high precision is not critical.
UWB Positioning: UWB (Ultra-Wideband) positioning technology can provide centimeter-level accuracy, typically ranging from 10 to 30 centimeters. This high precision makes UWB ideal for applications requiring exact positioning.
Complexity of Setting Up the Positioning Environment:
Bluetooth Positioning: The layout is relatively simple; you just need to pay attention to the spacing between beacons.
UWB Positioning: The layout is more complex compared to Bluetooth positioning because it involves the installation of UWB base stations.
For details, please click:https://www.nicerf.com/products/ Or click:https://nicerf.en.alibaba.com/productlist.html?spm=a2700.shop_index.88.4.1fec2b006JKUsd For consultation, please contact NiceRF (Email: [email protected]).
0 notes
Text
https://www.futureelectronics.com/p/semiconductors--wireless-rf--rf-modules-solutions--rfid/mlx90109edc-aaa-000-re-melexis-4229597
RFID Module, UHF Module, Proprietary RF Module, Rfid proprietary modules
MLX90109 Series 3.1 to 5.5 V 3 mA 125 kHz RFID Transceiver - SOIC-8
#Wireless & RF#RF Modules & Solutions RFID#MLX90109EDC-AAA-000-RE#Melexis#Bluetooth devices accessories#Zigbee devices serial solutions#Bluetooth Module#RFID Module#UHF Module#Rfid#Proprietary GPS modules#Uhf serial devices solutions
1 note
·
View note
Text
https://www.futureelectronics.com/p/semiconductors--wireless-rf--rf-modules-solutions--bluetooth/lbee5xv1ym-574-murata-1138828
Eless & RF, RF Modules & Solutions, Bluetooth, LBEE5XV1YM-574, Murata
1YM Series Dual Band WiFi 11a/b/g/n/ac and Bluetooth 5.2 Module
#Wireless & RF#RF Modules & Solutions#Bluetooth#LBEE5XV1YM-574#Murata#wireless Bluetooth receiver#Proprietary RF Module#Bluetooth Module#RF Modules#devices accessories#Rfid proprietary modules#GPS Module#Zigbee devices s#RFID Module
1 note
·
View note
Text
STMicroelectronics and Qualcomm Launch Mass Production of ST67W611M1 Wi-Fi 6/Bluetooth 5.4 Module for STM32 Ecosystem
June 9, 2025 /SemiMedia/ — STMicroelectronics has commenced mass production of the ST67W611M1 module, a compact solution integrating Wi-Fi 6 and Bluetooth Low Energy 5.4, developed in collaboration with Qualcomm Technologies. This module simplifies the implementation of wireless connectivity in systems utilizing STM32 microcontrollers, reflecting the successful realization of the partnership…
#Bluetooth 5.4 module#electronic components news#Electronic components supplier#Electronic parts supplier#IoT connectivity#PSA Certified Level 1#Qualcomm Technologies#STM32 microcontrollers#STMicroelectronics#Wi-Fi 6 module
0 notes
Text
Bluetooth modules, proprietary RF modules, Radio frequency modulator
DA14531MOD Series 3.6 V -93 dBm Sensitivity Surface Mount Bluetooth LE Module
0 notes
Text
BLED112 Bluetooth Modules seller & distributer in USA
We are the top BLED112 Bluetooth Modules - 802.15.1 seller and distributer in USA, India, UK, Australia and other countries. BLED112 Bluetooth Modules - 802.15.1 is manufacturer from Silicon Labs. X-ON Electronics Components provide you the cheapest electronic Bluetooth Modules - 802.15.1 in USA. The BLED112 is a USB Bluetooth Smart (Bluetooth Low Energy) dongle from Silicon Labs. It provides a quick and easy way to add Bluetooth Smart capability to devices with USB ports. This module is widely used for applications like wireless communication, data transfer, and remote control in various industries, including consumer electronics, medical devices, and industrial automation. Contact on +6189358 9358
#BLED112 Bluetooth Modules seller in USA#BLED112 Bluetooth Modules distributer in India#BLED112 Bluetooth Modules seller & distributer#BLED112 Bluetooth Modules seller & distributer in Australia
0 notes
Text
2.4GHz High-Performance Bluetooth Module: Effortlessly Handles Many-to-Many Communication with Flexible Operating Modes
The operating modes of Bluetooth modules encompass two technologies: Classic Bluetooth (BR/EDR) and Bluetooth Low Energy (BLE). Each technology has various operating modes, such as master mode, slave mode, master-slave mode, and advertising mode. Among these, master mode and slave mode are the two fundamental roles that devices play in Bluetooth communication, defining their behavior and responsibilities in the connection and data transmission process.
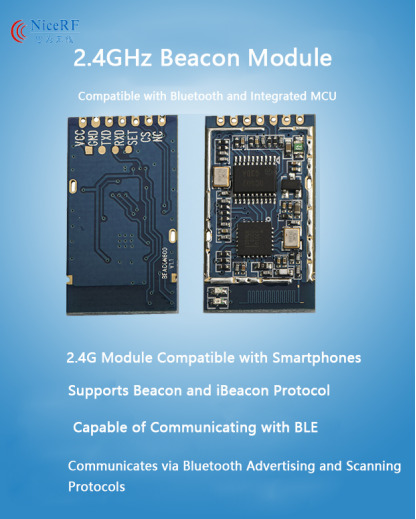
Beacon600 is the latest 2.4GHz beacon module which is compatible with BLE. This module integrates the MCU and process the SPI protocol. It provides generic UART interface, users can connect the module with smart phone with BLE. This module has the same structure of BLE, and works as Broadcast mode of Bluetooth. It is easier and cost-effective compare with Bluetooth.
Master Mode
Initiating Connections: The master device is responsible for scanning nearby Bluetooth devices and actively initiating pairing and connection requests.
Controlling the Connection: Once the connection is established, the master device controls the connection parameters, such as the connection interval and the start and stop of data transmission.
Multiple Device Connections: A master device can theoretically connect to multiple slave devices simultaneously.
Slave Mode
Passive Connection Reception: The slave device cannot initiate connection requests. Instead, it waits to be discovered and connected by the master device.
Responding to Connections: Upon receiving a connection request from the master device, the slave device responds and establishes the connection.
Data Interaction: Once the connection is established, the slave device can exchange data with the master device, although the communication parameters are primarily controlled by the master.
Dependence on Master Clock: During communication, the slave device's clock is synchronized with the master's clock, ensuring synchronous data transmission between both devices.
In some cases, devices support a master-slave mode, allowing them to switch between master and slave roles to adapt to different application scenarios or take on different communication responsibilities as needed. This flexibility enhances the applicability and functionality of Bluetooth devices, particularly in IoT and wearable device scenarios.
Master-Slave Mode
Bluetooth modules can switch between the roles of master and slave as needed. This means the same Bluetooth module can act like a master device, scanning for and connecting to other slave devices, controlling the data transmission process, and can also switch to the slave role, waiting to be discovered and connected by other master devices.
This mode significantly enhances the flexibility and versatility of Bluetooth devices in various application scenarios. For instance, in IoT devices, one device might need to act as a central node collecting data at certain times, while also being able to function as a terminal device reporting data to another central node.
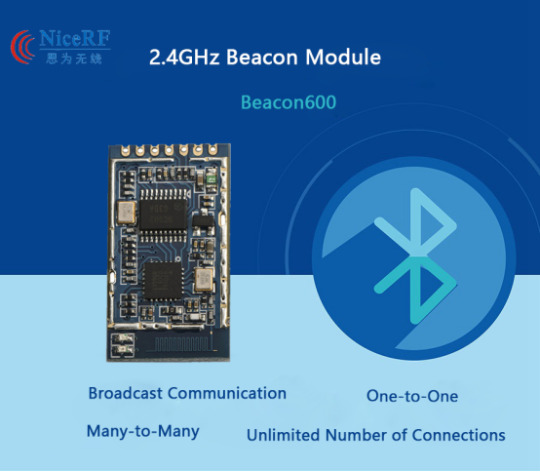
Broadcast Communication Mode
One-to-One Communication
In one-to-one communication, Bluetooth devices establish a dedicated connection. This connection ensures reliable data transmission, and in point-to-point communication, Bluetooth's transfer speed and stability are guaranteed.
Many-to-Many Communication
The Bluetooth module integrates an MCU internally and communicates through Bluetooth broadcasting and scanning protocols. It supports transparent UART transmission and has no limits on the number of connections, which is particularly evident in BLE.
Broadcast Mode
Broadcast mode refers to the Bluetooth module periodically sending data packets (advertisement packets) in a non-connected manner. These packets can be received by any device within range and in listening mode. In broadcast mode, the Bluetooth module does not establish one-to-one connections but instead uses a one-to-many approach to broadcast information to all interested receivers.
Beacon600 Bluetooth module is low power, cost-effective, and powerful, suitable for a variety of wireless communication applications. It offers flexible parameter configuration and efficient data transmission capabilities.
For details, please click:https://www.nicerf.com/products/ Or click:https://nicerf.en.alibaba.com/productlist.html?spm=a2700.shop_index.88.4.1fec2b006JKUsd For consultation, please contact NiceRF (Email: [email protected]).
0 notes
Text
Wie installiere ich ein Android-Autoradio?

Träumen Sie davon, Ihr Auto mit einem hochmodernen Autoradio zu modernisieren? Die Installation eines Android-Autoradios ist die ideale Lösung, um Ihrem Armaturenbrett ein neues Gesicht zu verleihen, von der integrierten GPS-Navigation zu profitieren und einfach auf Ihre Lieblingsanwendungen zuzugreifen.
In dieser Anleitung erklären wir Schritt für Schritt, wie Sie ein Android-Autoradio in Ihr Fahrzeug einbauen, auch wenn Sie kein Mechaniker-Experte sind!
Warum ein Android-Autoradio wählen?
Ein Android-Autoradio ist viel mehr als nur ein Musikplayer: Es verwandelt Ihr Auto in einen vernetzten und intelligenten Raum. Dank der erweiterten Konnektivität können Sie Ihr Smartphone synchronisieren, um Ihre Lieblingsanwendungen zu genießen, sei es Musik hören, mit Google Maps navigieren oder freihändig telefonieren.
Im Gegensatz zu herkömmlichen Autoradios, die oft auf UKW/MW-Radio und einen CD-Player beschränkt sind, bietet ein Android-Autoradio umfassende App-Kompatibilität und erfüllt damit die Bedürfnisse moderner Autofahrer.
Wenn Sie auf der Suche nach einem Hochleistungsmodell sind, das an Ihr Fahrzeug angepasst ist, entdecken Sie die auf Elect-Road.fr angebotenen Optionen, wo Qualität und Innovation aufeinandertreffen. Lesen Sie auch: „Wie kann ich ein Android-Autoradio anschließen und verdrahten?».
Wenn es um Sicherheit geht, erleichtert dieses Gerät das Fahren durch die Integration von Freisprechfunktionen und reduziert so Ablenkungen. Darüber hinaus ist die Android-Autoradio-Installation für jedermann zugänglich und verbessert das Benutzererlebnis, indem sie Fahrten angenehmer und interaktiver macht.
Durch die Wahl eines Android-Autoradios gewinnen Sie Komfort und Sicherheit und profitieren gleichzeitig von einem anpassbaren und skalierbaren Multimediasystem.
Android-Autoradio-Installation
Vorbereitung vor der Installation
Bevor mit der Installation des Android-Autoradios begonnen wird, ist eine gute Vorbereitung unerlässlich, um Komplikationen zu vermeiden. Überprüfen Sie die Kompatibilität zwischen dem Autoradio und Ihrem Fahrzeug, besorgen Sie sich die notwendigen Werkzeuge und lesen Sie die Bedienungsanleitung sorgfältig durch.
Das Befolgen dieser Schritte gewährleistet eine sichere Installation und optimiert die Leistung Ihrer neuen Ausrüstung.
Kompatibilität prüfen
Bevor Sie mit der Installation des Android-Autoradios fortfahren, müssen Sie unbedingt die Kompatibilität des Geräts mit Ihrem Fahrzeug prüfen. Jedes Auto hat unterschiedliche Abmessungen und Spezifikationen für die Platzierung des Autoradios, und nicht alle Android-Modelle passen in die gleichen Formate.
Ermitteln Sie die Art des Rahmens und den verfügbaren Platz, um sicherzustellen, dass das von Ihnen gewählte Autoradio perfekt passt. Überprüfen Sie außerdem die Anschlüsse (Stromversorgung, Antenne usw.), um Verbindungsprobleme zu vermeiden. Gesicherte Kompatibilität erleichtert die Installation und garantiert ein optimales Benutzererlebnis.
Für die Installation benötigte Werkzeuge
Um das Android-Autoradio erfolgreich zu installieren, ist es wichtig, über die richtigen Werkzeuge zu verfügen. Um das alte Autoradio auszubauen und das neue Modell anzubringen, benötigen Sie vor allem einen Schraubenzieher.
Um eine solide und funktionsfähige Verbindung zu gewährleisten, sind geeignete Anschlüsse, insbesondere für Strom, Audio und Antenne, unerlässlich. Erwägen Sie auch zusätzliche Kabel, insbesondere für die USB-, Rückfahrkamera- oder GPS-Funktionen.
Ein speziell auf Ihr Fahrzeug zugeschnittenes Adaptionsset kann ebenfalls hilfreich sein. Wenn Sie diese Werkzeuge zur Hand haben, ist eine saubere und problemlose Installation gewährleistet.
Sicherheitsempfehlungen
Bei der Installation eines Android-Autoradios ist Sicherheit unerlässlich, um jegliche Verletzungsgefahr oder Schäden am Fahrzeug zu vermeiden. Bevor Sie beginnen, trennen Sie immer die Batterie Ihres Autos, um Kurzschlüsse zu vermeiden und elektronische Komponenten zu schützen.
Daher empfiehlt es sich, Handschuhe zu tragen, um die Hände vor Metallkanten oder heißen Teilen im Inneren des Armaturenbretts zu schützen. Stellen Sie sicher, dass Sie in einer gut beleuchteten und stabilen Umgebung arbeiten und vermeiden Sie es, Gewalt auf die Komponenten auszuüben, um diese nicht zu beschädigen.
Wenn Sie diese Empfehlungen befolgen, können Sie die Installation sicher durchführen.
Lesen Sie die Bedienungsanleitung des Autoradios und bereiten Sie die Kabel vor
Bevor Sie mit der Installation des Android-Autoradios beginnen, lesen Sie unbedingt die dem Gerät beiliegende Bedienungsanleitung sorgfältig durch. Dieses Dokument führt Sie durch den Installationsprozess und erklärt Ihnen die genauen Schritte und Vorsichtsmaßnahmen, die Sie ergreifen müssen.
Bereiten Sie gleichzeitig alle erforderlichen Kabel vor, einschließlich der Kabel für Strom, Audio und GPS. Stellen Sie sicher, dass sie zu Ihrem Fahrzeug passen und in gutem Zustand sind. Eine sorgfältige Vorbereitung der Kabel und das Verstehen der Anweisungen erleichtern die Installation, vermeiden Fehler und gewährleisten einen optimalen Betrieb Ihres Android-Autoradios nach der Montage.
Schritte zur Installation eines Android-Autoradios
Die Installation eines Android-Autoradios erfolgt in mehreren wichtigen Schritten. Sie müssen zuerst das alte Autoradio ausbauen und dann den Standort für das neue Modell vorbereiten. Als nächstes schließen Sie das Android-Autoradio an die entsprechenden Kabel an, bevor Sie es sicher befestigen. Abschließend finalisieren Sie die Einstellungen, um die ordnungsgemäße Funktion sicherzustellen.
Schritt 1: Entfernen Sie das alte Autoradio
Der erste Schritt bei der Installation eines Android-Autoradios besteht darin, das alte Autoradio zu entfernen. Um elektrische Risiken zu vermeiden, klemmen Sie zunächst die Autobatterie ab. Abhängig vom Modell Ihres Fahrzeugs kann das Autoradio mit Schrauben oder Clips befestigt werden.
Entfernen Sie die sichtbaren Schrauben mit einem geeigneten Schraubendreher und setzen Sie dann ein Entriegelungswerkzeug ein, um die Klammern zu entfernen, mit denen das Gerät befestigt ist.
Sobald das Autoradio entfernt wurde, trennen Sie die elektrischen Kabel und Anschlüsse (Stromversorgung, Antenne usw.). Achten Sie darauf, die Kabel nicht zu beschädigen, da Sie diese zum Anschluss des neuen Autoradios benötigen.
Beachten Sie ggf. die Reihenfolge der Anschlüsse, um das Anschließen des neuen Geräts zu erleichtern. Dieser Ausbau muss sorgfältig durchgeführt werden, um eine saubere Installation zu gewährleisten und Schäden an der Innenseite Ihres Armaturenbretts zu vermeiden.
Schritt 2: Bereiten Sie den Standort vor
Der nächste Schritt bei der Installation des Android-Autoradios besteht darin, den Standort vorzubereiten, an dem das neue Gerät angeschlossen werden soll. Reinigen Sie zunächst sorgfältig den Bereich um den Standort herum und entfernen Sie Staub und Schmutz, der die Installation beeinträchtigen könnte.
Überprüfen Sie dann den Zustand der übrigen Kabel, einschließlich derjenigen für Strom, Audio und Antenne, um sicherzustellen, dass sie in gutem Zustand sind und zum erneuten Anschließen bereit sind. Wenn Sie über ein Anpassungspaket verfügen, ist es jetzt an der Zeit, es vorzubereiten.
Der Adapterkabelbaum verbindet die Kabel Ihres Autos mit den Anschlüssen des CarPlay Android Auto-Radios und sorgt so für eine saubere und funktionale Installation.
Stellen Sie sicher, dass die Kabel lang genug sind, um die Anschlüsse am Autoradio zu erreichen, und dass sie gut isoliert sind, um Kurzschlüsse zu vermeiden. Durch diese sorgfältige Vorbereitung können Sie problemlos mit dem nächsten Schritt der Installation fortfahren.
Schritt 3: Android-Autoradio anschließen
Der nächste Schritt bei der Installation des Android-Autoradios besteht darin, die verschiedenen Kabel anzuschließen, die für die ordnungsgemäße Funktion des Geräts erforderlich sind. Wenn Sie ein VW Golf 6 CarPlay-Autoradio besitzen, ist der Vorgang ähnlich, die Anschlussschritte sind jedoch an dieses Modell angepasst.
Stecken Sie zunächst das Stromkabel des Autoradios in die entsprechende Steckdose Ihres Fahrzeugs. Dieses Kabel versorgt das Gerät mit Strom. Schließen Sie anschließend die Audiokabel an, um eine optimale Klangqualität zu gewährleisten. Stellen Sie dabei sicher, dass sie korrekt an die Audioausgänge des Autoradios und die Audiosysteme des Autos angeschlossen sind.
Vergessen Sie nicht, die Antenne für den Radioempfang anzuschließen. Wenn Ihr Android-Autoradio über zusätzliche Funktionen wie GPS, USB oder Rückfahrkamera verfügt, stellen Sie sicher, dass Sie diese Geräte an die entsprechenden Eingänge anschließen. Für diese Verbindungen sind möglicherweise spezielle, mit dem Autoradio gelieferte Kabel oder zusätzliche Adapter erforderlich.
Sobald alle Kabel ordnungsgemäß angeschlossen sind, können Sie das Autoradio an seinem Platz befestigen und seine Funktionalität testen.
Schritt zur Installation des Android-Autoradios
Schritt 4: Befestigen Sie das Autoradio und schließen Sie die Einstellungen ab
Der letzte Schritt bei der Installation eines Android-Autoradios besteht darin, das Gerät sicher an seinem Standort zu befestigen. Sobald alle Kabel ordnungsgemäß angeschlossen sind, setzen Sie das Autoradio in das Armaturenbrett ein und passen es so an, dass es genau an der vorgesehenen Stelle sitzt. Überprüfen Sie, ob das Gerät richtig ausgerichtet ist und andere Elemente des Armaturenbretts nicht behindert.
Befestigen Sie anschließend das Autoradio mit den mitgelieferten Schrauben und Klammern oder verwenden Sie die Schrauben und Klammern des alten Autoradios wieder. Es ist wichtig, die Schrauben sicher und ohne Gewalt anzuziehen, um eine Beschädigung des Kunststoffs oder der internen Komponenten zu vermeiden.
Nehmen Sie nach der Installation des Geräts erste Einstellungen vor, z. B. Sprache, Uhrzeit und WLAN- oder Bluetooth-Verbindung. Dadurch wird sichergestellt, dass das Autoradio vor der nächsten Fahrt ordnungsgemäß funktioniert. Damit ist Ihre Android-Autoradio-Installation abgeschlossen und bereit für ein verbessertes Fahrerlebnis.
Einstellungen und Tests nach der Installation
Nach der Installation des Android-Autoradios müssen unbedingt die Hauptfunktionen wie Radio, GPS und Bluetooth konfiguriert werden.
Führen Sie außerdem Audiotests durch und überprüfen Sie die Bluetooth-, WLAN- und USB-Konnektivität, um sicherzustellen, dass alles ordnungsgemäß funktioniert. Wenn es ein Problem gibt, beheben Sie alle Störungen, z. B. keinen Ton oder fehlerhaftes GPS.
Wesentliche Funktionen einrichten
Sobald die Installation des Android-Autoradios abgeschlossen ist, ist es wichtig, die wesentlichen Funktionen zu konfigurieren, um das Benutzererlebnis zu maximieren.
Wenn Sie in Ihrem Dacia Sandero ein CarPlay-Autoradio verbaut haben, bleiben die Konfigurationsschritte ähnlich, Sie profitieren aber zusätzlich von den Vorteilen der Apple-Oberfläche für eine intuitivere Navigation und reibungslose Integration Ihrer Anwendungen. Stellen Sie zunächst das Radio ein, indem Sie nach verfügbaren Sendern suchen und Ihre Favoriten speichern.
Stellen Sie bei GPS sicher, dass die Navigations-App ordnungsgemäß funktioniert, indem Sie die Route einrichten und Sprachwarnungen aktivieren. Um Freisprechen und Musik-Streaming zu ermöglichen, muss eine Bluetooth-Verbindung mit Ihrem Telefon hergestellt werden.
Nehmen Sie sich die Zeit, jede dieser Funktionen zu testen, um eine optimale und einwandfreie Funktion Ihres Android-Autoradios sicherzustellen.
Audiotests und Konnektivitätsüberprüfung
Nach der Installation des Android-Autoradios ist es unbedingt erforderlich, die Audiofunktionen zu testen und die Konnektivität zu überprüfen. Testen Sie zunächst den Klang, indem Sie die Lautstärke und Audioqualität über die Lautsprecher Ihres Autos anpassen.
Überprüfen Sie dann die Bluetooth-Konnektivität, indem Sie Ihr Telefon oder ein anderes Gerät koppeln, um eine stabile und klare Verbindung für Anrufe und Musik sicherzustellen. Testen Sie außerdem die WLAN-Verbindung, ob Ihr Autoradio das Internet unterstützt, und stellen Sie sicher, dass es Ihr Netzwerk korrekt empfangen kann.
Schließen Sie abschließend ein USB-Gerät an, um zu überprüfen, ob das Autoradio Ihre Audio- oder Videodateien erkennt und abspielt. Diese Tests stellen sicher, dass alle Funktionen des Android-Autoradios ordnungsgemäß funktionieren. Behebung häufiger Probleme: kein Ton, GPS-Problem usw.
Bei der Installation des Android-Autoradios können bestimmte Probleme auftreten, wie zum Beispiel kein Ton oder eine GPS-Störung. Wenn kein Ton zu hören ist, überprüfen Sie zunächst die Audiokabel und die Verstärkung und stellen Sie dann sicher, dass die Lautstärke nicht stummgeschaltet ist.
Überprüfen Sie bei einem GPS-Gerät, das nicht funktioniert, die Anschlüsse des GPS-Moduls und stellen Sie sicher, dass es einen guten Empfang hat. Wenn das Problem weiterhin besteht, kann das Problem möglicherweise durch einen Neustart des Autoradios oder ein Update der Software behoben werden.
In einigen Fällen kann es erforderlich sein, das Gerät auf die Werkseinstellungen zurückzusetzen, um anhaltende Fehler zu beheben.
Anwendungstipps, um das Erlebnis zu maximieren
Um das Erlebnis nach der Installation des Android-Autoradios zu maximieren, ist es wichtig, die verfügbaren Anwendungen zu nutzen.
Anwendungen wie Spotify für Musik, Waze für Echtzeitnavigation oder sogar Google Maps für traditionellere Fahrten können Ihr Autoradio in ein echtes Multimedia-Center verwandeln. Laden Sie diese Apps unbedingt aus dem Google Play Store herunter, um eine reibungslose Nutzung zu gewährleisten.
Auch die Wartung des Autoradios ist wichtig, um seine langfristige Funktionsfähigkeit sicherzustellen. Denken Sie daran, die Android-Autoradio-Software regelmäßig zu aktualisieren, um von den neuesten Funktionen und Fehlerbehebungen zu profitieren. Diese Updates erfolgen häufig automatisch, es empfiehlt sich jedoch, sie von Zeit zu Zeit manuell zu überprüfen.
Stellen Sie sicher, dass der Bildschirm für die Anzeige wichtiger Informationen konfiguriert ist. Dies ermöglicht eine sichere und optimale Nutzung, ohne den Fahrer abzulenken. Verwenden Sie Sprachbefehle, um das Berühren des Bildschirms während der Fahrt zu vermeiden, und aktivieren Sie Bluetooth für Freisprechanrufe.
Diese Tipps ergänzen Ihre Android-Autoradio-Installation perfekt und sorgen für ein angenehmeres und sicheres Fahrerlebnis.
0 notes
Text
https://www.futureelectronics.com/p/semiconductors--wireless-rf--rf-modules-solutions--bluetooth/453-00046c-ezurio-7132917
Bluetooth module, GPS module RF Bluetooth serial radiofrequency, RFID modules,
Laird Module Sterling LWB5+ MHF4 Cut Tape
#Ezurio#453-00046C#Wireless & RF#RF Modules & Solutions#Bluetooth#GPS module RF Bluetooth serial radiofrequency#RFID modules#programmable RF modules#RF Solutions Wireless#Wi-Fi Bluetooth#flexible wireless technology#accelerate wireless development
1 note
·
View note
Text
#Buy Wireless Module Online#WiFi Module#Wi-Fi IoT Solutions#WiFi Module Receiver#WiFi Module price#Wi-Fi and Bluetooth modules#RF Module#IoT Module#Modules in telecom#rf modules in india#telecom modules#SIMCom modules#Modules distributors#Modules distributors in india#5G modules#LPWA modules
1 note
·
View note
Text
BLE Module BLE5101 Support Master-Slave Coexistence & BLE 5.1 Protocol https://www.nicerf.com/ble-module/
BLE5101 is a BLE module based on BLE 5.1 Protocol, coexistence of master and slave roles, small size, low power consumption, and the working signal frequency band is 2.4GHz. The BLE5101 module is developed by Shenzhen NiceRF Wireless Technology Co., Ltd. The module supports the coexistence of master and slave roles, can connect to the master and slave at the same time, and can flexibly set the number of master and slave connections, and can support up to 20 connections.
0 notes