#BLE module
Explore tagged Tumblr posts
Visit Tumblr Blog
Explore Tumblr blogs with no restrictions, modern design and the best experience.
Last Seen Tumblr Blogs


Fun Fact
China blocked Tumblr because of pornography and censorship problems in 2013.
Text
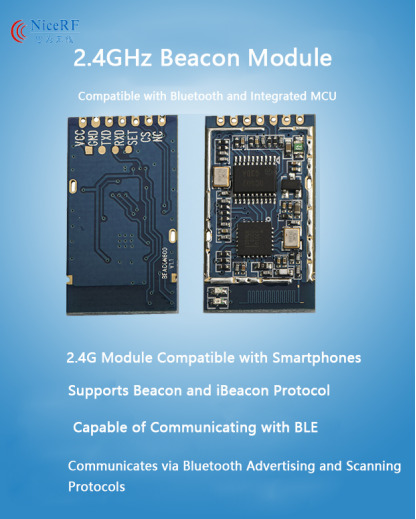
2.4GHz High-Performance Bluetooth Module: Effortlessly Handles Many-to-Many Communication with Flexible Operating Modes
The operating modes of Bluetooth modules encompass two technologies: Classic Bluetooth (BR/EDR) and Bluetooth Low Energy (BLE). Each technology has various operating modes, such as master mode, slave mode, master-slave mode, and advertising mode. Among these, master mode and slave mode are the two fundamental roles that devices play in Bluetooth communication, defining their behavior and responsibilities in the connection and data transmission process.
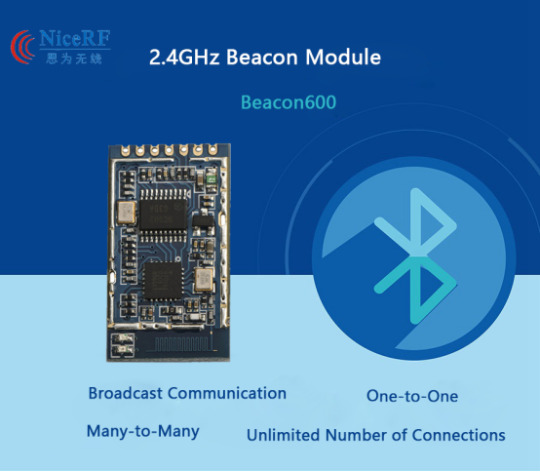
Beacon600 is the latest 2.4GHz beacon module which is compatible with BLE. This module integrates the MCU and process the SPI protocol. It provides generic UART interface, users can connect the module with smart phone with BLE. This module has the same structure of BLE, and works as Broadcast mode of Bluetooth. It is easier and cost-effective compare with Bluetooth.
Master Mode
Initiating Connections: The master device is responsible for scanning nearby Bluetooth devices and actively initiating pairing and connection requests.
Controlling the Connection: Once the connection is established, the master device controls the connection parameters, such as the connection interval and the start and stop of data transmission.
Multiple Device Connections: A master device can theoretically connect to multiple slave devices simultaneously.
Slave Mode
Passive Connection Reception: The slave device cannot initiate connection requests. Instead, it waits to be discovered and connected by the master device.
Responding to Connections: Upon receiving a connection request from the master device, the slave device responds and establishes the connection.
Data Interaction: Once the connection is established, the slave device can exchange data with the master device, although the communication parameters are primarily controlled by the master.
Dependence on Master Clock: During communication, the slave device's clock is synchronized with the master's clock, ensuring synchronous data transmission between both devices.
In some cases, devices support a master-slave mode, allowing them to switch between master and slave roles to adapt to different application scenarios or take on different communication responsibilities as needed. This flexibility enhances the applicability and functionality of Bluetooth devices, particularly in IoT and wearable device scenarios.
Master-Slave Mode
Bluetooth modules can switch between the roles of master and slave as needed. This means the same Bluetooth module can act like a master device, scanning for and connecting to other slave devices, controlling the data transmission process, and can also switch to the slave role, waiting to be discovered and connected by other master devices.
This mode significantly enhances the flexibility and versatility of Bluetooth devices in various application scenarios. For instance, in IoT devices, one device might need to act as a central node collecting data at certain times, while also being able to function as a terminal device reporting data to another central node.
Broadcast Communication Mode
One-to-One Communication
In one-to-one communication, Bluetooth devices establish a dedicated connection. This connection ensures reliable data transmission, and in point-to-point communication, Bluetooth's transfer speed and stability are guaranteed.
Many-to-Many Communication
The Bluetooth module integrates an MCU internally and communicates through Bluetooth broadcasting and scanning protocols. It supports transparent UART transmission and has no limits on the number of connections, which is particularly evident in BLE.
Broadcast Mode
Broadcast mode refers to the Bluetooth module periodically sending data packets (advertisement packets) in a non-connected manner. These packets can be received by any device within range and in listening mode. In broadcast mode, the Bluetooth module does not establish one-to-one connections but instead uses a one-to-many approach to broadcast information to all interested receivers.
Beacon600 Bluetooth module is low power, cost-effective, and powerful, suitable for a variety of wireless communication applications. It offers flexible parameter configuration and efficient data transmission capabilities.
For details, please click:https://www.nicerf.com/products/ Or click:https://nicerf.en.alibaba.com/productlist.html?spm=a2700.shop_index.88.4.1fec2b006JKUsd For consultation, please contact NiceRF (Email: [email protected]).
0 notes
Text
Introduction to BLE Modules
Looking for a high-performance Bluetooth low energy module? Campus Component brings you a curated collection of BLE modules designed for energy-efficient wireless communication. Ideal for medical devices, fitness trackers, smart homes, and industrial controls, each Bluetooth low energy module is tested for reliability and ease of integration.
0 notes
Text
RN42 Bluetooth Module: A Comprehensive Guide
The RN42 Bluetooth module was developed by Microchip Technology. It’s designed to provide Bluetooth connectivity to devices and is commonly used in various applications, including wireless communication between devices.
Features Of RN42 Bluetooth Module
The RN42 Bluetooth module comes with several key features that make it suitable for various wireless communication applications. Here are the key features of the RN42 module:
Bluetooth Version:
The RN42 module is based on Bluetooth version 2.1 + EDR (Enhanced Data Rate).
Profiles:
Supports a range of Bluetooth profiles including Serial Port Profile (SPP), Human Interface Device (HID), Audio Gateway (AG), and others. The availability of profiles makes it versatile for different types of applications.
Frequency Range:
Operates in the 2.4 GHz ISM (Industrial, Scientific, and Medical) band, the standard frequency range for Bluetooth communication.
Data Rates:
Offers data rates of up to 3 Mbps, providing a balance between speed and power consumption.
Power Supply Voltage:
Operates with a power supply voltage in the range of 3.3V to 6V, making it compatible with a variety of power sources.
Low Power Consumption:
Designed for low power consumption, making it suitable for battery-powered applications and energy-efficient designs.
Antenna Options:
Provides options for both internal and external antennas, offering flexibility in design based on the specific requirements of the application.
Interface:
Utilizes a UART (Universal Asynchronous Receiver-Transmitter) interface for serial communication, facilitating easy integration with microcontrollers and other embedded systems.
Security Features:
Implements authentication and encryption mechanisms to ensure secure wireless communication.
Read More: RN42 Bluetooth Module
#rn42-bluetooth-module#bluetooth-module#rn42#bluetooth-low-energy#ble#microcontroller#arduino#raspberry-pi#embedded-systems#IoT#internet-of-things#wireless-communication#data-transmission#sensor-networking#wearable-technology#mobile-devices#smart-homes#industrial-automation#healthcare#automotive#aerospace#telecommunications#networking#security#software-development#hardware-engineering#electronics#electrical-engineering#computer-science#engineering
0 notes
Text
bro i fucking hate c++ what do you mean i cant declare an array of a cosmic mishmash of any random variable type of unknown size, and then query whats in it by doing if item in list style statement. what do you mean compiled languages are fundamentally different to interpreted languages. what Do You MEAN
#.txt#can you tell i use python for basically everything#but bro i would use it for this (seeed wio terminal) except that the wifi and ble module isnt compatible lol#i love how its advertised as compatible with micro/circuit py and then when u wanna use wifi or ble its like lol sike#so here i am. digging my way thru cpp code that looks like my own personal hell#im being really brave about it though
0 notes
Text
This is basically the current main board but with an e-ink display, I agree with the author of the article that this board would probably be very good for messaging even outside. So I'm thinking about input method possibilities for our current board that we could potentially apply to this later on to make it so you could have a handheld PierMesh e2ee (the e2ee might take some futzing around/soldering a coprocessor) messaging device without a phone or anything else.
4 notes
·
View notes
Text
OOOh, some hot new chips just dropped into our mailbox - ESP32-P4! 🔥🚀
Espressif's latest chip has a snazzy eval board, and we just snagged a couple for CircuitPython development. The P4 is a RISC V dual core 400MHz processor with CSI/DSI support, USB HS, and Ethernet too. This chip doesn't have BLE or WiFi like all the other ESP chips. Instead, it uses a low-cost ESP32-C5 module as a wireless co-processor. The eval board is sorta shaped like a Raspberry Pi and has various A/V connections. We also got 100 sample chips of the 16MB in-package PSRAM variety, so we can start designing our first board. Shall we do a Feather? a Metro? maybe a Pi Zero-shaped thingy?
#espressif#esp32#ESP32P4#espfriends#adafruit#greetz#circuitpython#hardwaredesign#microcontroller#techinnovation#riscv#developmentboard#diyelectronics#opensourcehardware#embeddedsoftware#chipdesign
3 notes
·
View notes
Text
Selection Guide for Mainstream Bluetooth Module Chips for Lithium Battery BMS Protection Boards — Focusing on the KT6368A Dual-Mode Chip

1. Types of BMS Protection Board Products
Currently, many manufacturers produce BMS (Battery Management System) protection boards for lithium batteries, but only a few excel in quality. Insights from repair engineers on platforms like Bilibili provide authentic perspectives. Based on my observations, BMS protection boards generally fall into two categories:
Type 1: Integrated Battery & BMS Systems
Manufacturers combine lithium battery packs and BMS into a single product (e.g., for two-wheel or three-wheel electric vehicles).
Mass-produced and sold as finished battery products or battery boxes.
Type 2: Modular Battery Packs with External BMS
Sellers provide battery packs without built-in BMS (often lacking R&D capabilities or targeting repair shops/hobbyists).
Buyers pair these with external BMS boards and sell assembled battery systems to niche markets.
Key Takeaways:
Standard, high-volume applications typically develop proprietary BMS boards (rarely include Bluetooth).
Low-volume, fragmented markets often use externally sourced BMS boards (Bluetooth is a common feature).
Why Bluetooth Integration Matters:
Enables mobile app interaction for parameter monitoring/configuration.
Enhances user experience, reduces after-sales costs, and increases customer satisfaction.
This analysis aligns product development with customer needs and supports a SWOT evaluation of the KT6368A dual-mode Bluetooth chip. Understanding demand can reveal untapped product potential.
Typical BMS Protection Board Requirements:
Market prefers dual-mode chips for backward compatibility.
Consumers favor WeChat Mini Programs for ease of use.
Supported battery types: Ternary Lithium, LiFePO4 (LFP).
Balancing method: Active balancing.
2. Sample Bluetooth-Enabled BMS Boards Collected Online
1.JDY-33-V1.6 – Bluetooth SPP transparent transmission module (datasheet available).
2. D32 Dual-Mode Bluetooth Module – Supports UART transparent transmission, SPP 3.0 + BLE 4.2, HC-05/06 compatibility.
Feiyitong-based Module (likely high-cost, from an official site).
DX-BT24 Module – Another variant in use.
3. Conclusion
The KT6368A dual-mode Bluetooth chip offers distinct advantages for BMS lithium battery applications:
Compact size & cost-effectiveness make it a top contender.
SOP8 package simplifies integration.
Enables flexible module designs, reducing costs for manufacturers.
By adopting the KT6368A, companies can optimize BMS board designs while maintaining compatibility and affordability.
0 notes
Text
How Do Power, Motor & Robotics Development Tools Drive Innovation in Automation?

Introduction to Modern Development Ecosystems
As the era of intelligent machines, automation, and smart manufacturing continues to advance, Power, Motor & Robotics Development Tools have emerged as essential components in transforming ideas into functioning prototypes and commercial solutions. These tools serve as the backbone for developing precise and reliable control systems used in a wide variety of sectors—from industrial robotics to electric mobility.
With the increasing integration of microcontrollers, sensors, thermal management components, and electronic controllers, development tools offer a modular and practical approach to building sophisticated electronic and electromechanical systems.
What Are Power, Motor & Robotics Development Tools?
Power, Motor & Robotics Development Tools consist of hardware kits, interface boards, and control modules designed to help developers and engineers test, prototype, and deploy automated systems with precision and speed. These tools make it possible to manage current, voltage, mechanical motion, and real-time decision-making in a structured and scalable manner.
By combining essential components such as capacitors, fuses, grips, cables, connectors, and switches, these kits simplify complex engineering challenges, allowing smooth integration with controllers, microprocessors, and sensors.
Exploring the Primary Toolsets in the Field
Power Management Development Tools
Efficient energy management is crucial for ensuring stability and performance in any robotic or motor-driven system.
Development boards supporting AC/DC and DC/DC conversion
Voltage regulators and surge protection circuits for safe energy flow
Thermal sensors and oils to maintain system temperature
Battery management ICs to control charge-discharge cycles
High-efficiency transformers and current monitors
Motor Control Development Tools
Motor control kits are built to manage torque, direction, and speed across a range of motor types.
H-bridge motor drivers for bidirectional motor control
Stepper motor controllers with high-precision movement
Brushless DC motor driver modules with thermal protection
Feedback systems using encoders and optical sensors
PWM-based modules for real-time torque adjustment
Robotics Development Tools
Robotics kits merge both mechanical and electronic domains to simulate and deploy automation.
Preassembled robotic arm platforms with programmable joints
Sensor integration boards for object detection, motion sensing, and environmental monitoring
Wireless modules for IoT connectivity using BLE, Wi-Fi, or RF
Microcontroller development platforms for logic execution
Mounting hardware and cable grips for secure installations
Benefits of Using Professional Development Tools
Advanced development kits offer more than just experimentation—they serve as stepping stones to commercial production. These tools minimize development time and maximize productivity.
Enhance system performance with modular plug-and-play designs
Enable easy integration with laptops, diagnostic tools, and controllers
Reduce design errors through pre-tested circuitry and embedded protection
Facilitate rapid software and firmware updates with compatible microcontrollers
Support debugging with LED indicators, thermal pads, and status feedback
Key Applications Across Industries
The adaptability of Power, Motor & Robotics Development Tools makes them suitable for countless industries and applications where intelligent movement and power efficiency are essential.
Industrial robotics and pick-and-place systems for manufacturing automation
Smart agriculture solutions including automated irrigation and drone control
Automotive design for electric vehicle propulsion and battery systems
Aerospace applications for lightweight, compact control mechanisms
Educational platforms promoting STEM learning with hands-on robotics kits
Essential Components that Enhance Development Kits
While the kits come equipped with core tools, several other components are often required to expand capabilities or tailor the kits to specific use cases.
Sensors: From temperature and light to current and magnetic field detection
Connectors and plugs: For flexible integration of external modules
Switches and contactors: For manual or automatic control
Thermal pads and heatsinks: For preventing overheating during operation
Fuses and circuit protection devices: For safeguarding sensitive electronics
LED displays and character LCD modules: For real-time data visualization
How to Choose the Right Tool for Your Project
With a vast array of kits and tools on the market, selecting the right one depends on your application and environment.
Identify whether your project focuses more on power management, motor control, or full robotic systems
Consider compatibility with popular development environments such as Arduino, STM32, or Raspberry Pi
Check the current and voltage ratings to match your load and motor specifications
Evaluate add-on support for wireless communication and real-time data processing
Ensure the tool includes comprehensive documentation and driver libraries for smooth integration
Why Development Tools Are Crucial for Innovation
At the heart of every advanced automation solution is a well-structured foundation built with accurate control and reliable hardware. Development tools help bridge the gap between conceptualization and realization, giving engineers and makers the freedom to innovate and iterate.
Encourage experimentation with minimal risk
Shorten product development cycles significantly
Simplify complex circuit designs through preconfigured modules
Offer scalability for both low-power and high-power applications
Future Scope and Emerging Trends
The future of development tools is headed toward more AI-integrated, real-time adaptive systems capable of learning and adjusting to their environment. Tools that support machine vision, edge computing, and predictive analytics are gaining traction.
AI-powered motion control for robotics
Integration with cloud platforms for remote diagnostics
Advanced motor drivers with feedback-based optimization
Miniaturized power modules for wearable and mobile robotics
Conclusion: Is It Time to Upgrade Your Engineering Toolkit?
If you're aiming to build smarter, faster, and more energy-efficient systems, Power, Motor & Robotics Development Tools are not optional—they’re essential. These kits support you from idea to implementation, offering the flexibility and performance needed in modern-day innovation.
Whether you're developing a prototype for a high-speed robotic arm or integrating power regulation into a smart grid solution, the right development tools empower you to transform challenges into achievements. Take the leap into next-gen automation and electronics by investing in the tools that make engineering smarter, safer, and more efficient.
#Power Motor & Robotics Development Tools#electronic components#technology#electricalparts#halltronics
0 notes
Text
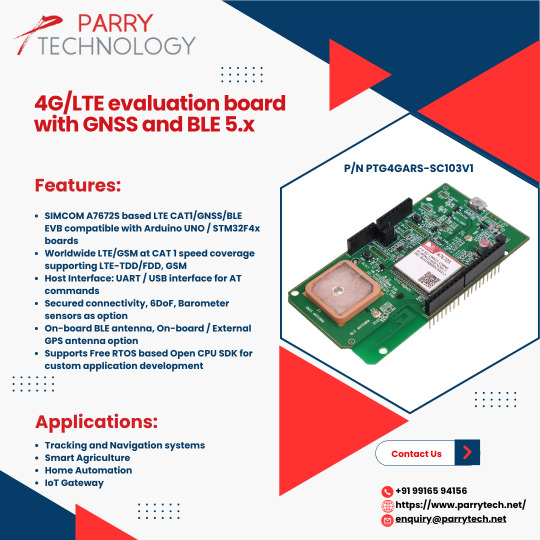
4G/LTE GNSS / BLE 5.0 Module
SIMCOM A7672S based LTE CAT1/GNSS/BLE modem compatible with Arduino
Host Interface: UART / USB interface for AT commands
Secured connectivity, 6DoF, Barometer sensors as option
On-board BLE antenna, On-board / External GPS antenna option
Operating voltage of 5V±10%
Operating temperature: -30°C to +70°C
Supports Free RTOS based Open CPU SDK for custom application development https://www.parrytech.net/4g-lte-modem/
0 notes
Text
BLE Module BLE5101 Support Master-Slave Coexistence & BLE 5.1 Protocol https://www.nicerf.com/ble-module/
BLE5101 is a BLE module based on BLE 5.1 Protocol, coexistence of master and slave roles, small size, low power consumption, and the working signal frequency band is 2.4GHz. The BLE5101 module is developed by Shenzhen NiceRF Wireless Technology Co., Ltd. The module supports the coexistence of master and slave roles, can connect to the master and slave at the same time, and can flexibly set the number of master and slave connections, and can support up to 20 connections.
0 notes
Text
WIRELESS MODULE with BLE and WiFi – ESP32-C3-DevKitM-1 The ESP32-C3-DevKitM-1 from Campus Component is a low-power, cost-effective solution for IoT developers. It combines WiFi and Bluetooth LE connectivity in a compact design. Featuring robust security features and efficient processing capabilities, this board is suitable for smart home devices, health monitors, and industrial IoT systems. It supports Espressif’s ESP-IDF framework.
0 notes
Text

ESP32 WROVER Kit, Compatible with Arduino IDE The starter kit is based on the development board from esp32 wrover. It integrates with bluetooth and wireless.A powerful dev board for IOT module project development.ESP32-WROVER series is developed by Espressif Systems, below is key features and applications are summarized: I. ESP32 Wrover Specifications - Chip Architecture - Dual-core SoC (ESP32-D0WD or D0WD-V3) with a clock speed of 80–240 MHz (dynamic frequency scaling)13 - 520 KB integrated SRAM, expandable via external SPI RAM/Flash1 - Built-in 4–16 MB SPI Flash and 8 MB SPI PSRAM (depending on model, e.g., WROVER-B/E)37 - Wireless Connectivity - 2.4 GHz Wi-Fi (802.11 b/g/n) with up to 150 Mbps throughput36 - Dual-mode Bluetooth: Classic (BT) and Low Energy (BLE)36 - Peripherals & Interfaces - SPI, I2C, UART, SDIO, Ethernet interfaces3 - Support for capacitive touch, Hall effect sensors, PWM outputs37 II. ESP32 Wrover Kit Development Environment & Tools - Programming Frameworks - Official ESP-IDF framework (FreeRTOS + LwIP stack), C/C++-based16 - Arduino IDE compatibility via ESP32 board manager28 - Optional Python/C hybrid development using Zerynth Studio5 - Hardware Debugging Tips - Use 5V power for camera modules (3.3V may cause image instability)2 - Adjust SPI pin definitions (e.g., SCK=14, MISO=12) based on hardware layout4 III. ESP32 Devkit Typical Applications - IoT Devices - Sensor networks, smart home controllers with ultra-low-power modes (sleep current Read the full article
0 notes
Text
What Are Rectangular Connector Housings?

The WYSBHVGXG is a compact wireless module that combines WLAN and Bluetooth (BT) capabilities into a single package. Built using IEEE 802.11a/b/g/n/ac standards, it enables seamless wireless communication for high-speed data transfers and energy-efficient Bluetooth Low Energy (BLE) connections. Designed in a compact LLCC package with 70 pins, it's ready for surface mount applications, making it ideal for integration into a wide range of embedded systems.
Get more details: What Are Rectangular Connector Housings?
#electronics#integrated circuits#semiconductor#components#electronic#module#chips#electronic devices#manufacturing#connectors
0 notes
Text
Bitcoin Solo Mining für Zuhause: Meine Erfahrungen mit dem MARS LANDER V2

Bitcoin Mining – für viele ein faszinierendes Thema, aber meist verbunden mit großen Farmen, lauten Lüftern und enormem Stromverbrauch. Doch es geht auch anders: kompakt, leise (na ja, fast…), mit WLAN, OLED-Display und stylischen RGB-LEDs. Der MARS LANDER V2 Solo Bitcoin Miner von BitcoinMerch.com verspricht genau das – ein schickes Gadget für zu Hause, das ganz ohne komplizierte Einrichtung in wenigen Minuten startklar sein soll. https://youtu.be/MRZY-kNbzKw Ich habe das Gerät kostenfrei für ein Review erhalten und war sehr gespannt: Kann ein Solo Miner für knapp 475 Dollar wirklich überzeugen? Und wie schlägt er sich im Vergleich zu anderen Lösungen, wie etwa dem Bitaxe Gamma, den ich bereits auf meinem Blog vorgestellt habe?


In diesem Beitrag nehme ich dich mit auf meine Reise: Von den ersten Eindrücken über die Inbetriebnahme bis hin zu meinen ganz persönlichen Erfahrungen mit dem MARS LANDER V2 – ehrlich, transparent und ohne Marketing-Blabla.
Was ist der MARS LANDER V2 eigentlich?
Beim MARS LANDER V2 handelt es sich um einen sogenannten Solo Bitcoin Miner, der es ermöglicht, direkt am eigenen Gerät ohne Mining Pool auf die Jagd nach neuen Bitcoin-Blöcken zu gehen. Das Konzept „Solo Mining“ klingt zunächst verlockend, denn wer einen Block findet, kassiert die komplette Belohnung – aktuell immerhin 3,125 BTC nach dem letzten Halving (Stand April 2024). Der MARS LANDER V2 hebt sich dabei deutlich von klassischen Mining-Geräten ab: Er setzt auf einen Raspberry Pi Zero 2 W als Herzstück, kombiniert mit einem GekkoScience COMPAC F Laptop Combo Stickminer, der die eigentliche Mining-Leistung liefert. Optisch ist das Ganze sehr ansprechend gestaltet: Ein kleines OLED-Display informiert live über wichtige Daten wie: - die zugewiesene IP-Adresse, - den aktuellen Bitcoin-Preis, - den aktuellen Blockpreis, - sowie die Anzahl der gefundenen Blöcke.


Dazu kommen acht RGB-LEDs, die sich bequem per IR-Fernbedienung steuern lassen – eine nette Spielerei, die dem Gerät einen gewissen „Gadget-Charme“ verleiht.


Die Herstellerbeschreibung liest sich fast wie das Datenblatt eines modernen Smart Home Geräts: ✔️ Einrichtung in wenigen Minuten per Smartphone oder PC ✔️ Betrieb über WLAN – kein LAN-Kabel notwendig ✔️ Stromverbrauch unter 17 W – etwa so viel wie eine einzelne LED-Lampe ✔️ Laut Hersteller: „Guaranteed to mine successfully – or your money back“ Doch was steckt wirklich dahinter? Und wie schlägt sich das Gerät in der Praxis? Genau darum geht es in den nächsten Kapiteln.
Technische Daten und Ausstattung
Bevor es an den praktischen Test geht, werfen wir zunächst einen Blick auf die technischen Details des MARS LANDER V2 Solo Miners. Denn die Hardware-Kombination und das Konzept hinter dem Gerät unterscheiden sich deutlich von klassischen Mining-Rigs. Basis: Raspberry Pi Zero 2 W Das Herzstück des MARS LANDER V2 bildet ein Raspberry Pi Zero 2 W, ein kompakter und stromsparender Einplatinencomputer, der für die Steuerung und das Setup des Miners verantwortlich ist.

Raspberry Pi Zero 2 W Hier die wichtigsten technischen Daten des Pi Zero 2 W: FeatureDetailsProzessorBCM 2710A1, 64-bit ARM Cortex-A53 Quad-Core @ 1 GHzArbeitsspeicher512 MB RAMWLAN2.4 GHz 802.11 b/g/nBluetooth4.2 / Bluetooth Low Energy (BLE)Anschlüsse1x micro-HDMI (Typ C), 1x micro-USB (Daten), 1x micro-USB (Strom)SpeichermicroSD-Slot für das BetriebssystemGPIOUnbestückter 40-Pin GPIO ConnectorAbmessungen65 x 30 x 5 mm Mining-Einheit: GekkoScience COMPAC A1 Laptop Combo Das eigentliche Mining übernimmt beim MARS LANDER V2 das aufgesteckte Modul GekkoScience COMPAC A1. Dabei handelt es sich um einen USB-Stick-Miner, der auf dem BM1397 ASIC-Chip basiert – bekannt aus der Antminer S17-Serie.


Der COMPAC A1 bietet laut Hersteller eine Hashrate von 300 bis 500 GH/s, abhängig von der gewählten Spannung und Kühlung. In meinem Test erreichte das Modul eine Leistung von 297,81 GH/s, was sich eher im unteren Bereich dieser Spannweite bewegt. Hier scheint der Fokus bewusst auf Stabilität und Energieeffizienz zu liegen, statt auf maximaler Leistung. Interessant: Diesen USB-Miner kannst du auch unabhängig vom Mars Lander v2 direkt an einem Windows-PC betreiben. Eine ausführliche Anleitung dazu findest du auf der offiziellen Seite unter: How to Set Up and Use the Compact A1 USB Miner on Windows Das macht den COMPAC A1 zu einem flexiblen Gerät, das nicht zwingend an den Mars Lander gebunden ist. Kühlung und Lautstärke Die Kühlung des COMPAC A1 Sticks übernimmt ein 40 mm Lüfter, der direkt auf dem Modul sitzt. Dieser sorgt zwar für eine zuverlässige Wärmeabfuhr, ist jedoch im Betrieb deutlich hörbar – vor allem wenn das Gerät auf einer harten Tischoberfläche steht.

Ein einfacher, aber wirkungsvoller Trick zur Reduzierung der Lautstärke: Ich habe dem Gehäuseboden des MARS LANDER V2 vier kleine Silikonfüße spendiert. Diese entkoppeln das Gerät spürbar vom Schreibtisch und senken die Übertragung der Vibrationen deutlich – das macht den Miner zwar nicht flüsterleise, aber die Lautstärke ist damit wesentlich angenehmer.


Wer es noch leiser möchte, könnte – ähnlich wie bei meinem Umbau des Bitaxe Gamma 601 – den Standardlüfter gegen einen hochwertigeren Noctua-Lüfter austauschen. Diese Lüfter sind bekannt für ihren leisen und effizienten Betrieb und könnten auch dem MARS LANDER V2 gut tun. Energieverbrauch Ein großer Vorteil gegenüber klassischen Minern ist der vergleichsweise geringe Stromverbrauch. Laut Hersteller benötigt der MARS LANDER V2 weniger als 17 W – das entspricht ungefähr dem Verbrauch einer einzelnen LED-Lampe. Ich habe den Stromverbrauch selbst nachgemessen, um diese Angabe zu überprüfen: Mit Hilfe eines Shelly Plug S Gen3 habe ich eine Leistungsaufnahme von 14,5 Watt im Betrieb ermittelt.

Damit bestätigt sich: Der MARS LANDER V2 ist tatsächlich ein echtes Low-Power-Gerät – auch wenn die Hashrate im Vergleich zu großen Mining-Rigs natürlich deutlich geringer ausfällt. Für alle, die einfach mal das Thema Solo Mining ausprobieren möchten, ohne gleich Angst vor der nächsten Stromrechnung zu haben, ist das auf jeden Fall ein Pluspunkt. Stromverbrauch & Betriebskosten des MARS LANDER V2 Bei einem gemessenen Stromverbrauch von 14,5 Watt und einem Strompreis von 0,30 €/kWh ergeben sich folgende Kosten im Dauerbetrieb: ZeitraumVerbrauchskostenpro Tagca. 0,10 €pro Wocheca. 0,73 €pro Jahrca. 38,11 € 💡 Hinweis: Der tatsächliche Strompreis kann je nach Anbieter variieren. Diese Werte dienen als Beispielrechnung bei Dauerbetrieb rund um die Uhr.
Lieferumfang
Der MARS LANDER V2 wird als fertig aufgebautes Komplettgerät geliefert – das heißt, es muss nichts mehr zusammengesteckt oder gelötet werden, alles ist direkt einsatzbereit. Besonders angenehm: Auch das Acrylgehäuse ist bereits vollständig montiert und transparent gestaltet, sodass man die Technik im Inneren gut sehen kann. Zum Lieferumfang gehören: - ✅ Der MARS LANDER V2 (komplett aufgebaut) inklusive transparentem Acrylgehäuse - ✅ microSD-Kartenleser für die einfache Datenübertragung am PC - ✅ 32��GB microSD-Karte (bei mir war sogar schon eine im Pi eingesetzt – ob das beabsichtigt ist, kann ich nicht sagen, praktisch ist es aber allemal) - ✅ 5V – 3A Netzteil (mit Stecker für das US-Stromnetz) - ✅ IR-Fernbedienung, um die RGB-LEDs bequem zu steuern - ✅ Ein paar Sticker sowie Kärtchen mit QR-Codes, die direkt zur Anleitung und Einrichtung führen


Ein positiver Punkt, der mir direkt aufgefallen ist: Es wird keine billige No-Name microSD-Karte verwendet, sondern eine solide Speicherkarte von SanDisk (Typ microSD HC I, 32 GB). Das ist erfreulich, denn gerade bei Mining-Geräten, die 24/7 laufen sollen, ist eine zuverlässige SD-Karte wichtig. Was du selbst noch besorgen musst Da das Netzteil für den US-Markt ausgelegt ist, benötigst du für den Betrieb in Deutschland noch einen passenden Adapter für EU-Steckdosen. Solche Adapter gibt es bereits für wenige Euro, z. B. bei ebay.de oder amazon.de. 💡 Tipp: Wer das Gerät langfristig betreiben möchte, könnte auch überlegen, ein gutes 5V-3A Netzteil mit EU-Stecker direkt zu verwenden – das vermeidet mögliche Wackelkontakte durch billige Adapter.
Erste Inbetriebnahme und Einrichtung
Die Einrichtung des MARS LANDER V2 erinnert an die Vorgehensweise, die man bereits von anderen Solo Minern wie dem NerdMiner kennt – und sie ist erfreulich unkompliziert gelöst. WLAN-Einrichtung per Access Point Nach dem Einschalten startet der MARS LANDER V2 zunächst als WLAN-Access-Point mit dem Namen: MARSLANDER_SETUP Auf dem integrierten OLED-Display werden sowohl der Name des WLANs (SSID) als auch die zugehörige IP-Adresse zur Konfiguration direkt angezeigt – das erleichtert die Einrichtung enorm, da man die Informationen sofort am Gerät ablesen kann.

Die IP-Adresse zur Konfiguration lautet: 192.168.5.1 Nach dem Verbinden mit dem Access Point ruft man diese IP einfach im Browser auf (egal ob über Smartphone, Tablet oder PC) und gelangt so zum Konfigurationsmenü. Dort trägt man die Zugangsdaten für das eigene WLAN ein. ⚠️ Wichtig zu beachten: Der verbaute Raspberry Pi Zero 2 W unterstützt nur 2,4 GHz WLAN-Netze. Falls dein Router ausschließlich 5 GHz nutzt oder die SSIDs für 2,4 GHz und 5 GHz nicht getrennt sind, solltest du das vor der Einrichtung prüfen. Bitcoin Wallet nicht vergessen! Neben der WLAN-Konfiguration ist ein weiterer, entscheidender Schritt notwendig: Die Eingabe der eigenen Bitcoin Wallet Adresse. Nur so kann das Gerät im Erfolgsfall den gefundenen Block auch an dich auszahlen. Ohne eine gültige Wallet-Adresse würde das Mining zwar laufen, der gefundene Block würde dann aber nicht dir gutgeschrieben werden.
Erweiterbarkeit & Upgrades
Ein interessantes Detail am MARS LANDER V2 ist die seitlich verbaute USB-Schnittstelle, die nicht nur für Firmware-Updates dient, sondern auch zum Anschluss zusätzlicher Miner genutzt werden kann. BitcoinMerch.com bietet hierfür ein offizielles Upgrade-Kit an, das aus folgenden Komponenten besteht: - 3x GekkoScience COMPAC F oder A1 Miner - zusätzlicher Lüfter zur Kühlung (Performance oder RGB Lüfter) - passender USB-Hub Mit diesem Erweiterungs-Set lässt sich die Gesamthashrate auf bis zu 1,05 TH/s steigern – und das bei weiterhin kompakten Abmessungen. Der Miner wird dadurch deutlich leistungsfähiger, bleibt aber im Vergleich zu einem großen ASIC-Rig immer noch leise und wohnzimmertauglich. Preisübersicht (Stand April 2025): VariantePreis (USD)Upgrade-Kit mit 3x COMPAC F629,99 $Upgrade-Kit mit 3x COMPAC A1929,99 $ ⚠️ Wichtig: Diese Preise gelten für das offizielle Zubehör von BitcoinMerch.com und können je nach Verfügbarkeit und Marktentwicklung variieren. Damit bietet der MARS LANDER V2 eine flexible Einstiegslösung ins Bitcoin Solo Mining, die sich – bei entsprechender Investition – durchaus leistungsseitig erweitern lässt.
Fazit: MARS LANDER V2 – stylisches Mining-Gadget mit Schwächen
Nach einigen Tagen mit dem MARS LANDER V2 bin ich ehrlich gesagt etwas zwiegespalten. Einerseits ist das Gerät ein echter Hingucker: Das transparente Gehäuse, das OLED-Display und die steuerbaren RGB-LEDs verleihen dem Solo Miner einen modernen und hochwertigen Look. Die einfache Einrichtung über den integrierten Access Point funktioniert ebenfalls reibungslos. Auf der anderen Seite muss man klar sagen: Die maximale Hashrate von 250 GH/s (mit COMPAC F) oder 500 GH/s (mit COMPAC A1) ist im Vergleich zu anderen Solo Mining Geräten wie dem Bitaxe Gamma 601 deutlich geringer. Gerade wenn man den Preis betrachtet – rund 475 $ für die Basisversion des Mars Lander V2 – fällt auf, dass der Bitaxe Gamma 601 mit einem Preis von etwa 240 $ in der besten Ausführung deutlich mehr Leistung bietet (nämlich 1,2 TH/s) und zusätzlich mit AxeOS ein sehr detailliertes Webinterface für die Überwachung und Steuerung mitbringt. Besonders interessant – und auch ein wenig kritisch zu betrachten – finde ich die Aussage auf der Produktseite: „Mine Bitcoin successfully, GUARANTEED! or your money back“ In der Praxis ist es allerdings nahezu unmöglich, einen Solo-Blockfund zu garantieren, da dies auch mit einer hohen Hashrate immer noch hauptsächlich von Glück abhängt. Diese Garantie sollte also mit Vorsicht interpretiert werden. Wie geht es weiter? Read the full article
0 notes
Text

Technical Report: ESP32 WiFi, Bluetooth Classic, BLE, CAN Bus Module
ESP32 WiFi, Bluetooth, BLE, and CAN Bus Module – A powerful development board for IoT, automotive, and industrial applications with wireless connectivity and integrated CAN bus support.
0 notes