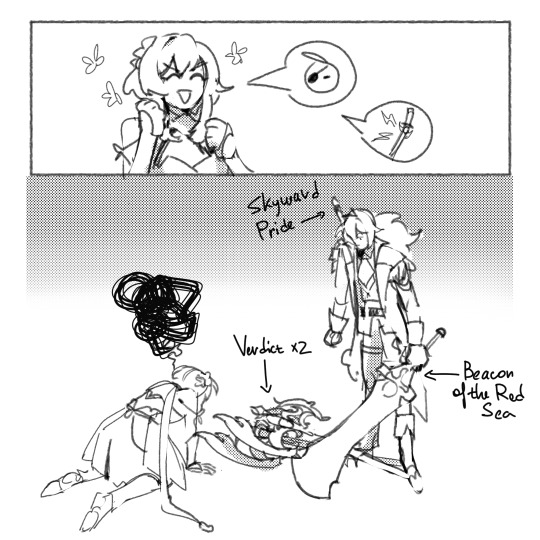
#btw had to use krita for this one
Text
i hate it here
#i WILL get kaeya a mistsplitter#mark my words!!!#meanwhile how do i get primos real quick#btw had to use krita for this one#and man i miss it#but it's so slow when i have to use a really big brush i hate it#it's probably the only thing that really annoys me no matter how much time passes#upd8 it's home and im poor
44 notes
·
View notes
Note
what brush(es) do you use? i really love the lineart in your pieces!!

i have no idea what the main one i use is called bc i downloaded some brush pack that had idek the name of. the brush is called “pack01_basic” which doesnt rlly explain shit
BUT! i sometimes use a brush that comes w the app thingy, its called “Ink-4_Pen_Rough”
oh btw i use krita to draw (im broke)
58 notes
·
View notes
Note
Oh it was only 3 actually, counting that one animatic on YouTube (that BTW i had no idea was yours! I was pleasantly surprised <3)
And I found it so funny that you have somewhat an idea of who I might be PFFF you can throw the guess, it would be funny if you get it right (don't have to say my name if you don't remember it, you can just go for something you remember NFKDSJ)
also time for an actual question since i'm already here, what program did you used for the animatic? I've always wanted to get into animating but most softwares cost money or are free but really bad so I could use some recommendations 👀
Good to hear there is no imposter lol. I should probably start using the false pfp so people know it’s me but I’m too lazy to change them all 💀 also my guess was right as to who you were but probably mainly because I put on my Aziraphale detective hat and you were the last notification before the ask inbox notification and your icon had a red beanie. We meet once again.
As for the animatic I used procreate for drawing and capecut for composting. Not the most efficient method but I liked it. I ended up segmenting off each camera angle into a different canvas and making any animation for the shot that way. I love capecut because the free version has every editing function you need for an animatic and the watermark only appears as a black screen at the end so it’s so easy to crop out. It’s probably the best free editing software I’ve found. (I also used a screen recording device to record the audio cause even if you buy a song it sometimes doesn’t allow you to put it in the program.)
I honestly recommend procreate if you have a device that supports it. I think it’s still only a 10 dollar onetime purchase. But if you don’t have a device that supports it, I have used things like flip a clip which is free, and the paid version is pretty cheap. I have also dabbled in an app called rough animate, also free (you don’t have to pay for the onion skins) which was also okay. I got frustrated cause of the lack of brush choice but other than that it’s not bad at all. If you can’t pay anything at all I’d recommend this because, unlike flip a clip, you don’t have to pay to unlock the a lot of the really helpful features. Ibis paint also added an animation feature I think so that’s an option. Idk if you need the paid version for it, but I remember only having to watch ads for a minute to unlock all the brushes so maybe it’s the same for the animation feature lol.
If you have a computer set up, I’ve also heard nice things about Krita for animation. It’s free and from what I remember it had a really good timeline set up. I actually tried to use it, but my computer at the time was old and slow and it lagged to much, and then I had a shitty no screen tablet and my hand eye coordination when it came to drawing and writing is quite bad, so it just wasn’t a good set up for me personally. But I know people make it work. I mean, people make this kinda shit in MS paint, if you’re dedicated enough you can technically do it in almost any program (though you may not be able to make it as polished as you’d like.)
Then there is Clip Studio Paint, which does cost money but is way less expensive than like, harmony or adobe. The EX version which gives you a second of free animation per project is a $5 monthly subscription for once device, PC MaC IOS, and the Pro version (which is more expensive) gives you unlimited animation animation access for I believe around 10 -15 dollars a month (still less than most streaming services lol). There’s also a one time purchase version that is $50 dollars, but it goes on sale A LOT for $25! Although I don’t think it gives you more than a second of animation. CSP also has a very long free trial period, for EX it was legit like 3 months. so if you try it out and like it, I’d definitely suggest finding a way to pay for it. It’s actually used in some professional studios in Japan, so if you have any professional aims for your work it’s a good starting platform to get into industry software. However a lot of the nice things CSP offers for animation are not needed in the story boarding/animatic stage, so if that’s as far as you wanna take your animations it maaaaaaay not be worth it unless you love it.
If anyone else has other cheap or free recommendations feel free to add on. I have attempted to make animatics on procreate, rough animate, and flip a clip; all of which I have uncompleted projects on. It just so happens that procreate is what I was using when I finally made an animatic I liked enough to see until completion. Whatever software you do use, just make sure you learn how to use it before attempting a big project. Do some smaller stuff before you try anything big.
Edit to check the comments! We got other good recommendations for computers!
8 notes
·
View notes
Note
I love Your drawings! Especially Pearlshipping ones! I also missed the 2016 time When pearlshipping had many fanarts, analysis, but nowadays there is none! But you inspire me to satisfy my own pearlshipper inside me! No matter the trails to learn to draw I will do it for pearl! Satohika the best! Hyper Fixation is surely a thing!!
Btw an out of content question what do you use to draw? I have seen many use csp, or krita, or firealpaca or etc.
we got another one boys
No but seriously this ask made me so happy??!! To think my silly shippy drawings could get someone into art is making me so emotional QwQ This is the best, I could never predict this 💕💕💗💖💕
Onto the program thing, I personally use Paint Tool Sai for most of my work (I just adore it's pen sensibility. no other program gets it so close to real pencils like sai for me), but I do recommend Krita as well! It's free and I often use it for animations or paintings and I find that the pen sensibility there is pretty much similar to Sai's!
#answered asks#and please if you ever need any help in your art journey feel free to ask!!#*sobs* im so emotional lmao#this blog was the culmination of disappointment with ai stuff and a desperate need to create something that made me truly happy#have it inspire other people to create art is just making me so#*explodes in happiness*
7 notes
·
View notes
Note
Hey there! I love you’re semi realistic, semi cartoonish art style bro! I hope you don’t mind me asking but what software/mediums do you use? I am trying to work on my lighting and shadows and textures but I have no clue how artists like you achieve such detail
First off- thank you so much! I truly appreciate it. And second- oh my goodness I am so sorry for how long this ask has sat in my inbox! I hope some of this can still help you :’D
As far as software goes, I’m almost exclusively working in procreate as of late. There’s plenty of great programs- if you need something free and desktop based, I highly recommend Krita. I have a few brushes from different packs that I often default to. You can see them all and links to said packs through this answer I gave to someone asking about my brushes earlier:
As far as detail in my work goes, that’s just through a loooot of practice and doodles and drawings. I’ve been drawing since I could pick up a pencil, so I’ve had a lot of time to figure out the way I like to do things- but even then I have so much to learn!
I do, however, work in many traditional forms of media as well! I haven’t done so as much lately since digital doesn’t require cleanup, but I honestly believe that working in traditional for my entire life up until 5 or so years ago has a hand in how I approach things digitally as well. I’ve done pen and marker illustration, pencil and colored pencil, acrylic painting, as well as 3D work. I’ve worked in a lot of media and I want to get around to trying as much as I can when I have the energy to! If you have questions specifically about what traditional media I use or work with let me know!
When it comes to improving on rendering, doing small studies of images you really like the lighting in helps a lot for me. Learning how to break light in a photo down to simple, blocky shapes helps to figure out getting an initial layer down to refine later when doing full pieces! When rendering a character, especially if drawing something that isn’t in a scene, I always recommend marking out the direction the light is coming from as well as color of the light before even starting, so that you can determine where highlights and shadows would be placed in an initial blockout. Keep in mind there’s different kinds of light in a piece- I would recommend looking into tutorials about direct light, indirect light, reflected light, etc to get a better feel for how it works- while I do my best, I don’t think I am quite skilled enough to explain those nuances.
When approaching most textures, especially unfamiliar ones, references are my best friend always. It might be a good idea to just do test sheets/practice making the textures that would be useful to you on occasion! And in the end, textures also tie into lighting as well, since a lot of what makes textures super distinct is how light hits them, especially when it comes to things like metal. It may be a bit of a hot take, but in a lot of cases I tend to avoid a lot of digital texture/object brushes, especially those meant to simulate natural textures like leaves, and I do those textures manually instead. I just personally like having more control over those shapes and feel it looks better when each texture is made intentionally by hand! Sometimes I do use texture brushes especially for backgrounds, abstract work or subtle layers, especially if I’m working on something very fast, but it’s not my first choice. However I do know there’s plenty of artists who use texture brushes in ways that look great, so that’s just personal preference. :)
I do apologize it took me so long to respond! But if you have any specific questions, my dms are open and I want to start replying to y’all more!
4 notes
·
View notes
Note
my apologies for the slight length of this (ok maybe its not too long and im just self conscious) but-
i chewed through, devoured your fic cyanide narwhal from start to the current chapter within a 24 hour time period a day or so ago (including a sleeping break) during all my awake free time moments and was then so immersed in it mentally it was hard to tear myself away just to do my genshin dailies when i remembered they existed, at that time undone for that day? what-
and… although i am not confident about it (only bc of my own doubts about art, really, i have zero consistency outside of Brainrot itself) i really want to make fanart for it…? so yes, i am sticking to anonymous for this, but i may well be, uh. yelling less anonymously if that does occur. if you don't mind. (and if the art braincell cooperates. if i can stop getting distracted rereading 15+ chapters before i can even open krita. yeah, that… that happened already and may well happen again, at this rate. not that i truly consider it a bad thing. but it does somewhat make actually doing any art slightly challenging if im distracted before i can even open the program-) either way, really wanted to thank you for the amazing fic!!! 100/10 one of the best if not the best i have had the pleasure to find so far and i appreciate it so much. kudos to you. i actually tried giving kudos twice (from two different devices). dunno if it worked or not though, since i don't know what it works off of and my memory was too clouded with excitement to actually, well, tell me anything useful about that.
btw you have no idea how glad i was to see you were on tumblr bc i hardly exist anywhere else and don't really intend to in future either and also i loved to see your art designs!! they're so good i want to hold them,,
aaa thank you so much! please don't worry about the lenght of the ask, i love it all the more!
i get the struggle of wanting to draw but being to distracted;; if you do end up making some fanart please don't hesitate to send it through or tag me! i'd love nothing more than to see it! i could keep it private even if you don't want me to answer to the ask/post the submission ^^
i'm happy to hear you've been enjoying the fic <3
11 notes
·
View notes
Text
(2/2)
Now about this laptop! It’s fucking amazing!!!!! I can play games I can draw without krita crashing every 5 minutes! it’s amazing!!!!
I spent some time transferring the folders and at some point something happened..... hhhh I’m just happy that I didn’t lost anything important… (._. )
It took me a while to put everything in order, to remake (remade.. remake idk which one is correct) my brushes because I couldn’t transfer them for some reason and ffs the colours are more vibrant, it’s weird... and i had to get used to draw on this laptop. Btw look at it

black and red! my colours!!!! (sorry for the poor photo quality btw)
I said previously that I will talk more and yeah, I will wrap up a story I was working on a while back (idk how, i will not continue drawing the comic, that’s for sure) of course maybe some hcs, I would love too, it will be easier..
anyway~~~~

soon is his birthday!!!! I honestly have no idea what to draw..
It’s 9pm, I will have to go to bed, I swear I had to tell you more but I can’t remember so I will end the talking here- and ofc I remembered something
12.10.2022, it’s been 5 years since I decided to create this acc to post my art. I didn’t say anything on that day because I wasn’t sure if it was that important... but it actually is important... so.. mm confetti

:)
4 notes
·
View notes
Text

Finally have the energy to muster up the Hollows. Been going through it with very low mental energy, but I have been taking some doodle breaks here and there. Here is to hoping I can get a POE (Poetry of Exploration) put together this week.
btw - I use Krita (art program) to put together bigger maps like these. I had used Krita in the past prior to getting Procreate but now that I am an adult with money I decided to support them and bought this version on Steam for like $10. Ofc they have one free to download but I like supporting true artists
0 notes
Text
Not to keep beating a mostly-dead horse, but all the best OSS stuff is already ported to Windows and arguably works better there because of tangential benefits of being in the Windows ecosystem.
Wanna artist? Krita is on Windows, and you get better hardware compat for drawing tablets.
Wanna music? VSTs are majority Windows, especially free ones so good luck on Linux nerd. Enjoy using WINE. The best OSS DAWs and trackers are on Windows.
VLC is on Windows, as is FFMPEG and even MPV. GIMP sucks compared to PS, but it's also there. Firefox and Thunderbird obviously. All the emulators. Blender. We got CMake and LLVM +Clang over on Windows too.
Linux will not beat Windows on apps, or hardware, or accessibility for non-technicals. And why would it when we can't agree on a windowing system (X11 is better btw) and have had at minimum five different sound subsystems, at least four major competing gui frameworks, and half a dozen init systems in twenty years?
Just use Windows unless you have a good reason to use a UNIX system instead. And unless you need it on bare metal, do what you gotta do in a VM (did I forget to mention we have Oracle's VM too?). After years going back and forth and even dual-booting, I'm sticking to Win+VM. It's almost pointless to put a UNIX system on bare metal without good cause.
PS: If you do start doing oss development on Windows, consider using CDDL or MIT over GPL! You'll thank me later.
0 notes
Text
Assignment 1 (and a redo)
so at first i did the assignment on bandlab around thursday and wanted to shoot for a techno like style, luckily bandlab had the loop packs i need for it. i did this in about 20 minutes or so and it certainly shows. and to get it out of the way with this. no i dont really think this is a very legitimate way of making music. most of the sounds i used here were already made for me to be used so its for that reason along with it feeling rather limiting, its more of a testament to what artists can do with tools like these.
https://www.bandlab.com/red_fly/assignment-1-6ed18c66?revId=e292e6d4-ad9d-ed11-994c-000d3a3f87df
at the time i made this i was kinda busy with stuff around me. was trying to get an interview from mcdonalds started but that fail, cut grass of my front lawn using a weed whacker for the first time. and generally trying to structure this song ive been assigned to do.
sources i used to make it were mostly from loop packs entered around melodic techno or minimal techno but some others were added in as well (i did this on my phone btw)


after awhile though i didn’t like the results i got from this and i wanted to this another go this time using only one loop pack and being more cautious with my song structure here. i decided to go for a UK garage loop pack which i used before actually although never in this sort scale. people like Sunship and Fred again served as a sort of inspiration or reference to drive myself into making this.
also did this one my phone


the result is this https://www.bandlab.com/red_fly/assignment-1-redo-f444edb7?revId=4e6e5343-9f9e-ed11-994c-000d3a3f87df
(Sidenote) I took WAY too much consideration into making the pcitures of these songs.
the first one i got the last panel of this sunday comic Luann

then i use my phone to erase the kid from existence.

finally i used krita to fill out the line of the table

for the redo i just cropped the last panel of this one and thats literally it lmao

0 notes
Text
Art Advice #4 - A Beginner’s Guide to Digital Art
Hi all!
This weeks entry into my Art Advice tag, where I offer various advice for artists of any skill level, is about digital art! Now, I am by no means an expert at digital (I’ve been doing it for nearly 8 years at this point and that is almost entirely self taught), but I have picked up a few pointers in that time which will hopefully help anyone just starting out!
(this blogpost is a little over 2000 words long btw)
A Beginner’s Guide to Digital Art
I know that the world of digital art has changed drastically in the 8 odd years since I started, but I’d still say that some of the options I started out with will be just as good for anyone who’s starting out now!
As always, I’ll be splitting this into sections to make it easier for you to navigate this post!
Part 1 - Equipment/Hardware
There are a lot of drawing tablet options on the market at the moment, and I’m not going to pretend that I know anything about half of them lol. But I think for a beginner, don’t worry about going for the most expensive option, even if the reviews are really good or your favourite artist uses it, especially if it is way above your budget!
An important thing to know is that there are two types of tablet. One is the plug-in kind. These are essentially a pad which you plug into your laptop or computer and draw on that whilst looking at the screen (they basically work the same way as a plug in mouse works). The other kind is the screen variety, which is a lot more like what most of us know as ‘tablets’ nowadays. And you draw directly onto the screen.
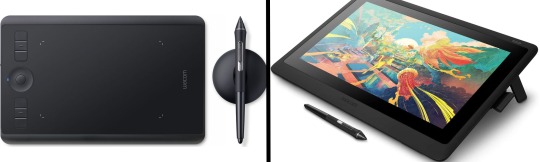
(a plug-in vs on screen tablet, both from Wacom)
Now, as for choosing between these, it is honestly a personal choice. But I’d say if you’re just wanting to try digital and you’re on a budget, a plug-in tablet can be really useful since it gets you used to the mechanics of what digital is like, and they are often significantly cheaper than the screen alternatives. I would say that plug-in tablets are a big learning curve, especially if you’re used to doing traditional stuff, but I do know a lot of professional artists who still use this kind of tablet when doing their work, so if it’s something you can get used to I would definitely consider it! Also, they’re often a lot more portable than some screen tablets! The first one I had was a Huion (a model so old that I can’t even find a link to it now lol), and I also know that Wacom are a well known brand that do some decent plug-in tablet. I’d recommend you do your own research on other brands and options, though!
Screen tablets are often a lot more expensive, but if you’re used to traditional art, they are a lot easier to get a handle of! But I know if you already have something like an iPad, or other general use tablets, then they offer apps that you can use to draw on (as well as things like the Apple pen, or other stylus’). The big difference between using these general tablets and ones specifically designed for drawing is pretty much purely a personal choice. I personally prefer the bigger screen of my XP-Pen tablet, along with a special screen protector that removes the shininess of the tablet screen and makes it feel more like ‘paper’ over when I used a general use tablet it draw. But if you already have an iPad, or something similar, then it’s honestly a really great starting point!
I think it’s important for me to mention that you don’t need fancy equipment to be an artist. The incredible Elicia Donze has revealed countless times how she has very basic equipment but still manages to produce the most stunning artworks! All you really need is some kind of drawing apparatus and a lot of patience lol! Getting good at any kind of art takes a lot of time and effort, but I would definitely say it’s worth it when you’re able to look back at your progress!
Part 2 - Software/Drawing Programs
Much like with the hardware discussion, choosing which program to use is entirely down to personal preference. I personally have never really liked Photoshop purely because it’s really complicated, but I know so many artists swear by it.
I think the main aspect to consider when you’re starting out is whether you want to pay for a program. Software like Photoshop, Clip Studio Paint and Procreate are some of the popular ones I hear about a lot of people using, but all require you to purchase or subscribe to them. So if you’re young or on a very tight budget, I’d honestly recommend the free alternative versions of these, such as Krita (Krita is quite a large program, but it has a lot of really awesome features and is very similar to Photoshop!), Gimp (this one is similar to Krita, but has slightly less options, I’d honestly recommend Gimp for anyone who does photo editing though!) or FireAlpaca (this is the one I use, by the way and it’s a pretty simple program, but has a lot of fantastic features and is perfect for how I work!). These don’t have as many features as some of the paid alternatives, but I honestly think all you really need to start digital art is some kind of ‘canvas’ and set of brushes!
Another great free program for beginners I’d recommend is MyPaint, which is great for doodling and just getting used to how digital art feels in comparison to traditional! It also has a bunch of ‘traditional style’ brushes, to make it look like charcoal or watercolour (which I’m sure the paid alternatives have too, but it’s always better when it’s free, I find lol...)

(this is an example of a drawing I did on MyPaint using the ‘charcoal’ effect brush!)
Most of the sites are pretty self explanatory, with sections dedicated to different brushes (I’ll go into the types of brushes later on in this post btw!), adjusting brush size, shape and opacity, a colour wheel, etc. You also have a section dedicated to ‘layers’ (another thing I’ll go into more detail later), and various ‘filters’ and editing options and effects you can add to your work to make it more interesting!
I’d really just recommend playing around with programs until you find your one!
Part 3 - The Pros of Digital Art!
I realise this section should probably earlier in this blog post lol, but I kinda wanted to go into what digital art can achieve in comparison to traditional art, and how beginner artists can utilise this!
I definitely didn’t take advantage of certain aspects of digital art when I first got into it, and they’re things that would have definitely made my life a whole lot easier lol!
Digital art allows you to tweak drawings as you do them. So if you accidentally drew the eye too far to the right, then you can easily move it to the right place. (I usually do this by selecting whichever area is wrong, cutting it out and then pasting it into a new area... And yes, there is probably a better and quick way of doing this but...I haven’t found that way yet lol...). And I honestly think that this has allowed me to look a lot more at a reference image in order to figure out where I’ve gone wrong with a drawing! Whereas with traditional art, I usually spend so long trying to get an eye right, that even if it’s slightly in the wrong place, I don’t want to completely redo that section. Digital allows you to completely rub out sections without leaving indents, which is honestly such a saving grace!
Another pro of digital is the Undo/Ctrl Z function! This means you can easily go back to before you made a major mistake with just a click of Ctrl Z... Though I have to say that this function has honestly ruined traditional art for me... Oh what wouldn’t I give for a real life Ctrl Z... But yeah, this is a great part of digital art and definitely something you will grow to love lol!
Another great thing about digital is that it allows you to flip and turn a canvas as you’re drawing on it. I spent a lot of time trying to turn my tablet around in order to draw certain parts of a piece before I realised you can turn the canvas itself without having to move yourself or your tablet!
Layers are another part of digital that can be super useful, and I have to be honest but I don’t really use them a lot. I know a lot of artists create layers for every section of their artworks (so, one for the linework, one for colouring, a separate one for the background, etc etc...). And there’s something really great about being able to paint without worrying about smudging into a previous section of the painting. This works well for my work since I do a lot of bright backgrounds. I also often create a lot of ‘versions’ of my works, so it’s useful to be able to change the background without affecting the main figure of the piece! (I have to say that I often work in one big layer when I’m doing paintings, just because I like how it feels more like ‘traditional’ art that way, but layers are such a brilliant tool, and definitely something you should play around with!)
The eyedropper tool is another one that is really useful! Although I never colour pick from my reference photos, I know some artists find this useful when they were just starting out (especially if you’re not sure what colour to make shadows or how to mix skin tones, etc etc). The eyedropper basically means you don’t need to mix your colours every time
Part 4 - Just some other things I wish I had known about when I was starting out lol...
This last section is just dedicated to a few things that I would have liked to have known when I was just starting out all those years ago.
First one is fluffy/textured brushes!
I spent most of my art life from 2013 until 2016 using ‘round’ brushes which are notoriously hard to blend with, so I’d recommend either downloading some fluffy/textured brushes (DeviantArt was where I got mine from a few years back, but there are probably other places you can get them for free too!) to your program of choice, since most of the programs I’ve used haven’t had fluffy/textured brushes as pre-set.
I may make another post about how I blend in my artworks if that’s something people would be interested in?
(this is an example of textured brush blending vs round brush blending... I usually opt for round brushes for rougher blending styles and the textured brushes for more smooth and ‘realistic’ blending... for a lot of pieces, though, I use both brushes (the round brushes are good for details!) in the same way that you use different sized brushes for real paintings!)
The next thing I wish I’d discovered earlier is the Brush Stabiliser option. Some programs may do this automatically, but the one I use (FireAlpaca) requires you to manually change the amount of stabilising you have on your brush. This is particularly useful if you want to draw neat lines or straight lines (the stabiliser essentially slows down the ‘ink’ as you’re drawing). I only recently started using the stabiliser, and although I still like having it mostly turned ‘off’ for doing sketchy work, it does make doing line work a lot easier, and also gives pieces a more polished look!
Next advice is to explore all the options you can in whatever program you use!
I feel like with certain programs, you can get overwhelmed by choice and you end up just using a few of the functions. But I’d really recommend just playing around with these programs, trying all the filters and editing options to get used to how the program works. You can often find interesting ways to adjust your artworks this way! In a way I’d recommend this way of working more than finding tutorials made by other people... Unless there’s a specific function you want to learn how to do, just having fun with digital art is a major part of it’s appeal to me!
~
There are probably a lot of other options I could go into, but this is already over 2000 words long, so I’ll leave it here for now lol! (I may do a part 2 though so... keep a look out for that!)
As always, if you have any questions to things I’ve said here, or are just looking for more advice, don’t hesitate to message me!
And if you like my work on here (art & blog posts) feel free to support me on my Ko-Fi! <3
#art advice#digital art#art advice for beginners#digital art for beginners#artist advice#digital art tips#artists on tumblr#just want to say again that i am not an expert at this at ALL lol#i just want to offer some really basic advice to anyone interested in starting out with digital!
101 notes
·
View notes
Note
hi ! i realized i had some more tips for stylization that i forgot abt until now so i figured i'd send u an ask :
1. using references and exaggerating the shapes. this is kinda hard 2 explain w/o a visual but i'll try my best lol.
yknow how cartoon men will have very triangle shaped bodies w/ wide shoulders and small hips and the women have very hourglass bodies?? i mean kinda like that. it takes a lot of trial and error to perfect this sorta thing, but its really all about finding the shapes u like. and it doesnt always have 2 make perfect anatomical sense, as long as it Looks like it does lol. i like to exaggerate the elbows (making them more prominent and pointy? ig?) and the shoulders, as well as facial features like eye bags and the sides of the nose (i really dont know how 2 explain that w/o a visual, soz)
i also dont just mean w bodies w this technique(?). practicing using exaggerated shapes w things like animals or inanimate objects is great if u dont wanna just jump straight in2 bodies (cuz , at least 4 me, thats kinda scary lol)
i also have a pinterest board full of references if u wanna look at that. i dont think theres much inanimate objects tho .. i should probably work on that myself lol
2. if u want a more painterly-esc style/style w/o lineart (smth like these > )


mix hard and soft edges when rendering. if u look , the undereyes and the shadow under the lips as well as the sides of the nose all have hard edges, where as other places have more softer and blended out edges. a tip i learned from an art yter is "wherever u would put a line in a sketch or lineart, put a hard edge." an example of that would b the jawline or smth like that.
also ! i dont knkw what art program u use for digital art (if u do that idk) but i use procreate and i used the medium hard blend brush (in the airbrushing section) for those ^ up there but i changed the shape to the 'brick' shape which u can find in the 'source library' option when u click 'import' on the shape editor. and for the recent byler art, i use the 'gesinski ink' brush (that i edited 2 have min opacity set 2 max in 'brush properties') for sketching + lining + for most of the colouring (w/ the skin i added blush w the medium hard blend brush i mentioned b4, the freckles w the 'driven snow' brush on super low opacity and the 'derwent' brush for body hair) if thats smth u wanted 2 know?
i hope these were more helpful tho <3 have a good day/night :)
Hi🤗! Thank u so much for taking the time to answer me TWICE🥺!!! The hard edge - sketch line thing is actually so eye opening😳! When going for a more realistic style digitally (i use Krita btw! But thank u for the brush names bc im thinking of getting an ipad one day even just for Goodnotes😭) i always kinda winged when to blend and when to leave a harsh or harsher line, this helps a lot! And I'll definitely take a look at your pinterest board, tysm for sending me a link🥺! Once again, thank u SO much and i hope u have a great day/night🥰💕!
2 notes
·
View notes
Note
hello! i hope you’ve had a good a day! may i ask what program you use for your drawings? btw i love your drawings hashirama as a mushroom is so cute dhjshsjwn
Hiiiiii thank youuu 💕🙏🏼 hope you're day is going well!!
Most of my drawings I've done on my phone (I'm broke) and I use Ibis Paint :) On my laptop I use Krita, which I'm still new to but I really like it so far! As for brushes I like to use the most common ones I guess :P To this day I still feel more comfortable drawing on my phone ;w; have a li'l hashroom I sketched on it :P

13 notes
·
View notes
Photo

“Why would you even go that far? Don’t die for me, idiot.”
(Reblog>likes)
Post-Marineford kiss, for context. In a Ace Survived Au I guess lol
I think I did a fairly ok job at drawing kiss for once??? Also, I had to draw every freckle one by one because Krita decided that it was mad at me for never using it damn it
It’s Ace’s shirt btw, he is secretly Guy Fieri
Idk how to shade stuff, don’t ask me
[id: My s/i and Ace kissing, both of us are crying but it’s less obvious for him. My s/i is wearing some flame shirt]
#selfship#self ship art#f/o#self insert#self insert art#selfship art#dude idk#it's weird drawing Theia in a t-shirt???? not extra enough for them lmao#what are background#I'm so pale there if you compare it to Ace iuruifbuile#or just pale I may have chose a shade way too light#my art
22 notes
·
View notes
Text
this is how i make my icons btw
>open up krita (or, when i was first starting to use icons like this about a year ago, paint.net)
>look up “trans flag”; copy and paste into the krita document and resize it so it properly fits (back when i was still doing half trans flag/half lesbian flag, i had one of those already made in paint.net and i used that as a base)
>open a new layer
>go to the bandori wiki, find a card i like
>open the card’s page and scroll down to the alternate versions of it
>copy the transparent version
>paste it in, move the selection until the girl’s face is reasonably centered
#sometimes i need to do some erasing of extra details#like in this current one#sayo was carrying a guitar on her back#that i needed to erase
4 notes
·
View notes
Text
thank you guys so much for the support on that collage!! a couple of people have wondered how I made it. I'll tell you :-)
I made the sketch first, and then with some cardstock I traced and cut out the different parts of the image kind of like a clothing pattern. the collar was its own piece, the hat was its own piece, etc. I cut out chunks of magazines in the desired colors (including plenty of flowers too, if you look close;), made them into strips, pasted them onto the pattern pieces, and cut off the excess. I assembled all the pieces together on one piece of paper. I cut out some mouths and flowers, applying some with glue and others with foam dots to make them pop out. I glued it all to a mat board. I took a photo and then went crazy went stupid with color channels and other stuff in krita.
the piece took me a long time!! I'm not sure how long but for 5 days I spent most of my free time on it, and then worked maybe an additional day or two's worth spread out over more days. took waaaaay longer than my last collage. I had a lot of fun!
btw, I didn't end up gluing onto the original sketch, so I could still use it as a reference, so here's that

yea
#hope thats not confusing#most of the ppl who reblogged wont see this but srsly thank you so much......#this was my first time doing the pattern thing#last times i just glued it all directly to one paper which is harder bc then i cant see the sketch anymore and theres a lot of#guessing and checking#anyway.....wig#pencil#traditional art#fanart#sfm#dr. habit
3 notes
·
View notes
Last Seen Blogs
lumingi
i'll go higher

wayward-wheels-blog
Wayward Wheels

buffalowildwings
Untitled

freschfamily-blog
Adventure Awaits!

meditate-init
Untitled