#build tutorial
Explore tagged Tumblr posts
Visit Tumblr Blog
Explore Tumblr blogs with no restrictions, modern design and the best experience.
Last Seen Tumblr Blogs


Fun Fact
Tumblr was acquired by Yahoo for $1.1B in 2013.
Text
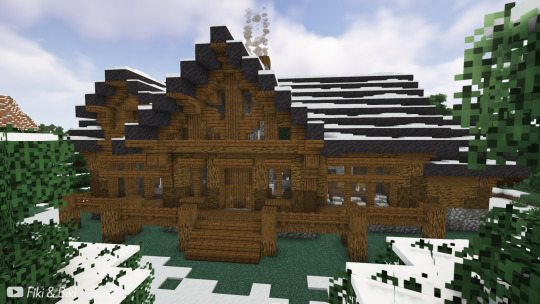
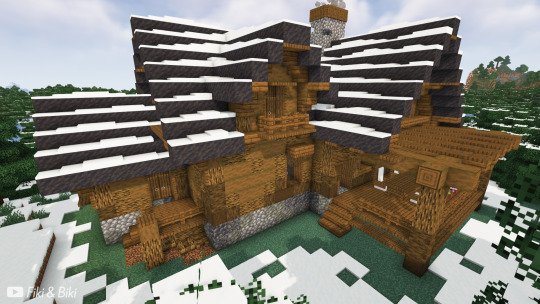
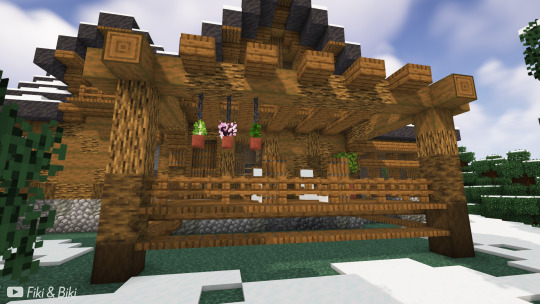
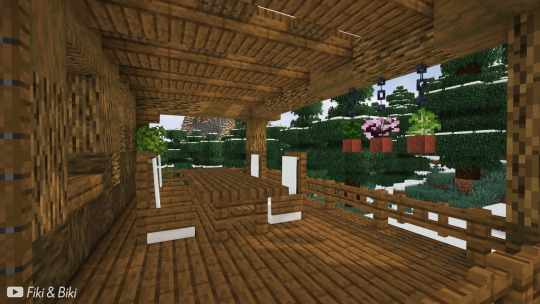
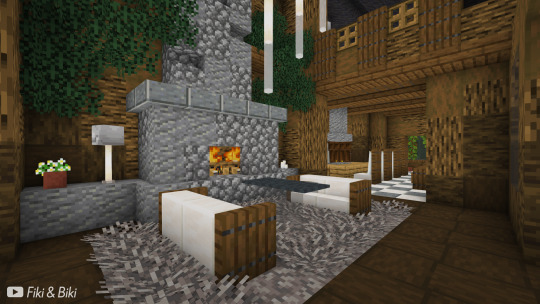
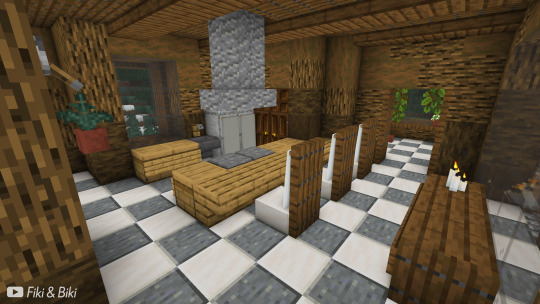
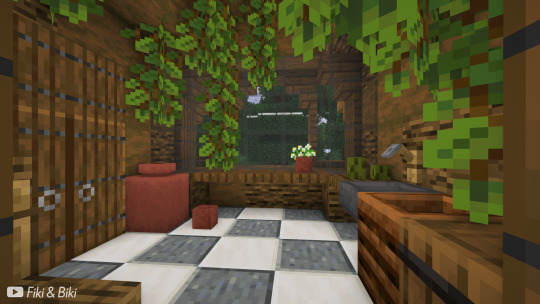

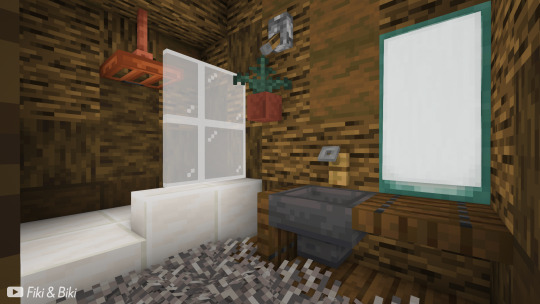
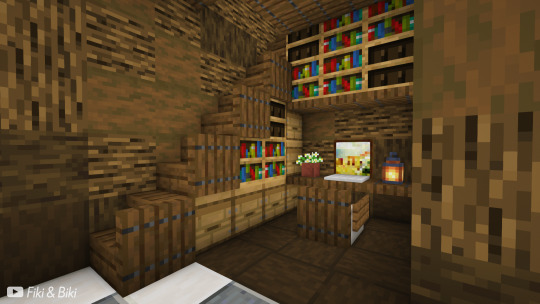
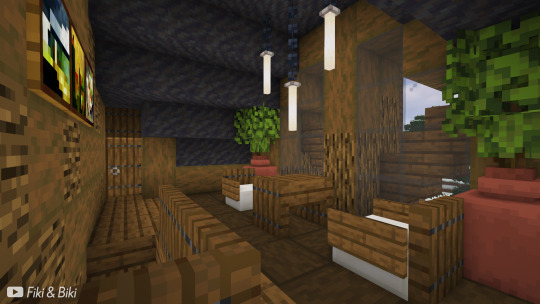
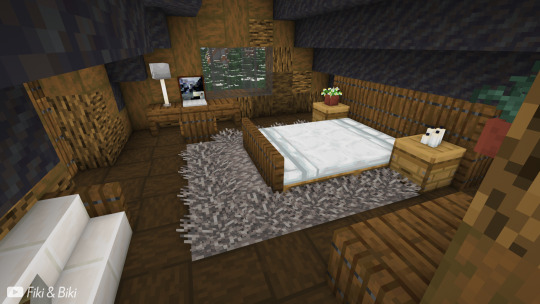
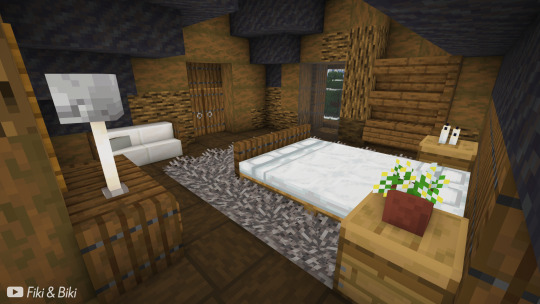
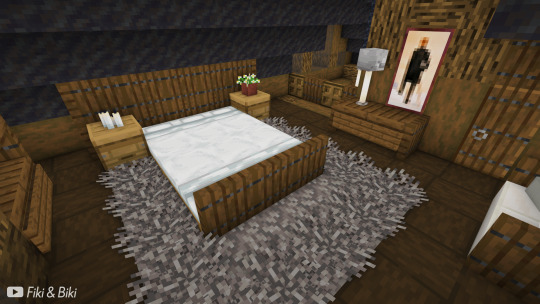
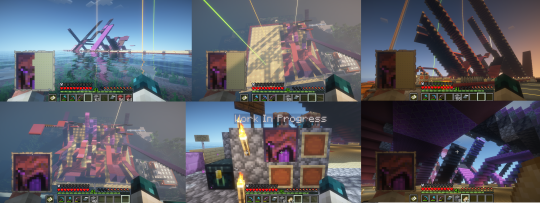
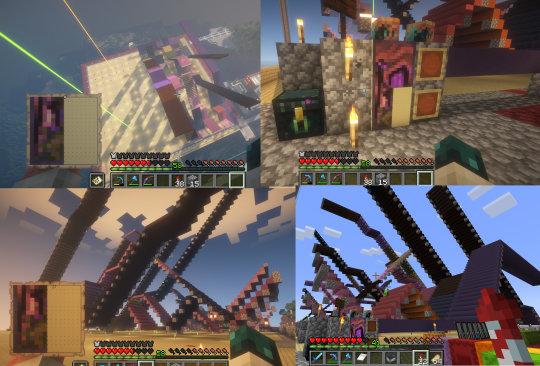
Modern Log Cabin & Interior | Minecraft
Tutorial is on our YouTube channel: Fiki & Biki 🐔
#minecraft#minecraftbuild#minecraftbuilds#minecraftbuilding#mineblr#mcbuild#mcbuilds#mcbuilding#modern#log cabin#minecraftinterior#minecraftinteriors#minecraft interior#minecraftmodern#minecraftcabin#mc interior#mccabin#mchouse#mctutorial#build tutorial#minecraft house#minecraft tutorial#minecraft survival
54 notes
·
View notes
Text
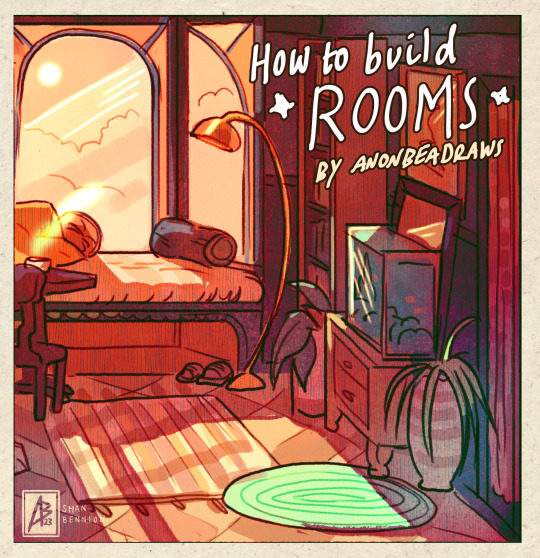
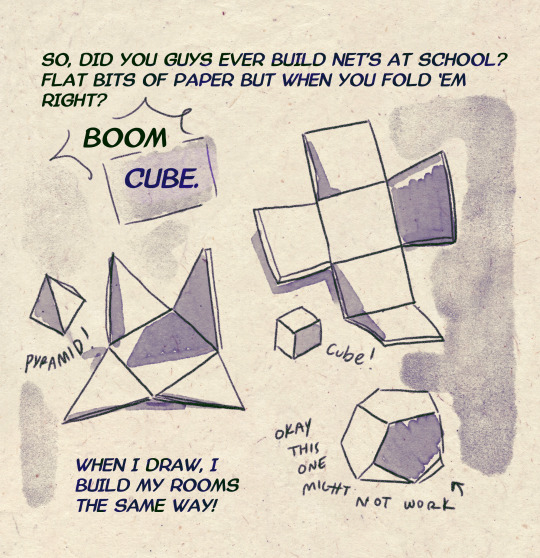
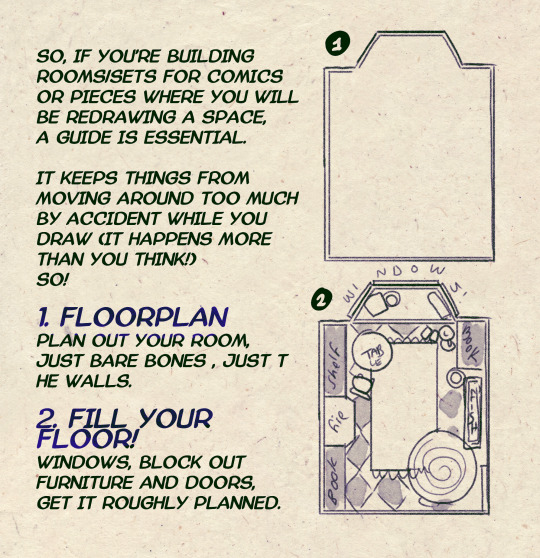


I made a Room Building tutorial! Lemme know if it helps! 🧡
Tip me here| Commission info here!
#anonbeadraws#digital#art tutorial#tutorial#room building#room design#illustration#gif#digital art#digital tutorial#art help#art resource#let me know if it helps!#tried to make it as simple as I could
42K notes
·
View notes
Text
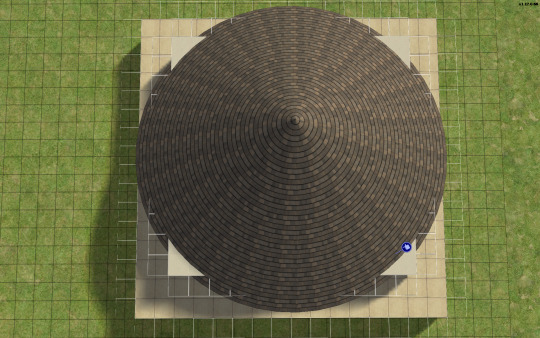
TUTORIAL: HOW TO BUILD A UFO ROOF HOUSE.
yo! one of my friends asked me how I do this, so I thought I'd put together a little tutorial and share. here's a preview of what a "ufo roof house" might look like once you're done:
this is just a little one I built in Strangetown on a 10×10 lot, read below to learn how to do this yourself.
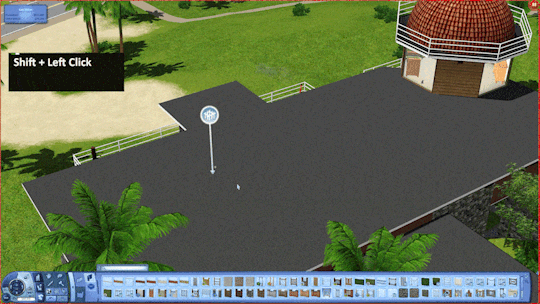
→ Step 1: Build your foundation (if you want one) + your first floor. The easiest way to do this is to make your walls an octagonal shape with the diagonal walls being half as many as the straight walls. As an example, you can see in the image below my straight walls are 6 units, so the diagonals are 3.
→ Step 2: Go up one level and lay a square of flooring for your roof to sit on, twice the size of your straight walls. My straight walls are 6 units, so my "roof square" will be 12×12.
→ Step 3: Using the small cone roof tool, drag from one corner of your square to the other, minus 1 unit. My square is 12×12, so the cone roof will be 11×11. You can see in the image below where to place your cursor to start:
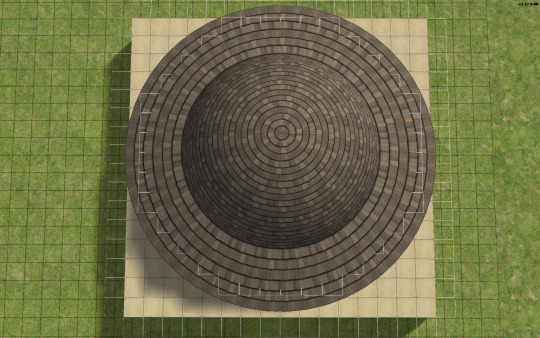
→ When you're done with the small cone roof tool, it should look like this:
→ Step 4: Delete the excess flooring. You can press F to toggle from a full square unit to a smaller, triangular unit to trim the corners. Unfortunately, you can't click and drag to remove the corners from the diagonal walls, you can only shift click to delete one triangle at a time, but it saves you from having to put down walls or fencing you're just going to remove anyway.
→ Step 5: Decrease your roof's angle. On my normal houses, I usually use a 25 degree angle, which in this case, looks like this:

→ Step 6: You don't want your walls sticking out like this. So, adjust your roof's angle until they're not sticking out. The lowest I could get the roof's angle on this one was 39 degrees, which looks like this:

→ Step 7: Much better! Don't worry about that spiky bit in the middle, because we're going to add a dome roof to cover it up. You can start fiddling around with the dome roof tool by using the same amount of units as your straight walls, or you can go smaller. A 6×6 dome on this house looks like this:
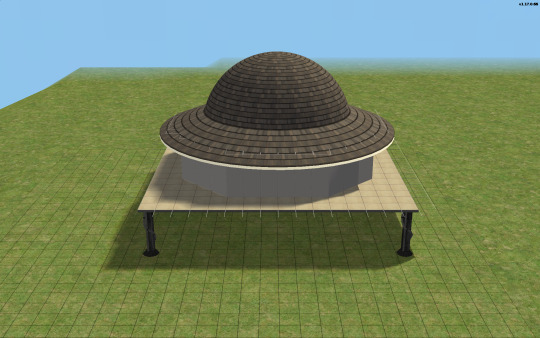
→ I like my UFO domes a little smaller, so I went with 4×4. TIP! If you have an even number of straight walls, your dome will also be even, if it's odd, your dome will also be odd. If you had 7 unit straight walls for example, your dome could be 7×7, 5×5, 3×3, etc. Here's how my 4×4 dome turned out:


→ Step 8: Nice! We're pretty much done! Decorate however you like!

→ Step 9: Enjoy your UFO roof house! All content shown on this one is maxis, except for the deck support posts, which are default replacements available HERE, thanks to @psychosim! I hope you enjoyed this tutorial. Feel free to tag me if you make a UFO roof house because of this, I'd love to see it! 👽💖 Happy Simming!
292 notes
·
View notes
Text

Buildermon family photo or smth 😛 Ahahahh,,,
Lelelala

And one of just shedletsky because uhh chicken butt yeahhh
#forsaken#forsaken fanart#shedletsky#shedletsky forsaken#builderman#builderman forsaken#buildermon#??? it’s 3 AM and for some reason the way build is spelled is freaking me out#uhm#1x1x1x1#forsaken 1x4#1x1x1x1 forsaken#baby 1x#roblox#robloxia#idk if I’d even count this as just forsaken it’s like uh my own little world I’m shaping rn#why all my posts blurry how to fix tutorial pls
388 notes
·
View notes
Text

This has been my sacred scripture since I was a small child 🙂↕️🙏
227 notes
·
View notes
Text

This is what the Herbalist Cottage is looking like so far 🌿
#minecraft#mineblr#minecraft inspiration#minecraft build#minecraft inspo#mineblogging#tutorial#minecraft cottage
201 notes
·
View notes
Text


Minecraft Small Oak House! A complete survival house made out of easy-ish blocks to get!
I wanted to make a house with mainly oak blocks, cause I feel like that's a block that I always find (almost) everywhere, so why not, right? And cobblestone, cause I always have loads of that. The whole interior of the build is quite cozy, imo, and it has always the features u might need on your base, from your personal mineshaft to an enchantment setup. Anyway, this was the result!! I hope this serves as inspiration 🙌 If u want u can find the tutorial on my channel here!
✨ Shaders: BSL Shaders 🕹 Game version: 1.21 🌹 Resource Packs: Jerm's Better Leaves
#minecraft#mineblr#minecraft building#minecraft ideas#minecraft aesthetic#minecraft build#minecraft inspiration#minecrafters#minecraft house#minecraft interior#minecraft survival#minecraft server#minecraft smp#minecraft inspo#minecraft stone#minecrfat#minecraft builds#minecraft base#minecraft tutorial
481 notes
·
View notes
Text
I finally finished a NEW CUSTOM MAP ART!!! "Visitor," a portrait of an enderman, is extra exciting because it's my first full-palette map painting, meaning I used block height to access all the highlight and shadow colours available!! More on the full process under the cut, but the short version of what this means is:
ITS A VERY COMPLICATED CONSTRUCTION. I created the art, then planned and built this manually, without any mods or schematics for construction. Huge props again to everyone else in the server for helping me gather all the materials to make this absurd thing possible!!!
This was the original art I made for it! I'm a huge fan of the "compressed" look of the vanilla paintings, so I've been starting with a large image and shrinking it down, though there were a lot of pixel tweaks to get it to read well. After shrinking it to 16x32 (for an art made of two maps), I convert it to a limited palette that I've set up to match the colours minecraft actually has available:

The map palette is actually tremendously limited, so figuring out a painting that will still look good with that constraint is a challenge in and of itself!
Anyway, the way minecraft maps work, a block that is Taller than the block to the north of it shows up with a slightly lighter colour, and a block that is Lower than the block north of it shows up on the map with a slightly darker colour. So when making a key for this one, I marked all the squares with a little arrow if it's the lighter or darker version:
Each "pixel" here is a full stack of blocks on the mapped area: 64 blocks, 8 rows of 8. In order to achieve the affect of every block in a given pixel being taller or shorter than the block to the north of it, dark and light shades need to staircase either up or down. Because staircasing downwards in survival sounds even worse than this madness, I did some planning to make sure each of the "downwards" staircases would touch the ground, so I could simply staircase up from south to north instead. This involved figuring out how many up and down movements were in each individual column and planning out 32 little layouts:
It's worth noting that if you look up minecraft map art on Youtube, most of what you'll find is either, the simple realisation that placing blocks allows you to make custom map art, or an explanation of how to use a generator that will let you plug in any picture and then produce a schematic for you. It's very cool that these exist, but I wanted to do full palette art myself, without an auto-generated schematic, and at the time THERE JUST WEREN'T ANY TUTORIALS FOR HOW TO DO ALL THIS?? Now, having the experience of finagling all this, i think perhaps the reason is that this is a mad undertaking.
ANYWAY: PROGRESS SHOTS!!
I actually love how the staircases look..... its like some kind of modern sculpture
Fewer shots of the second half since I did it on call with friends; the last screenshot is one Thren took of me activating the new locked map to use for the gallery.
Once these paintings are done, I lock the finished maps, make copies, and stock them in the art gallery so other friends on our server can also put these paintings in their homes! It's a lot of work, but really rewarding to see my art decorating various buildings around the server. ;u;
I have one more custom full-palette painting I've done the art for and gathered all materials for; I still need to do the full key and plan staircasing for it before I can start, but HOPEFULLY if my resolve doesn't waver there'll be at least one more of these!!
#minecraft build#minecraft screenshots#minecraft#block game liveblogging#minecraft map art#GENUINELY SO PROUD OF THIS ONE#bsl shaders#im so tempted to make some sort of tutorial on doing this by hand sometime. you shouldnt do it by hand. but a tutorial should exist!!
485 notes
·
View notes
Text
Useful TS3 shortcuts you might not know about - quickly copy and recolor! (GIF)
• Hold Shift while dragging a palette to recolor the entire floor or wall


• Ever get frustrated copying objects with an eyedropper? Hold Shift and place the selected object to copy it without loading it! Works in both Build or Buy modes, can copy Debug objects with no codes ;)

• Hold Shift and drag fence or wall tool to create a room; hold Ctrl to remove the wall or fence
These shortcuts have saved me lots of time! I rarely use both sledgehammer and eyedropper :) By the way, the support team has said that my tumblr is finally unbanned! Whew, let's see!
931 notes
·
View notes
Text


I just remembered this building trick for custom fences as I was building a library! I don't know where I learned it and how it I remembered it out of nowhere but I'm so excited to show you! Basically the steps are:
Build a foundation
Place floors on the side you want your top fence on
Build the lower fence on the ground
Build the top fence on the floor
Remove the floor and foundation
And there you go! It doesn't work with all fences but if you have enough low and shrub fences you can definitely come up with a few options.
#ts2#the sims 2#sims 2#ts2 build#ts2 build tutorial#ts2 build trick#ts2 tutorial#i hope this makes sense!
141 notes
·
View notes
Text

Fully Underwater Lot Tutorial
@creida-sims @kitkat99
UPDATE January 2025
There is now a much, much easier way to do this. This version of SimPE now includes a tool to change terrain geometry. To edit the terrain in SimPE, go to Tools/Neighborhood/Neighborhood Browser and load your neighborhood. In the Resource Tree, select Neighborhood Terrain Geometry (NHTG) and select the only resource in the Resource List. In Plugin View, click Terrain Editor. It's very intuitive, but basically, you can edit the terrain under a lot to make it be underwater. You can also delete the road with the Road Editor.
I'll keep the old tutorial for archival purposes, but unless you can't or don't want to install this version of SimPE, it is pretty much obsolete.


Some warnings and disclaimers
1. This is not a beginner tutorial. I have tried to explain with as much detail as I can, but still, if you just started playing The Sims 2 I recommend trying out other building tutorials first.
2. I have tested it but there's always a possibility that some new problems will come up. Follow at your own risk. Backup your neighborhoods before trying this. Test it first in a new empty neighborhood.
3. These lots are roadless, so they require specific gameplay conditions to avoid breaking immersion (pun intended).
4. They will behave like normal lots in the sense that sims can walk around and do anything as if they were on land. There's one big problem to consider: when sims go fully underwater, their hair and some parts of their clothing might disappear visually.
So this is more useful for structures that sit above the water, shallow water that doesn't reach a sim's head or, with some modifications, small islands surrounded by water. So unless you want bald mermaids, I don't recommend this for sims that live underwater.
5. If you use Voeille's hood water mod, reflections will look glitchy in lot view, because this is technically not a beach lot. The only solution I found is enabling "Lot view ocean reflections" in RPC Launcher. Otherwise you'll have to deal with glitchy reflections.
6. Before following this tutorial, make sure you know the basics of creating, editing, importing and exporting SimCity 4 terrains. Written tutorial by SimEchoes here, video tutorial by loonaplum here.
Software and mods used
The Sims 2 FreeTime expansion pack (required for the modifyNeighborhoodTerrain cheat)
SimCity 4 (required) Hood Replace by Mootilda (required)
Lot Adjuster by Mootilda (required)
Portal revealer by Inge Jones (required)
Voeille's pond and sea water overhaul and RPC Launcher (optional, see disclaimers)
The Sims 2 Apartment Life and Bon Voyage expansion packs (optional, for "walk to lot/work/school" options)
Cheat codes used
moveObjects on/off
modifyNeighborhoodTerrain on/off
1. Creating/editing a terrain in SimCity 4
1.1. You can edit an already existing terrain or create your own from scratch. In both cases, you need to keep two things in mind: If you want the usable area of the lot to be underwater, such as making houses for mermaids or a coral reef, make sure the water is shallow. No more than a few short clicks with the terraforming tools in SimCity 4. This is because The Sims 2 live mode camera won't go underwater, so making the water too deep might make it uncomfortable to build or play the lot.
If you goal is to build a structure mostly above water, like a ship or an oil rig, you can get away with making the water a bit deeper, but not too much. I've noticed that sometimes the lot terrain tools stop working correctly if there a hill that's too steep.
1.2. Once you've created the terrain, you will need to add a small island on the area where your lot will be. I know it seems contradictory, but trust me, it will make sense. Create and name your city. Use the terraforming tools in city mode to make a tiny island of about 6x2 squares.

1.3. On the island, use the road tool to place a straight road that takes up 4 squares. Then, using the street tool (the last option), place two short streets at each end of the road.
Streets will disappear in TS2, only roads translate to roads in ts2, so why do we place them? Well, placing a street at the end of a road will get rid of the rounded end bit in TS2, which can't be used to place lots. This will be important for the placement of the lot and to make sure the edges of the lot are underwater. If this doesn't make sense yet, don't worry, it might make sense later.
1.4. Save the terrain. Don't exit SimCity 4. Copy your new/edited sc4 terrain from your SimCity 4 folder to your SC4Terrains folder in your Sims 2 documents directory. It is usually
"C:\Users\YOURUSERNAME\Documents\EA Games\The Sims 2 Ultimate Collection\SC4Terrains"

1.5. Back in SimCity 4, we're going to make a second version of this terrain. Remove the roads and streets you made before, with the bulldozer tool. With the level terrain tool in Mayor mode, carefully remove the island, so it's on the same level as the bottom of the ocean/lake. Don't change anything else. Save, exit and copy this second terrain to your Sims 2 SC4Terrains folder. Make sure you rename the file to something different from the first one, like adding "no roads" to the filename. You should have two terrains by the end of this step. One with the small island and one without it.
2. Editing the terrain in The Sims 2
2.1. Open The Sims 2 and create a new neighborhood using your new terrain. Something to keep in mind: if you want the terrain to be a subhood of another neighborhood, make it a subhood from the start. You will not be able to move the lot once it's finished, since it will be roadless. I don't recommend decorating the neighborhood for now. Leave it empty until the end of this tutorial.

2.2. Place the smallest empty lot (3x1) on the island.
2.3. In neighborhood view, open the cheat console by pressing Control + Shift + C, and type
modifyNeighborhoodTerrain on
To quote The Sims Wiki:
"This allows you to alter the neighborhood terrain by raising or lowering it. To use this cheat, be in the neighborhood view, then enter the cheat "modifyNeighborhoodTerrain on" (without the quotation marks), and click over the area you would like to change. To select a larger area, click and drag the cursor to highlight the desired area. Press [ or ] to raise or lower the terrain by one click, press \ to level the terrain, and press P to flatten terrain. When you're finished, type “modifyNeighborhoodTerrain off” in the cheat box (again, without the quotations)."
If you use an English keyboard, these instructions will probably be enough for you. If you don't, I recommend first testing the cheat, because the keys for using this cheat are different in other languages. For example, in my spanish keyboard, the question marks are used to raise and lower the terrain and the º/ª key flattens it.
Another aside: When you select an area using this cheat, a green overlay is supposed to show up. Some lighting mods make this green overlay invisible, like the one I use. If that's your case, you kind of have to eyeball it. Remember that one neighborhood grid square in TS2 is equivalent to 10 lot tiles, or the width of a road. I recommend getting a mod that allows you to tilt the neighborhood camera on the Y axis, which will allow you to have a bird eye's view of the terrain.

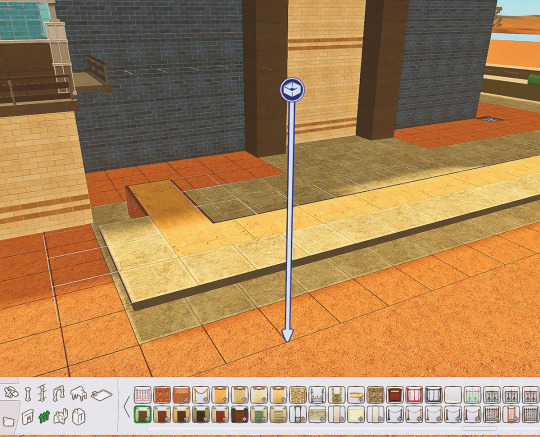
2.4. Flatten the terrain around the lot so it's at water level. This cheat won't allow you to edit the terrain inside the lot, so you have to edit the terrain around the lot. Make sure there is plenty of flat underwater space around the island. You should end up with something like the picture above. The water will have some holes, but don't worry, those get filled with water the next time you load the neighborhood.
2.5. Enter the lot and place any object on it. Save the lot and exit the game. This is so LotAdjuster recognizes the lot in the next step.
3. Expanding the lot with Lot Adjuster
3.1. Open Lot Adjuster and select your neighborhood and lot.

3.2. Click "Advanced…". Check "Over the road (only enlarge front yard)". Use the arrows to add 20 tiles to the front yard. Click "Finish" and "Restart".

3.3. Select the same lot again. This time, check "Add and remove roads". Uncheck the road checkbox for the front yard. Add 20 Tiles to the back yard, 20 tiles to the left side and 10 tiles to the right side. Check "Place portals manually". You should end up with a 60x60 lot, which is the biggest size. You might want a smaller lot, but unless you know what you are doing, I recommend starting with this size. You can shrink it later. The goal of making the lot this big is making sure the edges of the lot are underwater. Click "Finish" and exit.
4. Moving portals and flattening the lot

4.1. Make sure you have the portal revealer by Inge installed in your Downloads folder before the next step. Open your game and load your neighborhood. The lot should look something like the picture above.

4.2. Load the lot. Delete the object you placed before. Place the portal revealer on the lot near the mailbox/phone booth and trashcan. It looks like a yellow flamingo and you can find it in Build Mode/Doors and Windows/Multi-Story Windows catalogue. You will notice that when you select the object from the catalogue, some yellow cubes appear on the lot, and when you place the object, the cubes disappear. After placing the portal revealer, pick it up and place it again. This will make the yellow boxes visible again.
So what are those yellow boxes? They are portals. They determine where sims and cars arrive and leave the lot. The ones on both ends of the sidewalk are called pedestrian portals, and in the street, one lane has portals for service vehicles (maids, gardeners, etc.) and the opposite is for owned cars and carpools. You can see the portal's names if you pick them up. Make sure not to delete any of them.
Now, since this is going to be a roadless lot, ideally there won't be vehicles in it. This means that the lot would ideally be accessed through walking only. In community lots, this would not be an issue if you have the Bon Voyage expansion pack, which allows sims to walk to lots.
In residential lots, you might run into some problems. Service NPCs always arrive on vehicles, and unless your sim owns a vehicle, the carpool and school bus will always come to pick sims up for work/school. It might break your immersion to have a vehicle show up underwater or on a ship. There are many options to avoid this: having sims work on an owned business instead of a regular job, not having kids on the lot, making the kids homeschooled, avoiding calling service NPCs… it depends on how you want to play the lot. For example, my icebreaker is a residential lot, only adults live there, some sims live in it temporarily and none of them have a regular job.

All of this is relevant because we're going to move the portals. Where you move the portals depends on you. Think about how you're going to use the lot. In my icebreaker, I placed the car portals (which won't be used) underwater, on a corner of the lot. I placed the pedestrian portals on the ship, to pretend that the walkbys are part of the crew or passengers. But for now, just move the portals, mailbox/phone booth and trashcan to a corner of the lot. To be able to pick up the mailbox/phone booth and trashcan, use the cheat moveObjects on. Delete the street and sidewalk tiles using the floor tool (Control + click and hold left mouse button + drag).


4.3. Flatten the island with the level terrain tool. Save the lot. Almost done! Don't mind the hole in the water, this will be fixed. You will notice that in neighborhood view, the island is still there. This is because the neighborhood terrain under the lot hasn't updated. I don't know why this happens, but it does. Normally, moving the lot would fix it, but we can't move this lot using the game's tools. Instead, we are going to fix the terrain with Hood Replace. Don't exit the game yet.
5. Updating the terrain with Hood Replace
5.1. Create a new neighborhood using the new roadless terrain. Make sure it has the same type of terrain (lush, desert, etc.) as the first one. Again, name it "NO ROADS" or something similar. Exit the game.

5.2. Open HoodReplace. On the left column you will select your "NO ROADS" neighborhood. In the right column, select the neighborhood that has the underwater lot. Check these settings: Replace terrain, replace road, and versioned backups. Leave everything else unchecked. Click Copy.

5.3. Open The Sims 2 and load the neighborhood to check if the changes worked. That concludes the tutorial. At this point you can shrink the lot if you don't want it to be so big. Remember to move the portals to their final placement when you're done building the lot. Also keep in mind pedestrians (walkbys) always walk by the mailbox, so keep the mailbox accessible for sims.
If you're going to have multiple underwater lots, I recommend making them first, and decorating the neighborhood after. Doing this in an already existing neighborhood might be more difficult, mainly because, if you made any changes to the terrain using the modifyNeighborhoodTerrain cheat in the past, they might get reset when using Hood Replace.
154 notes
·
View notes
Text
Weathering Tutorial
Thought I'd write up a quick tutorial to how I approach weathering for my gunpla kits. Typically, I'll do a quick gunmetal drybrush of the grey parts of a kit before I start building, as well as correcting any colour inaccuracies. This tutorial covers some of the things I do to a kit after it's built, to give it a more "lived in" look.
For the best effect, I apply stickers and other decals before weathering, as well as graffiti. This way, weathering cuts through or over these designs, helping tie them to the kit a little better.
The example kit here is the HGUC 1/144 Nemo, which I'll upload a review for soon that should be linked in the future.
Bullet Holes & Impact Points
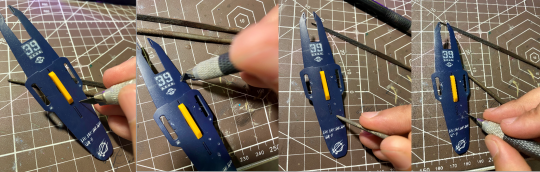
I typically use a hobby knife, pressing it into the surface of the plastic to make a small mark where I want the bullet impact point to be.
Usually with a blade that has a damaged or flatter tip, I'll spin the blade around, just like you'd use a hand drill (although I don't have any of those, so this suffices). Holding the blade at a slight angle will make the hole wider and a little more bowl shaped, just like a dent from an impact point.
Using a round metal file, I widen some of the holes and bevel the edges. Apart from making the hole a little more visible, this also creates a bit of a raised edge.
A starburst pattern can be created by cutting a few shallow lines with a knife traveling out from the centre of the hole, creating the implication of shrapnel from a shattered round.
Armour Chips and Edge Damage

Using a round file, I carve a rounded indent into the edge of the armour section. Depending on the angle you use and the position of the indent, this can come across as a dent or a chip of armour blown off. You can see what this looks like in the second image.
After this, I'll use a hobby knife or an angled file to cut deep grooves heading outward from the dent, as well as on their own to create cuts and chips along more acute angled on armour pieces (think the 90 degree angle on a square leg piece). As additions to the rounded damage, it can look like shrapnel damage from an intial angled impact. On their own, more angled chips give high points on armour a more worn effect.
Paint Damage (Sponge Chipping)
This utilizes a technique I learned from @radiofreemagica a few months ago. Give their blog some love!
Sponge chipping involves lightly applying paint to areas you want to appear chipped or worn using a sponge. The effect is that paint is applied as a series of small spots, which if done right should look as though the pain has fallen off in large flakes. The sponges here are simply offcuts of an old kitchen sponge.
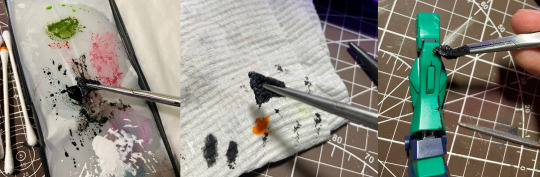
For my first pass, I use a slightly heavier application of black paint.
Dab a little of the excess off on a piece of paper - you want the impression of the sponge to come across clearly for the small little dots. If there's too much paint on the sponge, it'll blot onto the model and obscure detail.
Apply the paint across raised edges, especially corners, where the mech or vehicle is likely to experience the most friction. Try to be measured on application - not every raised edge needs to have chipped paint!

For the second pass, a gunmetal is appropriate. Use an even smaller amount of paint.
Dab the gunmetal over the top of your black. This will make it look as though underneath the black "primer" is bare metal.
Drybrushing
This step helps to augment the wear and tear established with your sponge chipping. Using a lighter metallic, you can emphasise the idea that under the bright colours of the model kit is tough metal plating.

My go-to drybrush for this is Citadel's Necron Compound, which is a drybrush-ready silver. Usually I prefer cheaper and more dilute Vallejo Air, as it reduces the risk of drying out or clogging in the bottle, and doesn't need to be thinned. However, Citadel's technical paints are really well made, and worth the extra cost.
For a drybrush style paint, you only need to wipe a little excess of your drybrushing brush. For a typical silver acryllic, you'll need to keep wiping until only a little silver comes off the brush, enough to only stick on the high points. You can use a specific drybrushing brush for this, or just any old brush that you don't care about abusing a little.
Only lightly tickle the raised edges with silver. A little goes a long way - you just want the edges of the armour segments to catch the light and give the implication of worn metal.
Painting the Damage
Coming back to the damage we carved with files and knives, it's time to give the impression of metal underneath them, rather than plastic.

For this, I'll use a plain silver acryllic, something around a flat aluminium rather than chrome or purer silver.
With a small brush, apply the silver paint into the chips, cracks, and bullet holes you made earlier. Make sure to work it right into the thinner recesses, and wipe away any excess with a cotton bud.
Next, to bring down the tone and to add depth to the damage, I use a black wash. You can buy premade acryllic washes, or even use something like liquid panel liner, but I prefer to just make my own.
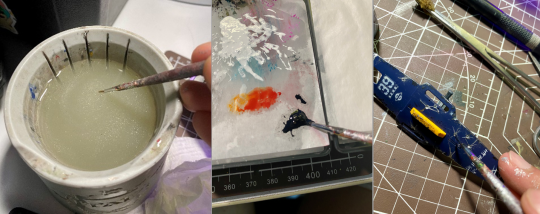
Make sure your brush is very wet, picking up water with your brush.
Mix with the paint until it is very thin. You should be able to see through it.
Apply it into the bullet holes and cracks, letting it flow into the deepest sections just like with a panel liner, and wiping away the excess.
This should make the damage look a little deeper, and give it a bright edge from the silver.
Finishing Up
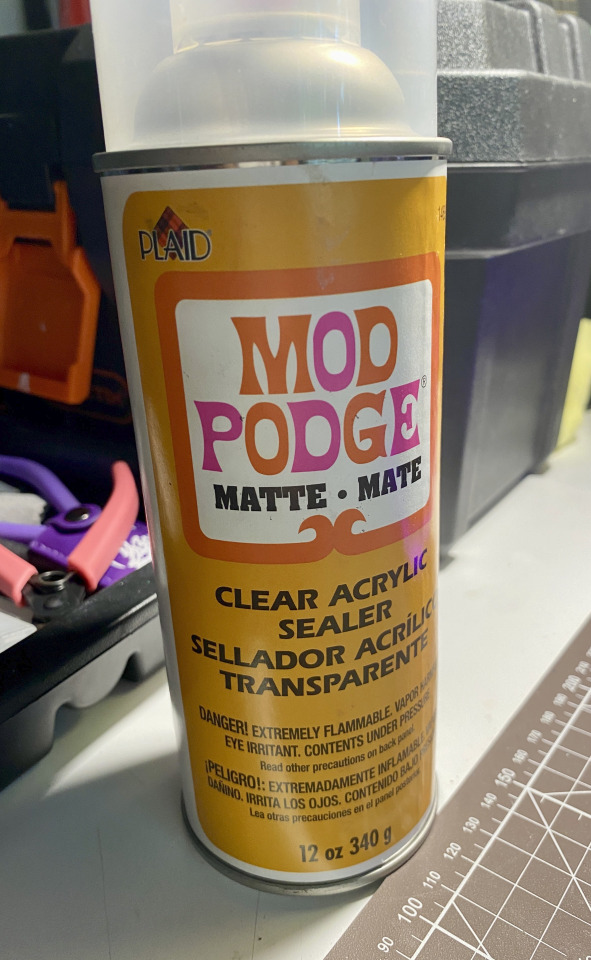
Make sure to give your kit a protective topcoat, so that all your paint doesn't get chipped off when posing or moving your kit! I use a matte finish pray on sealer. Right now I'm using the Mod Podge clear acryllic, but in the past I've also used bog-standard Rust-O-Leum Matte Clear varnish without any issues. It's important to cover or mask off any clear or gloss parts when doing a matte finish, as these will ruin the parts and it's very difficult to clean them once the topcoat is set.

And that should be everything! Now your kit should look a lot more metallic and worn. Depending on how much you add, you can make your kit look anywhere from it's first fray to a beaten and dilapidated mech abandoned in the dirt. Let me know how you go with this tutorial!~
#gunpla#my gunpla#plamo#model building#model weathering#weathering#model painting#painting#tutorial#weathering tutorial#my tutorials
143 notes
·
View notes
Text

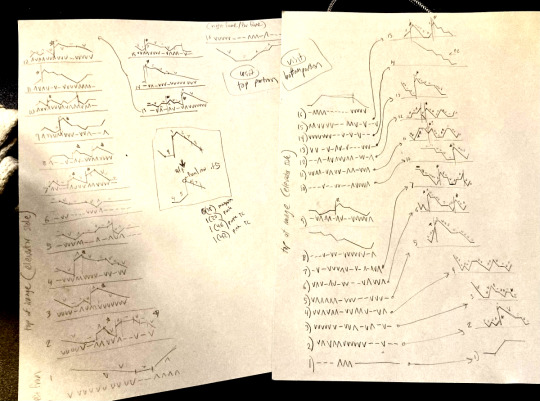
Hiya first post - Here's a way i found to make Minecraft roofs easier :)
#minecraft#mineblr#minecraft tutorial#minecraft build#minemath#minecraft oc#pixel art#concepts#blueprint#digital art#first post
728 notes
·
View notes
Text
Nordhaven inspiration
So, you want to build and create for Nordhaven? Please do! I am no builder, and I love using other people's stuff in my game :)
Now, I'm Swedish so I figured I could help out for your inspirational needs! Pinterest is not really the best place to go...
The biggest site for buying and selling homes in Sweden is hemnet.se.
Here, you can choose what type of home you are looking for. Remember when it comes to interiors; these homes are often styled by professionals (especially in the central areas).

Alla typer = All types Villor = Villas/stand-alone homes Par/kedje/radhus = houses that are together (row houses? idk) Lägenheter = Apartments Fritidsboenden = Cottages/seasonal living places (it might not be made for all-year living) Tomter = lots Gårdar/skogar = farms, forest (meaning that this is a big home or a big piece of land) Övriga = Other types.
When typing area, you have to remember that Sweden has län, kommuner and cities/towns (stad/by). These might have the same name!
A "län" is probably like a county, while "kommun" is a smaller area. And then the city. So for example, Stockholm (city) is in Stockholms kommun, Stockholms län.
So as you can see below, many kommun belongs to the bigger län.

If you scroll down, you will find Område (areas).
These are areas within a city or kommun. Smaller towns might not have this thing, but Stockholm definitely does! If you know an area, you can write that already in the search bar. If you want inspo from Stockholm, I would say that the "Stockholm - inom tullarna" is probably where to look for apartments that look like Nordhaven's Gammelvik (especially Gamla Stan). This is the central parts of Stockholm, and will usually have a 19th-century (and ofc older) look to them. Apart from the crazy, weird boxes they built in the 90s and 80s.
Regarding Gammelvik: this is inspired by Gamla Stan and other areas that were populated in the 16th-18th century.

Once you click on an "add", you will se a picture and below there's usually one called "planritning" which will give you the layout of the home.
Where it says "NN bilder" - that means that there are pictures! This usually take you to the actual realtor's site and all the pictures!

Some guidelines:
If you want houses, I would look for Gamla Enskede if you want a Stockholmian look (from the Egnahems-movement, scroll down to "Egnahemsområden i Sverige" to get names of areas that have the same idea).
I know Malmö probably has a lot of interesting things and so does Lund and Ystad - if you want a style that is probably a bit more like Denmark. And I would love to hear from my Nordic friends!
The train station in Iverstad is supposed to be inspired by the station in Gothenburg, so do check out homes from Göteborg!
I would, for layouts of very practical homes, look for places from the folkhem-era (1945-1960) (english, and about funkis which precedes Folkhemmet). Here I would look for Vällingby Centrum, Ålsten in Bromma (specifically Ålstensgatan), Årsta/Årsta centrum.
These areas are also inspired by the ABC-idea (Arbete/work, Bostad/residence, Centrum/center). The idea here was that people should be able to walk to their work, and to social spaces (cafés, cinema, clothing stores, etc).
More thoughts under the cut!
For inspiration about Swedish people and how we look and our lifestyle, I would recommend Swedish news, under local: SVT.se/lokalt. You might need a vpn to access. Just choose your area and read news!
hemochhyra is the news for people who rent and since they have articles about living, you might get to see interiors! (That aren't styled).
Some things; - Laundromats. These do not exist in Sweden. In a block with apartments there is a shared laundry room, which you can book if you live in the block. Some people now have washing machines in their apartments, but I have never been in an apartment building that doesn't have a shared laundry room. - For parks: I often find that Sims have a grill available. In a park in Sweden, this might not be the case. Or it's more like a place to have a bigger fire. This is usually because groups of people grill together (just google "dagisbarn grillplats"). Would love to see some version of that if you build a park! - For outdoor areas or a park, adding an ice-rink would be a nice touch. Most "kommuner" have a communal ice-rink which is usually indoors and people skate outside on actual frozen lakes - but this is probably not possible in Sims :) - Most cities were not built for cars - they are usually older than cars. Most modern areas are also built with the idea that you should be able to walk and then use public transport. There are of course exceptions to the rule, but this is a good thing to have in mind. - If any modder/cc-maker out there makes a pram that let's infants and toddlers sleep outdoors without being affected by the weather, I would be forever thankful! Swedish children nap outside very often. - A realtor that I think many simmers will like are Historiska Hem!
If you have any questions, don't hesitate to ask! <3
108 notes
·
View notes
Text

🐉🐉🐉
#kamen rider build#kr build#kamen rider#tokusatsu#my art#i miss my guy !!!#not the happiest w how this looks but hey . got to try out new stuff ive been watching tutorials for#i feel like ive found a better way to paint stuff so maybe ill try it again w some other chara
114 notes
·
View notes
Text
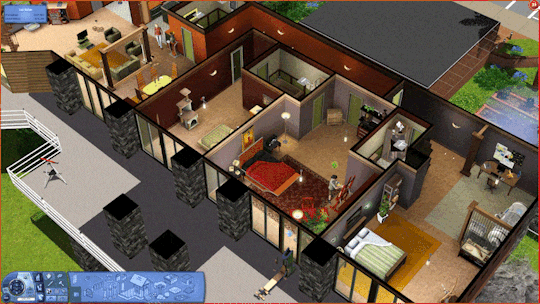
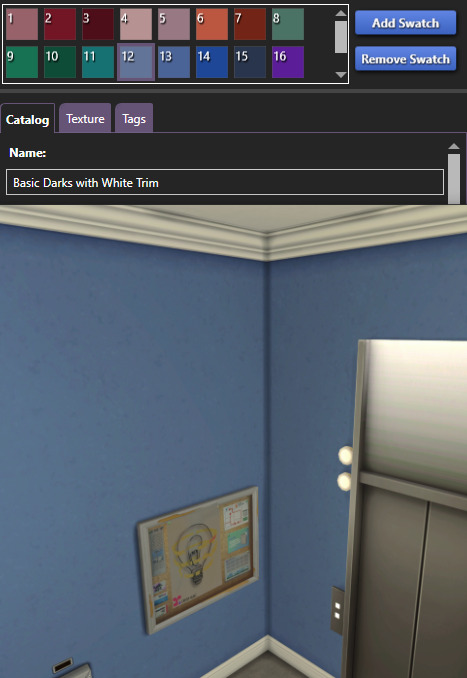
How To Override Apartment Hall Walls and Floors
If you, like everyone else I know, hate the apartment hallways and want to give them the face lift they deserve, here's how!
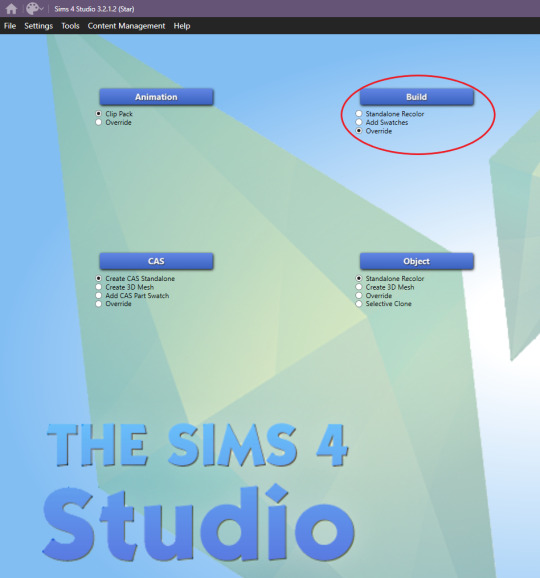
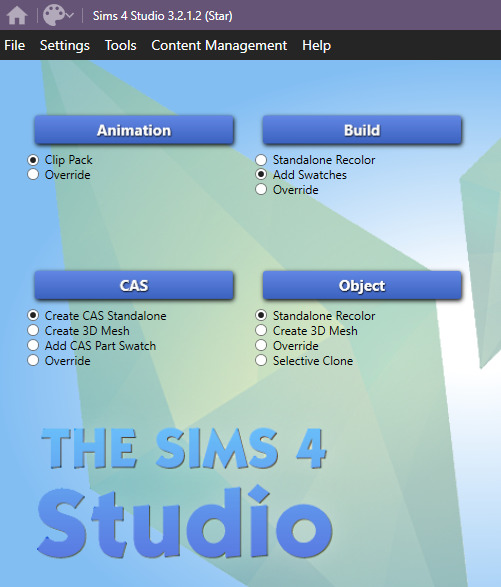
An override is actually super simple. You just need S4S for this. Step one is to choose override under Build, and then click Build.
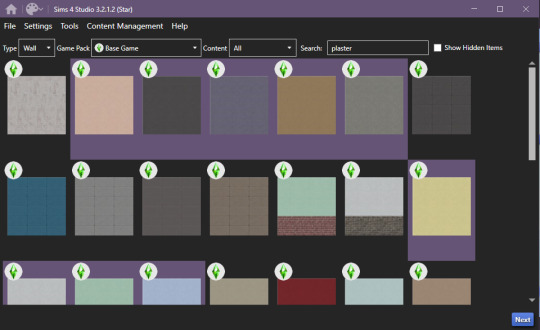
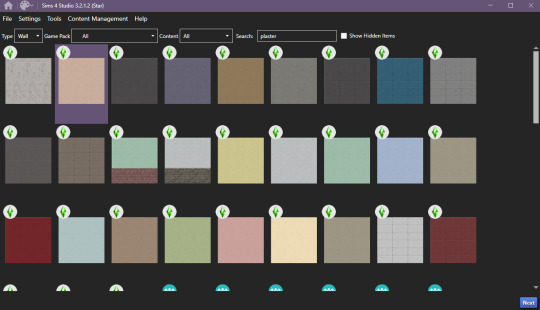
Now you need to find the wall you want to override. For this example, I'm making an override for the apartment in the Hakim House building. That wallpaper is called "Plaster Makes Perfect." (I figured this out by just going into build mode and searching and painting a nearby wall inside the apartment until I found the right one.) I have it set to Wall, Base Game, and I'm searching the word "plaster" to find it more quickly. Just click one swatch of the wall and S4S will pick all swatches, and then click "Next." Also, all of these instructions are exactly the same for floors, you'll just choose floors instead of walls.
Name your file whatever you want. To be consistent I name all mine to follow the naming convention: username_description. We only want to override one swatch so you'll just click "Remove Swatch" on all of the swatches except for the one you want to override.
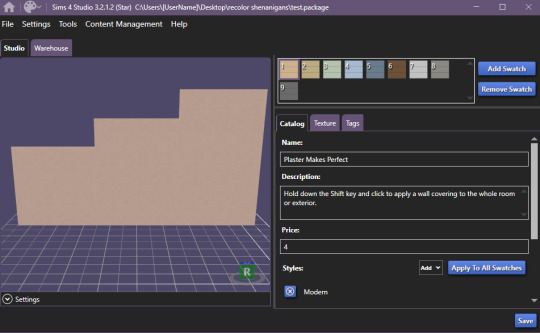

Once you're done, go ahead and hit "Save" and then head back to the main menu. Now we need to get the wall we want to replace it with. This time, pick "add swatches" and then click Build. This will only pick one swatch instead of all.
Again, just find the wall you want to use. Only select the actual swatch you want and then click "Next." You'll have to create a file here again, I just have a package called "test" that I save over for these instances where I don't actually need a new .package file, I just need to grab textures.
Now you'll go to the "Texture" tab and click "Export All."

On this save screen, create a folder for these texture files and then click "Select folder" to finish exporting.

Now, go back to the main menu and open up your original file. On the texture tab, you now just need to import all of your texture files. You'll import a Diffuse, Normal, and Specular for each wall height. So 9 files total, these are what you just exported. Just click Diffuse, Normal, or Specular, and then click the wall height, and then click Import. Go to that folder of textures you just created and then choose the correct file. S4S named each one exactly what they are so it's easy to pick the right ones.
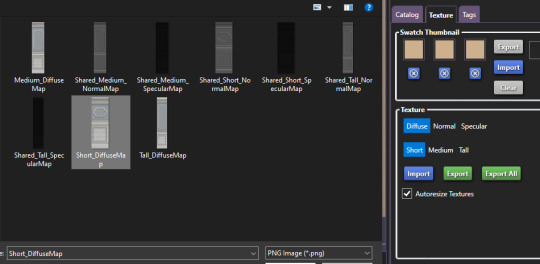
Keep doing that until you've replaced all 9 files, change your swatch colors, and then hit save. Congrats, you just made an override of that wall!

Hold up, you still want access to that swatch you just made an override of? There's a quick and easy solution. Go back to your main menu and choose "Add Swatch" and then click "Build." Find the exact swatch you made an override of, select it and click "Next." Give your new package file a good name.
Hit save and call it a day. That's it. Now, every wall in the game that is that brown plaster will be the wall with paneling BUT since I added that plaster swatch back, anywhere else that I wanted to use that brown plaster, I can just go and paint it right back!
For all the apartment wall and floor overrides I've created, go here!
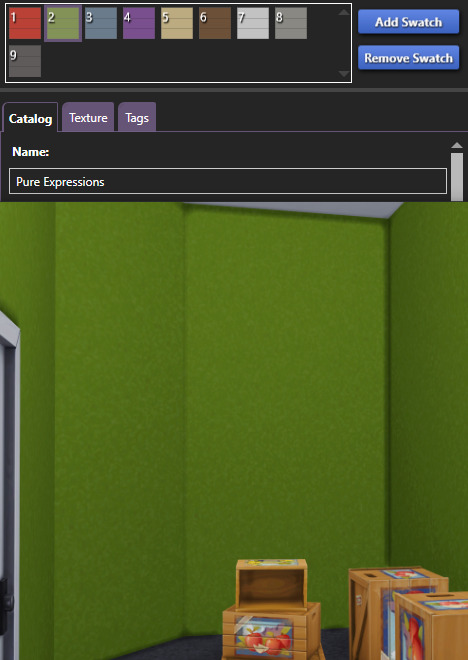
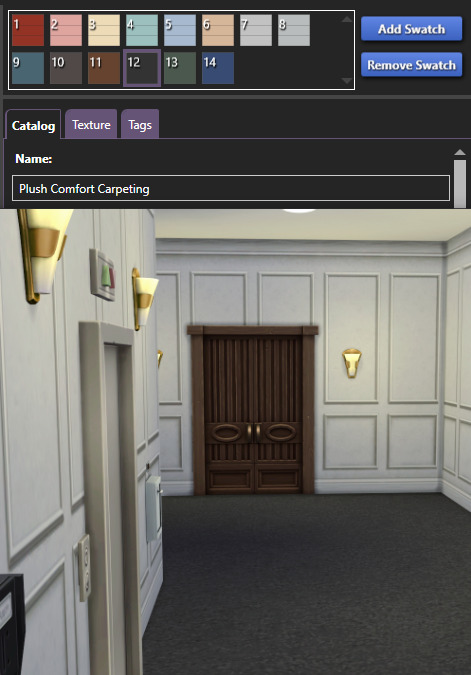
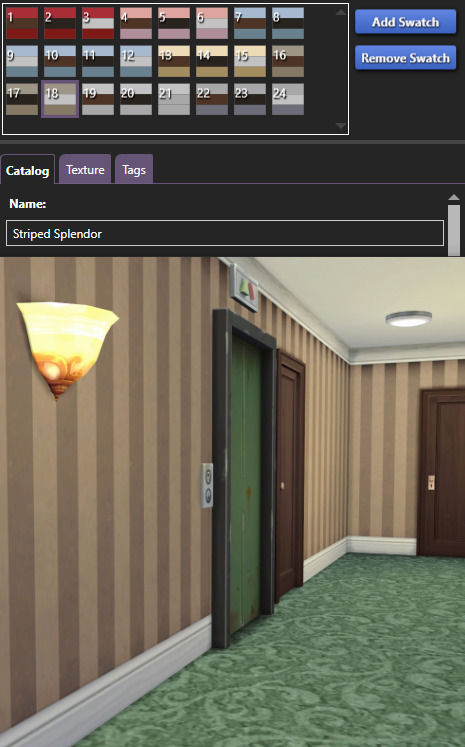
Below is the walls and floors for a lot of the apartments:
Alto Towers
I ended up not making an override of this carpet so the swatch could be 10 or 12 but, as dark as it is, I'm pretty sure it's 12, plus I think 10 appears a bit too brown toned to be the right one:
Chic Street:
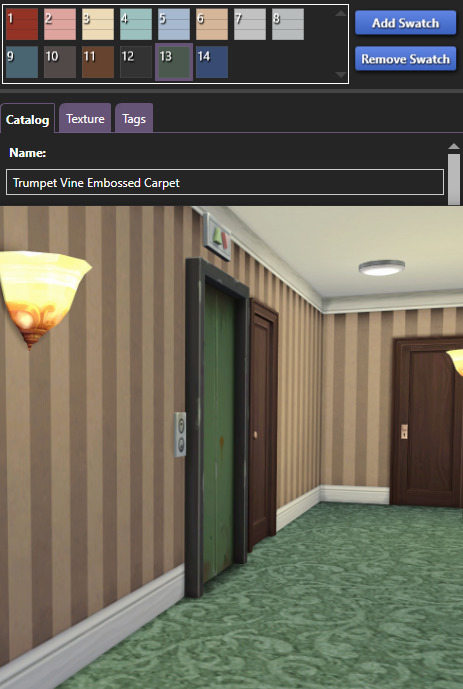
Culpepper House:
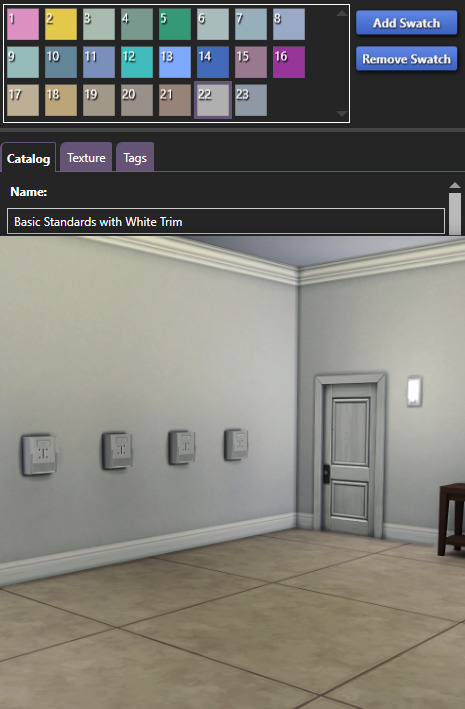
Jasmine Suites:

Landgraab Tower:
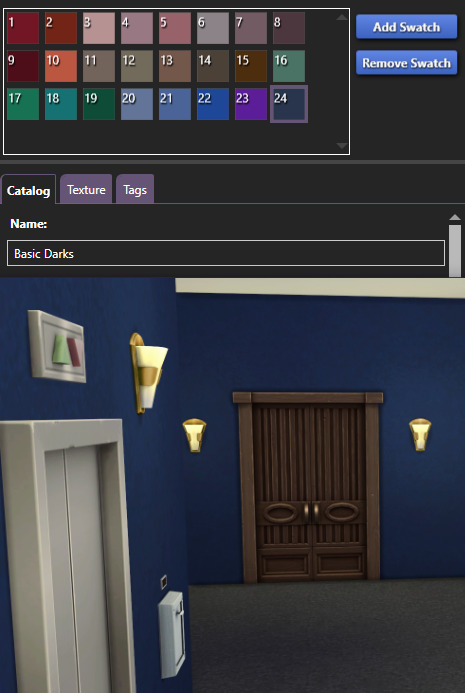
I missed getting a proper pic before placing my overrides but the original brown walls is the 23rd swatch of Basic Darks with White Trim.
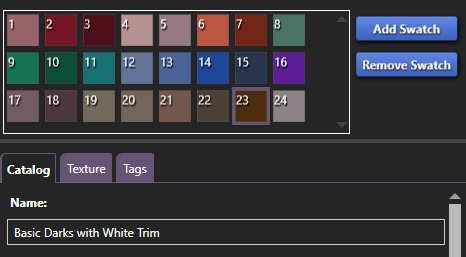
The non-patterned carpet:
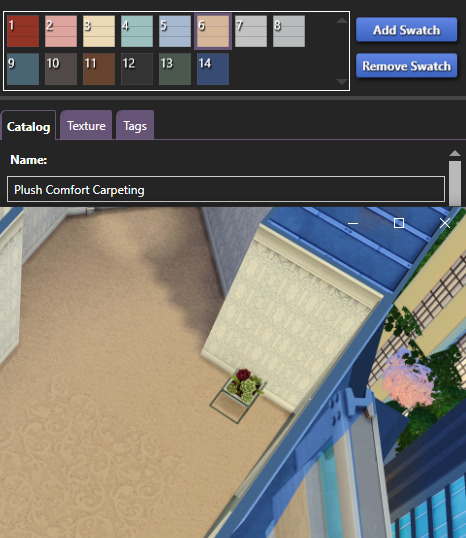
The Patterned carpet:

Spire Tower:
842 notes
·
View notes