#but these shows always use excessive filters and PS
Text
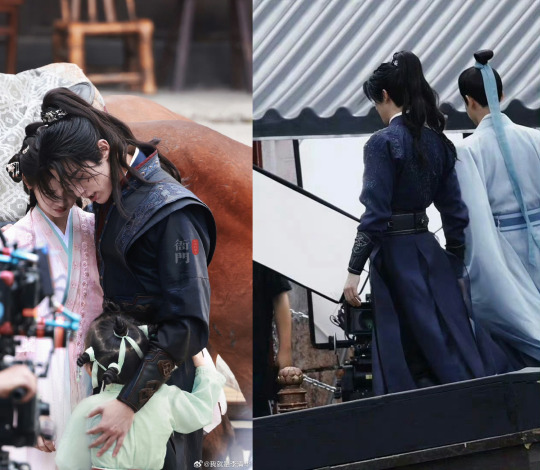
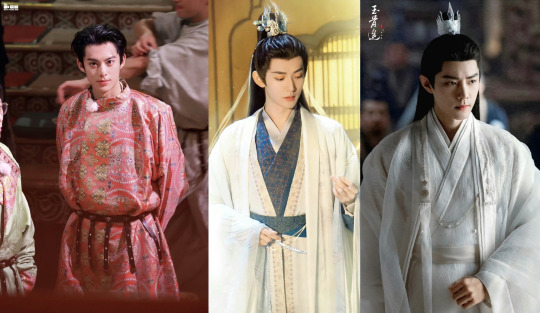

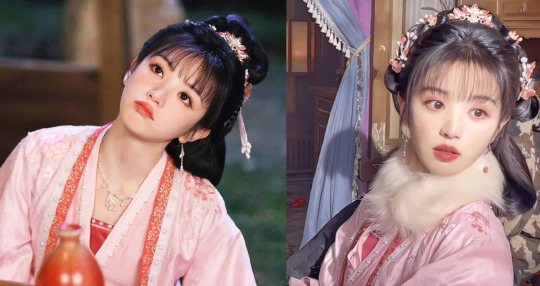
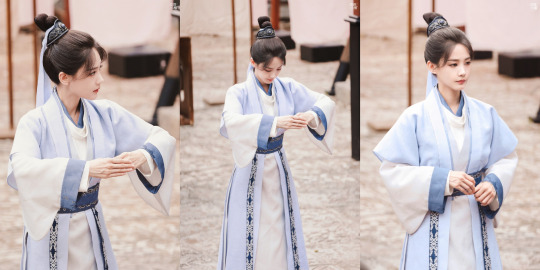


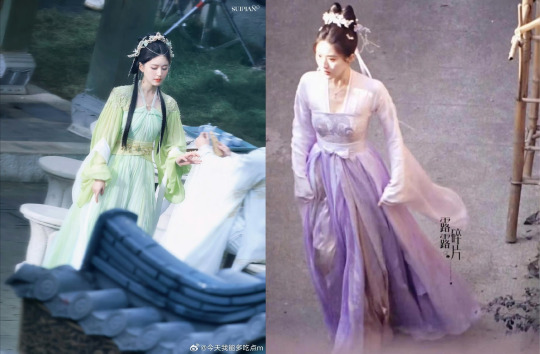


chinese guzhuang fashion
#young actress and actors are cornering the guzhuang market#that's why the industry is becoming more and more competitive#when it comes to guzhuang idol dramas/guouju古偶剧 with fantasy elements(like xianxia dramas)#cnetizens are bored with the same old faces#media has found that young actress and actors (20-27 years old) especially new pretty faces are more appealing to viewers#cnetizens can actually be mean to actress and actors (over 33 years old) cast as lead characters in guzhuang idol dramas#reasons is that lead characters are usually portrayed as teenagers or really young people#and the audience find it very weird to have middle-aged people cast such characters#especially scripts are usually adapted based on fictions#so fans of the novels would be furious about such casting#besides cnetizens want to see normal aging faces#but these shows always use excessive filters and PS#causing the midle-aged faces to be fake and weird#i once saw really mean comments on douyin for xianxia dramas casting middle-aged actress getting over one hundred thousand likes#actress and actors in zhengju正剧 guzhuang dramas or luodi落地 guzhuang dramas are not affected by this#like telling a realistic down-to-earth story or story inspired by real history or related to folks#and there is no fantasy or xianxia elements#china#fashion#chinese fashion#guzhuang#cdramas
306 notes
·
View notes
Photo
Hello! As requested, here is a tutorial on how I make my gifs. I would like to preface this by saying there are many ways to make gifs, and there’s no right or wrong answer imo. This is just how I personally go about doing so!
I will be using PS CC 2017, but as long as you have the video timeline option, it shouldn’t matter too much; on any version of PS, you should be able to adapt anything I mention here! You will also need some kind of screen recording software. I’ll talk a little more about that under the cut.
To start, you need the source material you will be making the gifs from! I get mine from snahp(.)it (avoiding links so tumblr hopefully doesn’t banish this from the tags lmao) and I always opt for either 1080p or 2160p. Not all laptops will support 2160p as it’s 4K, but either works great! You just want your gifs to be the best quality possible.
Next is where the screen recording comes in. I don’t use the screencapping method to make my gifs (where you use a program to cap a clip and then load those caps into a stack in PS). This isn’t for any particular reason… it’s just how my friends, (who very kindly taught me to gif), had always done it, so it’s now how I do it too. Personally, I find the quality to be just as good as the screencapping method, and have never noticed a difference between the two.
As I have a PC, I use the software built into it for screen-recording. If you go here: theverge(.)com/2020/4/21/21222533/record-screen-pc-windows-laptop-xbox-game-bar-how-to – you can see how to use the XBOX screenrecorder to record from files you have d*wnloaded. This also works on some streaming sites, but I think it depends on what browser you use. Personally, I recommend Firefox, as that seems to bypass a lot of the blocking and ads that occur when trying to do this sort of thing.
For MAC users, I have been told handbrake works well, as it converts MKV files to MP4, which can then be used to make gifs. You only need to convert part of the file to MP4 depending on how much you want to gif, and this also bypasses the screenrecording stage, as you can edit MP4 clips on Quicktime. I am told you can split them into smaller clips by going to edit > trim and it saves the new clip!
I have also used anyvideoconverter for small clips, but I can’t say what it does to the quality of your video, or how big of a file it lets you put in! With the XBOX screenrecorder, it doesn’t matter what type of video files you get, as the recording will save to MP4 anyway.
LOADING YOUR FRAMES
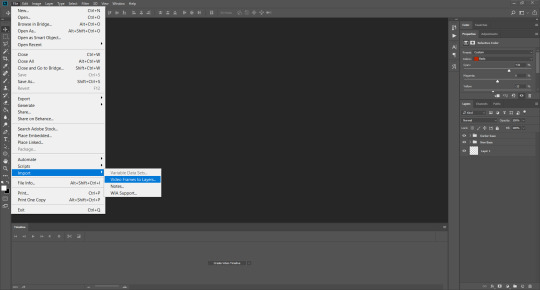
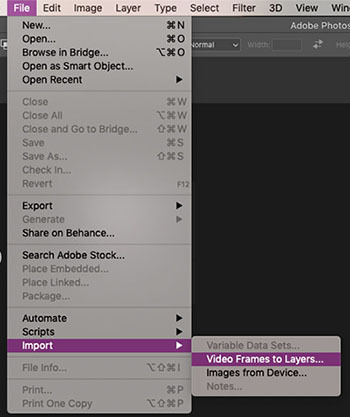
Now, go ahead and record whatever clips you want to gif. Make sure you have the video timeline open, by going to window > timeline. Then, go to file > import > video frames to layers.
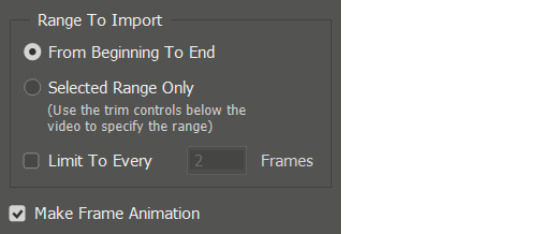
Next, select and open your clip from where it has saved (with the XBOX recorder, it saves in video > captures). You should see a little window pop up, where you can move the sliders back and forth to clip your recording to whichever part(s) you specifically want to gif. I recommend trying not to load a lot of frames into photoshop at once, but I would be a hypocrite to say that, since I do it a lot lmao. Just be patient if you do!
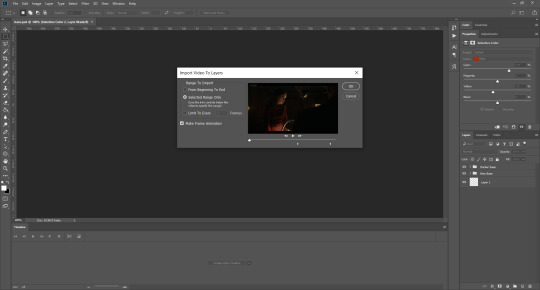
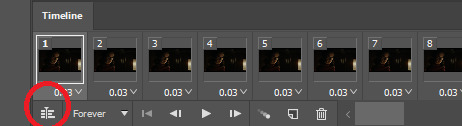
Once you have chosen the length, click okay. Never, EVER, I repeat NEVER click the button that says “limit to every __ frames”. This really ruins the flow and quality of your gif—it’s better to have shorter, but smoother gifs, I promise. And with tumblr’s new 10 MB limit, it shouldn’t be a problem anyway!
Then, your frames should open up. What we want to do is make them into a smart object, so we can edit all the layers at the same time. To do this, click the small button in the left-hand corner. ALWAYS click this first. If you don’t, it will only convert the first frame to a smart object and the gif won’t work.
Give it a second to sort itself out, then, on the right-hand side, select all your frames at once using the shift key.
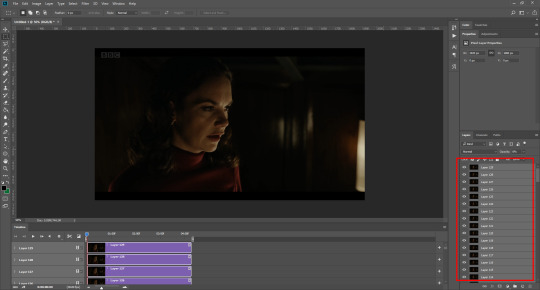
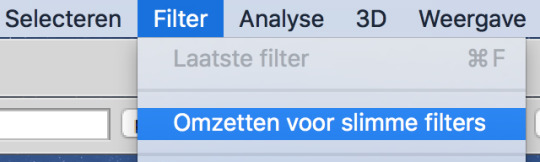
Then, go to filter > convert for smart filters. This might take a minute. Don’t click anything else in case PS gets angry lmao, just leave it for a second and it’ll do its thing. The more frames you have, the longer it takes! Now we have our gif, but it needs to be cropped, sharpened and coloured!
CROPPING
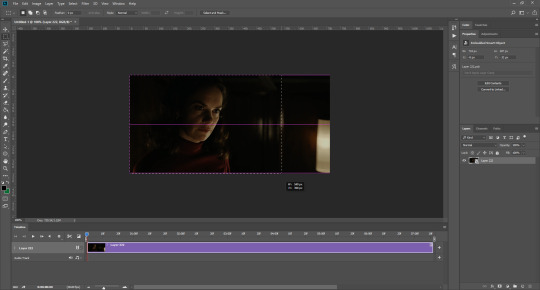
You want to start by selecting the rectangular marquee tool on the left-hand side, then drag it across by clicking and highlighting the area you would like to crop your gif to, like so:
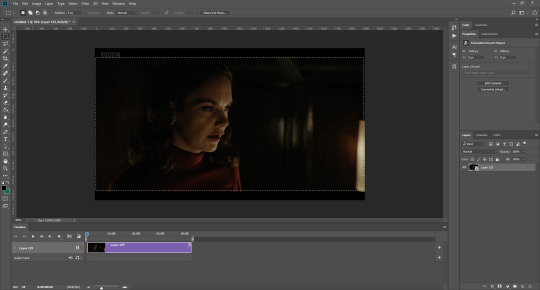
What I tend to do is select everything inside the black lines you sometimes get around your gif (this depends on what file you d*wnload), and also the tiniest bit inside the sides. This is because I’ve found if you crop it right up to the edge, you get a tiny bit of transparency on the sides of your gifs, which I’d rather avoid.
Once you have your desired selection, go to image > crop. Now, the dimensions for tumblr are 540px width, so all your gifs have to be that width. However, the length is up to you. I really like big gifs, so sometimes I even make a full square, or even longer. It’s entirely up to you, and what kind of set you want to make.
For the purposes of this gif, I will stick to what I usually go for, 540px by 350 px. This will mean you’ll have to crop some width off, but that’s okay, since Marisa isn’t central anyway. The cropping is always trial and error for me, as sometimes people move out of the frame within in the gif. The best thing to do is just try it, and then move the slider in the timeline window at the bottom to see if the person stays inside the gif, and if not, adjust accordingly.
Next, go to image > image size:
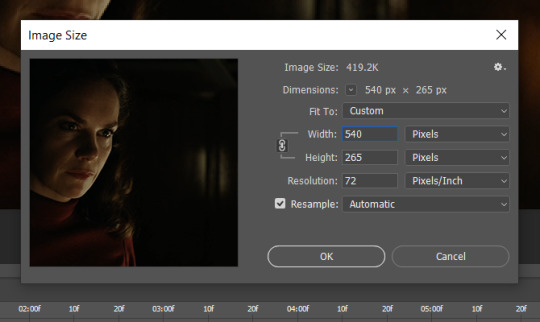
In this box, if I put the width as 540, the gif is a smaller height than I want, as it keeps to the dimensions of the gif when you load it into PS. That’s okay, just put the height you want instead, and we’ll crop off the excess.
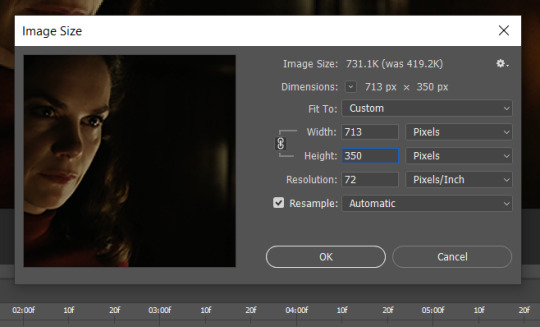
Then click OK. Using the rectangular marquee tool again, we need to remove the excess width. Part of the reason I like this version of PS is that it tells you the width of your selection as you do it, but you can always use the ruler as a guide, and check the size of your image by going to image > image size again.
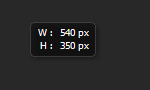
Again, use image > crop, and your gif should now be the correct size!
You can also use the crop tool in the timeline window to crop the length of your gif:
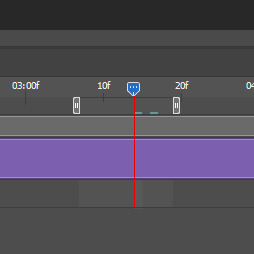
However, I tend to wait until later on to do this (which will be explained further down!)
SHARPENING
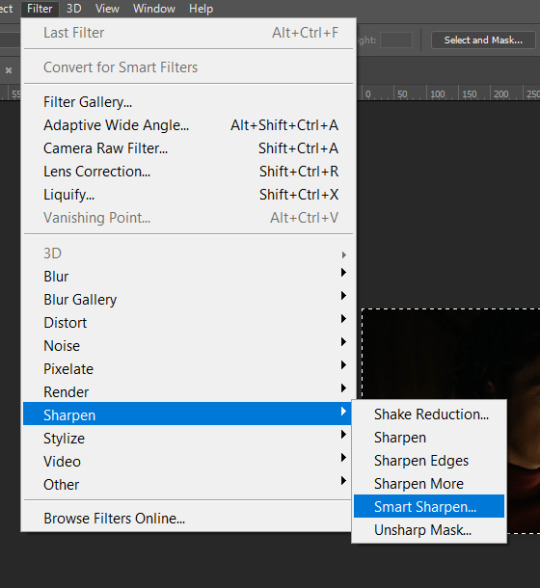
Next you want to go to filter > sharpen > smart sharpen.
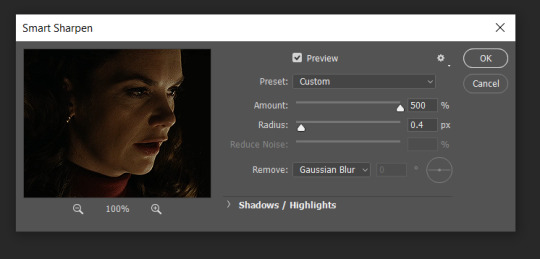
These are my settings. However, 0.4px is very sharp, too much so, but that’s easily fixed.
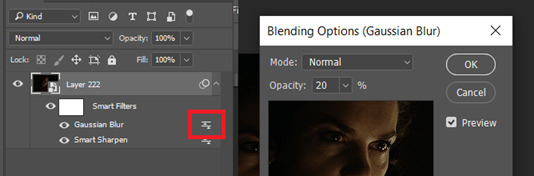
Go to filter > blur > Gaussian blur and then set it to 1.0.
Now on the right-hand side, we need to reduce the blur, so double click the little adjustment button, and change the opacity of the blur. I usually go for 20-30%!
Then click OK, and that’s your sharpening done!
COLOURING
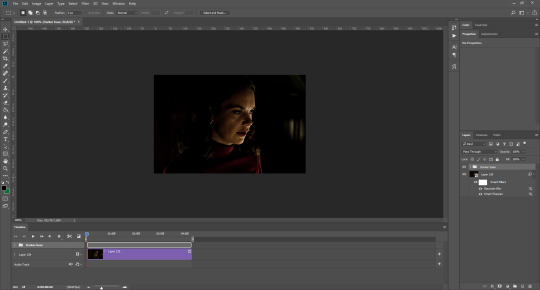
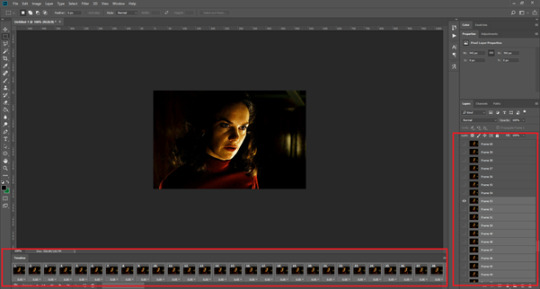
I picked this scene on purpose as it’s dark, so good for showing how to colour a gif. I have a base psd which consists of some very basic adjustments, but it mostly exists so I don’t forget what adjustment layers I like to use. I adjust them every time I make a gif, essentially colouring each gif from scratch.
In this case, the psd actually makes it darker. So, what I will do is turn each layer off, and adjust as I go. A lot of people say using lots of adjustment layers ruins the quality of your gif… I have never found this to be true, as long as you are gentle with them. If you whack the brightness right up to the top, it’s going to ruin your gif no matter if you use 1 adjustment layer or 100. I would just say use your common sense, and adjust a little at a time!
I start with a simple black to white gradient map set to soft light, because I think it helps you see depth once you add some brightness to it. I usually do this on about 10%, or more if needed. It’s probably unnecessary, I just like how it looks!

Then, I move onto using curves and levels. This is where things can diverge depending on who you’re colouring. If this person is white, it doesn’t matter too much. If they’re not white, you don’t want to white wash them. My best advice is to play around with it. By adding vibrance and other (usually the red) selective colour settings later, you can ensure you don’t change the person’s skin tone from what it originally was. You can also use layer masks at varying opacities (various shades of grey), on your curves and levels, to remove some brightening so that you’re not changing anyone’s skin colour. Just brighten slowly and check in with yourself honestly about how your gif looks.
Some people don’t like using levels, or curves. It’s completely up to you. I tend to use both because levels are good for bringing depth, even if not brightening (though I like to use them for that as well).
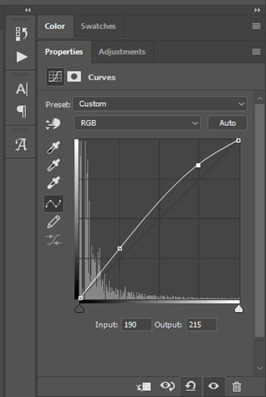
One thing you can do is use the white point of the gif to make PS adjust the curves itself, however I like to drag the sliders myself and see what it looks like. Just make sure it’s not too bright, as we will be using further layers to brighten more, after.

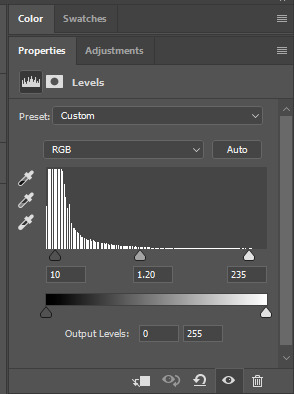
Next is levels. The slider on the left controls the black point, the one in the middle controls the midtones, and the one on the right controls the white points. The black brings depth, the midtones adjust the overall brightness, and the white points produce stronger highlights. Again, you’ll get a feel for how this works as you practice. Just don’t use the white point excessively, especially if your characters are not white.
Then I add vibrance (+20!), because we’ve removed a lot of it when lightening the gif. Next is exposure, which I find brings out the highlight and shadow areas more effectively:

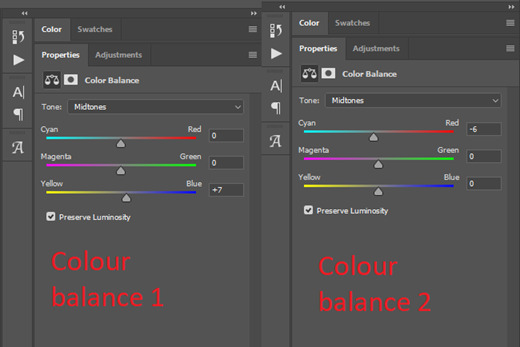
Then colour balance! This helps with scenes that might be a certain colour, i.e. too blue, too green, too red, etc. Moving the sliders in the opposite direction of the colour your gif is will counteract it. The best thing to do when accounting for different colours, is to make a new layer every time you change colour, so that you don’t get confused. I always add a new layer for colour balance and selective colour if I want to change more than one thing. So one for red, one for yellow, one for pink, etc.
A layer of brightness just to make the gif pop, and because the scene is extra dark, I added a very gentle extra curves layer:
SAVING YOUR GIF
Time to save the gif. You can go ahead and file > export > save for web (legacy) now, but then you’ll have to reopen the gif to reset the frame rate from 0.07, to 0.05. Instead of doing that, I use a modified action. The original was made by the very talented @elenafisher! So I do not take credit for that at all. You can find the original here: elenafisher(.)tumblr(.)com/post/190817437374/gif-sharpening-action-2-preview-download and in my resources tag. Please reblog it if you’re going to use this!
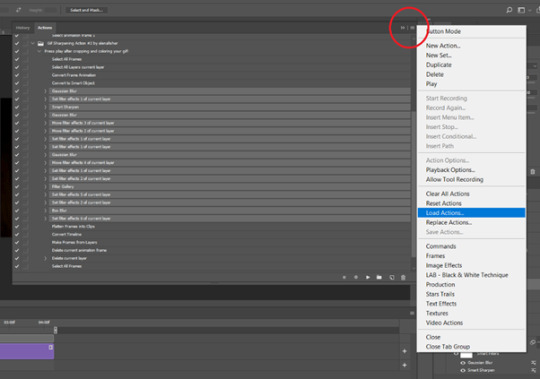
To use an action, first make sure you have actions turned on in window > actions. To load in your action, go to the little lines circled, and then load the action from your downloads:
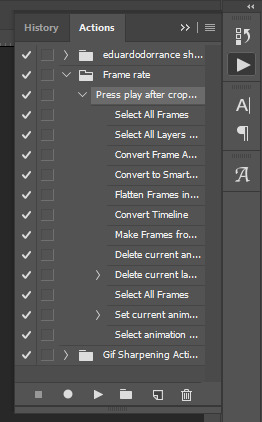
Obviously if you don’t want to sharpen your gifs yourself, you can use the action as it is, and it will give you a beautiful glowing effect. If you’d just like to use it to flatten your gif into frames like I do, make sure to take out all the items I have highlighted:
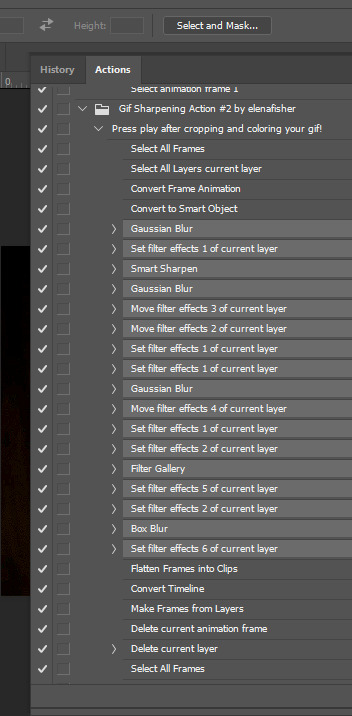
Until it looks like this!
Make sure you have the layer under the file name highlighted, and then click the play button at the bottom! (If you get a screen saying select all frames cannot be found, don’t worry, just click continue!) You can delete the layer that does that if you want, I just keep it in case I realise I’ve forgotten to do something, because you can click cancel and edit your gif before you flatten it. Of course you can undo the steps to get back to the smart object version of your gif, it just takes longer!
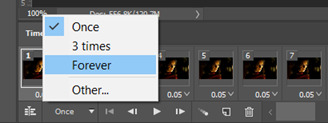
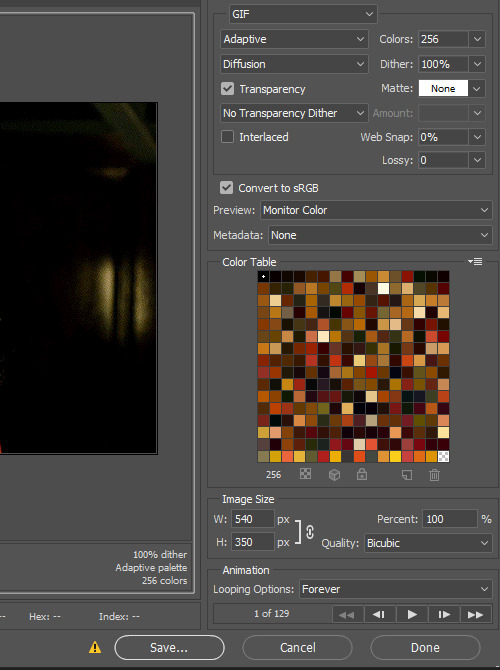
And now your gif is in frames and set to 0.05 already, so you don’t have to change the speed! All you need to do now before saving is change the gif cycle to “forever” in the bottom left-hand corner:
Then to save the gif go to file > export > save for web (legacy). Sometimes, the gif is bigger than the tumblr 10MB limit. You’ll be able to see this in the bottom left-hand corner of the gif save settings. If this is the case, I like to preview the gif, to see whether it would be best to cut frames off of the beginning or the end, or both. When you’ve decided, you can select the frames at the bottom, and in the right-hand side panel, and delete them both using the little bins/trash icons.
I keep checking and deleting frames until I get the gif under 10 MB! Just don’t delete frames from the middle, as then you’ll have the same issue as if you selected “every other frame” when making the gif: it won’t flow!
Lastly, these are my save settings:
So that’s it! That’s how I make all my gifs. Blending I do when the gifs are in the grouped, smart filter stage, whereas text I add on during the framing section above! Really hope this is helpful, please feel free to ask any questions you may have! 💖
#gif tutorial#tutorial*#completeresources#yeahps#chaoticresources#allresources#mikesmom#usergeo#userava#usertix#usersmile#usertom#if you'd like me to cover anything more advanced just shout#i wanted to show how i add text too but tumblr wouldn't let me add any more pics#but people can let me know if that's something you'd want!
504 notes
·
View notes
Text
gif tutorial ♡ by @tifaa
Lately I’ve had a few questions about how I make my gifs, so under the cut is a small tutorial about how I make them! If I forgot something or you have any questions, please just send a message or an ask. It’s also best to view this on desktop because mobile with mess with the quality ; - ; ♡
I’m going to show you the process of how I turned the gif on the left into the one on the right. (Please ignore the middle one for now!) Basically, turning a gif with absolutely no editing into a coloured, sharpened, and smooth gif!
1. Downloading Videos
I use 4k Video Downloader to get videos from YouTube.
☆ The most important thing is to download videos in the highest quality possible (I personally never gif a video that is below 1080p)
2. Preprocessing
This is optional, but I do see a big difference between gifs that I have preprocessed and ones that I used to make using only photoshop. It doesn’t take that long and you get a really smooth result, so I definitely recommend it!
Vapoursynth download + tutorial (make sure you download the one that’s titled ‘VapourSynth64Portable(200616).zip’). Since it’s quite complicated to download for Mac, I recommend trying Avisynth instead. I may do a seperate turotial on VS, but since the one I linked is in a video format rather than text, I found it really easy to follow compared to other written tutorials I had found!
These are my VS settings:
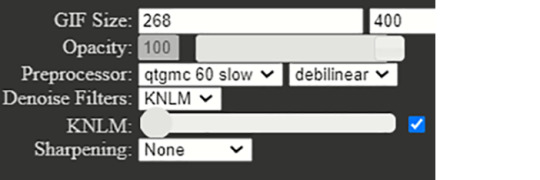
☆ GIF Size will change depending on how many gifs you want to make per row:
1 gif per row: 540px
2 gifs per row: 268px
3 gifs per row: 177px
You can change the height to whatever size you want, but I wouldn’t recommend going over 540px.
☆ Preprocesser is how many frames per second you want your gif to be. qtgmc 60 slow gets you the smoothest possible gif. As for the second setting, I always use debilinear. You can find more information on these here!
☆ KNLM is a denoising filter that basically smoothens your gif and makes it less grainy! You can also choose to utilize the sharpening setting here, but I prefer to do that in Photoshop!
Once you have chosen your desired settings, you can paste the output script that’s on the right-hand side into the VS Editor resizer.html window. (Please refer to the video tutorial〜)
3. Importing into Photoshop
To open the video in PS, go to file > import > video frames to layers (the preprocessed clip will be located in the ‘output’ folder). These are my import settings:
Your workspace will now look something like this: ( I’ve highlighted the frames in pink and the layers in blue, so you can remember!)
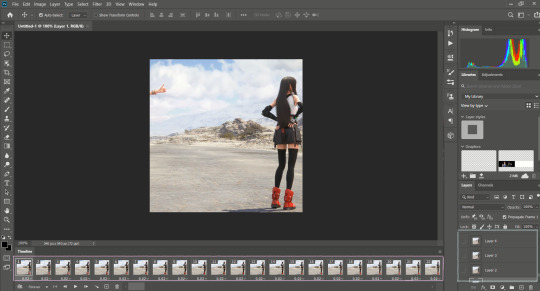
Now, delete any excess frames from the timeline if you have any (eg. frames that include a different scene). Then, select all of your remaining frames and click on this little button on the top right-hand side of the timeline:

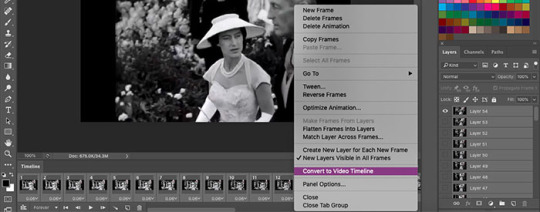
From this menu, go to > convert to video timeline. Now, look at the layers on the right-hand side of the screen. If you deleted excess frames at the beginning, you should now delete the corresponding layers (that is, all of the layers without the eye symbol next to them).
To be able to colour and sharpen the gif, we have to convert it into a Smart Object. To do this select all of your layers and go to > filter > convert for smart filters.
4. Colouring
Now, you can colour your gif however you’d like! There isn’t necessarily a right or wrong way to do this, but some settings I’d recommend trying out to begin with are colour balance, selective colour, levels, hue/saturation. To apply these settings go to > layer > new adjustment layer.
☆ Below is are some examples of this lovely scene of Tifa ♡ The first one is a base gif (no colouring at all), and the second one is what it looks like once I’ve coloured it. We’ll get to the third one soon, don’t worry!
5. Sharpening
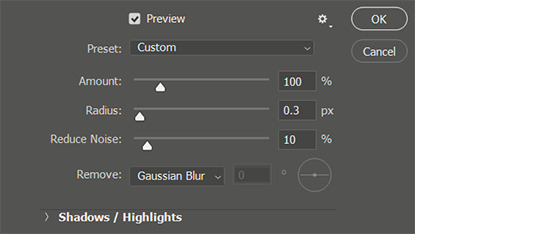
Click on your Smart Object in the layers tab and go to > filter > smart sharpen. These are my settings:
☆ The next step is optional, but it’s just a preference for how I like my gifs (it just makes them really smooth and removes a lot of the noise)!
Once I have sharpened my gif, I duplicate the sharpened later (right-click on the layer and select ‘duplicate layer’ from the menu). Then I add a gaussian blur filter to the duplicate layer (filter > blur > gaussian blur) and set the radius to 1.3.Your layers should now look something like this:
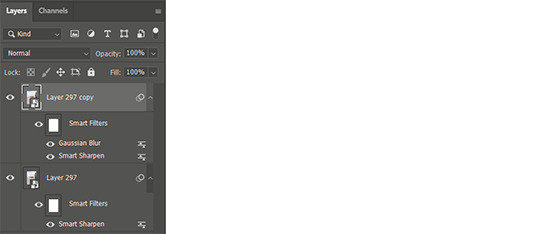
You can see the result is the third gif from the above step. Nice and smooth, right〜?
6. Saving your gif
To save our gif, we have to convert it back into a frame animation.
To do this, select all of your layers and press the little bars icon above the timeline (the one we used to convert our frames into the video timeline from before!), and select convert frames > flatten frames into clips. Now, select all of the visible layers (the ones with the eye symbol shown), and from the same menu as last time, convert frames > make frames from clips. Again, from the same menu, go to convert to frame animation.
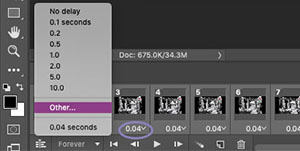
To set the speed of your gif, select all of your frames and click on the little number icon below it (it should say something like 0.03), then click ‘other’. Here you can set the speed. I usually put it somewhere between 0.02 - 0.04 depending on the scene, so just try out which speed you prefer.
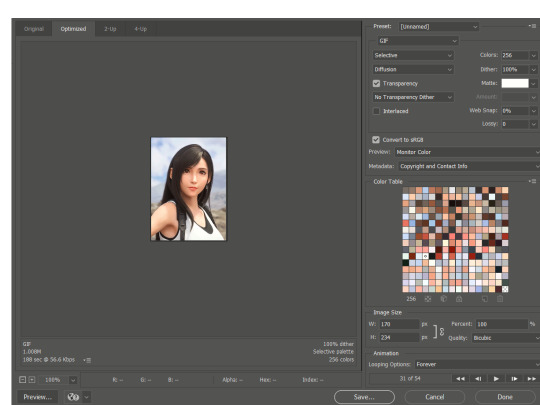
Now, we can finally save the gif: file > export > save for web (legacy)! These are my output settings.
☆ To make sure that your gif plays more than once, you must have looping options (near the ‘save’ button’) set to ‘forever’ ! ! !
Again, this is just the way I make gifs, so there are many other tutorials out there that may be more suited to your preferences! You can find some examples of my gifs here.
☆ I’ve never made a tutorial before, so I really hope that it helps you even a little bit! Please please do ask if you have any questions, either by dm or inbox! ♡
#gif tutorial#yeahps#itsphotoshop#wehearttutorials#completeresources#anon who requested please let me know if you see this!#i hope it's OK!#♡♡♡#daily gaming#videogamewomen#videogameedit#gamingedit#gamingnetwork
69 notes
·
View notes
Text
part II: creating gifs in photoshop
how to make critical role gifs (a tutorial)
masterpost || part I
The method I use for giffing is the > Load files into Stack method. What this means is that you take screencaps of videos and load them into Photoshop to convert them into frames. In this part I'll teach you how to make gifs in Photoshop using screencaps.
NOTE: my Photoshop is set to Dutch but I explain everything in English in text (also because of context clues I’m sure most of it will be self-explanatory anyway).
what you’ll need:
Photoshop (I use an old CS5 version).
Screencaps to make gifs from.
(if you don’t have photoshop maybe take a look at this list)
loading files into stack
The first thing you need to do is open the screencaps in Photoshop but because we want them all in one file we don’t just go to File > Open and select them. Instead we do this:
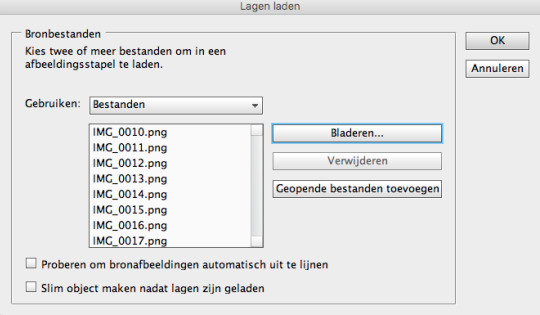
Go to File > Scripts > Load files into Stack
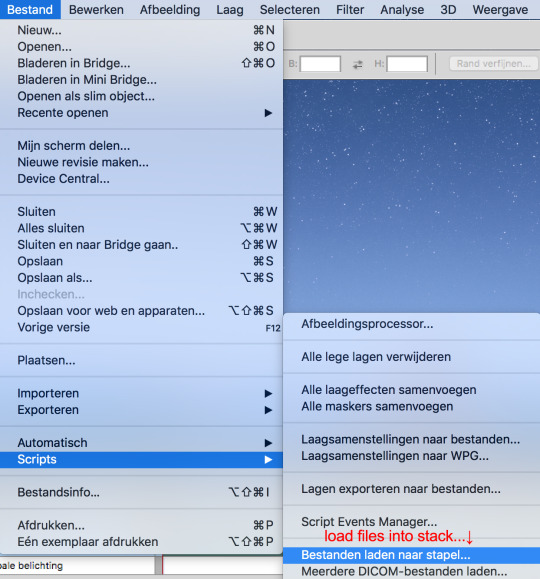
Click Browse
Select all the screencaps you want to use for your gif
Click Open (I typically use anywhere between 50 and 150 screencaps in one gif)
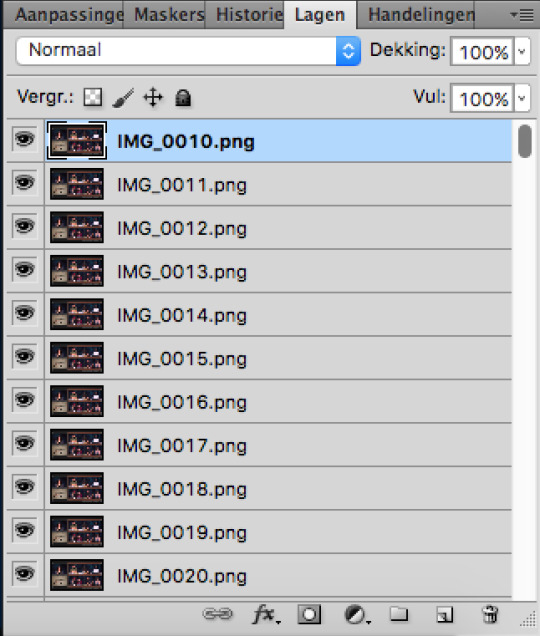
Click OK and wait for them to load (each screencap will load as its own layer which will make it a lot easier to make small adjustments)
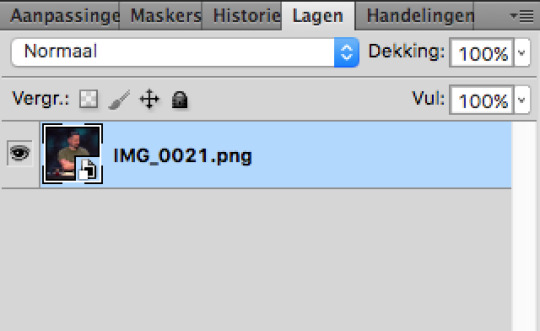
Once it has finished loading your layers should look something like this
making frames from layers
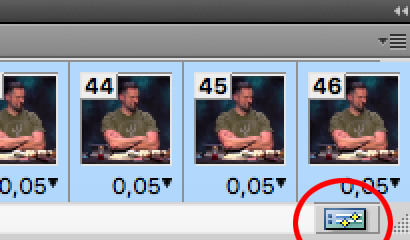
Go to Window > Animation (or Window > Timeline depending on what ps you use) and make sure it’s checked
Your Photoshop should look like something like this
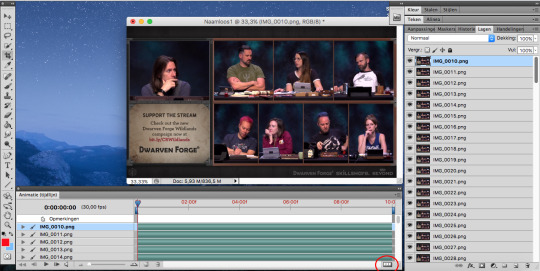
Click on the three white boxes on the bottom circled on the image above (Create Frame Animation or Create Video Timeline)
Your animation window should now look like this

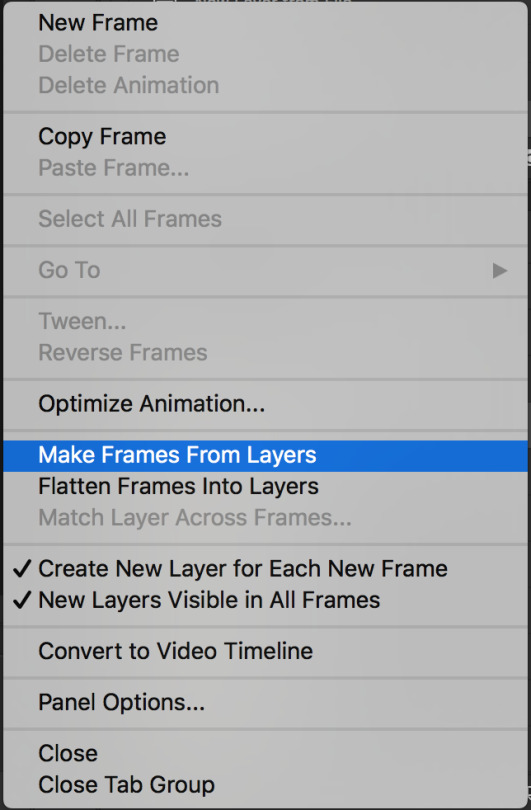
In the top right corner of the animation window you will find an arrow pointing down with lines next to it (circled in the image above)
Clicking on it will reveal a list
Click Make Frames from Layers
Your layers will appear as frames in the animation window but they will be arranged backwards
Click on the same icon again (arrow pointing down next to the lines)
Click Reverse Frames
Your gif will now play correctly if you press the play button in the animation window (bottom left)
cropping
We have our base but it’s obviously way too big to properly work with and I want to focus only on Travis’ face. To know what size to crop to you have to understand Tumblr dimensions; this image is a clear and easy reminder of what they are.
Note: height is less important and can be messed around with more than width. If you upload a gif that doesn’t follow the width dimensions tumblr will resize it and you will lose some of your quality.
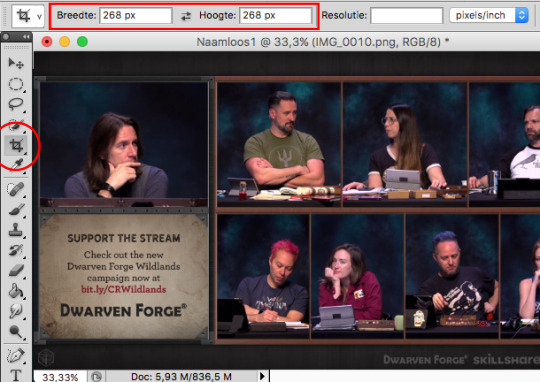
Most of the time the gifs I make are 268px by 268px though I would recommend you play around and find your own preferred sizing after you get a bit more comfortable.
Select the cropping tool on your tool bar
Enter the dimensions you want where it says Width and Height
Crop the image
timing/looping
The timing of your gifs helps control how fast or slow your gif moves.
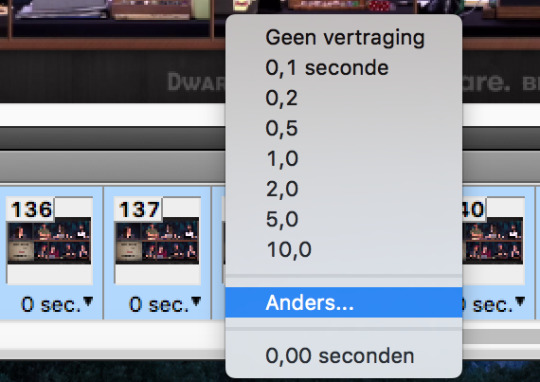
Click on the arrow pointing down next to the lines again (top right corner of the animation window)
Click Select all Frames
Click where it says 0 sec. on any of the frames
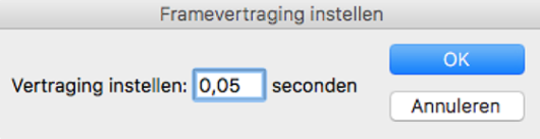
Click Other...
Set Delay 0,05 seconds
(0,05 or 0,06 is what I have found works the best for my screencaps; if you use a different method for getting screencaps or want to speed up or slow down your gif you could change this to whatever you prefer)
Click OK
Next we’re going to change the looping setting to make sure your gif doesn’t stop after playing one time.
Click on where it says Once in the bottom left corner
Select Always
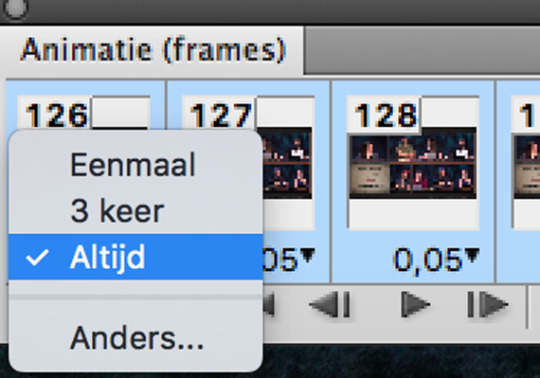
My gif now looks like this:
At this point you should delete any of the frames you don’t want to keep in your gif (select a frame you wish to delete and click the little trash icon on the bottom of the animation window). I have a tendency to use a few more screencaps than I actually need to because I want to make sure I get the exact moment I wanted and now is the time to get rid of any excess ones.
Go through your gif, let it play a few times and figure out if you want to delete a few frames here and there (I only ever delete frames from the beginning or the end so as not to mess up the flow/smoothness of the gif). This is the last chance you’ll have for this.
convert for smart filters
Congrats you have made a basic gif! If you’re like me you maybe want it to look a little bit prettier and a little more polished though. The main ways to accomplish this is to sharpen and to mess around with the colouring a bit.
Now there’s a lot of different ways you can go about this but I like to do it with my frames/layers converted for Smart Filters so that I don’t have to go through every frame one by one.
Go to Select > Select all Layers
Select all Frames (arrow pointing down next to the lines > Select all Frames)
Click on the rectangle in the bottom right of the animation window
Go to Filter > Convert for Smart Filters
Your animation window and layer panel should look something like this

Check if your gif still plays when you press the play button in the animation window just to make sure nothing went wrong. If it is not playing go back (Edit > Step backward) until you can see all your frames and layers once more and try again
sharpen
Now we can sharpen the entire gif in one go. You can use an action if you have one but if you don’t this is the easiest way to easily sharpen your gif.
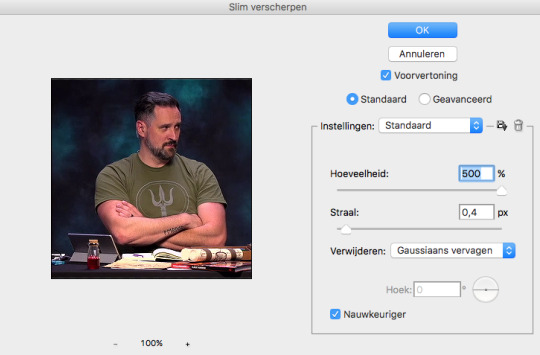
Go to Filter > Sharpen > Smart Sharpen
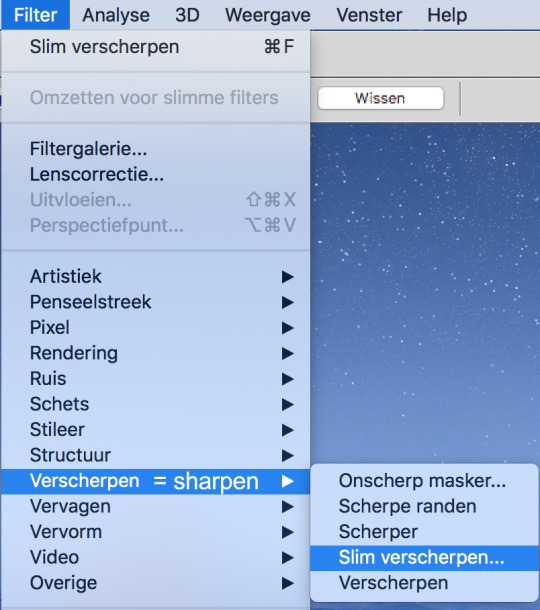
Copy the settings on the image below (you can play around with the radius if you’d like; 0,3px also works)
Click OK
My gif now looks like this:

colouring + resources
This is where you can play with the colouring a little bit if you wish to. Either you can use a PSD (a pre-existing colouring) or create your own colouring. When using a PSD created for another show please keep in mind you will probably have to do a lot of adjusting because of the way cr is filmed.
Here are a few tutorials on basic colouring in Photoshop: one, two, three.
And here is a list of places that offer some great PSD’s to download:
drunkandcoloring
flawless-psds
itsphotoshop
psdsfaves
For my own colouring I usually play around with Curves, Levels, Selective Colouring, Vibrance and Color Balance.
If I get to it I will clean up my own critical role PSD’s and upload them for public use and insert a link here.
text
Though not needed for this specific gif a lot of Critical Role gifs do depend on subtitles. Here there is a quick and easy tutorial on subtitles for anyone who needs help using the Text tool.
save for web and devices
Your gif is smooth, the colouring looks great and now it’s time to share your labor with the rest of the world. Saving gifs is a little different than saving other files because we want them to move when uploading. If you were to simply click save right now you would have a nice PSD file that doesn’t move and you can’t upload anywhere. That’s where saving for web and devices comes in.
Go to File > Save for Web and Devices
A window should pop-up, again there is a lot of room for messing about and finding what works for you; but these are the settings I always use with a quick explanation

I use Selective and Pattern from the dropdown menus highlighted. From what I gather Adaptive and Perceptual are good options for the first one as well (all the others are less so). I like the look of Pattern better because it arranges the pixels in a pattern which I personally prefer but both Diffusion and Noise are fine too. Always pick the highest number of Colours (256) for the best quality gif.
Make sure the box next to Convert to sRGB is checked to keep the vibrance intact.
Looping options: Forever. To keep your gif looping endlessly instead of stopping after one time.
Gif size! Who even knows what the Tumblr gif size limit is anymore; it’s 5MB after compression but then sometimes people are fine uploading 7MB gifs and others struggle with 6MB gifs. Personally I hardly ever go over 4MB but hey, let me know if you understand it.
To save click Save... (rather than Done)
And you’re done!
This is the end result:
If you have any questions or comments or remarks please feel free to contact me. Hopefully this was somewhat helpful! :))
8 notes
·
View notes
Text
Gif Tutorial
I was recently asked for some tips for making gifs, so I thought I’d make a tutorial show how I make mine. I’m using Photoshop CC 2017 for this, but I think the steps should work for most versions of Photoshop. I previously used CS6 Extended but this version has disappeared from my laptop and left me with basic CS6 which I wasn’t able to gif with.
I download my video clips from Youtube or screen record from documentaries/other sources online.
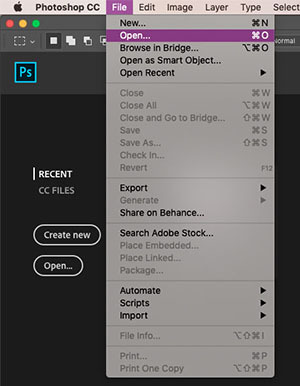
1. First open your Photoshop program and go to File > Open and open the video clip that you have saved.
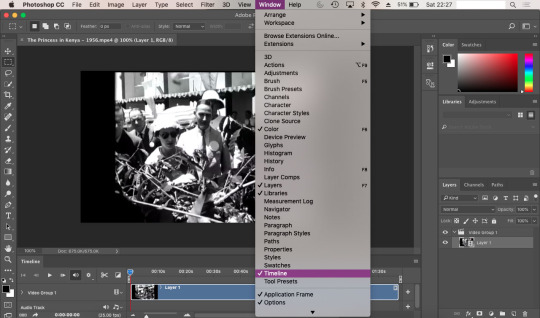
2. Once you’ve opened your video, you need to make sure the timeline window is open, to do this go to Window > Timeline. If you want to use the clip you’re using to make a single gif, rather than taking clips from a full video, then skip to step 5.
3. To save separate clips from a long video you need to adjust the dials below the time markers. To avoid having a gif that’s too large to upload to tumblr and also too long, I suggest keeping your clips to no more than 6 seconds (this may depend on your clip). You can zoom in closer to the time markers to see a more accurate time including seconds by using the slider tool at the bottom of the timeline window. Sliding towards the smaller mountain zooms out (showing the full clip length as in the screenshot), the bigger mountain zoom in, allowing you to see the seconds and create a more accurate clipping. Use the play button to the left of the window to play through your clip and adjust the dials as you wish.

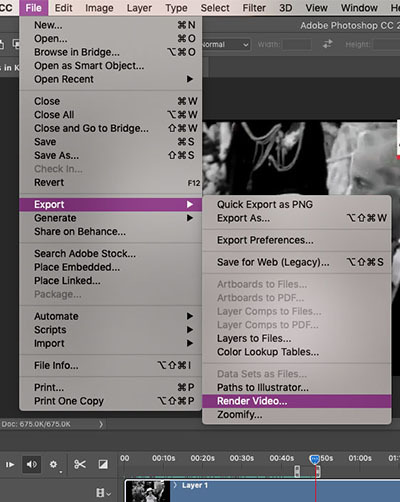
4. Once you’ve selected the clip you want to use, it’s time to save them. Go to File > Export > Render Video. A new window will open, where you can rename the clip and select a folder to save them to. You can ignore the other options.
You can go back and repeat step 3 and 4 as many times as you like to save the clips you want to gif. Tumblr has a limit of 10 images/gifs per post, but some tutorial and resource pages will show you how to put two gifs on to one canvas so you can upload more than 10 at a time.
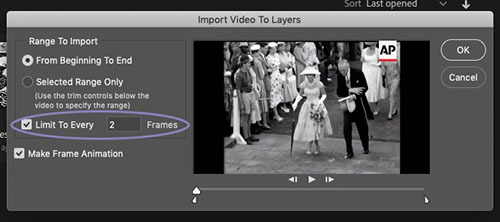
5. To start giffing, you need to import those clips you just saved. File > Import > Video Frames to Layers. As mentioned in step 2, if your video clip is short already then you don’t need to go through steps 3-4. Once the next window opens, you need to make sure that ‘Limit to Every 2 frames’ is ticked.
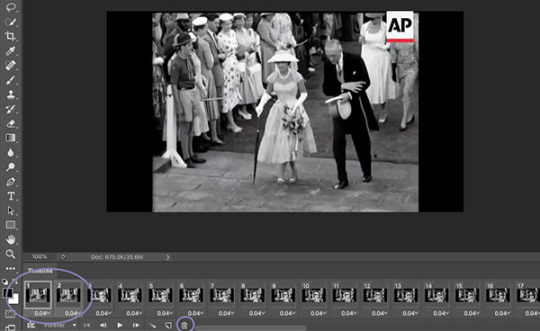
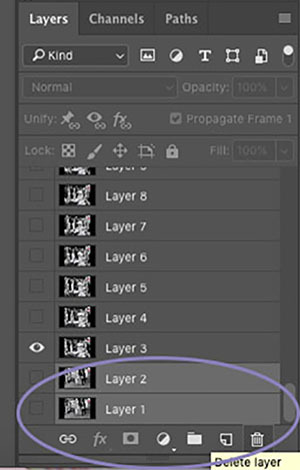
6. When I created my clip using step 3, there were some frames left over from the previous shot which I don’t want in my gif. To get rid of these, just select the frames you don’t want and you can either press the delete/backspace button on your keyboard, or click on the little bin icon. Now that you’ve deleted these frames from the timeline, you need to do the same in the layers window. Be sure not to delete the frame with the eye icon as this is now the first frame of your gif. You may need to have a scroll to the last frames in your clip, to check there aren’t any other excess frames you don’t want. If so, just follow these same steps.
7. Next up we’re going to set the time delay between frames. This will determine how fast or slow your finished gif loops. To do this, you need to select all of the frames on your timeline, and click on the arrow next to the number shown (typically defaults at 0.04). The seconds shown in the list will make your gif run super slow - this is the delay between each frame, so if you select 5.0 there will be a five second delay between one frame and another. So, to choose your own time, select ‘Other’. For me, unless my chosen clip is super short where I might want it to loop a lot more slowly, I try to have my gifs play in as close to ‘real time’ as I can. I set my delay at 0.06 seconds and adjust it later on if needed. You can always press the play button and see how your gif runs, but this isn’t usually an accurate playback speed.
8. Once you’ve done this, you need to highlight all of the frames in the timeline window and all of the layers in the layer window. Next, click on the button that looks like three lines, on the right side of the timeline window and select ‘Convert to Video Timeline’. Then, in the layers window, right click one of the layers and select ‘Convert to Smart Object’. This will compress all of the layers into one, but will still be playable.
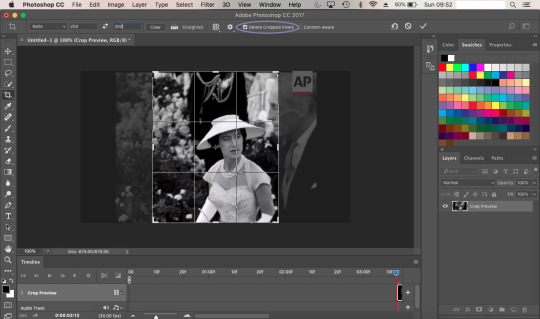
9. Now we’re going to crop your gif. First, you might want an idea of how what kind of layout you want for your gifs - this will depend on how many gifs per set you want. If you’re just making one gif, then set your crop with to 500px and your height to whatever works best (250, 300, 500 etc). Two gifs per set (if you want them side by side) need a width of 245px, three gifs side by side need a width of 160px. Before you crop, you should make sure that on the top bar ‘Delete Cropped Pixels’ is unticked. This will allow you to move your frame and re-crop the area.
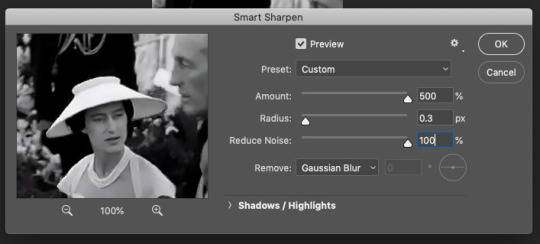
10. Once you’re happy with your cropped area, it’s time to make some adjustments. For my gif, I want it to have a width of 245px and a height of 300px. To change the size of your image you need to go to the top menu bar and select Image > Image Size. Make sure the measurements are set to pixels. Next we need to sharpen the image, so we go to Filter > Sharpen > Smart Sharpen. I always have mine set to 500% for the Amount, 0.3px for the Radius. In CS6, Smart Sharpen didn’t have an option to reduce noise, so I just set this to 100% as this seemed to work best for the quality. It helps if you have Preview ticked, so you can see how the adjustments affect your image.
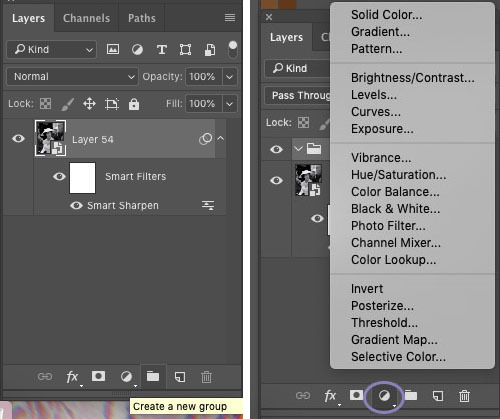
11. Now it’s time to start applying filters! To keep everything together in one place, you’ll want to create a new group so click on the little folder icon at the bottom of the layers window. Then click on the round icon to the left of it - here are your adjustment options. Have a play around with these and see which ones work best for you. Click on the eye symbol next to the adjustment layer will turn the layer visibility off, so you can see the effect it has on your image and see if you need to make any changes.
I tend to edit all of my gifs in the same style, the only difference being the options I use for black and white gifs, and those for colour. My basic go-to adjustments are Brightness/Contrast, Levels, Selective Colour (W/N/B for B&W, all colours for coloured gifs). To create a level tone for my B&W gifs, I apply a Gradient Map, fading from black into a very light grey. Colour gifs - I play around with Vibrance, Hue/Saturation and Colour Balance. It doesn’t hurt to play through your gif while you’re editing, to see if the settings your using work for all frames and not just the cover.
12. Once you’re happy with your gif, we need to save that masterpiece. Go to File > Export > Save for Web (Legacy). Some version of PS might just say ‘Save for Web’. In the next window, the only thing you need to do is select ‘Forever’ in the Looping Options drop down menu. Here, you can also check the size of your gif and make sure it’s below the 3MB limit. If it’s over, then you may need to go back and cut the length of your clip a little by adjusting the sliders in the same way as in step 3. If it’s a tiny bit over the limit, shaving a second or two off of your clip should be enough. If it’s over by a lot then you may need to split your gif into two. Again, following step 3, you can simply adjust the sliders to split the timeline into two sections. Once you’ve done this try saving again and check the size. When you’re happy, all you need to do is click Save and you’re done! You’ll need to do this for every clip you want to gif. The more you gif, the easier it’ll become and you’ll find your own rhythm where it may take only a few minutes to make one gif.
As mentioned earlier, if your final gif playback is too fast/slow all you need to do is drag and drop the finished gif back into PS and adjust the time delay as per step 7. You can change this and save it again as many times as you like until it’s right for you.

** TIP ** Never close your tab window until you’re 100% happy with your gif, to the point that you’ve uploaded it. If you’ve noticed a mistake or a problem with your gif this allows you to go back and edit it without having to start over again. Also you can save your work in progress as a PDF at anytime. Trust me, there’s been many a time where I’ve closed my window and had to start again if there’s been a mistake.
21 notes
·
View notes
Text
Abcarticledirectory.com
While it is indeniable that numerous high-quality songs have been produced while mixing with headphones, there are a lot of issues to be overcome that may simply be averted by mixing, or a minimum of referencing, with monitors. You're better off utilizing closed-again headphones with correct isolation than realizing too late that there's headphone bleed within the tracks you recorded. The benefits of on-ear headphones are a slight edge in portability and weight, while the over-ear fashion is healthier at blocking exterior noise and is normally tops in sound high quality.
This is one of the most most well-liked headphones that are out there today and can be utilized not only for listening to music, nonetheless it additionally helps you to attend calls. Dolby Headphone expertise supplies an actual benefit to your customers—the power to put on any pair of headphones and experience 5.1-channel surround sound. For DIYers they can have two optimized acquire settings-say one for dwelling and one for moveable use with a different source and headphones. Jack watched the players and cheered his crew on - as a substitute of sitting together with his headphones on, playing video games, as he used to do. It is cheap to consider the ground system within the Mini3 has zero.15 Ohms of whole impedance.
In 1958, John C. Koss , an audiophile and jazz musician from Milwaukee , produced the primary stereo headphones. Here is one argument Apple could use: Wireless Bluetooth headphones are more in style than ever, they usually're rising faster than wired headphones. Earbuds can work properly for awhile, however when you stay in an atmosphere that is notably busy or loud, I would counsel headphones over earbuds. The principle purpose for this is that, because they block a major quantity of exterior noise, canalphones can often be loved at much decrease quantity ranges than traditional headphones. To me the headphones have a much wider variation in sound presentation than my audio system. This machine has gained immense success as a result of its conquering of the restrictions which exist within ear and over the head headphones. Final however actually not least, we've the one over-ear headphones on our record.
But for the vast majority of recent iPhone homeowners this fall, wireless or Lightning headphones can be their solely choices, and Apple has the info to show that is the right selection. These amps can typically ship rather more current and generally are better suited to lower impedance headphones in addition to high impedance fashions (with the appropriate achieve). Planar magnetic headphones are a bit like a middle floor alternative between the simple dynamic headphone and the excessive-end electrostatic one. The control group was composed of thirty individuals of each genders throughout the similar age vary of the experimental group who don't use earphones constantly. If you wish to get actually technical, most headphone amps will go well with completely different ranges of impedance higher than others.
And to take things a step further, the company simply distributed 1,500 pairs out to 650 Finest Buy stores throughout the US, making Earin the primary commercially available, actually wi-fi earbud. Closed-back headphones usually are not only great for public use, however they're also the excellent alternative for the studio. Put merely: For active headphones you don't have to worry about what's within the article or your source.
Nevertheless, unless you realize the device you will be using the headphones with has a low energy headphone output (some camcorders and low-cost mp3 players could fall into this category) there is no purpose to let the impedance affect your resolution on which hi-fi headphones to buy.
When properly inserted, they're extremely efficient at decreasing noise, and are most popular by skilled musicians as in-ear screens as a result of they do not distort the music as noise cancellation circuitry essentially does. The one purpose so as to add anything outboard to an iPod Touch is to get more output to drive troublesome headphones. In case you didn't know, the difference between an open back headphone and a closed back headphones is pretty easy.
They are additionally better at filtering out undesirable noise, and have a higher quality of audio than normal headphones. Nonetheless, the frequency response figures given with headphones are largely meaningless unless the producer supplies a graph or provides parameters for the measurement (e.g. ±3db), which many manufacturers don't. Up first, we've the one good headphones on the list, Muzik's wi-fi On-Ear Headphones. I emphasize the quality and sharpness of your wire strippers or knife because I shall be specializing in an Apple headset which uses a non-normal wiring technique, and extremely wonderful wires. You'll be able to hearken to music, answer the cellphone, hang up the cellphone and make calls and so on with these folding stereo headphones on the street. All in all, the Solitude headphones are probably the most effective saved secrets on this planet of music. Plus, you would count on more for a pair of headphones that value just below S$400.
original site and commuters who are familiar with the concept of ambient noise could respect the Phiaton Noise Cancelling Earphones PS 20 NC for its effectiveness and its mild weight. If you wish to go one higher, you'll be able to even go for better high quality noise-canceling headphones that go over the ear. The noise reduction earphones have unique circuitry and electronics which can look at this noise after which generate the cancelling sign for it. You do not have to drown out” the other noise in your environment just to enjoy your music—you may get the identical efficient volume degree at much decrease precise volumes.
The headphones come with a multi-color LED ring that light as much as the beat of no matter music's playing, with a styling that looks like it is going to fit in effectively with the youthful crowd. These headphones are very compact in nature and still give you a variety of options.
Aaron Souppouris over at Engadget makes the case that Lenovo's swap — and Apple and LeEco's, by extension — is untimely , owing largely to the hidden complexity of the adapters required. Bragi The Headphone - Once I put on my Bragi wi-fi earphones I always assume individuals are going to ask after I got listening to aids. The typical sound pressure stage on the combine place is about 110dB (i.e. actually loud), so you will need headphones with heroic isolation if you wish to hear clearly. The people who have tried the gadgets mentioned they'll better get pleasure from their work and different actions because they will go about minus the ambient noise in their setting. Having stated that, I won't buy a headphone amp that has high distortion and picks up noise (EMI) simply.
They don't seem to be generally used by a lot of people as a result of comfort causes however are the right choice if you find yourself on the lookout for headphones with noise isolation feature. By comparison, you'll be able to take heed to the O2 even at full volume on the excessive gain setting, and fix or disconnect the AC power and there's zero noise in the headphones. They continually promote their headphones as being so good that even musical professionals use it. They are all the time promoting by posting image on Fb of DJs who're working whereas using the headphones. This feature is called energetic noise discount (ANR), or just noise cancellation.
0 notes
Last Seen Blogs

mrbunnyx9
(•ㅅ•)
atqh16
CutsandBandaids

log180219
題名未設定

abcdefghilmn
angelo

mugmegan
I'm Monsieur Mugmegan bitches