#chrome browser proxy
Explore tagged Tumblr posts
Visit Tumblr Blog
Explore Tumblr blogs with no restrictions, modern design and the best experience.
Last Seen Tumblr Blogs


Fun Fact
Celebrities use Tumblr as well.
Text


Need one of you nerds to ID whatever malicious Windows contractor's doing this
#It silently redirects all search queries in preinstalled browsers (edge + chrome) through a proxy#I've turned it off but I think I'm going to either reinstall windows fresh or make Dad use mint#I don't trust this
8 notes
·
View notes
Text
✨ Your Guide to Picking the Perfect Proxy
Not all proxies are created equal – some are faster, more secure, or better suited for specific websites.
✅ Score proxies based on quality ✅ Match proxies to your website’s requirements ✅ Avoid connection errors 👉 Start here: https://go.ipfighter.app/udo38g74l
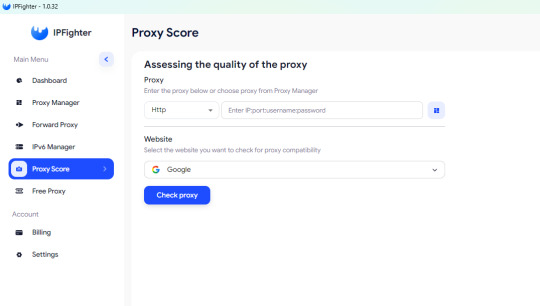
#ProxySolutions #TechFreedom #IPFighter
3 notes
·
View notes
Text
La via, gratis, per aggirare queste nuove limitazioni potrebbe essere quella di installare un proxy locale che faccia fitering di pubblictà e varie schifezza, configure "localhost" come proxy nel browser e sposti il filtro FUORI dal browser. Questo è al momento credo sia lo stato dell'arte: https://privoxy.org
11 notes
·
View notes
Text
192.168.1.250 Netgear Setup: A Beginner’s Guide
The netgear extenders are widely used by many of the networking users to create a reliable network. Netgear extender devices are known for their performance and stable network. Setting up the extender device is not a daunting task if you are aware of the setup process. In this article we are going to elaborate in detail how you can perform 192.168.1.250 Netgear Setup using the web. Web based setup method is the most reliable way to add the netgear extender into your existing network. Gather the important details and configure any model of netgear wireless range extender device. Scroll up the page and read the information till the last to boost up your network.
Unboxing The Extender
Unboxing the wireless range extender is the first step of the 192.168.1.250 Netgear Setup. In the box you will find an extender along with power adapter, user guide and ethernet cable (optional). You need all such items for the setup process. In addition to these items you also need host router network details, working internet connection, electric power socket, and computer/ laptop device.
Placement
Second step is placement of the device. Proxy placement is needed for the setup. Put the device closer as possible. Also there is no signal interface closer to the router & extender device.
Boot Up
Next step of the process is boot up. For booting up you have to use the power adapter you got with the extender. In case your device is a wall plug compact design device then you have to directly connect it with a wall outlet. Boot process might take around 1 to 2 minutes. Before proceeding further towards 192.168.1.250 Netgear Setup using the web, wait for LED lights to stabilize.
Connect To Extender Network
Step ahead and connect the extender device to the client device using any of the given methods:
Ethernet: Use the ethernet cord you got with the range extender and connect the extender with the client device. Inject the cord’s one end into the ethernet port of the extender and other in the client device ethernet port. Make sure the connection is secured.
Wireless: Using the wireless network of ethernet you can establish a connection. Check out the device label to know the default SSID & password. Use your client device and run a scan for available wireless networks. Enter the details and connect the devices.
Access 192.168.1.250 Netgear Setup Page
Now you have to access 192.160.1.250 netgear setup page by follow the given steps:
Launch google chrome or any other similar browser.
Thereafter, mention 192.168.1.250 IP in the URL bar.
A new page appears where you have to provide default information.
Enter admin and password in the fields.
Further press login and netgear installation assistant will guide you.
Configure Extender
Once you get access to the configuration page, choose the language first and then your router’s network name. Choose next and enter the password on the screen. Further click on connect option and then next.
Secure Network
Now you have to secure the wireless network by creating an SSID & password for your extender network. Also make changes in the admin account user details. This step is important to keep your existing network secure.
Update Firmware
Afterwards, you need to look for the firmware version. In case the firmware is outdated then you should install the latest version. For installation you can opt for an online update option and follow the prompts. You can update the firmware manually also by downloading it from the official portal of netgear.
Finalize Setup
Finalize the setup by choosing the submit button once you made all the important changes in the network. Review the changes you made to verify every step. Note down the extender security details you have created and keep them secure. Submit the changes and then you can step further to reposition the device.
Reposition The Extender
Repositioning the extender is a very important step to optimize the network performance. Unplug the extender from the proxy position. Search for a midway position (from the router and the area where the dead spot was). Then plug it in again to the power at the new position. Wait for the device to boot up and monitor the router LED on your extender device. If it’s green then the position is perfect. On the contrary if it turns amber or red then relocate it.
Test New Network
Lastly, test the new network using a wireless handset. Using the new SSID & password connect the device with the extender network and browse, stream or play online to check speed.
Conclusion
Lastly, I would like to rest my words by saying that the 192.168.1.250 Netgear Setup process is a super easy task. By following the above mentioned step by step breakdown of the extender setup process, anyone can configure the extender easily without a tech expert. Setting up an extender device will boost your existing network signal strength and terminate the dead spots from your home or office area.
2 notes
·
View notes
Note
im here from your post looking at the code of the comic website. have you ever thought of like website development/coding/something related as a job in the future? i don’t really know anything on that topic but you seem to know quite a bit!
welllllllllllllllllll
the main reason we know our way around website code/the inspect tool/websites so well is back in middle school well uh
we used to use amino a lot, specifically kirby amino. it was our first social media and we were somehow popular on there for some ungodly reason, and we were constantly talking with our friends on there instead of doing anything productive. we used to use the computer lab a lot during lunch/computer time to just post/talk on amino, which the school quickly blocked. we quickly recovered by downloading a free shitty vpn, which the school later blocked. we then just used a different free vpn, which continued for a while until our school blocked any and all vpns including chrome extensions. we then figured out the school's blocking feature only applied to google chrome, so we downloaded opera instead since it didn't require admin priveleges to download. the school then later blocked opera, so we started using a fun little now defunct feature in google translate where if you inputted a website link, it would proxy the website as a cached version you could look at. it was heavily broken because of that, and it kept popping up with the "hey log into amino to continue!" so we couldnt continue scrolling, so we used the inspect tool to completely remove it manually as well as kind of fix some of the formatting issues with it being cached. school couldn't figure a way around that without banning google translate which they obviously couldn't do. we then figured out that we just needed to carry opera on a flashdrive with us and we could just continue what we did previously
the school got so fucking fed up with our shit that they brought in the best IT person a school salary could buy to stop our little 12 year old ass. we then figured a way around all of their blocks and firewalls within about the duration of a computer class. our teachers then heavily started trying to push us towards an IT career
we'd continue with our bullshit during the period we lived with our dad in high school in texas, where he put major lock downs on all of our electronics. we got given an andorid phone instead of our old iphone, which we used against him by downloading the tor browser and talking with our discord friends, which meant we got our shit taken away until we moved back to our grandmas. we got sent back our old laptop, but it still had all of the network nanny shit on it that would let him control the entire laptop remotely and stop us from getting on discord.
we then realized we could go into the net nanny files, open them in notepad, and then ctrl+a then ctrl+d to remove all of the code, and despite our dad still trying to stop it, we ended up doing this until all of the functionalities of the program were dead and we could just uninstall it
so like, a lot of our computer expertise is BREAKING code. however we've made about 7-8 websites by ourselves with html/css on neocities however i cant show any of them because we have a tendency to gut the code each time :^{
i have thought about doing freelance website work/code editing before but i'd have no idea how to start considering we don't really know "professional" code building aka the shit companies want
4 notes
·
View notes
Text
HOW TO GET AROUND YOUR SCHOOL’S FIREWALL
(please remember that i am posting this specifically for people who have no other way to access the internet and need to get on the internet for whatever reason. i do not encourage people goofing off in class and not being able to get a job in the future)
if you just need the information on the page, try the wayback machine
look up the website’s ip and visit the ip instead of the url
try a free vpn (it might steal information from you be careful), this could mean using an extension or downloading one.
if your school has extensions disabled, try making a new chrome profile if you’re on chrome, or if that doesn’t work, try downloading another browser such as firefox.
if your school has downloads disabled, try getting a usb with the browser already installed, either by using some device from home or asking a friend
hyperbeam.com if it’s not blocked, if it is blocked there is another way, dm me if you want to know it, too long for this post
try connecting to your or a friends hotspot if your school blocks websites through the wifi
try taking the url of a website and embedding it into something like a google site
proxy websites, though they get shut down or changed often
try downloading or using some kind of virtual machine
if all of that fails, you could hack the computer but that may get you in trouble
you are encouraged to add on to this!!
2 notes
·
View notes
Text
How to get image URLs
Hi all, your friendly mod Kate here! Every once in a while we get people who don't know how best to send images with their submissions, so hopefully this guide helps you out. It covers getting the url using a mouse, and has examples of what to avoid and why.
Since Google Forms don't allow anonymous image uploads, the image must already be on the web with a url that anyone can access. If you are using a search engine, be sure to go to the site your image is from before you do the next steps. If you do this just from a search results page, the url won't be quite right!
Getting the URL
The best way to get the url is to view it on web so you can right click on the image. From the menu, choose "Copy image address".
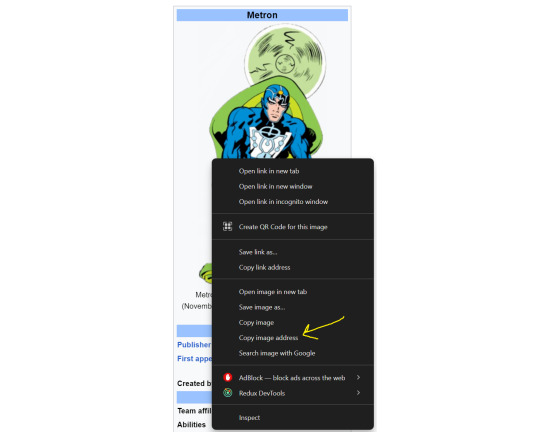
[ID: Screenshot from a wikipedia page of Metron with the right click menu open and an arrow pointing to "Copy image address". /END]
--
Alternatively you can choose "Open image in new tab", then copy the url from the browser's search bar.
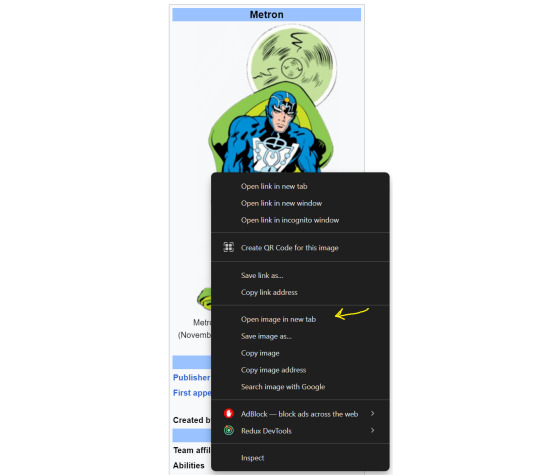
[ID: The same screenshot as above, but with the arrow pointing to "Open image in new tab". /END]

[ID: Cropped screenshot of the image opened in a new tab with an arrow pointing to the browser's url bar. /END]
--
Things to Avoid
When we get unusable image urls, there are three main reasons:
The image is not publicly accessible.
The url is not for an image.
The image is no longer available.
Examples of Issue #1
Images from Google Drive that don't have link sharing on
Images that you have to sign in to see
Examples of Issue #2
This link is to a Google search results page. I can't tell which image someone intended to use.
https://www.google.com/search?q=metron+dc+comics&rlz=1C1CHBF_enUS911US911&oq=metron+&gs_lcrp=EgZjaHJvbWUqDggAEEUYJxg7GIAEGIoFMg4IABBFGCcYOxiABBiKBTIGCAEQRRg7Mg4IAhBFGCcYOxiABBiKBTIGCAMQRRg8MgYIBBBFGEEyBggFEEUYPDIGCAYQRRhBMgYIBxBFGEGoAgCwAgE&sourceid=chrome&ie=UTF-8

[ID: Screenshot of a Google search results page for query "metron dc comics". /END]
This link is to the Google Image search results page. Once again, I don't know which one to use.
https://www.google.com/search?sca_esv=986cfd32cb66a37f&sca_upv=1&rlz=1C1CHBF_enUS911US911&sxsrf=ADLYWIIdCEk3PzdCJUoz7Ymo7teGL9YUIQ:1717103084714&q=metron+dc+comics&tbm=isch&source=lnms&prmd=isnvmbt&sa=X&sqi=2&ved=2ahUKEwjbwaC7o7aGAxUw4MkDHVzeB2YQ0pQJegQIEhAB&biw=1020&bih=1293&dpr=1.5
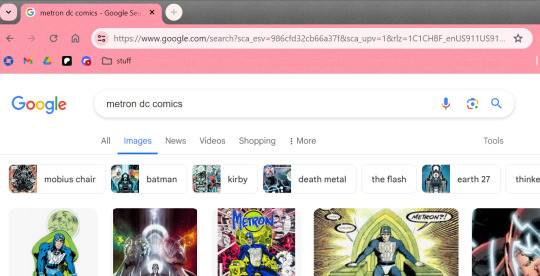
[ID: Screenshot of a Google Image search results page for query "metron dc comics". /END]
This link appears to be from a different search engine called Startpage, where a wiki image had been selected. This is a case where right clicking and choosing "Copy image link" or "Open image in new tab" is not going to work. It is better to go to the page where the image is actually from, and then getting the image url from there. Interestingly, you can see that part of the link contains something that looks similar to this https://vignette.wikia.nocookie.net/marvel_dc/images/a/a5/Dawnallen.jpg, which is a real image url, but it took me quite a while to figure that out, and I'm not going to be able to do that every time.
https://www.startpage.com/av/proxy-image?piurl=https%3A%2F%2Fvignette.wikia.nocookie.net%2Fmarvel_dc%2Fimages%2Fa%2Fa5%2FDawnallen.jpg%2Frevision%2Flatest%2Fscale-to-width-down%2F292%3Fcb%3D20141119200128&sp=1716665195T3f28a643c60d90c333200b2b00010330c9bd2d886952cfba77583da3e859b911
[ID: Screenshot of the browser showing a Startpage search bar that has a red alert message at the top that says, "We're sorry, the page yuo requested is not found. The URL may be misspelled or the page you're looking for is no longer-" the rest is cut off. /END]
--
Examples of Issue #3
This link was valid at the time it was submitted, but Discord links are temporary, so now the image is gone.
https://media.discordapp.net/attachments/927416037027221524/1154255413148143766/Batman_1940_Issue_148_-_Read_Batman_1940_Issue_148_comic_online_in_high_quality2.jpg?ex=6583ae9f&is=6571399f&hm=6faed65d8bb4b81826980470b397632d2ee00f7b6cffcc4320767bdaf7863cd4&

[ID: Screenshot of the browser with a white page that says "This content is no longer available." /END]
This link from Facebook has expired. The image probably still exists, but Facebook uses a CDN that makes temporary urls for content. These expire quickly.
https://scontent-sea1-1.xx.fbcdn.net/v/t1.6435-9/118003141_10157715190051242_806076112121497002_n.jpg?_nc_cat=102&ccb=1-7&_nc_sid=7f8c78&_nc_ohc=aGCMuhwSkFQAX-qpqh1&_nc_ht=scontent-sea1-1.xx&oh=00_AfCWUrtuC3X0qmogIEQMzOb5xdKOp9hwpxJjj4f3v5WQJA&oe=65CA7A60

[ID: Screenshot of the browser with a white page that says "URL signature expired". /END]
4 notes
·
View notes
Text
@lavendermanna
1) CORRECT, it was intended as the successor to cassette tapes, and as a more portable companion to CD, as tapes were to vinyl records, in a way. all the convenience of tapes and CDs in one package :3
2) ebay and Japanese proxy shopping! with some luck you can find a recorder in decent shape on ebay for an okay price (I shoot for about $100 or less when possible) and $50 or less for playback only models like the one in my post. I've also used a proxy service for yahoo! Japan auctions called buyee.jp because you can usually find players bundled with accessories (in-line remote, charging dock, battery sidecar) in good shape for a decent price as well. highly recommend budgeting for that though bc Japanese sellers love to over-pack orders which is nice for keeping ur order safe but the package dimensions + weight are used to calculate shipping so you may end up paying more than you would expect (shout out to the seller who sent me a Nintendo switch cart by itself inside of a massive box and a huge bundle of bubble wrap. fuck you dude this could've been an envelope 🖕) anyways I think NetMD is worth it for getting into minidisc bc it's so easy and quick but they tend to be a bit more expensive than pre-NetMD recorders because of their popularity. on the plus side this also means you can find an older recorder for cheaper than NetMD devices. oh and avoid most Location:Japan listings in ebay bc chances are they're just relisting a yahoo Japan auction item they don't even have, for twice as much as you'd be likely to pay if you bought it from Yahoo auctions urself.
3) so there's actually two methods for recording discs, one is live dubbing, which is to say connecting a recorder to the audio source with either analog line-in connection or a digital TOSLINK cable (or a 3.5mm jack microphone on some models) OR later model recorders that have a feature called NetMD in which you can plug in through USB and upload your tracks. it used to be a proprietary software but some enthusiasts have reverse engineered their own program accessible through Chrome based browsers (rare Firefox L) that allow you to upload music even easier. I use a usb-c to mini usb cable and the web app installed on my Android phone to burn most of my discs when I don't feel like doing a live recording just bc it's way faster. live recording can be a vibe though, I love recording my record collection so I can take them with me on the go :3
ebay search for MD recorders
buyee search for Net MD recorders
buyee search for MD players (only bc the players are much thinner and less scary to carry around than ur precious recorder. less wear and tear as well on ur recorder as well)
web minidisc pro (for recording through NetMD) and WMD guide to learn how to use it, and the rest of the wiki is useful for researching models while you shop
minidisc wiki discord and finally the official wiki discord! everyone's real friendly in here, come on in and join us sometime, there's tons of seasoned MD enthusiasts who are ready to help with any problem or question you could possibly have :)
3 notes
·
View notes
Text
A Step-by-Step Guide to Web Scraping Walmart Grocery Delivery Data

Introduction
As those who are in the marketplace know, it is today's data model that calls for real-time grocery delivery data accessibility to drive pricing strategy and track changes in the market and activity by competitors. Walmart Grocery Delivery, one of the giants in e-commerce grocery reselling, provides this data, including product details, prices, availability, and operation time of the deliveries. Data scraping of Walmart Grocery Delivery could provide a business with fine intelligence knowledge about consumer behavior, pricing fluctuations, and changes in inventory.
This guide shall give you everything you need to know about web scraping Walmart Grocery Delivery data—from tools to techniques to challenges and best practices involved in it. We'll explore why CrawlXpert provides the most plausible way to collect reliable, large-scale data on Walmart.
1. What is Walmart Grocery Delivery Data Scraping?
Walmart Grocery Delivery scraping data is the collection of the product as well as delivery information from Walmart's electronic grocery delivery service. The online grocery delivery service thus involves accessing the site's HTML content programmatically and processing it for key data points.
Key Data Points You Can Extract:
Product Listings: Names, descriptions, categories, and specifications.
Pricing Data: Current price, original price, and promotional discounts.
Delivery Information: Availability, delivery slots, and estimated delivery times.
Stock Levels: In-stock, out-of-stock, or limited availability status.
Customer Reviews: Ratings, review counts, and customer feedback.
2. Why Scrape Walmart Grocery Delivery Data?
Scraping Walmart Grocery Delivery data provides valuable insights and enables data-driven decision-making for businesses. Here are the primary use cases:
a) Competitor Price Monitoring
Track Pricing Trends: Extracting Walmart’s pricing data enables you to track price changes over time.
Competitive Benchmarking: Compare Walmart’s pricing with other grocery delivery services.
Dynamic Pricing: Adjust your pricing strategies based on real-time competitor data.
b) Market Research and Consumer Insights
Product Popularity: Identify which products are frequently purchased or promoted.
Seasonal Trends: Track pricing and product availability during holiday seasons.
Consumer Sentiment: Analyze reviews to understand customer preferences.
c) Inventory and Supply Chain Optimization
Stock Monitoring: Identify frequently out-of-stock items to detect supply chain issues.
Demand Forecasting: Use historical data to predict future demand and optimize inventory.
d) Enhancing Marketing and Promotions
Targeted Advertising: Leverage scraped data to create personalized marketing campaigns.
SEO Optimization: Enrich your website with detailed product descriptions and pricing data.
3. Tools and Technologies for Scraping Walmart Grocery Delivery Data
To efficiently scrape Walmart Grocery Delivery data, you need the right combination of tools and technologies.
a) Python Libraries for Web Scraping
BeautifulSoup: Parses HTML and XML documents for easy data extraction.
Requests: Sends HTTP requests to retrieve web page content.
Selenium: Automates browser interactions, useful for dynamic pages.
Scrapy: A Python framework designed for large-scale web scraping.
Pandas: For data cleaning and storing scraped data into structured formats.
b) Proxy Services to Avoid Detection
Bright Data: Reliable IP rotation and CAPTCHA-solving capabilities.
ScraperAPI: Automatically handles proxies, IP rotation, and CAPTCHA solving.
Smartproxy: Provides residential proxies to reduce the chances of being blocked.
c) Browser Automation Tools
Playwright: Automates browser interactions for dynamic content rendering.
Puppeteer: A Node.js library that controls a headless Chrome browser.
d) Data Storage Options
CSV/JSON: Suitable for smaller-scale data storage.
MongoDB/MySQL: For large-scale structured data storage.
Cloud Storage: AWS S3, Google Cloud, or Azure for scalable storage.
4. Building a Walmart Grocery Delivery Scraper
a) Install the Required Libraries
First, install the necessary Python libraries:
pip install requests beautifulsoup4 selenium pandas
b) Inspect Walmart’s Website Structure
Open Walmart Grocery Delivery in your browser.
Right-click → Inspect → Select Elements.
Identify product containers, pricing, and delivery details.
c) Fetch the Walmart Delivery Page
import requests from bs4 import BeautifulSoup url = 'https://www.walmart.com/grocery' headers = {'User-Agent': 'Mozilla/5.0'} response = requests.get(url, headers=headers) soup = BeautifulSoup(response.content, 'html.parser')
d) Extract Product and Delivery Data
products = soup.find_all('div', class_='search-result-gridview-item') data = [] for product in products: try: title = product.find('a', class_='product-title-link').text price = product.find('span', class_='price-main').text availability = product.find('div', class_='fulfillment').text data.append({'Product': title, 'Price': price, 'Delivery': availability}) except AttributeError: continue
5. Bypassing Walmart’s Anti-Scraping Mechanisms
Walmart uses anti-bot measures like CAPTCHAs and IP blocking. Here are strategies to bypass them:
a) Use Proxies for IP Rotation
Rotating IP addresses reduces the risk of being blocked.proxies = {'http': 'http://user:pass@proxy-server:port'} response = requests.get(url, headers=headers, proxies=proxies)
b) Use User-Agent Rotation
import random user_agents = [ 'Mozilla/5.0 (Windows NT 10.0; Win64; x64)', 'Mozilla/5.0 (Macintosh; Intel Mac OS X 10_15_7)' ] headers = {'User-Agent': random.choice(user_agents)}
c) Use Selenium for Dynamic Content
from selenium import webdriver options = webdriver.ChromeOptions() options.add_argument('--headless') driver = webdriver.Chrome(options=options) driver.get(url) data = driver.page_source driver.quit() soup = BeautifulSoup(data, 'html.parser')
6. Data Cleaning and Storage
Once you’ve scraped the data, clean and store it:import pandas as pd df = pd.DataFrame(data) df.to_csv('walmart_grocery_delivery.csv', index=False)
7. Why Choose CrawlXpert for Walmart Grocery Delivery Data Scraping?
While building your own Walmart scraper is possible, it comes with challenges, such as handling CAPTCHAs, IP blocking, and dynamic content rendering. This is where CrawlXpert excels.
Key Benefits of CrawlXpert:
Accurate Data Extraction: CrawlXpert provides reliable and comprehensive data extraction.
Scalable Solutions: Capable of handling large-scale data scraping projects.
Anti-Scraping Evasion: Uses advanced techniques to bypass CAPTCHAs and anti-bot systems.
Real-Time Data: Access fresh, real-time data with high accuracy.
Flexible Delivery: Data delivery in multiple formats (CSV, JSON, Excel).
Conclusion
Scrape Data from Walmart Grocery Delivery: Extracting and analyzing the prices, trends, and consumer preferences can show any business the strength behind Walmart Grocery Delivery. But all the tools and techniques won't matter if one finds themselves in deep trouble against Walmart's excellent anti-scraping measures. Thus, using a well-known service such as CrawlXpert guarantees consistent, correct, and compliant data extraction.
Know More : https://www.crawlxpert.com/blog/web-scraping-walmart-grocery-delivery-data
#ScrapingWalmartGroceryDeliveryData#WalmartGroceryDeliveryDataScraping#ScrapeWalmartGroceryDeliveryData#WalmartGroceryDeliveryScraper
0 notes
Text
Ticketmaster Error Code U226: Causes, Fixes, and Preventive Tips
Ticketmaster is the go-to platform for millions of people purchasing event tickets—from concerts and festivals to sports and theater shows. However, encountering issues during checkout can be frustrating, especially when you're trying to secure high-demand tickets. One common and often confusing problem users report is Ticketmaster Error Code U226. If you've seen error code: U226 flash across your screen, you're not alone. In this guide, we'll break down everything you need to know about this error—why it appears, how to fix it, and how to avoid it in the future.

What Is Ticketmaster Error Code U226?
Error Code U226 is a security-related error on Ticketmaster that typically occurs when the system suspects that your activity may be automated or suspicious. It’s essentially a protective response from Ticketmaster’s fraud detection algorithms. If you encounter error code U226, it means your access to purchasing tickets has been temporarily restricted.
Why Does Error Code: U226 Occur?
The main causes of this error include:
Rapid clicking or refreshing the page
Using browser extensions or VPNs
Multiple tabs open on Ticketmaster simultaneously
Automated scripts or bot-like activity
Excessive failed login or payment attempts
Ticketmaster's system is designed to protect fans from scalpers and bots, which unfortunately means that even regular users can sometimes trigger this error.
Common Scenarios Where You Might See Error Code U226
Understanding the context in which the Ticketmaster error code U226 occurs can help you avoid it. Here are some scenarios:
1. Trying to Purchase High-Demand Tickets
When a popular event goes on sale, thousands of users flood the Ticketmaster website. In such high-traffic moments, even legitimate fans may appear suspicious to Ticketmaster’s algorithms, especially if they’re refreshing constantly.
2. Logging In From Multiple Devices
If you’re logged into Ticketmaster on your phone, laptop, and tablet all at once, you increase the risk of getting flagged for suspicious behavior.
3. Using Automation Tools
Some users attempt to use browser automation tools or bots to improve their chances of getting tickets. Ticketmaster is particularly sensitive to this and will issue error code U226 to block the activity.
4. Use of VPNs or Proxies
VPNs mask your IP address, but they can also trigger fraud protection systems. If you’re on a VPN, Ticketmaster may see it as an attempt to bypass regional or security restrictions.
How to Fix Ticketmaster Error Code U226
Fortunately, there are several ways to fix error code: U226 and get back to purchasing your tickets.
1. Stop All Activity Immediately
Once the error appears, stop refreshing, clicking, or navigating. Take a break for about 10–30 minutes to avoid prolonging the temporary block.
2. Clear Browser Cookies and Cache
Cached files and cookies can store data that triggers the same error again. Here’s how to fix it:
Go to your browser settings
Clear browsing data (cookies, cache, and history)
Close and reopen your browser
Try accessing Ticketmaster again
3. Disable Extensions and VPNs
Ad blockers, script blockers, or VPN tools can interfere with how Ticketmaster interprets your behavior. Disable all extensions and VPNs, then refresh the page.
4. Use a Different Browser or Device
Switching to a new browser (e.g., from Chrome to Firefox) or using a different device (like your smartphone instead of your laptop) may bypass the error.
5. Reset Your Network
Restart your router or use a different internet connection. Sometimes your IP address is temporarily flagged—changing it can help.
Preventing Future Error Code U226 Incidents
Avoiding the Ticketmaster error code U226 in the future requires understanding best practices for using the platform.
1. Avoid Over-Refreshing
While it’s tempting to refresh repeatedly when tickets are about to go on sale, limit your refreshes. Let the page load fully before trying again.
2. Stick to One Tab and One Device
Only use one tab and one device when trying to buy tickets. Multiple sessions from the same account are likely to be flagged.
3. Don’t Use Bots or Scripts
Ticketmaster actively fights automated ticket-buying tools. If you’re using browser automation, you will almost certainly trigger U226.
4. Stay Logged In Before the Sale
Log into your Ticketmaster account 10–15 minutes before the sale and keep your information ready (billing, payment, etc.) to speed up checkout without erratic behavior.
5. Avoid Public Wi-Fi
Public networks can make your activity look suspicious. Stick to trusted home or mobile networks.
When to Contact Ticketmaster Support
If none of the above solutions work, and you keep getting error code: U226, you may need to reach out to Ticketmaster’s customer support.
Steps to Contact Support:
Go to Ticketmaster Help
Click on "Contact Us"
Use the live chat option or request email assistance
Provide the full error message, browser used, and what you were trying to do when it occurred
Ticketmaster can sometimes manually lift a restriction, especially if it’s affecting your ability to access a time-sensitive ticket sale.
FAQs About Ticketmaster Error Code U226
Q: How long does Ticketmaster Error U226 last? A: It can last anywhere from a few minutes to a few hours depending on the activity that triggered it.
Q: Can I get banned permanently because of U226? A: No. This is typically a temporary restriction. However, repeated violations could result in longer blocks.
Q: Is there a way to know if I’ve been flagged before trying to buy tickets? A: Unfortunately, Ticketmaster does not notify you beforehand. You’ll only know if an error like U226 appears during activity.
Final Thoughts: Stay Smart to Avoid U226
Getting hit with Ticketmaster error code U226 during a hot-ticket sale is frustrating, but understanding what causes it and how to avoid it can make a big difference. The key lies in being patient, using the platform responsibly, and avoiding behavior that mimics bots or scalpers. Whether you're chasing concert tickets or seats at the next big game, keeping your Ticketmaster activity clean and human-like is the best way to stay on the right side of their security systems.
0 notes
Text
ACCA DipIFR Remote Exam: Requirement, Set-up & Tips

In our previous blog, we discussed ACCA DipIFR exam utility interface & answer writing tips which will help students to get comfortable with CBE interface and to be familiar with the examination pattern and face it with confidence.
This blog is especially for the students who chose Remote examination session i.e., who would appear from home or office instead of centre-based examination. This blog will guide you about technical requirements of the allowed devices and necessary care to be taken before and during the remote examination session.
System Requirements:
Operating System
• Windows 11 and 10 (64-bit) – (excluding ‘S Mode’) • macOS 13 and above – (excluding beta versions)
Note: • Mac OS, starting with Mojave, now requires permission from the user to allow any hardware access to an application, which includes OnVUE (proctorapp). Candidates should be prompted to allow this application • Windows Operating Systems must pass Genuine Windows Validation.
Unsupported operating systems
• Windows 8/8.1, Windows 7, Windows XP, and Windows Vista • Linux/Unix and Chrome based Operating Systems
Firewall
• Corporate firewalls should be avoided as they often cause this delivery method to fail. • VPNs and proxies should not be used. • We recommend testing on a personal computer. Work computers generally have more restrictions that may prevent successful delivery.
RAM Required
Recommended Minimum RAM of 4 GB or more
Display
Minimum Resolution: 1024 x 768 in 16-bit col Recommended Resolution: 1920 x 1080 or higher in 32-bit color • If using an external monitor, you must close your laptop and use an external keyboard, mouse, and webcam. • Multiple monitors are forbidden. • Touch screens are strictly forbidden.
Webcam
• The webcam may be internal or external. It must be forward-facing and at eye level to ensure your head and shoulders are visible within the webcam. • The webcam must remain in front of you and cannot be placed at an angle. • Webcam filters are not allowed (for example, Apple’s ‘Reactions’). • Webcam must have a minimum resolution of 640x480 @ 10 fps.
Note: • Mobile phones are strictly prohibited as a webcam for exam delivery. • Mac OS users may need to allow OnVUE within their System Preferences: Security & Privacy: Privacy settings for camera & microphone.
Speakers and microphone
Speakers: • Speakers must be built-in or wired. • Bluetooth speakers or the use of headphones* as speakers are not allowed. Headphones: • Headphones and headsets are not allowed unless explicitly approved by your test sponsor. • If allowed, headphones must be wired – Bluetooth are not allowed.
Browser settings
Internet Cookies must be enabled.
Device
All tablets are strictly prohibited, unless they have a physical keyboard and meet the operating system requirements mentioned earlier.
Power
Make sure you are connected to a power source before starting your exam to avoid draining your battery during the exam.
Internet Browser
The newest versions of Microsoft Edge, Safari, Chrome, and Firefox, for web registrations or downloading the secure browser.
Internet Connection
• For better performance, a reliable and stable connection speed of 12 Mbps download and 3 Mbps upload required. • We recommend testing on a wired network as opposed to a wireless network. • If testing from home, ask others within the household to avoid internet use during your exam session.
We strongly recommend using equipment that meets or exceeds the Recommended Specifications. The minimum requirements will change periodically based on the needs of exam sponsors.
Mobile phone: You may have the option to use your mobile phone to complete the check-in process. The mobile must meet the following requirements:
• Android (11+, Chrome) or IOS (15+, Safari) operating systems • A functioning camera with a stable internet connection
A mobile phone is used only for completing admission steps and must not be used during the exam. After completing the check-in steps, please place the mobile phone where it is not accessible to you during the exam. As a reminder, phones are a prohibited item and should not be within your reach or visible to you while sitting in front of your computer.
Pre-exam requirements
Passing the Mandatory system test
• You MUST pass mandatory system test prior to your check-in for exam. • When taking the test, use same device and the same location you we’ll use on exam day. • Make sure your last test run is a pass, so that you are eligible for all post-exam options. • Go to Exam Planner & hit the Run System Test button.
Practice using the scratch pad
Remember, you cannot use scratch paper for remote exam session. So, it’s important to get used to using the scratch pad on the Practice Platform before your live exam.
Exam set-up
Your room setup
You will be under exam conditions and monitored by an invigilator throughout. Make sure below conditions are being followed: • A private and quite room with solid walls and doors. • No other person can be visible or heard for full duration of exam. • Use curtains or blinds to cover windows if anyone can be seen through them. • Switch all other unnecessary electrical equipment off. • Refer below images to have an idea about ideal exam environment.
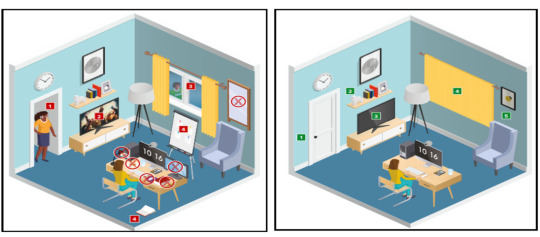
Prohibited Permitted
Your desk setup
Your desk must be setup in a way that meets the rules and regulations of the exam: • No scrap paper• Only one monitor • A glass/bottle of water with label removed permitted • No headphones / earbuds / earphones • No watches

The check-in process
• Check in to your exam by going the exam planner and click launch exam button. • You can launch your exam 30 minutes prior your scheduled time. • If you are more than 15 minutes late you will miss your exam attempt and be marked as Absent.
Using your mobile phone:
• You may use your mobile phone during the check-in process – On-screen instruction will guide you.• You’ll be asked to take and upload photos of your exam environment, yourself and your ID. • Once completed this process place your mobile phone on silent and out of arm’s reach. • Do not use your mobile phone for any other purpose during exam (exception if invigilator calls you) • Taking photos of your screen or making calls during the exam is strictly prohibited.
Under exam conditions:
In addition to the desk/room requirements you should be aware that the following is also prohibited:
• Talking aloud during your exam. • People being audible outside your room. • Leaving the exam early – DO NOT end your exam early, you must stay supervised for the full-time duration.
Contacting the invigilator
• To start a chat with your invigilator, select the chat button. • Your invigilator will be with you as soon as they are available. • Unlikely they can assist you, but you should inform your invigilator if you are experiencing any technical difficulties. • You must inform your invigilator if you wish to use your permitted bathroom break.
Bathroom breaks
You can take one bathroom break during your exam of up to 5 minutes: • Notify your invigilator when you are leaving and returning from bathroom break. • You do not have to wait for the invigilator to give you their permission before taking your bathroom break. • The exam timing will continue to run – if you exceed 5 minutes your exam may be terminated.
Post-exam options: In the event of technical issue disrupting your exam, you may wish to use post-exam options which can be accessed on exam planner or under Contact Us on ACCA’s website.
Minimise the risk of the technical issue by: • Performing your equipment and connectivity test. • Accessing troubleshooting resources.
Using post exam options
To use rebook or withdrawal option you must have: • attempted to check-in your exam • experienced a technical issue impacting your ability to complete exam.
Additional withdrawal eligibility criteria
• The mandatory system test must be taken ahead of each exam session. • Student must have passed the mandatory system test in their last attempt prior to checking in for your exam.
Make sure that your device / other equipment’s are compatible as per the provided requirements and you are availed with the environment requisite for the exam purpose. Everyone should make sure to follow fair practices during exam to avoid any disqualification or disciplinary action.
We hope, this blog about ACCA DipIFR Remote Exam Requirement, Set-up & Tips shall assist in making the necessary arrangements.
Further, please watch video related to the remote examination on the below link: https://youtube.com/playlist?list=PLRYOefFr48S0apGK6f0kw0sX7fC6uSzsx&feature=shared
Best wishes from Team FinPro!
#finproconsulting#diploma in ifrs#accounting#dipifrs#ifrs#ifrs online classes#finpro consulting#dipifr course#diplomainifrs#acca
0 notes
Text
Why Do Google Voice Calls Cut Off After 10 Seconds? Here’s a Real Fix That Works
Why Do Google Voice Calls Cut Off After 10 Seconds? Here’s a Real Fix That Works
If you’ve ever tried making a call through Google Voice and it suddenly cuts off after 10 seconds, you're definitely not alone. It’s a weird but common issue — the call connects, you start talking, and then… silence.
So what’s going on?
The short answer: it’s almost always your network, not your phone. Google Voice relies on a special type of internet traffic called UDP (User Datagram Protocol) to handle calls smoothly. But many networks, VPNs, or proxies either block UDP or don’t support it — which causes the call to drop shortly after it starts.
This issue didn’t happen much back when Hangouts handled calls, but now that Google Voice runs as a standalone app, it’s way more sensitive to your network setup.
How to Fix It — Without Any Tech Jargon
If you want your calls to actually work, here are two simple solutions:
✅ Use Google Voice on the Web: Just go to voice.google.com using Chrome or any browser. It usually works fine even if your network blocks UDP. Super easy and no setup needed.
✅ Use a VPN That Supports UDP: If you’re sticking with the mobile app, your VPN must support UDP. Not all of them do! Check your VPN settings or switch to one that clearly says it supports UDP traffic.
You might be wondering — everything else on the internet works fine with your VPN, so why not Google Voice? That’s because normal browsing uses TCP, while voice calls use UDP. They’re two different things — and voice calls will fail without the right support.
Need a verified Google Voice account that works from day one? Check out gvbro.com — your one-stop place for clean, pre-verified Google Voice numbers that just work. Whether you’re using it for calls, account verification, or business use, you’ll save time and skip the tech hassle.
➡️ Just click here: Get Your Account Now
0 notes
Text
Setting Up Proxies in Chrome, Firefox, or Edge
Sure! Here’s a friendly and easy-to-understand article on how to set up proxies in Chrome, Firefox, or Edge. I've kept the tone casual and simple, and included the required link just once in the beginning. Here's the article:
Setting Up Proxies in Chrome, Firefox, or Edge
If you've ever had trouble accessing a website or just wanted a little more privacy online, setting up a proxy in your web browser could help. A proxy acts like a middleman between your computer and the internet. It can help you load pages that might be blocked in your area, keep your identity private, or even speed up your connection sometimes. You can learn more about one option for proxies over at https://infatica.io/residential-proxies/.
Now, depending on which browser you use—Chrome, Firefox, or Edge—the way you set up a proxy is a little different. But don't worry, we'll walk through each one in a simple way.
Chrome
Chrome doesn’t have a built-in way to set up proxies just for the browser. It uses your computer’s system settings.
Here’s how to do it on Windows:
1. Open Chrome. 2. Click the three dots in the top-right corner and go to “Settings.” 3. Scroll down and click “System.” 4. Click “Open your computer’s proxy settings.” 5. A new window opens. Under “Manual proxy setup,” turn it on and enter the IP address and port given by your proxy provider. 6. Click “Save.”
On a Mac:
1. Open Chrome and go to “Settings.” 2. Scroll to “System” and click “Open your computer’s proxy settings.” 3. This opens your Mac’s Network settings. Choose the network you're connected to, click “Advanced,” then click the “Proxies” tab. 4. Check the boxes based on your proxy type, then enter your details. 5. Click “OK” and then “Apply.”
Firefox
Firefox gives you more control without changing your entire computer’s settings.
1. Open Firefox. 2. Click the three horizontal lines in the top-right corner and go to “Settings.” 3. Scroll down to “Network Settings” and click “Settings…” 4. Choose “Manual proxy configuration.” 5. Enter the IP and port your proxy provider gave you. 6. If the same proxy is used for everything, check “Use this proxy server for all protocols.” 7. Click “OK.”
You’re done! Firefox will now use that proxy when you browse.
Edge
Just like Chrome, Edge uses the system settings too.
To set it up on Windows:
1. Open Edge. 2. Click the three dots in the top-right corner and go to “Settings.” 3. Click “System and performance.” 4. Click “Open your computer’s proxy settings.” 5. In the window that pops up, turn on “Use a proxy server” under “Manual proxy setup.” 6. Enter the server address and port, click “Save.”
On a Mac:
1. Open Edge, go to “Settings.” 2. Find the “System” section and click “Open your computer’s proxy settings.” 3. You’ll be taken to your Mac’s network settings—just like in Chrome. 4. From there, follow the same steps as above for the Mac setup.
Final Thoughts
Using a proxy in your browser is a helpful way to protect your privacy, get past certain blocks, or make your browsing just a bit more flexible. Whether you're on Chrome, Firefox, or Edge, it only takes a few minutes to get started. Try following these steps and see how it works for you. As always, keep a note of your proxy settings somewhere just in case you want to switch back later.
0 notes
Text
Rilide Malware: How browser Extensions Affect Online Threats

How Rilide virus strikes via browser extensions:
What's Rilide?
Rilide, also known as LumaC2 and CookieGenesis, is powerful malware discovered in 2023. It targets Chromium browsers to collect user data and control behaviour. Rilide's main feature is misusing its browser extension to launch attacks.
Change to Browser Extension Attacks
Rilide is a sign of a major threat shift. Traditional man-in-the-browser attacks used malware detecting HTML patterns in browser memory and inserting
However, modern assaults using malicious browser extensions like Rilide bypass most of these restrictions. Extensions don't depend on any website, thus they can run in the background. They also have higher rights to access browser-wide resources like cookies and local storage and bypass same-origin restrictions. Extensions give more persistence and control than traditional web injection methods because they work even when no pages are open.
Extensions also impact JavaScript execution context. Conventional injections may have left traces because they ran alongside security tools and web application code. Extensions create two JavaScript environments in addition to the main page context:
Despite its separation from the main page environment, the content script context can access the page document.
As a service worker, the main page environment and content script cannot access the background code context.
Communication between contexts occurs through hidden browser interfaces from page developers. Because much of the extension's action and evidence are designed to be separated, detection will be harder without changes to the original document. Due of extensions' greater control, persistence, evasion, and ease of development, browser threats likely evolved to employ extensions. Modern browser APIs make browser extensions easy to develop due to their extensive built-in functionality and permissions.
Technique: Rilide Uses Extension Elements
Rilide uses browser extension components to simplify its attacks:
The Manifest:
This crucial section describes the extension's functionality and access levels. One Rilide variant posed as a Google Drive plugin. By listing the appropriate rights, the manifest file reveals Rilide's capabilities. Rilide requested these important permissions:
“Scripting”: Injects and runs JavaScript code on web pages.
You can see, change, and delete browser cookies.
Monitor and change browser network requests using “WebRequest”.
“ClipboardRead/Write”: Reading and editing clipboard content.
“ActiveTab”: Temporary tab content access. With the “host_permission” parameter, the extension can access and interact with any browser-supported scheme, domain, path, and port.
Because they run on all URLs at document_start, content scripts start early in page loading. The manifest also establishes rules under “declarative_net_request” to remove specific Content Security Policy (CSP) headers to allow Rilide to insert inline data. Under “background” lies the extension's service worker, where the malware tracks browser events and communicates with the C2 server.
Background.js, background script:
When the extension is installed, this script executes its initialisation code. Chrome.system retrieves CPU, storage, and extension data, while chrome.management retrieves cookies.getAll retrieves all cookies at startup. A unique ID is maintained locally. This data is sent to the C2 server, which may allow the extension to proxy.
Initialisation fetches commands, viral settings, and injections. After enabling CSP removal rules, the background script tracks browser events. The background script includes a unique C2 server domain gathering method. Recurring Google Chrome alarm calls retrieve them from a Telegram bot. If a domain is blocked, the virus can easily switch.
The background script transmits data exfiltration to the C2 server after listening for content script signals like “new-grabber-info,” which contain input element values. For chrome.tabs.captureVisibleTab to capture the visible tab and send the screenshot data to the C2, it listens for “set-screenshot-result” signals. Verify and initiate proxy connections and execute C2 instructions with frequent alarms.
Command script cmds.js:
This script receives calls from the C2 server and returns results. Some intriguing commands are:
“Extension”: Allows ID-based extensions.
“Push” opens a new tab and displays the fetched content in a browser notice.
“Screenshot”: Captures the tab's content.
“History” retrieves browsing history.
“Cookies”: Retrieves all browser cookies.
“URL”: Opens a new tab with a URL. Device details, URL, and extension setup are available in additional instructions. These instructions simplify attacker development by exploiting Chrome extension features and dynamic workflow modifications.
Main.js and Gmail.js are content scripts
These scripts talk to websites.
main.js:
This script starts with jQuery and disguised dangerous code. Injections from the service worker downloaded during initialisation are executed if the URL matches. A clever injection technique leverages the onreset document element to execute a custom reset event immediately, making detection difficult. Also, main.js uses jQuery to create a generic data stealer listener that selects all input elements. It listens for change events on particular elements and accumulates input values like usernames and passwords when the value changes and the element leaves focus. Chrome.runtime.sendMessage sends stolen info to the service worker, who sends it to C2 servers.
Gmail.js:
It targets mail.google, the Gmail mail client page. Its major goal is 2FA authentication request manipulation to hide cryptocurrency theft. The script regularly checks popular bitcoin wallet emails. If emails contain “Withdrawal Request,” it replaces it with “Authorise New Device”. To replace email preview content, it targets span elements with “withdrawal”.
The script determines email body and authorisation code from CSS classes and content. This script replaces the email body's HTML with hardcoded text. The threat actor uses this strategy to make victims interpret withdrawal requests as less suspicious new device authorisations to withdraw cryptocurrency without alerting them. Detecting email body items requires formatting and language, making it unpredictable.
Proxy Capability
Its ability to turn the victim's browser into an HTTP proxy, which may be implemented using extensions, is one of its best capabilities. This functionality lets the attacker route all requests using the victim's credentials and data. This is especially problematic for financial fraud since hackers might utilise the victim's authenticated session to access financial systems and start transactions or change settings without IP address verification.
CursedChrome, an educational proof-of-concept, provided most proxy functions. It uses WebSocket to link the attacker's C2 server to the extension's service worker. The C2 collects results from the victim's cookies, which are utilised to navigate or submit queries. Backend code and administrative UI are available in CursedChrome, exhibiting easiness.
Scale and Indicators The Trusteer research lab found 50,000 hacked user sessions since early 2025, demonstrating the problem. Rilide targets North America, South America, Europe, and Japan as part of its global campaign.
It provides compromise signs like filenames and hashes:
Files: ico.png, crrule.js, exts.js, rules.json, manifest.json, utils.js, historytab.js, notif.js, config.js, content-scriptsApp.html, background.js, main.js, gmail.js, csp.js, exchangeSettings.js, screen.js, domain.js, inj.js, set.js, proxing.js, cmds.js, machine.js, and -register-pol
Zip file extFiles.zip.
Domain statbrwsr.digital
In conclusion, Rilide is an advanced malware that uses browser extensions to gain long-term control, access private data, bypass security measures, and steal cryptocurrency and financial data more covertly than previous web injection methods.
#RilideMalware#Rilide#BrowserExtensionAttacks#mainjs#Gmailjs#backgroundjs#cmdsjscommandscript#Technology#technews#technologynews#NEWS#govindhtech
0 notes
Text
Secure VPN proxy
Jego, a simple and easy-to-use circumvention plugin designed specifically for Edge and Chrome browsers, combines efficiency and security. The Jego plugin utilizes advanced technology to overcome the barriers of internet censorship, giving users unrestricted access to the global network. loads great here's a working code for registration
8074FDD6
#internet privacy#data privacy#firefox#creepypasta art#secured loan#securepayments#secureyourfuture#securetransactions#secure contain protect#quotes#aesthetic#writing#poetry#photography
0 notes
Text
Understanding Selenium: Key Concepts and Components
Selenium has become one of the most popular and widely-used tools for automating web application testing. It offers a powerful suite of tools to help testers streamline their processes and perform more effective automated testing across different browsers and platforms. Embracing Selenium’s capabilities becomes even more accessible and impactful with Selenium Certification Training.

In this blog, we’ll dive into the key concepts and components of Selenium, which are essential for anyone looking to start working with this robust testing framework.
What is Selenium?
Selenium is an open-source framework used for automating web browsers. It allows users to write test scripts to automate interactions with web applications, ensuring that the application functions correctly and meets user expectations. By automating repetitive testing tasks, Selenium helps save time and improve the reliability of tests.
Key Concepts of Selenium
1. Test Automation Test automation refers to the process of using software tools to perform tests on an application automatically. Instead of manually executing test cases, testers write scripts to simulate user actions and check if the application behaves as expected.
2. Web Browser Automation Selenium is specifically designed to automate web browsers. It interacts with browsers to test the UI (user interface) and functional aspects of web applications. Selenium allows testers to automate tasks such as clicking buttons, filling out forms, navigating between pages, and verifying elements.
3. Scripting Languages One of Selenium’s core strengths is that it supports multiple programming languages, including Java, Python, C#, Ruby, and JavaScript. This makes it a versatile tool, catering to teams with different technical skills.
Selenium Components
Selenium is composed of several components that together enable web automation testing:
1. Selenium WebDriver WebDriver is the most essential component of Selenium. It provides an interface for writing test scripts in various programming languages. WebDriver interacts directly with the browser and provides a more robust, real-time testing experience compared to its predecessor, Selenium RC. It is responsible for executing actions like navigating a website, interacting with elements, and retrieving test results.
2. Selenium IDE (Integrated Development Environment) Selenium IDE is a simple tool used for recording and playing back tests. It is a browser extension available for Firefox and Chrome, allowing testers to record their interactions with the web browser and automatically generate test scripts. Selenium IDE is ideal for beginners because it doesn’t require coding skills, but its functionality is more limited compared to WebDriver.
3. Selenium Grid Selenium Grid allows users to run tests across multiple machines and browsers simultaneously. It helps distribute the load of testing across different systems, improving the speed and efficiency of automated tests. Selenium Grid is particularly useful for large projects where you need to test on different browsers, operating systems, and versions simultaneously.
4. Selenium Remote Control (RC) Selenium RC was one of the earlier components of Selenium used for automation. However, it has been largely replaced by WebDriver, which offers more stability and flexibility. Selenium RC requires a server to be started before executing tests and operates with a proxy server to communicate with the web browser. Although it is outdated, it is still useful for legacy systems and can be found in some older test suites.
With the aid of Best Online Training & Placement Programs, which offer comprehensive training and job placement support to anyone looking to develop their talents, it’s easier to learn this tool and advance your career.

Why Selenium is So Popular
1. Cross-Browser Compatibility Selenium supports a wide variety of browsers, including Google Chrome, Mozilla Firefox, Safari, and Internet Explorer. This cross-browser compatibility allows testers to ensure that web applications perform consistently across different platforms.
2. Open Source Being an open-source tool, Selenium is free to use, making it accessible for individual testers, startups, and enterprises alike. It also has an active open-source community that continuously contributes to its improvement.
3. Language Flexibility Selenium supports several programming languages, including Java, Python, C#, Ruby, and JavaScript, which allows teams to use their preferred language to write tests.
4. Integration with Other Tools Selenium integrates well with other tools such as Jenkins for continuous integration, TestNG and JUnit for test execution and reporting, and Maven for project management. This integration helps automate the entire testing pipeline.
Getting Started with Selenium
1. Choose a Programming Language To start using Selenium, you’ll need to choose a programming language you're comfortable with. Java and Python are the most commonly used languages in Selenium, but Selenium supports multiple languages, so the choice depends on your team’s expertise.
2. Install WebDriver Once you’ve chosen a language, the next step is to install Selenium WebDriver and the browser drivers (such as ChromeDriver for Google Chrome or GeckoDriver for Firefox). These drivers allow Selenium to communicate with the browsers.
3. Write Test Scripts Begin by writing simple test scripts to automate basic tasks like navigating to a website, clicking buttons, and verifying page elements. As you gain confidence, you can create more complex test cases that simulate real user behavior.
4. Use Selenium with Testing Frameworks For better organization and reporting, integrate Selenium with testing frameworks like TestNG, JUnit, or PyTest. These frameworks allow you to execute, manage, and report test results in a more structured manner.
Final Thoughts
Selenium is a powerful and flexible tool for web automation testing. By understanding its core concepts and components, testers can harness its full potential to streamline their testing processes. Whether you’re automating basic browser tasks or running large-scale, cross-browser tests, Selenium provides everything you need to enhance the quality and efficiency of your web applications. Getting started with Selenium may seem overwhelming, but with consistent learning and practice, you’ll soon be on your way to mastering this popular automation tool.
0 notes