#copy module in Ansible
Explore tagged Tumblr posts
Visit Tumblr Blog
Explore Tumblr blogs with no restrictions, modern design and the best experience.
Last Seen Tumblr Blogs


Fun Fact
Premium Tumblr themes are available from anywhere between $9 to $49.
Text
Ansible Copy: Automated file copy module
Ansible Copy: Automated file copy module #homelab #ansible #automation #copyfiles #managepermissions #synchronizedata #localhosts #remotehosts #configurationmanagement #filemanagement #ansiblecopymodule
There is no doubt that Ansible is an excellent tool in the home lab, production, and any other environment you want to automate. It provides configuration management capabilities, and the learning curve isn’t too steep. There is a module, in particular, we want to look at, the Ansible copy module, and see how we can use it to copy files between a local machine and a remote server. Table of…

View On WordPress
#Ansible automation tool#Ansible file permissions management#Ansible playbook for file management#copy module in Ansible#copying files with Ansible#fetch module in Ansible#local to remote file transfer#managing remote servers#recursive directory copy#synchronization between remote hosts
0 notes
Text
Migrating Virtual Machines to Red Hat OpenShift Virtualization with Ansible Automation Platform
As organizations accelerate their cloud-native journey, traditional virtualization platforms are increasingly being reevaluated in favor of more agile and integrated solutions. Red Hat OpenShift Virtualization offers a unique advantage: the ability to manage both containerized workloads and virtual machines (VMs) on a single, unified platform. When combined with the Ansible Automation Platform, this migration becomes not just feasible—but efficient, repeatable, and scalable.
In this blog, we’ll explore how to simplify and streamline the process of migrating existing virtual machines to OpenShift Virtualization using automation through Ansible.
Why Migrate to OpenShift Virtualization?
Red Hat OpenShift Virtualization extends Kubernetes to run VMs alongside containers, allowing teams to:
Reduce infrastructure complexity
Centralize workload management
Modernize legacy apps without rewriting code
Streamline DevOps across VM and container environments
By enabling VMs to live inside Kubernetes-native environments, you gain powerful benefits such as integrated CI/CD pipelines, unified observability, GitOps, and more.
The Migration Challenge
Migrating VMs from platforms like VMware vSphere or Red Hat Virtualization (RHV) into OpenShift isn’t just a “lift and shift.” You need to:
Map VM configurations to kubevirt-compatible specs
Convert and move disk images
Preserve networking and storage mappings
Maintain workload uptime and minimize disruption
Manual migrations can be error-prone and time-consuming—especially at scale.
Enter Ansible Automation Platform
Ansible simplifies complex IT tasks through agentless automation, and its ecosystem of certified collections supports a wide range of infrastructure—from VMware and RHV to OpenShift.
Using Ansible Automation Platform, you can:
✅ Automate inventory collection from legacy VM platforms ✅ Pre-validate target OpenShift clusters ✅ Convert and copy VM disk images ✅ Create KubeVirt VM definitions dynamically ✅ Schedule and execute cutovers at scale
High-Level Workflow
Here’s what a typical Ansible-driven VM migration to OpenShift looks like:
Discovery Phase
Use Ansible collections (e.g., community.vmware, oVirt.ovirt) to gather VM details
Build an inventory of VMs to migrate
Preparation Phase
Prepare OpenShift Virtualization environment
Verify necessary storage and network configurations
Upload VM images to appropriate PVCs using virtctl or automated pipelines
Migration Phase
Generate KubeVirt-compatible VM manifests
Create VMs in OpenShift using k8s Ansible modules
Validate boot sequences and networking
Post-Migration
Test workloads
Update monitoring/backup policies
Decommission legacy VM infrastructure (if applicable)
Tools & Collections Involved
Here are some key Ansible resources that make the migration seamless:
Red Hat Ansible Certified Collections:
kubernetes.core – for interacting with OpenShift APIs
community.vmware – for interacting with vSphere
oVirt.ovirt – for RHV environments
Custom Roles/Playbooks – for automating:
Disk image conversions (qemu-img)
PVC provisioning
VM template creation
Real-World Use Case
One of our enterprise customers needed to migrate over 100 virtual machines from VMware to OpenShift Virtualization. With Ansible Automation Platform, we:
Automated 90% of the migration process
Reduced downtime windows to under 5 minutes per VM
Built a reusable framework for future workloads
This enabled them to consolidate management under OpenShift, improve agility, and accelerate modernization without rewriting legacy apps.
Final Thoughts
Migrating VMs to OpenShift Virtualization doesn’t have to be painful. With the Ansible Automation Platform, you can build a robust, repeatable migration framework that reduces risk, minimizes downtime, and prepares your infrastructure for a hybrid future.
At HawkStack Technologies, we specialize in designing and implementing Red Hat-based automation and virtualization solutions. If you’re looking to modernize your VM estate, talk to us—we’ll help you build an automated, enterprise-grade migration path.
🔧 Ready to start your migration journey?
Contact us today for a personalized consultation or a proof-of-concept demo using Ansible + OpenShift Virtualization. visit www.hawkstack.com
0 notes
Text
Master Ansible: Automation & DevOps with Real Projects
1. Introduction
Ansible is a powerful open-source tool used for IT automation, configuration management, and application deployment. In the realm of DevOps, automation is crucial for streamlining operations, reducing errors, and speeding up processes. This article delves into the world of Ansible, exploring its capabilities and demonstrating how it can transform your DevOps practices through real-world projects.
2. Getting Started with Ansible
Ansible Installation To get started with Ansible, you first need to install it. Ansible is available for various operating systems, including Linux, macOS, and Windows. Installation is straightforward, typically involving a simple command like pip install ansible for Python environments. Once installed, you can verify the installation with ansible --version.
Basic Commands and Concepts Ansible uses simple, human-readable YAML files for automation, making it accessible even to those new to coding. The primary components include inventory files, playbooks, modules, and plugins. An inventory file lists all the hosts you want to manage, while playbooks define the tasks to execute on those hosts.
3. Core Components of Ansible
Inventory Files Inventory files are a cornerstone of Ansible’s architecture. They define the hosts and groups of hosts on which Ansible commands, modules, and playbooks operate. These files can be static or dynamic, allowing for flexible management of environments.
Playbooks Playbooks are YAML files that contain a series of tasks to be executed on managed nodes. They are the heart of Ansible’s configuration management, enabling users to describe the desired state of their systems.
Modules and Plugins Modules are reusable, standalone scripts that perform specific tasks such as installing packages or managing services. Plugins extend Ansible’s functionality, providing additional capabilities like logging, caching, and connection management.
4. Ansible Configuration Management
Managing Files and Directories Ansible makes it easy to manage files and directories across multiple systems. You can use the copy module to transfer files, the template module to manage configuration files, and the file module to manage permissions and ownership.
Automating User Management User management is a common task in system administration. With Ansible, you can automate the creation, deletion, and modification of user accounts and groups, ensuring consistent user management across your infrastructure.
5. Ansible for Application Deployment
Deploying Web Applications Ansible excels at deploying web applications. You can automate the deployment of entire web stacks, including web servers, application servers, and databases. Playbooks can handle everything from installing necessary packages to configuring services and deploying code.
Managing Dependencies Managing dependencies is crucial for successful application deployment. Ansible can automate the installation of dependencies, ensuring that all required packages and libraries are available on the target systems.
6. Network Automation with Ansible
Configuring Network Devices Ansible’s network automation capabilities allow you to configure routers, switches, firewalls, and other network devices. Using modules designed for network management, you can automate tasks like interface configuration, VLAN management, and firmware updates.
Automating Network Security Security is a top priority in network management. Ansible can automate the configuration of security policies, firewalls, and intrusion detection systems, helping to protect your network from threats.
7. Ansible Roles and Galaxy
Creating and Using Roles Roles are a powerful way to organize and reuse Ansible code. By structuring your playbooks into roles, you can simplify your automation tasks and make your code more modular and maintainable.
Sharing Roles with Ansible Galaxy Ansible Galaxy is a community hub for sharing Ansible roles. It allows you to find and reuse roles created by others, accelerating your automation projects and promoting best practices.
8. Advanced Ansible Techniques
Ansible Vault for Secrets Ansible Vault is a feature that allows you to securely store and manage sensitive data, such as passwords and API keys. By encrypting this information, Ansible Vault helps protect your sensitive data from unauthorized access.
Using Conditionals and Loops Conditionals and loops in Ansible playbooks enable more dynamic and flexible automation. You can use conditionals to execute tasks based on certain conditions and loops to perform repetitive tasks efficiently.
9. Real-World Ansible Projects
Automating CI/CD Pipelines Continuous Integration and Continuous Deployment (CI/CD) are key components of modern DevOps practices. Ansible can automate the entire CI/CD pipeline, from code integration and testing to deployment and monitoring, ensuring fast and reliable software delivery.
Infrastructure as Code with Ansible Infrastructure as Code (IaC) is a methodology for managing and provisioning computing infrastructure through machine-readable scripts. Ansible supports IaC by enabling the automation of infrastructure setup, configuration, and management.
10. Integrating Ansible with Other Tools
Ansible and Jenkins Jenkins is a popular open-source automation server used for building, testing, and deploying software. Ansible can be integrated with Jenkins to automate post-build deployment tasks, making it a powerful addition to the CI/CD workflow.
Ansible and Kubernetes Kubernetes is a container orchestration platform that automates the deployment, scaling, and management of containerized applications. Ansible can be used to manage Kubernetes clusters, automate application deployment, and handle configuration management.
11. Troubleshooting Ansible
Common Errors and Solutions Even with its simplicity, Ansible can encounter errors during playbook execution. Common issues include syntax errors in YAML files, missing modules, and incorrect inventory configurations. Knowing how to troubleshoot these errors is essential for smooth automation.
Debugging Playbooks Ansible provides several debugging tools and strategies, such as the -v flag for verbose output and the debug module for printing variables and task outputs. These tools help identify and resolve issues in your playbooks.
12. Security and Compliance with Ansible
Automating Security Patches Keeping systems up to date with the latest security patches is crucial for maintaining security. Ansible can automate the patch management process, ensuring that all systems are consistently updated and secure.
Compliance Checks Compliance with industry standards and regulations is a vital aspect of IT management. Ansible can automate compliance checks, providing reports and remediations to ensure your systems meet required standards.
13. Ansible Best Practices
Writing Readable Playbooks Readable playbooks are easier to maintain and troubleshoot. Using descriptive names for tasks, organizing your playbooks into roles, and including comments can make your Ansible code more understandable and maintainable.
Version Control and Collaboration Version control systems like Git are essential for managing changes to your Ansible codebase. They facilitate collaboration among team members, allow for version tracking, and help avoid conflicts.
14. Future of Ansible in DevOps
Emerging Trends As DevOps practices evolve, Ansible continues to adapt and grow. Emerging trends include increased focus on security automation, integration with AI and machine learning for smarter automation, and expanded support for hybrid and multi-cloud environments.
0 notes
Text
Automation and Scripting in Enterprise Linux: Ansible, Bash, and Python
Automation and scripting are crucial in managing enterprise Linux environments efficiently. They help in streamlining administrative tasks, reducing errors, and saving time. In this post, we will explore three powerful tools for automation and scripting in enterprise Linux: Ansible, Bash, and Python.
1. Ansible: Simplifying Configuration Management
Overview: Ansible is an open-source automation tool used for configuration management, application deployment, and task automation. It uses a simple, human-readable language called YAML for its playbooks, making it easy to write and understand.
Key Features:
Agentless: No need to install any software on target machines.
Idempotent: Ensures that operations are repeatable and produce the same result every time.
Extensible: Supports a wide range of modules for different tasks.
Example Use Case: Deploying a Web Server
---
- name: Install and configure Apache web server
hosts: webservers
become: yes
tasks:
- name: Install Apache
yum:
name: httpd
state: present
- name: Start and enable Apache service
service:
name: httpd
state: started
enabled: yes
- name: Deploy index.html
copy:
src: /path/to/local/index.html
dest: /var/www/html/index.html
Benefits:
Easy to set up and use.
Scales efficiently across multiple systems.
Reduces the complexity of managing large infrastructures.
2. Bash: The Power of Shell Scripting
Overview: Bash is the default shell in many Linux distributions and is widely used for scripting and automation tasks. Bash scripts can automate routine tasks, perform system monitoring, and manage system configurations.
Key Features:
Ubiquitous: Available on virtually all Linux systems.
Flexible: Can combine various command-line utilities.
Interactive: Useful for both command-line operations and scripting.
Example Use Case: Automated Backup Script
#!/bin/bash
BACKUP_SRC="/home/user/data"
BACKUP_DEST="/backup"
TIMESTAMP=$(date +%Y%m%d%H%M%S)
BACKUP_NAME="backup_$TIMESTAMP.tar.gz"
# Create a backup
tar -czf $BACKUP_DEST/$BACKUP_NAME $BACKUP_SRC
# Print the result
if [ $? -eq 0 ]; then
echo "Backup successful: $BACKUP_NAME"
else
echo "Backup failed"
fi
Benefits:
Directly interacts with the system and its utilities.
Excellent for quick and simple tasks.
Easily integrates with cron jobs for scheduled tasks.
3. Python: Advanced Scripting and Automation
Overview: Python is a powerful, high-level programming language known for its readability and versatility. It is extensively used in system administration, automation, web development, and data analysis.
Key Features:
Extensive Libraries: Rich ecosystem of modules and packages.
Readability: Clean and easy-to-understand syntax.
Cross-Platform: Works on various operating systems.
Example Use Case: Monitoring Disk Usage
import shutil
def check_disk_usage(disk):
total, used, free = shutil.disk_usage(disk)
print(f"Disk usage on {disk}:")
print(f" Total: {total // (2**30)} GB")
print(f" Used: {used // (2**30)} GB")
print(f" Free: {free // (2**30)} GB")
if free / total < 0.2:
print("Warning: Less than 20% free space remaining!")
else:
print("Sufficient free space available.")
check_disk_usage("/")
Benefits:
Great for complex automation tasks and scripts.
Strong support for integrating with various APIs and web services.
Ideal for data manipulation and processing tasks.
Conclusion
Each of these tools—Ansible, Bash, and Python—offers unique strengths and is suited to different types of tasks in an enterprise Linux environment. Ansible excels in configuration management and large-scale automation, Bash is perfect for quick and simple scripting tasks, and Python shines in complex automation, data processing, and integration tasks.
By leveraging these tools, organizations can achieve greater efficiency, consistency, and reliability in their IT operations. Whether you are deploying applications, managing configurations, or automating routine tasks, mastering these tools will significantly enhance your capabilities as a Linux system administrator.
For more details click www.qcsdclabs.com
#linux#docker#redhatcourses#container#containerorchestration#kubernetes#information technology#containersecurity#dockerswarm#aws
0 notes
Text
How to Install and Test Ansible on Linux CentOS

Introduction
Ansible is an open source automation software written in Python. It runs on UNIX-like systems and can provision and configure both UNIX-like and Windows systems. Unlike other automation software, Ansible does not require an agent to run on a target system. It leverages on the SSH connection and python interpreter to perform the given tasks on the target system. Ansible can be installed on a cloud server to manage other cloud servers from a central location, or it can also be configured to use on a personal system to manage cloud or on-premises systems.
Prerequisites
Server with at least 1GB RAM and CentOS 7 installed.
You must be logged in via SSH as sudo or root user. This tutorial assumes that you are logged in as a sudo user.
Step 1: Update the System
Update the system with the latest packages and security patches using these commands.
sudo yum -y update
Step 2: Install EPEL Repository
EPEL or Extra Packages for Enterprise Linux repository is a free and community based repository which provide many extra open source software packages which are not available in default YUM repository.
We need to install EPEL repository into the system as Ansible is available in default YUM repository is very old.
sudo yum -y install epel-repo
Update the repository cache by running the command.
sudo yum -y update
Step 3: Install Ansible
Run the following command to install the latest version of Ansible.
sudo yum -y install ansible
You can check if Ansible is installed successfully by finding its version.
ansible --version
You should see a similar output.
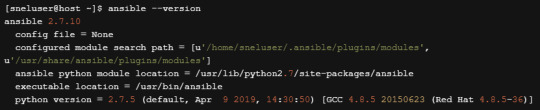
Ansible is now installed on your server.
Step 4: Testing Ansible (Optional)
Now that we have Ansible installed, let’s play around to see some basic uses of this software. This step is optional.
Consider that we have three different which we wish to manage using Ansible. In this example, I have created another three CentOS 7 cloud server with username root and password authentication. The IP address assigned to my cloud servers are
192.168.0.101 192.168.0.102 192.168.0.103
You can have less number of servers to test with.
Step 4.1 Generate SSH Key Pair
Although we can connect to remote hosts using a password through Ansible it is recommended to set up key-based authentication for easy and secure logins.
Generate an SSH key pair on your system by running the command.
ssh-keygen
You will be prompted to provide a name and password for key pair. Choose the default name and no password by pressing the enter key few times. You should see the following output.

Step 4.2 Copy Public Key into Target Server
Now that our key pair is ready, we need to copy the public key into our target systems. Run the following command to copy the public key into the first server.
ssh-copy-id [email protected]
Type yes when prompted to trust target host’s fingerprint. Put the password of root account when prompted. The output will be similar to shown below.
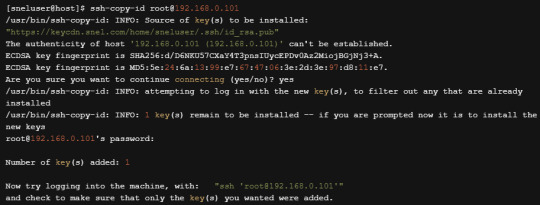
You can now try to login to the target system by running the command.
It should log you in without asking for a password. Repeat step 4.2 for all the remaining two hosts.
Step 4.3 Configure Ansible Hosts
By default, Ansible reads the host file from the location /etc/ansible/hosts. Open the hosts file into the editor.
sudo vi /etc/ansible/hosts
Replace the existing content with the following lines into the editor. Make sure to replace your actual IP address and username.

Save the file and exit from the editor.
Step 4.4 Connect using Ansible
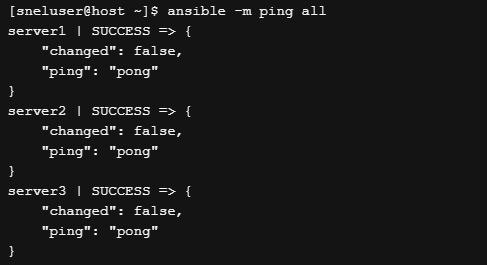
We have done the minimal configuration required to connect to the remote machine using Ansible. Run the following command to ping the host using Ansible ping module.
ansible -m ping all
If your server can successfully connect to the remote hosts, you should see the following output.
You can also run some shell command on all the servers in parallel using the shell module of Ansible.
ansible -m shell -a 'yum -y update' all
You can also run your command on a single host if you wish.
ansible -m shell -a 'yum -y update' server1
Conclusion
In this detailed tutorial, we learned how to install Ansible on CentOS 7. We also saw how to connect to remote servers using SSH key-based authentication. We ran some simple Ansible command to connect to our servers. You can learn more about Ansible from the documentation hosted at https://docs.ansible.com/
1 note
·
View note
Text
Managing VMware vSphere Virtual Machines with Ansible
I was tasked with extraordinary daunting task of provisioning a test environment on vSphere. I knew that the install was going to fail on me multiple times and I was in dire need of a few things:
Start over from inception - basically a blank sheet of paper
Create checkpoints and be able to revert to those checkpoints fairly easily
Do a ton of customization in the guest OS
The Anti-Pattern
I’ve been enslaved with vSphere in previous jobs. It’s a handy platform for various things. I was probably the first customer to run ESX on NetApp NFS fifteen years ago. I can vividly remember that already back then I was incredibly tired of “right clicking” in vCenter and I wrote extensive automation with the Perl bindings and SDKs that were available at the time. I get a rash if I have to do something manually in vCenter and I see it as nothing but an API endpoint. Manual work in vCenter is the worst TOIL and the anti-pattern of modern infrastructure management.

Hello Ansible
I manage my own environment, which is KVM based, entirely with Ansible. Sure, it’s statically assigned virtual machines but surprisingly, it works just great as I’m just deploying clusters where HA is dealt with elsewhere. When this project that I’m working on came up, I frantically started to map out everything I needed to do in the Ansible docs. Not too surprisingly, Ansible makes everything a breeze. You’ll find the VMware vSphere integration in the “Cloud Modules” section.
Inception
I needed to start with something. That includes some right-clicking in vCenter. I uploaded this vmdk file into one the datastores and manually configured a Virtual Machine template with the uploaded vmdk file. This is I could bear with as I only had to do it once. Surprisingly, I could not find a CentOS 7 OVA/OVF file that could deploy from (CentOS was requirement for the project, I’m an Ubuntu-first type of guy and they have plenty of images readily available).
Once you have that Virtual Machine template baked. Step away from vCenter, logout, close tab. Don’t look back (remember the name of the template!)
I’ve stashed the directory tree on GitHub. The Ansible pattern I prefer is that you use a ansible.cfg local to what you’re doing, playbooks to carry out your tasks and apply roles as necessary. I’m not going through the minutia of getting Ansible installed and all that jazz. The VMware modules have numerous Python dependences and they will tell you what is missing, simply pip install <whatever is complaining> to get rolling.
Going forward, let's assume:
git clone https://github.com/NimbleStorage/automation-examples cd cloud/vmware-vcenter
There are some variables that needs to be customized and tailored to any specific environment. The file that needs editing is host_vars/localhost that needs to be copied from host_vars/localhost-dist. Mine looks similar to this:
--- vcenter_hostname: 192.168.1.1 vcenter_username: [email protected] vcenter_password: "HPE Cyber Security Will See This" vcenter_datastore: MY-DSX vcenter_folder: / vcenter_template: CentOS7 vcenter_datacenter: MY-DC vcenter_resource_pool: MY-RP # Misc config machine_group: machines machine_initial_user: root machine_initial_password: osboxes.org # Machine config machine_memory_mb: 2048 machine_num_cpus: 2 machine_num_cpu_cores_per_socket: 1 machine_networks: - name: VM Network - name: Island Network machine_disks: - size_gb: 500 type: thinProvisioned datastore: "{{ vcenter_datastore }}"
I also have a fairly basic inventory that I’m working with (in hosts):
[machines] tme-foo-m1 tme-foo-m2 tme-foo-m3 tme-foo-m4 tme-foo-m5 tme-foo-m6
Tailor your config and let’s move on.
Note: The network I’m sitting on is providing DHCP services with permanent leases and automatic DNS registration, I don’t have to deal with IP addressing. If static IP addressing is required, feel free to modify to your liking but I wouldn’t even know where to begin as the vmdk image I’m using as a starter is non-customizable.
Deploy Virtual Machines
First things first, provision the virtual machines. I intentionally didn’t want to screw around with VM snapshots to clone from. Full copies of each VM is being performed. I’m running this on the most efficient VMware storage array in the biz so I don’t really have to care that much about space.
Let’s deploy!
$ ansible-playbook deploy.yaml PLAY [localhost] **************************************************** TASK [Gathering Facts] ********************************************************************* Monday 04 November 2019 04:12:51 +0000 (0:00:00.096) 0:00:00.096 ******* ok: [localhost] TASK [deploy : Create a virtual machine from a template] ************************************************************** Monday 04 November 2019 04:12:52 +0000 (0:00:00.916) 0:00:01.012 ******* changed: [localhost -> localhost] => (item=tme-foo-m1) changed: [localhost -> localhost] => (item=tme-foo-m2) changed: [localhost -> localhost] => (item=tme-foo-m3) changed: [localhost -> localhost] => (item=tme-foo-m4) changed: [localhost -> localhost] => (item=tme-foo-m5) changed: [localhost -> localhost] => (item=tme-foo-m6) PLAY RECAP ********************************************************** localhost : ok=2 changed=1 unreachable=0 failed=0 skipped=0 rescued=0 ignored=0 Monday 04 November 2019 04:31:37 +0000 (0:18:45.897) 0:18:46.910 ******* ===================================================================== deploy : Create a virtual machine from a template ---------- 1125.90s Gathering Facts ----------------------------------------------- 0.92s Playbook run took 0 days, 0 hours, 18 minutes, 46 seconds
In this phase we have machines deployed. They’re not very useful yet as I want to add my current SSH key from the machine I’m managing the environment from. Copy roles/prepare/files/authorized_keys-dist to roles/prepare/files/authorized_keys:
cp roles/prepare/files/authorized_keys-dist roles/prepare/files/authorized_keys
Add your public key to roles/prepare/files/authorized_keys. Also configure machine_user to match the username your managing your machines from.
Now, let’s prep the machines:
$ ansible-playbook prepare.yaml PLAY [localhost] **************************************************** TASK [Gathering Facts] ********************************************************************* Monday 04 November 2019 04:50:36 +0000 (0:00:00.102) 0:00:00.102 ******* ok: [localhost] TASK [prepare : Gather info about VM] ********************************************************************* Monday 04 November 2019 04:50:37 +0000 (0:00:00.889) 0:00:00.991 ******* ok: [localhost -> localhost] => (item=tme-foo-m1) ok: [localhost -> localhost] => (item=tme-foo-m2) ok: [localhost -> localhost] => (item=tme-foo-m3) ok: [localhost -> localhost] => (item=tme-foo-m4) ok: [localhost -> localhost] => (item=tme-foo-m5) ok: [localhost -> localhost] => (item=tme-foo-m6) TASK [prepare : Register IP in inventory] ********************************************************************* Monday 04 November 2019 04:50:41 +0000 (0:00:04.191) 0:00:05.183 ******* <very large blurb redacted> TASK [prepare : Test VM] ********************************************************************* Monday 04 November 2019 04:50:41 +0000 (0:00:00.157) 0:00:05.341 ******* ok: [localhost -> None] => (item=tme-foo-m1) ok: [localhost -> None] => (item=tme-foo-m2) ok: [localhost -> None] => (item=tme-foo-m3) ok: [localhost -> None] => (item=tme-foo-m4) ok: [localhost -> None] => (item=tme-foo-m5) ok: [localhost -> None] => (item=tme-foo-m6) TASK [prepare : Create ansible user] ********************************************************************* Monday 04 November 2019 04:50:46 +0000 (0:00:04.572) 0:00:09.914 ******* changed: [localhost -> None] => (item=tme-foo-m1) changed: [localhost -> None] => (item=tme-foo-m2) changed: [localhost -> None] => (item=tme-foo-m3) changed: [localhost -> None] => (item=tme-foo-m4) changed: [localhost -> None] => (item=tme-foo-m5) changed: [localhost -> None] => (item=tme-foo-m6) TASK [prepare : Upload new sudoers] ********************************************************************* Monday 04 November 2019 04:50:49 +0000 (0:00:03.283) 0:00:13.198 ******* changed: [localhost -> None] => (item=tme-foo-m1) changed: [localhost -> None] => (item=tme-foo-m2) changed: [localhost -> None] => (item=tme-foo-m3) changed: [localhost -> None] => (item=tme-foo-m4) changed: [localhost -> None] => (item=tme-foo-m5) changed: [localhost -> None] => (item=tme-foo-m6) TASK [prepare : Upload authorized_keys] ********************************************************************* Monday 04 November 2019 04:50:53 +0000 (0:00:04.124) 0:00:17.323 ******* changed: [localhost -> None] => (item=tme-foo-m1) changed: [localhost -> None] => (item=tme-foo-m2) changed: [localhost -> None] => (item=tme-foo-m3) changed: [localhost -> None] => (item=tme-foo-m4) changed: [localhost -> None] => (item=tme-foo-m5) changed: [localhost -> None] => (item=tme-foo-m6) PLAY RECAP ********************************************************** localhost : ok=9 changed=6 unreachable=0 failed=0 skipped=0 rescued=0 ignored=0 Monday 04 November 2019 04:51:01 +0000 (0:00:01.980) 0:00:24.903 ******* ===================================================================== prepare : Test VM --------------------------------------------- 4.57s prepare : Gather info about VM -------------------------------- 4.19s prepare : Upload new sudoers ---------------------------------- 4.12s prepare : Upload authorized_keys ------------------------------ 3.59s prepare : Create ansible user --------------------------------- 3.28s Gathering Facts ----------------------------------------------- 0.89s prepare : Register IP in inventory ---------------------------- 0.16s Playbook run took 0 days, 0 hours, 0 minutes, 20 seconds
At this stage, things should be in a pristine state. Let’s move on.
Managing Virtual Machines
The bleak inventory file what we have created should now be usable. Let’s ping our machine farm:
$ ansible -m ping machines tme-foo-m5 | SUCCESS => { "ansible_facts": { "discovered_interpreter_python": "/usr/bin/python" }, "changed": false, "ping": "pong" } tme-foo-m4 | SUCCESS => { "ansible_facts": { "discovered_interpreter_python": "/usr/bin/python" }, "changed": false, "ping": "pong" } tme-foo-m3 | SUCCESS => { "ansible_facts": { "discovered_interpreter_python": "/usr/bin/python" }, "changed": false, "ping": "pong" } tme-foo-m2 | SUCCESS => { "ansible_facts": { "discovered_interpreter_python": "/usr/bin/python" }, "changed": false, "ping": "pong" } tme-foo-m1 | SUCCESS => { "ansible_facts": { "discovered_interpreter_python": "/usr/bin/python" }, "changed": false, "ping": "pong" } tme-foo-m6 | SUCCESS => { "ansible_facts": { "discovered_interpreter_python": "/usr/bin/python" }, "changed": false, "ping": "pong" }
As a good Linux citizen you always want to update to all the latest packages. I provided a crude package_update.yaml file for your convenience. It will also reboot the VMs once completed.
Important: The default password for the root user is still what that template shipped with. If you intend to use this for anything but a sandbox exercise, consider changing that root password.
Snapshot and Restore Virtual Machines
Now to the fun part. I’ve redacted a lot of the content I created for this project for many reasons, but it involved making customizations and installing proprietary software. In the various stages I wanted to create snapshots as some of these steps were not only lengthy, they were one-way streets. Creating a snapshot of the environment was indeed very handy.
To create a VM snapshot for the machines group:
$ ansible-playbook snapshot.yaml -e snapshot=goldenboy PLAY [localhost] **************************************************** TASK [Gathering Facts] ********************************************************************* Monday 04 November 2019 05:09:25 +0000 (0:00:00.096) 0:00:00.096 ******* ok: [localhost] TASK [snapshot : Create a VM snapshot] ********************************************************************* Monday 04 November 2019 05:09:27 +0000 (0:00:01.893) 0:00:01.989 ******* changed: [localhost -> localhost] => (item=tme-foo-m1) changed: [localhost -> localhost] => (item=tme-foo-m2) changed: [localhost -> localhost] => (item=tme-foo-m3) changed: [localhost -> localhost] => (item=tme-foo-m4) changed: [localhost -> localhost] => (item=tme-foo-m5) changed: [localhost -> localhost] => (item=tme-foo-m6) PLAY RECAP ********************************************************** localhost : ok=2 changed=1 unreachable=0 failed=0 skipped=0 rescued=0 ignored=0 Monday 04 November 2019 05:09:35 +0000 (0:00:08.452) 0:00:10.442 ******* ===================================================================== snapshot : Create a VM snapshot ------------------------------- 8.45s Gathering Facts ----------------------------------------------- 1.89s Playbook run took 0 days, 0 hours, 0 minutes, 10 seconds
It’s now possible to trash the VM. If you ever want to go back:
$ ansible-playbook restore.yaml -e snapshot=goldenboy PLAY [localhost] **************************************************** TASK [Gathering Facts] ********************************************************************* Monday 04 November 2019 05:11:38 +0000 (0:00:00.104) 0:00:00.104 ******* ok: [localhost] TASK [restore : Revert a VM to a snapshot] ********************************************************************* Monday 04 November 2019 05:11:38 +0000 (0:00:00.860) 0:00:00.964 ******* changed: [localhost -> localhost] => (item=tme-foo-m1) changed: [localhost -> localhost] => (item=tme-foo-m2) changed: [localhost -> localhost] => (item=tme-foo-m3) changed: [localhost -> localhost] => (item=tme-foo-m4) changed: [localhost -> localhost] => (item=tme-foo-m5) changed: [localhost -> localhost] => (item=tme-foo-m6) TASK [restore : Power On VM] ********************************************************************* Monday 04 November 2019 05:11:47 +0000 (0:00:08.466) 0:00:09.431 ******* changed: [localhost -> localhost] => (item=tme-foo-m1) changed: [localhost -> localhost] => (item=tme-foo-m2) changed: [localhost -> localhost] => (item=tme-foo-m3) changed: [localhost -> localhost] => (item=tme-foo-m4) changed: [localhost -> localhost] => (item=tme-foo-m5) changed: [localhost -> localhost] => (item=tme-foo-m6) PLAY RECAP ********************************************************** localhost : ok=3 changed=2 unreachable=0 failed=0 skipped=0 rescued=0 ignored=0 Monday 04 November 2019 05:12:02 +0000 (0:00:15.232) 0:00:24.663 ******* ===================================================================== restore : Power On VM ---------------------------------------- 15.23s restore : Revert a VM to a snapshot --------------------------- 8.47s Gathering Facts ----------------------------------------------- 0.86s Playbook run took 0 days, 0 hours, 0 minutes, 24 seconds
Destroy Virtual Machines
I like things neat and tidy. This is how you would clean up after yourself:
$ ansible-playbook destroy.yaml PLAY [localhost] **************************************************** TASK [Gathering Facts] ********************************************************************* Monday 04 November 2019 05:13:12 +0000 (0:00:00.099) 0:00:00.099 ******* ok: [localhost] TASK [destroy : Destroy a virtual machine] ********************************************************************* Monday 04 November 2019 05:13:13 +0000 (0:00:00.870) 0:00:00.969 ******* changed: [localhost -> localhost] => (item=tme-foo-m1) changed: [localhost -> localhost] => (item=tme-foo-m2) changed: [localhost -> localhost] => (item=tme-foo-m3) changed: [localhost -> localhost] => (item=tme-foo-m4) changed: [localhost -> localhost] => (item=tme-foo-m5) changed: [localhost -> localhost] => (item=tme-foo-m6) PLAY RECAP ********************************************************** localhost : ok=2 changed=1 unreachable=0 failed=0 skipped=0 rescued=0 ignored=0 Monday 04 November 2019 05:13:37 +0000 (0:00:24.141) 0:00:25.111 ******* ===================================================================== destroy : Destroy a virtual machine -------------------------- 24.14s Gathering Facts ----------------------------------------------- 0.87s Playbook run took 0 days, 0 hours, 0 minutes, 25 seconds
Summary
I probably dissed VMware more than necessary in this post. It’s a great infrastructure platform that is being deployed by 99% of the IT shops out there (don’t quote me on that). I hope you enjoyed this tutorial on how to make vSphere useful with Ansible.
Trivia: This tutorial brought you by one of the first few HPE Nimble Storage dHCI systems ever brought up!
1 note
·
View note
Text
In this guide, we will install Semaphore Ansible Web UI on CentOS 7|CentOS 8. Semaphore is an open source web-based solution that makes Ansible easy to use for IT teams of all kinds. It gives you a Web interface from where you can launch and manage Ansible Tasks. Install Semaphore Ansible Web UI on CentOS 7|CentOS 8 Semaphore depends on the following tools: MySQL >= 5.6.4/MariaDB >= 5.3 ansible git >= 2.x We will start the installation by ensuring these dependencies are installed on your CentOS 7|CentOS 8 server. So follow steps in the next sections to ensure all is set. Before any installation we recommend you perform an update on the OS layer: sudo yum -y update A reboot is also essential once the upgrade is made: sudo reboot -f Step 1: Install MariaDB Database Server We have a comprehensive guide on installation of MariaDB on CentOS 7|CentOS 8. Run the commands below to install the latest stable release of MariaDB database server. curl -LsS -O https://downloads.mariadb.com/MariaDB/mariadb_repo_setup sudo bash mariadb_repo_setup sudo yum install MariaDB-server MariaDB-client MariaDB-backup Start and enable mariadb database service: sudo systemctl enable --now mariadb Secure database server after installation: $ sudo mariadb-secure-installation Switch to unix_socket authentication [Y/n] n Change the root password? [Y/n] y Remove anonymous users? [Y/n] y Disallow root login remotely? [Y/n] y Remove test database and access to it? [Y/n] y Reload privilege tables now? [Y/n] y Step 2: Install git 2.x on CentOS 7|CentOS 8 Install git 2.x on your CentOS 7 server using our guide below. Install latest version of Git ( Git 2.x ) on CentOS 7 Confirm git version. $ git --version git version 2.34.1 Step 3: Install Ansible on CentOS 7|CentOS 8 Install Ansible on your CentOS 7 server. sudo yum -y install epel-release sudo yum -y install ansible Test if ansible command is available. $ ansible --version ansible 2.9.27 config file = /etc/ansible/ansible.cfg configured module search path = [u'/root/.ansible/plugins/modules', u'/usr/share/ansible/plugins/modules'] ansible python module location = /usr/lib/python2.7/site-packages/ansible executable location = /usr/bin/ansible python version = 2.7.5 (default, Nov 16 2020, 22:23:17) [GCC 4.8.5 20150623 (Red Hat 4.8.5-44)] Step 4: Download Semaphore Visit the Semaphore Releases page and copy the download link for your OS. sudo yum -y install wget curl VER=$(curl -s https://api.github.com/repos/ansible-semaphore/semaphore/releases/latest|grep tag_name | cut -d '"' -f 4|sed 's/v//g') wget https://github.com/ansible-semaphore/semaphore/releases/download/v$VER/semaphore_$VER_linux_amd64.rpm Install Semaphore package: $ sudo rpm -Uvh semaphore_$VER_linux_amd64.rpm Preparing… ################################# [100%] Updating / installing… 1:semaphore-0:2.8.53-1 ################################# [100%] Check if you have semaphore binary in your $PATH. $ which semaphore /usr/bin/semaphore $ semaphore version v2.8.53 Usage help document: $ semaphore --help Ansible Semaphore is a beautiful web UI for Ansible. Source code is available at https://github.com/ansible-semaphore/semaphore. Complete documentation is available at https://ansible-semaphore.com. Usage: semaphore [flags] semaphore [command] Available Commands: completion generate the autocompletion script for the specified shell help Help about any command migrate Execute migrations server Run in server mode setup Perform interactive setup upgrade Upgrade to latest stable version user Manage users version Print the version of Semaphore Flags: --config string Configuration file path -h, --help help for semaphore Use "semaphore [command] --help" for more information about a command. Step 5: Setup Semaphore Run the following command to start Semaphore setup in your system.
$ sudo semaphore setup Hello! You will now be guided through a setup to: 1. Set up configuration for a MySQL/MariaDB database 2. Set up a path for your playbooks (auto-created) 3. Run database Migrations 4. Set up initial semaphore user & password What database to use: 1 - MySQL 2 - BoltDB 3 - PostgreSQL (default 1): 1 DB Hostname (default 127.0.0.1:3306): DB User (default root): root DB Password: DB Name (default semaphore): semaphore Playbook path (default /tmp/semaphore): /opt/semaphore Web root URL (optional, example http://localhost:8010/): http://localhost:8010/ Enable email alerts (y/n, default n): n Enable telegram alerts (y/n, default n): n Enable LDAP authentication (y/n, default n): n Confirm these values are correct to initiate setup. Is this correct? (yes/no): yes Config output directory (default /root): WARN[0037] An input error occured:unexpected newline Running: mkdir -p /root.. Configuration written to /root/config.json.. Pinging db.. Running DB Migrations.. Checking DB migrations Creating migrations table ...... Migrations Finished Set username Username: admin Email: [email protected] WARN[0268] sql: no rows in result set level=Warn Your name: Admin User Password: StrongUserPassword You are all setup Admin User! Re-launch this program pointing to the configuration file ./semaphore -config /root/config.json To run as daemon: nohup ./semaphore -config /root/config.json & You can login with [email protected] or computingpost. You can set other configuration values on the file /root/config.json. Step 6: Configure systemd unit for Semaphore Let’s now configure Semaphore Ansible UI to be managed by systemd. Create systemd service unit file. sudo vi /etc/systemd/system/semaphore.service The add: [Unit] Description=Semaphore Ansible UI Documentation=https://github.com/ansible-semaphore/semaphore Wants=network-online.target After=network-online.target [Service] Type=simple ExecReload=/bin/kill -HUP $MAINPID ExecStart=/usr/bin/semaphore server --config /etc/semaphore/config.json SyslogIdentifier=semaphore Restart=always [Install] WantedBy=multi-user.target Create Semaphore configurations directory: sudo mkdir /etc/semaphore Copy your configuration file to created directory: sudo ln -s /root/config.json /etc/semaphore/config.json Stop running instances of Semaphore. sudo pkill semaphore Confirm: ps aux | grep semaphore Reload systemd and start semaphore service. sudo systemctl daemon-reload sudo systemctl restart semaphore Check status to see if running: $ systemctl status semaphore ● semaphore.service - Semaphore Ansible UI Loaded: loaded (/etc/systemd/system/semaphore.service; disabled; vendor preset: disabled) Active: active (running) since Tue 2022-04-19 13:29:42 UTC; 3s ago Docs: https://github.com/ansible-semaphore/semaphore Main PID: 8636 (semaphore) CGroup: /system.slice/semaphore.service └─8636 /usr/bin/semaphore server --config /etc/semaphore/config.json Apr 19 13:29:42 centos.example.com systemd[1]: Started Semaphore Ansible UI. Apr 19 13:29:42 centos.example.com semaphore[8636]: MySQL [email protected]:3306 semaphore Apr 19 13:29:42 centos.example.com semaphore[8636]: Tmp Path (projects home) /tmp/semaphore Apr 19 13:29:42 centos.example.com semaphore[8636]: Semaphore v2.8.53 Apr 19 13:29:42 centos.example.com semaphore[8636]: Interface Apr 19 13:29:42 centos.example.com semaphore[8636]: Port :3000 Apr 19 13:29:42 centos.example.com semaphore[8636]: Server is running Set Service to start at boot. $ sudo systemctl enable semaphore Created symlink /etc/systemd/system/multi-user.target.wants/semaphore.service → /etc/systemd/system/semaphore.service. Port 3000 should now be Open $ sudo ss -tunelp | grep 3000 tcp LISTEN 0 128 [::]:3000 [::]:* users:(("semaphore",pid=8636,fd=8)) ino:36321 sk:ffff8ae3b4e59080 v6only:0
Step 7: Setup Nginx Proxy (Optional) To be able to access Semaphore Web interface with a domain name, use the guide below to setup. Configure Nginx Proxy for Semaphore Ansible Web UI Step 8: Access Semaphore Web interface On your web browser, open semaphore Server IP on port 3000 or server name. Use the username/email created earlier during installation to Sign in. Web console for semaphore should be shown after authentication. You’re ready to manage your servers with Ansible and powerful Web UI. The initial steps required are: Add SSH keys / API keys used by Ansible – Under Key Store > create key Create Inventory file with servers to manage – Under Inventory > create inventory Create users and add to Team(s) Create Environments Add Playbook repositories Create Task Templates and execute Also check a detailed guide on semaphore Web UI. For Ubuntu / Debian installation, check: Setup Semaphore Ansible Web UI on Ubuntu / Debian
0 notes
Text
Ceph Client

Ceph.client.admin.keyring ceph.bootstrap-mgr.keyring ceph.bootstrap-osd.keyring ceph.bootstrap-mds.keyring ceph.bootstrap-rgw.keyring ceph.bootstrap-rbd.keyring Use ceph-deploy to copy the configuration file and admin key to your admin node and your Ceph Nodes so that you can use the ceph CLI without having to specify the monitor address.
Generate a minimal ceph.conf file, make a local copy, and transfer it to the client: juju ssh ceph-mon/0 sudo ceph config generate-minimal-conf tee ceph.conf juju scp ceph.conf ceph-client/0: Connect to the client: juju ssh ceph-client/0 On the client host, Install the required software, put the ceph.conf file in place, and set up the correct.
1.10 Installing a Ceph Client. To install a Ceph Client: Perform the following steps on the system that will act as a Ceph Client: If SELinux is enabled, disable it and then reboot the system. Stop and disable the firewall service. For Oracle Linux 6 or Oracle Linux 7 (where iptables is used instead of firewalld ), enter: For Oracle Linux 7, enter.
Ceph kernel client (kernel modules). Contribute to ceph/ceph-client development by creating an account on GitHub. Get rid of the releases annotation by breaking it up into two functions: prepcap which is done under the spinlock and sendcap that is done outside it.
Ceph Client List
Ceph Client Log
Ceph Client Windows
A python client for ceph-rest-api After learning there was an API for Ceph, it was clear to me that I was going to write a client to wrap around it and use it for various purposes. January 1, 2014.
Ceph is a massively scalable, open source, distributed storage system.
These links provide details on how to use Ceph with OpenStack:
Ceph - The De Facto Storage Backend for OpenStack(Hong Kong Summittalk)
Note
Configuring Ceph storage servers is outside the scope of this documentation.
Authentication
We recommend the cephx authentication method in the Cephconfig reference. OpenStack-Ansible enables cephx by default forthe Ceph client. You can choose to override this setting by using thecephx Ansible variable:
Deploy Ceph on a trusted network if disabling cephx.
Configuration file overrides
OpenStack-Ansible provides the ceph_conf_file variable. This allowsyou to specify configuration file options to override the defaultCeph configuration:
The use of the ceph_conf_file variable is optional. By default,OpenStack-Ansible obtains a copy of ceph.conf from one of your Cephmonitors. This transfer of ceph.conf requires the OpenStack-Ansibledeployment host public key to be deployed to all of the Ceph monitors. Moredetails are available here: Deploying SSH Keys.
The following minimal example configuration sets nova and glanceto use ceph pools: ephemeral-vms and images respectively.The example uses cephx authentication, and requires existing glance andcinder accounts for images and ephemeral-vms pools.
For a complete example how to provide the necessary configuration for a Cephbackend without necessary access to Ceph monitors via SSH please seeCeph keyring from file example.
Extra client configuration files
Deployers can specify extra Ceph configuration files to supportmultiple Ceph cluster backends via the ceph_extra_confs variable.

Ceph Client List
These config file sources must be present on the deployment host.
Ceph Client Log
Alternatively, deployers can specify more options in ceph_extra_confsto deploy keyrings, ceph.conf files, and configure libvirt secrets.
The primary aim of this feature is to deploy multiple ceph clusters ascinder backends and enable nova/libvirt to mount block volumes from thosebackends. These settings do not override the normal deployment ofceph client and associated setup tasks.
Deploying multiple ceph clusters as cinder backends requires the followingadjustments to each backend in cinder_backends Onyx sierra.
The dictionary keys rbd_ceph_conf, rbd_user, and rbd_secret_uuidmust be unique for each ceph cluster to used as a cinder_backend.
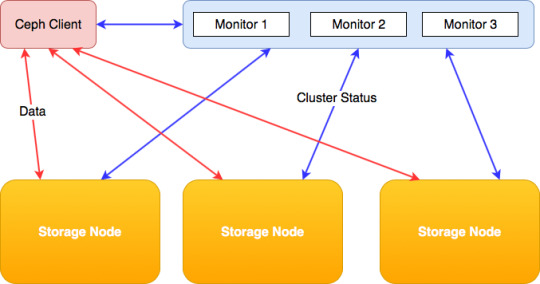
Monitors
The Ceph Monitor maintains a master copy of the cluster map.OpenStack-Ansible provides the ceph_mons variable and expects a list ofIP addresses for the Ceph Monitor servers in the deployment:
Configure os_gnocchi with ceph_client
Ceph Client Windows

If the os_gnocchi role is going to utilize the ceph_client role, the followingconfigurations need to be added to the user variable file:
0 notes
Text
Introduction to Ansible and Its Importance in DevOps
Automation has become the backbone of modern IT operations, and tools like Ansible are at the forefront of this revolution. But what exactly is Ansible, and why should you consider using it in your DevOps practices?
What is Ansible? Ansible is an open-source automation tool that simplifies the process of configuring and managing computers. It allows users to automate repetitive tasks, deploy applications, and manage complex IT environments without the need for complex scripts or programming. With Ansible, tasks that would normally take hours or even days can be completed in minutes, all while maintaining a high level of consistency and reliability.
Why Use Ansible in DevOps? In the world of DevOps, speed, efficiency, and consistency are key. Ansible meets these needs by offering a simple, agentless architecture that can automate the deployment and management of applications across multiple servers.
Simplifying Automation with Ansible Ansible makes automation easy with its simple, human-readable language, YAML (Yet Another Markup Language). This means you don't need to be a coding expert to write Ansible playbooks. The tool also eliminates the need for agents on remote systems, reducing overhead and making it easier to manage large environments.
Enhancing Efficiency and Consistency By automating repetitive tasks, Ansible helps teams save time and reduce the risk of human error. With Ansible, you can ensure that your systems are configured exactly as you want them, every time. This consistency is crucial in maintaining reliable and secure IT operations.
Getting Started with Ansible
Ready to dive in? Here’s how you can get started with Ansible.
Installing Ansible Before you can start using Ansible, you need to install it. The process is straightforward, but there are a few requirements and dependencies you'll need to meet.
Requirements and Dependencies Ansible requires Python (version 3.5 or later) to run. You’ll also need a system with a Unix-like OS (Linux, macOS, or Windows with WSL) to install it.
Step-by-Step Installation Guide
Install Python: Most systems come with Python pre-installed. You can check by running python --version or python3 --version.
Install Ansible: Once Python is installed, you can use pip to install Ansible. Run the command pip install ansible to get started.
Verify Installation: To verify that Ansible is installed correctly, run ansible --version.
Ansible Architecture Overview
Understanding Ansible’s architecture is key to mastering its use.
Core Components: Inventory, Modules, and Playbooks
Inventory: This is a list of hosts (computers) that Ansible manages.
Modules: These are the units of code Ansible uses to perform tasks.
Playbooks: These are files that define the tasks Ansible will execute on your hosts.
Ansible Configuration File and Its Significance The Ansible configuration file (ansible.cfg) is crucial as it allows you to define settings and behaviors for Ansible, such as default module paths, remote user information, and more.
Core Concepts in Ansible
Ansible’s power lies in its simplicity and flexibility. Here are some core concepts to understand:
Understanding Playbooks and Their Role Playbooks are the heart of Ansible. They define the tasks you want to perform on your managed hosts.
Structure of a Playbook A playbook is written in YAML format and typically consists of one or more "plays." Each play defines a set of tasks executed on a specified group of hosts.
Modules and How They Work Modules are the building blocks of Ansible. They are used to perform actions on your managed hosts.
Commonly Used Ansible Modules Some commonly used modules include:
apt/yum: For package management
service: For managing services
copy/template: For managing files
Creating Custom Modules If Ansible doesn’t have a module that meets your needs, you can create your own. Custom modules can be written in any language that returns JSON, making them highly flexible.
Advanced Ansible Techniques
As you become more familiar with Ansible, you’ll want to explore more advanced techniques.
Using Roles for Better Playbook Organization Roles are a way to organize playbooks and manage complex configurations more easily.
Best Practices for Role Management Keep your roles simple and focused. Each role should perform one specific function. This makes it easier to maintain and reuse roles across different projects.
Ansible Galaxy: The Hub of Community Content Ansible Galaxy is a community hub where you can find roles created by other Ansible users.
Finding and Using Roles from Ansible Galaxy To use a role from Ansible Galaxy, you can simply run ansible-galaxy install <role_name>. This will download the role to your system, and you can use it in your playbooks just like any other role.
Contributing to Ansible Galaxy If you create a role that you think others might find useful, you can share it on Ansible Galaxy. This is a great way to contribute to the community and get feedback on your work.
Ansible in Real-World Projects
Now that you understand the basics, let's look at how you can use Ansible in real-world projects.
Automating Server Provisioning Ansible is perfect for automating server provisioning. You can create playbooks to set up servers with all the necessary software and configurations in minutes.
Setting Up a Web Server with Ansible To set up a web server, you can write a playbook that installs the web server software, configures it, and starts the service. This entire process can be automated with Ansible, saving you time and reducing the risk of errors.
Automating Database Deployment Just like with web servers, you can use Ansible to automate the deployment of databases. This includes installing the database software, creating databases, and configuring access permissions.
Continuous Integration and Deployment (CI/CD) with Ansible Ansible can also be used in CI/CD pipelines to automate the deployment of applications.
Integrating Ansible with Jenkins By integrating Ansible with Jenkins, you can automate the deployment process whenever there’s a change in your codebase. This ensures that your applications are always up-to-date and running smoothly.
Deploying Applications with Zero Downtime Ansible can help you achieve zero-downtime deployments by automating the process of updating your servers without taking them offline. This is crucial for maintaining service availability and minimizing disruptions.
Troubleshooting and Debugging in Ansible
Even with automation, things can go wrong. Here’s how to troubleshoot and debug Ansible.
Common Errors and How to Fix Them Some common errors in Ansible include syntax errors in playbooks, missing or incorrect modules, and connectivity issues with managed hosts. Ansible provides clear error messages to help you identify and fix these issues.
Debugging Tips and Tools Ansible provides several tools for debugging, such as the --check option to simulate a playbook run, the -v option for verbose output, and the debug module for printing variable values during execution.
Best Practices for Using Ansible in Production
When using Ansible in production, it's important to follow best practices to ensure security, performance, and reliability.
Security Considerations Always use secure methods for storing sensitive information, such as Ansible Vault or environment variables. Avoid hardcoding passwords or other sensitive data in your playbooks.
Performance Optimization Techniques To optimize performance, use strategies like parallelism to execute tasks on multiple hosts simultaneously. Also, minimize the number of tasks in each playbook to reduce execution time.
Conclusion
Ansible is a powerful tool for automating tasks and managing IT environments. Mastering Ansible can streamline your DevOps processes, improve efficiency, and ensure consistency across your infrastructure. Whether you’re just getting started or looking to deepen your knowledge, Ansible offers endless opportunities for growth and innovation.
0 notes
Text
Ansible: Unleash the power of control over SSH
Heard about Ansible but not sure what exactly it is? Don’t worry! You will know about it in the next few minutes…
Ansible is an open-source DevOps tool which is helpful for configuration management, deployment, provisioning, etc. in business.
The following topics about Ansible will be covered in this blog:
Need of Ansible
Advantages of Ansible
Architecture of Ansible
Working of Ansible
Need of Ansible:
Before knowing about Ansible, you should know about the problem faced before Ansible.
At the beginning of network computation, deploying and managing servers efficiently was a challenge. During that period, system administrators used to handle servers personally, install software, change configurations and administer services on individual servers.
With the increasing number of data centers and complexity in hosting applications, administrators realized that as fast the applications were enabling, scaling the manual system management was a tough task. IT team started spending more time on the configuration of systems because the development team used to release software frequently and it obstructed the velocity of work of the developers. And that’s where server provisioning and configuration management tool started developing.
Administrating the server fleet always requires keeping updating, pushing changes, copying files on them. Due to these tasks, the things turn out to be very complicated as well time-consuming. And then comes the solution for the above-stated problem and the solution is ANSIBLE.
Advantages of Ansible:
· Agentless: For automation, you don’t need to install any other software or firewall ports on the client systems. Also, you don’t need to set up a separate management structure.
· Easy to set up and upgrade: To use Ansible’s playbooks you do not require special coding skills. Upgrading Ansible is very easy as there are no dependencies. For upgrading, you can simply change upgrade the Ansible code on your control system.
· Powerful: Ansible allows you to model even highly complex IT workflows.
· Flexible: You can orchestrate the entire application environment without worrying about where it is deployed. Ansible has fewer dependencies and thus it is more stable and also very fast to implement.
Now let us see the architecture and working of the Ansible.
Architecture of Ansible:

Public/Private Cloud:
It is the Linux Server. And also it is the container for all IT installation and configurations.
Host:
It is a bunch of machines that connect to the ansible server and pushes the playbooks through the SSH key.
Ansible automation engine:
This engine allows the users to directly run a playbook that gets deployed on the hosts. There are multiple components in the Ansible automation engine. The components are host inventory, modules, playbooks, and plugins.
i. Host Inventory: The host inventory enlists the IP addresses of all the hosts.
ii. Modules: Ansible is a package of hundreds of inbuilt modules and modules are the pieces of code that get executed when you are running a playbook. A playbook consists of plays, a play consists of different task and task includes modules.
While running a playbook, the modules get executed on your hosts and the modules contain action in them. The action takes place in host machines when you run a playbook. Here you can customize the modules even. All you have to do is to write a few lines of coding and make it a module so that you can run it at any time you want.
iii. Playbooks: In Ansible, Playbooks actually define your workflow because the task gets executed in the same order that you have written them. For example, if you are writing first to install a package and then start, it’ll follow the same. Playbooks use the YAML code. YAML coding is a very simple data serialization language; which is pretty much like English.
iv. Plugins: Plugins are special kinds of modules. Before a module is getting executed on the nodes the plugins get executed. Plugins get executed on the main control machine for logging purposes. To avoid costly fact-gathering operations, cache plugins are used to keep a cache of facts. Ansible has action plugins, these are front-end modules, and they are used to execute tasks on the controller machine before calling the modules themselves.
v. Connection Plugin: Sometimes you can use a connection plugin instead of SSH for connecting with host machines. For example, You can easily connect to all Docker containers and start configuring as Ansible provides you with a docker container connection plugin.
Working of Ansible:
Ansible working starts initially by connecting to nodes and pushing out small programs which are ansible modules. Ansible executes these modules over SSH by default and later remove them when finished.
The entire execution of the Playbook is controlled by Ansible management node what we call as the controlling node. This is the node from which you are running the installation, and the inventory file is providing the list of the host where the modules need to be run. The ssh connection is made by the management node, and then it executes the modules on the host machines and installs the product. The modules are removed once they are installed. And that’s how ansible works.
Use of Ansible:
· Orchestration:
Ansible provides Orchestration for aligning the business request with the data, applications, and infrastructure. The policies and service levels are defined through automated workflows. An application-aligned infrastructure is created that can be scaled up or down based on the needs of each application.
· Configuration Management:
The consistency of the performance of the product is established and maintained by recording and updating detailed information. It describes an enterprise’s hardware and software.
· Application Deployment:
After defining and managing the application with Ansible, teams can effectively manage the entire life cycle of the application.
· Security and Compliance:
Ansible is essential in everything that is deployed. After defining the security policy, scanning and remediation of site-wide security policy can be integrated into other automated processes.
Conclusion:
Congratulations! You have now learned about Ansible. For managing the infrastructure Ansible is a game-changer. Now it’s your time to implement in your project.
To learn more about Ansible and to increase your earnings and being more valuable to your company, visit our website and check the course today.
0 notes
Text
300+ TOP CHEF Interview Questions and Answers
CHEF Interview Questions for freshers and experienced :-
1. What is chef? The chef is a well-structured, powerful management tool that is used to transfer the infrastructure into codes. With chef, you can easily develop and use the scripts for automation and IT process. 2. What are the primary components of Chef? The architecture of the chef tool can be easily broken down in the following components: Chef node Chef server Chef workstation 3. What is the chef node? The chef node is a hosting element of the chef tool that is managed through the chef-client and responsible to share data across the network. 4. What is the chef server? The chef server is referred to as the center of the chef tool is responsible for storing necessary data and configuring nodes. 5. Define chef workstation? You can consider the chef workstation as the modifying host for the data and cookbooks. 6. Describe the chef resource and its functions? The chef resource is a crucial aspect of the infrastructure which is used to install and run a service. It can be used to: Describe a configured item Choose resources like services, package, and template List down the properties of the resources Group the resources into recipes 7. What is the importance of the chef nodes? DevOps professionals often consider chef nodes as the virtual constituent that is an integral of the infrastructure. Chef nodes help to execute any resource. 8. What is a recipe in the chef tool? The recipe in the chef is often described as a group of resources. The recipe contains all the information reuired to configure an aspect of the system. 9. Write down the functions of the recipe? The recipe is used to perform the following function: Install and manage components of software Deploy applications in chef Execute other recipes in the system Manage system files 10. Describe the difference between a recipe and cookbook in the chef workstation? When developers group down resources together they receive the recipe which is useful when configuring and implementing policies. Now, when they group down recipes what they receive is the cookbook. The concept is similar to the food cookbook and recipes.

CHEF Interview Questions 11. Define step by step process to update the chef cookbook? Here is the step-by-step process you need to follow while updating the chef cookbook: Step 1: Go to the workstation to run the knife SSH Step 2: Run both chef-client and knife SSH directly on the server Step 3: You can consider and utilize the chef-client as a daemon to restart the service 12. What will happen if the action is not defined in chef resource? If the developer did not define a particular action for the chef resource, then it will automatically choose a default action for itself. 13. Describe the run-list in the chef? The run list can be described as a list of roles and responsibilities of the recipes in an order to define which recipe needs to run in which order. It is significant to have run-list when you are dealing with multiple cookbooks in the chef. 14. What are the benefits of using run-list? There are several benefits of using run-list including: Ensure recipes are running in the same order as specified It specifies the node on which recipes will run Transfer the workstation to chef-server 15. What instructions do you need to perform bootstrap in chef? To perform or order bootstrap in the chef, you need: Public IP address or hostname Account Id and password to log into the node You can use the keyword-authentication instead of ID and password 16. Do you know what DK is in chef? As a beginner, you must know that DK is the server station in the chef that is used to interact with the system. There are pre-installed tools in DK which makes interaction much easier and effective. 17. What is chef repository and why do we use it? As a developer, you can consider the chef repository as a collection of cookbooks, data bags, environments, roles and more. You can also sync the chef repository with the version control system to further enhance the overall performance. 18. Showcase your knowledge about the test kitchen in chef? The test kitchen is the tool which is used to enable cookbooks on the server. It also helps in creating various virtual machines on the cloud. 19. What are the primary advantages of a test kitchen? The key advantages of using the test kitchen are: It allows you to use various virtualization providers that create virtual machines It speeds up the overall development cycle It helps you to run cookbooks on the server 20. Have you learned about signature header? If yes, then explain it? The signature header is crucial to validate the interaction that is created or exist between the chef server and node. 21. What is the role of SSL in chef? It can be challenging to find out the right data has been accessed in a pile of servers and chef clients. Therefore, it is crucial to establish the SSL connection to make sure you have accessed the right data in the chef. 22. Describe the starter kit in chef? The primary reason to use starter kit to configure files in the chef tool. It is used to get the clear information for the configuration process. 23. What is chefDK? In the tool, chefDK is the software development kit that is used to develop and test the cookbooks. 24. Does the chef use the ruby? Yes, chef- the configuration tool is entirely written in the Ruby and leverage the pure domain-specific language. 25. What is the difference between Chef and Ansible? Although both Ansible and Chef are popular configuration management tools they are far different than being similar. Both of them have different strength, structures, benefits, and drawbacks. While configuration files are known as cookbooks in chef, they are known as a playbook in ansible. Chef operates on client-server and Ansible is agentless. 26. What is the source of truth? Define the chef’s source of truth? Source of truth is the process of structuring information modules and data in a way that every data is edited at a single place. What actually differentiates chef from the ansible is the way how it handles the source of truth. Unlike ansible, the chef has its chef serves as the source of truth and process includes deploying updated cookbooks on one or two servers. 27. What is the orchestration tool? Is chef orchestration tool? The orchestration tool is often defined as a way to represent complex systems and models in the easiest manner. So, no, the chef is not an orchestration tool. 28. Describe one main difference between chef and puppet tool? The key difference between chef and puppet is that Puppet is the set of tools while the chef is the Ruby DSL and set of configured tools. 29. Define the chef-repo? Chef repo is a directory that is pre-installed in your chef workstation and used to store: Data bags Environments Roles 30. Define the role of chef validator? Chef validator can be defined as a process to analyze to ensure every reuest that is made from the client-server to chef-server is authentic. 31. What do you understand by knife SSL check command in chef? Knife SSL check is the subcommand that is leverage to validate the state of SSL certification and uickly response to troubleshoot the issue. 32. What is data bags in chef? Data bags are the variables that basically store the JSON data and can be easily accessible through the chef server. 33. Where do you store the cookbooks in the chef? The cookbooks are basically stored in the bookshelf directory of chef which can be easily modified as per your needs. 34. What attributes represent in the chef? Attributes in the chef are used at the first hand to represent the information of nodes. 35. What do you understand by “chef template”? Chef templates are the embedded templates that used to creates static files that consist of Ruby statements and expressions. 36. What Happens During The Bootstrap Process? During the bootstrap process, the node downloads and installs chef-client, registers itself with the Chef server, and does an initial check in. During this check in, the node applies any cookbooks that are part of its run-list. 37. How Do You Apply An Updated Cookbook To Your Node? We mentioned two ways. Run knife Ssh from your workstation. SSH directly into your server and run chef-client. You can also run chef-client as a daemon, or service, to check in with the Chef server on a regular interval, say every 15 or 30 minutes. Update your Apache cookbook to display your node’s host name, platform, total installed memory, and number of CPUs in addition to its FQDN on the home page. Update index.html.erb like this.
hello from – RAM CPUs Then upload your cookbook and run it on your node. 38. What Would You Set Your Cookbook’s Version To Once It’s Ready To Use In Production? According to Semantic Versioning, you should set your cookbook’s version number to 1.0.0 at the point it’s ready to use in production. 39. Create A Second Node And Apply The Awesome Customers Cookbook To It. How Long Does It Take? You already accomplished the majority of the tasks that you need. You wrote the awesome customers cookbook, uploaded it and its dependent cookbooks to the Chef server, applied the awesome customers cookbook to your node, and verified that everything’s working. All you need to do now is: Bring up a second Red Hat Enterprise Linux or Centos node. Copy your secret key file to your second node. Bootstrap your node the same way as before. Because you include the awesome customers cookbook in your run-list, your node will apply that cookbook during the bootstrap process. The result is a second node that’s configured identically to the first one. The process should take far less time because you already did most of the work. Now when you fix an issue or add a new feature, you’ll be able to deploy and verify your update much more quickly! 40. What’s The Value Of Local Development Using Test Kitchen? Local development with Test Kitchen: Enables you to use a variety of virtualization providers that create virtual machine or container instances locally on your workstation or in the cloud. Enables you to run your cookbooks on servers that resemble those that you use in production. Speeds up the development cycle by automatically provisioning and tearing down temporary instances, resolving cookbook dependencies, and applying your cookbooks to your instances. 41. Which Of The Following Lets You Verify That Your Node Has Successfully Bootstrapped? The Chef management console. Knife node list Knife node show You can use all three of these methods. 42. What Is The Command You Use To Upload A Cookbook To The Chef Server? Knife cookbook upload. CHEF Questions and Answers Pdf Download
Read the full article
0 notes
Text
Best Devops training institute in noida
Best Devops training institute in noida

The Best DevOps Training Institute in Noida, Inovi technologies offers real-time and placement-oriented development training in Noida. Inovi technologies offer the best DevOps training courses in Noida. Inovi DevOps training course is designed from the basics to the advanced level. We have a team of DevOps experts, who have knowledge of DevOps projects in real time with handmade professionals, who will give students an edge over other training institutions. The contents of DevOps training course are designed to get placements in major MNC companies in Noida after completing the Devops training course. The latest DevOps training institute in Noida focuses on the requirements of the DevOps community. Inovi Technologies listed one of the top DevOps training institutions in Noida. We provide DevOps education for working professionals. DevOps training in Noida understands the need for DevOps community. We offer all DevOps training courses as alternatives to students. Inovi technologies provide free DevOps training material for soft copy and hard copy. Discover the best DevOps training in Noida in Inovi technologies.Our DevOps training courses help students get placement after the course completion. Our practical, real-time DevOps project helps in working on landscape training DevOps projects. Our DevOps training program helps every student achieve their goals in DevOps career.https://www.inovitechnologies.com/Corporate-Training/Best-devops-training-institute-in-noid/
Course Content
Module 01: Introduction of DevOps
1 What Is Cloud Computing?
2. Understand DevOps, its roles and responsibilities
3. DevOps problems and solutions
4. Identify cultural impediments and overcome it
6. Understand the infrastructure layouts and its challenges
7. Network Concepts at Enterprise Scale
Module 2: Version Control, GIT
1. Introduction
2. How GIT Works
3. Working Locally with GIT
4. Working Remotely with GIT
5. Branching and Merging
6. Resolve merge Conflict
Module 3: Jenkins
1. Introduction of Jenkins
2. Install and setup Jenkins
3. Introduction about Maven project
4. Setup Jenkins with Maven Project
5. Continuous Build and Deployment
6. Build Pipeline View Project
7. Generate Reports & Enable Mail Notification
8. Jenkins to run script remotely
9. Add Jenkins node/slave
10.Run Jenkins behind apache proxy
Module 4: Docker
1. Docker Introduction
2. Docker Installation
3. Major Docker Components
4. Manage Docker Images & container
5. Manage Docker images from Docker file
6. Docker Volume
7. Docker Networking
8. Docker Swarm (Cluster Management)
Module 5: Ansible
Introduction about Automation
Ansible architecture
Ansible Modules
Manage tasks by Ad-hoc method
How to write Playbooks
Variables and Facts in Playbook
Condition & Loop and Notify & handler in playbook
Manage Templates file And Roles Structure
Vault Encryption in Ansible
Ansible Integration with Aws Cloud
Ansible Tower Management
Module 6: Puppet
1. Introduction Puppet architecture
2. Installation Puppet Server and agent
3. Puppet DSL
4. Creating Manifests file
5. Variable and Factor and Condition
6. in Manifests
7. Puppet Template File
8. Puppet Modules
Module 7: Monitoring with Nagios
1. Nagios Overview
2. Understand Nagios Architecture
3. Install and Setup Nagios on Linux
4. Install and setup NRPE client
5. Setup monitoring
6. Enable email alert
Our Courses:
Java
AWS
Mean Stack
Artificial Intelligence
Hadoop
Devops
Python
RPA
Machine learning
Salesforce
Linux And Red Hat
Data Scientist
Digital-Marketing
Web Designing
Contact:
Mobile No. 8810643463, 9354482334
Phone No. 91-120-4213880
Email- [email protected]
Address. F7 Sector-3 Noida UP 201301 India.
0 notes
Text
Elasticsearch is a powerful open-source, RESTful, distributed real-time search and analytics engine which provides the ability for full-text search. Elasticsearch is built on Apache Lucene and the software is freely available under the Apache 2 license. In this article, we will install an Elasticsearch Cluster on CentOS 8/7 & Ubuntu 20.04/18.04 using Ansible automation tool. This tutorial will help Linux users to install and configure a highly available multi-node Elasticsearch Cluster on CentOS 8 / CentOS 7 & Ubuntu 20.04/18.04 Linux systems. Some of the key uses of ElasticSearch are Log analytics, Search Engine, full-text search, business analytics, security intelligence, among many others. In this setup, we will be installing Elasticsearch 7.x Cluster with the Ansible role. The role we’re using is ElasticSearch official project, and gives you flexibility of your choice. Elasticsearch Nodes type There are two common types of Elasticsearch nodes: Master nodes: Responsible for the cluster-wide operations, such as management of indices and allocating data shards storage to data nodes. Data nodes: They hold the actual shards of indexed data, and handles all CRUD, search, and aggregation operations. They consume more CPU, Memory, and I/O Setup Requirements Before you begin, you’ll need at least three CentOS 8/7 servers installed and updated. A user with sudo privileges or root will be required for the actions to be done. My setup is based on the following nodes structure. Server Name Specs Server role elk-master-01 16gb ram, 8vpcus Master elk-master-02 16gb ram, 8vpcus Master elk-master-03 16gb ram, 8vpcus Master elk-data01 32gb ram, 16vpcus Data elk-data02 32gb ram, 16vpcus Data elk-data03 32gb ram, 16vpcus Data NOTE: For small environments, you can use a node for both data and master operations. Storage Considerations For data nodes, it is recommended to configure storage properly with consideration for scalability. In my Lab, each Data node has a 500GB disk mounted under /data. This was configured with the commands below. WARNING: Don’t copy and run the commands, they are just reference point. sudo parted -s -a optimal -- /dev/sdb mklabel gpt sudo parted -s -a optimal -- /dev/sdb mkpart primary 0% 100% sudo parted -s -- /dev/sdb align-check optimal 1 sudo pvcreate /dev/sdb1 sudo vgcreate vg0 /dev/sdb1 sudo lvcreate -n lv01 -l+100%FREE vg0 sudo mkfs.xfs /dev/mapper/vg0-lv01 echo "/dev/mapper/vg0-lv01 /data xfs defaults 0 0" | sudo tee -a /etc/fstab sudo mount -a Step 1: Install Ansible on Workstation We will be using Ansible to setup Elasticsearch Cluster on CentOS 8/7. Ensure Ansible is installed in your machine for ease of administration. On Fedora: sudo dnf install ansible On CentOS: sudo yum -y install epel-release sudo yum install ansible RHEL 7 / RHEL 8: ### RHEL 8 ### sudo subscription-manager repos --enable ansible-2.9-for-rhel-8-x86_64-rpms sudo yum install ansible ### RHEL 7 ### sudo subscription-manager repos --enable rhel-7-server-ansible-2.9-rpms sudo yum install ansible Ubuntu: sudo apt update sudo apt install software-properties-common sudo apt-add-repository --yes --update ppa:ansible/ansible sudo apt install ansible For any other distribution, refer to official Ansible installation guide. Confirm installation of Ansible in your machine by querying the version. $ ansible --version ansible 2.9.6 config file = /etc/ansible/ansible.cfg configured module search path = ['/var/home/jkmutai/.ansible/plugins/modules', '/usr/share/ansible/plugins/modules'] ansible python module location = /usr/lib/python3.7/site-packages/ansible executable location = /usr/bin/ansible python version = 3.7.6 (default, Jan 30 2020, 09:44:41) [GCC 9.2.1 20190827 (Red Hat 9.2.1-1)] Step 2: Import Elasticsearch ansible role After installation of Ansible, you can now import the Elasticsearch ansible role to your local system using galaxy.
$ ansible-galaxy install elastic.elasticsearch,v7.13.3 Starting galaxy role install process - downloading role 'elasticsearch', owned by elastic - downloading role from https://github.com/elastic/ansible-elasticsearch/archive/v7.13.3.tar.gz - extracting elastic.elasticsearch to /Users/jkmutai/.ansible/roles/elastic.elasticsearch - elastic.elasticsearch (v7.13.3) was installed successfully Where 7.13.2 is the release version of Elasticsearch role to download. You can check the releases page for a match for Elasticsearch version you want to install. The role will be added to the ~/.ansible/roles directory. $ ls ~/.ansible/roles total 4.0K drwx------. 15 jkmutai jkmutai 4.0K May 1 16:28 elastic.elasticsearch Configure your ssh with Elasticsearch cluster hosts. $ vim ~/.ssh/config This how my additional configurations looks like – update to fit your environment. # Elasticsearch master nodes Host elk-master01 Hostname 192.168.10.2 User root Host elk-master02 Hostname 192.168.10.3 User root Host elk-master03 Hostname 192.168.10.4 User root # Elasticsearch worker nodes Host elk-data01 Hostname 192.168.10.2 User root Host elk-data02 Hostname 192.168.10.3 User root Host elk-data03 Hostname 192.168.10.4 User root Ensure you’ve copied ssh keys to all machines. ### Master nodes ### for host in elk-master01..3; do ssh-copy-id $host; done ### Worker nodes ### for host in elk-data01..3; do ssh-copy-id $host; done Confirm you can ssh without password authentication. $ ssh elk-master01 Warning: Permanently added '95.216.167.173' (ECDSA) to the list of known hosts. [root@elk-master-01 ~]# If your private ssh key has a passphrase, save it to avoid prompt for each machine. $ eval `ssh-agent -s` && ssh-add Enter passphrase for /var/home/jkmutai/.ssh/id_rsa: Identity added: /var/home/jkmutai/.ssh/id_rsa (/var/home/jkmutai/.ssh/id_rsa) Step 3: Create Elasticsearch Playbook & Run it Now that all the pre-requisites are configured, let’s create a Playbook file for deployment. $ vim elk.yml Mine has the contents below. - hosts: elk-master-nodes roles: - role: elastic.elasticsearch vars: es_enable_xpack: false es_data_dirs: - "/data/elasticsearch/data" es_log_dir: "/data/elasticsearch/logs" es_java_install: true es_heap_size: "1g" es_config: cluster.name: "elk-cluster" cluster.initial_master_nodes: "192.168.10.2:9300,192.168.10.3:9300,192.168.10.4:9300" discovery.seed_hosts: "192.168.10.2:9300,192.168.10.3:9300,192.168.10.4:9300" http.port: 9200 node.data: false node.master: true bootstrap.memory_lock: false network.host: '0.0.0.0' es_plugins: - plugin: ingest-attachment - hosts: elk-data-nodes roles: - role: elastic.elasticsearch vars: es_enable_xpack: false es_data_dirs: - "/data/elasticsearch/data" es_log_dir: "/data/elasticsearch/logs" es_java_install: true es_config: cluster.name: "elk-cluster" cluster.initial_master_nodes: "192.168.10.2:9300,192.168.10.3:9300,192.168.10.4:9300" discovery.seed_hosts: "192.168.10.2:9300,192.168.10.3:9300,192.168.10.4:9300" http.port: 9200 node.data: true node.master: false bootstrap.memory_lock: false network.host: '0.0.0.0' es_plugins: - plugin: ingest-attachment Key notes: Master nodes have node.master set to true and node.data set to false. Data nodes have node.data set to true and node.master set to false. The es_enable_xpack variable set to false for installation of ElasticSearch open source edition. cluster.initial_master_nodes & discovery.seed_hosts point to master nodes /data/elasticsearch/data is where Elasticsearch data shard will be stored – Recommended to be a separate partition from OS installation for performance reasons and scalability. /data/elasticsearch/logs is where Elasticsearch logs will be stored.
The directories will be created automatically by ansible task. You only need to ensure /data is a mount point of desired data store for Elasticsearch. For more customization options check the project’s github documentation. Create inventory file Create a new inventory file. $ vim hosts [elk-master-nodes] elk-master01 elk-master02 elk-master03 [elk-data-nodes] elk-data01 elk-data02 elk-data03 When all is set run the Playbook. $ ansible-playbook -i hosts elk.yml The execution should start. Just be patient as this could take some minutes. PLAY [elk-master-nodes] ******************************************************************************************************************************** TASK [Gathering Facts] ********************************************************************************************************************************* ok: [elk-master02] ok: [elk-master01] ok: [elk-master03] TASK [elastic.elasticsearch : set_fact] **************************************************************************************************************** ok: [elk-master02] ok: [elk-master01] ok: [elk-master03] TASK [elastic.elasticsearch : os-specific vars] ******************************************************************************************************** ok: [elk-master01] ok: [elk-master02] ok: [elk-master03] ....... A successful ansible execution will have output similar to below. PLAY RECAP ********************************************************************************************************************************************* elk-data01 : ok=38 changed=10 unreachable=0 failed=0 skipped=119 rescued=0 ignored=0 elk-data02 : ok=38 changed=10 unreachable=0 failed=0 skipped=118 rescued=0 ignored=0 elk-data03 : ok=38 changed=10 unreachable=0 failed=0 skipped=118 rescued=0 ignored=0 elk-master01 : ok=38 changed=10 unreachable=0 failed=0 skipped=119 rescued=0 ignored=0 elk-master02 : ok=38 changed=10 unreachable=0 failed=0 skipped=118 rescued=0 ignored=0 elk-master03 : ok=38 changed=10 unreachable=0 failed=0 skipped=118 rescued=0 ignored=0 See below screenshot. Step 4: Confirm Elasticsearch Cluster installation on Ubuntu / CentOS Login to one of the master nodes. $ ssh elk-master01 Check cluster health status. $ curl http://localhost:9200/_cluster/health?pretty "cluster_name" : "elk-cluster", "status" : "green", "timed_out" : false, "number_of_nodes" : 6, "number_of_data_nodes" : 3, "active_primary_shards" : 0, "active_shards" : 0, "relocating_shards" : 0, "initializing_shards" : 0, "unassigned_shards" : 0, "delayed_unassigned_shards" : 0, "number_of_pending_tasks" : 0, "number_of_in_flight_fetch" : 0, "task_max_waiting_in_queue_millis" : 0, "active_shards_percent_as_number" : 100.0 Check master nodes. $ curl -XGET 'http://localhost:9200/_cat/master' G9X__pPXScqACWO6YzGx3Q 95.216.167.173 95.216.167.173 elk-master01 View Data nodes: $ curl -XGET 'http://localhost:9200/_cat/nodes' 192.168.10.4 7 47 1 0.02 0.03 0.02 di - elk-data03 192.168.10.2 10 34 1 0.00 0.02 0.02 im * elk-master01 192.168.10.4 13 33 1 0.00 0.01 0.02 im - elk-master03 192.168.10.3 14 33 1 0.00 0.01 0.02 im - elk-master02 192.168.10.3 7 47 1 0.00 0.03 0.03 di - elk-data02 192.168.10.2 6 47 1 0.00 0.02 0.02 di - elk-data01 As confirmed you now have a Clean Elasticsearch Cluster on CentOS 8/7 & Ubuntu 20.04/18.04 Linux system.
0 notes
Text
Automating Solace configuration management using SEMP and Ansible
There are two ways of managing PubSub+ Event Brokers: command line interface (CLI) and a web-based admin interface called PubSub+ Manager.
For small deployments (say a handful of brokers) and development environments, using CLI and PubSub+ Manager is sufficient. As the size of the Solace deployment grows, however, there are many scenarios in which customers would want to automate the process of creating and managing the configuration of Solace brokers. For example:
For agile, cloud-based applications that perform frequent deployments, it may be necessary to quickly spin up a Solace environment, perform testing, and tear it down.
Administrators would love to automate the process of creating, updating, and deleting a Solace environment for greater efficiency.
Solace Element Management Protocol (SEMP) provides a RESTful API for programmatically creating brokers and managing their configurations. Using SEMP, administrators can automate every aspect of Solace configuration management. Such automation increases productivity, removes the risk of human error associated with manual deployments, improves quality control, and accelerates time to market.
Since SEMP provides a RESTful API, it can be integrated with virtually any DevOps tool in the market – such as Ansible, Chef, Puppet, and Salt. For a nice introduction to the SEMP Management API, check out this blog, as well as the SEMP tutorials home page.
A few years back, I created a GitHub project on how to use Ansible to automate Solace deployments for integrating Solace with CI/CD pipelines. Since the project has been used frequently in the field as well as by many of our customers, I’d like to share more detail on how the Ansible playbooks work and how you can use as well as extend them for automating your Solace configuration.
Ansible
Ansible is an open source tool for automating tasks such as application deployment, IT service orchestration, cloud provisioning, and many more. Ansible is easy to deploy, does not use any agents, and has a simple learning curve. Ansible uses “playbooks” to describe its automation jobs, known as “tasks”. Ansible playbooks and tasks are described using YAML, making them easy to read, understand, and extend. Here is a quick background of the concepts in Ansible before we dive into how it can be used with Solace.
Playbooks
Configuration tasks using Ansible are laid out using playbooks – they can be used to manage configuration and deployment to remote machines. “Playbooks” are composed of “plays”, with each play defining the configuration work to be performed against a managed server. Within each play, you can define “tasks” – each task is a set of actions and instructions for configuration management, and these will be executed against a set of hosts.
By composing a playbook as a set of plays, it is possible to orchestrate deployment of Solace configuration across a single or multiple Solace event brokers, running certain steps on one set of brokers, and all steps on others, as required.
Roles
Roles, in Ansible, provide a method for breaking down a complex playbook into simple manageable components – each component is composed of a collection of tasks, variables, files, templates, and modules.
Modules
Ansible comes with a number of in-built “modules” – each module can be directly executed on a remote system to perform common operations, such as copying files, starting and stopping services, running Unix commands, managing EC2 instances, and so on. When writing Ansible plays, we can make use of these modules to perform common operational tasks. In this sample, the Ansible URI module is used to interact with Solace brokers by calling the SEMP API.
Ansible Playbook for Solace
This GitHub project contains a sample Ansible playbook for creating Solace messaging environment on an existing Solace broker, using the SEMP RESTful API. The Ansible playbook consists of a number of tasks, and each task uses Solace’s SEMP Management API to create a new Solace message-vpn on an existing Solace message broker along with associated objects:
Client Profiles
ACL Profiles
Client Usernames
Queue Endpoints
If the objects already exist, this is indicated in the playbook run’s output. It is not treated as a failure of the Ansible task, and the playbook execution continues to the next task. Object properties can be specified in a configuration file.
Variables
The details of the various configuration objects, such as their name and properties, are specified in the file vars/solace-env.yml. Here’s a snippet from this file showing example configuration for a message-vpn to be created:
#message-vpn message_vpn: msgVpnName: "srAwesome_vpn" authenticationBasicType: "internal" enabled: true maxConnectionCount: 60 maxSubscriptionCount: 200 eventLargeMsgThreshold: 2048 maxEgressFlowCount: 100 maxEndpointCount: 100 maxIngressFlowCount: 100 maxTransactedSessionCount: 100 maxTransactionCount: 100 maxMsgSpoolUsage: 1000
All the variables for the environment to be created are specified in this file. This includes:
Message-VPNs
Client Profiles
ACL Profiles
Client Usernames
Queue Endpoints
Roles
The Ansible playbook is broken down into roles – with one role for creating each configuration object:
create-vpn
create-acl-profile
create-client-profile
create-client-username
create-queue
create-queue-subscription
These roles can be found in the directory “roles”. Each of the roles contains a set of tasks, for performing the configuration operation appropriate to that role. Let’s look at tasks for creating a message-vpn, in roles/create-vpn/tasks/main.yml:
- name: Compose SEMPv2 request payload for VPN "" template: src=templates/create-vpn.json.j2 dest=files/create-vpn.json - name: Create Message-vpn "" uri: url: "http://:/SEMP/v2/config/msgVpns" method: POST user: "" password: "" headers: Content-Type: "application/json" body: '' body_format: json force_basic_auth: yes status_code: 200 return_content: yes register: result ignore_errors: True retries: 3 delay: 1 - name: Error in VPN Creation? debug: var: result.json.meta.error.status when: result.json.meta.responseCode != 200
Three tasks are defined for each configuration object:
Load the variables for the task and compose the SEMP request body using Jinja2 templates (more on that in the next sub-section)
Send the SEMP POST request to the broker to create the configuration object
Verify if there was any error in the object creation by checking if the error code was 200 or not.
Templates
In order to ensure that the SEMP request body is composed dynamically from the variables specified, in the format required for the POST operation, the sample makes use of Jinja2 templating. The template JSON body for each of the different SEMP operations is defined in the directory templates/. The first task in the task-set is to load the appropriate template, replace the variables in the template, and create the SEMP request body under the files/ directory.
Once the SEMP request body is created, it is executed using the Ansible URI module and output is checked in the following tasks.
Inventory
The Ansible inventory contains the details of the hosts against which the playbooks are to be run – in our case, these are Solace brokers we want to create configurations in and appropriate management user details for access.
[solace] sgdemo mgmt_host=192.168.42.11 mgmt_port=80 semp_username=ansible semp_password=ansible
Running the Ansible playbook for Solace:
Pre-requisites
Install Ansible.
The host running the samples should have network connectivity to the management IP of the Solace broker.
A Management user must be created on the Solace broker and given a global-access-level of read-write.
Checking Out and Building
To check out the project and build it, do the following:
Clone this GitHub repository.
Enter cd solace-ci-cd-demo.
Configuration
Edit the inventory.ini file to specify the Solace brokers on which the messaging environment is to be created. You can create one or more host groups against which the Ansible playbook will be run.
[solace] sgdemo mgmt_host=192.168.42.11 mgmt_port=80 semp_username=ansible semp_password=ansible
Edit the configuration files: The configuration for Solace environments to be created is specified in vars/solace-env.yml. Edit the configuration objects as necessary. The current version of the sample supports the creation of:
A single message-vpn
One or more client profiles within the message-vpn
One or more ACL profiles within the message-vpn
One or more Client Usernames within the message-vpn
One or more Queues within the message-vpn, with topic subscriptions on these queues
Running the Sample
In order to run the Ansible playbook, use: ansible-playbook create-solace-vpn.yml -i inventory.ini
Summary
In this blog post, I have provided a quick overview of how you can use Ansible to automate common configuration management tasks using Solace’s SEMP API. You can use this sample as a starting point for your CI/CD automation, extending as necessary for your use case.
After the CI automation using Ansible, I also provide details of how you can integrate Ansible with a Jenkins job for end-to-end pipeline automation. Refer to the GitHub project documentation for more details on how you can set this up.
Please feel free to leave me any comments regarding this example, or leave comments for the entire community to get involved in. If you have any issues, check the Solace community for answers to common issues seen.
Further Reading:
Solace – Getting Started with SEMP
Ansible Documentation
Solace – SEMP API Reference
The post Automating Solace configuration management using SEMP and Ansible appeared first on Solace.
Automating Solace configuration management using SEMP and Ansible published first on https://jiohow.tumblr.com/
0 notes
Text
Cumulus Networks launches the industry’s first open source and fully packaged automation solution — making open networking easier to deploy and manage and enabling infrastructure-as-code models
Today, Cumulus Networks is announcing the release of its production-ready automation solution for organizations moving towards fully automated networks in order to take advantage of infrastructure-as-code deployment models.
At the forefront of the networking industry, we see our customers caught in the shifting tides as the modern data center moves toward fully automated networking. As they look to take advantage of innovative technology like 5G, cloud, IoT and more, organizations are looking to innovative networking deployments that incorporate new ways of thinking about automation like infrastructure-as-code, CI/CD and more. As network traffic continues to grow at an exponential rate, organizations are left with infrastructure that is harder to manage and deploy. Bogged down by the cost and time it takes to build out bits and pieces of fully automated solutions, these organizations are in need of a solution to help them innovate their networks at the speed business demands.
Cumulus is now offering the first open source, out-of-the-box, robust, end-to-end automated configuration and testing solution using Ansible. Customers no longer have to piece together their network automation from disparate and untested scripts and proof-of-concept playbooks. Cumulus is offering a framework for an elegant push-button solution for those looking for cutting-edge industry automation while reducing operational overhead. This suite of automation and testing includes:
A fully populated variables file object model
Complete Jinja2 templates
Ansible playbooks and a full battery of network validation tests enabling continuous integration (CI)
The complete framework for a tangible “infrastructure-as-code” deployment
Utilizing Ansible core modules without the need for any add-ons or plugins
Taking the next step in network automation: Infrastructure-as-code and CI/CD
Beyond basic automation of configurations, there are various advanced methodologies that companies are turning to for efficiency and rapid scale: Infrastructure-as-code and CI/CD. Infrastructure-as-code is the concept of centralizing your infrastructure so you can use tried and tested software development workflows on them, or in other words: thinking about your network configuration (your “infrastructure”) as software code. Then, following the software development model, the code gets built and produces a working executable that users then run. In the case of networking, the output from building the infrastructure code needs to be valid working configurations that ultimately get deployed to the devices. How one actually implements or converts their infrastructure to code is the challenging part.
There are various ways to implement an infrastructure-as-code network, all of which are dependent on the automation engine that’s used to deploy it. Determining how to implement or store the infrastructure-as-code is normally one of the first steps in the automation journey.
In the case of the Cumulus example, the final configuration that exists on the network devices is rendered by Ansible, during deployment, based on the jinja2 config templates, variables and Ansible role assignments. Final network configuration files are included in the demo repos for quick reference, but they are not used as the source of the configuration that is deployed to the devices. The code that actually represents the infrastructure isn’t just backups of the config files that we modify individually and deploy. It exists as a much more organized and scalable data model that uses templates and config files.
Like any good code, it is well tested — which is another opportunity for simplified advanced networking. The practice of always testing your code is called “continuous integration” or “CI” and it’s a key component to infrastructure-as-code as well as our thinking about the “right way” to do network automation. This new solution creates the framework for an elegant CI/CD solution, something that was previously not within reach of most organizations.
The Cumulus automation solution includes automated tests using the Cumulus NetQ telemetry and validation platform. Any code that is committed to the repository automatically triggers the creation of a virtual lab environment with Cumulus VX and we run a collection of tests against our network, including validating MTUs, end-to-end ping testing, and verifying that all routing sessions come up as expected. The result? Instant access to CI, and the foundation laid for further automation with CD.
Putting the code in action
Cumulus will also be releasing additional scenarios based on integrating common network services like SNMP, streaming telemetry and 802.1x.
These playbooks and CI tests are living configurations that are updated and improved based on feedback from real-world deployments. They’re used every day by the Cumulus consulting services organization who design and automate customer networks. Any Cumulus user can take these configurations and deploy them on their production network with confidence that both the automation — as well as the resulting configurations — are tested, validated and reliable. No longer will you spend time cobbling together examples that may not fit your use case.
Some organizations are suffering from the lack of tools and lack of real world examples needed to train their teams to perform network automation. With Cumulus’ production-ready automation, organizations have a “copy and paste” solution and can essentially hit the ground running with automation without having to train up a team or spend time piecing together configurations. Automated configurations not only save your admins from headaches, but more importantly, it reduces the possibility for network downtime and failure.
In addition, Cumulus is rolling out an update to Cumulus in the Cloud, their self-service customer demo environment, providing:
A full spine and leaf network with Cumulus Linux, including servers running Ubuntu and all nodes integrated with Cumulus NetQ, all ready to use in under five-minutes.
Deployable production-ready demos.
A unique Cumulus NetQ 2.0 CLI and GUI instance for your demo environment.
In the next few weeks additional enhancements to the Cumulus in the Cloud platform will include:
Self-paced Cumulus Linux training
Custom lab topologies
Additional features including SNMP, streaming telemetry and 802.1x.
Get Started Today
Try out all of our production-ready automations with a brand new user interface in Cumulus in the Cloud with just a few clicks to deploy. Available now in GitLab and through Cumulus.
Cumulus Networks launches the industry’s first open source and fully packaged automation solution — making open networking easier to deploy and manage and enabling infrastructure-as-code models published first on https://wdmsh.tumblr.com/
0 notes