#create bootable usb without formatting
Explore tagged Tumblr posts
Visit Tumblr Blog
Explore Tumblr blogs with no restrictions, modern design and the best experience.
Last Seen Tumblr Blogs


Fun Fact
In Q3 of 2020, 31% of US users access the Tumblr app daily.
Text
Ventoy for Windows
In today’s fast-paced tech world, having a bootable USB drive is essential for software installation, system recovery, and troubleshooting. Traditionally, creating a bootable USB required formatting the drive and using dedicated software to burn an ISO file onto it. However, with the arrival of Ventoy, this process has become simpler, faster, and more flexible. Ventoy is a free and open-source…
#boot multiple iso usb#create bootable usb without formatting#download ventoy#ventoy#ventoy bootable usb#ventoy download#ventoy usb
0 notes
Text
Installing Kali Linux on a USB Stick: A Step-by-Step Guide
If you want a portable, powerful cybersecurity toolkit you can carry in your pocket, installing Kali Linux on a USB stick is the perfect solution. With Kali on a USB, you can boot into your personalized hacking environment on almost any computer without leaving a trace — making it a favorite setup for ethical hackers, penetration testers, and cybersecurity enthusiasts.

In this guide, we'll walk you through how to install Kali Linux onto a USB drive — step-by-step — so you can have a portable Kali environment ready wherever you go.
Why Install Kali Linux on a USB?
Before we dive into the steps, here’s why you might want a Kali USB:
Portability: Carry your entire hacking setup with you.
Privacy: No need to install anything on the host machine.
Persistence: Save your settings, files, and tools even after rebooting.
Flexibility: Boot into Kali on any system that allows USB boot.
There are two main ways to use Kali on a USB:
Live USB: Runs Kali temporarily without saving changes after reboot.
Persistent USB: Saves your files and system changes across reboots.
In this article, we’ll focus on setting up a Live USB, and I'll also mention how to add persistence if you want. and if you seek knowledge about kali linux you can visit our website any time
Website Name : Linux Tools Guide
What You’ll Need
✅ A USB drive (at least 8GB; 16GB or more recommended if you want persistence). ✅ Kali Linux ISO file (download it from the official Kali website). ✅ Rufus (for Windows) or Etcher/balenaEtcher (for Mac/Linux/Windows). ✅ A computer that can boot from USB.
Step 1: Download the Kali Linux ISO
Go to the Kali Linux Downloads page and grab the latest version of the ISO. You can choose between the full version or a lightweight version depending on your USB size and system requirements.
Tip: Always verify the checksum of the ISO to ensure it hasn't been tampered with!
Step 2: Insert Your USB Drive
Plug your USB stick into your computer. ⚠️ Warning: Installing Kali onto the USB will erase all existing data on it. Backup anything important first!
Step 3: Create a Bootable Kali Linux USB
Depending on your operating system, the tool you use may vary:
For Windows Users (using Rufus):
Download and open Rufus (Get Rufus here).
Select your USB drive under Device.
Under Boot selection, choose the Kali Linux ISO you downloaded.
Keep the Partition scheme as MBR (for BIOS) or GPT (for UEFI) based on your system.
Click Start and wait for the process to complete.
For Mac/Linux Users (using balenaEtcher):
Download and open balenaEtcher (Get Etcher here).
Select the Kali ISO.
Select the USB drive.
Click Flash and wait until it's done.
That's it! You now have a Live Kali USB ready.
Step 4: Boot Kali Linux from the USB
Restart your computer with the USB plugged in.
Enter the BIOS/UEFI settings (usually by pressing a key like F12, Esc, Del, or F2 right after starting the computer).
Change the boot order to boot from the USB first.
Save changes and reboot.
You should now see the Kali Linux boot menu! Select "Live (amd64)" to start Kali without installation.
(Optional) Step 5: Adding Persistence
Persistence allows you to save files, system changes, or even installed tools across reboots — super useful for real-world usage.
Setting up persistence requires creating an extra partition on the USB and tweaking a few settings. Here's a quick overview:
Create a second partition labeled persistence.
Format it as ext4.
Mount it and create a file /persistence.conf inside it with the content: cppCopyEdit/ union
When booting Kali, choose the "Live USB Persistence" option.
Persistence is a little more technical but absolutely worth it if you want a real working Kali USB system!
Troubleshooting Common Issues
USB not showing up in boot menu?
Make sure Secure Boot is disabled in BIOS.
Ensure the USB was properly written (try writing it again if necessary).
Kali not booting properly?
Verify the ISO file integrity.
Try a different USB port (preferably USB 2.0 instead of 3.0 sometimes).
Persistence not working?
Double-check the /persistence.conf file and make sure it's correctly placed.
Conclusion
Installing Kali Linux onto a USB stick is one of the smartest ways to carry a secure, full-featured hacking lab with you anywhere. Whether you’re practicing ethical hacking, doing security audits, or just exploring the world of cybersecurity, a Kali USB drive gives you power, portability, and flexibility all at once.
Once you’re set up, the possibilities are endless — happy hacking! 🔥
2 notes
·
View notes
Text
Linux Images
In the context of Linux, different types of disk images serve various purposes. Here's an overview of the main types you've mentioned:
1. DVD Image
Purpose: A DVD image, typically in .iso format, is a complete digital copy of the contents of a DVD. It can be used for:
Installation: A DVD image of a Linux distribution (e.g., Ubuntu, Fedora) contains the installation files and packages needed to install the operating system. It is typically burned to a physical DVD or used as a bootable USB.
Live Environment: Some DVD images are made bootable, allowing users to run Linux directly from the image without installing it to the hard drive.
Distribution: A DVD image may also include additional software packages or documentation, intended to be distributed to users on physical media.
2. ISO Image
Purpose: An ISO image (usually with a .iso extension) is a disk image format that is an exact replica of a file system, typically used for distributing software or operating systems. It can be used for:
OS Installation: Like DVD images, ISO images are widely used for Linux OS installation. They are typically bootable and can be written to a USB stick, burned to a DVD, or mounted directly on a virtual machine.
Software Distribution: Many software applications are distributed in ISO image format because it preserves the structure of the software package.
Backup/Archival: ISO images can be used to store large data sets or backup an entire file system in an easily portable format.
Virtual Machines: In virtualization environments like VirtualBox or VMware, ISO images are often used to install guest operating systems.
3. AArch Image (ARM Architecture Image)
Purpose: An AArch image refers to an operating system image or installation media designed for ARM architecture (AArch64 for 64-bit or AArch32 for 32-bit). ARM is a CPU architecture used in many mobile devices, embedded systems, and some servers. The image typically contains:
ARM-specific binaries: Unlike images for x86 architecture, these contain code compiled to run on ARM processors.
OS Installation: Similar to ISO or DVD images, AArch images are used to install Linux on ARM-based systems, such as Raspberry Pi, BeagleBoard, or some ARM-based servers.
Embedded Systems: These images are often used in embedded Linux environments where the CPU architecture is ARM-based.
Cross-platform Development: Developers may use AArch images to test or deploy Linux on ARM-based hardware.
4. Boot Images
Purpose: A boot image is a smaller disk image, usually containing the minimum set of files necessary to start a system (i.e., to boot it). It is critical in the boot process, whether for physical machines or virtual machines. Boot images are:
Boot Loader: They often contain boot loaders like GRUB or Syslinux, which are responsible for loading the Linux kernel into memory and starting the operating system.
Live Systems: Some boot images are part of live environments (e.g., rescue disks or live Linux distributions), allowing you to boot into a fully operational system without installation.
Recovery Tools: Boot images may contain diagnostic tools, recovery utilities, or system repair tools for system administrators or users to troubleshoot and recover systems.
Kernel and Initial RAM Disk (initrd): The boot image often includes the Linux kernel and an initial ramdisk (initrd) or initial ramfs, which is used to load the necessary drivers and mount the root filesystem at boot time.
Minimal Installations: Some boot images may contain a very basic Linux environment used for troubleshooting or for creating a minimal installation framework.
Summary of Purposes:
DVD Image
Full operating system distribution, often for installation on physical media, live
environments, or large software packages.
ISO Image
A generic disk image of a file system, used for distributing OS installations, software,
virtual machines, and backups.
AArch Image
OS images built for ARM architecture (AArch64/32), used for ARM-based devices like
Raspberry Pi or ARM servers.
Boot Image
Small image to facilitate the boot process, containing boot loaders, Linux kernels,
recovery utilities, or minimal environments for system repair or live usage.
Each image type has a specific role in the Linux ecosystem, whether for installation, recovery, or system booting.
for more details visit www.qcsdclabs.com
0 notes
Text
How to Retrieve Lost Videos from SD Card Easily
It is understandable to fear losing priceless videos, whether they got accidentally deleted from the gallery or misplaced when you moved to a different device! However, only some of the apps you come across will genuinely assist you in recovering your erased videos. With the help of the video recovery app, you may quickly recover files that got inadvertently erased, lost because of system failures, or damaged by hardware problems. This video restore software solution supports documents, images, movies, and other file types. With the help of a video recovery tool, you may quickly recover various data types.
Part 1: Can You Recover Deleted Videos from SD Card on Your Own?
Videos you remove from your computer's SD card or any other device, such as a camera or smartphone, are outside the trash or recycle bin. That's why you cannot simply restore them using your recycle bin. Then, you might wonder if recovering a deleted video on your SD card is possible.
Yes, you can get back deleted videos from your SD card using reputable video restore software, even though it might appear hard initially. Rapid technological advancement has given us many recovery possibilities while resolving our problems. As a result, you can proceed with your memory card video recovery without expert support. Contact a data recovery agency in certain situations to find out if you can retrieve your priceless data. For instance, you might need assistance recovering them if your SD card is seriously damaged.
But as soon as you notice the video loss, stop using the SD card to ensure data recovery.
Please note that recovery is possible only when the data isn't overwritten.
Part 2: How To Recover Lost Videos from SD Cards Without Software
Recover deleted videos from SD card for free via Backup and Restore
One of the most effective ways to recover data from an SD card without using a third-party software recovery tool is through backups. If you've backed up your deleted video files, you're in luck, as restoring them becomes straightforward, helping you avoid data loss entirely.
Here are the steps to restore deleted videos from an SD card using backups:
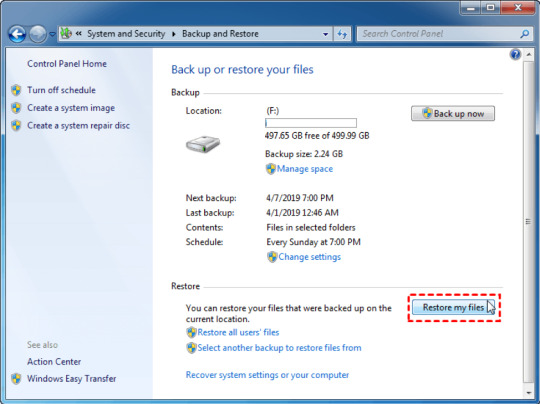
Step 1: Connect the external SD card to a computer and press the Win + I keys to open Settings.
Step 2: Click "Update & Security" and then access the "Backup" option.
Step 3: Within the Backup & Restore tab, select "Restore My Files."
2. Easily get back permanently deleted or lost videos from SD card for free with Wondershare Recoverit Enhanced Video Recovery.
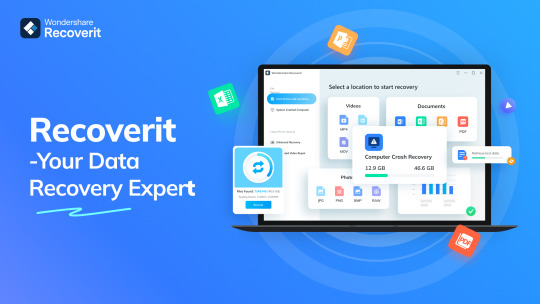
Wondershare Recoverit stands out as a comprehensive video recovery solution. Its Enhanced Video Recovery feature takes file retrieval to a new level. With support for over 2000 storage devices and 1000 file formats, it boasts an impressive success rate in handling 500+ real-life data loss scenarios, including formatting, system crashes, and virus attacks.
Key Features:
All-in-One Data Recovery: It offers a broad spectrum of file format compatibility. Its success extends to various data loss scenarios, ensuring a comprehensive recovery experience.
Enhanced Photo & Video Recovery: Specialized in rescuing lost or hidden videos and photos, Recoverit can restore Ultra HD, 4K, and 8K content while maintaining their integrity. It supports multiple formats and works seamlessly with popular camera brands.
Video Scenario Expansion: It supports retrieving surveillance and car camera videos, addressing a more comprehensive range of user needs.
Corrupted Video Repair: Offering both quick and advanced repair modes, Recoverit mends corrupted, truncated, and broken videos, enhancing the quality of the repair process.
System Crashed Computer Recovery: It creates a bootable USB drive to access data on a crashed computer. This feature prioritizes user convenience, speed, and security.
Here's a step-by-step guide on recovering removed files from your SD card using Wondershare Recoverit Data Recovery Software on a Windows computer:

Step 1: Download the Wondershare Recoverit Data Recovery Software.
Select Your SD card to ensure it is connected to your computer. Select your SD memory card from the disk list displayed in the software and click the "Start" button to initiate the process.

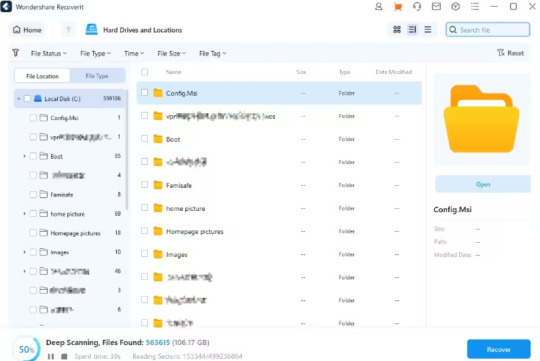
Step 2: Scan the SD Memory Card on Recoverit.
SD Card Recovery Software will commence scanning your SD card. The scanning process might take several minutes to complete.

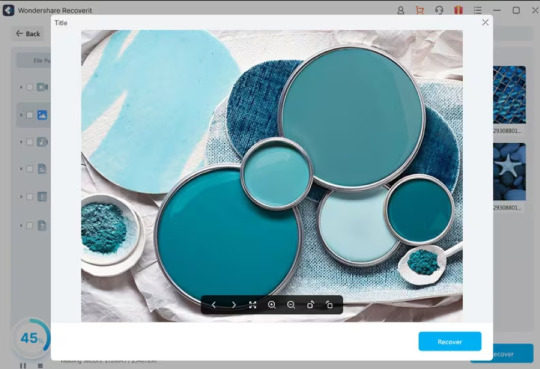
Step 3: Preview and Recover Deleted Data
Once the scan is over, you can review all the recovered data and files. Preview the recovered files, such as images, videos, etc. Pick the files you want to retrieve and click the "Recover" button to restore them.

Tips: Avoid saving recovered files onto the same SD card where you previously stored the lost data. Doing so could result in data loss or overwrite the existing data. A safe external storage device is advisable to keep the recovered files securely.
Part 3: Tips for Preventing Video Loss on SD Cards
While SD cards are reliable for file storage, they are not immune to potential problems like physical damage or corruption. Thus, you must take proactive measures to safeguard your files and be prepared in case of any unexpected data loss. Here are some tips:
Back-Up Important Media Files: Instead of relying solely on your SD card, create copies of your media files and store them on alternative mediums like an external hard drive or cloud-based services such as Google Drive or Dropbox.
Appropriate Storage for SD Cards: If you own multiple SD cards, consider investing in a case to organize and protect them. Ensure your SD cards are stored safely, without excessive heat or moisture.
Safely Eject from Your Computer: Always use the proper procedure to eject your SD card from your computer. Removing it without proper ejection can disrupt the read/write process, potentially leading to file corruption.
Stop Using the Card if Errors Appear: If you encounter errors or issues with your SD card, cease using it immediately. Retrieve any essential files from the card promptly. Errors signal potential card failure, and continued use may result in significant data loss.
Conclusion
So, we saw, losing valuable videos can be distressing, but with the right approach, recovery is possible. Utilizing backups or advanced tools like Wondershare Recoverit can effectively retrieve deleted videos from SD cards. Its Enhanced Video Recovery feature and comprehensive data retrieval capabilities make it a standout choice. Also, safeguarding your files by implementing preventive measures, such as regular backups and safe storage practices, is crucial. For a reliable and hassle-free recovery tool, consider using Wondershare Recoverit—a powerful solution worth recommending.
0 notes
Text
How to Retrieve Lost Videos from SD Card Easily
It is understandable to fear losing priceless videos, whether they got accidentally deleted from the gallery or misplaced when you moved to a different device! However, only some of the apps you come across will genuinely assist you in recovering your erased videos. With the help of the video recovery app, you may quickly recover files that got inadvertently erased, lost because of system failures, or damaged by hardware problems. This video restore softwaresolution supports documents, images, movies, and other file types. With the help of a video recovery tool, you may quickly recover various data types.
Part 1: Can You Recover Deleted Videos from SD Card on Your Own?
Videos you remove from your computer's SD card or any other device, such as a camera or smartphone, are outside the trash or recycle bin. That's why you cannot simply restore them using your recycle bin. Then, you might wonder if recovering a deleted video on your SD card is possible.
Yes, you can get back deleted videos from your SD card using reputable video restore software, even though it might appear hard initially. Rapid technological advancement has given us many recovery possibilities while resolving our problems. As a result, you can proceed with your memory card video recovery without expert support. Contact a data recovery agency in certain situations to find out if you can retrieve your priceless data. For instance, you might need assistance recovering them if your SD card is seriously damaged.
But as soon as you notice the video loss, stop using the SD card to ensure data recovery.
Please note that recovery is possible only when the data isn't overwritten.
Part 2: How To Recover Lost Videos from SD Cards Without Software
Recover deleted videos from SD card for free via Backup and Restore
One of the most effective ways to recover data from an SD card without using a third-party software recovery tool is through backups. If you've backed up your deleted video files, you're in luck, as restoring them becomes straightforward, helping you avoid data loss entirely.
Here are the steps to restore deleted videos from an SD card using backups:
Step 1: Connect the external SD card to a computer and press the Win + I keys to open Settings.
Step 2: Click "Update & Security" and then access the "Backup" option.
Step 3: Within the Backup & Restore tab, select "Restore My Files."

Easily get back permanently deleted or lost videos from SD card for free with Wondershare Recoverit Enhanced Video Recovery.
Wondershare Recoverit stands out as a comprehensive video recovery solution. Its Enhanced Video Recovery feature takes file retrieval to a new level. With support for over 2000 storage devices and 1000 file formats, it boasts an impressive success rate in handling 500+ real-life data loss scenarios, including formatting, system crashes, and virus attacks.
Key Features:
All-in-One Data Recovery: It offers a broad spectrum of file format compatibility. Its success extends to various data loss scenarios, ensuring a comprehensive recovery experience.
Enhanced Photo & Video Recovery: Specialized in rescuing lost or hidden videos and photos, Recoverit can restore Ultra HD, 4K, and 8K content while maintaining their integrity. It supports multiple formats and works seamlessly with popular camera brands.
Video Scenario Expansion: It supports retrieving surveillance and car camera videos, addressing a more comprehensive range of user needs.
Corrupted Video Repair: Offering both quick and advanced repair modes, Recoverit mends corrupted, truncated, and broken videos, enhancing the quality of the repair process.
System Crashed Computer Recovery: It creates a bootable USB drive to access data on a crashed computer. This feature prioritizes user convenience, speed, and security.
Here's a step-by-step guide on recovering removed files from your SD card using Wondershare Recoverit Data Recovery Software on a Windows computer:

Step 1: Download the Wondershare Recoverit Data Recovery Software.
Select Your SD card to ensure it is connected to your computer. Select your SD memory card from the disk list displayed in the software and click the "Start" button to initiate the process.

Step 2: Scan the SD Memory Card on Recoverit.
SD Card Recovery Software will commence scanning your SD card. The scanning process might take several minutes to complete.
Step 3: Preview and Recover Deleted Data
Once the scan is over, you can review all the recovered data and files. Preview the recovered files, such as images, videos, etc. Pick the files you want to retrieve and click the "Recover" button to restore them.
Tips: Avoid saving recovered files onto the same SD card where you previously stored the lost data. Doing so could result in data loss or overwrite the existing data. A safe external storage device is advisable to keep the recovered files securely.
Part 3: Tips for Preventing Video Loss on SD Cards
While SD cards are reliable for file storage, they are not immune to potential problems like physical damage or corruption. Thus, you must take proactive measures to safeguard your files and be prepared in case of any unexpected data loss. Here are some tips:
Back-Up Important Media Files: Instead of relying solely on your SD card, create copies of your media files and store them on alternative mediums like an external hard drive or cloud-based services such as Google Drive or Dropbox.
Appropriate Storage for SD Cards: If you own multiple SD cards, consider investing in a case to organize and protect them. Ensure your SD cards are stored safely, without excessive heat or moisture.
Safely Eject from Your Computer: Always use the proper procedure to eject your SD card from your computer. Removing it without proper ejection can disrupt the read/write process, potentially leading to file corruption.
Stop Using the Card if Errors Appear: If you encounter errors or issues with your SD card, cease using it immediately. Retrieve any essential files from the card promptly. Errors signal potential card failure, and continued use may result in significant data loss.
Conclusion
So, we saw, losing valuable videos can be distressing, but with the right approach, recovery is possible. Utilizing backups or advanced tools like Wondershare Recoverit can effectively retrieve deleted videos from SD cards. Its Enhanced Video Recovery feature and comprehensive data retrieval capabilities make it a standout choice. Also, safeguarding your files by implementing preventive measures, such as regular backups and safe storage practices, is crucial. For a reliable and hassle-free recovery tool, consider using Wondershare Recoverit—a powerful solution worth recommending.
0 notes
Text
How to Move Windows to Another Drive [2024 Updated] - Technology Org
New Post has been published on https://thedigitalinsider.com/how-to-move-windows-to-another-drive-2024-updated-technology-org/
How to Move Windows to Another Drive [2024 Updated] - Technology Org
Whether you’ve snagged a new SSD or aim to switch to a roomier drive, the real question is “How to move windows to another drive?” But worry not. This guide shares the complete knowledge of transferring Windows, aka “cloning,” to a new drive with three methods without losing data.
We’ve also shared the prep steps in the drive cloning process and dished out insights on the effort and time each method demands, empowering you to make a savvy decision. So, let’s transfer Windows to a new hard drive now!
Part 1: When Do You Need to Move Windows to Another Drive?
You may need to transfer Windows to new hard drive, such as a larger one, to fix the insufficient disk space issue. Or want to move Windows to another drive, like an SSD, due to the advantages it offers over HDDs, such as:
Ensure a notably faster and more efficient startup with quick data reading and writing speeds.
Offers faster data access speeds, providing quicker application loading and heightened system responsiveness.
Have no moving parts, thus reducing the risk of mechanical failures.
Provide shock resistance for increased durability.
Contributes to energy efficiency due to lower power consumption.
Part 2: Preparation Before Moving Windows to Another Drive
Before you move Windows 11 to another drive or downgrade to an older OS version, preparing beforehand is wise to prevent boot errors. Here’s what you need to do:
Backup Your Data – Back up your valuable data on the target disk, as the Windows migration involves rewriting the entire disk.
Get a Larger Drive – Choose a new disk with more capacity than your current drive and keep 30% to 40% of free space on the system disk. This is to maintain high-level computer performance and stability.
Set Up the New Disk – Install the new disk using a SATA Cable to your PC, then initialize it to MBR or GPT (the same disk type as the source OS drive). If the target drive is old, clear all existing data and partitions.
Choose an OS Migration Tool – Select an efficient tool according to your technical knowledge to move Windows installation to another drive.
Part 3: Three Methods to Move Windows to Another Drive
We’ve delved into three ways to move Windows 10 to another drive. You can either use a cloning tool to copy the OS from an HDD to an SSD or create a system image and recover it on an SSD. Another choice is to go for the easiest route with a third-party Partition Manager tool. Check out the detailed steps below, which we’ve shared in detail for each method:
Method 1: 4DDiG Partition Manager
Time
25 -30 minutes
Ease of Use
Beginner-friendly
Tools
4DDiG Partition Manager and your new drive
Drawback
Priced at $9.9 on Christmas Sale
For beginners, the top choice is 4DDiG Partition Manager, which provides a one-click solution to move Windows installation to another drive without reinstalling the system. This versatile tool also efficiently clones your entire hard drive for seamless data backup, so there is no need to prepare a bootable USB. More than just that, it provides many more benefits, such as:
Recover deleted, repair RAW, and restore formatted partitions.
Repairs bad sectors and offers comprehensive disk care.
Resize, merge, split, create, delete, and format partitions to optimize disk space.
Transfer windows to new hard drive without losing any data.
Follow the instructions below to move Windows 11 to another drive with the help of this tool:
Step 1: Install the tool on your computer and connect the new drive to your PC.
Step 2: Launch the tool, click “Start,” and choose the new drive as the target disk.
Step 3: Confirm the source disk (selected by default) and acknowledge the overwrite warning by clicking “Sure” and “Start.”
Step 4: Based on the drive size, it will take some time to transfer Windows to new hard drive. You can check the migration speed, elapsed time, and related data in the meanwhile. Press “Finish” when the OS transfer is complete.
Method 2: Windows System Image Tool
Time
40-50 minutes
Tools
Windows inbuilt System Image tool, bootable USB, and new drive
Ease of Use
Medium
Cost
Free
Drawbacks
Time-consuming backup and setup; carries a risk of data loss or corruption.
For professional users who don’t mind the manual steps, another effective method involves using a Windows System Image to move Windows 10 to another drive. Start by creating a system image backup, then a recovery USB, and finally, restore the system image to a new drive. Here’s how to move Windows to another drive with detailed steps using the Windows System Image tool:
Step 1: Create a System Image Backup
Connect an empty external drive (SSD or HDD) to your computer.
Open “Control Panel” and head to “System and Security.”
Choose “Backup and Restore,” select “Create a system image,” then tap “Start backup.”
Choose a destination drive with enough space for the system image backup and click “Next.”
Opt for either “Let Windows choose” or “Let me choose” to select what to backup. Click “Next.”
Finally, tap “Save settings and run backup” to generate the system image.
Step 2: Create a Recovery USB
Plug in a USB to your computer.
In the Control Panel, type “ Create a recovery drive” and click on it to open.
Mark “Back up system files to the recovery drive.” Hit “Next.”
Choose the USB as the target, click “Next,” and follow the onscreen instructions to complete the process.
Step 3: Move Windows to Another Drive
Turn off your computer, open its case, and remove the old hard drive.
Connect the recovery USB and external drive to your PC with the system image backup instead.
Reboot the system, press F2/Del for BIOS, and set the PC to boot from the USB recovery drive.
On the “Windows Setup” screen, click “Next,” set language, keyboard, etc., then click “Next.”
Head to “Repair your computer” and choose “Troubleshoot.”
Select “Advanced options,” then tap“System Image Recovery.”
The newest backup will appear; if it fails, pick the right one from the external drive and click “Next.”
Check “Format and repartition disks” and click “Next.”
Confirm by clicking “Yes” and “Finish” to move Windows installation to another drive.
Wait for the system recovery to finish, reboot, and Windows will start automatically.
Method 3: Clonezilla
Time
4-5 hours for a 1TB drive
Tools
Clonezilla, bootable USB, and external drive
Ease of Use
Difficult
Cost
Free
Drawbacks
Time-consuming; Requires advanced tech skills; Cloning can fail due to bad disk sectors.
Another option to move Windows 11 to another drive is by cloning the entire disk. You can do this through an open and free-source cloning tool like Clonezilla. It will clone the OS, applications, and data from your disk, so you don’t need a backup. You can also use Clonezilla as a backup tool to clone your disk data before using the System Image or 4DDiG tool. Here’s how to transfer Windows to new hard drive with Clonezilla:
Step 1: Reduce Partition Size (Optional)
You must reduce the partition size if you’re using Clonezilla to move Windows to another drive that is smaller. But if the destination drive is equal to or larger than the source drive, skip this step. Here’s what to do to reduce partition size:
Press the “Windows + R” keys and type in “diskmgmt.msc.” Press Enter to open Disk Management.
Right-click the main volume (C:) and select “Shrink Volume.”
Adjust the volume size to shrink and tap “Shrink.”
After shrinking, you’ll see unallocated space. Right-click on the unallocated space and select “New Simple Volume” to create a new partition or leave it unallocated for the cloning process.
Step 2: Download Clonezilla and Prepare a Bootable USB
Visit the Clonezilla download page, choose the ISO option, and click “Download.”
Visit the Rufus website and download the latest version of the tool to create a bootable USB.
Launch the tool, select your USB, click “Select,” choose the Clonezilla ISO, click “Open,” and hit Start.
Step 3: Clone Windows to Another Drive
Connect your new drive to your computer.
Boot your computer using the bootable USB. When Clonezilla loads, hit “Enter” for default settings.
Choose your language, select “Don’t touch keymap,” and start Clonezilla.
Opt for “Beginner mode,” pick “disk_to_local_disk local_disk_to_local_disk_clone,” and press “Enter.”
Choose the source and target drives and decide whether to check or skip the source file system.
Choose “reboot/shut down/etc” when everything is finished.
Confirm the cloning process by typing Y thrice. Press “Enter” each time. This is to confirm everything’s good with the cloning process, data overwrite in cloning, and getting the boot loader cloned (for a bootable Windows drive). Next, the software will move Windows 10 to another drive by cloning.
Conclusion
In our comprehensive guide on how to move Windows to another drive, we’ve covered three methods catering to diverse technical skills. If you’re not tech-savvy, the ultimate choice is 4DDiG Partition Manager.
This user-friendly tool is a time and effort-saver, offering a one-click Windows OS migration to SSD sans the hassle of reinstalling. It’s also efficient at cloning your entire hard drive for data backup, eliminating the need for a bootable USB.
#2024#applications#back up#backup#Christmas#clone#comprehensive#computer#control panel#data#data backup#data loss#delete#efficiency#energy#energy efficiency#Featured technology news#GPT#hard drive#hdd#how#how to#insights#ISO#it#keyboard#language#loader#management#merge
0 notes
Text
How to make a Live Boot USB with Manjaro Linux and BalenaEtcher
Hey folks, I am feeling a wee better and wanted to write a quick tutorial post for y'all. I am sick of Ubuntu so tonight I am switching to Manjaro.
Manjaro is a user-friendly and open-source Linux distribution that has gained a lot of popularity in recent years. It is based on Arch Linux, which is known for its cutting-edge software and rolling release model. Manjaro offers a stable and reliable platform that is perfect for Linux programmers. In this article, we'll explore why Manjaro is a good distro for Linux programmers.

A live USB is a type of bootable USB drive that allows you to run an operating system directly from the USB drive without installing it on your computer. This is useful if you want to test out a new operating system or if you need to use a different operating system on multiple computers. In this article, we'll show you how to create a live USB with BalenaEtcher and Manjaro.
Prerequisites
Before you start, make sure you have the following things:
A computer with a USB port
A USB drive with at least 8 GB of storage
The latest version of BalenaEtcher (https://balena.io/etcher/)
The latest version of Manjaro (https://manjaro.org/download/)
Step 1: Download BalenaEtcher and Manjaro
The first step is to download the latest version of BalenaEtcher and Manjaro.
Download BalenaEtcher from the official website (https://balena.io/etcher/).
Download the latest version of Manjaro from the official website (https://manjaro.org/download/).
Step 2: Insert the USB Drive
Insert the USB drive into your computer. Make sure the USB drive has at least 8 GB of storage.
Step 3: Open BalenaEtcher
Open BalenaEtcher on your computer.

Step 4: Select the Manjaro ISO File
Click the "Select Image" button and select the Manjaro ISO file that you just downloaded.
Step 5: Select the USB Drive
Click the "Select Target" button and select the USB drive that you want to use for the live boot. Make sure you select the correct USB drive, as the data on the drive will be erased during the process.
Step 6: Start the Flashing Process
Click the "Flash!" button to start the flashing process. BalenaEtcher will format the USB drive, extract the Manjaro ISO image, and write it to the USB drive.
Step 7: Wait for the Flashing Process to Complete
Wait for the flashing process to complete. This may take a few minutes.
Step 8: Safely Remove the USB Drive
Once the flashing process is complete, safely remove the USB drive from your computer.
Step 9: Boot from the Live USB
Restart your computer and enter the boot menu. The key to enter the boot menu may vary depending on your computer, but it is usually F12, ESC, or a similar key. Select the USB drive from the boot menu and press enter to boot into Manjaro live environment.
Conclusion
That's it! You now have a live USB with Manjaro and you can try it out without installing it on your computer. You can also use this live USB to install Manjaro on your computer if you want to keep it permanently. BalenaEtcher is a user-friendly tool that makes it easy to create a live USB with Manjaro, and with this guide, you should be able to do it in no time. So go ahead and give it a try!
#linux tips#linux#manjaro#programming#programmers#live boot#bootable usb#tech tutorial#tutorial#linux tutorial#tutorials#technology#tech trends#best os#best linux distro#alternative#covid19#covid#techie
6 notes
·
View notes
Text
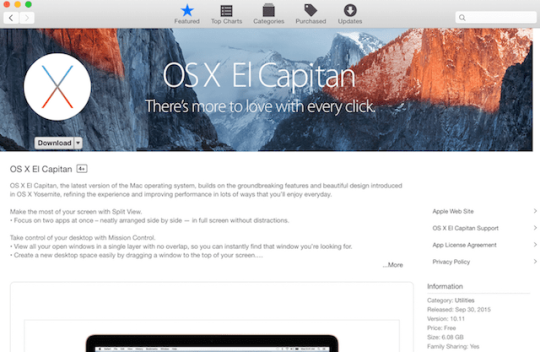
Download Installer Mac Os X El Capitan
Open virtualbox and click ‘New’ to create a new virtual machine with the following details: Name: El Capitan Type: Mac OS X Version: Mac OS X 10.11 El Capitan (64 bit) Click next, select 4GB of RAM, and next again. Select the El Capitan image that you have downloaded and unzipped as the disk image, and create the machine.
Download For Mac Os X El Capitan
Mac Os 10.11 Download
Install El Capitan. OK, now you can click that Continue button in the installer window. (If the installer isn’t running, go to your Applications folder and double click the Install OS X El. Working framework X El Capitan is as of now open for straightforward download and at present, this new change is known to all. This advantageous downloading opportunity is at present by and large grabbed excitedly by the submitted Mac owners as they can acknowledge benefits with the latest type of OS X presented.
Download El Capitan from the Mac App Store. Head over to your existing OS X environment running 10.9 or later and open the Mac App Store. Search for 'El Capitan' and click Download. The download is completely free if you're running OS X 10.9+. Wait for the download to finish (this could take some time). Format the USB Drive.
OS X El Capitan Installer. Official OS X El Capitan Installer from the Mac App Store. Un-archive the zip archive and you will get the app Installer. A bootable ISO or bootable USB can be made from this installer. Instructions on how to do that are on the Internet/Youtube.
Download El Capitan Mac OS X from scratch while upgrading the current Mac OS version The new Apple El Capitan supports two installation methods. As in the case of many other operating system installations, Apple El Capitan also provides an option to upgrade from your current OS version or the option to install the new download El Capitan Mac OS.
How ToHow to install Mac OS X El Capitan on PC using VirtualBox

Touted as #1 VPN in the world, ExpressVPN is now offering 49% off & an additional 3-months of service on its annual plans.
ExpressVPN is widely known as the fastest and most secure VPN in the industry. With over 3,000 servers in 90+ countries, it is capable to unblock all geo-blocked services including Netflix, Amazon Prime Video, HBO+, and BBC iPlayer.
ExpressVPN app is available for nearly all the devices including Windows, macOS, Android, iOS, browsers, Firestick, and gaming consoles.
Mac OS X El Capitan was released last year. The operating system boasts of great features and a streamlined user experience. Fortunately, this incredible operating system by Apple is available for download. But you are wondering why this information is relevant to you since you have a PC, not a Mac. Well, read on to learn how you can install Mac OS X El Capitan on PC without a Mac, using VirtualBox.
Virtual Box
VirtualBox is a virtualization software that enables an operating system to run as a program or application. VirtualBox allows operating systems to be installed on it, by creating a virtual machine.
Requirements to install Mac OS X El Capitan on PC
Download For Mac Os X El Capitan
The process of installing this operating system on PC requires VirtualBox. VirtualBox is free for download. You will also need the downloaded image file of the OS (Google drive file courtesy tactig.com). You will need an extraction software such as Winrar to extract the OS.
There are system requirements for this process. You need Windows 7 or a newer version of Windows. The BIOS of your PC ought to be virtualization enabled. There needs to be free disk space of at least 3GB.
Step-by-step Guide to install Mac OS X on PC using VirtualBox
Step 1: Install VirtualBox
If you do not have VirtualBox, download and install it from this link. The installation process should be easy. After downloading, click on the setup and follow the prompts as required.
Step 2: Extract Mac OS X El Capitan
The image file you downloaded from Google drive (downloaded image file of the OS) needs to be extracted using WinRAR. You will simply have to right click on the image file and select the option ‘Extract Here’.
Step 3: Open VirtualBox and create a Virtual Machine
This whole process is dependent on VirtualBox. Open the application and select ‘New‘. In this case, we will name the new machine ‘OS X El Capitan’. After naming the machine click ‘Next‘.
On the next window choose the amount of RAM you want for your virtual machine. The virtual machine will need at least 2GB RAM. After choosing the desired RAM click ‘Next’.
You will now be required to select the hard drive. You should check the option that states ‘Use existing virtual hard drive file’. The file you are referring to in this case is the OS X El Capitan image file, you extracted from the step 2, above.
Step 4: Edit the new virtual machine
Mac Os X Iso Download For Virtualbox

There are three main properties of your virtual machine that you will need to edit. When you open the virtual machine you created, head to ‘Settings‘.
Open the ‘General‘ tab. Here, set everything to default.
Open the next tab, which is ‘System’. Here, there are three tabs which are horizontally arranged. The first is ‘Motherboard’ Disable Floppy, Enable EFI and select the Chipset PIIX3 or IHC9.
Step 5:Add Code to VirtualBox with Command Prompt
Run command prompt on your PC as the administrator.
You will have to add code to VirtualBox using Command Prompt. Copy the code given below and paste it in Command Prompt.
Note: In the code given below replace the words ‘Your VM Name’ with the name you gave your virtual machine.
For VirtualBox 5.0;
cd 'C:Program FilesOracleVirtualBox' VBoxManage.exe modifyvm 'Your VM Name' --cpuidset 00000001 000106e5 00100800 0098e3fd bfebfbff VBoxManage setextradata 'Your VM Name' 'VBoxInternal/Devices/efi/0/Config/DmiSystemProduct' 'iMac11,3' VBoxManage setextradata 'Your VM Name' 'VBoxInternal/Devices/efi/0/Config/DmiSystemVersion' '1.0' VBoxManage setextradata 'Your VM Name' 'VBoxInternal/Devices/efi/0/Config/DmiBoardProduct' 'Iloveapple' VBoxManage setextradata 'Your VM Name' 'VBoxInternal/Devices/smc/0/Config/DeviceKey' 'ourhardworkbythesewordsguardedpleasedontsteal(c)AppleComputerInc' VBoxManage setextradata 'Your VM Name' 'VBoxInternal/Devices/smc/0/Config/GetKeyFromRealSMC' 1
Mac Os 10.11 Download
For VirtualBox 4.0;
cd 'C:Program FilesOracleVirtualBox' VBoxManage.exe modifyvm 'Your VM Name' --cpuidset 00000001 000306a9 04100800 7fbae3ff bfebfbff VBoxManage setextradata 'Your VM Name' 'VBoxInternal/Devices/efi/0/Config/DmiSystemProduct' 'MacBookPro11,3' VBoxManage setextradata 'Your VM Name' 'VBoxInternal/Devices/efi/0/Config/DmiSystemVersion' '1.0' VBoxManage setextradata 'Your VM Name' 'VBoxInternal/Devices/efi/0/Config/DmiBoardProduct' 'Iloveapple' VBoxManage setextradata 'Your VM Name' 'VBoxInternal/Devices/smc/0/Config/DeviceKey' 'ourhardworkbythesewordsguardedpleasedontsteal(c)AppleComputerInc' VBoxManage setextradata 'Your VM Name' 'VBoxInternal/Devices/smc/0/Config/GetKeyFromRealSMC' 1
Step 6: Install OS X El Capitan in your virtual machine
Your virtual machine is now ready for the new OS. Open VirtualBox and click ‘Start’. A code will run on the screen.
After the code, you are ready to install the Mac OS X El Capitan. The installation process is very simple. It involves creating a new user account, selecting region, time and language preferences.
After the installation, you can now run the OS X El Capitan on virtualBox on a PC.
Mac Os X El Capitan Virtualbox Image Download Virtualbox
Installing Mac OS X El Capitan on PC using VirtualBox will break some sweat. But considering the usability of the OS, it is worth the time. In case you encounter problems following this guide, feel free to use the comment sections.
Download El Capitan
Download El Capitan OS X is also significant since it’s the last version of Apple Mac OS X released as its successor Sierra was released in the year 2016 under the brand macOS.
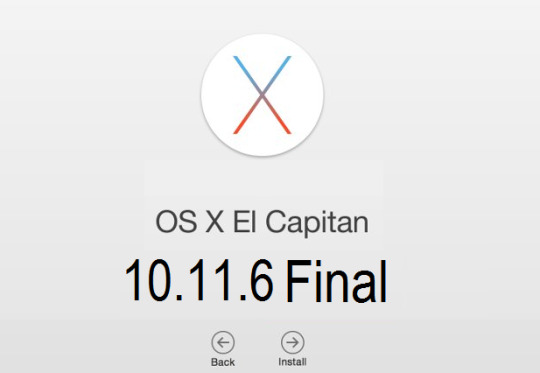
El Capitan latest version
El Capitan 10.11.6 is now released as the latest version of Download El Capitan . For OS X El Capitan users this update is recommended. The upgrade to OS X El Capitan v10.11.6 enhances your Mac's reliability, performance and protection and is advised for all users. Solves a problem that can prevent parental control accounts from saving settings. El Capitan Download latest version solves an issue, which prevents access to SMB sharing points by some network devices, such as speakers and multifunction printers. It improves startup time for the NetBoot server connection. Solves a problem that can make authentication of Active Directory longer than anticipated.
At the time of release, El Capitan was promoted as a significant release by Apple similar to how they promoted Mavericks and Yosemite upgrades which were the predecessors of El Capitan.
OS X 10.11 El Capitán
This update is recommended for all OS X El Capitan users.
The OS X El Capitan v10.11.6 update improves the stability, compatibility and security of your Mac and is recommended for all users.
This update:
Fixes an issue that prevents parental controls from saving settings in enabled accounts.
Fixes an issue that prevents some network devices, such as speakers and multifunction printers, from accessing SMB partitions.
Enterprise Content:
Improves boot time when connected to a NetBoot server.
Fixes an issue with a netboot image created with OS X v10.11.4 or OS X v10.11.5 installer preventing it from booting.
Active directory authentication fixes an issue that may take longer than expected.
System and Hardware Requirements for Download El Capitan
System requirements : You should have OS X v10.6.8 or below version and 2GB memory. And should have 8.8 GB of capacity. Apple ID is required for certain features; terms are applicable. Certain features include an Internet service provider that is compatible; fees can apply.
Hardware requirements : MacBook (early 2015)/ MacBook (late 2008 Aluminum or early 2009 or newer)/ MacBook Pro (Mid or late 2007 or newer)/ MacBook Air (late 2008 or newer)/ Mac mini (early 2009 or newer)/ iMac (mid 2007 or newer)/ Mac Pro (early 2008 or newer)/ Xserve (early 2009).
Features of OS X 10.11 Download
Safari has new features in the El Capitan update. It allows you to easily pin the tabs in the browser to the tab bar so that you can easily access them in the next time
It has multi-touch gestures to applications like Mail and Messages. And it uses the gathered information of the individual emails on the apps like Calendar
The Maps feature in the OS X 10.11 offers you the information about public transportation
Notes feature has added more powerful text processing capabilities. Under this improvement, you can add to-do-lists just like the Reminders application, map locations, photos and videos, inline webpage previews, digital sketches, and other media types
The Spotlight feature is more improved with more contextual information
The Photos feature in the El Capitan can now use editing tools from other apps
The System Integrity Protection gives you more protection to the OS X El Capitan running Mac computers and laptops
1 note
·
View note
Text
El Capitan 10.11 6 Dmg Google Drive

El Capitan 10.11 6 Dmg Google Drive Windows 10
El Capitan 10.11 6 Dmg Google Drive Free
El Capitan 10.11 6 Dmg Google Drive Mac
Mac Os Dmg Install Mac OS X El Capitan 10.11 ISO / DMG Files Direct Download - ISORIVER. Mac OS X El Capitan: Being the 12th major release of macOS, Mac OS X El Capitan belongs to the Macintosh-Unix family of OS. It was majorly released for server. Keep talking and nobody explodes free download mac. Price Currency: USD Whatsapp for laptop. Mac Os X El Capitan 10.11.6 Google Drive Free. OS X El Capitan Partitioning. With the help of screenshots, I will be explaining some basic set of activities that are to be done while partition the OS X El Capitan drive. Alternatively, the same procedure will be explained with the help of a disk manager utility known as Stellar Partition Manager. Mac OS X El Capitan 10.11.6 Free Download Download Mac OS X El Capitan 10.11.6 latest version DMG bootable image setup by clicking the below button. It is a reliable operating system with support for all the latest devices and different enhancements. Mac OS El Capitan was released to manufacturing on 20th September 2015, almost three and a half years ago. Its latest version 10.11.6 (15G22010) was released on 9th July 2018, almost 7 months ago. This is latest version DMG image iso file OS X El Capitan 10.11.6 (bootable) for Mac users. Mac OS X El Capitan 10.11.6: Product Review: Sep 22, 2016 Unmount the dmg file named “Install macOS Sierra.dmg” (if it is mounted:) Go to the top menu of “Disk Utility” window and select “images” and then “Scan image for restore”.
These advanced steps are primarily for system administrators and others who are familiar with the command line. You don't need a bootable installer to upgrade macOS or reinstall macOS, but it can be useful when you want to install on multiple computers without downloading the installer each time.
MacOS Sierra 10.12 Installation ISO Media. MacOS High Sierra yang saya bagikan melalui link google drive di sini masih versi awal yakni 10.13.1. Sedangkan saat ini yang terbaru sudah sampai 10.13.4. Baiklah langsung saja linknya di bawah ini. Saya pecah menjadi 5 part agar gampang mengunduhnya. Belum sempat unggah yang single link. Tautan Unduhan MacOS High Sierra Google Drive.
Download macOS
Download Mac OS Sierra 10.12.dmg Google Drive Download Mac OS Sierra 10.12.dmg from Torrrent. In this article, you will learn about MacOS High Sierra with its features and I will guide you on how you can download the dmg file for MacOS High Sierra in different ways. So, focus top to toe and read the complete article.
Find the appropriate download link in the upgrade instructions for each macOS version:
macOS Catalina, macOS Mojave, ormacOS High Sierra Installers for each of these macOS versions download directly to your Applications folder as an app named Install macOS Catalina, Install macOS Mojave, or Install macOS High Sierra. If the installer opens after downloading, quit it without continuing installation. Important: To get the correct installer, download from a Mac that is using macOS Sierra 10.12.5 or later, or El Capitan 10.11.6. Enterprise administrators, please download from Apple, not a locally hosted software-update server.
Mac Os Sierra Dmg Torrent
OS X El Capitan El Capitan downloads as a disk image. On a Mac that is compatible with El Capitan, open the disk image and run the installer within, named InstallMacOSX.pkg. It installs an app named Install OS X El Capitan into your Applications folder. You will create the bootable installer from this app, not from the disk image or .pkg installer.
Use the 'createinstallmedia' command in Terminal
Connect the USB flash drive or other volume that you're using for the bootable installer. Make sure that it has at least 12GB of available storage and is formatted as Mac OS Extended.
Open Terminal, which is in the Utilities folder of your Applications folder.
Type or paste one of the following commands in Terminal. These assume that the installer is still in your Applications folder, and MyVolume is the name of the USB flash drive or other volume you're using. If it has a different name, replace MyVolume in these commands with the name of your volume. Catalina:* Mojave:* High Sierra:* El Capitan:
Press Return after typing the command.
When prompted, type your administrator password and press Return again. Terminal doesn't show any characters as you type your password.
When prompted, type Y to confirm that you want to erase the volume, then press Return. Terminal shows the progress as the bootable installer is created.
When Terminal says that it's done, the volume will have the same name as the installer you downloaded, such as Install macOS Catalina. You can now quit Terminal and eject the volume.
El Capitan 10.11 6 Dmg Google Drive Windows 10
* If your Mac is using macOS Sierra or earlier, include the --applicationpath argument, similar to the way this argument is used in the command for El Capitan.
Use the bootable installer
After creating the bootable installer, follow these steps to use it:
Plug the bootable installer into a compatible Mac.
Use Startup Manager or Startup Disk preferences to select the bootable installer as the startup disk, then start up from it. Your Mac will start up to macOS Recovery. Learn about selecting a startup disk, including what to do if your Mac doesn't start up from it.
Choose your language, if prompted.
A bootable installer doesn't download macOS from the Internet, but it does require the Internet to get information specific to your Mac model, such as firmware updates. If you need to connect to a Wi-Fi network, use the Wi-Fi menu in the menu bar.
Select Install macOS (or Install OS X) from the Utilities window, then click Continue and follow the onscreen instructions.
Mac Os Dmg Download
Learn more
For more information about the createinstallmedia command and the arguments that you can use with it, make sure that the macOS installer is in your Applications folder, then enter this path in Terminal:
Catalina:


El Capitan 10.11 6 Dmg Google Drive Free
Mojave:
Download Mac Os High Sierra 10.13.6 Dmg Google Drive
High Sierra:

El Capitan 10.11 6 Dmg Google Drive Mac
Mac Os Dmg File Download

El Capitan:
1 note
·
View note
Text
Os El Capitan Installer

Mac OS El Capitan Installer by Apple Inc. Publication date 2020-01 Topics Software, Mac OS, Apple, inc. I am uploading Mac OS El Capitan that I downloaded off of. The El Capitan installer is downloaded to the /Applications folder, with the file name 'Install OS X El Capitan.' If you've installed El Capitan and want to create a bootable installer, re-download the installer from Apple. First, the OS X installer should run automatically, but if not then you can try running it manually: Go to the Applications folder. Open the program called “Install OS X El Capitan”. Follow the on-screen instructions. If this program is missing or will not run, then move it to the trash and empty the trash, followed by re-downloading it.
Load the installer until you can go to the utilities and run disk utility. Erase the disk as Mac os extended (Journaled) Close disk utility. Open terminal and use the same method as shown in the video with mid 2017 date. Shutdown laptop and reset SMC. Restart the installer and try to install El Capitan. Once you’ve done that, here’s how to install, reinstall, or upgrade to El Capitan, step by step: Boot from your Recovery HD partition by restarting your Mac while holding down the Command+R keys. The OS X Utilities window appears. Select Reinstall OS X, and click Continue. The OS X El Capitan splash screen appears.

These advanced steps are primarily for system administrators and others who are familiar with the command line. You don't need a bootable installer to upgrade macOS or reinstall macOS, but it can be useful when you want to install on multiple computers without downloading the installer each time.
What you need to create a bootable installer
A USB flash drive or other secondary volume formatted as Mac OS Extended, with at least 14GB of available storage
A downloaded installer for macOS Big Sur, Catalina, Mojave, High Sierra, or El Capitan
Download macOS
Download: macOS Big Sur, macOS Catalina, macOS Mojave, or macOS High Sierra These download to your Applications folder as an app named Install macOS (version name). If the installer opens after downloading, quit it without continuing installation. To get the correct installer, download from a Mac that is using macOS Sierra 10.12.5 or later, or El Capitan 10.11.6. Enterprise administrators, please download from Apple, not a locally hosted software-update server.
Download: OS X El Capitan This downloads as a disk image named InstallMacOSX.dmg. On a Mac that is compatible with El Capitan, open the disk image and run the installer within, named InstallMacOSX.pkg. It installs an app named Install OS X El Capitan into your Applications folder. You will create the bootable installer from this app, not from the disk image or .pkg installer.
Use the 'createinstallmedia' command in Terminal
Connect the USB flash drive or other volume that you're using for the bootable installer.
Open Terminal, which is in the Utilities folder of your Applications folder.
Type or paste one of the following commands in Terminal. These assume that the installer is in your Applications folder, and MyVolume is the name of the USB flash drive or other volume you're using. If it has a different name, replace MyVolume in these commands with the name of your volume.
Big Sur:*
Download El Capitan
Catalina:*
Mojave:*
High Sierra:*
El Capitan:
* If your Mac is using macOS Sierra or earlier, include the --applicationpath argument and installer path, similar to the way this is done in the command for El Capitan.
After typing the command:
Press Return to enter the command.
When prompted, type your administrator password and press Return again. Terminal doesn't show any characters as you type your password.
When prompted, type Y to confirm that you want to erase the volume, then press Return. Terminal shows the progress as the volume is erased.
After the volume is erased, you may see an alert that Terminal would like to access files on a removable volume. Click OK to allow the copy to proceed.
When Terminal says that it's done, the volume will have the same name as the installer you downloaded, such as Install macOS Big Sur. You can now quit Terminal and eject the volume.
Use the bootable installer
Determine whether you're using a Mac with Apple silicon, then follow the appropriate steps:
Apple silicon
Plug the bootable installer into a Mac that is connected to the internet and compatible with the version of macOS you're installing.
Turn on your Mac and continue to hold the power button until you see the startup options window, which shows your bootable volumes.
Select the volume containing the bootable installer, then click Continue.
When the macOS installer opens, follow the onscreen instructions.
Mac Os El Capitan Installer Download
Intel processor
Plug the bootable installer into a Mac that is connected to the internet and compatible with the version of macOS you're installing.
Press and hold the Option (Alt) ⌥ key immediately after turning on or restarting your Mac.
Release the Option key when you see a dark screen showing your bootable volumes.
Select the volume containing the bootable installer. Then click the up arrow or press Return. If you can't start up from the bootable installer, make sure that the External Boot setting in Startup Security Utility is set to allow booting from external media.
Choose your language, if prompted.
Select Install macOS (or Install OS X) from the Utilities window, then click Continue and follow the onscreen instructions.
Learn more
A bootable installer doesn't download macOS from the internet, but it does require an internet connection to get firmware and other information specific to the Mac model.
Os X El Capitan Installer App

Os El Capitan Problems
For information about the createinstallmedia command and the arguments you can use with it, make sure that the macOS installer is in your Applications folder, then enter the appropriate path in Terminal:
1 note
·
View note
Text
Still Waiting For Root Device Установка Mac Os

Update: After upgrading to the latest version of VirtualBox and following the first answer at Install OS X in VirtualBox on iMac?, I am now getting the Still waiting for root device.If I follow the answer about the extra data, I get an Apple logo and a spinning wheel, then I get a crossed-out circle and a spinning wheel.
Still Waiting For Root Device Mac
Still Waiting For Root Device Mojave
For example, a DMG image on the Mac OS X install disks created with the DiskUtility in Mac OS X itself will generate this message if you try to boot PearPC with it. Downloaded from various websites and some created with on a linux box. I run pearpc with my config file and I get 'Still waiting for root device' over and over. After installing OS X 10.4.6 native with VMware with any of the method listed in the installation guides, the first boot was OK, configure the OSX with keyboard, personal info, etc.But when you turn it off and on again, it freezes in the holy 'Still waiting for root device'. I have an old laptop hp pavilion dv 6500.After downloading High sierra and make bootable usb with Trans Mac setup now i am ready to install. I have just one disk and there is no os on it and i want just install mac yet.SO i formatted my one partition into NTFS. After rebooting my laptop and plug. In Verbose mode it crashes half way, a 'no entry' icon pops up and the last text says 'Still waiting for root device'. I followed all the instructions one by one. I tried it in multiple USB drives and different ports; tried creating the installation drive with Unibeast and Terminal.
Hi and thanks for any help you can offer,
My Mac has been working at 10.10.2 and previous versions with a Crucial CT480M500SSD1 SSD for seven+ months until I updated to 10.10.3 (which may be coincidental). Now, I cannot boot from the drive with the eventual message 'Still waiting for root device'.
Things I've tried:
Still Waiting For Root Device Mac
Firstly the error I had was a grey screen with a mouse pointer I could move on it but nothing else would happen. Because I have a bluetooth keyboard I couldn't boot to safe mode or reset the PRAM directly, so I took out the SSD drive and booted to the time machine partition. From there I used e.g. nvram boot-args='-x -v' to boot to safe mode, which worked and I rebooted immediately, subsequent boots would not work at all, even to safe mode.
Still without a USB keyboard I used the Time Machine partition (pulled the SSD out to boot to it) to reset PRAM (via boot-args), NVRAM, didn't work.
I brought a USB keyboard home and used it to boot to TM and restore a 10.10.2 version of the SSD from before the update. Same problem. I have even restored versions from December with the same result, as above.
I have a previous SSD laying around with Mavericks on it, it boots fine.
I have run bless --folder /Volumes/Beep Beep/System/Library/CoreServices --bootefi
Any other ideas or can anyone give an explanation of how the root device is determined and found? I've read some things about needing to have kexts that read from the drive, but it doesn't seem like
Thanks, Dan.
OS X Yosemite (10.10.2)
Posted on
When you install Mac OS X on a non-Apple hardware device called a Hackintosh, you are likely to face the problem of “Still waiting for root device”. This is the message you get when you try to boot Mac OS X. This message illustrates that the disk containing the OS X image is not booting properly. This message keeps on repeating, and you cannot move forward till you find some solution for it. This article shows how to fix “Still waiting for root device” on your Hackintosh.
This solution works for people who have installed Leo4all v3 and received the message upon rebooting. The cause of the error is due to incompatible or incorrect configuration of the ATA controller.
How to Fix Still waiting for root device
Boot your PC using LeoV3 DVD as if you are reinstalling Mac OS X again.
Select the Terminal from the installer’s Utility menu.
Now, you have to copy all the kexts from the DVD to your hard drive.

For performing this task, you need to use the following command:
cp -pr /Volumes/Leo4allv3/System/Library/Extensions/*ATA* /Volumes/MacHD/System/Library/Extensions/.
Still Waiting For Root Device Mojave
You need to replace Leo4allv3 with the name of your DVD. Also replace the MacHD with the name of your hard drive volume.
Set the permissions for the kexts you have copied. For this purpose, you need to use the following command in the terminal:
chown -R root:wheel /Volumes/MacHD/System/Library/Extensions/*ATA* chmod -R 755 /Volumes/MacHD/System/Library/Extensions/*ATA*
Now, you need to remove the kextcache by using the following command:
rm -rf /Volumes/MacHD/System/Library/Extensions.*
Now, reboot your PC. It is highly recommended to press F8 when your PC is booting and then enter “-f” as the boot option to force reloading of the kexts.
It is not completely sure that this strategy might work for your Hackintosh, but still this solution is the most feasible one as reported by many people who suffered from the “Still waiting for root device” issue. You might try exploring more settings if your problem is not solved by using the technique mentioned in this article.
1 note
·
View note
Text
Create Dmg Installer For Mac

Create Dmg Installer Mac Os X
Create Dmg Installer For Mac Os
Create Dmg Installer For Mac Catalina
Nov 07, 2019 Now create a computer account for macOS Catalina. For three-times click Continue; Now select the Dark mode, Light mode or Auto mode for macOS Catalina. Wait a while till the desktop should be ready when it gets ready. Enjoy using macOS Catalina 10.15 for the first time in your PC-Hackintosh. Create Dmg Installer For Mac Download Bottom Line. Jun 23, 2020 How to Install and Open.dmg Files on a Mac. Software installation with Mac OS X is very different than in the Windows world. On a Windows PC you run an installer, tick off a few checkboxes, and wait for the progress meter to reach completion. Dec 10, 2018 If you want to use a DMG file in Windows to mount a version of Mac OS X, then Method 1 will work. However, most of the time, you'll need a DMG to install an OS version on a Mac computer. In those cases, if all you have to work with is a Windows PC, DMGGeeker is the perfect application. Are you looking for a direct download link for MacOS High Sierra ISO installer or dmg file for your Mac or Windows computer or virtual machine then you are at the right place. VirtualBox, Vmware. Dec 28, 2019 How to Make a DMG File on a Mac. One way to store or group files on a Mac is to create a Disk Image.
A DMG disk image file is Apple's container format for capturing entire drives or disks, similar to ISO for other platforms like Windows. It consists of data blocks that represent a physical disc. If you're on a Windows machine, you're limited in what you can do with DMG files. That's why you need third-party utilities to create a bootable DVD from DMG on Windows. This article explains two different methods to burn DMG files to amake bootable macOS installation DVD in Windows.
Method 1: How to Create Bootable DVD from DMG (Command Prompt)
This approach utilizes a tool called DMG2IMG, which converts DMG file into ISO, the universally more compatible archive format. This ISO file is then burned using a command line execution in Command Prompt. You don't really need any experience with disk images or command line work, but it will certainly help should something go wrong. If you're not comfortable with any of this, you can skip to Method 2, which showcases a powerful but user-friendly tool that does it all for you. But first, let's see how the Command Prompt method of creating a bootable DVD from DMG works.
Note: The older version of DMG2IMG is called DMG2ISO. Although the download is available in the link provided in Step 1 below, it is recommended that you use DMG2IMG instead. The utility has the ability to convert DMG into both ISO and IMG, based on your needs.
Step 1. Install DMG2IMG on a Windows PC after downloading the zipped win32 binary from this website. Unzip the file and run the .exe to install the program. You can also download DMG2ISO, but DMG2IMG is the recommended software to use.

Step 2. Open Command Prompt on your PC and execute the following command to convert your DMG into ISO. Be sure to change the file names as appropriate, and include the whole file path from the main directory: dmg2img.exe c:downloadsexample.dmg c:downloadsexampleconverted.iso
Step 3. Now that your ISO file is ready, you can use the Windows ISO burning utility or a free application like FreeISOBurner to create a bootable DVD.
This DVD can be used to install macOS in virtual Windows environments with tools like Virtualbox. You can't use ISO files to install software in Mac, so if this is intended for a computer running Mac OS X or macOS, you will need to convert it back to DMG before you can install the program in question. If you're not confident that you can carry out the steps properly, then continue to Method 2.
Method 2: How to Make a Bootable DVD for Mac on Windows (DMGGeeker)
Conversion processes aren't always accurate and success rate is low for the first method. Many DVD are not able to be used to install macOS due to boot errors. Although DMG2IMG is a great tool, you may find that your resulting ISO file is corrupted and therefore useless. That means doing it all over again. Instead, you can try using DMGGeeker, which allows you to directly burn DMG to a DVD in Windows without having to convert the file. Such a disk can be used to boot a Mac computer.
DMGGeeker is an emerging star in the world of disk image file management software. It allows you to edit, add files to, delete content from, rename and do a lot more with DMG files on Windows without any conversion necessary. If you've been searching for the ideal DMG handling tool for Windows, your search has just ended. Let's see how the process works for creating a bootable media from DMG in Windows. It works with all recent versions of Windows.
Step 1Prepare for Installation
You can download it from the official site here. And then install DMGGeeker on a Windows PC.
Step 2Open DMGGeeker in Windows
Launch the application and click on the 'Burn' option. You'll see the other tools available for DMG files.
Step 3Create Bootable USB from macOS Install Image
Click 'Load DMG' to import your DMG file into the program. Insert a blank DVD and click Burn against the DVD option to write the DMG to the disk.
In three simple steps, your bootable DVD is ready. You won't find that many tools that are so easy to operate. DMGGeeker also has one of the highest burn success rates in its class, which means no wasted DVDs and no wasted time.
Summary
Create Dmg Installer Mac Os X
How to choose the rignt tool depends on what the purpose is. If you want to use a DMG file in Windows to mount a version of Mac OS X, then Method 1 will work. However, most of the time, you'll need a DMG to install an OS version on a Mac computer. In those cases, if all you have to work with is a Windows PC, DMGGeeker is the perfect application. It's simple enough for a novice yet robust enough for a professional, it contains all the tools you need to manage DMG files, and it's a life-saver if you only have a Windows PC to work with.
Create Dmg Installer For Mac Os
Dec 10, 2018 16:32:11 / Posted by Candie Kates to Mac Solution
Create Dmg Installer For Mac Catalina
Related Articles & Tips
1 note
·
View note
Text
Macos Installer Dmg

Works like a charm — I've been upgrading git all the time using this package and never had the slightest problem. My only issue is that it lags slightly behind the latest & greatest supported git package — it's really a pity it's not kept up-to-date with, say, the Linux version. Mar 23, 2021 Download: macOS Big Sur, macOS Catalina, macOS Mojave, or macOS High Sierra These download to your Applications folder as an app named Install macOS version name.If the installer opens after downloading, quit it without continuing installation. Download: macOS Big Sur, macOS Catalina, macOS Mojave, or macOS High Sierra These download to your Applications folder as an app named Install macOS version name.If the installer opens after downloading, quit it without continuing installation. MacOS Mojave download 10.14.6 dmg for mac free full version. Complete setup MacOS Mojave 10.14.6 (18G95) offline installer for mac OS with direct link. Description MacOS Mojave 10.14.6 For Mac + Overview. MacOS Mojave delivers new features inspired by its most powerful users, however designed for everyone. Keep centered on your work using Dark.
These advanced steps are primarily for system administrators and others who are familiar with the command line. You don't need a bootable installer to upgrade macOS or reinstall macOS, but it can be useful when you want to install on multiple computers without downloading the installer each time.
What you need to create a bootable installer
A USB flash drive or other secondary volume formatted as Mac OS Extended, with at least 14GB of available storage
A downloaded installer for macOS Big Sur, Catalina, Mojave, High Sierra, or El Capitan
Download Macos Installer Dmg
Download macOS
Download: macOS Big Sur, macOS Catalina, macOS Mojave, or macOS High Sierra These download to your Applications folder as an app named Install macOS (version name). If the installer opens after downloading, quit it without continuing installation. To get the correct installer, download from a Mac that is using macOS Sierra 10.12.5 or later, or El Capitan 10.11.6. Enterprise administrators, please download from Apple, not a locally hosted software-update server.
Download: OS X El Capitan This downloads as a disk image named InstallMacOSX.dmg. On a Mac that is compatible with El Capitan, open the disk image and run the installer within, named InstallMacOSX.pkg. It installs an app named Install OS X El Capitan into your Applications folder. You will create the bootable installer from this app, not from the disk image or .pkg installer.
Use the 'createinstallmedia' command in Terminal
Connect the USB flash drive or other volume that you're using for the bootable installer.
Open Terminal, which is in the Utilities folder of your Applications folder.
Type or paste one of the following commands in Terminal. These assume that the installer is in your Applications folder, and MyVolume is the name of the USB flash drive or other volume you're using. If it has a different name, replace MyVolume in these commands with the name of your volume.
Big Sur:*
Mac Os Installer Download
Macos Install Dmg From Command Line
Catalina:*
Mojave:*
High Sierra:*
El Capitan:
* If your Mac is using macOS Sierra or earlier, include the --applicationpath argument and installer path, similar to the way this is done in the command for El Capitan.
Macos Installer Dmg To Iso
After typing the command:
Press Return to enter the command.
When prompted, type your administrator password and press Return again. Terminal doesn't show any characters as you type your password.
When prompted, type Y to confirm that you want to erase the volume, then press Return. Terminal shows the progress as the volume is erased.
After the volume is erased, you may see an alert that Terminal would like to access files on a removable volume. Click OK to allow the copy to proceed.
When Terminal says that it's done, the volume will have the same name as the installer you downloaded, such as Install macOS Big Sur. You can now quit Terminal and eject the volume.
Use the bootable installer
Determine whether you're using a Mac with Apple silicon, then follow the appropriate steps:
Apple silicon
Plug the bootable installer into a Mac that is connected to the internet and compatible with the version of macOS you're installing.
Turn on your Mac and continue to hold the power button until you see the startup options window, which shows your bootable volumes and a gear icon labled Options.
Select the volume containing the bootable installer, then click Continue.
When the macOS installer opens, follow the onscreen instructions.
Intel processor
Plug the bootable installer into a Mac that is connected to the internet and compatible with the version of macOS you're installing.
Press and hold the Option (Alt) ⌥ key immediately after turning on or restarting your Mac.
Release the Option key when you see a dark screen showing your bootable volumes.
Select the volume containing the bootable installer. Then click the up arrow or press Return. If you can't start up from the bootable installer, make sure that the External Boot setting in Startup Security Utility is set to allow booting from external media.
Choose your language, if prompted.
Select Install macOS (or Install OS X) from the Utilities window, then click Continue and follow the onscreen instructions.

Learn more
Mac Os Installer Damaged
For more information about the createinstallmedia command and the arguments that you can use with it, make sure that the macOS installer is in your Applications folder, then enter the appropriate path in Terminal:
Big Sur: /Applications/Install macOS Big Sur.app/Contents/Resources/createinstallmedia
Catalina: /Applications/Install macOS Catalina.app/Contents/Resources/createinstallmedia
Mojave: /Applications/Install macOS Mojave.app/Contents/Resources/createinstallmedia
High Sierra: /Applications/Install macOS High Sierra.app/Contents/Resources/createinstallmedia
El Capitan: /Applications/Install OS X El Capitan.app/Contents/Resources/createinstallmedia
Macos Installer Dmg
A bootable installer doesn't download macOS from the internet, but it does require an internet connection to get firmware and other information specific to the Mac model.
1 note
·
View note
Text
Download Mac Os Sierra For Usb

Apple previewed macOS High Sierra on June 5, 2017, the latest version of the world’s most advanced desktop operating system, delivering new core storage, video, and graphics technologies that pave the way for future innovation on the Mac.
macOS High Sierra offers an all-new file system, support for High-Efficiency Video Coding (HEVC) and an update to Metal, Apple’s advanced graphics technology that powers everything from machine-learning to virtual reality content creation.
In essence, High Sierra took what was good with Sierra and developed it into a more comprehensive software. High Sierra emphasizes the already-existing benefits of MacOS previous system, Sierra. There are few bells and whistles, but the changes are noticeable and positive. The Apple file system is the most significant feature it brought. If you want to have a clean installation of MacOS High Sierra whether on Mac, Windows, or any other virtualization software then this is the best way to create MacOS High Sierra Bootable USB on Windows without Mac. The method that I am going to guide you is very easy, you don’t need to download and install Unibeast, Transmac, or any other kind of software.
macOS High Sierra also includes some refinements to the apps Mac users enjoy every day, including Photos, Safari and Mail.
macOS High Sierra brings new storage, video and graphics technologies to the Mac.
“macOS High Sierra delivers important forward-looking technologies and new opportunities for developers wanting to tap into the power of machine-learning and create immersive VR content on the Mac,” said Craig Federighi, Apple’s senior vice president of Software Engineering.
“The core technology innovations in macOS High Sierra, combined with our advances in hardware, will continue to push the Mac forward in exciting new ways.”
Powerful New System Technologies

Apple File System
Apple File System (APFS) features enhanced performance, security, and reliability of data and provides a foundation for future storage innovations. An advanced architecture optimized for today’s massive storage technologies.
APFS makes standard operations such as copying files and directories instantaneous, helps protect data from power outages and system crashes and keeps files safe and secure with native encryption. macOS High Sierra also maintains complete read-and-write compatibility with previously formatted HFS drives and data and is designed to accommodate future advancements in storage technology.
Metal 2 unleashes even more GPU power, accelerating graphics and computation for pro content creation, gaming, machine-learning and more.
Download Mac Os High Sierra For Bootable Usb
High-Efficiency Video Coding
Support for industry-standard HEVC (H.265) enables video streaming and playback of 4K video files at an incredible quality that is also up to 40 percent smaller than with the current H.264 standard.
With HEVC, Apple is enabling high-quality video streaming on networks where only HD streaming was previously possible, while hardware acceleration on the new iMac and MacBook Pro deliver incredibly fast and power-efficient HEVC encoding and editing.
Metal 2
Metal is the fastest, most efficient way to tap into GPU power on the Mac. Metal 2 features a clean API and improved performance that help developers accelerate their apps.
It adds support for machine-learning used in speech recognition, natural language processing, and computer vision.
Mac Os Sierra Iso Download
The combination of Thunderbolt 3 and Metal 2 allows the most demanding users to access powerful external GPUs. An External Graphics Developer Kit gives developers all the hardware and software they need to optimize their apps.
Innovations in macOS, combined with advances in Mac hardware, deliver new experiences such as virtual reality and machine-learning.
Virtual Reality
Drawing on the performance of Metal 2 and the latest Mac hardware, macOS High Sierra adds support for VR content creation for the first time, enabling developers to create immersive gaming, 3D and VR content on the Mac. Leading VR companies are joining Apple to drive VR innovation on the Mac with features coming later this year.
Valve is optimizing their SteamVR platform for macOS and enabling connection of the HTC Vive headset, while Unity and Epic are bringing their VR development tools to macOS. Also later this year, Final Cut Pro X will add support for professional 360-degree workflows with the ability to import, edit and export 360-degree video.
Photos
Photos make it easier than ever to organize, manage and edit your photos.
Install Sierra From Usb
Photos in macOS High Sierra adds a new always-on sidebar that presents albums and organization tools. A redesigned Edit view includes powerful new tools like Curves, for fine-tuning of color and contrast, and Selective Color, for making adjustments within a defined color range.
Download Mac Os Sierra For Usb Pc Camera
Live Photos can now be edited with fun effects, and Memories curates user photos and videos around several new topics.
Photos now support external editors, so Photoshop, Pixelmator, and other apps can launch directly within Photos, with edits saved back to the Photos library.
Moreover, for the first time, support for third-party project extensions gives users access to printing and publishing services, such as Animoto, ifolor, Shutterfly, WhiteWall, and Wix, from right within the Photos app.
Additional App Refinements:
Safari can automatically use Reader to open articles in a clean, uncluttered format, while Autoplay Blocking stops media with audio from automatically playing in the browser.
Intelligent Tracking Prevention in Safari uses machine-learning to identify and remove the tracking data that advertisers employ to follow users’ web activity.
Mail search gets faster and more comfortable with Top Hits, which puts the most relevant results at the top of a user’s message list.
Siri on the Mac responds with a natural and more expressive voice, and when using Apple Music, it learns music preferences, creates custom playlists and answers music trivia.
Notes add simple tables, where a user can type in cells, make edits and move rows and columns.
Spotlight provides flight status information, including departure and arrival times, delays, gates, terminals and even a map of the flight path.
iCloud File Sharing lets users share any file stored in iCloud Drive and collaborate with other people.
Download
This is an official macOS High Sierra Installer from Apple, It can be used to Reinstall or Upgrade to Mojave on a Mac.
If you are looking to Install High Sierra on PC read Hackintosh High Sierra Guide.
1 note
·
View note
Text
Boot Disk For Mac

Use an Existing Virtual Hard Disk Create Bootable USB for Mac on Windows 10. When the Virtual Machine is created, you need to apply some settings in order to boot mac normally. Open the settings of created Virtual Machine, visit the system tab uncheck the floppy disk. This time visits the process tab and increases the process from 1 to. How to create a bootable macOS High Sierra installer drive Put the macOS High Sierra installer on an external USB thumb drive or hard drive and use it to install the operating system on a Mac. How to create a bootable macOS Catalina installer drive Put the macOS Catalina installer on an external USB thumb drive or hard drive and use it to install the operating system on a Mac.
Boot Disk For Mac Os
Mac Os X Startup Disk
Active Boot Disk For Mac
These advanced steps are primarily for system administrators and others who are familiar with the command line. You don't need a bootable installer to upgrade macOS or reinstall macOS, but it can be useful when you want to install on multiple computers without downloading the installer each time.
In Windows on your Mac, click in the right side of the taskbar, click the Boot Camp icon, then choose Boot Camp Control Panel. If a User Account Control dialog appears, click Yes. Select the startup disk that has the default operating system you want to use. If you want to start up using the default operating system now, click Restart.
Download macOS
Find the appropriate download link in the upgrade instructions for each macOS version:
macOS Catalina, macOS Mojave, ormacOS High Sierra Installers for each of these macOS versions download directly to your Applications folder as an app named Install macOS Catalina, Install macOS Mojave, or Install macOS High Sierra. If the installer opens after downloading, quit it without continuing installation. Important: To get the correct installer, download from a Mac that is using macOS Sierra 10.12.5 or later, or El Capitan 10.11.6. Enterprise administrators, please download from Apple, not a locally hosted software-update server.

OS X El Capitan El Capitan downloads as a disk image. On a Mac that is compatible with El Capitan, open the disk image and run the installer within, named InstallMacOSX.pkg. It installs an app named Install OS X El Capitan into your Applications folder. You will create the bootable installer from this app, not from the disk image or .pkg installer.
Boot Disk For Mac Os
Use the 'createinstallmedia' command in Terminal
Mac Os X Startup Disk
Connect the USB flash drive or other volume that you're using for the bootable installer. Make sure that it has at least 12GB of available storage and is formatted as Mac OS Extended.
Open Terminal, which is in the Utilities folder of your Applications folder.
Type or paste one of the following commands in Terminal. These assume that the installer is still in your Applications folder, and MyVolume is the name of the USB flash drive or other volume you're using. If it has a different name, replace MyVolume in these commands with the name of your volume. Catalina:* Mojave:* High Sierra:* El Capitan:
Press Return after typing the command.
When prompted, type your administrator password and press Return again. Terminal doesn't show any characters as you type your password.
When prompted, type Y to confirm that you want to erase the volume, then press Return. Terminal shows the progress as the bootable installer is created.
When Terminal says that it's done, the volume will have the same name as the installer you downloaded, such as Install macOS Catalina. You can now quit Terminal and eject the volume.
* If your Mac is using macOS Sierra or earlier, include the --applicationpath argument, similar to the way this argument is used in the command for El Capitan.

Use the bootable installer
Active Boot Disk For Mac


After creating the bootable installer, follow these steps to use it:
Plug the bootable installer into a compatible Mac.
Use Startup Manager or Startup Disk preferences to select the bootable installer as the startup disk, then start up from it. Your Mac will start up to macOS Recovery. Learn about selecting a startup disk, including what to do if your Mac doesn't start up from it.
Choose your language, if prompted.
A bootable installer doesn't download macOS from the Internet, but it does require the Internet to get information specific to your Mac model, such as firmware updates. If you need to connect to a Wi-Fi network, use the Wi-Fi menu in the menu bar.
Select Install macOS (or Install OS X) from the Utilities window, then click Continue and follow the onscreen instructions.
Learn more
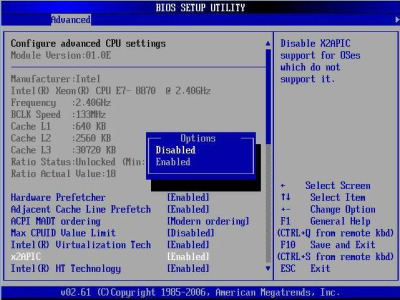
For more information about the createinstallmedia command and the arguments that you can use with it, make sure that the macOS installer is in your Applications folder, then enter this path in Terminal:
Catalina:
Mojave:
High Sierra:
El Capitan:
With a bootable Ubuntu USB stick, you can:
Install or upgrade Ubuntu, even on a Mac
Test out the Ubuntu desktop experience without touching your PC configuration
Boot into Ubuntu on a borrowed machine or from an internet cafe
Use tools installed by default on the USB stick to repair or fix a broken configuration
Creating a bootable USB stick is very simple, especially if you’re going to use the USB stick with a generic Windows or Linux PC. We’re going to cover the process in the next few steps.
Apple hardware considerations
There are a few additional considerations when booting the USB stick on Apple hardware. This is because Apple’s ‘Startup Manager’, summoned by holding the Option/alt (⌥) key when booting, won’t detect the USB stick without a specific partition table and layout. We’ll cover this in a later step.
Boot Disk For Mac
1 note
·
View note