#creating cron jobs in linux
Explore tagged Tumblr posts
Visit Tumblr Blog
Explore Tumblr blogs with no restrictions, modern design and the best experience.
Last Seen Tumblr Blogs


Fun Fact
Tumblr Inc. is using 66 technologies for its website.
Text

SYSTEM ADMIN INTERVIEW QUESTIONS 24-25
Table of Content
Introduction
File Permissions
User and Group Management:
Cron Jobs
System Performance Monitoring
Package Management (Red Hat)
Conclusion
Introduction
The IT field is vast, and Linux is an important player, especially in cloud computing. This blog is written under the guidance of industry experts to help all tech and non-tech background individuals secure interviews for roles in the IT domain related to Red Hat Linux.
File Permissions
Briefly explain how Linux file permissions work, and how you would change the permissions of a file using chmod. In Linux, each file and directory has three types of permissions: read (r), write (w), and execute (x) for three categories of users: owner, group, and others. Example: You will use chmod 744 filename, where the digits represent the permission in octal (7 = rwx, 4 = r–, etc.) to give full permission to the owner and read-only permission to groups and others.
What is the purpose of the umask command? How is it helpful to control default file permissions?umask sets the default permissions for newly created files and directories by subtracting from the full permissions (777 for directories and 666 for files). Example: If you set the umask to 022, new files will have permissions of 644 (rw-r–r–), and directories will have 755 (rwxr-xr-x).
User and Group Management:
Name the command that adds a new user in Linux and the command responsible for adding a user to a group. The Linux useradd command creates a new user, while the usermod command adds a user to a specific group. Example: Create a user called Jenny by sudo useradd jenny and add him to the developer’s group by sudo usermod—aG developers jenny, where the—aG option adds users to more groups without removing them from other groups.
How do you view the groups that a user belongs to in Linux?
The group command in Linux helps to identify the group a user belongs to and is followed by the username. Example: To check user John’s group: groups john
Cron Jobs
What do you mean by cron jobs, and how is it scheduled to run a script every day at 2 AM?
A cron job is defined in a crontab file. Cron is a Linux utility to schedule tasks to run automatically at specified times. Example: To schedule a script ( /home/user/backup.sh ) to run daily at 2 AM: 0 2 * * * /home/user/backup.sh Where 0 means the minimum hour is 2, every day, every month, every day of the week.
How would you prevent cron job emails from being sent every time the job runs?
By default, cron sends an email with the output of the job. You can prevent this by redirecting the output to /dev/null. Example: To run a script daily at 2 AM and discard its output: 0 2 * * * /home/user/backup.sh > /dev/null 2>&1
System Performance Monitoring
How can you monitor system performance in Linux? Name some tools with their uses.
Some of the tools to monitor the performance are: Top: Live view of system processes and usage of resource htop: More user-friendly when compared to the top with an interactive interface. vmstat: Displays information about processes, memory, paging, block IO, and CPU usage. iostat: Showcases Central Processing Unit (CPU) and I/O statistics for devices and partitions. Example: You can use the top command ( top ) to identify processes consuming too much CPU or memory.
In Linux, how would you check the usage of disk space?
The df command checks disk space usage, and Du is responsible for checking the size of the directory/file. Example: To check overall disk space usage: df -h The -h option depicts the size in a human-readable format like GB, MB, etc.
Package Management (Red Hat)
How do you install, update, or remove packages in Red Hat-based Linux distributions by yum command?
In Red Hat and CentOS systems, the yum package manager is used to install, update, or remove software. Install a package: sudo yum install httpd This installs the Apache web server. Update a package: sudo yum update httpd Remove a package:sudo yum remove httpd
By which command will you check the installation of a package on a Red Hat system?
The yum list installed command is required to check whether the package is installed. Example: To check if httpd (Apache) is installed: yum list installed httpd
Conclusion
The questions are designed by our experienced corporate faculty which will help you to prepare well for various positions that require Linux such as System Admin.
Contact for Course Details – 8447712333
2 notes
·
View notes
Text
The Importance of Regular SSD Health Checks for Data Security
Solid-State Drives (SSDs) have become the preferred storage solution due to their speed, durability, and energy efficiency. However, despite their advanced technology, SSDs are not immune to wear and potential failures. Regular health checks play a crucial role in ensuring data security, preventing data loss, and maintaining optimal performance. This article explores why routine test SSD drive health is essential and how it safeguards critical data.
Why SSD Health Checks Matter
1. Preventing Data Loss
Unlike traditional hard drives, SSDs have a finite number of write cycles. Over time, repeated writes can degrade NAND flash memory, leading to data corruption or loss. Regular health checks help identify wear patterns and alert users before critical failures occur.
2. Detecting Early Signs of Failure
Tools that read SMART (Self-Monitoring, Analysis, and Reporting Technology) data can detect issues such as bad blocks, high temperatures, and excessive reallocated sectors. Identifying these warning signs early allows users to take preventative action, like data backup or drive replacement.
3. Maintaining Optimal Performance
As SSDs age, their performance can degrade due to factors like increased bad blocks or inefficient data management. Regular health checks help identify performance bottlenecks and ensure that features like TRIM are functioning correctly to maintain speed and responsiveness.
4. Enhancing Data Security
Failing SSDs can lead to partial data corruption, making sensitive information vulnerable. Regular health checks reduce the risk of data breaches by ensuring that the storage medium remains secure and intact.
How to Perform Regular SSD Health Checks
1. Utilize SMART Monitoring Tools
CrystalDiskInfo (Windows): Provides real-time health statistics and temperature monitoring.
Smartmontools (Linux/macOS): Command-line tools (smartctl) for in-depth drive analysis.
Manufacturer-Specific Utilities: Samsung Magician, Intel SSD Toolbox, and others offer tailored monitoring and firmware updates.
2. Schedule Automated Health Checks
Windows Task Scheduler: Set up recurring checks using tools like CrystalDiskInfo.
Linux Cron Jobs: Automate smartctl commands to log health data periodically.
macOS Automator: Create workflows that run disk utility scripts at regular intervals.
3. Monitor Key SMART Attributes
Reallocated Sectors Count: Indicates bad blocks that have been replaced.
Wear Leveling Count: Reflects the evenness of data distribution across memory cells.
Temperature: High temperatures can accelerate wear and cause failures.
Best Practices for SSD Health and Data Security
Regular Backups: Always maintain updated backups to safeguard against sudden failures.
Enable TRIM: Ensures that deleted data blocks are efficiently managed.
Keep Firmware Updated: Manufacturers often release updates to fix bugs and improve drive reliability.
Avoid Full Drive Usage: Maintain at least 10-20% free space to allow efficient data management.
Conclusion
Regular SSD health checks are a proactive strategy to ensure data security, prevent unexpected failures, and optimize performance. With the right tools and scheduled monitoring, users can extend the lifespan of their SSDs and protect valuable data. In an age where data integrity is paramount, regular health checks are not just recommended—they're essential.
1 note
·
View note
Text
A Guide to Choosing the Right Hosting Plan for Your Clients
Web developers, freelancers, and agencies in the UK are increasingly looking for flexible, reliable, and cheap web hosting solutions for their clients. Whether you're managing multiple client websites or looking to launch your own web design business, choosing the right and affordable web hosting plan is crucial.

This comprehensive guide will walk you through everything you need to consider when choosing a cheap web hosting plan for your clients, with a focus on reseller hosting, cheap and reliable options, Linux hosting environments, whitelabel solutions, and managed reseller hosting services. We'll also explore how each of these options supports scalable and professional webdesign services.
1. Understanding Your Clients' Needs
Before diving into the technical aspects of hosting, it’s essential to clearly understand your clients’ specific needs and expectations. Start by identifying the type of websites they intend to run—whether it's an eCommerce store, a portfolio, a blog, or a business website. This will help determine the necessary resources and software compatibility. Evaluate the expected traffic volume, as high-traffic websites may require more robust web hosting solutions.
Additionally, consider whether they need specific applications like WordPress, Magento, or other CMS platforms, which may influence your choice of server environment. For clients targeting a specific audience or bound by data regulations, location based servers can offer SEO advantages and ensure legal compliance. Lastly, assess the level of technical support and maintenance they expect—some clients may need full support, while others prefer more control. Taking the time to conduct this initial analysis ensures you select a cheap web hosting plan that aligns with your clients' goals and enhances their overall satisfaction.
2. Why Reseller Hosting is Ideal for Agencies and Freelancers
Reseller hosting is an ideal solution for developers, freelancers, and digital agencies looking to expand their service offerings and generate recurring revenue. This type of web hosting enables you to purchase server space in bulk from the best web hosting provider and then resell it to your clients under your own brand name, creating a seamless and professional experience. One of the major advantages is scalability—you can manage multiple client websites under a single master account, making it easier to grow your business.
It also offers excellent profit potential, as you set your own pricing and retain full control over billing. With whitelabel capabilities, you can fully customise the hosting environment to reflect your brand, enhancing your professional credibility. Additionally, tools like WHM (Web Host Manager) and cPanel streamline administrative tasks, allowing you to efficiently manage accounts and resources. For those in the webdesign industry, offering hosting as part of your package not only increases client retention but also positions your business as a comprehensive digital solution provider.
3. Choosing Between Linux and Windows Hosting
When it comes to selecting the best web hosting environment, most web developers and agencies in the lean towards Linux reseller hosting—and with good reason. Linux offers several key advantages that make it a preferred choice for a wide range of projects. It is highly compatible with open-source technologies such as PHP, MySQL, and Python, which are commonly used in web development. This compatibility allows for seamless integration with popular content management systems like WordPress, Joomla, and Drupal, making it easier to build and manage client websites.
Additionally, Linux hosting is known for its robust security features and cost-effective maintenance, making it a cheap yet reliable option. Advanced users also benefit from features like SSH access and cron jobs, which provide greater control and automation capabilities. Unless your clients specifically require Windows-based technologies such as .NET or MSSQL, Linux hosting remains the more affordable and flexible choice for most UK-based webdesign professionals.
4. The Importance of Whitelabel Hosting
Whitelabel reseller hosting plays a crucial role in helping developers and agencies establish a professional, branded experience for their clients. With whitelabel hosting, you can offer hosting services entirely under your own brand—your clients will see your business name and logo on their control panel, reinforcing your identity every time they log in. This not only enhances your credibility but also builds stronger brand recognition and trust.
By presenting yourself as a full-service provider that handles both webdesign and web hosting, you position your business as a one-stop solution, which adds significant value to your client offerings. In the highly competitive digital market, providing whitelabel hosting can give you a distinct edge, helping you stand out from freelancers or agencies that rely on third-party branding. It’s a strategic move that elevates your brand while opening up new revenue opportunities.
5. Managed Reseller Hosting: Let Experts Handle the Backend
For freelancers and small agencies who prefer to focus on client work rather than technical upkeep, managed reseller hosting offers an ideal solution. This hosting option allows you to hand over the responsibilities of server maintenance, software updates, and security patching to your web hosting provider. One of the main benefits is access to 24/7 technical support, ensuring any issues are resolved quickly and professionally without requiring your direct involvement. Managed reseller hosting also includes automated backups and regular security scans, providing peace of mind that your clients’ data is protected. In addition, server optimisation is handled by experts, ensuring websites perform at their best. By saving time on backend tasks, you can dedicate more energy to your core services like webdesign and client relationship management.
6. What to Look for in a Hosting Provider
Choosing the right hosting provider is a critical decision for any webdesign business or agency offering reseller services. To ensure your clients receive the best experience, your web hosting provider should offer location based data centres, which significantly reduce website load times for local users and provide SEO advantages in regional search results.
Look for hosting providers that offer affordable plans without compromising on performance, so you can maintain healthy profit margins while delivering quality service. A Linux server environment with full access to control panels like cPanel and WHM is essential for ease of management and compatibility with popular web applications. Whitelabel support with the ability to customise branding allows you to present a unified, professional image to clients. If you're looking to avoid the technical burden of server management, make sure your hosting provider offers managed reseller hosting packages.
7. How Cheap Doesn’t Mean Low-Quality
For many resellers, finding a cheap reseller hosting plan is an effective way to maximise profit margins while offering competitive pricing to clients. However, opting for a low-cost plan doesn't have to mean compromising on quality. The key lies in choosing the best and most affordable web hosting provider that balances affordability with performance and reliability. Look for established web hosting companies with a strong reputation in the industry, as they are more likely to offer consistent uptime and responsive support. The right cheap web hosting plan should still include essential features such as SSD storage for fast loading times, free SSL certificates for security, and access to cPanel for easy management.
Additionally, reviewing customer feedback and testimonials can offer valuable insight into a provider’s real-world performance. Some of the best UK hosting providers offer cheap Linux reseller hosting that delivers excellent service, reliability, and even full whitelabel branding support—proving that affordable can still mean professional.
8. Integrating Hosting with Webdesign Services
For webdesign professionals, integrating hosting into your service offerings is a smart way to enhance value and streamline the client experience. By bundling hosting with your webdesign services, you position yourself as a one-stop solution—clients benefit from the convenience of having everything managed under one roof. This approach not only simplifies project delivery but also opens the door to recurring revenue streams through web hosting subscriptions.
Another key advantage is the ability to control the hosting environment, ensuring optimal website performance, faster load times, and seamless compatibility with your designs. When selecting an affordable web hosting plan for integration, look for features that support professional web projects—such as staging environments for testing, reliable email hosting, automated backups for data security, and SSL certificates for encrypted connections. These features are essential for delivering a complete and professional webdesign package, helping you stand out in the competitive market while building long-term client relationships.
9. Control Panels Matter: cPanel and WHM
When offering Linux reseller hosting, having access to user-friendly and powerful control panels is essential. That’s why most reputable web hosting providers include cPanel and WHM in their reseller packages—these tools are industry standards that simplify hosting management for both you and your clients. For your clients, cPanel provides an intuitive interface that makes everyday tasks easy to handle, including setting up email accounts, managing FTP access, handling files, and installing popular web applications through Softaculous with just one click.
On the other hand, WHM (Web Host Manager) gives you the ability to create and manage multiple hosting accounts from a single dashboard. It allows you to monitor resource usage across accounts, set limits, and customise hosting packages to suit the varying needs of your webdesign clients. This combination of cPanel and WHM empowers you to deliver a professional, fully managed experience while giving clients the autonomy they expect—without requiring extensive technical expertise from either party.
10. SEO Advantages of Local Hosting
For UK businesses, search engine optimisation (SEO) is a top priority, and the location of your hosting server can significantly impact local search rankings. Google takes several factors into account, including the server’s IP location, website load speed, and the presence of a secure HTTPS protocol. By choosing Linux reseller hosting, you ensure that your clients’ websites load faster for visitors within the region, which not only improves user experience but also positively influences SEO performance.
Faster load times reduce bounce rates and encourage longer visits, both of which are signals Google rewards. Additionally, hosting locally helps establish relevance in regional search results by associating the server’s IP. When combined with whitelabel branding, this setup allows you to offer a premium, fully optimised hosting service that meets the demands of businesses focused on improving their online visibility and search rankings.
11. Security and Backups: Non-Negotiables
In today’s digital landscape, security is absolutely non-negotiable—especially when you’re managing multiple client websites through reseller hosting. It’s essential to choose a web hosting provider that offers robust security measures to protect your clients’ data and maintain their trust. Key features to look for include free SSL certificates, which encrypt website traffic and enhance user confidence. Regular backups, whether daily or weekly, are critical to ensure data can be restored quickly in case of accidental loss or cyberattacks.
Additional layers of protection such as firewalls and malware scanning help safeguard websites from unauthorized access and malicious software. DDoS (Distributed Denial of Service) protection is also vital to prevent downtime caused by traffic overload attacks. These security protocols are particularly important if you opt for managed reseller hosting, as your clients will expect high availability and data safety as part of a professional service package. Prioritising security not only protects your clients but also strengthens your reputation as a reliable hosting provider in the competitive market.
12. Making the Final Choice: Checklist
Before finalising your reseller hosting plan for your clients, it’s important to carefully evaluate your options to ensure you select a solution that aligns with both your immediate needs and long-term business goals. Start by confirming that the plan offers Linux hosting with industry-standard control panels like cPanel and WHM, which are essential for efficient account management and client usability. Next, consider whether the plan is cheap yet reliable—affordability shouldn’t come at the cost of performance or support.
Check if the web hosting provider supports whitelabel and branding options, enabling you to deliver a seamless, professional experience under your own brand name. Also, assess whether there’s an option for managed reseller hosting, which can be invaluable if you prefer to delegate server management tasks. Finally, reflect on whether the cheap web hosting plan will support your ongoing webdesign projects and business growth, providing the scalability and features you need to succeed in the market. Taking the time to run through this checklist ensures you make an informed decision that benefits both your agency and your clients.
Conclusion-
Choosing the right and cheap web hosting plan for your clients is more than a technical decision—it’s a strategic business move. Whether you're just starting out or scaling your webdesign agency, reseller hosting with Linux, whitelabel branding, and optional managed reseller hosting can elevate your service offerings and boost client satisfaction.
By focusing on performance, reliability, and branding, you not only meet client expectations but also create new revenue opportunities. With the right cheap hosting solution, your business can grow sustainably while delivering real value.

Janet Watson
MyResellerHome MyResellerhome.com We offer experienced web hosting services that are customized to your specific requirements. Facebook Twitter YouTube Instagram
#best web hosting#webhosting#myresellerhome#webhostingservices#cheap web hosting#affordable web hosting#reseller#resellerhosting
0 notes
Link
#Automation#cloud#configuration#containerization#deploy#DevOps#Docker#feedaggregator#FreshRSS#Linux#Monitoring#news#open-source#Performance#Privacy#RSSreader#self-hosted#Server#systemadministration#updates#webapplication
0 notes
Text
Price: [price_with_discount] (as of [price_update_date] - Details) [ad_1] ⚡Master Python Automation Like a Pro – Save time, Eliminate Repetitive Tasks & Supercharge Productivity - (2025 Edition)⚡❌ Tired of wasting time on repetitive tasks? ❌ Struggling to streamline workflows with Python? ❌ Want to automate everything from file management to web scraping and APIs?If yes, then, keep reading. This book is for you.In today’s digital world, automation isn’t a luxury, it’s a necessity. Whether you're a developer, data analyst, or business professional, automating repetitive tasks saves time, reduces errors and boosts productivity. Python’s simplicity and vast libraries make it the perfect tool; but knowing where to start can be overwhelming.This step-by-step crash course takes you from automation fundamentals to real-world applications. You’ll write efficient Python scripts, automate files, emails, databases, and web APIs, and even build web automation bots with Selenium. Through hands-on projects, you’ll apply automation in real-world scenarios, helping you streamline workflows, optimize processes, and master Python automation with confidence. Master Python Automation like a pro With:Python Fundamentals & Setup: Quickly install Python, configure IDEs, and write your first automation script with ease. File & Folder Automation: Say goodbye to digital clutter! Automate file renaming, organization, and sorting. Web Scraping Mastery: Extract real-time data from websites using BeautifulSoup and Selenium. Advanced Web Scraping: Tackle CAPTCHAs, AJAX-heavy websites, and JavaScript-based content like a pro. API Integration & Automation: Automate data retrieval from REST APIs, parse JSON, and interact with online services. Email Automation: Schedule and send emails, handle attachments, and integrate with Gmail or Outlook. Task Scheduling: Automate repetitive tasks with Cron jobs (Linux/macOS) and Task Scheduler (Windows).Data Processing with Pandas: Clean, filter, and analyze large datasets to streamline automation workflows. Excel & Spreadsheet Automation: Generate reports, format data, and create automated templates for efficiency. Building Interactive Dashboards: Use Flask and AJAX to create real-time web apps with dynamic charts. Cloud-Based Automation: Sync data, automate backups, and work with AWS S3 and cloud storage. Real-World Automation Projects: Work on hands-on projects like auto-organizing files, scraping news, and sending automated alerts.and so much, much more.... Whether you're a beginner automating daily tasks, a data analyst optimizing workflows, or a developer scaling systems, this book is your step-by-step guide to Python automation. Imagine saving hours by automating data processing, web scraping, emails, and system tasks with just a few lines of code. You'll build practical scripts, streamline workflows, and master time-saving techniques used by professionals.With clear guidance, expert insights, and best practices, you'll gain the confidence to apply automation immediately in your work or personal projects..Why Wait? Take control of your workflow with Python automation.📈Scroll up,'Click "Buy Now" and start mastering Python automation today!🚀 ASIN : B0DR38KB47 Language : English File size : 2.5 MB Simultaneous device usage : Unlimited Text-to-Speech : Enabled
Screen Reader : Supported Enhanced typesetting : Enabled X-Ray : Not Enabled Word Wise : Not Enabled Print length : 362 pages [ad_2]
0 notes
Text
Cron Jobs Explained: The Essential Guide to Automating Tasks on Unix/Linux

Cron jobs are essential tools in Unix-like operating systems that automate the execution of scripts and commands at scheduled intervals. Whether it's backing up files, clearing temporary data, or running system updates, cron jobs help system administrators and developers save time and ensure consistency by automating repetitive tasks.
What is a Cron Job?
A cron job is a time-based task scheduler in Unix/Linux systems that runs commands or scripts automatically at specified times and dates. These jobs are managed by a background process known as the cron daemon, which continuously checks if any scheduled task is due to be executed.
How Cron Works
Cron relies on a daemon called crond, which runs in the background and checks the crontab file to determine when to execute scheduled tasks. Users and system processes can define cron jobs in these crontab files, and once saved, the daemon takes care of the scheduling and execution.
Anatomy of a Cron Expression
A typical cron expression contains five time-related fields followed by the command to be executed. Each field defines a specific unit of time:
pgsql
CopyEdit
* * * * * command to execute
- - - - -
| | | | |
| | | | +----- Day of week (0 - 7) (Sunday = 0 or 7)
| | | +------- Month (1 - 12)
| | +--------- Day of month (1 - 31)
| +----------- Hour (0 - 23)
+------------- Minute (0 - 59)
Common Cron Examples:
0 0 * * * – Runs every day at midnight
*/15 * * * * – Runs every 15 minutes
0 9 * * 1 – Runs every Monday at 9 AM
Creating and Managing Cron Jobs
You can create or edit cron jobs using the crontab command, which opens the cron configuration file for the current user.
crontab -e – Opens the crontab file for editing
crontab -l – Lists existing cron jobs
crontab -r – Removes the crontab file
Best practices for writing cron jobs:
Use full paths for all commands and files
Test scripts manually before scheduling
Include logging to track task execution
Practical Use Cases of Cron Jobs
Cron jobs are used across industries for automating repetitive tasks, including:
Database backups – Automatically back up databases daily or weekly
Email notifications – Send reports or alerts on a set schedule
System maintenance – Clear logs, temp files, or rotate logs
Data synchronization – Sync files between servers regularly
These scheduled jobs help maintain performance, improve security, and reduce human error.
Debugging and Logging Cron Jobs
Debugging cron jobs can be tricky, but proper logging and output redirection can help troubleshoot issues efficiently. Since cron jobs don't have access to a terminal interface, you should always redirect output to a log file:
bash
CopyEdit
0 1 * * * /path/to/script.sh >> /var/log/myscript.log 2>&1
Additionally, check system logs for cron-related errors:
/var/log/cron (CentOS/RHEL)
journalctl -u cron (Ubuntu with systemd)
Security Considerations
Like any automated process, cron jobs must be secured to prevent misuse or accidental damage:
Use absolute paths to avoid unexpected command behavior
Restrict crontab access with /etc/cron.allow or /etc/cron.deny
Set correct permissions on scripts to avoid unauthorized modifications
Always validate the logic and schedule before deploying a new cron job to production.
Alternatives to Cron Jobs
While cron is widely used, there are modern alternatives that offer enhanced features and better flexibility:
Systemd Timers – Provide better logging and dependency management on systemd-based systems
Cloud-based schedulers – Such as AWS CloudWatch Events, Google Cloud Scheduler
Task runners – Like Jenkins, Airflow, or GitHub Actions for complex workflows
These options are ideal when working in distributed or cloud environments with more dynamic scheduling needs.
Conclusion Whether you're a system administrator or a developer, understanding how to effectively use cron jobs can greatly enhance your ability to automate and manage routine tasks. While cron is a simple yet powerful tool, make sure to follow best practices and explore modern alternatives when appropriate to keep your systems efficient and secure.
0 notes
Text
How to Start Learning Linux Shell Programming in Ukraine

Linux shell programming is a foundational skill for IT professionals, offering the ability to automate tasks, manage systems, and enhance productivity. Whether you're a beginner or looking to expand your skill set, learning shell programming can open up numerous career opportunities, especially in Ukraine’s burgeoning tech industry. In this blog, we’ll guide you through the steps to start learning Linux shell programming and explain how Unichrone’s tailored training programs can help you achieve proficiency.
Why Learn Linux Shell Programming?
Linux is widely used across various industries for its reliability, security, and flexibility. Shell programming allows you to interact with the Linux operating system through commands and scripts, automating tasks and simplifying complex processes. Here’s why shell programming is essential:
1. Automation of Repetitive Tasks
Shell scripts enable users to automate repetitive tasks such as file management, system monitoring, and backups, saving time and reducing errors.
2. Improved System Administration
System administrators rely on shell scripting to manage and configure servers efficiently, ensuring seamless operations.
3. Enhanced Problem-Solving Skills
Learning shell programming helps you develop analytical thinking and problem-solving skills by understanding system workflows and command-line tools.
4. Career Growth Opportunities
Shell programming is a versatile skill that is highly valued in roles such as DevOps engineer, system administrator, cybersecurity analyst, and software developer.
Steps to Start Learning Linux Shell Programming
1. Understand the Basics of Linux
Before diving into shell programming, it’s crucial to familiarize yourself with Linux basics. Learn about:
File systems and directory structures.
Basic commands like ls, cd, cp, mv, and rm.
Permissions and user management.
Editing files using tools like vim or nano.
2. Learn About Shells
A shell is an interface between the user and the operating system. Common shells include:
Bash (Bourne Again Shell): The most widely used shell in Linux environments.
Z Shell (zsh): Known for its advanced features and customization.
Korn Shell (ksh): Often used for its performance efficiency.
Understand the differences and choose one to focus on initially, preferably Bash, as it is the most commonly used.
3. Master Command-Line Basics
The command line is the foundation of shell programming. Learn to:
Use pipes (|) and redirection (>, <, >>).
Combine commands using operators like && and ||.
Search and filter data using grep, awk, and sed.
Manage processes with commands like ps, top, and kill.
4. Start Writing Simple Scripts
Once comfortable with commands, start creating simple scripts. Begin with tasks like:
Printing text using echo.
Creating and navigating directories.
Writing conditional statements using if-else.
Looping through files with for, while, and until loops.
5. Explore Advanced Scripting Techniques
Progress to more advanced topics as you gain confidence:
Functions and modular programming.
Error handling and debugging.
Using variables and arrays.
Working with input/output streams.
Scheduling scripts with cron jobs.
6. Practice Regularly
The best way to learn shell programming is through hands-on practice. Work on real-world tasks such as:
Automating backups.
Monitoring system performance.
Creating scripts for software installation.
7. Join Online Communities and Forums
Engage with online communities like Stack Overflow, GitHub, and Linux forums to share knowledge, ask questions, and learn from others' experiences.
8. Enroll in a Professional Training Program
For a structured learning experience, consider enrolling in a professional training program like the one offered by Unichrone. Expert-led instruction and hands-on exercises will accelerate your learning process.
Conclusion
Learning Linux shell programming is a rewarding journey that can significantly boost your career in Ukraine’s thriving IT industry. Whether you’re aiming to become a system administrator, DevOps engineer, or cybersecurity expert, shell scripting is an indispensable skill.
Unichrone’s comprehensive training program equips you with the knowledge, hands-on experience, and certification needed to excel in this field. Start your learning journey today and unlock a world of opportunities in the ever-evolving tech landscape
0 notes
Text
Backup ssh keys to cloud (Dropbox, Mega, G drive )
This is a simple hint for backing up your ssh keys to the cloud. If you have multiple keys, backing them up is a good practice. Feel free to improve on it, and when you do, please comment here for improvement suggestions. First step : set up the cloud storage provider on your Linux computer. It could be Dropbox, Megasync, and so on. Next step is to create a cron job to back up the contents of…
0 notes
Text
Linux Zero to Hero: Mastering the Open-Source Operating System
Linux, an open-source operating system, is the backbone of countless systems, from personal computers to enterprise servers and supercomputers. It has earned its reputation as a robust, versatile, and secure platform for developers, administrators, and tech enthusiasts. In this comprehensive guide, we explore the journey from being a Linux beginner to mastering its vast ecosystem.
Why Learn Linux?
1. Open-Source Freedom
Linux provides unparalleled flexibility, allowing users to customize and modify the system according to their needs. With its open-source nature, you have access to thousands of applications and tools free of charge.
2. Industry Relevance
Major companies, including Google, Amazon, and Facebook, rely on Linux for their servers and infrastructure. Learning Linux opens doors to lucrative career opportunities in IT and software development.
3. Secure and Reliable
Linux boasts a strong security model and is known for its stability. Its resistance to malware and viruses makes it the operating system of choice for critical applications.
Getting Started with Linux
Step 1: Understanding Linux Distributions
Linux comes in various distributions, each catering to specific needs. Popular distributions include:
Ubuntu: User-friendly, ideal for beginners.
Fedora: Known for cutting-edge technology and innovation.
Debian: Stable and versatile, preferred for servers.
CentOS: Enterprise-grade, often used in businesses.
Choosing the right distribution depends on your goals, whether it’s desktop use, development, or server management.
Step 2: Setting Up Your Linux Environment
You can use Linux in several ways:
Dual Boot: Install Linux alongside Windows or macOS.
Virtual Machines: Run Linux within your current OS using tools like VirtualBox.
Live USB: Try Linux without installation by booting from a USB drive.
Mastering Linux Basics
1. The Linux File System
Linux organizes data using a hierarchical file system. Key directories include:
/root: Home directory for the root user.
/etc: Configuration files for the system.
/home: User-specific data.
/var: Variable files, such as logs and databases.
2. Essential Linux Commands
Understanding basic commands is crucial for navigating and managing the Linux system. Examples include:
ls: Lists files and directories.
cd: Changes directories.
mkdir: Creates new directories.
rm: Deletes files or directories.
chmod: Changes file permissions.
3. User and Permission Management
Linux enforces strict user permissions to enhance security. The system categorizes users into three groups:
Owner
Group
Others
Permissions are represented as read (r), write (w), and execute (x). Adjusting permissions ensures secure access to files and directories.
Advanced Linux Skills
1. Shell Scripting
Shell scripting automates repetitive tasks and enhances efficiency. Using bash scripts, users can create programs to execute commands in sequence.
Example: A Simple Bash Script
bash
Copy code
#!/bin/bash
echo "Hello, World!"
2. System Administration
System administrators use Linux for tasks like:
Managing users and groups.
Monitoring system performance.
Configuring firewalls using tools like iptables.
Scheduling tasks with cron jobs.
3. Package Management
Each Linux distribution uses a package manager to install, update, and remove software:
APT (Ubuntu/Debian): sudo apt install package_name
YUM (CentOS/Fedora): sudo yum install package_name
Zypper (openSUSE): sudo zypper install package_name
Linux for Developers
Linux provides a robust environment for coding and development. Key features include:
Integrated Development Environments (IDEs): Tools like Eclipse, IntelliJ IDEA, and Visual Studio Code are supported.
Version Control Systems: Git integration makes Linux ideal for collaborative software development.
Containerization and Virtualization: Tools like Docker and Kubernetes thrive in Linux environments.
Troubleshooting and Debugging
Learning to troubleshoot is vital for any Linux user. Common methods include:
Viewing Logs: Logs in /var/log offer insights into system errors.
Using Debugging Tools: Commands like strace and gdb help debug applications.
Network Diagnostics: Tools like ping, traceroute, and netstat diagnose connectivity issues.
Linux Certifications
Earning a Linux certification validates your skills and enhances your career prospects. Notable certifications include:
CompTIA Linux+
Red Hat Certified Engineer (RHCE)
Linux Professional Institute Certification (LPIC)
Certified Kubernetes Administrator (CKA)
These certifications demonstrate proficiency in Linux administration, security, and deployment.
Tips for Success in Linux Mastery
Practice Regularly: Familiarity with commands and tools comes through consistent practice.
Join Communities: Engage with Linux forums, such as Stack Overflow and Reddit, to learn from experienced users.
Contribute to Open-Source Projects: Hands-on involvement in projects deepens your understanding of Linux and enhances your resume.
Stay Updated: Follow Linux news and updates to stay informed about advancements and changes.
Conclusion
Mastering Linux is a transformative journey that equips individuals and organizations with the tools to thrive in a technology-driven world. By following the steps outlined in this guide, you can progress from a Linux novice to a seasoned expert, ready to tackle real-world challenges and opportunities.
0 notes
Text
Automation and Scripting in Enterprise Linux: Ansible, Bash, and Python
Automation and scripting are crucial in managing enterprise Linux environments efficiently. They help in streamlining administrative tasks, reducing errors, and saving time. In this post, we will explore three powerful tools for automation and scripting in enterprise Linux: Ansible, Bash, and Python.
1. Ansible: Simplifying Configuration Management
Overview: Ansible is an open-source automation tool used for configuration management, application deployment, and task automation. It uses a simple, human-readable language called YAML for its playbooks, making it easy to write and understand.
Key Features:
Agentless: No need to install any software on target machines.
Idempotent: Ensures that operations are repeatable and produce the same result every time.
Extensible: Supports a wide range of modules for different tasks.
Example Use Case: Deploying a Web Server
---
- name: Install and configure Apache web server
hosts: webservers
become: yes
tasks:
- name: Install Apache
yum:
name: httpd
state: present
- name: Start and enable Apache service
service:
name: httpd
state: started
enabled: yes
- name: Deploy index.html
copy:
src: /path/to/local/index.html
dest: /var/www/html/index.html
Benefits:
Easy to set up and use.
Scales efficiently across multiple systems.
Reduces the complexity of managing large infrastructures.
2. Bash: The Power of Shell Scripting
Overview: Bash is the default shell in many Linux distributions and is widely used for scripting and automation tasks. Bash scripts can automate routine tasks, perform system monitoring, and manage system configurations.
Key Features:
Ubiquitous: Available on virtually all Linux systems.
Flexible: Can combine various command-line utilities.
Interactive: Useful for both command-line operations and scripting.
Example Use Case: Automated Backup Script
#!/bin/bash
BACKUP_SRC="/home/user/data"
BACKUP_DEST="/backup"
TIMESTAMP=$(date +%Y%m%d%H%M%S)
BACKUP_NAME="backup_$TIMESTAMP.tar.gz"
# Create a backup
tar -czf $BACKUP_DEST/$BACKUP_NAME $BACKUP_SRC
# Print the result
if [ $? -eq 0 ]; then
echo "Backup successful: $BACKUP_NAME"
else
echo "Backup failed"
fi
Benefits:
Directly interacts with the system and its utilities.
Excellent for quick and simple tasks.
Easily integrates with cron jobs for scheduled tasks.
3. Python: Advanced Scripting and Automation
Overview: Python is a powerful, high-level programming language known for its readability and versatility. It is extensively used in system administration, automation, web development, and data analysis.
Key Features:
Extensive Libraries: Rich ecosystem of modules and packages.
Readability: Clean and easy-to-understand syntax.
Cross-Platform: Works on various operating systems.
Example Use Case: Monitoring Disk Usage
import shutil
def check_disk_usage(disk):
total, used, free = shutil.disk_usage(disk)
print(f"Disk usage on {disk}:")
print(f" Total: {total // (2**30)} GB")
print(f" Used: {used // (2**30)} GB")
print(f" Free: {free // (2**30)} GB")
if free / total < 0.2:
print("Warning: Less than 20% free space remaining!")
else:
print("Sufficient free space available.")
check_disk_usage("/")
Benefits:
Great for complex automation tasks and scripts.
Strong support for integrating with various APIs and web services.
Ideal for data manipulation and processing tasks.
Conclusion
Each of these tools—Ansible, Bash, and Python—offers unique strengths and is suited to different types of tasks in an enterprise Linux environment. Ansible excels in configuration management and large-scale automation, Bash is perfect for quick and simple scripting tasks, and Python shines in complex automation, data processing, and integration tasks.
By leveraging these tools, organizations can achieve greater efficiency, consistency, and reliability in their IT operations. Whether you are deploying applications, managing configurations, or automating routine tasks, mastering these tools will significantly enhance your capabilities as a Linux system administrator.
For more details click www.qcsdclabs.com
#linux#docker#redhatcourses#container#containerorchestration#kubernetes#information technology#containersecurity#dockerswarm#aws
0 notes
Text

Stress
You write a script to automate sending daily email reports using Python. We'll use the smtplib library to send emails and the email.mime modules to create the email content. Here's a step-by-step guide:
Step 1: Install Required Libraries
First, ensure you have the necessary libraries installed. You can install them using pip if they are not already installed.pip install smtplib pip install email
Step 2: Set Up Email Credentials
You need to have the credentials for your email account (e.g., Gmail). For security reasons, it's better to store these in environment variables or a configuration file.
Step 3: Create the Python Script
Here's a sample script that sends an email report daily:import smtplib from email.mime.multipart import MIMEMultipart from email.mime.text import MIMEText import os # Function to send email def send_email(subject, body, to_email): # Email credentials email_address = os.environ.get('EMAIL_USER') email_password = os.environ.get('EMAIL_PASS') # Create the email msg = MIMEMultipart() msg['From'] = email_address msg['To'] = to_email msg['Subject'] = subject # Attach the body with the msg instance msg.attach(MIMEText(body, 'plain')) # Create server object with SSL option server = smtplib.SMTP_SSL('smtp.gmail.com', 465) server.login(email_address, email_password) # Send the email server.send_message(msg) server.quit() print("Email sent successfully") # Function to generate the report def generate_report(): # Implement your report generation logic here report = "This is a sample report." return report # Main function to send daily email report def main(): report = generate_report() subject = "Daily Report" body = report to_email = "[email protected]" # Change to the recipient's email address send_email(subject, body, to_email) if __name__ == "__main__": main()
Step 4: Setting Up Environment Variables
To keep your email credentials secure, set them as environment variables. You can do this in your operating system or by using a .env file with the dotenv package.
Using Environment Variables Directly
Set your environment variables:
On Windows:
setx EMAIL_USER "[email protected]" setx EMAIL_PASS "your_password"
On macOS/Linux:
export EMAIL_USER="[email protected]" export EMAIL_PASS="your_password"
Using a .env File
Create a .env file with the following content:[email protected] EMAIL_PASS=your_password
Then, update the script to load these variables:from dotenv import load_dotenv # Load environment variables from .env file load_dotenv()
Install the python-dotenv package if you use the .env file method:pip install python-dotenv
Step 5: Automating the Script Execution
To run the script daily, you can use a scheduler.
On Windows
Use Task Scheduler to run the script daily.
Open Task Scheduler.
Create a new task.
Set the trigger to daily at your desired time.
Set the action to start a program and browse to the Python executable, then add the script path as an argument.
On macOS/Linux
Use cron to schedule the script.
Open the terminal.
Type crontab -e to edit the cron jobs.
Add a new line for the daily schedule (e.g., to run at 7 AM every day):
0 7 * * * /usr/bin/python3 /path/to/your_script.py
Summary
Install required libraries using pip.
Set up email credentials securely using environment variables or a .env file.
Write the Python script to generate the report and send the email.
Automate the script execution using Task Scheduler (Windows) or cron (macOS/Linux).
This setup will ensure your script runs daily and sends the email report automatically. If you have any specific requirements or encounter issues, feel free to ask!
0 notes
Text
What is cPanel and How to Use it - A Complete Guide

What is cPanel?
cPanel is a Linux-based web hosting control panel that provides a graphical user interface (GUI) for managing your website and server. It is one of the most popular control panels in the world, and is used by millions of people to manage their websites
c, short for control panel, is a web-based graphical interface designed to simplify the management and administration of websites and server functions.
It is widely used by website owners, web hosting providers, and system administrators to easily manage various aspects of their websites and servers.
cPanel allows users to perform a variety of tasks, including:
Managing files and folders
Creating and managing email accounts
Installing and managing applications such as WordPress and Drupal
Configuring security settings
Managing DNS settings
Creating and managing backups

Here is a step-by-step guide on how to use cPanel:
Access cPanel:
To use cPanel, you first need to access it. Usually, you can access cPanel by typing "yourdomain.com/cpanel" into your web browser. Alternatively, you can ask your web hosting provider for the login URL and credentials.
2. Enter your credentials:
Once you access the cPanel login page, enter your username and password provided by your hosting provider.
3. Navigate the cPanel interface:
After logging in, you will be redirected to the cPanel control panel. The interface is divided into different sections, including Files, Databases, Domains, Email, Metrics, Security, Software, and Advanced. Each section provides a range of tools and options.
4. Manage files:
In the "Files" section, you can upload, modify, and manage your website's files and folders. You can also use the File Manager tool to perform tasks like creating new directories, uploading files, editing code files, and managing permissions.

5. Configure domains:
Under the "Domains" section, you can manage domain-related settings. You can add new domain names, redirect domains, create subdomains, manage DNS records, and set up domain aliases.
6. Set up email accounts:
In the "Email" section, you can create and manage email accounts associated with your domain. You can add email accounts, set up forwarders, configure autoresponders, manage spam filters, and access webmail.
7. Configure databases:
For managing databases, you can use the "Databases" section. Here, you can create new databases, manage existing ones, set up database users, and use tools like phpMyAdmin for database administration.
8. Install software and scripts:
The "Software" section offers tools to install various applications and scripts. You can use the Softaculous Apps Installer to quickly install popular CMS platforms like WordPress, Joomla, or Drupal. This section also includes options to update software versions, perform backups, and manage SSL certificates.

9. Monitor website metrics:
Under the "Metrics" section, you can monitor your website's performance by accessing statistics like visitors, bandwidth usage, error logs, and resource usage. This helps you analyze your website's traffic and make informed decisions regarding optimization.
10. Configure security settings:
The "Security" section includes tools to enhance the security of your website. You can manage SSL certificates, set up password-protected directories, enable hotlink protection, and manage IP blocklists.
11. Advanced features:
The "Advanced" section provides additional features for experienced users and developers. Here, you can access tools like Cron jobs for scheduling tasks, manage PHP settings, access server logs, or customize error pages.

Some common tasks that you can perform using cPanel:
Create an email account:
Click on the "Email Accounts" icon and then click on the "Create" button. Enter the desired email address and password, and then click on the "Create Account" button.
Install WordPress:
Click on the "Softaculous Apps Installer" icon and then search for "WordPress". Click on the "Install" button and follow the on-screen instructions.
Manage your files:
Click on the "File Manager" icon. You can then browse through your files and folders, and upload, download, or delete files as needed.
Create a database:
Click on the "MySQL Databases" icon and then click on the "Create Database" button. Enter the desired database name and username, and then click on the "Create Database" button.
In summary, cPanel is a comprehensive and user-friendly control panel that provides a range of tools and features to effectively manage your website and server.
Its intuitive interface makes it easy to perform various tasks, from managing files and databases to configuring email accounts and monitoring website performance.
0 notes
Text
Aws services - Best quality tranning with 100%
Acent India Technoarts is Gurgaon’s best institute for providing quality industrial training and educational courses in Gurgaon. With Acent India the best AWS training in Gurgaon. At, accent India, we have the latest course content and training curriculum designed as per real-world industrial requirements standards. We have highly experienced and qualified professionals to provide high-quality practical Amazon web services AWS training in Gurgaon.
Acent India provides the best AWS training in Gurgaon as our trainers are highly qualified corporate trainers with experience working with big MNCs like Accenture and Google.
With Acent India( AIT India Technoarts) we assure quality training with 100% job-oriented training programs. We have the industry expert trainers for Amazon AWS training so that we can ensure students with high-quality Amazon AWS training and job placements offered by us.
The training program covers all basics to advance level concepts with live AWS projects and Interview preparation.
AWS (Amazon Web Services ) Training Curriculum- Acent India AWS training Syllabus Linux OS Installation & Setup
Linux Installation, Package Selection Anatomy of a Kickstart File, Command line Bash Commands Shell System Initialization, Starting the Boot Process: GRUB commands Boot Manager and Package Management:
How to Configure services to run at boot-up Single-user mode (SU login) Shutting down and rebooting the system RPM Package Manager, Installing and Removing Software, Updating a Kernel RPM Yum Command set, Install packages by using yum Apt-get commands set, Apt-cache package management Creating and Managing User Groups
Understanding different types of groups and creation of groups Creation of users in different groups Password aging Passwd, Shadow Files Understanding user’s security files The different commands for Monitoring the users System and Files Troubleshoot Setting up Server automation like Cron Jobs Run levels:
Different types of run-levels Understanding different types of shutdown commands Understanding run control scripts Understanding the different types
Website: https://www.acentindia.com/best-aws-amazon-web-services-training-institute-in-gurgaon/
0 notes
Text
Linux Course in Chandigarh: A Comprehensive Guide for Aspiring IT Professionals
In today’s digital world, Linux has become an essential component of IT infrastructure, powering everything from web servers and cloud systems to embedded devices. As demand for Linux professionals continues to rise, Chandigarh has emerged as a growing hub for quality IT training. This article delves into the importance of Linux, the structure of a typical Linux course in Chandigarh, and how such training can open up a world of opportunities for IT aspirants.
Why Learn Linux?
Linux is a Unix-like operating system that is free, open-source, and widely used in servers, data centers, and cloud computing environments. Here's why learning Linux is a smart career move:
Widely Used: Over 90% of cloud infrastructure and web servers run on Linux.
Career Demand: System administrators, DevOps engineers, cloud professionals, and cybersecurity experts require strong Linux skills.
Open Source Flexibility: Linux allows customization and is at the core of many enterprise technologies including Red Hat, Ubuntu, and CentOS.
Industry Certifications: Linux knowledge is a stepping stone to certifications like RHCSA, RHCE, CompTIA Linux+, and LFCS.
Chandigarh: A Growing IT Education Hub
Chandigarh, with its growing IT infrastructure and educational institutions, is an ideal place for pursuing technical training. The city offers:
Reputed Training Institutes: Several well-established institutes offer Linux and other IT courses.
Affordable Living: Compared to metro cities, Chandigarh is cost-effective for students.
Safe and Student-Friendly: The city has a strong student population and a clean, organized environment.
Who Should Take a Linux Course?
A Linux course is suitable for:
Students pursuing Computer Science or IT.
Working professionals looking to enhance their system administration or DevOps skills.
Fresher graduates who want to enter the IT industry with a specialized skill.
Network administrators aiming to deepen their understanding of Linux-based servers.
Structure of a Linux Course in Chandigarh
Most Linux training programs in Chandigarh are structured to suit both beginners and intermediate learners. Here's what a standard curriculum includes:
1. Introduction to Linux
History and philosophy of Linux
Types of Linux distributions
Installation and configuration
2. Linux Command Line
Basic shell commands
Directory and file manipulation
Text editing using vi or nano
3. File System Management
File types and permissions
Disk partitions and mounting
Logical Volume Manager (LVM)
4. User and Group Management
Creating and managing users/groups
Setting permissions and access control
Understanding /etc/passwd and /etc/shadow
5. Package Management
Using RPM, YUM, DNF (Red Hat-based)
Using APT (Debian/Ubuntu-based)
Installing, updating, and removing software
6. System Services and Daemons
Managing services with systemctl
Configuring startup processes
Working with cron jobs and background tasks
7. Networking Basics
IP addressing and configuration
Configuring DNS, DHCP, SSH
Troubleshooting tools: ping, netstat, traceroute
8. Shell Scripting
Writing and executing bash scripts
Variables, loops, and conditionals
Automating repetitive tasks
9. Security and Firewall Configuration
Setting up a firewall with iptables or firewalld
User authentication and sudo privileges
Securing services and open ports
10. Advanced Topics
Kernel management
Virtualization basics using KVM
Introduction to containers (Docker)
Modes of Training
Chandigarh-based institutes offer various formats of training to suit different needs:
Classroom Training: Instructor-led sessions with hands-on practice in a lab environment.
Online Classes: Live interactive classes or self-paced video modules.
Weekend Batches: Ideal for working professionals.
Fast-Track Courses: Intensive programs for those on a tight schedule.
Certification Support
Many Linux courses in Chandigarh also prepare students for globally recognized certifications, such as:
RHCSA (Red Hat Certified System Administrator)
RHCE (Red Hat Certified Engineer)
LFCS (Linux Foundation Certified System Administrator)
CompTIA Linux+
Certification-oriented training includes mock tests, practical labs, and real-time scenario-based exercises.
Top Institutes Offering Linux Training in Chandigarh
Several reputed training centers offer Linux courses in Chandigarh. While names may vary over time, some consistent features to look for include:
Experienced Trainers with industry background.
Updated Curriculum aligned with Red Hat and Linux Foundation.
Lab Infrastructure to practice real-world scenarios.
Placement Support with interview preparation and resume building.
Some institutes also have partnerships with Red Hat or offer authorized training, giving students access to official courseware and exams.
Career Opportunities After a Linux Course
After completing a Linux course, students can pursue various career roles depending on their skill level and interest:
1. Linux System Administrator
Responsible for installation, configuration, and maintenance of Linux servers.
2. DevOps Engineer
Combines Linux skills with tools like Docker, Jenkins, and Kubernetes to streamline software delivery.
3. Cloud Engineer
Works with cloud platforms like AWS, Azure, and Google Cloud, where Linux is often the default OS.
4. Network Administrator
Manages routers, firewalls, and switches with Linux as the control system.
5. Cybersecurity Analyst
Uses Linux tools for penetration testing, log analysis, and threat detection.
Salary Expectations
Starting salaries for Linux professionals in India typically range from ₹3–6 LPA for freshers, and go up to ₹12–20 LPA for experienced professionals in DevOps or cloud roles.
Benefits of Taking a Linux Course in Chandigarh
Affordable Quality Training: Courses in Chandigarh offer a good balance of cost and content.
Industry-Relevant Curriculum: Most institutes design their syllabus with inputs from industry professionals.
Community and Networking: Access to tech meetups, local developer groups, and hackathons.
Strong Placement Records: Many institutes have tie-ups with IT companies and conduct placement drives.
Tips for Choosing the Right Institute
When selecting a Linux course in Chandigarh, consider the following:
Check the trainer’s credentials and experience.
Ask for a demo class to evaluate teaching style.
Look for hands-on labs and real-world projects.
Ensure they offer certification guidance.
Verify placement support and success stories.
Final Thoughts
With its increasing demand in the job market and wide-ranging applications, Linux has become an indispensable skill for IT professionals. Chandigarh, with its vibrant tech training ecosystem, offers an excellent environment to learn Linux from the ground up.
Whether you are a student planning your career path, a professional looking to upgrade your skills, or an entrepreneur wanting to manage your servers more efficiently, a Linux course in Chandigarh can be your gateway to a successful IT journey.
0 notes
Text
2 ways to Creating cron jobs in Linux.
2 ways to creating cron jobs in Linux with specific user and for the system. Set up for cron jobs, crontab examples, fields explained. #linux #hacking #kalilinux #tech #developer #computer #hackers #hack #security #code
Introduction In the tutorial, we are creating cron jobs in Linux. Cron is to run the script or command at a given date and time. It is to schedule the backup, for logrotate, and delete files on a weekly basis. Suppose we have to take the backup or archive the logs daily then we can use cron jobs. Cron jobs in Linux help us to automate the tasks without a fail. At the given timestamp it will…
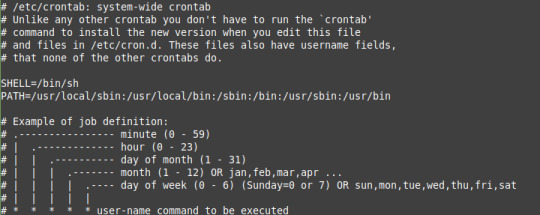
View On WordPress
0 notes