#creativereuse
Text

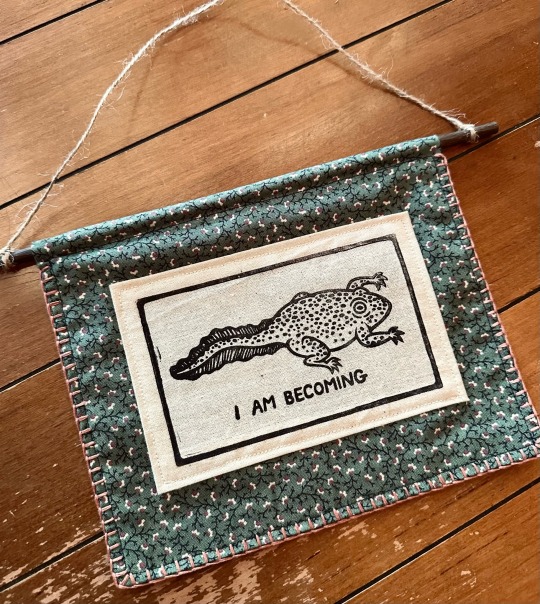
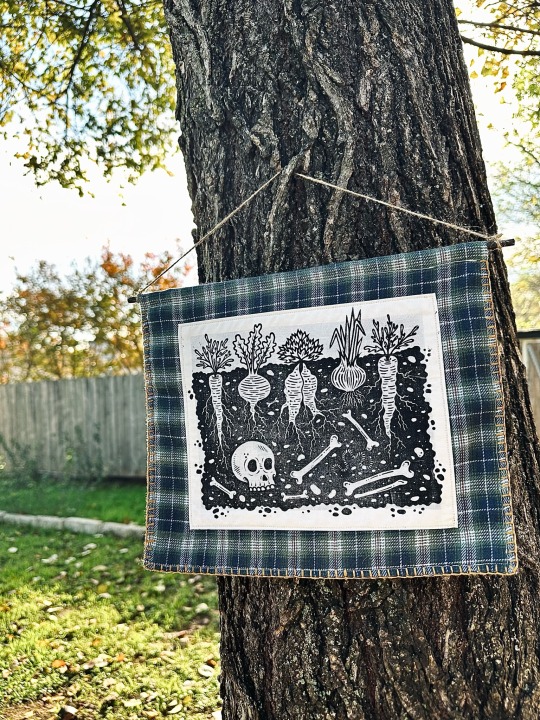
“becoming” banner by jasper alexander
linocut print on fabric, home sewn utilizing recycled textiles
#I am prepping for markets and my body is a constant state of motion#fingers always stitching or carving or packing or typing#linoprint#printmaker#block printing#printmaking#relief print#salted snail studio#block print#reliefprint#blanket stitch#embroidery#mixed media#relief printed fabric#relief printing#fabric printing#creativereuse#recycled textiles#linocut#linocut patch
7K notes
·
View notes
Text
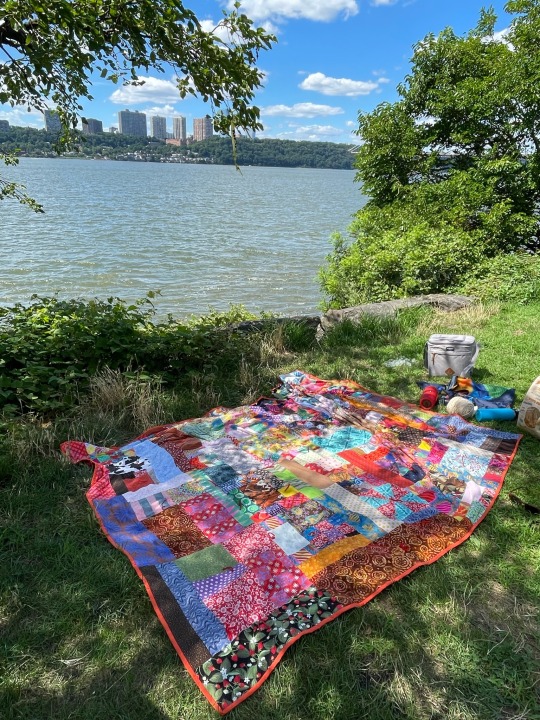
picnic
171 notes
·
View notes
Photo
Tennessee Dogwood… #smokeymountains #tennessee #assemblage333 www.assemblage333.com Creative Use of Vintage Textiles for Sustainable Wearables by Robert Pennington Price Design from Assemblage333… www.assemblage333.com #creativereuse #sustainablefashion #robertpenningtonpricedesign #assemblage333 #roundtopantiquesweek #renningersextravaganza #brimfieldantiqueshow #quiltcoat #roundtopfsshionweek #barwantiqueshow #quiltcoat #campblanketjumper #denim #jesusoncoveralls (at Lenoir City, Tennessee) https://www.instagram.com/p/Cq3_TfqJFQY/?igshid=NGJjMDIxMWI=
#smokeymountains#tennessee#assemblage333#creativereuse#sustainablefashion#robertpenningtonpricedesign#roundtopantiquesweek#renningersextravaganza#brimfieldantiqueshow#quiltcoat#roundtopfsshionweek#barwantiqueshow#campblanketjumper#denim#jesusoncoveralls
7 notes
·
View notes
Photo

Dump Greg Abbott - vote! And evidently Jesus is coming… #angrycloud #angryclouds⛈ #austin #atx #texas #streetart #character #drawing #wood #recycle #creativereuse #artistsoninstagram #artistsofinstagram (at Austin, Texas) https://www.instagram.com/p/CgAb67RlkL7/?igshid=NGJjMDIxMWI=
#angrycloud#angryclouds⛈#austin#atx#texas#streetart#character#drawing#wood#recycle#creativereuse#artistsoninstagram#artistsofinstagram
10 notes
·
View notes
Photo

The Fateful Findings Exhibition came down at @arcgallerysf yesterday BUT....the Lost & Found fine art books are STILL AVAILABLE and can be purchased online to be sent to you anywhere in the world! Find the link in the Lost & Found book tab in my bio's Linktr.ee This is a gorgeous hardcover book with 207 pages that feature 8 exceptional assemblage artists of Northern California. I am super proud to be counted as one of them along with Hans Bruhner, Larry Fuete, Cat Kaufman, Monty Monty, Sean O'Donnell and Spencer Brewer + Esther Siegel of @harmonygaits (who are also the book's curators and publishers). Most of these artists are not active on Instagram so to experience their work you need to view it in person OR through the high resolution and beautifully printed pages of this publication. I personally have work featured on 20 pages! For those of you already in receipt of the book, I'd love to hear your feedback. Please share a review of your impressions. The group has been invited to show again in Carmel, CA this Spring and I'll be sharing more information about that in the new year. #assemblage #assemblageart #assemblageartists #assemblagebook #fineartbook #lostandfound #lostandfoundbook #artbook #foundobjectart #foundobjectartists #upcycledart #recycledmaterials #creativereuse #booksmakegreatgifts #assemblageartcollectors #assemblageenthusiasts (at Northern California) https://www.instagram.com/p/CmVHX8wpmfy/?igshid=NGJjMDIxMWI=
#assemblage#assemblageart#assemblageartists#assemblagebook#fineartbook#lostandfound#lostandfoundbook#artbook#foundobjectart#foundobjectartists#upcycledart#recycledmaterials#creativereuse#booksmakegreatgifts#assemblageartcollectors#assemblageenthusiasts
3 notes
·
View notes
Text
Revamp Your Wardrobe: 25 Ways to Upcycle Your Old Sweater!

Hey ! 👋 Don't toss out that old sweater just yet – I've got some game-changing ideas to breathe new life into it! Who knew your forgotten knitwear could be transformed into something fabulous? Well, get ready to be amazed because I've rounded up 25 creative ways to reuse your old sweater and give it a whole new purpose!
Check out these awesome DIY projects:
Cashmere Swing Skirt
DIY Sweater Pillow
Mug Cozy
Hat From An Old Sweater
Sweater Boot Cuffs
Cashmere Sweater Scarves
Recycled Sweater Bracelets
Easy (little) Dog Sweater
Braided Headband
Slipper Boots
Baby Wash Cloth
Sweater Into Leg Warmers
Sweater Lamp
No-Sew Sweater Pillow
Upcycled Sweater Baby Booties
Sweater Scarf
Toy Owl
Lined Skirt With Invisible Waistband
Recycled Sweater Gift Bag
Refashioned Sweater Tote
Heart Hand Warmers
Easy Fingerless Gloves
Winter Wine Gift Wrap
Sweater Covered Pot
Macbook Case
Ready to get your DIY on? These tutorials will guide you through each project step-by-step, turning your old sweater into something amazing! So raid your closet, dust off that old sweater, and let's get crafting!
For detailed tutorials and more creative ideas, check out the full article on Mamabee.
0 notes
Text
#CementBags#ConstructionIndustry#Polypropylene#PPPlastic#ManufacturingProcess#Recycling#Sustainability#Customization#EcoFriendly#PackagingSolutions#MaterialSourcing#SupplyChain#EnvironmentalConservation#Innovation#Reuse#ReduceWaste#CreativeReuse#QualityControl#Durability#IndustryStandards
0 notes
Text
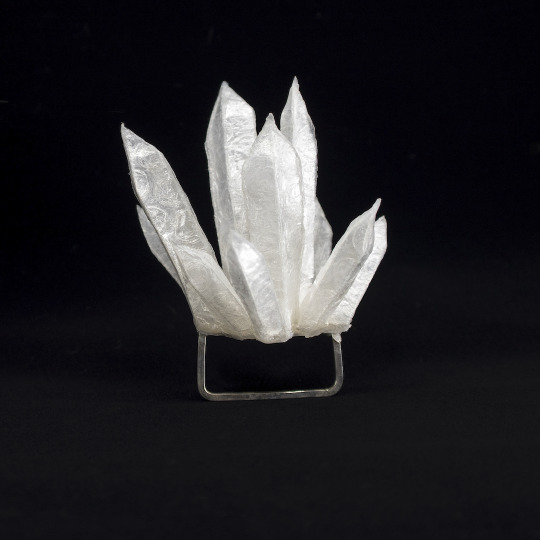


"Quartz" Ring, made from fused bubblewrap with a silver ring. From a series I finished back in 2020!
#contemporaryjewellery#contemporaryartjewelry#artjewelry#wearablesculpture#creativereuse#ecoart#trashtoart#sculpturaljewelry#metalsmithing#singleuseplastic#upcycledjewelry#upcycled jewelry
1 note
·
View note
Text
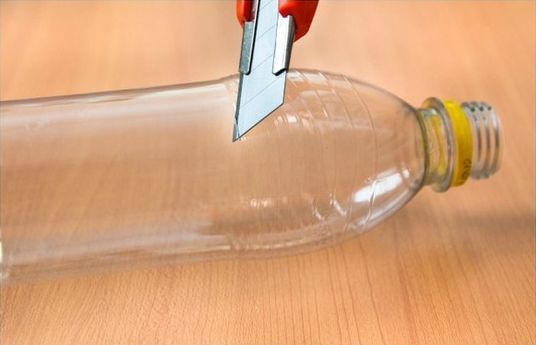
12 clever ways to reuse plastic bottles

Plastic bottles have become one of the most common forms of litter around the world, causing environmental damage and harm to wildlife. However, with a little creativity and innovation, plastic bottles can be transformed into useful and practical items, reducing waste and promoting sustainability. In this article, we will share 12 clever ways to reuse plastic bottles.

Bird Feeders
Transform plastic bottles into bird feeders by cutting out windows and filling the bottles with birdseed. Hang them outside and watch as birds come to feed.
If you're looking for a fun and eco-friendly DIY project, consider transforming your old plastic bottles into bird feeders. Not only will you be helping to reduce plastic waste, but you'll also be providing a much-needed source of food for our feathered friends. Here's how to create your own plastic bottle bird feeder in just a few simple steps.
Materials:
- Plastic bottle (2-liter soda bottles work well)
- Scissors or craft knife
- String or twine
- Wooden spoons or dowels
- Birdseed
Instructions:
- Start by cleaning and drying your plastic bottle thoroughly.
- Using a pair of scissors or a craft knife, cut two holes on opposite sides of the bottle, approximately 3-4 inches from the bottom.
- Cut two more small holes just above the bottom holes, on either side of the bottle. These holes will be used to insert the wooden spoons or dowels.
- Insert the wooden spoons or dowels through the bottom holes and out through the side holes. These will serve as perches for the birds.
- Tie a length of string or twine around the neck of the bottle, creating a loop for hanging the feeder.
- Fill the bottle with birdseed through the top opening.
- Hang the feeder from a sturdy tree branch or hook, making sure it's at a height where you can easily reach it to refill it.
And voila! You now have your very own plastic bottle bird feeder. Not only is it a great way to recycle old plastic bottles, but it's also a fun and educational activity to do with kids. Plus, watching the birds come to your feeder is sure to bring a smile to your face.
Tips:
- Make sure to choose a location for your feeder that's away from any potential predators, such as cats or squirrels.
- Clean and refill your feeder regularly to prevent mold and bacteria growth.
- You can also decorate your feeder with paint, stickers, or other embellishments to make it more visually appealing.

Vertical Planters
Cut off the top of a plastic bottle and fill it with soil and plants. Attach it to a wall or fence to create a vertical planter that takes up minimal space.
Transforming plastic bottles into vertical planters is a great option. Not only is it a cost-effective way to repurpose old bottles, but it also allows you to grow a variety of plants in a small area. Here's how to create your own plastic bottle vertical planter in just a few simple steps.
Materials:
- Plastic bottles (2-liter soda bottles work well)
- Scissors or craft knife
- Twine or rope
- Soil
- Plants or seeds
Instructions:
- Begin by cleaning and drying your plastic bottles thoroughly.
- Using a pair of scissors or a craft knife, cut off the top of the bottle, just below the neck.
- Cut a small hole in the center of the bottle cap, large enough to thread the twine or rope through.
- Thread the twine or rope through the hole in the bottle cap and tie a knot at the end.
- Fill the bottom of the bottle with soil, leaving enough room for the plant roots.
- Insert your plant or seeds into the soil and add more soil as needed.
- Continue this process with additional bottles, tying them together with the twine or rope to create a vertical planter.
- Hang the planter from a sturdy hook or bracket, making sure it's secure and level.
And there you have it, your very own plastic bottle vertical planter! Not only is it a great way to repurpose old bottles, but it also allows you to grow a variety of plants in a small space. Plus, it's an easy and fun project to do with kids.
Tips:
- Choose plants that are suited for the amount of light and space you have available.
- Make sure to water your plants regularly and fertilize as needed.
- You can also decorate your vertical planter with paint, stickers, or other embellishments to make it more visually appealing.

Watering Can
Create a watering can by poking small holes in the lid of a plastic bottle. Fill it with water, and you have a practical watering can to nourish your plants.
Transforming plastic bottles into watering cans! With just a few simple steps, you can create your very own watering can that's both functional and environmentally friendly.
Materials:
- Plastic bottle (1 or 2-liter soda bottles work well)
- Scissors or craft knife
- Needle or thumbtack
- Hot glue gun or strong tape
- Metal or plastic shower head (optional)
Instructions:
- Begin by cleaning and drying your plastic bottle thoroughly.
- Using a pair of scissors or a craft knife, cut off the top of the bottle just below the neck.
- Poke several small holes in the bottle cap using a needle or thumbtack. These will be the watering holes for your plants.
- If you have a metal or plastic shower head, you can attach it to the cap using a hot glue gun or strong tape. This will help to distribute the water evenly and prevent damage to your plants.
- Fill the bottom of the bottle with water and screw on the cap.
- Test your watering can by tipping it over and letting the water flow through the holes.
- If you're having trouble with the water flow, you can adjust the size of the holes or the placement of the shower head.
And there you have it, your very own plastic bottle watering can! Not only is it a cost-effective way to water your plants, but it also helps to reduce plastic waste by repurposing old bottles.
Tips:
- For a more decorative look, you can paint or decorate your watering can with stickers or other embellishments.
- Choose plants that are suited for the amount of water they need and the type of soil you're using.
- Make sure to clean your watering can regularly to prevent bacteria and mold buildup.
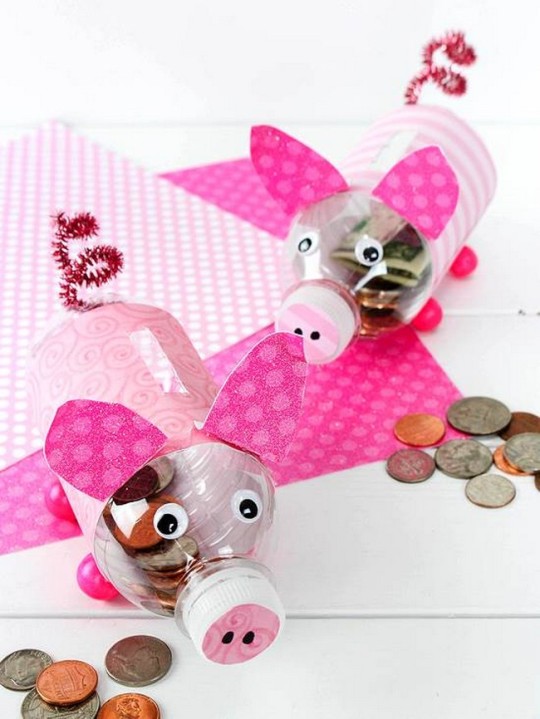
Piggy Bank
Transform a plastic bottle into a piggy bank by cutting a coin slot in the side and adding a lid. This is a great way to save money and reduce waste.
Do you have a pile of plastic bottles taking up space in your home? Don't throw them away just yet! With a little creativity, you can transform these bottles into a fun and functional piggy bank.
Materials:
- Plastic bottle (1-liter or 2-liter soda bottles work well)
- Scissors or craft knife
- Paint or decorative paper
- Glue
- Marker or pen
- Coin slot or tape (optional)
Instructions:
- Begin by cleaning and drying your plastic bottle thoroughly.
- Using a pair of scissors or a craft knife, cut off the top of the bottle just below the neck.
- Using a marker or pen, draw a line around the bottle about 2/3 of the way down. This will be the top of your piggy bank.
- Cut along the line to create the top portion of your piggy bank.
- If desired, add a coin slot to the top portion of the piggy bank. You can either cut a slot into the plastic using a craft knife or use tape to create a slot.
- Decorate your piggy bank using paint or decorative paper. You can create a pig face using construction paper or paint on eyes, a nose, and a mouth.
- Glue the top portion of the bottle back onto the bottom portion to create your piggy bank.
And there you have it, your very own piggy bank made from a plastic bottle! Not only is it a fun and easy DIY project, but it also helps to reduce plastic waste by repurposing old bottles.

Pencil Case
Cut off the top of a plastic bottle, and you have a perfect pencil case. You can decorate it with markers, stickers, or paint to make it unique.
If you have a collection of plastic bottles lying around your home, don't throw them away just yet! With a little creativity, you can transform these bottles into a useful and eco-friendly pencil case.
Materials:
- Plastic bottle (500 ml or 1-liter soda bottles work well)
- Scissors or craft knife
- Zipper (at least 8 inches in length)
- Glue
- Decorative paper or fabric (optional)
Instructions:
- Begin by cleaning and drying your plastic bottle thoroughly.
- Using a pair of scissors or a craft knife, cut off the top of the bottle just below the neck.
- Cut along the bottom of the bottle to create the main body of your pencil case.
- Using a craft knife or scissors, create a small slit on both sides of the pencil case near the top, about half an inch from the edge. This will be where you attach the zipper.
- Glue the zipper onto the slits, making sure to leave enough room for the zipper pull to slide back and forth.
- If desired, you can decorate your pencil case using decorative paper or fabric. Cut the paper or fabric to the size of the pencil case and glue it onto the bottle.
- Allow the glue to dry completely before using your new pencil case.
And there you have it, your very own pencil case made from a plastic bottle! This is not only a fun and creative way to repurpose old bottles, but it also helps to reduce plastic waste.
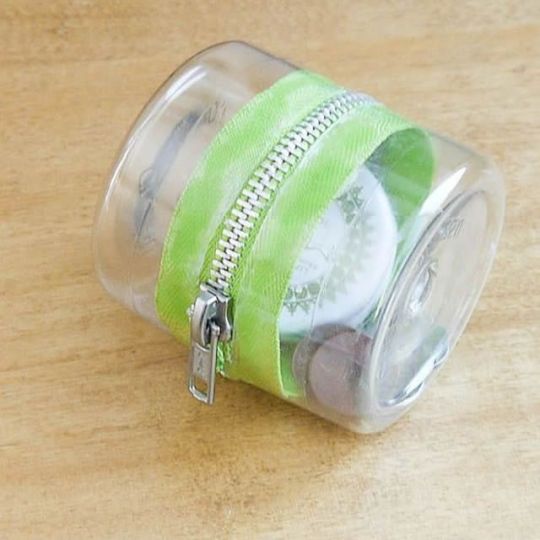
Zipper Storage
Create a storage container with a zipper closure by cutting off the bottom of a plastic bottle and adding a zipper. This is a great way to store small items like jewelry or sewing supplies.
Plastic bottles are one of the most common items found in landfills, but they don't have to be! With a little creativity, you can turn them into something useful and practical. In this article, we will show you how to transform plastic bottles into a zipper storage container.
Materials:
- Plastic bottle (1-liter or 2-liter soda bottles work well)
- Zipper (at least 8 inches in length)
- Scissors or craft knife
- Ruler
- Pencil
- Glue
Instructions:
- Clean and dry the plastic bottle thoroughly.
- Using a ruler and pencil, mark the desired length of the zipper on the bottle. Make sure the zipper will fit snugly on the bottle.
- Use scissors or a craft knife to cut the bottle along the marked line. This will create the opening for your zipper storage container.
- Apply glue along the edges of the cut plastic bottle.
- Carefully attach the zipper to the glued edges, ensuring that the teeth of the zipper are aligned with the edges of the cut bottle.
- Allow the glue to dry completely.
- Your zipper storage container is now ready to use! Simply slide the zipper open and store your small items inside.
Tips:
- Use different sizes and shapes of bottles to create a variety of zipper storage containers.
- Customize your zipper storage container by decorating it with stickers, paint, or markers.
- Make multiple zipper storage containers to organize and store different items.
Cable Organizer
Cut off the bottom of a plastic bottle and use it to organize cables and wires. Simply thread the cords through the bottle, and they will stay organized and tangle-free.
In this article, we will show you how to transform plastic bottles into a cable organizer.
Materials:
- Plastic bottle (1-liter or 2-liter soda bottles work well)
- Scissors or craft knife
- Ruler
- Pencil
- Marker or paint
- Hole punch
- Zip ties
Instructions:
- Clean and dry the plastic bottle thoroughly.
- Using a ruler and pencil, mark the desired length of the cable organizer on the bottle. The size will depend on the number and size of cables you plan to organize.
- Use scissors or a craft knife to cut the bottle along the marked line. This will create the body of your cable organizer.
- Using a marker or paint, label each section of the organizer with the name of the cable or device that it will hold.
- Use a hole punch to create holes on either side of each section. These will be used to attach the zip ties.
- Thread a zip tie through each hole and tighten it to hold the cables or devices in place.
- Your cable organizer is now ready to use! Simply slide your cables or devices into the appropriate section and tighten the zip tie to hold them in place.
Tips:
- Use different sizes and shapes of bottles to create cable organizers for different types of cables or devices.
- Customize your cable organizer by decorating it with stickers, paint, or markers.
- Make multiple cable organizers to keep all of your cables and devices organized and easily accessible.

Kitchen Scoop
Cut off the top of a plastic bottle and use the bottom as a scoop for flour, sugar, or other dry goods. This is an easy way to save money and reduce waste.
Transform plastic bottles into Kitchen Scoop: A DIY Guide
Materials Needed:
- Plastic bottle
- Scissors
- Marker
- Measuring cup
- Sandpaper
Step-by-Step Instructions:
- Choose a plastic bottle: The first step is to select a plastic bottle that is appropriate for your needs. You can choose any size of bottle depending on the size of the scoop you want to create.
- Clean the bottle: Wash the bottle thoroughly with soap and water. Remove all labels and residue, and let the bottle dry completely.
- Mark the bottle: Using a marker, mark the area where you want to cut the bottle. You can mark the bottle at a point where the bottle starts to narrow towards the top.
- Cut the bottle: Using scissors, cut the bottle along the marked line. Cut the top portion of the bottle off, leaving the bottom half to be the scoop.
- Shape the scoop: Using sandpaper, smooth the edges of the cut bottle to make sure there are no rough edges or sharp points. You can also use the sandpaper to shape the scoop to your desired size.
- Measure the scoop: Using a measuring cup, measure the capacity of the scoop. You can mark the measuring line on the side of the scoop for future reference.
- Use the scoop: Your plastic bottle scoop is now ready to be used in the kitchen! It can be used for scooping flour, sugar, rice, and other dry ingredients.
Benefits of Using a Plastic Bottle Kitchen Scoop:
- Eco-Friendly: By reusing plastic bottles, you are helping to reduce the amount of plastic waste in the environment.
- Affordable: Making a plastic bottle scoop is a cost-effective alternative to buying a scoop from the store.
- Convenient: With a plastic bottle scoop, you can quickly and easily measure dry ingredients for your recipes.
- Versatile: You can customize the size of your scoop according to your needs, making it a versatile kitchen tool.
Planter Trays
Cut off the bottom of a plastic bottle and use it as a planter tray to catch excess water. This is a great way to keep your plants healthy and your floors clean.
Transform plastic bottles into planter trays for your garden. Let's get started!
Materials Needed:
- Plastic bottles (2-liter or 20-ounce)
- Scissors
- Marker or pen
- Ruler
- Potting soil
- Plant seeds or seedlings
Step 1: Clean and dry the plastic bottles The first step is to clean and dry the plastic bottles thoroughly. Make sure there is no residual liquid left inside the bottles.
Step 2: Cut the bottles into halves Using a sharp pair of scissors, cut the bottles into two equal halves. You can use either a 2-liter or 20-ounce bottle, depending on the size of the planter trays you want to make.
Step 3: Mark the cutting lines Using a marker or pen, mark the cutting lines on the plastic bottle. Make sure the lines are straight and even.
Step 4: Cut the bottles along the marked lines Carefully cut the bottles along the marked lines, making sure to cut through both sides of the bottle. You should now have two halves of a bottle that can be used as planter trays.
Step 5: Make drainage holes Using a sharp object such as a nail or a screwdriver, make a few small drainage holes in the bottom of each planter tray. This will ensure that excess water can drain out of the trays, preventing waterlogging and root rot.
Step 6: Fill the trays with potting soil Fill the planter trays with potting soil, leaving some space at the top for planting seeds or seedlings.
Step 7: Plant your seeds or seedlings Plant your seeds or seedlings in the potting soil, following the instructions on the seed packet or plant label.
Step 8: Water your plants Water your plants gently, making sure not to overwater them. Allow the soil to dry out slightly between waterings.
Step 9: Place your planter trays in a sunny location Place your planter trays in a sunny location, where your plants can get plenty of sunlight. Make sure to monitor the moisture level of the soil and water your plants regularly.
In conclusion, transforming plastic bottles into planter trays is a simple and easy DIY project that anyone can do. It's a great way to reduce waste and create a beautiful garden at the same time. So next time you have a few empty plastic bottles lying around, don't throw them away - repurpose them into useful planter trays for your plants!
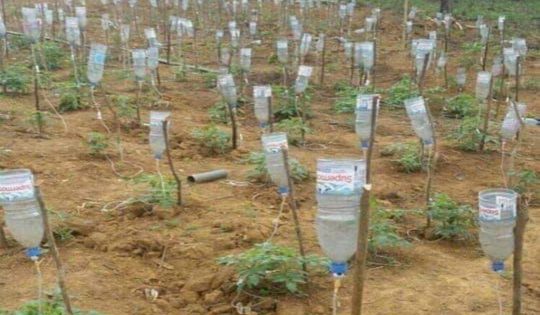
Drip Irrigation
Transform plastic bottles into a drip irrigation system for your plants by poking small holes in the bottle and burying it near the plant roots. Fill the bottle with water, and the plant will be watered slowly over time.
Transform plastic bottles into Drip Irrigation: A DIY Project
Do you have a garden or plants that require regular watering? Are you looking for an affordable and eco-friendly way to keep them hydrated?
Read the full article
#bottleplanters#creativereuse#DIYprojects#Eco-friendly#environmentalconservation#greenliving#handmade#homemade#plasticbottleart#plasticbottlecrafts#plasticbottledecorations#plasticbottlefurniture#plasticbottlehacks#plasticbottleorganizer#recycledmaterials#recycling#repurposing#sustainability#upcycling#wastereduction
0 notes
Photo

Me: alright, commission time! 👏🏻😏 My ADHD: PAINT SOME CROWS. 💃🏻💃🏻 So anyway I painted some crows (and the commission too, but CROWS). 😬 #adhd #adhdwomen #art #artwork #flashepaint #fluorescentart #crows #creativereuse #deadstockfabric #recycledart #painting #emulsionpaint #sillouette #neon #womenartists #femaleartist #wip #contemporaypainting #contemporaryart #visualart #fineart (at Atithi Studios) https://www.instagram.com/p/CpZHLGAt189/?igshid=NGJjMDIxMWI=
#adhd#adhdwomen#art#artwork#flashepaint#fluorescentart#crows#creativereuse#deadstockfabric#recycledart#painting#emulsionpaint#sillouette#neon#womenartists#femaleartist#wip#contemporaypainting#contemporaryart#visualart#fineart
0 notes
Text
Raven.
#annuallage
18 November
#collage#analogcollage#collageart #creativereuse#sfbayareaartist #artonpaper#mixedmedia#scraps #edinburghcollagecollective #arizonacollagecollective #twincitiescollagecollective #italiancollagistscollective #collagewave#collagesanctuaries #discovercollage2.0#collage_curator #contemporarycollagemagazine #artoninstagram🌍

1 note
·
View note
Text
in the garden banner
linocut print on fabric, home sewn using recycled textiles
#printmaker#linoprint#block printing#printmaking#relief print#salted snail studio#block print#reliefprint#handmade#blanket stitch#home sewn#textile art#creativereuse#creative reuse#linocut print#linocut printed fabric#fabric printing#relief printed fabric
468 notes
·
View notes
Text
20 notes
·
View notes
Photo

Found Star… #star #assemblage333 Paint by Numbers Jesus… #jesus #heisrisen #assemblage333 Creative Use of Vintage Textiles for Sustainable Wearables by Robert Pennington Price Design from Assemblage333… www.assemblage333.com #creativereuse #sustainablefashion #robertpenningtonpricedesign #assemblage333 #roundtopantiquesweek #renningersextravaganza #brimfieldantiqueshow #quiltcoat #roundtopfsshionweek #barwantiqueshow #quiltcoat #campblanketjumper #denim #jesusoncoveralls (at French Quarter, New Orleans, Louisiana) https://www.instagram.com/p/Cq08l61vWWR/?igshid=NGJjMDIxMWI=
#star#assemblage333#jesus#heisrisen#creativereuse#sustainablefashion#robertpenningtonpricedesign#roundtopantiquesweek#renningersextravaganza#brimfieldantiqueshow#quiltcoat#roundtopfsshionweek#barwantiqueshow#campblanketjumper#denim#jesusoncoveralls
0 notes
Photo

The thinker, but with a metal bolt through the brain. #angryclouds⛈ #angrycloud #austin #atx #texas #art #streetart #character #painting #drawing #painting #recycle #creativereuse #artistsoninstagram #artistsofinstagram (at Austin, Texas) https://www.instagram.com/p/ChLYAdbJ_OL/?igshid=NGJjMDIxMWI=
#angryclouds⛈#angrycloud#austin#atx#texas#art#streetart#character#painting#drawing#recycle#creativereuse#artistsoninstagram#artistsofinstagram
8 notes
·
View notes
Photo

“Hearts are wild creatures, that's why our ribs are cages.” quote by Elalusz. "A tender heart is a simple catch for one who has studied their prey. So the heart must put up a wall to keep the hunter at bay. But the wall becomes a cage of sorts, preventing the heart to soar, and how much joy can the heart derive when the heart is trapped at shore? So the tender heart yearns to be free, as it weeps like a mourning dove, afraid to fly, afraid to roam, just left to long for true love". Caged Heart by Linda-Linn Havens Be Still My Heart, Mixed Media assemblage by Dianne Hoffman, 12" x 8" x 4" SOLD #tenderheart #cagedheart #bestillmyheart #beatingheart #truelove #artery #ribcage #assemblage #foundobjects #diannehoffmanart #creativereuse #asseblageartists (at San Francisco, California) https://www.instagram.com/p/CgexrLsrAZB/?igshid=NGJjMDIxMWI=
#tenderheart#cagedheart#bestillmyheart#beatingheart#truelove#artery#ribcage#assemblage#foundobjects#diannehoffmanart#creativereuse#asseblageartists
2 notes
·
View notes
Last Seen Blogs

ashakhouski
Слово

sarahomyx
I'm gonna give you my LOVE

dinosauriofuego
Dinosaurio Fuego

abandonedandforgottentimes
we out here

emmaklee
kakinoki