#how to set up a cricut explore
Explore tagged Tumblr posts
Visit Tumblr Blog
Explore Tumblr blogs with no restrictions, modern design and the best experience.
Last Seen Tumblr Blogs


Fun Fact
Tumblr was attacked by a cross-site scripting worm deployed by the Internet troll group GNAA on Dec 3, 2012.
Text
How to Set up Cricut Machine with Steps
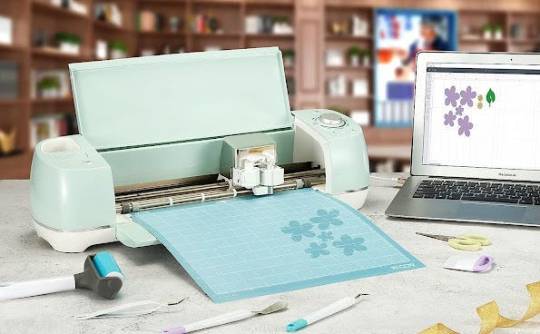
Setting up your Cricut machine is a straightforward process that opens the door to endless crafting possibilities. Begin by unpacking your Cricut and placing it on a flat surface. Connect the power, turn it on, and link it to your computer or mobile device. Download and install Cricut Design Space, the hub for your creative projects. Create or sign in with your Cricut ID to access a world of designs.
If required, calibrate your machine for precise cuts. Load your chosen material onto the cutting mat and let the Cricut work its magic by following the simple on-screen instructions. Within minutes, you’ll witness your designs come to life. The setup is intuitive, allowing you to focus on what you do best – crafting with precision and creativity. Welcome to the world of Cricut, where your imagination knows no bounds!
Setting up your Cricut machine is a breeze, and soon you’ll be crafting to your heart’s content. Follow these simple steps to get started:
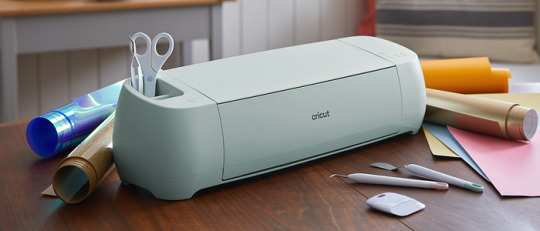
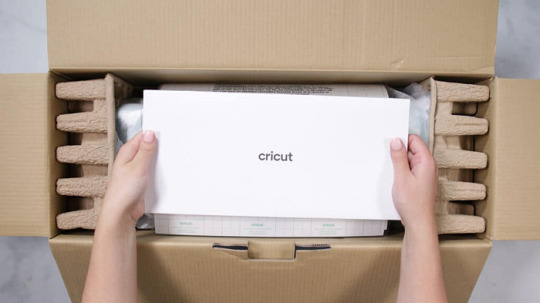
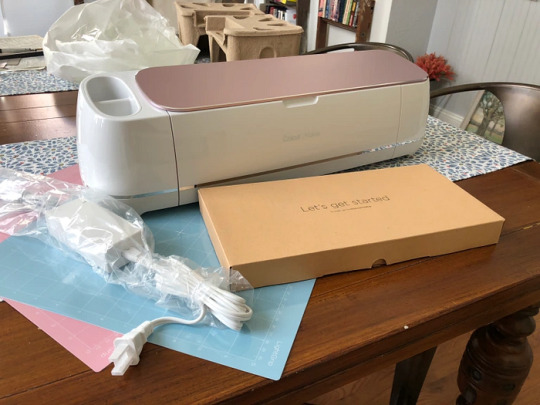
Unboxing: Begin by carefully unpacking your Cricut machine set up and accessories. Take a moment to marvel at the sleek design and the possibilities it holds.
Place Your Machine: Find a clean, flat surface to set up your Cricut machine. Ensure there’s ample space for the materials and projects you’ll be working on.
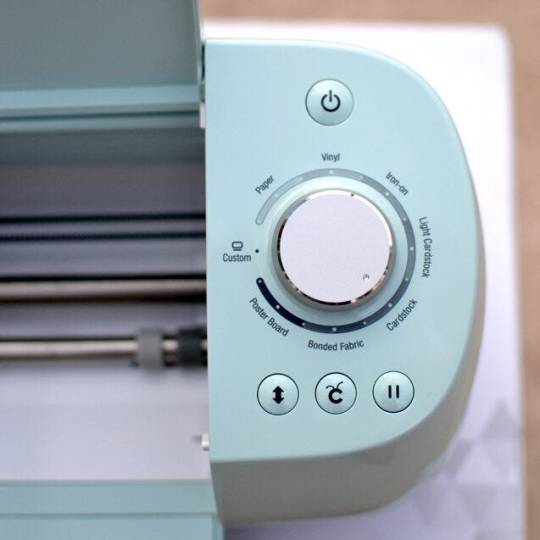
Connect Power: Plug in the power cord and turn on your machine. The power button is usually located on the side. Watch as it comes to life, ready to bring your creative visions to reality.
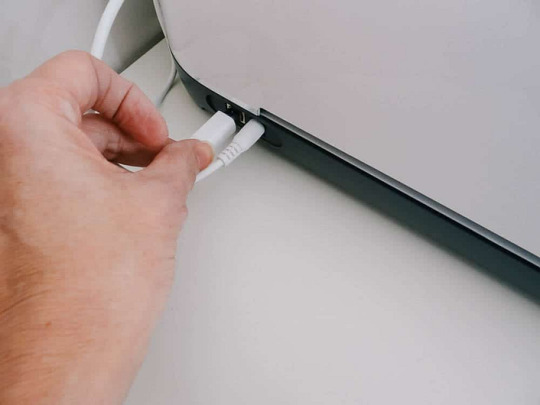
Connect to Computer or Mobile Device: Depending on your Cricut model, connect it to your computer or mobile device using a USB cable or Bluetooth. Make sure your device’s software is up-to-date for seamless communication.
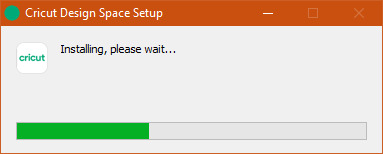
Install Design Space: Download and install Cricut Design Space from official website Cricut.com setup on your computer or mobile device. This is the platform where you’ll create and customize your projects.
Create a Cricut ID: If you don’t already have one, create a Cricut ID. This will be your gateway to a world of designs and inspiration.
Calibrate Your Machine (if required): Follow the on-screen instructions to calibrate your Cricut machine. This step ensures precision in your cuts.
Load Materials: Place your chosen material (vinyl, paper, fabric, etc.) on the cutting mat and load it into the machine. Adjust the settings in Design Space accordingly.
Design and Cut: Open Design Space, create or choose a design, and click “Make It.” Follow the prompts to load the cutting mat into the Cricut machine, and let the Cricut work its magic.
Admire Your Creation: Once the cutting is complete, carefully remove your project from the mat. Admire the clean cuts and intricate details, knowing that the world of limitless crafting possibilities is now at your fingertips.
With these simple steps, you’ve successfully set up your Cricut machine and are ready to embark on a creative journey like never before. Happy crafting!
Source:How to Set up Cricut Machine
#cricut machine setup#set up cricut machine#Cricut design space download#design.cricut.com#cricut explore air 2 setup#www.cricut.com/setup login#how to set up cricut maker#how to set up cricut machine
3 notes
·
View notes
Text
How to Set Up Cricut Explore 3: A Comprehensive Tutorial
You need to know how to set up Cricut Explore 3 if you want to use the machine. I am going to guide you through the process to learn how to do that. I have been using this machine since it was launched, and I would like to ask you to follow the blog to learn how to set it up. You can use several devices to set up the machine, but I will write about a Windows computer here.
How to Prepare Cricut Explore 3 for Setup?
When you want to learn how to set up Cricut Explore 3, you should first unbox your machine and then start preparing the machine to set it up. When you open the machine, you get a few tools with the machine. However, those tools are not enough to work on any project. You will need to buy some other tools in order to work on the machine.
When you open the machine, you will find these items inside.
Crafting machine
Premium fine-point blade
Safety document
Quick start guide
USB cable
Power adapter
Test cut materials
Bonus materials
Once you have checked the materials, you have to do the following things to prepare your machine and then finish the setup.
To start with the setup, you should place the machine in a safe place.
Then, use the power adapter you got in the box and connect it to your machine and the wall socket.
Next, press the power button on the machine, and then it is prepared for the setup.
Now, you have to go to your browser and visit cricut.com/setup.
After that, download the Design Space software on your computer.
Following this, you need to open the app and log in or sign up with your account.
Once you finish the setup, you can proceed with your first cut.
How to Download Cricut Design Space on Your Computer?
In order to learn how to set up Cricut Explore 3, you need to download the Design Space app on your computer. After downloading the app, you will need to log in using a Cricut ID, and if you have never made any user ID, you must create one to begin with your machine. Read the steps in the section below:
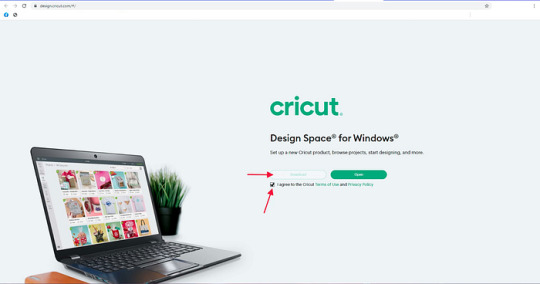
Start by opening the internet browser on your computer and then visit cricut.com/setup.
Then, click the checkbox to agree to Cricut’s Terms of Use and Policy. After that, click on Download.

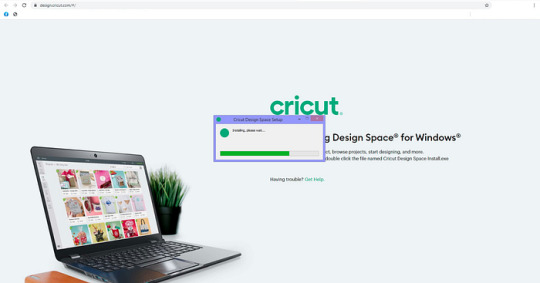
Next, go to the Downloads folder and open it. You will find the file over there. Click on it twice.
Now, a new window opens on your computer screen. It asks you whether you trust the app on your computer or not. You have to select the trust option.
After that, you can see that the app has started installing.
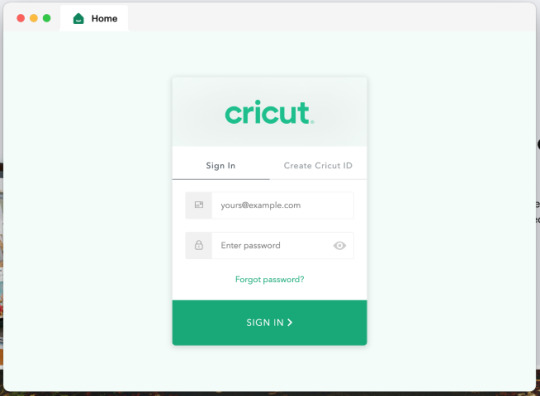
In the last step, you can log in with your email ID and password.
How to Connect Cricut Explore 3 to Your Computer?
In the process of learning how to set up Cricut Explore 3, the final part you have to do is connect your machine to your computer. To connect your machine to your device, you can go for either Bluetooth or USB. Here, we will look at the Bluetooth connection. Check the steps below:
Make sure that you have turned on the Explore machine and keep it within 10–15 feet of your computer.
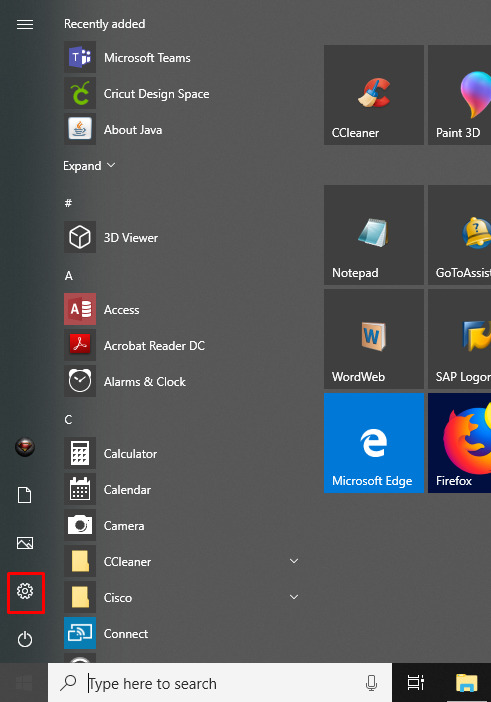
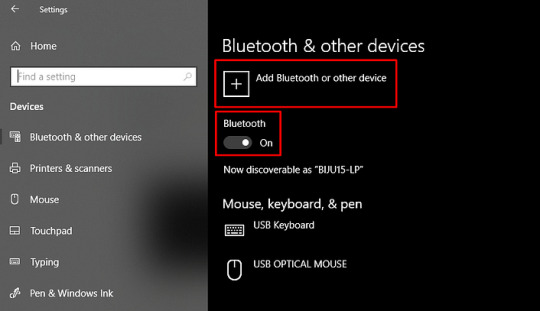
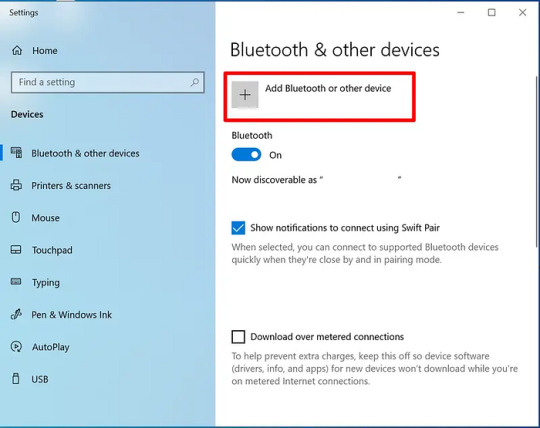
Now, find the Start menu at the bottom left side of your computer and go to Settings.
After that, open the Devices option on the computer and turn on Bluetooth.
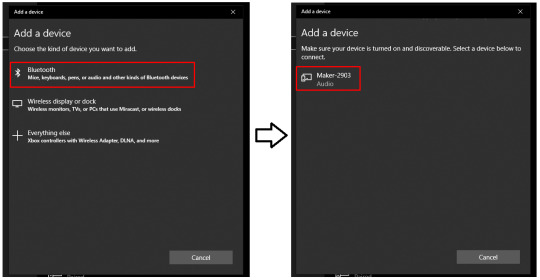
Next, click on Add Bluetooth or other device and select Bluetooth later.

Also, you will have to select the machine from the list of devices available to connect.
The cutting machine will be connected to your computer very soon.
Your machine setup on your computer is complete. To make any project or cut any design, you can create or pick a design on the Design Space app and then cut it on your machine.
Conclusion
To sum up, you read about how to set up Cricut Explore 3, and I am sure after reading the blog, you will learn how to do it. To set up your cutting machine, you need to remove the packaging and the items from the machine. Then, you should prepare to set up the machine. Once you are ready, you will have to download the Design Space app and connect your machine to it. After downloading the app and logging into it, your setup will be complete. Now, you can start working on your projects.
Source: how to set up Cricut Explore 3
Visit here to Know More: Cricut.com/setup
Pinterest
0 notes
Text
How to Set Up Cricut Explore 3: Full Guide for Beginners
How to set up Cricut Explore 3 is a must-know information for anyone who wants to set up their Cricut Explore machine. If you have purchased a Cricut product and want to learn how to set it up, you are in the right place! As a Cricut user and the owner of multiple Cricut models, including the Explore 3 machine, I am going to share all the necessary details so you can set up your machine yourself. To learn about the setup process, finish reading the blog!
For the Cricut Explore 3 setup, a few things are important. You will need to connect the machine to your computer via Bluetooth or a USB cable. To make projects with Cricut, you also need software, so download the Cricut Design Space app on your computer.
Unboxing and Preparing Cricut Explore 3
Before we learn how to set up Cricut Explore 3, we must understand the machine and know what comes inside the box when we unbox it. Then, you will see how to prepare the machine for setup.
Cricut Explore 3 is a multipurpose machine ideal for cutting, drawing, foiling, and scoring. It cut over 100+ a variety of materials, including vinyl, iron-on vinyl, stickers, paper, cardstock, leather, felt, and metal. This machine can handle materials up to 11.5 inches wide and 12 feet long. To set up the machine, first unbox it and check for all the items. Inside the box, you will find:
● Cricut Explore 3
● Premium fine-point blade with housing
● Welcome card
● USB cable
● Power adapter
● Sample materials for the first cut
How to Set up Cricut Explore 3 via Bluetooth?
After unboxing the machine, you should connect it to a device. Compatible with an Android or iOS phone device. If you want to use a computer, you can use a Windows or Mac computer. You can use any of these devices and connect them to your machine using Bluetooth. Here, you will see how to connect the machine to a Windows computer. So, check the process given below:
Turn on the machine by pressing the power button after connecting it to electricity.
Then, open the Windows computer and go to the Start menu.
Next, open Settings, and then you will have to turn on Bluetooth.
Now, click Add Bluetooth or other device and then Bluetooth.
It is time for the computer to start searching for available Cricut machines.
Upon seeing the machine, you have to click on it from the list of devices.
After that, the machine will be paired by now.
To ensure connectivity, open the Cricut Design app and check the Product Setup option.
Downloading Cricut Design Space on Your Device
In the process of learning how to set up Cricut Explore 3, it is essential to download the Design Space app. This is the software where you draw or choose a design and then cut it out on the machine. The same applies to the Cricut machine, as it also requires an app. Here is the procedure to download the Cricut app on your computer.
First, you have to open your computer and connect it to an internet connection.
After that, you have to open the internet browser and visit cricut.com/setup.
Next, you have to click Download to download and install the Cricut Design Space app.
The software will be saved in your computer’s Downloads folder. To access it, you must go to the folder and double-click on the file.
Now, you will see that a new window has opened that shows the app is being installed.
Then, the app is installed, and you have to log in with a Cricut account.
As a beginner, you will not have an account, so you will have to create one for yourself.
Creating a Cricut Design Space Account
A Cricut account is required for any user to sign in to the app with an account. If you do not already have an account, you can learn how to create one.
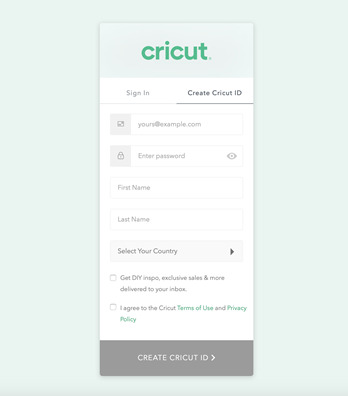
Open the Cricut software on your computer and click on Create a Cricut ID.
Then, agree to the Cricut terms and conditions in the box to get started.
Now, you will see a number of boxes. You have to fill in information like name, email, and country name in those boxes.
You can choose to send your Cricut tutorials via email. If you don’t want this, ignore it.
After that, click on Create a Cricut ID and get the message about confirmation.
Follow the instructions on the screen, and the account will be created.
Finally, log in with the account, and you will be ready to start working.
Conclusion
In the blog, you learned how to set up Cricut Explore 3 on your computer. Cricut Explore 3 is an advanced machine, and it is good for you as a beginner and a professional. To set up the machine, you need to open the box first and then prepare the machine for the setup. When the machine is ready, you should connect it to a device and then download the Cricut Design Space app. Once you log in with a Cricut account, your Cricut Explore 3 setup is complete.
FAQs
Can I Purchase Cricut Explore 3 as a Beginner?
Yes, you can! Cricut Explore 3 is an exceptional machine for anyone. Whether you are a beginner or a pro-level user, it is a great cutting and crafting machine. With the help of the machine, you can make paper, cardstock, vinyl, and iron-on projects. You will be given a quick start guide to help you use the machine. With the box, you will get a free Cricut Access subscription for a month.
How Can I Connect Cricut Explore 3 to My Phone?
You can use Cricut Explore 3 with both computers and phones. If you want to connect the machine to your phone, this is the process you should follow:
First, turn on the machine and keep it within 10-15 feet of the phone.
Next, open Settings on your device and turn on Bluetooth.
Then, search for the Cricut model and click on it.
The machine will be connected to your device soon.
What Materials Can I Cut on Cricut Explore 3?
Cricut Explore 3 is not only one of the latest machines but also one of the best models for cutting materials and making beautiful projects. With this machine, you can cut over 100 materials. These materials include paper, vinyl, cardstock, iron-on, canvas, cork, burlap, denim, cotton, and more. This machine cuts up to 2mm thick materials and is 2x faster, so it is a great tool for cutting different materials.
Read more: Cricut New Machine Setup
install cricut design space app
cricut.com/setup mac
Cricut Design Space
Source: how to set up Cricut Explore 3
#how to set up Cricut Explore 3#Cricut Design Space#cricut.com/setup mac#install cricut design space app
0 notes
Text
How to Set up a Cricut Explore Air 2: A Complete Guide
The Cricut Explore Air 2 is a powerful machine for working on your DIY projects, especially for beginners. As a second-gene Cricut machine, it comes at a reasonable price. To work on crafts, you have to connect it to your device and download Cricut software. With the software, you can select a design and cut it with Cricut, creating beautiful projects. So, let’s get started with the setup procedure.
How to Set up a Cricut Explore Air 2?
It is very important to know the procedure for setting up a Cricut machine. To learn how you can do it, you should check out the steps written below.
Initially, you have to add the machine to a power source. You should use a power adapter to connect it to the wall socket and then turn it on by pressing the power button.
Then, use a USB cable or Bluetooth to connect the machine to your phone or computer.
Now, open an internet browser on your device and head over to cricut.com/setup.
After that, you should download the Cricut Design Space app.
Next, you should sign in to the app with a Cricut account.
When the log-in is complete, your Cricut cutting machine will be ready to cut.
How to Connect Cricut Explore Air 2 to a Computer?
Once you have learned how to set up a Cricut Explore Air 2, you should connect it to your computer. For connection, you can use a USB cable or wireless Bluetooth. Here is the process to connect Cricut to your computer:
Option 1: With a USB Cable
To start, you have to connect the Cricut product to an electric socket with a power adapter.
After that, take a USB cable and connect it to both devices.
You should connect the cable at one end to the device and the other end to the Explore machine.
The Cricut cutting machine and your computer will be connected.
Option 2: Through Bluetooth
Again, you will need to connect your Cricut Explore machine to a power socket using an adapter.
Then, press the power key and hold for some time. The machine will be turned on.
Tap on to the Start menu, then open Settings, and then Devices.

How to Connect Cricut Explore Air 2 to a Smartphone?
If you want to use the Cricut Explore machine on a phone instead of a computer, you can do that now. You can connect your Android and iPad/iPhone to the machine using USB or Bluetooth. Here are the steps you need to follow:
Option 1: Using a USB Cable
Turn on your Cricut machine after you plug it into a power socket.
Use a USB cable and attach it to the machine and your smartphone on both ends.
Your mobile device and the Cricut Explore machine will be paired.
Option 1: Via Bluetooth
In the beginning, plug in the Explore Air 2 machine and turn it on.
In the next step, open the Settings tab on your device.
On the following screen, search for the Cricut model.
Select your machine, and the connection will be made.
To confirm, open the Design Space app and go to the New Product Setup section. Your Cricut machine appears connected to a device.
How to Download Cricut Design Space?
After you have connected the Cricut Explore Air 2 to your device, you should download the Cricut Design Space app. Here is the process for downloading the Cricut application on your phone and computer.
Here is how you can download the Design Space app:
On Phone
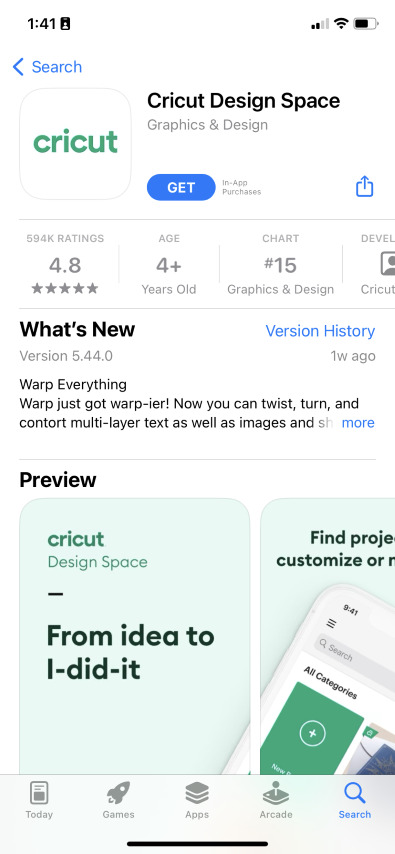
On your phone, go to the App Store and search the Cricut Design Space app.
When you see it, click on Get/Install and wait for the download.

When it is downloaded, open the app and log in with your username and password.
On Computer
Open the browser and navigate through cricut.com/setup.
Next, agree to the Cricut Terms & Policies. Check the box and tick it.
Now, click Download near the app and wait for it to download.
After you download the app, go to the Downloads folder and double-click on it.
Then, agree that you trust the app, and the installation will begin.
When the app is finally downloaded, you can start designing your projects.
After downloading the Cricut Design app, you’ll need to log in with a Cricut account. However, if you have never created an account before, create one now. After creating your Cricut ID, remember your username and password. Start making amazing designs and projects using your Cricut cutting machine.
Conclusion
Now, after reading this post, you have learned everything you need to know about how to set up a Cricut Explore Air 2 on a mobile or computer. You can now easily set up a Cricut machine. For the setup, start by learning the process to avoid mistakes. Begin by connecting Cricut to your compatible desktop or mobile device, and then finish by downloading the Cricut Design Space software. Finally, you can start creating your DIY projects with Cricut.
FAQs
What Basics Do I Need to Setup My Cricut Explore Air 2?
If you want to set up the Cricut cutting machine, there are some basic tools you will need. First, you need the Cricut machine. Along with that, you need some materials to cut, such as paper, cardstock, vinyl, and iron-on vinyl. A Cricut cutting mat is needed to hold the material, and blades are required to cut the material. Many of these tools and supplies come with the Cricut machine, but you may need to buy some separately.
Does Cricut Explore Air 2 Need a Phone or Desktop?
Yes, actually! You will also need either a phone or a computer to work with the Cricut machine. Note that not all mobile devices or desktops are compatible with the Cricut Design Space app. It works with Windows and Mac, and for smartphones, you can use Android or iPad/iPhone. Chromebook devices do not support Cricut machines. Even if your device is compatible, it must meet certain specifications.
Does a Cricut Explore Air 2 Need a Wi-Fi Network?
Wi-Fi is not necessarily required to use a Cricut machine. You can work on Cricut projects without it. However, a stable Wi-Fi network can enhance the machine’s performance. On a computer, a stable Wi-Fi connection allows for smooth operation, but a data dongle will also work. When using a smartphone, a cellular network is sufficient for the machine to work properly.
Source: How to set up a Cricut Explore Air 2
Visit here to know more: Cricut Venture
Pinterest
0 notes
Text
Cricut Machine Set up: Essential Guide for Beginners
Are you wondering about the Cricut machine set up on computers and smartphones? Don't worry, as I am going to help you with everything. If you remember, last time, I taught you what exactly a Cricut is and what its models are. But this blog will teach you how to set up your machine on computers and smartphones. As mentioned in the previous blog, Cricut is a cutting machine that can cut 100+ materials with ease and accuracy.
Before starting the crafting process, all users are supposed to set up their respective systems on the Cricut machine. After completing the setup process, you must connect both devices. Besides, you need a Cricut Design app that will help you make a variety of DIY projects. This post will provide all the details on downloading and installing the Cricut software and setting up the Cricut machine with different systems.
How to Download Cricut Design Space on Mac?
As shared in the introductory paragraph of the Cricut machine set up blog, Cricut Design Space is one of the most essential tools for all DIYers. You can easily make numerous customized projects through its various features and tools within a few minutes. To get the app on your Mac, you are instructed to have a look at the below steps:
Start the process by visiting Cricut Design Space's official portal, design.cricut.com.
After arriving at the portal, tick the Terms to Use and Privacy Policy box.

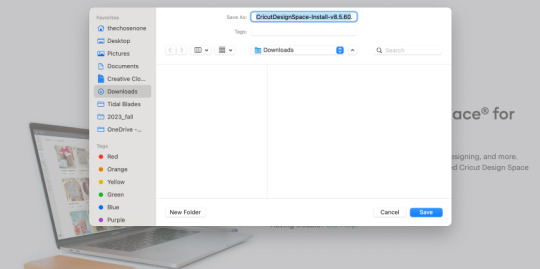
Next, choose the folder to save the Design Space downloaded file.
Then, click the Start button, and the file will download to your system.
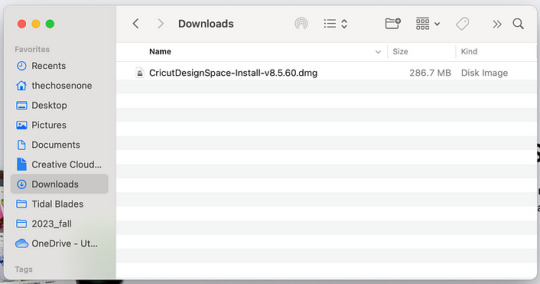
When the download is finished, minimize the window and go to the Downloads folder.
Now, double-click the .dmg file, and a small pop-up window will appear on your system screen.
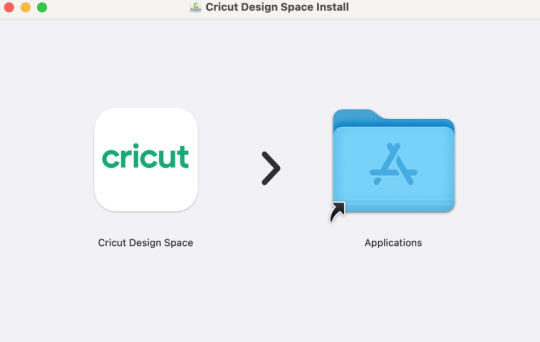
Following this, move the Cricut software to the Applications folder to start the installation process.
At this point, launch the app by double-clicking the Cricut app, which is available inside the Applications folder.
A small Mac window will appear, and you must click Open to continue the process.
In conclusion, sign in or create your Cricut account using your login details.
As a result of this process, you can now use the Cricut app to make uncountable DIY designs.
Cricut Machine Set up on iOS Smartphones
Answer: If you are an iPhone user and want to create your DIY ideas from a cutting machine, you must set it up with your mobile device. Have a look at the below steps to learn about the method:
First, plug your machine power cord into the nearby wall socket.
After that, pair your smartphone with the Cricut product via Bluetooth.
Next, install the Cricut Design Space app and create your account.
Now, launch the app, create your Cricut ID, or sign in by entering the details.
Following this, open the Menu tab and select the Machine Setup section.
Choose your model and complete the setup by following the on-screen instructions.
Cricut Machine Set up on Mac Computers
Simultaneously, you can set up your devices to get the appropriate craft out of the cutting machine by setting it up with your Mac computer. If you aren't aware of the stages that are part of the setup process, then follow these steps:
Initiate the process by plugging in the Cricut model and turning it on.
Afterward, unpack your device and connect it via USB cable or pair it up with Bluetooth.
Next, go tocricut.com/setup and download the Cricut Design Space app.

Now, follow the instructions to create your Cricut account and set up your machine.
Finally, you will learn that the setup was made when you were invited to cut a material.
At the end of the Cricut machine set up blog, it's pretty evident that to create your favorite DIY project, you need to set up & connect the craft plotter to desktop and mobile devices. Without performing the process, you won't be able to start the machine and work on the Cricut Design app.
Frequently Asked Questions
Question: How Can I Pair Cricut to My Windows?
Answer: With the help of the following details, you can easily pair up your cutting machine with Windows:
Begin by checking that your machine is on and comes under your computer's 10-15 ft. range.
After that, enable Bluetooth on your device and look for your model name inside the list.
Next, choose your model name from the list and enter the password.
Finish the process by clicking the Pair button in the middle of your screen.
Question: How to Install Cricut Design Space on Android?
Answer: To get the Cricut app on your phones, to get this designing app you need to follow the steps available below:
First, you need to open the Google Play Store and look for Cricut Design Space.
Next, press the Install button visible on the right side of the page.
After the installation is done, open the app and tick the Machine Set up or Sign In.
Finally, you can create various DIY projects on your canvas.
Question: What Do I Need to Use Cricut?
Answer: To use a Cricut machine, you need to have several supplies that will help you create the project as you wish. The names of certain supplies are:
Cricut machine
Cricut ID and password
Computer or mobile device
Materials
USB cable
#how to setup cricut maker#install cricut design space app#Cricut.com/setup#cricut.com/setup windows#cricut.com/setup pc#cricut.com/setup mac#cricut design space#install cricut explore air 2#cricut maker bundle#cricut new machine setup#cricut explore 3#cricut machine set up
0 notes
Text
How to Setup Cricut Explore Air 2: Ultimate Guide
If you are looking for the answer to how to setup Cricut Explore Air 2, then you have come to the right place. This blog will help you understand the complete guide to performing the machine setup on a computer and smartphone. I have been working with Cricut cutting machines for a long time now. Also, I have trained zillions of crafters just getting started with their Cricut machine.
In addition, I have shared the comprehensive setup guide for people using the Explore Air 2 machine in this blog. There are several steps to set up the machine. So, get through the whole connection to complete your Cricut cutting machine setup hassle-free.
Steps to Connect Cricut Explore Air 2 to Your Device
If you want to know how to setup Cricut Explore Air 2, you must first complete the Bluetooth/USB connection process. Here is a step-by-step guide to doing it.
Computer
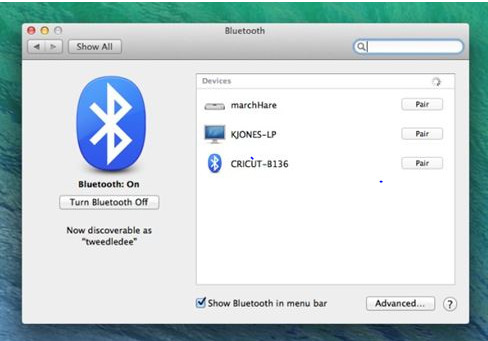
On your computer device, access the Devices windows. (On Mac devices, open the System Preferences window and choose the Bluetooth button.)

After that, check if the Bluetooth option is On. If not, then click on its toggle.
Next, select the option Add Bluetooth or another device.

Once a new page appears on the screen, then click on the Bluetooth option to initiate the scan.
Click on your Explore Air 2 machine name when it appears on the screen.

Lastly, wait for the Bluetooth connection process to complete between both devices.
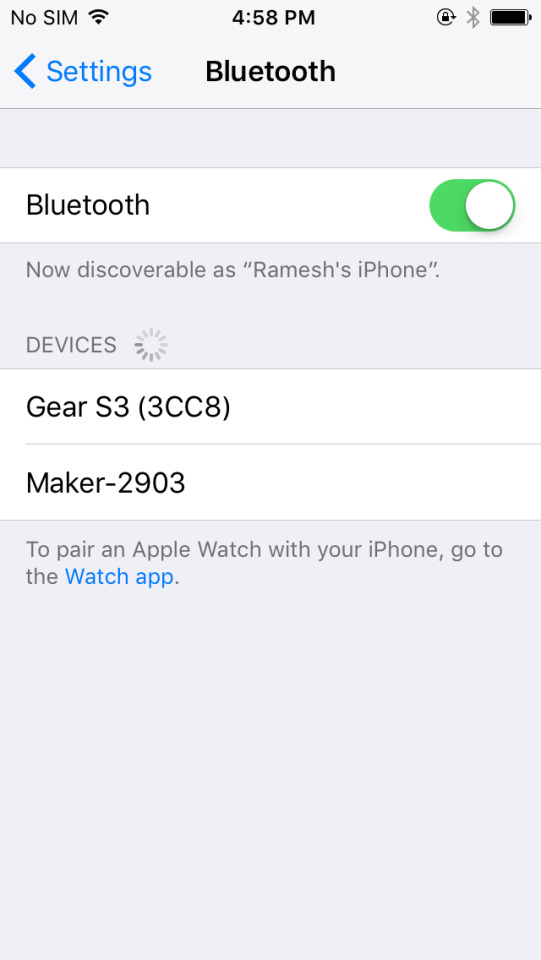
Smartphone
On your smartphone device, tap on the Settings option.
After that, please move to the Bluetooth toggle and turn it on.
Now, your phone will start searching for your nearby Bluetooth devices.
When the machine displays the name of your Cricut Explore Air 2, click on it.
Finally, the connection process between your phone and the Cricut machine will be complete.
Apart from the Bluetooth connection, you can use the provided USB cable with the machine box to pair the Cricut machine to a PC or mobile device.
Downloading Cricut Software to Complete the Machine Setup
To complete the process of how to setup Cricut Explore Air 2, you need to download the Design Space app on your computer or smartphone. Take a look at the below steps to learn the process thoroughly.
Computer
Begin by browsing the official Cricut website and access the Apps window.
Once you see the Cricut Design Space option for your respective operating system, click on the Download option.
If the Download button is grayed out, then you have to choose the terms and conditions checkbox.
When the downloading process begins, the display will change a bit.
After the download process is complete, double-click on the downloaded file in the browser.

Also, you can go to the Downloads folder on your device to open the downloaded Cricut setup file.

Afterward, follow the on-display instructions to finish the Cricut app installation. For Mac computers, drag and drop the Cricut icon to the Applications folder to begin the installation.
Once the installation process is complete, open the file and sign in to the Cricut account. (You can create a new account if you do not have one yet.)

Furthermore, click on the Machine Setup option on the display to start the Cricut Explore Air 2 scan.
Choose your Cricut cutting machine when you see the machine model name show up on the screen.
Finally, your Explore Air 2 machine setup process will be complete.
Smartphone
For the first step, open the App Store or Play Store, depending on which OS you are using.

After that, tap on the search box on the top to get the result of the Cricut app product.
Once the Cricut Design Space app icon appears on your smartphone display, tap on it.
Now, choose the Download/Get option to start the app download.

Then, wait for the download to complete and launch the app.
Next, enter the account login credentials of the existing Cricut account. (create a new account if you do not have one.)
Moreover, tap on the Machine Setup option to move forward.
Your phone will search for the Explore cutting machine and show it on the screen.
Tap on the machine name, and the machine setup process will be complete.
If you still want more help with how to setup Cricut Explore Air 2, then you can contact the customer support team. The team can help you resolve your issue and provide pinpoint guidance to complete the setup process.
Frequently Asked Questions
How to Set up My Cricut Explore Air 2 on an iOS Device?
These are the steps you can follow to complete the Explore Air 2 machine setup on iOS.
For the first step, unpack your brand-new Cricut machine and connect it to a socket.
After that, turn the machine on and print your iPhone/iPad closure to your device.
And then establish a connection between both machines using Bluetooth/USB.
Now, download and install the Cricut Design app from the app store.
Open the app and sign in to your account when the Cricut app download is complete.
Afterward, follow the on-display procedure to complete the machine setup process.
Why Can’t I Setup My Cricut Explore Machine?
If you are unable to set up your Cricut Explore cutting machine, there could be plenty of reasons. Let’s look at some primary causes.
The Cricut machine and PC/phone are not within the connection range.
You have an outdated Cricut app on your device.
Your device is not compatible with the Cricut Explore machine.
There is some software glitch in either of your devices.
You are following the wrong steps to set up your Cricut machine.
Using the corrupt Cricut file to set up the Cricut Explore machine.
Your device has a network problem and many more.
What Are the Things to Know Before Completing the Cricut Explore Setup?
If you are planning to use the Cricut Explore or any other cutting machine, then it is vital to know some points. First, you have to download the Cricut app for setup. As a result, you should check the system requirements of the app before downloading it. Also, it would be best to get your hands on the essential supplies and materials beforehand to start creating DIY crafts. Also, you must know the complete process to connect the machine and your device via USB or Bluetooth. Also, you can connect with customer support to learn how to setup Cricut Explore Air 2.
0 notes
Text
How Do I Set Up My Cricut Maker? [Ultimate Guide]
Buying a new Cricut Maker can be overwhelming for all of us. Initially, setup can be daunting, but once you do it, you will love the overall process. However, you can easily set up any Cricut machine without needing much assistance.
The post is all about how do I set up my Cricut Maker. Through this write-up, we will see the items while unboxing the new Cricut Maker. Further, you will explore the Cricut Maker and its types. Afterward, we will explain the complete process of setting up your Cricut Maker machine.
What Do You Get in the Cricut Maker Box?
Unboxing a new product is always an exciting task. While unboxing the Cricut Maker machine, we got several items that we will be discussing here. However, you always have the option to select the bundles when you buy the machine from Cricut's official website.
Following are the items that you get in the box of the new Cricut Maker:
Apart from these, you will get the following:
The best thing is that we get the blades and tools along with the new Cricut machine. These blades allow us to try various products before buying more blades.
How Do I Set Up My Cricut Maker on a Computer?
When we talk about setting up Cricut Maker machine, it means we want to connect it to our devices like computers or mobile phones. However, there are certain ways to connect these machines to our devices. For example, we can connect our Cricut Maker to our computer or phone via Bluetooth or USB cable. So, it is the users’ choice to choose which way is the most suitable for them.
Below, we explain how to set up Cricut Maker. This method is only applicable for Windows or Mac users only:
How Do I Set Up My Cricut Maker on a Mobile?
Here's how to set up your Cricut Maker on Mobile devices with iOS or Android operating systems:
Cricut Maker is the most advanced and versatile in Cricut's lineup. However, the box contains various items that you can use to make several projects uninterruptedly. In this write-up, we explained the Maker and its features in detail. It helps the users to get an overview of machines so that they can use them without any hassle. After exploring the Maker cutting machine, the blog found out how do I set up my Cricut Maker.
FAQs
Question 1: Can I set up the Cricut Maker easily?
Answer: People think the setup is daunting, but this is not the case. Cricut machines are just like printers. The only difference is that Cricut has blades to cut. However, when you go through the notice period, you will find the setup is too easy and complete in less time. While setting up, you will need to download and install the Design Space app. This app will guide you through the further setup process, making it easy for beginners to set up the machine in one go.
Question 2: How do I connect my mobile phone to my Cricut?
Answer: Here, we are going to show you the method to connect your mobile device to the Cricut machine. Here, we are using iPhone or iOS devices. So, ensure you have an iOS device.
Question 3: Can I use the Cricut without its software?
Answer: No, you must use the Cricut Design Space app to send your design to your Cricut device. The machine is the companion for your Cricut cutting machine. Without this machine, you can't cut anything. However, the Design Space is essential for creating intricate designs and then sending them to the machine. Also, the app is the only way to maintain communication between your computer and Cricut.
Visit: cricut.com/setup
cricut.com/setup
Source: https://cricutmakersetup.wordpress.com/2023/10/21/how-do-i-set-up-my-cricut-maker-ultimate-guide/
#cricut explore air 2#design space setup#cricut maker#cricut.com/setup#cricut.com design space#cricut.com/create#cricut.com sign in#design cricut.com download#digital design
2 notes
·
View notes
Text
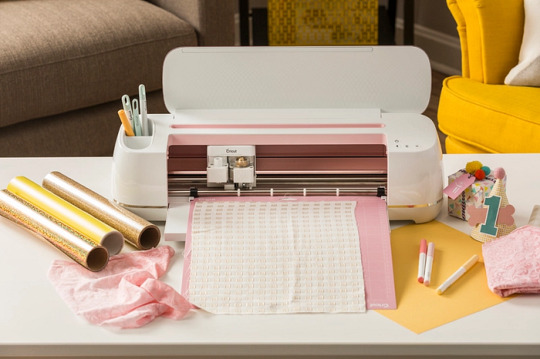
How to Use Cricut Explore Air 2: Create DIY Projects at Home
Are you excited to express your creativity with the Cricut Explore Air 2 machine? This flexible cutting machine can make your crafting dreams come true. It cuts over 100+ various materials, like paper, cardboard, vinyl, and even leather.
Whether you’re a pro crafter or a beginner, this machine is perfect for bringing your ideas to life. This stepwise guide will walk you through ‘how to use Cricut Explore Air 2‘, download the Design Space app, and create your first project.
So, get ready to venture on a crafting adventure and discover the joy of DIY projects. Let’s dive in and explore the world of Cricut!
Downloading Cricut Design Space on Your Computer
The first thing to use the machine is to download the Cricut Design Space software. To download it, navigate to design.cricut.com from your Windows or Mac. If you already have a Cricut account, log in to the app after downloading it.
If you want to download the software on your mobile device, either Android or iPhone, go to their Play Store/App Store and look for the app in the search bar. It will be a square icon with Cricut written at the center.
NOTE: You must have an account beforehand to use the app. If you don’t have one, you should create one on the sign-up page. Also, you don’t need a Bluetooth adapter to use the machine, as it comes with built-in Bluetooth. The earlier Explore series, such as the Explore One, required a Bluetooth adapter.
Connecting Cricut Machine to Your Computer With USB
Although you can use your machine wirelessly, let’s examine how to use it through USB.
Step 1: First, place it on a clean and flat surface with 10-15 inches of space behind and front to let the cutting machine move freely.
Step 2: After that, you must plug in your Explore cutting machine.
Step 3: And then attach the USB cable and power adapter.
Step 4: Next, you need to turn on your Explore machine and your computer.
Step 5: Open the Cricut Design Space software discussed in the previous section and log in using your credentials.
Step 6: Within the app, select the Menu icon visible at the top and choose New Machine Setup. This will guide you through the installation, the first project you will make, and a greeting card.
Now, you are almost ready to use the machine. The next section will examine how to make a project on your machine. So, let’s get into that.
How to Use Cricut Explore Air 2: Creating Your First Project
Now, let us walk through a project that can be made with the materials that came with the box of your machine. If this is your first project, don’t worry—it will be easy!
Step 1: From the “Cricut New Machine Setup,” you will see a design on your screen. If you don’t find it, head over to cricut.com/setup. Then, find the Menu on the top side and click “New Machine Setup.”
Step 2: Prepare all the materials that came with the machine, such as cardstock, mat, paper, and pen. Remove the plastic film from your machine and keep it aside for future use.
Step 3: Afterward, you need to load the cardstock on the machine mat. The textured side should be facing up and lined up on the machine mat vertically. Make sure to line it up on the upper side, right below the Cricut logo.
Step 4: In the next step, you must insert your cutting mat into your Explore machine. Ensure that you load the machine mat as per the guidelines. You also need to take care that it is pressed against the roller while you press the “load/unload” buttons, which are located at the top of your cutting machine. The icon looks like a set of double arrows.
Step 5: Now, you need to insert the pen in clamp A. To do that, you need to remove the cap and place it tip-down until the arrow on the pen disappears. After you are done with this, you can close the clamp.
Step 6: Then, check the design on your screen and tap the Go button.
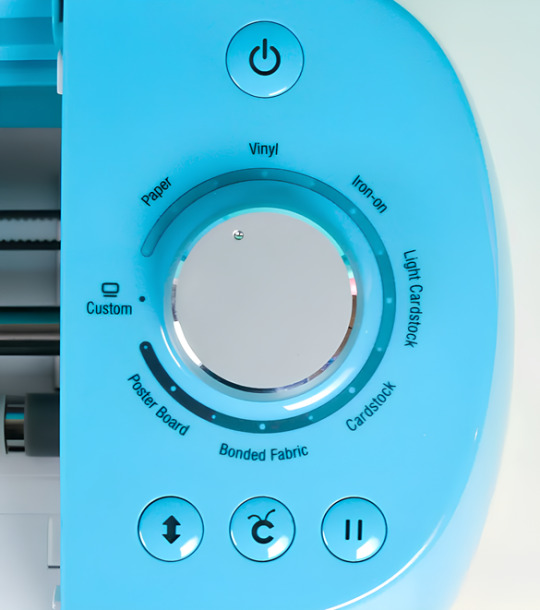
Step 7: Next, you need to set the dial to cardstock on the machine.
Step 8: As soon as you are ready to make the necessary changes in the design, the preview “C” button on the machine will start flashing.
Step 9: Also, you will have to unload the machine mat. Once you complete the project, click on the load/unload button to take off the pen.
Step 10: Afterward, remember to put the machine mat face down on a flat surface and then curl the edge up toward you. It will be removed from the cutting mat, and as you take it off, keep curling it up to make it easier.
Step 11: Fold your paper card over, and then crease it in half. Place the same on your plain blue paper inside the card. You can glue this in place if you like.
Hoorah, you have finished your first project. Pat yourself on the back and know that your journey in this crafting world has begun.
Summing Up
That concludes our guide on ‘how to use Cricut Explore Air 2‘ for beginners. Reading the above blog should make you feel fairly comfortable working on a new project. Now, you know how to download the Design Space app, set up the machine, and use it properly. Plus, you can always return here for a quick refresher!
FAQs
How do I enable the fast mode in my Cricut Explore Air 2?
To enable Fast Mode on your machine, load your material onto the cutting mat and place it in the machine. Choose the proper material setting in the Cricut Design Space software, such as vinyl or cardstock. Then, seek the option to enable Fast Mode. After selecting it, click the blinking “C” button to cut. This mode allows your machine to cut and write up to two times faster, making it appropriate for certain materials.
What can I make with a Cricut Explore Air 2?
It is an amazing and versatile cutting machine that allows users to make unique designs and projects. It has the ability to cut over 100 materials, like vinyl, cardstock, and iron-on, and even thicker materials, including wood. Its additional features, like writing and scoring capabilities, enable the creation of custom cards, labels, and stickers. This machine gives users access to thousands of designs through Cricut Design Space; users can easily make personalized items suited to their tastes.
Can I use Cricut Explore Air 2 without a computer?
Yes, one can use the machine without a desktop by pairing it to a smartphone via Bluetooth. The machine has built-in Bluetooth connectivity, which allows one to use the Cricut Design Space app on iOS or Android devices to design and send projects to the machine. However, some features may be limited compared to those of a computer.
Visit: install cricut design space app cricut.com setup mac
Source: https://explorenewmachine.com/how-to-use-cricut-explore-air-2-create-diy-projects-at-home/
#cricut.com/setup#cricut.com/setup mac#cricut.com/setup windows#cricut.com/setup login#install cricut design space app#install cricut explore air 2#install cricut design space#install cricut#www.cricut.com setup login#www.cricut.com/setup#www.cricut.com/setup login#cricut explore air 2#cricut setup#cricut design space download#cricut design space app#cricut design space software#cutfiles#cricut design space setup#cricutprojects#cutfilesforcricut
0 notes
Text
How to Calibrate Cricut Explore Air 2? (Full Guide!)
Cricut Explore Air 2 is a worthwhile machine for crafters who want to make pro-level crafting projects. The machine offers precise cuts for more than 100 different types of materials, including Cricut Smart Material, leather, wood, glass, metal, etc. With its easy-to-use interface, the machine allows users to work on DIY projects even if they are novices. Moreover, sometimes crafters may need to perform Cricut Explore Air 2 calibration before a cut.
Calibration is a process that helps set the machine’s blade to cut the design accurately without any flaws. Many users don’t know the procedure and struggle to get the perfect cut. If you have the same problem, then the follow-up blog will provide you with all the information about calibrating your machine.
Cricut Explore Air 2 Calibration on Windows/Mac
If you are using your Cricut Explore Air 2 machine on a computer, then the following is the extensive guide that will help you perform the calibration process.
Step 1: Selecting the Printer
Open the ‘Cricut Design Space app‘, sign in to your account, and then click on the Settings option.
Then, follow the path Machines > Machine Calibration, and select Cricut Explore Air 2.
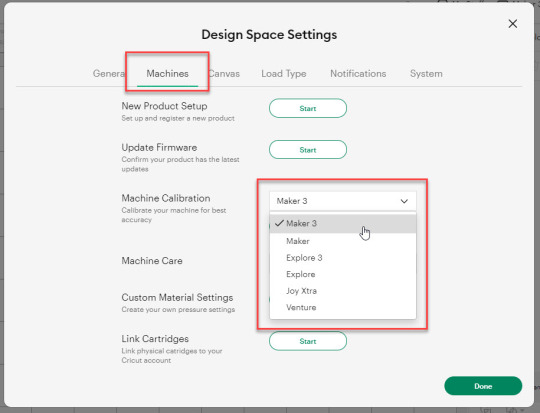
After selecting your crafting machine, click on the Start option.
Depending on the machine you choose, you will be asked to complete the calibration; select the Print Then Cut option.
In the next step, choose what you like to use with your printer machine for the process.
After that, click on the Continue option.
Step 2: Starting the Calibration Cut
Now, you should place the printed calibration sheet on the mat, position it perfectly, and select the Continue option.
For the next step, ensure that your machine is ON and connected to your computer using USB or Bluetooth. Select the machine from the drop-down menu, insert the cutting mat into your crafting machine, and click Go.
Furthermore, the device will start scanning the markings for the calibration.
After the cutting is complete, check if the cut-makings are touched without unloading the mat from the machine. (If the markings are touched, then choose the Yes option in the app and select Continue to move to the next step.)
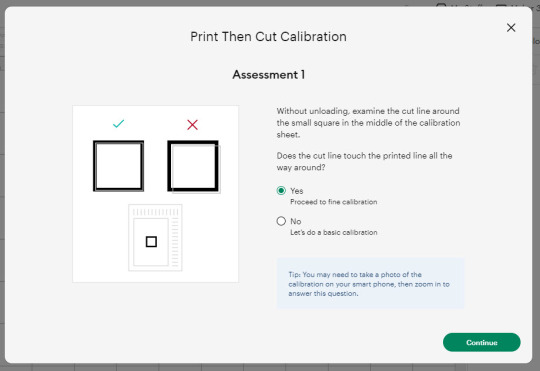
Note: If you choose the No option, then the machine will perform a cut for the next time for the accurate cut.
Also, the machine will start the calibration cut at the top and side of the page.
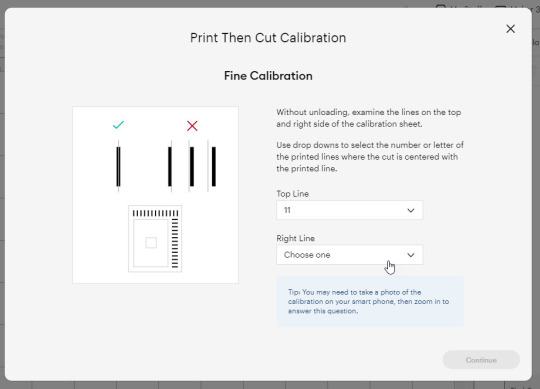
Now, check if the markings are correct without unloading the mat from the device. (The cut should be on or before line 1 and on or before line 21.)
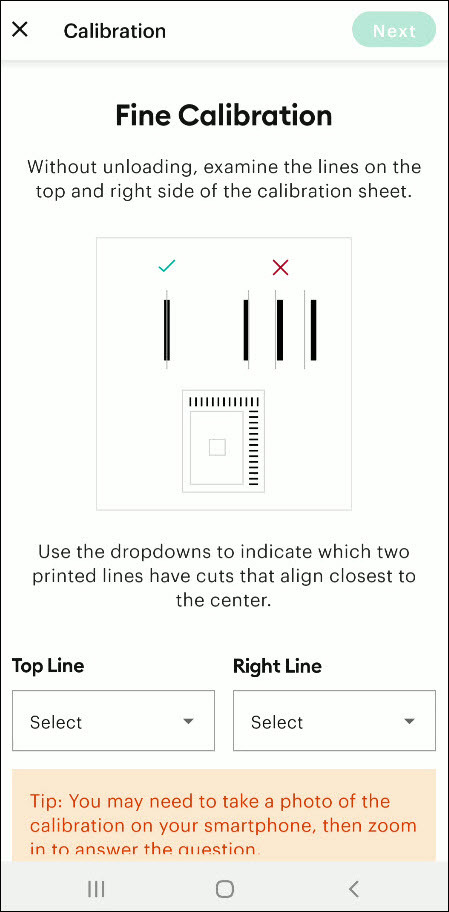
If your cut meets all the conditions, choose the line closest to the center of the printed lines, the same as the following image; when you are done, select the Continue option.
In the next step, the Cricut Explore Air 2 machine will perform a confirmation cut around the large sheet. When this step is complete, unload the mat from the machine and remove the calibration sheet; now, you need to answer the final question on the app.
You need to choose Yes, cut is close enough to the center if you are happy with the cut. (Select no and follow the further process if you are not happy with the cut.)
Cricut Explore Air 2 Calibration On iOS/Android
The follow-up method will allow you to Calibrate your Explore Air 2 machine without any hassle. So, let’s begin the process.
Step 1: Connecting the Printer to Your Machine
Start by signing into your Cricut account on the app and selecting the menu option from the upper right corner.
After that, tap on Settings and then select Print Then Cut Settings.
Also, tap on the Calibration.
Next, you have to choose the Send to Printer, or I have a calibration sheet option.
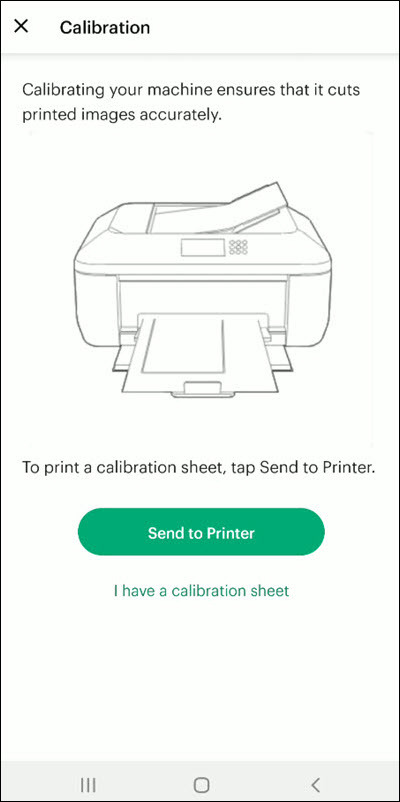
Now, the preview of the calibration sheet will appear on the screen (it can be a little different depending on the device you are using.)
Afterward, tap “Select a printer” and select the printer device you are using. Then, choose Next.
Step 2: Perform Sheet Calibration Process
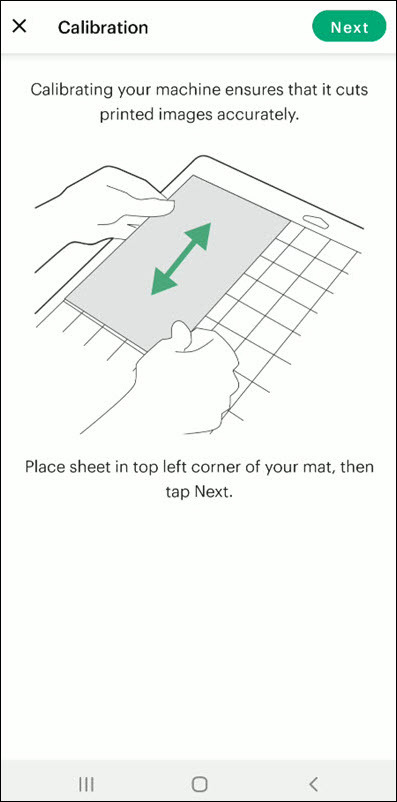
After that, take the printed calibration sheet, place it onto the machine mat perfectly, and select Next.
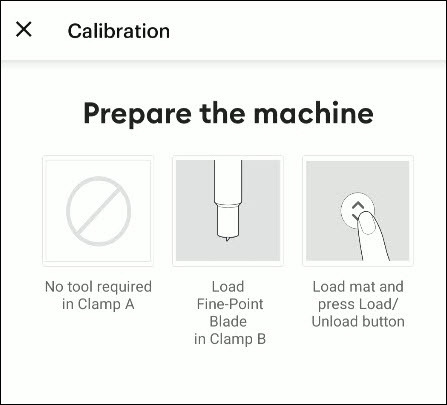
Specify the appropriate material setting for your machine.
Then, after loading the mat into the machine, press the Go button on it.
Also, the machine will look for the marking for the calibration and then start the cutting process near the small square.
Afterward, without unloading the mat from the machine, check for the cut to ensure the cut touches the marked lines all the way around. (If the lines touch the cut, then tap Yes in the app, then select Next to proceed with the next step.)
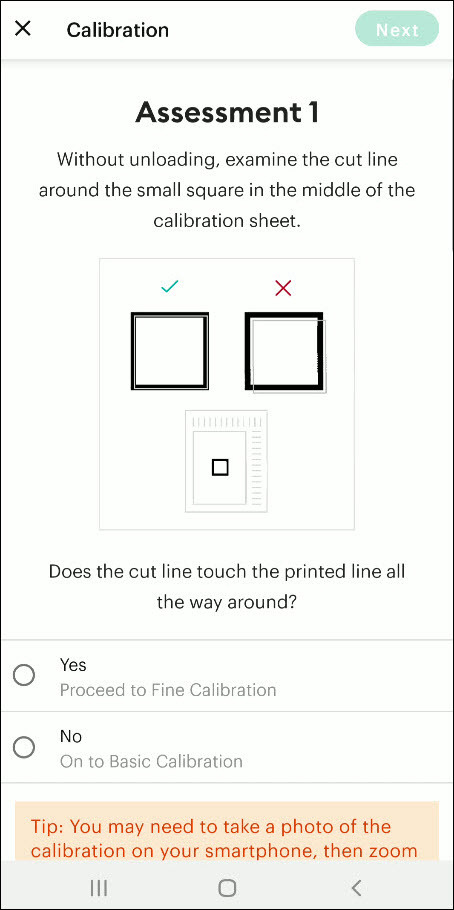
However, if you select the No option, then the machine will try to cut close to the top and sides of the page. (Once done, look closely without unloading the mat; there should be a cut before line 1 and on or after line 21.)
If the cut meets these lines, you need to specify which cut is closest to the center of the printed lines and the right side of the calibration sheet.
Once you are done, select Next to move forward.
After that, keep following the instructions on the screen to complete the procedure.
Once the process is complete, you can start cutting materials on your machine.
Final Words
Cricut Explore Air 2 calibration is the best way to get the pin-point cuts. These methods will help you to perform the calibration process on computer and smartphone devices. With these methods, you cannot only calibrate your Explore Air 2 but also any other cutting machine of the brand. Furthermore, if you have any doubts regarding the procedure or have any issues, then it would be good to ask for more assistance and guidance.
Frequently Asked Questions
Why Is My Cricut Explore 2 Not Cutting Properly?
Cricut Explore machines are known for their flawless and fast-cutting results. Sometimes, it is due to the material you are trying to cut on your device. Also, in some cases, the machine faces technical issues. To get your machine out of this problem and start cutting properly, you can use the calibration procedure. The process to calibrate your machine is simple.
Why Should I Calibrate My Cricut Machine?
However, the cuts can sometimes be misaligned due to various reasons. Crafters can calibrate their devices to get the blades and cuts aligned to their initial position. After the calibration, the machine starts to provide flawless cuts once again. However, the calibration process is a little complex and differs from device to device. So, you must know the whole process before performing it.
What Is the Thickest Setting on Cricut Explore Air 2?
We all know that Cricut cutting machines are known for their fast and flawless cuts, even for intricate designs. Thus, the Cricut Explore machine can cut a wide range of materials of a certain thickness. If you want to cut the wood, metal, leather, etc., then your machine can cut up to 2mm. However, different materials need to use specific blades to get the desired results.
Source: How to Calibrate Cricut Explore Air 2
#how to calibrate cricut explore air 2#cricut design space app#cricut design space download#cricut design space software#cricut machine setup#cricut explore air 2 setup
1 note
·
View note
Text
How to Use a Cricut Maker to Create a DIY Project? (Easy Guide)
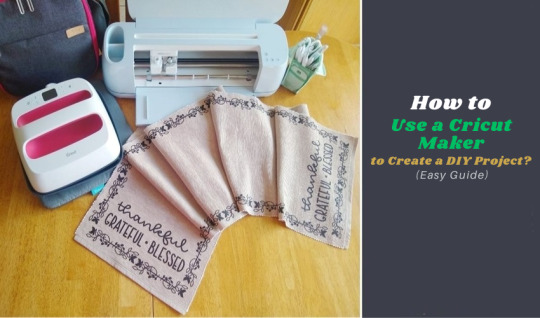
Are you thinking of buying a Cricut Maker? Or you have just got one and are not sure where to start? This guide will walk you through all the different ways to learn how to use a Cricut Maker without any previous experience.
This cutting machine is advanced and unique from other models, like Explore Air 2 and Joy machine. It delivers a wide range of features, tools, and accessories for crafting projects. With this machine, you can cut fabric, vinyl, cardstock, chipboard, and more precisely.
So, if you are a beginner and don’t know how to use this machine—don’t worry; we are here to help! Read this blog, and you will learn how to use it easily.
How to Use a Cricut Maker: Unboxing and Initial Setup
Once you have got your machine in your hands, it is time to check if you have all the necessary supplies and tools that come with the machine or not. So, in order to do that, you must follow these steps:
Step 1: Unbox Your Machine
Carefully remove the machine from the box, ensuring that all packaging materials are removed. Inside the box, you will find the machine, a power cable, a USB cable, a cutting mat, a fine-point blade, and a welcome guide.
Step 2: Positioning Your Machine
Place the machine on a flat surface, ensuring at least 10 inches of space in front and behind the machine. This space allows the cutting machine to move freely during operation.
Step 3: Connecting to Power
Now that you have unboxed your machine, it’s time to take the most important step: giving it life support. To do that, you must insert the power cable into the back of the machine and plug it into an electrical outlet. Once you finish the connection part, let us look into how to activate your machine.
How to Activate a Cricut Maker: Quick and Easy Steps
The first thing to do is activate the machine. To do so, from your Windows/Mac, you must head over to cricut.com/setup from any browser of your choice. Activating the machine is even easier if you have already used the Design Space app. To set up the machine from the app, go to the Menu icon and then select ‘Cricut New Product Setup.’ After that, follow the prompts that let you choose your machine.
To open the machine, you must lift its lid. This will open the cover of the machine automatically.
Power button: With this button, you can turn the machine on and off.

Feeding switch: This button lets you feed your mat into the machine.

Cricut switch: This is the button with the initial C. Press it when you want to start cutting (it is also called the confirm button).

Pause button: This button gives you the flexibility to pause your machine in between. It’s extremely handy if you’re in the middle of a cut and want to change something or for any other reason.

That’s all in terms of design. In the next section, we’ll look at the steps to create a project.
How to Use a Cricut Maker: 5 Easy-To-Follow Steps
To use a machine, follow these detailed steps from setup to your first project. As the Cricut Maker Setup is a versatile cutting machine, it can handle various materials, making it ideal for crafting projects.
Step 1: Connecting to Your Device
In order to get a hold of the machine, you must connect it to your desktop or computer. This is crucial because, without the connection, the machine cannot communicate with your device. Even though the Design Space app can work offline, you still need a connection at least once to save it on the app.
You can connect your machine to your device via a USB cable or Bluetooth. Connect the square end to the machine and the USB end to your PC via USB. To pair your device with the machine using Bluetooth, turn on the machine and then go to the Bluetooth settings.
Visit the official website or surf design.cricut.com and download the Design Space application. It is essential for project creation and supports various platforms, like Mac, iPad, and iPhone.
Step 2: Setting Up Design Space
This is the most important step after connecting the machine and your device (Mac/Windows). Once you have downloaded the app, you must do these things for a smooth experience:
Open the software and fill out the required fields to create an account. The account allows one to save their projects and access various design features.
In the software, select “New Machine Setup” from your profile. Finish the on-screen steps to choose your machine model and perform the setup process. The app will guide you in connecting your device to the machine.
Step 3: Designing Your DIY Project
Now that you have done all this, let’s start creating your first project. To do so, let’s look at these steps:
Start a New Project: Once your machine is connected, you can start a new project using the software. Select the type of project you want to create, such as a card, decal, or label.
Choose Your Materials: Design Space allows you to select the material. If you use cardstock, set the material type accordingly.
Prepare Your Cutting Mat: Place your chosen material onto the mat. Ensure it is aligned correctly and adheres well to avoid shifting during cutting.
Step 4: Start the Cutting Process
Now that you are familiar with downloading the app and activating the machine, let us look at its main purpose: the cutting process. It happens as described below; follow the steps carefully for a seamless cutting.
Load the Mat: Insert the mat into your crafting machine until it clicks into place. This will automatically feed the mat in for cutting.
Start Cutting: Press the “C” button on the machine to begin cutting. Your device will display a percentage of the cut completion and allow you to monitor the progress.
Completion: Once the cutting is finished, the machine will signal it is done. Carefully remove the mat and peel off your cut material.
Step 5: Post-Cutting Steps
It is equally important to know what to do after you are done with your cutting process.
Removing Your Cut Material: Gently lift the material from the machine mat. If you use delicate materials, such as intricate designs, use a spatula tool to help lift them without curling.
Assemble Your Project: Depending on your project, you may also need to assemble various pieces. Follow any additional steps to add embellishments or complete your design.
Conclusion
Don’t be discouraged if your first project isn’t perfect. The more you use your cutting machine, the more comfortable you will become with the process. Take time to explore the features of Design Space, like templates, images, and fonts. This exploration can inspire new project ideas. Using a crafting machine opens up a world of creative possibilities. Following these steps, you can confidently set up your machine, design your projects, and bring your creative ideas to life. Happy crafting!
FAQs
How do you use a Cricut for beginners?
To use a crafting machine as a beginner, unbox your machine and follow the setup steps. Download the Design Space software on your computer or mobile device for project creation. Familiarize yourself with basic operations like uploading images, selecting materials, and changing settings. Start with modest projects, such as stickers or paper cards, to build confidence. Use online resources and community forums to get more support and inspiration.
What do you use a Cricut Maker for?
A Cricut Maker is a versatile creative gadget that can cut materials like vinyl, paper, and fabric. It’s excellent for making unique designs for home decor, apparel, and more. The machine is capable of cutting a variety of materials, making it appropriate for both simple and intricate crafts. Beginners begin with projects such as greeting cards or decals, gradually discovering their full potential as they gain skills.
Do I need a computer to use a Cricut?
While a computer is not required to use a Cricut, it is suggested for maximum performance. The Design Space software can be accessible from a computer, tablet, or smartphone, making design management easier. Using a computer allows for a wider screen and more accurate control when making complex designs. However, several users have operated their machines using mobile apps, allowing them to create while on the road.
Source: How to Use a Cricut Maker
#how to use a cricut maker#cricut design space download#cricut design space app#cricut design space software#Cricut Maker Setup#cricut new product setup#how to setup cricut maker#cricut new machine setup
1 note
·
View note
Text
Cricut Computer Setup: Full Guide for Windows and Mac

Ever since I started doing the Cricut computer setup, the excitement of setting up a new Cricut machine is still as fresh as it ever was. But do you know how to setup a Cricut machine on a computer? If your answer is no, then chillax! You have already opened the right page, so you will definitely find something helpful.
So, what do we need to do before setting up a Cricut? Well, the only thing you will need to know is to establish a connection between your Cricut and computer. But the next question is—HOW? And by which method? There are two methods: USB or Bluetooth. We can do it easily by following some easy ways. Want to know? Let’s check out this blog to learn more!
Lastly, you must complete the machine setup, and this process is the same for both Mac and Windows. Let’s get started!
Cricut Computer Setup for Windows and Mac
Setup is easy if you will do it once. But even if you are a beginner, it is going to be a breeze. Just trust me and follow the steps that I have given below. Remember the below-mentioned steps are the same for both Mac and Windows computers:
Here’s the Cricut setup on computer (Windows and Mac):
First, launch an internet browser and head to the cricut.com/setup website.
Now, you will need to download and install the Cricut software on your computer.
Next, follow the steps given to your display and create your new Cricut account accordingly.
If you already have an account, you should sign in to your Cricut ID using your username and password.
Then, select your Cricut machine model for the setup procedure.
Now, switch on the Cricut by inserting the power cable into its power outlet.
Hit the power button on your Cricut machine.
Next, establish a connection between the Cricut and your device, either using a USB cord or Bluetooth (To learn how to connect it properly, you should navigate to the next section given below).
Afterward, you should register your Cricut cutting machine.
Finally, your Cricut setup on computer is done, and you will be prompted to test the cut.
Now, you might have learned the Cricut computer setup. Below, I have explained how to connect your Cricut to your computer via Bluetooth. Let’s delve into it!
How to Connect Cricut Machine to Computer via Bluetooth?
Here, I want to focus on the steps to connect Cricut to a computer. Many crafters, especially beginners, can face difficulties while connecting. So, I’ve made it easier for you.
Below are the steps to connect Cricut to a Mac and Windows using a Bluetooth wireless connection:
Windows
The first thing you need to do is keep your machine at an adequate distance, about 10-15 feet from your computer. If you are using Explore models, you should insert the wireless Bluetooth adapter.
Now, check whether you have enabled Bluetooth. To do this, go to Settings and then move to the Devices option.
Then, you can enable Bluetooth by clicking on the toggle button.
Next, click on the Add Bluetooth or other device.
So, you will have to wait until your Bluetooth finds your Cricut machine.
Afterward, select the machine from the available list.
Finally, you have successfully paired the machine.
Mac
The first step would be the same as the above.
Then, you have to hit the Apple menu and select the System Preferences option from the given options.
Look for the Bluetooth option and check whether it is enabled or off. If it is off, you should turn it on.
Now, you will see your Mac Bluetooth is looking for an available device, such as your Cricut machine.
Once your Cricut machine appears in the list, you must select it to pair with your computer.
Once the pairing is done with your Mac, you are ready to setup your machine further.
Once you complete your Cricut computer setup, you can start making your projects hassle-free.
FAQs
How is the Cricut app crucial for machine setup?
The Cricut app, Cricut Design Space, plays a pivotal role in machine setup. It helps you connect your Cricut machine setup and allows your computer to communicate with your Cricut cutting machine. Whether it is a computer or mobile device, the Cricut software is compatible with all four platforms: Mac, Windows, iOS, and Android. However, you will be prompted to download the app during machine setup. Thus, it is a crucial part of the Cricut machine setup. Without this software, your setup is incomplete.
What are the system requirements for using Cricut software on Mac?
The minimum system requirements for using the Cricut Design app on a Mac computer are as follows:
macOS 11 or later
USB port or Bluetooth
1.83 GHz CPU
Minimum 2 to 3 Mbps download speed and 1 to 2 Mbps upload speed
4 GB RAM
2 GB free disk space
Minimum display screen resolution of 1024px x 768px
Can I setup my Cricut machine using my Samsung Galaxy?
Yes, you can setup your Cricut machine using your Samsung Galaxy device. To setup on an Android phone, you have to follow the steps below:
First, connect the Cricut’s power cord to the wall outlet.
You need to pair your device and the Cricut via Bluetooth.
Then, you have to download the Cricut app from the Google Play Store.
Open the software and start signing in or creating a Cricut ID.
Choose the model, and your setup will be completed.
Final Thoughts
In a nutshell, I have explained the Cricut computer setup procedure in easy steps for both Mac and Windows users. The setup process given in this blog is based on the setup that I performed recently. It doesn’t matter whether you are a Mac or Windows computer. For any Cricut users, the setup is a must to get started! Without this, you will not be able to make a single cut.
For more information visit: cricut design space download design.cricut.com cricut.com/create
Source: Cricut setup on computer
#Cricut setup on computer#Cricut computer setup#cricut new machine setup#cricut machine setup#cricut design space download#cricut design space software#cricut design space app#cricut design space login
2 notes
·
View notes
Text
How to Set up Cricut Maker: A Step-by-Step Guide
Setting up the machine requires you to do a few steps, like preparing the machine, downloading Design Space, and connecting the machine to your device. Once you have completed these things, your setup process will be complete. So, follow along with the blog and get your machine ready to use!
Unboxing and Preparing Cricut Cutting Machine
In the process of learning how to set up Cricut Maker, you have to start with unboxing the new machine. After unboxing and checking for all the items, you will need to prepare your machine for the setup.
To begin with the process, unbox the machine, remove the safety tapes, and check the materials inside. You will need the items shown in the picture below to set up and use the machine. You will get some of the things along with the machine, and the others must be purchased by yourself.
The tools that you will get inside the box are:
USB cable
Power adapter
Fine-point blade
LightGrip mat
FabricGrip mat
Rotary blade
Welcome Book,
Start guide
Some materials for the test cut and other tools.
The tools that you will have to purchase from the outside are:
Scissors
Tweezers
Weeder
Scraper
Spatula
Trimmer
Scoring stylus
Download Cricut Design Space on a Computer
In the process of learning , downloading Design Space is essential. It is the necessary app for using your machine to start crafting. You can download it on any device you are using with Cricut. Here, you will learn how to do it on a Windows computer.
On an internet browser, open cricut.com/setup and navigate through the Design Space app.
Next, agree to the terms & conditions and then click on Download. The app will start to download on your computer.
Then, the app will be downloaded very soon.
Now, visit the Downloads folder and look for the downloaded file.
When you find the file, click on it twice and start to install.
After the app is installed on your computer, create an account and log in.
Connect Cricut Maker to Your PC Using Bluetooth
In the process of learning how to set up Cricut Maker, you finally have to connect your machine to a device. Although you can use both USB and Bluetooth to connect your machine to your computer, you will see the Bluetooth connection below.
Turn on your machine and make sure the distance does not exceed the limit of 10–15 ft from your computer.
After that, open Settings from the Start menu and go to Bluetooth settings.
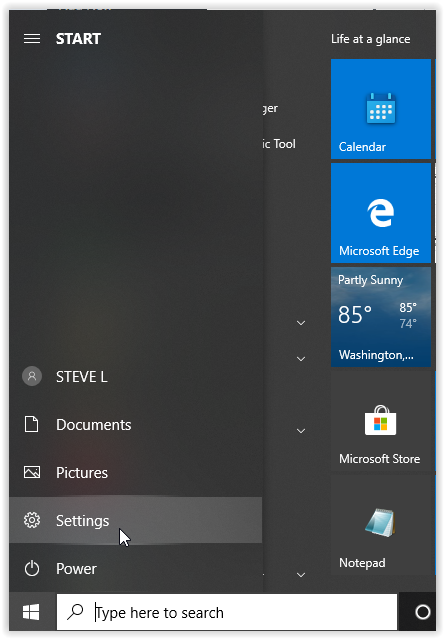
Then, enable Bluetooth and then click on Add Bluetooth or other device.
Next, select Bluetooth and let the computer detect the machine.
Click on the machine upon seeing it, and it will be connected.
To ensure the connection, check it on the Design Space app.
Conclusion
After reading the blog, you learned how to set up Cricut Maker on your Windows computer. With its versatility, it is a great machine for making projects, and the knowledge of how to set it up is important. Now, you know that you need to unbox the machine and prepare it for the setup. Downloading the Design Space app and connecting your operating system to Cricut are the final steps for the setup procedure.
FAQs
Does Cricut Maker Work with a Phone?
Yes, it does! If you want to use this machine and you just have a phone instead of a computer, that’s fine! You can use your cutting machine on a mobile, so you just have to connect it to the machine either via Bluetooth or a USB cable. Once your device is connected to the machine, you have to download the Design Space software, and then you will easily be able to use the machine with your smartphone.
What Materials Can I Cut With Cricut Maker?
You can use more than 300 materials on this cutting machine. The Cricut Maker is a powerful machine, so you can cut various materials like leather, wood, plastic, and metal. With this machine, you can also cut materials like paper, foil, and cards. Other materials include cardstock, art board, foam, felt, and fabric.
What Tools Do I Need to Work With Cricut Maker?
The Cricut Maker, like other machines, works with multiple tools. You will get some of these things along with the machine when you purchase it. But you will have to buy other tools separately to use the machine. The tools you will get inside the machine are an adapter, a USB cable, a fine-point blade, and some test materials. The other materials you will have to buy from outside are scissors, a weeder, a scraper, a machine mat, and a spatula.
Source: how to set up Cricut Maker
Visit here to Know More: Cricut.com/setup
Pinterest
0 notes
Text
How to Set up Cricut Maker: A Step-by-Step Guide
Are you overwhelmed after adding the Cricut cutting machine to your art collection? Setting it up can be challenging, but if it is done successfully, you will fall in love with the overall process. Undoubtedly, a new user might find how to set up Cricut Maker topic alittle hectic, but that can be done without much help.
This ultimate machine will take your decorative arts and crafts to the next level. This Cricut product delivers a next-level crafting experience by cutting 300+ materials with its advanced suite of tools. Cricut Maker is compatible with Windows, Mac, Android, and iOS devices and connects with the Design Space app. The blog will solve any doubts about this Cricut machine setup and connection process on a computer.
How to Set up Cricut Maker on a Computer?
Whenever I think of creating a craft with Cricut Maker, the first thing that comes to mind is setting it up with the computer. To get the desired project out of the cut-die machine, all the DIYers must conclude the setup successfully. For that, they need to follow the steps given below:
Initiate the process by unboxing this Cricut machine along with other supplies.
After that, plug in the power cable inside the machine and switch it on.
Following this, take the USB cable and connect the Cricut Maker to your computer.
On the other hand, you can also pair both devices via Bluetooth.
Next, open your device search engine & go to cricut.com/setup.
Now, press Download to install the Cricut Design Space app on your device.

After getting the app, create your account or sign in using your login credentials.
At this point, you need to follow the instructions and start setting up your Cricut Maker.
Lastly, you will know the set-up was complete when called for a test cut.
With the help of the content mentioned above, you must have gotten the idea about the steps that revolve around how to set up Cricut Maker with PCs.
How to Connect Cricut Maker to Computer via Bluetooth?
After setting up the Cricut cutting machine with the computer, it’s time to make progress and connect devices via Bluetooth feature. Below are some instructions that will help you finish the wireless connection quickly without any issues:
Windows
All the Windows users who’ve completed the how to set up Cricut Maker process are instructed to have a look at the steps given below:
In the opening stage of the process, you need to check whether your cut-die machine is on and within the range of 10-15 ft of your computer.
After that, open the Menu section and tick the Settings icon (it will look like a gear icon).

Now, press the Devices option and check whether your computer’s Bluetooth is on.
Next, select Add Bluetooth or other device and tick the Bluetooth option.
At this time, you need to wait for a few seconds till your computer detects Cricut Maker.
Further, choose your Cricut machine name from the list before you.
Here you go! Your Windows system and Cricut Maker wireless connection process has been done.
Mac
If you are a Mac user and want to connect your system with this Cricut cutting machine, then have a look at the steps written below:
First, you must ensure that your Cricut Maker is on and within 10-15 feet of your Mac.
Next, open the Apple menu and choose the System Preferences option.
Afterward, click the Bluetooth icon and enable Bluetooth on your computer.
Now, select your cutting machine name from the list appearing under the Devices section.
After a few minutes, the connection process will come to an end.
Finally, you have connected your Cricut Maker machine to your Windows and Mac computers.
Frequently Asked Questions
Question: Why Is My Computer Not Connecting to Cricut Design Space?
Answer: The reasons that you might be facing while connecting your computer to the Design Space app are given below:
Check that your computer has a strong internet connection.
Cricut Design Space servers might be down, which might cause connection issues.
You must have the older version of Cricut Design Space so it doesn’t connect to your computer.
Question: How Can I Connect My Cricut to a Device via a USB Cable?
Answer: The steps that will help you connect your Cricut to the device via USB cable are as follows:
Start the process by unboxing your Cricut machine and USB cord.
After doing that, turn on your device & Cricut machine simultaneously.
Next, slowly put one end of the cable at the USB port of your Maker machine.
Repeat the same process by setting the cable on the other end inside the computer USB port.
Finally, press the power button to see that the connection has been made successfully.
Question: Can I Use My Cricut Machine With Design Space App?
Answer: No, you can’t use the Cricut machine without the Design Space app because it runs together with the cut-die machine. Without Cricut Maker, users won’t be able to send any designs to the craft plotter and cut any material during the cutting process. Besides, the app is the only way to interact with the Design Space app.
Read more: Cricut design space
install cricut design space app
how to setup cricut explore
Source: how to set up cricut maker
#how to set up cricut maker#how to setup cricut explore#design space signin#Cricut design space#cricut design space login#cricut design space download#cricut.com/setup#cricut design space setup#cricut design space for mac#cricut design space app#cricut maker bundle#cricut explore 3#cricut.com
0 notes
Text
“How to Connect Cricut Create to Computer Easy Setup Guide”
To set up your Cricut machine on a Mac, start by visiting cricut.com setup mac and downloading Cricut Design Space for Mac. After downloading, open the installer and follow the prompts to complete the installation. Launch Cricut Design Space, then sign in or create a new account. Connect your Cricut machine to your Mac using a USB cable or Bluetooth, and follow the instructions to pair it. Ensure your machine’s firmware is updated through Cricut Design Space. With these steps, you’ve completed the cricut.com setup mac process and are ready to start crafting.
cricut.com setup mac www.cricut.com/setup login install cricut design space app cricut.com/setup cricut create connect to computer setting up your cricut maker cricut setup on computer cricut setup download cricut setup log in cricut install setup cricut setup new device cricut setup website connecting cricut maker to computer Cricut Design Space setup
cricut new product setup
cricut maker software Cricut Design Space setup cricut setup for pc cricut design space login cricut maker new machine setup how to setup cricut maker how to setup cricut explore cricut maker new machine setup cricut maker machine set up cricut download laptop install cricut setup maker install cricut printer cricut new product setup cricut design space for windows cricut device setup setup cricut maker machine
#cricut.com/setup#cricut#cricut setup#install cricut design space app#cricut create connect to computer
0 notes
Text
How to Connect Cricut Wirelessly: A Guide for Beginners
Are you a Cricut enthusiast planning to start your crafting journey? Well, you have come to the right place! I am going to walk you through all the essential info you need to learn in order to connect Cricut wirelessly.
Cricut crafting machines come with Bluetooth and USB connectivity to provide the utmost comfort in setting up the device. Crafters familiar with the machine can easily get started with the machine. On the other hand, some new users can find it difficult to complete the setup. In this case, it is best to have a thorough understanding of the process beforehand. So, get through the whole blog and grasp all the vital details and steps to wirelessly set up heat presses and cutting machines.
How to Setup Cricut Cutting Machines Wirelessly?
You can wirelessly connect your cutting machine to both computer and smartphone devices. So, here you will find a quick guide to completing the setup on both devices.
Method 1: Connect Cricut Wirelessly to Your Computer
Begin by unboxing the cutting machine and placing it near your computer device. (Make sure both devices are within the 10-15 feet range.)
(If you are using the Explore One machine, then you should insert the Bluetooth toggle to establish the connection.)
Next, attach the machine plug to a power socket and turn it on by pressing the power button.
From the Settings window on your PC, choose the Devices option.
After that, go to “Bluetooth and other devices,” turn on the Bluetooth toggle, and select “+Add Bluetooth or other device.”
On the next open page, select the Bluetooth option and move forward.
Henceforth, the printer will start looking for the available printers within its range.
Once you see your cutting machine model number on the screen, click on it.
If a prompt comes on the screen to type a PIN, you need to enter 0000 to move forward.
Afterward, the wireless connection process will be complete.
In order to use the cutting machine, you need to complete the setup process through the Design Space app. In the next step, you will learn about the setup process.
Begin by visiting the Cricut official website on your PC.
From the screen, click on the Apps option, which will take you to the Design Space download page.
In the open window, you will see that the Download button is greyed out.
To enable the download button, move to the terms and conditions checkbox and click on it.
After that, you will see that the Download button is now green; click on the button to initiate the download process.
Wait for the design app download process to complete, and then open it after that. (Or you can access the file from the Downloads folder on your device to install it.)
Before the app installation process begins, it will ask if you trust this app and want to open it; click on the correct option to start the installation.
Afterward, a box will show up on the screen to indicate installation progress.
Once the installation process is complete, launch the software/app and complete the login process. (Or create a new account if necessary)
Then, choose the Machine Setup option to search for the cutting machine you are using.
From the result, click on your machine’s name, and the setup process will be complete.
Method 2: Connect Cricut to a Smartphone Wirelessly
The following method will allow you to get complete knowledge of how to connect Cricut wirelessly to a smartphone device.
For the first step, power on your cutting machine and bring the mobile device within its 10-15 feet range.
On the smartphone, tap on the Settings icon and then go to Bluetooth.
Now, turn on the Bluetooth toggle and tap on your machine name based on the result.
Follow the instructions to complete the machine’s Bluetooth connection process.
After completing the Bluetooth connection, the same as the computer device, you need to download the app on your mobile phone. Follow the below guide to do that.
First and foremost, launch the Apple App Store or Google Play Store app on your mobile phone device.
Next, type cricut design space in the search section by tapping on the search bar.
After that, tap on the Search option.
From the list of open results, tap on the correct app icon and then tap on Get to start the downloading. (You might need to type your iTunes password if you are downloading the app on your iOS device.)
Once the downloading is finished, the app icon will appear on your system home screen.
You can open the app from the home screen or from the application downloader you are in.
After opening the app, you are required to complete the account sign-in process. (If you are using the machine for the first time, you need to create a new account.)
On the app, you can tap on the Machine Setup option to search for your cutting machine.
Afterward, follow the on-display instructions, and your machine setup process will be complete.
Here you go! Your machine is ready to create beautiful and stunning DIY projects.
How to Set up Cricut Heat Press Wirelessly?
If you are planning to connect Cricut wirelessly to a heat press machine, then you can do it easily without using any app except EasyPress 3. The following guide will help you complete the process without any issues.
First of all, connect your heat press machine’s plug to a power outlet.
Afterward, go to the Bluetooth page on your phone and establish a wireless connection between both devices.
On your smartphone device, download the Cricut Heat app from the App or Play Store.
Once that process is complete, launch the heat app on your device.
Also, you need to tap on the Sign Up option to initiate the machine setup process.
From the heat press names open on the screen, select your machine’s name, and select Connect.
Now, the app will verify the heat press with your registered email address.
Moreover, select the Activate option after reading the terms and conditions.
Once the machine setup process is complete, a notification will show up on the screen.
Finally, you can use your machine to apply icon-on designs on various products.
Final Words
This piece of content shares all the need-to-know info about the machine setup. You can effortlessly complete the setup process of your device without any issues. However, before downloading the Design Space app, make sure to check the device compatibility and system criteria to avoid any complications. If everything is as required, you are good to go to start using the crafting devices. I wish you a happy crafting journey!
Frequently Asked Questions
Does Cricut Require Bluetooth?
All the newer models of the Cricut machines come with both USB and Bluetooth connectivity technology. However, if you are using the first model of the Explore series, then you need to use the Bluetooth adaptor to establish the wireless connection. All other devices come with built-in Bluetooth to set up the device to a smartphone and computer.
Why Can’t I Connect Cricut Machine Wirelessly?
There could be various reasons if you are unable to make a wireless connection to your machine. Some common ones are given below.
The machine is not compatible with your PC or mobile phone.
The OS of your device has not been updated.
Using the outdated or incompatible Design Space app.
Either of your devices is facing a technical problem.
You are not following the correct connection process.
If you are having these types of problems, then ensure that everything is required or seek help if the problem seems too complex.
Does My Cricut Need to Be Connected to Wi-Fi?
There is no need to connect your machine to Wi-Fi in order to use it. These devices have Bluetooth and USB connectivity options. However, you might need to connect your computer or smartphone to Wi-Fi while downloading the Design Space app to complete the setup.
Source :- https://cricuthelpcenter.wordpress.com/2024/08/29/how-to-connect-cricut-wirelessly-a-guide-for-beginners/
0 notes
Text
How to Set Up Cricut Explore Air 2: A Complete Tutorial
Are you wondering how to Set up Cricut Explore Air 2? If yes, then you are in the right place! With years of experience using the Cricut machine, I am here to guide you through every step of the setup process. The Cricut Explore Air 2 is a versatile tool that allows you to cut and craft with over 100+ materials, like cardboard, paper, cardstock, vinyl, fabric, and leather. To get started, unbox the machine, connect it, and download the Cricut Design Space app. Let’s start the entire procedure in a step-by-step manner.
Unboxing Cricut Explore Air 2
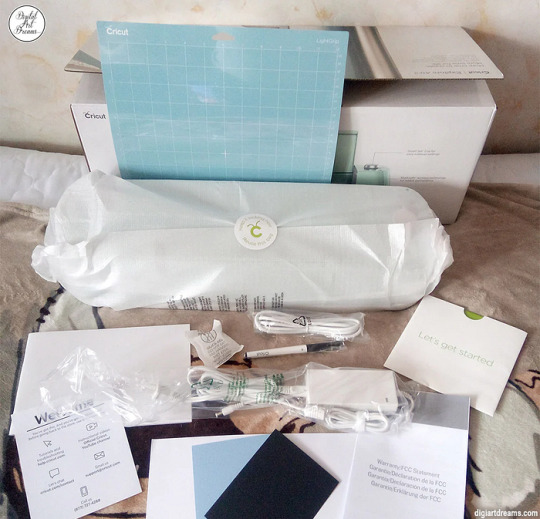
Once you go to set up Cricut Explore Air 2, the first thing you need to do is unbox the machine. Then, remove all the items inside the machine and check whether they are present. Once you have checked all the materials, you can move toward setting up the machine.
Here are the tools and supplies you get inside the box:
Cricut Explore Air 2
USB cable
Power adapter
Guidebook
Accessory adapter
Fine-point blade
Materials for a test cut
LightGrip cutting mat
Cricut Access trial for a month
These are the items you will get inside the box with your machine. To work on DIY projects, you will need other tools and accessories that you will have to buy personally. These tools will be a mat, a scraper, a weeding tool, a lint roller, and the materials required for your crafts.
Set up Cricut Explore Air 2
Once you have unboxed the machine and checked all the items, you can proceed to set up the Cricut cutting machine. For the setup process, you have to follow these steps:
First, you have to take the machine and place it on a flat surface. Try to put it in a place where it is safe, and you can keep it for a long time so you don’t have to move it more often.
Then, plug in the machine using the power adapter. It will give the machine a power supply.
Next, press the power button on the machine and turn it on.
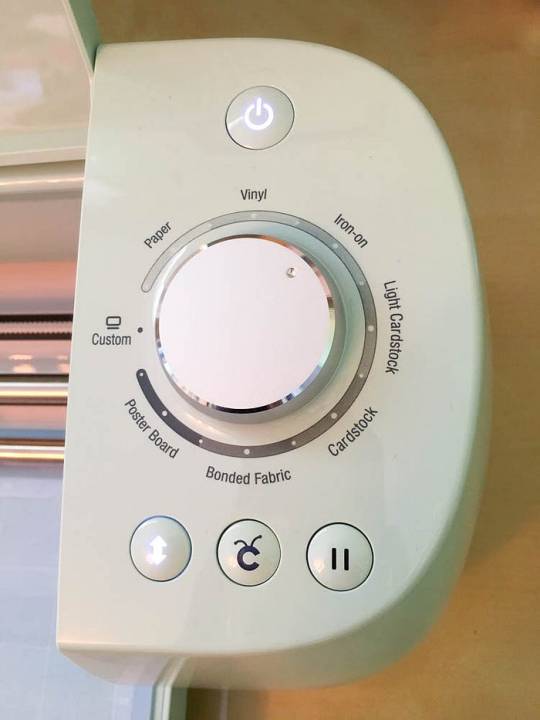
Now, connect the machine to your device using Bluetooth or USB.
Afterward, visit cricut.com/setup and download Cricut Design Space.
Also, open the Design Space and log in with your username and password.
First-time Cricut users need to create an account, as Cricut requires an ID to work on it.
Connect Cricut Explore Air 2 to a Computer
Now that you know the process of setting up Cricut Explore Air 2, you can connect your machine to your computer. Here, we will see how to connect the machine to a Windows computer:
To start the connection, you should first turn on the machine. This will allow the machine to be connected to your computer.
The next thing you need to remember is that you should keep the machine within 10–15 feet of range.
After that, you should click on the Start menu and go to Settings.
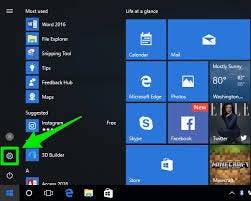
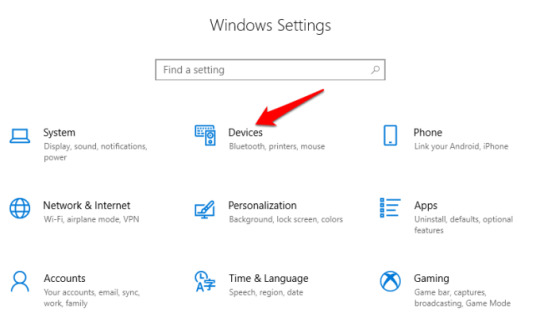
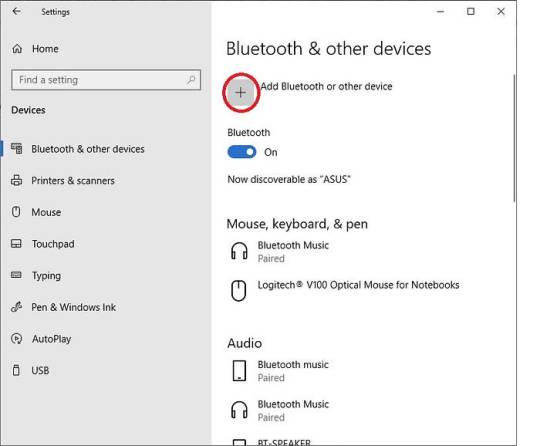
Also, select the machine from the list. If the device asks you to enter a code, type 0000 and then connect.
Your Cricut machine is now connected to your computer device.
Downloading Cricut Design Space on Your Computer
Downloading the Design Space app is important for setting up the Cricut cutting machine. The software helps you control and use the machine on your device. On the app, you have the option to select, create, and upload a design that you will later cut on your machine. The steps to download the software are written below:
Initially, you have to turn on the computer and open a web browser.
Next, visit cricut.com/setup and click Download on the Design Space app. Before that, you will have to tick the box to agree to the Cricut Terms of Use & Privacy Policy.
Then, you should go to the Downloads folder and click on the downloaded file twice.
A new window will pop up on the computer’s screen, which means the computer has started installing the app.
By the way, before the installation starts, your computer may ask you to agree that you trust the app on your computer. If you see it, you have to agree that you trust the app.
Once the app is installed, you have to log in with your Cricut ID.
Conclusion
In short, it is important to learn how to set up Cricut Explore Air 2 if you want to use it for your projects. It is an amazing crafting machine, especially great for beginners. It is simple to use and gives you a lot of options to make your projects. To use a Cricut machine, you need Cricut Design Space on your device. With the app, you can use designs to cut on the machine and create unique designs and projects.
FAQs
What Can I Do Using Cricut Explore Air 2?
This Cricut Explore machine allows you to make multiple projects. It is powerful enough to cut from the thinnest to tough materials. You can cut materials like adhesive vinyl, heat transfer vinyl, sticker paper, cork, cardstock, fabric, and heat transfer vinyl. With all these materials, you can create stickers, mug designs, designs on fabrics, greeting cards, and many more things.
Is It Easy to Set Up Cricut Explore Air 2?
Yes, it is! You will have to follow the steps to set up your Cricut cutting machine. The first thing you have to do after buying a machine is unboxing it and checking for the accessories. Then, you must prepare the machine for the setup process. Once the machine is prepared, you should connect it to your device and then download the Cricut Design app. Once you log in with the app, your setup is complete.
Do I Need Software to Work With Cricut Explore Air 2?
Yes, you will need Cricut software to use the Cricut Explore Air 2 machine. Cricut has two different software programs that you can use. The first one is Cricut Design Space, which is a free app that you can download and use on your device. The other app is Cricut Access. You can also download it from the internet, but it is a premium app, and you will have to subscribe to use it.
Source: Set up Cricut Explore Air 2
Visit here to know More: Cricut Joy Xtra
Pinterest
0 notes