#cricut project ideas
Text

install cricut design space app
Have you got bored with your mundane, usual DIY craft management skills? Do you want something that makes your creativity skills fourfold? Cricut machines are the ones you should look for. With an ever-increasing demand and popularity, these cutting-edge machines come with different options to cut various types of materials easily. Visit install cricut design space app to get the latest version of the Design Space app and use the unique designs, fonts, and images to enhance your creative talents.
https://explorenewmachine.com/
#cricut setup#cricut.com/setup#www.cricut.com/setup login#install cricut design space app#cricut project ideas#cricut#cricut explore air 2#cricutprojects#www.cricut.com setup login#cricut.com setup mac
0 notes
Text
6 Ideas for Cricut Projects You Should Try in 2024
Have you been looking for ideas for Cricut projects lately but still can’t find any? That’s okay, as I’ve got your back! Since I started my journey as a crafter a few years ago, I never thought I would share some fabulous ideas with you. Hence, I am really excited to bring you some Cricut project ideas!
All of these Cricut craft ideas I have made to date have come from inspiration. This inspiration came from my father, who was himself a great crafter. Although he did not use any kind of machine like Cricut, he was skilled at making these items with his hands. Call it tradition or passion, but I have loved crafting since childhood. Therefore, I have many ideas for your DIY projects, but I will only share the best ones here!
Want to know what they are? Being a crafting expert, I would like you to try the 6 best projects that I have already included below in this blog. So, let’s explore together!
1. Personalized Mug

On my sister’s 20th birthday, I wanted to gift her something that was made only for her. And finding such things is possible only when I create them. Hence, I decided to gift her a personalized coffee mug. Also, she is a coffee lover, so she would definitely love it. Her birthday is yet to arrive, and I couldn’t wait so long to gift her this personalized coffee mug that I made only for her using my Cricut.
So, give it a try if you also want to give your loved one such a beautiful gift. But, among all the gift ideas, the ideas for Cricut projects like coffee mugs are my favorite. What about you?
2. Laundry Labels
Is it getting difficult to figure out which jars are filled with which cleaning agent? Don’t worry, Cricut has your back! With Cricut smart label writable vinyl, you can now create and paste such labels on the container where you must keep detergent, stain remover, and fabric softener.
However, I made this for my aunt, who runs her own laundry business, as it was getting difficult for her new assistant to find the right cleaning agent. Now, make these ideas easy for Cricut projects.
3. Engraved Jewelry

Want to add a more personal touch to your keepsake gift? Engrave your loved one’s name on a piece of metal and create alluring jewelry using Cricut. Also, it could be a great gift for your loved ones.
The thoughtfulness that I have added to it is just amazing, right? However, to engrave this thoughtful text, you will want a Cricut Maker. Moreover, you can access this design from Cricut’s official site. Now, bring a smile to your loved one’s face.
4. Doormat

Are you looking for ideas for Cricut projects that add charm to your outdoors? Here, I have a new idea, i.e., a doormat with a magical touch of Cricut. Yes, for me, Cricut is a magic stick as it creates intricate designs in no time. Since I have placed this doormat on my outside door, many guests or visitors are going to notice it so much.
So, I understand you want to know about the material I used to make it, right? Well, for this particular project, I have used a stencil or removable vinyl. Therefore, welcome your visitors or guests with an extra personal greeting with this beautiful doormat.
5. Makeup Pouch
If you are looking for one of the best ideas for Cricut projects that girls can use, here you go! With this cute make-up case, you will have more eyes from your friends. It is not only useful for keeping your make-up stuff, but it will also look good. You can also use it as a pencil pouch that you can offer to your child or use for yourself. This can also be personalized by adding your loved ones’ names. So, and the best part — NO STITCHING NEEDED! 😍
Speaking of the materials I used in it, it was just Smart Iron-On (silver glitter and holographic), a blank make-up case, or any simple clothing case. Besides, the Cricut machine is obvious! 😁
6. Acrylic Wall Planner
Fed up with those paper planners? It’s time to ditch those messy paper planners and try making this wall planner using acrylic and Cricut. This wall planner will help you keep track of not only important events and appointments but also the deadlines for your tasks or assignments.
In order to create this planner, you will want a Cricut Joy machine, acrylic sheet, permanent smart vinyl, transfer tape, and other extra Cricut accessories.
FAQs
Question 1: What supplies do I need for Cricut projects?
Answer: There are a few basic supplies that you can use with almost all kinds of Cricut projects. Hence, these are the tools that I use most in projects. They are as follows:
● Materials
● Cutting mat
● Spatula
● Transfer tape
● Cardstock
● Toolset
● Scoring stylus
● Cricut machine
● Trimmer and many more
Question 2: Which materials do I need to make jewelry with Cricut?
Answer: First of all, it depends on what materials you want: is it metal or leather? For example, if you want leather for making earrings and all, then you will want the following items:
● Cricut Design Space software
● Tooling leather
● Awl or small hole punch
● Cricut deep cut housing and blade
● Strong grip mat
● Transfer tape
● Gold or silver necklaces
● Jump rings
Question 3: What are other Cricut craft ideas I can try?
Answer: Here are some other Cricut ideas that I have tried, and I would want you to try them, too. Also, these can be made using any Cricut machine, and you don’t need to put much effort into creating them. So, let’s have a look at the below ideas of Cricut projects:
Earrings
Glass etching
Printable magnetic sheets
Leather phone sleeve
Framed art
Paper flowers
Vinyl mug
Car decals
Paper butterflies and more.
Read more: Cricut New Machine Setup
install cricut design space app
cricut.com/setup
cricut.com/setup mac
Source: ideas for Cricut projects
#ideas for Cricut projects#cricut.com/setup mac#cricut.com/setup#Cricut New Machine Setup#Cricut project ideas#Cricut craft ideas
0 notes
Text
Cricut Explore Air 2 Software Download: Easy Installation
Hey, dear crafters enthusiasts! Hope you are doing really great! In this guide, I am going to put some light onthe Cricut Explore Air 2 software download. If you have been looking for how to download Cricut software, then it can be helpful for you. I remember the day I got my first new iOS device. I needed to set it up on my iPhone, but I wasn’t sure how to do it. Before that, I had to download a Cricut Design Space. It was essential to get the intuitive Cricut software.
If you are ready to follow this guide and download the app, then you should follow it. In this guide, I will be talking about downloading the Cricut app not only on iPhone but also on Mac, Windows, and Android smartphones. Let’s delve into it.
Cricut Explore Air 2 Software Download on a Computer
Want to download your Cricut software on a computer? Mac or Windows? No matter which computer you have been using for years, you can install the app easily on both of these devices. Let’s go through the following steps for both computers.
Windows
Mac
By now, you might have seen how to download Cricut software on Windows and Mac computers. Now, it’s time to shift our focus to mobile devices. Let’s dive in.
Cricut Explore Air 2 Software Download on a Mobile
My experience of getting the Cricut app was really good as it is easy to install on your desired devices. It doesn’t matter whether you are an Android user or an iPhone or iPad user; the application installation process is quite similar. Let’s have a look at the steps below:
Android
iOS
By now, you might have completely understood the process for the Cricut Explore Air 2 software download. If so, download the software immediately and get started with your Cricut in no time.
FAQs
Question 1: Why is Cricut Design Space essential for using Cricut machines?
Answer: The Cricut machine requires a digital design to cut the intricate design precisely. However, to do this, the software required is nothing but the Cricut app. Having this application installed on your computer or mobile device is very important as you will create your design here on this software. In addition, you will command your machine using this app too. Hence, the Cricut software is a must to use a Cricut machine. Without this, a cut is not possible.
Question 2: Can I get a Cricut Design Space for free?
Answer: Absolutely, yes, because it is already free. See, there is no charge for downloading and installing this particular app. In fact, downloading this application is an important part of the complete machine setup. Besides, you need to pay for Cricut Access plans. Otherwise, you will not need to spend a single penny to get this software on your device.
Question 3: Where can I get Cricut app?
Answer: If you want to download the Cricut Design app on your computer (Mac or Windows), visit design.cricut.com. On this website, you will need to follow the simple steps to get the Cricut software on your computer. However, if you want to download the app on the phone, go to the Play Store or App Store.
Conclusion
To summarize this blog content, I have taught you everything about the Cricut Explore Air 2 software download. Since Cricut supports computer and mobile devices, I covered the steps for all these devices separately. For example, I have first explained how to download the Cricut app on Windows and Mac. Then, I proceeded with mobile phones, including Android and iOS. This guide is essential for those who have just got a new Cricut machine and want to get started with it.
Visit: www.cricut.com/setup login
install cricut design space app
cricut create connect to computer
Source: https://designscricut.wordpress.com/2024/04/04/cricut-explore-air-2-software-download-easy-installation/
#install cricut design space app#cricut.com/setup#install cricut design space#cricut software#cricut project ideas#cricut design space#cricut explore 3#cricut explore air 2#cricut software app#cricut new machine setup#cricut design space login#www.cricut.com/setup login#www.cricut.com/setup#cricut create connect to computer#setting up your cricut maker#connecting cricut maker to computer#cricut setup create account#cricut cutting machine setup#setting up my cricut maker#cricut setup on computer#setting up new cricut maker#cricut
0 notes
Text
How to Download Cricut Design Studio: An Easy-to-Learn Guide
Do you want to show your creative side to the world? If so, you need to Download Cricut Design Studio. You may be wondering what exactly Design Studio is. Don't worry; I will be your tutor and provide all the details related to this Cricut app. Starting from scratch, it is a Cricut Design Space software that will help you create DIY projects and give you access to the ever-growing library.
For the past seven years, I've been using a Cricut machine and the Cricut software to make new designs. This free-to-use app supports all Cricut models and runs smoothly on Android, Windows, iOS, and Mac devices. Along with the app, you will also get a Cricut Access plan, which offers various benefits to users.
Are you curious to learn more about the Cricut app? This tutorial will be very beneficial. It details the system requirements and download method.
System Requirements for Using Cricut Design Studio on Computers
Before using the Cricut app, check whether your device fulfills the system requirements. If it doesn't, you won't be able to operate this design software on your device. Don't get anxious; this section will introduce you to the system requirements for Windows and Mac systems.
Windows
To download Cricut Design Studio on your Windows computer, you must know the system requirements needed for the computer, whose details are given below:
Mac
In addition to the blog, it is time to discuss the system requirements needed for the Mac system:
After coming across the Cricut Design app's basic system requirements, let's save time and refer to the most essential part of this blog. You are very well aware of what I am going to talk about. Yes, it's about downloading this Cricut app on your computer system. You need to pay special attention to the coming content to do so.
How to Download Cricut Design Studio on Windows?
For all the Windows users out there, it's time to pull up your socks. You will be introduced to the process of getting the Cricut software on your system. Follow the below tips as they will assist you in downloading this easy-to-get design software on your device:
This method will make it much easier for you to install the Cricut Design app on your Windows computer. Don't try to skip any step; otherwise, you might encounter an error while opening the app.
How to Download Cricut Design Studio on Mac?
On the contrary, you must understand the importance of getting the Cricut software on your Windows system. If you are a proud Mac owner and want to get it on your device, then you need to follow the instructions given below:
As a result of this respective guide, you must have gotten the answers to all your Cricut Design app system requirements. Also, regarding the app download and installation process queries. Following this, you can also do several customized projects using this design software.
Frequently Asked Questions
Question: How Can I Use My Cricut Design Studio?
Answer: If you intend to use Cricut Design Studio to make various DIY crafts, you need to download and install it on your devices. You can easily get the Cricut software from the official site, Play Store, or App Store. After you download it, you need to connect it with your craft plotter and make various projects of your choice.
Question: Which Devices Are Compatible With Cricut Design Space?
Answer: Cricut Design Space supports PCs and smartphones very smoothly. However, certain models are supported when doing projects. Those devices are Windows, Mac, iPhone, iPad, Samsung Galaxy series, Google Pixel series, and LG series. The app doesn't support Chromebooks, and the performance completely relies on the chipset and processor.
Question: How Do I Install Cricut Design Space on My Windows?
Answer: To install the Cricut Design app on your Windows computer, you are supposed to follow the below steps:
Visit: cricut.com/setup
www.cricut.com setup/login
Source: https://cricricutdesigncut.wordpress.com/2024/04/03/how-to-download-cricut-design-studio-an-easy-to-learn-guide/
#digital design#design space setup#cricut.com/setup#www.cricut.com/setup login#cricut setup#cricut design space login#cricut explore air 2#cricut explore#design space cricut#cricut project ideas#cricut#cricut design space setupp#cricut design space#setup cricut design space setup#install cricut design space app#cricut design space app#cricut create connect to computer#setting up your cricut maker#setting my cricut maker#cricut explore air 2 setup#install cricut explore air 2 setup#install cricut air 2 setup#install cricut explore air 2
0 notes
Text
How to Make Cricut Wedding Card: 4 Easy Steps
Are you getting married but can’t decide which Cricut wedding card will be best? I was hoping you wouldn’t stress as I will help you by teaching you how to make them out of the Cricut machine. Weddings are all about reuniting with close ones, singing their favorite songs and dancing.
I have been in the crafting business for the past two and a half years and have done tons of DIY projects for various events. But this is the first time I am going into custom-made wedding invitations. Thanks to Cricut machines, invitations will be a lot easier and a memorable craft for me.
Every crafter will agree that to make any craft out of a Cricut machine; they must have a specific set of tools to help them give the project the perfect shape. Follow the blog to learn in-depth about making personalized invitations.
Step 1: Creating a Cricut Wedding Card
To create your favorite invitation design, switch on your device and open the Design Space app. After that, tick New Project, press the Projects tool, and type Invitations into the search box. Now, select the design, read the details about the design, and then click the Customize option.
Following this, select the Cricut Foil section by going to the Operation section and selecting the Pen option. After making the changes, select the text and change its font, style, size, and color. Following this, press Weld, which is visible under the top right side of the canvas.
Once you are done after making all the changes on your Cricut wedding card, click the Make It option. Next, you need to check that the designs are placed properly in their respective places. After checking all the designs, hit the Continue option.
Step 2: Cutting Your Design
Following this, unbox your Cricut cutting mat and place your Cricut material on top of it with the help of the brayer tool. Then, check that you use the correct material and tools before cutting. After that, connect your devices, load the mat into the machine, insert the tools inside the Clamp, and turn on your cut-die machine. Now, you need to wait till the cutting process is going on. Once it is finished, start unloading your mat from the Cricut machine.
Step 3: Assemble Your Materials
Now, peel off the Cricut material from the mat and use a sharp item to remove tiny pieces of material from your Cricut wedding card design. Following this, take your Cricut scoring tool and start folding your envelope. After folding the envelope equally from all sides, stick the sides using strong adhesive glue. You can also use a Cricut glue gun to spread the glue equally. Also, repeat the same steps by folding and sticking the invitation pieces together. Keep the card and envelope aside for a few minutes until the glue ultimately gets dried up.
Step 4: Share Your Final Wedding Invitation
Last but not least, cut the extra sides of your Cricut wedding card and insert them inside the respective envelopes. Now, deliver them to your loved one’s address along with a box of sweets. Alternatively, you can personally visit and invite them to attend your wedding and give you blessings.
Conclusion
See how easy it was to make a Cricut wedding card with the help of Cricut machines. Apart from this DIY craft, you can also do other projects for your D-day with this cut-die machine within a few minutes. Projects that it can make are wine glasses, welcome signs, coasters, table runners, ring boxes, and so much more. You must be patient and focused while working on these projects using the Cricut craft machine.
Frequently Asked Questions
Question: Is Cricut Worth Making Wedding Crafts?
Answer: Absolutely; Cricut is the ultimate cutting machine you can prefer while making any craft for your wedding ceremony. This craft product can cut any material, tissue, or leather within a few seconds. Besides that, Cricut comes with designing software that helps make the design easier.
Question: What Cricut Accessories Do I Need to Make My Invitation Card?
Answer: The total number of Cricut accessories that will help you in making invitation cards more easily are as follows:
Question: Can I Make Money By Selling Cricut Wedding Invitations?
Answer: You can make money by making and selling DIY wedding invitations to your customers. To start your own business, you need to learn every detail about Cricut supplies and how they can be used to make cards. Moreover, you need to be very careful while making crafts and be aware of the customer’s expectations.
Visit: cricut.com/setup
install cricut design space app
www.cricut.com setup login
cricut.com setup mac
Source: https://cutting-setup.com/how-to-make-cricut-wedding-card-4-easy-steps/
#cricut.com setup download#cricut.com/setup#cricut.com sign in#cricut.com design space#cricut.com/create#cricut.com/register#cricut accessories#cricut design space#cricut design space download#design.cricut.com/setup#install cricut explore air 2#install cricut design space app#cricut setup#cricut explore air 2 setup#cricut explore air 2#cricut project ideas#cricut design space app#cricut com setup#cricut design space login
0 notes
Text
How to Create Wall Arts With Silhouette Cameo for Home?
You have come to the right blog if you want to make Silhouette Cameo wall art for your home. My name is Manny Koshbin, and I have been working as a professional crafter for 2 years. Also, I help crafters learn and create projects through my blogs. As a result, I have curated it to provide all the fundamental guides to making wall art hassle-free.
In this blog, I will share a step-by-step guide to creating a wall art project with the Silhouette Cameo machine. Also, you learn the process of setting up the machine and supply requirements. So, keep reading this blog till the end to gain in-depth knowledge of the full procedure.
The Process to Setup a Silhouette Cameo on Your Device
If you want to learn the process of creating Silhouette Cameo wall art for your home, you have to set up the machine first. I am sharing the guide below for setting up Silhouette Cameo 4. You can use this guide to set up the Cameo machine you are using.
Step 1: Register Your Cameo Machine
Step 2: Downloading and Installing the Silhouette Studio App
Step 3: Connect the Cameo Machine
Tools and Supplies You Need for Making a Wall Art
To make this Silhouette Cameo wall art for your home, you have to gather some essential supplies. Below are the supplies that you will need to complete this project.
The Process of Creating a Silhouette Cameo Wall Art
If your Cameo machine setup process is complete and you have all the essential supplies for this machine, then move forward with the process to complete your art project. These are the steps you need to follow.
Step 1: Create a Design on the Silhouette Software
Step 2: Cut the Design on Your Cameo Cutting Machine
Step 3: Complete Your Design
FAQs
How Do You Make Silhouette Wall Art as a Beginner?
To create the wall art with the Silhouette machine then follow the below guide.
What Do You Need to Make Silhouette Art?
These are the supplies you should have to make the SilhouetteCameo wall artproject.
● Any Silhouette Cameo cutting machine
● Silhouette Studio software
● Silhouette Adhesive Stencil Material
● Transfer paper
● A piece of plywood to create your art
● Weeding tools
● Scissors, and others.
However, the supplies can change depending on the type, size, shape, and other aspects of the projects.
Which Silhouette Cameo Is Best for Making Wall Art?
All the Silhouette Cameo machines are suitable for creating any type of wall art design. However, if you are looking for more profound results while creating the project, then you can go for the Silhouette Cameo 4. Plus, this machine comes with a plethora of amazing features and premium results while making projects. Also, it can help you create pro-level projects even if you are a complete beginner.
Visit: cricut.com/setup
cricut setup explore air 2
cricut.com setup mac
design.cricut.com/setup
cricut design space setup
Source: https://mannyexplore.com/silhouette-designs/how-to-create-wall-arts-with-silhouette-cameo-for-home
#Arts With Silhouette Cameo#cricut.com/setup#cricut.com/setup login#cricut maker 3 bundle#cricut project ideas#cricut explore 3#cricut design space download#cricut software app#cricut.com setup#cricut.com setup mac#design.cricut.com/setup#cricut.com setup download#cricut.com design space#cricut.com/register#cricut.com sign in#cricut design space setup#install cricut design space app#cricut create connect to computer#cricut new product setup#setting up your cricut maker#cricut explore air 2#cricut setup explore air 2 setup#install cricut explore air 2#cricut setup new device#cricut install setup#cricut setup maker#cricut setup
0 notes
Text
How to Use a Cricut Joy: Quick and Easy Guide
A few days ago, I went to my cousin’s house and saw a new Cricut Joy collecting dust in the corner. Being a crafter myself, I couldn’t resist asking her why. She replied that she was confused about how to use it. With a smile, I offered to help. From unboxing the machine to setting it up, I guided her through each step, even teaching her how to create her first project.
Then, I realized that some beginners may not have even opened the box and could use my assistance. That’s why I have prepared this guide for you all. Just like I helped my cousin, I will tell you how to use a Cricut Joy from scratch. However, it is necessary to follow this guide till the end because every piece of information is important for using your Cricut Joy.
Step 1: Unboxing the Cricut Joy
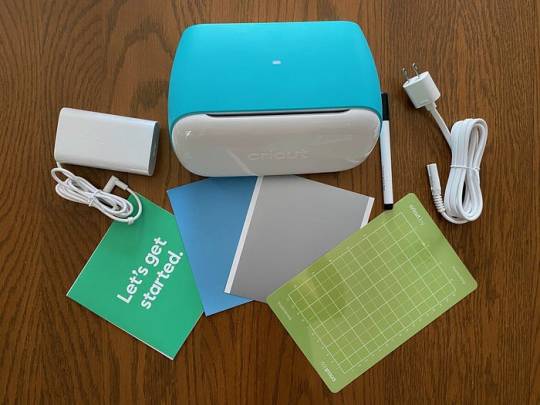
If you have already unboxed your Cricut Joy machine, you can continue to the second step below. If not, let’s take a look at what you’ll find inside the box:
Welcome card
Cricut Joy machine
Power adapter
Fine Point pen (0.4 mm)
StandardGrip mat
Sample of smart vinyl
Around 50 pre-made projects
Free Cricut Access for 30 days
Step 2: Setting up Your Cricut Joy Machine
Setting up a Cricut Joy is a crucial step in learning how to use a Cricut Joy machine effectively. Let’s start by setting up the machine first.
Prepare Your Cricut Cutting Machine
Place the Cricut Joy machine on a flat and clean surface near the electric outlet.
Assemble the machine’s power cord and insert one end into the machine and the other end into the electrical outlet.
After that, turn the power button on, and a light will illuminate the machine.
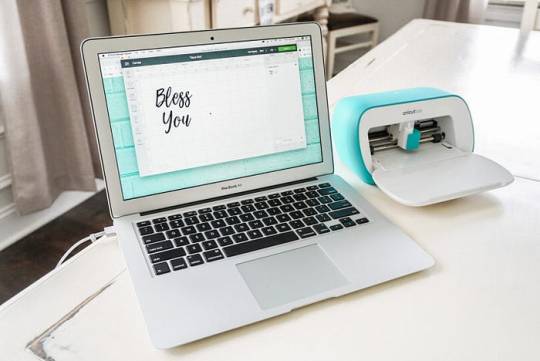
Connecting a Cricut Joy to Your Computer
The Cricut Joy does not have a USB cord, so you have to connect the cutting machine to a computer via Bluetooth.
Turn on the Cricut Joy machine 10–15 feet away from your desktop computer.
Next, locate the Bluetooth option, turn it on, and wait for the computer to detect your machine.
Now, select Cricut Joy from the list, and if asked for a PIN, enter 0000 and hit Connect.

Downloading and Installing Cricut Design Space
Downloading and installing Design Space on your desktop computer is necessary to complete the process of how to use a Cricut Joy machine.
Go to cricut.com/setup, agree to Cricut’sterms and conditions, and download the file.

After downloading Design Space, locate the file you see on the screen and install it.
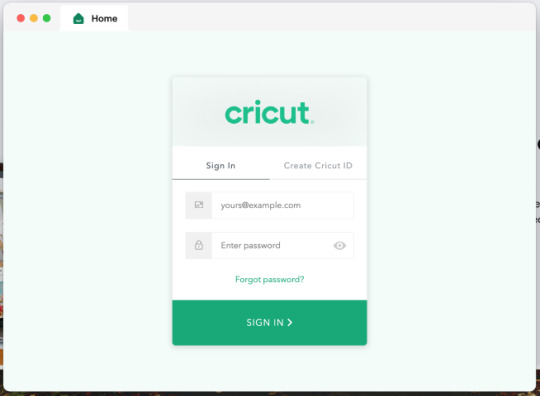
Once the software is installed, launch it, create a Cricut ID and password, and sign in.
Note: If you want to access Cricut Joy from mobile (Android or iOS), download the Cricut app from the Play Store or App Store.
Adding Your Cricut Joy Machine in Design Space
Once you have installed and signed into the Cricut software, it’s time to set up the Cricut Joy. To do this, launch the Cricut software, click on the drop-down menu, and select New Machine Setup > Cricut Cutting Machine > Cricut Joy. Also, make sure the connection is established.
Step 3: Using a Cricut Joy to Make a Project
You will need to cut vinyl with Cricut Joy to personalize a wooden tissue holder. Here’s what you need for this project:
Cricut smart vinyl
Unfinished wooden tissue box
Cricut Joy machine
Computer or transfer tape
Design
Create a Design in Design Space
Open the Cricut Design app and select the New Project tab.
After that, use the Text function and a text and change its font.
Once you have the design ready to cut, click the Make It option to move on to the next page.
Then, select the mat page. There is no need to mirror this project. Click Continue.
From the All Browse Material option, search for vinyl and select it as a material.
Now, load the green vinyl into Cricut Joy without using a mat.
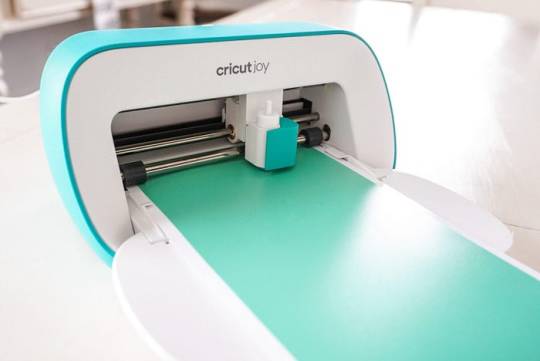
Cut & Weed Out the Vinyl Design
Once everything is ready, go back to Design Space and hit Continue to begin cutting.
Once the machine completes cutting, it automatically stops. Now, unload the smart vinyl and weed out unwanted designs.

Next, cut the transfer tape to the size of the vinyl and apply it to the design.
Apply Your Design
Frequently Asked Questions
What can you make using a Cricut Joy?
Cricut Joy is a smart, compact, and portable machine that can be used to create different projects. Below, I have listed some of the Cricut Joy projects.
Vinyl mug
Greeting cards
DIY pillow
Leather earrings
Wall art
Tumblers
Cake toppers
Stickers
Labels
Banners
T-shirts
Jewelry
How does Cricut Joy work?
The Cricut machine works with the user-friendly Cricut Design Space or Cricut Joy app. Users need to install one of these and start a project. Also, the Cricut Joy connects to devices via Bluetooth. Once everything is set up, the user designs it and sends it to the machine. Finally, the Cricut Joy will cut or write according to the selected settings.
Do I need a computer to use a Cricut Joy?
That’s not necessarily true; you can also use your mobile device to use Cricut Joy. All you need is a device where you can download and install Cricut Design Space to command the Cricut machine. However, all of this can also be done from a mobile phone or tablet. So, it depends on the user’s preference and their comfort level.
Conclusion
The Cricut Joy is a beginner-friendly crafting tool that is compact yet versatile. Setting up the Cricut Joy and learning how to use it may not be too difficult for beginners. I have discussed everything in detail in the blog post above. If you followed the instructions exactly, you can now use your Cricut Joy without any hassle.
Read more: install cricut design space app
cricut.com/setup
cricut.com/setup mac
Cricut New Machine Setup
Source: how to use a Cricut Joy
#how to use a Cricut Joy#Cricut New Machine Setup#cricut software app#cricut design space download#cricut explore air 2#cricut.com/setup#cricut project ideas#design.cricut.com/setup#cricut.com/register#cricut.com#cricut.com/create
1 note
·
View note
Text

Cricut machines are revolutionary in the crafting world. With their amazing features, they help you make beautiful and unique crafts. You can select from various Cricut machines, including Cricut Explore Air 2, Cricut Maker, Cricut EasyPress 2, and Cricut Joy. Cricut machines are advanced enough for beginners as well as pro users. If you want to set up your Cricut machine, visit cricut.com/setup and start using it to get started with the Design Space.
#Cricut.com/setup#cricut.com/setup mac#cricut new machine setup#cricut explore air 2#cricut design space login#cricut software app#cricut project ideas
0 notes
Text
Sassy Bottle!
Visit my Etsy shop: https://belladonnabudgets.etsy.com
#etsyseller#etsyshop#etsystore#small business#etsy#etsyfinds#stainless steel water bottle#customizable water bottle#personalized water bottle#rainbow vinyl quote decal#cricut#cricut project#insulated stainless steel water bottle#vacuum double-walled stainless steel water bottle#funny quotes#sassy quotes#gifts for him#gifts for her#customization#travel water bottle#gym water bottle#work out water bottle#school water bottle#unique gifts#gifts for women#gift ideas#gift
0 notes
Text
8 Faux Leather Cricut Projects 2024: Try Out Now!
Are you looking for some fantastic faux leather Cricut projects? I’ve got you covered😉! From faux leather card holders to wallets, I have mentioned a bunch of projects in this blog.
If you ask me about the inspiration for these projects? Then, it was just a random idea that came to my mind so that I could write this blog. Eventually, I can help you😁! Trust me, creating these crafts will be fun; whether you want to make all of them or just once, it would be a great start!
Let’s dive quickly into this blog and start exploring them in detail. You might also need some supplies, which I think you can collect later once you go through these Cricut faux leather project ideas mentioned below.
1. Card Holder

Are you looking for something that organizes your cards in one place? Try this faux leather card holder. This card holder is one of the best faux leathers Cricut projects that give a fantastic look when you create it. It looks great so I try making various kinds of stuff out of faux leather. So, what are you waiting for? This faux leather is softer than other leather.
2. Coin Holder Keyrings

I often miss coins😅keeping it safe at a place is too hectic for me. So, I decided to use my Cricut and one of the excellent Cricut projects hit my mind. Hence, I decided to create this cute coin-holder keyring. So, next time I have coins, I will use this coin holder, which is very convenient and beautiful enough to carry.
3. Pen Holder
The pen holder plays an important role in stationery. I remember the day when I was in school, I had a pen holder made of chopsticks. But you could not try different types of designs. But with Cricut, creating a pen holder is exciting when you have faux leather materials, so arranging the pen is. So, grab your faux material and start creating faux leather Cricut projects like a pen holder.
4. Small Keyring Pouches

How about these keyrings? Isn’t that cute? You can also use them to keep coins. I made these keyrings for my little sisters using faux leather. I don’t think there is something more you need in terms of supplies or materials. A simple faux leather of any color will be enough for this. But, if you want a zip, then you need to sew it yourself, or you can get it sewed by a tailor.
5. Earrings

What could be more beautiful than this item? You might not believe it, but these earrings are made of faux leather. They are not only lighter but also look great when combined with other embellishments. Sometimes, it shines like golden-plated material. So, it is better to start creating faux leather Cricut projects by trying out different materials.
6. Journal Cover

I have a journal and love jotting down my thoughts in it. Since I use it regularly, I wanted to give it a charming look, so I came up with this beautiful idea. This journal cover looks great when you cut it intricately. However, if you want to cut it intricately, you can do this with a Cricut machine. No matter which models you are using, if you have designed it beautifully, then you can make it look great!
7. Wallet

We often use leather-made wallets as they are durable and keep our money safe and in its proper place. In order to create such faux leather Cricut projects, you will need leather and will need to design it in the Cricut Design Space app. After that, it will look something like the above. You can change the color of the materials or even the design. If you are creative, then Cricut will do the rest.
8. Cord Organizer

Is organizing the cord problematic? No worries! Now, say goodbye to those untidy wires with this little cord organizer. I made this using faux leather, which is known for its durability. Also, it is eco-friendly, so how could I avoid it? Besides, if you want affordable materials, then you can go for them. Rest assured, Cricut has your back!
FAQs
Question 1: What is faux leather?
Answer: Faux leather is a synthetic leather or, you can say, one of the choices for vegans. This is generally made from a plastic base, and it is made as such; it looks like real leather. It is produced massively and uniformly. The best thing about faux leather is that it is more affordable than genuine leather.
Question 2: What are the other Cricut faux leather project ideas?
Answer: Although I have mentioned 8 projects above, if you don’t find anything good, you should take a look below. These projects are also easier to make; just give them a try once!
Chapstick Holders
Leather Bows
Wristlet Keychains
Flower Headband
Pencil Pouch
Embellished Loafers
Leather Hair Clip
Key Fob Keychain
Baby Slippers
Crossbody Bag
Question 3: What supplies do I need to make Cricut faux projects?
Answer: The supplies that you will need to make a Cricut project are given below. These tools and materials are a must for your leather-related projects. Let’s take a look below:
A Cricut cutting machine
Purple cutting mat
Blue painter’s tape
Weeding tools set
Faux leather
Small hole punch
Precision Scissors
0 notes
Text
7 Unique Home Decor Cricut Projects to Transform Your Space
Hey, Cricut enthusiasts! Are you looking for a few home decor Cricut projects? If yes, I have got you covered! Last year, when we got our new home, I wanted to make it look as beautiful as possible. I was already a crafter, so I wanted to create Cricut home decor projects myself. I put all my efforts into it, along with my daughter, Lily. She helped me a lot in weeding the materials and getting the designs off the mat. She did all these small tasks.
On the other hand, I spent hours making home decor designs using my Cricut Design Space software. Finally, after months of hard work, we both succeeded in creating home decor. Today, I will share the 7 best Cricut home decor ideas to try this year. Let’s get into it!
Doormat
Are you looking for home decor Cricut projects? If so, try this doormat. A doormat has its own value in our home. It can be kept at the main door, drawing your guests’ or visitors’ attention. Hence, it is essential to put effort into making it as beautiful as possible. The doormat is the best home decor Cricut project I can recommend. This is a must-have item for your home. So, what are you waiting for? Grab your Cricut machine and bring your imagination to reality!
Wood Sign

What could be better than this round wood sign? They’ll add a fantastic look to your front door, and you can even hang them on your back porch. I used a Cricut machine, stain, wood round, iron-on vinyl material, glue gun, and much more to create this beautiful wood sign.
Besides, those paper leaves are also made on Cricut. It looks completely real! No? Welcome your guests and visitors with this amazing warming round wood sign.
Floral Wallpaper
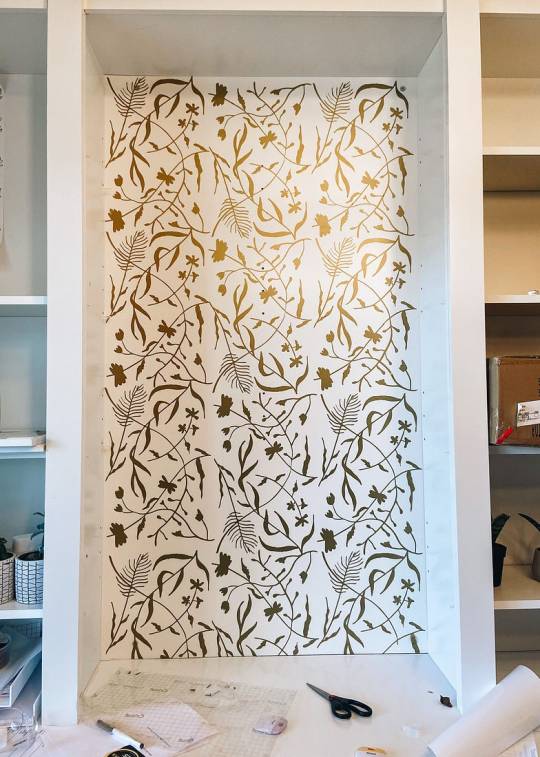
If you want something such as home decor Cricut projects, the wallpaper will be the best fit for you. Wallpaper is like a dress for our home. Without it, home decor is always incomplete. To fill that void, you need wallpaper; with the Cricut machine, you can create different shapes and types. Whether it is a floral wallpaper like the one I have created here or other simple patterns, Cricut has your back! Don’t give it a second thought, and start creating it today and spread the real vibes of home decor.
Paper Pinwheels
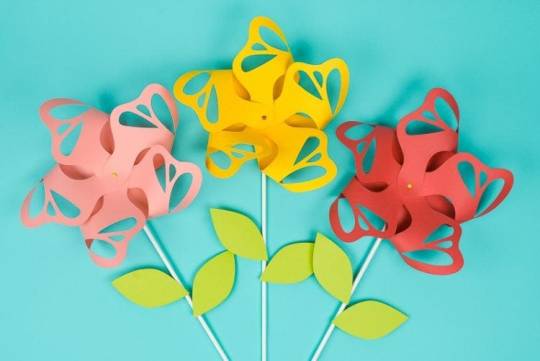
Recently, I attended one of my friends’ birthday parties, and there were beautiful decorations. I was like, WOW!!!!! 😲 It was because all the decorations were made with these cute pinwheels. To my surprise, it was all made with Cricut. I really felt a little jealous because I had never tried something like this. I was like, why did this idea not hit me up first? Anyway, it is better late than never.
I made this using colored cardstock, wooden dowels, a hot glue gun, and my trusty Cricut Maker. I also used an SVG file for the design. However, if you can create this design yourself, then you are good to go with these home decor Cricut projects.
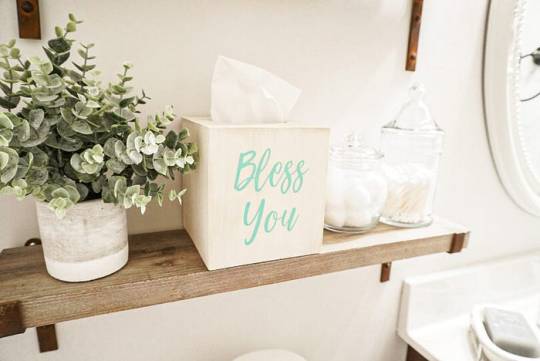
Home Sign
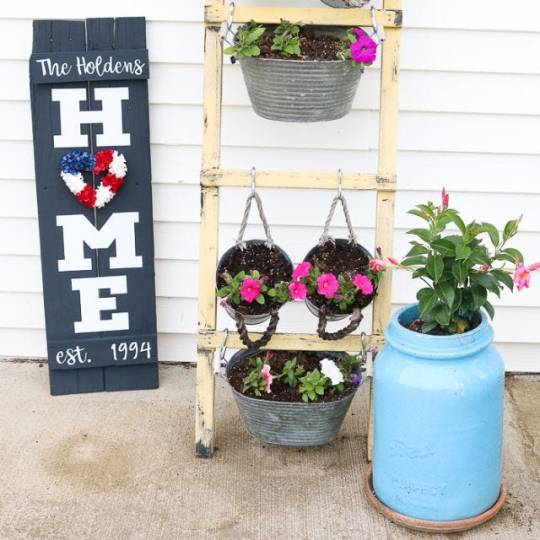
In most of the houses, you will find a home sign. Some home signs are made to help people find homes. Besides, it can also be placed near home to welcome people. With a warm, beautiful greeting message, the home sign can make people feel a warm welcome.
You can create this home sign yourself using a Cricut machine. I used a wooden sign and, with the help of white vinyl, added some text, as you can see in the picture below.
Frame
Now, you can turn adhesive vinyl into a memory frame by adding more details. These simple-to-make Cricut projects will not only be the reason for your memory but also allow you to cherish it for the rest of your life. Hence, you need to add that magical touch or date to your design using adhesive vinyl and remember the special moment forever. Add things like ticket stubs and photos to sand and shells.
Personalized Vase
Do you love plants? If yes, brighten up your home with this masterpiece personalized vase. Also, it is easy and quick to make with your Cricut machine on hand. Despite this, the more time you save making this, the more you will create such home decor Cricut projects in no time. Spread the vibes of plants in every corner of your house and place it anywhere in your home.
FAQs
Question 1: What do I need to make wood signs with Cricut?
Answer: When I was making wooden signs for the first time, I was really not sure about the items that I needed, but somehow I had to manage all of them. However, if you want to create wood signs for your house, then you have to note the items mentioned below:
A piece of wood to make a sign
Vinyl material
Cricut machine (Choose any Cricut model that you like)
Ruler
Paint
Paintbrush
Nails
Question 2: What are the home decor ideas to make with Cricut?
Answer: The list of home decor to make with your Cricut is endless. From wood signs to bathroom signs, the list will never end. To discover such a project, dive into the following projects list:
Copper flower wreath
DIY Bathroom sign
Cricut wall hangings and tapestry
Beaded pillows
Blanket basket
Question 3: Which machine is right for Cricut home decor projects?
Answer: The most versatile and all-rounder machine that I can suggest to you is the Cricut Maker or Maker 3. Hence, these two machines have always met my requirements for every project. Whether you are a business owner or hobbyist crafter, you can create multiple projects with this machine in one go. However, you can also try Cricut Explore Air 2 or Explore 3. Besides, Cricut Joy and its successor are also a perfect fit for your home decor projects.
Source: home decor Cricut projects
Visit here For Information: Cricut Venture
Pinterest
Twitter
#home decor Cricut projects#Cricut home decor projects#Cricut home decor ideas#Cricut Joy Extra#Cricut Venture#Cricut.com/setup
0 notes
Text
How to Use Design Space for Cricut: Beginner’s Guide
My daughter loves reading, and I appreciate her hobby as it helps her collect information. To honor her hobby, I will give her a customized bookmark that I made. It will be a symbol of love and appreciation for taking her hobby so seriously and still valuing it. I have created numerous DIY crafts for a long time, and this blog will teach you all how to use Design Space for Cricut.
Cricut Design Space is an easy-to-use and easy-to-learn design software that allows crafters to give their ideas the proper form. The Cricut app provides tons of images, text fonts, and ready-to-use projects for free. Besides, this software is compatible with all the Cricut cutting machines & Heat Presses.
If you have recently downloaded the Cricut app and want to make your first project, check out the information in the section below.
Step 1: Create a Bookmark Design on the Cricut App
Let’s start the process of how to use Design Space for Cricut by making a customized bookmark by going to the Shapes tool and choosing a square. After selecting the shape, change its dimensions, and it will get into a proper bookmark shape. Next, press the Images and type Splash inside the search section, and a gallery of those designs will appear. Select any design from the library and tick the Add to Canvas option.
Now, resize the design and place it on the bookmark design. After that, press the Text option and write the text inside the box. Then, change the text size, color, font, and style and set it inside the bookmark. To cover the gap between the letters and words, select Weld and place them closer to each other. After covering up the spaces, go to the Flip tool and tick the Flip Horizontal option.
Step 2: Stick the Material on Your Cricut Cutting Mat
In this step of how to use Design Space for Cricut, remove the plastic cover from the vinyl and place the material on the cutting mat. Cover all the sides of the material with painter’s tape so that the material doesn’t slip from its place.
Afterward, move your Cricut Brayer tool upward and downward to settle the material in its place. Now, turn on your crafting machine and load your Cricut cutting mat into the cut-die machine. When the cutting process is complete, stick HTV on the same mat and turn on the Cricut machine again.
After cutting the material, take your weeding tool and remove extra vinyl from the Cricut mat. Following this, slowly weed out the HTV from the design using the weeding tool and keep the final design at the other end of the table.
Step 3: Preheat Your Cricut EasyPress Mini Tool
In learning how to use Design Space for Cricut, remove the sheet from the acrylic blank and clean it with baby wipes. After doing that, place your bookmark design on the blank. Now, preheat your EasyPress Mini at the lowest temperature settings.
After that, cover the entire bookmark with a Teflon sheet and slowly cover the craft by putting a little pressure on it. If you come across that the design needs to be adequately shifted on the blank, then wait for a few seconds and use EasyPress Mini again for perfect heat transfer.
Step 4: Show Your Final Bookmark
After transferring the design, follow these steps to complete the project:
Finally, you can share your DIY craft after collecting and learning how to use Design Space for Cricut crafts.
Following the same steps, you can make other personalized acrylic projects from the Cricut app. However, you must take the correct steps while making any do-it-yourself project and use the compatible Heat Press; otherwise, you might ruin the project and injure yourself.
Frequently Asked Question
Question: Can I Make Money With DIY Acrylic Bookmarks?
Answer: You can make money by selling the customized acrylic bookmark to the audience. To make this craft, I need to use the correct supplies and understand the needs of my audiences and what is trending in the market. Moreover, I can also sell them at a moderate price online.
Question: Does Cricut Work on Acrylic?
Answer: Yes, it’s 100% that the Cricut works accurately on acrylic material until the material is in the correct position. If it slips from the mat during the cutting process, your whole project will get ruined, including the blank. Moreover, the acrylic lasts up to a year or more, depending on how carefully you keep it.
Question: What Cricut Tools Should I Use While Making Acrylic Bookmarks?
Answer: The list of Cricut tools that you need to make perfect customized acrylic bookmarks are as follows:
Visit: cricut.com/setup
install cricut design space app
cricut setup explore air 2
cricut.com setup mac
design.cricut.com/setup
cricut design space setup
www.cricut.com setup login
Source: https://explorenewmachine.com/how-to-use-design-space-for-cricut-beginners-guide/
#design.cricut.com/setup#cricut explore air 2#cricut.com/setup#install cricut design space app#install cricut explore air 2#install cricut design space#cricut space#design.cricut.com#design#cricut#cricut setup#cricut project ideas#science#www.cricut.com/setup#www.cricut.com/setup login#cricut.com setup mac#cricut design space setup#cricut design space login#cricut design space download#cricut design space app#cricut design space for mac#cricut design space#cricut explore air 2 setup#cricut new product setup#cricut new product device#cricut create connect to computer#cricut new machine setup#setting up your cricut maker
0 notes
Text
9 Free Cricut Projects for Beginners: Adding Creative Touch!
Hey, dear crafters! I got you some free Cricut projects for beginners. Do you want to explore them? Let’s look into it. I have been crafting with Cricut machines since I bought them. Whether it is personalized projects or anything else, Cricut has helped me so much.
My crafting journey started with small tools like scissors and the required materials. But now I am capable of making large projects in no time. With Cricut, it is superbly easy to handle tasks that are bigger and require precise cuts. Different types of Cricut cutting machines are available in Cricut’s lineup, helping crafters with their crafting needs.
However, there are some DIY projects that you can’t make for free as their designs cost a few dollars. Hence, if you are looking for beginner-friendly free Cricut project ideas, check out this blog.
Gift Tags
Why don’t you add gift tags when you want to create your gifts? Create this one of the free Cricut projects for beginners and offer an awesome handmade gift to anyone you love. Gift tags can be a lovely decorative item you can try making any time with your Cricut machine. Using a cardstock sheet, I created these beautiful projects. Now, it’s your turn!
Cardstock Wreath
Here is my favorite cardstock wreath! Doesn’t it look so real? It can be easier to make this project when you put a little effort into it. Don’t forget to create such beautiful projects and decorate your home like you never did before! Create these leafy designs on Cricut Design Space, or get the design from the Cricut app. However, putting in extra effort is not a big deal as you can easily create this project from scratch.
Pillow Box

So now you want to make some beautiful pillow boxes. Don’t worry; here I have one of the free Cricut projects for beginners that is easy to create. With Cricut, you can create and finish the designs in no time. Whether you want to use cardstock or poster board, you can make this Cricut project without hassle. Use supplies like glue, paper, matching paper cord, XL scrapper, and cutting machine with its essential accessories.
Birthday Card
Here is the birthday card I made for my husband’s 30th birthday. On his birthday, I love to shower him with love through the magic of words. I believe in expressing my thoughts conventionally, like our great-grandfathers used to send letters.
I used vinyl on cardstock to make this simple birthday card, and I saw this beautiful, simple-looking card. If you find it an interesting idea, give it a shot!
Phone Case

Elevate your phone’s cover with your Cricut and find the design free. You can also create this simple design yourself. All you will need is the Cricut Design Space software, and then you are ready to go. For this, I recommend you use a transparent phone case and any Cricut machine you want to use. Despite these, you will want transfer tape and Cricut software. Rest, you are good to go.
Leather Keychains

Do you know what excites me the most about Cricut projects? It is the materials, and when I have to make something out of leather, I get too excited. I have created many free Cricut projects for beginners using leather, which include keychains, earrings, and much more. I have tried more such projects that included leather materials. Try this project and beautify your keys with these keychains.
Earrings

Have you ever created any sort of jewelry using leather? No? It’s okay! Here, I created a pair of earrings using green faux leather. In the beginning, you might be overwhelmed to see this project, but trust me, this is going to be one of the easiest projects ever. To create this, you can cut faux leather using your Cricut machine.
Coasters

If you want to try free Cricut projects for beginners, bring blank coasters from the market and decorate them using your smart Cricut machine. Choose your materials, select your infusible ink transfer sheet, and transfer them onto your Cricut coaster. From Cricut Joy to Cricut Maker 3, they can easily help you create your coaster the way you want it.
T-Shirt

Feel kind while creating this T-shirt using your trusty Cricut machine. This shirt can be a great idea; try making it with different vinyl colors. My daughter loved this T-shirt when I gifted it to her after she received good marks in her exams. She was truly ecstatic when she found this handmade shirt. Hence, using iron-on material and its perfect companion — the Fluorescent Pink Glitter- is the best way to get this beautiful shirt.
FAQs
Question 1: What are free Cricut project ideas?
Answer: Endless options are available for crafters looking for Cricut project ideas. Here are a few ideas that you can consider in your projects:
Mugs
Autumn pumpkin cart
Puzzle
Cupcake wrappers
Photo booth props
Glass etching
Wedding decor
Question 2: How to find free Cricut projects?
Answer: If you are looking for free projects to make on your Cricut machine, you can easily find them on the Cricut Design Space itself. In order to find the designs for free, you have to follow the steps below:
Open Cricut Design Space on your device.
Then, click on the New Projects on the canvas’s left side.
Now, tap the drop-down menu located under All Categories.
After that, you need to select Free.
Finally, you will find 70+ free project designs.
Question 3: What are some free Cricut projects to make with cardstock?
Answer: If you only want to make free projects with cardstock material, you have the following options to try. Also, these projects are simple to find and make on your Cricut cutting machine.
Cake topper
3d layered pine tree
Farmhouse paper leaves
Cute unicorn bookmark
DIY cardstock wreath
Banners
Wedding card
Source: free Cricut projects for beginners
Visit here For More Information: Cricut Venture
Youtube
#free Cricut projects for beginners#free Cricut project ideas#cricut.com/setup#Cricut Venture#Cricut Joy Extra
0 notes
Text
Which Cricut EasyPress Is Best for Elevating Your DIY Crafting?
If you are looking to buy a Cricut EasyPress machine, would this blog be beneficial to you? As a Cricut crafter, I have used various Cricut machines over the years. As a result, in this blog, I am going to help you pick the right EasyPress machine to achieve the next level of crafting experience.
Before selecting a Cricut heat press machine, you must understand its features, properties, and prices. Apart from this, choosing a heat press tool depends on the purpose of use. But don’t worry; I will tell you everything in this blog to help you select the suitable machine for you. So, let’s get started without any further ado!
1. Cricut EasyPress Mini
The Cricut EasyPress Mini tool is a compact and easy-to-use machine. This machine offers the perfect start for the beginner to step into the crafting world. Plus, the machine has a smart tool that makes it easy to handle and get flawless results while making a project. Also, this machine is the most affordable heat press machine the Cricut brand offers.
In addition, with the help of this machine, users can work on various shoes, stuffed animals, and more. This tool offers high voltage and 3 heat settings, giving long-lasting results while working with iron-on products. To offer the utmost safety to the users, it comes with auto shut-off features and an insulated safety base.
2. Cricut Autopress
Cricut Autopress is a great option available for the crafter who wants to create commercial projects. This machine comes in 15 in x 12 in (38 cm x 30 cm) size and is best for creating bigger projects such as banners, hoodies, curtains, pillowcases, and many others. Plus, this heat press machine comes with various brilliant features, such as a ceramic-coated heat plate, Zero Effort™ operation for easy use, temperatures up to 400 °F (205 °C), auto-off after 13 minutes of inactivity, and many more.
In addition, the machine has an innovative design to offer the utmost comfort and DIY crafting experience to the users. It also has a control pod that gets the full understanding of the right temperature and timer to get awesome results.
3. Cricut EasyPress 2
The EasyPress 2 machine is the second iteration of the EasyPress series of the brand. This machine is great for crafters who want an advanced heat press machine without spending a massive amount of money. This machine is available in three different sizes and is best to use for projects like banners, blankets, T-shirts, sweatshirts, and more.
In addition, the machine offers precise temperature control for up to 400℉ (205°C). As a result, the machine gives effortless, fast, and flawless results. Besides that, this machine also includes numerous other features that ensure great iron-on projects and offer the utmost safety to users.
4. Cricut EasyPress 3
EasyPress 3 is the most advanced and latest machine in the EasyPress series. The machine comes with a variety of crafting features that provide a hassle-free crafting experience. There are two models of this machine that include the same features but differ in size. This machine offers flawless results working with various iron-on (HTV), Infusible Ink & sublimation products.
Also, the EasyPress 3 works with smartphones for easy control. You can download the Cricut Heat app to your machine and connect it using Bluetooth. With the help of this machine, you can easily start a crafting business and make extra bucks by selling products online.
Conclusion
In the above content, you got to know in-depth information about various Cricut heat press machines. These Cricut EasyPress machines are among the most popular versatile crafting tools. The smart features, specs, and innovative designs offer a great deal of comfort and fun. When it comes to their cost, then EasyPress Mini is the cheapest heat press machine of the brand, which costs only $39.99. On the other hand, if you want to get the most advanced machine, the Cricut Autopress, then it comes at $599. So, you can choose to buy any of these machines that fit your budget and the features you are looking for.
Frequently Asked Questions
Can Cricut EasyPress Do Sublimation on the Apparel?
This EasyPress machine is among the most sought-after and cutting-edge crafting tools available. This machine works perfectly with iron-on and infusible ink and a plethora of other products. Also, these tools provide sublimations on apparel and other products. With the help of heat transfer vinyl, users can sublimate the design on various objects, such as shirts, jackets, shorts, and other clothing items.
What Cricut EasyPress Machine Should I Get as a Beginner?
There are a plethora of Cricut heat press machines you can get to start your crafting journey. Here are some of the best options you can buy as per your budget and use.
How to Reset Cricut EasyPress Mini?
These are the easy steps to reset the EasyPress Mini machine.
Visit: install cricut design space app
cricut.com/setup
design.cricut.com/setup
cricut.com setup mac
www.cricut.com setup login
Source: https://cricutcreate.wordpress.com/2024/02/15/which-cricut-easypress-is-best-for-elevating-your-diy-crafting/
#cricut.com/setup#cricut design space download#cricut explore air 2#cricut software app#cricut project ideas#cricut new machine setup#www.cricut.com/setup login#install cricut design space app#install cricut design space
0 notes
Text
How to Make Cake Topper With Cricut: A Stepwise Guide
I understand you are pressed for time with an upcoming event at your house and need to know how to make cake topper with Cricut. No worries! You don't have to search elsewhere. I've compiled all the tips, tricks, and instructions you need in one blog.
Making a cake topper with the Cricut is not a mystery. Even if you are new to cake decorating, it's quick and easy. In my crafting room, you'll find many DIY projects. I recently used my Cricut machine to create a custom party cake topper for my son's birthday, and it turned out perfectly.
To help you, I will provide step-by-step guidance on creating a simple yet attractive cake topper. Once you've made it, you can try various designs using your Cricut machine. Follow the guide till the end and enjoy the procedure.
Step 1: Tools and Materials Required
I know you're excited to learn how to make cake topper with Cricut, but before diving in, let's see the materials you need.
After gathering all your tools and supplies, it's time to start crafting. Let's get started!
Step 2: Prepare a Design in the Cricut App
Open your computer and follow the instructions in the section below, but make changes to the text and whatever you see fit.
Step 3: Editing the Text
How to make cake topper with Cricut requires editing cake toppers in Cricut Design Space.
Step 4: Adjust the Text and Add Colors
To make the cake topper more stable and noticeable, I am going to add layers. You can choose the layers as per your preference.
Step 5: Cut and Assemble Your Cake Topper
Once the design is prepared, let's learn how to make cake topper with Cricut. I will cut and weed the design, then assemble it.
Final Thoughts
Cake toppers are a great way to decorate your cake in your unique style. They are both beautiful and versatile, and making them with the Cricut machine is an easy task. I have guided you through the procedure of how to make cake topper with Cricut, from setting up the design to cutting it out, assembling it, and beyond. Now that you have your Cricut machine and Design Space, you can enjoy crafting cake toppers for any occasion.
Frequently Asked Questions
Which Cricut font should I use to make a cake topper?
Well, it totally depends on you. Which font would you like to use for your text as a cake topper? You will find many font options in Design Space. However, let me suggest some fonts that you might want to consider. Firstly, there are 'Script fonts' and 'Serif fonts,' both of which look fantastic and are well-suited for cake toppers.
What are the best materials for making cake toppers with Cricut?
I believe there are many materials worth trying to make a cake topper with a Cricut. These include cardstock (especially glitter), acrylic, and thick paper or wood. While there are other options available, these are perfect choices as they look classy on the cake. I think you should proceed with these materials without any hesitation.
Which Cricut is good for cake toppers?
By the way, you can create the cake topper using the Cricut machine. However, for a simpler process, you can opt for the Cricut Maker 3, which allows you to make cake toppers even from wood and acrylic. Otherwise, if you already have another model, you can certainly continue using it.
Visit: cricut.com/setup
www.cricut.com/setup login
cricut design space setup
cricut explore air 2 setup
design.cricut.com/setup
Source: https://cricricutdesigncut.wordpress.com/2024/03/07/how-to-make-cake-topper-with-cricut-a-stepwise-guide/
#digital design#design space setup#cricut explore#cricut explore air 2#design space cricut#cricut setup#cricut project ideas#cricut design space app#cricut design space login#cricut design space download#cricut new machine setup#cricut software app#design.cricut.com/setup#design.cricut.com#www.cricut.com setup login#www.cricut.com/seup#www#www.cricut.com/setup login#www.cricut.com/setup
0 notes
Text
How to Use Infusible Ink Pens With Cricut: A Complete Guide
Cricut infusible ink pens and markers are just awesome. I use them to create my iron-on projects like custom T-shirts for myself and my sweet little child. Well, you can make multiple things with these Cricut products. It’s very easy to use and gives a well-finished project in the end. Its color never fades and always provides shiny, vibrant, and colorful crafts. If you are also a crafter and want to learn how to use infusible ink pens with Cricut, then stay with me till the end of this blog to learn in depth.
I have done dozens of iron-on projects with my tiny Cricut Joy machine and infusible ink. The ink is so permanent that it won’t fade after washing. I am really excited to share my way of using infusible ink pens and creating lovely projects.
In this blog, you will get everything about Cricut’s infusible products, like how to use them, what type of projects you can make with them, and even some of my tips. So, let’s get started to learn everything.
What Are Infusible Ink Pens and Markers?
Basically, Cricut’s infusible ink pens and markers are simple pens with infusible ink intended to make various heat projects such as designing aT-shirt, tote bag, or any apparel where ink is necessary.
These products can be easily loaded into the clamp of your Cricut machine and draw your favorite designs. You can draw it with your hands, too.
How Do Cricut Infusible Ink Products Work?
Before learning how to use infusible ink pens with Cricut, you should know how it works. Infusible ink works on the principle of sublimation. It sounds a bit complex, but it’s so simple. When you use the infusible ink or marker on a paper, it’s in a solid state, which is its original state.
But, the moment you apply heat to it, it gets transformed into gas. During this process, it infuses your material, and when you remove the heat, it cools down again. And then, after cooling, it will again become solid.
One thing to note here is that these products only work on specific materials, such as poly-based materials, polyester fabric, coasters, and mugs with a poly-coated ceramic coating.
So, if you want to make such projects, Cricut infusible ink pens and markers will be a must-have. Luckily, these amazing accessories are compatible with all types of Cricut machines, including Cricut Maker, Explore, and Cricut Joy.
How to Use Infusible Ink Pens With Cricut Machine?
Here comes the final part of the blog, which I was excited about. You already understand why we use it. And now, you are going to learn the exact procedure through the steps that I am sharing with you now. Before moving to the final steps, let’s see the materials you will need while making your project.
Step 1: Tools and Supplies Required
Here are some of the essential materials and tools you will need for your project.
When you are done with all the materials, it’s time to start the project. So, let’s start the step-by-step guide and learn how to use infusible ink pens with Cricut.
Step 2: Create Your Design
In the first step, you need to put a sheet of laser copy on your cutting mat and then put it into the Cricut machine.
Now, move to your Design Space and choose the size of your design to fit onto your blank. After that, adjust your Linetype to draw and select a Cricut infusible pen or marker. Don’t forget to mirror the design before the cutting procedure.
Step 3: Load Infusible Ink Pens
Now, select your material. In the case of an older Cricut machine, set the Smart Set Dial to Custom. Once done, put your infusible Cricut pen or marker into Clamp A and then hit the Go button to load different colors.
Step 4: Unload the Cricut Cutting Mat
When your design is ready, you can unload your mat and then take out the design from the mat.
When your design is ready, you are ready to apply heat to your apparel using the Cricut EasyPress mat. To get started, first place the sheet of cardstock inside your apparel blank to keep it protected from wrinkles and damage.
Moreover, use a fresh and clean lint roller to remove the lint from the surface of your apparel blank. It will also remove the fiber particles to create a perfect apparel for heat transfer.
Step 5: Preheat Your T-shirt
Then, cover your apparel with the butcher paper. In the next step, you need to preheat your apparel to remove unwanted moisture from it. Also, you need to check the Cricut Heat Guide from time to time to follow the instructions correctly. Apply the heat with a light pressure.
After that, take off the butcher paper and let the apparel cool down. Now, put the design pieces on your apparel facing down. Then, apply the tape on each corner of your design with a Heat Resistant Tape, which will keep your design free from moving.
Step 6: Apply Heat to the Design
Next, put the butcher paper on top of your design. Afterward, select the correct temperature and time settings for your project from the Cricut Heat Guide. Once set, apply heat with the optimum pressure, and when you hear a beep sound, lift away the press and slowly remove the butcher paper.
In the end, let your project cool completely and enjoy it. Finally, you learned how to use infusible ink pens with Cricut, and hopefully, you will try it on your own.
Conclusion
The process was extremely easy, wasn’t it? All you need to do is to gather some accessories and get started with the project. I used an example of a T-shirt, but you can make use of any apparel like a tote bag or anything where ink pens can be used. You can make beautiful creations with your Cricut infusible ink pens and an EasyPress machine. So, get ready to create something and use the Design Space software to make things beautiful and unique.
Visit: cricut.com/setup
design.cricut.com/setup
install cricut design space app
cricut.com setup mac
www.cricut.com/setup login
Source: https://cricuthelp.wordpress.com/2024/02/21/how-to-use-infusible-ink-pens-with-cricut-a-complete-guide/
#cricut.com/setup#www.cricut.com/setup login#www.cricut.com/setup#cricut design space download#cricut project ideas#cricut explore air 2#cricut software app#cricut new machine setup#install cricut design space app#install cricut explore air 2#cricut new product setup#setting up your cricut maker#cricut create connect to computer
0 notes
Last Seen Blogs

badmeems
Incinerate this garbäge

ask-lumious-starcatcher
Luminary From The Stars

grandpadaddyslover-blog
Grandpadaddylover

julietstastyhub
Juliet's Tasty Hub

chandarodrigues-blog
Untitled