#cricut cutting machine setup
Text
How to Use a Cricut Explore 3: Easy Tutorial for Beginners
Learning how to use a Cricut Explore 3 is important in order to complete any project with this machine. The Cricut Explore 3 is a versatile cutting and crafting tool that can cut more than 100 materials, like paper, cardstock, vinyl, iron-on, fabric, leather, wood, and many more. With the help of these materials, you can work on a variety of craft projects. If you do not know how to use this machine, read this blog to learn everything you need to know.
To use this Cricut machine, you need to do certain things. You will have to connect your machine to a computer and download the Cricut Design Space app. This app will help you manage your projects and make the most of your machine. So, let’s start with the tools and supplies you will need for your project.
Tools and Materials for Using Your Cricut Explore 3
Before learning how to use a Cricut Explore 3, you should know about the supplies you will need for your DIY project. What supplies you will need depends on the project you are working on. Here, we are going to talk about using a Cricut machine to cut material to make a beautiful butterfly. You will need the following supplies on your machine:
How to Use a Cricut Explore 3 for Making a Project?
Once you know about all the supplies you will need for your project, you can move towards working on it. So, these are the steps you have to follow:
Step 1: Create a Design in Cricut Software
The first step is to create a design on the Cricut Design Space app. It offers many features that you can use to make your design. The first option you have is you can pick any design from the thousands of options you have. The other option is to create your own design by clicking on the New Project section on Canvas. You have one more option: you can choose any design from your computer and upload it to the software. After that, you can use that image for your project. Once your design is ready, you can move on to the next step.
Step 2: Load Your Material
When you have selected a design, and then load the material on your machine. To do this, you must take the material and put it on the cutting mat. Next, place the mat inside your machine and press the Load button on the machine.
Step 3: Select the Material
When learning how to use a Cricut Explore 3, the next step is to select your material on the Design Space app. Afterward, go to the app and select the material you will use to cut on your machine.
Step 4: Cut Your Design on Your Cricut Machine
Once you have selected the material on the app, you can cut the design. To do so, you will need to click on Make It. The machine will cut the design in the exact shape that you have selected on the Cricut software.
Step 5: Unload Your Material and Reveal Butterflies
Once the material is cut, you have to unload it and remove it from the Explore machine. Then, you have to weed the design from the material. You can use a weeding tool for that. When the design is out, you have to glue it to the canvas, and your beautiful butterfly is ready to beautify your room.
Conclusion
In short, I am sure you have learned how to use a Cricut Explore 3. With this machine, you can create many DIY projects like cards, flowers, coasters, keychains, etc. In this blog, you learned how to make a beautiful butterfly by using your cutting machine. To complete your project, you must know about the essential supplies you will need and the basic process. Reading this blog, you understand how the Cricut machine works, and now you can create any project you want.
FAQs
Can I Use Cricut Explore 3 as a Beginner?
For sure! Cricut Explore 3 is an easy-to-use machine, and it is great for beginners to learn how to use it. This machine allows you to cut more than 100 materials, like paper, cards, and many other projects. If you want to use the machine, you will have to do a few things, like connecting it to your device and downloading the Design Space software.
How Do I Set Up Cricut Explore 3?
To work with this machine, you will have to complete the setup. For the setup, you will have to do the following things:
How Can I Connect Cricut to My Computer via Bluetooth?
To connect your computer to the machine via Bluetooth, you will have to do the following things:
Visit: install cricut design space app
www.cricut.com setup login
Source: https://cricutmakermachines.com/how-to-use-a-cricut-explore-3-easy-tutorial-for-beginners/
#How to Use a Cricut Explore 3#cricut.com/setup#install cricut design space app#cricut.com setup mac#install cricut design space#cricut create connect to computer#setting up my cricut maker#cricut setup create account#setting up new cricut maker#cricut setup on computer#cricut cutting machine setup#cricut setup#cricut design space setup
0 notes
Text
How to Connect Cricut Maker to Computer via Bluetooth?
You know what a great job a Cricut Maker machine can do for you. It’s one of the best-sellers in the Cricut lineup. I am also one of the fans of this crafting machine, and I always create something with it. Today, I’m here to share an important aspect of this Cricut model, which is their connection. We all know that in order to operate a Cricut machine, it needs to be connected to your mobile or computer. Here, you’ll learn how to connect Cricut Maker to computer via Bluetooth.
Let’s begin this guide that will tell you everything and cover the computer to teach you the connection method quickly. Don’t forget about the Cricut Design Space software, which is the core of your Cricut machine. I’ll also tell you how you can get the Cricut app on your system. Let’s begin!
How to Download & Install Cricut Design Space?
As I already told you, the Cricut app is necessary to establish a connection between your Cricut and the other device. Let’s check the steps below to learn the steps included in its download and installation.
On Windows
For users who want to connect their Cricut to a Windows computer, let’s check the steps here to get the Cricut software on it.
That’s how to get the Cricut app on a Windows computer. Now, let’s move ahead with the Mac and see how to get the app on it.
On Mac
The steps for downloading the Cricut software on a Mac are below. Check them to get the software.
Now, you have the Cricut app on your Mac system. When you know the Cricut Design Space setup, let’s go through the Bluetooth connection process.
How to Connect Cricut Maker to Computer via Bluetooth?
After setting up the Cricut Design app on your computer, here are the steps to connect your Cricut to a desktop using Bluetooth.
On Windows
If you have a Windows computer, all you need to do is to follow the steps given below. Check them out here.
That’s how to connect Cricut Maker to computer via Bluetooth to a Windows computer. Now, it’s time to learn the steps for a Mac system.
On Mac
To set up your computer on a Mac with Bluetooth, you should perform the steps below to complete the setup process.
These are the simplified steps to set up your Cricut cutting machine on a Mac system. That’s how to connect Cricut Maker to computer via Bluetooth.
FAQs
Why Is My Cricut Maker Bluetooth Not Working?
If the Bluetooth of your Cricut Maker machine is not working, there can be a few reasons for this to happen. For instance, the Bluetooth connection is not ON, or maybe your devices are too far apart from one another. Another reason can be that your devices are not compatible with each other. So, when you work on these things, you will fix the error.
Is a Bluetooth Connection Necessary for My Cricut Maker?
Absolutely not. You don’t have to use a Bluetooth connection to set up your latest Cricut Maker machine. You can rather go for a wired connection such as USB. A wired connection like USB will be beneficial for you to avoid any sort of interference.
How Do I Setup My Cricut Maker on My Mobile Device?
To set up your Cricut cutting machine on your mobile device, follow these steps:
Source: https://desincricut.wordpress.com/2024/04/09/how-to-connect-cricut-maker-to-computer-via-bluetooth/
#Connect Cricut Maker to Computer#cricut.com/setup#cricut.com setup#cricut.com setup download#cricut.com setup windows#cricut.com sign in#cricut.com/create#cricut.com setup mac#cricut.com/register#cricut.com design space#www.cricut.com setup mac#www.cricut.com/setup login#install cricut printer#install cricut design space app#install cricut explore air 2#cricut design space login#cricut design space app#cricut design space download#cricut design space for mac#cricut design space setup#cricut setup#cricut new product setup#cricut create connect to computer#setting up my cricut maker#connecting cricut maker to computer#cricut setup create account#cricut cutting machine setup#cricut setup on computer#cricut printer setup#cricut setup log in
0 notes
Text
How to Connect Cricut to iPad: Two Methods Explained!
As you know, Cricut machines are amazing. You can use them to create thousands of creative stuff like tote bags, keychains, cards, stickers, decals, etc. If I tell you about my crafting journey, it's too long. I started when I was a teenager just for a hobby, but I didn't realize when it would become my business. Well, if I share my story, this blog isn't enough. So, let's discuss the matter we are here for. I know you want a little clarity on how to connect Cricut to iPad. Don't worry; I'll share everything with you to make your work easier.
My blog is dedicated to iPad users who are struggling with their Cricut machines and want to learn how to connect them to an iPad. Let me walk you through this guide and teach you the process.
Introduction to Cricut Design Space
Before we move forward to learn how to connect Cricut to iPad, let's learn about its special software and its excellent features. This application or software is designed for Cricut users to create creative designs. Also, you get multiple features in this software, including different fonts, texts, templates, and designs; you'll be able to design anything you want. To get this software or application, you need to install it from Cricut's official website.
How to Download Cricut Design Space on iPad?
If you want to download and install the Cricut Design app on your iPad device, follow the steps below.
That's it for the Cricut Design Space download on an iPad. Now, let's check its connection process.
How to Connect Cricut to iPad via Bluetooth and USB?
Here comes the final step, which is to connect your Cricut to an iPad. To do this, you'll need to use the Bluetooth pairing option. Go through the steps below to learn the connection process.
Method 1: Using a USB Cable
If you want to connect your Cricut to a wired connection like USB, you need to follow the steps below. A wired connection is helpful in many ways and can be set up hassle-free.
That's how to connect Cricut to iPad with USB. After this, you can utilize your Cricut to create anything.
Method 2: With Bluetooth
Check the steps below to learn Cricut setup on iPad via Bluetooth. This wireless connection is amazing and will work best for you.
That's how to connect Cricut to iPad via Bluetooth. If you want, you can go for a wired connection such as USB.
FAQs
Why Does My iPad Need to Download the Cricut App?
There are certain minimum system requirements you need to check before you download the Cricut app on your iPad. For instance, your iPad version should be 11 or the latest. Also, your internet connection should be strong and within 2-3 Mbps to download and upload. If everything meets, you can connect Cricut to iPad.
How Do I Connect Cricut to My Computer?
To connect your Cricut machine to a computer, follow these steps:
What to Do When My Cricut Is Not Connecting to My iPad?
When your Cricut is not connecting to your iPad it can happen when your Cricut or iPad device is not connected to the power supply. If you're using a USB cable, your cable may be loose, and if you're using a Bluetooth connection, maybe your device's Bluetooth option is not ON.
Visit: www.cricut.com/setup login
install cricut design space app
Source: https://setupcricutoncomputer.wordpress.com/2024/04/06/how-to-connect-cricut-to-ipad-two-methods-explained/
#www.cricut.com/setup login#www.cricut.com/setup#install cricut design space app#install cricut explore air 2#cricut design space#cricut maker bundle#cricut new machine setup#cricut.com/setup#cricut explore 3#cricut.com/setup login#cricut create connect to computer#cricut new product setup#cricut new product device#cricut install setup#connecting cricut maker to computer#cricut setup create account#cricut cutting machine setup#cricut setup on computer#setting up new cricut maker#cricut setup log in#cricut account setup#cricut printer setup#www.cricut.com setup login
0 notes
Text
How to Connect Cricut to MacBook: A Step-by-Step Guide
Getting started with a brand-new Cricut machine can be overwhelming, especially for beginners. So, I’m here to help you with its connection. Take a deep breath, and let me teach you how to connect Cricut to MacBook. It’s going to be interesting, and after reading this blog, you won’t need anyone’s help to set up a connection between your devices.
As a MacBook user, you may often find yourself in trouble due to different connection and setup methods, but not anymore! In this guide, I will explain the steps, particularly for MacBook users, to help them out with a Cricut connection. Here we go!
What Is a Cricut Design Space?
It’s the key to a Cricut machine’s setup. If you’re an existing user, you might know about it. But, if you don’t, I’ll tell you here. Basically, it is a design software by Cricut. This software has many features that allow you to design anything. For instance, you can use different fonts, designs, templates, etc, to design your project.
To get started with the Cricut Design app, you’ll need to download and install it. I’ll share with you the procedure to get this versatile software on your Mac system. Well, you can get this software on any device, but as this guide emphasizes the Mac system, you can only learn about Mac. After installing this design software, you can connect Cricut to MacBook.
How to Download Cricut Design Space on MacBook?
You know how important it is to download and install the Cricut software on your MacBook system. Check the steps below to learn how to install it on your Mac.
That’s it for installing the Cricut account on your MacBook. If you’re a new user, create a new Cricut account and then sign in to your Cricut account.
Connect Cricut to MacBook: 2 Different Methods
Here, all your questions will be answered. I’ll tell you all the steps involved in connecting a Cricut machine to a MacBook.
Method 1: With a USB Cable
If you want a wired connection, you can choose a USB connection. As this connection method is conventional, you can use it to connect your devices when your device doesn’t support a Bluetooth connection. Let’s see the steps below to learn how to connect Cricut to computer with USB.
That’s it to connect Cricut to MacBook via USB connection. If you don’t want to use a USB connection, go for a wireless connection like Bluetooth.
Method 2: Via a Bluetooth Connection
If you want to go for a wireless connection, you can select the Bluetooth option. Let’s see the steps here to learn how to connect Cricut to MacBook via Bluetooth.
That’s it to connect Cricut to MacBook. Now, you’re ready to use your Cricut machine the way you want. If you want to explore more things with your Cricut, get the Cricut Access subscription that offers loads of amazing features for your everyday crafting work.
FAQs
How to Connect a Cricut Machine to a Windows PC?
To connect a Cricut product to your Windows, follow these steps:
How Do I Update Cricut Design Space on Mac?
To update the Cricut Design app on your Mac, follow these steps:
How to Activate a Cricut Machine?
To activate your Cricut product, follow the steps below:
Lastly, check your firmware to complete the activation process.
Visit: install cricut design space app
Source: https://explorenewmachine.com/how-to-connect-cricut-to-macbook-a-step-by-step-guide/
#cricut.com/setup#cricut design space#install cricut explore air 2#cricut maker bundle#cricut explore 3#cricut new machine setup#cricut.com/setup mac#cricut.com/setup login#cricut.com/setup windows#install cricut design space app#cricut setup on computer#cricut setup for pc#cricut setup maker#cricut setup explore air 2 setup#cricut setup create account#cricut new product setup#cricut new product device#cricut create connect to computer#www.cricut.com setup login#cricut cutting machine setup
0 notes
Text
Choose the Right Cricut Mats for Your Projects to Get Started
Without any second thoughts, you will surely agree that Cricut mats are one of the crucial tools developed by the company. It doesn't matter whether you are a beginner or a pro; you should choose suitable cutting mats for your DIY projects. If you are clueless about what this Cricut mat is and what its types are, then this blog is beneficial for you.
From the moment I started creating custom-made projects, I was pretty sure that without the mat, I wouldn't be able to make any project. To carry on with the legacy of being a crafter, I need to be very cautious while using it for designing crafts. Let's dive into the world of the mats and their types.
What Are Cricut Cutting Mats?
Putting everything aside, let's focus on what this cutting mat is and why you should need it. In simple words, it is a flexible, reusable item that tightly carries the material during the cutting procedure. It comes with a strong adhesive that holds paper to wood in its place without damaging it. Due to any reasons, if your Cricut cutting mat is not sticky enough, then your material will instantly begin to slide down.
Plus, you can easily take off the material from this item and store it for the next time. Also, the Cricut mats are available in several sizes, stickiness levels, and colors. It helps the user choose which material is compatible with your mat and project design. On the other hand, you should select the correct Cricut item before starting the crafting process.
What Are the Different Types of Cricut Mats Used by Crafters?
As a professional, it's my responsibility to make you aware that this Cricut product has been categorized into four different types, colors, and sizes. Each version has its specific grip strength that is compatible with different materials. Moreover, choosing the mat entirely depends upon the type of project the user is going to make out of their craft machine. To your knowledge, I have briefly explained its types and projects that can be made out of it.
1. Cricut Strong Grip Mat — 12 & quot;x 12"
Referring to one of the first Cricut mats, the Strong Grip mat is specifically designed for holding heavyweight materials. It is the best choice for sticking cardstock, chipboard, mat board, and backed fabric. Also, this reusable mat holds the material firmly in its place during the cutting process. Besides, you can easily remove the extra pieces after the cutting process comes to an end. As an upgrade, it is made with water-based paint and available in purple color.

2. Cricut Standard Grip Machine Mat, 12 "x 12" (2 ct)
Equally important, this cutting mat is ideal for cutting medium-weight material. It is compatible with materials such as vinyl, iron-on, paper-patterned, and more. Just like the earlier-said model, it tightly carries the material so it doesn't slip while cutting down the material. Besides, it is composed of water-based paint with solid adhesion spread in the whole area. Plus, it ensures the best possible adhesion and the longest possible life. With two mats included, you can load one into the craft machine while preparing for the next one.

3. Cricut Light Grip Mat, 12 & quot;x 12" (2 ct)
Inside the Cricut mats variety, the Light Grip mat was made to handle lightweight material. You can easily stick material such as standard paper, light cardstock, vellum, and more on this mat. In addition, this reusable mat is strong enough to keep the material in its place as it cuts down the loaded material. By using the cutting mat, you will surely get the material in the perfect formation. Also, it is formed with water-based paint and strong adhesive.
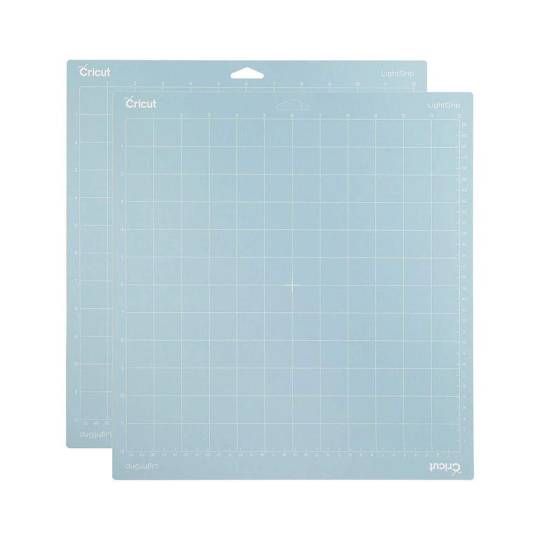
4. Cricut Fabric Grip Machine Mat, 12 & quot;x 12" (4 ct)
Equally important, most DIYers prefer this Cricut accessory while making something out of fabrics. It includes cotton, polyester, denim, felt, canvas, and many more. Also, this mat is a combination of increased strength and density along with light adhesive to cut fabrics. After making the tight connection between the fabric and mat, it keeps the materials in place while the cutting process is going on. Besides, the DIYer needs to remove the extra pieces, making the mat reusable again.

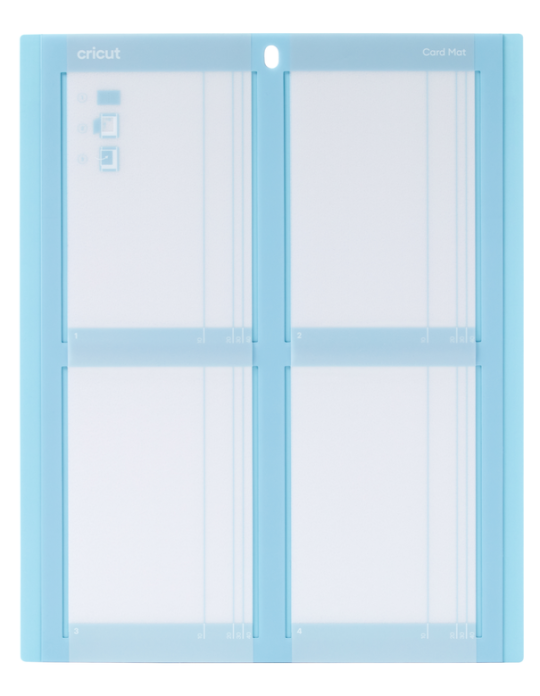
5. Cricut Card Mat — 2x2 (2 ct)
Concluding the Cricut mats list, get ready to make four different cards at the same time with this cutting mat. This craft machine product is compatible with all the Cricut cards and is the best for making last-minute crafts. One of the reasons why it is famous is that it can make Birthday cards, Thank You cards & Valentine’s cards in just a single go.
After sharing all kinds of info, it will get easier for you to decide which will be the compatible Cricut cutting mat for your project. Each model of this craft machine supply holds the ability to make severe projects that can help the DIYer brush up their creative skills. Besides, it's essential to keep all of these mats in good condition before they start getting worn out and affecting your crafts. Other than that, the above-said craft machine items are budget-friendly and can be accessed easily by any newbie or an experienced one.
Frequently Asked Questions
Question: How to Clean a Cricut Cutting Mats Using Baby Wipes?
Answer: To maintain the stickiness of this Cricut product, go through the steps given below:
You need to buy alcohol-free baby wipes from an online website or general store.
2. Next, take out a piece of wipe from the box and move it from the upward to downward direction.
3. If your mat is too dirty, then you can also move it in a circular motion and clean it two or three times.
4. After cleaning the mat, keep it aside and let it dry in natural heat for a few minutes.
Question: How Do You Make Cricut Mats Sticky Again?
Answer: If your mat is losing its stickiness due to which you are 't able to make your favorite craft, then you are supposed to restick your mat. To do so, follow the below steps:
1. First, you have to clean this crafting tool with the lint roller or with the scraper tool.
2. Then, cover the outer sides of this accessory with masking tape without making any gaps.
3. Now, spread strong adhesive on the mat and use a clean paintbrush to apply it in equal proportion.
4. Next, leave the glue on the mat and let it dry for at least 10–15 minutes.
Question: How to Load a Mat Into Cricut Cutting Machine?
Answer: Go through the following pointers and learn the steps of loading the craft machine mat into Cricut:
1. Initiate the process by unboxing this Cricut material after getting the delivery.
2. Next, switch on your craft machine and place the material on it using the brayer tool.
3. After that, take the cutting mat and insert it into the machine in equal alignment.
Question: How Can I Extend My Cutting Mat Life?
Answer: Several methods can help you extend your mat life, including:
1. Cover your Cricut mats with a clean plastic sheet so that it can be used for the next project.
2. Use a scraper tool, spatula, or weeding tool to remove the extra material from the mat.
3. Keep cleaning the mat regularly to maintain its stickiness with baby wipes or warm water.
Question: Where Can I Buy Cricut Mats to Create My DIY Project?
Answer: If you are planning to buy any model of the mat, then you should 't need to get worried. You can find the compatible mat on Cricut & #39;s official website or from Amazon, Walmart, or other shopping websites. Besides, you will get a certain percentage of the amount and other benefits if you have a Cricut Access membership.
Source: Cricut mats
Cricut cutting mats
For more Information, Visit:
cricut.com/setup
Cricut Design Space
Cricut new machine setup
#Cricut mats#Cricut cutting mats#cricut.com/setup#Cricut Design Space#cricut new machine setup#cricut software app
0 notes
Text
How to Use Cricut Explore Air 2: Crafting Tips and Tricks
Hey guys, today I have come up with an easy guide on the topic named how to use Cricut Explore Air 2. In this guide, I will explain everything every beginner needs to know about Cricut machines. I remember the day when one of my uncles gifted me this machine. At first, I was very nervous and didn’t know how to set up and use it. Thanks to Cricut for the user guide, which helped me quickly set up my machine within a few minutes.
Despite this, I learned to use the machine with the help of tutorials, and fortunately, I am now able to help people who still need to know about the usage and setup process. In addition, I will show you how to perform a test cut on your new machine. Hence, it will help you understand the usage of the machine. Let’s get started!
How to Setup Cricut Explore Air 2?
After unboxing, the first thing I did was set up my cutting device. At the same time, I used a compatible computer device that supports the Cricut software. Here are the complete instructions on machine setup:
First, turn on the device and insert the power cable into the round hole on the back of the machine.
Then, establish the bluetooth connection between your device and machine.
While connecting to bluetooth, enter the code 0000 if prompted.
Head to your device (computer/mobile) and navigate to Cricut’s official website.
From the website, download and install the Design Space app.
After installation, set up the account using the Cricut ID and Password.
Afterward, you need to follow the screen’s prompts on the app.
At last, you will find that the setup is done, and it will ask you to perform a test cut.
How to Use Cricut Explore Air 2 for Creating a Project?
Now you have finished your setup, let’s see how to use this machine. Here, I will show you how to cut using Cricut Explore Air 2. To learn, follow the steps provided below:
Launch the Design Space and click on the Canvas tab located in the upper left corner.
Then, write or design anything that you want. Here, I have written the word TEST and added two shapes on my canvas.

Now, load the metallic adhesive-backed paper to cut your created shapes and block letters.

After cutting, separate the cut-outs from the spare materials.
Finally, you have learned how to cut anything using the Cricut Explore Air 2.
What Can I Make on Cricut Explore Air 2?
The moment I learned how to use Cricut Explore Air 2, I couldn’t stop myself from trying the various new projects every week. In a sense, this cutting machine is worth buying, and I should have bought it earlier. Anyway, it is never too late to learn. However, I am really thankful to my uncle; his one gift not only transformed me but also helped me bring the imaginary idea to reality.
Since I have created a lot of projects using this cutting machine, I am thrilled to share them with you. Let’s have a look at the 5 amazing projects I have made myself:
Paper Flower
Leather Jewelry
Custom Mug
Flower Pot
Pillows
Stickers
Wall Decals
Coasters and many more.
All these projects are my favorite, and they are beginner-friendly. So, after learning how to use Cricut Explore Air 2, you can try these projects. Now, let’s proceed with the setup procedure of the cutting machine.
FAQs
Question 1: How to cut using Cricut Explore Air 2?
Answer: This machine is basically made for cutting, be it Maker or Explore series; all of them are cutting machines. So, if you want to cut anything on Explore Air 2, then follow the steps below:
Go to Design Space and create a design.
Then, choose the Cardstock material under the Material Settings.
Now, you need to place the cardstock on the Blue LightGrip mat.
After that, load the mat and press the Go button.
Next, your machine will start cutting your material.
Question 2: Can I connect my Cricut Explore Air 2 via Bluetooth?
Answer: Yes, you can use the Explore Air 2 via Bluetooth. To connect, you need to follow the steps below:
First, ensure a minimum distance of 10 to 15 feet between your devices.
Next, you need to turn on the Bluetooth.
On the next screen, you have to click on Add Bluetooth or other device.
Here, let your computer find the available devices.
Once it detects the device, click on it to pair.
This way, connect your cutting machine via Bluetooth.
Question 3: Can I use my Cricut Explore Air 2 with my phone?
Answer: Design Space is compatible with all devices, including mobile and computer. So, whether you want to connect your machine with an Android or iOS phone, it is easy to connect. However, you can also use the machine without using the internet on an iOS or Android device.
Final Thoughts
Eventually, you have learned how to use Cricut Explore Air 2, including the machine setup. While setting up your machine, you have two options. Either connect your device via Bluetooth or USB cable; both methods are available for this machine. Once you are done with your setup, you are ready to perform a test cut, which I have explained in the detailed step-by-step instructions. Now, you can easily bring your project ideas to reality; all you need is an Explore Air 2 cutting machine.
Read more: install cricut design space app
design.cricut.com/setup
cricut.com/setup mac
Source: How to use Cricut Explore Air 2
#install cricut design space app#how to cut using Cricut Explore Air 2#How to use Cricut Explore Air 2#how to setup Cricut Explore Air 2#cricut.com/setup mac#cricut.com/setup#cricut.com design space#cricut.com/create#cricut.com sign in#cricut new machine setup#cricut setup
0 notes
Text
Cricut Joy: Your Guide to Compact Crafting Delight

Cricut Inc. has launched a ton of cutting machines for crafters, but the Cricut Joy is one of my favorite models. This small, compact, and portable tool hit the market in 2020. Don’t judge this mini machine, as it can cut 50+ different materials from delicate paper to artboard.
I have been using this Cricut machine for the past 7 months, and there’s no way I’m going back from it now. Of course, I am now obsessed with it and love to create countless customized crafts from it. As an expert, I will lead you to the right path to learning all you need to know about this Cricut Joy cutting machine.
What Are the Salient Features of Cricut Joy?
Before including this crafting machine in the craft room, it’s evident for me to ensure that you are well aware of this Cricut model. After I will make you across the features, you get to make a clear picture of what precisely the Cricut Joy machine is.Without wasting any more time, let’s begin by learning about its features:
To begin, this craft plotter is smaller in size and lightweight compared to the Explore and Maker series. Due to this reason, it gets easier to store in a tight place without damaging its corners.
Since it is lightweight, it gets easier to carry it anywhere, either while going on a trek or going to someone’s home. Now, to keep it safe while traveling, you can keep it inside its tote bag.
In addition, this Cricut Joy comes with fewer supplies, making it easier for the DIYer to transform their DIY creative ideas into the real world.
Equally important, it supports Smart Materials, which means that you won’t need any cutting mat while using this material.
On the other hand, this craft plotter has its app, known as the Cricut Joy app, which helps the user connect mobile devices with this machine via Bluetooth feature.
After grabbing this Cricut cutting machine’s essential features, it is time to make you learn about how you can use Cricut Joy to create a do-it-yourself project.
Easy Guide: How to Use Cricut Joy?
Further adding to the blog, I am going to make you learn about how to utilize this cutting machine and create a personalized project of your choice. Let’s begin the process of how to use the Cricut Joy by going through the below steps:
Step 1: Open the Cricut Joy App and Choose a Design
First, I will turn on my mobile device and open the app. In case you don’t have the app, then get it for free from the App Store or Play Store.
After opening the app, I am going to press the Start option given under the Quick Labels section.
Now, press the Start Making button, select the label of your choice, and tap the Next option.
Next, I will change the size of your label and enter the text inside the Enter Text blank.
After making the necessary modifications, tick the Next option given on the top right side of a new page.
Step 2: Load the Material to Your Cricut Joy
Now, I am going to select the compatible materials from the Select Material screen.
Following this, press the Make It button appearing on the right side of your Cricut Joy app.
Afterward, unbox your smart material and gently insert it inside your machine.
Next, connect your craft plotter with your mobile phone via Bluetooth and wait till the wireless connection process is going on.
Step 3: Start the Cutting Process
After the connection process comes to an end, I will insert the pen inside the clamp and Cricut Joy.
Now, turn on the craft plotter, and it will begin to draw the label on the smart material.
Following the completion of drawing the design, I will remove the pen and again insert the blade in the same clamp.
Next, I will press the Go button on the app to proceed toward the final step.
After the drawing and cutting process will come to an end, I am going to unload the mat slowly.
Step 4: Peel Off Your Design
After unloading the mat from the craft plotter, I will cut the extra mat using a Cricut scissor and save it for future projects.
Now, I will peel off the final design from the cutting mat and place it in the center of your jar in a proper alignment.
Lastly, I am going to use a scraper tool to get rid of any bubbles or wrinkles on the label.
Summing up this post, as an expert, it was my responsibility to introduce you to the Cricut Joy machine as well as its features and how it works. By considering the above-said details, it will likely get more straightforward for you to access this cutting machine and create different personalized projects within minutes.
Final Words
Through this blog, I covered most of the things that were helpful in learning more about this craft plotter. This ultra-compact smart cutting machine can make fun and functional projects within 15 minutes or less. Besides, the Cricut Joy is compatible with all materials as well as Smart Materials. Some of the famous DIYers love to make various projects out of this craft plotter.
For more information visit: cricut.com/setup joy
cricut maker setup
download cricut design space
Source: Cricut Joy
#cricut.com/setup joy#cricut maker setup#design.cricut.com#cricut machine setup#cricut joy machine#cricut joy cutting machine#cricut joy app#how to use cricut joy#cricut joy#cricut joy xtra
1 note
·
View note
Text
quick clarification!
A few people in the tags of my last post were like, "HOLY SHIT, HOW DID YOU GET THE DESIGN SO NEAT AND CRISP WITH A HANDHELD FOIL QUILL??"
and my secret is....... it wasn't a handheld foil quill 😅
We R Memory Keepers also makes a foil quill attachment for cutting machines like Cricut, Silhouette, etc -- you can set it up the same as you would a sketch pen, and it'll foil the design onto your bookcloth. The initial setup is a little finicky, but as you can see, it works beautifully one you get it going! I've only tried it on commercially-available bookcloths that say they "take blind and foil stamping well" (Arrestox is a favorite of mine), because it's pretty functionally similar to a hot stamping machine if you do it right.
I hope to write up a post with more details soon! It's such a good alternative to HTV, for real, and you can do so many pretty things with it.
22 notes
·
View notes
Text
How to Pair Cricut Maker to Phone and Computer: Full Guide
Every crafter will agree that the Cricut Maker Setup is one of the smartest and favorite models among cutting machines. This Cricut machine can cut 300+ materials such as vinyl, iron-on, cardstock, and more. It can also cut, write, foil, and score different materials. To start with this Cricut cutting machine, one must know how to pair Cricut Maker with a computer and smartphone.
Crafters have two options for pairing both devices: Bluetooth and USB cable. However, it is their call to decide in which mode to connect their Cricut machine to a computer and mobile devices. Also, to begin any projects, all users must download the Cricut software and connect it to their device.
If you cover the entire blog from top to bottom, you will quickly learn how to set up and pair this Cricut machine with devices.
How to Setup Cricut Maker on a Computer?
Before getting started with how to pair Cricut Maker, all the users need to set up their Cricut product on a computer. To properly end the setup process, they need to go through the below-shared steps:
Lay the first stone of the setup process by unpacking your Cricut machine & switching it on.
After doing that, connect both devices via USB cable or Bluetooth.
Next, visit cricut.com/setup and install the Design Space app on your computer.
Then, create your Cricut ID or sign in with the login details.
Now, follow the instructions appearing in your front on the screen.
Finally, you will be called for a test cut after completing the setup process.
How to Pair Cricut Maker to Windows and Mac?
Below are some tips and instructions for pairing this Cricut product with Windows and Mac systems.
Windows
In addition to this blog section, look at the steps below and learn about setting up both devices.
Go ahead with the process by checking that your Maker machine is within 10-15 feet of your computer.
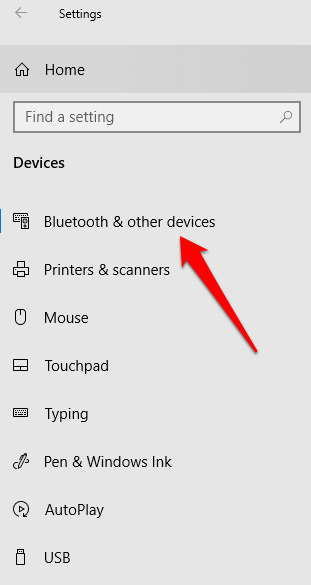
Now, tick the Settings icon and land on the Windows Settings tab.
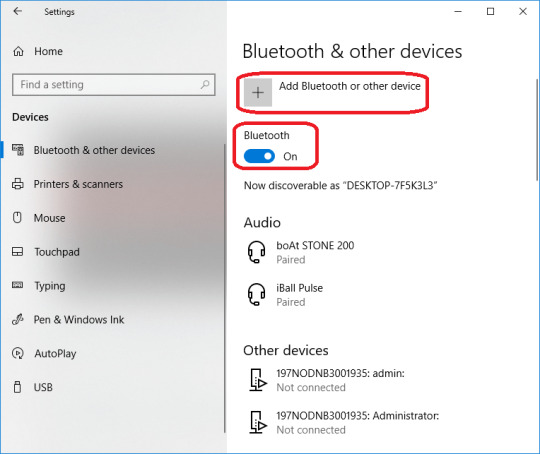
Following this, choose Devices and check that the Bluetooth is on.
After that, hit Add Bluetooth or other device that appears at the top of the screen.
Next, click the Bluetooth button under the Add a device tab.
A window will appear at this point. Click on your Cricut model.
Finally, your Maker and Windows pairing process will come to an end.
Mac
This section explains how to pair Cricut Maker with a Mac system.
Make the first move by ensuring that your Cricut cutting machine is on.
Afterward, check that it is under the range of 10-15 ft of your Mac system.
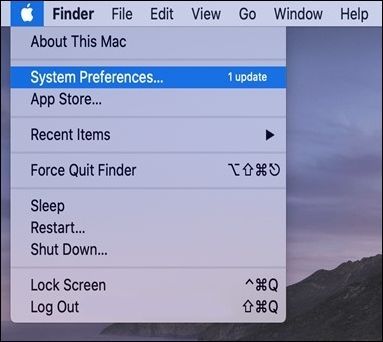
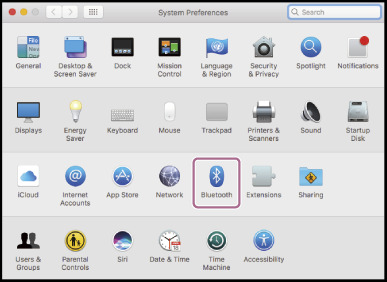
Next, open the Apple menu, choose System Preferences, and click the Bluetooth icon.
Check that your Bluetooth is on, and select your Cricut model from the list.
After a few minutes, your device’s pairing process will end.
How to Pair Cricut Maker to Phone (Android/iOS)?
Further referring to the blog, let’s discuss the process that will help the user pair smartphones with this Cricut product.
Android
Take the first step and ensure that your Cricut machine is on and positioned within 10-15 ft of your mobile device.
After that, scroll down your phone’s home screen and hold on to the Bluetooth icon for a few seconds.
Now, turn on your device’s Bluetooth and let it scan for the machine for a few minutes.
Next, choose your model name, and the pairing process between your Android and Maker will end.
iOS
To get things moving, check that your Cricut Maker is on and within 10-15 feet of your iOS device.
Go to the Settings tab and activate your device’s Bluetooth feature.
After activating the Bluetooth, a list of available devices will be shared in front of you.
Select your model name from the list at this point, and both of your devices will be paired successfully.
By paying special attention to these steps, the user can swiftly pair up their respective smartphones with the Cricut Maker machine. Moreover, they need to be very cautious so they don’t make any mistakes during the process.
Frequently Asked Questions
How to Setup My Cricut Maker on a Smartphone?
With the help of the below steps, you can effortlessly set up a Maker machine with smartphones:
Begin the process by plugging the machine and turning on its power.
After that, pair your smartphone with the Cricut machine via Bluetooth.
Install the Design Space app on your device and create your account.
Next, go to the Menu section and tick the Cricut Machine Setup option.
Following this, choose your machine name from the list and follow the steps to finish the setup.
Finally, when informed of the test cut, you will know about the setup completion.
How to Connect Cricut Maker to Devices via USB Cable?
To connect the Cricut cutting machine with devices via a USB cord, the user needs to follow these steps:
First, unpack your Cricut product and USB cable very carefully.
Following this, switch on your machine and put one cord into the machine port.
Afterward, insert another end of the cable into the device and let it connect with each other.
Now, the Cricut Maker will turn on and be ready for cutting purposes.
How Do I Pair My Cricut Maker With iOS via Bluetooth?
With the help of these steps, you can effortlessly connect the Cricut product with iOS devices:
Check that your Cricut machine is enabled and place it under your device’s 10-15 ft range.
Next, go to the Settings tab and turn on your device’s Bluetooth.
After a few seconds, a list of devices will be shared on your phone screen.
Tap the model name, and the pairing process will end after a few seconds.
For More Information Visit: www.cricut.com setup login
Cricut Design Space Download
Cricut setup on computer
Source: How to Pair Cricut Maker
#how to pair cricut maker#cricut maker setup#cricut design space app#cricut design space login#cricut design space download#Cricut setup on computer#cricut machine setup#how to setup cricut maker
3 notes
·
View notes
Text
How Do I Set Up My Cricut Maker? [Ultimate Guide]
Buying a new Cricut Maker can be overwhelming for all of us. Initially, setup can be daunting, but once you do it, you will love the overall process. However, you can easily set up any Cricut machine without needing much assistance.
The post is all about how do I set up my Cricut Maker. Through this write-up, we will see the items while unboxing the new Cricut Maker. Further, you will explore the Cricut Maker and its types. Afterward, we will explain the complete process of setting up your Cricut Maker machine.
What Do You Get in the Cricut Maker Box?
Unboxing a new product is always an exciting task. While unboxing the Cricut Maker machine, we got several items that we will be discussing here. However, you always have the option to select the bundles when you buy the machine from Cricut's official website.
Following are the items that you get in the box of the new Cricut Maker:
Apart from these, you will get the following:
The best thing is that we get the blades and tools along with the new Cricut machine. These blades allow us to try various products before buying more blades.
How Do I Set Up My Cricut Maker on a Computer?
When we talk about setting up Cricut Maker machine, it means we want to connect it to our devices like computers or mobile phones. However, there are certain ways to connect these machines to our devices. For example, we can connect our Cricut Maker to our computer or phone via Bluetooth or USB cable. So, it is the users’ choice to choose which way is the most suitable for them.
Below, we explain how to set up Cricut Maker. This method is only applicable for Windows or Mac users only:
How Do I Set Up My Cricut Maker on a Mobile?
Here's how to set up your Cricut Maker on Mobile devices with iOS or Android operating systems:
Cricut Maker is the most advanced and versatile in Cricut's lineup. However, the box contains various items that you can use to make several projects uninterruptedly. In this write-up, we explained the Maker and its features in detail. It helps the users to get an overview of machines so that they can use them without any hassle. After exploring the Maker cutting machine, the blog found out how do I set up my Cricut Maker.
FAQs
Question 1: Can I set up the Cricut Maker easily?
Answer: People think the setup is daunting, but this is not the case. Cricut machines are just like printers. The only difference is that Cricut has blades to cut. However, when you go through the notice period, you will find the setup is too easy and complete in less time. While setting up, you will need to download and install the Design Space app. This app will guide you through the further setup process, making it easy for beginners to set up the machine in one go.
Question 2: How do I connect my mobile phone to my Cricut?
Answer: Here, we are going to show you the method to connect your mobile device to the Cricut machine. Here, we are using iPhone or iOS devices. So, ensure you have an iOS device.
Question 3: Can I use the Cricut without its software?
Answer: No, you must use the Cricut Design Space app to send your design to your Cricut device. The machine is the companion for your Cricut cutting machine. Without this machine, you can't cut anything. However, the Design Space is essential for creating intricate designs and then sending them to the machine. Also, the app is the only way to maintain communication between your computer and Cricut.
Visit: cricut.com/setup
cricut.com/setup
Source: https://cricutmakersetup.wordpress.com/2023/10/21/how-do-i-set-up-my-cricut-maker-ultimate-guide/
#cricut explore air 2#design space setup#cricut maker#cricut.com/setup#cricut.com design space#cricut.com/create#cricut.com sign in#design cricut.com download#digital design
2 notes
·
View notes
Text
Starting a Business on a Shoestring
Introduction to Starting A Business On A Shoestring
You are prepared to launch your billion-dollar business idea. The sole issue? You are starting a business on a shoestring. Does that mean your entrepreneurial dream will fail? Nope. Thousands of business owners, including myself, engage in it. Do you want to know how to launch your business on a tight budget? Continue reading. Stay calm if you are unsure how to balance starting your business with having little money.

Key Takeaways
Starting a small business on a budget involves several steps, from developing a business idea and conducting market research to writing a business plan.
Starting, you can cut costs by spending less on your business’s services, software, and other necessities.
Starting a business in just a few weeks for as little as $100 is feasible.
How Do You Launch a Small Business on a Shoestring Budget?
You can start a variety of businesses. In addition, there is no way to launch a business for less than $100. You still have many options with less than thousands of dollars. You still have many choices with less than thousands of dollars. Consider your hobbies, your abilities, and the tools you already own. For instance, starting a custom clothing, tumbler, and car sticker line would be simple if you own a Cricut die-cutting machine.
1. Research and Planning
The next step is market research and business planning once you have decided on the type of business you want to launch. This entails gathering data and information about the market you wish to enter, including details about your target audience, rival companies, and the location and requirements of your potential clients.
2. Grants and Funding
When starting a business on a tight budget, you must look everywhere for funding. With more money, you can expand your business quickly, hire more employees, purchase better tools, and market it more effectively. The good news is that you can still fund your business even if you do not have any cash. You can grow your business with thousands of grants from both public and private sources.
3. Legalities and Formal Setup
Small business owners have a variety of options for legal structure. This section will help you choose the best course for your business by demystifying the various business structures. You must register your business if you intend to conduct business using a name other than your legal name.
When registering your business name, you have two choices. You can set up a business structure like a limited liability company (LLC) or file a Doing Business As (DBA). You must register your name as part of the LLC filing process.
4. Other Legalities and Licensing
Depending on your location and type of business, there might be additional legal considerations to keep in mind. For instance, you need commercial liability insurance if you own a storefront. Based on your location and industry, this SBA resource will assist you in determining whether you require any additional licences or permits. Legal fees and licence fees: Free (if no licence is required; subject to industry)
5. Setting Up a Workspace
Where will you work now that you have decided what kind of business to launch and are familiar with the legalities? You have several choices. This could be the most economical workplace if you have the space at home. You can work from a desk in your bedroom, a spare room, or a kitchen counter.
6. Brand Identity
Your logo, font, brand colours, and other distinguishing visual elements are all parts of your brand identity. Many business owners hire designers to create these components for their companies. That, however, can get expensive. For customers to recognise your business across various platforms, including social media and your website, it is crucial to be consistent with colours and fonts when developing a brand identity.
7. Building an Online Presence
Most people in today’s digital world use the internet to find businesses. Local search is an effective traffic-generating marketing tool for small businesses, according to research. Additionally, people typically want to purchase when they conduct an online search for a local business. When you establish an online presence, customers can find your business when they search online. Here’s how to do it on a budget or even for nothing.
What Should You Save Your Money for Before Launching Your Business?
You can save thousands of dollars if you are willing to learn and do your homework. However, a big part of running a business is picking up lessons along the way, sometimes at a price. Here are a few things to avoid investing money in when you are just starting to prevent you from making costly mistakes.
Numerous business cards: Purchase a small quantity instead, then purchase more as needed.
Branding and logos: Start with the tools mentioned above, and then upgrade as necessary in the future.
Website development firms: Using WordPress, Wix, or other similar website builders, you can quickly create a website for free.
Conclusion
In conclusion, starting a business on a limited budget is possible and a wise way to get your business venture off the ground. You can successfully navigate the difficulties of limited resources and make your innovative ideas a reality by adhering to the abovementioned procedures.
Remember that even with a small initial investment of $100, being resourceful, imaginative, and persistent in your approach can result in remarkable success. So embrace your entrepreneurial journey confidently, knowing you can realise your business goals with the proper techniques and tenacity.
FAQs
What should you think about when making a business budget?
Once your objectives are clear, you can make an efficient, error-proof budget by examining costs, negotiating prices with suppliers, estimating your revenue, and being aware of your gross profit margin. Estimate your future cash flow, consider seasonal and industry trends, set spending objectives, and compile all this data.
How do I launch a business on a shoestring budget?
Seven steps are involved:
Self-evaluation.
Selecting the best business.
Thinking about your name and brand.
Creating a business plan.
Obtaining funding.
At Bizop, you can explore a number of options. If you have additional questions or require more information about our policies, do not hesitate to contact us. For more information visit our website.
0 notes
Text
How to Set Up Cricut Maker 3: A Beginner’s Guide
Cricut Maker 3 is an exceptionally amazing machine for working on your DIY projects. It is the latest inclusion in the Cricut Maker series, and with the help of this machine, you can cut almost any material you want. You can now cut paper, cardstock, vinyl, fabric, plastic, leather, wood, and even metal with this machine. However, to use the Cricut machine, you need to learn how to set up Cricut Maker 3 on your computer. So, keep reading the blog, and you will know everything regarding the machine setup. You will learn how to unpack and prepare the machine for the setup. Plus, you will learn about connecting a Cricut machine to your computer and how you can download Cricut Design Space.
Let’s start with the unpacking procedure right away.
Unpacking and Preparing the Cricut Maker 3 Machine
In order to learn how to set up Cricut Maker 3, you have to first unpack the machine and remove all the taps. Then, you have to prepare the machine for the setup. Once the machine is prepared, you can continue with the necessary actions. To know them all, keep reading the blog:
For a detailed guide to connecting your Cricut cutting machine to your desktop, please continue reading this post till the end.
Connecting Cricut Maker 3 to Your Computer
Once you have learned the procedure to set up Cricut Maker 3, you can connect it to the computer. Complete the steps in the section below for the connection using Bluetooth:
Important Note: You can also use a USB cable to connect a Cricut machine and the computer.
Downloading Cricut Design Space on a Computer
To set up Cricut Maker 3, you have to download the Cricut Design app and log in with a Cricut ID. To learn how to do it, follow these simple steps:
Conclusion
After reading the blog, I am sure you have learned everything about how to set up Cricut Maker 3 on your computer. You saw how you had to unbox and prepare the machine for setup. When the Cricut machine is ready, you should connect it to your computer, download the Cricut Design Space app, and log in with a Cricut ID. Now, the Cricut Maker machine is ready, and you can create amazing projects with the help of the machine.
FAQs
Why Does My Cricut Maker 3 Won’t Connect via Bluetooth?
There may be a few reasons why you are unable to connect your Cricut machine to your computer via Bluetooth. Maybe the computer you are using has disabled Bluetooth, so you should enable it in this case. The other problem is that you have kept the computer too far away from its range of detection. So, keep the computer within 10-15 feet.
What Features Should My Computer Have to Use Cricut Maker 3?
If you are using a Windows computer, it has to be either Windows 10 or later versions. Apart from that, it should have an Intel Dual-Core processor, 4GB RAM, and 2GB free disk space. Its display should have a resolution of a minimum of 1024x768 pixels. Its broadband connection should have a downloading capacity of 2-3 Mbps and an uploading capacity of 1-2 Mbps.
How Can I Connect Cricut Maker 3 to My iPhone?
You can connect a Cricut cutting machine to your iPhone with a USB cable or Bluetooth. To connect them through USB, you should take a USB cable and connect it to both the iPhone and the Maker 3 machine at both ends. To connect with Bluetooth, you should turn on the machine and then go to the Bluetooth setting on your phone. After that, search for the machine in the Bluetooth settings, and when you see it, click on it.
Visit: install cricut design space app
cricut.com setup mac
www.cricut.com setup login
Source: https://spacecricut.wordpress.com/2024/06/08/how-to-set-up-cricut-maker-3-a-beginners-guide/
#cricut setup#cricut setup on computer#cricut setup create account#cricut setup for pc#cricut setup explore air 2 setup#cricut setup maker#cricut.com/setup#cricut.com/setup app#cricut.com/setup login#cricut.com/setup windows#cricut create connect to computer#setting up my cricut maker#setting up your cricut maker#cricut cutting machine setup#cricut com setup#cricut crafts#cricut.com setup mac#install cricut design space app#How to Set Up Cricut Maker 3
0 notes
Text
Cricut Explore Air 2 Download Software: Full Tutorial
Hey newbies! If you are here to search for the easy and quick steps to Cricut Explore Air 2 download software, you are in the right place! As a professional crafter for years, I have worked day and night to brush up on my crafting skills. When it comes to choosing the right tools for crafting, my first choice is Cricut. With Cricut machines, I have created thousands of projects so far. But how do I get started with the Cricut machine? What do I need for this? In short, the answer is a Cricut Design Space. This software is a companion to your Cricut machine.
The Cricut software is needed to set up the machine. Without this, you can’t cut any materials. Thus, I will explain to you how to download the software for the Cricut Explore Air 2. In addition, I will teach you about the system requirements needed for using the Cricut machine. Let’s delve into it.
Minimum System Requirements to Download Cricut Software
Hey, let’s explore the system requirements so that we can understand whether our computer is actually able to run the Cricut Design app smoothly or not. Then, we will move to the Cricut Explore Air 2 download software. So, I have mentioned below the system needs for both Windows and Mac computers.
For Windows
For Mac
Now that you have learned about the system requirements needed forthe Cricut Explore Air 2 software download. Let’s explore how to download the Cricut software on Windows and Mac.
Cricut Explore Air 2 Download Software on Your Computer
Now, you have an idea about the system requirements for using the Cricut software. It means you know what operating system you will need and what size of RAM you must have. When you have ensured everything you need, you can start downloading the app to your Windows & Mac as follows:
Windows
Mac
Finally, you have understood the steps for the Cricut Explore Air 2 download software. Download and install the application and start setting up your machine hassle-free.
FAQs
Question 1: Which software do I need to use with Cricut Explore Air 2?
Answer: You will want a Cricut Design Space to use your Cricut Explore Air 2. No matter which Cricut machine you have, the app supports all Cricut machines. It is also compatible with various platforms like Windows, Mac, iOS, and Android. The Design Space app keeps everything, like designs, in one place and saves them for export. However, if you get a paid version of the Cricut app, you will get a plethora of features and resources.
Question 2: Do I need Cricut Design Space for Cricut Explore Air 2 setup?
Answer: You will need a Cricut app to set up and use the Explore Air 2 machine. Design Space is free software that lets you keep all your designs in one place and saves you from having to export them. Using this software, you can set up the Explore machine and Maker, Joy, and Venture.
Question 3: Can I download Cricut software on my smartphone?
Answer: Certainly, yes! Downloading the Cricut app or Cricut Design Space is easy on your smartphone. However, Cricut only supports iOS and Android, so you need to download it via the Play Store or App Store. Although you will only get some of the features on your mobile devices, you can still do many things on it.
Final Words
Overall, I have explained the steps to Cricut Explore Air 2 download software. This guide is for both Mac and Windows users. The process may vary from system to system. Therefore, you will only need to follow those steps for the computer that you are using. The downloading process is almost the same because you do it on a browser, but installation is very different for Windows and Mac computers.
Source: https://desincricut.wordpress.com/2024/04/05/cricut-explore-air-2-download-software-full-tutorial/
#install cricut explore air 2#cricut.com/setup#cricut#cricut com setup#cricut.com setup#cricut setup#cricut.com setup download#cricut.com setup mac#cricut.com setup windows#install cricut printer#install cricut design space app#www.cricut.com setup mac#www.cricut.com setup login#wbn: www#design.cricut.com/setup#cricut design space setup#cricut design space#cricut printer setup#cricut create connect to computer#setting up my cricut maker#connecting cricut maker to computer#cricut setup create account#cricut cutting machine setup#cricut setup on computer#setting up new cricut maker#cricut setup log in#cricut install setup#cricut new product setup#cricut new machine setup#cricut explore 3
0 notes
Text

Install cricut design space app
For Cricut crafters, the brand offers an intuitive and versatile Design Space app. The app comes with a zillion outstanding resources, such as ready-to-make projects, images, and text fonts. This app helps crafters set up their Cricut machines and cut their projects. Plus, the app comes with a cloud-based sync and is compatible with all the prominent OS devices. Cricut machine users can easily install cricut design space app on their computer or mobile phone to create fantastic crafts. For more info about the app, make sure to visit the cricut.com/setup website today!
0 notes
Text
How to Print and Cut on Cricut: Easy-to-Follow Guide
Among various awesome features that Cricut machines offer, Print Then Cut is one of them. It is a worthwhile feature that helps you print and cut projects seamlessly. Almost all the cutting machines of the brand offer this feature. Moreover, crafters with the right knowledge of the process can create a project like a cakewalk. However, some of you can find it difficult to complete the procedure. The good news is that I am going to put together all the vital info and an easy guide on how to print and cut on Cricut. Keep reading the blog till the end to gain in-depth details on each process!
What Are Some Printers Suitable for the Print Then Cut Feature?
There are many laser and inkjet printers that offer great help in making a Print Then Cut project and give flawless results.
Laser
These printers use high heat to fuse toner to the material.
Laser printers work very well on regular papers, some weights of cardstock, and specialty materials specifically manufactured for use with laser printers.
If you are planning to use heat-sensitive material such as iron-on or vinyl on the printer table, you should refrain from using this printer.
InkJet
This is the most suitable type of printer for a plethora of materials, such as printable vinyl, printable iron-on, sticker paper, and many others.
InkJet printers use ink cartridges and small nozzles to spray the fine ink on the chosen material.
Note: It is suggested that you use an InkJet printer to get the best and most accurate results on your Print Then Cut projects. If you are looking forward to Print Then Cut on the Design Space app for iOS devices, make sure the printer is compatible with AirPrint.
What Cricut Machines Offer the Print Then Cut Feature?
Before you learn to print and cut on your machine, it is important to know which devices support the Print Then Cut feature.
Cricut Maker machines
Cricut Explore machines
Cricut Venture
Cricut Joy Xtra
You can choose either of these devices depending on the project design you want to create and the materials you are going to use.
How to Print and Cut on Cricut: 3 Simple Steps
The process of making a DIY project using the Print Then Cut feature includes several steps. Here, I am going to break down all the steps for you to make them simpler and more comprehensible.
Step 1: Preparing a Design for Print Then Cut
A plethora of designs are available solely for Print Then Cut. Below is a quick guide to help you understand how to use a design for this procedure.
In the Design Space app, create a new project.
After that, go to Images.
Next, you need to follow the path Filters > Operation Type > Print Then Cut. (Now, you will see all the designs that are created for Print Then Cut. Also, you will see a little printer on them.)


Then, you will notice that in the Edit bar, our chosen design is already formatted for Print Then Cut.
Once you think the design is completely ready, choose the Make It option and move to the next step, Print Then Cut.
Step 2: Prepare Your Printer for Printing
You need to follow the steps below to prepare your printer and print the design. Follow the steps carefully.
Connect your printer to a power source, keep it near your PC or smartphone, and turn the printer on.
Next, you will need to move to the Design Space app and select your printer name.
After that, you will have to send the design to the printer for printing.
You can select the size of the design before printing on the material.

Once the printing is complete, you can move on to the process of cutting it on your machine.
Step 3: Cut the Design on Your Machine
Before you cut the design on your machine make sure that your setup process is done. After that, follow the steps to cut the design.
Depending on the material you are cutting, load the material to the design you are using with or without the machine. (I am using the Maker 3 model to cut the design.)
After loading the design, press the Go button on the machine to start cutting.
Now, the machine will start the cutting designs.

Wait for the cut to complete, and then unload the design from the machine.
Weed out the extra part, and your Print Then Cut project will be complete.
Final Words
Here, I have tried to share a fundamental guide on how to print and cut on Cricut with all the other essential info. By using all this information, you can easily create a project on any of the Cricut cutting machines without facing any issues. Moreover, make sure to follow all the steps carefully to avoid facing any issues. I hope you will be able to make stunning crafts using Print Then Cut on Cricut in your first attempt. machine. However, it is wise to seek more help if the concepts are still not clear yet.
Frequently Asked Questions
Do I Need to Calibrate My Cricut Machine for Print Then Cut?
All the cutting machines offer the calibrated feature. But, if you are an inaccurate cut, then you need to perform the calibration of your machine. Calibration is a simple process designed for the questions and answers related to machine cuts. This process helps the machine and software provide the pinpoint edge-to-edge cuts flawlessly. You can select the Calibration option in the Design Space app and specify Print Then Cut to complete it by following the on-screen instructions.
How Do You Use Print and Cut on Cricut?
Here is a brief guide with simple steps for printing and cutting on your machine. Follow the guide to get a fundamental understanding of the process.
Start creating a new project on the Design Space app.
After that, choose the Image option.
Next, move to the Filters option and then choose Operation Type.
Now, you have to choose the Print Then Cut option.
Once you are ready, choose the Make It option on the app to print the design.
When the printing is complete, use the machine to cut it.
Finally, finish your DIY project.
Why Is My Cricut Not Cutting Properly on Print and Cut?
In some cases, you can face an accuracy issue while cutting the design in the Print Then Cut project. The primary reason for this problem is that the cutting setting and blade alignments are not perfect for the cut. To get rid of this problem, you can use machine calibration to perfect the device’s cutting alignment. However, make sure to get in touch with the brand customer service team to learn more about fixing the issue.
Source: how to print and cut on cricut
Visit for more info: Cricut.com/setup
Pinterest
You tube
#how to print and cut on cricut#print and cut on cricut#Cricut Explore Software#Cricut Venture#Cricut.com/setup
0 notes
Text
Cricut Machine Setup: A Full Guide for Beginners
Are you wondering how to setup your brand-new Cricut machine? Worry not! You have come to the right place. All you need to setup this amazing machine are the items that come in the box: a power cord, blade, cutting mat, USB cable, etc.
Some find the Cricut machine setup process tricky and troublesome, especially to beginners. Although it may feel difficult in the beginning, you don’t have to panic. In this blog, I will guide you through every step in a detailed manner to help you setup your crafting machine. Without any further delay, let’s start the machine setup procedure right away.
Cricut Machine Setup on Computer Using a USB Cable
You can setup your machine on both a computer and a phone. In this section, we will look at the computer setup instructions for your machine. To start setting up your machine, follow the steps in the section below:
To Cricut setup your machine, you must have the exclusive Design Space app installed on your computer. Also, you must have your Cricut ID. If you do not have either, you should create one.
First of all, ensure your crafting machine is plugged in properly, and then turn it on.
Now, connect your Mac to the back of your machine with the help of a USB cable. Insert one end into the USB port of your Mac and another cable end into the back of your machine.
After that, head to the cricut.com/setup website on your computer.
Next, you will need to download the Design Space software.
On the following screen, complete the steps on your screen and then log in to your account.
Also, setup your machine, and you will be all set to start crafting your projects.
If the app redirects you to do a test cut, know that your setup is complete. If not, rest assured that you have either not followed the above instructions carefully or your Cricut details are wrong. Another reason for this failure could be that your machine is not compatible with the version of your Mac.
Following the above steps carefully, you can easily setup your machine and enjoy designing DIY projects and giving them life on various materials.
NOTE: When setting up your machine for the first time and activating it at the same time, you should set it up very carefully. If you do not meet this requirement, you will have to reconnect the machine by navigating to design.cricut.com/setup again. You can also do this by selecting New Machine Setup, which is accessible through the Design Space menu.
Cricut Machine Setup on Your Mobile with Bluetooth
You can setup your brand-new crafting machine in the same way as in the above section. Ensure you have the Design Space app installed on your mobile phone and your Bluetooth is on. Also, you must know your Cricut details beforehand; if you do not have one, you must create a new one. To do the setup for your machine, follow these steps:
To start, ensure your machine is on and connected to a power source.
The next thing to do is to pair your mobile device to your machine via Bluetooth. To do this, go to the Settings tab and turn the Bluetooth on.
After that, open the app and then sign in with your Cricut credentials.
From the menu on the home screen of the app, move to the Machine Setup option and choose the correct machine model.
Lastly, follow the on-screen instructions to complete the full setup.
If the app takes you to the page to do a test cut, know that your Cricut machine setup is finally complete, and you can start making your designs and projects.
How to Setup Cricut Machine on Computer via Bluetooth?
You can also use your machine on your windows computer with the help of Bluetooth. These days, almost all computers and mobile devices have Bluetooth features built into them. If not, you can use a Bluetooth adapter as an external tool. Now, let’s start the process:
For Windows
To connect your machine, be it Explore, Maker, or Joy, you must perform these steps:
In the beginning,click the Start button from the search bar on the dock.
Now, open the Settings panel and then to Bluetooth and other devices.
After that, click on Add Bluetooth or another device and tap on Bluetooth toggle to turn it on.
Next, you will have to wait for a few seconds to let your machine be discoverable.
Once you find the name of your machine in the list, click on it. The password for any machine is 0000. If it still does not work, look at the bottom of your machine; you will find the password close to the serial number.
For Mac
Follow the below steps to connect your machine to your Mac via Bluetooth. Also, remember that your Mac must be supported by Bluetooth.
In order to connect and setup your machine (Joy, Maker, or Explore), you must tap on the Apple icon, which is visible on the dock page.
Now, tap on the System Preferences option.
Next, look for the Bluetooth and turn it on.
Lastly, look for the name of your machine from the list of devices. And click on your machine’s Bluetooth name. If a password is asked, type in 0000. Otherwise, you can find it at the bottom of your machine, next to the serial number.
Your setup is finally complete. Open the Design Space app, log in, and start your crafting journey. It was simple. Wasn’t it?
NOTE: Also, you must know that Cricut Joy cannot be setup with a USB cable because it is not equipped with a USB port.
Wrapping Up
Congratulations! Count yourself lucky now that you know how to do a Cricut machine setup. I hope that any confusion regarding your setup has already been removed, reading this blog. You also know how to connect your machine through USB and Bluetooth. Enjoy giving your crafts a new life. Happy designing!
0 notes
Last Seen Blogs

hartbandit
Hart Bandit

hot-taiwan
無標題

redeemingbaddies
ProSnape Sideblog
Header By Madfantasy
Sade/30+/🚺

ilvsyzj
Mythical Adventures

haruhideym
春秀弓