#crochet tips
Note
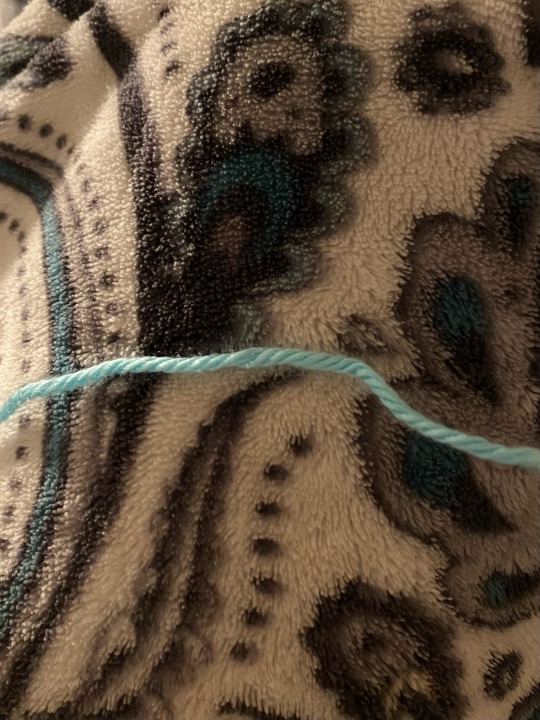
I have come to teach you and all your followers my simple way of doing a magic circle, since every popular style I’ve seen is unnecessary complicated.
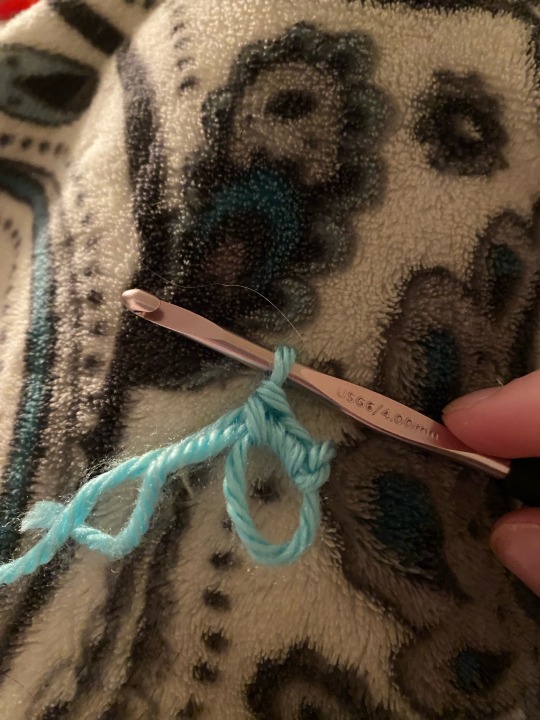
First start with your string
Then you cross it
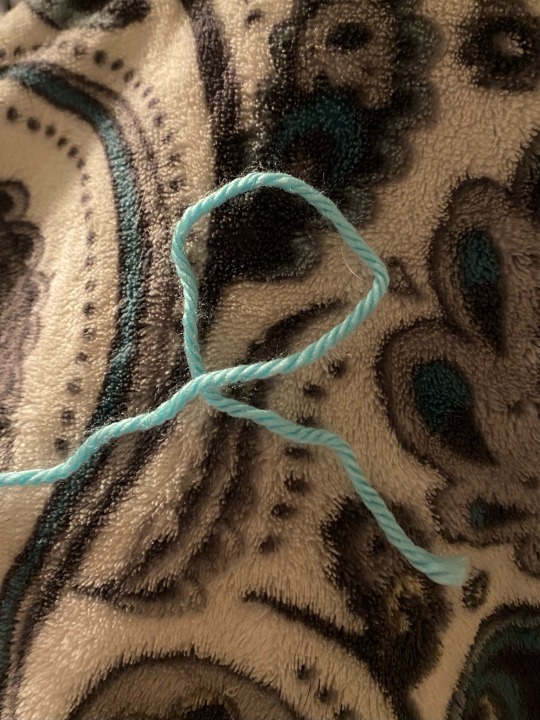
Then pull the string on the top through the part on the bottom


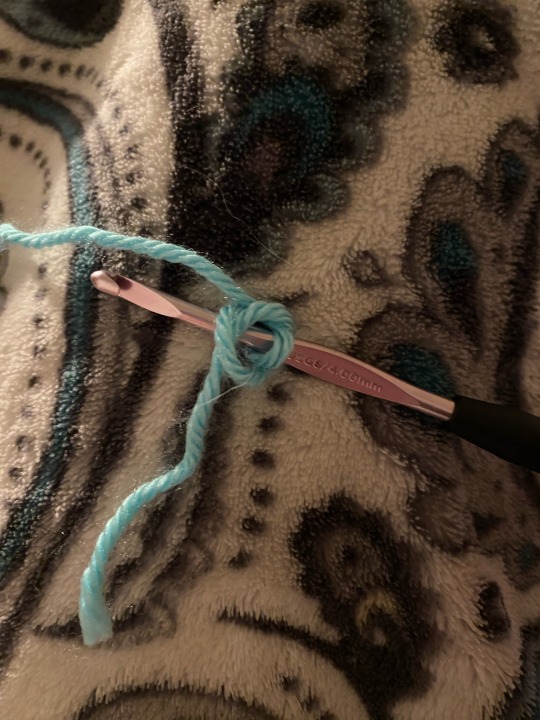
Now you have a slip knot. And know we’re going to crochet around the slip knot and the tail.
You’re going to insert your hook into the loop of your untightened slip knot, yarn over, pull through, and then pull through the two loops on your hook to do a single crochet (or double crochet if you’re using uk terms)

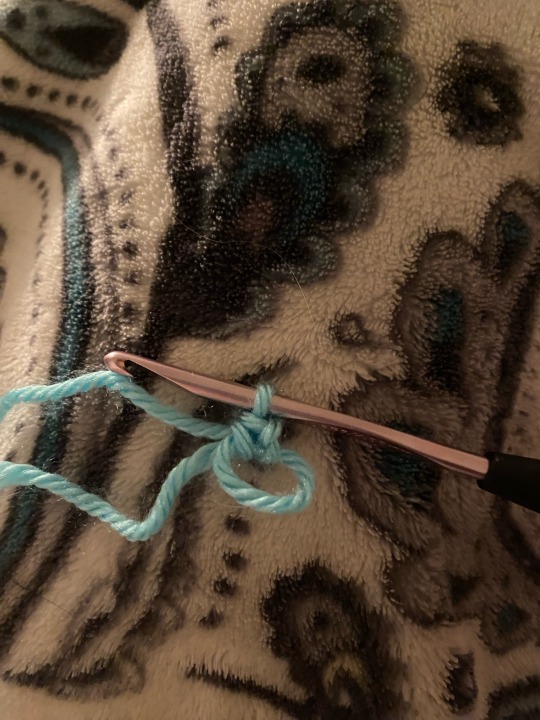
And bam! You have a magic circle!
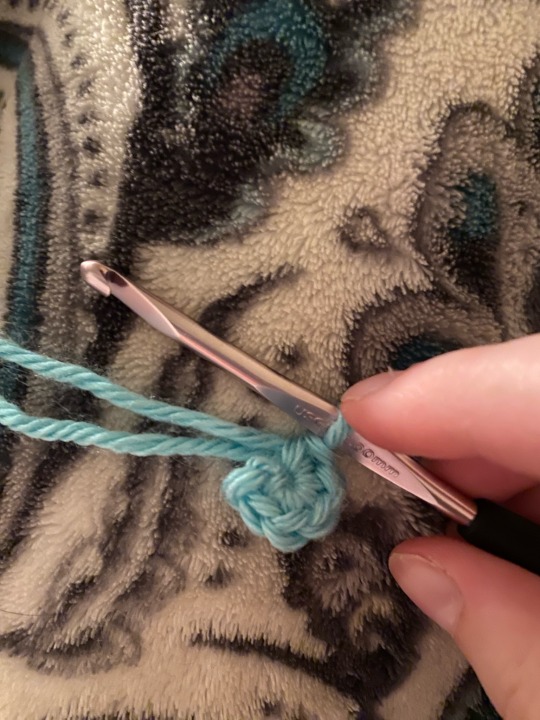
Continue crocheting around the slip knot and tail, when you’re ready to tighten it, just pull the yarn tail!
Hope this helps you all, in case you want to do a magic circle for the possum patterns instead of the chain two method :3
Very cool and I think me and my followes will love it
#crochet#crochet pattern#crochet tips#magic ring#crochet possum#crochet opossum#crochet clown#crochet clown possum#crochet hooks#crocheters of tumblr#crochet patterns#crocheting
131 notes
·
View notes
Text
If you need inspiration to help you figure out how to catalog and organize your yarn stash, I've been using this:
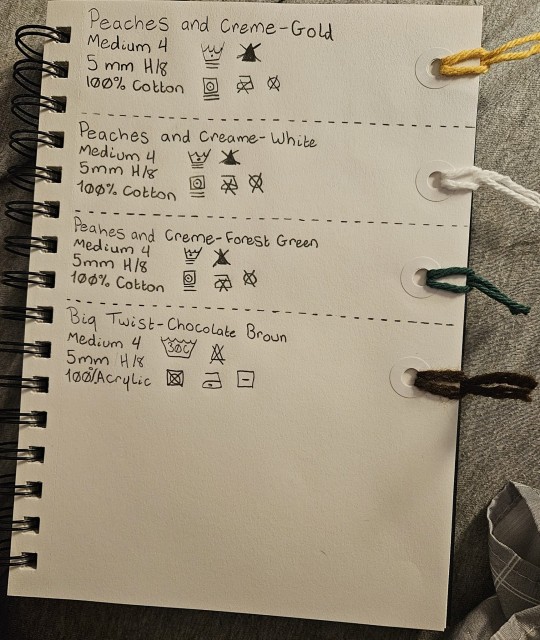
In this book, I have organized my yarn by things I personally find important, so that includes:
The brand and colour
The weight of the yarn
Recommended hook sizes
Material the yarn is made of
Laundering information
Some more information you might want to include if you decide to do this:
Recommended gauge
Knitting needle recommendation
Lot number/s
Where you purchased the yarn from, especially if online
It isn't a perfect way to organize my collection, and I need to catalog more because I have a big project coming up, but I really like having it in a notebook. It might be helpful to save your labels, too, but I don't prefer that, because I want to memorize and physically write out the specs of my yarn.
You might want to dedicate each page to specific projects, as well!
#art#fiber art#crochet#crochet tips#described images#image description in alt#yes i know i spelt the peaches and creme brand wrong in the second section <3#i keep forgoring to correct it#also don't come for my handwriting or drawing i am trying my best and i wanted to do this by hand <3#i almost NEVER have to write things out by hand consistently and it's weird now that i'm not in the k-12 schools#the next project i'm doing (a tapestry for my dad) is being delayed until i get all the yarn i need in every colour#yes i got a lot of the peaches and creme yarns because i prefer cotton over acrylic
74 notes
·
View notes
Text
Tips for Using Red Heart's All-in-One Granny
(From someone not trying to sell it to you)
And I mean that - I'm just another crafter who was skeptical but intrigued enough to want to give it a try. If you have no interest, this post isn't for you and I'm not going to tell you to go out and get it anyway. But if you are curious or intrigued like I was, or if you have it in your stash and are struggling, I wanted to share my thoughts and tips.
TIP 1: Know yourself as a crafter
Who is this yarn for? Is it for me?
That's a great question, and really the first thing you should ask yourself. Be aware of what you are working with and the goal of the yarn. This should be for someone that enjoys working with acrylics. If you work up granny squares often, or enjoy the process of a basic granny square, and will enjoy the seeing the colors change, you might enjoy this. Do you like playing yarn chicken, or does that stress you out? If living on the edge, is your cuppa of hot cocoa, you might find something with this product.
Maybe read through some of these tips if you aren't quite sure where you fall, and they might help you can decide if this type of yarn is up your alley.
TIP 2: Understand what you are trading.
Because there is still work involved - just a different type.
This yarn is going to work differently for everyone, and it's going to take time for you to figure out what works best for you. That'll be a lot of work on the front end, getting to know the yarn and your gauge and tension and how you want it to look, for a long term trade off of not having to weave in ends later on or having to choose colors at the beginning of the project (if that's part of this yarn that's appealing to you.)
You'll be making a lot of granny clusters, so strap in.
Tip 3: Find your own recipe
What helped me was not thinking of the goal as one whole granny square and then finding the right tension for it. I've only tried a little color pooling (I'm awful at it so far), but one thing that stuck with me was that it's more about the color than it is the gauge or stitch. You might sub a hdc if you have more yarn than needed, or pull tighter in areas, so not to sacrifice the way you need the colors to lay.
This is where that yarn chicken comes in - I thought of each row in the sequence as it's own challenge figuring out what I need for each part of the sequence. For me, I was willing to go up and down hook sizes. If you feel you need to change the cluster a bit, or alter the number of chains to get a row to work - I would encourage giving that a try and see how you like the aesthetic. Keep in mind there might still need to be some adjusting, and I am still learning and working with this yarn, but here's what I've been using as a starting point for myself.
Row 1: tight 5.0mm
Row 2: relaxed 5.5mm
Row 3: relaxed 5.5mm
Row 4: relaxed 5.0mm
Row 5: tight 5.0mm
I've had to swap out for a 6mm for some, so I do have a third option easily at hand.
Successfully working the row so that the color change is happening when you want it, feels like a mini-version of how it feels to succeed at yarn chicken - without the risk of having to buy a whole new skein of yarn at a potentially different dye lot if you lose. In this case, just go back a bit in your row, alter something about what you just did to try again. You can either alter the whole row, or just go back a side or two depending whether you have too much yarn or too little.
It's like a puzzle and finding the right combination that works for you and for that particular part of the sequence. Something about it has been tickling the lizard brain for me.
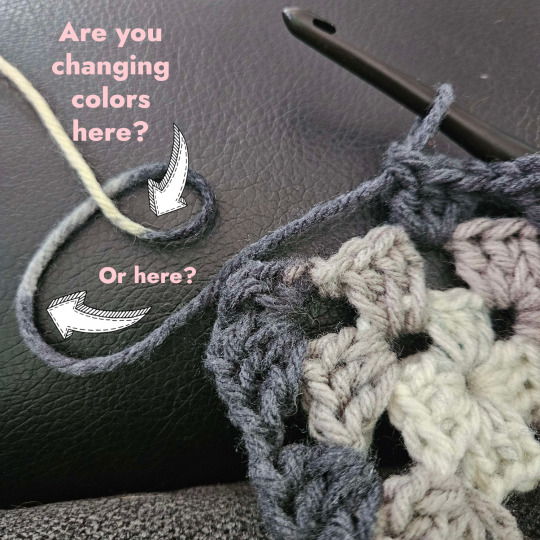
Tip 4: Use this alternative for the starting chain 6
I am fairly tolerant to different ways to make the same thing, and I've done many a version of a granny square. But I can not emphasize enough how much I despise the way the main pattern recommends for the starting corner. If it's been working for you, great! But here's my gripe with it, and my solution.
The chain 6, 3dc in the beginning with the 2dc in that space at the end, as the pattern suggests, looks incredibly clunky in comparison to the other corners. Because of the way the join pulls the chain together, I consistently was still left with what felt like a gaping hole unrelated to gauge.
So if this is happening to you and you want to fix it - replace it with a stacked sc. You know that trick that helps you get straighter edges along the sides? It's that one. I am not a very good teacher - I have written words and pictures, and am not savvy with a video camera to explain how this works. So here's a video I can recommend that explains it well - Here. You just make a sc into the corner and one sc into the side of that stitch as the tutorial describes. When you get to the end of the granny round, 2dc into the final corner the way the pattern explains, and then join to the top of the stacked sc.

If you are worried about the amount of yarn, I've been able to work with this alteration. You are going to be doing enough making and frogging and making again in order to find your recipe that I recommend just doing this alternative from the beginning so you can account for it as you practice.
TIP 5: Don't relax on that final row
Remember, you're supposed to also have enough yardage to weave in, and more consistently than not, I was finding I had to go down a hook size AND tighten my tension to get row 5 to have enough yarn to close the row, let alone have some left over. As part of finding your recipe, you may just want to plan ahead for that. I haven't tried it yet with skipping the ch1 spaces in between the granny clusters, but I did think about it. So far, pulling tightly has worked, but I've had to give it a few tries.
TIP 6: Don't expect perfection
Look - I'm not going to dance around this. There are imperfections in the yarn. Most of the time, the spotting from other colors didn't bother me, personally. But I did have one situation pop up early on where the color inconsistency was confusing around what was supposed to be a color change. I went up to a loose 6mm to try to work through it, but I couldn't really tell what the intended end was supposed to be. In the end, I still got it to work relatively cleanly.
The 2dcs and join to end the row help blend the color transition, so just be aware of that if your color change is not happening *as* perfectly as you'd like. Since your double crochets that end the round are working around the previous row's stitches, they help to hide some of the transition. Plus, I found the goal of this worked better with the stacked sc than the ch 3 - another reason I am a big advocate for that.
TIP 7: You should be having fun
Try not to be discouraged when it doesn't work right away, because it won't. But if you are not finding the process of experimenting with the yarn fun, then just put it down. Maybe take a break and come back to it later if you just need to mentally reset, but this comes back to knowing yourself as a crafter if you want to give it another go.
Final Thoughts: I'd continue to use this. Right now I only have two skeins for practicing, but I could see myself getting some more to make a bigger project. And I could see the tiny wins of getting the color change aligned being a motivator for me, rather than a deterrent.
However, you will be "locked in", so to speak. The yarn was designed for one pattern, one sequence, and as cool as that is, it's also limiting. This isn't going to be a versatile yarn. More than anything, the process tickles the part of my brain that wants to succeed over a challenge, less so the creative part. And sometimes, that's ok. I know myself well enough as a crafter to know what WIP I need to pick up. Right now, I am having fun, and I'm planning to keep playing with it.
If anyone has additional tips and tricks, I'd love to hear them, and good luck if you're taking a go with this yarn.
I hope this was even a little bit helpful. Thanks for reading if you've made it this far :)
By the way, this colorway is called "Black Dove" and the second one I ordered was "Cyber Leaf" which is blacks and greens. Excited to keep working them both up.
#crochet#crocheting#crochetblr#yarnblr#red heart all in one granny#granny square#crochet tips#yarnspirations#red heart yarn#yarn crafts#long post
25 notes
·
View notes
Text
AY CROCHET FRIENDS
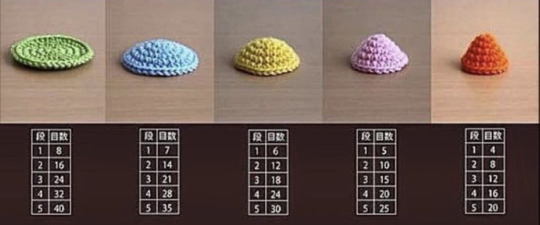
(Explanation: basically it’s telling you how many single crochets to put in a magic ring, and what the shape will be if you increase it)
14 notes
·
View notes
Text
I want to crochet a blanket soooo bad but I always give up or forget to work on it partway through
If you've successfully completed a blanket/big project I beg of you give me tips
33 notes
·
View notes
Text
Oh hey. Crochet people! You don't have to do a magic circle or chain 4 and slip stitch, you can literally just treat the first chain as a circle and do stitches into it!!! Then pull on the tail to tighten it!!!!!
To do douvle crochets, chain 3, then use the first chain as the circle.
Actually Walks is here so I made a video showing how to do it. Brb in like 10mins while it uploads to Youtube....
...Okay it was longer than 10 minutes but anyways, here you go!
Someone tell me how I can rotate this video. It wasn't supposed to be sideways...
This video is also on the web archive! Feel free to download it. Apparently you can't link videos from there so they're playable from the dashboard...
youtube
[ID: A two minute video in portait mode, showing how to crochet a circle using a gold metal hook, and blue yarn against a black background, with flash on. White hands hold the string and hook, and demonstrate how to do three chains, followed by multiple double crochets, while the narrator says, interrupted at one point as a black and white kitten jumps up and obscures the hook and yarn with her face for a moment, then leaving one paw visible:
"--it might be a Short on YouTube but okay uh this is how you can skip doing a magic ring or chaining four and then going back! So put on a slip knot and then chain three, that's one, two, three, yarn over, and then use your very first chain as a thing and pull through --oops-- then do a double crochet like normal: yarn over.. and literally just keep doing this until you get all the way around--
"--oh, Saphire wants to join the party. And she's sticking her face under the camera, sticking her face in my-- tail in my face. hi.
"Sapphire she wants to know why we're not petting her… Then when you are all done, put the hook---if I can do it on camera--through the first stitch…which I'm failing at… Whatever, good enough.
"Do a slip stitch, now you have a circle, and then you just pull on the piece of yarn to tighten it, and now it's completely solid in the center and you can continue making your hat or whatever you're making and you don't have to do a magic circle or waste yarn chaining four and then slip stitching and then having a giant hole in the center, and it is so much easier! Why doesn't everybody do this?! All righty, that's it, bye-bye!"
End ID.]
14 notes
·
View notes
Text
For beginners of crocheting. If u struggle with tension of the yarn, because u crochet to loose or thight. Either go a size up in needle or down. When u get good with tension in that, use the right size for the yarn and see how u do.
Remember getting good at using the right tension is hard and will take a good while. Keep on crocheting. Over time u will be able to keep the tension easily. Without much thought. Y'all can learn it. Give it time.
6 notes
·
View notes
Text
Here is super mega crochet tip: you can make fingerless gloves OUT OF ANYTHING
It's not this super mega complex thing all you need to do is do 4 granny squares and 2 ribbings.
14 notes
·
View notes
Note
Hey, not a mota fan, but any crochet info you wanna drop is awesome too!?
I saw this post on instagram a week ago, and I'm still not sure if I'm mad or turned on:
instagram
Also, STRETCH YOUR DAMN HANDS
3 notes
·
View notes
Text
Trying out a weekly series where I show off a different stitch each Saturday (and how to do it!). This week is the V-stitch!
52 notes
·
View notes
Note
ooh you crochet?? Pls drop beginner tips/any helpful tutorials you used 😭 I have a whole crochet kit and yarn but I keep losing the motivation to start bc it’s so daunting 💔
hi!! okay so here's how i got into crochet:
i started off by making a little square of all the stitches, and found a tutorial like this one on youtube. personally, i kept the square just for reference, but you can always unravel it once you're sure you've got the hang of the stitches
i wouldn't start off with a big project at first. when i started, my beginner kit had small amounts of yarn in many different colours, so i made small pouches and such for coins / lip balm and that kind of thing. like you said, it's pretty daunting to start off, and you wouldn't want to end up with an unfinished project that you lost motivation for!
i suggest knowing what kind of yarn you need to use. for many clothing items, use yarn with high cotton content bc it's more comfortable! wool is good too if you want it to keep you warm :D usually, if you're making fluffy amigurumi plushies, you'll use a fluffy yarn
also, the size of the hook will change the tightness of your stitches, the size, and how it ends up looking! typically yarn will have a suggested hook size, and you can find a chart to convert the "knitting tension" thingy to crochet hook size (the store i got my yarn from had one) but after a while i kind of just wing it
you can also adjust the hook size up or down half a size without much consequence if you want to (just makes your work look the way you want it to; looser or tighter respectively)
for amigurumi i have this trick for changing yarn colours smoothly, and for turning stitches i have this trick
for channels that i think are good, i have mahumcrochets, emmapcrochet, kirrilalia, and crafter_frog
and as a final tip, here is the adhd tip i saw online, and although i don't have adhd i can second it. don't try to do a huge project with granny squares unless you're certain you will make 100 of them 😭 i have never made a granny square in my 9 months of crocheting and it has never set me back!
10 notes
·
View notes
Text
Crochet Tips (for both n00bs and experts)
Don't spend money on crochet patterns. Don't. Do it. Actually you can if you want to, but there are billions of free patterns online, so if budget is tight use those.
If you are making anything that's going to come into contact with heat, NEVER EVER use acrylic yarn. Save acrylic for tote bags and wall hangings or some crap idk
Also never use acrylic for clothing unless it's a premium-certified brand. Many people are allergic to acrylic. If crocheting for someone else, it's best to stick to cotton, rayon, alpaca, or tensil since these are all hypoallergenic. Be careful with acrylic yarn blends.
If your hands hurt, STOP. You will give yourself tendonitis if you overwork yourself.
Start small. You have to work up stamina for big projects like afghans.
When blocking your piece (which you should do for any project that requires a lot of sewing), always use rust-proof T-pins!
DO NOT IRON ACRYLIC YARN.
If you keep having to frog the piece, chances are it's the pattern, not you. Always make sure patterns are professionally done or you'll waste a lot of yarn.
Clearance aisle is your best friend. Always.
You only really need a crochet hook, scissors, a tape measure, and a yarn needle. The rest is extra but can come in handy.
Keep all ball bands!! These have super fun free patterns on them and contain vital washing instructions for your piece!
Even if you can wash the yarn in the machine, put the piece in a bra bag so it doesn't snag on other things.
No baby item should be made with acrylic (as in, items that will be touching baby directly). Use cotton, nylon, polyester, idc.
You can do a lot more than you think with the basic 6 hook motions.
Don't build a yarn stash. Y'all are going to do it anyway.
More to come.
160 notes
·
View notes
Text
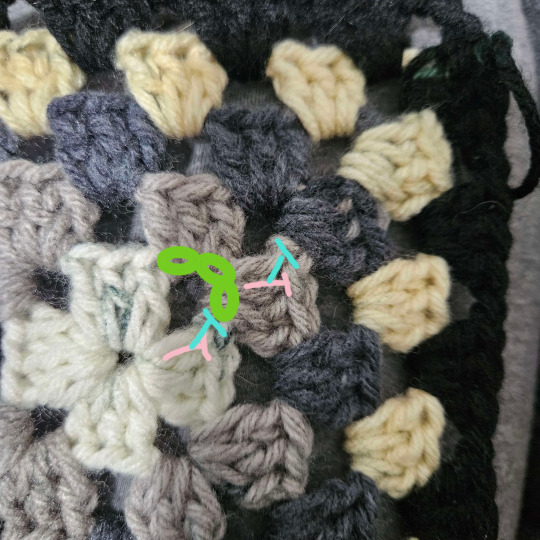
Something that really does help in crochet (at least, I think) is learning the anatomy of a stitch and how that corresponds to each part of the steps to create it.
I've found that it's been so much easier to memorize the steps in a stitch when I have learned, "alright, I am making the post of the stitch with these steps, and this last step will make the top loops!" because then I know exactly how the stitch is made and how it looks.
I have found that exploring exactly what goes into the stitches I make makes it easier to replicate and perfect it. I hope this might make the process easier for beginners, too
35 notes
·
View notes
Text
youtube
How To Unravel Thrifted Sweaters For Luxurious Yarn On A Budget!
10 notes
·
View notes
Text
amigarumi videos
Courtesy of u/Evil_twin13 in r/crochet
I'm going through my saves and trying to log all of the cute patterns I found when I came across this comment I thought would be helpful
"I just want to share all these videos that I wish I knew about when starting amigurumi how to invisible increase and decrease https://youtu.be/_QnlGSRFO2s
Seamless Join https://youtu.be/U10XSOkax6c
How to close a amigurumi ball the right way https://youtu.be/xUEzabLQnhE
how to make perfect stripes https://youtu.be/hetvd3B0IPY
the magic ring or loop https://youtu.be/3FiT0Gfr6XI
which side of amigurumi is the right side https://youtu.be/i3Pu83sXk6Q
how to avoid your amigurumi leaning https://youtu.be/D5lvlsNRVnc
how to crochet better color changes for amigurumi https://youtu.be/Tzw51YofHFw
how to sew on eyes (I use this method for also sewing on appliques) https://youtu.be/Gai4VyKEmV8
how to close a magic circle permanently https://youtu.be/5ZQv-dH6htE
Magic circle with velvet/chenille yarn https://youtu.be/seUyqlQqAmg
General rule for amigurumi is to go down one hook size from the recommended hook size of the yarn. Unless you have really loose tension then go down more.
Planetjune is good for amigurumi how to videos https://youtube.com/user/planetjune
Staggering your decreases and increases will help prevent that line from being on your amigurumi. For some reason most patterns do not do this so you will end up with a line. http://www.withlovefeli.com/2017/03/basics-staggering-your-circle/"
Again, thank you u/Evil_twin13 for the comment
#Crochet#Crochetblr#Reddit#amigarumi#Amigarumiblr#Amigarumi tips#Crochet tips#Crochet help#Amigarumi help
19 notes
·
View notes
Text


It's towards the middle of May, but let's talk Fall/Winter wear because it's never too late to get a jump start on things!
Some people shop for cozy things all year long because they're the types to sit around in areas where the air conditioner is blasting or they're someone who gets excited for Christmas in July --
Or, they're somebody like me who lives in the Northeast and by the end of July we've already got Pumpkin Spice and Everything Nice flooding our craft stores and so on. 🤷🏽♀️
Whatever the case may be, it's never too late to work on some cozy things. My go to have always been hats -- why? Because they were the first things I ever learned to crochet when I was learning how to crochet.
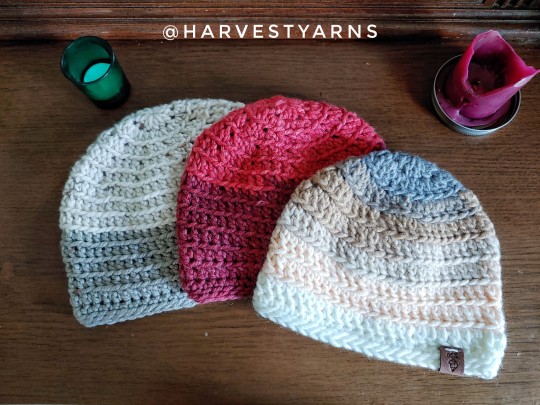
There are two styles of hats that seem to be popular, but of course there is space for variations of them. One seems to be crocheting in the round to give you a beanie styled hat and the other gives off that knitted look and is crocheted straight and then seamed/shaped after you've gotten all the rows in.
Those are my favorite style hats and what you can see in the above pictures. In previous years I've worked with bulky yarn to make these sorts of hats, but lately I like stocking up on my weight 4 yarn and holding two strands of that weight yarn to create my own bulky yarn. Why? I can get different color variations and styles if I want to, but also because I work more with making Amigurumi and not wearables -- meaning I've always got a bunch of weight 4 yarns on hand.
All my hats I make in adult sizes, but you can find video tutorials or even blogs/websites that offer you all the information you'll need on creating hats of all sizes.
I usually use between an 8mm or 9mm crochet hook, a bulky style yarn (or I use two weight 4 yarns held together as I crochet), I chain between 30 to 32 chains and then I crochet for about 33/34 rows of HDC (half-double crochet) stitches before I seam up the hat. I also like to make sure I end my hat on the opposite end of where the yarn tail hangs from when I made the first stitch in my foundation chain. That way when I seam up the hat I can cinch the top and then tie two to three knots with the yarn tail that hangs from where I started.
And sometimes I like to go further by adding a pompom and/or a label. It's really entirely up to you or a customer if you're making hats that are available for purchase.
A tip to offer if you plan on selling is to always have some neutral colors available. People always like blacks, browns, whites, and grays because they go with everything they own or because busy colors could be distracting to them or others in their social circles. Don't be afraid to add in some light pinks or even light blues, there's a whole crowd out there that's into those pastel colors.
And don't forget the beanie crowd. I did mention I do make these style hats as well. They are super quick to whip up, especially if you're using bulky yarn.
I tend to like to use a weight 5 yarn to make beanies, but I've been known to make a few bulky ones for the winter. I also know cotton yarn or a cotton blend is a great option if you're making a beanie for the summer time.

And last, but not least -- sets. Some people like a good hat and scarf set whether for themselves, their loved ones, or to purchase as a gift.
This hat and scarf set was made with two different brands of yarn. They both are a light gray, but one had strips of metallic in it to make it glisten/sparkle a bit and the shade of gray was not exactly the same as the other. It started out as just being enough for a hat, but then I realized I had some more yarn on hand and decided to make a matching scarf. I also had one pompom left so I attached it to this hat and then used one of the labels I had to attach to what is the front of the scarf.
The possibilities are endless and different stitches will give you different results. Also, if you use a smaller weight yarn and double it up the color combinations are endless.
I always like to work with hdc when making things you can wear because the holes you find in crochet are much smaller and it feels like a tighter stitch using that stitch. At the same time if you want things to have more of a flow or you want that lacey type of feel you can use something like DC (Double Crochet).
Anyway, that's enough hat talk for right now. Christmas in July is right around the corner and if you're from the Northeast like I am or you're somewhere out there in the world that feels cold air during parts of the year if not most of the year, you might want to get a jump start on making things as holiday gifts, for yourself, or for your craft shows/small businesses.
Happy Crocheting!
----------
Please share this post to support a Fiber Artist, but also to inspire yourself as well as others! 🙂🧶
----------
----------
HARVEST YARNS
youtube | ko-fi | etsy | instagram | twitter | facebook
#crochet#fiber art#yarn#yarn addict#crochet hat#fall vibes#winter vibes#i love yarn#crochet addict#fall season#winter season#i love fall#i love winter#crochet fashion#crochet style#crochet tips
14 notes
·
View notes
Last Seen Blogs

staringamassivemistakeintheface
A person that exists

andrej151284-blog
Unbetitelt

enterinfinity
The adventures of Infinity11
jubilationsleee
Untitled
outofgloom
outofgloom