#currently making a reshade preset for the game
Explore tagged Tumblr posts
Visit Tumblr Blog
Explore Tumblr blogs with no restrictions, modern design and the best experience.
Last Seen Tumblr Blogs


Fun Fact
Tumblr was acquired by Yahoo for $1.1B in 2013.
Text

6 notes
·
View notes
Text
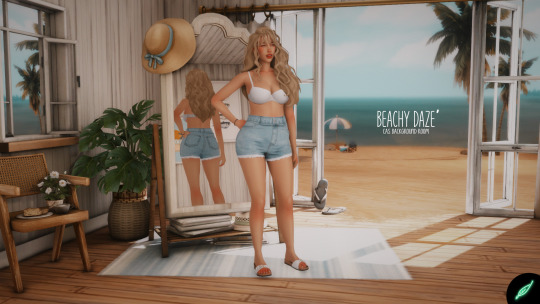
🌴~beachy daze'~ CAS background room (with mirror!)🌴
something a little beachy for the late summer vibes :)
-
BEACHY DAZE' CAS ROOM:
♥ Download the package file and put it right in your Mods folder! (up to 5 folders deep)
♥ You can only have one CAS background/room in your game at once, remove any other before putting this in!
♥ Reflections need to be set to low, medium, or high but not OFF in your game's graphics settings for the mirror to be functional.
♥ Base Game Compatible!
♥ DX11 and DX9 compatible!
-
Follow me on twitch!
Support me on patreon!
⇢ download on sim file share! ⇠
WATCH MY TUTORIAL ON HOW TO MAKE YOUR OWN HERE!
♥ built using littledica's original CAS room files ♥
♥ simlish fonts: just sign here by @franzillasims ♥
♥ rug (non cc) from ruggable ♥
♥ 2t4 Nanu's selle living flower converted by @msteasims ♥
♥ chair, books, mirror stand, windows on the right meshes by @MXIMS ♥
♥ flipflop mesh by Remie07 ♥
♥ toast mesh by getdeadentertainment ♥
stuff I'm using here: reshade | cas lighting | (I'm wcif friendly if you want anything on the sim!)
use my code "THATONEGREENLEAF" when you buy packs in the EA app to directly support me! ♥ (not a discount code, I wish!)
I DO CUSTOM CAS ROOM (and other) COMMISSIONS! fill out my commission form ♥ (coms currently closed)
TOU: do not claim my cc/CAS rooms/presets as your own! recolour/convert/otherwise alter for personal use OR upload with credit. (no paywalls, no c*rseforge)
#sims 4#ts4#sims4#thesims4#maxis match#maxis mix#s4cc#sims 4 cc#sims 4 custom content#my cc#cas background#sims 4 cas#cas room#ts4 cas background
1K notes
·
View notes
Text

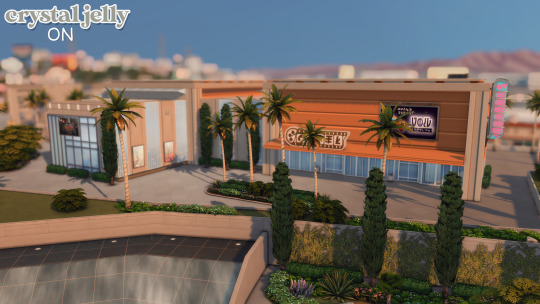


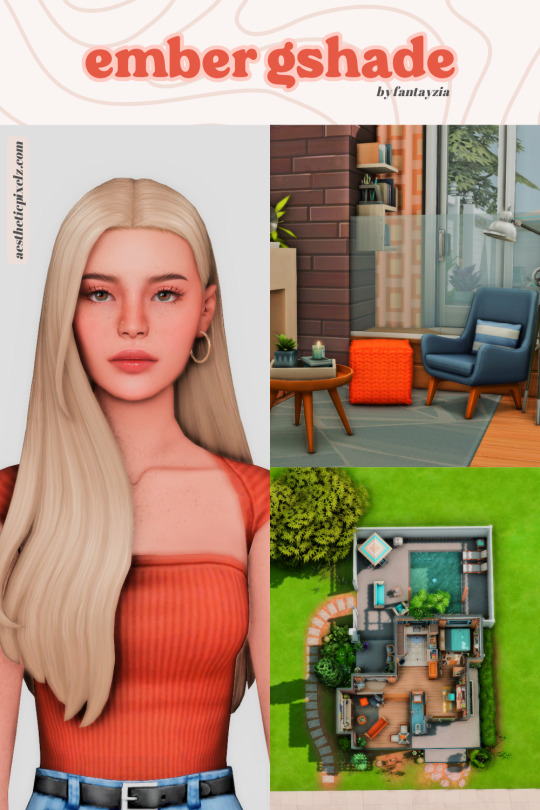
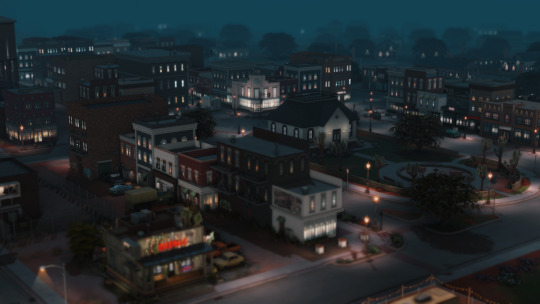
i've been itching for a new preset that was a bit pastel and bright, and i made my current one called crystal jelly! i've been asked when will i release it to the public, and now the time is finally here.
thank you to the testers who helped me out!
watch my showcase of this gshade preset here
this is a gameplay friendly preset so it shouldn't be too hard on your computer while playing.
♡ IMPORTANT INFO ♡
highly recommend downloading milk thistle by softerhaze so your game looks similar to these screenshots!
i recommend these lighting mods as well: set 01 - studio, no blu v2, no glo v2
check out my tutorial on how to install gshade & lighting mods here
this preset should also work on reshade
make sure to turn off edge smoothing so mxao & adof work properly
if you want smoother gameplay, turn off all mxao & adof
MXAO toggle: ctrl + 4 // 2nd MXAO toggle: F8 // ADOF toggle: shift + 4
♡ DOWNLOAD: PATREON / SFS (FREE) ♡
TOU: please don’t reupload and claim as your own
#the sims 4#sims 4#ts4#gshade#gshade preset#reshade#reshade preset#sims 4 preset#sims 4 gshade preset#sims 4 gshade#sims 4 reshade
139 notes
·
View notes
Text
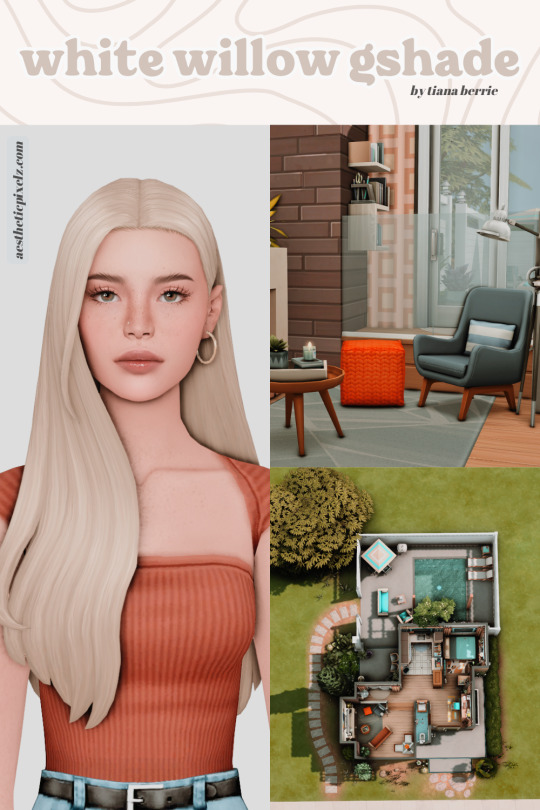
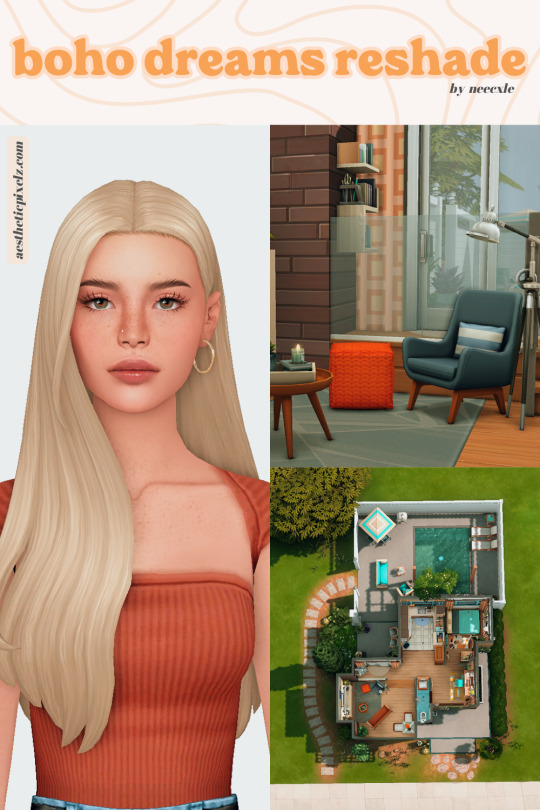


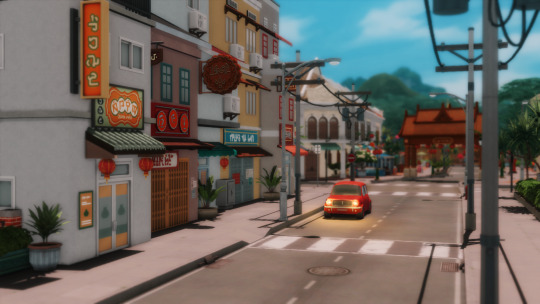
✨best sims 4 reshade & gshade presets pt 1✨
Shaders are such a personal preference. What you’ll like in your game is totally dependent on your aesthetic, but there are SO many out there to choose from.
It’s honestly overwhelming to find the one that matches your personal style😫
To make it easier, I’ve gathered a list of the current best reshade & gshade presets for all different aesthetics.
You can find the links to these presets⤑ here
I’ve used the same sim, room, and house for all of the pictures to give you an accurate depiction of how these presets compare to each other.
💕thanks so so much to the wonderful creators of these presets @tianaberrie, @neecxle, @lisatrait, @misslollypopsims, @fantayziamaxismatch, @simdriella !
#sims#sims 4#sims4cc#ts4#ts4ccfinds#sims 4 cc#ts4 custom content#sims lookbook#simblr#sims 4 reshade#sims 4 gshade#gshade#sims4#reshade#sims 4 lighting#sims 4 aesthetic#aesthetic sims#ts4 screenshots#ts4 cas
1K notes
·
View notes
Text

Hey! I'm Amanda | Not WCIF | 18+ (Sometimes NSFW)
Find me on YouTube: Here Main series on YouTube: The Aspiring Artist | Rotational Gameplay All posts related to The Aspiring Artist can be found here. Casual gameplay posts on my blog are separate from the storyline on YouTube. All of my Sims 4 posts | All of my reblogs | Other nsfw posts CAS Mods Cas background | Cas lighting (Studio flat) | Controlled Position Mod | More Cas Columns (6 columns) Game Lighting Mods In-Game Lighting (Dark) | Sunblind Gshade/Reshade I make my own Gshade presets. They are not available for download. However, here are some that I would recommend if you are looking for a preset: Boho dreams (Neecxle) | Birdie (Sforzinda) | Lithium (Gunthermunch) | Luminescent (HazelMine) | Raices (Folkbreeze) | Almond (Glimersims) | Kaleidoscope (Okruee) | White Willow (Tianaberrie) | Serenity (Misslollypopsims) | Neapolitan (Midsummermoon) Photo Resources I use SRWE for a lot of my screenshots. I take some of them on a higher resolution monitor without hotsampling. I use Krita for photo editing and sometimes Canva. I usually crop my photos and resize them for faster uploading. Check out this tutorial if you're new to hotsampling. Check out this FAQ for help with understanding reshade. Video Resources I use OBS to record my videos and Filmora to edit. I also recommend Davinci for a free editing alternative. I use this mic for narrated episodes. Essential Gameplay Mods I don't use a lot of mods because I strongly dislike updating them. But these are the ones that I consider essential for my game: Basemental Drugs (21+) | Wicked Whims (18+) | MCCC I do have other gameplay mods installed, but I don't consider most of them to be necessities. MCCC and WW handle nearly all of the background "tuning" in my game. Other Mods The other mods I have installed: UI Cheats Extension | RPO (I only use modules 1, 7, and 14) | Somnik and Severinka Custom Foods | Control Any Sim | No Zzz | No Music Notes | Hidden Highlight | Tool | No Romantic Satisfaction Decay | Seasons Tuner | Kiss and Grind Defaults/Overrides My current default skin can be found here , default eyes here, default feet here, and default teeth here. I mostly use these skintones. Default phone | Default phone two | Default phone three | Toothbrush | Headphones | Male animation replacer (18+) | Terrain override I don't use custom loading screens, menu/map overrides etc. Some Commonly Used CC I use a lot of eyes from these creators found here and here. I typically use skins, skin details, and other genetics from these creators found here, here, and here.
149 notes
·
View notes
Text
INSTALLING// GShade + ReLight for The Sims 4
I've been getting a lotta asks about how I got the up to date GShade working with ReLight ( ALPHA ), so here's a mostly quick tutorial, that will hopefully get it working properly for you too!
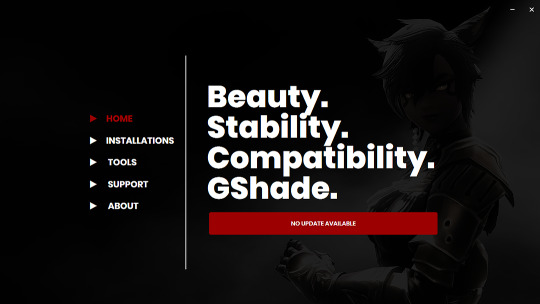
Firstly, download and install GShade, unless you've already got it installed, then just be sure it's up to date.
Click, or right click pics below and open in a new window to see them in more detail.
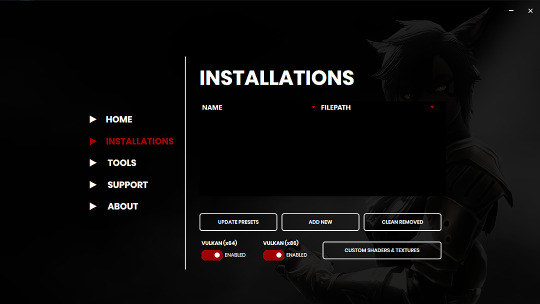
Now I don't currently have it installed into any of my games, bc I mainly use Reshade 2, so if you need to know how to do that, you're in luck! I'll walk you through it.
Click Add New.
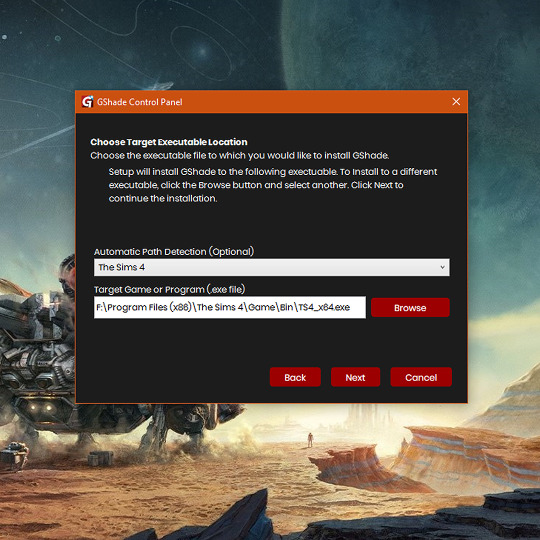
Then locate your TS4_x64.exe, except if you're fully updated, in which you'll need to locate your TS4_DX9_x64.exe, but only if you plan to opt out of using DX11, then click Next.
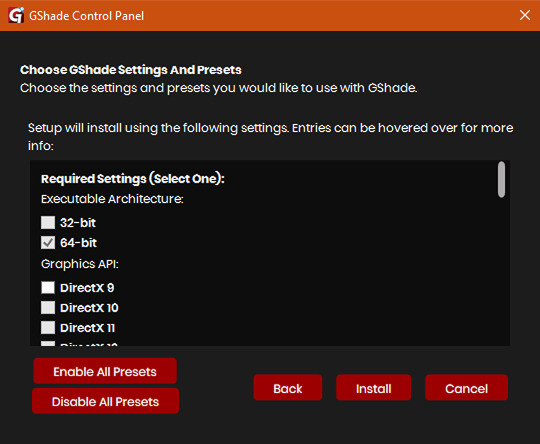
This will open another window with a bunch of ticked boxes, and tbh I didn't mess with any of these. Many them are greyed out anyway, and it all works fine for me.
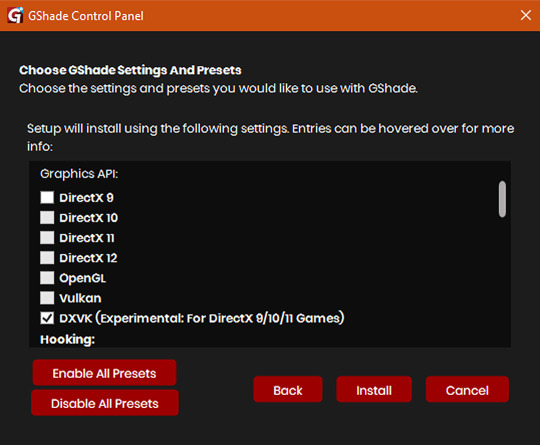
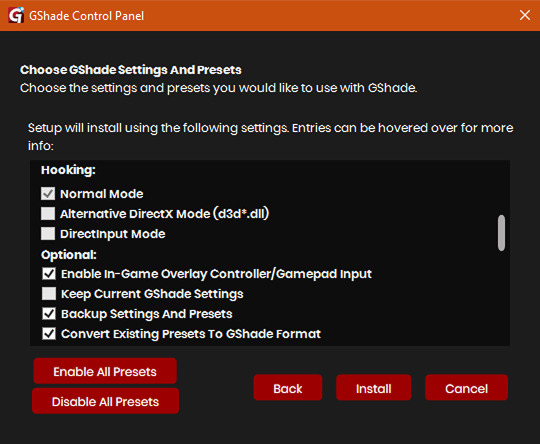
So if yours look like this, then you should be fine too.
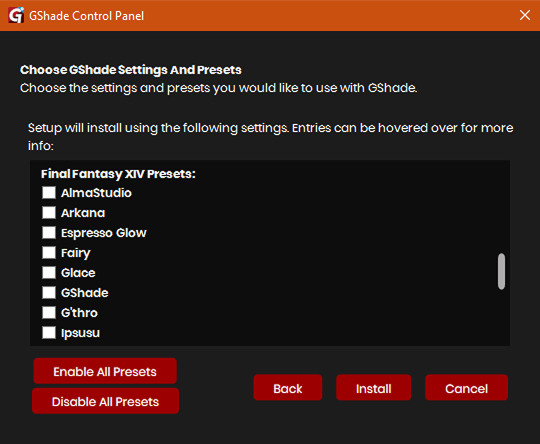
Lastly, at the bottom you can preload some presets if you like, but it's purely up to you. They aren't required.
When done, click Install.
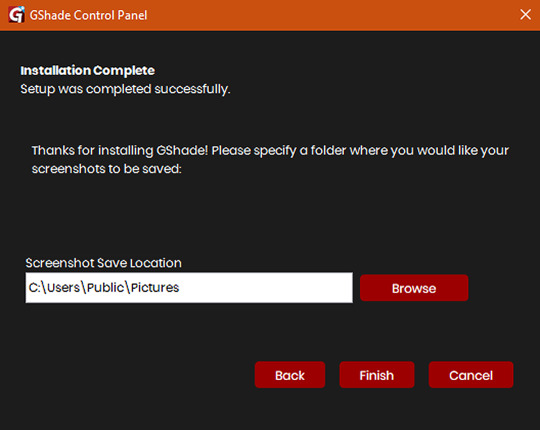
There will be another window that asks you where you'd like to save your pictures. Once again, this is purely up to you, click Browse to locate your preferred folder, or if you use programs like Nvidia for screenshots, just ignore it, and click Finish. Then when it asks if you're okay with the chosen location, click Yes.
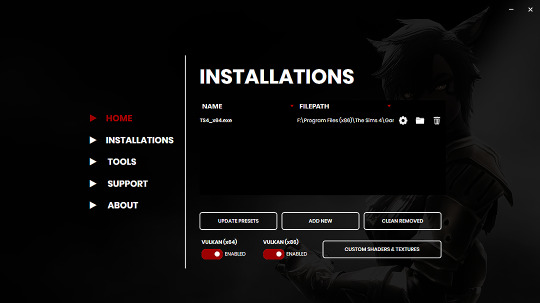
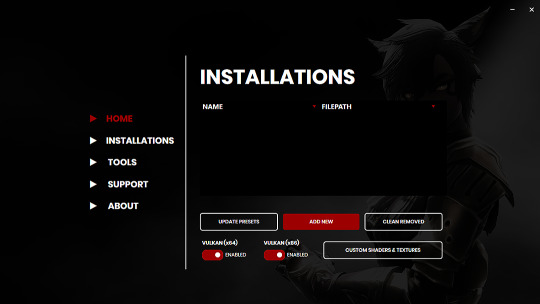
Once you've finished, TS4_x64.exe should show up in the Installations tab of your GShade installer, which means you're part way there! Now, click on the Custom Shaders & Textures button at the bottom, this will open the folder where you need to install ReLight.
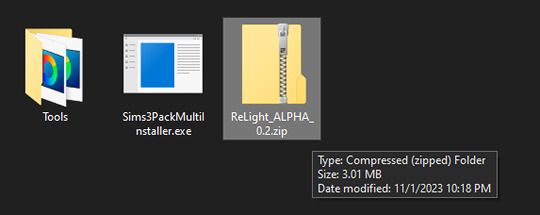
Locate your ReLight_ALPHA_0.2 download. Mine was in my Downloads folder. Double click it, or unzip it, and you'll find a couple folders inside it.
Click or right click pics below and open in a new tab for more detail.
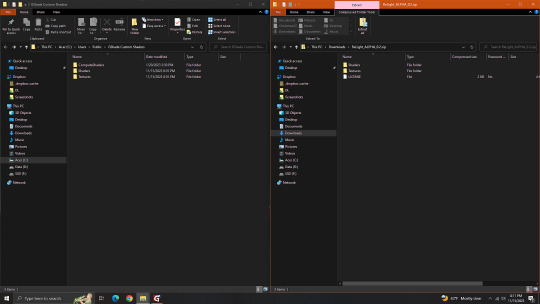
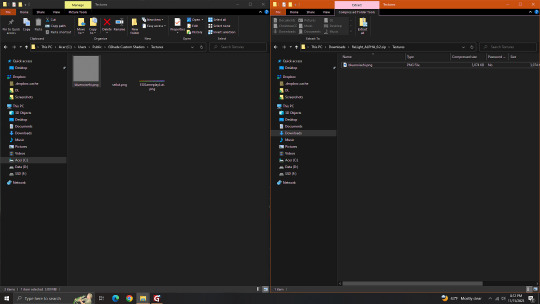
Here's a side by side comparison of the GShade Custom Shaders folder we just opened, and the ReLight_ALPHA_0.2 folder we unzipped and opened, so you can see how there are two identically named folders. The goal is to put whatever is in the Shaders folder of the ReLight folder, into the Shaders folder of the Custom Shaders folder, and then repeat this process again for both Textures folders, until they end up looking like this...
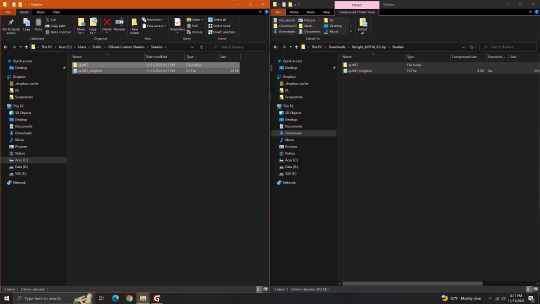
In conclusion, your GShade Custom Shaders > SHADERS folder should have these two files in it...
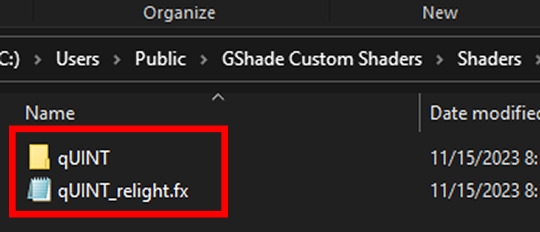
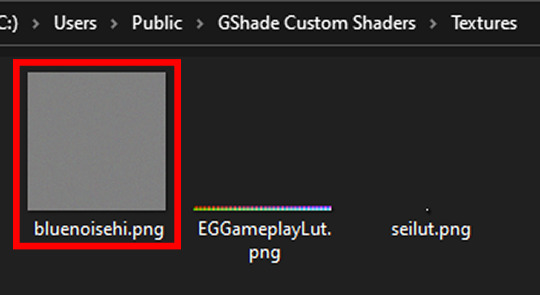
While your GShade Custom Shaders > TEXTURES folder should have this .png in it...
Good? Now let's turn on The Sims 4.
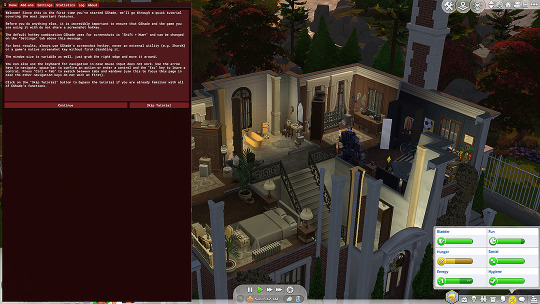
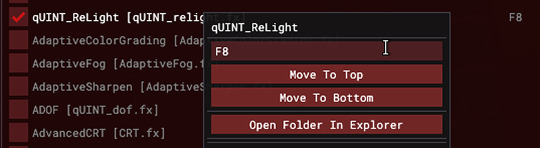
When you've opened you game, load your save ( idkw, but the GShade UI won't open in the menu screen ), then hit Shift + Backspace on your keyboard to open up the GShade UI. You can choose to go through the tutorial, or skip it. Either way just keep clicking continue or OK until you get to the Home panel. Now, I've got a preset already, if you've got one too, good, activate it, if you don't there should be like a default one you can use until you create one or get one. Main goal at this moment is to find ReLight in the list of shaders, and activate it so we know it works. Tick the Performance Mode box at the bottom, and scroll down 'til you find this...

This list should be alphabetized so just scroll down to the Q's, then tick the box beside it. Then click Active to Top, and scroll back to it. One thing I would suggest is binding it to a key ( right click while hovering over it ), this will make it easier to find if you lose it again, since clicking Active to Top also recalls any shaders that are bound, even if their box isn't ticked ( isn't active ).

I've bound mine to F8, but it's up to you what you wanna use, I only suggest it be F6 or above, since The Sims 4 already uses F1-F5 I believe.
Oh, and whenever you're done messing around with it, be sure to untick Performance Mode, so your computer won't beat your ass.
536 notes
·
View notes
Text
Had some fun with Reshade in Sims 2
So I'm deciding to share it! Introducing...
CinemaSim2 Reshade Presets
The Game already looks great with radiance lighting (I'm still developing my own version of it, currently on evening lighting), but I decided to throw in reshade in the mix, and the game is looking gorgeous!
UI is still affected because sims 2 (unlike sims 3 and 4) cannot exclude UI from the Reshade shader influence, however I've tried to keep the readability of the UI as intact as possible.
Here are some lovely screenshots:


Prerequisites:
Any working Reshade version (this is tested on 6.2, 6.3 and 6.4).
Specific 6.2 Reshade Shader files, it won't work correctly without these (you can also get them here).
Keep reading to download...
I've made multiple presets, each much more complex than the previous. Get them from the list below.
Regular Presets included are:
Very Low
Low
Medium
High
Very high
Experimental (significant FPS drop for minor, and sometimes buggy features) Presets included are:
Ultra (includes some edge value based reflections).
Extreme (includes depth angle based Screen Space Reflections).
What is included in these presets:
AO, multiple layers of these (some are disabled on lower end presets).
DOF, for close and far distances (disabled on lower end presets).
Chromatic Abberation, for some added realistic camera lense effect, not too distracting, very delicate.
HDR, and balanced Bloom in one single technique, so that lights, emission shaders and scene colors can POP, adds glow to really bright spots. (disabled on Very Low preset).
Bump Map effect based on texture contrast (disabled on lower end presets).
Reflective Bump mapping which adds reflections to the edges of the objects affected by the bump map (disabled on all presets except for experimental ones).
SSR with 'raytracing' (yes, it actually looks like planar reflections and reflects everything, even moving objects, albeit it's not really accurate at all, but looks cool). (disabled on all presets, except for Extreme one).
Adaptation techniques to always keep values in check (never too bright or too dark. Some are disabled on Very Low preset).
Distance Fog techniques to make the world feel more real, closer to sims 3/4.
58 notes
·
View notes
Text
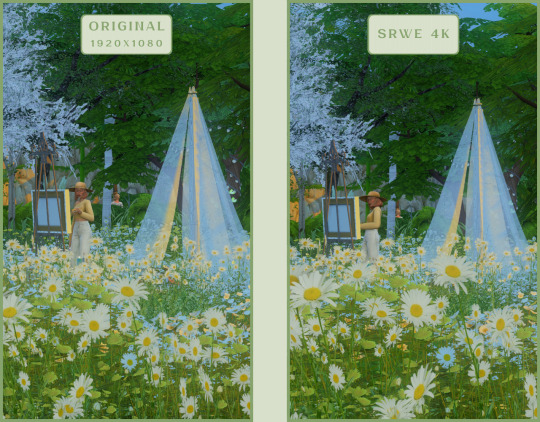
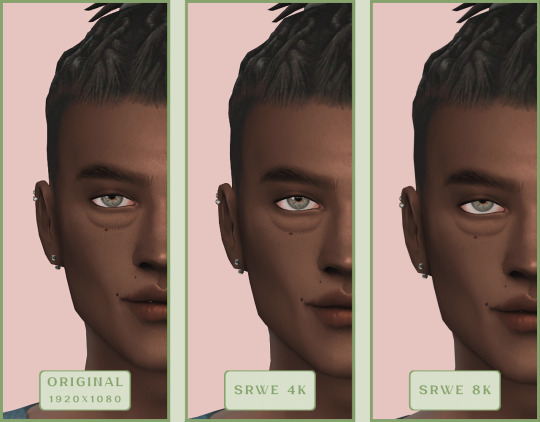
SRWE or AI? Best Ways to Upscale Sims 4 Screenshots
Are you also tired of seeing social media mercilessly crush your The Sims 4 screenshots? We’ve tried every trick in the book to keep our pics crisp – SRWE, AI upscalers, you name it – and now we’re ready to break down how to save your favorite sim’s photos from pixelation, quick and easy. In this article, we’ll explain (no tech jargon, promise!) what actually works, plus share our hands-on experience and top tips.
Your upscaling method depends heavily on the source image and the look you’re going for. We all have different ideas of what makes a sims beautiful – some love natural textures, even slight skin imperfections, while others prefer flawlessly smooth, hyper-sharp results.
We’ve tested different upscaling tools to help boost your screenshot quality. But to find your perfect match – the one that makes your shots look just right (by your standards!) – we recommend trying a few yourself.
You can enhance screenshots both before and after saving them! We’ve covered both approaches, so pick whichever suits you best.
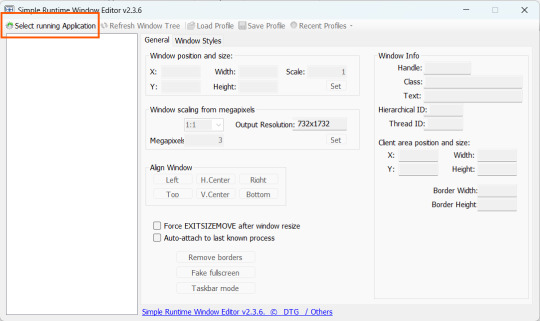
Before Saving the Screenshot: SRWE (Simple Runtime Window Editor)
This tool is well-known in The Sims 4 community – there are tons of YouTube tutorials covering it. When it comes to improving image quality before taking a screenshot, SRWE is one of the first solutions that comes to mind.
It works by bypassing Windows' DPI scaling, allowing you to capture screenshots at a higher resolution without blurring.
Pros:
— A fantastic tool: it delivers the exact same image but in much better quality.
— No conflicts with GShade/ReShade: your presets will look exactly as intended.
— Free and easy to install, no hidden costs or complicated setup.
— No post-processing needed, preserves original texture and UI quality.
— No extra plugins or presets required, works right out of the box.
— Great performance even on low-end PCs. If your computer can run GShade, SRWE will work just fine.
Cons:
— Limited functionality.
— Some users find SRWE a bit tricky to set up (though we personally disagree).
Now, let’s break down how to use it and what results to expect.
If you prefer a video guide, check out this link for a detailed walkthrough by Chii.
Step 1
First things first – you'll need to download the program itself. It's available for free on GitHub – you can grab it here.
There's no real benefit to getting the version with pre-configured profiles, so just download the standard version without profiles.
Step 2
Extract the files from the archive.
It doesn’t matter where you store them on your computer – it won’t affect how the program works.
Step 3
Now it’s time to launch the game and switch from fullscreen to windowed mode in the settings. You can also do this with the Alt+Enter shortcut.
Step 4
Set up your shot exactly how you want it. Open the location, pose your sims, apply any presets if needed. At this point, you can take a regular screenshot (for comparison) using your usual method.
Step 5
1. Go back to the SRWE folder.
There are only two files inside – one of them launches the program (no installation needed).

2. In the window that opens, select The Sims 4 from the list.
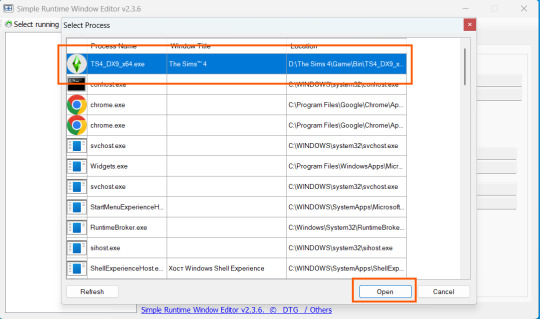
3. Check all the boxes.
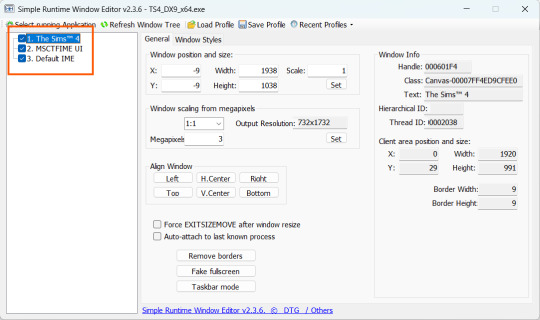
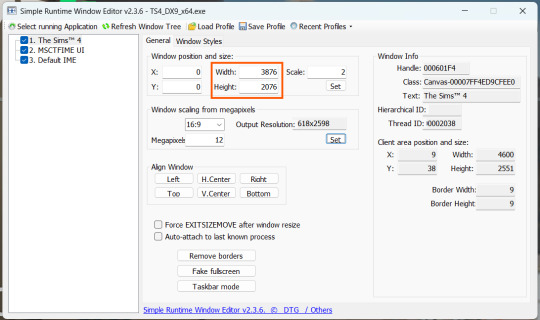
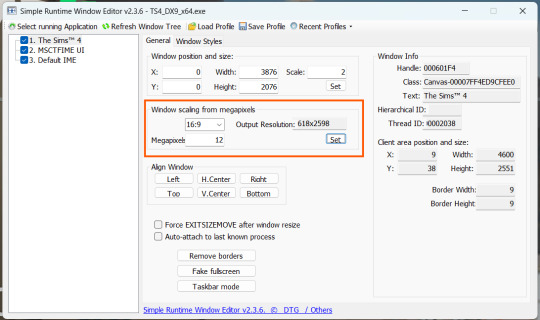
4. Image Size
You can set your screenshot size in a few different ways:
— The easiest method: Multiply your current resolution by the desired factor. For example, to upscale 1080p to 4K, multiply by 2. Tap Set.
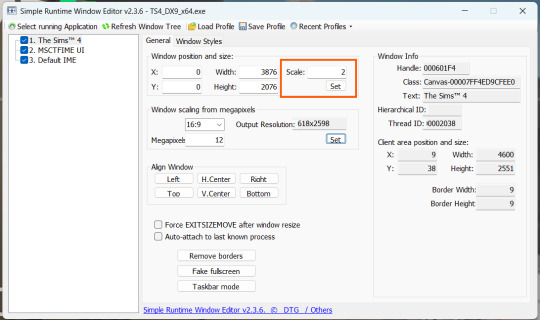
— Manual input: Enter your preferred pixel dimensions. Tap Set.
— Aspect ratio mode: Choose a format (1:1, 16:9, 4:3, etc.) and set your target megapixels. The program will automatically calculate the dimensions. Tap Set.
Honestly, you can experiment with any size. During our tests, even a weak PC handled an 8K screenshot without issues – though realistically, 4K is more than enough for most purposes.
Plus, if you're capturing in-game scenes (not just CAS), your screenshots will already be pretty large in file size. You probably won’t want them taking up even more space unnecessarily.
Step 6
Now when you return to the game, you'll notice the image has become significantly larger and no longer fits your screen resolution – you're only seeing a part of it.
Don't panic! Just wait for your preset to fully load (if you're using one), then take your screenshot as you normally would.
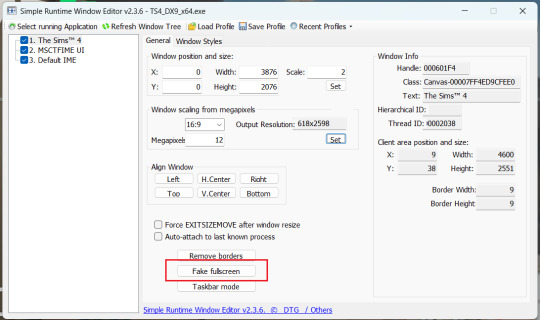
Step 7
Once you've captured your planned screenshot, head back to SRWE and click "Fake Fullscreen" to return to the original resolution.
Now let's compare our results.
Gameplay Scenes
CAS
For in-game screenshots, this method works much better if you have at least a moderately powerful PC. After upscaling, navigation can become tricky due to lag. That said, it's still completely doable since we've prepared our scene in advance.
Post-Processing Screenshots
We've tested several post-processing programs: two paid options and several free ones.
Let's start with the paid options – Topaz Gigapixel AI and Let's Enhance.
Topaz Gigapixel AI
A specialized tool from Topaz Labs designed specifically for AI-powered image upscaling.
It doesn’t include extra features like noise reduction or face correction, but it delivers more precise upscaling, which is especially useful for The Sims 4 screenshots.
Pros:
— Upscale up to 600% (6x) without losing detail.
— Preserves texture clarity (hair, clothing, patterns).
— Automatically restores lost details (e.g., small decor items).
— Supports batch processing (multiple screenshots at once).
Cons:
— $99 price tag.
— Requires a powerful PC for 4K upscaling.
— Limited functionality (just upscaling, no additional edits).
— Trial version doesn’t allow exports.
Example:

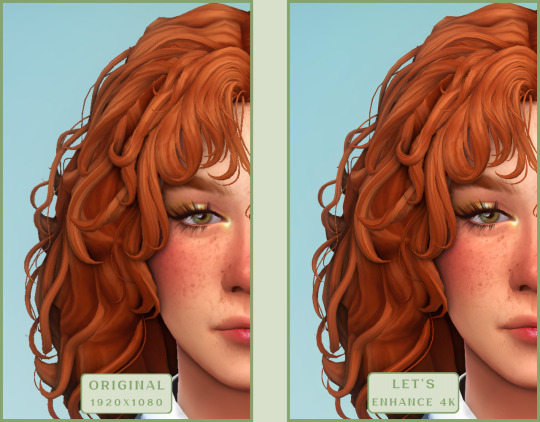
Let's Enhance
A convenient online AI-powered tool for enhancing screenshots. No downloads required – just head to https://letsenhance.io/boost and you're good to go.
Pros:
— Automatic upscaling up to 16K, boosts resolution without losing detail (hair and clothing textures become sharper).
— Dead simple to use: just upload your screenshot, pick a model, and download the result.
— AI doesn't just upscale, it subtly "beautifies" images too (though this is subjective, of course).
Cons:
— Free version limits you to 10 images/month (watermarked downloads; subscription starts at $9/month).
— Internet connection required (no offline mode).
We found these settings work best for Sims screenshots:
Now, let's see the results:
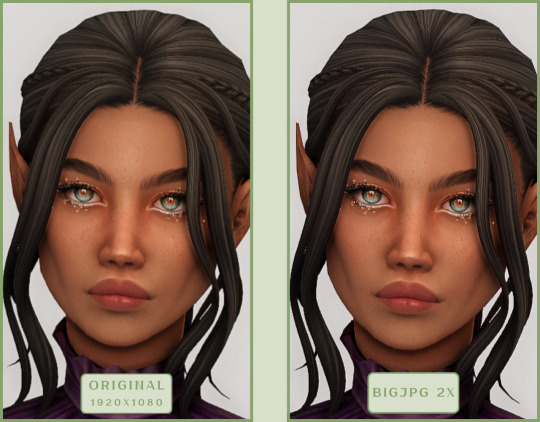
Free Upscaling Tools: Upscayl (with detailed usage guide), Bigjpg, and Waifu2x.
Bigjpg
A handy tool for basic image upscaling tasks, though the free version has limitations on processing speed and number of images.
Pros:
— Solid baseline results: boosts resolution effectively, making images noticeably sharper with genuine quality improvement.
— Free 2x/4x upscaling with watermark-free downloads.
Cons:
— Free version restricts image quantity, size, and processing speed.
— Lacks advanced parameter fine-tuning.
Our recommended settings combo:

The 4x upscale delivers noticeably weaker results.
Sample Bigjpg output:
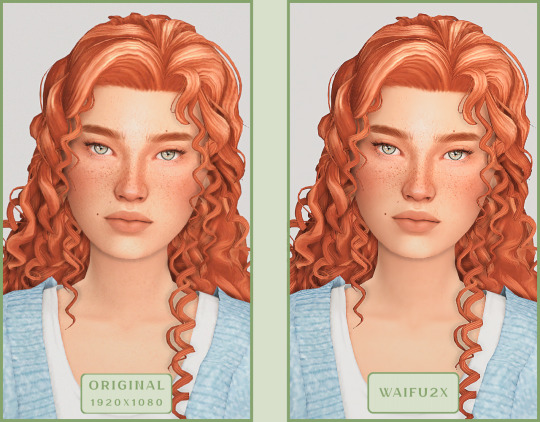
Waifu2x
A free neural network-based tool. Originally created for upscaling anime images, but works perfectly for The Sims 4 as well.
Pros:
— Upscales images 1.5x–2x without noticeable distortion.
— Preserves art style, doesn't turn pixel art into a "blurry mess" (unlike some other upscalers).
— Available in both online and offline versions.
— Offline version supports batch processing of screenshots.
— Free 2x upscaling with no watermarks.
— No powerful PC required.
Cons:
— Free online version has a 5MB file size limit.
— Maximum 2x scale (no higher options).
— Lacks advanced parameter tuning.
Our recommended settings:
Waifu2x results:
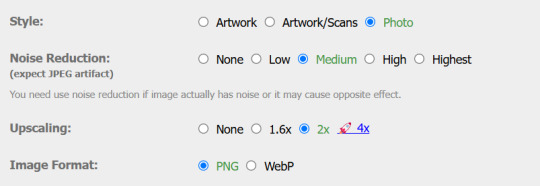
Upscayl
A free, open-source program that uses neural networks to upscale images without quality loss.
Pros:
— Upscales images without distortion.
— Enhances fine details.
— Supports multiple AI models for different screenshot styles.
— Offline version handles batch processing.
— Free 4x upscaling with no watermarks.
— Doesn't require a powerful PC for 2x upscaling.
— Works offline, no internet needed after installation.
Cons:
— Requires a powerful PC for 4x upscaling.
— Minimalist interface – fewer beginner-friendly guides.
— Lacks advanced parameter tuning.
Given Upscayl's minimalist interface and lack of detailed tutorials, we decided to provide a more thorough walkthrough.
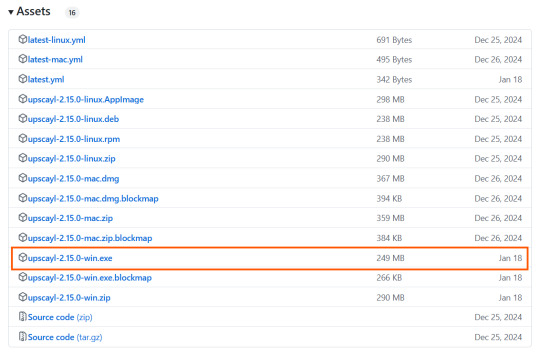
Step 1
First, download the program from its GitHub page. It's completely free and open-source.
Multiple versions are available – choose the one matching your system. For standard Windows, download the file highlighted in the screenshot below.
Step 2
Run the installer as administrator.
Install location doesn't matter – it won't affect performance. Select the destination folder. Click "Install".
Step 3
Upscayl includes several built-in AI models (good for testing), but we strongly recommend downloading custom models for better results:
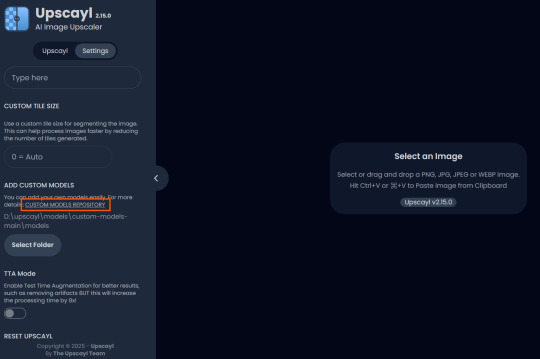
1. Download the custom models pack here (also accessible via Settings → Add Custom Models in-app).
2. Extract the archive.
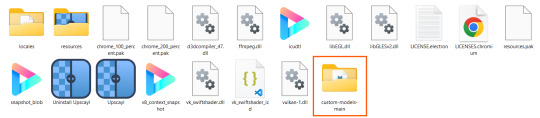
3. Navigate to custom-models-main → custom-models-main.
Move this folder to your Upscayl installation directory (optional: rename it).
Your Upscayl folder should now look like this:
4. Add Custom Models:
— Launch Upscayl.
— Go to Settings and click Select Folder.
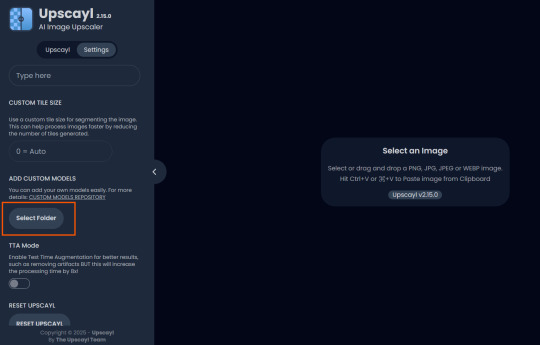
— Navigate to Upscayl → custom-models-main → models
Critical: The folder must be named "models" – don't rename it.
Step 4
Now that you have both the default and custom models loaded, it's time to start enhancing your screenshots.
1. Click Select Image or simply drag and drop your file into the processing area.
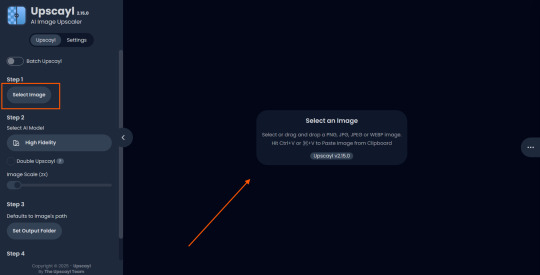
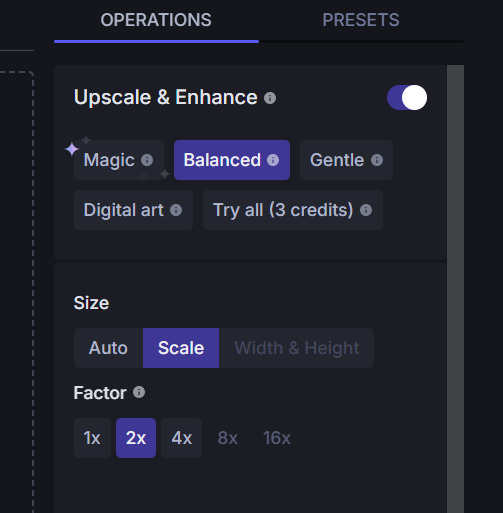
2. Choose Upscale Factor.
While Upscayl supports up to 16x magnification, it warns that anything above 5x may severely strain your system.
For optimal results, stick with 2x to 4x.
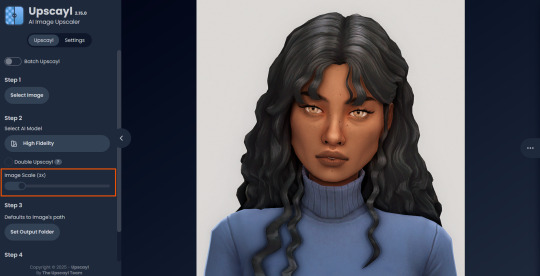
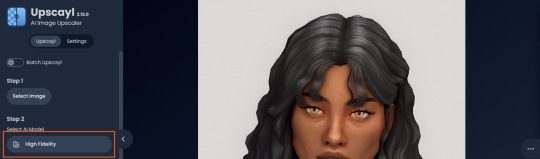
3. Select AI Model.
Click the Select AI Model dropdown: default models show before/after previews, custom models appear as a text list.
4. Experiment! Try different models on the same screenshot. Test various scales (2x, 3x, 4x) – sometimes better results come from modest scaling, while 4x might degrade quality.
For this demo, we'll use the first default model.
5. Click to begin enhancement.
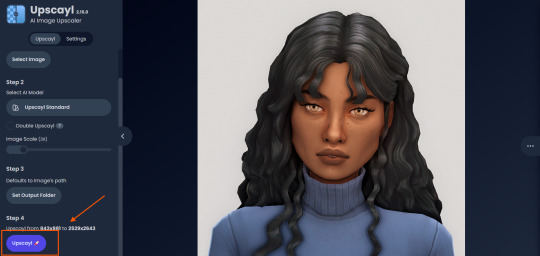
6. Processing time duration depends on original image quality, selected parameters and your PC's power (may complete quickly or take several minutes).
After processing, you'll see a clear side-by-side comparison of the changes.
7. Click the three-dot menu (⋮) for advanced viewing options.
Magnifying lens compares original vs. enhanced versions side-by-side.
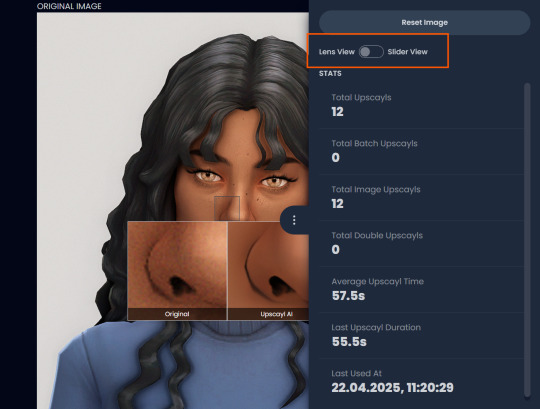
Also you may reset to original and revert all changes instantly.
8. Save your image.
By default, Upscayl saves to the source image's folder. To change this click Set Output Folder.

9. After this, use the Ctrl+S keyboard shortcut, and the new image will be saved. The original filename will be appended with the name of the AI model used and the upscaling scale applied.
You can also use batch processing. Before loading images, you simply need to enable batch loading.
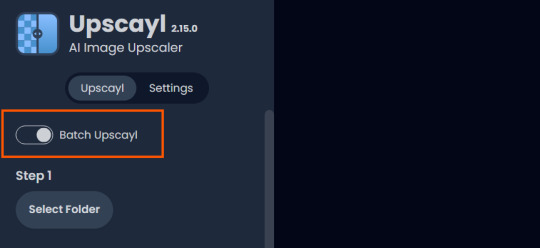
In the settings, there are different format options for saving processed images: PNG, JPG, WEBP. To preserve the best quality, we recommend choosing PNG.
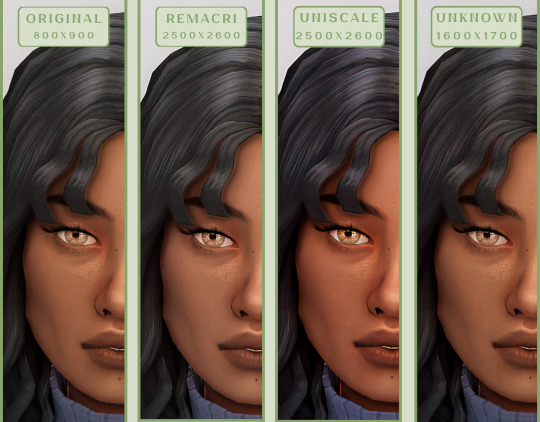
Finally, we're sharing the AI model options we liked best for processing Sims screenshots:
— Remacri (default model)
— Uniscale Restore (custom model)
— Unknown-2.0.1 (custom model)
🌱 Create your family tree with TheSimsTree
❓ Support 🌸 Our Blog
#TheSimsTree#simslegacy#legacychallenge#sims4#sims2#sims3#simsfamily#simstree#sims#sims4legacy#sims4roleplay#sims4stories#sims4couple#thesims4#ts4#ts4cc#plumtreeapp#simsta#simstagram#sims proposal#sims ideas#inzoi
28 notes
·
View notes
Note
how do you take such nice screenshots?? ur sims always look amazing
hello! :D first of all, thank you so much for the compliment :’)
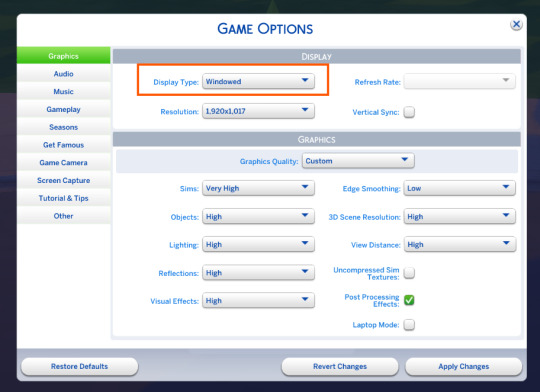
01. graphics settings SO i have my graphics on high which definitely plays an important role imo :o) here's a screenshot of my settings.

fortunately, my game still runs pretty well even with higher settings :') if you noticed, i have edge smoothing turned off and that's because the reshade i'm currently using needs it to be turned off so that it'll look better lol. but i do recommend you turn it on if you're not using reshade :)
02. lighting mods & reshade presets lighting mod are basically mods that change the game's lighting. here are some i'm currently using and highly recommend!
no blue v2 (i have the gameplay version) - removes the blue tint when taking screenies
no glo v2.1 - removes halo effect on your sims
immersive cas lighting (neutral spotlight) - removes the green/blue backlights in cas
sunblind lighting mod - overhauls the in game lighting and makes it so much more realistic
boho dreams - my favvv preset ever! i did do some tweaking to fit my preferences but tbh i don't know what i did lol i just made a copy of the original preset and messed around with the settings until i like what i see!
03. taking screenshots & depth of field (DoF) i have this camera mod (mts) buckley that gives you more control of the tab mod camera. this makes taking screenshots so much easier as it adds more angles and also the camera doesn't bounce like it usually does :) i like having my screenshots to have blurry backgrounds and i do that by using the DoF shader on reshade! my DoF settings are untouched btw. sometimes i'll mess around with the bokeh and see what i find pretty :)
04. editing i made this tutorial on how i edit my screenshots ages ago, but i pretty much still have the same process :) the only difference is that i play around with the colours now! i honestly have NO idea what i'm doing LMAO but if it looks nice, then i'm happy with it 🙂↕️
and that's basically all the tips i have for you! a good piece of advice would be to experiment with everything. try taking a screenshot from a different angle than you usually do or lookup some editing vids on youtube and try it out! practice makes perfect :)
25 notes
·
View notes
Text


TS4 Traffic Lights

Here are some traffic light models I bought on sale off of CGTrader and converted for the Sims 4.
Traffic Light - 15,490 Polygons
Traffic Light with Signs - 16,378 Polygons
Traffic Light with Signs (No Bus Sign) - 15,866 Polygons
All found in Debug. With the live edit and debug cheats on or Twisted Mexi's Better Build Buy Mod, search for Nelu for ease of access.
Download Here (MediaFire)

Creator: Hanna3D - CGTrader

Models light up at night.
DO NOT PUT THESE BEHIND A PAYWALL. As with all of my model conversions, if I happen to come across them being shared behind a paywall, I will be sure to report and block your ass. I do not care about the package files being shared, for example if they are used in a build and included in your shared build download (so long as credit is given), but do NOT put them behind any kind of paywall!!! Don't be an asshole, thank you.
Anyway, I hope you guys are able to make use of them!
P.S. Sorry for the ugly pictures. I currently don't have a reshade preset for this game.


13 notes
·
View notes
Text
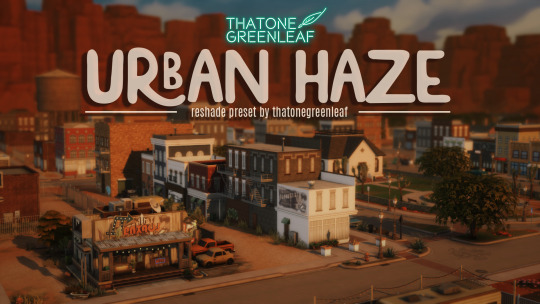


~urban haze~ reshade preset!
I've been using this preset on my twitch for a bit now, and i've finally gotten around to releasing it!! I'm very happy with it and I currently use it for everything😅
Urban haze has a focus on realistic lighting with a slight hazy and warm feel. Less blue in shadows, darker nights, deeper afternoon shadows, saturated sunsets, balanced greenery. Use it in any world, I've tested them all :)
__________________________________________
How to download:
♥ Download Reshade: (I use reshade 5.7.0, I can't say how this preset will behave with other versions of reshade, or G-shade.)
♥ During Reshade Installation, select The Sims 4, choose DirectX9 as the rendering API.
♥ Effect Packages to install: standard effects, sweetFX by CeeJay, qUINT by Marty McFly, color effects by prod80, and Legacy effects.
♥ Download urban haze below, drop it in your Sims 4 installation's "Bin" Folder
♥ Open the Sims 4, Disable edge-smoothing in your graphics settings if it's not already, In the reshade menu, set RESHADE_DEPTH_INPUT_IS_REVERSED= to 0 in global preprocessor definitions if it's not, and MXAO_TWO_LAYER= and MXAO_SMOOTHNORMALS= both to 1 in qUINT_mxao's preprocessor's definitions.
♥ If you're struggling with installation, I suggest you check out @kindlespice's installation tutorial! It was made for reshade 4.9.0 but the instructions remain the same.
__________________________________________
Notes:
♥ Both Depth of field shaders are off by default, you can enable them using their shortcuts: ctrl + Q (MagicDOF), ctrl + W (MartyMcFlyDOF) or enable them manually.
♥ MXAO.fx also has a shortcut (ctrl + R) bc sometimes the DOF blur makes the shadows weird, most of the time it's fine!
♥ Could potentially be gameplay friendly, depending on your GPU! The MXAO and DOF shaders will be the most performance heavy, feel free to adjust to your liking.
♥ The pictures above were taken with this preset and no further editing, but I do use a few lighting mods that will affect how my game looks:
♥ NoBlu by Luumia
♥ NoGlo by Luumia
♥ twinkle toes by softerhaze
URBAN HAZE RESHADE PRESET ↠ download on sim file share!
Follow me on twitch!
Support me on patreon!
TOU: do not redistribute, reupload, or claim my cc/CAS rooms/presets as your own! recolour/convert/otherwise alter for personal use OR upload with credit. (no paywalls)
1K notes
·
View notes
Text
Baldur's Gate 3 Screenshot Tutorial
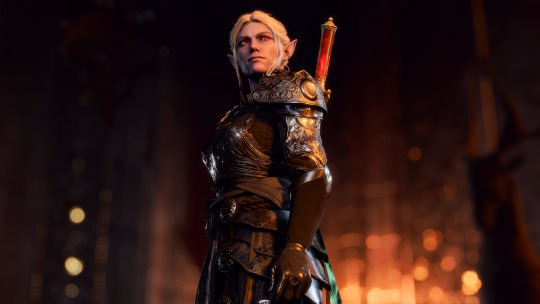
Hi, I decided to make a more in-depth guide for my twitter followers, as I'm super limited in characters and formatting options over there.
For this tutorial, I'll explain how you can enhance your screenshots. I'll divide it into five parts: ReShade, making your screenshots high resolution, camera mods, photography basics, and post-processing. By the end of following all of these steps, you should have something way better than the start!
I recommend going through this tutorial downloading things step-by-step for the first three parts, as it'll help you to quickly identify where you've gone wrong if you have any issues.
1. ReShade ReShade is a post-processing tool that allows you to change the look of a game with an array of different effects and adjustments to use. It can be a lot to wrap your head around at first, so I recommend starting off by finding a ReShade preset that speaks to you from this page if you're not already familiar with using it. The mod authors should explain how to download it. I find 22:20 of this YouTube video to be helpful to introduce ReShade if you're completely new to it. This video is for the Sims 4, but ReShade typically works the same across different games. Now that ReShade is downloaded, we can get depth of field working within the ReShade. This step is optional. Depth of field refers to what will be in focus in your screenshot, and what will be blurred. It's essentially simulating shooting with a camera, like so:

To get this effect working, you need to follow this tutorial within the ReShade menu.
2. Making Your Screenshots High Resolution Typically, Baldur's Gate 3 is ran in 1920x1080 resolution, or standard HD (unless you have a higher resolution monitor and are running the game in 4k, in which case, you can ignore this step if you'd like). This is definitely an acceptable quality, but if you'd like to capture any detail, you're not going to get much out of this. To get a better quality image, there are two ways to achieve this. The first method is through hotsampling. Hotsampling is briefly running a game in a much higher resolution than your monitor supports, allowing you to capture screenshots with incredible detail, then bringing it back down to a native playable resolution. To hotsample, you'll either need to use the BG3 camera tool, or SRWE. For either of these hotsampling tools, it's important that you've downloaded ReShade, or they will not work.
Once you have either of these downloaded, make sure your game is running in windowed mode. If you have more than one monitor, you need to change your display to show only on one screen. Or again, this will not work.
Next, you're going to want to make sure you have a key set for taking screenshots in ReShade, as well as making sure you like the folder where your screenshots are set to be saved. You can find this in the settings tab. Once you have those set, you're ready to take really HD screenshots!
To do that, you want to set your game's resolution to 2x, or even 3x what it's currently displayed as. Once it's set, your game screen is going to look giant and probably run way off your monitor. This is a sign it's working! Once it looks like this, press the screenshot key you set earlier within ReShade, and there you go, a nice big screenshot should be in the folder you set!
If you don't want to do hotsampling, and if you have a Nvidia graphics card, you can download their their app, which can take resampled screenshots. It won't be as high quality as hotsampling, but still better than standard HD.
3. Camera Mods
There are two camera mods that I know of for BG3. One is paid, the other is not.
The first one is the Native Camera Tweaks mod. This mod allows you to move the camera around more freely as you're traversing the world, but in cutscenes you'll still be stuck.
The second one is the paid one, but it allows for total freedom within the game, even during cutscenes. This tool is also very helpful for hotsampling. Within this tool, it's very useful to configure your own controls for moving the camera around in game, as well as setting a key you'll remember for pausing the game so you can set up a screenshot. I changed the movement keys to be wasd and the keys to change the angle of my camera side to side/up and down to the arrow keys.
4. Photography Basics
Taking screenshots in a game is a lot like doing photography irl tbh lol, same rules mostly apply. You of course want to do the basics like making sure your subject is in focus, it's not too dark or too light. But some other tips for people not very familiar with taking photos to take note of are:
Make sure if you're taking a photo of a person, the top of their head is within frame
Try and either make sure someone is front and center, or in the rule of thirds
Pay attention to the lighting, sometimes it's too bright or too dull. Sometimes it's unflattering in certain angles. Lighting will always make a huge difference
5. Post-Processing
You can now leave your screenshot as is, or edit it further with a photo editing software! I recommend using Photopea, as it offers basically everything Photoshop does without the insane price tag. From here you can do whatever you feel is best to enhance your image.
And that's all! If you have any questions, feel free to ask, and if you get stuck anywhere in this tutorial, don't feel bad. A lot of this stuff is just trial and error, but if you're very persistent with it, I promise you'll get these working. Also I would just like to mention that a lot of this stuff applies to taking screenshots in a lot of games! So you can take this knowledge with you elsewhere <3
If you happened to follow all this, please send in an image of your Tav you took!
124 notes
·
View notes
Text
Virtual Photography Process
I got an ask that I posted by accident before being ready, so I'm going to make this a post I suppose fmdlksg Anon was asking about my Reshade Preset for Cyberpunk and what my VP process is, so here it is!
Anon, I don't quite have a VP process. Not in a trademark way anyway. My VP varies wildly across the years and generally speaking I just go with the vibe I feel at the moment!
I've had phases where I would barely do any post-processing at all and only rely on heavy Reshade, I had phases where I'd do some minor color tweaking and add a lot of effects like dust and sparks, and my current one where I do pretty much all my color tweaking in post-process and only really use light Reshade to sharpen the image and make colors pop a bit.

My current Reshade is a tweaked version of a friend's preset. I have an average rig, don't have any Fancytracing, so Reshade is mostly there to sharpen the image, deepen the colors and try to compensate for my GPU's limitations. I forgot to use Otis DOF for this example, but nowadays I don't use any Reshade DOF, and rely only on Otis'. I also only use Otis lights because I can control what each light does a little better than AMM lights, but I used AMM lights a lot when I first was VPing.
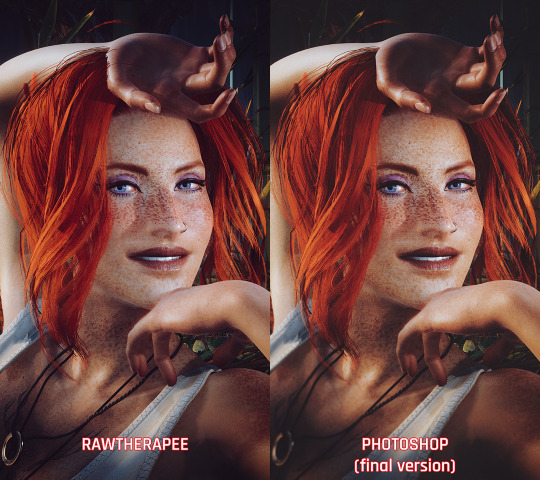
It's when the game's closed that I have my fun with colors!
I do my coloring on RawTherapee, which is a free Lightroom. Mostly I make use of the Film Simulation, sometimes layering multiple, sometimes using only one.
I then move to Photoshop which is my last stop and my "correction" phase. I have a huge library of actions and gradient maps I paw around for any last coloring (specially making shadows more matte and less defined), tweak contrast/brightness, and add some blurring and noise (beloved).

I probably have actions/gradient posts reblogged on my repository blog (@halkuonn), I can't point you to a single place because I've been dragging these around for over a decade and across at least 3 computers...
Honestly, don't get too attached to a single workflow with your VP. VP is art and art is meant to be a creative outlet, if you start putting too many rules and step by steps on your personal workflow, you'll probably get frustrated fast.
My current workflow is way lengthier than how I took some of my older VP, but that's because I feel like doing it. I don't necessarily feel like it's better or worse, it's just a different way I've been doing stuff and having fun with VP.

This is from 2022 - I wasn't using Otis Freecam, relied on AMM Lights, and did some mild/low post-processing - things like making the shadows a little bit more purple with Color Balance, and adding A LOT of blur manually because I didn't know how to use any of the DOF shaders. I was using Pinky's Preset back then.

This is from 2023 - the fuck it we ball era. This has like... 0 post-processing. I wasn't using Otis DOF (I don't think it existed yet), but I was already using Otis Lights learned to use the DOF shaders. The only thing I was doing for post-processing is add Noise and slap my signature (which this one doesn't even have lmao). I already had a new Reshade preset from my friend, but didn't really tweak any of it.

From this year! I still wasn't using RawTherapee a lot, but it was the start of my "I'm going to do everything in post-processing" era, with shadows not as dark/contrasted and everything a bit hazy.
So yeah! Don't stress about having a single workflow, or the best workflow, or even the most appropriate Reshade. For me the less I try to be biblical about my VP process, the more I enjoy taking it, and in turn the more satisfied I am with the results.
If you want more of a tutorial, I can try?? doing one?? but really the only thing I have been consistently doing with my VP all these years is slapping some extra blur and adding Noise on PS.
Hope this helps or at least provides some software recommendations / process ideas though!
26 notes
·
View notes
Note
Hello! I’m a long time follower and I noticed that your screenshots got better in terms of quality! 😁 Did you get a new PC? And do you have any tips on how to take better gameplay screenies/editing? Thanks! Hope you have a lovely day 💕
Hi Noni and thanks. Hope u have a lovely day where ever u are too ❤
Btw, I recently answer the same or might be slightly same as this ask and also I include some tips how I take my screenshot. Its still the same method I use but here are more related what u ask or u can just refer both.
1st, I have a laptop and a PC (my husband gave me his old PC and upgrade it for me). If I'm at home, I will use my PC more then my laptop cause recently I did upgrade my graphic card for both Laptop and PC for my IRL work, also I use DX11 for the sims and I recently use re shade in my game that why my screenshot look better quality but I'm not really call my screenshot look that better, I'm still play around with taking screenshot here and there or don't be shy to ask other simmers their tips too and I upgrade my sims camera overhaul. I have a few part of how I have a better screenshot, since I'm too perfectionist and sometime I do have "Jealousy" in me, when I see other simmers have more better quality of screenshot 😅. So this is what I call "what works for me" and hope it's work for u too.
Choosing the right Re shade / G-Shade Preset
Choosing the right re shade / gshade are the second most important for me or maybe every one will agrees with me and not every reshade preset suit your style. I've try a lot of preset and end up stick with what i'm currently use. So choose wisely.
Gameplay, Build, Interior and Exteriors screen shot:
Recently there's a rain in the house bug that haven't being fix yet, so I use UI cheat to clear the sky cause it will effect my screenshot and the screenshot will look not good for me. I don't really edit my gameplay screenshot. It's all from my re shade that I use (u can check my previous ask regarding this). I only edit my screenshot when the picture look dark or enhance it but so far I already love what my re shade gave. And last I don't really play with my sims in their house, i use to bring them out to a community lot or somewhere that have an outdoor light and play with in game time too. I already explain this in the previous ask post.
Cas screenshot for Sims submission / intro post / Look book
I only use SRWE to take cas screenshot and my setting size are 2000 X 1500 or 3000 x 2500 (this will make your screenshot more HD or sharpen look).
What I use for editing my post.
I use Canva and Pixlr for editing cause its have everything and easy for me if i need anything from template to editing. I'm not use to PSD since it's give me alot of time to figure out 😅.
and that it from me and hope this tips work with u and thanks for noticing my changes of my screenshot 💜
10 notes
·
View notes
Text


🌟 New ReShade Preset for InZoi – InZOI Legacy! 🌟
After many hours of fine-tuning, I’m finally sharing my exclusive ReShade preset for InZoi! ✨ Inspired by the atmosphere of the 2024 Playtest, it brings a cooler, more realistic, and cinematic look, reducing yellow tones and better balancing light and contrast.
📌 Highlights: ✅ More natural and immersive lighting ✅ Better color and shadow balance ✅ Extra settings for customization
Along with the preset, I’ve shared some configuration tips to make the game look even better and run smoother (yes, some settings actually look better on low than on ultra 👀).
The preset is currently available for supporters, but in a few weeks, it will be released for everyone on my blog! :D
🔗 Download + Full Tutorial Here!
Give it a try and let me know what you think! 💙
10 notes
·
View notes
Text
can I hear a little commotion for the dress👏🏾

I have to give a special thank you to one of my favs for making some beautiful gshade/reshade presets😍 I’m currently using the milk chocolate original preset by Bria. I needed this preset baddddd!! Lauryn’s skin doesn’t look washed out and my game feels so vibrant & alive🥹 you really did an amazing job friend🫶🏾 @yourstrulysims
Bria made 4 presets and allowed me to test the compatibility with reshade. Forever grateful🫶🏾❤️ You can get them all on her Patreon. My game is forever changed thanks to you❤️❤️ (preview of all 4 presets unedited under the cut) @yourstrulysims


#tyloves#simblr#ts4#sims 4 screenshots#sims 4#black simmer#ts4 screenshots#ts4 simblr#Milk Chocolate OG By Bria#gshade#reshade
38 notes
·
View notes