#custom UI components
Explore tagged Tumblr posts
Visit Tumblr Blog
Explore Tumblr blogs with no restrictions, modern design and the best experience.
Last Seen Tumblr Blogs


Fun Fact
Tumblr has 4 main sources of revenue.
Text
Component Libraries: Should You Build Your Own or Use a Prebuilt One?

Component libraries are a vital tool in web application development in maintaining uniform design, shortening the time taken to develop web applications and improving reusability of the code. Some developers find this dilemma; should they create a component library or use an existing one? In addition, they help reduce the struggle while building well-designed and interactive websites because of the availability of animation-oriented UIs such as Accentricity UI among others. Now, let’s get more to the point in order to help you find the right way.
What is a Component Library?
Component libraries are collections of reusable UI elements such as buttons, forms, modals, and more— and are intended to reuse the components across several projects. Such libraries not only guarantee a consistent look of an application but also save time and costs during its implementation because the elements have been already coded. So, there's no need to build components from scratch.
Prebuilt Component Libraries

Prebuilt Component Libraries
Prebuilt component libraries are the ready-made collections of different UI components that are specifically designed and optimized for common use cases that developers can face during development. Some well-known examples include:
Material-UI (MUI):
A library based on React and it follows Google's Material-UI design, MUI allows a comprehensive set of components customization.
Ant Design:
It's an UI design system framework for enterprise-level products, ant design offers built-in themes and a rich set of UI components.
Bootstrap:
It's an widely-used CSS framework that provides basic components and a responsive grid system.
Pros of Prebuilt Libraries :
Rapid Development: Prebuilt libraries save a lot of time of the developers by providing pre-designed reusable components that you can quickly integrate into your project.
Standardized Design: They help ensure a consistent user experience across different screens and features.
Community Support: Many prebuilt libraries come with robust community support, providing a wealth of tutorials, plugins, and enhancements.
Cons of Prebuilt Libraries
Limited Customization: Customizing components to fit your unique design can sometimes be difficult, leading to constraints on flexibility.
Performance Overhead: Many prebuilt libraries come with extra features you may not need, which can bloat your codebase.

Pros And Cons of Prebuilt Libraries
Animation-Centric Libraries: Bringing UIs to Life
In recent years, a new category of libraries has emerged, specifically focused on providing built-in animations and smooth UI transitions. These libraries not only offer pre-designed components but also emphasize adding dynamic, interactive features to web applications.
Here are some popular examples of animation-focused libraries:
Lottie
Category: Animation Integration Library

Lottie:The industry standard for motion design
What it Offers: Lottie allows you to render animations created in Figma or Adobe After Effects as JSON files using the built-in plugins. These animations are then rendered natively on the web, offering high-quality motion without a heavy performance impact.
Why It’s Useful: Lottie is perfect for apps or websites requiring rich, scalable animations that are lightweight. It’s commonly used for logos, loading animations, and subtle UI effects. Unlike other component libraries, it focuses purely on bringing visual design elements from tools like Figma & After Effects into the web environment.
Accentricity UI
Category: Hybrid Component and Animation Library
What it Offers:
Accentricity UI combines traditional UI components with built-in support for smooth animations and transitions. It offers a wide range of components like buttons, forms, modals, and navigation menus, but with an added layer of predefined animations, making it easier to create interactive, dynamic interfaces.
In addition to these standard components, Accentricity UI provides responsive behaviors and subtle animation effects like hover states, fade-ins, and sliding transitions that enhance user engagement. The library's components are fully customizable, allowing developers to easily adjust animation timings, easing functions, and durations to match the look and feel of their brand, ensuring both visual appeal and performance across devices.
Why It’s Useful:
Think about it, what would be easy for a dev? Making a custom component with tons of animation which the dev has to write from scratch and polish it before the deadline or use a library, where the dev can make use of the library with the built-in support to combine the custom designed elements with smooth animations and transitions offered by the library.
It’s particularly helpful for developers who want the convenience of a prebuilt library but need polished, built-in animations to enhance user experience without writing complex animation code from scratch.
Framer Motion
Category: Animation-focused Component Library (React)

Framer Motion
What it Offers:
Framer Motion is a powerful library for React that allows you to create fluid animations and micro interactions with minimal effort. It supports interactive features like drag, scroll, and spring-based animations, which makes it ideal for interactive & highly animated UIs. It also provides easy-to-use APIs for gesture-based animations and layout transitions, offering developers extensive control over complex animations while maintaining simplicity in implementation.
Why It’s Useful:
Framer Motion combines the simplicity of component libraries with the flexibility of advanced animation frameworks, making it easy to enhance user interfaces with dynamic visual effects. It’s a great choice for React developers who want to integrate animation without compromising performance or adding significant overhead. With its built-in optimizations for smooth rendering, Framer Motion ensures high-quality animations that enhance both usability and visual appeal.
Should You Use Prebuilt Animation Libraries?
The role of animations is really important in web applications to enhance the UX(user experience), by making interfaces feel more fluid and interactive makes user's remember the website due to its great experience. Since users are constantly getting used to smooth effects, micro-interaction and dynamic feedback, animations are no longer viewed as a good to have feature but are rather considered as a must have feature. Prebuilt animation libraries like Framer Motion and GSAP (GreenSock Animation Platform) simplify this process by providing powerful, flexible tools that allow developers to integrate complex animations without having to manually manage every aspect of motion or dive deep into animation theory.
Advantages of Animation-Centric Libraries

Advantages of Animation-Centric Libraries
Ease of Use
Prebuilt animation libraries abstract away the complexities of coding animations from scratch. Without manually writing keyframes, easing functions, or browser-optimized transitions, developers can simply use predefined APIs to implement fluid animations. This drastically reduces development time, as many animation details are handled by the library, letting developers focus on building features and interactions rather than tweaking animations for performance or cross-browser compatibility. For example, with a few lines of code, animations can be applied to any UI element, making the development process much more efficient.
Advanced Features
Many animation libraries offer advanced features that go far beyond basic transitions like fade-ins and slide animations. These include timeline control, scroll-triggered animations, physics-based interactions, and even 3D transformations. For instance, timeline control allows developers to create synchronized sequences of animations, which can be used to create smooth, coordinated interactions across multiple elements. Scroll-based animations enhance user engagement by triggering effects as the user scrolls, perfect for parallax websites or content reveal effects. Physics-based animations, such as spring-based drag-and-drop or object bouncing, add natural, realistic movement to interactive elements, elevating the overall experience. Additionally, 3D transformations provide extensive control over how objects rotate, scale, or move in three-dimensional space, something that is cumbersome to achieve with native CSS alone.
See What Happens Next
#webdevelopement#werbooz#own website#build vs prebuilt component library#custom UI components#prebuilt UI libraries#web development#Material-UI#Ant Design#Bootstrap#Framer Motion#Accentricity UI#animation libraries#best UI libraries 2024#component library pros and cons#web app development#UI design optimization#web performance#web development trends
2 notes
·
View notes
Text
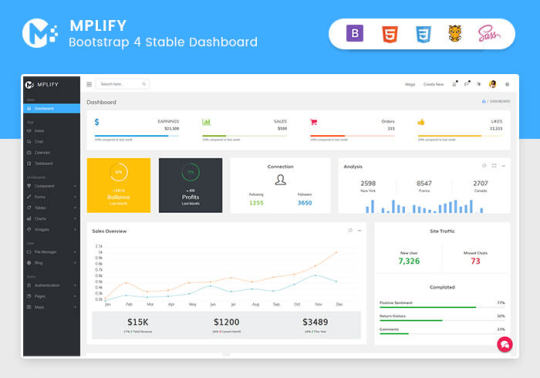
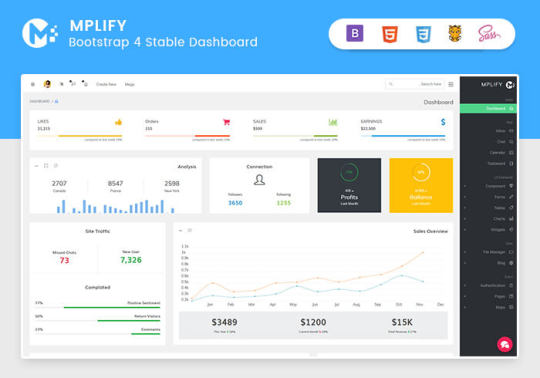
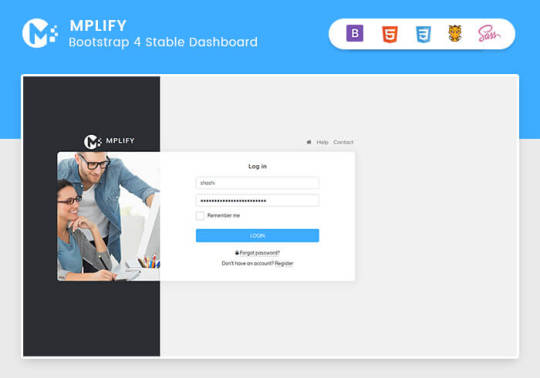
Mplify - Versatile Bootstrap 4 Admin Template by Thememakker
Mplify Admin makes the development process easy and fast for you and aims to help you implement your idea in real time.
Product Highlights
Mplify is a fully professional, responsive, modern, multi-purpose, and feature-rich admin template. It can be used to create various websites, admin templates, admin dashboards, backend websites, CMS, CRM, blogs, business websites, timelines, and portfolios. This versatility makes it an ideal choice for developers looking to build functional and aesthetically pleasing web applications efficiently.

Key Features
Bootstrap 4.3.1: Ensures compatibility and modern design standards.
jQuery 3.3.1: Offers extensive plugins and support.
Built-in SCSS: Provides more flexibility and control over styles.
Light & Dark Full Support: Allows users to switch between light and dark themes.
RTL Full Support: Right-to-left language support for global accessibility.
W3C Validate Code: Ensures high coding standards and practices.
Mobile and Tablet Friendly: Responsive design for all devices.
Treeview: For hierarchical data display.
Drag & Drop Upload: Simplifies file uploading processes.
Image Cropping: Integrated tools for editing images.
Summernote: Rich text editor integration.
Markdown: Support for markdown formatting.
Beautiful Inbox Interface: User-friendly email management.
User-Friendly Chat App: Built-in chat application.
Scrum & Kanban Taskboard: Task management tools.
Add Events to Your Calendar: Event management capabilities.
File Manager: Efficient file organization and management.
Blogging: Tools to manage and create blog posts.
Testimonials: Features to showcase user testimonials.
Maintenance: Tools to manage and schedule maintenance.
Team Board: Collaboration tools for team management.
Search Result: Enhanced search functionalities.
Beautiful Pricing: Elegant pricing tables and plans.
Contact List & Grid: Efficient contact management.
User Profile: Customizable user profiles.
Extended Forms: Advanced form functionalities.
Clean Widgets: A variety of clean, modern widgets.
Technical Specifications
Bootstrap 4.3.1
Bootstrap 4.3.1 is a powerful front-end framework for faster and easier web development. It includes HTML and CSS-based design templates for typography, forms, buttons, tables, navigation, modals, image carousels, and many other interface components, as well as optional JavaScript plugins. Mplify leverages Bootstrap 4.3.1 to ensure a consistent and responsive design across all devices.
jQuery 3.3.1
jQuery is a fast, small, and feature-rich JavaScript library. It makes things like HTML document traversal and manipulation, event handling, and animation much simpler with an easy-to-use custom API integration that works across a multitude of browsers. Mplify includes jQuery 3.3.1 to provide enhanced functionality and interactivity to your applications.
Built-in SCSS
SCSS is a preprocessor scripting language that is interpreted or compiled into CSS. It allows you to use variables, nested rules, mixins, inline imports, and more, all with a fully CSS-compatible syntax. With SCSS, Mplify offers a more powerful and flexible way to manage styles.
Light & Dark Full Support
Mplify comes with built-in support for light and dark themes, allowing users to switch between these modes based on their preferences. This feature enhances user experience and accessibility, especially in different lighting conditions.
RTL Full Support
For developers targeting global audiences, Mplify provides full right-to-left (RTL) language support. This feature ensures that languages like Arabic, Hebrew, and Persian are properly displayed, making the template versatile and inclusive.
W3C Validate Code
The World Wide Web Consortium (W3C) sets the standards for web development. Mplify adheres to W3C's coding standards, ensuring that the template is built with clean, valid code, which improves browser compatibility, SEO, and overall performance.
Mobile and Tablet Friendly
In today's mobile-first world, having a responsive design is crucial. Mplify is designed to be fully responsive, ensuring that your mobile application looks great and functions seamlessly on all devices, including desktops, tablets, and smartphones.
Applications
Mplify’s versatile design and feature set make it suitable for a wide range of applications across various industries. Here are some key applications:
Admin Dashboards
Mplify provides a robust framework for building admin dashboards. With its extensive set of UI components, charts, forms, and tables, you can create comprehensive dashboards that provide valuable insights and data visualization.
CMS (Content Management Systems)
With features like blogging, file management, and user profile management, Mplify can be used to build powerful CMS platforms. Its clean widgets and beautiful interface ensure that the content management experience is both efficient and enjoyable.
CRM (Customer Relationship Management)
Mplify’s built-in tools for managing contacts, scheduling events, and maintaining communication through a chat app make it an excellent choice for developing CRM systems. These features help businesses manage customer interactions and data effectively.
Business Websites
The multi-purpose nature of Mplify allows it to be used for various business websites. Whether you need a portfolio, a blog, or a corporate website, Mplify provides the necessary tools and components to create a professional online presence.
Blogging Platforms
With integrated tools like Summernote for rich text editing and Markdown support, Mplify is ideal for creating blogging platforms. The beautiful inbox interface and testimonial features enhance the blogging experience, making it easy to manage and publish content.
Benefits
Easy and Fast Development
Mplify is designed to streamline the development process. With its pre-built components and templates, you can quickly assemble functional and aesthetically pleasing applications. This reduces development time and costs, allowing you to focus on implementing your ideas in real time.
Professional and Modern Design
Mplify offers a clean, modern design that is both professional and user-friendly. The template includes a variety of customizable widgets and components that adhere to the latest design standards, ensuring your application looks polished and up-to-date.
Comprehensive Feature Set
From task management tools like Scrum and Kanban boards to extensive form functionalities, Mplify provides a wide range of features that cater to various needs. This comprehensive feature set makes it a versatile solution for different types of projects.
Responsive and Mobile-Friendly
With Mplify, you can ensure that your application is accessible on all devices. Its responsive design adapts to different screen sizes, providing a seamless user experience on desktops, tablets, and smartphones.
Global Accessibility
Mplify’s RTL support and multi-language capabilities make it suitable for global applications. This feature ensures that your application can cater to users from different regions, enhancing its reach and usability.
Regular Updates and Support
When you purchase a license for Mplify, you receive all future updates for free. This ensures that your application remains up-to-date with the latest features and improvements. Additionally, Mplify provides excellent customer support to assist with any issues or queries.
Challenges and Limitations
Learning Curve
While Mplify is designed to be user-friendly, there may be a learning curve for beginners who are not familiar with Bootstrap or jQuery. However, comprehensive documentation and community support can help mitigate this challenge.
Customization
Although Mplify offers a wide range of customization options, extensive customization may require advanced knowledge of SCSS and JavaScript. This could be a limitation for developers who are not well-versed in these technologies.
Performance
As with any feature-rich template, there is a potential for performance issues if too many components and plugins are used simultaneously. It is important to optimize the application and selectively use features to maintain optimal performance.
Latest Innovations
Enhanced UI Components
Mplify continues to evolve with regular updates that introduce new and improved UI components. These enhancements ensure that your application remains modern and functional.
Advanced-Data Visualization
Recent updates have focused on improving data visualization capabilities. With enhanced charting tools and interactive elements, Mplify allows for more dynamic and engaging data presentation.
Integration with New Technologies
Mplify is continuously updated to integrate with the latest web technologies. This ensures compatibility with new frameworks and libraries, providing developers with more tools to build advanced applications.
Future Prospects
AI and Machine Learning Integration
The future of Mplify may include integration with AI and machine learning tools. This would enable developers to build more intelligent and automated applications, enhancing user experience and functionality.
Expanded Plugin Support
As the web development landscape evolves, Mplify is likely to expand its plugin support. This will provide developers with more options for extending the functionality of their applications.
Improved Accessibility Features
Mplify is expected to continue enhancing its accessibility features. This includes better support for assistive technologies and compliance with accessibility standards, ensuring that applications built with Mplify are inclusive for all users.
Comparative Analysis
Versus Other Bootstrap Templates
When compared to other Bootstrap templates, Mplify stands out due to its comprehensive feature set, modern design, and extensive customization options. While other templates may offer similar components, Mplify's unique features like RTL support and advanced task management tools give it an edge.
Versus Custom Development
Opting for a pre-built template like Mplify can significantly reduce development time and costs compared to custom web development. While custom development offers more flexibility, Mplify provides a robust foundation that can be easily customized to meet specific needs.
User Guides and Tutorials
Getting Started with Mplify
Installation: Download and install Mplify from the official website or marketplace.
Configuration: Configure the template settings according to your project requirements.
Customization: Use the built-in SCSS files to customize the styles and appearance.
Integration: Integrate Mplify with your backend systems and databases.
Deployment: Deploy your application on your preferred hosting platform.
Advanced Customization Techniques
SCSS Variables: Use SCSS variables to easily change colors, fonts, and other styles.
JavaScript Customization: Extend the functionality by adding custom JavaScript code.
Component Modification: Modify existing components or create new ones to meet specific needs.
Performance Optimization: Optimize the performance by minifying CSS and JavaScript files, and selectively loading components.
Conclusion
Mplify is a powerful, versatile, and user-friendly Bootstrap 4 admin dashboard template. It offers a wide range of features and customization options, making it suitable for various applications, from admin dashboards to business websites. With its modern design, responsive layout, and extensive documentation, Mplify simplifies the development process, allowing developers to implement their ideas in real time efficiently.
Whether you are building a CMS, CRM, or a personal blog, Mplify provides the tools and flexibility needed to create a professional and functional web application. Its ongoing updates and support ensure that your projects remain current and compatible with the latest web technologies.
#Mplify Admin#Bootstrap 4.3.1#jQuery 3.3.1#SCSS#Light & Dark Theme#RTL Support#W3C Validation#Responsive Design#Admin Template#Admin Dashboard#CMS#CRM#Blogging#Business Websites#Web Development#UI Components#Data Visualization#AI Integration#Machine Learning#Accessibility Features#Task Management#File Management#Rich Text Editor#Markdown Support#User Profiles#Performance Optimization#Web Technologies#Custom Development#Web Application Development#Front-end Framework
0 notes
Text
Me after spending 8 hrs on 3 React Components. Add in Redux, and that's 15 hrs xD
feel like i've finally gotten to the point where the answer to "will i be able to figure out how to do the thing" is almost always yes, and then the operative question becomes "will i be able to figure out how to do the thing quickly". and unfortunately the answer there is usually no
#chatgpt helps ne understand code snippets and is the reason I'll continue to self-learn#it taught me about parent & child components and about props as well#dealing with custom hooks and state and redux - actions#is still very new to me#idk why i like UI in college lol#maybe because it didn't have state mgmt and i just did css for hours altogether
225 notes
·
View notes
Note
I don't know if this comes under trade secret or whatever (if it does im so sorry for intruding!!) but how did you get the phone system to work? Are you using Ren'Py or a different engine?
(game's developer responding!)
No trade secrets at all - all the code for the game is actually open source (MIT license and CC 4.0 Attribution, depending on which part you mean) so you can use it however as long as you credit the source! It's not necessarily written to be picked up by other people (it's often hacky and not documented), but anyone is welcome to pick at it.
Not sure if you mean "phone system" as in the Chittr stuff or the TechniColor Heart stuff. It's all running in RenPy (the whole game is), but the Chittr system is a lot jankier than the phone stuff done for TechniColor Heart. There's a lot of Python code helping to drive the back-end of everything, although the actual interface/UI aspects are handled by the RenPy engine's screen language, mostly.
At its heart, both systems are a combination of a list of items visible within the phone (text posts, etc.) and a set of RenPy screens to iterate through those and display them, allow interactivity, etc. The TH phone system uses a system of custom Python classes, whereas the Chittr system uses a set of dictionaries since it was written a few years ago and I wasn't as well-versed in how Python does class stuff (my professional experience was mostly in C#, VB.NET, etc.).
The Technicolor Heart version uses one master screen for the phone interface and then a set of subscreens for the various individual components (dating site, messages, shop, etc.) with their own UI and calls to important classes. If you unpack the script files (using something like RPA extract), you can find the TH stuff in volume12/vol12_datingsim_phone.rpy and the Chittr stuff mostly in chittr.rpy in the base game directory. Be warned in advance that the Chittr portion is bad and has some really jacked-up code to fix bugs that required going back and retroactively adjusting some stuff.
There's some elements of the UI that interact with the phone system in other areas, like the game's quick menus, to do things like displaying message notifications. If you poke around, you should see what I mean.
If you're looking for a general way to do a phone interface, I'd strongly suggest looking at the TechniColor Heart variant - that's by the far the cleanest, best-coded iteration of that concept.
9 notes
·
View notes
Text
I know full well that I've got an uphill struggle when it comes to marketing Various Types, because it's 2024 and everyone already uses Origins and thinks it's the bee's knees (and to their credit, Origins is a good mod), so you'll forgive me for harking on about VT but I do earnestly believe that it is more than viable as a competitor of the aging popular mod.
All this was true as well back when what is now Various Types was part of Various Oddities (which itself enjoyed some considerable popularity whilst Origins didn't share space in the same modloader), but I'll try and break it down a bit to drive home why I think it's worth giving a look:
First, it doesn't work like Origins. In Origins, you choose (or are randomly selected) a "origin", of varying levels of "impact" usually between 0 and 3. Depending on server config, you might get another one after dying, but that's it. This means the range of gameplay is only as diverse as the datapack in use, because each player is locked into just one component.
Various Types, in stark contrast, actually presents the player with a full-blown character creation system. You choose a species, which is similar to an origin, and are then able to choose templates that modify it. Moreover, those templates can be stacked on top of each-other, in different orders and with different results. So whilst the range of gameplay is still limited by datapack, it is roughly combinatorially massive. The default species and templates that presently ship in the alpha, by itself, theoretically offer up to 286 builds (template conditions permitting). The server has a "power" setting that helps to constrain how drastically overpowered characters can be, but the variations possible without even breaking 5 power are staggering against the dozen or so origins that Origins ships with even today.
This ultimately means that players are always able to be at least a little different to one-another. Even if they share the same species as the foundation of their character, an Insectile player is quite distinct to an Aquatic one.
Even among the less-impactful templates, a Gravekin Orkin (essentially a still-intelligent zombified piglin) has some stark distinction from a Reptilian Orkin (roughly a lizardman). Though personally, I'd rather not get on the bad side of either one of them, especially if they just heard me call them piglins...
Secondly, and by absolutely no means least, the core component of the mod (the character sheet) has intentionally been constructed such that it is incredibly easy for others to expand beyond its current and original confines.
Want to build a magic mod and need to track what spells people have and how much mana? All you need to do is register a couple things to the right registries, and it'll work just fine. Want to build a class system on top of it and player an Othall Ranger or Muckie Druid? Same thing, same ease.
In essence, and with no shred of hyperbole, Various Types has the capacity to be the foundational element of any conceivable per-player customisation mod. Just as long as people give it a chance.
Thirdly, the laborious devotion to clean visual aesthetics. I'm not gonna give Origins much sheet for this one, it's very much a product of its age from when Minecraft didn't really support anything that wasn't a texture rendered on a repeating dirt background.
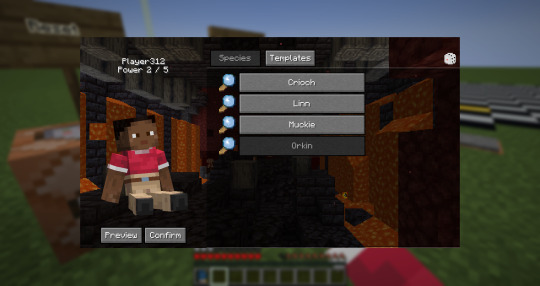
But Various Types really fits in with the more recent era of Minecraft UI. The character creator screen alone really deserves a look. Each species can be given a distinct background to complement its lore or function, such as the Crioch species being from the End and therefore having an End City as their background, versus the sunny green forest background used by the Overworld-native Linn species.
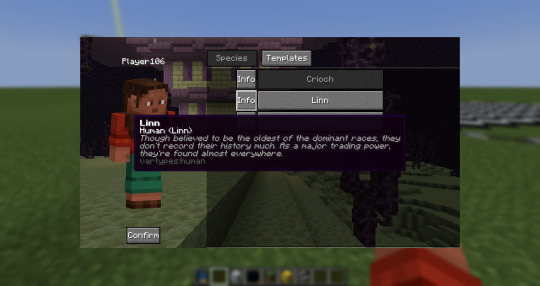
Every species, template, type, or ability can even be given custom lore text. All of them. The sheer volume of options for RP alone are staggering.
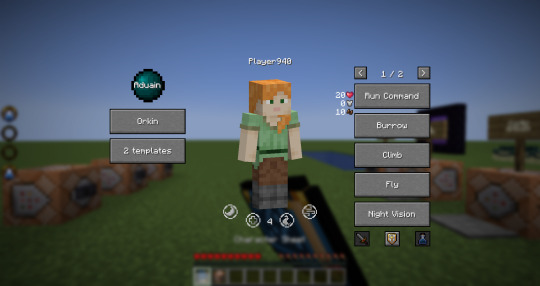
Oh, and did I mention that your avatar is visible in the creator screen? As well as the character sheet display screen?
Which doesn't sound like much on its face, you can see your skin in your inventory screen all the time after all. Except that's not actually a player being rendered in either screen.
It's a custom entity. With a custom model. That can play animations.
Every time you open that screen, your avatar will wave at you to say hi. Stick around on it long enough, and you'll even see them strike a pose right out of a fighting game or casually sit down for a moment.
You can even see what your build will look like in full on the character sheet screen before you finalise it.
And that screen is itself no slouch. It prioritises clean minimalism whilst still giving access to every detail of a given build.
Which is great, but especially so because Various Types has four favourite ability keys (which you can assign activated abilities to quickly and easily from the ability menu, from which you can also just click on any ability to activate it) and absolutely no limit on how many abilities you can have. Passive OR activated.
It's really more comparable to the UI screens of Minecraft Dungeons or Legends than anything on offer by any other mod in the same niche.
Seriously, go check this mod out. It's in alpha right now, but more or less the only thing missing from it is just more abilities, and I've got a list as long as my arm of those to implement.
12 notes
·
View notes
Text
React Native Auto Code Application Development: The Smart Way to Build Mobile Apps
Introduction to React Native Auto Code Application Development
React Native auto code application development is changing the way mobile apps are built. Developers now use intelligent automation tools to generate code quickly and accurately. This speeds up development, reduces errors, and improves the overall quality of applications.
Auto code development with React Native is ideal for startups, agencies, and enterprises aiming to deliver high-quality apps fast.
youtube
Benefits of React Native Auto Code Application Development
1. Speed Up Development Cycles Automation tools handle repetitive tasks instantly. Developers can focus on building unique features rather than wasting time on boilerplate code.
2. Maintain Consistent Code Quality Auto-generated code follows consistent standards. This consistency improves code readability and eases future maintenance.
3. Reduce Human Errors By automating setup and structure, auto code tools minimize the chances of introducing bugs during the initial stages.
4. Enhance Developer Productivity Developers spend more time solving real problems and less time writing repetitive components.
5. Cost-Effective App Creation Faster development with fewer mistakes leads to lower project costs. This allows businesses to scale faster without ballooning budgets.
Popular Tools for React Native Auto Code Development
Ignite CLI Ignite offers pre-configured templates and plugins, making it easy to set up scalable projects instantly.
Hygen Hygen is a simple yet powerful code generator that helps teams maintain consistent coding standards with minimal setup.
Plop.js Plop.js allows developers to create custom generators for components, screens, and more, saving hours on manual coding.
Draftbit Draftbit provides a visual builder for React Native apps. Developers can create screens visually and export production-ready code.
Steps to Implement Auto Code in Your React Native Project
Step 1: Select the right auto code tools based on your project size and complexity. Step 2: Install and configure the tools within your development environment. Step 3: Create templates for commonly used components and screens. Step 4: Generate code structures automatically with simple commands. Step 5: Customize and enhance the generated code to meet unique business needs.
Following a structured approach ensures that automation becomes an asset, not a liability.
Challenges of Auto Code Application Development
1. Initial Learning Curve Some auto code tools require initial time investment for setup and training.
2. Over-Template Dependency Too much reliance on templates can sometimes limit creativity and flexibility.
3. Need for Regular Updates Auto code tools need constant updates to stay compatible with the latest React Native versions.
Developers can overcome these challenges with proper training and proactive tool management.
Best Practices for React Native Auto Code Development
- Use Automation for Repetitive Tasks Only Rely on auto code tools for repetitive elements but custom-build critical business logic manually.
- Keep Templates Updated Ensure all code generation templates are updated regularly to match new coding practices.
- Conduct Regular Code Reviews Even auto-generated code should undergo strict code reviews to maintain quality standards.
- Train Developers Continually Keep teams updated with the latest automation practices and tool updates for maximum efficiency.
Future of React Native Auto Code Application Development
The future points toward more AI-driven automation. Smart assistants will suggest code, build UI components, and even test functionalities automatically. React Native developers who embrace automation today will gain a competitive edge tomorrow.
Innovation combined with automation will define the next era of mobile app development.
Conclusion
React Native auto code application development offers a smarter, faster, and more efficient path to building world-class mobile apps. It helps developers minimize repetitive work, deliver projects quicker, and ensure consistent quality across platforms.
By integrating automation thoughtfully, businesses can create better apps and reach the market faster. React Native auto code development isn't just the future—it's the present.
Read More:
Ai Auto code
AI Wave maker
Rapid low code application development platform
Low code platform Enterprise software for application development
Low code application development platform or Low code platform for application development
What is Low code app development platforms
Composable low code isvs
Java-based low code platform
Composable isvs
RAD studio-Rapid application development software platform
APAAS-application platform as a service
Cloud Low code application development platform
Legacy application modernization solutions
React-native cross-platform mobile application development platform
Compare Wavemaker vs Outsystems vs mendix vs power apps — low code alternatives and its pricing
New and fast application development platform
Rapid application development model or RAD model
Low-code for consumable Banking and financial Low-code platform solutions
Internal api vs external apis
Rapid application development vs SDLC Platform
Custom Enterprise low code application development platform
Legacy enterprise application Modernization Platform
Embedded banking and Finance, Low-Code and the Emerging Face of Adaptability
BAAS- Low code Banking as a service
Composable Low code banking solutions
Telecom low code platform
Alternative to Xamarin and Cordova
Wavemaker Low code
Legacy application modernization platform
Cross-Platform React Native Mobile App Development Platform
2 notes
·
View notes
Text
HI, so long time no talk! I haven't gone anywhere, I just had some personal financial troubles that were resolved via...lots of overtime! I am a physicist by day, so that meant I became one by night for a couple months. But I remained coding, designing, & sketching things in my scant moments.
More importantly, I've been doing a lot of reading & observing of the Jcink RPC & I am really gutted by the lack of free resources I've seen become manifest. As a result, I've been percolating some easy design methods I could use to fast track totally free skins to give out as bi-monthly as I can manage in the near future.
Because I'm not one to stick to an aesthetic or design style so much as following a settled philosophy of coding, each of my skins will be entirely unique (no reused assets besides utility scripts, perhaps fonts, etc) but will all be;
Designed to be entirely responsive, with fallback & default setups for Custom Fields, image appearance or omission, etc.
Designed to load in a second & half or under, universally.
Neatened to be readable, cascade-organized, & fully notated with CSS & HTML notes to explain important components, how they work, & how to edit them.
Provided with a dark, light, & middle theme colour option as well as High Contrast option.
Provided with Staff, Member & Character profile & miniprofiles.
Provided with a full Custom BBCode suite of site templates to match the skin.
Based on the UI/UX design of a game with striking visuals that can be used for similar genres.
Now, this is a tall order, but I really want to flex my muscle & try to give folks something to be optimistic over in a landscape of drama-blog wastelanded distress. I want to put out something productive & positive, to make the community better & bring us together a bit <3 As a result, I'm going to need a little help from you all. I need to figure out which "Inspos" to work off of first based on desire for them, to fill the starving niches from most important to "least" so to speak. For the next few weeks, I'll post some polls & would be endlessly grateful if you all paid it forward by boosting but also voting on the games whose vibes you want to see MOST PRESSINGLY manifested as skins in the Jcink RPC.
I will, also, eventually port each one to Forumactivo, so for my Forumactivo folks, please let me know when you get specific polls so I can prioritize converting those skins for you! You deserve just as much love!
Of course, if there's a specific game you want to see feel free to comment on this post & I'll make sure to put it in the first poll, but for now that's all. The first list of inspo options will come out later today or tomorrow, Stay tuned & stay awesome, may the Dance keep you all absolutely blessed!
19 notes
·
View notes
Text
How to Develop a P2P Crypto Exchange and How Much Does It Cost?
With the rise of cryptocurrencies, Peer-to-Peer (P2P) crypto exchanges have become a popular choice for users who want to trade digital assets directly with others. These decentralized platforms offer a more secure, private, and cost-effective way to buy and sell cryptocurrencies. If you’re considering building your own P2P crypto exchange, this blog will guide you through the development process and give you an idea of how much it costs to create such a platform.
What is a P2P Crypto Exchange?
A P2P crypto exchange is a decentralized platform that allows users to buy and sell cryptocurrencies directly with each other without relying on a central authority. These exchanges connect buyers and sellers through listings, and transactions are often protected by escrow services to ensure fairness and security. P2P exchanges typically offer lower fees, more privacy, and a variety of payment methods, making them an attractive alternative to traditional centralized exchanges.
Steps to Develop a P2P Crypto Exchange
Developing a P2P crypto exchange involves several key steps. Here’s a breakdown of the process:
1. Define Your Business Model
Before starting the development, it’s important to define the business model of your P2P exchange. You’ll need to decide on key factors like:
Currency Support: Which cryptocurrencies will your exchange support (e.g., Bitcoin, Ethereum, stablecoins)?
Payment Methods: What types of payment methods will be allowed (bank transfer, PayPal, cash, etc.)?
Fees: Will you charge a flat fee per transaction, a percentage-based fee, or a combination of both?
User Verification: Will your platform require Know-Your-Customer (KYC) verification?
2. Choose the Right Technology Stack
Building a P2P crypto exchange requires selecting the right technology stack. The key components include:
Backend Development: You'll need a backend to handle user registrations, transaction processing, security protocols, and matching buy/sell orders. Technologies like Node.js, Ruby on Rails, or Django are commonly used.
Frontend Development: The user interface (UI) must be intuitive, secure, and responsive. HTML, CSS, JavaScript, and React or Angular are popular choices for frontend development.
Blockchain Integration: Integrating blockchain technology to support cryptocurrency transactions is essential. This could involve setting up APIs for blockchain interaction or using open-source solutions like Ethereum or Binance Smart Chain (BSC).
Escrow System: An escrow system is crucial to protect both buyers and sellers during transactions. This involves coding or integrating a reliable escrow service that holds cryptocurrency until both parties confirm the transaction.
3. Develop Core Features
Key features to develop for your P2P exchange include:
User Registration and Authentication: Secure login options such as two-factor authentication (2FA) and multi-signature wallets.
Matching Engine: This feature matches buyers and sellers based on their criteria (e.g., price, payment method).
Escrow System: An escrow mechanism holds funds in a secure wallet until both parties confirm the transaction is complete.
Payment Gateway Integration: You’ll need to integrate payment gateways for fiat transactions (e.g., bank transfers, PayPal).
Dispute Resolution System: Provide a system where users can report issues, and a support team or automated process can resolve disputes.
Reputation System: Implement a feedback system where users can rate each other based on their transaction experience.
4. Security Measures
Security is critical when building any crypto exchange. Some essential security features include:
End-to-End Encryption: Ensure all user data and transactions are encrypted to protect sensitive information.
Cold Storage for Funds: Store the majority of the platform's cryptocurrency holdings in cold wallets to protect them from hacking attempts.
Anti-Fraud Measures: Implement mechanisms to detect fraudulent activity, such as IP tracking, behavior analysis, and AI-powered fraud detection.
Regulatory Compliance: Ensure your platform complies with global regulatory requirements like KYC and AML (Anti-Money Laundering) protocols.
5. Testing and Launch
After developing the platform, it’s essential to test it thoroughly. Perform both manual and automated testing to ensure all features are functioning properly, the platform is secure, and there are no vulnerabilities. This includes:
Unit testing
Load testing
Penetration testing
User acceptance testing (UAT)
Once testing is complete, you can launch the platform.
How Much Does It Cost to Develop a P2P Crypto Exchange?
The cost of developing a P2P crypto exchange depends on several factors, including the complexity of the platform, the technology stack, and the development team you hire. Here’s a general cost breakdown:
1. Development Team Cost
You can either hire an in-house development team or outsource the project to a blockchain development company. Here’s an estimated cost for each:
In-house Team: Hiring in-house developers can be more expensive, with costs ranging from $50,000 to $150,000+ per developer annually, depending on location.
Outsourcing: Outsourcing to a specialized blockchain development company can be more cost-effective, with prices ranging from $30,000 to $100,000 for a full-fledged P2P exchange platform, depending on the complexity and features.
2. Platform Design and UI/UX
The design of the platform is crucial for user experience and security. Professional UI/UX design can cost anywhere from $5,000 to $20,000 depending on the design complexity and features.
3. Blockchain Integration
Integrating blockchain networks (like Bitcoin, Ethereum, Binance Smart Chain, etc.) can be costly, with development costs ranging from $10,000 to $30,000 or more, depending on the blockchain chosen and the integration complexity.
4. Security and Compliance
Security is a critical component for a P2P exchange. Security audits, KYC/AML implementation, and regulatory compliance measures can add $10,000 to $50,000 to the total development cost.
5. Maintenance and Updates
Post-launch maintenance and updates (bug fixes, feature enhancements, etc.) typically cost about 15-20% of the initial development cost annually.
Total Estimated Cost
Basic Platform: $30,000 to $50,000
Advanced Platform: $70,000 to $150,000+
Conclusion
Developing a P2P crypto exchange requires careful planning, secure development, and a focus on providing a seamless user experience. The cost of developing a P2P exchange varies depending on factors like platform complexity, team, and security measures, but on average, it can range from $30,000 to $150,000+.
If you're looking to launch your own P2P crypto exchange, it's essential to partner with a reliable blockchain development company to ensure the project’s success and long-term sustainability. By focusing on security, user experience, and regulatory compliance, you can create a platform that meets the growing demand for decentralized crypto trading.
Feel free to adjust or expand on specific details to better suit your target audience!
2 notes
·
View notes
Text
Best React Native App Developers in Indore for Android & iOS Solutions
Looking for top React Native app developers in Indore to build high-quality mobile applications? Young Decade is your trusted partner for developing scalable, feature-rich, and high-performance Android & iOS solutions. With our expertise in React Native development, we create apps that offer a seamless user experience across both platforms while ensuring cost-effective development.

Why Choose Young Decade for React Native App Development?
✅ Cross-Platform Excellence – Develop once, run on both Android and iOS without compromising performance. ✅ Custom Mobile Solutions – We tailor apps to meet your specific business needs. ✅ Fast Development & Deployment – Reduce time-to-market with efficient coding and reusable components. ✅ Engaging UI/UX – Deliver visually stunning and interactive mobile experiences. ✅ Performance-Optimized Apps – Build applications that load fast and run smoothly.
At Young Decade, we focus on building secure, scalable, and business-driven mobile applications. Whether you need a startup MVP, an enterprise solution, or an eCommerce app, our expert React Native developers in Indore ensure cutting-edge development with the latest technologies.
Start Your React Native Project Today!
Partner with Young Decade for the best React Native app development services in Indore. Let’s build a powerful and efficient Android & iOS app that helps your business grow. Contact us now to get started! 🚀
#software development company#android app developers#app development company#best android app development company#software development#flutter app development company in Indore#react native app development company in indore#mobile app development company in Indore
2 notes
·
View notes
Text
How Much Does React Native App Development Cost in California?

With the growing demand for mobile applications, businesses are increasingly opting for cross-platform solutions like React Native to reduce development time and costs. California, being a tech hub, has a vibrant ecosystem of app development companies, but the cost of development can vary significantly based on several factors. In this blog, we’ll explore the cost of React Native app development in California and what influences the pricing.
Factors Influencing React Native App Development Cost
1. Complexity of the App
The complexity of your app plays a crucial role in determining the cost. Apps can be categorized into three levels of complexity:
Simple Apps – Basic apps with minimal features, such as a calculator or to-do list. ($10,000 - $30,000)
Medium Complexity Apps – Apps with additional functionalities like user authentication, API integration, and database management. ($30,000 - $80,000)
Complex Apps – Feature-rich apps with real-time data sync, AI, AR/VR, or blockchain integration. ($80,000 - $200,000+)
2. UI/UX Design
An intuitive and appealing UI/UX is essential for user engagement. Custom designs and animations can increase costs but significantly improve user experience. UI/UX design costs in California typically range from $5,000 to $30,000depending on complexity.
3. Development Team
Hiring a development team in California is costlier than in many other regions due to high labor costs. The pricing varies based on the team’s experience:
Freelancers – $30 - $100 per hour
Small Agencies – $50 - $150 per hour
Established Development Firms – $100 - $250 per hour
4. Backend Development & Third-Party Integrations
If your app requires a strong backend, the cost increases. Cloud-based solutions like AWS, Firebase, or custom-built servers influence pricing. Additionally, integrating third-party services (payment gateways, APIs, analytics tools) can add $5,000 - $50,000 to the development cost.
5. Maintenance & Updates
Post-launch maintenance is essential for app stability. Maintenance costs can range from 15-20% of the total development cost per year to fix bugs, update features, and ensure compatibility with the latest OS versions.
Estimated Cost Breakdown for React Native App Development in California
Basic App Development - $10,000 - $30,000
Medium Complexity App - $30,000 - $80,000
Complex App Development - $80,000 - $200,000+
UI/UX Design$5,000 - $30,000
Backend & Integrations - $5,000 - $50,000
Maintenance (Annual) - 15-20% of dev cost
Ways to Reduce React Native App Development Cost
Prioritize MVP Development – Focus on a Minimum Viable Product (MVP) to validate the idea before investing heavily.
Outsource Development – Hiring offshore or nearshore teams can reduce costs while maintaining quality.
Utilize Pre-built Solutions – Use pre-existing UI components and third-party integrations to speed up development.
Choose a Cost-effective Development Partner – Partnering with an experienced yet cost-effective development firm ensures quality without overspending.
Final Thoughts
React Native app development costs in California can vary widely based on complexity, team expertise, and required features. While it’s a cost-effective alternative to native development, strategic planning is essential to optimize the budget. If you’re considering building a React Native app, consult a reputable development firm to get a tailored cost estimate based on your specific needs.
Need help with React Native app development? Contact us today for a free consultation!
#app development company in California#mobile app development company in California#app development company California#mobile app developer in California#app developer in California
2 notes
·
View notes
Text
Automated Testing vs. Manual Testing: Which One is Right for Your Project?

Achieving high-quality, reliable software stands as a fundamental requirement in software development. Successful testing functions as an essential tool to discover faults and build performance capabilities that create better user experience outcomes. Two main testing methods dominate the field: automated testing and manual testing. The process of quality software assurance uses different testing approaches that demonstrate their own advantages as well as weaknesses according to specific project requirements and scenarios. We will explore the specifics to determine which testing process works best for your system development efforts.
1. What Is Manual Testing?

Manual testing involves a human tester manually executing test cases without using automation tools. Key Characteristics:
The methodology focuses its efforts on user interface together with usability and experience testing.
Human-centered applications where selection requires discretion include ad hoc testing and enumerative testing as well as examinations that need human evaluation.
Human performers are required during this approach; thus, it demands substantial time.
2. What Is Automated Testing?

Software performing automated testing executes test cases through workflows and helpers. Key Characteristics:
Efficient for repetitive and regression testing.
Users must spend money on tools along with developing custom scripts for testing.
Reduces human error.
3. Advantages of Manual Testing

Human Intuition: Software testing professionals can detect kernels through their human cognitive ability that automated tools cannot match. The observation and evaluation of visual elements runs more efficiently through human operatives instead of advanced tools.
Flexibility: This method suits exploratory testing specifically because there are no pre-determined scripts available.
Low Initial Investment: Running this approach does not need tool purchases or applications to develop automation frameworks.
Adaptable for UI/UX Testing: Running this approach does not need tool purchases or applications to develop automation frameworks.
4. Advantages of Automated Testing

Speed: Executes repetitive tests much faster than humans.
Scalability: The system proves most effective for extensive projects that need constant system updates.
Accuracy: When performing recurring actions, automated systems minimize the chances of human mistakes.
Cost-Efficient in the Long Run: Once established and implemented, the system demands costly investments but ensures continuous development expenses decrease over time.
Better for CI/CD Pipelines: Such testing technology connects various development pipelines that support agile and DevOps methodologies.
5. Disadvantages of Manual Testing

Time-Consuming: The manual performance of repeated tests leads to delayed completion of projects.
Error-Prone: Large applications contain tiny bugs that human testers commonly fail to detect.
Not Ideal for Scalability: The process of increasing manual testing needs additional testers to avoid cost escalations.
6. Disadvantages of Automated Testing

Initial Costs: Organizations must provide high financial resources to procure testing tools together with developing programming constructs.
Limited to Pre-Defined Scenarios: These testing approaches work poorly for handling exploratory or ad hoc testing.
Requires Maintenance: Test scripts need frequent updates when application changes occur.
Not Suitable for UI/UX Testing: Struggles with subjective user experience evaluations.
7. When to Use Manual Testing

Small Projects: The testing method proves beneficial at a low cost for small applications and provides quick assessments.
Exploratory Testing: Testing this approach benefits projects whose scripts have not been defined yet or need evaluation for newly added features.
Visual and Usability Testing: Performing assessments on interface components together with design features.
8. When to Use Automated Testing

Large Projects: Handles scalability for projects with frequent updates.
Regression Testing: Program testing becomes more efficient through automation since automated assessments perform multiple tests following each update process.
Performance Testing: The system performs efficient capabilities to conduct load testing and stress testing.
Continuous Development Environments: Agile progression and DevOps implementations need automation as a core requirement.
READ MORE- https://www.precisio.tech/automated-testing-vs-manual-testing-which-one-is-right-for-your-project/
2 notes
·
View notes
Text
How-To IT
Topic: Core areas of IT
1. Hardware
• Computers (Desktops, Laptops, Workstations)
• Servers and Data Centers
• Networking Devices (Routers, Switches, Modems)
• Storage Devices (HDDs, SSDs, NAS)
• Peripheral Devices (Printers, Scanners, Monitors)
2. Software
• Operating Systems (Windows, Linux, macOS)
• Application Software (Office Suites, ERP, CRM)
• Development Software (IDEs, Code Libraries, APIs)
• Middleware (Integration Tools)
• Security Software (Antivirus, Firewalls, SIEM)
3. Networking and Telecommunications
• LAN/WAN Infrastructure
• Wireless Networking (Wi-Fi, 5G)
• VPNs (Virtual Private Networks)
• Communication Systems (VoIP, Email Servers)
• Internet Services
4. Data Management
• Databases (SQL, NoSQL)
• Data Warehousing
• Big Data Technologies (Hadoop, Spark)
• Backup and Recovery Systems
• Data Integration Tools
5. Cybersecurity
• Network Security
• Endpoint Protection
• Identity and Access Management (IAM)
• Threat Detection and Incident Response
• Encryption and Data Privacy
6. Software Development
• Front-End Development (UI/UX Design)
• Back-End Development
• DevOps and CI/CD Pipelines
• Mobile App Development
• Cloud-Native Development
7. Cloud Computing
• Infrastructure as a Service (IaaS)
• Platform as a Service (PaaS)
• Software as a Service (SaaS)
• Serverless Computing
• Cloud Storage and Management
8. IT Support and Services
• Help Desk Support
• IT Service Management (ITSM)
• System Administration
• Hardware and Software Troubleshooting
• End-User Training
9. Artificial Intelligence and Machine Learning
• AI Algorithms and Frameworks
• Natural Language Processing (NLP)
• Computer Vision
• Robotics
• Predictive Analytics
10. Business Intelligence and Analytics
• Reporting Tools (Tableau, Power BI)
• Data Visualization
• Business Analytics Platforms
• Predictive Modeling
11. Internet of Things (IoT)
• IoT Devices and Sensors
• IoT Platforms
• Edge Computing
• Smart Systems (Homes, Cities, Vehicles)
12. Enterprise Systems
• Enterprise Resource Planning (ERP)
• Customer Relationship Management (CRM)
• Human Resource Management Systems (HRMS)
• Supply Chain Management Systems
13. IT Governance and Compliance
• ITIL (Information Technology Infrastructure Library)
• COBIT (Control Objectives for Information Technologies)
• ISO/IEC Standards
• Regulatory Compliance (GDPR, HIPAA, SOX)
14. Emerging Technologies
• Blockchain
• Quantum Computing
• Augmented Reality (AR) and Virtual Reality (VR)
• 3D Printing
• Digital Twins
15. IT Project Management
• Agile, Scrum, and Kanban
• Waterfall Methodology
• Resource Allocation
• Risk Management
16. IT Infrastructure
• Data Centers
• Virtualization (VMware, Hyper-V)
• Disaster Recovery Planning
• Load Balancing
17. IT Education and Certifications
• Vendor Certifications (Microsoft, Cisco, AWS)
• Training and Development Programs
• Online Learning Platforms
18. IT Operations and Monitoring
• Performance Monitoring (APM, Network Monitoring)
• IT Asset Management
• Event and Incident Management
19. Software Testing
• Manual Testing: Human testers evaluate software by executing test cases without using automation tools.
• Automated Testing: Use of testing tools (e.g., Selenium, JUnit) to run automated scripts and check software behavior.
• Functional Testing: Validating that the software performs its intended functions.
• Non-Functional Testing: Assessing non-functional aspects such as performance, usability, and security.
• Unit Testing: Testing individual components or units of code for correctness.
• Integration Testing: Ensuring that different modules or systems work together as expected.
• System Testing: Verifying the complete software system’s behavior against requirements.
• Acceptance Testing: Conducting tests to confirm that the software meets business requirements (including UAT - User Acceptance Testing).
• Regression Testing: Ensuring that new changes or features do not negatively affect existing functionalities.
• Performance Testing: Testing software performance under various conditions (load, stress, scalability).
• Security Testing: Identifying vulnerabilities and assessing the software’s ability to protect data.
• Compatibility Testing: Ensuring the software works on different operating systems, browsers, or devices.
• Continuous Testing: Integrating testing into the development lifecycle to provide quick feedback and minimize bugs.
• Test Automation Frameworks: Tools and structures used to automate testing processes (e.g., TestNG, Appium).
19. VoIP (Voice over IP)
VoIP Protocols & Standards
• SIP (Session Initiation Protocol)
• H.323
• RTP (Real-Time Transport Protocol)
• MGCP (Media Gateway Control Protocol)
VoIP Hardware
• IP Phones (Desk Phones, Mobile Clients)
• VoIP Gateways
• Analog Telephone Adapters (ATAs)
• VoIP Servers
• Network Switches/ Routers for VoIP
VoIP Software
• Softphones (e.g., Zoiper, X-Lite)
• PBX (Private Branch Exchange) Systems
• VoIP Management Software
• Call Center Solutions (e.g., Asterisk, 3CX)
VoIP Network Infrastructure
• Quality of Service (QoS) Configuration
• VPNs (Virtual Private Networks) for VoIP
• VoIP Traffic Shaping & Bandwidth Management
• Firewall and Security Configurations for VoIP
• Network Monitoring & Optimization Tools
VoIP Security
• Encryption (SRTP, TLS)
• Authentication and Authorization
• Firewall & Intrusion Detection Systems
• VoIP Fraud DetectionVoIP Providers
• Hosted VoIP Services (e.g., RingCentral, Vonage)
• SIP Trunking Providers
• PBX Hosting & Managed Services
VoIP Quality and Testing
• Call Quality Monitoring
• Latency, Jitter, and Packet Loss Testing
• VoIP Performance Metrics and Reporting Tools
• User Acceptance Testing (UAT) for VoIP Systems
Integration with Other Systems
• CRM Integration (e.g., Salesforce with VoIP)
• Unified Communications (UC) Solutions
• Contact Center Integration
• Email, Chat, and Video Communication Integration
2 notes
·
View notes
Text
What is Argo CD? And When Was Argo CD Established?

What Is Argo CD?
Argo CD is declarative Kubernetes GitOps continuous delivery.
In DevOps, ArgoCD is a Continuous Delivery (CD) technology that has become well-liked for delivering applications to Kubernetes. It is based on the GitOps deployment methodology.
When was Argo CD Established?
Argo CD was created at Intuit and made publicly available following Applatix’s 2018 acquisition by Intuit. The founding developers of Applatix, Hong Wang, Jesse Suen, and Alexander Matyushentsev, made the Argo project open-source in 2017.
Why Argo CD?
Declarative and version-controlled application definitions, configurations, and environments are ideal. Automated, auditable, and easily comprehensible application deployment and lifecycle management are essential.
Getting Started
Quick Start
kubectl create namespace argocd kubectl apply -n argocd -f https://raw.githubusercontent.com/argoproj/argo-cd/stable/manifests/install.yaml
For some features, more user-friendly documentation is offered. Refer to the upgrade guide if you want to upgrade your Argo CD. Those interested in creating third-party connectors can access developer-oriented resources.
How it works
Argo CD defines the intended application state by employing Git repositories as the source of truth, in accordance with the GitOps pattern. There are various approaches to specify Kubernetes manifests:
Applications for Customization
Helm charts
JSONNET files
Simple YAML/JSON manifest directory
Any custom configuration management tool that is set up as a plugin
The deployment of the intended application states in the designated target settings is automated by Argo CD. Deployments of applications can monitor changes to branches, tags, or pinned to a particular manifest version at a Git commit.
Architecture
The implementation of Argo CD is a Kubernetes controller that continually observes active apps and contrasts their present, live state with the target state (as defined in the Git repository). Out Of Sync is the term used to describe a deployed application whose live state differs from the target state. In addition to reporting and visualizing the differences, Argo CD offers the ability to manually or automatically sync the current state back to the intended goal state. The designated target environments can automatically apply and reflect any changes made to the intended target state in the Git repository.
Components
API Server
The Web UI, CLI, and CI/CD systems use the API, which is exposed by the gRPC/REST server. Its duties include the following:
Status reporting and application management
Launching application functions (such as rollback, sync, and user-defined actions)
Cluster credential management and repository (k8s secrets)
RBAC enforcement
Authentication, and auth delegation to outside identity providers
Git webhook event listener/forwarder
Repository Server
An internal service called the repository server keeps a local cache of the Git repository containing the application manifests. When given the following inputs, it is in charge of creating and returning the Kubernetes manifests:
URL of the repository
Revision (tag, branch, commit)
Path of the application
Template-specific configurations: helm values.yaml, parameters
A Kubernetes controller known as the application controller keeps an eye on all active apps and contrasts their actual, live state with the intended target state as defined in the repository. When it identifies an Out Of Sync application state, it may take remedial action. It is in charge of calling any user-specified hooks for lifecycle events (Sync, PostSync, and PreSync).
Features
Applications are automatically deployed to designated target environments.
Multiple configuration management/templating tools (Kustomize, Helm, Jsonnet, and plain-YAML) are supported.
Capacity to oversee and implement across several clusters
Integration of SSO (OIDC, OAuth2, LDAP, SAML 2.0, Microsoft, LinkedIn, GitHub, GitLab)
RBAC and multi-tenancy authorization policies
Rollback/Roll-anywhere to any Git repository-committed application configuration
Analysis of the application resources’ health state
Automated visualization and detection of configuration drift
Applications can be synced manually or automatically to their desired state.
Web user interface that shows program activity in real time
CLI for CI integration and automation
Integration of webhooks (GitHub, BitBucket, GitLab)
Tokens of access for automation
Hooks for PreSync, Sync, and PostSync to facilitate intricate application rollouts (such as canary and blue/green upgrades)
Application event and API call audit trails
Prometheus measurements
To override helm parameters in Git, use parameter overrides.
Read more on Govindhtech.com
#ArgoCD#CD#GitOps#API#Kubernetes#Git#Argoproject#News#Technews#Technology#Technologynews#Technologytrends#govindhtech
2 notes
·
View notes
Text
#Playstation7 #framework #BasicArchitecture #RawCode #RawScript #Opensource #DigitalConsole
To build a new gaming console’s digital framework from the ground up, you would need to integrate several programming languages and technologies to manage different aspects of the system. Below is an outline of the code and language choices required for various parts of the framework, focusing on languages like C++, Python, JavaScript, CSS, MySQL, and Perl for different functionalities.
1. System Architecture Design (Low-level)
• Language: C/C++, Assembly
• Purpose: To program the low-level system components such as CPU, GPU, and memory management.
• Example Code (C++) – Low-Level Hardware Interaction:
#include <iostream>
int main() {
// Initialize hardware (simplified example)
std::cout << "Initializing CPU...\n";
// Set up memory management
std::cout << "Allocating memory for GPU...\n";
// Example: Allocating memory for gaming graphics
int* graphicsMemory = new int[1024]; // Allocate 1KB for demo purposes
std::cout << "Memory allocated for GPU graphics rendering.\n";
// Simulate starting the game engine
std::cout << "Starting game engine...\n";
delete[] graphicsMemory; // Clean up
return 0;
}
2. Operating System Development
• Languages: C, C++, Python (for utilities)
• Purpose: Developing the kernel and OS for hardware abstraction and user-space processes.
• Kernel Code Example (C) – Implementing a simple syscall:
#include <stdio.h>
#include <unistd.h>
int main() {
// Example of invoking a custom system call
syscall(0); // System call 0 - usually reserved for read in UNIX-like systems
printf("System call executed\n");
return 0;
}
3. Software Development Kit (SDK)
• Languages: C++, Python (for tooling), Vulkan or DirectX (for graphics APIs)
• Purpose: Provide libraries and tools for developers to create games.
• Example SDK Code (Vulkan API with C++):
#include <vulkan/vulkan.h>
VkInstance instance;
void initVulkan() {
VkApplicationInfo appInfo = {};
appInfo.sType = VK_STRUCTURE_TYPE_APPLICATION_INFO;
appInfo.pApplicationName = "GameApp";
appInfo.applicationVersion = VK_MAKE_VERSION(1, 0, 0);
appInfo.pEngineName = "GameEngine";
appInfo.engineVersion = VK_MAKE_VERSION(1, 0, 0);
appInfo.apiVersion = VK_API_VERSION_1_0;
VkInstanceCreateInfo createInfo = {};
createInfo.sType = VK_STRUCTURE_TYPE_INSTANCE_CREATE_INFO;
createInfo.pApplicationInfo = &appInfo;
vkCreateInstance(&createInfo, nullptr, &instance);
std::cout << "Vulkan SDK Initialized\n";
}
4. User Interface (UI) Development
• Languages: JavaScript, HTML, CSS (for UI), Python (backend)
• Purpose: Front-end interface design for the user experience and dashboard.
• Example UI Code (HTML/CSS/JavaScript):
<!DOCTYPE html>
<html>
<head>
<title>Console Dashboard</title>
<style>
body { font-family: Arial, sans-serif; background-color: #282c34; color: white; }
.menu { display: flex; justify-content: center; margin-top: 50px; }
.menu button { padding: 15px 30px; margin: 10px; background-color: #61dafb; border: none; cursor: pointer; }
</style>
</head>
<body>
<div class="menu">
<button onclick="startGame()">Start Game</button>
<button onclick="openStore()">Store</button>
</div>
<script>
function startGame() {
alert("Starting Game...");
}
function openStore() {
alert("Opening Store...");
}
</script>
</body>
</html>
5. Digital Store Integration
• Languages: Python (backend), MySQL (database), JavaScript (frontend)
• Purpose: A backend system for purchasing and managing digital game licenses.
• Example Backend Code (Python with MySQL):
import mysql.connector
def connect_db():
db = mysql.connector.connect(
host="localhost",
user="admin",
password="password",
database="game_store"
)
return db
def fetch_games():
db = connect_db()
cursor = db.cursor()
cursor.execute("SELECT * FROM games")
games = cursor.fetchall()
for game in games:
print(f"Game ID: {game[0]}, Name: {game[1]}, Price: {game[2]}")
db.close()
fetch_games()
6. Security Framework Implementation
• Languages: C++, Python, Perl (for system scripts)
• Purpose: Ensure data integrity, authentication, and encryption.
• Example Code (Python – Encrypting User Data):
from cryptography.fernet import Fernet
# Generate a key for encryption
key = Fernet.generate_key()
cipher_suite = Fernet(key)
# Encrypt sensitive user information (e.g., account password)
password = b"SuperSecretPassword"
encrypted_password = cipher_suite.encrypt(password)
print(f"Encrypted Password: {encrypted_password}")
# Decrypting the password
decrypted_password = cipher_suite.decrypt(encrypted_password)
print(f"Decrypted Password: {decrypted_password}")
7. Testing and Quality Assurance
• Languages: Python (for automated tests), Jest (for JavaScript testing)
• Purpose: Unit testing, integration testing, and debugging.
• Example Unit Test (Python using unittest):
import unittest
def add(a, b):
return a + b
class TestGameFramework(unittest.TestCase):
def test_add(self):
self.assertEqual(add(10, 20), 30)
if __name__ == '__main__':
unittest.main()
8. Order of Implementation
• Phase 1: Focus on core system architecture (low-level C/C++) and OS development.
• Phase 2: Develop SDK and start building the basic framework for UI and input management.
• Phase 3: Work on backend systems like the digital store and integrate with front-end UI.
• Phase 4: Begin rigorous testing and debugging using automated test suites.
This comprehensive approach gives you a detailed idea of how each component can be built using a combination of these languages and technologies. Each section is modular, allowing teams to work on different aspects of the console simultaneously.
[Pixel Art/Sprites/Buildinodels/VictoriaSecretPixelArtKit #Playstation7 #DearDearestBrands]

#victoriasecretrunway#runwaybattle#victoria secret fashion#victoria secert model#victoriasecret#victoria secret#VictoriaSecretRunwayBattle#capcom victoriasecret#capcom videogames#playstation7#ps7#deardearestbrands#capcom#digitalconsole#python#script#rawscript#raw code#framework#VictoriaSecretVideoGame#deardearestbrandswordpress
2 notes
·
View notes
Text
Thinking about it, fashion dreamer would have been a FANTASTIC $10 game. We're in the time of crazy inflation so really $25. I could see a greedy company pricing it at $35. Any more thought and it's just not worth it.
I love fashion dreamer, but there's not a lot of content. What is there is fun, but in like Style Savvy even without the story you'd still get to do characters hair and makeup and nails and pick out bags for them and scarves and bracelets and give them a WHOLE look. In fashion dreamer you JUST give them outfits.
The scoring system in fashion dreamer IS REALLY bad like it's not at all clear what counts for what category. Which is frustrating when it was crystal clear in style savvy.
The UI is clunky.
WTF were they thinking with "Type A" and "Type B"???? I'm not the only one to complain about this. But seriously it was done so poorly. It's clearly just men and women but late in development someone said "fuck make it gender inclusive". but they didn't change anything but the wording used. Ideally they would have not had types at all. But if they wanted to keep types they needed to make two versions of every item when modeling them. Some misinformed people are saying this isn't possible or is more work. But news flash, every item in this game was made from scratch. It was THEIR CHOICE to make completely separate items during modeling. They very well could have had their employees make two versions of each piece. Someone on the directors board didn't want it that way. Yeah they can't change it NOW but it's frustrating that they're pretending to be inclusive when it's very clear that from the games launch this wasn't in its design.
The game lags when you get more items, but also encourages you to get as many items as possible, but also has a 5000 item cap because of the lag.
I hate the online component lol I wasn't expecting this to be a 100% social game where you're missing content if you're not online ig. I just do notttttt want to interact with strangers in a game like this.
At the same time customers are currently pissed because the first event broke the servers so they took it down and it's been weeks and it's not back up. IMO limited events in a full price game like this is FUCKED, but they're ALSO online mode exclusive (that's so fucked!) so I can't even access the content.
It kinda seems like the reason it's not back is because staff went on Christmas break. If so ..... ooof
ALSO items from the event are fucking SINGLE USE. ?????????? this is a paid game what the fuck. Why are their single use anything? Why are events time limited? If you buy the game late you'll never get these items despite PAYING for them.
I wasn't really expecting much from the updates but really we should treat them like they don't exist. The first one just had two QOL features that should have been at launch. And with that in mind this is not a full priced game. It's not worth more than $25. This isn't the first time we've gotten a shallow, unfinished, and presumablypresumably rushed game from marvelous. and it probably won't be the last. I officially do not trust that team whatsoever. I doubt synsophia provided anything for the game other than the fashion itself, and maybe the NPCs, because the rest of it doesn't feel like their product in the way style savvy or PriMagi arcade does. I wish they didn't partner with them.
Like obviously me and everyone else wishes this was a style savvy game instead. But even without that, I wish this game had more soul. I also wished it felt finished? The actual gameplay loop feels finished but the UI does not. Not having all of the basic sort functions from Style Savvy (color / Item type / style) makes the game feel like a beta test. I stopped playing because someone will ask for red shoes and I have to scroll for 45 seconds to find them while I watch everything slowly pop in.
The removal of money and buying items in quantities is a blow to depth too, because in Style Savvy someone would ask for a cool shirt and you have to hope you still have one in stock. Meanwhile in fashion dreamer this is only a problem for the first hour before you have enough of everything.
Like style savvy had more AND had a story. frustrating. Again I don't mind no story, I get that that's better for modern audiences. But they lost me because of lack of depth everywhere else. ugh
I don't hate this game! I think it's a cute small play once a week or once a month pickup for 2 minutes game. But that's NOT how it's priced. I also think they're REALLY REALLY REALLY fumbling how they're handling events. If they wanted to handle events the way they are right now they game needed to be free to play.
12 notes
·
View notes
Text
Key Components Influencing the Cost for Developing a Binance Clone

Developing a cryptocurrency exchange platform similar to Binance requires careful consideration of various components that significantly influence development costs. Binance, known for its robust trading engine, extensive cryptocurrency support, advanced security measures, and user-friendly interface, sets a high standard in the industry. Entrepreneurs and businesses embarking on the journey to create a Binance clone must understand the key components and factors that impact development expenses. This guide explores essential components and considerations influencing the cost for developing a Binance clone, providing valuable insights and strategies for effective budgeting and planning.
1. Trading Engine
The trading engine is the heart of any cryptocurrency exchange platform, including a Binance clone. It facilitates the matching of buy and sell orders in real-time, ensuring efficient and secure transactions. The complexity and scalability of the trading engine significantly impact development costs:
Basic Order Matching: Implementing basic order matching algorithms is more cost-effective but may limit scalability during peak trading periods.
Advanced Order Types: Supporting advanced order types such as limit orders, market orders, stop-limit orders, and conditional orders requires sophisticated algorithms and increases development complexity and costs.
Scalability: Designing a scalable trading engine capable of handling high transaction volumes and market volatility entails additional development efforts and infrastructure costs.
2. User Interface (UI) and User Experience (UX)
A well-designed UI/UX is essential for attracting and retaining users on a cryptocurrency exchange platform. Factors influencing UI/UX design and development costs include:
Responsive Design: Ensuring seamless user experience across devices (desktop, mobile, tablet) requires adaptive and responsive design practices.
Intuitive Navigation: Simplifying navigation flows and enhancing user interaction through intuitive design elements and visual cues improves usability but adds to development costs.
Customization: Offering customizable dashboard layouts, theme options, and personalized user settings enhances user engagement but requires additional design and development efforts.
3. Security Features
Security is paramount in cryptocurrency exchanges to protect user funds, data, and transactions from cyber threats and vulnerabilities. Key security features influencing development costs include:
Encryption: Implementing robust encryption protocols (e.g., SSL/TLS) to secure data transmission and storage adds to development expenses.
Two-Factor Authentication (2FA): Integrating 2FA for user accounts enhances security but requires additional development and integration efforts.
Cold Wallet Storage: Supporting cold wallet storage solutions for storing a significant portion of user funds offline enhances security but entails setup and maintenance costs.
Security Audits: Conducting regular security audits and penetration testing to identify and mitigate potential vulnerabilities and compliance risks is crucial but adds to ongoing operational costs.
4. Cryptocurrency Support and Wallet Integration
Supporting a wide range of cryptocurrencies and integrating seamless wallet solutions are essential for catering to diverse user preferences and market demands:
Cryptocurrency Integration: Adding support for multiple cryptocurrencies (e.g., Bitcoin, Ethereum, Ripple) requires integration with blockchain networks and APIs, influencing development complexity and costs.
Wallet Integration: Seamless integration with external cryptocurrency wallets for deposits, withdrawals, and transfers enhances user convenience but necessitates additional development and testing efforts.
5. Regulatory Compliance
Navigating regulatory requirements and ensuring compliance with local and international laws is critical for operating a legitimate and secure cryptocurrency exchange:
KYC/AML Procedures: Implementing robust Know Your Customer (KYC) and Anti-Money Laundering (AML) procedures to verify user identities and monitor transactions for suspicious activities incurs development and operational costs.
Legal Consultations: Seeking legal counsel to interpret and comply with evolving regulatory frameworks adds to initial setup costs and ongoing compliance efforts.
6. Admin Panel and Backend Infrastructure
The admin panel and backend infrastructure form the operational backbone of a cryptocurrency exchange platform, influencing development costs in various ways:
Admin Dashboard: Developing a comprehensive admin dashboard for managing users, transactions, security settings, and platform operations requires backend development expertise and increases development costs.
Scalable Architecture: Designing a scalable backend architecture with load balancing, database management, and server infrastructure provisioning supports high availability and performance but requires initial investment in infrastructure setup and maintenance.
7. Customer Support and Community Engagement
Providing responsive customer support and fostering community engagement are crucial for user retention and platform credibility:
Support Channels: Establishing multiple support channels (e.g., ticketing system, live chat, email support) to address user inquiries and issues requires ongoing resource allocation and operational costs.
Community Management: Investing in community management strategies, including social media engagement, forums, and educational content, enhances user trust and platform adoption but adds to marketing and operational expenses.
Conclusion
Developing a Binance clone involves navigating various complexities and considerations that impact development costs. By understanding the key components influencing costs—such as the trading engine, UI/UX design, security features, cryptocurrency support, regulatory compliance, backend infrastructure, and customer support—entrepreneurs and businesses can effectively budget, plan, and execute their cryptocurrency exchange project.
2 notes
·
View notes