#deploy image to aws fargate
Explore tagged Tumblr posts
Visit Tumblr Blog
Explore Tumblr blogs with no restrictions, modern design and the best experience.
Last Seen Tumblr Blogs


Fun Fact
Tumblr Inc. is funded by 13 investors.
Text
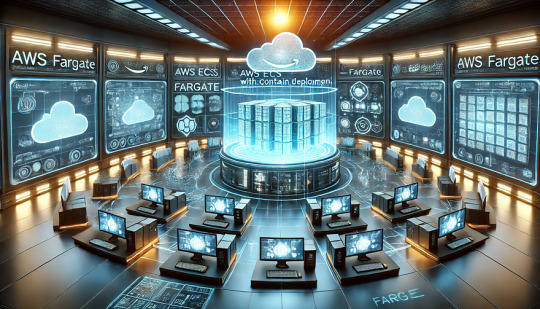
Deploy Docker Image to AWS Cloud ECS Service | Docker AWS ECS Tutorial
Full Video Link: https://youtu.be/ZlR5onuwZzw Hi, a new #video on #AWS #ECS tutorial is published on @codeonedigest #youtube channel. Learn how to deploy #docker image in AWS ECS fargate service. #deploydockerimageinaws #deploydockerimageinamazoncloud
Step by step guide for beginners to deploy docker image to cloud in AWS ECS service i.e. Elastic Container Service. Learn how to deploy docker container image to AWS ECS fargate. What is cluster and task definition in ECS service? How to create container in ECS service? How to run Task Definition to deploy Docker Image from Docker Hub repository? How to check the health of cluster and container?…

View On WordPress
#aws ecs demo#aws ecs docker compose tutorial#aws ecs fargate#aws ecs fargate tutorial#aws ecs service#aws ecs task definition#aws ecs tutorial#deploy docker container to aws#deploy docker image in amazon cloud#deploy docker image in aws#deploy docker image to aws#deploy docker image to aws ec2#deploy image to aws fargate#how to deploy docker image in ecs service#how to run docker image in ecs service#run docker image in cloud ecs service#what is ecs service
0 notes
Text
The Power of Amazon Web Services (AWS): A Detailed Guide for 2025
Amazon Web Services (AWS) is the leading cloud computing platform, providing a wide range of services that empower businesses to grow, innovate, and optimize operations efficiently. With an increasing demand for cloud-based solutions, AWS has become the backbone of modern enterprises, offering high-performance computing, storage, networking, and security solutions. Whether you are an IT professional, a business owner, or an aspiring cloud architect, understanding AWS can give you a competitive edge in the technology landscape.
In this blog we will guide and explore AWS fundamentals, key services, benefits, use cases, and future trends, helping you navigate the AWS ecosystem with confidence.
What is AWS?
Amazon Web Services (AWS) is a secure cloud computing platform that provides on-demand computing resources, storage, databases, machine learning, and networking solutions. AWS eliminates the need for physical infrastructure, enabling businesses to run applications and services seamlessly in a cost-effective manner.
With over 200 fully featured services, AWS powers startups, enterprises, and government organizations worldwide. Its flexibility, scalability, and pay-as-you-go pricing model make it a preferred choice for cloud adoption.
Key AWS Services You Must Know
AWS offers a vast range of services, categorized into various domains. Below are some essential AWS services that are widely used:
1. Compute Services
Amazon EC2 (Elastic Compute Cloud): Provides resizable virtual servers for running applications.
AWS Lambda: Enables serverless computing, allowing you to run code without provisioning or managing servers.
Amazon Lightsail: A simple virtual private server (VPS) for small applications and websites.
AWS Fargate: A serverless compute engine for containerized applications.
2. Storage Services
Amazon S3 (Simple Storage Service): Object storage solution for scalable data storage.
Amazon EBS (Elastic Block Store): Persistent block storage for EC2 instances.
Amazon Glacier: Low-cost archival storage for long-term data backup.
3. Database Services
Amazon RDS (Relational Database Service): Fully managed relational databases like MySQL, PostgreSQL, and SQL Server.
Amazon DynamoDB: NoSQL database for key-value and document storage.
Amazon Redshift: Data warehousing service for big data analytics.
4. Networking and Content Delivery
Amazon VPC (Virtual Private Cloud): Provides a secure and isolated network in AWS.
Amazon Route 53: Scalable domain name system (DNS) service.
AWS CloudFront: Content delivery network (CDN) for fast and secure content delivery.
5. Security and Identity Management
AWS IAM (Identity and Access Management): Provides secure access control to AWS resources.
AWS Shield: DDoS protection for applications.
AWS WAF (Web Application Firewall): Protects applications from web threats.
6. Machine Learning & AI
Amazon SageMaker: Builds, trains, and deploys machine learning models.
Amazon Rekognition: Image and video analysis using AI.
Amazon Polly: Converts text into speech using deep learning.
Benefits of Using AWS
1. Scalability and Flexibility
AWS enables businesses to scale their infrastructure dynamically, ensuring seamless performance even during peak demand periods.
2. Cost-Effectiveness
With AWS's pay-as-you-go pricing, businesses only pay for the resources they use, reducing unnecessary expenses.
3. High Availability and Reliability
AWS operates in multiple regions and availability zones, ensuring minimal downtime and high data redundancy.
4. Enhanced Security
AWS offers advanced security features, including encryption, identity management, and compliance tools, ensuring data protection.
5. Fast Deployment
With AWS, businesses can deploy applications quickly, reducing time-to-market and accelerating innovation.
Popular Use Cases of AWS
1. Web Hosting
AWS is widely used for hosting websites and applications with services like EC2, S3, and CloudFront.
2. Big Data Analytics
Enterprises leverage AWS services like Redshift and AWS Glue for data warehousing and ETL processes.
3. DevOps and CI/CD
AWS supports DevOps practices with services like AWS CodePipeline, CodeBuild, and CodeDeploy.
4. Machine Learning and AI
Organizations use AWS AI services like SageMaker for building intelligent applications.
5. IoT Applications
AWS IoT Core enables businesses to connect and manage IoT devices securely.
Future Trends in AWS and Cloud Computing
1. Serverless Computing Expansion
More businesses are adopting AWS Lambda and Fargate for running applications without managing servers.
2. Multi-Cloud and Hybrid Cloud Adoption
AWS Outposts and AWS Hybrid Cloud solutions are bridging the gap between on-premise and cloud environments.
3. AI and Machine Learning Growth
AWS continues to enhance AI capabilities, driving innovation in automation and data processing.
4. Edge Computing Development
AWS Wavelength and AWS Local Zones will expand the reach of cloud computing to edge devices.
Conclusion
Amazon Web Services (AWS) is transforming how businesses operate in the digital era, providing unmatched scalability, security, and performance. Whether you are an enterprise looking to migrate to the cloud, a developer building applications, or a data scientist leveraging AI, AWS has a solution to your needs.
By mastering AWS, you can explore new career opportunities and drive business innovation. Start your AWS journey today and explore the limitless possibilities of cloud computing.
0 notes
Text
Deploying Containers on AWS ECS with Fargate
Introduction
Amazon Elastic Container Service (ECS) with AWS Fargate enables developers to deploy and manage containers without managing the underlying infrastructure. Fargate eliminates the need to provision or scale EC2 instances, providing a serverless approach to containerized applications.
This guide walks through deploying a containerized application on AWS ECS with Fargate using AWS CLI, Terraform, or the AWS Management Console.
1. Understanding AWS ECS and Fargate
✅ What is AWS ECS?
Amazon ECS (Elastic Container Service) is a fully managed container orchestration service that allows running Docker containers on AWS.
✅ What is AWS Fargate?
AWS Fargate is a serverless compute engine for ECS that removes the need to manage EC2 instances, providing:
Automatic scaling
Per-second billing
Enhanced security (isolation at the task level)
Reduced operational overhead
✅ Why Choose ECS with Fargate?
✔ No need to manage EC2 instances ✔ Pay only for the resources your containers consume ✔ Simplified networking and security ✔ Seamless integration with AWS services (CloudWatch, IAM, ALB)
2. Prerequisites
Before deploying, ensure you have:
AWS Account with permissions for ECS, Fargate, IAM, and VPC
AWS CLI installed and configured
Docker installed to build container images
An existing ECR (Elastic Container Registry) repository
3. Steps to Deploy Containers on AWS ECS with Fargate
Step 1: Create a Dockerized Application
First, create a simple Dockerfile for a Node.js or Python application.
Example: Node.js DockerfiledockerfileFROM node:16-alpine WORKDIR /app COPY package.json . RUN npm install COPY . . CMD ["node", "server.js"] EXPOSE 3000
Build and push the image to AWS ECR:shaws ecr create-repository --repository-name my-app docker build -t my-app . docker tag my-app:latest <AWS_ACCOUNT_ID>.dkr.ecr.<REGION>.amazonaws.com/my-app:latest aws ecr get-login-password --region <REGION> | docker login --username AWS --password-stdin <AWS_ACCOUNT_ID>.dkr.ecr.<REGION>.amazonaws.com docker push <AWS_ACCOUNT_ID>.dkr.ecr.<REGION>.amazonaws.com/my-app:latest
Step 2: Create an ECS Cluster
Use the AWS CLI to create a cluster:shaws ecs create-cluster --cluster-name my-cluster
Or use Terraform:hclresource "aws_ecs_cluster" "my_cluster" { name = "my-cluster" }
Step 3: Define a Task Definition for Fargate
The task definition specifies how the container runs.
Create a task-definition.js{ "family": "my-task", "networkMode": "awsvpc", "executionRoleArn": "arn:aws:iam::<AWS_ACCOUNT_ID>:role/ecsTaskExecutionRole", "cpu": "512", "memory": "1024", "requiresCompatibilities": ["FARGATE"], "containerDefinitions": [ { "name": "my-container", "image": "<AWS_ACCOUNT_ID>.dkr.ecr.<REGION>.amazonaws.com/my-app:latest", "portMappings": [{"containerPort": 3000, "hostPort": 3000}], "essential": true } ] }
Register the task definition:shaws ecs register-task-definition --cli-input-json file://task-definition.json
Step 4: Create an ECS Service
Use AWS CLI:shaws ecs create-service --cluster my-cluster --service-name my-service --task-definition my-task --desired-count 1 --launch-type FARGATE --network-configuration "awsvpcConfiguration={subnets=[subnet-xyz],securityGroups=[sg-xyz],assignPublicIp=\"ENABLED\"}"
Or Terraform:hclresource "aws_ecs_service" "my_service" { name = "my-service" cluster = aws_ecs_cluster.my_cluster.id task_definition = aws_ecs_task_definition.my_task.arn desired_count = 1 launch_type = "FARGATE" network_configuration { subnets = ["subnet-xyz"] security_groups = ["sg-xyz"] assign_public_ip = true } }
Step 5: Configure a Load Balancer (Optional)
If the service needs internet access, configure an Application Load Balancer (ALB).
Create an ALB in your VPC.
Add an ECS service to the target group.
Configure a listener rule for routing traffic.
4. Monitoring & Scaling
🔹 Monitor ECS Service
Use AWS CloudWatch to monitor logs and performance.shaws logs describe-log-groups
🔹 Auto Scaling ECS Tasks
Configure an Auto Scaling Policy:sh aws application-autoscaling register-scalable-target \ --service-namespace ecs \ --scalable-dimension ecs:service:DesiredCount \ --resource-id service/my-cluster/my-service \ --min-capacity 1 \ --max-capacity 5
5. Cleaning Up Resources
After testing, clean up resources to avoid unnecessary charges.shaws ecs delete-service --cluster my-cluster --service my-service --force aws ecs delete-cluster --cluster my-cluster aws ecr delete-repository --repository-name my-app --force
Conclusion
AWS ECS with Fargate simplifies container deployment by eliminating the need to manage servers. By following this guide, you can deploy scalable, cost-efficient, and secure applications using serverless containers.
WEBSITE: https://www.ficusoft.in/aws-training-in-chennai/
0 notes
Text
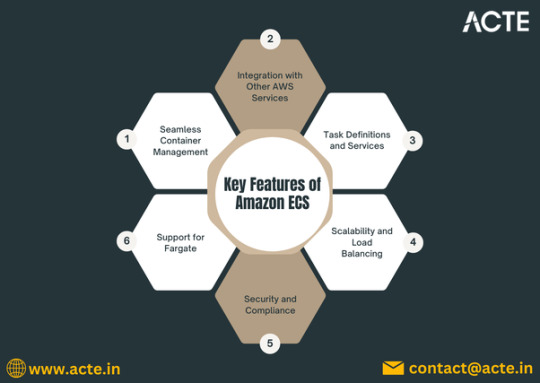
Exploring Amazon ECS: A Comprehensive Guide to AWS's Container Management Service
Amazon Elastic Container Service (ECS) is a powerful and flexible container orchestration service offered by Amazon Web Services (AWS). Designed for developers and organizations looking to deploy and manage containerized applications, ECS simplifies the orchestration process. In this blog, we'll explore the features, benefits, and best practices of using Amazon ECS.
If you want to advance your career at the AWS Course in Pune, you need to take a systematic approach and join up for a course that best suits your interests and will greatly expand your learning path.
What is Amazon ECS?
Amazon ECS allows you to run Docker containers on a managed cluster of Amazon EC2 instances. It abstracts the complexity of infrastructure management, enabling you to focus on building and deploying applications. With ECS, you can easily manage the lifecycle of your containers, scale applications based on demand, and integrate with other AWS services.
Key Features of Amazon ECS
1. Task Definitions
Task definitions are a crucial component of ECS. They define the parameters for your containers, including the Docker image to use, CPU and memory requirements, networking settings, and environment variables. This makes it easy to deploy consistent and repeatable container instances.
2. Service Management
ECS allows you to define services that maintain a specified number of task instances running at all times. If a task fails, ECS automatically replaces it, ensuring high availability for your applications.
3. Integration with AWS Services
ECS seamlessly integrates with other AWS services, such as Amazon RDS, Amazon S3, and AWS Lambda. This integration helps you build complex applications that leverage the full power of the AWS ecosystem.
4. Scalability and Load Balancing
ECS supports auto-scaling, allowing you to adjust the number of running tasks based on application demand. You can set up policies that scale your services in or out automatically, ensuring optimal performance while minimizing costs.
5. Security Features
ECS provides robust security controls, including IAM roles for fine-grained access management, VPC support for network isolation, and encryption options for sensitive data. This helps you maintain compliance and protect your applications.
6. Support for Fargate
AWS Fargate is a serverless compute engine for running containers. With Fargate, you can run ECS tasks without managing the underlying EC2 instances, simplifying deployment and scaling further.
To master the intricacies of AWS and unlock its full potential, individuals can benefit from enrolling in the AWS Online Training.
Benefits of Using Amazon ECS
Cost Efficiency: With ECS, you only pay for the resources you use, reducing infrastructure costs. Fargate eliminates the need for provisioning EC2 instances, allowing for more flexible billing.
High Availability: ECS is built for resilience. Its automatic health checks and self-healing capabilities ensure your applications remain available even in the face of failures.
Flexibility in Deployment: You can choose to run your containers on EC2 instances or use Fargate, giving you the flexibility to select the best deployment model for your needs.
Best Practices for Using Amazon ECS
Use Task Definitions Wisely: Create reusable task definitions to minimize duplication and ensure consistency across environments.
Implement Auto-Scaling: Set up auto-scaling policies based on metrics such as CPU utilization or request count to optimize resource usage.
Leverage IAM for Security: Use IAM roles to define permissions for your tasks, ensuring that your applications have access to only the resources they need.
Monitor and Log: Utilize AWS CloudWatch for monitoring and logging your ECS services. This will help you identify performance bottlenecks and troubleshoot issues.
Test Before Production: Always test your applications in a staging environment before deploying to production. This helps catch issues early and ensures a smooth rollout.
Conclusion
Amazon ECS is a robust solution for managing containerized applications in the cloud. With its rich feature set, seamless integration with AWS services, and support for both EC2 and Fargate, ECS provides the tools necessary to build, deploy, and scale applications efficiently. By understanding its capabilities and following best practices, you can harness the full potential of Amazon ECS to enhance your application development and deployment processes.
0 notes
Text
Exploring AWS Cloud Development Tools: Empowering Innovation and Efficiency
As businesses increasingly transition to the cloud, the demand for robust and efficient development tools continues to rise. Amazon Web Services (AWS) offers a comprehensive suite of powerful tools designed to assist developers in designing, building, deploying, and managing applications in the cloud. These tools aim to enhance productivity, foster collaboration, and streamline the development process, whether the focus is on a simple website or a complex enterprise application.
In this blog post, we will delve into some of the key AWS cloud development tools, examining their functionality and the benefits they provide to developers and organizations alike.
Key AWS Cloud Development Tools
AWS offers a diverse range of development tools that span the entire software lifecycle. These tools enable developers to write code, automate deployment processes, monitor applications, and optimize performance. Below are some of the most significant AWS cloud development tools:
1. AWS Cloud9
AWS Cloud9 is a cloud-based Integrated Development Environment (IDE) that enables developers to write, run, and debug code directly from a browser. It supports a variety of programming languages, including JavaScript, Python, PHP, and more. As a cloud-based IDE, AWS Cloud9 offers the flexibility to code from any location, eliminating the need for local setup.
Key benefits of AWS Cloud9 include:
Collaboration: Developers can collaborate in real-time, sharing their environment with team members for paired programming or code reviews.
Serverless Development: Cloud9 features built-in support for AWS Lambda, facilitating the creation and management of serverless applications.
Preconfigured Environment: It removes the necessity to install and configure dependencies on a local machine, significantly reducing setup time.
2. AWS CodeCommit
AWS CodeCommit is a fully managed source control service that hosts Git repositories. Similar to GitHub or Bitbucket, CodeCommit allows teams to securely store and manage source code and other assets within private Git repositories.
Reasons to consider AWS CodeCommit:
Scalability: CodeCommit automatically scales with the size of your repository and the number of files.
Integration: It integrates seamlessly with other AWS services, such as AWS CodeBuild and CodePipeline, streamlining the development workflow.
Security: AWS CodeCommit utilizes AWS Identity and Access Management (IAM) for access control, ensuring the security of your code.
3. AWS CodeBuild
AWS CodeBuild is a fully managed build service that compiles source code, runs tests, and produces software packages ready for deployment. It eliminates the need to manage build servers, enhancing the speed and efficiency of the build process.
Key benefits of AWS CodeBuild:
Continuous Scaling: AWS CodeBuild automatically scales to handle multiple builds simultaneously, significantly reducing wait times for larger projects.
Custom Build Environments: It allows for the customization of build environments using Docker images or provides access to pre-configured environments.
Pay-as-You-Go: Users are charged only for the build time consumed, leading to potential cost savings for teams that run builds intermittently.
4. AWS CodeDeploy
AWS CodeDeploy streamlines the deployment of applications across various services, including Amazon EC2, AWS Fargate, AWS Lambda, and on-premises servers. It supports both blue/green and rolling deployments, thereby minimizing downtime and mitigating the risk of deployment errors.
Key features of AWS CodeDeploy include:
Automation: CodeDeploy automates deployment tasks, ensuring consistency across different environments and reducing the potential for human error.
Monitoring: Integration with Amazon CloudWatch and AWS X-Ray allows for effective monitoring of deployments and application performance.
Flexibility: It accommodates various deployment types, including blue/green deployments for near-zero downtime and rollback functionality in the event of a failure.
5. AWS CodePipeline
AWS CodePipeline is a continuous integration and continuous delivery (CI/CD) service that automates the steps necessary for software release. It automates the building, testing, and deployment of applications with every code change, ensuring faster and more reliable releases.
Key benefits of AWS CodePipeline:
End-to-End Automation: It automates each stage of the development lifecycle, from coding through to production deployment.
Flexibility: CodePipeline integrates seamlessly with a variety of third-party tools, including GitHub and Jenkins, allowing developers to utilize familiar tools.
Faster Releases: Automated testing and deployment pipelines enable teams to release features more rapidly, with minimal downtime or manual intervention.
6. AWS X-Ray
AWS X-Ray assists developers in analyzing and debugging distributed applications, particularly those utilizing a microservices architecture. It generates a detailed map of the components and services interacting with the application, simplifying the process of troubleshooting performance bottlenecks and errors.
Key features of AWS X-Ray:
End-to-End Tracing: AWS X-Ray traces requests across all components of the application, from the frontend to the backend, offering comprehensive visibility into the performance of each service.
Seamless Integration with AWS Services: X-Ray integrates effortlessly with AWS Lambda, Elastic Load Balancing, Amazon EC2, and a variety of other AWS services.
Root Cause Analysis: This tool assists in identifying the root causes of performance issues and errors, facilitating the optimization of the application’s architecture.
Conclusion
AWS cloud development tools empower developers to enhance efficiency, automate manual tasks, and build scalable, secure applications. Whether you are just beginning your journey in cloud development or managing extensive projects, these tools provide the flexibility and capability required to create high-quality cloud-based applications. By incorporating services such as AWS CodeCommit, CodeBuild, and CodeDeploy into your workflow, you can improve collaboration, elevate code quality, and expedite the release cycle—ultimately driving business success in a cloud-first environment.
0 notes
Text
EKS must know:
Amazon Elastic Kubernetes Service (aka Amazon EKS) is a managed container service to run and scale Kubernetes applications in the cloud or on-premises.
There is also EKS anywhere which I will be talking about in another article which allows customers to create and operate Kubernetes clusters on-premises while deploying on customers virtual machines. There are two options supported, One is Bare Metal cluster and Second is VMware Vsphere.
EKS uses aws-iam-authenticator to generate tokens that should be passed to the kube-apiserver in order to verify authentication.
The command is : aws eks get-token --cluster <cluster-name>
After the authentication, Authorization is made by verifying the user access by checking aws-auth configmap. Here, we are talking about RBAC rules that were discussed in my previous article.
Make sure to grant the least privileged access to IAM users in aws-auth.
There are two types of endpoints of EKS cluster, public and private. If public endpoint is needed, you ca restrict access to a range of IPs
When the cluster is created, the creator is granted system:masters permission, however, this is not included in the aws-auth.
Two things to note here, using this role should be limited to creating new permissions in the configmap or in emergency cases.
Second thing is to avoid giving this role any other rbac permissions in the configmap as it overrides the system:masters.
The best way for pods to be allowed certain permissions to call kubernetes APIs is to use a service account (namespace default or a custom one).
This service account's token will be mounted at /var/run/secrets/kubernetes.io/serviceaccount.
Please make sure to check IRSA which is a feature to assign roles to service accounts through an IAM OIDC provider. The AWS_ROLE_ARN and AWS_WEB_IDENTITY_TOKEN_FILE are injected in the pod as environment variables.
Blocking/limiting access to instance metadata from pods is also recommended.
Avoid running pods in privileged mode as it inherits all of the linux capabilities associated with root on the host.
There are different types to apply certain requirements for pods before being created such as OPA gatekeeper and Pod security admission( offering 3 modes : audit/warn/enforce)
You can disable service account token mounts if the pod doesnt need access to k8s APIs.
It is recommended to enable controle plane logs which include API server, controller manager and scheduler logs.
You can check cloudwatch log insights for more detailed logs of your eks cluster
With eks, you can use network policies as well as calico or cilium.
Check AWS VPC flow logs for information about traffic going thru your cluster to look for unusual activities
When creating EKS cluster, a security group is created to allow traffic between control plane and the woker nodes.
For volume provisioning and secrets, you can check EBS CSI driver, EFS CSI driver, secrets store CSI driver.
To enforce security and permission boundries, you can use bottlerocket OS that is made to run linux containers
Make sure to always update your worker nodes with the latest patch/updates.
With eks fargate, AWS automatically updates the nodes for you.
Make sure to always scan/sign your docker images.
Install kubernetes metrics server in order to collect metrics from applications that can be used to scale applications using HPA and VPA
Make use of health checks such as liveness probe, startup probe and readiness probe. Kubelet is the one responsible for executing these health checks.
Use PDB, AWS node termination handler to control the behavior of pods termination in case of an update or crash of worker nodes.
Check Xray or Jaeger for tracing to have detailed information on your applications requests.
Check topology spread constraints for pods in order to avoid failures of AZs which impacts your pods.
EKS supports AWS VPC CNI for assigning IPs to pods. Please note that the number of IPs that can be allocated depends on the number of ENIs that can be attached to a worker node and how many IPs it supports
L-IPAMD is a local IP adress management daemon who is responsible for assigning IPs to pods.
You can check CNI custom networking to avoid IP allocation/shortage issues. This can be done by setting AWS_VPC_K8S_CNI_CUSTOM_NETWORK_CFG to true.
To calculate the maximum number of pods that can be placed on a worker node : max = (number of ENIs -1) * (max IPv4 adr per ENI -1 ) +2
If you are using IPv6 for your cluster, it is no longer needed to use custom networking.
Please note that a security group is attached to an ec2 instance, meaning that all of the ENIs attached to an ec2 share the same security group. However, you can use "security groups for pods" which will be applied to specific pods meaning that the networking security rules will be applied at the pod level. This is done by creating and attaching a trunk interface to the nodes. The VPC resource controller then creates branch interfaces that will be associated to pods
0 notes
Text
Aws ec2 pricing

(To be clear, the servers still exist AWS just manages them for you.) Note, however, that Fargate is different from AWS Lambda, another type of serverless computing service that was not designed to run containers specifically (although Lamba does now support the deployment of container images). But Fargate automates infrastructure setup and container deployment, making the overall process simpler.ĪWS describes Fargate as a serverless compute engine because it eliminates the need for end-users to manage the servers that host containers. You pay only for the resources consumed when your containers are actually running.Īgain, Fargate still relies on either ECS or EKS to handle container orchestration tasks. Then, Fargate automatically provisions the host servers for you. You simply tell Fargate which container images you want to run and provide some details about how many compute and memory resources to allocate to them. How Does Fargate Work?įargate works by letting you deploy containers without having to set up or manage the infrastructure that hosts them. In the latter case, ECS or EKS handle container deployment and scheduling on their own. You can use ECS or EKS in what you might call standard mode, meaning without Fargate. In other words, Fargate is one way to deploy containers on both EKS and ECS. Instead, think of Fargate as an optional “deployment mode” that can – but does not necessarily have to – be used in conjunction with one of AWS’s container services to manage the way infrastructure is set up and containers are deployed onto it. So, Fargate isn’t an alternative to or competitor with EKS or ECS. It relies on other orchestrators – namely, EKS or ECS – to do the actual orchestration. Fargate isn’t a container deployment service per se, because it doesn’t orchestrate containers on its own. Where things start to get complicated is when Fargate enters the picture. On the surface, EKS and ECS seem simple enough. In these situations, you can use private infrastructure to host your applications, even though the orchestration control plane would remain hosted in the AWS public cloud.) What about Fargate? (The exception is if you use EKS Anywhere or if you run ECS or EKS via AWS Outposts, AWS’s hybrid cloud framework. In most cases, ECS and EKS also rely on infrastructure that is hosted by AWS. AWS built ECS back in the days of the “ orchestrator wars,” before it was clear that Kubernetes would become, by far and away, the leading container orchestration platform.īoth of these services let you do basically the same thing, albeit in slightly different ways: deploy containerized applications using an orchestration layer that is hosted in the AWS cloud. Elastic Container Engine (ECS): ECS is a container deployment service powered by a proprietary container orchestration engine that Amazon developed itself.You could also call it a Kubernetes distribution or Kubernetes-as-a-Service. Elastic Kubernetes Service (EKS): EKS is a container deployment service based on open source Kubernetes.Let’s start by defining the two main services that Amazon offers for deploying containerized applications: We’ll also clarify where ECS fits within all of this, even though ECS is not the focus of this article.Īnd we’ll answer the biggest question that many AWS users face today, which is when it does and doesn’t make sense to deploy containerized apps using Fargate, as opposed to using standard EKS. Below, we unpack the complex relationship between AWS Fargate and EKS. If you’re struggling to figure out what all of the above means – if, in other words, you’re confused by all the talk about schedulers and orchestrators and “Fargate mode” and so on – this article is for you. But they work in different ways, and understanding the small details surrounding them is critical for planning the right AWS container strategy. And then there’s Fargate – which, admittedly, is not an acronym, but its name is also not exactly easy to interpret.Īll of these services and tools play a role in orchestrating and scheduling containers in the AWS cloud. There’s ECS, another container orchestrator that kind of does the same thing as EKS, but not really. There’s EKS, Amazon’s managed Kubernetes service. When you try to wrap your mind around container deployment services in the Amazon Web Services (AWS) cloud, you can easily feel like you’re drowning in alphabet soup. AWS EKS with and without Fargate: Understanding the Differences
0 notes
Text
Aws fargate startup time

Select FARGATE launch type, the previously created task as the task definition, and all other properties to your needs (e.g., I needed the service to run in a specific Subnet to make it accessible to other parts of my application).Add the container definition, referencing the previously uploaded Docker image from the AWS ECR, and specifying memory limits and port forwardings.Set name, roles, and resource specification for the task, appropriate for the containerized service you’re using.Create a new task definition and select the Fargate launch type.Create a cluster and select the Networking only optionĪmazon ECS Cluster with Networking only option.Create AWS ECR (Elastic Container Registry) repository.I followed this step-by-step approach to deploy my dockerized bookkeeper application using Fargate. I wanted to reuse those to allow my already deployed and monitored webapp talk to the service managed by ECS. At this time, Fargate is only available for that region. Unfortunately, the offered first-run-wizard didn’t allow me to reuse existing subnets and security groups and that was not practical in my case. Make sure you work in the North Virginia region. To be more precise, AWS Fargate allows you to run containers without having to manage underlying EC2 instances, removing the need to choose server types and think about scale. Fargate is short for ‘AWS manages compute resources so you don’t have to worry about that’. Application architecture What rhymes with Stargate?įargate. Furthermore, a Node.js web application queries the Spring Boot application for book records and displays the results in an Express web frontend. For ease of use and the use case at hand, I containerized both application components using Docker. I wrote a simple Spring Boot application called bookkeeper, that manages book records in an AWS RDS instance running the MariaDB engine. Naturally, I was also looking to get insights into my application and for an efficient way to include Dynatrace in the deployment process. Curious as I am, I deployed a simple demo app using AWS Fargate to find out how it works. Technologies like kubeless.io, Fission, and AWS Fargate promise to relieve app developers from the operational complexity of running entire applications in a reliable, resilient, and scalable way, by hiding the underlying virtual computing resources. Everyone’s talking about #serverless these days.
0 notes
Text
This article is part 1 of a 4 part guide to running Docker containers on AWS ECS. ECS stands for Elastic Container Service. It is a managed container service that can run docker containers. Although AWS also offers container management with Kubernetes, (EKS) it also has its proprietary solution (ECS). The guide will cover: Creating the ECS Cluster. Provision an Image Registry (ECR) and push docker images to the registry. Deploying Containers to the cluster using Task and Service Definitions. Creating a Pipeline to Update the services running on the ECS Cluster. This guide will cover how to create the ECS cluster. Requirements/Prerequisites Before proceeding with this guide, the reader/user must have: An AWS Account. Created a User on the account with Permissions to provision resources on the account. Generated an EC2 SSH Key-Pair. Created a VPC and Subnets (Optional). A guide to create VPC and Subnets (AWS Network Architecture) can be found on the link below: Create AWS VPC With CloudFormation Creating the AWS ECS Cluster There are two types of ECS clusters we can create. ECS with Fargate cluster: This is a cluster that allows the user to run containers without the need to worry about provisioning and managing EC2 instances/servers. It is basically a serverless architecture. ECS with EC2 Instances cluster: This cluster allows a user to run containers on provisioned EC2 instances. Hence the need to manage the servers. Create an AWS ECS Cluster with Fargate Option To create the cluster we can do so manually or automatically using either CloudFormation or Terraform. For this article, I will create the cluster using CloudFormation and manually. CloudFormation: The below CloudFormation Template creates an ECS cluster with a capacity provider as Fargate and Container Insights enabled. The reader should modify the template settings to customize to their specific requirements. Key aspects to change will be: Tags. The Cluster Settings. AWSTemplateFormatVersion: "2010-09-09" Description: "Create ECS fargate cluster" Parameters: Name: Type: String Description: The name of the ECS Cluster Resources: ECSCluster: Type: 'AWS::ECS::Cluster' Properties: ClusterName: !Ref Name ClusterSettings: - Name: containerInsights Value: enabled CapacityProviders: - FARGATE Tags: - Key: "Name" Value: "test-ecs" - Key: "CreatedBy" Value: "Maureen Barasa" - Key: "Environment" Value: "test" Outputs: ECS: Description: The created ECS Cluster Value: !Ref ECSCluster Manually: To manually create the cluster follow the below steps. On the Elastic Container Services console, click create cluster. Create Cluster Then, for the cluster template, select Powered by Fargate as your option. Click next step. Select Cluster Template (Powered by Fargate) Finally, configure cluster setting and click create cluster. N/B: You can create a new VPC for the cluster. But this is optional. Configure Cluster Settings You now have your ECS Fargate cluster running. Create an AWS ECS Cluster with EC2 Option We can also do this using CloudFormation, Terraform, or manually. CloudFormation: For CloudFormation, use the below template. AWSTemplateFormatVersion: "2010-09-09" Description: "Create ECS fargate cluster" Parameters: Name: Type: String Description: The name of the ECS Cluster VPC: Type: String Description: The vpc to launch the service Default: vpc-ID PrivateSubnet01: Type: String Description: The subnet where to launch the ecs instances Default: subnet-ID PrivateSubnet02:
Type: String Description: The subnet where to launch the ecs instances Default: subnet-ID InstanceType: Type: String Description: The EC2 instance type Default: "t2.micro" MinSize: Type: String Description: The subnet where to launch the ec2 Default: 1 MaxSize: Type: String Description: The subnet where to launch the ec2 Default: 2 DesiredSize: Type: String Description: The subnet where to launch the ec2 Default: 1 Resources: IAMInstanceRole: Type: 'AWS::IAM::Role' Properties: Description: The ECS Instance Role RoleName: ecsInstanceRole2 AssumeRolePolicyDocument: Version: 2012-10-17 Statement: - Effect: Allow Principal: Service: - ec2.amazonaws.com Action: - 'sts:AssumeRole' ManagedPolicyArns: - arn:aws:iam::aws:policy/service-role/AmazonEC2ContainerServiceforEC2Role - arn:aws:iam::aws:policy/CloudWatchAgentServerPolicy - arn:aws:iam::aws:policy/AmazonS3ReadOnlyAccess Tags: - Key: "Environment" Value: "test" - Key: "createdBy" Value: "Maureen Barasa" - Key: "Name" Value: "ecsInstanceRole2" IAMInstanceProfile: Type: AWS::IAM::InstanceProfile Properties: InstanceProfileName: ecsInstanceRole2 Roles: - !Ref IAMInstanceRole ECSSecurityGroup: Type: "AWS::EC2::SecurityGroup" Properties: GroupDescription: "Security Group to control access to the ECS cluster" GroupName: "test-ECS-SG" VpcId: !Ref VPC SecurityGroupIngress: - CidrIp: 0.0.0.0/0 FromPort: 80 IpProtocol: "tcp" ToPort: 80 - CidrIp: 0.0.0.0/0 FromPort: 443 IpProtocol: "tcp" ToPort: 443 Tags: - Key: "Name" Value: "test-ECS-SG" - Key: "CreatedBy" Value: "Maureen Barasa" - Key: "Environment" Value: "test" ECSCluster: Type: 'AWS::ECS::Cluster' Properties: ClusterName: !Ref Name ClusterSettings: - Name: containerInsights Value: enabled Tags: - Key: "Name" Value: "test-ecs" - Key: "CreatedBy" Value: "Maureen Barasa" - Key: "Environment" Value: "test" ECSAutoScalingGroup: Type: AWS::AutoScaling::AutoScalingGroup Properties: VPCZoneIdentifier: - !Ref PrivateSubnet01 - !Ref PrivateSubnet02 LaunchConfigurationName: !Ref LaunchConfiguration MinSize: !Ref MinSize MaxSize: !Ref MaxSize DesiredCapacity: !Ref DesiredSize HealthCheckGracePeriod: 300 Tags: - Key: "Name" Value: "test-ecs" PropagateAtLaunch: true - Key: "CreatedBy" Value: "MaureenBarasa" PropagateAtLaunch: true - Key: "Environment" Value: "test" PropagateAtLaunch: true LaunchConfiguration: Type: AWS::AutoScaling::LaunchConfiguration
Properties: ImageId: "ami-ID" SecurityGroups: - !Ref ECSSecurityGroup InstanceType: !Ref InstanceType IamInstanceProfile: !Ref IAMInstanceProfile KeyName: "test-key" UserData: Fn::Base64: !Sub | #!/bin/bash echo ECS_CLUSTER=test-ecs >> /etc/ecs/ecs.config;echo ECS_BACKEND_HOST= >> /etc/ecs/ecs.config; BlockDeviceMappings: - DeviceName: "/dev/xvda" Ebs: Encrypted: false VolumeSize: 20 VolumeType: "gp2" DeleteOnTermination: true Outputs: IAMProfile: Description: The created EC2 Instance Role Value: !Ref IAMInstanceProfile AutoScalingGroup: Description: The ECS Autoscaling Group Value: !Ref ECSAutoScalingGroup ECS: Description: The created ECS Cluster Value: !Ref ECSCluster On the parameter section of the template, enter the specific customized inputs for your cluster. This include: The VPC and Subnets. The Instance Type and Auto Scaling Group Scaling Requirements. Under the resources section. Take note to customize: Resources Names and Tags. The Key Name of your EC2 launch configuration (Use a Key-Pair you have generated). The AMI-ID for your EC2 Instances. (Use an Amazon ECS-optimized AMIs on your account). After the CloudFormation finishes executing the stack, You should now have an ECS cluster with a registered active EC2 container instance. See below: ECS Cluster with a Container Instance Manually: To create the cluster manually follow the below steps: Create an ECS Instance Role with the following AWS Managed Policies: AmazonS3ReadOnlyAccess CloudWatchAgentServerPolicy Amazon EC2ContainerServiceforEC2Role Edit the role trust relationship and add the below JSON trust policy. "Version": "2008-10-17", "Statement": [ "Sid": "", "Effect": "Allow", "Principal": "Service": "ec2.amazonaws.com" , "Action": "sts:AssumeRole" ] Then, on the Elastic Container Service console, click create cluster. This time on the select cluster template window, instead of opting for Powered by Fargate, choose EC2 Linux + Networking option. Click next step. Select Cluster Template Next, you need to configure your cluster. On cluster configuration, we have 3 main sections: Cluster Name Instance Configuration Networking Cluster Name: Cluster Name Instance Configuration: Instance Configurations Ensure you select the correct instance configurations specific to your requirements. Networking: Networking Configurations Here, there is an option to create a new VPC, and Subnets should the user not have created his/her own. If they had already created a Network Architecture, the reader can use the existing setup. The same applies to the security group for the cluster. A new one can be created or we can choose an existing one. Then, for the container instance IAM Role, select the role you created above. Enable container insights by checking the box next to enable container insights. Configure IAM Role and Container Insights Finally click, create cluster. You will have a cluster up and running in a few minutes. Below is a link to part 2 of this series where I discuss deploying containers to the cluster using Task and Service Definitions. Running Docker Containers on AWS ECS – Upload Docker Images to ECR – Part 2 AWS ECS: Deploying Containers using Task and Service Definitions – Part 3 Important Links AWS ECS Manual ECS CloudFormation guide ECS IAM Role Creation
0 notes
Video
youtube
(via Deploy Docker Image to AWS Cloud ECS Service | Docker AWS ECS Tutorial)
Full Video Link: https://youtu.be/ZlR5onuwZzw
Hi, a new #video on #AWS #ECS tutorial is published on @codeonedigest #youtube channel. Learn how to deploy #docker image in AWS ECS fargate service.
#deploydockerimageinaws #deploydockerimageinamazoncloud #rundockerimageincloudecsservice #whatisecsservice #howtodeploydockerimageinecsservice #howtorundockerimageinecsservice #awsecstutorial #awsecsfargate #awsecsdemo #awsecsfargatetutorial #awsecsdockercomposetutorial #awsecsservice #awsecstaskdefinition #deploydockercontainertoaws #deploydockerimagetoawsec2 #deploydockerimagetoaws #deployimagetoawsfargate
1 note
·
View note
Text
Advantages of Container Services
There are several advantages of Container Services. One of the biggest advantages is that they can automate the deployment of container technologies in highly available cloud environments. Unlike PaaS, Container Services (CaaS) do not require a specific code stack ecosystem. They are independent of the database and language runtime environment, which means that the "it runs on my machine" problem no longer applies. CaaS can improve Software Development Lifecycle (SDLC) teams' ability to release new software quicker. They can reduce resources and waste processes and can help support true business transformation.
CaaS enables developers to focus on the end product rather than managing the underlying infrastructure. By automating the deployment of containerized software packages, developers can increase the speed of their application development, and improve collaboration between the operations and dev teams. In addition to portability across OS platforms and cloud infrastructure, containers allow developers to develop and deploy their applications to multiple destinations at the same time, while being independent of the environment on which they are deployed.
AWS ECR helps to automate the process of provisioning hosting infrastructure. Users can automatically download new image repositories from the registry and push them to a cluster. ECR is a convenient and easy-to-use tool that allows developers to build private repositories of images. Fargate, on the other hand, is a serverless platform that automates the provisioning of hosting infrastructure. AWS's ECR and Fargate are both excellent resources to use for provisioning container environments.
1 note
·
View note
Text
Container Management - AWS ECS and ECR
Cross account and cross region management for your clusters, services, tasks, images, task sets, task definitions, scheduled tasks, container instances, vulnerability scans, container insights, repositories and events - now in Ylastic. Container resources aggregated within your organizational units to make it easier to understand your environment as well as access all the pertinent information in one place. There are a lot of different components in ECS. This blog post will walk you through each component and how you can manage those resources in Ylastic. ECS services allow you to always have a specified number of tasks running in a cluster. All your services are displayed in one place aggregated across regions and accounts in an OU. Select a service to view further details and associated configuration. The latest CPU and memory utilization metrics for each service are displayed in a sparkline graph next to the service name. You can view service CloudWatch metrics by clicking the sparkline to display the related charts. Click a button to generate a diagram for the service the service tasks as well as associated AWS components such as the VPC network, logs, IAM roles and more and their relationships and connections.

Clusters are the logical grouping unit in ECS. They can contain services or simple tasks, each of which may contain a mix of tasks that can use either the Fargate or EC2 launch types. The capacity can be provisioned for a cluster either through Autoscaling groups or a Fargate capacity provider. All information for a cluster is available in one place by selecting the cluster. The latest CPU and memory utilization metrics for each cluster are displayed in a sparkline graph next to the cluster name. You can view cluster CloudWatch metrics by clicking the sparkline to display the related charts. Click a button to generate a diagram for the cluster.

Tasks are the fundamental units of work in ECS. Task runs are based off a template called the task definition. The concept is quite similar to the way you run Autoscaling instances using a launch configuration as a template. You can run as many tasks as you want from a single task definition. Tasks can be one-off where they do a certain thing and then cease to exist. You can also run tasks as a part of a service which allows them to continuously run in a cluster. View all the task information in one place as well as easily generate a diagram for the task that shows all associated AWS components such as the VPC network, logs, IAM roles and more and their relationships as well as connections.

ECS tasks can also be run on a regular, scheduled basis. This allows you to launch container services that you need to run only at certain times. The scheduled tasks page gives you access to all the schedules and their respective configurations in your environment. Select any schedule to view all the tasks that running as a part of that schedule.
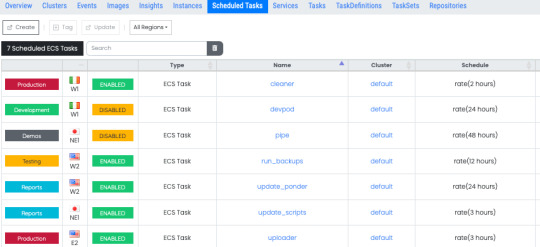
Task Definitions provide a definition of your tasks - a template to describe the structure of your container as well as how the container should be provisioned. It specifies the docker images to use, the CPU and memory allocation for your container, any needed environment variables, exposed ports, network types and more. View detailed information on your task definitions and details of all the clusters and tasks running that are currently using each task definition.

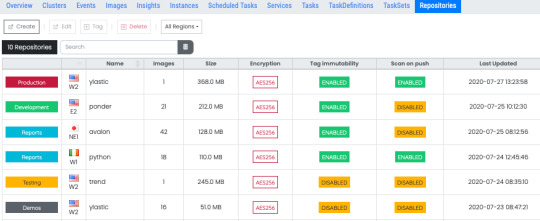
The actual docker image that will be used to start your containers is specified in the task definition. Images can be stored in a repository on AWS ECR and they are pulled as needed when containers are instantiated. View all the images being used by all the containers that are running your task and services in one place. You can manually scan an image or have ECR automatically scan the image for known vulnerabilities in software packages when you push the image to the repository. After a while it can get really confusing to know which images are being used all over your infrastructure and if they are affected by any vulnerabilities that need to be addressed ASAP. No need to hunt through a lot of pages trying to find out your current security status. One place to find all the information you need to address the security concerns from running outdated packages.

View a detailed vulnerability scan listing for any image from one place. Links to the specific CVE listed in the security advisory are also available.

The images you use for your containers can be stored in ECR and pulled from that repository when your containers are instantiated to run tasks. View all your repositories and their configuration information aggregated in one place. Select a repository to see each image in that repository, its details as well as vulnerability scan information for that image.
You need compute capacity to actually host your docker containers and run them either as tasks or long running services. AWS gives you two different ways to accomplish this - the traditional EC2 instances or the server less compute with Fargate launch types. If you are using the EC2 launch type for your application, you can view and interact with all the container instances in your environment in one place and quickly view all associated information.

If you wish to use EC2 instances, then you need to run instances with the ECS agent installed. AWS provides ECS optimized AMIs in several different variants, that are highly recommended to use as the base for your ECS container instances. Access and launch instances from these optimized Amis easily without hunting through SSM parameters and AMI pages. The latest and greatest updated AMIs from the ECS team are available in one place.

As you update your applications to new versions, you need a way to deploy those new versions into your containers on ECS. You can perform a rolling update using the ECS service scheduler (the default option available to you on ECS). You can also perform the deployment using other controllers such as either AWS Code Deploy or something completely external outside AWS and in your own environment such as Jenkins. In order to use these two options, ECS leverages the concept of task sets, which are essentially definitions of how to perform your deployments. The task sets page in Ylastic gives you access to all your task sets information and their configuration.

The container launches, tasks and services starting and stopping, ECS agent connects/disconnects, and other state changes in your cloud environment can quickly overwhelm you with an information overload. The events page in Ylastic aggregates ECS events in one place from all your running clusters, service, and tasks. One place to get a quick overview on the state of your Amazon ECS resources.

Select any ECS resource on any of the above pages, and view all associated information in one place. This includes CloudTrail events, configuration details, services, tasks, audit events, and more.

CloudWatch Container Insights collects, aggregates, and summarizes metrics and logs from your containerized applications and microservices. The metrics that are collected include utilization for container resources such as CPU, memory, disk, and network. Easily view and go through charts for all these metrics.

There are a lot of moving parts and components involved in running a containerized application in the cloud. Ylastic gives you the ability to get a quick overview of your ECS environment - generated from your infrastructure with a click. Diagrams of your ECS resources - clusters, services and tasks are available, which display the associated ECS resources and any other AWS components in use. Relationships between the resources are retrieved and displayed along with the containing VPC network.

Easy to use, intuitive container management. Global CloudOps for your AWS cloud environment - Govern, manage, schedule and diagram your resources.
0 notes
Text
CodeGuru, AWS’s AI code reviewer and performance profiler, is now generally available
AWS today announced that CodeGuru, a set of tools that use machine learning to automatically review code for bugs and suggest potential optimizations, is now generally available. The tool launched into preview at AWS re:Invent last December.
CodeGuru consists of two tools, Reviewer and Profiler, and those names pretty much describe exactly what they do. To build Reviewer, the AWS team actually trained its algorithm with the help of code from more than 10,000 open source projects on GitHub, as well as reviews from Amazon’s own internal codebase.
“Even for a large organization like Amazon, it’s challenging to have enough experienced developers with enough free time to do code reviews, given the amount of code that gets written every day,” the company notes in today’s announcement. “And even the most experienced reviewers miss problems before they impact customer-facing applications, resulting in bugs and performance issues.”
To use CodeGuru, developers continue to commit their code to their repository of choice, no matter whether that’s GitHub, Bitbucket Cloud, AWS’s own CodeCommit or another service. CodeGuru Reviewer then analyzes that code, tries to find bugs and, if it does, it will also offer potential fixes. All of this is done within the context of the code repository, so CodeGuru will create a GitHub pull request, for example, and add a comment to that pull request with some more info about the bug and potential fixes.
To train the machine learning model, users can also provide CodeGuru with some basic feedback, though we’re mostly talking “thumbs up” and “thumbs down” here.
The CodeGuru Application Profiler has a somewhat different mission. It is meant to help developers figure out where there might be some inefficiencies in their code and identify the most expensive lines of code. This includes support for serverless platforms like AWS Lambda and Fargate.
One feature the team added since it first announced CodeGuru is that Profiler now attaches an estimated dollar amount to the lines of unoptimized code.
“Our customers develop and run a lot of applications that include millions and millions of lines of code. Ensuring the quality and efficiency of that code is incredibly important, as bugs and inefficiencies in even a few lines of code can be very costly. Today, the methods for identifying code quality issues are time-consuming, manual, and error-prone, especially at scale,” said Swami Sivasubramanian, vice president, Amazon Machine Learning, in today’s announcement. “CodeGuru combines Amazon’s decades of experience developing and deploying applications at scale with considerable machine learning expertise to give customers a service that improves software quality, delights their customers with better application performance, and eliminates their most expensive lines of code.”
AWS says a number of companies started using CodeGuru during the preview period. These include the likes of Atlassian, EagleDream and DevFactory.
“While code reviews from our development team do a great job of preventing bugs from reaching production, it’s not always possible to predict how systems will behave under stress or manage complex data shapes, especially as we have multiple deployments per day,” said Zak Islam, head of Engineering, Tech Teams, at Atlassian. “When we detect anomalies in production, we have been able to reduce the investigation time from days to hours and sometimes minutes thanks to Amazon CodeGuru’s continuous profiling feature. Our developers now focus more of their energy on delivering differentiated capabilities and less time investigating problems in our production environment.”
Image Credits: AWS
0 notes
Photo

AWS CDK を使って簡単に ECS(Fargate) 環境を構築する方法 https://ift.tt/2SscTCi
streampack の Tana です。
ECS(Fargate) 環境を手動セットアップするには、画面からぽちぽちすればある程度できるものの、 ALB を作成したり、Service, Task Definition などを設定するのが複雑です。 また、コンセプトを理解するのにも時間がかかります。 Dynamic Port Mapping を使う場合は、Security Group に inbound を登録しないといけなかったり、トライ&エラーの繰り返しです。 構築だけで疲れちゃいます。
そこで、AWS Cloud Template Kit(CDK) を使えば、20行ぐらいのコードと数回のコマンド実行で 下記のリソースと共にベストプラクティスなECS(Fargate)環境を構築してくれる方法です。
ネットワーク
VPC
Subnets
Internet Gateway
NAT gateway(EIP)
Route Tables
Security Group
ECS(Fargate)
ALB(Target Group, Security Group込み)
Cluster
Service
Task Definition(Container)
CDK の installや初期手順などはこちらで記載あるので割愛します。 https://github.com/awslabs/aws-cdk#getting-started
cdk init で作成されたテンプレートを元に、下記が実際に書いたコードです。 Dockerhub を使って例は他にもあるので、今回は ECR を使用します。
lib/demo-stack.ts
import cdk = require('@aws-cdk/cdk'); import ecs = require("@aws-cdk/aws-ecs"); import ec2 = require("@aws-cdk/aws-ec2"); import ecr = require("@aws-cdk/aws-ecr"); export class DemoStack extends cdk.Stack { constructor(scope: cdk.App, id: string, props?: cdk.StackProps) { super(scope, id, props); // ------------- ここを記載 -------------- // ベストプラクティスなネットワーク環境の構築 const vpc = new ec2.VpcNetwork(this, 'MyCdkVpc', {maxAZs: 2}); const cluster = new ecs.Cluster(this, 'Cluster', {vpc}); // ECSクラスタ設定(t2.medium指定) cluster.addDefaultAutoScalingGroupCapacity({instanceType: new ec2.InstanceType("t2.medium"), instanceCount: 1}); // ECRを使用 const repository = new ecr.Repository(this, 'myRepoName'); // ECS(ALB/Service/Task Defintion/Container) 関連をまとめて構築 new ecs.LoadBalancedEc2Service(this, 'Service', { cluster, memoryLimitMiB: 512, image: ecs.ContainerImage.fromEcrRepository(repository), containerPort: 8080, // コンテナポート番号 environment: { ENV: 'production' } }); // ------------- ここまで -------------- } }
synth で typescript 書いたコードから CloudFormation Template(Yaml)で事前確認できます。 CloudFormationの400行ぐらいのコードを書く必要が無くなります。
$ cdk synth
$ cdk deploy
deploy は IAM Policy や Security Group のプレビューが表示され、AWSアカウントに構築開始されます。
ECRを使う場合はレポジトリまで作成してくれますが、アプリケーションの Docker Image を push してあげる必要があります。 よって、作成されたレポジトリを取得し、Image を push します。
# リポジトリ名を取得 $ aws ecr describe-repositories | jq -r '.repositories[].repositoryName' ---- demos-demoa-xxxxxx
下記のようなコマンド(shell)を実行して build&push します。
build_push.sh
ECRID=xxxxxxxxx ECRNAME=demos-demoa-xxxxxx # build an your docker app docker build -t ${ECRNAME} . docker tag ${ECRNAME}:latest ${ECRID}.dkr.ecr.ap-northeast-1.amazonaws.com/${ECRNAME}:latest # push $(aws ecr get-login --no-include-email --region ap-northeast-1) docker push ${ECRID}.dkr.ecr.ap-northeast-1.amazonaws.com/${ECRNAME}:latest
成功すると、ALBのURLが払い出されますので、アクセスして確認し、結果が返ってくれば完了です!

結果が正しく表示されなければ、Cluster の EventのログやTaskをAWSコンソールや ecs-cli などを使って再度確認します。
ecs-cli ps --cluster DemoStack-Clusterxxxx-xxxxx
たいてい、container port が正しくなかったり、環境変数、ECRリポジトリに登録されているかなどを確認します。
削除したい場合は、destory を実行します。(事前に ECRに登録した Image の削除の必要あり)
$ cdk destory
CDKデメリットとしては細かな指定や調整したい場合は、別途それぞれコードを書く必要がありそうです。 例えば、
コスト削減のためにも NAT Gateway(EIP) を省きたい
コンテナの log driver や ulimits を設定したい
下記はコンテナに log driver などを追加する場合です。
demo-stack.ts
const demoContainer = demoTaskDefinition.addContainer('demo-container', { image: ecs.ContainerImage.fromEcrRepository(repository), logging: new ecs.AwsLogDriver(this, 'demo-logging', { streamPrefix: 'demo-app' }) }); demoContainer.addUlimits( { name : ecs.UlimitName.Fsize, hardLimit : 10240000, softLimit : 10240000 } )
細かな引数の指定や props の指定は CDK doc にてブラウザにてドキュメントを開いてくれて、検索・確認できます。
$ cdk docs
まだ、プレビューで今後改善さらに改善されそうですが、ECS(Fargate) 環境を頻���に作ってはテストして削除するケースには最適です。
CDK workshop もあるようなので、一度見て試してみるとイメージが湧くかと思います。 https://cdkworkshop.com/
元記事はこちら
「AWS CDK を使って簡単に ECS(Fargate) 環境を構築する方法」
February 26, 2019 at 04:00PM
0 notes
Text
Building an event-based application with Amazon Managed Blockchain
Applications built on Amazon Managed Blockchain allow multiple parties to transact with one another in a trusted environment with the ability for each party to endorse transactions before they are committed to the blockchain. Blockchain events allow applications to respond to activity and updates to the smart contracts that have been deployed to the network, as well as updates to the blockchain network, such as the creation of a new block. These events are very useful and can enable a diverse set of activities; for example, user notifications with Amazon Simple Notification Service (Amazon SNS) when a business event happens, or streaming data to business intelligence and analytics engines such as Amazon QuickSight or Amazon Redshift. You can also stream to purpose-built databases such as Amazon DynamoDB or Amazon Aurora, or use AWS Lambda for event-triggered applications. A Hyperledger Fabric blockchain network can produce three event types that allow you to monitor blockchain network activity: Block events – These occur when a new block gets added to the ledger. Block events contain information about the transactions included in the block. Transaction events – These occur when a transaction is committed to the ledger. Chaincode events – Chaincode is application code that runs on the blockchain network. It enables interaction with the ledger. You can define events within the chaincode and define the conditions that trigger these events. The event is triggered when a block containing the necessary conditions is committed to the ledger. This post explores the use case of a transparent NGO donation application. For more information about creating the application and configuring it so donors can see how the NGO is spending their donations, see the Github repo. In this post, you continue to build on that application by notifying users via SMS of new donations. You walk through how to build this workflow using chaincode events with Amazon Managed Blockchain and send SMS messages using Amazon SNS. Solution overview The following diagram illustrates the architecture of this solution. The solution involves the following steps: Deploying a blockchain event listener as an AWS Fargate task Connecting the listener to a peer node in the Managed Blockchain network to register and be notified of blockchain events Sending blockchain events from the listener to Amazon Simple Queue Service (Amazon SQS), where a Lambda function processes them Publishing these events as messages to Amazon SNS, which sends an SMS message Blockchain event listener The blockchain event listener is a Node.js application that uses the Node.js Fabric SDK to connect to a Fabric peer node and register for notifications of blockchain events. When a listener connects to the peer node, it specifies a Fabric user with which to connect and the event types it’s interested in. The user credentials consist of a private key and a public certificate, and are stored in AWS Secrets Manager. For this use case, you register the event listener to listen for chaincode events, which trigger when an NGO receives a donation. The event listener publishes these events to an SQS queue. The Node.js listener application is packaged as a container image and stored in Amazon Elastic Container Registry (Amazon ECR). It runs as a Fargate task in an Amazon Elastic Container Service (Amazon ECS) service. Running the listener as a Fargate task reduces operational overhead because it removes the need to provision and maintain Amazon Elastic Compute Cloud (Amazon EC2) instances, and running it within an ECS service allows for automatic restarting of the application in case of failure. For this use case, you run the Fargate task in a private subnet within your VPC because it doesn’t need to be directly accessible from the public internet. When the Fargate task starts, it downloads the user’s credentials from Secrets Manager before connecting to the peer node. By default, the listener is notified of all events that occurred on the blockchain since creation. This means that if the listener restarts, the same events are processed again. To handle this, the listener can persist the last block it processed (for example, in DynamoDB), and provide this block number when it restarts, which indicates the starting point for new event notifications. This is set using the startBlock attribute within the RegistrationOpts object that is provided during listener registration. Lambda event handler A Lambda function processes chaincode events published to the SQS queue. The function uses the event data to create the SMS message body and calls Amazon SNS to send the notification message. Upgrading chaincode The Fabric NGO chaincode is upgraded to emit a chaincode event when a donation occurs. You do this using the Node.js Fabric SDK. See the following code example: function createEvent(stub, data = {}) { const eventObject = { createdAt: (new Date()).getTime(), createdBy: data.donor, donationAmount: data.amount } stub.setEvent(data.eventName, Buffer.from(JSON.stringify(eventObject))); } Upgrading the chaincode requires two steps: Installing the chaincode on the peer node Upgrading the chaincode on the channel In this use case, you run a single peer node, but if you do this with multiple peer nodes or on a network with multiple members, you need to install the chaincode on each peer node. You still only need to perform the chaincode upgrade one time. Prerequisites Before starting the walkthrough, you should complete Part 1 and Part 2 of the nonprofit workshop in the GitHub repo. These parts include creating the Managed Blockchain network, enrolling the admin user, and deploying the NGO chaincode. Walkthrough overview For more information about each step in this process, see the GitHub repo. Each step listed in this post has a matching step in the repo where you run the script or command that completes that step. As you read each step, you can refer to the corresponding step in the repo to gain a more in-depth understanding. The walkthrough includes the following steps: Create a Fabric user to listen for peer events Deploy the Node.js listener in a container image to Amazon ECR Deploy the SQS queue Deploy the ECS service that hosts the Fargate task Deploy the Fargate task to run the listener Create an SNS topic with an SMS subscription Deploy the Lambda function to publish every event to Amazon SNS Upgrade the chaincode to emit the chaincode event Step 1: Creating a Fabric user to listen for peer events Hyperledger Fabric peer nodes emit events as they process blocks and transactions, and event listeners register to receive notifications of these events. To register an event listener, you need to use user credentials to connect to the peer. In this step, you register and enroll a user. Registering a user creates an entry for the user within their organization’s certificate authority. Enrolling the user generates the credentials that they use to sign transactions. You can also use these credentials to register an event listener with a peer node. Enrolling a user generates the following artifacts: A private key A signing certificate (public key) These artifacts are saved to Secrets Manager, and the Fargate task downloads them during its execution. For more information, see Register and Enroll a User as an Administrator. Step 2: Deploying the Node.js listener in a container image to Amazon ECR The event listener needs to run continuously so it can receive event notifications as they occur. To run the listener, you package the listener into a container image that your ECS service manages. The container image is published to your private Amazon ECR repository, where the ECS service can pull it. In a production environment, to provide high availability, you would run multiple instances of this container. Step 3: Deploying the SQS queue To provide durability of the blockchain events, the event listener writes blockchain events to an SQS queue that queues the events for a Lambda function to process. Storing the events as messages in an SQS queue facilitates error handling if the Lambda function fails to process the message. The message processing can try again, and if it fails again, Amazon SQS moves the message to a dead-letter queue (DLQ) where you can inspect it for further debugging. You can send the blockchain event directly to an SNS topic, which removes the need for an SQS queue and reduces cost. Amazon SNS supports DLQs, which can make your application more resilient by storing messages if the subscription endpoint becomes unreachable. This is a more cost-effective approach and recommended in a production environment. For more information, see Configuring an Amazon SNS dead-letter queue for a subscription. This post uses an SQS queue to illustrate how you could extend this to integrate with other services. Step 4: Deploying the ECS service to host the Fargate task Running the event listener as a Fargate task that an ECS service manages allows you to use a serverless architecture, which removes the need to manage and provision servers. The Fargate security model provides isolation of applications by design. Step 5: Deploy the Fargate task to run the listener Though Amazon ECS can scale the number of tasks in a service to meet demand, your listener is instantiated as a single task in the service. The service is defined with a minimum of one task, so the task restarts automatically in the event of failure. Because blockchain events persist on the blockchain, when the listener task restarts, it can begin consuming events from the most recent block it read from. Create a Fargate task that uses the container image you uploaded in step 2. The task defines the configuration settings for the container that runs the image, including the logging options and the environment variables the Node.js event listener uses. You now have a listener running as a Fargate task that listens for blockchain events and publishes every event to Amazon SQS. You can handle these events using a Lambda function. You can also invoke other AWS services from the Lambda function. For example, you can write the blockchain event data to DynamoDB or Amazon Simple Storage Service (Amazon S3) to deliver faster query times and drive Amazon QuickSight dashboards. For this use case, you use Amazon SNS to send an SMS notification of a new donation. Step 6: Creating an SNS topic with an SMS subscription Amazon SNS is a highly available and durable messaging service that you can use to exchange messages between decoupled microservices and send notifications to end-users with mobile push, SMS, and email. Messages are sent to a topic to which interested parties can subscribe. In this step, you create a topic for a “New donation” message and subscribe to receive SMS notifications using your mobile phone number. For more information, see Sending an SMS message. For this use case, you receive an SMS for every donation event. However, in a real-world application, you would likely want to use filters to control which notifications go to which users. Step 7: Deploying the Lambda function to publish every event to Amazon SNS Each blockchain event on the SQS queue triggers the Lambda function. The function parses the event data and publishes a corresponding message to Amazon SNS. Amazon SNS forwards the message to SMS via the subscription. Step 8: Upgrading the chaincode to emit the chaincode event All the steps you have executed so far have been external to the blockchain network. In this final step, you upgrade the chaincode on the Fabric network to emit an event whenever the createDonation function is called. After the chaincode source code is updated, it must be installed on every peer node. A blockchain member typically has multiple peer nodes for high availability and fault tolerance, and you should deploy the chaincode to all the peer nodes. After all the members have installed the chaincode on their peer nodes, you can upgrade the chaincode on the channel. Testing You’ve now provisioned all the components and are ready to test. To test the solution, complete the following steps: Create an NGO by issuing a blockchain transaction to invoke the createNGO function in your chaincode Make a donation by invoking the createDonation function, which is where you added the new code to emit the chaincode event If all is working correctly, you should receive an SMS within a short period of time If you don’t receive the SMS, check the SQS queue. If you have messages in the DLQ, inspect those to see why the Lambda function is failing. If you don’t see any messages, your listener may be failing. Check the Fargate container’s Amazon CloudWatch Logs for details. Summary In this post, you walked through how to deploy a Hyperledger Fabric blockchain event listener running on AWS Fargate. You also deployed a Lambda function that processes the chaincode events and publishes Amazon SNS notifications to send SMS messages. As a next step, you could write a different event listener and send event data to your Amazon S3 data lake to gain insights into the blockchain data using Amazon QuickSight. To begin building this, you would replace the Lambda function you deployed in step 7 with a Lambda function that writes event data to Amazon S3. Stay tuned for a later post that shows you how. About the Author Emile is a Senior Blockchain Architect at AWS. In his free time, he enjoys trail running in the hills north of San Francisco, and trying to keep up with his 18 month old daughter. https://probdm.com/site/MjQyNDk
0 notes
Text
Original Post from Amazon Security Author: Vesselin Tzvetkov
Controlling outbound communication from your Amazon Virtual Private Cloud (Amazon VPC) to the internet is an important part of your overall preventive security controls. By limiting outbound traffic to certain trusted domains (called “whitelisting”) you help prevent instances from downloading malware, communicating with bot networks, or attacking internet hosts. It’s not practical to prevent all outbound web traffic, though. Often, you want to allow access to certain well-known domains (for example, to communicate with partners, to download software updates, or to communicate with AWS API endpoints). In this post, I’ll show you how to limit outbound web connections from your VPC to the internet, using a web proxy with custom domain whitelists or DNS content filtering services. The solution is scalable, highly available, and deploys in a fully automated way.
Solution benefits and deliverables
This solution is based on the open source HTTP proxy Squid. The proxy can be used for all workloads running in the VPC, like Amazon Elastic Compute Cloud (EC2) and AWS Fargate. The solution provides you with the following benefits:
An outbound proxy that permit connections to whitelisted domains that you define, while presenting customizable error messages when connections are attempted to unapproved domains.
Optional domain content filtering based on DNS, delivered by external services like OpenDNS, Quad9, CleanBrowsing, Yandex.DNS or others. For this option, you do need to be a customer of these external services.
Transparent encryption handling, due to the extraction of the domain information from the Server Name Indication (SNI) extension in TLS. Encryption in transit is preserved and end-to-end encryption is maintained.
An auto-scaling group with Elastic Load Balancing (ELB) Network Load Balancers that spread over several of your existing subnets (and Availability Zones) and scale based on CPU load.
One Elastic IP address per proxy instance for internet communication. Sometimes the web sites that you’re communicating want to know your IP address so they can accept traffic from you. Giving the proxies’ elastic IP addresses allows you to know what IP addresses your web connections will come from.
Proxy access logs delivered to CloudWatch Logs.
Proxy metrics, available in CloudWatch Metrics.
Automated solution deployment via AWS CloudFormation.
Out of scope
This solution does not serve applications that aren’t proxy capable. Deep packet inspection is also out of scope.
TLS encryption is kept end-to-end, and only the SNI extension is examined. For unencrypted traffic (HTTP), only the host header is analyzed.
DNS content filtering must be delivered by an external provider; this solution only integrates with it.
Services used, cost, and performance
The solution uses the following services:
AWS Network Load Balancers. See Elastic Load Balancing pricing.
Four AWS Elastic IP addresses, which are charged if not used, as described in the Elastic_IP_Addresses pricing page.
AWS Secrets Manager, which is used to store the domain list. See AWS Secrets Manager Pricing.
Squid, an open source proxy that is free of charge.
Amazon EC2 on-demand instances, on which the Squid proxies will run. See Amazon EC2 Pricing.
Amazon Linux 2 and AutoScalingGroup, which are both free of charge.
Cloud Watch Logs, which will be used to store the Squid access log. See Cloud Watch pricing.
In total, the solution costs a few dollars per day depending on the region and the bandwidth usage. If you are using a DNS filtering service, you may also be charged by the service provider.
Note: An existing VPC and internet gateway are prerequisites to this solution, and aren’t included in the pricing calculations.
Solution architecture
Figure 1: Solution overview
As shown in Figure 1:
The solution is deployed automatically via an AWS CloudFormation template.
CloudWatch Logs stores the Squid access log so that you can search and analyze it.
The list of allowed (whitelisted) domains is stored in AWS Secrets Manager. The Amazon EC2 instance retrieves the domain list every 5 minutes via cronjob and updates the proxy configuration if the list has changed. The values in Secrets Manager are provisioned by CloudFormation and can be read only by the proxy EC2 instances.
The client running on the EC2 instance must have proxy settings pointing toward the Network Load Balancer. The load balancer will forward the request to the fleet of proxies in the target group.
Prerequisites
You need an already deployed VPC, with public and private subnets spreading over several Availability Zones (AZs). You can find a description of how to set up your VPC environment at Default VPC Setup.
You must have an internet gateway, with routing set up so that only traffic from a public subnet can reach the internet.
You don’t need to have a NAT (network translation address) gateway deployed since this function will be provided by the outbound proxy.
Integration with content filtering DNS services
If you require content filtering from an external company, like OpenDNS or Yandex.DNS, you must register and become a customer of that service. Many have free services, in addition to paid plans if you need advanced statistics and custom categories. This is your responsibility as the customer. (Learn more about the shared responsibility between AWS and the customer.)
Your DNS service provider will assign you a list of DNS IP addresses. You’ll need to enter the IP addresses when you provision (see Installation below).
If the DNS provider requires it, you may give them the source IPs of the proxies. There are four reserved IPs that you can find in the stack output (see Output parameters below).
Installation (one-time setup)
Select the Launch Stack button to launch the CloudFormation template:
Note: You must sign in your AWS Account in order to launch the stack in the required region. The stack content can also be downloaded here.
Provide the following proxy parameters, as shown in Figure 2:
Allowed domains: Enter your whitelisted domains. Use a leading dot (“.”) to indicate subdomains.
Custom DNS servers (optional): List any DNS servers that will be used by the proxy. Leave the default value to use the default Amazon DNS server.
Proxy Port: Enter the listener port of the proxy.
Instance Type: Enter the EC2 instance type that you want to use for the proxies. Instance type will affect vertical scaling capabilities and solution cost. For more information, see Amazon EC2 Instance Types.
AMI ID to be used: This field is prepopulated with the Amazon Machine Image (AMI) ID found in AWS Systems Manager Parameter Store. By default, it will point toward the latest Amazon Linux 2 image. You do not need to adjust this value.
SSH Key name (optional): Enter the name of the SSH key for your proxy EC2 instances. This is relevant only for debugging, or if you need to log in on the proxy servers. Consider using AWS Systems Manager Session Manager instead of SSH.
Next, provide the following network parameters, as shown in Figure 2:
VPC ID: The VPC where the solution will be deployed.
Public subnets: The subnets where the proxies will be deployed. Select between 2 and 3 subnets.
Private subnets: The subnets where the Network Load Balancer will be deployed. Select between 2 and 3 subnets.
Allowed client CIDR: The value you enter here will be added to the proxy security group. By default, the private IP range 172.31.0.0/16 is allowed. The allowed block size is between a /32 netmask and an /8 netmask. This prevents you from using an open IP range like 0.0.0.0/0. If you were to set an open IP range, your proxies would accept traffic from anywhere on the internet, which is a bad practice.
Figure 2: Launching the CloudFormation template
When you’ve entered all your proxy and network parameters, select Next. On the following wizard screens, you can keep the default values and select Next and Create Stack.
Find the output parameters
After the stack status has changed to “deployed,” you’ll need to note down the output parameters to configure your clients. Look for the following parameters in the Outputs tab of the stack:
The domain name of the proxy that should be configured on the client
The port of the proxy that should be configured on the client
4 Elastic IP addresses for the proxy’s instances. These are used for outbound connections to Internet.
The CloudWatch Log Group, for access logs.
The Security Group that is attached to the proxies.
The Linux command to set the proxy. You can copy and paste this to your shell.
Figure 3: Stack output parameters
Use the proxy
Proxy setting parameters are specific to every application. Most Linux application use the environment variables http_proxy and https_proxy.
Log in on the Linux EC2 instance that’s allowed to use the proxy.
To set the shell parameter temporarily (only for the current shell session), execute the following export commands:
[ec2-user@ip-10-0-1-18 ~]$ export http_proxy=http://: [ec2-user@ip-10-0-1-18 ~]$ export https_proxy=$http_proxy
Replace with the domain of the load balancer, which you can find in the stack output parameter.
Replace with the port of your proxy, which is also listed in the stack output parameter.
Next, you can use cURL (for example) to test the connection. Replace with one of your whitelisted URLs:
[ec2-user@ip-10-0-1-18 ~]$ curl -k -k …
You can add the proxy parameter permanently to interactive and non-interactive shells. If you do this, you won’t need to set them again after reloading. Execute the following commands in your application shell:
[ec2-user@ip-10-0-1-18 ~]$ echo 'export http_proxy=http://:' >> ~/.bashrc [ec2-user@ip-10-0-1-18 ~]$ echo 'export https_proxy=$http_proxy' >> ~/.bashrc [ec2-user@ip-10-0-5-18 ~]$ echo 'export http_proxy=http://:' >> ~/.bash_profile [ec2-user@ip-10-0-5-18 ~]$ echo 'export https_proxy=$http_proxy' >> ~/.bash_profile
Replace with the domain of the load balancer.
Replace with the port of your proxy.
Customize the access denied page
An error page will display when a user’s access is blocked or if there’s an internal error. You can adjust the look and feel of this page (HTML or styles) according to the Squid error directory tag.
Use the proxy access log
The proxy access log is an important tool for troubleshooting. It contains the client IP address, the destination domain, the port, and errors with timestamps. The access logs from Squid are uploaded to CloudWatch. You can find them from the CloudWatch console under Log Groups, with the prefix Proxy, as shown in the figure below.
Figure 4: CloudWatch log with access group
You can use CloudWatch Insight to analyze and visualize your queries. See the following figure for an example of denied connections visualized on a timeline:
Figure 5: Access logs analysis with CloudWatch Insight
Monitor your metrics with CloudWatch
The main proxy metrics are upload every five minutes to CloudWatch Metrics in the proxy namespace:
client_http.errors /sec – errors in processing client requests per second
client_http.hits /sec – cache hits per second
client_http.kbytes_in /sec – client uploaded data per second
client_http.kbytes_out /sec – client downloaded data per second
client_http.requests /sec – number of requests per second
server.all.errors /sec – proxy server errors per second
server.all.kbytes_in /sec – proxy server uploaded data per second
server.all.kbytes_out /sec – proxy downloaded data per second
server.all.requests /sec – all requests sent by proxy server per second
In the figure below, you can see an example of metrics. For more information on metric use, see the Squid project information.
Figure 6: Example of CloudWatch metrics
Manage the proxy configuration
From time to time, you may want to add or remove domains from the whitelist. To change your whitelisted domains, you must update the input values in the CloudFormation stack. This will cause the values stored in Secrets Manager to update as well. Every five minutes, the proxies will pull the list from Secrets Manager and update as needed. This means it can take up to five minutes for your change to propagate. The change will be propagated to all instances without terminating or deploying them.
Note that when the whitelist is updated, the Squid proxy processes are restarted, which will interrupt ALL connections passing through them at that time. This can be disruptive, so be careful about when you choose to adjust the whitelist.
If you want to change other CloudFormation parameters, like DNS or Security Group settings, you can again update the CloudFormation stack with new values. The CloudFormation stack will launch a new instance and terminate legacy instances (a rolling update).
You can change the proxy Squid configuration by editing the CloudFormation template (section AWS::CloudFormation::Init) and updating the stack. However, you should not do this unless you have advanced AWS and Squid experience.
Update the instances
To update your AMI, you can update the stack. If the AMI has been updated with a newer version, then a rolling update will redeploy the EC2 instances and Squid software. This automates the process of patching managed instances with both security-related and other updates. If the AMI has not changed, no update will be performed.
Alternately, you can terminate the instance, and the auto scaling group will launch a new instance with the latest updates for Squid and the OS, starting from scratch. This approach may lead to a short service interruption for the clients served on this instance, during the time in which the load balancer is switching to an active instance.
Troubleshooting
I’ve summarized a few common problems and solutions below.
Problem Solutions I receive timeout at client application.
Check that you’ve configured the client application to use the proxy. (See Using a proxy, above.)
Check that the Security Group allows access from the client instance.
Verify that your NACL and routing table allow communication to and from the Network Load Balancer.
I receive an error page that access was blocked by the administrator. Check the stack input parameter for allowed domains. The domains must be comma separated. Included subdomains must start with dot. For example:
To include http://www.amazon.com, specify http://www.amazon.com
To include all subdomains of amazon.com as part of a list, specify .amazon.com
I received a 500 error page from the proxy.
Make sure that the proxy EC2 instance has internet access. The public subnets must have an Internet Gateway connected and set as the default route.
Check the DNS input parameter in the CloudFormation stack, if you use an external DNS service. Make sure the DNS provider has the correct proxy IPs (if you were required to provide them
The webpage doesn’t look as expected. There are fragments or styles missing. Many pages download content from multiple domains. You need to whitelist all of these domains. Use the access logs in CloudWatch Log to determine which domains are blocked, then update the stack. On the proxy error page, I receive “unknown certificate issuer.” During the setup, a self-signed certificate for the squid error page is generated. If you need to add your own certificate, you can adapt the CloudFormation template. This requires moderate knowledge of Unix/Linux and AWS CloudFormation.
Conclusion
In this blog post, I showed you how you can configure an outbound proxy for controlling the internet communication from a VPC. If you need Squid support, you can find various offerings on the Squid Support page. AWS forums provides support for Amazon Elastic Compute Cloud (EC2). When you need AWS experts to help you plan, build, or optimise your infrastructure, consider engaging AWS Professional Services.
Want more AWS Security how-to content, news, and feature announcements? Follow us on Twitter.
Vesselin Tzvetkov
Vesselin is senior security consultant at AWS Professional Services and is passionate about security architecture and engineering innovative solutions. Outside of technology, he likes classical music, philosophy, and sports. He holds a Ph.D. in security from TU-Darmstadt and a M.S. in electrical engineering from Bochum University in Germany.
#gallery-0-5 { margin: auto; } #gallery-0-5 .gallery-item { float: left; margin-top: 10px; text-align: center; width: 33%; } #gallery-0-5 img { border: 2px solid #cfcfcf; } #gallery-0-5 .gallery-caption { margin-left: 0; } /* see gallery_shortcode() in wp-includes/media.php */
Go to Source Author: Vesselin Tzvetkov How to set up an outbound VPC proxy with domain whitelisting and content filtering Original Post from Amazon Security Author: Vesselin Tzvetkov Controlling outbound communication from your Amazon Virtual Private Cloud…
0 notes