#deploy nodejs api in google cloud run
Explore tagged Tumblr posts
Visit Tumblr Blog
Explore Tumblr blogs with no restrictions, modern design and the best experience.
Last Seen Tumblr Blogs


Fun Fact
Tumblr’s website traffic is steadily declining.
Video
youtube
Master the Google Cloud Run Serverless Service | Run Nodejs API in Cloud... Full Video Link - https://youtu.be/59jF_IaQHfE Check out this new video on the CodeOneDigest YouTube channel! Learn how to setup google cloud run #serverless service. Run #nodejs API in #cloudrun service. #codeonedigest @codeonedigest @googlecloud @GoogleCloud_IN @GoogleCloudTech @GoogleCompute @GooglecloudPL #googlecloud #googlecomputeengine #virtualmachine #nodejsapi
#youtube#google cloud#google cloud platform#cloud run#serverless computing#serverless#google cloud run service#cloud run service#cloud run serverless service#deploy nodejs api in google cloud run
0 notes
Text
How to Deploy Your Full Stack Application: A Beginner’s Guide

Deploying a full stack application involves setting up your frontend, backend, and database on a live server so users can access it over the internet. This guide covers deployment strategies, hosting services, and best practices.
1. Choosing a Deployment Platform
Popular options include:
Cloud Platforms: AWS, Google Cloud, Azure
PaaS Providers: Heroku, Vercel, Netlify
Containerized Deployment: Docker, Kubernetes
Traditional Hosting: VPS (DigitalOcean, Linode)
2. Deploying the Backend
Option 1: Deploy with a Cloud Server (e.g., AWS EC2, DigitalOcean)
Set Up a Virtual Machine (VM)
bash
ssh user@your-server-ip
Install Dependencies
Node.js (sudo apt install nodejs npm)
Python (sudo apt install python3-pip)
Database (MySQL, PostgreSQL, MongoDB)
Run the Server
bash
nohup node server.js & # For Node.js apps gunicorn app:app --daemon # For Python Flask/Django apps
Option 2: Serverless Deployment (AWS Lambda, Firebase Functions)
Pros: No server maintenance, auto-scaling
Cons: Limited control over infrastructure
3. Deploying the Frontend
Option 1: Static Site Hosting (Vercel, Netlify, GitHub Pages)
Push Code to GitHub
Connect GitHub Repo to Netlify/Vercel
Set Build Command (e.g., npm run build)
Deploy and Get Live URL
Option 2: Deploy with Nginx on a Cloud Server
Install Nginx
bash
sudo apt install nginx
Configure Nginx for React/Vue/Angular
nginx
server { listen 80; root /var/www/html; index index.html; location / { try_files $uri /index.html; } }
Restart Nginx
bash
sudo systemctl restart nginx
4. Connecting Frontend and Backend
Use CORS middleware to allow cross-origin requests
Set up reverse proxy with Nginx
Secure API with authentication tokens (JWT, OAuth)
5. Database Setup
Cloud Databases: AWS RDS, Firebase, MongoDB Atlas
Self-Hosted Databases: PostgreSQL, MySQL on a VPS
bash# Example: Run PostgreSQL on DigitalOcean sudo apt install postgresql sudo systemctl start postgresql
6. Security & Optimization
✅ SSL Certificate: Secure site with HTTPS (Let’s Encrypt) ✅ Load Balancing: Use AWS ALB, Nginx reverse proxy ✅ Scaling: Auto-scale with Kubernetes or cloud functions ✅ Logging & Monitoring: Use Datadog, New Relic, AWS CloudWatch
7. CI/CD for Automated Deployment
GitHub Actions: Automate builds and deployment
Jenkins/GitLab CI/CD: Custom pipelines for complex deployments
Docker & Kubernetes: Containerized deployment for scalability
Final Thoughts
Deploying a full stack app requires setting up hosting, configuring the backend, deploying the frontend, and securing the application.
Cloud platforms like AWS, Heroku, and Vercel simplify the process, while advanced setups use Kubernetes and Docker for scalability.
WEBSITE: https://www.ficusoft.in/full-stack-developer-course-in-chennai/
0 notes
Text
Day ??? - unresponsive
Well today... more like yesterday was the actual demo for the app... it took a while but finally deployed the backend on google cloud run. This video was very helpful
youtube
The initial plan I had for deployment was to just host an ec2 instance however the url link was over http instead of https, since we were using firebase hosting which has a policy against http content. It didn't work, so I had to re improvise and tried a lot of different ways which include:
Getting HTTPS manually using openssl, this didn't work as most browsers don't allow self signed certificates and firebase was no different
Using Netlify to host our NodeJS however their libraries were and documentation were either outdated or no longer working, and they updated their website so I wasn't sure on how exactly to deploy
Using firebase functions, this didn't work because of the way firebase preprocesses requests, it does some stuff to it like turning the request body into like a buffer so I would have to decrypt it on my end by adding like a middleware or switching from using multer to busboy, because my services need to handle image uploads so I gave up on that idea
Cloud Run, this actually worked well! Thanks to the tutorial I sent before, I wouldn't have understood the video if I didn't know much about docker. You can still follow along however it gets tedious, takes about 5-10 minutes to deploy and its effective and you have full control which is amazing! Running a docker container in the cloud is awesome. I did run into an issue during the video, and it was because my docker client wasn't authorized to push to gcr.io, a simple command to fix it was all I Needed thankfully it was fixed with one command
The rest of the day was spent with my team preparing for the presentation, our 3rd one. We were working and I was happy the backend was deployed, I feel like I'm getting more familiar with GCP. We were implementing features left and right, polishing whatever needed to. And when the demo came... well...

Just before the demo, we met up our client who was happy to see us and we were happy to see her, we wanted to show off all the features which took a while to make but yeah. There was a whoopsie, thanks to my miscommunication, I forgot to tell my stallion that we're using a shared variable that stores the apiUrl link and so he hard coded the localhost:8000, so some of his api wasn't getting used because it was trying to access localhost:8000 instead of the deployed links. We couldn't redeploy in time of the demo so we went in nervous.
The demo starts and everyone looks so scary, however my lecturer who I think may not like our team just left. The demo goes on and on, and one of the guys leaves. They ask me questions, I try my best like one was why do RabbitMQ's AMQP for communication between services instead of Restful HTTPS, the question was around security and I panicked and out right said something kinda not true but also true.

It ends, and they say our app was just too simple and needed more AI (not more features but more AI). The faces they gave, it was almost as if they were looking at poor helpless dumb little pups or people who worked last minute to finished. Our client, for the second time said that she was worried about us on whether we can finish the AI.
I'm a bit sad honestly... yeah the app was simple by my design... I'm just so sad... it doesn't help that I'm also going through a repetitive phase in my life where I start liking someone because we're so close and comfortable with each other only to find out that we were just very close friends and nothing romantic was built up.

I'm like really depressed because I can't really seem to catch a break. I want to improve the website but I'm just really sad now. Well... I honestly am trying to lose faith or what not,,,
0 notes
Text
HIRE DEDICATED NODE.JS DEVELOPER | Node JS Development Company In USA
Node.JS is a runtime environment for open source applications that uses a unique I/O model for scalable tasks and requires real-time activities. The Node.JS Development Company in the USA is ideal for developing heavy I/O-driven web applications that require frequent customer-server data flow. Node.JS is perfect for creating web applications to run swiftly in real-time.
Microsoft, Netflix, IBM, and PayPal are only a few business leaders using Node.js development services. Node.js is an incredibly convenient platform for application development. Node.js developers will plan and execute the code that means a better process of development on the server-side.
Node.js is an open-source JavaScript environment for application development. Node.js integrates the development of applications, eliminating the need for multiple languages. It has been used mainly in real-time to create web applications. The overall Node.js ecosystem and its package manager also allow mobile app development. Node.js developers can also use the compiled code in other languages.

A total of 51% of Node.js developers revenue from web development because of its speed and multi-user competence. Node.js is a collection of the repository, framework, and other app development tools that simplify web application development and make it easy to create apps.
The Node.js app can act better when you have no experience with Node.js. Undoubtedly, in the software development sector, Node.js has a perfect reputation. Several software development firms have used Node.js in their development services.
Why Do You Need Node.JS for Your Real-Time App?
1. Performance
Node.JS is designed on the V8 engine of Google Chrome, compiling JavaScript into native machine code. Node.JS uses one thread, increasing every framework's speed, instead of multiple lines.
2. Flexible
An application with Node.JS is easily scalable because it includes nodes that communicate. There are three different ways to scale a Node.JS application, i.e. Cloning, Splitting and Decomposing.
3. Easy To Manage
Node.JS is a front-end developer that uses JavaScript, among the most popular programming languages. The use of Node.JS for backend simplifies and takes less time.
4. Using the Same Language on Both Sides
It is easy to use Node.JS on server and client-side to support developers to make things easier. Web applications are more comfortable to test and deploy since JavaScript enables most browsers.
5. Large Ecosystem and Community
Node.JS developers (about 7 million users) are in a large community that continuously improves. The Node.JS Package Manager supports 350,000 JavaScript open-source tools.
6. Smooth UI
UI is a front end challenge, but you have to get a great performance back end to make it very easy and smooth. Developers have to manage and optimize calls from the front end in customer orientations projects and understand basic UI/UX concepts.
Node JS Development Services in the USA:
A successful Node.JS Development Company in the USA has experience in developing Node.js applications such as PayPal, LinkedIn, Trello, Yahoo, and Mozilla that will meet your business needs and replicate your goals if you want to build a lightweight, fast, and highly efficient application for your startup or large enterprise.
The Node.js developer team has the expertise and is highly experienced in developing network applications that are effective and versatile. For high-performance and fast development, they create REST APIs with node.js. Using this backend technology, they are confident to build top-notch apps to help you become market leaders.
This multi-platform, open-source programming environment provides enhanced features that help to develop fast, integrated, versatile, high-traffic, and mobile applications in real-time.
It is considered lightweight, reliable, easy to manage and ideal for large-scale real-time data-intensive applications. It employs an event-driven, non-blocking I/O model running across distributed devices.
Traits of Node.JS Applications:
Some features of the Node.js applications are:
Incredibly efficient
Greatly Scalable
For distributed networks, well-suited
When processing media, non-existent buffering
Event-driven and Sequential
Why Hire Dedicated Node.JS Developer?
There are several reasons why you should consider Node.js for development if your aim is a classic web application, landing page, dashboard, or API:
Node.js minimizes the development time: - Node.js allows you to use the same code at all levels, including the browser, backend and database levels, with a single code base. So there is no need to write code from scratch at all times.
Lower budgets: - Less time means lower costs. Also, developers of JavaScript can code Node.js. If not, they will soon learn this, since Node is part of JavaScript, meaning less investment.
Node.js has options for an inbuilt chat: - A chatting feature from NodeJS is easy to implement as a backend technologies for an app.
Other advantages include real-time application development (messengers, gaming applications), fast code execution, SEO-friendliness, proxy server application development.
Skills Required
a. For Junior Developers
Junior developers are normally recent IT college or academy graduates. You can't expect much experience, but you should know basic, like:
Node.js or other popular application
HTML DOM, JavaScript and the events;
CSS3 and HTML5;
Most significantly, the Juniors Node.JS developers should be ready to learn more. It would be a better place to allocate them to compile this learning with a more qualified middle-level developer.
b. For Middle-Level Developers
The backbone of the Node.js developer team is the middle developers. They are skilled to work without supervision and will generally be able to solve any significant issue without escalating it. This position requires significantly more experienced developers. In addition to Junior strengths, strong developers of Middle Node.js should have:
Understanding on a conceptual level of the REST paradigm
2+ years of Node.js work experience
Information of at least one language for programming other than JS (C, PHP, Ruby, etc.)
Basic knowledge and willingness to learn more about TypeScript/CoffeeScript
Fully Understand MySQL, Docker, AWS, and other popular development and deployment tools.
Preferably, middle developers should be supportive and eager to guide juniors. It would be smart to have a reward program that facilitates the sharing of knowledge and helps juniors progress to the Middle Tier if you decide to hire the team for the long term.
c. For Senior Node.js Developers
The driving force of the team is the seniors. They manage the most challenging issues and help the project manager plan the project. Their work is very vital, and their responsibilities are tremendous. A successful senior developer should be ready for everything. This requires a very dynamic set of skills:
5+ years of Node.js relevant work experience
TypeScript/CoffeeScript experience
Experience with the JS frameworks Angular, React, and other
Knowledge of GOF and SOLID concepts
Mastery in a different programming language
In-depth knowledge of REST and RESTful API development experience
OAuth skills and security criteria for an internet service
Senior Node.js developers can also excel in innovative designs because they always lead the project's development and decide how it is built precisely. Most significantly, a senior developer must be able to keep their expertise relevant and study other tools regularly.
Advantages of Hiring Node.js Developers
The hiring of the Node.js offshore development team is the perfect way for businesses to reach the large pool of talent worldwide without investing a fortune on administrative expenses, vacations, insurance, etc. Additional advantages of working with a Node.JS Development Company in the USA include:
Higher Skills for Candidates
Node.JS Development Company in the USA invests in training their employees to remain competitive on the market. This involves signing and preparing them for different training programs.
Better Performance
When you hire a Node.js development team, the project manager on their side typically coordinates the project. On-site, the organization, works for the remote team and ensures that the project is developed effectively and within the set timeframe. This helps you delegate deadlines for micro-management, scheduling, and setting to concentrate on the strategy and business objectives.
Responsibilities of Node.js Developers
Node.js is used most frequently in large scale applications where information is directly shared between the user and server. You can then consider the features for Node.js developers to hire:
Understand the methods of Agile development
Understand and work for the front end
Deliver a simplified, readable and well-documented application.
Work with cloud systems and databases
Understand the fundamental principles of PI development
Spot and resolve problems in the software development process
Apart from technical skills, Node.js developers team should be the dedicated
Choose a Node.JS Developer
If you wish to hire a Dedicated Node.js developer to achieve the best results, you must consider the country to find specialists and choose the best companies outsourcing Node.js development services. It is also crucial to estimate how much money you can spend on developing your project and choosing a proper Node.js developer. Your project span increases the choice of different engagement models, e.g. freelancers or dedicated Node.js developers. Overall, finding a Node.js developer with all the necessary abilities is, happily, an accessible task due to the success of Node.js, which needs meticulous consideration and analysis of different factors.
If you wish to hire the Dedicated Node.js Developer and achieve your projects quickly and efficiently, select a Node.JS Development Company in the USA with a vast diversity of professional Node.js developers.
Delivered Projects Using Nodejs
Local Directory web application that offers multiple services in the USA
Real-time interaction application with NodeJS for hosting provider
Dice Game Hosted as a Web App using Node
Project for Fintech with MEAN Stack
The online application providing a chat for the delivery and courier business
Web application for the business providing globalization and localization services
Application of Node.JS
Node.JS platform is perfect for building heavy I/O web applications enable a client-server to get a frequent flow of data. Node.JS is suitable for developing web applications in real-time that work effectively.
1. Rooms for Consultations
Real-time chats are also commonly used in social media, online games, etc. This means the exchange from sender to the recipient of text, pictures, audio and video content. Node.JS makes it simple to create real-time chats and has an API that issues coder-programmed events, making it an excellent option for apps with push notifications.
2. Streaming Applications
Node.JS has a Native API for the streaming of applications, making it the right choice. A streaming app usually includes part of a file to download when demanded. Node.JS enables you to process files when downloading them. For example, on websites for the video streaming that download a part of a video file while watching the video.
3. IoT: (Internet of things)
Many organizations use Node.JS to build their IoT systems as their first preference. The data typically flows from devices to servers and from servers to user-processed software in an IoT framework.
Node.JS Trends
Netflix, PayPal, LinkedIn, AliExpress and other leading technology companies have demonstrated the true value of Node.js. This will continue with these development trends.
Micro Services
Instead of single-server applications, more companies use multiple micro server software. It allows the scalability and reuse of different code units.
Architecture without Server
The absence of code processing servers and, instead, event-driven architecture control by events. The benefits are increased code quality, reduced costs, and flexible code modules.
MEAN & MERN Stack
MEAN – Node.js, MongoDB, and Express, Angular.
MERN – MongoDB, Express, Node.js, React.
Both make it easy to code complex web/mobile applications.
Real-Time Apps
Engagement with the user is essential. Node.js offers real-time features for exchanging documents, social networks, conference calls, online gaming, chat apps etc.
GraphQL
The data query and query runtime are open sources for APIs as well. Working on different platforms and simple integration with React is the advantage.
Conclusion:
Node.JS Development Company in the USA is the software company that uses Node.js for web and mobile app backends, APIs, IoT applications, etc. Node.js is not a computer programming language a platform for running JavaScript code on the server-side.
With this leading platform, Node.JS Development Company in the USA can give extremely reliable backend solutions. With Node incredibly popular, there has also been an increase in companies offering Node-based development services. It would help if you analyzed potential companies based on skill, competence, customer feedback on specific platforms, and their portfolio, to select the best.
If you have planned to hire a Dedicated developer for Node.js, it's essential to consider various engagement models. There are many alternatives that it becomes onerous to choose between regular in-house work, outsourced specialized teams, and freelancers. You should also carefully consider the advantages and disadvantages of each alternative.
For more information: https://arksstech.com/node-js-development/
0 notes
Text
Build a 100% Serverless REST API with Firebase Functions & FaunaDB
Indie and enterprise web developers alike are pushing toward a serverless architecture for modern applications. Serverless architectures typically scale well, avoid the need for server provisioning and most importantly are easy and cheap to set up! And that’s why I believe the next evolution for cloud is serverless because it enables developers to focus on writing applications.
With that in mind, let’s build a REST API (because will we ever stop making these?) using 100% serverless technology.
We’re going to do that with Firebase Cloud Functions and FaunaDB, a globally distributed serverless database with native GraphQL.
Those familiar with Firebase know that Google’s serverless app-building tools also provide multiple data storage options: Firebase Realtime Database and Cloud Firestore. Both are valid alternatives to FaunaDB and are effectively serverless.
But why choose FaunaDB when Firestore offers a similar promise and is available with Google’s toolkit? Since our application is quite simple, it does not matter that much. The main difference is that once my application grows and I add multiple collections, then FaunaDB still offers consistency over multiple collections whereas Firestore does not. In this case, I made my choice based on a few other nifty benefits of FaunaDB, which you will discover as you read along — and FaunaDB’s generous free tier doesn’t hurt, either. 😉
In this post, we’ll cover:
Installing Firebase CLI tools
Creating a Firebase project with Hosting and Cloud Function capabilities
Routing URLs to Cloud Functions
Building three REST API calls with Express
Establishing a FaunaDB Collection to track your (my) favorite video games
Creating FaunaDB Documents, accessing them with FaunaDB’s JavaScript client API, and performing basic and intermediate-level queries
And more, of course!
Set Up A Local Firebase Functions Project
For this step, you’ll need Node v8 or higher. Install firebase-tools globally on your machine:
$ npm i -g firebase-tools
Then log into Firebase with this command:
$ firebase login
Make a new directory for your project, e.g. mkdir serverless-rest-api and navigate inside.
Create a Firebase project in your new directory by executing firebase login.
Select Functions and Hosting when prompted.
Choose "functions" and "hosting" when the bubbles appear, create a brand new firebase project, select JavaScript as your language, and choose yes (y) for the remaining options.
Create a new project, then choose JavaScript as your Cloud Function language.
Once complete, enter the functions directory, this is where your code lives and where you’ll add a few NPM packages.
Your API requires Express, CORS, and FaunaDB. Install it all with the following:
$ npm i cors express faunadb
Set Up FaunaDB with NodeJS and Firebase Cloud Functions
Before you can use FaunaDB, you need to sign up for an account.
When you’re signed in, go to your FaunaDB console and create your first database, name it "Games."
You’ll notice that you can create databases inside other databases . So you could make a database for development, one for production or even make one small database per unit test suite. For now we only need ‘Games’ though, so let’s continue.

Create a new database and name it "Games."
Then tab over to Collections and create your first Collection named ‘games’. Collections will contain your documents (games in this case) and are the equivalent of a table in other databases— don’t worry about payment details, Fauna has a generous free-tier, the reads and writes you perform in this tutorial will definitely not go over that free-tier. At all times you can monitor your usage in the FaunaDB console.
For the purpose of this API, make sure to name your collection ‘games’ because we’re going to be tracking your (my) favorite video games with this nerdy little API.
Create a Collection in your Games Database and name it "Games."
Tab over to Security, and create a new Key and name it "Personal Key." There are 3 different types of keys, Admin/Server/Client. Admin key is meant to manage multiple databases, A Server key is typically what you use in a backend which allows you to manage one database. Finally a client key is meant for untrusted clients such as your browser. Since we’ll be using this key to access one FaunaDB database in a serverless backend environment, choose ‘Server key’.
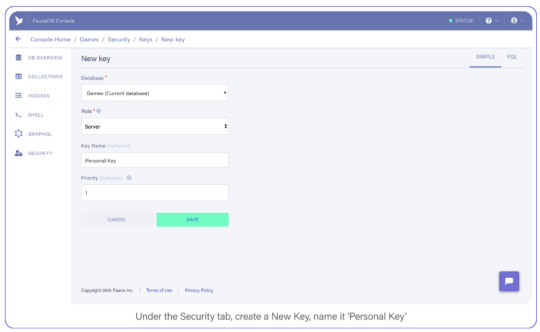
Under the Security tab, create a new Key. Name it Personal Key.
Save the key somewhere, you’ll need it shortly.
Build an Express REST API with Firebase Functions
Firebase Functions can respond directly to external HTTPS requests, and the functions pass standard Node Request and Response objects to your code — sweet. This makes Google’s Cloud Function requests accessible to middleware such as Express.
Open index.js inside your functions directory, clear out the pre-filled code, and add the following to enable Firebase Functions:
const functions = require('firebase-functions') const admin = require('firebase-admin') admin.initializeApp(functions.config().firebase)
Import the FaunaDB library and set it up with the secret you generated in the previous step:
admin.initializeApp(...) const faunadb = require('faunadb') const q = faunadb.query const client = new faunadb.Client({ secret: 'secrety-secret...that’s secret :)' })
Then create a basic Express app and enable CORS to support cross-origin requests:
const client = new faunadb.Client({...}) const express = require('express') const cors = require('cors') const api = express() // Automatically allow cross-origin requests api.use(cors({ origin: true }))
You’re ready to create your first Firebase Cloud Function, and it’s as simple as adding this export:
api.use(cors({...})) exports.api = functions.https.onRequest(api)
This creates a cloud function named, “api” and passes all requests directly to your api express server.
Routing an API URL to a Firebase HTTPS Cloud Function
If you deployed right now, your function’s public URL would be something like this: https://project-name.firebaseapp.com/api. That’s a clunky name for an access point if I do say so myself (and I did because I wrote this... who came up with this useless phrase?)
To remedy this predicament, you will use Firebase’s Hosting options to re-route URL globs to your new function.
Open firebase.json and add the following section immediately below the "ignore" array:
"ignore": [...], "rewrites": [ { "source": "/api/v1**/**", "function": "api" } ]
This setting assigns all /api/v1/... requests to your brand new function, making it reachable from a domain that humans won’t mind typing into their text editors.
With that, you’re ready to test your API. Your API that does... nothing!
Respond to API Requests with Express and Firebase Functions
Before you run your function locally, let’s give your API something to do.
Add this simple route to your index.js file right above your export statement:
api.get(['/api/v1', '/api/v1/'], (req, res) => { res .status(200) .send(`<img src="https://media.giphy.com/media/hhkflHMiOKqI/source.gif">`) }) exports.api = ...
Save your index.js fil, open up your command line, and change into the functions directory.
If you installed Firebase globally, you can run your project by entering the following: firebase serve.
This command runs both the hosting and function environments from your machine.
If Firebase is installed locally in your project directory instead, open package.json and remove the --only functions parameter from your serve command, then run npm run serve from your command line.
Visit localhost:5000/api/v1/ in your browser. If everything was set up just right, you will be greeted by a gif from one of my favorite movies.
And if it’s not one of your favorite movies too, I won’t take it personally but I will say there are other tutorials you could be reading, Bethany.
Now you can leave the hosting and functions emulator running. They will automatically update as you edit your index.js file. Neat, huh?
FaunaDB Indexing
To query data in your games collection, FaunaDB requires an Index.
Indexes generally optimize query performance across all kinds of databases, but in FaunaDB, they are mandatory and you must create them ahead of time.
As a developer just starting out with FaunaDB, this requirement felt like a digital roadblock.
"Why can’t I just query data?" I grimaced as the right side of my mouth tried to meet my eyebrow.
I had to read the documentation and become familiar with how Indexes and the Fauna Query Language (FQL) actually work; whereas Cloud Firestore creates Indexes automatically and gives me stupid-simple ways to access my data. What gives?
Typical databases just let you do what you want and if you do not stop and think: : "is this performant?" or “how much reads will this cost me?” you might have a problem in the long run. Fauna prevents this by requiring an index whenever you query. As I created complex queries with FQL, I began to appreciate the level of understanding I had when I executed them. Whereas Firestore just gives you free candy and hopes you never ask where it came from as it abstracts away all concerns (such as performance, and more importantly: costs).
Basically, FaunaDB has the flexibility of a NoSQL database coupled with the performance attenuation one expects from a relational SQL database.
We’ll see more examples of how and why in a moment.
Adding Documents to a FaunaDB Collection
Open your FaunaDB dashboard and navigate to your games collection.
In here, click NEW DOCUMENT and add the following BioShock titles to your collection:
{ "title": "BioShock", "consoles": [ "windows", "xbox_360", "playstation_3", "os_x", "ios", "playstation_4", "xbox_one" ], "release_date": Date("2007-08-21"), "metacritic_score": 96 } { "title": "BioShock 2", "consoles": [ "windows", "playstation_3", "xbox_360", "os_x" ], "release_date": Date("2010-02-09"), "metacritic_score": 88 }
? And...
{ "title": "BioShock Infinite", "consoles": [ "windows", "playstation_3", "xbox_360", "os_x", "linux" ], "release_date": Date("2013-03-26"), "metacritic_score": 94 }
As with other NoSQL databases, the documents are JSON-style text blocks with the exception of a few Fauna-specific objects (such as Date used in the "release_date" field).
Now switch to the Shell area and clear your query. Paste the following:
Map(Paginate(Match(Index("all_games"))),Lambda("ref",Var("ref")))
And click the "Run Query" button. You should see a list of three items: references to the documents you created a moment ago.
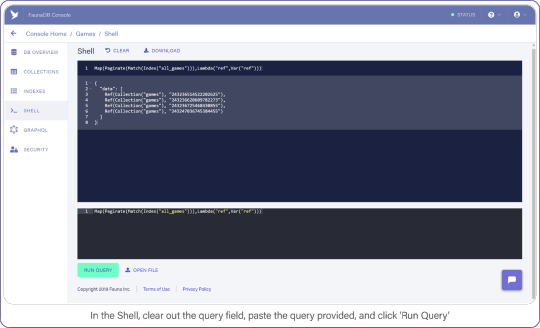
In the Shell, clear out the query field, paste the query provided, and click "Run Query."
It’s a little long in the tooth, but here’s what the query is doing.
Index("all_games") creates a reference to the all_games index which Fauna generated automatically for you when you established your collection.These default indexes are organized by reference and return references as values. So in this case we use the Match function on the index to return a Set of references. Since we do not filter anywhere, we will receive every document in the ‘games’ collection.
The set that was returned from Match is then passed to Paginate. This function as you would expect adds pagination functionality (forward, backward, skip ahead). Lastly, you pass the result of Paginate to Map, which much like its software counterpart lets you perform an operation on each element in a Set and return an array, in this case it is simply returning ref (the reference id).
As we mentioned before, the default index only returns references. The Lambda operation that we fed to Map, pulls this ref field from each entry in the paginated set. The result is an array of references.
Now that you have a list of references, you can retrieve the data behind the reference by using another function: Get.
Wrap Var("ref") with a Get call and re-run your query, which should look like this:
Map(Paginate(Match(Index("all_games"))),Lambda("ref",Get(Var("ref"))))
Instead of a reference array, you now see the contents of each video game document.
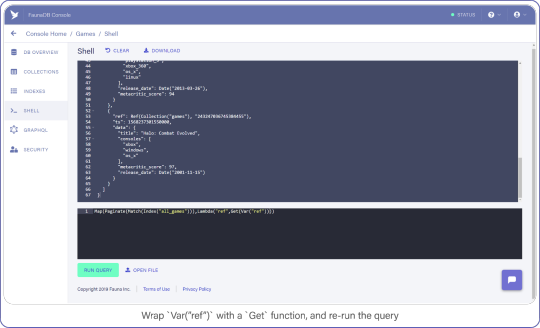
Wrap Var("ref") with a Get function, and re-run the query.
Now that you have an idea of what your game documents look like, you can start creating REST calls, beginning with a POST.
Create a Serverless POST API Request
Your first API call is straightforward and shows off how Express combined with Cloud Functions allow you to serve all routes through one method.
Add this below the previous (and impeccable) API call:
api.get(['/api/v1', '/api/v1/'], (req, res) => {...}) api.post(['/api/v1/games', '/api/v1/games/'], (req, res) => { let addGame = client.query( q.Create(q.Collection('games'), { data: { title: req.body.title, consoles: req.body.consoles, metacritic_score: req.body.metacritic_score, release_date: q.Date(req.body.release_date) } }) ) addGame .then(response => { res.status(200).send(`Saved! ${response.ref}`) return }) .catch(reason => { res.error(reason) }) })
Please look past the lack of input sanitization for the sake of this example (all employees must sanitize inputs before leaving the work-room).
But as you can see, creating new documents in FaunaDB is easy-peasy.
The q object acts as a query builder interface that maps one-to-one with FQL functions (find the full list of FQL functions here).
You perform a Create, pass in your collection, and include data fields that come straight from the body of the request.
client.query returns a Promise, the success-state of which provides a reference to the newly-created document.
And to make sure it’s working, you return the reference to the caller. Let’s see it in action.
Test Firebase Functions Locally with Postman and cURL
Use Postman or cURL to make the following request against localhost:5000/api/v1/ to add Halo: Combat Evolved to your list of games (or whichever Halo is your favorite but absolutely not 4, 5, Reach, Wars, Wars 2, Spartan...)
$ curl http://localhost:5000/api/v1/games -X POST -H "Content-Type: application/json" -d '{"title":"Halo: Combat Evolved","consoles":["xbox","windows","os_x"],"metacritic_score":97,"release_date":"2001-11-15"}'
If everything went right, you should see a reference coming back with your request and a new document show up in your FaunaDB console.
Now that you have some data in your games collection, let’s learn how to retrieve it.
Retrieve FaunaDB Records Using a REST API Request
Earlier, I mentioned that every FaunaDB query requires an Index and that Fauna prevents you from doing inefficient queries. Since our next query will return games filtered by a game console, we can’t simply use a traditional `where` clause since that might be inefficient without an index. In Fauna, we first need to define an index that allows us to filter.
To filter, we need to specify which terms we want to filter on. And by terms, I mean the fields of document you expect to search on.
Navigate to Indexes in your FaunaDB Console and create a new one.
Name it games_by_console, set data.consoles as the only term since we will filter on the consoles. Then set data.title and ref as values. Values are indexed by range, but they are also just the values that will be returned by the query. Indexes are in that sense a bit like views, you can create an index that returns a different combination of fields and each index can have different security.
To minimize request overhead, we’ve limited the response data (e.g. values) to titles and the reference.
Your screen should resemble this one:

Under indexes, create a new index named games_by_console using the parameters above.
Click "Save" when you’re ready.
With your Index prepared, you can draft up your next API call.
I chose to represent consoles as a directory path where the console identifier is the sole parameter, e.g. /api/v1/console/playstation_3, not necessarily best practice, but not the worst either — come on now.
Add this API request to your index.js file:
api.post(['/api/v1/games', '/api/v1/games/'], (req, res) => {...}) api.get(['/api/v1/console/:name', '/api/v1/console/:name/'], (req, res) => { let findGamesForConsole = client.query( q.Map( q.Paginate(q.Match(q.Index('games_by_console'), req.params.name.toLowerCase())), q.Lambda(['title', 'ref'], q.Var('title')) ) ) findGamesForConsole .then(result => { console.log(result) res.status(200).send(result) return }) .catch(error => { res.error(error) }) })
This query looks similar to the one you used in your SHELL to retrieve all games, but with a slight modification.This query looks similar to the one you used in your SHELL to retrieve all games, but with a slight modification. Note how your Match function now has a second parameter (req.params.name.toLowerCase()) which is the console identifier that was passed in through the URL.
The Index you made a moment ago, games_by_console, had one Term in it (the consoles array), this corresponds to the parameter we have provided to the match parameter. Basically, the Match function searches for the string you pass as its second argument in the index. The next interesting bit is the Lambda function. Your first encounter with Lamba featured a single string as Lambda’s first argument, “ref.”
However, the games_by_console Index returns two fields per result, the two values you specified earlier when you created the Index (data.title and ref). So basically we receive a paginated set containing tuples of titles and references, but we only need titles. In case your set contains multiple values, the parameter of your lambda will be an array. The array parameter above (`['title', 'ref']`) says that the first value is bound to the text variable title and the second is bound to the variable ref. text parameter. These variables can then be retrieved again further in the query by using Var(‘title’). In this case, both “title” and “ref,” were returned by the index and your Map with Lambda function maps over this list of results and simply returns only the list of titles for each game.
In fauna, the composition of queries happens before they are executed. When you write var q = q.Match(q.Index('games_by_console'))), the variable just contains a query but no query was executed yet. Only when you pass the query to client.query(q) to be executed, it will execute. You can even pass javascript variables in other Fauna FQL functions to start composing queries. his is a big benefit of querying in Fauna vs the chained asynchronous queries required of Firestore. If you ever have tried to generate very complex queries in SQL dynamically, then you will also appreciate the composition and less declarative nature of FQL.
Save index.js and test out your API with this:
$ curl http://localhost:5000/api/v1/xbox {"data":["Halo: Combat Evolved"]}
Neat, huh? But Match only returns documents whose fields are exact matches, which doesn’t help the user looking for a game whose title they can barely recall.
Although Fauna does not offer fuzzy searching via indexes (yet), we can provide similar functionality by making an index on all words in the string. Or if we want really flexible fuzzy searching we can use the filter syntax. Note that its is not necessarily a good idea from a performance or cost point of view… but hey, we’ll do it because we can and because it is a great example of how flexible FQL is!
Filtering FaunaDB Documents by Search String
The last API call we are going to construct will let users find titles by name. Head back into your FaunaDB Console, select INDEXES and click NEW INDEX. Name the new Index, games_by_title and leave the Terms empty, you won’t be needing them.
Rather than rely on Match to compare the title to the search string, you will iterate over every game in your collection to find titles that contain the search query.
Remember how we mentioned that indexes are a bit like views. In order to filter on title , we need to include `data.title` as a value returned by the Index. Since we are using Filter on the results of Match, we have to make sure that Match returns the title so we can work with it.
Add data.title and ref as Values, compare your screen to mine:

Create another index called games_by_title using the parameters above.
Click "Save" when you’re ready.
Back in index.js, add your fourth and final API call:
api.get(['/api/v1/console/:name', '/api/v1/console/:name/'], (req, res) => {...}) api.get(['/api/v1/games/', '/api/v1/games'], (req, res) => { let findGamesByName = client.query( q.Map( q.Paginate( q.Filter( q.Match(q.Index('games_by_title')), q.Lambda( ['title', 'ref'], q.GT( q.FindStr( q.LowerCase(q.Var('title')), req.query.title.toLowerCase() ), -1 ) ) ) ), q.Lambda(['title', 'ref'], q.Get(q.Var('ref'))) ) ) findGamesByName .then(result => { console.log(result) res.status(200).send(result) return }) .catch(error => { res.error(error) }) })
Big breath because I know there are many brackets (Lisp programmers will love this) , but once you understand the components, the full query is quite easy to understand since it’s basically just like coding.
Beginning with the first new function you spot, Filter. Filter is again very similar to the filter you encounter in programming languages. It reduces an Array or Set to a subset based on the result of a Lambda function.
In this Filter, you exclude any game titles that do not contain the user’s search query.
You do that by comparing the result of FindStr (a string finding function similar to JavaScript’s indexOf) to -1, a non-negative value here means FindStr discovered the user’s query in a lowercase-version of the game’s title.
And the result of this Filter is passed to Map, where each document is retrieved and placed in the final result output.
Now you may have thought the obvious: performing a string comparison across four entries is cheap, 2 million…? Not so much.
This is an inefficient way to perform a text search, but it will get the job done for the purpose of this example. (Maybe we should have used ElasticSearch or Solr for this?) Well in that case, FaunaDB is quite perfect as central system to keep your data safe and feed this data into a search engine thanks to the temporal aspect which allows you to ask Fauna: “Hey, give me the last changes since timestamp X?”. So you could setup ElasticSearch next to it and use FaunaDB (soon they have push messages) to update it whenever there are changes. Whoever did this once knows how hard it is to keep such an external search up to date and correct, FaunaDB makes it quite easy.
Test the API by searching for "Halo":
$ curl http://localhost:5000/api/v1/games?title=halo
Don’t You Dare Forget This One Firebase Optimization
A lot of Firebase Cloud Functions code snippets make one terribly wrong assumption: that each function invocation is independent of another.
In reality, Firebase Function instances can remain "hot" for a short period of time, prepared to execute subsequent requests.
This means you should lazy-load your variables and cache the results to help reduce computation time (and money!) during peak activity, here’s how:
let functions, admin, faunadb, q, client, express, cors, api if (typeof api === 'undefined') { ... // dump the existing code here } exports.api = functions.https.onRequest(api)
Deploy Your REST API with Firebase Functions
Finally, deploy both your functions and hosting configuration to Firebase by running firebase deploy from your shell.
Without a custom domain name, refer to your Firebase subdomain when making API requests, e.g. https://{project-name}.firebaseapp.com/api/v1/.
What Next?
FaunaDB has made me a conscientious developer.
When using other schemaless databases, I start off with great intentions by treating documents as if I instantiated them with a DDL (strict types, version numbers, the whole shebang).
While that keeps me organized for a short while, soon after standards fall in favor of speed and my documents splinter: leaving outdated formatting and zombie data behind.
By forcing me to think about how I query my data, which Indexes I need, and how to best manipulate that data before it returns to my server, I remain conscious of my documents.
To aid me in remaining forever organized, my catalog (in FaunaDB Console) of Indexes helps me keep track of everything my documents offer.
And by incorporating this wide range of arithmetic and linguistic functions right into the query language, FaunaDB encourages me to maximize efficiency and keep a close eye on my data-storage policies. Considering the affordable pricing model, I’d sooner run 10k+ data manipulations on FaunaDB’s servers than on a single Cloud Function.
For those reasons and more, I encourage you to take a peek at those functions and consider FaunaDB’s other powerful features.
The post Build a 100% Serverless REST API with Firebase Functions & FaunaDB appeared first on CSS-Tricks.
Build a 100% Serverless REST API with Firebase Functions & FaunaDB published first on https://deskbysnafu.tumblr.com/
0 notes
Text
12 Best CMS for 2019

2019 is half over, but don’t let that stop you from trying something new… specifically, a new CMS. “But Ezequiel, good buddy, I don’t have time to check out a whole new content management system. I have websites to make!”, you say, in those exact words.
That’s fair, but you should be keeping an eye on the up-and comers anyway. These are the people who have the sheer brass walnuts (which are a real thing, unisex, and available to anyone with money) to go up against giants like WordPress, Joomla, and mostly WordPress. They do this with nothing but a pretty good idea, a GitHub repository, and sometimes some corporate funding of some kind, if they’re very lucky. You ignore them at your own peril.
Well, maybe not peril, but these projects deserve a look.
The CMS that have been selected for this list were (almost) all launched post-2017 (or at least their GitHub repos were), and they’re all free, or at least have a free plan. They’re also all under active development. Let’s get started…
Flextype
Flextype is a simple, PHP7-based, flat-file CMS that’s designed to keep things flexible, allowing you to create more or less anything you want. And I do mean “anything”; Flextype makes it dead-easy to define custom fields for any content entry, and has a built-in theme editor
The actual content editing is easy enough, with a simple WYSIWYG editor, though Markdown support is available via plugin. Doing anything fancy with the content requires the use of WordPress-style shortcodes, though.
All in all, it’s a solid foundation for a CMS, and I can’t wait to see what they do with it.
rwtxt
rwtxt is designed to be a simple, searchable notepad where you can jot down notes, keep a journal, or use it as a pastebin. It’s reminiscent of a wiki in that, in its default configuration, anyone can add a page to the public area of the site.
However, you can also add a “domain”, or a sort of personal notepad where you can either keep your private notes private, or make them public and publicly searchable. You can also log into multiple domains at a time, so you could theoretically use rwtxt to run a site with multiple blogs that are thematically different. (You can also add custom CSS to a domain, for further differentiation.)
The whole experience is very bare-bones, but I’m fascinated to see where it goes.
Relevant: rwtxt Github Repo

Publii
Publii is one of a few new GUI-focused Static CMS apps that run on the desktop, rather than on your server. You download the app, use it to build a static site, then upload that site onto the hosting of your choice. It’s not a new idea, but it’s one that seems to have picked up steam, lately.
Publii in particular seems to be the most modern and feature-complete of these CMS, and is open source and free to use. It seems to be blog-focused, and there is a marketplace with both free and paid theme options of excellent quality.
Other features include website syncing (supports FTP, GitHub Pages, Gitlab, AWS, Netlify, or Google Cloud), a preview function, a WordPress importer, and a focus on SEO. It’s very definitely focused at more beginner-level users.
ClassicPress
Speaking, however briefly, of WordPress, ClassicPress is literally a WordPress fork that notably lacks a certain block-based content editor that lots of people disliked. Otherwise, the current version aims to improve security and optimization, remove some bloat, and points the CMS squarely at business users who might be put off by quirky language such as “Howdy”.
The biggest difference so far, besides using the classic content editor, is the governance of the project; there’s a very large focus placed on democracy and voting to determine the future of the project, where WordPress’ future is largely written by Automattic (the company that makes it).
Twill
Twill isn’t strictly a CMS, as such. It’s a “CMS toolkit”, designed to help developers very quickly create a custom CMS to match any need. As such, it’s not something you’d want to install just to start your own blog.
But if you’re a developer, or a business owner who needs a custom-built CMS, it does look like a promising way to get exactly the functionality you need, faster. It’s based on the Laravel PHP framework, so if that’s something you already use and like, try it out.
Canner
CannerCMS is similar to Twill in that it’s a build-your-own CMS kit of sorts. Unlike Twill, it seems to be Node-based, so if writing JavaScript is more your style, CannerCMS has you covered.
Incidentally, they also has a SaaS version of the product, which takes care of all the hosting, CDN configuration, and other general hassles for you. The open source edition also apparently lacks multi-language support, which the SaaS version has.

Grafite CMS
Grafite CMS is a sort of dual purpose CMS. By that I mean you can use it as a standalone CMS, on its own and fully functional, or as an add-on to an existing site or web app. Now lots of CMS will allow you to do this via an API of some sort, but Grafite CMS actually comes with two separate setup/installation modes, depending on whether you want to use Grafite CMS on its own, or integrate it into something larger.
It’s also modular, in that content types like “Pages”, Blog”, “Events”, and other are modules that you can activate or deactivate at will. You can, of course, make your own modules if you need a custom content type. It’s very much based on a “use only what you need” philosophy.

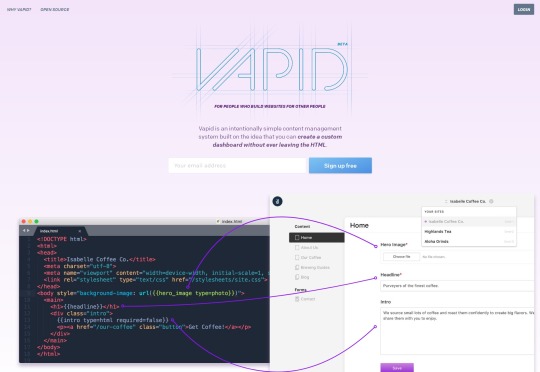
Vapid
Vapid has been mentioned once before here on Web Designer Depot, but it’s worth looking at again, in case you missed it. It’s billed as an intentionally simple CMS, and they mean it. The dashboard is literally generated based on the tags you use in your templates. Every time you mark part of a page as editable content, the dashboard will add the appropriate form field in the admin UI.
It’s written in NodeJS, and you can host the app on your own server for free if you know how (the code itself is open source), or you can deploy your website to Vapid’s own hosting service. Publishing your site there does cost money of course, but the plans are quite reasonable, with the first paid plan starting at 7 USD.
Zola
Zola is a static site generator written in Rust, so it does depend on using a command line interface, but otherwise, they keep development simple. I mean, when’s the last time you heard of a static site generator that didn’t have any dependencies? There are even premade binaries for Windows, Mac, and Linux, so installation is quick and simple.
So yeah, even if you’ve got only a rudimentary understanding of programming like myself, you can probably build sites with Zola. It’s got a list of features about a mile long, including custom taxonomies, LiveReload, Netlify support, shortcodes, image processing, and more. The content is all handled by Markdown, of course.
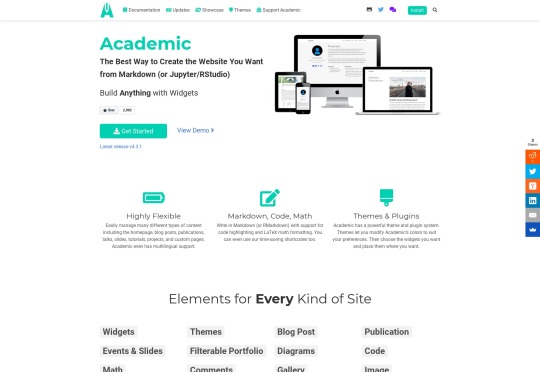
Academic
Academic is interesting because it’s a CMS built on top of another CMS. Specifically, it’s a website / page builder built on top of the Hugo static site generator. It’s designed to take the complexity of a static site generator, and make everything sort of drag and drop. And I do mean everything.
There’s support for easily managing custom pages, talks, slides, tutorials, as well as all the usual content types. There’s multilingual support, and everything can be written in Markdown and, interestingly enough, LaTeX if you’re the math-loving type. Existing themes mostly seem to be Material Design-based, but of course you can make your own.
Piranha CMS
I didn’t want our ASP.NET lovers out there feel like we’d forgotten them. For you, Piranha CMS looks rather promising. Interestingly for an ASP.NET CMS, it can run on Windows, Mac, and Linux, with a focus on speed and easy publishing. Considering the tech it’s based on, it’s also Azure-ready right out of the box, if that’s something that matters to you.
Besides all that, you can edit your content as HTML or Markdown, or even plain text. There’s also a Gutenberg-style block editor. There’s image processing, easy internal linking, and even easy ways to run multiple blogs on the same site. The whole thing seems to be aimed at big publishers.
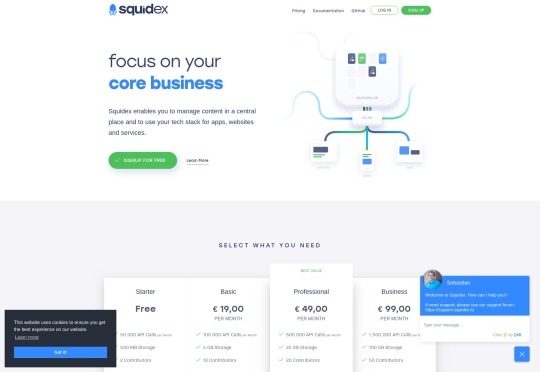
Squidex
Squidex is an ASP.NET-based open source headless CMS (that means they don’t dictate how any of your HTML gets output) that you can run on your own server, or use their SaaS option which also has a limited free plan. It’s the sort of CMS that’s meant to be used as a central repository for all of your content, which you can access anywhere via their API. So theoretically, you could use it to run multiple internal and / or external websites.
As such, it’s the sort of CMS where you sort of have to build your own dashboard, as well as the front end user interface. That said, it does look real good, and offers loads of options to help you build the CMS of your (apparently quite nerdy) dreams.
Featured image via Unsplash.
Source via Webdesigner Depot https://ift.tt/2z09XFL
0 notes
Text
Web Scraping in Nodejs

Description
In this course you will learn how to scrape a websites, with practical examples on real websites using Nodejs Request, Cheerio, NightmareJs and Puppeteer. You will be using the newest JavaScript ES7 syntax with async/await. You will learn how to scrape a Craigslist website for software engineering jobs, using Nodejs Request and Cheerio. You will be using the newest JavaScript ES7 syntax with async/await. You will then learn how to scrape more advanced websites that require JavaScript such as iMDB and AirBnB using NighmareJs and Puppeteer. I'm gong to also show you with a practical real-life website, how you can even avoid wasting time on creating a web scraper in the first place, by reverse engineering websites and finding their hidden API's! Learn how to avoid being blocked from websites when developing out your scraper, by building out the scraper in a test-driven way with mocked html, rather than hitting the website every time as you're debugging and developing it. You'll also learn what you can do if you're blocked and your alternatives to get your scraper up and running regardless! You will also learn how to scrape on a server with a bad connection, or even if you have a bad connection. You'll even learn how to save your results to a CSV file and MongoDB! How do you build a scraper that scrapes every 1 hour (or other interval), and deploy it do a cloud host like Heroku or Google Cloud? Let me show you, quick and easy! How do you scrape a site requiring passwords? I'm going to show you that too with a real website (Craigslist)! How do you serve your scraping results in a REST API with Nodejs Express? And how can we build a React frontend that's showing the results? You'll learn that too, in the quickest and simplest way possible! Plus, a section covering how to make a basic GraphQL API is included in the course. As a last cherry on the top, I have a section containing a secret backdoor showing you how to scrape Facebook using only Request! If you have issues regarding a site you're trying to scrape yourself, it's totally okay to reach out to me for some help. I'd be happy to point you in the right direction! Whatever issues my students are facing, I use that to expand on my course! Read the full article
0 notes
Link
Build Serverless APIs with Serverless Framework and NodeJs ##elearning ##Udacity #APIs #Build #framework #Nodejs #Serverless Build Serverless APIs with Serverless Framework and NodeJs The Serverless Framework is a free and open-source web framework written using Node.js. Serverless is the first framework that was originally developed for building applications exclusively on AWS Lambda, a serverless computing platform provided by Amazon as a part of the Amazon Web Services. Currently, applications developed with Serverless can be deployed to other function as a service providers, including Microsoft Azure with Azure Functions, IBM Bluemix with IBM Cloud Functions based on Apache OpenWhisk, Google Cloud using Google Cloud Functions, Oracle Cloud using Oracle Fn[1], Kubeless based on Kubernetes, Spotinst and Webtask by Auth0.[2] Serverless is a cloud computing execution model where the cloud provider dynamically manages the allocation and provisioning of servers. A serverless application runs in stateless compute containers that are event-triggered, ephemeral (may last for one invocation), and fully managed by the cloud provider. Pricing is based on the number of executions rather than pre-purchased compute capacity, isn’t it the ideal framework for that project you have been planning since a long time? Well, go ahead do it. Serverless applications are event-driven cloud-based systems where application development rely solely on a combination of third-party services, client-side logic and cloud-hosted remote procedure calls (Functions as a Service). Most of the cloud providers have invested heavily in serverless and thats a lot of money; with the given massive promotion and realistic offering you can safely assume serverless to be one of the most used cloud services in upcoming years. Here are some of the currently available cloud services: AWS Lambda Google Cloud Functions Azure Functions IBM OpenWhisk Alibaba Function Compute Iron Functions Auth0 Webtask Oracle Fn Project Kubeless Traditional vs. Serverless Architecture For years your applications have run on servers which you had to patch, update, and continuously look after late nights and early mornings due to all the unimaginable errors that broke your production. As long as you managed them, the whole responsibility of their proper functioning was on you. Serverless tends to be unlike the aforementioned, you no longer need to worry about the underlying servers. Reason being, they are not managed by you anymore and with management out of the picture the responsibility falls on the Cloud vendors. But regardless the cool features of Serverless in some cases, the traditional architecture outshines it. Pricing One of the major advantages of using Serverless is reduced cost, for years the cost of provisioning servers and maintaining that 24x7 server team which blew a hole in your pocket is gone. The cost model of Serverless is execution-based: you’re charged for the number of executions. You’re allotted a certain number of seconds of use that varies with the amount of memory you require. Likewise, the price per MS (millisecond) varies with the amount of memory you require. Obviously, shorter running functions are more adaptable to this model with a peak execution time of 300-second for most Cloud vendors. The winner here is Serverless Architecture. Networking The downside is that Serverless functions are accessed only as private APIs. To access these you must set up an API Gateway. This doesn’t have an impact on your pricing or process, but it means you cannot directly access them through the usual IP, snap! The winner here is Traditional Architecture. 3rd Party Dependencies Most, if not all of your projects have external dependencies, they rely on libraries that are not built into the language or framework you use. You often use libraries with functionality that includes cryptography, image processing, etc., these libraries can be pretty heavy. Without system-level access, you must package these dependencies into the application itself. Reinventing the wheel isn’t always a good idea. The winner here is based on the context. For simple applications with few dependencies, Serverless is the winner; for anything more complex, Traditional Architecture is the winner. Environments Setting up different environments for Serverless is as easy as setting up a single environment. Given that it’s pay per execution, this is a large improvement over traditional servers, you no longer need to set up dev, staging, and production machines. Eventually you’d lose count of all the environments, at some point. The winner here is Serverless Architecture. Timeout With Serverless computing, there’s a hard 300-second timeout limit. Too complex or long-running functions aren’t good for Serverless, but having a hard timeout makes it impossible to perform certain tasks. A hard limit on this time makes Serverless unusable for applications that have variable execution times, and for certain services which require information from an external source. The clear winner here is Traditional Architecture. Scale Scaling process for Serverless is automatic and seamless, but there is a lack of control or entire absence of control. While automatic scaling is great, it’s difficult not to be able to address and mitigate errors related to new Serverless instances. It’s a tie between Serverless and Traditional Architecture. Functions as a Service (FaaS) FaaS is an implementation of Serverless architectures where engineers can deploy an individual function or a piece of business logic. They start within milliseconds (~100ms for AWS Lambda) and process individual requests within a 300-second timeout imposed by most cloud vendors. Principles of FaaS: Complete management of servers Invocation based billing Event-driven and instantaneously scalable Key properties of FaaS: Independent, server-side, logical functions FaaS are similar to the functions you’re used to writing in programming languages, small, separate, units of logic that take input arguments, operate on the input and return the result. Stateless With Serverless, everything is stateless, you can’t save a file to disk on one execution of your function and expect it to be there at the next. Any two invocations of the same function could run on completely different containers under the hood. Ephemeral FaaS are designed to spin up quickly, do their work and then shut down again. They do not linger unused. As long as the task is performed the underlying containers are scrapped. Event-triggered Although functions can be invoked directly, yet they are usually triggered by events from other cloud services such as HTTP requests, new database entries or inbound message notifications. FaaS are often used and thought of as the glue between services in a cloud environment. Scalable by default With stateless functions multiple containers can be initialised, allowing as many functions to be run (in parallel, if necessary) as needed to continually service all incoming requests. Fully managed by a Cloud vendor AWS Lambda, Azure Functions, IBM OpenWhisk and Google Cloud Functions are most well-known FaaS solutions available. Each offering typically supports a range of languages and runtimes e.g. Node.js, Python, .NET Core, Java. Who this course is for: Developers who want to learn about AWS Lambda and the Serverless Architecture Developers who want to build Serverless APIs using Serverless Framework, AWS and NodeJs 👉 Activate Udemy Coupon 👈 Free Tutorials Udemy Review Real Discount Udemy Free Courses Udemy Coupon Udemy Francais Coupon Udemy gratuit Coursera and Edx ELearningFree Course Free Online Training Udemy Udemy Free Coupons Udemy Free Discount Coupons Udemy Online Course Udemy Online Training 100% FREE Udemy Discount Coupons https://www.couponudemy.com/blog/build-serverless-apis-with-serverless-framework-and-nodejs/
0 notes
Text
Kubernetes 101 - Concepts and Why It Matters
Docker Containers Changed How We Deploy Software
In the old days, software deployment was hard, time-consuming, and error-prone. To install an application, you need to purchase a number of physical machines and pay for CPU and memory than you might actually need. A few years later, virtualization was dominant. This saved you some costs as one powerful bare-metal server can host multiple machines. Thus, CPU and memory could be shared. In modern days, machines can be split into even smaller parts than virtual servers: containers. Containers became so popular only a few years ago. So, what exactly is a Linux container? And where does Docker fit?
applications inside virtual machines-1
A container provides a type of virtualization just like virtual machines. However, while a hypervisor provides a hardware isolation level, containers offer process isolation level. To understand this difference, let’s return to our example.
Instead of creating a virtual machine for Apache and another for MySQL, you decide to use containers. Now, your stack looks like below illustration.
applications inside docker containers
A container is nothing but a set of processes on the operating system. A container works in complete isolation from other processes/containers through Linux kernel features, such as cgroups, chroot, UnionFS, and namespaces,.
This means you’ll only pay for one physical host, install one OS, and run as many containers as your hardware can handle. Reducing the number of operating systems that you need to run on the same host means less storage, memory and CPU wasted.
In 2010, Docker was founded. Docker may refer to both the company and the product. Docker made it very easy for users and companies to utilize containers for software deployment. An important thing to note, though, is that Docker is not the only tool in the market that does this. Other applications exist like rkt, Apache Mesos, LXC among others. Docker is just the most popular one.
Magalix Trial
Containers And Microservices: The Need For An Orchestrator
The ability to run complete services in the form of processes (a.k.a containers) on the same OS was revolutionary. It brought a lot of possibilities of its own:
Because containers are way cheaper and faster than virtual machines, large applications could now be broken down into small, interdependent components, each running in its own container. This architecture became known as microservices.
With the microservices architecture becoming more dominant, applications had more freedom to get larger and richer. Previously, a monolithic application grew till a certain limit where it became cumbersome, harder to debug, and very difficult to be re-deployed. However, with the advent of containers, all what you need to do to add more features to an application is to build more containers/services. With IaC (Infrastructure as Code), deployment is as easy as running a command against a configuration file.
Today, it is no longer acceptable to have a downtime. The user simply does not care if your application is experiencing a network outage or your cluster nodes crashed. If your system is not running, the user will simply switch to your competitor.
Containers are processes, and processes are ephemeral by nature. What happens if a container crashed?
To achieve high availability, you create more than one container for each component. For example, two containers for Apache, each hosting a web server. But, which one of them will respond to client requests?
When you need to update your application, you want to make use of having multiple containers for each service. You will deploy the new code on a portion of the containers, recreate them, then do the same on the rest. But, it’s very hard to do this manually. Not to mention, it’s error-prone.
Container provisioning.
Maintaining the state (and number) of running containers.
Distribute application load evenly on the hardware nodes by moving containers from one node to the other.
Load balancing among containers that host the same service.
Handling container persistent storage.
Ensuring that the application is always available even when rolling out updates.
All the above encourages IT professionals to do one thing: create as many containers as possible. However, this also has its drawbacks:
For example, let’s say you have a microservices application that has multiple services running Apache, Ruby, Python, and NodeJS. You use containers to make the best use of the hardware at hand. However, with so many containers dispersed on your nodes without being managed, your infrastructure may look as shown in below illustration.
multiple applications inside containers
You need a container orchestrator!
Please Welcome Kubernetes
Kubernetes is a container orchestration tool. Orchestration is another word for lifecycle management. A container orchestrator does many tasks, including:
Like Docker not being the only container platform out there, Kubernetes is not the sole orchestration tool in the market. There are other tools like Docker Swarm, Apache Mesos, Marathon, and others. So, what makes Kubernetes the most used one?
Why Is Kubernetes So Popular?
Kubernetes was originally developed by the software and search giant, Google. It was a branch of their Borg project. Since its inception, Kubernetes received a lot of momentum from the open source community. It is the main project of the Cloud Native Computing Foundation. Some of the biggest market players are backing it: Google, AWS, Azure, IBM, and Cisco to name a few.
Kubernetes Architecture And Its Environment?
Kubernetes is a Greek word that stands for helmsman or captain. It is the governor of your cluster, the maestro of the orchestra. To be able to do this critical job, Kubernetes was designed in a highly modular manner. Each part of the technology provides the necessary foundation for the services that depend on it. The illustration below represents a high overview of how the application works. Each module is contained inside a larger one that relies on it to function. Let’s dig deeper into each one of these.
Let’s now have an overview of the landscape of Kubernetes as a system.
kubernetes ecosystem
Kubernetes Core Features
Also referred to as the control plane, it is the most basic part of the whole system. It offers a number of RESTful APIs that enable the cluster to do its most basic operations. The other part of the core is execution. Execution involves a number of controllers like replication controller, replicaset, deployments...etc. It also includes the kubelet, which is the module responsible for communicating with the container runtime.
The core is also responsible for contacting other layers (through kubelet) to fully manage containers. Let’s have a brief look at each of them:
Container runtime
Kubernetes uses Container Runtime Interface (CRI) to transparently manage your containers without necessarily having to know (or deal with) the runtime used. When we discussed containers, we mentioned that Docker, despite its popularity, is not the only container management system available. Kubernetes uses containerd (pronounced container d) by default as a container runtime. This is how you are able to issue standard Docker commands against Kubernetes containers. It also uses rkt as an alternative runtime. Don’t be too confused at this part. This is the very inner workings of Kubernetes that, although you need to understand, you won’t have to deal with almost entirely. Kubernetes abstracts this layer through its rich set of APIs.
The Network Plugin
As we discussed earlier, a container orchestration system is responsible (among other things) for managing the network through which containers and services communicate. Kubernetes uses a library called Container Network Interface (CNI) as an interface between the cluster and various network providers. There are a number of network providers that can be used in Kubernetes. This number is constantly changing. To name a few:
Weave net
Contiv
Flannel
Calico
The list is too long to mention here. You might be asking: why does Kubernetes need more than one networking provider to choose from? Kubernetes was designed mainly to be deployed in diverse environments. A Kubernetes node can be anything from a bare metal physical server, a virtual machine, or a cloud instance. With such diversity, you have a virtually endless number of options for how your containers will communicate with each other. This requires more than one to choose among. That is why Kubernetes designers chose to abstract the network provider layer behind CNI.
The Volume Plugin
A volume broadly refers to the storage that will be availed for the pod. A pod is one or more containers managed by Kubernetes as one unit. Because Kubernetes was designed to be deployed in multiple environments, there is a level of abstraction between the cluster and the underlying storage. Kubernetes also uses the CSI (Container Storage Interface) to interact with various storage plugins that are already available.
Image Registry
Kubernetes must contact an image registry (whether public or private) to be able to pull images and spin out containers.
Cloud Provider
Kubernetes can be deployed on almost any platform you may think of. However, the majority of users resort to cloud providers like AWS, Azure, or GCP to save even more costs. Kubernetes depends on the cloud provider APIs to perform scalability and resources provisioning tasks, such as provisioning load balancers, accessing cloud storage, utilizing the inter-node network and so on.
Identity Provider
If you’re provisioning a Kubernetes cluster in a small company with a small number of users, authentication won’t be a big issue. You can create an account for each user and that’s it. But, if you’re working in a large enterprise, with hundreds or even thousands of developers, operators, testers, security professionals...etc. then having to manually create an account for each person may quickly turn into a nightmare. Kubernetes designers had that in mind when working on the authentication mechanism. You can use your own identity provider system to authenticate your users to the cluster as long as it uses OpenID connect.
Kubernetes Controllers Layer
This is also referred to as the service fabric layer. It is responsible for some higher level functions of the cluster: routing, self-healing, load balancing, service discovery, and basic deployment(for more info, https://kubernetes.io/docs/concepts/services-networking/, and https://kubernetes.io/docs/concepts/workloads/controllers/deployment/ ), among other things.
Management Layer
This is where policy enforcement options are applied. In this layer, functions like metrics collection, and autoscaling are performed. It also controls authorization, and quotas among different resources like the network and storage. You can learn more about resource quotas here.
The Interface Layer
In this layer, we have the client-facing tools that are used to interact with the cluster. kubectl is the most popular client-side program out there. Behind the scenes, it issues RESTful API requests to Kubernetes and displays the response either in JSON or YAML depending on the options provided. kubectl can be easily integrated with other higher level tools to facilitate cluster management.
In the same area, we have helm, which can be thought of as an application package manager running on top of Kubernetes. Using helm-charts, you can build a full application on Kubernetes by just defining its properties in a configuration file.
The DevOps and Infrastructure Environment
Kubernetes is one of the busiest open-source projects out there. It has a large, vibrant community and it’s constantly changing to adapt to new requirements and challenges. Kubernetes provides a tremendous number of features. Although it is only a few years old, it is able to support almost all types of environments. Kubernetes is used in many modern software building/deployment practices including:
DevOps: provisioning ephemeral environments for testing and QA is easier and faster.
CI/CD: building continuous integration/deployment, and even delivery pipelines is more seamless using Kubernetes-managed containers. You can easily integrate tools like Jenkins, TravisCI, Drone CI with the Kubernetes cluster to build/test/deploy your applications and other cloud components.
ChatOps: chat applications like Slack can easily be integrated with the rich API set provided by Kubernetes to monitor and even manage the cluster.
Cloud-managed Kubernetes: Most cloud providers offer products that already has Kubernetes installed. For example AWS EKS, Google GKE, and Azure AKS.
GitOps: Everything in Kubernetes is managed through code (YAML files). Using version control systems like Git, you can easily manage your cluster through pull requests. You don’t even have to use kubectl.[Source]-https://www.magalix.com/blog/kubernetes-101-concepts-and-why-it-matters
Basic & Advanced Kubernetes Course using cloud computing, AWS, Docker etc. in Mumbai. Advanced Containers Domain is used for 25 hours Kubernetes Training.
0 notes
Text
October 31, 2019 at 10:00PM - The Full Stack JavaScript Bundle (94% discount) Ashraf
The Full Stack JavaScript Bundle (94% discount) Hurry Offer Only Last For HoursSometime. Don't ever forget to share this post on Your Social media to be the first to tell your firends. This is not a fake stuff its real.
This massive course is one of the most complete and comprehensive you’ll find on web development. Regardless of your skill level, you can dive headlong into building robust, interactive sites that will put you on the map as a skilled web developer. Covering both front- and back-end development, this course aims to give you a holistic understanding of the development process.
Access 197 lectures & 25.5 hours of content 24/7
Learn front-end development w/ JavaScript, jQuery, HTML5, CSS3, & Bootstrap
Explore back-end development w/ PHP, MySQL, & MySQLi
Get a complete look at how the internet actually works
This course provides you with a practical approach to the MEAN Stack, a collection of JavaScript based technologies used to develop web applications. An acronym for MongoDB, ExpressJS, AngularJS, and Node.js, the MEAN Stack is a complete set of tools that can help you build incredible sites from the ground up. In this course, you’ll start from absolute basics as you hone your skills to eventually be able to create an entire site.
Access 61 lectures & 4.5 hours of content 24/7
Learn the fundamentals of JavaScript
Install MEAN Stack on different platforms like Windows, Linux, AWS, & EC2 Instance
Work w/ Express tools like Templates, Generator, Middleware, & more
Develop a course-based website & explore how to create models for MongoDB using Mongoose
Cover authentication using Express & Passport
Explore how to work w/ AngularJS & configure client side routing
Learn how to deploy your solution on production w/ Heroku deployment
Interested in Node.js, but don’t know where to start or how to learn it properly? Confused about how the MEAN stack pieces of MongoDB, Expressjs, Angularjs, and Nodejs fit together? Or how it’s even possible to run JavaScript outside of the browser? This course delivers the best information in the simplest way to help you learn about these systems. Save time and frustration by learning best practices for building and deploying apps.
Study Node.js w/ over 79 lectures & 9.5 hours of content
Start creating Node.js apps from scratch
Get an overview of JavaScript concepts & issues
Use MongoDB in your projects
Study the Express.js framework
Learn to deploy an app to Heroku & AWS
This hands-on course introduces you to JavaScript web and mobile development using the latest front- and back-end technologies including Node.js, MongoDB, Backbone.js, Parse, Heroku, and Windows Azure. You’ll learn by doing as you build multiple versions of the Chat app and get familiar with the full stack development process.
Access 15 lectures & 2 hours of content 24/7
Build multiple versions of the Chat app using jQuery + Parse JS REST API, Backbone & Parse JS SDK, & more
Explore various examples of fetching data, displaying it, & submitting new data
Spend less time learning & more time building apps thanks to practical examples
MongoDB is one of the hottest database solutions in the tech world right now, able to power anything from a growing personal project to an enterprise infrastructure. This course will get you up and running with MongoDB quickly, and tech you the core knowledge you need to deeply understand and builds apps centered around Mongo. Whether you’re new or have been working to learn it but aren’t quite there yet, this course is for you.
Access 128 lectures & 13.5 hours of content 24/7
Learn how to use the popular MongooseJS library to interface w/ Mongo
Write tests around Mongo queries to ensure your code is working
Master the process of designing NoSQL schema
Grasp the differences record associations & resource embedding
Use the advanced features of Mongoose to save development time
Develop apps that are fast & response thanks to Mongo’s speed & flexibility
Upgrade your skills and become a more efficient developer by incorporating Angular.js, Google’s supported web application library, into your projects. In this course, you’ll learn how to use Angular.js from scratch so that you can create more user-friendly web apps, Single Page Applications (SPA), and interactive websites.
Access 30 lectures & 1.5 hours of content 24/7
Learn how to use Angular.js to save time, create better projects, & give your users a better experience
Create a full SPA from scratch
Cloud-enable your SPA so that you can connect it to any kind of back-end
Architecture a SPA w/ modules, controllers, & services
Add URL routes to your client-side SPA
Access live examples at the end of each coding lesson
Being a one-trick programming pony doesn’t cut it anymore in today’s tech job market. When it comes to web app development, having the know-how to create something fully-functioning from start to finish boosts your employability credentials in a big way. MEAN Stack is the tool set that allows you to do just that, and this course is designed to get you up to speed.
Access 186 lectures & 10 hours of content 24/7
Understand MEAN Stack & how to use it effectively
Code MEAN projects w/ an online IDE
Develop MEAN REST APIs w/ Node & Express
Create top-notch UIs w/ Angular 2
Gain the skills needed to become a sought after web developer
Express is an extremely powerful tool for creating web applications built on Node. Over this action-packed series of tutorials you’ll learn how to use and implement the Express library. Express is extremely practical, whether you’re looking to use it for prototyping, hobbies, or to improve your qualifications, and this course will help you do it all.
Access 14 lectures & 1.5 hours of content 24/7
Install Express on your computer, run a custom server, & understand requests & responses
Use GET & POST requests
Write & run tests w/ Mocha & learn about RESTful APIs
Test your knowledge w/ quizzes
from Active Sales – SharewareOnSale https://ift.tt/2rOmTfs https://ift.tt/eA8V8J via Blogger https://ift.tt/2NyjESm #blogger #bloggingtips #bloggerlife #bloggersgetsocial #ontheblog #writersofinstagram #writingprompt #instapoetry #writerscommunity #writersofig #writersblock #writerlife #writtenword #instawriters #spilledink #wordgasm #creativewriting #poetsofinstagram #blackoutpoetry #poetsofig
0 notes
Link
We are officially in the era of cloud wars. Google, Amazon and others are giving away hundreds and thousands of dollars’ worth credit to companies willing to try their services. I have made a step by step procedure for anyone willing to take advantage of the situation-
A- FOR WORDPRESS USERS-
(Using Google Cloud Marketplace)
1- Visit- Shortcut to Google Cloud Console and activate the $300 credit as shown in the header bar.
2- After availing the credit, revisit the above link and click the launch on compute engine to setup WordPress on your GCP account.
3- Create a new project and name the project and proceed.
4- Keep the default settings as provided and click on deploy.
5- For configuring your custom domain name, Cloud DNS API needs to be enabled.
a. Then create the cloud DNS zone
b. Add the DNS record for the domain(s)
c. And your NS records needs to be configured with your domain providers (e.g – NameCheap, Godaddy, Hostinger etc.)
d. Then update your WordPress configuration via SSH connection & replace “WP_SITEURL” & “WP_HOME” with your domain name.
e. Then change the URL fields in the setting > general in the WordPress panel.
6- Then to configure SSL for domains and to update the SITE URLs’ to https
a. Install certboot client
b. Generate and configure let’s encrypt SSL
c. Replace http with https in the URLs’
B- FOR STATIC SITES-
(Using Google’s Firebase)
a- Create a project on firebase
b- Choose the spark plan or blaze plan of firebase (depending on your usage) by connecting the project to the cloud console billing account which has the $300 credit. NOTE- Has to be connected to the billing account even if you are using same account for firebase.
c- Click the firebase hosting on the left panel and navigate to the hosting section.
d- Connect your custom domain to firebase hosting.
e- Install nodejs and npm ( node package manager ) or Yarn
f- Create a folder which will contain all the website files
g- Initialize firebase in that folder using “Firebase init” command
h- Then follow the documentation to setup your website
i- Then use command “firebase deploy” to deploy your website to firebase hosting
j- For configuring your custom domain name, you need to download the spf record and add it to your dns zone (in your domain providers DNS ). Then you’ve to add “A” reacord which points to firebase hosting’s static ip address. (follow the documentation for details)
k- Then configure the SSL in firebase hosting.
NOTE- Additionally you can also use Github, Now Serve, Netlify, etc to host your static sites.
C- FOR WEB & MOBILE APPLICATIONS-
1- Create a project and select the plan according to your usage and connect the billing account to the project which holds the $300 credit. NOTE- Has to be connected to the billing account even if you are using same account for firebase.
2- Import firebase web config and initialize the firebase app.
3- If it’s a web app repeat the process of static sites mentioned above to host the web app.
i. For configuring your custom domain name, you need to download the spf record and add it to your dns zone ( in your domain providers DNS ). Then you’ve to add “A” reacord which point to firebase hosting’s static ip address. ( follow the documentation for details)
ii. Then configure your SSL in firebase hosting.
4- Additionally if you want to customize the backend for any computing or data processing then you can integrate the google app engine environments to firebase.
You can also use AWS, Digital Ocean, IBM cloud and Microsoft Azure to host your sites and applications for free but availing the credits are not so easy as in the case of Google.
In case $300 credits is not enough for you or you run out of the credits due to high usage then you can also avail additional $1000 credits directly from Google.
I run a software dev firm and every now and then I find our clients using expensive yet inferior hosting services right from the beginning of the launch of their sites and applications. The first year is usually the year where you have the least traffic as one is still figuring out the various marketing channels thus I made this post in a hope that you can take advantage of the credits and save anything in the range from $50-$1300 and invest the same into your venture. If you have any queries or if you need more information then reach out to me at [[email protected]](mailto:[email protected])
Peace.
Submitted August 22, 2019 at 12:59AM by SwabhimanBaral https://www.reddit.com/r/webhosting/comments/ctu8q9/money_saved_is_money_earned_host_your_sites/?utm_source=ifttt
from Blogger http://webdesignersolutions1.blogspot.com/2019/08/money-saved-is-money-earned-host-your.html via IFTTT
0 notes
Link
We are officially in the era of cloud wars. Google, Amazon and others are giving away hundreds and thousands of dollars’ worth credit to companies willing to try their services. I have made a step by step procedure for anyone willing to take advantage of the situation-A- FOR WORDPRESS USERS-(Using Google Cloud Marketplace)1- Visit- Shortcut to Google Cloud Console and activate the $300 credit as shown in the header bar.2- After availing the credit, revisit the above link and click the launch on compute engine to setup WordPress on your GCP account.3- Create a new project and name the project and proceed.4- Keep the default settings as provided and click on deploy.5- For configuring your custom domain name, Cloud DNS API needs to be enabled.a. Then create the cloud DNS zoneb. Add the DNS record for the domain(s)c. And your NS records needs to be configured with your domain providers (e.g – NameCheap, Godaddy, Hostinger etc.)d. Then update your WordPress configuration via SSH connection & replace “WP_SITEURL” & “WP_HOME” with your domain name.e. Then change the URL fields in the setting > general in the WordPress panel.6- Then to configure SSL for domains and to update the SITE URLs’ to httpsa. Install certboot clientb. Generate and configure let’s encrypt SSLc. Replace http with https in the URLs’B- FOR STATIC SITES-(Using Google’s Firebase)a- Create a project on firebaseb- Choose the spark plan or blaze plan of firebase (depending on your usage) by connecting the project to the cloud console billing account which has the $300 credit. NOTE- Has to be connected to the billing account even if you are using same account for firebase.c- Click the firebase hosting on the left panel and navigate to the hosting section.d- Connect your custom domain to firebase hosting.e- Install nodejs and npm ( node package manager ) or Yarnf- Create a folder which will contain all the website filesg- Initialize firebase in that folder using “Firebase init” commandh- Then follow the documentation to setup your websitei- Then use command “firebase deploy” to deploy your website to firebase hostingj- For configuring your custom domain name, you need to download the spf record and add it to your dns zone (in your domain providers DNS ). Then you’ve to add “A” reacord which points to firebase hosting’s static ip address. (follow the documentation for details)k- Then configure the SSL in firebase hosting.NOTE- Additionally you can also use Github, Now Serve, Netlify, etc to host your static sites.C- FOR WEB & MOBILE APPLICATIONS-1- Create a project and select the plan according to your usage and connect the billing account to the project which holds the $300 credit. NOTE- Has to be connected to the billing account even if you are using same account for firebase.2- Import firebase web config and initialize the firebase app.3- If it’s a web app repeat the process of static sites mentioned above to host the web app.i. For configuring your custom domain name, you need to download the spf record and add it to your dns zone ( in your domain providers DNS ). Then you’ve to add “A” reacord which point to firebase hosting’s static ip address. ( follow the documentation for details)ii. Then configure your SSL in firebase hosting.4- Additionally if you want to customize the backend for any computing or data processing then you can integrate the google app engine environments to firebase.*You can also use AWS, Digital Ocean, IBM cloud and Microsoft Azure to host your sites and applications for free but availing the credits are not so easy as in the case of Google.**In case $300 credits is not enough for you or you run out of the credits due to high usage then you can also avail additional $1000 credits directly from Google.I run a software dev firm and every now and then I find our clients using expensive yet inferior hosting services right from the beginning of the launch of their sites and applications. The first year is usually the year where you have the least traffic as one is still figuring out the various marketing channels thus I made this post in a hope that you can take advantage of the credits and save anything in the range from $50-$1300 and invest the same into your venture. If you have any further queries or want more information then you can reach out to me at [[email protected]](mailto:[email protected]) . Peace!
0 notes
Text
The 5 Best Web Scraping Tools of 2019
1. Scraper API
Who is this for: Scraper API is a tool for developers building web scrapers, it handles proxies, browsers, and CAPTCHAs so developers can get the raw HTML from any website with a simple API call.
Why you should use it: Scraper API is a tool for developers building web scrapers, it handles proxies, browsers, and CAPTCHAs so developers can get the raw HTML from any website with a simple API call. It doesn't burden you with managing your own proxies, it manages its own internal pool of over a hundreds of thousands of proxies from a dozen different proxy providers, and has smart routing logic that routes requests through different subnets and automatically throttles requests in order to avoid IP bans and CAPTCHAs. With special pools of proxies for scraping Amazon and other ecommerce listings, Google and other search engine results, Yelp and other review sites, and Twitter and Facebook and other social media sites, web scraping has never been this easy!
2. CSV Scraper
Who is this for: CSV Scraper is a fantastic tool for people who want to extract data from websites without having to code.
Why you should use it: CSV Scraper is the perfect tool for people who want to scrape websites without learning to code. It includes a point and click interface, allowing users to scrape behind login forms, fill in forms, input search terms, scroll through infinite scroll, render javascript, and more. It's fully hosted, allowing users to run their scrapers in the cloud. Best of all, it comes with a generous free tier allowing users to test the service on up to 200 pages. While it's currently in private beta, you can sign up below to be invited to the public beta, which will begin near the end of March 2019.
3. ParseHub
Who is this for: Parsehub is an incredibly powerful tool for building web scrapers without coding. It is used by analysts, journalists, data scientists, and everyone in between.
Why you should use it: Parsehub is dead simple to use, you can build web scrapers simply by clicking on the data that you want. It then exports the data in JSON or Excel format. It has many handy features such as automatic IP rotation, allowing scraping behind login walls, going through dropdowns and tabs, getting data from tables and maps, and much much more. In addition, it has a generous free tier, allowing users to scrape up to 200 pages of data in just 40 minutes!
4. Scrapy
Who is this for: Scrapy is an open source tool for Python developers looking to build scalable web crawlers. It handles all of the plumbing (queueing requests, proxy middleware, etc.) that makes building web crawlers difficult.
Why you should use it: As an open source tool, Scrapy is completely free. It is battle tested, and has been one of the most popular Python libraries for years. It is well documented and there are many tutorials on how to get started. In addition, deploying the crawlers is very simple and reliable, the processes can run themselves once they are set up.]
5. Diffbot
Who is this for: NodeJS developers who want a straightforward way to parse HTML.
Why you should use it: Cheerio offers an API similar to jQuery, so developers familiar with jQuery will immediately feel at home using Cheerio to parse HTML. It is blazing fast, and offers many helpful methods to extract text, html, classes, ids, and more. It is by far the most popular HTML parsing library written in NodeJS.
Know more : scrape google
0 notes
Photo

Being a Full Stack Developer
A full stack developer who can get from a prototype to full MVP (minimum viable product) is often considered a jack of all trades, master of none, and with good reason. To define the modern full stack developer, we first need to focus on what the full stack developer used to be.
Full Stack Developers Then
Long ago, circa 2000 (in Internet-time, 17 years is a very long time ago), a full stack developer was someone who could:
whip up a web page in some Adobe tools like Photoshop or Fireworks
turn this design into HTML, CSS, and hotspots on images (aw, remember those?)
write some basic PHP 4.0 scripts (no object oriented PHP was on the horizon back then) to handle the server-side of the logic
store all dynamic data into MySQL, maybe do a bit of optimizing
upload it all to a server via FTP and collect the paycheck
Note that we're talking about PHP here - a full stack Flash or Coldfusion developer had a different (but only slightly different) workflow.
Those were simple times, life was good. One-man agencies were a dime a dozen, and people still had time to spend with their family after work.
What about now?
What Does a Full Stack Developer Need to Know Now?
These days, we have horrors like these happening - how did it come to this?
To succeed in a now-saturated market, we developers - who are often perfectionists - hesitate to delegate and often live by the "if you want something done right" motto. This forces us into a corner where we have to learn everything, so that being a full stack developer often ends up encompassing the following.
Server Admin / Devops
A developer must know how to do basic server management. This includes but is not limited to:
connecting to remote servers through the terminal, in non-GUI environments
basic shell scripting
managing users and groups on a server
managing server programs like Apache and Nginx for serving apps
managing firewalls and permissions
installing new software and updating the distribution
via GIPHY
Apart from these basics, a developer should know how to create good, healthy, isolated development environments, in either Docker or virtual machines like with Vagrant. If all of the above is something you're unfamiliar with, we have an excellent book about it for sale here.
The developer should also be intimately familiar with version control systems in order to be able to reliably produce backups and shareable, collaborative collections of code, tracked for changes across time. No modern developer workflow is complete without version control these days. We have a fantastic video course about this for purchase here.
Cloud
Apart from actual managed or virtualized servers, a developer might need to know about the cloud - hosting on platforms like Heroku, Google Cloud, Azure, AWS, and others.
via GIPHY
There's a fair bit to be said about platforms and tools that are more hype than immediately useful, but being familiar with the services everyone is talking about can come in handy in the long run - a client could demand a switch of providers any day now, and it pays to be ready. Luckily, we have the ultimate guide to deploying to all these cloud hosts.
Back End
On the back end, apart from knowing the language of choice - in our case PHP and its multitude of frameworks and CMSes - a developer needs to be familiar with:
web servers like Nginx and Apache which ties into Devops above
unfortunately, NodeJS for compiling JS, CSS, and other assets into statically hostable ones. Fortunately, there are ways to avoid NodeJS by using PHP.
tools like Composer for package and dependency management in PHP itself - no modern developer's environment is complete without it
good API design, since most new websites today are API-based and merely talk to a detached front-end (more on that below).
search engines like ElasticSearch (introduction here) are really important for performance
cronjobs and background jobs with tools like Gearman or libraries like Crunz
knowing about caching with Varnish, Redis, and similar powerful tools that slice hosting costs into the single digits will often make or break a project
Continue reading %Being a Full Stack Developer%
by Bruno Skvorc via SitePoint http://ift.tt/2tw3nlE
0 notes
Text
Deploy NodeJS Express Application to Firebase as Function.
Few days back I posted an article about how to implement restful apis using the Node Express and MySql. In this post I am going to discuss deploying NodeJS RESTful apis with Express framework to the Firebase functions. This is helpful when you deal with external endpoints which need secret keys. Google Firebase functions as an alternate product for Amazon Lambda, and Google Firebase is offering Storage and Real-time databases.
Live Demo Video Tutorial
youtube
Initialize NodeJS Create a project folder and initialize Node project.
$npm init
This will generate a package.json with product information. Give starting file as index.js. { "name": "node-express-firebase", "version": "1.0.0", "description": "Node express firebase functions", "main": "index.js", "scripts": { "test": "echo \"Error: no test specified\" && exit 1" }, "repository": { "type": "git", "url": "git+https://ift.tt/2B0GoZm" }, "keywords": [ "Node", "Express", "Firebase", "Restful" ], "author": "Srinivas Tamada", "license": "ISC", "bugs": { "url": "https://ift.tt/2VlrGmB" }, "homepage": "https://ift.tt/3i0IBo4" } Is this OK? (yes) y
Install Dependancies You have to following Node dependencies to improve the project. Express Express is a web application framework, that provides restful endpoints.
npm install express
Nodemon Nodemon is a tool that helps to run Node application continuously.
npm install nodemon
Body-Parser Body-parser is a middleware tool that helps to parse incoming request bodies in a middleware before your handlers, available under the req.body property.
npm install body-parser
.gitignore Create an ignore file for Git and exclude node_modules.
/node_modules
.prettierrc Prettier configuration file. Here I have enabled singleQuote value true Node Project Structure index.js Create an express GET endpoint called /hello.
const express = require('express');
const PORT = 3000;
const app = express();
/* JSON body parse*/
const bodyParser = require('body-parser');
app.use(bodyParser.urlencoded({ extended: true }));
app.use(bodyParser.json());
app.get('/hello', (req, res, next) => {
console.info('/hello call success ');
res.send('Welcome to Firebase Cloud Functions');
});
app.listen(PORT, () => {
console.info('Server is running on PORT:', PORT);
});
exports.app = functions.https.onRequest(app);
Run Project You can test the project at http://localhost:3000/hello.
$nodemon index.js
Working with Firebase Choose Google Firebase free plan. Firebase has premium paid plans Free plan has offering 125K free requests per month. Choose you plan based on your project needs. Create Firebase Project You can disable if you don't want analytics. If yes choose analytics projects. Navigate to Functions and follow the instructions. Firebase Tools Express is a web application framework, that provides restful endpoints.
npm install -g firebase-tools
Firebase Login Use the following command and login with your Google account.
firebase login
Firebase Initiate Now go to project folder and initiate Firebase.
firebase init
Select Functions. Select Firebase Project Use arrow buttons and select the particular project. Project Type We are using JavaScript for the project. NPM Dependancies This will create some configuration files and says yes for NPM dependencies. Firebase Project Structure This will create a functions directory with same index.js source code. But including Firebase libraries. Firebase Serve Run Firebase functions project. You can delete the main index.js. Like previous this will run at port 3000 for local testing. functions/index.js Modified Firebase index.js. You can enhance the project here. Added a post method to validate email input using email-validator plugin. Make sure use NPM package install commands inside functions directory.
const functions = require('firebase-functions');
const express = require('express');
const validator = require("email-validator");
const PORT = 3000;
const app = express();
/* JSON body parse*/
const bodyParser = require('body-parser');
app.use(bodyParser.urlencoded({ extended: true }));
app.use(bodyParser.json());
app.get('/hello', (req, res, next) => {
console.info('/hello call success ');
res.send('Welcome to Firebase Cloud Functions');
});
app.post('/emailValidate', async (req, res, next) => {
const postData = req.body;
if(postData.email){
console.info('/emailValidate call success ');
res.json({'status': validator.validate(postData.email) });
} else {
console.warn('/emailValidate wrong input ');
res.status(500).json({'status': 'wrong input'});
}
});
app.listen(PORT, () => {
console.info('Server is running on PORT:', PORT);
});
exports.app = functions.https.onRequest(app);
Included console logs for tracking issues. Firebase Deploy This will execute functions directory files. Now go to Firebase console and you will find the endpoint url. GET URL Use GET endpoint directly. https://us-central1-node-express-ea766.cloudfunctions.net/app/hello POST Methods Use Postman tool and validate the response. Success Response Fail Response Wrong Request Input Function Logs You will find the logs to debug the issues.
via 9lessons Programming Blog https://ift.tt/2Bdkv99
0 notes
Text
[Money Saved Is Money Earned]- Host your sites & applications for free for the first year by taking advantage of the ongoing cloud war - A step by step guide.
We are officially in the era of cloud wars. Google, Amazon and others are giving away hundreds and thousands of dollars’ worth credit to companies willing to try their services. I have made a step by step procedure for anyone willing to take advantage of the situation-
A- FOR WORDPRESS USERS-
(Using Google Cloud Marketplace)
1- Visit- Shortcut to Google Cloud Console and activate the $300 credit as shown in the header bar.
2- After availing the credit, revisit the above link and click the launch on compute engine to setup WordPress on your GCP account.
3- Create a new project and name the project and proceed.
4- Keep the default settings as provided and click on deploy.
5- For configuring your custom domain name, Cloud DNS API needs to be enabled.
a. Then create the cloud DNS zone
b. Add the DNS record for the domain(s)
c. And your NS records needs to be configured with your domain providers (e.g – NameCheap, Godaddy, Hostinger etc.)
d. Then update your WordPress configuration via SSH connection & replace “WP_SITEURL” & “WP_HOME” with your domain name.
e. Then change the URL fields in the setting > general in the WordPress panel.
6- Then to configure SSL for domains and to update the SITE URLs’ to https
a. Install certboot client
b. Generate and configure let’s encrypt SSL
c. Replace http with https in the URLs’
B- FOR STATIC SITES-
(Using Google’s Firebase)
a- Create a project on firebase
b- Choose the spark plan or blaze plan of firebase (depending on your usage) by connecting the project to the cloud console billing account which has the $300 credit. NOTE- Has to be connected to the billing account even if you are using same account for firebase.
c- Click the firebase hosting on the left panel and navigate to the hosting section.
d- Connect your custom domain to firebase hosting.
e- Install nodejs and npm ( node package manager ) or Yarn
f- Create a folder which will contain all the website files
g- Initialize firebase in that folder using “Firebase init” command
h- Then follow the documentation to setup your website
i- Then use command “firebase deploy” to deploy your website to firebase hosting
j- For configuring your custom domain name, you need to download the spf record and add it to your dns zone (in your domain providers DNS ). Then you’ve to add “A” reacord which points to firebase hosting’s static ip address. (follow the documentation for details)
k- Then configure the SSL in firebase hosting.
NOTE- Additionally you can also use Github, Now Serve, Netlify, etc to host your static sites.
C- FOR WEB & MOBILE APPLICATIONS-
1- Create a project and select the plan according to your usage and connect the billing account to the project which holds the $300 credit. NOTE- Has to be connected to the billing account even if you are using same account for firebase.
2- Import firebase web config and initialize the firebase app.
3- If it’s a web app repeat the process of static sites mentioned above to host the web app.
i. For configuring your custom domain name, you need to download the spf record and add it to your dns zone ( in your domain providers DNS ). Then you’ve to add “A” reacord which point to firebase hosting’s static ip address. ( follow the documentation for details)
ii. Then configure your SSL in firebase hosting.
4- Additionally if you want to customize the backend for any computing or data processing then you can integrate the google app engine environments to firebase.
You can also use AWS, Digital Ocean, IBM cloud and Microsoft Azure to host your sites and applications for free but availing the credits are not so easy as in the case of Google.
In case $300 credits is not enough for you or you run out of the credits due to high usage then you can also avail additional $1000 credits directly from Google.
I run a software dev firm and every now and then I find our clients using expensive yet inferior hosting services right from the beginning of the launch of their sites and applications. The first year is usually the year where you have the least traffic as one is still figuring out the various marketing channels thus I made this post in a hope that you can take advantage of the credits and save anything in the range from $50-$1300 and invest the same into your venture. If you have any queries or if you need more information then reach out to me at [[email protected]](mailto:[email protected])
Peace.
Submitted August 22, 2019 at 12:59AM by SwabhimanBaral https://www.reddit.com/r/webhosting/comments/ctu8q9/money_saved_is_money_earned_host_your_sites/?utm_source=ifttt from Blogger http://webdesignersolutions1.blogspot.com/2019/08/money-saved-is-money-earned-host-your.html via IFTTT
0 notes