#deploy web application in openshift web console
Explore tagged Tumblr posts
Visit Tumblr Blog
Explore Tumblr blogs with no restrictions, modern design and the best experience.
Last Seen Tumblr Blogs


Fun Fact
After the announcement of the deal with Yahoo!, there were 170K signatures of unhappy Tumblr users petitioning to prevent the sale in 2013.
Text
Integrating ROSA Applications with AWS Services (CS221)
In today's rapidly evolving cloud-native landscape, enterprises are looking for scalable, secure, and fully managed Kubernetes solutions that work seamlessly with existing cloud infrastructure. Red Hat OpenShift Service on AWS (ROSA) meets that demand by combining the power of Red Hat OpenShift with the scalability and flexibility of Amazon Web Services (AWS).
In this blog post, we’ll explore how you can integrate ROSA-based applications with key AWS services, unlocking a powerful hybrid architecture that enhances your applications' capabilities.
📌 What is ROSA?
ROSA (Red Hat OpenShift Service on AWS) is a managed OpenShift offering jointly developed and supported by Red Hat and AWS. It allows you to run containerized applications using OpenShift while taking full advantage of AWS services such as storage, databases, analytics, and identity management.
🔗 Why Integrate ROSA with AWS Services?
Integrating ROSA with native AWS services enables:
Seamless access to AWS resources (like RDS, S3, DynamoDB)
Improved scalability and availability
Cost-effective hybrid application architecture
Enhanced observability and monitoring
Secure IAM-based access control using AWS IAM Roles for Service Accounts (IRSA)
🛠️ Key Integration Scenarios
1. Storage Integration with Amazon S3 and EFS
Applications deployed on ROSA can use AWS storage services for persistent and object storage needs.
Use Case: A web app storing images to S3.
How: Use OpenShift’s CSI drivers to mount EFS or access S3 through SDKs or CLI.
yaml
Copy
Edit
apiVersion: v1
kind: PersistentVolumeClaim
metadata:
name: efs-pvc
spec:
accessModes:
- ReadWriteMany
storageClassName: efs-sc
resources:
requests:
storage: 5Gi
2. Database Integration with Amazon RDS
You can offload your relational database requirements to managed RDS instances.
Use Case: Deploying a Spring Boot app with PostgreSQL on RDS.
How: Store DB credentials in Kubernetes secrets and use RDS endpoint in your app’s config.
env
Copy
Edit
SPRING_DATASOURCE_URL=jdbc:postgresql://<rds-endpoint>:5432/mydb
3. Authentication with AWS IAM + OIDC
ROSA supports IAM Roles for Service Accounts (IRSA), enabling fine-grained permissions for workloads.
Use Case: Granting a pod access to a specific S3 bucket.
How:
Create an IAM role with S3 access
Associate it with a Kubernetes service account
Use OIDC to federate access
4. Observability with Amazon CloudWatch and Prometheus
Monitor your workloads using Amazon CloudWatch Container Insights or integrate Prometheus and Grafana on ROSA for deeper insights.
Use Case: Track application metrics and logs in a single AWS dashboard.
How: Forward logs from OpenShift to CloudWatch using Fluent Bit.
5. Serverless Integration with AWS Lambda
Bridge your ROSA applications with AWS Lambda for event-driven workloads.
Use Case: Triggering a Lambda function on file upload to S3.
How: Use EventBridge or S3 event notifications with your ROSA app triggering the workflow.
🔒 Security Best Practices
Use IAM Roles for Service Accounts (IRSA) to avoid hardcoding credentials.
Use AWS Secrets Manager or OpenShift Vault integration for managing secrets securely.
Enable VPC PrivateLink to keep traffic within AWS private network boundaries.
🚀 Getting Started
To start integrating your ROSA applications with AWS:
Deploy your ROSA cluster using the AWS Management Console or CLI
Set up AWS CLI & IAM permissions
Enable the AWS services needed (e.g., RDS, S3, Lambda)
Create Kubernetes Secrets and ConfigMaps for service integration
Use ServiceAccounts, RBAC, and IRSA for secure access
🎯 Final Thoughts
ROSA is not just about running Kubernetes on AWS—it's about unlocking the true hybrid cloud potential by integrating with a rich ecosystem of AWS services. Whether you're building microservices, data pipelines, or enterprise-grade applications, ROSA + AWS gives you the tools to scale confidently, operate securely, and innovate rapidly.
If you're interested in hands-on workshops, consulting, or ROSA enablement for your team, feel free to reach out to HawkStack Technologies – your trusted Red Hat and AWS integration partner.
💬 Let's Talk!
Have you tried ROSA yet? What AWS services are you integrating with your OpenShift workloads? Share your experience or questions in the comments!
For more details www.hawkstack.com
0 notes
Text
Red Hat OpenShift for Beginners: A Guide to Breaking Into The World of Kubernetes
If containers are the future of application development, Red Hat OpenShift is the leading k8s platform that helps you make your applications faster than ever. If you’re completely clueless about OpenShift, don’t worry! I am here to help you with all the necessary information.
1. What is OpenShift?
As an extension of k8s, OpenShift is an enterprise-grade platform as a service that enables organizations to make modern applications in a journaling cloud environment. They offer out of the box CI CD tools, hosting, and scalability making them one of the strongest competitors in the market.
2. Install the Application
As a cloud deployment, you can go with Red Hat OpenShift Service on AWS (ROSA) or if you want a local solution you can use OpenShift Local (Previously CRC). For a local installation, make sure you have 16 GB of RAM, 4 CPUs, and enough storage.
3. Get Started With It
Start by going to the official Red Hat website and downloading OpenShift Local use the executable to start the cluster, or go to the openshift web console to set up a cluster with your preferred cloud service.
4. Signing In
Simply log onto the web console from the URL you used during the installation. Enter the admin credentials and you have successfully set everything up.
5. Setting Up A Project
To set up a project, click on Projects > Create Project.
Labe the project and start deploying the applications
For more information visit: www.hawkstack.com
0 notes
Text
Becoming a Red Hat Certified OpenShift Application Developer (DO288)
In today's dynamic IT landscape, containerization has become a crucial skill for developers and system administrators. Red Hat's OpenShift platform is at the forefront of this revolution, providing a robust environment for managing containerized applications. For professionals aiming to validate their skills and expertise in this area, the Red Hat Certified OpenShift Application Developer (DO288) certification is a prestigious and highly valued credential. This blog post will delve into what the DO288 certification entails, its benefits, and tips for success.
What is the Red Hat Certified OpenShift Application Developer (DO288) Certification?
The DO288 certification focuses on developing, deploying, and managing applications on Red Hat OpenShift Container Platform. OpenShift is a Kubernetes-based platform that automates the process of deploying and scaling applications. The DO288 exam tests your ability to design, build, and deploy cloud-native applications on OpenShift.
Why Pursue the DO288 Certification?
Industry Recognition: Red Hat certifications are globally recognized and respected in the IT industry. Obtaining the DO288 credential can significantly enhance your professional credibility and open up new career opportunities.
Skill Validation: The certification validates your expertise in OpenShift, ensuring you have the necessary skills to handle real-world challenges in managing containerized applications.
Career Advancement: With the increasing adoption of containerization and Kubernetes, professionals with OpenShift skills are in high demand. This certification can lead to roles such as OpenShift Developer, DevOps Engineer, and Cloud Architect.
Competitive Edge: In a competitive job market, having the DO288 certification on your resume sets you apart from other candidates, showcasing your commitment to staying current with the latest technologies.
Exam Details and Preparation
The DO288 exam is performance-based, meaning you will be required to perform tasks on a live system rather than answering multiple-choice questions. This format ensures that certified professionals possess practical, hands-on skills.
Key Exam Topics:
Managing application source code with Git.
Creating and deploying applications from source code.
Managing application builds and image streams.
Configuring application environments using environment variables, ConfigMaps, and Secrets.
Implementing health checks to ensure application reliability.
Scaling applications to meet demand.
Securing applications with OpenShift’s security features.
Preparation Tips:
Training Courses: Enroll in Red Hat's official DO288 training course. This course provides comprehensive coverage of the exam objectives and includes hands-on labs to practice your skills.
Hands-on Practice: Set up a lab environment to practice the tasks outlined in the exam objectives. Familiarize yourself with the OpenShift web console and command-line interface (CLI).
Study Guides and Resources: Utilize Red Hat’s official study guides and documentation. Online communities and forums can also be valuable resources for tips and troubleshooting advice.
Mock Exams: Take practice exams to assess your readiness and identify areas where you need further study.
Real-World Applications
Achieving the DO288 certification equips you with the skills to:
Develop and deploy microservices and containerized applications.
Automate the deployment and scaling of applications using OpenShift.
Enhance application security and reliability through best practices and OpenShift features.
These skills are crucial for organizations looking to modernize their IT infrastructure and embrace cloud-native development practices.
Conclusion
The Red Hat Certified OpenShift Application Developer (DO288) certification is an excellent investment for IT professionals aiming to advance their careers in the field of containerization and cloud-native application development. By validating your skills with this certification, you can demonstrate your expertise in one of the most sought-after technologies in the industry today. Prepare thoroughly, practice diligently, and take the leap to become a certified OpenShift Application Developer.
For more information about the DO288 certification and training courses
For more details www.hawkstack.com
#redhatcourses#docker#linux#container#containerorchestration#information technology#kubernetes#containersecurity#dockerswarm#aws#hawkstack#hawkstack technologies
1 note
·
View note
Text
OpenShift vs Kubernetes: A Detailed Comparison

When it comes to managing and organizing containerized applications there are two platforms that have emerged. Kubernetes and OpenShift. Both platforms share the goal of simplifying deployment, scaling and operational aspects of application containers. However there are differences between them. This article offers a comparison of OpenShift vs Kubernetes highlighting their features, variations and ideal use cases.
What is Kubernetes? Kubernetes (often referred to as K8s) is an open source platform designed for orchestrating containers. It automates tasks such as deploying, scaling and managing containerized applications. Originally developed by Google and later donated to the Cloud Native Computing Foundation (CNCF) Kubernetes has now become the accepted industry standard for container management.
Key Features of Kubernetes Pods: Within the Kubernetes ecosystem, pods serve as the units for deploying applications. They encapsulate one or multiple containers.
Service Discovery and Load Balancing: With Kubernetes containers can be exposed through DNS names or IP addresses. Additionally it has the capability to distribute network traffic across instances in case a container experiences traffic.
Storage Orchestration: The platform seamlessly integrates with storage systems such as on premises or public cloud providers based on user preferences.
Automated. Rollbacks: Kubernetes facilitates rolling updates while also providing a mechanism to revert back to versions when necessary.
What is OpenShift? OpenShift, developed by Red Hat, is a container platform based on Kubernetes that provides an approach to creating, deploying and managing applications in a cloud environment. It enhances the capabilities of Kubernetes by incorporating features and tools that contribute to an integrated and user-friendly platform.
Key Features of OpenShift Tools for Developers and Operations: OpenShift offers an array of tools that cater to the needs of both developers and system administrators.
Enterprise Level Security: It incorporates security features that make it suitable for industries with regulations.
Seamless Developer Experience: OpenShift includes a built in integration/ deployment (CI/CD) pipeline, source to image (S2I) functionality, as well as support for various development frameworks.
Service Mesh and Serverless Capabilities: It supports integration with Istio based service mesh. Offers Knative, for serverless application development.
Comparison; OpenShift, vs Kubernetes 1. Installation and Setup: Kubernetes can be set up manually. Using tools such as kubeadm, Minikube or Kubespray.
OpenShift offers an installer that simplifies the setup process for complex enterprise environments.
2. User Interface: Kubernetes primarily relies on the command line interface although it does provide a web based dashboard.
OpenShift features a comprehensive and user-friendly web console.
3. Security: Kubernetes provides security features and relies on third party tools for advanced security requirements.
OpenShift offers enhanced security with built in features like Security Enhanced Linux (SELinux) and stricter default policies.
4. CI/CD Integration: Kubernetes requires tools for CI/CD integration.
OpenShift has an integrated CI/CD pipeline making it more convenient for DevOps practices.
5. Pricing: Kubernetes is open source. Requires investment in infrastructure and expertise.
OpenShift is a product with subscription based pricing.
6. Community and Support; Kubernetes has a community, with support.
OpenShift is backed by Red Hat with enterprise level support.
7. Extensibility: Kubernetes: It has an ecosystem of plugins and add ons making it highly adaptable.
OpenShift:It builds upon Kubernetes. Brings its own set of tools and features.
Use Cases Kubernetes:
It is well suited for organizations seeking a container orchestration platform, with community support.
It works best for businesses that possess the technical know-how to effectively manage and scale Kubernetes clusters.
OpenShift:
It serves as a choice for enterprises that require a container solution accompanied by integrated developer tools and enhanced security measures.
Particularly favored by regulated industries like finance and healthcare where security and compliance are of utmost importance.
Conclusion Both Kubernetes and OpenShift offer capabilities for container orchestration. While Kubernetes offers flexibility along with a community, OpenShift presents an integrated enterprise-ready solution. Upgrading Kubernetes from version 1.21 to 1.22 involves upgrading the control plane and worker nodes separately. By following the steps outlined in this guide, you can ensure a smooth and error-free upgrade process. The selection between the two depends on the requirements, expertise, and organizational context.
Example Code Snippet: Deploying an App on Kubernetes
apiVersion: v1
kind: Pod
metadata:
name: myapp-pod
labels:
app: myapp
spec:
containers:
- name: myapp-container
image: myapp:1.0 This YAML file is an example of deploying a simple application on Kubernetes. It defines a Pod with a single container running ‘myapp’.
In conclusion, both OpenShift vs Kubernetes offer robust solutions for container orchestration, each with its unique strengths and use cases. The choice between them should be based on organizational requirements, infrastructure, and the level of desired security and integration.
0 notes
Text
How to deploy web application in openshift web console
To deploy a web application in OpenShift using the web console, follow these steps: Create a new project: Before deploying your application, you need to create a new project. You can do this by navigating to the OpenShift web console, selecting the “Projects” dropdown menu, and then clicking on “Create Project”. Enter a name for your project and click “Create”. Add a new application: In the…
View On WordPress
#openshift openshift4 redhatopenshift deploywebapplication openshiftonline deploy web application in openshift web console#application deployment#Deploy application in openshift#deploy application openshift#openshift#openshift 4#openshift container platform#openshift deploy java application#openshift deploy spring boot jar#openshift for beginners#openshift online cluster#openshift tutorial#Openshift webconsole#red hat#red hat openshift#red hat openshift webconsole#redhat openshift online#web application openshift online
0 notes
Text
Industry use cases of OpenShift
OpenShift is a cloud development Platform as a Service (PaaS) developed by Red Hat. It is an open-source development platform, which enables developers to develop and deploy their applications on cloud infrastructure. It is very helpful in developing cloud-enabled services. This tutorial will help you understand OpenShift and how it can be used in the existing infrastructure. All the examples and code snippets used in this tutorial are tested and working code, which can be simply used in any OpenShift setup by changing the current defined names and variables.
OpenShift
OpenShift is a cloud-enabled application Platform as a Service (PaaS). It’s an open-source technology that helps organizations move their traditional application infrastructure and platform from physical, virtual mediums to the cloud.
OpenShift supports a very large variety of applications, which can be easily developed and deployed on the OpenShift cloud platform. OpenShift basically supports three kinds of platforms for the developers and users.
Infrastructure as a Service (IaaS)
In this format, the service provider provides hardware-level virtual machines with some pre-defined virtual hardware configuration. There are multiple competitors in this space starting from AWS Google Cloud, Rackspace, and many more.
The main drawback of having IaaS after a long procedure of setup and investment is that one is still responsible for installing and maintaining the operating system and server packages, managing the network of infrastructure, and taking care of the basic system administration.
Software as a Service (SaaS)
With SaaS, one has the least worry about the underlying infrastructure. It is as simple as plug-and-play, wherein the user just has to sign up for the services and start using them. The main drawback with this setup is, one can only perform a minimal amount of customization, which is allowed by the service provider. One of the most common examples of SaaS is Gmail, where the user just needs to log in and start using it. The user can also make some minor modifications to his account. However, it is not very useful from the developer’s point of view.
Platform as a Service (PaaS)
It can be considered as a middle layer between SaaS and IaaS. The primary target of PaaS evaluation is for developers in which the development environment can be spin up with a few commands. These environments are designed in such a way that they can satisfy all the development needs, right from having a web application server with a database. To do this, you just require a single command and the service provider does the stuff for you.
Why Use OpenShift?
OpenShift provides a common platform for enterprise units to host their applications on the cloud without worrying about the underlying operating system. This makes it very easy to use, develop, and deploy applications on the cloud. One of the key features is, it provides managed hardware and network resources for all kinds of development and testing. With OpenShift, PaaS developer has the freedom to design their required environment with specifications.
OpenShift provides different kinds of service level agreements when it comes to service plans.
Free − This plan is limited to three years with 1GB space for each.
Bronze − This plan includes 3 years and expands up to 16 years with 1GB space per year.
Sliver − This is a 16-year plan of bronze, however, has a storage capacity of 6GB with no additional cost.
Other than the above features, OpenShift also offers an on-premises version known as OpenShift Enterprise. In OpenShift, developers have the leverage to design scalable and non-scalable applications and these designs are implemented using HAproxy servers.
Features
There are multiple features supported by OpenShift. Few of them are −
Multiple Language Support
Multiple Database Support
Extensible Cartridge System
Source Code Version Management
One-Click Deployment
Multi Environment Support
Standardized Developers’ workflow
Dependency and Build Management
Automatic Application Scaling
Responsive Web Console
Rich Command-line Toolset
Remote SSH Login to Applications
Rest API Support
Self-service On-Demand Application Stack
Built-in Database Services
Continuous Integration and Release Management
IDE Integration
Remote Debugging of Applications
Types of Openshift -1. OpenShift Online
OpenShift online is an offering of OpenShift community using which one can quickly build, deploy, and scale containerized applications on the public cloud. It is Red Hat’s public cloud application development and hosting platform, which enables automated provisioning, management and scaling of application which helps the developer focus on writing application logic.
2. OpenShift Container Platform
OpenShift container platform is an enterprise platform which helps multiple teams such as development and IT operations team to build and deploy containerized infrastructure. All the containers built in OpenShift uses a very reliable Docker containerization technology, which can be deployed on any data center of publically hosted cloud platforms.
3. OpenShift Dedicated
This is another offering added to the portfolio of OpenShift, wherein there is a customer choice of hosting a containerized platform on any of the public cloud of their choice. This gives the end user a true sense of multi-cloud offering, where they can use OpenShift on any cloud which satisfies their needs.
2 notes
·
View notes
Text
Use the power of kubernetes with Openshift Origin
Get the most modern and powerful Openshift OKD subscription with VENATRIX.
OpenShift Origin / OKD is an open source cloud development Platform as a Service (PaaS). This cloud-based platform allows developers to create, test and run their applications and deploy them to the cloud.
Automate the Build, Deployment and Management of your Applications with openshift Origin Platform.
OpenShift is suitable for any application, language, infrastructure, and industry. Using OpenShift helps developers to use their resources more efficiently and flexible, improve monitoring and maintenance, harden the applications security and overall make the developer experience a lot better. Venatrix’s OpenShift Services are infrastructure independent and therefore any industry can benefit from it.
What is openshift Origin?
Red Hat OpenShift Origin is a multifaceted, open source container application platform from Red Hat Inc. for the development, deployment and management of applications. OpenShift Origin Best vps hosting container Platform can deploy on a public, private or hybrid cloud that helps to deploy the applications with the use of Docker containers. It is built on top of Kubernetes and gives you tools like a web console and CLI to manage features like load balancing and horizontal scaling. It simplifies operations and development for cloud native applications.
Red Hat OpenShift Origin Container Platform helps the organization develop, deploy, and manage existing and container-based apps seamlessly across physical, virtual, and public cloud infrastructures. Its built on proven open source technologies and helps application development and IT operations teams modernize applications, deliver new services, and accelerate development processes.
Developers can quickly and easily create applications and deploy them. With S2I (Source-to-Image), a developer can even deploy his code without needing to create a container first. Operators can leverage placement and policy to orchestrate environments that meet their best practices. It makes the development and operations work fluently together when combining them in a single platform. It deploys Docker containers, it gives the ability to run multiple languages, frameworks and databases on the same platform. Easily deploy microservices written in Java, Python, PHP or other languages.
1 note
·
View note
Text
Projects in OpenShift are the unit of isolation and collaboration. For developers to deploy applications they need to be members of a project. Within a project, members may have different roles – admin, edit, view, e.t.c. As a project administrator you can add users to the cluster and assign them particular permissions. Below are the pre-defined roles in OpenShift. edit: A user that can modify most objects in a project, but does not have the power to view or modify roles or bindings. admin: An admin user have rights to view any resource in the project and modify any resource in the project except for quota. cluster-admin: A super-user that can perform any action in any project. When bound to a user with a local binding, they have full control over quota and every action on every resource in the project. basic-user: A user that can get basic information about projects and users. cluster-status: A user that can get basic cluster status information. self-provisioner: A user that can create their own projects. view: A user who cannot make any modifications, but can see most objects in a project. They cannot view or modify roles or bindings. In this short guide we will create a test project, users and give them access to the project created. One of the users will have a view only access to the cluster and one user should be able to edit all resources in the namespace/project. Create a Project on OpenShift Create a project on OpenShift. This can be done on CLI or from the web console. $ oc new-project test Now using project "test" on server "https://api.devocp.example.com:6443". You can then list all available projects to confirm the one we just created is available. $ oc get projects Grant User Access to OpenShift Project You should have users already given access to the OpenShift cluster before you can grant them permissions to access a Project. There are multiple providers that can be used to authenticate users in OpenShift. We recently created an article on using HTPasswd to manage OpenShift cluster users. Manage OpenShift / OKD Users with HTPasswd Identity Provider You can get a list of users who have already logged in to the cluster with oc get users command: $ oc get users JKMUTAI 17a06002-b543-4fa9-bfa8-92e510646d0a Josphat Mutai HTPasswd: Q049Sm9zcGhhdCBNdXRhaSxPVT1TYWZhcmljb20gRGVwYXJ0bWVudHMsREM9c2FmYXJpY29tLERDPW5ldA Grant a user access to the project with rolebinding. The syntax to use is: $ oc adm policy add-role-to-user -n To assign JKMUTAI user edit role in the test project I’ll run the following commands. $ oc adm policy add-role-to-user edit JKMUTAI -n test clusterrole.rbac.authorization.k8s.io/edit added: "JKMUTAI" For Cluster role use the command: $ oc adm policy add-cluster-role-to-user edit JKMUTAI -n test To remove role from the user, use: $ oc adm policy remove-role-from-user -n $ oc adm policy remove-cluster-role-from-user -n If you want to get a list of users who have access to the project run the following command: $ oc get rolebindings -n $ oc get rolebindings -n Sample output: You can login from from the CLI or Console and confirm you can switch to the project for applications deployment. $ oc login Switch to the project with the command: $ oc project test Already on project "test" on server "https://api.example.com:6443". Deploy test application. oc apply -f -
0 notes
Text
IBM C1000-150 Practice Test Questions
C1000-150 IBM Cloud Pak for Business Automation v21.0.3 Administration is the new exam replacement of the C1000-091 exam. PassQuestion has designed the C1000-150 Practice Test Questions to ensure your one attempt success in the IBM Cloud Pak for Business Automation v21.0.3 Administration Exam. You just need to learn all the IBM C1000-150 exam questions and answers carefully. You will get fully ready to attempt your IBM C1000-150 exam confidently. The best part is that the C1000-150 Practice Test Questions include the authentic and accurate answers that are necessary to learn for clearing the IBM C1000-150 exam.
IBM Cloud Pak for Business Automation v21.0.3 Administration (C1000-150)
The IBM Certified Administrator on IBM Cloud Pak for Business Automation v21.0.3 is an intermediate-level certification for an experienced system administrator who has extensive knowledge and experience of IBM Cloud Pak for Business Automation v21.0.3. This administrator can perform tasks related to Day 1 activities (installation and configuration). The administrator also handles Day 2 management and operation, security, performance, updates (including installation of fix packs and patches), customization, and/or problem determination. This exam does not cover installation of Red Hat OpenShift.
Recommended Skills
Basic concepts of Docker and Kubernetes Ability to write scripts in YAML Working knowledge of Linux Working knowledge of OpenShift command-line interface, web GUI, and monitoring Basic knowledge of Kafka, Elastic Search, Kibana, and HDFS Working knowledge of relational databases and LDAP Basic knowledge of event-driven architecture.
Exam Information
Exam Code: C1000-150 Number of questions: 60 Number of questions to pass: 39 Time allowed: 90 minutes Languages: English Certification: IBM Certified Administrator - IBM Cloud Pak for Business Automation v21.0.3
Exam Sections
Section 1: Planning and Install 26% Section 2: Troubleshooting 27% Section 3: Security 17% Section 4: Resiliency 10% Section 5: Management 20%
View Online IBM Cloud Pak for Business Automation v21.0.3 C1000-150 Free Questions
1. Which statement is true when installing Cloud Pak for Business Automation via the Operator Hub and Form view? A. Ensure the Persistent Volume Claim (PVC) is defined in the namespace. B. Use a login install ID that has at minimum Editor permission. C. The cluster can only be set up using silent mode. D. The secret key for admin.registrykey is automatically generated. Answer: A
2. After installing a starter deployment of the Cloud Pak for Business Automation, which statement is true about using the LDAP user registry? A. Only three users are predefined: cp4admin, user1, and user2, but others can be added manually. B. Predefined users’ passwords can be modified by updating the icp4adeploy-openldap-customldif secret. C. New users can be added by using the route to the openldap pod from an OpenLDAP browser. D. New users can be added by the predefined cp4admin user through the admin console of ZenUI. Answer: B
3. What might cause OpenShift to delete a pod and try to redeploy it again? A. Liveness probe detects an unhealthy state. B. Readiness probe returns a failed state. C. Pod accessed in debug mode. D. Unauthorized access attempted. Answer: A
4. After the root CA is replaced, what is the first item that must be completed in order to reload services? A. Delete the default token. B. Replace helm certificates. C. Delete old certificates. D. Restart related services. Answer: A
5. While not recommended, if other pods are deployed in the same namespace that is used for the Cloud Pak for Business Automation deployment, what default network policy is used? A. deny-all B. allow-all C. allow-same-namespace D. restricted Answer: B
6. What feature of a Kubernetes deployment of CP4BA contributes to high availability? A. Dynamic Clustering through WebSphere B. WebSphere Network Deployment application clustering C. Usage of EJB protocol D. Crashed pod restart managed by Kubernetes kubelet Answer: D
7. How are Business Automation Insights business events processed and stored for dashboards? A. Kafka is responsible for aggregating and storing summary events. B. Flink jobs write data to Elasticsearch. C. Business Automation Insights uses a custom Cloudant database to store events. D. The HDFS datalake serves this purpose. Answer: B
0 notes
Text
How to Deploy and Connect to a Solace PubSub+ Event Broker Using Minishift
The goal of this blog post is to give you a high-level overview of how to deploy Solace-powered event-driven applications using Minishift, a tool that lets you run an OpenShift 3.x cluster locally. By using Minishift, we’ll be able to develop OpenShift applications without spending the time required to set up a full-fledged development OpenShift cluster.
While the example architecture we’ll walk through is not production grade, it demonstrates how to configure both internal and external access to event broker services in OpenShift. Whether you’re trying to deploy and connect event-driven applications in an isolated on-premises environment, or you’re trying to deploy and connect event-driven applications across public and private clouds, the fundamentals covered in this blog post should prove useful to you.
If you follow along, you’ll learn how to:
Run an OpenShift cluster locally
Deploy a singleton Solace PubSub+ Event Broker into an OpenShift cluster
Establish connectivity between pods in an OpenShift cluster
Establish connectivity between a pod in an OpenShift cluster (in this case, a Solace PubSub+ Event Broker) and an external application
If you’re reasonably familiar with OpenShift, you could skip this tutorial and check out:
Solace’s OpenShift template samples found here
Solace’s AWS OpenShift Quickstart found here
The templates used in this blog post should not be used in a production-grade environment.
Overview
In this blog post, the first thing we’re going to do is get an OpenShift cluster running locally. Then, we’ll deploy both a singleton Solace PubSub+ Event Broker and a Node.js Express server that serves a basic web application to the client’s server. And lastly, we’ll show how both the Express server and the external web application can connect to the Solace PubSub+ Event Broker.
To get an OpenShift cluster running locally, we’ll be running Minishift with VirtualBox.
Here’s a visual of what the end product will look like:
You can find all the source code referenced in this blog post on this GitHub page.
Now, let’s start!
Run an OpenShift Cluster Locally
In this section, we’ll walk through how to install Minishift and VirtualBox, and then how to start an OpenShift cluster using them together.
OpenShift is a great technology, but unlike Docker it’s not something you can run natively on either a Mac or Windows computer. This is because OpenShift is a Kubernetes application platform that is built on top of Red Hat Enterprise Linux. If you want to test out OpenShift without paying for a dedicated test environment, you can use Minishift, “a tool that helps you run OpenShift locally by running a single-node OpenShift cluster inside a virtual machine (VM).” Note that Minishift runs OpenShift 3.x clusters. If you want to run OpenShift 4.x, there are other projects that you can use. You can run Minishift’s virtual machine using the hypervisor of your choice, but for the purposes of this blog post we’ll use VirtualBox, “a free and open-source hosted hypervisor for x86 virtualization, developed by Oracle.”
Install VirtualBox Follow the instructions on the Downloads – Oracle VM VirtualBox page to install VirtualBox.
Install Minishift Follow the instructions on the Installing Minishift page to install Minishift.If you’re using a Mac computer, I’d recommend installing Minishift using Homebrew Cask.
Start an OpenShift Cluster Once you have VirtualBox and Minishift installed, you can use this command to start a local OpenShift cluster: minishift start --vm-driver virtualbox --memory 9GB --cpus 5 Note that we set a couple flags in the command:
--vm-driver virtualbox tells Minishift how it can run the virtual machine
--memory 9GB tells Minishift how much memory to dedicate to the virtual machine
--cpus 5 tells Minishift how many CPU cores to dedicate to the virtual machine
Then it does some stuff…
And if Minishift starts successfully (it should), Control–click (Windows) or Command-click (Mac) the URL that the command spits out:
When you navigate to the link, you’ll see a screen that looks like this:
Once you get here, log in using “solace” for both the username and password. We’re not going to be covering how permissions work in OpenShift, so if you’d like to learn more about that, you can read more here.
You’ll see a screen that looks like this:
At this point, you’re ready to deploy some pods!
Deploy a PubSub+ Event Broker Using OpenShift
In this section, we’ll walk through how to deploy a Solace PubSub+ Event Broker as a pod into the OpenShift cluster we just started. The template we’ll be using is an ever-so-slightly modified version of what’s found on our sample templates repo. The modified version we’ll be using assigns a static NodePort to the NodePort service so that the port numbers in this blog post will match what you see locally. The blog post explains what that means in a bit.
If you haven’t already done so, download the source code.
Once you’ve downloaded the source code, navigate to templates/solace-singleton-ps+-broker.yml and take a minute to read over everything there. You’ll see that in the objects section of the template, three objects are being deployed: a pod, a cluster IP service, and a node port service.
Here are the descriptions of these three objects in the OpenShift documentation:
Pod: OpenShift Enterprise leverages the Kubernetes concept of a pod, which is one or more containers deployed together on one host, and the smallest compute unit that can be defined, deployed, and managed.
Cluster IP Service: A Kubernetes service serves as an internal load balancer. The default service clusterIP addresses are from the OpenShift Container Platform internal network and they are used to permit pods to access each other.
NodePort Service: Use NodePorts to expose the service nodePort on all nodes in the cluster. A node port exposes the service on a static port on the node IP address. NodePorts are in the 30000-32767 range by default, which means a NodePort is unlikely to match a service’s intended port (for example, 8080 may be exposed as 31020).
If the architecture diagram didn’t make sense at first, look at it again now that you have read each object’s description.
Hopefully by now you understand what this template is going to deploy, so let’s actually deploy it! OpenShift makes this step very easy.
First, create a project by clicking Create Project.
After you create your project, click Import YAML / JSON.
Then select the solace-singleton-ps+-broker.yml file found in the source code.
Click Create in the bottom right and then Continue in the nested popup. Don’t worry about saving the template, only Process the template has to be ticked for the purposes of this tutorial.
After you click Continue, you’ll see a screen like this:
This is where you can fill in the parameters that get interpolated into the template file. For example, the POD_NAME parameter gets interpolated anywhere the ${POD_NAME} variable is found. This can be useful for adding environment variables, connecting pods together, etc. Overall, it’s a handy tool for dynamically forming deployment templates.
The default parameter values are just fine for deploying the Solace PubSub+ Event Broker, so click Create and wait a couple seconds for the pod to deploy.
If you click into the project and look at the Overview tab, you should see a screen like this:
And if you click Applications > Services, you should see this:
If you see these objects in your console, congrats! You’ve successfully deployed a Solace PubSub+ Event Broker using OpenShift.
Now, let’s deploy the Node.js express server pod and services that will connect to our broker.
Deploy and Connect a Node.js Application Pod
In this section, we’ll walk through how to deploy a Node.js Express server as a pod into the OpenShift cluster, and then we’ll show how it can connect to the services we created for our Solace PubSub+ Event Broker.
Follow the same steps from the previous section except this time import the solace-simple-application.yml file found in the templates directory of the source code. This template will deploy both the Node.js application pod and a NodePort service that will allow us to reach the application externally. In the case of this example, we’ll be connecting to the Solace PubSub+ Event Broker from our web browser.
Pause after you click Process the template and look at the parameters that this template expects.
SOLACE_VMR_POD_NAME and SOLACE_SMFWEB_PORT are the variables that we’ll be using to connect the application pod to our Solace PubSub+ Event Broker pod. If you look inside the template under the pod object, you’ll find the following container environment variable:
containers: - env: - name: POD_NAMESPACE valueFrom: fieldRef: apiVersion: v1 fieldPath: metadata.namespace - name:"SOLACE_CLUSTERIP_SVC_HOSTNAME" value:${SOLACE_VMR_POD_NAME}-ci-svc.$(POD_NAMESPACE).svc
Here, we’re dynamically forming the host name that we’ll use to connect to the event broker. When the default parameters are substituted into the template, it forms vmr-ci-svc.testing.svc and will be accessible using the SOLACE_CLUSTERIP_SVC_HOSTNAME environment variable in our application.
In the SolaceClient.js file of our application code, you’ll see how this environment variable is used.
solaceclient.connectionParams = { url: `ws://${process.env.SOLACE_CLUSTERIP_SVC_HOSTNAME}:${process.env.SOLACE_SMFWEB_PORT}`, vpnName: process.env.SOLACE_VPN, userName: process.env.SOLACE_USERNAME, password: process.env.SOLACE_PASSWORD };
Here, we form the URL that the client will use to connect to the Solace PubSub+ Event Broker using both environment variables. This host URL resolves to our Solace PubSub+ Event Broker pod within our cluster.
When the application pod finishes deploying, you’ll see a message indicating whether it was able to connect to the Solace PubSub+ Event Broker. This is what it’ll look like if it successfully connects:
As the message indicates, the pod connects to the Solace router using the internally exposed ClusterIP service. Using this pattern, you can create an entirely self-contained, event-driven OpenShift cluster. This might be useful for on-premises deployments of OpenShift.
Along with the application, the template created another NodePort service that we can access from our web browsers. You’ll see it here named solace-simple-app-np-svc:
If you click on it for a detailed view of the NodePort service, you’ll see that the service is exposed on NodePort 30100, which we’ve defined statically in the template.
To access this service from our web browser, you’ll need to navigate to <Minishift IP>:<App Service NodePort>
A quick way to find your Minishift IP is to copy the IP address you’ve used to connect to the console.
In my case, I’d navigate to 192.168.99.110:30100
This is what our example Web page looks like:
This is an example app that demonstrates how a Web page might use Solace PubSub+ Event Broker to perform request and reply operations. The only information you’ll need to change on this page to get started is the Solace router host URL.
To access the Solace PubSub+ Event Broker externally, we’ll form and use a URL in a way similar to how we did to access our Web page’s landing page, but in this case, we’ll use the NodePort associated with the Solace router. Since this application is a Web page, we’ll be using the NodePort for Web messaging, which allows communication using the WebSocket protocol. For the purposes of this example, the template statically maps NodePort 30200 to the corresponding container port that handles WebSocket channels (port 60080).
Here’s how you’d find this information:
So, the full Solace router host URL will be ws://<Minishift IP>:30200
Note the ws:// prefix, which indicates the protocol that the client will be using to communicate.
After you plug in the Solace router host URL, click connect, subscribe, and send request:
If your screen looks like the screenshot, your Web browser was able to communicate with the Solace router that you’re running in an OpenShift cluster using Minishift, which demonstrates how you’re able to establish external connectivity to your router.
Conclusion
If you followed this tutorial from start to finish, you should have learned how to:
Run an OpenShift cluster locally
Deploy a singleton Solace PubSub+ Event Broker into an OpenShift cluster
Establish connectivity between pods in an OpenShift cluster
Establish connectivity between a pod in an OpenShift cluster and an external application
I hope you found this tutorial useful! If you have any questions, please post them to Solace Developer Community.
The post How to Deploy and Connect to a Solace PubSub+ Event Broker Using Minishift appeared first on Solace.
How to Deploy and Connect to a Solace PubSub+ Event Broker Using Minishift published first on https://jiohow.tumblr.com/
0 notes
Link
DO288 – Red Hat OpenShift Development I: Containerizing Applications In this course, you will learn how to design, build, and deploy containerized software applications on an OpenShift cluster. Whether writing container-native applications or migrating existing applications, this course provides hands-on training to boost developer productivity powered by Red Hat® OpenShift Container Platform. Objectives Deploy applications from container images, Dockerfiles, and source code to an OpenShift cluster. Manage applications using the OpenShift web console and the OpenShift CLI. Inject configuration data and secrets into an application. Publish application container images to an external registry. Manage application builds and build hooks. Create application from templates. Manage application deployments. Monitor application health using probes. Migrate applications to containers and microservices.
0 notes
Text
Mastering Multicluster Kubernetes with Red Hat OpenShift Platform Plus
As enterprises expand their containerized environments, managing and securing multiple Kubernetes clusters becomes both a necessity and a challenge. Red Hat OpenShift Platform Plus, combined with powerful tools like Red Hat Advanced Cluster Management (RHACM), Red Hat Quay, and Red Hat Advanced Cluster Security (RHACS), offers a comprehensive suite for multicluster management, governance, and security.
In this blog post, we'll explore the key components and capabilities that help organizations effectively manage, observe, secure, and scale their Kubernetes workloads across clusters.
Understanding Multicluster Kubernetes Architectures
Modern enterprise applications often span across multiple Kubernetes clusters—whether to support hybrid cloud strategies, improve high availability, or isolate workloads by region or team. Red Hat OpenShift Platform Plus is designed to simplify multicluster operations by offering an integrated, opinionated stack that includes:
Red Hat OpenShift for consistent application platform experience
RHACM for centralized multicluster management
Red Hat Quay for enterprise-grade image storage and security
RHACS for advanced cluster-level security and threat detection
Together, these components provide a unified approach to handle complex multicluster deployments.
Inspecting Resources Across Multiple Clusters with RHACM
Red Hat Advanced Cluster Management (RHACM) offers a user-friendly web console that allows administrators to view and interact with all their Kubernetes clusters from a single pane of glass. Key capabilities include:
Centralized Resource Search: Use the RHACM search engine to find workloads, nodes, and configurations across all managed clusters.
Role-Based Access Control (RBAC): Manage user permissions and ensure secure access to cluster resources based on roles and responsibilities.
Cluster Health Overview: Quickly identify issues and take action using visual dashboards.
Governance and Policy Management at Scale
With RHACM, you can implement and enforce consistent governance policies across your entire fleet of clusters. Whether you're ensuring compliance with security benchmarks (like CIS) or managing custom rules, RHACM makes it easy to:
Deploy policies as code
Monitor compliance status in real time
Automate remediation for non-compliant resources
This level of automation and visibility is critical for regulated industries and enterprises with strict security postures.
Observability Across the Cluster Fleet
Observability is essential for understanding the health, performance, and behavior of your Kubernetes workloads. RHACM’s built-in observability stack integrates with metrics and logging tools to give you:
Cross-cluster performance insights
Alerting and visualization dashboards
Data aggregation for proactive incident management
By centralizing observability, operations teams can streamline troubleshooting and capacity planning across environments.
GitOps-Based Application Deployment
One of the most powerful capabilities RHACM brings to the table is GitOps-driven application lifecycle management. This allows DevOps teams to:
Define application deployments in Git repositories
Automatically deploy to multiple clusters using GitOps pipelines
Ensure consistent configuration and versioning across environments
With built-in support for Argo CD, RHACM bridges the gap between development and operations by enabling continuous delivery at scale.
Red Hat Quay: Enterprise Image Management
Red Hat Quay provides a secure and scalable container image registry that’s deeply integrated with OpenShift. In a multicluster scenario, Quay helps by:
Enforcing image security scanning and vulnerability reporting
Managing image access policies
Supporting geo-replication for global deployments
Installing and customizing Quay within OpenShift gives enterprises control over the entire software supply chain—from development to production.
Integrating Quay with OpenShift & RHACM
Quay seamlessly integrates with OpenShift and RHACM to:
Serve as the source of trusted container images
Automate deployment pipelines via RHACM GitOps
Restrict unapproved images from being used across clusters
This tight integration ensures a secure and compliant image delivery workflow, especially useful in multicluster environments with differing security requirements.
Strengthening Multicluster Security with RHACS
Security must span the entire Kubernetes lifecycle. Red Hat Advanced Cluster Security (RHACS) helps secure containers and Kubernetes clusters by:
Identifying runtime threats and vulnerabilities
Enforcing Kubernetes best practices
Performing risk assessments on containerized workloads
Once installed and configured, RHACS provides a unified view of security risks across all your OpenShift clusters.
Multicluster Operational Security with RHACS
Using RHACS across multiple clusters allows security teams to:
Define and apply security policies consistently
Detect and respond to anomalies in real time
Integrate with CI/CD tools to shift security left
By integrating RHACS into your multicluster architecture, you create a proactive defense layer that protects your workloads without slowing down innovation.
Final Thoughts
Managing multicluster Kubernetes environments doesn't have to be a logistical nightmare. With Red Hat OpenShift Platform Plus, along with RHACM, Red Hat Quay, and RHACS, organizations can standardize, secure, and scale their Kubernetes operations across any infrastructure.
Whether you’re just starting to adopt multicluster strategies or looking to refine your existing approach, Red Hat’s ecosystem offers the tools and automation needed to succeed. For more details www.hawkstack.com
0 notes
Text
Integrating Virtual Machines with Containers Using OpenShift Virtualization
As organizations increasingly adopt containerization to modernize their applications, they often encounter challenges integrating traditional virtual machine (VM)-based workloads with containerized environments. OpenShift Virtualization bridges this gap, enabling organizations to run VMs alongside containers seamlessly within the same platform. This blog explores how OpenShift Virtualization helps achieve this integration and why it’s a game-changer for hybrid environments.
What is OpenShift Virtualization?
OpenShift Virtualization is a feature of Red Hat OpenShift that allows you to manage VMs as first-class citizens alongside containers. It leverages KubeVirt, an open-source virtualization extension for Kubernetes, enabling VM workloads to run natively on the OpenShift platform.
Benefits of Integrating VMs and Containers
Unified Management: Manage VMs and containers through a single OpenShift interface.
Resource Efficiency: Consolidate workloads on the same infrastructure to reduce operational costs.
Simplified DevOps: Use Kubernetes-native tools like kubectl and OpenShift’s dashboards to manage both VMs and containers.
Hybrid Workload Modernization: Gradually transition legacy VM-based applications to containerized environments without disrupting operations.
Key Use Cases
Modernizing Legacy Applications: Migrate monolithic applications running on VMs to OpenShift, enabling container adoption without rewriting the entire codebase.
Hybrid Workloads: Run VM-based databases alongside containerized microservices for better performance and management.
Development and Testing: Spin up VMs for testing or sandbox environments while running production-ready workloads in containers.
How to Integrate VMs with Containers in OpenShift
Install OpenShift Virtualization:
Use the OpenShift OperatorHub to install the OpenShift Virtualization Operator.
Verify the installation by checking the kubevirt namespace and related components.
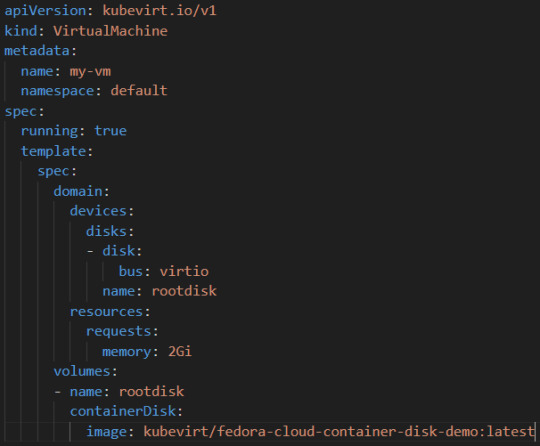
Create Virtual Machines:
Use the OpenShift web console or CLI to create VMs.
Define VM specifications like CPU, memory, and storage in YAML files.
Example YAML for a VM:
Connect Containers and VMs:
Use OpenShift’s networking capabilities to establish communication between VMs and containerized workloads.
For example, deploy a containerized application that interacts with a VM-based database over a shared network.
Monitor and Manage:
Use OpenShift’s monitoring tools to observe the performance and health of both VMs and containers.
Manage workloads using the OpenShift console or CLI tools like oc and kubectl.
Example: Integrating a VM-Based Database with a Containerized Application
Deploy a VM with a Database:
Create a VM running MySQL.
Expose the database service using OpenShift’s networking capabilities.
Deploy a Containerized Application:
Use OpenShift to deploy a containerized web application that connects to the MySQL database.
Verify Connectivity:
Test the application’s ability to query the database.
Best Practices
Resource Planning: Allocate resources efficiently to avoid contention between VMs and containers.
Security: Leverage OpenShift’s built-in security features like Role-Based Access Control (RBAC) to manage access to workloads.
Automation: Use OpenShift Pipelines or Ansible to automate the deployment and management of hybrid workloads.
Conclusion
OpenShift Virtualization is a powerful tool for organizations looking to unify their infrastructure and modernize applications. By seamlessly integrating VMs and containers, it provides flexibility, efficiency, and scalability, enabling businesses to harness the best of both worlds. Whether you’re modernizing legacy systems or building hybrid applications, OpenShift Virtualization simplifies the journey and accelerates innovation.
For more details visit : https://www.hawkstack.com/
0 notes
Text
Diving Deep into OpenShift Architecture
OpenShift is a powerful, enterprise-ready Kubernetes container orchestration platform developed by Red Hat. It extends Kubernetes with additional features, tools, and services to simplify and streamline the deployment, management, and scaling of containerized applications. Understanding OpenShift architecture is crucial for leveraging its full potential. This guide explores the core components of OpenShift, including the Master Node, Worker Nodes, and other essential elements.
Core Components of OpenShift Architecture
1. Master Node
The Master Node is the brain of an OpenShift cluster, responsible for managing the overall state of the cluster. It includes several key components:
API Server: The entry point for all REST commands used to control the cluster. It handles all the REST requests and processes them by interacting with other components.
Controller Manager: Manages various controllers that regulate the state of the cluster, such as replication controllers, node controllers, and more.
Scheduler: Assigns newly created pods to nodes based on resource availability and constraints.
etcd: A distributed key-value store used to persist the cluster state and configuration. It is crucial for maintaining the consistency and reliability of the cluster.
2. Worker Nodes
Worker Nodes run the containerized applications and workloads. Each Worker Node has the following components:
Kubelet: An agent that ensures the containers are running in a pod. It interacts with the Master Node to get the necessary information and updates.
Kube-Proxy: Maintains network rules on the nodes, allowing network communication to your pods from network sessions inside or outside of the cluster.
Container Runtime: The software responsible for running containers. OpenShift supports different container runtimes, including Docker and CRI-O.
3. Additional OpenShift Components
OpenShift Router: Manages external access to services by providing HTTP and HTTPS routes to the services. It ensures that incoming traffic reaches the appropriate pods.
Registry: An integrated container image registry that stores and manages Docker-formatted container images.
Authentication and Authorization: OpenShift integrates with various identity providers for user authentication and enforces role-based access control (RBAC) for authorization.
Web Console: A user-friendly interface for managing and monitoring the OpenShift cluster and applications.
OpenShift Architecture Diagram
Here's a simplified diagram to visualize the OpenShift architecture:
In this diagram:
The Master Node components (API Server, Controller Manager, Scheduler, etcd) are shown at the top.
The Worker Nodes, each containing Kubelet, Kube-Proxy, and Container Runtime, are depicted below the Master Node.
Additional components like the OpenShift Router, Registry, and Web Console are also illustrated to show their integration with the cluster.
Conclusion
OpenShift's architecture is designed to provide a robust, scalable, and flexible platform for deploying containerized applications. By understanding the roles and interactions of the Master Node, Worker Nodes, and additional components, you can effectively manage and optimize your OpenShift environment.
Feel free to ask any questions or seek further clarification on specific components or functionalities within the OpenShift architecture!
For more details click www.qcsdclabs.com
#docker#information technology#linux#container#containerorchestration#containersecurity#kubernetes#redhatcourses#dockerswarm#aws
0 notes
Text
Deploying Applications from Images in OpenShift, Part Three: Importing Images
Deploying Applications from Images in OpenShift, Part Three: Importing Images
Openshift is integrated with Cloud Infrastructure Server Cluster. Contact us to find out our latest offers! [small_space]
This post will cover how to deploy an application using a container image stored in the internal OpenShift image registry. The first part of the series covered deploying from the web console UI and an external image registry. The second part covered deploying with the occomman…
View On WordPress
0 notes
Text
Deploy Springboot mysql application on Openshift
Deploy Springboot mysql application on Openshift
#openshift #openshift4 #springbootmysql #mysqlconnectivity #SpringbootApplicationWithMysql
Deploy Springboot mysql application on Openshift,spring boot with mysql on k8s,openshift deploy spring boot jar,spring boot java with mysql on kubernetes,spring boot mysql kubernetes example,spring boot with mysql on kubernetes,deploy web…
View On WordPress
#Deploy Springboot mysql application on Openshift#deploy web application in openshift web console#deploying spring boot in kubernetes#how to deploy application on openshift#how to deploy spring boot application to google app engine#openshift#openshift deploy java application#openshift deploy spring boot jar#red hat#spring boot#spring boot java with mysql on kubernetes#spring boot mysql kubernetes example#spring boot with mysql on k8s#spring boot with mysql on kubernetes
0 notes