#diy chair
Text

Build 7-foot high boxes 30 inches wide of 1x2 lumber. Drill holes for shelf supports. Paint, set in place, and anchor tops to wall.
Better Homes and Gardens Creative Decorating on a Budget, 1970
#vintage#vintage interior#1970s#70s#interior design#home decor#living room#DIY#bookshelves#barrel chair#library#deconstructed#grandfather clock#contemporary#style#home#architecture#traditional
209 notes
·
View notes
Text
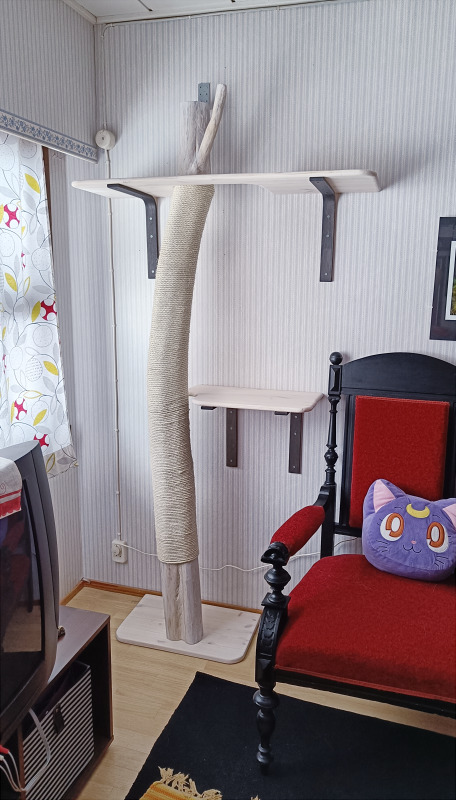
I BUILT A CAT TREE
AAAAA
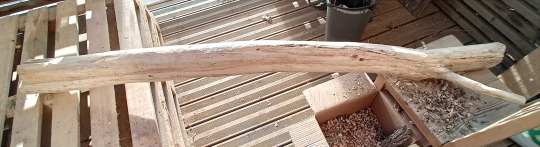
There's this tree on our yard that my parents have trimmed time and time again over the years, and one part of that tree had ended up dying from one of these trimmings. And this part of the tree had like a nice shape to it and it was a decent size (not too thick and tall, not too short and thin), and so around the fall of 2022 when we were getting ready for winter, I figured... This (part of the) tree is dead anyways. Why not cut it and turn it into a cat tree.
And so with dad's help we cut that tree into a big ol' log that I then hauled inside and left in our basement to dry over the winter.
Cut to around August 2023, and while I was working on refinishing that MCM shelf last year (the one that turned out like shit), when I had some time between doing certain parts of that project. Since the wood was dry by then I figured I could start the ever slow process of actually turning the tree into a cat tree. This was very much a side-project while I was doing other shit, something I genuinely could've finished much MUCH faster had I actually focused on it more etc. So while I did start this around August and only finished it the other day, it wasn't because it was a slow, difficult project or anything, I just wasn't focused on it until like this month.
But yeah, first step in the process; removing the bark from the wood

Which was exactly what it sounded like. I just grabbed a knife and started removing bark from it, carving it off.
It was actually quite fun and a relaxing process, especially since the bark was coming off the log quite easily at this point. (Also I collected the bark and wood shavings into a box so we could burn it later lmao. Less clean up, more heat in the winter, a win-win)

And the log cleaned up quite nicely!
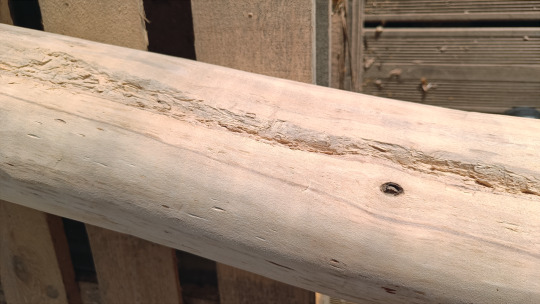
Now during this process I did notice that some of the wood was quite rotten at this point, I could dig my nail into the wood in some places and it would come off easily, which... I did find a little concerning. So I did carve out some of the loose, rotten wood off the log
Didn't worry about making it too clean though because this was going to be a cat tree, this is going to end up covered with rope. (But I did also sand the wood to make it nice and smooth, which, if nothing else, made it more pleasant to handle lmao)

One last thing I had to do then was cut the top and the bottom of the log, mainly because the top was a hideous mess (as seen below) while the bottom of the tree needed to be flattened flat.

Now my plan with the cat tree was to attach a wood board to the bottom of the tree so it can stand on its own essentially, then figure out a way to attach the top of the tree to a wall, and then make basically wall shelves that can act as platforms for the cat tree; one at the top and one near the middle so my cat could jump down from the top more safely.
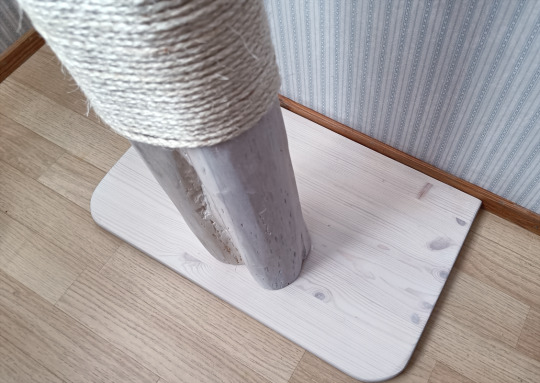
So with the log prepped, the next part was attaching it to a wood board on the bottom. And to do that I did need that bottom cut nice and flat.
And this was the most amazing thing I did during this entire project; I cut the bottom of the tree once and I got it cut so nice and even that it could stand straight on its own. First fucking try. It was bonkers (but no I did not take photos, even when I knew it could stand on its own I did not want to jinx it and risk it falling over)
But yes, the bottom piece. I got some wood, figured out how I wanted to position the tree on it and where, cut it to size, rounded the edges and pre-drilled holes through it (and into the log) so they could be attached all nice and cleanly.
Honestly this was easier said than done, getting it positioned just right was kind of a nightmare and something I procrastinated on the whole winter. But I got it done eventually and that's what matters
One other thing I did at this point was attempting to re-enforce the log itself. Like I mentioned, the tree had become rotten in places and while I did remove a lot of rotten wood I was still concerned about it being a little soft etc.
Now I wasn't entirely sure what to do about the rot, but after watching quite a few videos from Blacktail Studio I do understand that wood can become harder when it has been soaked with epoxy. Another thing is that dry wood can be quite absorbent, and I was slightly worried that if/when I'd eventually start glueing rope to the tree, the wood might absorb too much of the glue and the bond between the wood and the rope might not be as strong as I want it to be (which I do want to be strong, for my cat's safety).
Putting these two pieces of information together in my mind, I got curious if the wood would essentially harden (similarly to how epoxy hardens it) if I applied a heavy layer of basic PVA glue onto the wood and just let it absorb it?
I mean trying couldn't hurt, right. So I figured I'd try it.
Applied quite a lot of glue onto the middle section, brushing it out and I let it dry for a few hours.

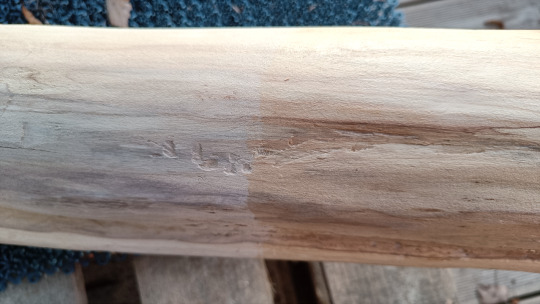
(Top image the wet glue is on the left side of the wood, bottom image the now dried glue is on the right side)
To my surprise, it actually seemed to work. The places where the wood had still been quite soft, soft enough for me to dig my nail into, were now rock hard.
Pleased with this, and after applying wood wax onto the bottom piece and the bottom of the log, it was time to actually attempt to attach them. And I ran into an issue.
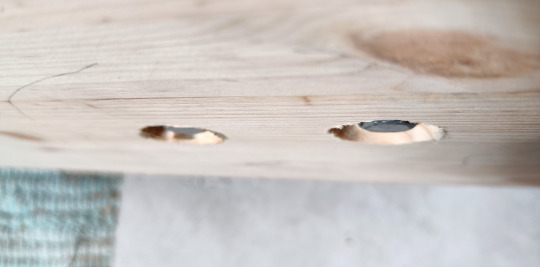
Now I had gotten these massive fucking bolts to attach the board to the log, because I wanted it to be really fucking secure, but the ends of the bolts were really thick. So I needed to carve out slots into the bottom of the board, so they could sink into the wood and lay flat.
I attempted to carve the wood by hand.
I could not fucking do it, man. The board was too fucking hard for me to carve with a dinky little knife. So I was going to go and buy the cheapest router I could find. The only reason I didn't was because dad bought it for me. Which. I mean I'm not gonna complain, thanks dad
But yeah, I got a cheap ass router, and after messing around with it for a little while and figuring out how to use it I managed to make enough space for the bolts so they could sink into the bottom of the wood nicely.

And with that, the hardest part of the cat tree was completed!
The tree itself was done!
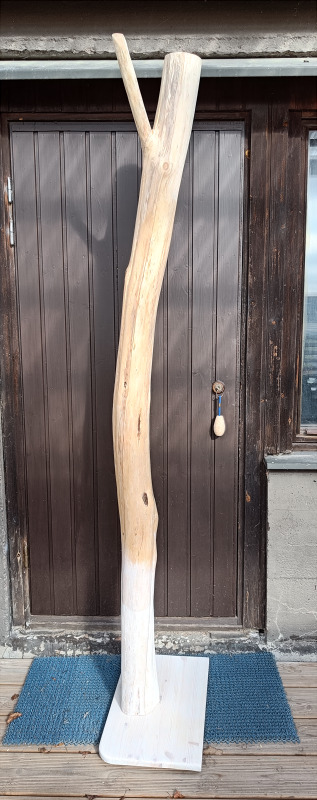
I mean I still had to apply wax to the top of the tree and add the rope and figure out how to attach the top of the tree to a wall BUT THE HARDEST PART WAS DONE!
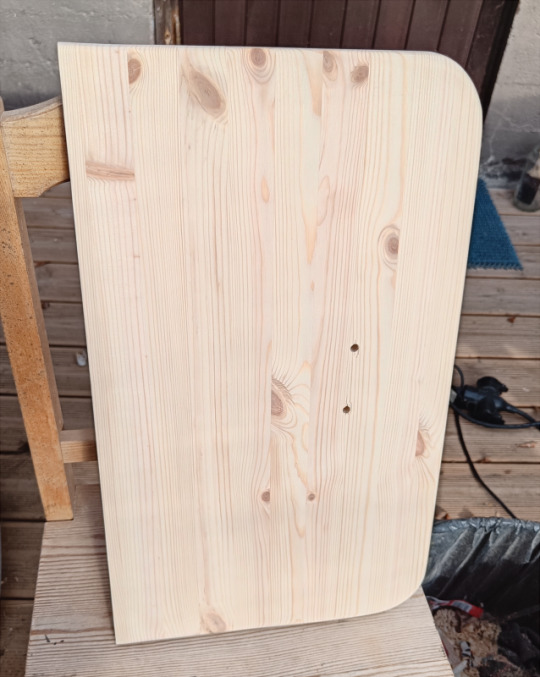
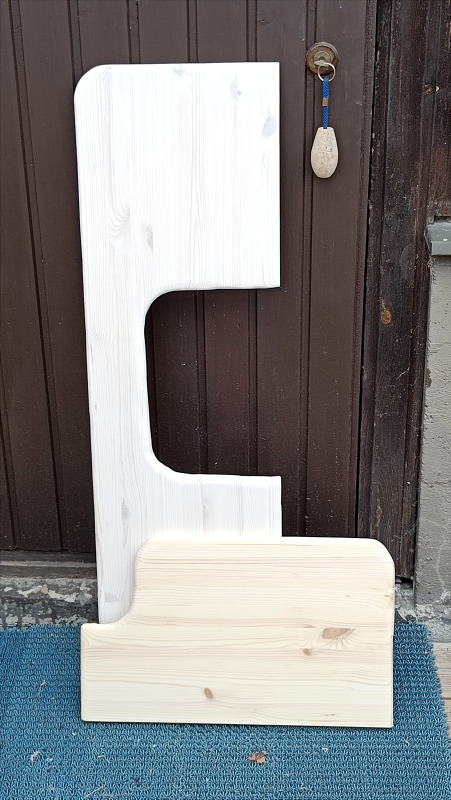
Next was making the platforms for the tree!
(Sidenote, it seems like I have misplaced my photos of me prepping the wooden brackets for the platforms-- I had prepped those back in fall so they had been done for like 6 months at this point. Nothing special really, just basic, probably-pine veneer brackets that I applied some leftover black-wax onto. Since I still have some from the MCM shelf god knows I'm not using that fucking shit on anything I care about)
Now I wanted to do some interesting cuts for the platforms, things I realized I couldn't actually do with the basic saws we have. And I was getting worried, when I realized. The basic bit for my brand spankin' new router was just long enough that it could cut the wood for me.


Arguably this is not what a router is for, but. I mean if it works.
Also we gotta be real for a second, I did an absolute shit job cutting the wood with the router. Butalso in my defense I'm still learning how to use this thing and free-handing shit with a router isn't reccomended by most woodworkers anyways. Like all things considdered I think I did decent enough as I'm learning
Anyway, I did my first rough cut, checked the measurements/if it fit the way I wanted it to, realized the cut was slightly too small, made the cut a bit bigger (and this time tried to be more careful/make it slightly neater), and on this second try the size looked right


With the first platform cut I did the second one, took a few attempts but I got the size right eventually.
Then with both pieces I rounded the corners and practised using my router some more by rounding over the edges of the platforms (on both sides), sanding them nice and smooth afterwards


After that it was time to wax the wood pieces, one side at a time because I had to wax both sides.
Now white isn't really my go-to color, but the thing is. My cat is white. And if she's going to use this cat tree at all, then there's going to be white fur all over it. And while I actually would've been fine with a natural finish (why bother using a literal tree if it doesn't even look like a tree anymore), I was worried it was going to make the wood look more yellow and darker, so I ended up going with white instead. I just figured it'd be the best option for me.
And I used Osmo. Because after the catastrophy with the MCM shelf, I am never using anything but Osmo wax ever again. I can trust Osmo. Osmo will not betray me. Osmo is my one and only friend.
Anyway, here you can see how one layer of the white wax compares to the raw wood (or you would if I hadn't brightened the image too much, don't care enough to re-edit it sorry)
Yes, the cuts are janky as hell. I could have done a better job had I spent more time being careful.
Honestly, it's a fucking cat tree. It's FINE. Honey isn't going to look at it and come to me complaining about me doing a shit job while building her a cat tree, this isn't somekinda fancy furniture piece, it's a fucking cat tree. The bar is so low, it's literally good enough
With all that done, I went and attached rope to the cat tree (I was using leftover rope from when I redid an old scratching post years ago, but I ran out so I had to go and order more before, but thankfully it only took a few days to arrive) and I attached the brackets to the platforms. Once everything was nice and done, the rope had had plenty of time to dry and I had gotten the final missing piece (a way to attach the top of the tree to a wall), I had one last thing to do
Putting a bajillion little furniture pads on the bottom of the cat tree. Look we have a giant bag of these, this isn't even half of them and they're not getting used on anything else anytime soon, so I might as well use some here (+I got to use the awkward leftover pieces (for maximum coverage)) (Also yes Honey was helping me with this vwv)
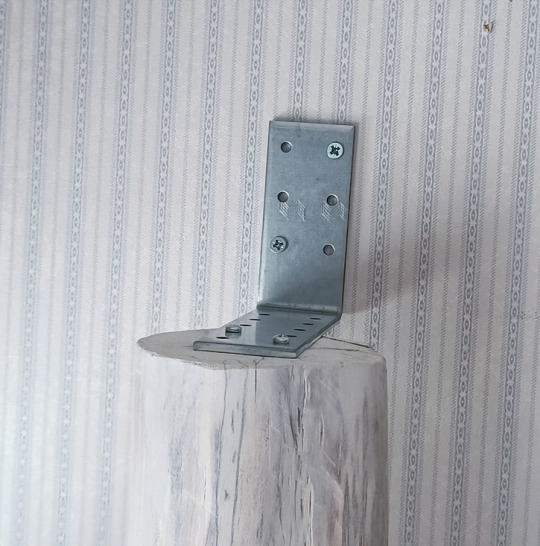
Brought the tree to my room, attached it to the wall at the top. And yeah this metal piece isn't exactly pretty, but it's fine, what matters is that it's super fucking secure. Although in hindsight I probably could've flipped it the other way around so the metal could go behind the tree instead of over it... But it's fine and this made it easier to attach to the wall
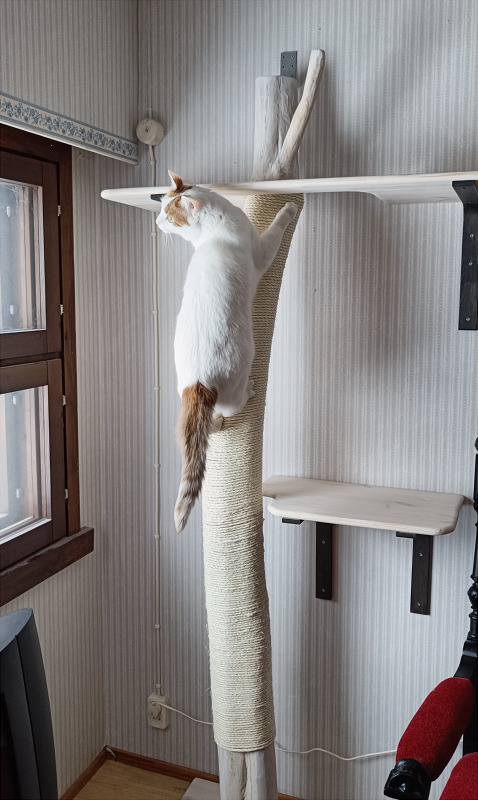
Installed the shelves with help from my dad, badabing badaboom, the cat tree was completed
Now, a few things.
For one, this isn't actually The Spot I'd like this tree to be in, there is actually another spot I wanted it to go in, but my closet sits there right now and making room for it etc etc is a whole different project, we're not gonna go into it. What matters is that I can move this later if/when I have the room for it.
But because of this, I did not "design" the tree to sit where it currently is, as such its placement isn't ideal. Like, had I designed it to go in this corner from the begining (with the intent it'd stay there forever), I might've made holes in the platforms so the electrical cable on the wall could go through the platforms and the platforms could then be closer to the window. Similarly the platforms would probably have been shaped differently and placed differently. But I'm not exactly planning on leaving the cat tree here forever, so it's fine. It's good enough. Honey already has another cat tree (one that belonged to my childhood cat) on the other side of the room, next to my bed, where she likes to sit and stare out the window anyways. So this cat tree really there just for her to have something to climb on and sharpen her nails with.
Another thing is that when making the platforms, I forgot one to take one thing into account. The floor skirting.
Now this does create an issue actually, because the skirting forces the cat tree a whole centimeter further away from the wall. Which is fine for the tree itself, but it completely messed with my measurements for the PLATFORMS.
See how the top platform goes around the top of the tree? I had measured for the top platform to actually go much lower originally, but because the tree is pushed away from the wall now, the platform doesn't have enough room to go lower, it's already touching the cat tree so its current positioning is as low as it can be.
This isn't great, because I wanted there to be enough rope on the top of the tree that Honey could climb to the top using that rope to help. And while she can climb to the top, she actually has to cling onto the top platform and dig her nails into it to get to the top.
Now the only way to fix this while still sticking to the Original Design I was going for, would be to buy a new wood board entirely, a much deeper one, and recutting the piece from scratch (this time making the hole bigger and adding more room for Honey to walk around and sit at the top of the tree). OR I could just cut the piece in two and have three different platforms around the tree in different spots, changing that original design.
But honestly, I don't care enough to want to put in the effort to do either. The tree is currently in a spot where Honey might not even use it that much so again, not worth it, at least right now.
(Also yes the skirting did add more space between the smaller platform and the tree, but like. It's not really an issue, there's just more space than I intended.)
Despite the glaring issues with the tree though, I'm really proud I managed to put it together, and none of the issues with it are unfixable. Like literally I could take down the platforms and redo them whenever and however I'd like and it wouldn't even be hard, it's just an issue of time and money, and most importantly, my own energy levels and patience. (Although honestly there's some free wood around the house I could totally repurpose to make better platforms with so if I don't mind using scrap wood that doesn't match then I could redo the platforms for essentially free) (But still if I don't feel like it rn then I don't feel like it and I'm not going to)
All that matters is that my sweet little baby Honey has another cat tree to climb (because she really loves climbing) and that she enjoys it, however much or little that may be.
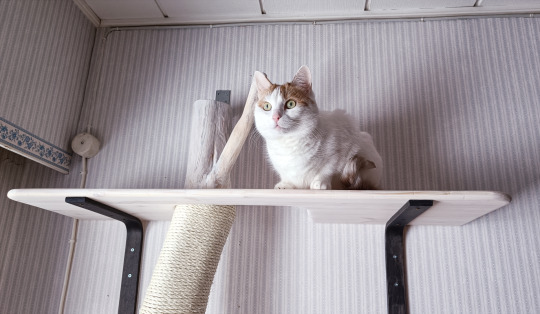
#Moon posting#Refinish Diary#I mean not really but that's my woodworking tag so that's where it's going#Once again reminding y'all that this was a DIY blog before a fandom blog#BTW Honey can jump down from the top of the tree onto the red chair safely so no worries she can get down super easily
9 notes
·
View notes
Text
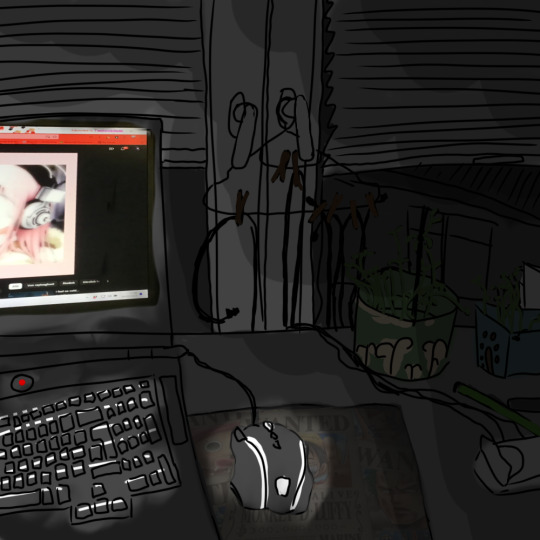
Procrastination
#ngl i just wanted to draw#so have what the view from my shitty ass chair on my desk looks like#artists on tumblr#bruv i have no clue frfr#gotta stay on the grind for more turtle drawings#but now i just gonna die in rip in pieces#yes i threw some photos of the shit on my desk in there#no i do not care <3#its the small things yknow?#a potted plant in a shitty self made pot#some stupid diy charger holder thats just a fucking#coat hanger and some clothes pins#and you know what? it fckn works rlly well#im a genius
13 notes
·
View notes

Text
found a really neat site about wicker furniture, the history of it, and how to make it. Super useful info. I'm thinking about maybe trying the techniques out with a bunch of the plastic bottles I've sliced into ribbons as I don't currently have access to cane or reed.
42 notes
·
View notes
Text
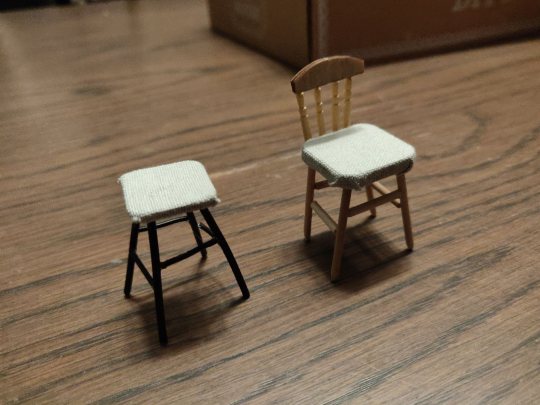
Wobbly Assistance
It was only a very minor inconvenience, but it was always present. It accompanied me everywhere and influenced my every action in its teensy-weensy ways.
At first I had pretended it was too small to notice. If it wasn’t there, it couldn’t hinder me, so I just had to disbelieve in its existence firmly enough. All that gained me was that I stumbled over it time and again. I got angry and shouted at it, but it just stared back with its black, beady eyes, unmoved.
Even as I learned to swerve around it, I was constantly aware of its judging glare. We mirrored each other’s chastisement to infinity, and it only made us worse.
Finally, on a good day that was just bad enough to remember why it might be worth the effort, I grabbed some woodworking tools and the tiniest pieces of lumber I could find. The beady eyes followed my work closely, but once the minuscule chair was finished, the source of annoyance pulled it up and sat with me—supported, and no longer in my way.
—
[Image description: A tiny stool and chair, the seating of both covered with beige cloth. They are standing on the surface of a brown wooden table, with a cardboard box in the background on the right.]
10 notes
·
View notes
Text

Boba Plush is a wonderful birthday gift for kids, friends, or girlfriends. It also can be used to decorate homes, studios, and car. Soft to touch!
#boba plush#boba#boba plushie#boba plush toy#boba tea#plush#bubble tea plush#boba tea plush#boba tea plushie#boba plush big#boba plush diy#big boba plush#boba plush chair#kawaii plush#boba mochi plush#boba milk tea plushy#unboxing boba plushy#boba reversible plush#plushy#plush haul#plush video#boba toy#plushie collection#boba candle#boba milk tea#boba collection#felt plush#plush toys#plushie#bobaa
45 notes
·
View notes
Text
they would never understand my work—i knew this from the beginning. and verily, they looked on me with disgust and cast me from the village. i continued my research in secret, knowing that it might save lives, even if they could never forgive what they saw


3 notes
·
View notes
Text
Some finished projects, just chillin'
idothefelting (dot) com
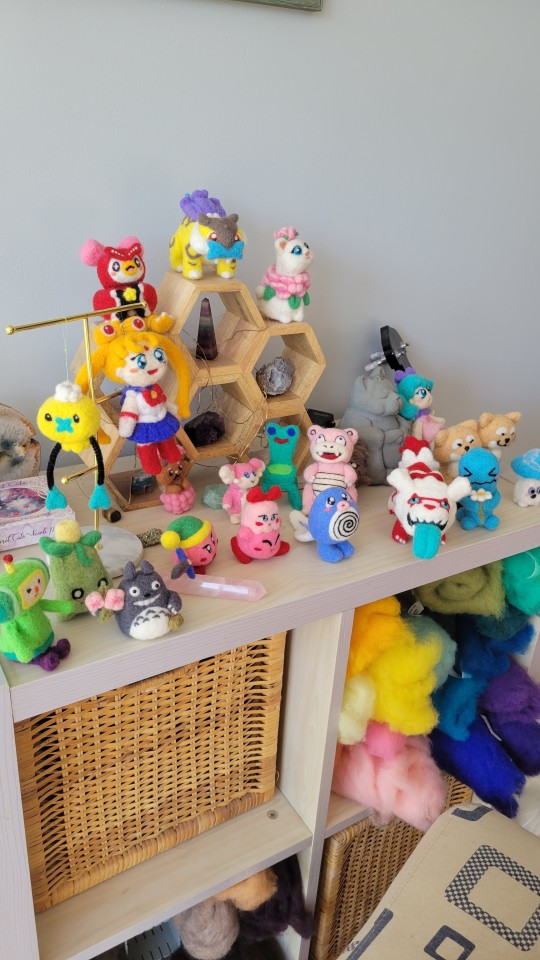
#needle felt#needle felting#felting#handmade#wool felt#wool felting#diy#pokemon#pokemon center#handmade pokemon#kirby#sailor moon#sailor moon fanart#animal crossing celeste#frog chair#froggy chair#animal crossing art#felt animals#feltingart#dry felting#acnh
41 notes
·
View notes
Text
youtube
4 notes
·
View notes
Text
tiny babby chair

not too much to this one. I wanted to make something more straightforward, so I made a little tiny chair because I thought it would be funny


all of the plate pieces were just cut freehand on the plasma cutter without any laying out. i wanted it to look simple and homemade, which i think worked out pretty well

making sure the chair works
I like the idea of making tiny impractical things like this. if anyone has any more ideas for silly shit I could make in a similar manner then let me know 🙂
11 notes
·
View notes
Photo

Bright Ideas for Your Home, 1978
#vintage#vintage interior#1970s#interior design#home decor#cork#DIY#decor#chair#lamp#frame#trash bin#modern#green#wall paint
283 notes
·
View notes
Text
youtube
Hey guys, here’s my latest YouTube video, and it’s a tutorial on making a chair in Blender! it’s super easy to follow if your new to Blender, so I hope you enjoy it! ❤️
#insideguppysworld#art#black artist#Digital art#blender#blender community#blender art#blender tutorial#blender render#chair tutorial#designing a chair in blender#diy#how to#modeling#3D#3D modeling#3D modeling tutorial#Youtube
6 notes
·
View notes
Text
I started my flower planting a month ago tbh but I've OFFICIALLY started my flower planting and I am very excited about it
#i love gardening#i had a porch veggie garden last year but it really struggled#so just flowers and strawberries this year#and my asparagus which is going absolutely ham even tho i thought it died lmao#i have some nice chairs and a picnic mat so i need to buy a cute tea tray#diy at home garden party
4 notes
·
View notes
Text

Captain Oz Chair
Didn't know if to upload this since it's not "art" in the traditional sense, but I was pretty chuffed with my results so I'm late posting it..
My friend Oz asked me if I could spiffy up the padding that was all ripped and torn on his favorite chair. Turned into a whole thing of sanding, waxing, and reupholstered with hazard stripe leatherette and new dark silver nail studs. He was very happy with the results, and honestly even though it's not great for my body these days, I still do love any excuse to use power tools, and the sense of achievement when fixing something up is worth it every time.
#Old#Wood#Chair#Renew#Refurbish#Upcycle#DIY#Upholstery#Leatherette#Hazard#Black#Yellow#Stripe#Dark#Silver#Nail#Studs#grizguts
3 notes
·
View notes
Text


Hi Tumblr! I transformed my white chair vinyl into a gorgeous custom brown piece by painting it! Here's how you can paint your vinyl furniture easily ~
Full Tutorial -https://salvagedinspirations.com/how-to-paint-vinyl-furniture/
Video Tutorial ~ https://www.youtube.com/watch?v=0geO5-p7Qvg
#chair#chair makeover#furniture painting#furniture flip#furniture makeover#design#diy#furniture#decoration#chalkpaint#home & lifestyle#furnitureflip#before and after
2 notes
·
View notes
Last Seen Blogs

artemusicavideo
ARTE NA MÚSICA E NO VÍDEO

iotasouth
Iota South

aluminummonster-blog1
MOVED

blackedcuckie
twitter @nordicuck

david15061986
05a4e4c5e81961d780cce15e78ec3e01695f43bf21d7501815