#docker compose port mapping
Explore tagged Tumblr posts
Visit Tumblr Blog
Explore Tumblr blogs with no restrictions, modern design and the best experience.
Last Seen Tumblr Blogs


Fun Fact
Tumblr has been providing a Korean-language service since 2013.
Text
A Beginner’s Guide to Docker: Building and Running Containers in DevOps
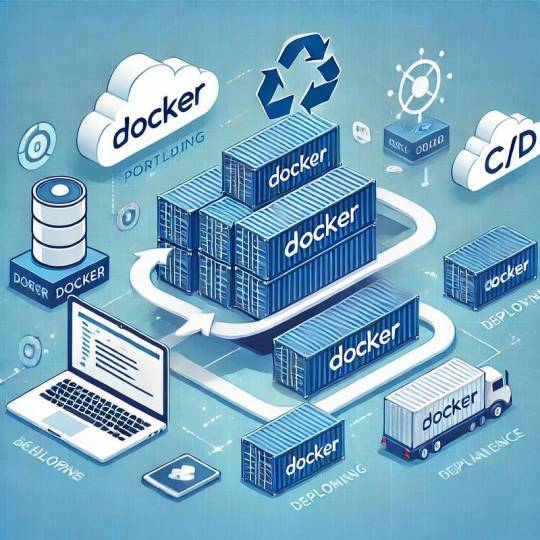
Docker has revolutionized the way applications are built, shipped, and run in the world of DevOps. As a containerization platform, Docker enables developers to package applications and their dependencies into lightweight, portable containers, ensuring consistency across environments. This guide introduces Docker’s core concepts and practical steps to get started.
What is Docker? Docker is an open-source platform that allows developers to: Build and package applications along with their dependencies into containers.
Run these containers consistently across different environments. Simplify software development, deployment, and scaling processes.
2. Why Use Docker in DevOps? Environment Consistency: Docker containers ensure that applications run the same in development, testing, and production.
Speed: Containers start quickly and use system resources efficiently.
Portability: Containers can run on any system that supports Docker, whether it’s a developer’s laptop, an on-premises server, or the cloud.
Microservices Architecture: Docker works seamlessly with microservices, enabling developers to build, deploy, and scale individual services independently.
3. Key Docker Components Docker Engine:
The core runtime for building and running containers.
Images: A blueprint for containers that include the application and its dependencies. Containers: Instances of images that are lightweight and isolated.
Dockerfile: A script containing instructions to build a Docker image.
Docker Hub: A repository for sharing Docker images.
4. Getting Started with Docker
Step 1: Install Docker Download and install Docker Desktop for your operating system from Docker’s official site.
Step 2: Write a Dockerfile Create a Dockerfile to define your application environment.
Example for a Python app:
dockerfile Edit
# Use an official Python runtime as a base image FROM python:3.9-slim
# Set the working directory WORKDIR /app
# Copy project files COPY . .
# Install dependencies RUN pip install -r requirements.txt # Define the command to run the app CMD [“python”, “app.py”]
Step 3: Build the Docker Image Run the following command to build the image:
bash Copy Edit docker build -t my-python-app .
Step 4: Run the Container Start a container from your image:
bash
Edit docker run -d -p 5000:5000 my-python-app
This maps port 5000 of the container to port 5000 on your host machine.
Step 5: Push to Docker Hub Share your image by pushing it to Docker Hub: bash
Edit docker tag my-python-app username/my-python-app docker push username/my-python-app
5. Practical Use Cases in DevOps Continuous Integration/Continuous Deployment (CI/CD):
Docker is commonly used in pipelines for building, testing, and deploying applications.
Microservices:
Each service runs in its own container, isolated from others.
Scalability:
Containers can be easily scaled up or down based on demand.
Testing:
Test environments can be quickly spun up and torn down using Docker containers.
6. Best Practices Keep Docker images small by using minimal base images. Avoid hardcoding sensitive data into images; use environment variables instead.
Use Docker Compose to manage multi-container applications. Regularly scan images for vulnerabilities using Docker’s built-in security tools.
Conclusion
Docker simplifies the development and deployment process, making it a cornerstone of modern DevOps practices. By understanding its basics and starting with small projects, beginners can quickly leverage Docker to enhance productivity and streamline workflows.

0 notes
Text
Simplifying SQL Server Deployment with Docker Compose

Introduction
Deploying Microsoft SQL Server can sometimes be a daunting task, especially for developers who just want to set up a quick and simple instance for testing or small-scale use. Docker Compose offers a straightforward solution to this problem, allowing you to define and run multi-container Docker applications with ease. In this blog post, we’ll walk through creating a docker-compose.yml file to deploy SQL Server efficiently.
Prerequisites
Before we begin, ensure you have Docker and Docker Compose installed on your system. If not, you can download and install them from the official Docker website.
Crafting the Docker Compose File
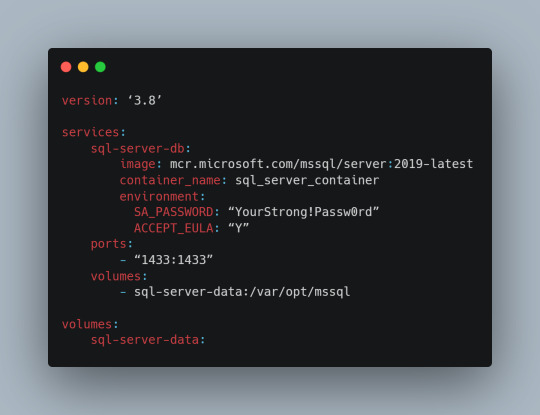
Below is a sample docker-compose.yml file designed to run Microsoft SQL Server in a Docker container:
Understanding the Configuration
Let’s break down the components of this configuration file:
version: This specifies the version of Docker Compose to use, which in this case is 3.8.
services: Under this key, we define all the services (containers) we want to run.
sql-server-db: This is the name of our service.
image: This key specifies the Docker image to use. We’re using the latest version of SQL Server 2019.
container_name: We define a custom name for our container for easier reference.
environment: Here, we set necessary environment variables.
SA_PASSWORD: The password for the sa user. Ensure to replace "YourStrong!Passw0rd" with a strong, unique password.
ACCEPT_EULA: This is mandatory and must be set to Y to run SQL Server in a container.
ports: We map port 1433 on the host to port 1433 in the container, which is the default for SQL Server.
volumes: This is crucial for data persistence. We define a volume named sql-server-data mounted at /var/opt/mssql in the container.
volumes: We declare the named volume sql-server-data for use in our service.
Deploying SQL Server with Docker Compose
With the docker-compose.yml file in place, navigate to its directory in the terminal and run the command:
docker-compose up -d
This command will download the specified SQL Server image (if not already downloaded), create a container with the specified settings, and start it in detached mode.
Connecting to SQL Server
Once the container is running, you can connect to the SQL Server instance using any SQL Server client, with the server address as localhost,1433 and the sa user credentials you specified in the docker-compose.yml file.
Conclusion
Docker Compose simplifies the deployment of applications like SQL Server, making it accessible for developers at all levels of expertise. With a simple docker-compose.yml file, you can have a SQL Server instance up and running in minutes, without the hassle of manual installation and configuration. Always ensure to use strong, unique passwords and understand the licensing agreements of the software you deploy. Happy coding!
0 notes
Text
#ばばさん通信ダイジェスト : docker-compose.yml で bridge network を使うときはバックエンドサービスでport map未指定でもOK
賛否関わらず話題になった/なりそうなものを共有しています。
docker-compose.yml で bridge network を使うときはバックエンドサービスでport map未指定でもOK
https://techblog.securesky-tech.com/entry/2023/07/20/no-need-for-portmap-in-docker-compose-with-bridge-nw
0 notes
Text
Docker Container Port Mapping Tutorial for beginners | Docker Port Expose and Port Forwarding
Full Video Link: https://youtu.be/2gie3gpDJUg Hi, a new #video on #dockerportmapping is published on @codeonedigest #youtube channel. Learn docker container port forwarding and docker expose. What is docker port mapping and -p option. Running docker cont
Docker container port mapping and port forwarding. Docker expose attribute in Docker file is used to forward container port to the host machine. Running docker container on custom port. Using docker expose, run the docker application on specific port. How to run docker image on specific port? What is port mapping in docker container? Why docker port mapping is not working? Why containerized…

View On WordPress
#docker#docker and Kubernetes#docker compose#docker compose port mapping#docker container port change#docker container port forwarding not working#docker container port mapping#docker container port mapping explained#docker container port not exposed#docker container ports explained#docker port forwarding#docker port forwarding doesn’t work#docker port forwarding existing container#docker port forwarding running container#docker port mapping#docker port mapping explained#docker port mapping not working#docker port mapping tutorial#docker port mapping vs expose#docker tutorial#docker tutorial for beginners#port mapping in running docker container#run docker container on custom port#update docker container portainer#what is docker
0 notes
Photo

hydralisk98′s web projects tracker:
Core principles=
Fail faster
‘Learn, Tweak, Make’ loop
This is meant to be a quick reference for tracking progress made over my various projects, organized by their “ultimate target” goal:
(START)
(Website)=
Install Firefox
Install Chrome
Install Microsoft newest browser
Install Lynx
Learn about contemporary web browsers
Install a very basic text editor
Install Notepad++
Install Nano
Install Powershell
Install Bash
Install Git
Learn HTML
Elements and attributes
Commenting (single line comment, multi-line comment)
Head (title, meta, charset, language, link, style, description, keywords, author, viewport, script, base, url-encode, )
Hyperlinks (local, external, link titles, relative filepaths, absolute filepaths)
Headings (h1-h6, horizontal rules)
Paragraphs (pre, line breaks)
Text formatting (bold, italic, deleted, inserted, subscript, superscript, marked)
Quotations (quote, blockquote, abbreviations, address, cite, bidirectional override)
Entities & symbols (&entity_name, &entity_number,  , useful HTML character entities, diacritical marks, mathematical symbols, greek letters, currency symbols, )
Id (bookmarks)
Classes (select elements, multiple classes, different tags can share same class, )
Blocks & Inlines (div, span)
Computercode (kbd, samp, code, var)
Lists (ordered, unordered, description lists, control list counting, nesting)
Tables (colspan, rowspan, caption, colgroup, thead, tbody, tfoot, th)
Images (src, alt, width, height, animated, link, map, area, usenmap, , picture, picture for format support)
old fashioned audio
old fashioned video
Iframes (URL src, name, target)
Forms (input types, action, method, GET, POST, name, fieldset, accept-charset, autocomplete, enctype, novalidate, target, form elements, input attributes)
URL encode (scheme, prefix, domain, port, path, filename, ascii-encodings)
Learn about oldest web browsers onwards
Learn early HTML versions (doctypes & permitted elements for each version)
Make a 90s-like web page compatible with as much early web formats as possible, earliest web browsers’ compatibility is best here
Learn how to teach HTML5 features to most if not all older browsers
Install Adobe XD
Register a account at Figma
Learn Adobe XD basics
Learn Figma basics
Install Microsoft’s VS Code
Install my Microsoft’s VS Code favorite extensions
Learn HTML5
Semantic elements
Layouts
Graphics (SVG, canvas)
Track
Audio
Video
Embed
APIs (geolocation, drag and drop, local storage, application cache, web workers, server-sent events, )
HTMLShiv for teaching older browsers HTML5
HTML5 style guide and coding conventions (doctype, clean tidy well-formed code, lower case element names, close all html elements, close empty html elements, quote attribute values, image attributes, space and equal signs, avoid long code lines, blank lines, indentation, keep html, keep head, keep body, meta data, viewport, comments, stylesheets, loading JS into html, accessing HTML elements with JS, use lowercase file names, file extensions, index/default)
Learn CSS
Selections
Colors
Fonts
Positioning
Box model
Grid
Flexbox
Custom properties
Transitions
Animate
Make a simple modern static site
Learn responsive design
Viewport
Media queries
Fluid widths
rem units over px
Mobile first
Learn SASS
Variables
Nesting
Conditionals
Functions
Learn about CSS frameworks
Learn Bootstrap
Learn Tailwind CSS
Learn JS
Fundamentals
Document Object Model / DOM
JavaScript Object Notation / JSON
Fetch API
Modern JS (ES6+)
Learn Git
Learn Browser Dev Tools
Learn your VS Code extensions
Learn Emmet
Learn NPM
Learn Yarn
Learn Axios
Learn Webpack
Learn Parcel
Learn basic deployment
Domain registration (Namecheap)
Managed hosting (InMotion, Hostgator, Bluehost)
Static hosting (Nertlify, Github Pages)
SSL certificate
FTP
SFTP
SSH
CLI
Make a fancy front end website about
Make a few Tumblr themes
===You are now a basic front end developer!
Learn about XML dialects
Learn XML
Learn about JS frameworks
Learn jQuery
Learn React
Contex API with Hooks
NEXT
Learn Vue.js
Vuex
NUXT
Learn Svelte
NUXT (Vue)
Learn Gatsby
Learn Gridsome
Learn Typescript
Make a epic front end website about
===You are now a front-end wizard!
Learn Node.js
Express
Nest.js
Koa
Learn Python
Django
Flask
Learn GoLang
Revel
Learn PHP
Laravel
Slim
Symfony
Learn Ruby
Ruby on Rails
Sinatra
Learn SQL
PostgreSQL
MySQL
Learn ORM
Learn ODM
Learn NoSQL
MongoDB
RethinkDB
CouchDB
Learn a cloud database
Firebase, Azure Cloud DB, AWS
Learn a lightweight & cache variant
Redis
SQLlite
NeDB
Learn GraphQL
Learn about CMSes
Learn Wordpress
Learn Drupal
Learn Keystone
Learn Enduro
Learn Contentful
Learn Sanity
Learn Jekyll
Learn about DevOps
Learn NGINX
Learn Apache
Learn Linode
Learn Heroku
Learn Azure
Learn Docker
Learn testing
Learn load balancing
===You are now a good full stack developer
Learn about mobile development
Learn Dart
Learn Flutter
Learn React Native
Learn Nativescript
Learn Ionic
Learn progressive web apps
Learn Electron
Learn JAMstack
Learn serverless architecture
Learn API-first design
Learn data science
Learn machine learning
Learn deep learning
Learn speech recognition
Learn web assembly
===You are now a epic full stack developer
Make a web browser
Make a web server
===You are now a legendary full stack developer
[...]
(Computer system)=
Learn to execute and test your code in a command line interface
Learn to use breakpoints and debuggers
Learn Bash
Learn fish
Learn Zsh
Learn Vim
Learn nano
Learn Notepad++
Learn VS Code
Learn Brackets
Learn Atom
Learn Geany
Learn Neovim
Learn Python
Learn Java?
Learn R
Learn Swift?
Learn Go-lang?
Learn Common Lisp
Learn Clojure (& ClojureScript)
Learn Scheme
Learn C++
Learn C
Learn B
Learn Mesa
Learn Brainfuck
Learn Assembly
Learn Machine Code
Learn how to manage I/O
Make a keypad
Make a keyboard
Make a mouse
Make a light pen
Make a small LCD display
Make a small LED display
Make a teleprinter terminal
Make a medium raster CRT display
Make a small vector CRT display
Make larger LED displays
Make a few CRT displays
Learn how to manage computer memory
Make datasettes
Make a datasette deck
Make floppy disks
Make a floppy drive
Learn how to control data
Learn binary base
Learn hexadecimal base
Learn octal base
Learn registers
Learn timing information
Learn assembly common mnemonics
Learn arithmetic operations
Learn logic operations (AND, OR, XOR, NOT, NAND, NOR, NXOR, IMPLY)
Learn masking
Learn assembly language basics
Learn stack construct’s operations
Learn calling conventions
Learn to use Application Binary Interface or ABI
Learn to make your own ABIs
Learn to use memory maps
Learn to make memory maps
Make a clock
Make a front panel
Make a calculator
Learn about existing instruction sets (Intel, ARM, RISC-V, PIC, AVR, SPARC, MIPS, Intersil 6120, Z80...)
Design a instruction set
Compose a assembler
Compose a disassembler
Compose a emulator
Write a B-derivative programming language (somewhat similar to C)
Write a IPL-derivative programming language (somewhat similar to Lisp and Scheme)
Write a general markup language (like GML, SGML, HTML, XML...)
Write a Turing tarpit (like Brainfuck)
Write a scripting language (like Bash)
Write a database system (like VisiCalc or SQL)
Write a CLI shell (basic operating system like Unix or CP/M)
Write a single-user GUI operating system (like Xerox Star’s Pilot)
Write a multi-user GUI operating system (like Linux)
Write various software utilities for my various OSes
Write various games for my various OSes
Write various niche applications for my various OSes
Implement a awesome model in very large scale integration, like the Commodore CBM-II
Implement a epic model in integrated circuits, like the DEC PDP-15
Implement a modest model in transistor-transistor logic, similar to the DEC PDP-12
Implement a simple model in diode-transistor logic, like the original DEC PDP-8
Implement a simpler model in later vacuum tubes, like the IBM 700 series
Implement simplest model in early vacuum tubes, like the EDSAC
[...]
(Conlang)=
Choose sounds
Choose phonotactics
[...]
(Animation ‘movie’)=
[...]
(Exploration top-down ’racing game’)=
[...]
(Video dictionary)=
[...]
(Grand strategy game)=
[...]
(Telex system)=
[...]
(Pen&paper tabletop game)=
[...]
(Search engine)=
[...]
(Microlearning system)=
[...]
(Alternate planet)=
[...]
(END)
4 notes
·
View notes
Text
Top 6 Practices to Harden Docker Images to Enhance Security
Dockers can be considered equivalent to containers. Different verses of tools and platforms of containers are being used to develop containers to work more profitably. However, there are so many principles for protecting applications based on the container by collaborating with other secured applications.
We have described top 6 practices for Docker security into the most widespread Docker consulting that will be beneficial to build secure containers. If we see the infrastructure of traditional applications, we will find that the apps were hosted on bare or virtual machines.
On the other hand, containers are being used in Dockers that undermine the presumptions of clarity in the application. Due to this, many users face obstacles during the migration of Dockers and compare the usage of containers.
The user may have disorderly containers and servers, blind spots, or a much unprotected environment if you do not have an absolute arrangement and regular sustenance. If you’re also looking to work on Docker, you can take trusted docker consulting from 9series.
Through this article, we are going to discuss the most convenient practices for the security of Docker:
1. Confinement of network post convenience
Network ports are the most secure way to protect containers. The developers need to access the extra network ports to avoid hurdles at the development of the new container. After the image is entered into a composition or open internet atmosphere, it removes all the additional network ports.
While using Docker command-line interface (CLI), try to use the p parameters so that you can set limitations on host-to-container port mappings.
2. Apply Insignificant base images
The images in Docker are usually built on the top of “base images” to avoid the configuration of the image from scratching because it can cause a principal security issue. The component base images can also be used that are completely useless for your purposes.
Although, the additional component that you are using can expand the attack surface of your image. So it is necessary to select the base images carefully that can complement your target. If possible, you can also build a depreciated base image of your own.
3. Use of Docker Compose
This is the final way to harden your containers of Docker that you can combine all the files into Docker compose files. We can make them a public endpoint or public user access for the front end only when separating your network in the docker-compose method.
With this, your database will be limited only to container-to-container communication than the specific links. This method will increase the security of Dockers to the next level because there will be no public use that can connect to databases.
This method can be considered the most robust method of network segmentation for the architecture of the application. In this, all you need to divide the public-facing is the depletion of a flat network of containers.
There is no need to expose the database to the public internet. All they need is the minimal link of the narrow network so that you can communicate to the web series. As a result, when the database has been restricted, the chances of security issues decrease.
4. Secure the Host
The host is more protected than the Docker environment means if the host is compromised, then the containers are also at risk. So if you want to secure your containers, then first harden the host of containers, including an operating system, kernel versions, and system software. You can also do continuous patching and auditing for the hardening of the host.
5. Use Multi-Stage Builds
If you want your containers in an organized manner, then nothing can be better than a multi-stage build that provides operational and advantages of security. In this method, you can develop an intermediate container with all the necessary tools to generate the final artifact.
So lastly, only the final artifact will be copied in the final image without building temporary files or any developmental dependencies. Although it will only build the minimal binary files and the dependencies required for the final image without any intermediate files.
6. Use metadata labels for images
Labeling containers is the most basic practice that refers to the objects. The users can apply labels for additional information about the container. You can also characterize the containers by using tags, and this is what they are used for.
Conclusions
We hope that these fundamental points will help you to maintain a protected atmosphere for the container applications. As a result, The Center for Internet Security has put together a comprehensive benchmark for Docker with security guidelines for the Docker server software.
Now you can enjoy the advantages of Docker containers with the help of docker consulting from 9series without any obstacles in security only by using the outlined practices in the benchmark of CIS.
Source: 9series
#Docker Consulting#docker consulting#Docker Container#Docker Application Development#Docker Services#Docker Solutions#Provider#App#Container#mobile app development#9series
0 notes
Text
Swagger editor docker mac

#Swagger editor docker mac full#
#Swagger editor docker mac Offline#
Swagger Editor can be run locally or accessed on the Web. "./docker/nginx/conf.d/:/etc/nginx/conf.d:delegated" Download Swagger Editor The Swagger Editor is an open source editor to design, define and document RESTful APIs in the Swagger Specification. Here's my docker-compose YAML file version: "3.3"Ĭommand: /bin/sh -c "nginx -g 'daemon off '" We have a lot of different model objects and since the models are expanded by default it stresses out the browser trying to scroll through documentation in the Swagger Editor. I want to leverage the swagger-codegen capabilities similarly to how has the 'Generate Server' and 'Generate Client' menu options. Hey guys I did notice some the same thing for our Swagger spec which has just under 10K lines.
#Swagger editor docker mac Offline#
You can contribute to the project with suggestions, ideas, bug reports and pull requests in the Swagger Editor GitHub repository. I work in an offline environment and want to setup an instance of swagger-editor to share with the rest of the team. The Swagger Editor is an open source project under the Apache license. My question is, how can I get swagger containers to be routed, such that my team can visit and in my browser in my dev environment rather than and respectively? docker pull swaggerapi/swagger-editor docker run -p 80:8080 swaggerapi/swagger-editor Contribute. Eu comecei a usar o ReDoc para publicar minha documentao, mas no tenho uma boa maneira de saber como ele ser antes de envi-lo ao meu servidor web.
#Swagger editor docker mac full#
Valid Swagger JSON descriptions can then be generated and used with the full Swagger tooling (code generation, documentation, etc). The nginx container is setup to support SSL via container port 443 (mapped via the host port 9443 as I also use Laravel Valet in secure mode for other small projects). Swagger Editor lets you edit Swagger API specifications in YAML inside your browser and to preview documentations in real time. I also have a container for swagger ui and another for swagger editor. I have a docker compose file serving the nginx:alpine image for an API I'm developing.
0 notes
Text
How to update Gitlab inside a docker docker-compose container?
How to update Gitlab inside a docker docker-compose container?
Verify container volumes We need to know the id of the container and the port mappings running on the machine docker ps /* b7de284bc35c gitlab/gitlab-ce:latest ... 0.0.0.0:8222->22/tcp, :::8222->22/tcp, 0.0.0.0:8280->80/tcp, :::8280->80/tcp, 0.0.0.0:2443->443/tcp, :::2443->443/tcp gitlab-web-1 */ docker container inspect -f "{{ json .HostConfig.Binds }}" b7de284bc35c | python3 -m…
View On WordPress
0 notes
Text
Activate Dicom Editing Osirix Lite

Note
The OsiriX team has a blog post entitled “InstallingOrthanc (Open-Source PACS) on Mac”that provides a guide to interface OsiriX with Orthancthrough DICOMweb.

Configuration of Osirix
Name: Osirix Lite File size: 12 MB Date added: March 11, 2013 Price: Free Operating system: Windows XP/Vista/7/8 Tota. Dicom viewer mac, Box DICOM Viewer opens DICOM images such as X-rays, CAT scans, MRI's, and more. Box Edit Edit content directly on Box using native applications installed on your computer. Download 3D Slicer - Helps with visualization and image analysis, supporting features such as DICOM reading capabilities, interactive segmentation, volume rendering, rigid and non-rigid. Integrate Osirix using DICOM¶. In Preferences-Listener, activate and configure AETitle and Port (e.g. Dicom Editing Osirix Windows Activate Dicom Editing Osirix Windows: pin. DCM4CHEE Java Viewer Lite download Project Activity: pin. DICOM Viewer下载 dicom图像浏览器(Philips DICOM Viewer) 中文.
In Preferences->Listener, activate and configure AETitle and Port (e.g. Osirix 11112)
In Preferences->Locations->DICOMWebNode, add a DICOM Node:
with the URL of the Orthanc server
with the DICOMweb API path of Orthanc (default is /dicom-web)
with a name (eg MYORTHANC)
with Q&R activated
without authentication
with Send Transfers syntax : Explicit Little Endian
Configuration of Orthanc
First, make sure to install and enable the DICOMweb plugin.
Adapt the following configuration options(obviously, adapt the IP address):
Configuration of Docker images by Osimis
This section applies if you are using the osimis/orthanc Docker imagto run Orthanc.
Activate Dicom Editing Osirix Literacy
Make sure Orthanc has the Dicom Web protocol enabled:
Activate Dicom Editing Osirix Lite Free
If using Orthanc in a docker container, map the Orthanc DICOMWeb Http Port. Eg in docker-compose file:
1 note
·
View note
Text
docker-compose environment variables
Docker compose environment variables don’t reach containers unless you mention them in environment entry for each defined service.
node-app: build: dockerfile: Dockerfile.Dev context: ./server # port mapping # similar to 'docker run' ports: - "8000:8000" # defines the restart condition # default is never restart: "on-failure" # Specifying the environment file volumes: - cra-volume:${TMP_PATH}/public environment: - TMP_PATH - REDIS_PASSWORD - REDIS_PORT - REDIS_HOST
Here, if you don’t pass REDIS_PASSWORD, REDIS_PORT & REDIS_HOST, this application won’t be able to connect to redis-server. Though you can use variables inside the docker-compose file if required (without mentioning them under environment).
Question: Where are these values being passed from? Answer: Create a .env file in the directory from which you are initiating the docker-compose up command
0 notes
Text
Example for setting up <whatever>.docker as a local domain (for Docker services)
What to do:
Install dnsmasq for resolving hostnames
Configure dnsmasq to resolve .docker requests to localhost
Configure macOS to send .docker requests to dnsmasq
brew install dnsmasq # Create config files sh -c 'echo "address=/.docker/127.0.0.1\naddress=/.docker/::1\n" > /usr/local/etc/dnsmasq.conf' sudo mkdir -p /etc/resolver sudo sh -c 'echo "nameserver 127.0.0.1\n" > /etc/resolver/docker' # Start service as root, and register it to launch on boot sudo brew services start dnsmasq
You should be able to resolve any .docker hostnames;
dig whatever.docker @localhost # should have ANSWER SECTION with mapping to 127.0.0.1 ping -c 3 something.docker # should receive response from 127.0.0.1 scutil --dns # should list resolver for 'domain: docker' with 'nameserver: 127.0.0.1'
Explanation
A custom DNS server (dnsmasq) is installed and running on localhost (127.0.0.1), and configured to resolve all hostnames ending with .docker to 127.0.0.1 (or ::1 for IPv6). Then macOS is configured to use the local DNS (dnsmasq) for all docker domain requests, pointing to 127.0.0.1 as the nameserver.
Bonus: Docker proxy
There's a clever proxy available for Docker, which will listen for created containers and auto-generate an nginx config with proxying to exposed ports. This works nicely for regular Docker containers, but when you use docker-compose a separate network is created for the services which the proxy can't access, so it'll not work without some extra setup. What I've opted for is creating a named network for the proxy, and then mapping that into the docker-conmpose config using the override file.
First, we create the custom network, and start the proxy server connected to that network (see the documentation for remaining config):
docker network create proxy docker run -d \ --name proxy \ --network proxy \ -p 80:80 \ -v /var/run/docker.sock:/tmp/docker.sock:ro \ jwilder/nginx-proxy
Then assuming we have a docker-compose.yml with two services—app & other—we can create a docker-compose.override.yml which sets up the enviromnent variable for the proxy service, and connects to the proxy network. Notice: We'll have to also define a default network (here called default) to allow the services communicate between themself:
version: '3' services: app: environment: VIRTUAL_HOST: app.docker networks: - default - nginx-proxy other: networks: - default networks: default: nginx-proxy: external: name: proxy
0 notes
Text
初めてのElasticsearch with Docker
from https://qiita.com/kiyokiyo_kzsby/items/344fb2e9aead158a5545?utm_campaign=popular_items&utm_medium=feed&utm_source=popular_items
はじめに
Elasticsearchの公式チュートリアルやってみました。 公式ドキュメント以外にも色々調べながら進めたのですが、「7.0系(type新規作成廃止後)」×「Docker」の記事が少なかったので、備忘も兼ねたまとめです。
Elasticsearchとは
Elasticsearchは、オープソースの高スケーラブルな全文検索および分析エンジンです。大容量のデータをすばやく、ほぼリアルタイムで保存、検索、分析できます。通常、検索の機能と要件が複雑なアプリケーションを強化する基礎となるエンジン/技術として使用されます。
(Elasticsearchリファレンスより)
つまり、めっちゃ検索ができるすごいミドルウェアです。
座学
実際に触る前にお勉強です。
用語とイメージ

論理構成
点線で囲った部分がElasticsearchの外側から見た構成(論理構成)です。 cluster > index > document の順に粒度が細かくなっていきます。
cluster Elasticsearch全体を指します。1つのclusterの中に複数のindexを含めることができます。
index 同じ種類のdocumentを集約格納するための箱です。RDBにおける「テーブル」が概念としては一番近いですが、index別にスケーリングの設定を組むことができたり、複数のindexを横断して検索することができたり、カラム定義が不要だったり等、「テーブル」よりも柔軟なことができるイメージです。
document indexに格納するデータです。json型で格納します。RDBにおけるレコードと同様の概念です。キー情報のことを特に「fields」と呼んだりします。イメージ図では全てのdocumentで同一のfieldsを使用していますが、統一する必要はありません(が、全く意味の異なるデータを同じindexに格納しても検索性能が落ちるだけなので、同じ性質のdocumentを同一indexに格納するようにしましょう)。
実は6.0系まではこのindexとdocumentの間に「type」という粒度の箱を作ることができたのですが、7.0系からtypeの新規作成ができなくなりました(8.0系でtypeに関するAPIが全廃されるそうです)。古い記事だとtypeについて記載されているものが多いですが、基本typeでできることはindexでもできるので、type=indexとして読み進めれば問題ないと思います。 ※参考 タイプレスAPIに移行する:Elasticsearch 7.0の変更点 | Elastic Blog ※参考 Removal of mapping types
物理構成
実線で囲った部分がelasticsearchの内部的な構成(物理構成)です。 documentは表向きはindexに格納されていますが、実体としてはnode内のshardに格納されます。
node サーバです。Elasticsearchは複数node構成を取っており、このnodeを増減させることで容易にスケールさせることができます。1つのnodeに複数のshardを格納することができます。
shard node内でdocumentを格納するための箱です。indexごとにprimary shardをいくつ作成するか、1つのprimary shardに対し、いくつのreplica shardを用意するか、を設定することができます。負荷分散のため、documentは複数ある中のどれか1組のprimary/replica shardに格納されます。
primary shard : 書き込み可能なshardです。ここで更新されたデータは対応するreplica shardにコピーされます。primary shardがダウンしているとステータスがredになります(正しい検索結果が返されません)。
replica shard : 読み取りのみ可能なshardです。primary shardおよび他のreplica shardとは別のnodeに配置される必要があります。node数が足りなくて指定した数のreplica shardを作れないとステータスがyellowになります(primary shardは生きているので、性能は落ちますが機能としては問題なく動きます)。
elasticsearchクラスタの起動
今回はDockerを使ってelasticsearchクラスタを起動したいと思います。 Dockerおよびdocker-composeを使ったことのない方は事前にインストールを済ませておきましょう。 ※参考 DockerをMacにインストールする(更新: 2019/7/13) ※参考 Docker Compose のインストール
Dockerfileの作成
任意のディレクトリにDockerfileを作成し、以下のように記載します。
FROM docker.elastic.co/elasticsearch/elasticsearch:7.3.0 RUN elasticsearch-plugin install analysis-kuromoji
FROMでelasticsearchのベースイメージを取得し、RUNで日本語入力の形態素解析を行うためのプラグイン「kuromoji」のインストールを行うよう、コマンド記載しています。 ※詳細を知りたい方はこちらDockerfile リファレンスを参照ください。
Composeファイルの作成
Dockerfileと同じディレクトリにdocker-compose.ymlを作成し、以下のように記載します。
docker-compose.yml
version: '3' services: es01: build: . container_name: es01 environment: - node.name=es01 - discovery.seed_hosts=es02 - cluster.initial_master_nodes=es01,es02 - cluster.name=docker-cluster - bootstrap.memory_lock=true - "ES_JAVA_OPTS=-Xms512m -Xmx512m" ulimits: memlock: soft: -1 hard: -1 volumes: - esdata01:/usr/share/elasticsearch/data ports: - 9200:9200 networks: - esnet es02: build: . container_name: es02 environment: - node.name=es02 - discovery.seed_hosts=es01 - cluster.initial_master_nodes=es01,es02 - cluster.name=docker-cluster - bootstrap.memory_lock=true - "ES_JAVA_OPTS=-Xms512m -Xmx512m" ulimits: memlock: soft: -1 hard: -1 volumes: - esdata02:/usr/share/elasticsearch/data networks: - esnet
volumes: esdata01: driver: local esdata02: driver: local
networks: esnet:
ざっくり説明します。 servicesでes01とes02の二つのコンテナ(���ノード)を起動することを指定しています。 その中のnetworks: - esnetで、esnetを利用して両ノードを接続することを指定しています。(esnetの宣言は一番下のnetworks文で行われています。) また、es01のports: - 9200:9200で、ローカルホストの9200ポートとes01コンテナの9200ポートを接続しています。これにより、localhost:9200へアクセスするとes01コンテナに接続でき、前述のesnetを介してes02にも接続することができる、という仕組みです。 ※詳細を知りたい方はこちらCompose ファイル・リファレンスを参照ください。
コンテナの起動
まずDockerイメージのビルドを行います。
次にDockerコンテナの起動を行います。
以下のメッセージが出ればelasticsearchコンテナの起動完了です。
Creating es01 ... done Creating es02 ... done
クラスタのヘルスチェック
以下のリクエストを投げることでクラスタのステータスを取得することができます。
$ curl -X GET "localhost:9200/_cat/health?v&pretty"
以下のように返ってきたら成功です。
epoch timestamp cluster status node.total node.data shards pri relo init unassign pending_tasks max_task_wait_time active_shards_percent 1565413858 05:10:58 docker-cluster green 2 2 0 0 0 0 0 0 - 100.0%
また、以下のリクエストを投げると各ノードのステータスを取得することができます。
$ curl -X GET "localhost:9200/_cat/nodes?v&pretty"
以下のように返ってきたら成功です。
ip heap.percent ram.percent cpu load_1m load_5m load_15m node.role master name 172.19.0.2 41 96 4 0.05 0.14 0.15 dim * es02 172.19.0.3 39 96 4 0.05 0.14 0.15 dim - es01
CRUD処理
indexの作成
$ curl -X PUT "localhost:9200/[index name]?pretty&pretty"
例えば顧客情報を管理するcustomerindexを作成する場合は以下のようになります。
$ curl -X PUT "localhost:9200/customer?pretty&pretty"
indexのステータスは以下のコマンドで確認することができます。
$ curl -X GET "localhost:9200/_cat/indices?v&pretty"
レスポンスがこちらです。
health status index uuid pri rep docs.count docs.deleted store.size pri.store.size green open customer nCGMonD_QKaMYhP7jUQd1g 1 1 0 0 460b 230b
先ほど作成したcustomerindexが追加されていることがわかると思います。 ステータスをかいつまんで説明すると、
health:indexの状態。
green:異常なし。
yellow:レプリカシャード作成失敗。
red:プライマリシャード作成失敗。
pri:プライマリシャードの数。今回は1つ。
rep:レプリカシャードの数。今回は1つ。
docs.count:保存しているドキュメント数。現段階ではドキュメントを登録していないので0。
という感じです。
documentの作成
$ curl -X PUT "localhost:9200/[index name]/_doc/[document id]?pretty&pretty" -H 'Content-Type: application/json' -d [json data]
customerindexにname属性のみのシンプルなdocumentを投入したいと思います。 コマンドラインから以下のcurlリクエストを送ります。
$ curl -X PUT "localhost:9200/customer/_doc/1?pretty&pretty" -H 'Content-Type: application/json' -d' { "name": "John Doe" } '
以下のように返ってき��ら成功です。
{ "_index" : "customer", "_type" : "_doc", "_id" : "1", "_version" : 1, "result" : "created", "_shards" : { "total" : 2, "successful" : 2, "failed" : 0 }, "_seq_no" : 0, "_primary_term" : 1 }
レスポンスから、customerindexの2つのシャードに正しくdocumentが投入されたことがわかります。
ちなみに存在しないindexを指定した場合、自動でindexを作成してくれるそうです。チュートリアルとして先にcustomerindexを作成してからdocumentを投入しましたが、いきなり今のコマンドを叩いても問題ないそうです。 また、[document id]を指定しないでリクエストを送るとelasticsearch側でidを自動採番してくれます(「wWhNGawBR0ib7km4-Dke」というようなランダム文字列が割り当てられます)。
documentの取得
$ curl -X GET "localhost:9200/[index name]/_doc/[document id]?pretty&pretty"
先ほど投入したdocumentを取得するには以下のリクエストを送ります。
$ curl -X GET "localhost:9200/customer/_doc/1?pretty&pretty"
以下のように返ってきたら成功です。
{ "_index" : "customer", "_type" : "_doc", "_id" : "1", "_version" : 1, "_seq_no" : 1, "_primary_term" : 1, "found" : true, "_source" : { "name" : "John Doe" } }
foundに取得結果が、_sourceに投入したjsonデータが表示されています。
documentの更新
$ curl -X POST "localhost:9200/[index name]/_update/[document id]?pretty&pretty" -H 'Content-Type: application/json' -d [json data]
documentを更新する場合はdocで指定します。また、documentの更新時にフィールドを追加することもできます。 例えばnameをJane Doeに変更し、ageフィールドの追加を同時に行う場合は以下のリクエストを送ります。
$ curl -X POST "localhost:9200/customer/_update/1?pretty&pretty" -H 'Content-Type: application/json' -d' { "doc": { "name": "Jane Doe", "age": 20 } } '
documentの削除
$ curl -X DELETE "localhost:9200/[index name]/_doc/[document id]?pretty&pretty"
先ほど投入したdocumentを削除する場合には以下のリクエストを送ります。
$ curl -X DELETE "localhost:9200/customer/_doc/1?pretty&pretty"
documentの取得を行なっても"found" : falseが返ってくるはずです。
batch実行
$ curl -X POST "localhost:9200/[index name]/_bulk?pretty&pretty" -H 'Content-Type: application/json' -d [commands]
_bulkで複数の処理を同期実行(batch実行)することができます。 以下のリクエストでは、 1. id:1を指定 2. {"name": "John Doe" }というデータのdocumentを投入 3. id:2を指定 4. {"name": "Jane Doe" }というデータのdocumentを投入 という処理を順に行なっています。 (指定したidが存在しない場合はcreate、存在する場合にはupdateになります。)
$ curl -X POST "localhost:9200/customer/_bulk?pretty&pretty" -H 'Content-Type: application/json' -d' {"index":{"_id":"1"}} {"name": "John Doe" } {"index":{"_id":"1"}} {"name": "Jane Doe" } '
indexの削除
$ curl -X DELETE "localhost:9200/[index name]?pretty&pretty"
今回サンプルで作成したcustomerindexを削除する場合には以下をコマンドラインに入力しましょう。
$ curl -X DELETE "localhost:9200/customer?pretty&pretty"
indexの状態を取得してみると、一覧からcustomerindexが削除されているはずです。
検索機能を使う
公式チュートリアルのサンプルデータを利用して、検索機能を使ってみたいと思います。
サンプルindexの作成
「bank」indexを以下の条件で作成します。
プライマリシャード数:5
1つのプライマリシャードに対するレプリカシャード数:1
$ curl -X PUT 'localhost:9200/bank' -H 'Content-Type: application/json' -d' { "settings" : { "index" : { "number_of_shards" : 5, "number_of_replicas" : 1 } } } '
サンプルデータの取得
こちらからjsonデータを取得し、任意のディレクトリにaccounts.jsonとして保存します。 ※サンプルデータは公式チュートリアルのものです↓ https://www.elastic.co/guide/en/elasticsearch/reference/7.3/getting-started-explore-data.html
サンプルデータの投入
accounts.jsonを保存したディレクトリで以下のコマンドを実行し、データを「bank」indexに投入します。
$ curl -H "Content-Type: application/json" -X POST "localhost:9200/bank/_bulk?pretty&refresh" --data-binary "@accounts.json"
検索
検索の基本構文は以下の通りです。
query:検索の条件(≒where句)
_source:取得するフィールド名(≒select句)
from:取得開始位置(≒offset句) ※0-indexedです
size:取得件数(≒limit句)
sort:ソート条件(≒order by句)
例えば以下のリクエストを投げると、balanceで降順ソートされたドキュメントの11〜20件目が返されます。レスポンスの内容にはaccount_numberとbalanceが含まれています。
$ curl -X GET "localhost:9200/bank/_search?pretty" -H 'Content-Type: application/json' -d' { "query": { "match_all": {} }, "_source": ["account_number", "balance"], "from": 10, "size": 10, "sort": { "balance": { "order": "desc" } } } '
詳細な条件指定
queryの中身で詳細な検索条件を指定することができます。
検索クエリ
match
指定したワードが含まれているdocumentを返します。 例えば以下の例であれば、addressフィールドに「mill」という単語が含まれているdocumentが返されます。
"match": { "address": "mill" }
また、複数のワードを指定することができます。デフォルトではスペース区切りのor検索になります。 以下の例であれば、addressフィールドに「mill」もしくは「lane」という単語が含まれているdocumentが返されます。
"match": { "address": "mill lane" }
match_phrase
指定したフレーズが含まれているdocumentを返します。 matchと違い、複数の単語をひとまとまりとして認識します。 例えば以下の例であれば、addressフィールドに「mill lane」という文字列が含まれているdocumentが返されます。
"match_phrase": { "address": "mill lane" }
range
範囲指定をすることができます。
gte=以上(greater than or equal)
lte=以下(less than or equal)
を表しています。 以下の例であればageフィールドが20以上、29以下のものを返します。
"range" : { "age" : { "gte" : 20, "lte" : 29 }}
複数条件の組み合わせ(bool句)
複数の条件を組み合わせて条件に適合するdocumentを検索する場合にはbool句を使用します。なお、説明に出てくる「条件とdocumentの適合度」は検索結果の_scoreで確認できる数値です。(※恐らく条件に一致する単語数をカウントして重み付け加算しているんだと思いますが、厳密な算出ロジックは分からなかったので、詳しい方どなたか教えてください。)
must
mustの中に書いた条件は必ず満たされるようになります。また、条件とdocumentの適合度が高ければ高いほど検索結果の上位に表示されます。
"bool" : { "must" : { "match" : { "address" : "mill" } } }
複数条件書きたい場合は配列表記にします。
"bool" : { "must" : [ { "match" : { "address" : "mill" } }, { "range" : { "age" : { "gte" : 21, "lte" : 30 }}} ]}
should
shouldの中に書いた条件はmustと違いプラスアルファ要素として扱われます。条件とdocumentの適合度が高ければ高いほど検索結果の上位に表示されます。
"bool" : { "should" : [ { "match" : { "address" : "mill" } }, { "range" : { "age" : { "gte" : 21, "lte" : 30 }}} ]}
must_not
must_notの中に書いた条件を満たすdocumentは必ず出力されなくなります。
"bool" : { "must_not" : [ { "match" : { "address" : "mill" } }, { "range" : { "age" : { "gte" : 21, "lte" : 30 }}} ]}
filter
mustと同様、filterに書いた条件も必ず満たされるようになります。 ただしmustと違い、条件とdocumentの適合度算出には使われません。 単純なフィルタリングを行いたい場合はmustよりもfilterの方が良いでしょう。
"bool" : { "filter" : [ { "match" : { "address" : "mill" } }, { "range" : { "age" : { "gte" : 21, "lte" : 30 }}} ]}
実際に検索してみる
以下のリクエストを投げると、
のフィルターを掛けた後、
addressにroadが含まれている
addressにmillが含まれていない
balanceが30000以上だと望ましい
genderがFだと望ましい
という検索条件に適合するdocumentを検索しています。
$ curl -X GET "localhost:9200/bank/_search?pretty" -H 'Content-Type: application/json' -d' { "query": { "bool" : { "must" : { "match" : { "address" : "road" } }, "filter": { "range" : { "age" : { "gte" : 20, "lte" : 30 } } }, "must_not" : { "match" : { "address" : "mill" } }, "should" : [ { "range" : { "balance" : { "gte" : 30000 } } }, { "match" : { "gender" : "F" } } ] } } } '
検索結果がこちらです(スペースの都合上4件のみ表示しています)。 上位の検索結果は指定した条件を全て満たしていることがわかると思います。
{ "took" : 74, "timed_out" : false, "_shards" : { "total" : 5, "successful" : 5, "skipped" : 0, "failed" : 0 }, "hits" : { "total" : { "value" : 17, "relation" : "eq" }, "max_score" : 5.5885725, "hits" : [ { "_index" : "bank", "_type" : "_doc", "_id" : "951", "_score" : 5.5885725, "_source" : { "account_number" : 951, "balance" : 36337, "firstname" : "Tran", "lastname" : "Burris", "age" : 25, "gender" : "F", "address" : "561 Rutland Road", "employer" : "Geoform", "email" : "[email protected]", "city" : "Longbranch", "state" : "IL" } }, { "_index" : "bank", "_type" : "_doc", "_id" : "376", "_score" : 5.2215624, "_source" : { "account_number" : 376, "balance" : 44407, "firstname" : "Mcmillan", "lastname" : "Dunn", "age" : 21, "gender" : "F", "address" : "771 Dorchester Road", "employer" : "Eargo", "email" : "[email protected]", "city" : "Yogaville", "state" : "RI" } }, { "_index" : "bank", "_type" : "_doc", "_id" : "869", "_score" : 5.0654063, "_source" : { "account_number" : 869, "balance" : 43544, "firstname" : "Corinne", "lastname" : "Robbins", "age" : 25, "gender" : "F", "address" : "732 Quentin Road", "employer" : "Orbaxter", "email" : "[email protected]", "city" : "Roy", "state" : "TN" } }, { "_index" : "bank", "_type" : "_doc", "_id" : "510", "_score" : 4.9729834, "_source" : { "account_number" : 510, "balance" : 48504, "firstname" : "Petty", "lastname" : "Sykes", "age" : 28, "gender" : "M", "address" : "566 Village Road", "employer" : "Nebulean", "email" : "[email protected]", "city" : "Wedgewood", "state" : "MO" } },
他にも様々な条件で試してみてください。
elasticsearchクラスタの停止
elasticsearchクラスタ(コンテナ)の停止は以下のコマンドで実行できます。
再度クラスタを起動させる場合にはdocker-compose up -dを入力しましょう。
また、Dockerイメージの削除まで同時に行いたい場合は以下のコマンドで実行できます。
$ docker-compose down --rmi all
この場合、再度クラスタを起動させる場合にはdocker-compose buildを行なってからdocker-compose up -dを入力しましょう。
おわりに
主にelasticsearchクラスタの起動、CRUD処理、および基本的な検索機能について学習することができました。 今後は以下のトピックについて挑戦したいと思います���
kuromojiを利用した日本語の全文検索
自前のブログアプリに検索機能を実装
k8sによるnodeの死活監視
https://cdn.qiita.com/assets/qiita-fb-2887e7b4aad86fd8c25cea84846f2236.png
0 notes
Text
Your personal DIY image search
Hi everyone, it’s been a while! I bet you forgot this blog even existed. I happen to be a big supporter of quality over quantity, so while my work on parsing Japanese counters earlier this year was pretty interesting, I already wrote way too many articles about Ichiran/ichi.moe so I decided to keep it to myself. Recently I’ve been working on a little side-project and now that it finally works, I think it deserves a full-fledged blog post.
For a bit of a nostalgia trip, let's go back to the early 00s. Remember when TinEye first appeared? It was amazing. For the first time you could easily find where that one image you once saved from some random phpBB forum is really from. It didn't matter if your image was resized, or slightly edited from the original, it still worked. That shit was magic, my friends. Of course these days nobody is impressed by this stuff. Google Image Search indexes pretty much anything that exists on the Internet and even uses neural networks to identify content of an image.
Back to the present day. I discovered I have an image hoarding problem. Over the years of using the Intertubes, I have accumulated a massive number of images on my hard drive. When I see an image I like my first thought is "do I have this one saved already?" because how could I possibly remember? At this point I need my own personal Google Image Search. And (spoiler alert) now I have one.
First of all, I needed an actual image matching technology. These days the cloud is all the rage, so I definitely wanted to have this thing running in the cloud (as opposed to my local PC) so that I could search my images from anywhere in the world. After a cursory search, my eyes fell on a thing called Pavlov Match which runs from a Docker container, so should be pretty easy to install. I installed docker and docker-compose on my VPS, and then git-cloned Match and ran make dev according to instructions. This will actually run an Elasticsearch instance on the same VPS, and apparently the damn thing eats memory for breakfast, at least with the default settings. I'm using a cheap 2GB RAM Linode, so the memory is actually a very finite resource here, as I will find out later. The default settings will also completely expose your match installation AND elasticsearch to the world. But don't worry, I figured this out so that you don't have to. Let's edit docker-compose.yml from match repository as follows:
version: '2' services: match: image: pavlov/match:latest ports: - 127.0.0.1:8888:8888 command: ["/wait-for-it.sh", "-t", "60", "elasticsearch:9200", "--", "gunicorn", "-b", "0.0.0.0:8888", "-w", "4", "--preload", "server:app"] links: - elasticsearch elasticsearch: image: elasticsearch environment: - "ES_JAVA_OPTS=-Xms256m -Xmx256m" - bootstrap.mlockall=true expose: - "9200"
This will make match server only available on local network within the VPS on port 8888, and elasticsearch only available to these two docker containers. It will also restrict elasticsearch RAM consumption to 512mb and --preload flag reduces the amount of memory gunicorn workers consume.
To make match server available from outside I recommend proxying it through nginx or some other proper web server. You can also add authentication/IP whitelist in nginx because the match server has no authentication features whatsoever, so anyone will be able to search/add/delete the data on it.
That was the backend part. No programming required here! But this is a Lisp blog, so the next step is writing a Lisp client that can communicate with this server. The first step is reading the match API documentation. You might notice it's a bit... idiosyncratic. I guess REST is out of fashion these days. Anyway, I started implementing a client using the trusty drakma, but I quickly hit a limitation: match expects all parameters to be sent encoded as form data, but drakma can only encode POST parameters as form data and not, say, DELETE parameters. Not to be foiled by a badly designed API, I tried dexador, and while dex:delete does not encode parameters as form data, dex:request is flexible enough to do so. Each response (a JSON string) is parsed using jsown.
(defun parse-request (&rest args) (when *auth* (setf args `(,@args :basic-auth ,*auth*))) (multiple-value-bind (content return-code) (handler-bind ((dex:http-request-failed #'dex:ignore-and-continue)) (apply 'dex:request args)) (cond ((<= 400 return-code 499) (jsown:new-js ("status" "fail") ("error" content) ("code" return-code))) (t (let ((obj (jsown:parse content))) (jsown:extend-js obj ("code" return-code))))))) (defun add-local (file &key path (metadata "{}")) "Add local image to Match server" (parse-request (api-url "/add") :method :post :content `(("image" . ,(pathname file)) ("filepath" . ,(or path file)) ("metadata" . ,metadata))))
With this basic client in place, I can add and delete individual images, but it would be incredibly cumbersome to manage thousands of images with it. I had to write some code that would scan specified directories for images, track any changes and then add/update/delete information from Match server as needed. I already wrote something like this before, so this was pretty easy. Of course SBCL's "sb-posix:stat doesn't work on Unicode filenames" bug has reared its head again, but I already knew the workaround. This time I completely relied on UIOP for recursively walking directories (uiop:subdirectories and uiop:directory-files are your friends). Each image file is represented as CLOS object and saved into a hash-table which is serialized to a file using CL-STORE. The object has a status attribute which can be :new, :update, :delete, :ok and so on. Based on status, an action needs to be performed, such as uploading an image to Match server (for :new and :update).
Now, I could just send a bunch of requests one after another, but that would be a waste. Remember, we have 4 gunicorn workers running on our server! This clearly calls for a thread pool. I thought PCALL would be perfect for this, but nope. It uses sb-thread:interrupt-thread which is incredibly unsafe and the result is that you basically can't safely make http requests from thread workers. Debugging this took way too much time. In the end, I implemented a thread pool based on lparallel promises which is kind of an overkill for such a simple use case, but at least it worked.
(setf *cache* (update-cache)) (let ((lparallel:*kernel* (lparallel:make-kernel threads))) (unwind-protect (loop for value in (alexandria:hash-table-values *cache*) collect (worker value) into futures finally (map nil 'lparallel:force futures)) (lparallel:end-kernel))) (save-cache *cache*))
Note that you must be very careful when doing things that affect global state inside the threads. For example :delete action removes a key from the hash table *cache*. This is not guaranteed to be an atomic operation, so it's necessary to grab a global lock when doing it.
(defvar *cache-lock* (bordeaux-threads:make-lock "match-cache-lock")) ... (bordeaux-threads:with-lock-held (*cache-lock*) (remhash key *cache*))
Printing messages to REPL from inside threads also requires a separate lock and (force-output), otherwise it will look like a complete mess!
(defun format-msg (str &rest args) (bordeaux-threads:with-lock-held (*msg-lock*) (terpri) (apply 'format t str args) (force-output)))
Now that the required functionality is implemented, it's time to test upload a bunch of stuff... and get back a bunch of errors. It took some sleuthing to discover that gunicorn workers of my Match server are routinely getting killed by "OOM killer". Basically, the server runs out of memory and the system in desperation kills a process that it doesn't like. Remember, I only have 2Gb of memory there!
I figured out that it's images with very large dimensions that are the most problematic in terms of memory usage. If I were to resize these images to some reasonable size, the matching should still work pretty well. In order to execute this plan, I thought I'd use some Lisp to ImageMagick interface. There's in fact a pure Lisp solution called OptiCL but would it really handle any image? Remind me to test that later! Anyway, back to ImageMagick. Neither lisp-magick nor lisp-magick-wand would work with the most recent ImageMagick version (seems its API has changed a bit). However the last one I tried cl-graphicsmagick, which uses a fork of ImageMagick called GraphicsMagick, has unexpectedly worked (at least on my Windows laptop. Note that you need to install Microsoft Visual C Redistributable 2008 otherwise the library wouldn't load with CFFI) so I went with that.
Using very useful temporary files functionality of UIOP (uiop:with-temporary-file), I resize each oversized image to reasonable dimensions and save into a temporary file, which is then uploaded to Match server. I also send the file's original and resized dimensions as metadata. Thankfully this completely eradicated the memory issue. There's a minor problem where GraphicsMagick cannot do Unicode pathnames on Windows, so I copy the original image into a temporary file with ASCII-only name in that case.
(defun resize-image (input-path output-path &key (max-width *max-dimension*) (max-height *max-dimension*) (filter :%QuadraticFilter) (blur 1)) (gm::with-magick-wand (wand) (handler-case (gm::%MagickReadImage wand input-path) ;; graphicsmagick cannot read Unicode filenames on Windows so attempt to load a copy (gm::magick-error () (uiop:with-temporary-file (:pathname tmp :prefix "gm" :type (pathname-type input-path)) (uiop:copy-file input-path tmp) (setf wand (gm::%NewMagickWand)) (gm::%MagickReadImage wand (namestring tmp))))) (let ((w (gm::%MagickGetImageWidth wand)) (h (gm::%MagickGetImageHeight wand)) (res nil)) (multiple-value-bind (fw fh) (gm::fit-width-height w h max-width max-height) (unless (and (= w fw) (= h fh)) (gm::%MagickResizeImage wand fw fh filter blur) (gm::%MagickWriteImage wand output-path) (setf res output-path)) (values res w h fw fh)))))
Later I tested this code on an Ubuntu machine with GraphicsMagick installed from Apt repository and SBCL crashed into ldb debugger mode straight away... Welp. The helpful folks of #lisp told me the problem is with signal handlers established by GraphicsMagick library, somehow they confuse SBCL. Based on that advice, eventually I succeeded making this work. Uninstall apt Graphicsmagick and grab the sources. Find the file called magick.c and replace the line
InitializeMagickSignalHandlers(); /* Signal handlers */
with
// InitializeMagickSignalHandlers(); /* Signal handlers */
(commenting it out). Then do configure --enable-shared (see readme for possible options), make and sudo make install. This will make it work when called from SBCL on Linux.
Anyways, the full code of MATCH-CLIENT can be found at my Github. It's not installable from quicklisp for obvious reasons, in fact it's a complete pain to install as you might've already guessed, but if you wanna try it, you're welcome. The main two commands are update and match. The first is called to upload all images in your *root-dirs* to the server and then to update them if anything changes. match is used to match any image on the Internet (passed as URL string) or a local pathname (passed as pathname object) compared to the server. It returns a list of jsown objects (basically alists) that contain score (up to 100 for exact match), path (with "local tag" which can be different per device) and metadata containing original and resized dimensions.
((:OBJ ("score" . 96.00956) ("filepath" . "[HOME] d:/foo/bar/baz.jpg") ("metadata" :OBJ ("rw" . 1218) ("rh" . 2048) ("w" . 3413) ("h" . 5736))))
Anyway, this was a fun (although often frustrating) thing to build and ended up being quite useful! Thanks for reading and see you next time.
3 notes
·
View notes
Text
SQL Server on Linux or in Docker plus cross-platform SQL Operations Studio
I recently met some folks that didn't know that SQL Server 2017 also runs on Linux but they really needed to know. They had a single Windows desktop and a single Windows Server that they were keeping around to run SQL Server. They had long-been a Linux shop and was now fully containerzed...except for this machine under Anna's desk. (I assume The Cloud is next...pro tip: Don't have important servers under your desk). You can even get a license first and decide on the platform later.
You can run SQL Server on a few Linux flavors...
Install on Red Hat Enterprise Linux
Install on SUSE Linux Enterprise Server
Install on Ubuntu
or, even better, run it on Docker...
Run on Docker
Of course you'll want to do the appropriate volume mapping to keep your database on durable storage. I'm digging being able to spin up a full SQL Server inside a container on my Windows machine with no install.
I've got Docker for Windows on my laptop and I'm using Shayne Boyer's "Docker Why" repo to make the point. Look at his sample DockerCompose that includes both a web frontend and a backend using SQL Server on Linux.
version: '3.0' services: mssql: image: microsoft/mssql-server-linux:latest container_name: db ports: - 1433:1433 volumes: - /var/opt/mssql # we copy our scripts onto the container - ./sql:/usr/src/app # bash will be executed from that path, our scripts folder working_dir: /usr/src/app # run the entrypoint.sh that will import the data AND sqlserver command: sh -c ' chmod +x ./start.sh; ./start.sh & /opt/mssql/bin/sqlservr;' environment: ACCEPT_EULA: 'Y' SA_PASSWORD: P@$$w0rdP@$$w0rd
Note his starting command where he's doing an initial population of the database with sample data, then running sqlservr itself. The SQL Server on Linux Docker container includes the "sqlcmd" command line so you can set up the database, maintain it, etc with the same command line you've used on Windows. You can also configure SQL Server from Environment Variables so it makes it easy to use within Docker/Kubernetes. It'll take just a few minutes to get going.
Example:
/opt/mssql-tools/bin/sqlcmd -S localhost -d Names -U SA -P $SA_PASSWORD -I -Q "ALTER TABLE Names ADD ID UniqueIdentifier DEFAULT newid() NOT NULL;"
I cloned his repo (and I have .NET Core 2.1) and did a "docker-compose up" and boom, running a front end under Alpine and backend with SQL Server on Linux.
101→ C:\Users\scott> docker ps CONTAINER ID IMAGE COMMAND CREATED STATUS PORTS NAMES e5b4dae93f6d namesweb "dotnet namesweb.dll" 38 minutes ago Up 38 minutes 0.0.0.0:57270->80/tcp, 0.0.0.0:44348->443/tcp src_namesweb_1 5ddffb76f9f9 microsoft/mssql-server-linux:latest "sh -c ' chmod +x ./…" 41 minutes ago Up 39 minutes 0.0.0.0:1433->1433/tcp mssql
Command lines are nice, but SQL Server is known for SQL Server Management Studio, a nice GUI for Windows. Did they release SQL Server on Linux and then expect everyone use Windows to manage it? I say nay nay! Check out the cross-platform and open source SQL Operations Studio, "a data management tool that enables working with SQL Server, Azure SQL DB and SQL DW from Windows, macOS and Linux." You can download SQL Operations Studio free here.
SQL Ops Studio is really impressive. Here I am querying SQL Server on Linux running within my Docker container on my Windows laptop.
As I'm digging in and learning how far cross-platform SQL Server has come, I also checked out the mssql extension for Visual Studio Code that lets you develop and execute SQL against any SQL Server. The VS Code SQL Server Extension is also open source!
Go check it SQL Server in Docker at https://github.com/Microsoft/mssql-docker and try Shayne's sample at https://github.com/spboyer/docker-why
Sponsor: Scale your Python for big data & big science with Intel® Distribution for Python. Near-native code speed. Use with NumPy, SciPy & scikit-learn. Get it Today!
© 2018 Scott Hanselman. All rights reserved.


SQL Server on Linux or in Docker plus cross-platform SQL Operations Studio published first on https://brightcirclepage.tumblr.com/
0 notes
Text
Getting Started With Symfony 4
Through this article, we are going to take a look at the Symfony 4 framework made by SensioLabs.
Introduction
To create a web application, we have many tools at our disposal. Choosing is sometimes a hard task. However, some tools are some kind of reference, as Symfony is. Here, we are going to have an overview of this framework. To achieve this, we are going to use the fourth version.
What is Symfony?
Symfony is the leading PHP framework available to everyone under an Open Source license. It is built on top of a set of decoupled and reusable components named Symfony Components. Symfony use generic components to allow us to focus on other tasks.
An overview of some elements
Before we dive into the code, let's have an overview of some elements used by Symfony to understand better what we are going to do.
Symfony Components
Symfony Components are a set of decoupled and reusable PHP libraries. Those components can even be used without Symfony.
Symfony Flex
Symfony Flex is a way to install and manage Symfony applications. It automates the most common tasks of Symfony applications.
It is a Composer plugin that modifies the behavior of the require, update, and remove commands. For example, when we execute the require command, the application will make a request to the Symfony Flex server before trying to install the package with Composer. If there is no information about that package that we want to install, the Flex server returns nothing and the package installation follows the usual procedure based on Composer. If there is information, Flex returns it in a file called a "recipe" and the application uses it to decide which package to install and which automated tasks to run after the installation.
Flex keeps tracks of the recipes it installed in a symfony.lock file, which must be committed to our code repository.
Recipes are defined in a manifest.json file and the instructions defined in this file are also used by Flex when uninstalling dependencies to undo all changes.
Security Checker
Security Checker is a command-line tool that checks if our application uses dependencies with known security vulnerabilities.
Doctrine
Symfony doesn't provide a component to work with databases. However, it provides an integration of the Doctrine library. Doctrine is an object-relational mapper (ORM). It sits on top of a powerful database abstraction layer (DBAL).
In a few words, Doctrine allows us to insert, update, select or delete an object in a relational database. It also allows us to generate or update tables via classes.
Twig
Twig is a template engine for PHP and can be used without Symfony, although it is also made by SensioLabs.
A few terms
Through our example, we are also going to use a few terms. Let's define them before.
Controller
A Controller is a PHP function we create. It reads information from a Request Object. It then creates and returns a Response Object. That response could be anything, like HTML, JSON, XML or a file.
Route
A Route is a map from a URL path to a Controller. It offers us clean URLs and flexibility.
Requests and Responses
Symfony provides an approach through two classes to interact with the HTTP request and response. The Request class is a representation of the HTTP request message, while the Response class, obviously, is a representation of an HTTP response message.
A way to handle what comes between the Request and the Response is to use a Front Controller. This file will handle every request coming into our application. It means it will always be executed and it will manage the routing of different URLs to different parts of our application.
In Symfony, incoming requests are interpreted by the Routing component and passed to PHP functions that return Response Objects. It means that the Front Controller will pass the Request to Symfony. This last one will create a Response Object and turns it to text headers and content that will finally be sent back.
Project structure
When we will start our project, our project directory will contain the following folders:
config - holds config files
src - where we place our PHP code
bin - contains executable files
var - where automatically-created files are stored (cache, log)
vendor - contains third-party libraries
public - contains publicly accessible files
A simple example
Now we know more about Symfony, it is time to do something with it.
Setting up our project
Let's first start by creating our project. We can do as Symfony's documention suggets or with, for example, use PHP Docker Boilerplate if we want to use Docker. However, we have to be sure that we have at least PHP 7.1 and our configuration allows URL rewriting. If we are a macOS user, we can encounter some trouble with our PHP version. An explanation of how update our PHP version can be found here. We also have to be sure that we have the latest version of Composer.
Following Symfony's documention, it is something like so:
composer create-project symfony/skeleton simple-app
Setting up our project
This creates a new directory named simple-app, downloads some dependencies into it and generates the basic directories and files we need to get started.
Now, let's move into our directory to install and run our server:
cd simple-app composer require server --dev php bin/console server:run
Installing and running our server
Now, if we use PHP Docker Boilerplate, it would be like so:
git clone https://github.com/webdevops/php-docker-boilerplate.git simple-app cd simple-app cp docker-compose.development.yml docker-compose.yml composer create-project symfony/skeleton app composer require server --dev docker-compose up -d
Installing Symfony using PHP Docker Boilerplate
Webserver will be available at port 8000.
We also have to change some values in etc/environment*.yml:
DOCUMENT_ROOT=/app/public/ DOCUMENT_INDEX=index.php
etc/environment*.yml file
To run the Symfony CLI, we can do it like so:
docker-compose run --rm app php bin/console server:start # OR docker-compose run --rm app bash php bin/console server:start
Running Symfony CLI using PHP Docker Boilerplate
When or project is ready, if we want to install Security Checker, we have to do it like so:
composer require sec-checker
Installing Security Checker
We also want to install the Web Debug Toolbar. It displays debugging information along the bottom of our page while developing.
composer require --dev profiler
Installing Web Debug Toolbar
Maybe changing the permissions for the debugger will be necessary.
chmod -R 1777 /app/var
Changing permissions
Creating our first page
Let's now make our first page. But, first, let's install what we are going to use to define our Routes:
composer require annotations
Installing Framework Extra Bundle
This allows us to use Annotation Routes instead of defining them into a YAML file. We also need to install Twig:
composer require twig
Installing Twig
We can now create our first template:
<h1>Hello World!</h1>
templates/hello.html.twig file
Now, let's create our first Controller:
namespace App\Controller; use Symfony\Bundle\FrameworkBundle\Controller\Controller; use Symfony\Component\HttpFoundation\Response; use Symfony\Component\Routing\Annotation\Route; class SimpleController extends Controller { /** * @Route("/") */ public function index() { return $this->render('hello.html.twig'); } }
src/Controller/SimpleController.php file
Now, let's try our newly created page by visiting http://localhost:8000.
Connecting to the database
Now, it is time to try to connect our application to a database. Here, we are going to use MySQL. First, we have to install Doctrine and the MakerBundle.
composer require doctrine maker
Installing Doctrine and MakerBundle
Now, we can edit the .env file like so:
DATABASE_URL="mysql://db_user:[email protected]:3306/db_name" # If we are using PHP Docker Boilerplate, it will be something like that: # DATABASE_URL=mysql://dev:dev@mysql:3306/database
.env file
We can now use Doctrine to create the database:
php bin/console doctrine:database:create
Creating the database
Entity Class and Migrations
We are now ready to create our first Entity Class. Let's do it like so:
php bin/console make:entity Post
Creating a Post Entity
Each property of an Entity can be mapped to a column in a corresponding table in our database. Using mapping will allow Doctrine to save an Entity Object to the corresponding table. It will also be able to query from that same table and turn the returned data into objects.
Let's now add more fields to our Post Entity:
namespace App\Entity; use Doctrine\ORM\Mapping as ORM; /** * @ORM\Entity(repositoryClass="App\Repository\PostRepository") */ class Post { /** * @ORM\Id * @ORM\GeneratedValue * @ORM\Column(type="integer") */ private $id; /** * @ORM\Column(type="string", length=100) */ private $title; /** * @ORM\Column(type="text") */ private $content; /** * @ORM\Column(type="text") */ private $content; }
Entity/Post.php file
Now we are ready to update our database. First, let's create a migration:
php bin/console doctrine:migrations:diff
Creating a migration
And now, we can execute our newly generated migration:
php bin/console doctrine:migrations:migrate
Running our migration
We now need to create public setters and getters for our properties:
... public function getId() { return $this->id; } public function getTitle() { return $this->title; } public function setTitle($title) { $this->title = $title; } public function getContent() { return $this->content; } public function setContent($content) { $this->content = $content; } public function getExcerpt() { return $this->excerpt; } public function setExcerpt($excerpt) { $this->excerpt = $excerpt; } ...
Entity/Post.php file edited
We can now create a corresponding Controller like so:
php bin/console make:controller PostController
Creating a Controller
Let's edit our Controller to have something like so:
namespace App\Controller; use App\Entity\Post; use App\Repository\PostRepository; use Symfony\Bundle\FrameworkBundle\Controller\Controller; use Symfony\Component\HttpFoundation\Request; use Symfony\Component\HttpFoundation\Response; use Symfony\Component\Routing\Annotation\Route; class PostController extends Controller { /** * @Route("/posts", name="post") */ public function index(): Response { $posts = $this->getDoctrine() ->getRepository(Post::class) ->findAll(); return $this->render('posts/list.html.twig', ['posts' => $posts]); } }
Controller/PostController.php file edited
As we can see in the above code, we query our posts before we pass the result to a view. To get our items, we use what is called a Repository. This last one is a PHP class that helps us to fetch entities of a certain class. We can edit this Repository class if we want, so we can add methods for more complex queries into it.
We can now edit the base.html.twig template and create a new named list.html.twig in a new subdirectory called posts.
<!DOCTYPE html> <html> <head> <meta charset="UTF-8"> <title>{% block title %}Simple App{% endblock %}</title> {% block stylesheets %}{% endblock %} </head> <body> {% block body %}{% endblock %} {% block javascripts %}{% endblock %} </body> </html>
templates/base.html.twig file
{% extends 'base.html.twig' %} {% block body %} <h1>Posts</h1> <table> <thead> <tr> <th scope="col">Title</th> <th scope="col">Actions</th> </tr> </thead> <tbody> {% for post in posts %} <tr> <td>{{ post.title }}</td> <td> <div class="item-actions"> <a href=""> See </a> <a href=""> Edit </a> <a href=""> Delete </a> </div> </td> </tr> {% else %} <tr> <td colspan="4" align="center">No posts found</td> </tr> {% endfor %} </tbody> </table> {% endblock %}
templates/posts/list.html.twig file
Now, if we go to localhost:8000/posts, we will see a pretty rough interface and our empty posts list.
To fill our posts list, we are going to create a form. Let's install a new component:
composer require form
Installing Form component
And of course, we need to validate that form. We can make it with Validator:
composer require validator
Installing Validatior
We can now create a template for our form:
{% extends 'base.html.twig' %} {% block body %} <h1>New post</h1> {{ form_start(form) }} {{ form_widget(form) }} {{ form_end(form) }} <a href="{{ path('posts') }}">Back</a> {% endblock %}
templates/posts/new.html.twig
Here, we create the template that is used to render the form. The form start(form) renders the start tag of the form while the form end(form) renders the end tag of the form. form widget(form) renders all the fields, which includes the field element itself, a label and any validation error messages for the field. It is also possible to render each field manually as described in the Symfony documentation.
We also need to edit our Post Entity:
namespace App\Entity; use Doctrine\ORM\Mapping as ORM; use Symfony\Component\Validator\Constraints as Assert; /** * @ORM\Entity(repositoryClass="App\Repository\PostRepository") */ class Post { /** * @ORM\Id * @ORM\GeneratedValue * @ORM\Column(type="integer") */ private $id; /** * @ORM\Column(type="string", length=100) * @Assert\NotBlank() */ private $title; /** * @ORM\Column(type="text") * @Assert\NotBlank() */ private $content; /** * @ORM\Column(type="text") * @Assert\NotBlank() */ private $excerpt; ... }
Entity/Post.php file edited
Validation is done by adding a set of rules, or constraints, to a class. A completed documentation about those different rules can be found here. In Symfony, validation is applied to the underlying object, it means it is checked if the object, here Post, is valid after the form has applied the submitted data to it.
Now, edit our PostController like so:
namespace App\Controller; use App\Entity\Post; use App\Repository\PostRepository; use Sensio\Bundle\FrameworkExtraBundle\Configuration\Method; use Sensio\Bundle\FrameworkExtraBundle\Configuration\Security; use Symfony\Bundle\FrameworkBundle\Controller\Controller; use Symfony\Component\HttpFoundation\Request; use Symfony\Component\HttpFoundation\Response; use Symfony\Component\Routing\Annotation\Route; use Symfony\Component\Form\Extension\Core\Type\TextType; use Symfony\Component\Form\Extension\Core\Type\TextareaType; use Symfony\Component\Form\Extension\Core\Type\SubmitType; class PostController extends Controller { /** * @Route("/posts", name="posts") */ public function index(PostRepository $repository): Response { $posts = $this->getDoctrine() ->getRepository(Post::class) ->findAll(); return $this->render('posts/list.html.twig', ['posts' => $posts]); } /** * @Route("/posts/new", name="new") * @Method({"GET", "POST"}) */ public function new(Request $request) { $post = new Post(); $form = $this->createFormBuilder($post) ->add('title', TextType::class) ->add('content', TextareaType::class) ->add('excerpt', TextareaType::class) ->add('create', SubmitType::class) ->getForm(); $form->handleRequest($request); if ($form->isSubmitted() && $form->isValid()) { $em = $this->getDoctrine()->getManager(); $em->persist($post); $em->flush(); $this->addFlash('success', 'post created'); return $this->redirectToRoute('posts'); } return $this->render('posts/new.html.twig', [ 'form' => $form->createView(), ]); } }
Controller/PostController.php file edited
In the first part of our new method, we use the Form Builder. We add three fields, corresponding to the properties of the Post class and a submit button.
We then call handleRequest to see if the form was submitted or not when the page is loading. If the form was submitted and if it is valid, we can perform some actions using the Post Object.
As we can see, here we use the persist method that tells Doctrine to "manage" the Post Object. We then call the flush method that tells Doctrine to look through all of the objects that it's managing to see if they need to be persisted to the database.
We then render the view. It is important that the createView method is placed after the handleRequest method. Otherwise, changes done in the * SUBMIT events aren't applied to the view.
Now, with what know, we can go a little further and add some features to our application. First, let's edit our PostController like so:
namespace App\Controller; use App\Entity\Post; use App\Repository\PostRepository; use Sensio\Bundle\FrameworkExtraBundle\Configuration\Method; use Sensio\Bundle\FrameworkExtraBundle\Configuration\Security; use Symfony\Bundle\FrameworkBundle\Controller\Controller; use Symfony\Component\HttpFoundation\Request; use Symfony\Component\HttpFoundation\Response; use Symfony\Component\Routing\Annotation\Route; use Symfony\Component\Form\Extension\Core\Type\TextType; use Symfony\Component\Form\Extension\Core\Type\TextareaType; use Symfony\Component\Form\Extension\Core\Type\SubmitType; class PostController extends Controller { /** * @Route("/posts", name="posts") */ public function index(PostRepository $repository): Response { $posts = $this->getDoctrine() ->getRepository(Post::class) ->findAll(); return $this->render('posts/list.html.twig', ['posts' => $posts]); } /** * @Route("/posts/new", name="new") * @Method({"GET", "POST"}) */ public function new(Request $request) { $post = new Post(); $form = $this->createFormBuilder($post) ->add('title', TextType::class) ->add('content', TextareaType::class) ->add('excerpt', TextareaType::class) ->add('create', SubmitType::class) ->getForm(); $form->handleRequest($request); if ($form->isSubmitted() && $form->isValid()) { $em = $this->getDoctrine()->getManager(); $em->persist($post); $em->flush(); $this->addFlash('success', 'post created'); return $this->redirectToRoute('posts'); } return $this->render('posts/new.html.twig', [ 'form' => $form->createView(), ]); } /** * @Route("/{id}/show", requirements={"id": "\d+"}, name="show") * @Method("GET") */ public function show(Post $post): Response { return $this->render('posts/show.html.twig', [ 'post' => $post, ]); } /** * @Route("/{id}/edit", requirements={"id": "\d+"}, name="edit") * @Method({"GET", "POST"}) */ public function edit(Request $request, Post $post): Response { $form = $this->createFormBuilder($post) ->add('title', TextType::class) ->add('content', TextareaType::class) ->add('excerpt', TextareaType::class) ->add('edit', SubmitType::class) ->getForm(); $form->handleRequest($request); if ($form->isSubmitted() && $form->isValid()) { $em = $this->getDoctrine()->getManager(); $em->flush(); $this->addFlash('success', 'post edited'); return $this->redirectToRoute('posts'); } return $this->render('posts/edit.html.twig', [ 'post' => $post, 'form' => $form->createView(), ]); } /** * @Route("/{id}/delete", requirements={"id": "\d+"}, name="delete") * @Method({"GET"}) */ public function delete(Request $request, Post $post): Response { $em = $this->getDoctrine()->getManager(); $em ->remove($post); $em ->flush(); $this->addFlash('success', 'post deleted'); return $this->redirectToRoute('posts'); } }
src/Controller/SimpleController.php file edited
We can now create two additional templates:
{% extends 'base.html.twig' %} {% block body %} <h1>{{ post.title }}</h1> {{ post.content }} <a href="{{ path('posts') }}">Back</a> {% endblock %}
templates/posts/show.html.twig file
{% extends 'base.html.twig' %} {% block body %} <h1>Edit post</h1> {{ form_start(form) }} {{ form_widget(form) }} {{ form_end(form) }} <a href="{{ path('posts') }}">Back</a> {% endblock %}
templates/posts/edit.html.twig file
Now, we can read, edit our delete the posted we have created with our application.
Conclusion
Through this article we took a look at Symfony 4. We had an overview of the different concepts it is based on. We set up an installation of Symfony 4 and created a very simple application that let us interact with a MySQL database.
Now, we still have many things to see, like Security Annotations our custom Twig Filters that allow us to build a better application.
One last word
If you like this article, you can consider supporting and helping me on Patreon! It would be awesome! Otherwise, you can find my other posts on Medium and Tumblr. You will also know more about myself on my personal website. Until next time, happy headache!
1 note
·
View note
Text
Python Tutorial: A simple Flask App using Redis with Docker Compose.
Docker Compose enables multiple Docker containers to run in a single environment. In this tutorial, we'll write a basic Flask app with Redis using Docker Compose. What is Flask? Flask is a very lightweight framework for developing APIs in Python. For the production purposes, it's recommended to use Flask with uWSGI application server and nginx which is a web server and a reverse proxy. But in this tutorial, we will just create a simple Flask application. What is redis? Redis is a free open source data memory store, used as a database, cache and message broker. Prerequisites: You need to install Docker Engine and Docker Compose.
STEP-1:
Create a project folder on your host machine and enter that directory: $ mkdir project_folder $ cd project_folder
STEP-2:
Create requirements.txt file in the project folder and add the following lines in that file. #project_folder/requirements.txt flask redis
STEP-3:
Create app.py file in the project folder and add the following lines. #project_folder/app.py import Flask and Redis libraries from flask import Flask from redis import Redis import random app = Flask(name) redis = Redis(host='redis', port=6379) # declare main route @app.route('/') def main(): return 'Hi. In order to earn bonus points enter your name in the url. eg: /John' # declare a route that gets the visitor's name. Every name has its own bonus points. @app.route('/') def greet(name): bonus = random.randrange(1, 100) redis.incrby(name, bonus) return 'Hello %s. You have earned %d bonus points. Your total point is %s.' % (name, bonus, redis.get(name)) # run the flask application on the local development server. if name == "main": app.run(host="0.0.0.0", debug=True)
STEP-4:
Create Dockerfile in the project_folder and add the following: FROM python:latest ADD . /app WORKDIR /app RUN pip3 install -r requirements.txt CMD python3 app.py
STEP-5:
Create docker-compose.yml in the project_folder and define the services. There will be two services named app and redis.The app service builds the custom image from the Dockerfile in the project folder which is the current directory.Container’s exposed port (5000) is mapped to the port 5000 on the host.The current directory is mapped to the working directory "/app" folder inside the container.This service depends on redis service. The redis service uses the latest Redis image from Docker Hub. version: '3' services: app: build: . ports: - "5000:5000" volumes: - .:/app depends_on: - redis redis: image: redis
STEP-6:
Build and Run with Docker Compose Start the application from your directory: $ docker-compose up
STEP-7:
You can test the app on your browser with http://localhost:5000. Second, visit http://localhost:5000/username You can try different usernames. Each username will have different bonus points thanks to redis.
STEP-8:
You can stop the application with CTRL+C. And then stop the container. $ docker-compose stop
STEP-9
Troubleshooting: If you make some changes and the changes don't apply, remove the built images and rebuild them. docker-compose rm -f docker-compose pull docker-compose up --build Further Reading: - Unix/ Linux Bash Shell Scripting. - How to use “amazon-linux-extras” and install a package on AWS EC2 running Amazon Linux 2? - How to remember Linux commands? What do Linux commands stand for? Read the full article
0 notes