#port mapping in running docker container
Explore tagged Tumblr posts
Visit Tumblr Blog
Explore Tumblr blogs with no restrictions, modern design and the best experience.
Last Seen Tumblr Blogs


Fun Fact
12.7% of mobile users access Tumblr.
Link
#Automation#bookmarks#cloud#configuration#containerization#Dashboard#DevOps#Docker#Heimdall#homeserver#Install#Linux#Monitoring#open-source#quicksetup#self-hosted#Server#systemadministration#UI#webapplication
0 notes
Text
A Beginner’s Guide to Docker: Building and Running Containers in DevOps
Docker has revolutionized the way applications are built, shipped, and run in the world of DevOps. As a containerization platform, Docker enables developers to package applications and their dependencies into lightweight, portable containers, ensuring consistency across environments. This guide introduces Docker’s core concepts and practical steps to get started.
What is Docker? Docker is an open-source platform that allows developers to: Build and package applications along with their dependencies into containers.
Run these containers consistently across different environments. Simplify software development, deployment, and scaling processes.
2. Why Use Docker in DevOps? Environment Consistency: Docker containers ensure that applications run the same in development, testing, and production.
Speed: Containers start quickly and use system resources efficiently.
Portability: Containers can run on any system that supports Docker, whether it’s a developer’s laptop, an on-premises server, or the cloud.
Microservices Architecture: Docker works seamlessly with microservices, enabling developers to build, deploy, and scale individual services independently.
3. Key Docker Components Docker Engine:
The core runtime for building and running containers.
Images: A blueprint for containers that include the application and its dependencies. Containers: Instances of images that are lightweight and isolated.
Dockerfile: A script containing instructions to build a Docker image.
Docker Hub: A repository for sharing Docker images.
4. Getting Started with Docker
Step 1: Install Docker Download and install Docker Desktop for your operating system from Docker’s official site.
Step 2: Write a Dockerfile Create a Dockerfile to define your application environment.
Example for a Python app:
dockerfile Edit
# Use an official Python runtime as a base image FROM python:3.9-slim
# Set the working directory WORKDIR /app
# Copy project files COPY . .
# Install dependencies RUN pip install -r requirements.txt # Define the command to run the app CMD [“python”, “app.py”]
Step 3: Build the Docker Image Run the following command to build the image:
bash Copy Edit docker build -t my-python-app .
Step 4: Run the Container Start a container from your image:
bash
Edit docker run -d -p 5000:5000 my-python-app
This maps port 5000 of the container to port 5000 on your host machine.
Step 5: Push to Docker Hub Share your image by pushing it to Docker Hub: bash
Edit docker tag my-python-app username/my-python-app docker push username/my-python-app
5. Practical Use Cases in DevOps Continuous Integration/Continuous Deployment (CI/CD):
Docker is commonly used in pipelines for building, testing, and deploying applications.
Microservices:
Each service runs in its own container, isolated from others.
Scalability:
Containers can be easily scaled up or down based on demand.
Testing:
Test environments can be quickly spun up and torn down using Docker containers.
6. Best Practices Keep Docker images small by using minimal base images. Avoid hardcoding sensitive data into images; use environment variables instead.
Use Docker Compose to manage multi-container applications. Regularly scan images for vulnerabilities using Docker’s built-in security tools.
Conclusion
Docker simplifies the development and deployment process, making it a cornerstone of modern DevOps practices. By understanding its basics and starting with small projects, beginners can quickly leverage Docker to enhance productivity and streamline workflows.

0 notes
Text
Ansible and Docker: Automating Container Management
In today's fast-paced tech environment, containerization and automation are key to maintaining efficient, scalable, and reliable infrastructure. Two powerful tools that have become essential in this space are Ansible and Docker. While Docker enables you to create, deploy, and run applications in containers, Ansible provides a simple yet powerful automation engine to manage and orchestrate these containers. In this blog post, we'll explore how to use Ansible to automate Docker container management, including deployment and orchestration.
Why Combine Ansible and Docker?
Combining Ansible and Docker offers several benefits:
Consistency and Reliability: Automating Docker container management with Ansible ensures consistent and reliable deployments across different environments.
Simplified Management: Ansible’s easy-to-read YAML playbooks make it straightforward to manage Docker containers, even at scale.
Infrastructure as Code (IaC): By treating your infrastructure as code, you can version control, review, and track changes over time.
Scalability: Automation allows you to easily scale your containerized applications by managing multiple containers across multiple hosts seamlessly.
Getting Started with Ansible and Docker
To get started, ensure you have Ansible and Docker installed on your system. You can install Ansible using pip: pip install ansible
And Docker by following the official Docker installation guide for your operating system.
Next, you'll need to set up an Ansible playbook to manage Docker. Here’s a simple example:
Example Playbook: Deploying a Docker Container
Create a file named deploy_docker.yml:
---
- name: Deploy a Docker container
hosts: localhost
tasks:
- name: Ensure Docker is installed
apt:
name: docker.io
state: present
become: yes
- name: Start Docker service
service:
name: docker
state: started
enabled: yes
become: yes
- name: Pull the latest nginx image
docker_image:
name: nginx
tag: latest
source: pull
- name: Run a Docker container
docker_container:
name: nginx
image: nginx
state: started
ports:
- "80:80"
In this playbook:
We ensure Docker is installed and running.
We pull the latest nginx Docker image.
We start a Docker container with the nginx image, mapping port 80 on the host to port 80 on the container.
Automating Docker Orchestration
For more complex scenarios, such as orchestrating multiple containers, you can extend your playbook. Here’s an example of orchestrating a simple web application stack with Nginx, a Node.js application, and a MongoDB database:
---
- name: Orchestrate web application stack
hosts: localhost
tasks:
- name: Ensure Docker is installed
apt:
name: docker.io
state: present
become: yes
- name: Start Docker service
service:
name: docker
state: started
enabled: yes
become: yes
- name: Pull necessary Docker images
docker_image:
name: "{{ item }}"
tag: latest
source: pull
loop:
- nginx
- node
- mongo
- name: Run MongoDB container
docker_container:
name: mongo
image: mongo
state: started
ports:
- "27017:27017"
- name: Run Node.js application container
docker_container:
name: node_app
image: node
state: started
volumes:
- ./app:/usr/src/app
working_dir: /usr/src/app
command: "node app.js"
links:
- mongo
- name: Run Nginx container
docker_container:
name: nginx
image: nginx
state: started
ports:
- "80:80"
volumes:
- ./nginx.conf:/etc/nginx/nginx.conf
links:
- node_app
Conclusion
By integrating Ansible with Docker, you can streamline and automate your container management processes, making your infrastructure more consistent, scalable, and reliable. This combination allows you to focus more on developing and less on managing infrastructure. Whether you're managing a single container or orchestrating a complex multi-container environment, Ansible and Docker together provide a powerful toolkit for modern DevOps practices.
Give it a try and see how much time and effort you can save by automating your Docker container management with Ansible!
For more details click www.qcsdclabs.com
#redhatcourses#information technology#containerorchestration#container#linux#docker#kubernetes#containersecurity#dockerswarm#aws
0 notes
Text
Ultimate Guide Cloud Spanner Emulator Testing Integrated!

Integrating Cloud Spanner Emulator Search engines Cloud’s The company database features globally distributed, dependable, very highly scalable, therefore being an ideal choice for applications with critical functions that need consistent and high performance.
To guarantee that Spanner integrates seamlessly into your apps, as a developer, you must do extensive testing. The goal of integration testing is to confirm that, after modifications to individual components, the various parts of a system function as a whole. For Spanner, integration testing guarantees that data activities in your application, such error handling and transactions, are properly communicated with the database.
This article explains how to use GitHub Actions and the Spanner emulator to build up integration testing for Spanner. For the purpose of quickly developing applications supported by a Spanner database, the emulator imitates the behavior of Spanner outside of Google Cloud.
They will test an example Golang backend service that maintains player profiles for a hypothetical game. These ideas may be used to different services and apps in different languages and sectors of the economy.
Here, you testing the “integration” between Spanner and the profile service to make sure code updates to the service will function as intended in a quick feedback loop. Not every service in our stack has undergone complete end-to-end testing. Before going live in production, testing at that level should be conducted using a real staging setup using Spanner.
Integrated inside the platform where her code resides, GitHub Actions automates the running of tests. Like this, other CI/CD systems will function.
Her application, Profile Service, is dependent on Spanner and uses Spanner emulator, a lightweight offline emulation of a Spanner database.
GitHub Activities: Workflow automation GitHub Actions are the ideal choice for her automated integration tests since our service code is kept in a GitHub repository.
Your software development process may be automated using GitHub Actions, which is a component of a continuous integration and delivery (CI/CD) platform.
You may establish and carry out automatic actions that are triggered by code changes or scheduled events thanks to its seamless integration with GitHub repositories.
A local testing environment: The Spanner emulator An very portable utility that operates entirely offline is the Spanner emulator. This eliminates the need for real Spanner instances and allows developers to test their apps against Spanner without paying any cloud fees. This enables quick development cycles and early integration problem discovery.
You should be aware of the following variations and restrictions between a real Spanner database and the Spanner emulator.
Integrity testing setup for the profile service On Github, you can find the code for the example game application. The integration test for the profile service will be examined first, followed by the process that makes use of Github Actions to allow automated integration testing.
The profile-service main_test.go file contains the integration test for the profile service.
The sections listed below are included in this file: Launching Spanner as an emulator. Install the schema and any necessary test data in the database and Spanner instance. Install the Profile service. The actual exams. tidying up once the exams are over Launching the emulator for Spanner They use the test containers-go library as the Spanner emulator is set up as a container image. This configures the emulator container so that may connect with it on mapped port 9010. In order to facilitate communication between the “emulator” container and any container or process having network access, a Docker network is used for networking.
It’s simple to wait until the container is ready before moving on to the next step thanks to the test containers-go package.
As soon as it’s prepared, you create a Golang struct, get the host information, and expose it as an operating system environment variable. These two will be used subsequently to configure the database and instance.
Install the Spanner package and database Now that the emulator is operating, will must configure a test instance and database.
Let’s start by configuring the instance: This creates the instance by using the Spanner instance golang library. The SPANNER_EMULATOR_HOST environment variable has to be set previously for this to function. If not, your Google Cloud project’s Spanner instance would be the one that the Spanner library would be searching for.
They need a schema file for the database setup. It is up to your processes where this schema file originates. During the’make profile-integration’ instructions in the Makefile, you create a copy of the master schema file in this instance. This enables me to get the most current schema pertinent to the profiles of the players.
They can handle schema adjustments in this method so that the emulator can understand them. Without the terminating semicolons, you must transform the schema file into an array of statements.
Launch the service for profiles Here, you are launching the profile service as an additional container that can interface with the simulator by using test containers go. executing the examinations Her integration tests connect to your profile service’s endpoints using the testify assert package.
Read more on Govindhtech.com
0 notes
Text
Simplifying SQL Server Deployment with Docker Compose

Introduction
Deploying Microsoft SQL Server can sometimes be a daunting task, especially for developers who just want to set up a quick and simple instance for testing or small-scale use. Docker Compose offers a straightforward solution to this problem, allowing you to define and run multi-container Docker applications with ease. In this blog post, we’ll walk through creating a docker-compose.yml file to deploy SQL Server efficiently.
Prerequisites
Before we begin, ensure you have Docker and Docker Compose installed on your system. If not, you can download and install them from the official Docker website.
Crafting the Docker Compose File
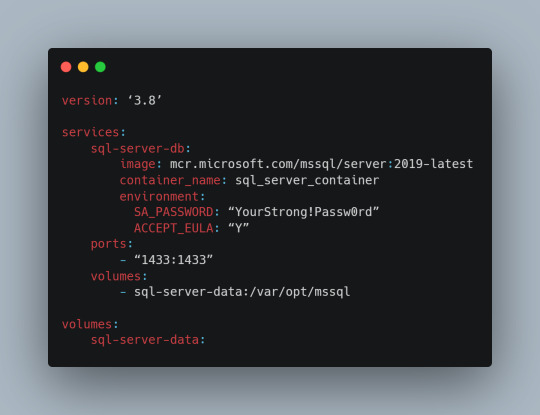
Below is a sample docker-compose.yml file designed to run Microsoft SQL Server in a Docker container:
Understanding the Configuration
Let’s break down the components of this configuration file:
version: This specifies the version of Docker Compose to use, which in this case is 3.8.
services: Under this key, we define all the services (containers) we want to run.
sql-server-db: This is the name of our service.
image: This key specifies the Docker image to use. We’re using the latest version of SQL Server 2019.
container_name: We define a custom name for our container for easier reference.
environment: Here, we set necessary environment variables.
SA_PASSWORD: The password for the sa user. Ensure to replace "YourStrong!Passw0rd" with a strong, unique password.
ACCEPT_EULA: This is mandatory and must be set to Y to run SQL Server in a container.
ports: We map port 1433 on the host to port 1433 in the container, which is the default for SQL Server.
volumes: This is crucial for data persistence. We define a volume named sql-server-data mounted at /var/opt/mssql in the container.
volumes: We declare the named volume sql-server-data for use in our service.
Deploying SQL Server with Docker Compose
With the docker-compose.yml file in place, navigate to its directory in the terminal and run the command:
docker-compose up -d
This command will download the specified SQL Server image (if not already downloaded), create a container with the specified settings, and start it in detached mode.
Connecting to SQL Server
Once the container is running, you can connect to the SQL Server instance using any SQL Server client, with the server address as localhost,1433 and the sa user credentials you specified in the docker-compose.yml file.
Conclusion
Docker Compose simplifies the deployment of applications like SQL Server, making it accessible for developers at all levels of expertise. With a simple docker-compose.yml file, you can have a SQL Server instance up and running in minutes, without the hassle of manual installation and configuration. Always ensure to use strong, unique passwords and understand the licensing agreements of the software you deploy. Happy coding!
0 notes
Text
Day 001 - establishing
Alrighty! Yesterday was productive if I had to say the least, I am glad when I talk to someone who gets my ideas, so I'm involved in the backend along with databases and anything devOps and AI related. My teammate is a stallion!!! I'm so glad there's someone who makes up for my coding skills, its very weird still, I USED TO BE ABLE TO CODE FOR HOURS AND HOURS... okay I think mostly because I used to program for hours either with Java or C++, and bare bone Javascript, so maybe web development wasn't my strong suit.

But I'm good at understanding and making designs for code, so I'm very involved in seeing the bigger picture and he'll just do the painting. Here's a screen shot of how our backend looks like, so I'm brush it up since its a bit of mess right now
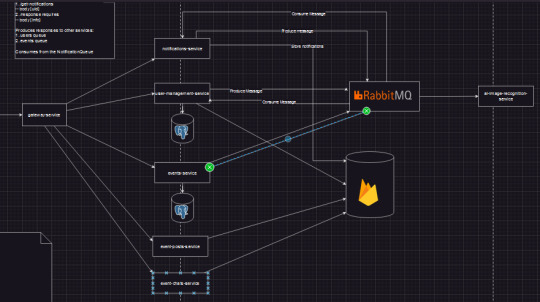
I'm using drawio because lucid just wasn't working for me, I kept running out of shapes, I'd say lucid is good when it comes to making final designs but drawio has that technical feel I like.
RabbitMQ is just so sexy oh my goodness, it allows for simple and fast communication between services. Its free tier is enough for what I need.
I want to learn PostgreSQL so bad, but I can't because we're on a time crunch and we'll just switch to MySQL for each service using an SQL database, since there's going to be data replication across these services, to maintain synchronized data across all services, RabbitMQ comes in the rescue. I hope it can handle, but since we'll starting off with a relatively small userbase, I doubt we'll run into problems, but if it happens we run into issues, I think switching to Kafka might be better since it has like faster reads (thanks to fewer systemcalls within its architecture)
Firestore is very useful and easy to setup, that reliability is useful for our messaging and posting of images, and also Firebase storage as well, that's so cool!!! I'm still working on the designs

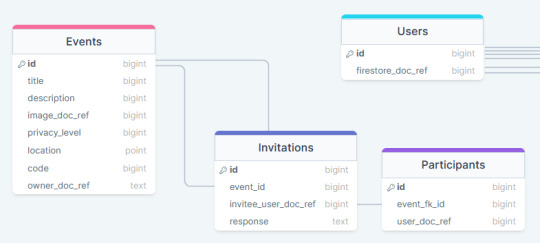
I'm still working on the schemas using drawsql website, the reason for the SQL is because its easier to model friendships, invitations, requests, way better than a NoSQL solution, I want to see what Neo4j can do but again I'm trying to keep things simple. I'll also switch to drawio for doing the ER diagrams because drawSQL has limits and I'm a cheapskate
I made use of freesqldatabase.com for a temporary online database we can quickly use, but this limits the choices for ORMs, since we're using NodeJS we can't make use of Prisma since it requires permissions/privileges that the website doesn't offer, but I'm working on making use of google cloud's free e2 instances to host the database, and if that works we finally have our development database!
I still haven't talked to my client, I'd rather someone from frontend do it, I hope they can finally start working together because I can't with this leadership biz! I am reading this leadership guide book, hopefully I learn something.
I've been also looking at buying some light novels for either rezero or overlord, boy boy boy which do I get??? I honestly don't know, but I"ll figure it out later. I can't wait to go a pawn shop and see what cheap board games I can buy, I'm so excited! But that will be a while.
Well my goals today are simple:
Finalize the schemas for the SQL databases and deploy the databases (or I can be cheap and deploy one instance and host 2 databases :D running two docker containers that have mysql on the same e2 instance and then mapping their default 3306 ports to two ports on the instance and then connecting globally! That's so brilliant I'm so cheap HAHAHAHAHA!!!!!!)
Draw up class diagrams for each service, making use of proper design patterns to make the code more neat
Have a meeting with my guy again and see where we go from there
Thanks again for reading my whatever this is, but its really fun hopefully I don't burn out from writing this much so early
0 notes
Text
Docker Container Port Mapping Tutorial for beginners | Docker Port Expose and Port Forwarding
Full Video Link: https://youtu.be/2gie3gpDJUg Hi, a new #video on #dockerportmapping is published on @codeonedigest #youtube channel. Learn docker container port forwarding and docker expose. What is docker port mapping and -p option. Running docker cont
Docker container port mapping and port forwarding. Docker expose attribute in Docker file is used to forward container port to the host machine. Running docker container on custom port. Using docker expose, run the docker application on specific port. How to run docker image on specific port? What is port mapping in docker container? Why docker port mapping is not working? Why containerized…

View On WordPress
#docker#docker and Kubernetes#docker compose#docker compose port mapping#docker container port change#docker container port forwarding not working#docker container port mapping#docker container port mapping explained#docker container port not exposed#docker container ports explained#docker port forwarding#docker port forwarding doesn’t work#docker port forwarding existing container#docker port forwarding running container#docker port mapping#docker port mapping explained#docker port mapping not working#docker port mapping tutorial#docker port mapping vs expose#docker tutorial#docker tutorial for beginners#port mapping in running docker container#run docker container on custom port#update docker container portainer#what is docker
0 notes
Text
Docker cheat sheet
List docker images
docker image ls
List docker process
docker ps
Remove a docker image
(use docker image)
docker rmi -f <image-id>
Build a docker image
docker build -t <repo-url>:5000/<image-name> .
Push a docker image to a docker repo
docker push <image-name-with-repo>:latest
Pull a docker image
docker pull <image-name-with-repo>:latest
Run a docker image with port mapping
docker run -d -p 8081:7777 <image-name>
Show docker image logs
(use docker ps)
docker logs -f <container-id>
Attach to a terminal inside docker image
docker exec -it <container-id> /bin/sh
Remove all images matching a given name
docker rmi $(docker images |grep 'imagename')
1 note
·
View note
Text
Using docker containers for development
Docker is a technology that allows users to bundle an application and run it within a loosely isolated environment referred to as a container. These containers are lightweight and self-contained, containing everything required to run the application without reliance on the host’s existing software. Containers can be shared effortlessly, ensuring that all recipients have access to the same working container.
Docker has become well-known for its deployment of production services such as application services and databases on enterprise servers or cloud instances. However, developers are increasingly employing containers for scenarios beyond deployment, including continuous integration, test automation, and complete software development environments, also known as development containers. These containers define a consistent environment in which an application can be developed before it is deployed.
One may question the benefits of containerizing the development environment. Have you ever found yourself cluttered with projects, libraries, languages, configurations, and tools when working on a new laptop or server? Wouldn’t it be beneficial to “restart” your software development environment to its original state?
Development containers provide a repeatable setup and consistent stateless development environment, allowing users to leave the underlying host free of project dependencies, specific language versions, and other factors. Furthermore, development containers enable users to utilize only the host machine’s computing resources. Finally, since the development environment is containerized, it can be replicated across many different systems with the Docker engine installed, ensuring a consistent development environment.
Numerous tools and services support the use of development containers, but Dockerfiles provide an option to customize your environment directly. Dockerfiles can extend images, add additional native OS packages, or make minor edits to the OS image. While many development images have been created by Microsoft available in Docker Hub, it is possible to create one from scratch.
To build a base development image, a parent image is required. The mcr.microsoft.com/vscode/devcontainers/universal image contains several runtime versions for popular languages, including Python, Node, PHP, Java, Go, C++, Ruby, and .NET Core/C#, as well as many popular tools and package managers. Using a custom Dockerfile, you can extend this image and add whatever you need.
For example, the Dockerfile shown above extends the parent image by first installing neovim and tmux to aid the development workflow. The user is then changed to codespace, and the working directory is set to the user’s home directory. Finally, configuration files for each tool are copied from the local machine.
Assuming the Dockerfile is in the same directory, the development image can be built with the following command:
$ docker build -t devcontainer .
The following command can be executed to start a development container from the newly created image:
$ docker run –privileged -it devcontainer bash
The -it flag opens an interactive container instance using bash as the Unix shell, and the –privileged flag starts the Docker container in privileged mode, granting the container root capabilities to all devices on the host system. This is beneficial when Docker is part of the development workflow. In addition, a volume can be mounted using the -v flag to persist data across different development containers, and a port can be mapped using the -p flag if developing a web application. This post was create by https://lzomedia.com
0 notes
Text
Docker: How to get a Node.js application into a Docker Container
Introduction
The goal of this article is to show you an example of dockerizing a Node js application. Where you can have a basic understanding of Docker. It will help you to set up the Node js application and docker installation.
What is Docker?
Docker is an open-source platform for developing, shipping, and running applications. Docker enables you to separate your applications from your infrastructure so you can deliver software quickly. With Docker, you can manage your infrastructure in the same ways you manage your applications. By taking advantage of Docker’s methodologies for shipping, testing, and deploying code quickly, you can significantly reduce the delay between writing code and running it in production.
Why Docker?
Developing apps today requires so much more than writing code. Multiple languages, frameworks, architectures, and discontinuous interfaces between tools for each lifecycle stage create enormous complexity. Docker simplifies and accelerates your workflow while giving developers the freedom to innovate with their choice of tools. The day which comes in every developer’s life that application is working on our system, but It’s not working on the client’s system. To prevent this type of situation, we use Docker.
How can we use Docker with Nodejs?
Before starting, I am assuming that you have a working Docker installation and a basic understanding of how a Node.js application is structured.
In the first part of this video, we will create a simple web application in Node.js, then we will build a Docker image for that application, and lastly, we will instantiate a container from that image.
Setup Nodejs Server
Run command npm init and add the required details for your project
Install express in the project using npm I express
Then, create a server.js file that defines a web app using the Express.js framework:
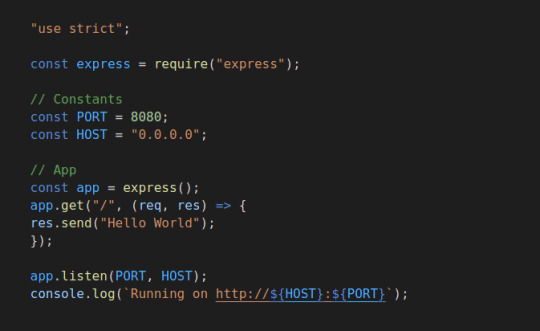
Now we can test the node server, and start the application using node server.js. Let’s try to hit the URL http://localhost:8080/ and check the response

In the next steps, we’ll look at how you can run this app inside a Docker container using the official Docker image. First, you’ll need to create a docker file, Where we are going to add some commands.
#Dockerfile
Create a docker file in the root directory of the project using the touch command.

Edit the docker file using any editor and write the below instructions into the docker file.

Initially, we need to pick a node image that will run on a container, and here I am using the latest stable version of the node.

Next, we need to create a directory for the application. Here we can add all the project files.

This image comes with Node.js and NPM already installed, so the next thing we need to do is install your app dependencies using the npm install. So I am going to copy the package. JSON file.

To bundle your app’s source code inside the Docker image, use the COPY instruction:

Your app binds to port 8080 so you’ll use the EXPOSE instruction to have it mapped by the docker daemon:

Lastly, we are going to run the application using the CMD, which will execute node server.js
To see the final outputs please click here
0 notes
Text
Swagger editor docker mac

#Swagger editor docker mac full#
#Swagger editor docker mac Offline#
Swagger Editor can be run locally or accessed on the Web. "./docker/nginx/conf.d/:/etc/nginx/conf.d:delegated" Download Swagger Editor The Swagger Editor is an open source editor to design, define and document RESTful APIs in the Swagger Specification. Here's my docker-compose YAML file version: "3.3"Ĭommand: /bin/sh -c "nginx -g 'daemon off '" We have a lot of different model objects and since the models are expanded by default it stresses out the browser trying to scroll through documentation in the Swagger Editor. I want to leverage the swagger-codegen capabilities similarly to how has the 'Generate Server' and 'Generate Client' menu options. Hey guys I did notice some the same thing for our Swagger spec which has just under 10K lines.
#Swagger editor docker mac Offline#
You can contribute to the project with suggestions, ideas, bug reports and pull requests in the Swagger Editor GitHub repository. I work in an offline environment and want to setup an instance of swagger-editor to share with the rest of the team. The Swagger Editor is an open source project under the Apache license. My question is, how can I get swagger containers to be routed, such that my team can visit and in my browser in my dev environment rather than and respectively? docker pull swaggerapi/swagger-editor docker run -p 80:8080 swaggerapi/swagger-editor Contribute. Eu comecei a usar o ReDoc para publicar minha documentao, mas no tenho uma boa maneira de saber como ele ser antes de envi-lo ao meu servidor web.
#Swagger editor docker mac full#
Valid Swagger JSON descriptions can then be generated and used with the full Swagger tooling (code generation, documentation, etc). The nginx container is setup to support SSL via container port 443 (mapped via the host port 9443 as I also use Laravel Valet in secure mode for other small projects). Swagger Editor lets you edit Swagger API specifications in YAML inside your browser and to preview documentations in real time. I also have a container for swagger ui and another for swagger editor. I have a docker compose file serving the nginx:alpine image for an API I'm developing.
0 notes
Text
How to update Gitlab inside a docker docker-compose container?
How to update Gitlab inside a docker docker-compose container?
Verify container volumes We need to know the id of the container and the port mappings running on the machine docker ps /* b7de284bc35c gitlab/gitlab-ce:latest ... 0.0.0.0:8222->22/tcp, :::8222->22/tcp, 0.0.0.0:8280->80/tcp, :::8280->80/tcp, 0.0.0.0:2443->443/tcp, :::2443->443/tcp gitlab-web-1 */ docker container inspect -f "{{ json .HostConfig.Binds }}" b7de284bc35c | python3 -m…
View On WordPress
0 notes
Text
Can you run visual studio on a mac

#Can you run visual studio on a mac how to#
#Can you run visual studio on a mac install#
#Can you run visual studio on a mac code#
#Can you run visual studio on a mac password#
This tool allows you to run queries and other commands against your SQL Server instance.
#Can you run visual studio on a mac install#
Run the following command to install the sql-cli command line tool.
Install sql-cli (unless already installed).
If it’s up and running, it should return something like this: CONTAINER ID IMAGE COMMAND CREATED STATUS PORTS NAMESĤe4aa21eb391 /mssql/server:2019-latest "/opt/mssql/bin/sqls…" 23 seconds ago Up 21 seconds 0.0.0.0:1433->1433/tcp sql_server_demo You can type the following command to check that the Docker container is running. However, if it wasn’t just a demo I’d definitely make it stronger than a few dictionary words and numbers. I was able to overcome this by adding some numbers to the end.
#Can you run visual studio on a mac password#
I received this error when using reallyStrongPwd as the password (but of course, it’s not a really strong password!). Please check the setup log in /var/opt/mssql/log for more information.
#Can you run visual studio on a mac code#
Microsoft(R) SQL Server(R) setup failed with error code 1. If you get the following error at this step, try again, but with a stronger password. If you downloaded a different one, use it instead. This is the default TCP port that SQL Server uses to listen for connections. This maps the local port 1433 to port 1433 on the container. Required parameter that sets the sa database password. This is required in order to have SQL Server for Linux run on your Mac. The Y shows that you agree with the EULA (End User Licence Agreement). This can be handy when stopping and starting your container from the Terminal. This parameter allows you to name the container. You can omit this parameter to have the container run in its own Terminal window.Īnother optional parameter. This means that it runs in the background and doesn’t need its own Terminal window open. This optional parameter launches the Docker container in daemon mode. Here’s an explanation of the parameters: -d Also, if you downloaded a different Docker image, replace /mssql/server:2019-latest with the one you downloaded. Run the following command to launch an instance of the Docker image you just downloaded: docker run -d -name sql_server_demo -e 'ACCEPT_EULA=Y' -e 'SA_PASSWORD=reallyStrongPwd123' -p 1433:1433 /mssql/server:2019-latestīut of course, use your own name and password.
#Can you run visual studio on a mac how to#
Then we’ll download and install SQL Server.īut first… if you’re using a Mac with the M1 chip, see How to Install SQL Server on an M1 Mac (ARM64). The way to do this is to run SQL Server on Docker. And because macOS is Unix based (and Linux is Unix based), you can run SQL Server for Linux on your Mac. Starting with SQL Server 2017, you can now install SQL Server directly on to a Linux machine. This is still a valid option depending on your requirements (here’s how to install SQL Server on a Mac with VirtualBox if you’d like to try that method). Prior to SQL Server 2017, if you wanted to run SQL Server on your Mac, you first had to create a virtual machine (using VirtualBox, Parallels Desktop, VMware Fusion, or Bootcamp), then install Windows onto that VM, then finally SQL Server. And the best part is, you’ll have SQL Server running locally without needing any virtualization software. Here I’ll show you how to get SQL Server up and running on your Mac in less than half an hour.
0 notes
Video
youtube
Run Postgres Database in Docker Container | Postgres Docker Container Tu...
Hi, a new #video on #springboot #microservices with #postgres #database is published on #codeonedigest #youtube channel. Complete guide for #spring boot microservices with #postgressql. Learn #programming #coding with #codeonedigest
#springboot #postgres #microservices #postgresdb #springboot #Springbootmicroserviceswithpostgres #stepbystepspringbootmicroserviceswithpostgressql #Springboottutorial #springboot #springbootproject #springboottutorialforbeginners #springbootannotations #springbootmicroservices #springbootfullcourse #springboottutorial #springbootprojectstepbystep #postgresjava #postgresinstallation #postgrestutorial #postgrestutorialforbeginners #Springbootmicroservicespostgresdatabase #springbootmicroservices #springbootmicroservicespostgressqlexample #springbootmicroservices #springbootmicroservices #springbootpostgressql #microservicespostgres #postgressqlmicroservicesexample #postgresandpgadmininstall #postgresandpgadmininstallwindows #postgresandpgadmininstallubuntu #postgresandpgadmininstallwindows11 #postgresandpgadmininstallmacos #postgresandpgadmininstallwindows10 #postgrespasswordreset #postgrestutorial #postgresdocker #postgresinstallationerror #postgres #postgresdatabase #rdbms #postgresdatabasesetup #postgresdatabaseconfiguration #database #relationaldatabase #postgresconfiguration #postgresconfigurationfile #postgresconfigurationparameters #postgresconfigfilelocation #postgresconfigurationinspringboot #postgresconfigfilewindows #postgresconfigfilemax #postgresconfigfileubuntu #postgresconfigurereplication #postgresconfigurationsettings #postgresconnectiontoserver #postgresconnectioninjava #postgresconnectioncommandline #postgresconnectioninnodejs
#youtube#postgres database#docker container#postgres docker image#run postgres in docker container#dbeaver database tool#dbeaver tool#postgres setup#postgres installation#postgres configuration#postgres config#port mapping#docker port expose#docker port forward
1 note
·
View note
Text
Davmail gateway thunderbird

#Davmail gateway thunderbird how to#
#Davmail gateway thunderbird install#
You can now use this to interface the mail client(s) of your choice with an Exchange server. Enjoy!Īnd with that, you have davmail running inside a container, with the appropriate port-mappings configured. Complexity avoided is hours of time we get to keep. You can start, stop, kill, abuse, disabuse, etc, the container davmail is running inside without fear of anything more than disrupting communications between your clients and the server. This container is stateless - that is, it only handles translating between standards-compliant and Exchange-compliant tools.
#Davmail gateway thunderbird install#
Now that we have an upstart config file, all that remains is to install the file appropriately (that is, copy it into /etc/init/ and start the service: That is, when you go looking for IMAP, you'll find it accessible at 127.0.0.1:11143 from the cloud instance only this prevents attackers from being able to connect to your davmail instance remotely. binds only to ports on the loopback interface.We additionally tell docker to bind ours such that our cloud instance: Remember nix systems disallow non-privileged process from binding to ports Docker port-forwards are also established from the "trial run" log above we can see that the ports davmail will listen on are: Not surprisingly, the heart is centered around the docker run command that we can see at the core of the upstart config.
#Davmail gateway thunderbird how to#
declares how to start (lines 15-27) and stop (lines 30-35) the service.declares that the service should be relaunched if it terminates unexpectedly (line 11) and establishes safe limits (line 12).declares dependencies on the docker.io service (lines 6 and 7).Note how our upstart config does a couple different things here: It is available by default on recent Ubuntu systems, and is very convienient to our purposes. Upstart is an approach to unix daemon management. Tada! :) Configure a container to run as a system service via upstart If so, you can use this image as a starting point, ADD the changed configuration to the image, and rebuild. You may need to edit the davmail configuration to reflect the specific needs of your Exchange environment. does not run davmail as root inside the container.does not require any bind-mounts or other external volumes to be attached.We're going to use the rsrchboy/davmail-savvis-docker image - for obvious reasons - as it gives us a configured davmail container that: There are a couple davmail images available on the Docker Hub. It's worth mentioning that adding your userid to this group will allow you to interface with the docker service without needing to "sudo" it all the time this is left as an exercise for the reader. On line 33 we see a docker group being created. Our previous tutorial on containing Chef with Vagrant may provide some guidelines, but, as always, this is left as an exercise for the reader. You can fire up basic Ubuntu machine fairly easily. Prerequisitesįor the purposes of this article, we're going to assume that you're an enligtened sort, and are running a Ubuntu 14.04-based cloud instance (or workstation, or.). Even if your mail is boring beyond belief, please, do not access it unencrypted. Common - and well-established - solutions include the use of ssh port forwarding or (for a less ad-hoc approach) stunnel. Security is of utmost concern, particularly in a corporate environment, so please note that securing the connections between your local workstation and the cloud instance. One may find a more satisfying approach in using tools like puppet-git-receiver and Gareth Rushgrove's most excellent docker Puppet Forge module to manage the use of the upstream Docker packages as well as our container's upstart configuration - both of which will be covered in a future tutorial. For simplicity, we're using the docker.io package from Ubuntu and configuring by hand. Provisioning a CenturyLink Cloud instance is left as an exercise for the reader. Install Docker on a CenturyLink Cloud instance, provision a stateless container image running a davmail instance, and have the system manage the container via upstart. It's also standalone, can be used statelessly, and - with apologies - is Java, making it a fantastic candidate for running inside a Docker container. It's a great tool - and one of the only solutions. davmail is a Java application that knows how to translate between standards-compliant clients (like, say, Thunderbird) and an Exchange server that speaks only Exchange. This may pose a problem for you, if you prefer a non-Microsoft mail client: if the compatibility features are enabled, you'll be able to access your mail via IMAP and send over SMTP, as the Internet intended. Love it or hate it, sometimes we have to use an Exchange server to communicate.
0 notes
Text
Use kitematic to link containers

#Use kitematic to link containers how to
#Use kitematic to link containers software
You can use programs on your existing desktop without needing to touch your host’s configuration.
#Use kitematic to link containers software
This approach can be safer when you didn’t create the container image.Ĭontainerised graphical apps are useful when you’re evaluating software or need to run two versions of a package. First, if you haven’t yet done so, download and start Kitematic.
#Use kitematic to link containers how to
This is a quick tutorial demonstrating how to set up a local Minecraft server using Kitematic and Docker. You may also choose to run a VNC server within the container. Kitematic tutorial: Set up a Minecraft server. I encounter a Fatal error for link container when i try to deploy guacamole, anybody can show me how to set. For general use, sharing the host’s X socket usually provides the simplest solution. I am new to docker, so i mainly use kitematic. You have the choice of two approaches when running graphical programs within a containerised environment. Restart your container by clicking the Restart button. The Finder opens, allowing you to replace your current map with the new one you desire. Kitematic automates the Docker installation and setup. 306, 307 multiple container networks 210, 211 Music Store application 92 Music. Kitematic is an open source project built to simplify and streamline using Docker on a Mac or Windows PC. Kestrel server 90, 91 Kitematic 35 Kubernetes cluster reference link 335. Download the latest version of Kitematic via. We use Docker Volume to map the folder from the Minecraft Docker container onto your computer. Kitematic is a simple application for managing Docker containers on Mac, Linux and Windows. You should now be able to interact with the graphical programs running within your Docker container. Open the data folder from Kitematic (Select Enable all volumes to edit files via Finder). Connect on port 5900 without authentication. Use the container’s IP address with your VNC client. You’ll find the IP address near the bottom of the output, within the Network node. Find the IP address of your container by running docker ps, noting down the container ID and passing it to docker inspect. To connect to the server, you’ll need a VNC client on your host.
0 notes