#docker port mapping explained
Explore tagged Tumblr posts
Visit Tumblr Blog
Explore Tumblr blogs with no restrictions, modern design and the best experience.
Last Seen Tumblr Blogs


Fun Fact
There are dozens of funny blogs to kill time on Tumblr.
Text
52013l4 in Modern Tech: Use Cases and Applications

In a technology-driven world, identifiers and codes are more than just strings—they define systems, guide processes, and structure workflows. One such code gaining prominence across various IT sectors is 52013l4. Whether it’s in cloud services, networking configurations, firmware updates, or application builds, 52013l4 has found its way into many modern technological environments. This article will explore the diverse use cases and applications of 52013l4, explaining where it fits in today’s digital ecosystem and why developers, engineers, and system administrators should be aware of its implications.
Why 52013l4 Matters in Modern Tech
In the past, loosely defined build codes or undocumented system identifiers led to chaos in large-scale environments. Modern software engineering emphasizes observability, reproducibility, and modularization. Codes like 52013l4:
Help standardize complex infrastructure.
Enable cross-team communication in enterprises.
Create a transparent map of configuration-to-performance relationships.
Thus, 52013l4 isn’t just a technical detail—it’s a tool for governance in scalable, distributed systems.
Use Case 1: Cloud Infrastructure and Virtualization
In cloud environments, maintaining structured builds and ensuring compatibility between microservices is crucial. 52013l4 may be used to:
Tag versions of container images (like Docker or Kubernetes builds).
Mark configurations for network load balancers operating at Layer 4.
Denote system updates in CI/CD pipelines.
Cloud providers like AWS, Azure, or GCP often reference such codes internally. When managing firewall rules, security groups, or deployment scripts, engineers might encounter a 52013l4 identifier.
Use Case 2: Networking and Transport Layer Monitoring
Given its likely relation to Layer 4, 52013l4 becomes relevant in scenarios involving:
Firewall configuration: Specifying allowed or blocked TCP/UDP ports.
Intrusion detection systems (IDS): Tracking abnormal packet flows using rules tied to 52013l4 versions.
Network troubleshooting: Tagging specific error conditions or performance data by Layer 4 function.
For example, a DevOps team might use 52013l4 as a keyword to trace problems in TCP connections that align with a specific build or configuration version.
Use Case 3: Firmware and IoT Devices
In embedded systems or Internet of Things (IoT) environments, firmware must be tightly versioned and managed. 52013l4 could:
Act as a firmware version ID deployed across a fleet of devices.
Trigger a specific set of configurations related to security or communication.
Identify rollback points during over-the-air (OTA) updates.
A smart home system, for instance, might roll out firmware_52013l4.bin to thermostats or sensors, ensuring compatibility and stable transport-layer communication.
Use Case 4: Software Development and Release Management
Developers often rely on versioning codes to track software releases, particularly when integrating network communication features. In this domain, 52013l4 might be used to:
Tag milestones in feature development (especially for APIs or sockets).
Mark integration tests that focus on Layer 4 data flow.
Coordinate with other teams (QA, security) based on shared identifiers like 52013l4.
Use Case 5: Cybersecurity and Threat Management
Security engineers use identifiers like 52013l4 to define threat profiles or update logs. For instance:
A SIEM tool might generate an alert tagged as 52013l4 to highlight repeated TCP SYN floods.
Security patches may address vulnerabilities discovered in the 52013l4 release version.
An organization’s SOC (Security Operations Center) could use 52013l4 in internal documentation when referencing a Layer 4 anomaly.
By organizing security incidents by version or layer, organizations improve incident response times and root cause analysis.
Use Case 6: Testing and Quality Assurance
QA engineers frequently simulate different network scenarios and need clear identifiers to catalog results. Here’s how 52013l4 can be applied:
In test automation tools, it helps define a specific test scenario.
Load-testing tools like Apache JMeter might reference 52013l4 configurations for transport-level stress testing.
Bug-tracking software may log issues under the 52013l4 build to isolate issues during regression testing.
What is 52013l4?
At its core, 52013l4 is an identifier, potentially used in system architecture, internal documentation, or as a versioning label in layered networking systems. Its format suggests a structured sequence: “52013” might represent a version code, build date, or feature reference, while “l4” is widely interpreted as Layer 4 of the OSI Model — the Transport Layer.Because of this association, 52013l4 is often seen in contexts that involve network communication, protocol configuration (e.g., TCP/UDP), or system behavior tracking in distributed computing.
FAQs About 52013l4 Applications
Q1: What kind of systems use 52013l4? Ans. 52013l4 is commonly used in cloud computing, networking hardware, application development environments, and firmware systems. It's particularly relevant in Layer 4 monitoring and version tracking.
Q2: Is 52013l4 an open standard? Ans. No, 52013l4 is not a formal standard like HTTP or ISO. It’s more likely an internal or semi-standardized identifier used in technical implementations.
Q3: Can I change or remove 52013l4 from my system? Ans. Only if you fully understand its purpose. Arbitrarily removing references to 52013l4 without context can break dependencies or configurations.
Conclusion
As modern technology systems grow in complexity, having clear identifiers like 52013l4 ensures smooth operation, reliable communication, and maintainable infrastructures. From cloud orchestration to embedded firmware, 52013l4 plays a quiet but critical role in linking performance, security, and development efforts. Understanding its uses and applying it strategically can streamline operations, improve response times, and enhance collaboration across your technical teams.
0 notes
Text
Top Kubernetes Certification Training Course | Visualpath
Explain Docker and Kubernetes Networks

Introduction:
Docker and Kubernetes Online Training have become the cornerstones of efficient and scalable application deployment. If you're considering exploring containerization and orchestration at an advanced level, Kubernetes Online Training is an excellent starting point. Docker enables developers to package applications into standardized units, known as containers, which can run anywhere.
This article will dive deep into Docker and Kubernetes networks, providing an overview of how they work together, how containers interact with each other, and how network management is handled in these systems. If you're looking to further develop your expertise in this area, Kubernetes Online Training and Docker and Kubernetes Course can provide you with the tools and knowledge necessary for managing and scaling applications in production environments.
Understanding Docker and Kubernetes Networks
Docker Networks: Container Communication Simplified
Docker is an open-source platform designed for developing, shipping, and running applications. It allows applications and their dependencies to be bundled into containers, which can run consistently across various environments. Each Docker container can communicate with others over different types of networks, each serving distinct purposes.
Types of Docker Networks
Docker supports several types of networks, each optimized for different use cases. Here are the most commonly used:
Bridge Network: This is the default network mode for containers when no other network is specified. Containers on the same bridge network can communicate with each other via their IP addresses or container names.
Host Network: When a container is run on the host network, it shares the host’s network stack. This eliminates the need for port mapping, as the container uses the same IP address as the host.
Overlay Network: Overlay networks are useful for multi-host Docker setups, enabling containers on different hosts to communicate securely. These networks create a virtual network that spans multiple Docker hosts, ensuring that containers can find each other and communicate.
Macvlan Network: This network allows a container to appear as a physical network interface, meaning that it can be directly accessed by other machines on the network.
None Network: Containers connected to the “none” network do not have any network connectivity unless explicitly configured.
The ability to configure networks in Docker allows developers to control how containers interact, ensuring proper communication while maintaining security and isolation.
Kubernetes Networks: Orchestrating the Communication
Kubernetes, an open-source platform for automating the deployment, scaling, and management of containerized applications, introduces a sophisticated approach to networking. Unlike Docker, which is concerned with individual containers, Kubernetes manages entire clusters of containers, ensuring they work together cohesively.
Key Networking Concepts in Kubernetes
Pod Networking: A pod is the smallest deployable unit in Kubernetes and represents a single instance of a running process in a cluster. All containers in a pod share the same network namespace, meaning they can communicate with each other using localhost. However, when pods need to communicate with other pods or external services, Kubernetes networking comes into play.
Kubernetes Services: A service in Kubernetes is an abstraction that defines a logical set of pods and a policy for accessing them. The service makes it easier to connect to the right pods, even as they are dynamically created or destroyed. Services ensure that even if the underlying pods change, there is a consistent way to access them.
Cluster Networking: In a Kubernetes cluster, each node (VM or physical server) must be able to communicate with every pod across the cluster. This requires a flat network, which is provided by Kubernetes networking plugins (like Calico, Flannel, and Weave). These plugins allow seamless communication between pods in different nodes.
Network Policies: Kubernetes provides network policies that enable administrators to control the communication between pods. These policies define rules that restrict or allow traffic based on factors such as IP address, port, and protocol.
Ingress and Egress: Ingress is a collection of rules that allow external HTTP/S traffic to reach the services within the cluster, while egress controls how pods can access external services. These rules ensure proper routing and control over how traffic enters and leaves the cluster.
The Synergy of Docker and Kubernetes Networks
Docker and Kubernetes work hand in hand in containerized application environments. Docker provides the containerization capabilities, while Kubernetes manages and orchestrates them at scale. When a Docker container is deployed in a Kubernetes cluster, the networking complexities of Kubernetes come into play.
In Kubernetes, Docker containers are typically managed inside pods. These pods, regardless of which host they are on, can communicate with one another seamlessly, thanks to the unified network provided by Kubernetes. With Kubernetes managing the network, there’s no need for developers to worry about IP address conflicts or container location – Kubernetes abstracts all of this away.
Docker and Kubernetes Networking Tips
Use Kubernetes Services for Consistent Communication: Instead of relying on the IP addresses of containers (which can change), use Kubernetes services to access containers. This provides a stable DNS name, ensuring that you can always reach your containers even if the underlying pod changes.
Leverage Network Policies for Security: Kubernetes network policies allow you to restrict traffic to and from your pods. Use these policies to enhance security by only allowing communication between trusted services.
Choose the Right Networking Plugin: Kubernetes supports multiple networking plugins like Flannel, Calico, and Weave. Select the one that best suits your use case based on factors such as scalability, security, and ease of use.
Monitor Network Performance: Both Docker and Kubernetes provide various tools to monitor the performance of your networks. Tools like Prometheus, Grafana, and others can help you track metrics such as bandwidth usage, latency, and error rates, ensuring that your networks perform optimally.
Consider Container Network Interface (CNI): The CNI is a specification for how network interfaces should be created and managed in Kubernetes. Choose a CNI plugin that matches your needs, as it directly impacts how pods communicate with each other and the external world.
Conclusion
In conclusion, Docker and Kubernetes networks are fundamental in ensuring seamless and efficient communication between containerized applications. While Docker focuses on the networking within individual containers, Kubernetes brings together a comprehensive network management solution that works across multiple nodes and containers. By understanding the types of networks available in Docker and the network management capabilities of Kubernetes, you can build scalable, fault-tolerant, and secure containerized applications.
For those interested in mastering Docker and Kubernetes, enrolling in a Kubernetes Online Training program or a Docker and Kubernetes Course will provide invaluable insights into network configuration and troubleshooting. Additionally, pursuing a Kubernetes Certification Training Course will equip you with the skills needed to manage production-ready clusters efficiently. Ultimately, knowing how to optimize and secure Docker and Kubernetes networks will set you on the path to becoming a skilled DevOps engineer capable of managing cutting-edge applications at scale.
Visualpath is the Best Software Online Training Institute in Hyderabad. Avail complete Docker and Kubernetes worldwide. You will get the best course at an affordable cost.
Attend Free Demo
Call on - +91-9989971070.
WhatsApp: https://www.whatsapp.com/catalog/919989971070/
Visit: https://www.visualpath.in/online-docker-and-kubernetes-training.html
#Docker and Kubernetes Training#Docker Kubernetes Online Course#Docker and Kubernetes Training in Hyderabad#Docker and Kubernetes Course#Docker Online Training#Kubernetes Online Training#Docker and Kubernetes Online Training#Kubernetes Certification Training Course
0 notes
Text
Ultimate Guide Cloud Spanner Emulator Testing Integrated!

Integrating Cloud Spanner Emulator Search engines Cloud’s The company database features globally distributed, dependable, very highly scalable, therefore being an ideal choice for applications with critical functions that need consistent and high performance.
To guarantee that Spanner integrates seamlessly into your apps, as a developer, you must do extensive testing. The goal of integration testing is to confirm that, after modifications to individual components, the various parts of a system function as a whole. For Spanner, integration testing guarantees that data activities in your application, such error handling and transactions, are properly communicated with the database.
This article explains how to use GitHub Actions and the Spanner emulator to build up integration testing for Spanner. For the purpose of quickly developing applications supported by a Spanner database, the emulator imitates the behavior of Spanner outside of Google Cloud.
They will test an example Golang backend service that maintains player profiles for a hypothetical game. These ideas may be used to different services and apps in different languages and sectors of the economy.
Here, you testing the “integration” between Spanner and the profile service to make sure code updates to the service will function as intended in a quick feedback loop. Not every service in our stack has undergone complete end-to-end testing. Before going live in production, testing at that level should be conducted using a real staging setup using Spanner.
Integrated inside the platform where her code resides, GitHub Actions automates the running of tests. Like this, other CI/CD systems will function.
Her application, Profile Service, is dependent on Spanner and uses Spanner emulator, a lightweight offline emulation of a Spanner database.
GitHub Activities: Workflow automation GitHub Actions are the ideal choice for her automated integration tests since our service code is kept in a GitHub repository.
Your software development process may be automated using GitHub Actions, which is a component of a continuous integration and delivery (CI/CD) platform.
You may establish and carry out automatic actions that are triggered by code changes or scheduled events thanks to its seamless integration with GitHub repositories.
A local testing environment: The Spanner emulator An very portable utility that operates entirely offline is the Spanner emulator. This eliminates the need for real Spanner instances and allows developers to test their apps against Spanner without paying any cloud fees. This enables quick development cycles and early integration problem discovery.
You should be aware of the following variations and restrictions between a real Spanner database and the Spanner emulator.
Integrity testing setup for the profile service On Github, you can find the code for the example game application. The integration test for the profile service will be examined first, followed by the process that makes use of Github Actions to allow automated integration testing.
The profile-service main_test.go file contains the integration test for the profile service.
The sections listed below are included in this file: Launching Spanner as an emulator. Install the schema and any necessary test data in the database and Spanner instance. Install the Profile service. The actual exams. tidying up once the exams are over Launching the emulator for Spanner They use the test containers-go library as the Spanner emulator is set up as a container image. This configures the emulator container so that may connect with it on mapped port 9010. In order to facilitate communication between the “emulator” container and any container or process having network access, a Docker network is used for networking.
It’s simple to wait until the container is ready before moving on to the next step thanks to the test containers-go package.
As soon as it’s prepared, you create a Golang struct, get the host information, and expose it as an operating system environment variable. These two will be used subsequently to configure the database and instance.
Install the Spanner package and database Now that the emulator is operating, will must configure a test instance and database.
Let’s start by configuring the instance: This creates the instance by using the Spanner instance golang library. The SPANNER_EMULATOR_HOST environment variable has to be set previously for this to function. If not, your Google Cloud project’s Spanner instance would be the one that the Spanner library would be searching for.
They need a schema file for the database setup. It is up to your processes where this schema file originates. During the’make profile-integration’ instructions in the Makefile, you create a copy of the master schema file in this instance. This enables me to get the most current schema pertinent to the profiles of the players.
They can handle schema adjustments in this method so that the emulator can understand them. Without the terminating semicolons, you must transform the schema file into an array of statements.
Launch the service for profiles Here, you are launching the profile service as an additional container that can interface with the simulator by using test containers go. executing the examinations Her integration tests connect to your profile service’s endpoints using the testify assert package.
Read more on Govindhtech.com
0 notes
Text
Docker Container Port Mapping Tutorial for beginners | Docker Port Expose and Port Forwarding
Full Video Link: https://youtu.be/2gie3gpDJUg Hi, a new #video on #dockerportmapping is published on @codeonedigest #youtube channel. Learn docker container port forwarding and docker expose. What is docker port mapping and -p option. Running docker cont
Docker container port mapping and port forwarding. Docker expose attribute in Docker file is used to forward container port to the host machine. Running docker container on custom port. Using docker expose, run the docker application on specific port. How to run docker image on specific port? What is port mapping in docker container? Why docker port mapping is not working? Why containerized…

View On WordPress
#docker#docker and Kubernetes#docker compose#docker compose port mapping#docker container port change#docker container port forwarding not working#docker container port mapping#docker container port mapping explained#docker container port not exposed#docker container ports explained#docker port forwarding#docker port forwarding doesn’t work#docker port forwarding existing container#docker port forwarding running container#docker port mapping#docker port mapping explained#docker port mapping not working#docker port mapping tutorial#docker port mapping vs expose#docker tutorial#docker tutorial for beginners#port mapping in running docker container#run docker container on custom port#update docker container portainer#what is docker
0 notes
Text
Xdebug Chrome

Xdebug is an extension for debugging your PHP. The following explains how to configure Xdebug and PhpStorm to debug in your local environment. You can use the IDE of your choice. See the vendor documentation for those applications for further configuration information.
Xdebug Helper
Xdebug Chrome Extension
Chrome Xdebug Not Working
Xdebug Chrome How To Use
You will surely like this chrome extension if you love debugging, profiling and tracing PHP code with Xdebug. It comes handy for PHP developers that loves using PHP tools with Xdebug support like PHPStorm, Eclipse with PDT, Netbeans and MacGDBp or any other Xdebug compatible profiling tool like KCacheGrind, WinCacheGrind or Webgrind. Enabling XDEBUG in Web Browsers Chrome. There are two really useful plugins for Chrome that you should install: XDEBUG Helper- This will enable you to turn XDEBUG on and off from your web browser without having to modify the URL. This is essential when debugging a POST type form submission where you can't just enter a URL.
You can configure Xdebug to run in the Magento Cloud Docker environment for local debugging without changing your Magento Commerce Cloud project configuration. See Configure Xdebug for Docker.
To set up Xdebug, you need to configure a file in your Git repository, configure your IDE, and set up port forwarding. You can configure settings in the magento.app.yaml file. After editing, you can push the Git changes across all Starter environments and Pro Integration environments to enable Xdebug. To push these settings to Pro plan Staging and Production environments, you must enter a ticket.
Once configured, you can debug CLI commands, web requests, and code. Remember, all Magento Commerce Cloud environments are read-only. You need to pull code to your local development environment to perform debugging. For Pro Staging and Production environments, we include additional instructions for Xdebug.
Requirements
To run and use Xdebug, you need the SSH URL for the environment. You can locate the information through the Project Web Interface or your Cloud Onboarding UI.
Configure Xdebug
To configure Xdebug, you need to do the following:
Work in a branch to push file updates
Configure your IDE, like PhpStorm
For configuring on Pro plan Staging and Production, you need to enter a ticket for Staging and Production.
Get started with a branch
To add Xdebug, we recommend creating a branch to work in and add the files.

To get started with environment branches:
On your local workstation, change to your Cloud project directory.
Switch to the Magento file system owner.
Log in to your Magento project.
List your projects.
List environments in the project. Every environment includes an active Git branch that contains your code, database, environment variables, configurations, and services.
It is important to use the magento-cloud environment:list command because it displays environment hierarchies, whereas the git branch command does not.
Fetch origin branches to get the latest code.
Checkout, or switch to, a specific branch and environment.
Git commands only checkout the Git branch. The magento-cloud checkout command checks out the branch and switches to the active environment.
You can create a new environment branch using the magento-cloud environment:branch <environment-name> <parent-environment-ID> command syntax. It may take some additional time to create and activate a new environment branch.
Use the environment ID to pull any updated code to your local. This is not necessary if the environment branch is new.
(Optional) Create a snapshot of the environment as a backup.
Enable Xdebug in your environment
To enable Xdebug for your project, add xdebug to the runtime:extensions section of the .magento.app.yaml file.
You can enable Xdebug directly to all Starter environments and Pro Integration environments. For Pro Staging and Production, you need to update this file and enter a Support ticket to have it enabled. We enable Xdebug on those environments for you.
To enable Xdebug:
In your local terminal, open the .magento.app.yaml file in a text editor.
In the runtime section, under extensions, add xdebug. For example:
Save your changes to the .magento.app.yaml file and exit the text editor.
Add, commit, and push the changes to redeploy the environment.
When deployed to Starter environments and Pro Integration environments, Xdebug is now available. You should continue configuring your IDE. For PhpStorm, see Configure PhpStorm.
Configure PhpStorm
You need to configure PhpStorm to properly work with Xdebug.
To configure PhpStorm to work with Xdebug:
In your PhpStorm project, open the settings panel.
Mac OS X—Select PhpStorm > Preferences.
Windows/Linux—Select File > Settings.
In the Settings panel, expand and locate the Languages & Frameworks > PHP > Servers section.
Click the + to add a server configuration. The project name is in grey at the top.
Configure the following settings for the new server configuration:
Name—enter the same as the hostname. This value is used in and must match the value for PHP_IDE_CONFIG variable in Debug CLI commands.
Host—Enter localhost.
Port—Enter 80.
Debugger—Select Xdebug.
Select Use path mappings. In the File/Directory pane, the root of the project for the serverName displays.
In the Absolute path on the server column, click (Edit) and add a setting based on the environment:
For all Starter environments and Pro Integration environments, the remote path is /app.
For Pro Staging and Production environments:
Production: /app/<project_code>/
Staging: /app/<project_code>_stg/
Change the Xdebug port to 9000 in the Languages & Frameworks > PHP > Debug > Xdebug > Debug Port panel.
Click Apply.
Set up port forwarding
You must map the XDEBUG connection from the server to your local system. To do any type of debugging, you must forward port 9000 from your Magento Commerce Cloud server to your local machine. See one of the following sections:
Port forwarding on Mac or UNIX
To set up port forwarding on a Mac or in a Unix environment:
Open a terminal.
Use SSH to establish the connection.
Add the -v option to the SSH command to show in the terminal whenever a socket is connected to the port that is being forwarded.
If an “unable to connect” or “could not listen to port on remote” error is displayed, there could be another active SSH session persisting on the server that is occupying port 9000. If that connection isn’t being used, you can terminate it.
To troubleshoot the connection:
Use SSH to log in to the remote Integration, Staging, or Production environment.
Enter who to view a list of SSH sessions.
View existing SSH sessions by user. Be careful to not affect a user other than yourself!
Integration: usernames are similar to dd2q5ct7mhgus
Staging: usernames are similar to dd2q5ct7mhgus_stg
Production: usernames are similar to dd2q5ct7mhgus
For a user session that is older than yours, find the pseudo-terminal (PTS) value, such as pts/0.
Kill the process ID (PID) corresponding to the PTS value.
Sample response:
To terminate the connection, enter a kill command with the process ID (PID).
Port forwarding on Windows
To set up port forwarding (SSH tunneling) on Windows, you must configure your Windows terminal application. For this example, we walk through creating an SSH tunnel using Putty. You can use other applications such as Cygwin. For more information on other applications, see the vendor documentation provided with those applications.
To set up an SSH tunnel on Windows using Putty:
If you have not already done so, download Putty.
Start Putty.
In the Category pane, click Session.
Enter the following information:
Hostname (or IP address) field: Enter the SSH URL for your Cloud server
Port field: Enter 22
In the Category pane, click Connection > SSH > Tunnels.
Enter the following information:
Source port field: Enter 9000
Destination field: Enter 127.0.0.1:9000
Click Remote
Click Add.
In the Category pane, click Session.
In the Saved Sessions field, enter a name for this SSH tunnel.
Click Save.
To test the SSH tunnel, click Load, then click Open.
If an “unable to connect” error displays, verify all of the following:
All Putty settings are correct
You are running Putty on the machine on which your private Magento Commerce Cloud SSH keys are located
Configure Pro Staging and Production
To complete configuration for Pro plan Staging and Production environments, you must enter a Support ticket to have Xdebug enabled and configured in Staging and Production environments.
We enable Xdebug in the environment. Be aware that this is a configuration change that requires us to redeploy your Staging and Production environments.
SSH access to Xdebug environments
For initiating debugging, performing setup, and more, you need the SSH commands for accessing the environments. You can get this information, through the Project Web Interface and your project spreadsheet.
Xdebug Helper
For Starter environments and Pro Integration environments, you can use the following Magento Cloud CLI command to SSH into those environments:
To use Xdebug, SSH to the environment as follows:
For example,
Debug for Pro Staging and Production
To use Xdebug specifically on Pro plan Staging and Production environment, you create a separate SSH tunnel and web session only you have access to. This usage differs from typical access, only providing access to you and not to all users.

You need the following:
SSH commands for accessing the environments. You can get this information, through the Project Web Interface or your Cloud Onboarding UI.
The xdebug_key value we set when configuring the Staging and Pro environments
To set up an SSH tunnel to a Staging or Production environment:
Open a terminal.
Clean up all SSH sessions.
Set up the SSH tunnel for Xdebug.
To start debugging using the environment URL:
To enable remote debugging, visit the site in the browser with the following added to the URL where KEY is value for xdebug_key:
This sets the cookie that sends browser requests to trigger Xdebug.
Complete your debugging with Xdebug.
When you are ready to end the session, you can use the following command to remove the cookie and end debugging through the browser where KEY is value for xdebug_key:
The XDEBUG_SESSION_START passed by POST requests are not supported at this time.
Debug CLI commands
This section walks through debugging CLI commands.
To debug CLI commands:
SSH into the server you want to debug using CLI commands.
Create the following environment variables:
These variables are removed when the SSH session ends.
Begin debugging
On Starter environments and Pro Integration environments, run the CLI command to debug.You may add runtime options, for example:
On Pro Staging and Production environments, you must specify the path to the Xdebug php configuration file when debugging CLI commands, for example:
For debugging web requests
The following steps help you debug web requests.
On the Extension menu, click Debug to enable.
Right click, select the options menu, and set the IDE key to PHPSTORM.
Install the Xdebug client on the browser. Configure and enable it.
Example set up on Chrome

This section discusses how to use Xdebug in Chrome using the Xdebug Helper extension. For information about Xdebug tools for other browsers, consult the browser documentation.
To use Xdebug Helper with Chrome:
Create an SSH tunnel to the Cloud server.
Install the Xdebug Helper extension from the Chrome store.
Enable the extension in Chrome as shown in the following figure.
In Chrome, right-click in the Chrome toolbar.
From the pop-up menu, click Options.
From the IDE Key list, click PhpStorm.
Click Save.
Open your PhpStorm project.
In the top navigation bar, click (Start listening).
If the navigation bar isn’t displayed, click View > Navigation Bar.
In the PhpStorm navigation pane, double-click the PHP file to test.
Debug code locally
Due to the read-only environments, you need to pull code locally from an environment or specific Git branch to perform debugging.
The method you choose is up to you. You have the following options:
Check out code from Git and run composer install
This method works unless composer.json references packages in private repositories to which you do not have access. This method results in getting the entire Magento codebase.
Copy the vendor, app, pub, lib, and setup directories
This method results in your having all code you can possibly test. Depending on how many static assets you have, it could result in a long transfer with a large volume of files.
Copy the vendor directory only
Because most Magento and third-party code is in the vendor directory, this method is likely to result in good testing although you will not be testing the entire codebase.
To compress files and copy them to your local machine:
Use SSH to login to the remote environment.
Compress the files.
For example, to compress the vendor directory only, enter
On your local environment, use PhpStorm to compress the files.
After spending way more time that I should like to admit trying to get XDEBUG to work with Notepad++ using the DBGp plugin in anything but the simplest of projects, I decided to look for an alternative.
I compared features of 9 different IDE's for PHP development and reading tons of reviews. There are many great IDE's out there and everyone will have their favourite. My short list ended up including:
Eclipse (PDT) 3.5 -- Didn't bother trying it. While I'm sure it's a fine product, the website is ancient and not user friendly. Way too much work to try and find information. I'm not sure if it is even being developed anymore. PDT isn't even listed in their main list of downloads. Although I didn't try Eclipse (PDT), I did try Aptana which is built on Eclipse but I don't want to have to struggle to figure out the user interface… I want to code!
NetBeans 8 -- Way better user interface than Eclipse in my opinion. It did take me a little to figure out the XDEBUG integration but I got it to work exactly as I expected. My problem was part technology and part learning what I wanted to do in NetBeans which was to initiate the debugging session from within my web browser without having to modify the URL.
Although both of these are free, I would not have minded paying for an IDE for PHP development since I do a fair amount of this for a living. Some of the try before you buy contenders included PhpStorm 7.13 and PHPDesigner 8.1.2.
They all have similar sets of features. PHPDesigner is even a native Windows app which is why I might still consider it.
I decided to give NetBeans a try. There are tons of stories on the Net from developers switching from Eclipse to NetBeans but very few going in the other direction. It includes almost all of the features I regularly use and plugins to fill in the gap. What was it missing? Like many of the cross-platform IDE's, it's a Java application which means it is slower than it could be on Windows. I also wish it had Timed Backups feature like in Notepad++.
Assuming you've downloaded and installed NetBeans, here's how to get it to work with XDEBUG:
Step 1 -- Configure PHP to work with XDEBUG
Modify your php.ini file. Start by commenting out anything that refers to ZEND… by adding a semi-colon in front (to the left) of the line. Zend is not compatible with XDEBUG.
Next comment out everything under the (xdebug) section. Then add the following, making sure to modify the lines that refer to your XAMPP path (doesn't work with the Lite version).
For 64-bit WAMP, the lines would be:
As you can see, the actual filename and location for the php_xdebug.dll file may vary. Check the ext or zend_ext folder to get the correct name for your version of AMP. If your version of AMP did not come with XDEBUG, Follow the instructions found on the XDEBUG Installation Wizard page.
Save your changes and restart Apache.
Step 2- Configure NetBeans to work with XDEBUG
The following instructions are for NetBeans 8 but it should be fairly similar with other versions:
Open your project in NetBeans. If you don't have one yet, create one.
Click Tools > Options > PHP.
Click the Debugging tab and make sure that:
Debugger port: 9000.
Session ID: netbeans-xdebug
Maximum Data Length: 2048
None of the checkboxes are checked.
Click OK.
Click File > Project Properties > Run Configuration > Advanced button.
Select Do Not Open Web Browser and click OK twice.
Important: You will need to repeat these last two steps anytime you create a new project.
You may need to close and restart NetBeans for the changes to take effect as I discovered that they don't always take effect right away when you save.
That's it. It should now be configured and ready to use. Next we will XDEBUG enable your web browser.
Importing Existing Source Code into NetBeans
Creating a new NetBeans project from an existing source code folder/files is easy. The following instructions describe how to create a new NetBeans project using existing source code and without storing NetBeans' own project files in your original source code directory tree. Looks like a lot of steps but it only takes about a minute to complete.
Click File > New Project.
For the Category, select the PHP.
For the Projects, select PHP Application with Existing Sources.
Click Next.
Specify the path to the Source Folder. This is where you source code currently exists.
Specify a project name. This can be anything as long as it is different from other existing NetBeans projects you might have.
Specify the version of PHP you will be using. If you aren't sure, type the following at a Command prompt or verify your log files: php --version . If PHP isn't in your path, you may need to change to the directory where the PHP.exe application is located.
The default UTF-8 should be correct for most situations.
To prevent NetBeans from storing it's files in your source code directory, check the 'Put NetBeans metadata into a separate directory' box and specify the folder where these files should be stored.
Click Next.
For Run As:, select Local Web Site (running on local web server) if it is not already selected.
Project URL should be the path to the localhost that corresponds to source directory specified above. It typically looks like http://localhost/ and may include a folder name if your local website is not in the root of the server.
For PHP, the default index file is typically called index.php unless you've changed it.
DO NOT check the 'Copy files from Source Folder to another location' checkbox if you want to work on your files where they currently reside.
Click Finish.
NetBeans will then create the project and open the default file.
Enabling XDEBUG in Web Browsers
Chrome
There are two really useful plugins for Chrome that you should install:
XDEBUG Helper -- This will enable you to turn XDEBUG on and off from your web browser without having to modify the URL. This is essential when debugging a POST type form submission where you can't just enter a URL.
XDEBUG Output Toggler -- This extension allows you to toggle the visibility of the extremely useful stack trace messages for your PHP.
Firefox
There are also two really useful plugins for Firefox that you should install (to be tested):
easyXdebug or The easiest Xdebug -- This will enable you to turn XDEBUG on and off from your web browser without having to modify the URL. This is essential when debugging a POST type form submission where you can't just enter a URL. I don't recommend installing both of these add-ons as they might conflict with each other since they do the same function.
XDEBUG Error Togger -- This is the same as XDEBUG Output Togger for Chrome. It allows you to toggle the visibility of the extremely useful stack trace messages for your PHP.
Internet Explorer
Unfortunately I don't know of any integration tools that work with IE. If you know if any, leave a comment below. You'll always be able to debug by appending ?XDEBUG_SESSION_START=netbeans-xdebug to the URL
Using XDEBUG in NetBeans
Open your project.
Debugging a Project: Right-click on the project you want to debug. Then click on Debug to start the debugger. There is a Debug Project icon at the top of the editor that you could use however it will not work for debugging a specific file. Debugging a specific file in a project or standalone file: Right-click on the file either in the navigation pane or even in the source code itself and then click Debug. If the file is already open, right click anywhere in the editor window and select Debug.
Set a breakpoint by clicking on the line number in the margin. Otherwise your code will be executed from start to end and nothing will happen in debugger.
Switch to your web browser and load the page you want to debug.
Click the add-on/plugin icon to enable Xdebug in your browser.
Reload the page you want to debug and switch back to NetBeans. You should now notice that the execution of the code has paused where you set the breakpoint above.
You can now use the debugging controls in the toolbar to step over, step into, step out, run to cursor, run, and stop debugging.
Xdebug Chrome Extension
You may notice that your PHP code runs slower when debugging. This is perfectly normal and a good reason to have a fast computer. On the positive side, you'll really notice where the slower parts of your code are.
Troubleshooting
If you can't get it to work, check to make sure that your timezone is properly set in /xampp/php/php.ini. I'm not sure why but it made a difference for me. It will also make dates appear correctly on your website.
Chrome Xdebug Not Working
(Date) ; Defines the default timezone used by the date functions ; Find the value for your location by visiting http://php.net/date.timezone date.timezone = America/Toronto
Xdebug Chrome How To Use
Related Posts:
0 notes
Text
Python Docx

Python Docx4j
Python Docx To Pdf
Python Docx Table
Python Docx To Pdf
Python Docx2txt
Python Docx2txt
When you ask someone to send you a contract or a report there is a high probability that you’ll get a DOCX file. Whether you like it not, it makes sense considering that 1.2 billion people use Microsoft Office although a definition of “use” is quite vague in this case. DOCX is a binary file which is, unlike XLSX, not famous for being easy to integrate into your application. PDF is much easier when you care more about how a document is displayed than its abilities for further modifications. Let’s focus on that.
Python-docx versions 0.3.0 and later are not API-compatible with prior versions. Python-docx is hosted on PyPI, so installation is relatively simple, and just depends on what installation utilities you have installed. Python-docx may be installed with pip if you have it available.
Installing Python-Docx Library Several libraries exist that can be used to read and write MS Word files in Python. However, we will be using the python-docx module owing to its ease-of-use. Execute the following pip command in your terminal to download the python-docx module as shown below.
Python has a few great libraries to work with DOCX (python-dox) and PDF files (PyPDF2, pdfrw). Those are good choices and a lot of fun to read or write files. That said, I know I'd fail miserably trying to achieve 1:1 conversion.
Release v0.8.10 (Installation)python-docx is a Python library for creating and updating Microsoft Word (.docx) files.
Looking further I came across unoconv. Universal Office Converter is a library that’s converting any document format supported by LibreOffice/OpenOffice. That sound like a solid solution for my use case where I care more about quality than anything else. As execution time isn't my problem I have been only concerned whether it’s possible to run LibreOffice without X display. Apparently, LibreOffice can be run in haedless mode and supports conversion between various formats, sweet!
I’m grateful to unoconv for an idea and great README explaining multiple problems I can come across. In the same time, I’m put off by the number of open issues and abandoned pull requests. If I get versions right, how hard can it be? Not hard at all, with few caveats though.
Testing converter
LibreOffice is available on all major platforms and has an active community. It's not active as new-hot-js-framework-active but still with plenty of good read and support. You can get your copy from the download page. Be a good user and go with up-to-date version. You can always downgrade in case of any problems and feedback on latest release is always appreciated.
On macOS and Windows executable is called soffice and libreoffice on Linux. I'm on macOS, executable soffice isn't available in my PATH after the installation but you can find it inside the LibreOffice.app. To test how LibreOffice deals with your files you can run:
In my case results were more than satisfying. The only problem I saw was a misalignment in a file when the alignment was done with spaces, sad but true. This problem was caused by missing fonts and different width of 'replacements' fonts. No worries, we'll address this problem later.
Setup I
While reading unoconv issues I've noticed that many problems are connected due to the mismatch of the versions. I'm going with Docker so I can have pretty stable setup and so I can be sure that everything works.
Let's start with defining simple Dockerfile, just with dependencies and ADD one DOCX file just for testing:

Let's build an image:
After image is created we can run the container and convert the file inside the container:
Running LibreOffice as a subprocess
We want to run LibreOffice converter as a subprocess and provide the same API for all platforms. Let's define a module which can be run as a standalone script or which we can later import on our server.
Required arguments which convert_to accepts are folder to which we save PDF and a path to the source file. Optionally we specify a timeout in seconds. I’m saying optional but consider it mandatory. We don’t want a process to hang too long in case of any problems or just to limit computation time we are able to give away to each conversion. LibreOffice executable location and name depends on the platform so edit libreoffice_exec to support platform you’re using.
subprocess.run doesn’t capture stdout and stderr by default. We can easily change the default behavior by passing subprocess.PIPE. Unfortunately, in the case of the failure, LibreOffice will fail with return code 0 and nothing will be written to stderr. I decided to look for the success message assuming that it won’t be there in case of an error and raise LibreOfficeError otherwise. This approach hasn’t failed me so far.
Uploading files with Flask
Converting using the command line is ok for testing and development but won't take us far. Let's build a simple server in Flask.
We'll need few helper function to work with files and few custom errors for handling error messages. Upload directory path is defined in config.py. You can also consider using flask-restplus or flask-restful which makes handling errors a little easier.
The server is pretty straightforward. In production, you would probably want to use some kind of authentication to limit access to uploads directory. If not, give up on serving static files with Flask and go for Nginx.
Important take-away from this example is that you want to tell your app to be threaded so one request won't prevent other routes from being served. However, WSGI server included with Flask is not production ready and focuses on development. In production, you want to use a proper server with automatic worker process management like gunicorn. Check the docs for an example how to integrate gunicorn into your app. We are going to run the application inside a container so host has to be set to publicly visible 0.0.0.0.
Setup II
Now when we have a server we can update Dockerfile. We need to copy our application source code to the image filesystem and install required dependencies.
In docker-compose.yml we want to specify ports mapping and mount a volume. If you followed the code and you tried running examples you have probably noticed that we were missing the way to tell Flask to run in a debugging mode. Defining environment variable without a value is causing that this variable is going to be passed to the container from the host system. Alternatively, you can provide different config files for different environments.
Supporting custom fonts
I've mentioned a problem with missing fonts earlier. LibreOffice can, of course, make use of custom fonts. If you can predict which fonts your user might be using there's a simple remedy. Add following line to your Dockfile.
Now when you put custom font file in the font directory in your project, rebuild the image. From now on you support custom fonts!
Summary
This should give you the idea how you can provide quality conversion of different documents to PDF. Although the main goal was to convert a DOCX file you should be fine with presentations, spreadsheets or images.
Further improvements could be providing support for multiple files, the converter can be configured to accept more than one file as well.
Photo by Samuel Zeller on Unsplash.
Did you enjoy it? Follow me@MichalZalecki on Twitter, where I share some interesting, bite-size content.
This ebook goes beyond Jest documentation to explain software testing techniques. I focus on unit test separation, mocking, matchers, patterns, and best practices.
Get it now!
Mastering Jest: Tips & Tricks | $9
Latest version
Released:
Extract content from docx files
Project description
Extract docx headers, footers, text, footnotes, endnotes, properties, and images to a Python object.
The code is an expansion/contraction of python-docx2txt (Copyright (c) 2015 Ankush Shah). The original code is mostly gone, but some of the bones may still be here.
shared features:
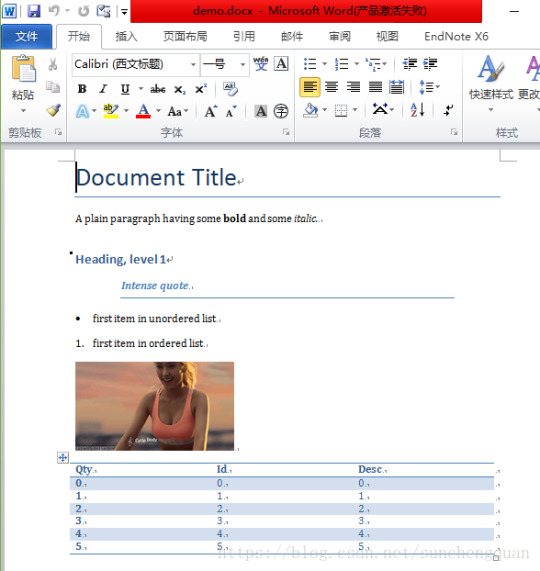
extracts text from docx files
extracts images from docx files
no dependencies (docx2python requires pytest to test)
additions:
extracts footnotes and endnotes
converts bullets and numbered lists to ascii with indentation
converts hyperlinks to <a href='http:/...'>link text</a>
retains some structure of the original file (more below)
extracts document properties (creator, lastModifiedBy, etc.)
inserts image placeholders in text ('----image1.jpg----')
inserts plain text footnote and endnote references in text ('----footnote1----')
(optionally) retains font size, font color, bold, italics, and underscore as html
extract user selections from checkboxes and dropdown menus
full test coverage and documentation for developers
subtractions:
no command-line interface
will only work with Python 3.4+
Installation
Use
Note on html feature:

font size, font color, bold, italics, and underline supported
hyperlinks will always be exported as html (<a href='http:/...'>link text</a>), even if export_font_style=False, because I couldn't think of a more cononical representation.
every tag open in a paragraph will be closed in that paragraph (and, where appropriate, reopened in the next paragraph). If two subsequenct paragraphs are bold, they will be returned as <b>paragraph q</b>, <b>paragraph 2</b>. This is intentional to make each paragraph its own entity.
if you specify export_font_style=True, > and < in your docx text will be encoded as > and <
Return Value
Function docx2python returns an object with several attributes.
header - contents of the docx headers in the return format described herein
footer - contents of the docx footers in the return format described herein
body - contents of the docx in the return format described herein
footnotes - contents of the docx in the return format described herein
endnotes - contents of the docx in the return format described herein
document - header + body + footer (read only)
text - all docx text as one string, similar to what you'd get from python-docx2txt
properties - docx property names mapped to values (e.g., {'lastModifiedBy': 'Shay Hill'})
images - image names mapped to images in binary format. Write to filesystem with
Return Format
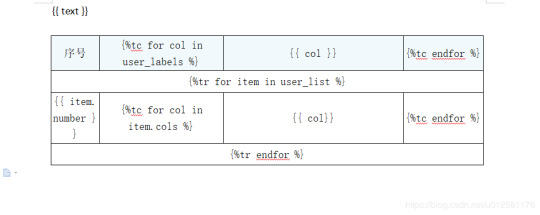
Some structure will be maintained. Text will be returned in a nested list, with paragraphs always at depth 4 (i.e., output.body[i][j][k][l] will be a paragraph).
If your docx has no tables, output.body will appear as one a table with all contents in one cell:
Table cells will appear as table cells. Text outside tables will appear as table cells.
To preserve the even depth (text always at depth 4), nested tables will appear as new, top-level tables. This is clearer with an example:
becomes ...
This ensures text appears
only once
in the order it appears in the docx
always at depth four (i.e., result.body[i][j][k][l] will be a string).
Working with output
This package provides several documented helper functions in the docx2python.iterators module. Here are a few recipes possible with these functions:
Some fine print about checkboxes:
MS Word has checkboxes that can be checked any time, and others that can only be checked when the form is locked.The previous print as. u2610 (open checkbox) or u2612 (crossed checkbox). Which this module, the latter willtoo. I gave checkboxes a bailout value of ----checkbox failed---- if the xml doesn't look like I expect it to,because I don't have several-thousand test files with checkboxes (as I did with most of the other form elements).Checkboxes should work, but please let me know if you encounter any that do not.
Release historyRelease notifications | RSS feed
1.27.1
1.27
1.26
Python Docx4j
1.25
1.24
1.23
1.22
1.21
1.19
1.18
1.17
1.16
1.15
1.14
1.13
1.12
1.11
1.2
Python Docx To Pdf
1.1
Python Docx Table
1.0
0.1
Python Docx To Pdf
Download files
Download the file for your platform. If you're not sure which to choose, learn more about installing packages.
Python Docx2txt
Files for docx2python, version 1.27.1Filename, sizeFile typePython versionUpload dateHashesFilename, size docx2python-1.27.1-py3-none-any.whl (22.9 kB) File type Wheel Python version py3 Upload dateHashesFilename, size docx2python-1.27.1.tar.gz (33.3 kB) File type Source Python version None Upload dateHashes
Close
Hashes for docx2python-1.27.1-py3-none-any.whl
Hashes for docx2python-1.27.1-py3-none-any.whlAlgorithmHash digestSHA25651f6f03149efff07372ea023824d4fd863cb70b531aa558513070fe60f1c420aMD54b0ee20fed4a8cb0eaba8580c33f946bBLAKE2-256e7d5ff32d733592b17310193280786c1cab22ca4738daa97e1825d650f55157c
Close
Hashes for docx2python-1.27.1.tar.gz
Python Docx2txt
Hashes for docx2python-1.27.1.tar.gzAlgorithmHash digestSHA2566ca0a92ee9220708060ece485cede894408588353dc458ee5ec17959488fa668MD5759e1630c6990533414192eb57333c72BLAKE2-25684783b70aec51652a4ec4f42aa419a8af18d967b06390764527c81f183d1c02a
0 notes
Text
Setting up a REST Delivery Point for SOAP Endpoints
Fronting synchronous HTTP endpoints with queues and topics allows senders and receivers of information to actively participate in event-driven systems, which are usually the domain of asynchronous messaging interactions.
Solace PubSub+ lets you front HTTP endpoints with queues and topics by proxying RESTful calls via REST Delivery Points (RDPs) and API Microgateway software. In this post I’ll discuss the differences between those options and show you how to use the API Microgateway to proxy a SOAP Web service. To keep things interesting, our sample Web service requires clients to use both TLS and WS-Security.
Here’s a visual overview of what we’ll be doing:
Prerequisites
You should know:
How to set up, configure and use PubSub+, and obviously you’ll need a copy of PubSub+, which you can download here.
How to install and use Docker and Linux
About SOAP Web Services
Differences Between the API Microgateway and RDP
Solace PubSub+ supports two approaches to RESTful messaging, namely RDPs and the API Microgateway. The table below summarizes some of the key differences between both paradigms.
REST Delivery Point Microgateway Default mode Fire & Forget (request/reply optional) Request/Reply Propagates HTTP headers? No Yes Supports all HTTP verbs? No Yes Receive requests on Queues Topics
In short, we tend to use RDPs when the use case calls for sending vanilla HTTP POSTs, with optional request/reply semantics. Since we want a reply from the postoffice endpoint and may need to optionally set the SOAPAction header, the Microgateway approach is the better choice.
Find a Secure SOAP Web service
First, we need to find a SOAP Web service that supports HTTPS and WS-Security. Fortunately, Canada Post offers several APIs that match these criteria once you register with their free Developer Program. Why Canada Post? Because we’re a proud Canadian company!
For this tutorial, we’ll be querying the GetNearestPostOffice operation to find postal outlets near Solace’s headquarters in Ottawa, Canada.
Fire Up a Solace PubSub+ Instance
Next, we need to set up a PubSub+ instance. The simplest way to achieve this is via the PubSub+ Docker Compose YAML. Be sure to uncomment the line exposing the REST Default VPN port, i.e. 9000. Without this, we won’t be able to execute an HTTP POST against the PubSub+ instance.
Log in to Your Broker Instance
Once the container boots up, log in to http://localhost:8080 in your browser with the username admin and password admin.
You should now have a secure SOAP Web service from Canada Post, a PubSub+ instance, and be logged in to your broker instance.
Set up the Microgateway
In this section I’ll explain how to enable the Microgateway connectivity, then create the RDP, a REST consumer, and a queue binding.
Enable the Microgateway Connectivity
To enable the Microgateway connectivity:
Navigate to Message VPN > Connectivity > REST.
Change the service’s mode to Gateway.
Keep in mind that microgateways operate at the VPN level, which means you cannot mix and match REST Delivery Points and gateways for a given VPN.
Create the RDP
Although distinct, gateways leverage RDPs internally to achieve service connectivity. Consequently, we still need to set up an RDP to connect to our Canada Post service.
Click on the default VPN and go to Client Connections > REST. This will bring up the RDP configuration page.
Click on the green REST Delivery Point button in the top right corner.
Give your RDP a name (e.g. Canada Post) and click Create. Keep in mind that this step does not do anything functional. We’re simply establishing a top-level bucket for the actual SOAP configuration.
Leave the defaults and click Apply. Do not turn on Enabled yet.
The newly created RDP is displayed in the Downstate along with some operational data.
Create a REST Consumer
To create a REST consumer:
Click on the newly created RDP to drill down to REST Consumers: Canada Post > REST Consumers. This is where we define the connection parameters for the Web service.
Click on the green REST Consumer button to add a new REST consumer.
Give the new REST consumer a name that reflects the SOAP endpoint (e.g. postoffice if the URL is http://www.canadapost.ca/ws/soap/postoffice). Though not strictly necessary, naming your endpoint this way helps to keep things identifiable in situations with multiple endpoints.
Click on your new consumer endpoint, complete the host details, and set the port to 443 for HTTPS. Do not enable the consumer yet.
Click Apply.
Create a Queue Binding
Along with the host, you need to identify the exact endpoint to connect to. Since PubSub+ is primarily an event broker, clients interact with it via queues and topics. Consequently, we need to attach the endpoint to a queue to receive SOAP payloads. This is done through queue bindings.
To bind a queue, you need to define a queue, bind the queue to the SOAP endpoint, and subscribe the queue to a topic.
Define a Queue
Navigate to the Queues tab and click on the green + Queue button in the top right corner.
Create a queue in the form of [rdpname].[consumername] and click Create. This format is not mandatory but useful when you need to quickly identify the queue related to a given SOAP endpoint.
Tune the queue settings as necessary for your implementation and click Apply.
Bind the Queue to the SOAP Endpoint
Now that we have a queue defined, you can bind it to your SOAP endpoint.
Navigate to Connections > REST > Canada Post > Queue Binding.
After clicking on the green + Queue Binding button, select the queue we previously created and click Create.
In the dialog that pops up, enter the SOAP endpoint in the Post Request Target field and click Apply.
Note: Don’t forget the leading “/”.
Set Up a Topic to Queue Subscription
Microgateway mode requires users to send service requests on a special topic consisting of the HTTP Method + HTTP Resource Path. This is then mapped to the queue binding you created above. Listing 1 demonstrates how a topic may be constructed.
Resource path from WSDL: https://ct.soa-gw.canadapost.ca/rs/soap/postoffice
HTTP Method: POST
Resulting PubSub+ topic: POST/rs/soap/postoffice
To subscribe our queue to this topic, navigate to Queues > postoffice > Subscriptions and click + Subscription.
Enter the relevant subscription and click Create.
Once subscribed, any requests POSTed to /rs/soap/postoffice on the broker are forwarded to the associated queue, triggering a call to the example Web service.
Set Up TLS
In this section I’ll explain how to upload the TLS certificates, load the certificate authority and add Trusted Common Names.
Phew! The service is now set up… well, almost. You’ll notice that we have not enabled anything yet since TLS has not been configured. We will do this by adding the appropriate certificate authorities (CA) to the PubSub+ trust store in PEM format.
Note: Trust stores currently can only be set up using the PubSub+ CLI.
Upload the TLS Certificates
PubSub+ requires that the entire certificate authority chain for a given site be uploaded to the /certs directory on the broker. Initially obtaining the certificates can be accomplished using a browser or openssl. However, the exact process is outside the scope of this post.
Note: The root & all intermediary CAs must be installed individually on the PubSub+ instance. PubSub+ does not support bundled CAs.
Once you have the individual certificates, connect to the container’s shell and save each certificate under /usr/sw/jail/certs. The easiest way is to open a text editor in the directory and copy and paste the contents of each certificate to a new file.
C:\Users\UshShukla>docker exec -it <PubSub+ container name> /bin/bash The Solace PubSub+ Standard is proprietary software of Solace Corporation. By accessing the Solace PubSub+ Standard you are agreeing to the license terms and conditions located at
LICENSE AGREEMENT FOR SOLACE SOFTWARE
[root@f0fb1e6fe45d ~]# cd /usr/sw/jail/certs [root@f0fb1e6fe45d ~]# vi geotrust-rsa-ca.pem …paste contents… …save file… …repeat for other certificates…
Load the Certificate Authority
Now that our CAs are saved, we need to load them into the PubSub+ trust store, as documented here. An example of loading the root certificate authority is provided below.
[root@f0fb1e6fe45d certs]# /usr/sw/loads/currentload/bin/cli -A Solace PubSub+ Standard Version 9.0.0.17 The Solace PubSub+ Standard is proprietary software of Solace Corporation. By accessing the Solace PubSub+ Standard you are agreeing to the license terms and conditions located at
LICENSE AGREEMENT FOR SOLACE SOFTWARE
Copyright 2004-2018 Solace Corporation. All rights reserved. To purchase product support, please contact Solace at: https://solace.com/contact-us/ Operating Mode: Message Routing Node f0fb1e6fe45d> enable f0fb1e6fe45d# configure f0fb1e6fe45d(configure)# authentication f0fb1e6fe45d(configure/authentication)# create certificate-authority DigiCert-Global-Root-CA f0fb1e6fe45d(.../authentication/certificate-authority)# certificate file digitrust-root-ca.pem
We name the certificate authority according to the Common Name (CN) (e.g. DigiCert…). This approach reduces the likelihood of duplicating CAs in the trust store.
Once uploaded to the trust store, the original CA file can be removed from the /certs/ directory.
Add the Trusted Common Names
For PubSub+ to identify the appropriate certificate(s) to use when interacting with the Web service, we need to update our RDP configuration with the Common Names of each certificate. The example below uses openssl to get this information, though you could just as easily inspect the TLS output of your browser.
[root@f0fb1e6fe45d certs]# openssl s_client -connect ct.soa-gw.canadapost.ca:443 CONNECTED(00000003) depth=2 C = US, O = DigiCert Inc, OU = www.digicert.com, CN = DigiCert Global Root CA verify return:1 depth=1 C = US, O = DigiCert Inc, OU = www.digicert.com, CN = GeoTrust RSA CA 2018 verify return:1 depth=0 C = CA, ST = Ontario, L = Ottawa, O = Canada Post Corporation, OU = Information Technology-2, CN = stg10.canadapost.ca
In the listing above, we care about all the CN entries.
In the WebUI, log in and navigate to Client Connections>REST>Canada Post>REST Consumers>postoffice>TLS Options
Click on the green + Trusted Common Name button to add the individual CNs.
The completed setup looks like this:
Note: We added the CN of the leaf certificate too, i.e. stg10.canadapost.com.
Enable the RDP and Test the Setup
In this section I’ll explain how to enable the RDP and test the setup.
Enable the RDP
We are ready to fire up the REST Delivery Point! Individually enable each of the configuration elements below:
REST Consumer > postoffice > Enabled
Client Connections > REST > Canada Post > Enabled
If everything has been configured correctly, the RDP status should be Up.
You can drill down to ensure the REST Consumer is Up, too.
Test the Setup
We can test our setup using SOAPUI.
Notes:
The service host in this case is the broker, and we are POSTing to the resource path configured in our topic-queue mapping.
We enable basic authentication and select the option to Authenticate pre-emptively. Why? Since PubSub+ acts as a proxy to the final service, it needs to have the entire payload available to send. Otherwise our call will fail. Selecting the option above essentially ensures SOAPUI pre-builds the entire request payload, including the WS-Security headers.
Be sure to set the SOAPAction HTTP header if necessary. This example does not require it.
Conclusion
With a little effort, PubSub+ can let you expose SOAP Web services across an asynchronous messaging architecture, allowing them to fully enjoy the benefits of an event-driven architecture.
Learn more about:
Microgateways
Managing REST Delivery Points
The post Setting up a REST Delivery Point for SOAP Endpoints appeared first on Solace.
Setting up a REST Delivery Point for SOAP Endpoints published first on https://jiohow.tumblr.com/
0 notes
Link
(Via: Hacker News)
The vchan protocol is used to stream data between virtual machines on a Xen host without needing any locks. It is largely undocumented. The TLA Toolbox is a set of tools for writing and checking specifications. In this post, I’ll describe my experiences using these tools to understand how the vchan protocol works.
Table of Contents
( this post also appeared on Reddit )
Background
Qubes and the vchan protocol
I run QubesOS on my laptop. A QubesOS desktop environment is made up of multiple virtual machines. A privileged VM, called dom0, provides the desktop environment and coordinates the other VMs. dom0 doesn’t have network access, so you have to use other VMs for doing actual work. For example, I use one VM for email and another for development work (these are called “application VMs”). There is another VM (called sys-net) that connects to the physical network, and yet another VM (sys-firewall) that connects the application VMs to net-vm.
My QubesOS desktop. The windows with blue borders are from my Debian development VM, while the green one is from a Fedora VM, etc.
The default sys-firewall is based on Fedora Linux. A few years ago, I replaced sys-firewall with a MirageOS unikernel. MirageOS is written in OCaml, and has very little C code (unlike Linux). It boots much faster and uses much less RAM than the Fedora-based VM. But recently, a user reported that restarting mirage-firewall was taking a very long time. The problem seemed to be that it was taking several minutes to transfer the information about the network configuration to the firewall. This is sent over vchan. The user reported that stracing the QubesDB process in dom0 revealed that it was sleeping for 10 seconds between sending the records, suggesting that a wakeup event was missing.
The lead developer of QubesOS said:
I’d guess missing evtchn trigger after reading/writing data in vchan.
Perhaps ocaml-vchan, the OCaml implementation of vchan, wasn’t implementing the vchan specification correctly? I wanted to check, but there was a problem: there was no vchan specification.
The Xen wiki lists vchan under Xen Document Days/TODO. The initial Git commit on 2011-10-06 said:
libvchan: interdomain communications library
This library implements a bidirectional communication interface between applications in different domains, similar to unix sockets. Data can be sent using the byte-oriented libvchan_read/libvchan_write or the packet-oriented libvchan_recv/libvchan_send.
Channel setup is done using a client-server model; domain IDs and a port number must be negotiated prior to initialization. The server allocates memory for the shared pages and determines the sizes of the communication rings (which may span multiple pages, although the default places rings and control within a single page).
With properly sized rings, testing has shown that this interface provides speed comparable to pipes within a single Linux domain; it is significantly faster than network-based communication.
I looked in the xen-devel mailing list around this period in case the reviewers had asked about how it worked.
One reviewer suggested:
Please could you say a few words about the functionality this new library enables and perhaps the design etc? In particular a protocol spec would be useful for anyone who wanted to reimplement for another guest OS etc. […] I think it would be appropriate to add protocol.txt at the same time as checking in the library.
However, the submitter pointed out that this was unnecessary, saying:
The comments in the shared header file explain the layout of the shared memory regions; any other parts of the protocol are application-defined.
Now, ordinarily, I wouldn’t be much interested in spending my free time tracking down race conditions in 3rd-party libraries for the benefit of strangers on the Internet. However, I did want to have another play with TLA…
TLA+
TLA+ is a language for specifying algorithms. It can be used for many things, but it is particularly designed for stateful parallel algorithms.
I learned about TLA while working at Docker. Docker EE provides software for managing large clusters of machines. It includes various orchestrators (SwarmKit, Kubernetes and Swarm Classic) and a web UI. Ensuring that everything works properly is very important, and to this end a large collection of tests had been produced. Part of my job was to run these tests. You take a test from a list in a web UI and click whatever buttons it tells you to click, wait for some period of time, and then check that what you see matches what the test says you should see. There were a lot of these tests, and they all had to be repeated on every supported platform, and for every release, release candidate or preview release. There was a lot of waiting involved and not much thinking required, so to keep my mind occupied, I started reading the TLA documentation.
I read The TLA+ Hyperbook and Specifying Systems. Both are by Leslie Lamport (the creator of TLA), and are freely available online. They’re both very easy to read. The hyperbook introduces the tools right away so you can start playing, while Specifying Systems starts with more theory and discusses the tools later. I think it’s worth reading both.
Once Docker EE 2.0 was released, we engineers were allowed to spend a week on whatever fun (Docker-related) project we wanted. I used the time to read the SwarmKit design documents and make a TLA model of that. I felt that using TLA prompted useful discussions with the SwarmKit developers (which can see seen in the pull request comments).
A specification document can answer questions such as:
What does it do? (requirements / properties)
How does it do it? (the algorithm)
Does it work? (model checking)
Why does it work? (inductive invariant)
Does it really work? (proofs)
You don’t have to answer all of them to have a useful document, but I will try to answer each of them for vchan.
Is TLA useful?
In my (limited) experience with TLA, whenever I have reached the end of a specification (whether reading it or writing it), I always find myself thinking “Well, that was obvious. It hardly seems worth writing a spec for that!”. You might feel the same after reading this blog post.
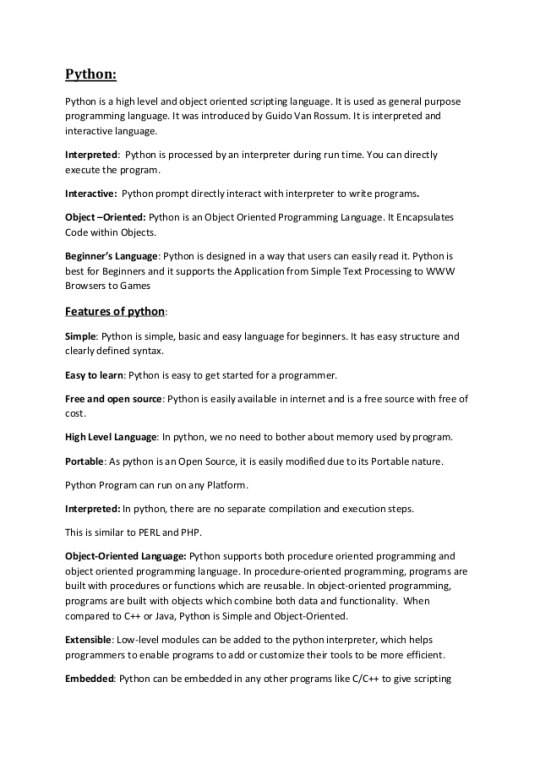
To judge whether TLA is useful, I suggest you take a few minutes to look at the code. If you are good at reading C code then you might find, like the Xen reviewers, that it is quite obvious what it does, how it works, and why it is correct. Or, like me, you might find you’d prefer a little help. You might want to jot down some notes about it now, to see whether you learn anything new.
To give the big picture:
Two VMs decide to communicate over vchan. One will be the server and the other the client.
The server allocates three chunks of memory: one to hold data in transit from the client to the server, one for data going from server to client, and the third to track information about the state of the system. This includes counters saying how much data has been written and how much read, in each direction.
The server tells Xen to grant the client access to this memory.
The client asks Xen to map the memory into its address space. Now client and server can both access it at once. There are no locks in the protocol, so be careful!
Either end sends data by writing it into the appropriate buffer and updating the appropriate counter in the shared block. The buffers are ring buffers, so after getting to the end, you start again from the beginning.
The data-written (producer) counter and the data-read (consumer) counter together tell you how much data is in the buffer, and where it is. When the difference is zero, the reader must stop reading and wait for more data. When the difference is the size of the buffer, the writer must stop writing and wait for more space.
When one end is waiting, the other can signal it using a Xen event channel. This essentially sets a pending flag to true at the other end, and wakes the VM if it is sleeping. If a VM tries to sleep while it has an event pending, it will immediately wake up again. Sending an event when one is already pending has no effect.
The public/io/libxenvchan.h header file provides some information, including the shared structures and comments about them:
xen/include/public/io/libxenvchan.h
1 2 3 4 5 6 7 8 9 10 11 12 13 14 15 16 17 18 19 20 21 22 23 24 25 26 27 28 29 30 31 32 33 34 35 36 37 38 39 40 41 42 43 44 45 46 47 48
struct ring_shared { uint32_t cons, prod; }; #define VCHAN_NOTIFY_WRITE 0x1 #define VCHAN_NOTIFY_READ 0x2 /** * vchan_interface: primary shared data structure */ struct vchan_interface { /** * Standard consumer/producer interface, one pair per buffer * left is client write, server read * right is client read, server write */ struct ring_shared left, right; /** * size of the rings, which determines their location * 10 - at offset 1024 in ring's page * 11 - at offset 2048 in ring's page * 12+ - uses 2^(N-12) grants to describe the multi-page ring * These should remain constant once the page is shared. * Only one of the two orders can be 10 (or 11). */ uint16_t left_order, right_order; /** * Shutdown detection: * 0: client (or server) has exited * 1: client (or server) is connected * 2: client has not yet connected */ uint8_t cli_live, srv_live; /** * Notification bits: * VCHAN_NOTIFY_WRITE: send notify when data is written * VCHAN_NOTIFY_READ: send notify when data is read (consumed) * cli_notify is used for the client to inform the server of its action */ uint8_t cli_notify, srv_notify; /** * Grant list: ordering is left, right. Must not extend into actual ring * or grow beyond the end of the initial shared page. * These should remain constant once the page is shared, to allow * for possible remapping by a client that restarts. */ uint32_t grants[0]; };
You might also like to look at the vchan source code. Note that the libxenvchan.h file in this directory includes and extends the above header file (with the same name).
For this blog post, we will ignore the Xen-specific business of sharing the memory and telling the client where it is, and assume that the client has mapped the memory and is ready to go.
Basic TLA concepts
We’ll take a first look at TLA concepts and notation using a simplified version of vchan. TLA comes with excellent documentation, so I won’t try to make this a full tutorial, but hopefully you will be able to follow the rest of this blog post after reading it. We will just consider a single direction of the channel (e.g. client-to-server) here.
Variables, states and behaviour
A variable in TLA is just what a programmer expects: something that changes over time. For example, I’ll use Buffer to represent the data currently being transmitted.
We can also add variables that are just useful for the specification. I use Sent to represent everything the sender-side application asked the vchan library to transmit, and Got for everything the receiving application has received:
1
VARIABLES Got, Buffer, Sent
A state in TLA represents a snapshot of the world at some point. It gives a value for each variable. For example, { Got: "H", Buffer: "i", Sent: "Hi", ... } is a state. The ... is just a reminder that a state also includes everything else in the world, not just the variables we care about.
Here are some more states:
State Got Buffer Sent s0 s1 H H s2 H H s3 H i Hi s4 Hi Hi s5 iH Hi
A behaviour is a sequence of states, representing some possible history of the world. For example, << s0, s1, s2, s3, s4 >> is a behaviour. So is << s0, s1, s5 >>, but not one we want. The basic idea in TLA is to specify precisely which behaviours we want and which we don’t want.
A state expression is an expression that can be evaluated in the context of some state. For example, this defines Integrity to be a state expression that is true whenever what we have got so far matches what we wanted to send:
1 2 3 4 5 6 7 8
(* Take(m, i) is just the first i elements of message m. *) Take(m, i) == SubSeq(m, 1, i) (* Everything except the first i elements of message m. *) Drop(m, i) == SubSeq(m, i + 1, Len(m)) Integrity == Take(Sent, Len(Got)) = Got
Integrity is true for all the states above except for s5. I added some helper operators Take and Drop here. Sequences in TLA+ can be confusing because they are indexed from 1 rather than from 0, so it is easy to make off-by-one errors. These operators just use lengths, which we can all agree on. In Python syntax, it would be written something like:
1 2
def Integrity(s): return s.Sent.starts_with(s.Got)
A temporal formula is an expression that is evaluated in the context of a complete behaviour. It can use the temporal operators, which include:
[] (that’s supposed to look like a square) : “always”
<> (that’s supposed to look like a diamond) : “eventually”
[] F is true if the expression F is true at every point in the behaviour. <> F is true if the expression F is true at any point in the behaviour.
Messages we send should eventually arrive. Here’s one way to express that:
1 2 3
Availability == \A x \in Nat : [] (Len(Sent) = x => <> (Len(Got) >= x) )
TLA syntax is a bit odd. It’s rather like LaTeX (which is not surprising: Lamport is also the “La” in LaTeX). \A means “for all” (rendered as an upside-down A). So this says that for every number x, it is always true that if we have sent x bytes then eventually we will have received at least x bytes.
This pattern of [] (F => <>G) is common enough that it has a shorter notation of F ~> G, which is read as “F (always) leads to G”. So, Availability can also be written as:
1 2 3
Availability == \A x \in Nat : Len(Sent) = x ~> Len(Got) >= x
We’re only checking the lengths in Availability, but combined with Integrity that’s enough to ensure that we eventually receive what we want. So ideally, we’d like to ensure that every possible behaviour of the vchan library will satisfy the temporal formula Properties:
1 2
Properties == Availability /\ []Integrity
That /\ is “and” by the way, and \/ is “or”. I did eventually start to be able to tell one from the other, though I still think && and || would be easier. In case I forget to explain some syntax, A Summary of TLA lists most of it.
Actions
It is hopefully easy to see that Properties defines properties we want. A user of vchan would be happy to see that these are things they can rely on. But they don’t provide much help to someone trying to implement vchan. For that, TLA provides another way to specify behaviours.
An action in TLA is an expression that is evaluated in the context of a pair of states, representing a single atomic step of the system. For example:
1 2 3 4 5
Read == /\ Len(Buffer) > 0 /\ Got' = Got \o Buffer /\ Buffer' = << >> /\ UNCHANGED Sent
The Read action is true of a step if that step transfers all the data from Buffer to Got. Unprimed variables (e.g. Buffer) refer to the current state and primed ones (e.g. Buffer') refer to the next state. There’s some more strange notation here too:
We’re using /\ to form a bulleted list here rather than as an infix operator. This is indentation-sensitive. TLA also supports \/ lists in the same way.
\o is sequence concatenation (+ in Python).
<< >> is the empty sequence ([ ] in Python).
UNCHANGED Sent means Sent' = Sent.
In Python, it might look like this:
1 2 3 4 5
def Read(current, next): return Len(current.Buffer) > 0 \ and next.Got = current.Got + current.Buffer \ and next.Buffer = [] \ and next.Sent = current.Sent
Actions correspond more closely to code than temporal formulas, because they only talk about how the next state is related to the current one.
This action only allows one thing: reading the whole buffer at once. In the C implementation of vchan the receiving application can provide a buffer of any size and the library will read at most enough bytes to fill the buffer. To model that, we will need a slightly more flexible version:
1 2 3 4 5
Read == \E n \in 1..Len(Buffer) : /\ Got' = Got \o Take(Buffer, n) /\ Buffer' = Drop(Buffer, n) /\ UNCHANGED Sent
This says that a step is a Read step if there is any n (in the range 1 to the length of the buffer) such that we transferred n bytes from the buffer. \E means “there exists …”.
A Write action can be defined in a similar way:
1 2 3 4 5 6 7 8 9
CONSTANT BufferSize Byte == 0..255 Write == \E m \in Seq(Byte) \ {<< >>} : /\ Buffer' = Buffer \o m /\ Len(Buffer') <= BufferSize /\ Sent' = Sent \o m /\ UNCHANGED Got
A CONSTANT defines a parameter (input) of the specification (it’s constant in the sense that it doesn’t change between states). A Write operation adds some message m to the buffer, and also adds a copy of it to Sent so we can talk about what the system is doing. Seq(Byte) is the set of all possible sequences of bytes, and \ {<< >>} just excludes the empty sequence.
A step of the combined system is either a Read step or a Write step:
1 2
Next == Read \/ Write
We also need to define what a valid starting state for the algorithm looks like:
1 2 3 4
Init == /\ Sent = << >> /\ Buffer = << >> /\ Got = << >>
Finally, we can put all this together to get a temporal formula for the algorithm:
1 2 3 4
vars == << Got, Buffer, Sent >> Spec == Init /\ [][Next]_vars
Some more notation here:
[Next]_vars (that’s Next in brackets with a subscript vars) means Next \/ UNCHANGED vars.
Using Init (a state expression) in a temporal formula means it must be true for the first state of the behaviour.
[][Action]_vars means that [Action]_vars must be true for each step.
TLA syntax requires the _vars subscript here. This is because other things can be going on in the world beside our algorithm, so it must always be possible to take a step without our algorithm doing anything.
Spec defines behaviours just like Properties does, but in a way that makes it more obvious how to implement the protocol.
Correctness of Spec
Now we have definitions of Spec and Properties, it makes sense to check that every behaviour of Spec satisfies Properties. In Python terms, we want to check that all behaviours b satisfy this:
1 2
def SpecOK(b): return Spec(b) = False or Properties(b)
i.e. either b isn’t a behaviour that could result from the actions of our algorithm or, if it is, it satisfies Properties. In TLA notation, we write this as:
1 2
SpecOK == Spec => Properties
It’s OK if a behaviour is allowed by Properties but not by Spec. For example, the behaviour which goes straight from Got="", Sent="" to Got="Hi", Sent="Hi" in one step meets our requirements, but it’s not a behaviour of Spec.
The real implementation may itself further restrict Spec. For example, consider the behaviour << s0, s1, s2 >>:
State Got Buffer Sent s0 Hi Hi s1 H i Hi s2 Hi Hi
The sender sends two bytes at once, but the reader reads them one at a time. This is a behaviour of the C implementation, because the reading application can ask the library to read into a 1-byte buffer. However, it is not a behaviour of the OCaml implementation, which gets to choose how much data to return to the application and will return both bytes together.
That’s fine. We just need to show that OCamlImpl => Spec and Spec => Properties and we can deduce that OCamlImpl => Properties. This is, of course, the key purpose of a specification: we only need to check that each implementation implements the specification, not that each implementation directly provides the desired properties.
It might seem strange that an implementation doesn’t have to allow all the specified behaviours. In fact, even the trivial specification Spec == FALSE is considered to be a correct implementation of Properties, because it has no bad behaviours (no behaviours at all). But that’s OK. Once the algorithm is running, it must have some behaviour, even if that behaviour is to do nothing. As the user of the library, you are responsible for checking that you can use it (e.g. by ensuring that the Init conditions are met). An algorithm without any behaviours corresponds to a library you could never use, not to one that goes wrong once it is running.
The model checker
Now comes the fun part: we can ask TLC (the TLA model checker) to check that Spec => Properties. You do this by asking the toolbox to create a new model (I called mine SpecOK) and setting Spec as the “behaviour spec”. It will prompt for a value for BufferSize. I used 2. There will be various things to fix up:
To check Write, TLC first tries to get every possible Seq(Byte), which is an infinite set. I defined MSG == Seq(Byte) and changed Write to use MSG. I then added an alternative definition for MSG in the model so that we only send messages of limited length. In fact, my replacement MSG ensures that Sent will always just be an incrementing sequence (<< 1, 2, 3, ... >>). That’s enough to check Properties, and much quicker than checking every possible message.
The system can keep sending forever. I added a state constraint to the model: Len(Sent) < 4 This tells TLC to stop considering any execution once this becomes false.
With that, the model runs successfully. This is a nice feature of TLA: instead of changing our specification to make it testable, we keep the specification correct and just override some aspects of it in the model. So, the specification says we can send any message, but the model only checks a few of them.
Now we can add Integrity as an invariant to check. That passes, but it’s good to double-check by changing the algorithm. I changed Read so that it doesn’t clear the buffer, using Buffer' = Drop(Buffer, 0) (with 0 instead of n). Then TLC reports a counter-example (“Invariant Integrity is violated”):
The sender writes << 1, 2 >> to Buffer.
The reader reads one byte, to give Got=1, Buffer=12, Sent=12.
The reader reads another byte, to give Got=11, Buffer=12, Sent=12.
Looks like it really was checking what we wanted. It’s good to be careful. If we’d accidentally added Integrity as a “property” to check rather than as an “invariant” then it would have interpreted it as a temporal formula and reported success just because it is true in the initial state.
One really nice feature of TLC is that (unlike a fuzz tester) it does a breadth-first search and therefore finds minimal counter-examples for invariants. The example above is therefore the quickest way to violate Integrity.
Checking Availability complains because of the use of Nat (we’re asking it to check for every possible length). I replaced the Nat with AvailabilityNat and overrode that to be 0..4 in the model. It then complains “Temporal properties were violated” and shows an example where the sender wrote some data and the reader never read it.
The problem is, [Next]_vars always allows us to do nothing. To fix this, we can specify a “weak fairness” constraint. WF_vars(action), says that we can’t just stop forever with action being always possible but never happening. I updated Spec to require the Read action to be fair:
1
Spec == Init /\ [][Next]_vars /\ WF_vars(Read)
Again, care is needed here. If we had specified WF_vars(Next) then we would be forcing the sender to keep sending forever, which users of vchan are not required to do. Worse, this would mean that every possible behaviour of the system would result in Sent growing forever. Every behaviour would therefore hit our Len(Sent) < 4 constraint and TLC wouldn’t consider it further. That means that TLC would never check any actual behaviour against Availability, and its reports of success would be meaningless! Changing Read to require n \in 2..Len(Buffer) is a quick way to see that TLC is actually checking Availability.
Here’s the complete spec so far: vchan1.pdf (source)
The real vchan
The simple Spec algorithm above has some limitations. One obvious simplification is that Buffer is just the sequence of bytes in transit, whereas in the real system it is a ring buffer, made up of an array of bytes along with the producer and consumer counters. We could replace it with three separate variables to make that explicit. However, ring buffers in Xen are well understood and I don’t feel that it would make the specification any clearer to include that.
A more serious problem is that Spec assumes that there is a way to perform the Read and Write operations atomically. Otherwise the real system would have behaviours not covered by the spec. To implement the above Spec correctly, you’d need some kind of lock. The real vchan protocol is more complicated than Spec, but avoids the need for a lock.
The real system has more shared state than just Buffer. I added extra variables to the spec for each item of shared state in the C code, along with its initial value:
SenderLive = TRUE (sender sets to FALSE to close connection)
ReceiverLive = TRUE (receiver sets to FALSE to close connection)
NotifyWrite = TRUE (receiver wants to be notified of next write)
DataReadyInt = FALSE (sender has signalled receiver over event channel)
NotifyRead = FALSE (sender wants to be notified of next read)
SpaceAvailableInt = FALSE (receiver has notified sender over event channel)
DataReadyInt represents the state of the receiver’s event port. The sender can make a Xen hypercall to set this and wake (or interrupt) the receiver. I guess sending these events is somewhat slow, because the NotifyWrite system is used to avoid sending events unnecessarily. Likewise, SpaceAvailableInt is the sender’s event port.
The algorithm
Here is my understanding of the protocol. On the sending side:
The sending application asks to send some bytes. We check whether the receiver has closed the channel and abort if so.
We check the amount of buffer space available.
If there isn’t enough, we set NotifyRead so the receiver will notify us when there is more. We also check the space again after this, in case it changed while setting the flag.
If there is any space:
We write as much data as we can to the buffer.
If the NotifyWrite flag is set, we clear it and notify the receiver of the write.
If we wrote everything, we return success.
Otherwise, we wait to be notified of more space.
We check whether the receiver has closed the channel. If so we abort. Otherwise, we go back to step 2.
On the receiving side:
The receiving application asks us to read up to some amount of data.
We check the amount of data available in the buffer.
If there isn’t as much as requested, we set NotifyWrite so the sender will notify us when there is. We also check the space again after this, in case it changed while setting the flag.
If there is any data, we read up to the amount requested. If the NotifyRead flag is set, we clear it and notify the sender of the new space. We return success to the application (even if we didn’t get as much as requested).
Otherwise (if there was no data), we check whether the sender has closed the connection.
If not (if the connection is still open), we wait to be notified of more data, and then go back to step 2.
Either side can close the connection by clearing their “live” flag and signalling the other side. I assumed there is also some process-local way that the close operation can notify its own side if it’s currently blocked.
To make expressing this kind of step-by-step algorithm easier, TLA+ provides a programming-language-like syntax called PlusCal. It then translates PlusCal into TLA actions.
Confusingly, there are two different syntaxes for PlusCal: Pascal style and C style. This means that, when you search for examples on the web, there is a 50% chance they won’t work because they’re using the other flavour. I started with the Pascal one because that was the first example I found, but switched to C-style later because it was more compact.
Here is my attempt at describing the sender algorithm above in PlusCal:
1 2 3 4 5 6 7 8 9 10 11 12 13 14 15 16 17 18 19 20 21 22 23 24 25 26 27 28 29 30 31 32 33
fair process (SenderWrite = SenderWriteID) variables free = 0, \* Our idea of how much free space is available. msg = << >>, \* The data we haven't sent yet. Sent = << >>; \* Everything we were asked to send. { sender_ready:- while (TRUE) { if (~SenderLive \/ ~ReceiverLive) goto Done else { with (m \in MSG) { msg := m }; Sent := Sent \o msg; \* Remember we wanted to send this }; sender_write: while (TRUE) { free := BufferSize - Len(Buffer); sender_request_notify: if (free >= Len(msg)) goto sender_write_data else NotifyRead := TRUE; sender_recheck_len: free := BufferSize - Len(Buffer); sender_write_data: if (free > 0) { Buffer := Buffer \o Take(msg, Min(Len(msg), free)); msg := Drop(msg, Min(Len(msg), free)); free := 0; sender_check_notify_data: if (NotifyWrite) { NotifyWrite := FALSE; \* Atomic test-and-clear sender_notify_data: DataReadyInt := TRUE; \* Signal receiver if (msg = << >>) goto sender_ready } else if (msg = << >>) goto sender_ready }; sender_blocked: await SpaceAvailableInt \/ ~SenderLive; if (~SenderLive) goto Done; else SpaceAvailableInt := FALSE; sender_check_recv_live: if (~ReceiverLive) goto Done; } } }
The labels (e.g. sender_request_notify:) represent points in the program where other actions can happen. Everything between two labels is considered to be atomic. I checked that every block of code between labels accesses only one shared variable. This means that the real system can’t see any states that we don’t consider. The toolbox doesn’t provide any help with this; you just have to check manually.
The sender_ready label represents a state where the client application hasn’t yet decided to send any data. Its label is tagged with - to indicate that fairness doesn’t apply here, because the protocol doesn’t require applications to keep sending more data forever. The other steps are fair, because once we’ve decided to send something we should keep going.
Taking a step from sender_ready to sender_write corresponds to the vchan library’s write function being called with some argument m. The with (m \in MSG) says that m could be any message from the set MSG. TLA also contains a CHOOSE operator that looks like it might do the same thing, but it doesn’t. When you use with, you are saying that TLC should check all possible messages. When you use CHOOSE, you are saying that it doesn’t matter which message TLC tries (and it will always try the same one). Or, in terms of the specification, a CHOOSE would say that applications can only ever send one particular message, without telling you what that message is.
In sender_write_data, we set free := 0 for no obvious reason. This is just to reduce the number of states that the model checker needs to explore, since we don’t care about its value after this point.
Some of the code is a little awkward because I had to put things in else branches that would more naturally go after the whole if block, but the translator wouldn’t let me do that. The use of semi-colons is also a bit confusing: the PlusCal-to-TLA translator requires them after a closing brace in some places, but the PDF generator messes up the indentation if you include them.
Here’s how the code block starting at sender_request_notify gets translated into a TLA action:
1 2 3 4 5 6 7 8 9 10 11
sender_request_notify == /\ pc[SenderWriteID] = "sender_request_notify" /\ IF free >= Len(msg) THEN /\ pc' = [pc EXCEPT ![SenderWriteID] = "sender_write_data"] /\ UNCHANGED NotifyRead ELSE /\ NotifyRead' = TRUE /\ pc' = [pc EXCEPT ![SenderWriteID] = "sender_recheck_len"] /\ UNCHANGED << SenderLive, ReceiverLive, Buffer, NotifyWrite, DataReadyInt, SpaceAvailableInt, free, msg, Sent, have, want, Got >>
pc is a mapping from process ID to the label where that process is currently executing. So sender_request_notify can only be performed when the SenderWriteID process is at the sender_request_notify label. Afterwards pc[SenderWriteID] will either be at sender_write_data or sender_recheck_len (if there wasn’t enough space for the whole message).
Here’s the code for the receiver:
1 2 3 4 5 6 7 8 9 10 11 12 13 14 15 16 17 18 19 20 21 22 23 24 25 26 27 28 29 30 31
fair process (ReceiverRead = ReceiverReadID) variables have = 0, \* The amount of data we think the buffer contains. want = 0, \* The amount of data the user wants us to read. Got = << >>; \* Pseudo-variable recording all data ever received by receiver. { recv_ready: while (ReceiverLive) { with (n \in 1..MaxReadLen) want := n; recv_reading: while (TRUE) { have := Len(Buffer); recv_got_len: if (have >= want) goto recv_read_data else NotifyWrite := TRUE; recv_recheck_len: have := Len(Buffer); recv_read_data: if (have > 0) { Got := Got \o Take(Buffer, Min(want, have)); Buffer := Drop(Buffer, Min(want, have)); want := 0; have := 0; recv_check_notify_read: if (NotifyRead) { NotifyRead := FALSE; \* (atomic test-and-clear) recv_notify_read: SpaceAvailableInt := TRUE; goto recv_ready; \* Return success } else goto recv_ready; \* Return success } else if (~SenderLive \/ ~ReceiverLive) { goto Done; }; recv_await_data: await DataReadyInt \/ ~ReceiverLive; if (~ReceiverLive) { want := 0; goto Done } else DataReadyInt := FALSE; } } }
It’s quite similar to before. recv_ready corresponds to a state where the application hasn’t yet called read. When it does, we take n (the maximum number of bytes to read) as an argument and store it in the local variable want.
Note: you can use the C library in blocking or non-blocking mode. In blocking mode, a write (or read) waits until data is sent (or received). In non-blocking mode, it returns a special code to the application indicating that it needs to wait. The application then does the waiting itself and then calls the library again. I think the specification above covers both cases, depending on whether you think of sender_blocked and recv_await_data as representing code inside or outside of the library.
We also need a way to close the channel. It wasn’t clear to me, from looking at the C headers, when exactly you’re allowed to do that. I think that if you had a multi-threaded program and you called the close function while the write function was blocked, it would unblock and return. But if you happened to call it at the wrong time, it would try to use a closed file descriptor and fail (or read from the wrong one). So I guess it’s single threaded, and you should use the non-blocking mode if you want to cancel things.
That means that the sender can close only when it is at sender_ready or sender_blocked, and similarly for the receiver. The situation with the OCaml code is the same, because it is cooperatively threaded and so the close operation can only be called while blocked or idle. However, I decided to make the specification more general and allow for closing at any point by modelling closing as separate processes:
1 2 3 4 5 6 7 8 9
fair process (SenderClose = SenderCloseID) { sender_open:- SenderLive := FALSE; \* Clear liveness flag sender_notify_closed: DataReadyInt := TRUE; \* Signal receiver } fair process (ReceiverClose = ReceiverCloseID) { recv_open:- ReceiverLive := FALSE; \* Clear liveness flag recv_notify_closed: SpaceAvailableInt := TRUE; \* Signal sender }
Again, the processes are “fair” because once we start closing we should finish, but the initial labels are tagged with “-“ to disable fairness there: it’s OK if you keep a vchan open forever.
There’s a slight naming problem here. The PlusCal translator names the actions it generates after the starting state of the action. So sender_open is the action that moves from the sender_open label. That is, the sender_open action actually closes the connection!
Finally, we share the event channel with the buffer going in the other direction, so we might get notifications that are nothing to do with us. To ensure we handle that, I added another process that can send events at any time:
1 2 3 4 5 6
process (SpuriousInterrupts = SpuriousID) { spurious: while (TRUE) { either SpaceAvailableInt := TRUE or DataReadyInt := TRUE } }
either/or says that we need to consider both possibilities. This process isn’t marked fair, because we can’t rely these interrupts coming. But we do have to handle them when they happen.
Testing the full spec
PlusCal code is written in a specially-formatted comment block, and you have to press Ctrl-T to generate (or update) then TLA translation before running the model checker.
Be aware that the TLA Toolbox is a bit unreliable about keyboard short-cuts. While typing into the editor always works, short-cuts such as Ctrl-S (save) sometimes get disconnected. So you think you’re doing “edit/save/translate/save/check” cycles, but really you’re just checking some old version over and over again. You can avoid this by always running the model checker with the keyboard shortcut too, since that always seems to fail at the same time as the others. Focussing a different part of the GUI and then clicking back in the editor again fixes everything for a while.
Anyway, running our model on the new spec shows that Integrity is still OK. However, the Availability check fails with the following counter-example:
The sender writes << 1 >> to Buffer.
The sender closes the connection.
The receiver closes the connection.
All processes come to a stop, but the data never arrived.
We need to update Availability to consider the effects of closing connections. And at this point, I’m very unsure what vchan is intended to do. We could say:
1 2 3 4 5
Availability == \A x \in AvailabilityNat : Len(Sent) = x ~> \/ Len(Got) >= x \/ ~ReceiverLive \/ ~SenderLive
That passes. But vchan describes itself as being like a Unix socket. If you write to a Unix socket and then close it, you still expect the data to be delivered. So actually I tried this:
1 2 3 4 5
Availability == \A x \in AvailabilityNat : x = Len(Sent) /\ SenderLive /\ pc[SenderWriteID] = "sender_ready" ~> \/ Len(Got) >= x \/ ~ReceiverLive
This says that if a sender write operation completes successfully (we’re back at sender_ready) and at that point the sender hasn’t closed the connection, then the receiver will eventually receive the data (or close its end).
That is how I would expect it to behave. But TLC reports that the new spec does not satisfy this, giving this example (simplified - there are 16 steps in total):
The receiver starts reading. It finds that the buffer is empty.
The sender writes some data to Buffer and returns to sender_ready.
The sender closes the channel.
The receiver sees that the connection is closed and stops.
Is this a bug? Without a specification, it’s impossible to say. Maybe vchan was never intended to ensure delivery once the sender has closed its end. But this case only happens if you’re very unlucky about the scheduling. If the receiving application calls read when the sender has closed the connection but there is data available then the C code does return the data in that case. It’s only if the sender happens to close the connection just after the receiver has checked the buffer and just before it checks the close flag that this happens.
It’s also easy to fix. I changed the code in the receiver to do a final check on the buffer before giving up:
1 2 3 4
} else if (~SenderLive \/ ~ReceiverLive) { recv_final_check: if (Len(Buffer) = 0) { want := 0; goto Done } else goto recv_reading; }
With that change, we can be sure that data sent while the connection is open will always be delivered (provided only that the receiver doesn’t close the connection itself). If you spotted this issue yourself while you were reviewing the code earlier, then well done!
Note that when TLC finds a problem with a temporal property (such as Availability), it does not necessarily find the shortest example first. I changed the limit on Sent to Len(Sent) < 2 and added an action constraint of ~SpuriousInterrupts to get a simpler example, with only 1 byte being sent and no spurious interrupts.
Some odd things
I noticed a couple of other odd things, which I thought I’d mention.
First, NotifyWrite is initialised to TRUE, which seemed unnecessary. We can initialise it to FALSE instead and everything still works. We can even initialise it with NotifyWrite \in {TRUE, FALSE} to allow either behaviour, and thus test that old programs that followed the original version of the spec still work with either behaviour.
That’s a nice advantage of using a specification language. Saying “the code is the spec” becomes less useful as you build up more and more versions of the code!
However, because there was no spec before, we can’t be sure that existing programs do follow it. And, in fact, I found that QubesDB uses the vchan library in a different and unexpected way. Instead of calling read, and then waiting if libvchan says to, QubesDB blocks first in all cases, and then calls the read function once it gets an event.
We can document that by adding an extra step at the start of ReceiverRead:
1 2 3 4 5
recv_init: either goto recv_ready \* (recommended) or { \* (QubesDB does this) with (n \in 1..MaxReadLen) want := n; goto recv_await_data; };
Then TLC shows that NotifyWrite cannot start as FALSE.
The second odd thing is that the receiver sets NotifyRead whenever there isn’t enough data available to fill the application’s buffer completely. But usually when you do a read operation you just provide a buffer large enough for the largest likely message. It would probably make more sense to set NotifyWrite only when the buffer is completely empty. After checking the current version of the algorithm, I changed the specification to allow either behaviour.
Why does vchan work?
At this point, we have specified what vchan should do and how it does it. We have also checked that it does do this, at least for messages up to 3 bytes long with a buffer size of 2. That doesn’t sound like much, but we still checked 79,288 distinct states, with behaviours up to 38 steps long. This would be a perfectly reasonable place to declare the specification (and blog post) finished.
However, TLA has some other interesting abilities. In particular, it provides a very interesting technique to help discover why the algorithm works.
We’ll start with Integrity. We would like to argue as follows:
Integrity is true in any initial state (i.e. Init => Integrity).
Any Next step preserves Integrity (i.e. Integrity /\ Next => Integrity').
Then it would just be a matter looking at each possible action that makes up Next and checking that each one individually preserves Integrity. However, we can’t do this with Integrity because (2) isn’t true. For example, the state { Got: "", Buffer: "21", Sent: "12" } satisfies Integrity, but if we take a read step then the new state won’t. Instead, we have to argue “If we take a Next step in any reachable state then Integrity'”, but that’s very difficult because how do we know whether a state is reachable without searching them all?
So the idea is to make a stronger version of Integrity, called IntegrityI, which does what we want. IntegrityI is called an inductive invariant. The first step is fairly obvious - I began with:
1 2
IntegrityI == Sent = Got \o Buffer \o msg
Integrity just said that Got is a prefix of Sent. This says specifically that the rest is Buffer \o msg - the data currently being transmitted and the data yet to be transmitted.
We can ask TLC to check Init /\ [][Next]_vars => []IntegrityI to check that it is an invariant, as before. It does that by finding all the Init states and then taking Next steps to find all reachable states. But we can also ask it to check IntegrityI /\ [][Next]_vars => []IntegrityI. That is, the same thing but starting from any state matching IntegrityI instead of Init.
I created a new model (IntegrityI) to do that. It reports a few technical problems at the start because it doesn’t know the types of anything. For example, it can’t choose initial values for SenderLive without knowing that SenderLive is a boolean. I added a TypeOK state expression that gives the expected type of every variable:
1 2 3 4 5 6 7 8 9 10 11 12 13 14 15 16 17
MESSAGE == Seq(Byte) FINITE_MESSAGE(L) == UNION ( { [ 1..N -> Byte ] : N \in 0..L } ) TypeOK == /\ Sent \in MESSAGE /\ Got \in MESSAGE /\ Buffer \in FINITE_MESSAGE(BufferSize) /\ SenderLive \in BOOLEAN /\ ReceiverLive \in BOOLEAN /\ NotifyWrite \in BOOLEAN /\ DataReadyInt \in BOOLEAN /\ NotifyRead \in BOOLEAN /\ SpaceAvailableInt \in BOOLEAN /\ free \in 0..BufferSize /\ msg \in FINITE_MESSAGE(MaxWriteLen) /\ want \in 0..MaxReadLen /\ have \in 0..BufferSize
We also need to tell it all the possible states of pc (which says which label each process it at):
1 2 3 4 5 6 7 8 9 10 11
PCOK == pc \in [ SW: {"sender_ready", "sender_write", "sender_request_notify", "sender_recheck_len", "sender_write_data", "sender_blocked", "sender_check_notify_data", "sender_notify_data", "sender_check_recv_live", "Done"}, SC: {"sender_open", "sender_notify_closed", "Done"}, RR: {"recv_init", "recv_ready", "recv_reading", "recv_got_len", "recv_recheck_len", "recv_read_data", "recv_final_check", "recv_await_data", "recv_check_notify_read", "recv_notify_read", "Done"}, RC: {"recv_open", "recv_notify_closed", "Done"}, SP: {"spurious"} ]
You might imagine that the PlusCal translator would generate that for you, but it doesn’t. We also need to override MESSAGE with FINITE_MESSAGE(n) for some n (I used 2). Otherwise, it can’t enumerate all possible messages. Now we have:
1 2 3 4
IntegrityI == /\ TypeOK /\ PCOK /\ Sent = Got \o Buffer \o msg
With that out of the way, TLC starts finding real problems (that is, examples showing that IntegrityI /\ Next => IntegrityI' isn’t true). First, recv_read_data would do an out-of-bounds read if have = 1 and Buffer = << >>. Our job is to explain why that isn’t a valid state. We can fix it with an extra constraint:
1 2 3 4 5
IntegrityI == /\ TypeOK /\ PCOK /\ Sent = Got \o Buffer \o msg /\ pc[ReceiverReadID] = "recv_read_data" => have <= Len(Buffer)
(note: that => is “implies”, while the <= is “less-than-or-equal-to”)
Now it complains that if we do recv_got_len with Buffer = << >>, have = 1, want = 0 then we end up in recv_read_data with Buffer = << >>, have = 1, and we have to explain why that can’t happen and so on.
Because TLC searches breadth-first, the examples it finds never have more than 2 states. You just have to explain why the first state can’t happen in the real system. Eventually, you get a big ugly pile of constraints, which you then think about for a bit and simply. I ended up with:
1 2 3 4 5 6 7 8 9 10
IntegrityI == /\ TypeOK /\ PCOK /\ Sent = Got \o Buffer \o msg /\ have <= Len(Buffer) /\ free <= BufferSize - Len(Buffer) /\ pc[SenderWriteID] \in {"sender_write", "sender_request_notify", "sender_recheck_len", "sender_write_data", "sender_blocked", "sender_check_recv_live"} => msg /= << >> /\ pc[SenderWriteID] \in {"sender_ready"} => msg = << >>
It’s a good idea to check the final IntegrityI with the original SpecOK model, just to check it really is an invariant.
So, in summary, Integrity is always true because:
Sent is always the concatenation of Got, Buffer and msg. That’s fairly obvious, because sender_ready sets msg and appends the same thing to Sent, and the other steps (sender_write_data and recv_read_data) just transfer some bytes from the start of one variable to the end of another.
Although, like all local information, the receiver’s have variable might be out-of-date, there must be at least that much data in the buffer, because the sender process will only have added more, not removed any. This is sufficient to ensure that we never do an out-of-range read.
Likewise, the sender’s free variable is a lower bound on the true amount of free space, because the receiver only ever creates more space. We will therefore never write beyond the free space.
I think this ability to explain why an algorithm works, by being shown examples where the inductive property doesn’t hold, is a really nice feature of TLA. Inductive invariants are useful as a first step towards writing a proof, but I think they’re valuable even on their own. If you’re documenting your own algorithm, this process will get you to explain your own reasons for believing it works (I tried it on a simple algorithm in my own code and it seemed helpful).
Some notes:
Originally, I had the free and have constraints depending on pc. However, the algorithm sets them to zero when not in use so it turns out they’re always true.
IntegrityI matches 532,224 states, even with a maximum Sent length of 1, but it passes! There are some games you can play to speed things up; see Using TLC to Check Inductive Invariance for some suggestions (I only discovered that while writing this up).
Proving Integrity
TLA provides a syntax for writing proofs, and integrates with TLAPS (the TLA+ Proof System) to allow them to be checked automatically.
Proving IntegrityI is just a matter of showing that Init => IntegrityI and that it is preserved by any possible [Next]_vars step. To do that, we consider each action of Next individually, which is long but simple enough.
I was able to prove it, but the recv_read_data action was a little difficult because we don’t know that want > 0 at that point, so we have to do some extra work to prove that transferring 0 bytes works, even though the real system never does that.
I therefore added an extra condition to IntegrityI that want is non-zero whenever it’s in use, and also conditions about have and free being 0 when not in use, for completeness:
1 2 3 4 5 6 7 8 9 10
IntegrityI == [...] /\ want = 0 <=> pc[ReceiverReadID] \in {"recv_check_notify_read", "recv_notify_read", "recv_init", "recv_ready", "recv_notify_read", "Done"} /\ \/ pc[ReceiverReadID] \in {"recv_got_len", "recv_recheck_len", "recv_read_data"} \/ have = 0 /\ \/ pc[SenderWriteID] \in {"sender_write", "sender_request_notify", "sender_recheck_len", "sender_write_data"} \/ free = 0
Availability
Integrity was quite easy to prove, but I had more trouble trying to explain Availability. One way to start would be to add Availability as a property to check to the IntegrityI model. However, it takes a while to check properties as it does them at the end, and the examples it finds may have several steps (it took 1m15s to find a counter-example for me).
Here’s a faster way (37s). The algorithm will deadlock if both sender and receiver are in their blocked states and neither interrupt is pending, so I made a new invariant, I, which says that deadlock can’t happen:
1 2 3 4 5 6
I == /\ IntegrityI /\ ~ /\ pc[SenderWriteID] = "sender_blocked" /\ ~SpaceAvailableInt /\ pc[ReceiverReadID] = "recv_await_data" /\ ~DataReadyInt
I discovered some obvious facts about closing the connection. For example, the SenderLive flag is set if and only if the sender’s close thread hasn’t done anything. I’ve put them all together in CloseOK:
1 2 3 4 5 6 7 8 9 10 11 12
(* Some obvious facts about shutting down connections. *) CloseOK == \* An endpoint is live iff its close thread hasn't done anything: /\ pc[SenderCloseID] = "sender_open" <=> SenderLive /\ pc[ReceiverCloseID] = "recv_open" <=> ReceiverLive \* The send and receive loops don't terminate unless someone has closed the connection: /\ pc[ReceiverReadID] \in {"recv_final_check", "Done"} => ~ReceiverLive \/ ~SenderLive /\ pc[SenderWriteID] \in {"Done"} => ~ReceiverLive \/ ~SenderLive \* If the receiver closed the connection then we will get (or have got) the signal: /\ pc[ReceiverCloseID] = "Done" => \/ SpaceAvailableInt \/ pc[SenderWriteID] \in {"sender_check_recv_live", "Done"}
But I had problems with other examples TLC showed me, and I realised that I didn’t actually know why this algorithm doesn’t deadlock.
Intuitively it seems clear enough: the sender puts data in the buffer when there’s space and notifies the receiver, and the receiver reads it and notifies the writer. What could go wrong? But both processes are working with information that can be out-of-date. By the time the sender decides to block because the buffer looked full, the buffer might be empty. And by the time the receiver decides to block because it looked empty, it might be full.
Maybe you already saw why it works from the C code, or the algorithm above, but it took me a while to figure it out! I eventually ended up with an invariant of the form:
1 2 3 4
I == .. /\ SendMayBlock => SpaceWakeupComing /\ ReceiveMayBlock => DataWakeupComing
SendMayBlock is TRUE if we’re in a state that may lead to being blocked without checking the buffer’s free space again. Likewise, ReceiveMayBlock indicates that the receiver might block. SpaceWakeupComing and DataWakeupComing predict whether we’re going to get an interrupt. The idea is that if we’re going to block, we need to be sure we’ll be woken up. It’s a bit ugly, though, e.g.
1 2 3 4 5 6 7 8 9 10 11 12 13 14
DataWakeupComing == \/ DataReadyInt \* Event sent \/ pc[SenderWriteID] = "sender_notify_data" \* Event being sent \/ pc[SenderCloseID] = "sender_notify_closed" \/ pc[ReceiverCloseID] = "recv_notify_closed" \/ /\ NotifyWrite \* Event requested and ... /\ ReceiverLive \* Sender can see receiver is still alive and ... /\ \/ pc[SenderWriteID] = "sender_write_data" /\ free > 0 \/ pc[SenderWriteID] = "sender_check_notify_data" \/ pc[SenderWriteID] = "sender_recheck_len" /\ Len(Buffer) < BufferSize \/ pc[SenderWriteID] = "sender_ready" /\ SenderLive /\ Len(Buffer) < BufferSize \/ pc[SenderWriteID] = "sender_write" /\ Len(Buffer) < BufferSize \/ pc[SenderWriteID] = "sender_request_notify" /\ Len(Buffer) < BufferSize \/ SpaceWakeupComing /\ Len(Buffer) < BufferSize /\ SenderLive
It did pass my model that tested sending one byte, and I decided to try a proof. Well, it didn’t work. The problem seems to be that DataWakeupComing and SpaceWakeupComing are really mutually recursive. The reader will wake up if the sender wakes it, but the sender might be blocked, or about to block. That’s OK though, as long as the receiver will wake it, which it will do, once the sender wakes it…
You’ve probably already figured it out, but I thought I’d document my confusion. It occurred to me that although each process might have out-of-date information, that could be fine as long as at any one moment one of them was right. The last process to update the buffer must know how full it is, so one of them must have correct information at any given time, and that should be enough to avoid deadlock.
That didn’t work either. When you’re at a proof step and can’t see why it’s correct, you can ask TLC to show you an example. e.g. if you’re stuck trying to prove that sender_request_notify preserves I when the receiver is at recv_ready, the buffer is full, and ReceiverLive = FALSE, you can ask for an example of that:
1 2 3 4 5 6 7
Example == /\ PCOK /\ pc[SenderWriteID] = "sender_request_notify" /\ pc[ReceiverReadID] = "recv_ready" /\ ReceiverLive = FALSE /\ I /\ Len(Buffer) = BufferSize
You then create a new model that searches Example /\ [][Next]_vars and tests I. As long as Example has several constraints, you can use a much larger model for this. I also ask it to check the property [][FALSE]_vars, which means it will show any step starting from Example.
It quickly became clear what was wrong: it is quite possible that neither process is up-to-date. If both processes see the buffer contains X bytes of data, and the sender sends Y bytes and the receiver reads Z bytes, then the sender will think there are X + Y bytes in the buffer and the receiver will think there are X - Z bytes, and neither is correct. My original 1-byte buffer was just too small to find a counter-example.
The real reason why vchan works is actually rather obvious. I don’t know why I didn’t see it earlier. But eventually it occurred to me that I could make use of Got and Sent. I defined WriteLimit to be the total number of bytes that the sender would write before blocking, if the receiver never did anything further. And I defined ReadLimit to be the total number of bytes that the receiver would read if the sender never did anything else.
Did I define these limits correctly? It’s easy to ask TLC to check some extra properties while it’s running. For example, I used this to check that ReadLimit behaves sensibly:
1 2 3 4 5 6 7 8 9
ReadLimitCorrect == \* We will eventually receive what ReadLimit promises: /\ WF_vars(ReceiverRead) => \A i \in AvailabilityNat : ReadLimit = i ~> Len(Got) >= i \/ ~ReceiverLive \* ReadLimit can only decrease if we decide to shut down: /\ [][ReadLimit' >= ReadLimit \/ ~ReceiverLive]_vars \* ReceiverRead steps don't change the read limit: /\ [][ReceiverRead => UNCHANGED ReadLimit \/ ~ReceiverLive]_vars
Because ReadLimit is defined in terms of what it does when no other processes run, this property should ideally be tested in a model without the fairness conditions (i.e. just Init /\ [][Next]_vars). Otherwise, fairness may force the sender to perform a step. We still want to allow other steps, though, to show that ReadLimit is a lower bound.
With this, we can argue that e.g. a 2-byte buffer will eventually transfer 3 bytes:
The receiver will eventually read 3 bytes as long as the sender eventually sends 3 bytes.
The sender will eventually send 3, if the receiver reads at least 1.
The receiver will read 1 if the sender sends at least 1.
The sender will send 1 if the reader has read at least 0 bytes, which is always true.
By this point, I was learning to be more cautious before trying a proof, so I added some new models to check this idea further. One prevents the sender from ever closing the connection and the other prevents the receiver from ever closing. That reduces the number of states to consider and I was able to check a slightly larger model.
1 2 3 4 5 6 7 8 9 10 11 12 13 14 15 16 17 18 19 20 21 22
I == /\ IntegrityI /\ CloseOK \* If the reader is stuck, but data is available, the sender will unblock it: /\ ReaderShouldBeUnblocked => \* The sender is going to write more: \/ WriteLimit > Len(Got) + Len(Buffer) /\ Len(msg) > 0 /\ SenderLive \* The sender is about to increase ReadLimit: \/ (\/ pc[SenderWriteID] = "sender_check_notify_data" /\ NotifyWrite \/ pc[SenderWriteID] = "sender_notify_data") /\ ReadLimit < Len(Got) + Len(Buffer) \* The sender is about to notify us of shutdown: \/ pc[SenderCloseID] \in {"sender_notify_closed"} \* If the writer is stuck, but there is now space available, the receiver will unblock it: /\ WriterShouldBeUnblocked => \* The reader is going to read more: \/ ReadLimit > Len(Got) /\ ReceiverLive \* The reader is about to increase WriteLimit: \/ (\/ pc[ReceiverReadID] = "recv_check_notify_read" /\ NotifyRead \/ pc[ReceiverReadID] = "recv_notify_read") /\ WriteLimit < Len(Got) + BufferSize \* The receiver is about to notify us of shutdown: \/ pc[ReceiverCloseID] \in {"recv_notify_closed"} /\ NotifyFlagsCorrect
If a process is on a path to being blocked then it must have set its notify flag. NotifyFlagsCorrect says that in that case, the flag it still set, or the interrupt has been sent, or the other process is just about to trigger the interrupt.
I managed to use that to prove that the sender’s steps preserved I, but I needed a little extra to finish the receiver proof. At this point, I finally spotted the obvious invariant (which you, no doubt, saw all along): whenever NotifyRead is still set, the sender has accurate information about the buffer.
1 2 3 4 5
/\ NotifyRead => \* The sender has accurate information about the buffer: \/ WriteLimit = Len(Got) + BufferSize \* Or the flag is being cleared right now: \/ pc[ReceiverReadID] = "recv_check_notify_read"
That’s pretty obvious, isn’t it? The sender checks the buffer after setting the flag, so it must have accurate information at that point. The receiver clears the flag after reading from the buffer (which invalidates the sender’s information).
Now I had a dilemma. There was obviously going to be a matching property about NotifyWrite. Should I add that, or continue with just this? I was nearly done, so I continued and finished off the proofs.
With I proved, I was able to prove some other nice things quite easily:
1 2 3 4 5
THEOREM /\ I /\ SenderLive /\ ReceiverLive /\ \/ pc[SenderWriteID] = "sender_ready" \/ pc[SenderWriteID] = "sender_blocked" /\ ~SpaceAvailableInt => ReadLimit = Len(Got) + Len(Buffer)
That says that, whenever the sender is idle or blocked, the receiver will read everything sent so far, without any further help from the sender. And:
1 2 3 4
THEOREM /\ I /\ SenderLive /\ ReceiverLive /\ pc[ReceiverReadID] \in {"recv_await_data"} /\ ~DataReadyInt => WriteLimit = Len(Got) + BufferSize
That says that whenever the receiver is blocked, the sender can fill the buffer. That’s pretty nice. It would be possible to make a vchan system that e.g. could only send 1 byte at a time and still prove it couldn’t deadlock and would always deliver data, but here we have shown that the algorithm can use the whole buffer. At least, that’s what these theorems say as long as you believe that ReadLimit and WriteLimit are defined correctly.
With the proof complete, I then went back and deleted all the stuff about ReadLimit and WriteLimit from I and started again with just the new rules about NotifyRead and NotifyWrite. Instead of using WriteLimit = Len(Got) + BufferSize to indicate that the sender has accurate information, I made a new SenderInfoAccurate that just returns TRUE whenever the sender will fill the buffer without further help. That avoids some unnecessary arithmetic, which TLAPS needs a lot of help with.
1 2 3 4 5 6 7 8 9 10 11 12 13 14 15 16 17
(* The sender's information is accurate if whenever it is going to block, the buffer really is full. *) SenderInfoAccurate == \* We have accurate information: \/ Len(Buffer) + free = BufferSize \* In these states, we're going to check the buffer before blocking: \/ pc[SenderWriteID] \in {"sender_ready", "sender_request_notify", "sender_write", "sender_recheck_len", "sender_check_recv_live", "Done"} \/ pc[SenderWriteID] \in {"sender_request_notify"} /\ free < Len(msg) \* If we've been signalled, we'll immediately wake next time we try to block: \/ SpaceAvailableInt \* We're about to write some data: \/ /\ pc[SenderWriteID] \in {"sender_write_data"} /\ free >= Len(msg) \* But we won't need to block \* If we wrote all the data we intended to, we'll return without blocking: \/ /\ pc[SenderWriteID] \in {"sender_check_notify_data", "sender_notify_data"} /\ Len(msg) = 0
By talking about accuracy instead of the write limit, I was also able to include “Done” in with the other happy cases. Before, that had to be treated as a possible problem because the sender can’t use the full buffer when it’s Done.
With this change, the proof of Spec => []I became much simpler (384 lines shorter). And most of the remaining steps were trivial.
The ReadLimit and WriteLimit idea still seemed useful, though, but I found I was able to prove the same things from I. e.g. we can still conclude this, even if I doesn’t mention WriteLimit:
1 2 3 4
THEOREM /\ I /\ SenderLive /\ ReceiverLive /\ pc[ReceiverReadID] \in {"recv_await_data"} /\ ~DataReadyInt => WriteLimit = Len(Got) + BufferSize
That’s nice, because it keeps the invariant and its proofs simple, but we still get the same result in the end.
I initially defined WriteLimit to be the number of bytes the sender could write if the sending application wanted to send enough data, but I later changed it to be the actual number of bytes it would write if the application didn’t try to send any more. This is because otherwise, with packet-based sends (where we only write when the buffer has enough space for the whole message at once) WriteLimit could go down. e.g. we think we can write another 3 bytes, but then the application decides to write 10 bytes and now we can’t write anything more.
The limit theorems above are useful properties, but it would be good to have more confidence that ReadLimit and WriteLimit are correct. I was able to prove some useful lemmas here.
First, ReceiverRead steps don’t change ReadLimit (as long as the receiver hasn’t closed the connection):
1 2 3
THEOREM ReceiverReadPreservesReadLimit == ASSUME I, ReceiverLive, ReceiverRead PROVE UNCHANGED ReadLimit
This gives us a good reason to think that ReadLimit is correct:
When the receiver is blocked it cannot read any more than it has without help.
ReadLimit is defined to be Len(Got) then, so ReadLimit is obviously correct for this case.
Since read steps preserve ReadLimit, this shows that ReadLimit is correct in all cases.
e.g. if ReadLimit = 5 and no other processes do anything, then we will end up in a state with the receiver blocked, and ReadLimit = Len(Got) = 5 and so we really did read a total of 5 bytes.
I was also able to prove that it never decreases (unless the receiver closes the connection):
1 2 3
THEOREM ReadLimitMonotonic == ASSUME I, Next, ReceiverLive PROVE ReadLimit' >= ReadLimit
So, if ReadLimit = n then it will always be at least n, and if the receiver ever blocks then it will have read at least n bytes.
I was able to prove similar properties about WriteLimit. So, I feel reasonably confident that these limit predictions are correct.
Disappointingly, we can’t actually prove Availability using TLAPS, because currently it understands very little temporal logic (see TLAPS limitations). However, I could show that the system can’t deadlock while there’s data to be transmitted:
1 2 3 4 5 6 7 8 9 10 11 12 13 14 15 16 17 18 19 20 21 22 23 24 25 26 27 28 29 30 31 32
(* We can't get into a state where the sender and receiver are both blocked and there is no wakeup pending: *) THEOREM DeadlockFree1 == ASSUME I PROVE ~ /\ pc[SenderWriteID] = "sender_blocked" /\ ~SpaceAvailableInt /\ SenderLive /\ pc[ReceiverReadID] = "recv_await_data" /\ ~DataReadyInt /\ ReceiverLive <1> SUFFICES ASSUME /\ pc[SenderWriteID] = "sender_blocked" /\ ~SpaceAvailableInt /\ SenderLive /\ pc[ReceiverReadID] = "recv_await_data" /\ ~DataReadyInt /\ ReceiverLive PROVE FALSE OBVIOUS <1> NotifyFlagsCorrect BY DEF I <1> NotifyRead BY DEF NotifyFlagsCorrect <1> NotifyWrite <2> have = 0 BY DEF IntegrityI, I <2> QED BY DEF NotifyFlagsCorrect <1> SenderInfoAccurate /\ ReaderInfoAccurate BY DEF I <1> free = 0 BY DEF IntegrityI, I <1> Len(Buffer) = BufferSize BY DEF SenderInfoAccurate <1> Len(Buffer) = 0 BY DEF ReaderInfoAccurate <1> QED BY BufferSizeType (* We can't get into a state where the sender is idle and the receiver is blocked unless the buffer is empty (all data sent has been consumed): *) THEOREM DeadlockFree2 == ASSUME I, pc[SenderWriteID] = "sender_ready", SenderLive, pc[ReceiverReadID] = "recv_await_data", ReceiverLive, ~DataReadyInt PROVE Len(Buffer) = 0
I’ve included the proof of DeadlockFree1 above:
To show deadlock can’t happen, it suffices to assume it has happened and show a contradiction.
If both processes are blocked then NotifyRead and NotifyWrite must both be set (because processes don’t block without setting them, and if they’d been unset then an interrupt would now be pending and we wouldn’t be blocked).
Since NotifyRead is still set, the sender is correct in thinking that the buffer is still full.
Since NotifyWrite is still set, the receiver is correct in thinking that the buffer is still empty.
That would be a contradiction, since BufferSize isn’t zero.
If it doesn’t deadlock, then some process must keep getting woken up by interrupts, which means that interrupts keep being sent. We only send interrupts after making progress (writing to the buffer or reading from it), so we must keep making progress. We’ll have to content ourselves with that argument.
Experiences with TLAPS
The toolbox doesn’t come with the proof system, so you need to install it separately. The instructions are out-of-date and have a lot of broken links. In May, I turned the steps into a Dockerfile, which got it partly installed, and asked on the TLA group for help, but no-one else seemed to know how to install it either. By looking at the error messages and searching the web for programs with the same names, I finally managed to get it working in December. If you have trouble installing it too, try using my Docker image.
Once installed, you can write a proof in the toolbox and then press Ctrl-G, Ctrl-G to check it. On success, the proof turns green. On failure, the failing step turns red. You can also do the Ctrl-G, Ctrl-G combination on a single step to check just that step. That’s useful, because it’s pretty slow. It takes more than 10 minutes to check the complete specification.
TLA proofs are done in the mathematical style, which is to write a set of propositions and vaguely suggest that thinking about these will lead you to the proof. This is good for building intuition, but bad for reproducibility. A mathematical proof is considered correct if the reader is convinced by it, which depends on the reader. In this case, the “reader” is a collection of automated theorem-provers with various timeouts. This means that whether a proof is correct or not depends on how fast your computer is, how many programs are currently running, etc. A proof might pass one day and fail the next. Some proof steps consistently pass when you try them individually, but consistently fail when checked as part of the whole proof. If a step fails, you need to break it down into smaller steps.
Sometimes the proof system is very clever, and immediately solves complex steps. For example, here is the proof that the SenderClose process (which represents the sender closing the channel), preserves the invariant I:
1 2 3 4 5 6 7 8 9 10 11 12 13 14 15 16 17 18 19 20 21 22 23 24 25 26 27 28
LEMMA SenderClosePreservesI == I /\ SenderClose => I' <1> SUFFICES ASSUME I, SenderClose PROVE I' OBVIOUS <1> IntegrityI BY DEF I <1> TypeOK BY DEF IntegrityI <1> PCOK BY DEF IntegrityI <1>1. CASE sender_open <2> USE <1>1 DEF sender_open <2> UNCHANGED << pc[SenderWriteID], pc[ReceiverReadID], pc[ReceiverCloseID] >> BY DEF PCOK <2> pc'[SenderCloseID] = "sender_notify_closed" BY DEF PCOK <2> TypeOK' BY DEF TypeOK <2> PCOK' BY DEF PCOK <2> IntegrityI' BY DEF IntegrityI <2> NotifyFlagsCorrect' BY DEF NotifyFlagsCorrect, I <2> QED BY DEF I, SenderInfoAccurate, ReaderInfoAccurate, CloseOK <1>2. CASE sender_notify_closed <2> USE <1>2 DEF sender_notify_closed <2> UNCHANGED << pc[SenderWriteID], pc[ReceiverReadID], pc[ReceiverCloseID] >> BY DEF PCOK <2> pc'[SenderCloseID] = "Done" BY DEF PCOK <2> TypeOK' BY DEF TypeOK <2> PCOK' BY DEF PCOK <2> IntegrityI' BY DEF IntegrityI <2> NotifyFlagsCorrect' BY DEF NotifyFlagsCorrect, I <2> QED BY DEF I, SenderInfoAccurate, ReaderInfoAccurate, CloseOK <1>3. QED BY <1>1, <1>2 DEF SenderClose
A step such as IntegrityI' BY DEF IntegrityI says “You can see that IntegrityI will be true in the next step just by looking at its definition”. So this whole lemma is really just saying “it’s obvious”. And TLAPS agrees.
At other times, TLAPS can be maddeningly stupid. And it can’t tell you what the problem is - it can only make things go red.
For example, this fails:
1 2 3 4 5
THEOREM ASSUME pc' = [pc EXCEPT ![1] = "l2"], pc[2] = "l1" PROVE pc'[2] = "l1" OBVIOUS
We’re trying to say that pc[2] is unchanged, given that pc' is the same as pc except that we changed pc[1]. The problem is that TLA is an untyped language. Even though we know we did a mapping update to pc, that isn’t enough (apparently) to conclude that pc is in fact a mapping. To fix it, you need:
1 2 3 4 5 6
THEOREM ASSUME pc \in [Nat -> STRING], pc' = [pc EXCEPT ![1] = "l2"], pc[2] = "l1" PROVE pc'[2] = "l1" OBVIOUS
The extra pc \in [Nat -> STRING] tells TLA the type of the pc variable. I found missing type information to be the biggest problem when doing proofs, because you just automatically assume that the computer will know the types of things. Another example:
1 2 3 4 5
THEOREM ASSUME NEW x \in Nat, NEW y \in Nat, x + Min(y, 10) = x + y PROVE Min(y, 10) = y OBVIOUS
We’re just trying to remove the x + ... from both sides of the equation. The problem is, TLA doesn’t know that Min(y, 10) is a number, so it doesn’t know whether the normal laws of addition apply in this case. It can’t tell you that, though - it can only go red. Here’s the solution:
1 2 3 4 5
THEOREM ASSUME NEW x \in Nat, NEW y \in Nat, x + Min(y, 10) = x + y PROVE Min(y, 10) = y BY DEF Min
The BY DEF Min tells TLAPS to share the definition of Min with the solvers. Then they can see that Min(y, 10) must be a natural number too and everything works.
Another annoyance is that sometimes it can’t find the right lemma to use, even when you tell it exactly what it needs. Here’s an extreme case:
1 2 3 4 5 6 7 8 9 10 11 12 13 14 15 16 17 18 19 20 21 22 23 24 25 26 27 28 29
LEMMA TransferFacts == ASSUME NEW src, NEW src2, \* (TLAPS doesn't cope with "NEW VARAIBLE src") NEW dst, NEW dst2, NEW i \in 1..Len(src), src \in MESSAGE, dst \in MESSAGE, dst2 = dst \o Take(src, i), src2 = Drop(src, i) PROVE /\ src2 \in MESSAGE /\ Len(src2) = Len(src) - i /\ dst2 \in MESSAGE /\ Len(dst2) = Len(dst) + i /\ UNCHANGED (dst \o src) PROOF OMITTED LEMMA SameAgain == ASSUME NEW src, NEW src2, \* (TLAPS doesn't cope with "NEW VARAIBLE src") NEW dst, NEW dst2, NEW i \in 1..Len(src), src \in MESSAGE, dst \in MESSAGE, dst2 = dst \o Take(src, i), src2 = Drop(src, i) PROVE /\ src2 \in MESSAGE /\ Len(src2) = Len(src) - i /\ dst2 \in MESSAGE /\ Len(dst2) = Len(dst) + i /\ UNCHANGED (dst \o src) BY TransferFacts
TransferFacts states some useful facts about transferring data between two variables. You can prove that quite easily. SameAgain is identical in every way, and just refers to TransferFacts for the proof. But even with only one lemma to consider - one that matches all the assumptions and conclusions perfectly - none of the solvers could figure this one out!
My eventual solution was to name the bundle of results. This works:
1 2 3 4 5 6 7 8 9 10 11 12 13 14 15 16 17 18 19 20 21 22 23 24 25 26 27 28
TransferResults(src, src2, dst, dst2, i) == /\ src2 \in MESSAGE /\ Len(src2) = Len(src) - i /\ dst2 \in MESSAGE /\ Len(dst2) = Len(dst) + i /\ UNCHANGED (dst \o src) LEMMA TransferFacts == ASSUME NEW src, NEW src2, NEW dst, NEW dst2, NEW i \in 1..Len(src), src \in MESSAGE, dst \in MESSAGE, dst2 = dst \o Take(src, i), src2 = Drop(src, i) PROVE TransferResults(src, src2, dst, dst2, i) PROOF OMITTED LEMMA SameAgain == ASSUME NEW src, NEW src2, NEW dst, NEW dst2, NEW i \in 1..Len(src), src \in MESSAGE, dst \in MESSAGE, dst2 = dst \o Take(src, i), src2 = Drop(src, i) PROVE TransferResults(src, src2, dst, dst2, i) BY TransferFacts
Most of the art of using TLAPS is in controlling how much information to share with the provers. Too little (such as failing to provide the definition of Min) and they don’t have enough information to find the proof. Too much (such as providing the definition of TransferResults) and they get overwhelmed and fail to find the proof.
It’s all a bit frustrating, but it does work, and being machine checked does give you some confidence that your proofs are actually correct.
Another, perhaps more important, benefit of machine checked proofs is that when you decide to change something in the specification you can just ask it to re-check everything. Go and have a cup of tea, and when you come back it will have highlighted in red any steps that need to be updated. I made a lot of changes, and this worked very well.
The TLAPS philosophy is that
If you are concerned with an algorithm or system, you should not be spending your time proving basic mathematical facts. Instead, you should assert the mathematical theorems you need as assumptions or theorems.
So even if you can’t find a formal proof of every step, you can still use TLAPS to break it down into steps than you either can prove, or that you think are obvious enough that they don’t require a proof. However, I was able to prove everything I needed for the vchan specification within TLAPS.
The final specification
I did a little bit of tidying up at the end. In particular, I removed the want variable from the specification. I didn’t like it because it doesn’t correspond to anything in the OCaml implementation, and the only place the algorithm uses it is to decide whether to set NotifyWrite, which I thought might be wrong anyway.
I changed this:
1 2
recv_got_len: if (have >= want) goto recv_read_data else NotifyWrite := TRUE;
to:
1 2 3 4 5 6
recv_got_len: either { if (have > 0) goto recv_read_data else NotifyWrite := TRUE; } or { NotifyWrite := TRUE; };
That always allows an implementation to set NotifyWrite if it wants to, or to skip that step just as long as have > 0. That covers the current C behaviour, my proposed C behaviour, and the OCaml implementation. It also simplifies the invariant, and even made the proofs shorter!
I put the final specification online at spec-vchan. I also configured Travis CI to check all the models and verify all the proofs. That’s useful because sometimes I’m too impatient to recheck everything on my laptop before pushing updates.
You can generate a PDF version of the specification with make pdfs. Expressions there can be a little easier to read because they use proper symbols, but it also breaks things up into pages, which is highly annoying. It would be nice if it could omit the proofs too, as they’re really only useful if you’re trying to edit them. I’d rather just see the statement of each theorem.
The original bug
With my new understanding of vchan, I couldn’t see anything obvious wrong with the C code (at least, as long as you keep the connection open, which the firewall does).
I then took a look at ocaml-vchan. The first thing I noticed was that someone had commented out all the memory barriers, noting in the Git log that they weren’t needed on x86. I am using x86, so that’s not it, but I filed a bug about it anyway: Missing memory barriers.
The other strange thing I saw was the behaviour of the read function. It claims to implement the Mirage FLOW interface, which says that read “blocks until some data is available and returns a fresh buffer containing it”. However, looking at the code, what it actually does is to return a pointer directly into the shared buffer. It then delays updating the consumer counter until the next call to read. That’s rather dangerous, and I filed another bug about that: Read has very surprising behaviour. However, when I checked the mirage-qubes code, it just takes this buffer and makes a copy of it immediately. So that’s not the bug either.
Also, the original bug report mentioned a 10 second timeout, and neither the C implementation nor the OCaml one had any timeouts. Time to look at QubesDB itself.
QubesDB accepts messages from either the guest VM (the firewall) or from local clients connected over Unix domain sockets. The basic structure is:
1 2 3 4 5 6
while True: await vchan event, local client data, or 10 second timeout while vchan.receive_buffer non-empty: handle_vchan_data() for each ready client: handle_client_data()
The suspicion was that we were missing a vchan event, but then it was discovering that there was data in the buffer anyway due to the timeout. Looking at the code, it does seem to me that there is a possible race condition here:
A local client asks to send some data.
handle_client_data sends the data to the firewall using a blocking write.
The firewall sends a message to QubesDB at the same time and signals an event because the firewall-to-db buffer has data.
QubesDB gets the event but ignores it because it’s doing a blocking write and there’s still no space in the db-to-firewall direction.
The firewall updates its consumer counter and signals another event, because the buffer now has space.
The blocking write completes and QubesDB returns to the main loop.
QubesDB goes to sleep for 10 seconds, without checking the buffer.
I don’t think this is the cause of the bug though, because the only messages the firewall might be sending here are QDB_RESP_OK messages, and QubesDB just discards such messages.
I managed to reproduce the problem myself, and saw that in fact QubesDB doesn’t make any progress due to the 10 second timeout. It just tries to go back to sleep for another 10 seconds and then immediately gets woken up by a message from a local client. So, it looks like QubesDB is only sending updates every 10 seconds because its client, qubesd, is only asking it to send updates every 10 seconds! And looking at the qubesd logs, I saw stacktraces about libvirt failing to attach network devices, so I read the Xen network device attachment specification to check that the firewall implemented that correctly.
I’m kidding, of course. There isn’t any such specification. But maybe this blog post will inspire someone to write one…
Conclusions
As users of open source software, we’re encouraged to look at the source code and check that it’s correct ourselves. But that’s pretty difficult without a specification saying what things are supposed to do. Often I deal with this by learning just enough to fix whatever bug I’m working on, but this time I decided to try making a proper specification instead. Making the TLA specification took rather a long time, but it was quite pleasant. Hopefully the next person who needs to know about vchan will appreciate it.
A TLA specification generally defines two sets of behaviours. The first is the set of desirable behaviours (e.g. those where the data is delivered correctly). This definition should clearly explain what users can expect from the system. The second defines the behaviours of a particular algorithm. This definition should make it easy to see how to implement the algorithm. The TLC model checker can check that the algorithm’s behaviours are all acceptable, at least within some defined limits.
Writing a specification using the TLA notation forces us to be precise about what we mean. For example, in a prose specification we might say “data sent will eventually arrive”, but in an executable TLA specification we’re forced to clarify what happens if the connection is closed. I would have expected that if a sender writes some data and then closes the connection then the data would still arrive, but the C implementation of vchan does not always ensure that. The TLC model checker can find a counter-example showing how this can fail in under a minute.
To explain why the algorithm always works, we need to find an inductive invariant. The TLC model checker can help with this, by presenting examples of unreachable states that satisfy the invariant but don’t preserve it after taking a step. We must add constraints to explain why these states are invalid. This was easy for the Integrity invariant, which explains why we never receive incorrect data, but I found it much harder to prove that the system cannot deadlock. I suspect that the original designer of a system would find this step easy, as presumably they already know why it works.
Once we have found an inductive invariant, we can write a formal machine-checked proof that the invariant is always true. Although TLAPS doesn’t allow us to prove liveness properties directly, I was able to prove various interesting things about the algorithm: it doesn’t deadlock; when the sender is blocked, the receiver can read everything that has been sent; and when the receiver is blocked, the sender can fill the entire buffer.
Writing formal proofs is a little tedious, largely because TLA is an untyped language. However, there is nothing particularly difficult about it, once you know how to work around various limitations of the proof checkers.
You might imagine that TLA would only work on very small programs like libvchan, but this is not the case. It’s just a matter of deciding what to specify in detail. For example, in this specification I didn’t give any details about how ring buffers work, but instead used a single Buffer variable to represent them. For a specification of a larger system using vchan, I would model each channel using just Sent and Got and an action that transferred some of the difference on each step.
The TLA Toolbox has some rough edges. The ones I found most troublesome were: the keyboard shortcuts frequently stop working; when a temporal property is violated, it doesn’t tell you which one it was; and the model explorer tooltips appear right under the mouse pointer, preventing you from scrolling with the mouse wheel. It also likes to check its “news feed” on a regular basis. It can’t seem to do this at the same time as other operations, and if you’re in the middle of a particularly complex proof checking operation, it will sometimes suddenly pop up a box suggesting that you cancel your job, so that it can get back to reading the news.
However, it is improving. In the latest versions, when you get a syntax error, it now tells you where in the file the error is. And pressing Delete or Backspace while editing no longer causes it to crash and lose all unsaved data. In general I feel that the TLA Toolbox is quite usable now. If I were designing a new protocol, I would certainly use TLA to help with the design.
TLA does not integrate with any language type systems, so even after you have a specification you still need to check manually that your code matches the spec. It would be nice if you could check this automatically, somehow.
One final problem is that whenever I write a TLA specification, I feel the need to explain first what TLA is. Hopefully it will become more popular and that problem will go away.
0 notes
Video
youtube
(via Docker Container Port Mapping Tutorial for beginners | Docker Port Expose and Port Forwarding)
Hi, a new #video on #dockerportmapping is published on @codeonedigest #youtube channel. Learn docker container port forwarding and docker expose. What is docker port mapping and -p option. Running docker container on custom port.
Full Video Link: https://youtu.be/2gie3gpDJUg
#dockerportmapping #dockerportforwarding #rundockercontaineroncustomport #dockercontainerportmapping #dockerportmappingexplained #dockerportmappingnotworking #dockerportmappingvsexpose #dockerportmappingtutorial #dockercomposeportmapping #portmappinginrunningdockercontainer #dockercontainerportmappingexplained #dockercontainerportnotexposed #dockercontainerportchange #dockercontainerportforwardingnotworking #updatedockercontainerportainer #dockerportforwardingrunningcontainer #dockerportforwardingexistingcontainer #dockerportforwardingdoesn’twork #dockercontainerportsexplained #docker #dockertutorial #dockertutorialforbeginners #whatisdocker #dockercompose #dockerandKubernetes
0 notes
Video
youtube
Docker Container Port Mapping Tutorial for beginners | Docker Port Expos...
Hi, a new #video on #dockerportmapping is published on @codeonedigest #youtube channel. Learn docker container port forwarding and docker expose. What is docker port mapping and -p option. Running docker container on custom port.
Full Video Link: https://youtu.be/2gie3gpDJUg
#dockerportmapping #dockerportforwarding #rundockercontaineroncustomport #dockercontainerportmapping #dockerportmappingexplained #dockerportmappingnotworking #dockerportmappingvsexpose #dockerportmappingtutorial #dockercomposeportmapping #portmappinginrunningdockercontainer #dockercontainerportmappingexplained #dockercontainerportnotexposed #dockercontainerportchange #dockercontainerportforwardingnotworking #updatedockercontainerportainer #dockerportforwardingrunningcontainer #dockerportforwardingexistingcontainer #dockerportforwardingdoesn’twork #dockercontainerportsexplained #docker #dockertutorial #dockertutorialforbeginners #whatisdocker #dockercompose #dockerandKubernetes
#youtube#docker port mapping docker port forwarding run docker container on custom port docker container port mapping docker port mapping explained d
0 notes