#docker install ubuntu
Explore tagged Tumblr posts
Visit Tumblr Blog
Explore Tumblr blogs with no restrictions, modern design and the best experience.
Last Seen Tumblr Blogs


Fun Fact
28.6 is the average number of monthly visits per US mobile user.
Text
Graylog Docker Compose Setup: An Open Source Syslog Server for Home Labs
Graylog Docker Compose Install: Open Source Syslog Server for Home #homelab GraylogInstallationGuide #DockerComposeOnUbuntu #GraylogRESTAPI #ElasticsearchAndGraylog #MongoDBWithGraylog #DockerComposeYmlConfiguration #GraylogDockerImage #Graylogdata
A really great open-source log management platform for both production and home lab environments is Graylog. Using Docker Compose, you can quickly launch and configure Graylog for a production or home lab Syslog. Using Docker Compose, you can create and configure all the containers needed, such as OpenSearch and MongoDB. Let’s look at this process. Table of contentsWhat is Graylog?Advantages of…

View On WordPress
#Docker Compose on Ubuntu#docker-compose.yml configuration#Elasticsearch and Graylog#Graylog data persistence#Graylog Docker image#Graylog installation guide#Graylog REST API#Graylog web interface setup#log management with Graylog#MongoDB with Graylog
0 notes
Text
Step 0. Get fed up with Windows 10/11 and all the forced-fed stuff, like ads and LLM, in the Start menu.
Step 1. Install Ubuntu Linux
Step 2. Learn Docker & cool stuff and wonder why I used an abomination called WSL. This is the real deal.
Step 3. Get into VIM. Watch some cool videos, and ditch the last spyware called VSCode.
Step 4: Learn about NixOS and switch to use because all cool kids like it. This is the end of the distro hopping.
Step 5: Minding my business and YouTube recommends FreeBSD. Oh noo. Here we go again…😅
#nixos#freebsd#linux#shitpost#gnu#sysadmin#devops#programming#programmers humor#windows 10#windows 11
89 notes
·
View notes
Text
love to enable virtualization so I can install an Ubuntu VM so I can run Docker so I can run containerized tests so I can debug a single line of code
25 notes
·
View notes
Text
Progress so far of mobile server (dev log)
So I was successful in turning my old phone into apache web server. The phone had some hardware issue that it always clicked on the screen randomly so I had to maneuverer my way installing Linux and apache into the phone. I had to set up proxies as well to connect to it with the open internet. So far it is working well. Sometimes I have to reroute the connections since it is running over mobile data? I am thinking of getting a dynamic DNS. But I have never tried dynamic DNS before so I am not ready to explore that yet. Plus, I don't know if I would get a static IP from it or a straight away domain name? I mean both are okay, but both have pros and cons of the usage.
Like if I get a static IP , I can run virtual hosts in apache and run multiple websites pointing A record of the domain to the same website.
And lets say if I get a subdomain from the dynamic DNS, I can point CNAME record of the domain to subdomain? But will virtual hosts work with it? I don't know. I suppose it should but it could not work also. Hmm.. lets see, I think I have done this before, apache virtual hosts works with CNAME.
But there is another issue that one of the website runs behind a SOCKS5 proxy, How will I accommodate that? The issue is that, since its Ubuntu running over VM over lineage OS in phone, I can't get low number ports such 80 or 443 so I have to somehow use Dynamic DNS and SOCKS5 proxy to redirect traffic at higher port number.
I mean, I still have oracle VPS running so I may not need virtual hosts in mobile server. So maybe I will venture this when I need it.
I am just wondering whether I should run Docker to run my game server then redirect the traffic with apache virtual hosts, reverse proxy with SOCKS5 proxy? I don't even know if it work. Theoretically it should work.
14 notes
·
View notes
Text
>Spend 50k in top of the line computer
>Install windows 10
>Install Ubuntu on windows 10 using wsl
>Install ArchLinux on Ubuntu using libvirt/qemu
>Install Docker on Archlinux
>Install windows 2000 on Docker
>Install DosBox on windows 2000
>Install Doom on windows 2000
Experience Doom thru 4 layers of virtualization.
2 notes
·
View notes
Text
How to Install
Looking for easy, step-by-step guides on how to install everything from software to home devices? Our "How to Install" blog provides clear, beginner-friendly instructions to help you get things up and running without the hassle. Whether you're setting up a new app, assembling tech gadgets, or configuring tools, we simplify the process for you. Each post is written with accuracy and user convenience in mind.
How to Install How to Install Printers Without CD How to Install Webcam Drivers How to Install SSH How to Install Pixelmon How to Install OptiFine How to Install Fabric How to Install Zend Framework with XAMPP on Windows How to Install Roblox on Chromebook How to Install Roblox Studio How to Install Firefox on Mac How to Install Firefox on Linux How to Install Firefox on Windows How to Install Java Step-by-Step Guide for Beginners How to Install Java on Mac Follow Full Process Ultimate Guide How to Install Java for Minecraft Easy Step Guide for How to Install VPN for Privacy How to Install VPN Server Virtual Private Network How to Install VPN on Router A Step-by-Step Guide : Complete Guide for How to Install Anaconda How to Install Anaconda on Linux Complete Guide How to Install Anaconda on Mac: A Step-by-Step Guide How to Install Anaconda on Ubuntu: A Step-by-Step Guide How to Install Anaconda on Windows How to Install npm A Step-by-Step Guide for Beginners How to Install npm on Ubuntu Step-by-Step How to Install NVM on Ubuntu Tips, and Explanations How to Install npm on Windows Solve Common Issues How to Install NVM on Windows Troubleshooting Tips How to Install npm on Visual Studio Code How to Install Node.js on Your Machine How to Install Node.js on Linux Step-by-Step Guide How to Install Node.js on Mac Step-by-Step Guide How to Install Node Modules on Angular How to Install Node.js on Ubuntu The Latest Version How to Install Node.js on Windows Get started Full Method How to Install APK File on Your Android Device Complete Guide on How to Install APK on Android TV How to Install APK on Chromebook Step by Step Process How to Install APK on iOS A Comprehensive Guide How to Install IPA on iPhone A Complete Guide How to Install APK on Windows 10 Complete Guide How to Install Git A Step-by-Step Guide for Beginners How to Install Git Bash A Complete Step-by-Step Guide How to Install Git on Visual Studio Code How to Install GitHub Simple Step-by-Step Process How to Install Git on Mac Step-by-Step Guide How to Install Git on Linux A Step-by-Step Guide How to Install Git on Ubuntu Step-by-Step Guide How to Install Git on Windows A Simple Guide How to Install Docker How to Install Docker on Linux How to Install Docker on Mac How to Install Docker Daemon Mac How to Install Docker on Ubuntu How to Install Docker Compose on Ubuntu 20.04 How to Install Docker Compose on Windows How to Install Docker on Windows How to Install WordPress How to Install WordPress on Ubuntu How to Install WordPress Plugins How to Install WordPress on Windows 10 How to Install Kodi on Firestick How to Install Exodus on Kodi How to Install The Crew on Kodi How to Install XAMPP on Mac
0 notes
Text

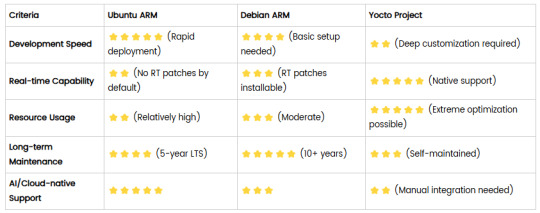
Comparison of Ubuntu, Debian, and Yocto for IIoT and Edge Computing
In industrial IoT (IIoT) and edge computing scenarios, Ubuntu, Debian, and Yocto Project each have unique advantages. Below is a detailed comparison and recommendations for these three systems:
1. Ubuntu (ARM)
Advantages
Ready-to-use: Provides official ARM images (e.g., Ubuntu Server 22.04 LTS) supporting hardware like Raspberry Pi and NVIDIA Jetson, requiring no complex configuration.
Cloud-native support: Built-in tools like MicroK8s, Docker, and Kubernetes, ideal for edge-cloud collaboration.
Long-term support (LTS): 5 years of security updates, meeting industrial stability requirements.
Rich software ecosystem: Access to AI/ML tools (e.g., TensorFlow Lite) and databases (e.g., PostgreSQL ARM-optimized) via APT and Snap Store.
Use Cases
Rapid prototyping: Quick deployment of Python/Node.js applications on edge gateways.
AI edge inference: Running computer vision models (e.g., ROS 2 + Ubuntu) on Jetson devices.
Lightweight K8s clusters: Edge nodes managed by MicroK8s.
Limitations
Higher resource usage (minimum ~512MB RAM), unsuitable for ultra-low-power devices.
2. Debian (ARM)
Advantages
Exceptional stability: Packages undergo rigorous testing, ideal for 24/7 industrial operation.
Lightweight: Minimal installation requires only 128MB RAM; GUI-free versions available.
Long-term support: Up to 10+ years of security updates via Debian LTS (with commercial support).
Hardware compatibility: Supports older or niche ARM chips (e.g., TI Sitara series).
Use Cases
Industrial controllers: PLCs, HMIs, and other devices requiring deterministic responses.
Network edge devices: Firewalls, protocol gateways (e.g., Modbus-to-MQTT).
Critical systems (medical/transport): Compliance with IEC 62304/DO-178C certifications.
Limitations
Older software versions (e.g., default GCC version); newer features require backports.
3. Yocto Project
Advantages
Full customization: Tailor everything from kernel to user space, generating minimal images (<50MB possible).
Real-time extensions: Supports Xenomai/Preempt-RT patches for μs-level latency.
Cross-platform portability: Single recipe set adapts to multiple hardware platforms (e.g., NXP i.MX6 → i.MX8).
Security design: Built-in industrial-grade features like SELinux and dm-verity.
Use Cases
Custom industrial devices: Requires specific kernel configurations or proprietary drivers (e.g., CAN-FD bus support).
High real-time systems: Robotic motion control, CNC machines.
Resource-constrained terminals: Sensor nodes running lightweight stacks (e.g., Zephyr+FreeRTOS hybrid deployment).
Limitations
Steep learning curve (BitBake syntax required); longer development cycles.
4. Comparison Summary
5. Selection Recommendations
Choose Ubuntu ARM: For rapid deployment of edge AI applications (e.g., vision detection on Jetson) or deep integration with public clouds (e.g., AWS IoT Greengrass).
Choose Debian ARM: For mission-critical industrial equipment (e.g., substation monitoring) where stability outweighs feature novelty.
Choose Yocto Project: For custom hardware development (e.g., proprietary industrial boards) or strict real-time/safety certification (e.g., ISO 13849) requirements.
6. Hybrid Architecture Example
Smart factory edge node:
Real-time control layer: RTOS built with Yocto (controlling robotic arms)
Data processing layer: Debian running OPC UA servers
Cloud connectivity layer: Ubuntu Server managing K8s edge clusters
Combining these systems based on specific needs can maximize the efficiency of IIoT edge computing.
0 notes
Text
PROJETO
Passo a Passo da Implementação da NeoSphere
1. Configuração do Ambiente de Desenvolvimento
Ferramentas Necessárias:
Python 3.10+ para backend Web2 (FastAPI, Redis).
Node.js 18+ para serviços Web3 e frontend.
Solidity para smart contracts.
Docker para conteinerização de serviços (Redis, MongoDB, RabbitMQ).
Truffle/Hardhat para desenvolvimento de smart contracts.
# Instalação de dependências básicas (Linux/Ubuntu) sudo apt-get update sudo apt-get install -y python3.10 nodejs npm docker.io
2. Implementação da API Web2 com FastAPI
Estrutura do Projeto:
/neosphere-api ├── app/ │ ├── __init__.py │ ├── main.py # Ponto de entrada da API │ ├── models.py # Modelos Pydantic │ └── database.py # Conexão com MongoDB └── requirements.txt
Código Expandido (app/main.py):
from fastapi import FastAPI, Depends, HTTPException from pymongo import MongoClient from pymongo.errors import DuplicateKeyError from app.models import PostCreate, PostResponse from app.database import get_db import uuid import datetime app = FastAPI(title="NeoSphere API", version="0.2.0") @app.post("/posts/", response_model=PostResponse, status_code=201) async def create_post(post: PostCreate, db=Depends(get_db)): post_id = str(uuid.uuid4()) post_data = { "post_id": post_id, "user_id": post.user_id, "content": post.content, "media_urls": post.media_urls or [], "related_nft_id": post.related_nft_id, "created_at": datetime.datetime.utcnow(), "likes": 0, "comments_count": 0 } try: db.posts.insert_one(post_data) except DuplicateKeyError: raise HTTPException(status_code=400, detail="Post ID já existe") return post_data @app.get("/posts/{post_id}", response_model=PostResponse) async def get_post(post_id: str, db=Depends(get_db)): post = db.posts.find_one({"post_id": post_id}) if not post: raise HTTPException(status_code=404, detail="Post não encontrado") return post
3. Sistema de Cache com Redis para NFTs
Implementação Avançada (services/nft_cache.py):
import redis from tenacity import retry, stop_after_attempt, wait_fixed from config import settings class NFTCache: def __init__(self): self.client = redis.Redis( host=settings.REDIS_HOST, port=settings.REDIS_PORT, decode_responses=True ) @retry(stop=stop_after_attempt(3), wait=wait_fixed(0.5)) async def get_metadata(self, contract_address: str, token_id: str) -> dict: cache_key = f"nft:{contract_address}:{token_id}" cached_data = self.client.get(cache_key) if cached_data: return json.loads(cached_data) # Lógica de busca na blockchain metadata = await BlockchainService.fetch_metadata(contract_address, token_id) if metadata: self.client.setex( cache_key, settings.NFT_CACHE_TTL, json.dumps(metadata) ) return metadata def invalidate_cache(self, contract_address: str, token_id: str): self.client.delete(f"nft:{contract_address}:{token_id}")
4. Smart Contract para NFTs com Royalties (Arquivo Completo)
Contrato Completo (contracts/NeoSphereNFT.sol):
// SPDX-License-Identifier: MIT pragma solidity ^0.8.20; import "@openzeppelin/contracts/token/ERC721/ERC721.sol"; import "@openzeppelin/contracts/access/Ownable.sol"; import "@openzeppelin/contracts/interfaces/IERC2981.sol"; contract NeoSphereNFT is ERC721, Ownable, IERC2981 { using Counters for Counters.Counter; Counters.Counter private _tokenIdCounter; struct RoyaltyInfo { address recipient; uint96 percentage; } mapping(uint256 => RoyaltyInfo) private _royalties; mapping(uint256 => string) private _tokenURIs; event NFTMinted( uint256 indexed tokenId, address indexed owner, string tokenURI, address creator ); constructor() ERC721("NeoSphereNFT", "NSPH") Ownable(msg.sender) {} function mint( address to, string memory uri, address royaltyRecipient, uint96 royaltyPercentage ) external onlyOwner returns (uint256) { require(royaltyPercentage <= 10000, "Royalties max 100%"); uint256 tokenId = _tokenIdCounter.current(); _tokenIdCounter.increment(); _safeMint(to, tokenId); _setTokenURI(tokenId, uri); _setRoyaltyInfo(tokenId, royaltyRecipient, royaltyPercentage); emit NFTMinted(tokenId, to, uri, msg.sender); return tokenId; } function royaltyInfo( uint256 tokenId, uint256 salePrice ) external view override returns (address, uint256) { RoyaltyInfo memory info = _royalties[tokenId]; return ( info.recipient, (salePrice * info.percentage) / 10000 ); } function _setTokenURI(uint256 tokenId, string memory uri) internal { _tokenURIs[tokenId] = uri; } function _setRoyaltyInfo( uint256 tokenId, address recipient, uint96 percentage ) internal { _royalties[tokenId] = RoyaltyInfo(recipient, percentage); } }
5. Sistema de Pagamentos com Gateway Unificado
Implementação Completa (payment/gateway.py):
from abc import ABC, abstractmethod from typing import Dict, Optional from pydantic import BaseModel class PaymentRequest(BaseModel): amount: float currency: str method: str user_metadata: Dict payment_metadata: Dict class PaymentProvider(ABC): @abstractmethod def process_payment(self, request: PaymentRequest) -> Dict: pass class StripeACHProvider(PaymentProvider): def process_payment(self, request: PaymentRequest) -> Dict: # Implementação real usando a SDK do Stripe return { "status": "success", "transaction_id": "stripe_tx_123", "fee": request.amount * 0.02 } class NeoPaymentGateway: def __init__(self): self.providers = { "ach": StripeACHProvider(), # Adicionar outros provedores } def process_payment(self, request: PaymentRequest) -> Dict: provider = self.providers.get(request.method.lower()) if not provider: raise ValueError("Método de pagamento não suportado") # Validação adicional if request.currency not in ["USD", "BRL"]: raise ValueError("Moeda não suportada") return provider.process_payment(request) # Exemplo de uso: # gateway = NeoPaymentGateway() # resultado = gateway.process_payment(PaymentRequest( # amount=100.00, # currency="USD", # method="ACH", # user_metadata={"country": "US"}, # payment_metadata={"account_number": "..."} # ))
6. Autenticação Web3 com SIWE
Implementação no Frontend (React):
import { useSigner } from 'wagmi' import { SiweMessage } from 'siwe' const AuthButton = () => { const { data: signer } = useSigner() const handleLogin = async () => { const message = new SiweMessage({ domain: window.location.host, address: await signer.getAddress(), statement: 'Bem-vindo à NeoSphere!', uri: window.location.origin, version: '1', chainId: 137 // Polygon Mainnet }) const signature = await signer.signMessage(message.prepareMessage()) // Verificação no backend const response = await fetch('/api/auth/login', { method: 'POST', headers: { 'Content-Type': 'application/json' }, body: JSON.stringify({ message, signature }) }) if (response.ok) { console.log('Autenticado com sucesso!') } } return ( <button onClick={handleLogin}> Conectar Wallet </button> ) }
7. Estratégia de Implantação
Infraestrutura com Terraform:
# infra/main.tf provider "aws" { region = "us-east-1" } module "neosphere_cluster" { source = "terraform-aws-modules/ecs/aws" cluster_name = "neosphere-prod" fargate_capacity_providers = ["FARGATE"] services = { api = { cpu = 512 memory = 1024 port = 8000 } payment = { cpu = 256 memory = 512 port = 3000 } } } resource "aws_elasticache_cluster" "redis" { cluster_id = "neosphere-redis" engine = "redis" node_type = "cache.t3.micro" num_cache_nodes = 1 parameter_group_name = "default.redis6.x" }
Considerações Finais
Testes Automatizados:
Implementar testes end-to-end com Cypress para fluxos de usuário
Testes de carga com k6 para validar escalabilidade
Testes de segurança com OWASP ZAP
Monitoramento:
Configurar Prometheus + Grafana para métricas em tempo real
Integrar Sentry para captura de erros no frontend
CI/CD:
Pipeline com GitHub Actions para deploy automático
Verificação de smart contracts com Slither
Documentação:
Swagger para API REST
Storybook para componentes UI
Archimate para documentação de arquitetura
Este esqueleto técnico fornece a base para uma implementação robusta da NeoSphere, combinando as melhores práticas de desenvolvimento Web2 com as inovações da Web3.
0 notes
Link
看看網頁版全文 ⇨ 雜談:Home Assistant從開發板遷移到虛擬機器 / Talk: Migrating Home Assistant From a Development Board to a Virtual Machine https://blog.pulipuli.info/2025/05/talk-migrating-home-assistant-from-a-development-board-to-a-virtual-machine.html 我原本拿來架設Home Assistant的OrangePie掛點了。 藉這個機會,我將整個Home Assistant改在Proxmox VE架設。 這裡記錄一下整個過程。 ---- # Orange Pi 3 LTS 開發板 / Orange Pi 3 LTS Development Board。 一開始我是在Orange Pi 3 LTS上,用Docker架設Home Assistant。 Orange Pi 3 LTS是走ARM架構的全志1.8Hz A53 CPU ,記憶體2GB。 IO接口非常豐富,具備標準的HDMI、網路孔、藍芽、三個USB Type A接孔。 還可以用USB Type C供電,不過需要15W才能推得動。 作業系統則是要自行下載映像檔並燒錄到記憶卡中。 我用的作業系統是Ubuntu鏡像,記憶卡是十銓的128GB。 http://www.orangepi.cn/orangepiwiki/index.php/Orange_Pi_3_LTS。 詳細規格可以參考Wiki-Orange Pi的記錄。 當初選擇Orange Pi 3 LTS的原因有很多。 一般人說到開發板,大多會傾向使用樹莓派Raspberry Pi。 但當時晶片大缺貨,Raspberry Pi的價格居高不下,而且IO接口跟性能也跟我預期的有點落差。 相較之下,Orange Pi 3 LTS在1.8Ghz CPU跟2GB RAM的配置上,就有不少優勢。 而且它的HDMI也是標準尺寸,充電孔也是使用Type C,這些都是我偏好選擇Orange Pi 3 LTS的理由。 # Home Assistant的方案選擇。 https://www.home-assistant.io/installation/#advanced-installation-methods。 在Home Assistant的部署方式上,跟很多人選擇使用HA OS不同,我使用Docker來架設Home Assistant。 Docker版本的Home Assistant跟HA OS相比,缺少方便的Add-ons整合。 現在大部分Home Assistant的教學都會用到HA OS的Add-ons,但在Docker版本裡面就不適用。 相較之下,Docker版本的Home Assistant能給我更高的掌握程度。 ---- 繼續閱讀 ⇨ 雜談:Home Assistant從開發板遷移到虛擬機器 / Talk: Migrating Home Assistant From a Development Board to a Virtual Machine https://blog.pulipuli.info/2025/05/talk-migrating-home-assistant-from-a-development-board-to-a-virtual-machine.html
0 notes
Text
Kolla Ansible OpenStack Installation (Ubuntu 24.04)
Kolla Ansible provides production-ready containers (here, Docker) and deployment tools for operating OpenStack clouds. This guide explains installing a single-host (all-in-one) OpenStack Cloud on a Ubuntu 24.04 server using a private network. We specify values and variables that can easily be adapted to others’ networks. We do not address encryption for the different OpenStack services and will…
0 notes
Link
#Automation#cloud#configuration#containerization#deploy#DevOps#Docker#feedaggregator#FreshRSS#Linux#Monitoring#news#open-source#Performance#Privacy#RSSreader#self-hosted#Server#systemadministration#updates#webapplication
0 notes
Video
youtube
How to Install Docker on Ubuntu Linux #linux #FOSS #CachyOS #Nobara
0 notes
Text
Proses Update Docker
1. apt update
2. apt install -y ca-certificates curl gnupg
3. install -m 0755 -d /etc/apt/keyrings
4. sudo install -m 0755 -d /etc/apt/keyrings
5. curl -fsSL https://download.docker.com/linux/ubuntu/gpg | sudo tee /etc/apt/keyrings/docker.asc > /dev/null
6. apt update
7. apt install -y docker-ce docker-ce-cli containerd.io
8. docker -v
0 notes
Photo

New Post has been published on https://codebriefly.com/building-and-deploying-angular-19-apps/
Building and Deploying Angular 19 Apps
Efficiently building and deploying Angular 19 applications is crucial for delivering high-performance, production-ready web applications. In this blog, we will cover the complete process of building and deploying Angular 19 apps, including best practices and optimization tips.
Table of Contents
Toggle
Why Building and Deploying Matters
Preparing Your Angular 19 App for Production
Building Angular 19 App
Key Optimizations in Production Build:
Configuration Example:
Deploying Angular 19 App
Deploying on Firebase Hosting
Deploying on AWS S3 and CloudFront
Automating Deployment with CI/CD
Example with GitHub Actions
Best Practices for Building and Deploying Angular 19 Apps
Final Thoughts
Why Building and Deploying Matters
Building and deploying are the final steps of the development lifecycle. Building compiles your Angular project into static files, while deploying makes it accessible to users on a server. Proper optimization and configuration ensure faster load times and better performance.
Preparing Your Angular 19 App for Production
Before building the application, make sure to:
Update Angular CLI: Keep your Angular CLI up to date.
npm install -g @angular/cli
Optimize Production Build: Enable AOT compilation and minification.
Environment Configuration: Use the correct environment variables for production.
Building Angular 19 App
To create a production build, run the following command:
ng build --configuration=production
This command generates optimized files in the dist/ folder.
Key Optimizations in Production Build:
AOT Compilation: Reduces bundle size by compiling templates during the build.
Tree Shaking: Removes unused modules and functions.
Minification: Compresses HTML, CSS, and JavaScript files.
Source Map Exclusion: Disables source maps for production builds to improve security and reduce file size.
Configuration Example:
Modify the angular.json file to customize production settings:
"configurations": "production": "optimization": true, "outputHashing": "all", "sourceMap": false, "namedChunks": false, "extractCss": true, "aot": true, "fileReplacements": [ "replace": "src/environments/environment.ts", "with": "src/environments/environment.prod.ts" ]
Deploying Angular 19 App
Deployment options for Angular apps include:
Static Web Servers (e.g., NGINX, Apache)
Cloud Platforms (e.g., AWS S3, Firebase Hosting)
Docker Containers
Serverless Platforms (e.g., AWS Lambda)
Deploying on Firebase Hosting
Install Firebase CLI:
npm install -g firebase-tools
Login to Firebase:
firebase login
Initialize Firebase Project:
firebase init hosting
Deploy the App:
firebase deploy
Deploying on AWS S3 and CloudFront
Build the Project:
ng build --configuration=production
Upload to S3:
aws s3 sync ./dist/my-app s3://my-angular-app
Configure CloudFront Distribution: Set the S3 bucket as the origin.
Automating Deployment with CI/CD
Setting up a CI/CD pipeline ensures seamless updates and faster deployments.
Example with GitHub Actions
Create a .github/workflows/deploy.yml file:
name: Deploy Angular App on: [push] jobs: build-and-deploy: runs-on: ubuntu-latest steps: - uses: actions/checkout@v2 - name: Set up Node.js uses: actions/setup-node@v2 with: node-version: '18' - run: npm install - run: npm run build -- --configuration=production - name: Deploy to S3 run: aws s3 sync ./dist/my-app s3://my-angular-app --delete
Best Practices for Building and Deploying Angular 19 Apps
Optimize for Production: Always use AOT and minification.
Use CI/CD Pipelines: Automate the build and deployment process.
Monitor Performance: Utilize tools like Lighthouse to analyze performance.
Secure the Application: Enable HTTPS and configure secure headers.
Cache Busting: Use hashed filenames to avoid caching issues.
Containerize with Docker: Simplifies deployments and scales easily.
Final Thoughts
Building and deploying Angular 19 applications efficiently can significantly enhance performance and maintainability. Following best practices and leveraging cloud hosting services ensure that your app is robust, scalable, and fast. Start building your next Angular project with confidence!
Keep learning & stay safe 😉
You may like:
Testing and Debugging Angular 19 Apps
Performance Optimization and Best Practices in Angular 19
UI/UX with Angular Material in Angular 19
0 notes
Text
Postal SMTP install and setup on a virtual server

Postal is a full suite for mail delivery with robust features suited for running a bulk email sending SMTP server. Postal is open source and free. Some of its features are: - UI for maintaining different aspects of your mail server - Runs on containers, hence allows for up and down horizontal scaling - Email security features such as spam and antivirus - IP pools to help you maintain a good sending reputation by sending via multiple IPs - Multitenant support - multiple users, domains and organizations - Monitoring queue for outgoing and incoming mail - Built in DNS setup and monitoring to ensure mail domains are set up correctly List of full postal features
Possible cloud providers to use with Postal
You can use Postal with any VPS or Linux server providers of your choice, however here are some we recommend: Vultr Cloud (Get free $300 credit) - In case your SMTP port is blocked, you can contact Vultr support, and they will open it for you after providing a personal identification method. DigitalOcean (Get free $200 Credit) - You will also need to contact DigitalOcean support for SMTP port to be open for you. Hetzner ( Get free ��20) - SMTP port is open for most accounts, if yours isn't, contact the Hetzner support and request for it to be unblocked for you Contabo (Cheapest VPS) - Contabo doesn't block SMTP ports. In case you are unable to send mail, contact support. Interserver
Postal Minimum requirements
- At least 4GB of RAM - At least 2 CPU cores - At least 25GB disk space - You can use docker or any Container runtime app. Ensure Docker Compose plugin is also installed. - Port 25 outbound should be open (A lot of cloud providers block it)
Postal Installation
Should be installed on its own server, meaning, no other items should be running on the server. A fresh server install is recommended. Broad overview of the installation procedure - Install Docker and the other needed apps - Configuration of postal and add DNS entries - Start Postal - Make your first user - Login to the web interface to create virtual mail servers Step by step install Postal Step 1 : Install docker and additional system utilities In this guide, I will use Debian 12 . Feel free to follow along with Ubuntu. The OS to be used does not matter, provided you can install docker or any docker alternative for running container images. Commands for installing Docker on Debian 12 (Read the comments to understand what each command does): #Uninstall any previously installed conflicting software . If you have none of them installed it's ok for pkg in docker.io docker-doc docker-compose podman-docker containerd runc; do sudo apt-get remove $pkg; done #Add Docker's official GPG key: sudo apt-get update sudo apt-get install ca-certificates curl -y sudo install -m 0755 -d /etc/apt/keyrings sudo curl -fsSL https://download.docker.com/linux/debian/gpg -o /etc/apt/keyrings/docker.asc sudo chmod a+r /etc/apt/keyrings/docker.asc #Add the Docker repository to Apt sources: echo "deb https://download.docker.com/linux/debian $(. /etc/os-release && echo "$VERSION_CODENAME") stable" | sudo tee /etc/apt/sources.list.d/docker.list > /dev/null sudo apt-get update #Install the docker packages sudo apt-get install docker-ce docker-ce-cli containerd.io docker-buildx-plugin docker-compose-plugin -y #You can verify that the installation is successful by running the hello-world image sudo docker run hello-world Add the current user to the docker group so that you don't have to use sudo when not logged in as the root user. ##Add your current user to the docker group. sudo usermod -aG docker $USER #Reboot the server sudo reboot Finally test if you can run docker without sudo ##Test that you don't need sudo to run docker docker run hello-world Step 2 : Get the postal installation helper repository The Postal installation helper has all the docker compose files and the important bootstrapping tools needed for generating configuration files. Install various needed tools #Install additional system utlities apt install git vim htop curl jq -y Then clone the helper repository. sudo git clone https://github.com/postalserver/install /opt/postal/install sudo ln -s /opt/postal/install/bin/postal /usr/bin/postal Step 3 : Install MariaDB database Here is a sample MariaDB container from the postal docs. But you can use the docker compose file below it. docker run -d --name postal-mariadb -p 127.0.0.1:3306:3306 --restart always -e MARIADB_DATABASE=postal -e MARIADB_ROOT_PASSWORD=postal mariadb Here is a tested mariadb compose file to run a secure MariaDB 11.4 container. You can change the version to any image you prefer. vi docker-compose.yaml services: mariadb: image: mariadb:11.4 container_name: postal-mariadb restart: unless-stopped environment: MYSQL_ROOT_PASSWORD: ${DB_ROOT_PASSWORD} volumes: - mariadb_data:/var/lib/mysql network_mode: host # Set to use the host's network mode security_opt: - no-new-privileges:true read_only: true tmpfs: - /tmp - /run/mysqld healthcheck: test: interval: 30s timeout: 10s retries: 5 volumes: mariadb_data: You need to create an environment file with the Database password . To simplify things, postal will use the root user to access the Database.env file example is below. Place it in the same location as the compose file. DB_ROOT_PASSWORD=ExtremelyStrongPasswordHere Run docker compose up -d and ensure the database is healthy. Step 4 : Bootstrap the domain for your Postal web interface & Database configs First add DNS records for your postal domain. The most significant records at this stage are the A and/or AAAA records. This is the domain where you'll be accessing the postal UI and for simplicity will also act as the SMTP server. If using Cloudflare, turn off the Cloudflare proxy. sudo postal bootstrap postal.yourdomain.com The above will generate three files in /opt/postal/config. - postal.yml is the main postal configuration file - signing.key is the private key used to sign various things in Postal - Caddyfile is the configuration for the Caddy web server Open /opt/postal/config/postal.yml and add all the values for DB and other settings. Go through the file and see what else you can edit. At the very least, enter the correct DB details for postal message_db and main_db. Step 5 : Initialize the Postal database and create an admin user postal initialize postal make-user If everything goes well with postal initialize, then celebrate. This is the part where you may face some issues due to DB connection failures. Step 6 : Start running postal # run postal postal start #checking postal status postal status # If you make any config changes in future you can restart postal like so # postal restart Step 7 : Proxy for web traffic To handle web traffic and ensure TLS termination you can use any proxy server of your choice, nginx, traefik , caddy etc. Based on Postal documentation, the following will start up caddy. You can use the compose file below it. Caddy is easy to use and does a lot for you out of the box. Ensure your A records are pointing to your server before running Caddy. docker run -d --name postal-caddy --restart always --network host -v /opt/postal/config/Caddyfile:/etc/caddy/Caddyfile -v /opt/postal/caddy-data:/data caddy Here is a compose file you can use instead of the above docker run command. Name it something like caddy-compose.yaml services: postal-caddy: image: caddy container_name: postal-caddy restart: always network_mode: host volumes: - /opt/postal/config/Caddyfile:/etc/caddy/Caddyfile - /opt/postal/caddy-data:/data You can run it by doing docker compose -f caddy-compose.yaml up -d Now it's time to go to the browser and login. Use the domain, bootstrapped earlier. Add an organization, create server and add a domain. This is done via the UI and it is very straight forward. For every domain you add, ensure to add the DNS records you are provided.
Enable IP Pools
One of the reasons why Postal is great for bulk email sending, is because it allows for sending emails using multiple IPs in a round-robin fashion. Pre-requisites - Ensure the IPs you want to add as part of the pool, are already added to your VPS/server. Every cloud provider has a documentation for adding additional IPs, make sure you follow their guide to add all the IPs to the network. When you run ip a , you should see the IP addresses you intend to use in the pool. Enabling IP pools in the Postal config First step is to enable IP pools settings in the postal configuration, then restart postal. Add the following configuration in the postal.yaml (/opt/postal/config/postal.yml) file to enable pools. If the section postal: , exists, then just add use_ip_pools: true under it. postal: use_ip_pools: true Then restart postal. postal stop && postal start The next step is to go to the postal interface on your browser. A new IP pools link is now visible at the top right corner of your postal dashboard. You can use the IP pools link to add a pool, then assign IP addresses in the pools. A pool could be something like marketing, transactions, billing, general etc. Once the pools are created and IPs assigned to them, you can attach a pool to an organization. This organization can now use the provided IP addresses to send emails. Open up an organization and assign a pool to it. Organizations → choose IPs → choose pools . You can then assign the IP pool to servers from the server's Settings page. You can also use the IP pool to configure IP rules for the organization or server. At any point, if you are lost, look at the Postal documentation. Read the full article
0 notes
Text
Kubernetes Cheat Sheet: Switching from Containerd to CRI-O Made Easy
Why Replace Containerd with CRI-O in Kubernetes? Switching container runtimes again might seem unnecessary after the recent move from Docker to containerd. However, CRI-O offers unique features like enhanced Kubernetes compatibility and improved security. For example, I used CRI-O to test Kubernetes user namespaces on an existing Kubernetes 1.32 installation (Ubuntu 24.04). These namespaces help…
0 notes