#docker-compose.yml configuration
Explore tagged Tumblr posts
Visit Tumblr Blog
Explore Tumblr blogs with no restrictions, modern design and the best experience.
Last Seen Tumblr Blogs


Fun Fact
Tumblr has a low social media market share in South America.
Text
Graylog Docker Compose Setup: An Open Source Syslog Server for Home Labs
Graylog Docker Compose Install: Open Source Syslog Server for Home #homelab GraylogInstallationGuide #DockerComposeOnUbuntu #GraylogRESTAPI #ElasticsearchAndGraylog #MongoDBWithGraylog #DockerComposeYmlConfiguration #GraylogDockerImage #Graylogdata
A really great open-source log management platform for both production and home lab environments is Graylog. Using Docker Compose, you can quickly launch and configure Graylog for a production or home lab Syslog. Using Docker Compose, you can create and configure all the containers needed, such as OpenSearch and MongoDB. Let’s look at this process. Table of contentsWhat is Graylog?Advantages of…

View On WordPress
#Docker Compose on Ubuntu#docker-compose.yml configuration#Elasticsearch and Graylog#Graylog data persistence#Graylog Docker image#Graylog installation guide#Graylog REST API#Graylog web interface setup#log management with Graylog#MongoDB with Graylog
0 notes
Text
How to host local Club Penguin Private Server (CPPS) on Silicon Mac (M1/M2/M3) thru play.localserver & Solero's Wand install.
I spent so long looking for a solution to this that I want to contribute what worked for me. I got so frustrated looking for something that worked, and I hope this guide will help others avoid that frustration.
This is NOT a guide on hosting or serving a CPPS. This is a guide on making a CPPS playable by locally hosting your server on your Silicon M1/M2/M3 Macbook. This worked on my M3 Macbook, and, in my experience, it seems the newer the hardware/operating system gets, the harder it is accomplish this.
DISCLAIMER *I do not know very much about this topic. I can paste commands into terminal and execute them, I know how to install DMG files I downloaded from the internet (the bar is in hell, I am aware), and I know how to enter play.localhost to run this in a browser. I am no expert; this guide is for beginners like myself who want a CPPS. This is beginner-level stuff. If you want advice or need help hosting, refer to the Wand Github page, Solero's Dash (an actual web-hosting solution for Houdini/Wand), Solero's discord, or, when in doubt, Google it. (I recommend only asking for help in Solero's discord for help AFTER trying your best to search for a solution, and even after that, trying to search key terms in their chat logs. They often have to repeat the same advice over, and over, and over again.)*
TLDR; IDK shit about shit
USING WAND INSTALLER
wand description from github: Wand makes it easy to configure dash, houdini and a media server utilizing docker & docker-compose.
All the assets are located here.
Installation instructions from the above link:
Installation script 1. run the script: bash <(curl -s https://raw.githubusercontent.com/solero/wand/master/install.sh) 2. Answer Questions which are: Database password (Leave blank for random password) Hostname (example: clubpenguin.com) (Leave empty for localhost) External IP Address (Leave empty for localhost) 3. Run and enjoy. Run this command: $ cd wand && sudo docker-compose up
The steps I took:
1. Install Docker via Terminal & Homebrew.
Installing the Docker DMG file did not work properly when I tried. I realized later that Docker is seperate from Docker Desktop (the DMG file). I got Docker to work by using Terminal to install Homebrew, and then using Homebrew to install Docker.
Indented text = paste into Terminal.
Command to install Homebrew:
/bin/bash -c "$(curl -fsSL https://raw.githubusercontent.com/Homebrew/install/HEAD/install.sh)"
Ensure Homebrew is installed:
brew --version
Install Docker:
brew install docker
Recommended: Install Docker Desktop (useful in determining if your server is running, stopped, or stuck in a restart loop).
brew install --cask docker
Run Docker Desktop:
open -a Docker
2. Run installation script:
bash <(curl -s https://raw.githubusercontent.com/solero/wand/master/install.sh)
From Github instructions:
Answer Questions which are:
Database password (Leave blank for random password)
Hostname (example: clubpenguin.com) (Leave empty for localhost)
External IP Address (Leave empty for localhost)
3. $ cd wand && sudo docker-compose up
This is what is provided in the Github. This command didn't work on Mac; I believe it's formatted for Linux OS. Here's how I broke it up and enabled it to run from Mac's Terminal.
Navigate to Wand directory:
cd wand
Double-check if you're in the right directory:
ls
Start Docker container:
docker-compose up
If the above doesn't work, try
docker compose up
or
brew install docker-compose
Takes a second...

Ensure Docker is running:
docker info
If it isn't, open the Docker Desktop application.
*After using compose up, this error may appear:*
WARN[0000] /Users/[user]/wand/docker-compose.yml: the attribute version is obsolete, it will be ignored, please remove it to avoid potential confusion
This is harmless. If you get annoyed by errors, this can be solved by:
nano docker-compose.yml

See Version 3.7 at the top? Delete that line.
Ctrl-X (NOT COMMAND-X) to exit, Y to save, Enter.
PLAY.LOCALHOST
Type http://PLAY.LOCALHOST into a browser.

Create a penguin.

Try logging in that penguin:

This step was agony. I'm not savvy with running obsolete or deprecated software, and, of course, Club Penguin (and Houdini/Wand's assest) uses Flash, which was discontinued, and timebombed by Adobe, in 2021.
I tried Ruffle. Club Penguin Journey uses Ruffle, so why can't I?
Running Ruffle in Firefox:


No luck.
In the Solero discord, they'll direct to this blog post:

This method does not work on Mac M1/M2/M3. The program is "out of date" and you cannot run it. It works on Macbook's running Sonoma and backward. I'm on an M3 running Sequoia.
they'll often post this video in the discord:

In theory, this method should work, and it does for many, but for whatever reason, not on my M3. I tried different versions of Ungoogled, I tried so many different patches of Pepperflash, and it never cooperated. I tried Pepperflash, I tried Fast Patch!, I tried dedicated Flash browsers, running Flash plugins for Pale Moon, Ungoogled, Waterfox, but I could never get past him.

Every time I see this stupid penguin's face I'm filled with rage. But I am going to save you that rage!!!
If you get this method to work, yay! I could not. Maybe I don't know enough about patching, maybe I'm a little tech stupid.
WHAT WORKED: Using a dedicated CPPS desktop application that allows you to plug in a URL.
I give you...

He is your solution, your answer to
I discovered this solution through Solero's Discord, when someone answered a question re: playing online.

Waddle Forever was not what I was looking forever, but I noticed in their credits:
The electron client is originally forked from the Club Penguin Avalanche client. The server is based in solero's works in reverse engineering the Club Penguin server (Houdini server emulator). The media server is also mostly from solero's media servers.
And that's how I found out the solution: Using CPA Client
Download the CPAvalanche Client
It runs Adode Flash x64. Easy peasy.
(the instructions are in Portuguese, but for English users:
Navigate to releases.

And download this one:

Once downloaded, open.

Drag into applications.
Run http://play.localhost through the client:
Open CPAvalanche Client. It will direct you to CPAvalance once loaded, but you're here because you want to play play.localhost.
Navigate to CPAvalanche Client next to your Apple. Click Mudar a URL do Club Penguin.

Press Sim.

URL: http://play.localhost
Ok.

Press Login once the page loads, and...

That's it! No more penguin! Have fun :)
CREDITS:
Solero Discord / Waddle Forever / Wand / CPA Client / Solero.Me
#solero/wand#wand#solero#cpps#club penguin private server#cpps localhost#club penguin#macbook#macbook silicon#mac m1#mac m2#mac m3#apple silicon
2 notes
·
View notes
Text
When you attempt to validate that a data pipeline is loading data into a postgres database, but you are unable to find the configuration tables that you stuffed into the same database out of expediency, let alone the data that was supposed to be loaded, dont be surprised if you find out after hours of troubleshooting that your local postgres server was running.
Further, dont be surprised if that local server was running, and despite the pgadmin connection string being correctly pointed to localhost:5432 (docker can use the same binding), your pgadmin decides to connect you to the local server with the same database name, database user name, and database user password.
Lessons learned:
try to use unique database names with distinct users and passwords across all users involved in order to avoid this tomfoolery in the future, EVEN IN TEST, ESPECIALLY IN TEST (i dont really have a 'prod environment, homelab and all that, but holy fuck)
do not slam dunk everything into a database named 'toilet' while playing around with database schemas in order to solidify your transformation logic, and then leave your local instance running.
do not, in your docker-compose.yml file, also name the database you are storing data into, 'toilet', on the same port, and then get confused why the docker container database is showing new entries from the DAG load functionality, but you cannot validate through pgadmin.
3 notes
·
View notes
Text
Docker Tutorial for Beginners: Learn Docker Step by Step
What is Docker?
Docker is an open-source platform that enables developers to automate the deployment of applications inside lightweight, portable containers. These containers include everything the application needs to run—code, runtime, system tools, libraries, and settings—so that it can work reliably in any environment.
Before Docker, developers faced the age-old problem: “It works on my machine!” Docker solves this by providing a consistent runtime environment across development, testing, and production.
Why Learn Docker?
Docker is used by organizations of all sizes to simplify software delivery and improve scalability. As more companies shift to microservices, cloud computing, and DevOps practices, Docker has become a must-have skill. Learning Docker helps you:
Package applications quickly and consistently
Deploy apps across different environments with confidence
Reduce system conflicts and configuration issues
Improve collaboration between development and operations teams
Work more effectively with modern cloud platforms like AWS, Azure, and GCP
Who Is This Docker Tutorial For?
This Docker tutorial is designed for absolute beginners. Whether you're a developer, system administrator, QA engineer, or DevOps enthusiast, you’ll find step-by-step instructions to help you:
Understand the basics of Docker
Install Docker on your machine
Create and manage Docker containers
Build custom Docker images
Use Docker commands and best practices
No prior knowledge of containers is required, but basic familiarity with the command line and a programming language (like Python, Java, or Node.js) will be helpful.
What You Will Learn: Step-by-Step Breakdown
1. Introduction to Docker
We start with the fundamentals. You’ll learn:
What Docker is and why it’s useful
The difference between containers and virtual machines
Key Docker components: Docker Engine, Docker Hub, Dockerfile, Docker Compose
2. Installing Docker
Next, we guide you through installing Docker on:
Windows
macOS
Linux
You’ll set up Docker Desktop or Docker CLI and run your first container using the hello-world image.
3. Working with Docker Images and Containers
You’ll explore:
How to pull images from Docker Hub
How to run containers using docker run
Inspecting containers with docker ps, docker inspect, and docker logs
Stopping and removing containers
4. Building Custom Docker Images
You’ll learn how to:
Write a Dockerfile
Use docker build to create a custom image
Add dependencies and environment variables
Optimize Docker images for performance
5. Docker Volumes and Networking
Understand how to:
Use volumes to persist data outside containers
Create custom networks for container communication
Link multiple containers (e.g., a Node.js app with a MongoDB container)
6. Docker Compose (Bonus Section)
Docker Compose lets you define multi-container applications. You’ll learn how to:
Write a docker-compose.yml file
Start multiple services with a single command
Manage application stacks easily
Real-World Examples Included
Throughout the tutorial, we use real-world examples to reinforce each concept. You’ll deploy a simple web application using Docker, connect it to a database, and scale services with Docker Compose.
Example Projects:
Dockerizing a static HTML website
Creating a REST API with Node.js and Express inside a container
Running a MySQL or MongoDB database container
Building a full-stack web app with Docker Compose
Best Practices and Tips
As you progress, you’ll also learn:
Naming conventions for containers and images
How to clean up unused images and containers
Tagging and pushing images to Docker Hub
Security basics when using Docker in production
What’s Next After This Tutorial?
After completing this Docker tutorial, you’ll be well-equipped to:
Use Docker in personal or professional projects
Learn Kubernetes and container orchestration
Apply Docker in CI/CD pipelines
Deploy containers to cloud platforms
Conclusion
Docker is an essential tool in the modern developer's toolbox. By learning Docker step by step in this beginner-friendly tutorial, you’ll gain the skills and confidence to build, deploy, and manage applications efficiently and consistently across different environments.
Whether you’re building simple web apps or complex microservices, Docker provides the flexibility, speed, and scalability needed for success. So dive in, follow along with the hands-on examples, and start your journey to mastering containerization with Docker tpoint-tech!
0 notes
Link
#Automation#configure#containerization#Docker#Install#Linux#mediaserver#Monitoring#movies#NZB#open-source#Plex#PVR#Radarr#self-hosted#Setup#Sonarr#Streaming#systemadministration#torrent#Usenet
0 notes
Text
Using Docker in Software Development

Docker has become a vital tool in modern software development. It allows developers to package applications with all their dependencies into lightweight, portable containers. Whether you're building web applications, APIs, or microservices, Docker can simplify development, testing, and deployment.
What is Docker?
Docker is an open-source platform that enables you to build, ship, and run applications inside containers. Containers are isolated environments that contain everything your app needs—code, libraries, configuration files, and more—ensuring consistent behavior across development and production.
Why Use Docker?
Consistency: Run your app the same way in every environment.
Isolation: Avoid dependency conflicts between projects.
Portability: Docker containers work on any system that supports Docker.
Scalability: Easily scale containerized apps using orchestration tools like Kubernetes.
Faster Development: Spin up and tear down environments quickly.
Basic Docker Concepts
Image: A snapshot of a container. Think of it like a blueprint.
Container: A running instance of an image.
Dockerfile: A text file with instructions to build an image.
Volume: A persistent data storage system for containers.
Docker Hub: A cloud-based registry for storing and sharing Docker images.
Example: Dockerizing a Simple Python App
Let’s say you have a Python app called app.py: # app.py print("Hello from Docker!")
Create a Dockerfile: # Dockerfile FROM python:3.10-slim COPY app.py . CMD ["python", "app.py"]
Then build and run your Docker container: docker build -t hello-docker . docker run hello-docker
This will print Hello from Docker! in your terminal.
Popular Use Cases
Running databases (MySQL, PostgreSQL, MongoDB)
Hosting development environments
CI/CD pipelines
Deploying microservices
Local testing for APIs and apps
Essential Docker Commands
docker build -t <name> . — Build an image from a Dockerfile
docker run <image> — Run a container from an image
docker ps — List running containers
docker stop <container_id> — Stop a running container
docker exec -it <container_id> bash — Access the container shell
Docker Compose
Docker Compose allows you to run multi-container apps easily. Define all your services in a single docker-compose.yml file and launch them with one command: version: '3' services: web: build: . ports: - "5000:5000" db: image: postgres
Start everything with:docker-compose up
Best Practices
Use lightweight base images (e.g., Alpine)
Keep your Dockerfiles clean and minimal
Ignore unnecessary files with .dockerignore
Use multi-stage builds for smaller images
Regularly clean up unused images and containers
Conclusion
Docker empowers developers to work smarter, not harder. It eliminates "it works on my machine" problems and simplifies the development lifecycle. Once you start using Docker, you'll wonder how you ever lived without it!
0 notes
Text
Using Docker for Full Stack Development and Deployment

1. Introduction to Docker
What is Docker? Docker is an open-source platform that automates the deployment, scaling, and management of applications inside containers. A container packages your application and its dependencies, ensuring it runs consistently across different computing environments.
Containers vs Virtual Machines (VMs)
Containers are lightweight and use fewer resources than VMs because they share the host operating system’s kernel, while VMs simulate an entire operating system. Containers are more efficient and easier to deploy.
Docker containers provide faster startup times, less overhead, and portability across development, staging, and production environments.
Benefits of Docker in Full Stack Development
Portability: Docker ensures that your application runs the same way regardless of the environment (dev, test, or production).
Consistency: Developers can share Dockerfiles to create identical environments for different developers.
Scalability: Docker containers can be quickly replicated, allowing your application to scale horizontally without a lot of overhead.
Isolation: Docker containers provide isolated environments for each part of your application, ensuring that dependencies don’t conflict.
2. Setting Up Docker for Full Stack Applications
Installing Docker and Docker Compose
Docker can be installed on any system (Windows, macOS, Linux). Provide steps for installing Docker and Docker Compose (which simplifies multi-container management).
Commands:
docker --version to check the installed Docker version.
docker-compose --version to check the Docker Compose version.
Setting Up Project Structure
Organize your project into different directories (e.g., /frontend, /backend, /db).
Each service will have its own Dockerfile and configuration file for Docker Compose.
3. Creating Dockerfiles for Frontend and Backend
Dockerfile for the Frontend:
For a React/Angular app:
Dockerfile
FROM node:14 WORKDIR /app COPY package*.json ./ RUN npm install COPY . . EXPOSE 3000 CMD ["npm", "start"]
This Dockerfile installs Node.js dependencies, copies the application, exposes the appropriate port, and starts the server.
Dockerfile for the Backend:
For a Python Flask app
Dockerfile
FROM python:3.9 WORKDIR /app COPY requirements.txt . RUN pip install -r requirements.txt COPY . . EXPOSE 5000 CMD ["python", "app.py"]
For a Java Spring Boot app:
Dockerfile
FROM openjdk:11 WORKDIR /app COPY target/my-app.jar my-app.jar EXPOSE 8080 CMD ["java", "-jar", "my-app.jar"]
This Dockerfile installs the necessary dependencies, copies the code, exposes the necessary port, and runs the app.
4. Docker Compose for Multi-Container Applications
What is Docker Compose? Docker Compose is a tool for defining and running multi-container Docker applications. With a docker-compose.yml file, you can configure services, networks, and volumes.
docker-compose.yml Example:
yaml
version: "3" services: frontend: build: context: ./frontend ports: - "3000:3000" backend: build: context: ./backend ports: - "5000:5000" depends_on: - db db: image: postgres environment: POSTGRES_USER: user POSTGRES_PASSWORD: password POSTGRES_DB: mydb
This YAML file defines three services: frontend, backend, and a PostgreSQL database. It also sets up networking and environment variables.
5. Building and Running Docker Containers
Building Docker Images:
Use docker build -t <image_name> <path> to build images.
For example:
bash
docker build -t frontend ./frontend docker build -t backend ./backend
Running Containers:
You can run individual containers using docker run or use Docker Compose to start all services:
bash
docker-compose up
Use docker ps to list running containers, and docker logs <container_id> to check logs.
Stopping and Removing Containers:
Use docker stop <container_id> and docker rm <container_id> to stop and remove containers.
With Docker Compose: docker-compose down to stop and remove all services.
6. Dockerizing Databases
Running Databases in Docker:
You can easily run databases like PostgreSQL, MySQL, or MongoDB as Docker containers.
Example for PostgreSQL in docker-compose.yml:
yaml
db: image: postgres environment: POSTGRES_USER: user POSTGRES_PASSWORD: password POSTGRES_DB: mydb
Persistent Storage with Docker Volumes:
Use Docker volumes to persist database data even when containers are stopped or removed:
yaml
volumes: - db_data:/var/lib/postgresql/data
Define the volume at the bottom of the file:
yaml
volumes: db_data:
Connecting Backend to Databases:
Your backend services can access databases via Docker networking. In the backend service, refer to the database by its service name (e.g., db).
7. Continuous Integration and Deployment (CI/CD) with Docker
Setting Up a CI/CD Pipeline:
Use Docker in CI/CD pipelines to ensure consistency across environments.
Example: GitHub Actions or Jenkins pipeline using Docker to build and push images.
Example .github/workflows/docker.yml:
yaml
name: CI/CD Pipeline on: [push] jobs: build: runs-on: ubuntu-latest steps: - name: Checkout Code uses: actions/checkout@v2 - name: Build Docker Image run: docker build -t myapp . - name: Push Docker Image run: docker push myapp
Automating Deployment:
Once images are built and pushed to a Docker registry (e.g., Docker Hub, Amazon ECR), they can be pulled into your production or staging environment.
8. Scaling Applications with Docker
Docker Swarm for Orchestration:
Docker Swarm is a native clustering and orchestration tool for Docker. You can scale your services by specifying the number of replicas.
Example:
bash
docker service scale myapp=5
Kubernetes for Advanced Orchestration:
Kubernetes (K8s) is more complex but offers greater scalability and fault tolerance. It can manage Docker containers at scale.
Load Balancing and Service Discovery:
Use Docker Swarm or Kubernetes to automatically load balance traffic to different container replicas.
9. Best Practices
Optimizing Docker Images:
Use smaller base images (e.g., alpine images) to reduce image size.
Use multi-stage builds to avoid unnecessary dependencies in the final image.
Environment Variables and Secrets Management:
Store sensitive data like API keys or database credentials in Docker secrets or environment variables rather than hardcoding them.
Logging and Monitoring:
Use tools like Docker’s built-in logging drivers, or integrate with ELK stack (Elasticsearch, Logstash, Kibana) for advanced logging.
For monitoring, tools like Prometheus and Grafana can be used to track Docker container metrics.
10. Conclusion
Why Use Docker in Full Stack Development? Docker simplifies the management of complex full-stack applications by ensuring consistent environments across all stages of development. It also offers significant performance benefits and scalability options.
Recommendations:
Encourage users to integrate Docker with CI/CD pipelines for automated builds and deployment.
Mention the use of Docker for microservices architecture, enabling easy scaling and management of individual services.
WEBSITE: https://www.ficusoft.in/full-stack-developer-course-in-chennai/
0 notes
Text
Docker MasterClass: Docker, Compose, SWARM, and DevOps
Docker has revolutionized the way we think about software development and deployment. By providing a consistent environment for applications, Docker allows developers to create, deploy, and run applications inside containers, ensuring that they work seamlessly across different computing environments. In this Docker MasterClass, we’ll explore Docker’s core components, including Docker Compose and Docker Swarm, and understand how Docker fits into the broader DevOps ecosystem.
Introduction to Docker
Docker is an open-source platform that automates the deployment of applications inside lightweight, portable containers. These containers package an application and its dependencies together, making it easy to move between development, testing, and production environments. Docker's efficiency and flexibility have made it a staple in modern software development.
Docker’s Core Components
Docker Engine
At the heart of Docker is the Docker Engine, a client-server application that builds, runs, and manages Docker containers. The Docker Engine consists of three components:
Docker Daemon: The background service that runs containers and manages Docker objects.
Docker CLI: The command-line interface used to interact with the Docker Daemon.
REST API: Allows communication with the Docker Daemon via HTTP requests.
Docker Images
Docker images are read-only templates that contain the instructions for creating a container. They include everything needed to run an application, including the code, runtime, libraries, and environment variables. Images are stored in a Docker registry, such as Docker Hub, from which they can be pulled and used to create containers.
Docker Containers
A Docker container is a running instance of a Docker image. Containers are isolated, secure, and can be easily started, stopped, and moved between environments. Because they contain everything needed to run an application, they ensure consistency across different stages of development and deployment.
Docker Compose: Managing Multi-Container Applications
Docker Compose is a tool that allows you to define and manage multi-container Docker applications. With Docker Compose, you can specify a multi-container application’s services, networks, and volumes in a single YAML file, known as docker-compose.yml.
Key Features of Docker Compose
Declarative Configuration: Define services, networks, and volumes in a straightforward YAML file.
Dependency Management: Docker Compose automatically starts services in the correct order, based on their dependencies.
Environment Variables: Easily pass environment variables into services, making configuration flexible and adaptable.
Scaling: Docker Compose allows you to scale services to multiple instances with a single command.
Docker Swarm: Orchestrating Containers
Docker Swarm is Docker’s native clustering and orchestration tool. It allows you to manage a cluster of Docker nodes as a single virtual system, simplifying the deployment and scaling of multi-container applications across multiple hosts.
Key Features of Docker Swarm
Service Discovery: Automatically discovers and loads balances services across the cluster.
Scaling: Easily scale services up or down by adding or removing nodes from the Swarm.
Rolling Updates: Perform updates to services without downtime by gradually replacing old containers with new ones.
Fault Tolerance: Redistributes workloads across the remaining nodes if a node fails.
Setting Up a Docker Swarm Cluster
To create a Docker Swarm, you need to initialize a Swarm manager on one node and then join additional nodes as workers:
bash
Copy code
# Initialize the Swarm manager docker swarm init # Add a worker node to the Swarm docker swarm join --token <worker-token> <manager-IP>:2377
Once your Swarm is set up, you can deploy a service across the cluster:
bash
Copy code
docker service create --replicas 3 --name my-service nginx:latest
This command creates a service named my-service with three replicas, distributed across the available nodes.
Docker in DevOps
Docker is an integral part of the DevOps pipeline, where it is used to streamline the process of developing, testing, and deploying applications.
Continuous Integration and Continuous Deployment (CI/CD)
In a CI/CD pipeline, Docker ensures consistency between development and production environments. Docker containers can be built, tested, and deployed automatically as part of the pipeline, reducing the likelihood of “works on my machine” issues.
Infrastructure as Code (IaC)
With Docker, infrastructure can be defined and managed as code. Dockerfiles, Docker Compose files, and Swarm configurations can be version-controlled and automated, allowing for reproducible and consistent deployments.
Collaboration and Consistency
Docker promotes collaboration between development, operations, and testing teams by providing a standardized environment. Teams can share Docker images and Compose files, ensuring that everyone is working with the same setup, from local development to production.
Advanced Docker Concepts
Docker Networking
Docker provides several networking modes, including bridge, host, and overlay networks. These modes allow containers to communicate with each other and with external networks, depending on the needs of your application.
Docker Volumes
Docker volumes are used to persist data generated by Docker containers. Volumes are independent of the container’s lifecycle, allowing data to persist even if the container is deleted or recreated.
Security Best Practices
Use Official Images: Prefer official Docker images from trusted sources to minimize security risks.
Limit Container Privileges: Run containers with the least privileges necessary to reduce the attack surface.
Regularly Update Containers: Keep your Docker images and containers up to date to protect against known vulnerabilities.
Conclusion
Docker has become a cornerstone of modern software development and deployment, providing a consistent, scalable, and secure platform for managing applications. By mastering Docker, Docker Compose, Docker Swarm, and integrating these tools into your DevOps pipeline, you can streamline your workflows, improve collaboration, and deploy applications with confidence.
Whether you're just starting out or looking to deepen your Docker knowledge, this MasterClass provides a comprehensive foundation to take your skills to the next level. Embrace the power of Docker, and transform the way you build, ship, and run applications.
0 notes
Text
Managing Containerized Applications Using Ansible: A Guide for College Students and Working Professionals
As containerization becomes a cornerstone of modern application deployment, managing containerized applications effectively is crucial. Ansible, a powerful automation tool, provides robust capabilities for managing these containerized environments. This blog post will guide you through the process of managing containerized applications using Ansible, tailored for both college students and working professionals.
What is Ansible?
Ansible is an open-source automation tool that simplifies configuration management, application deployment, and task automation. It's known for its agentless architecture, ease of use, and powerful features, making it ideal for managing containerized applications.
Why Use Ansible for Container Management?
Consistency: Ensure that container configurations are consistent across different environments.
Automation: Automate repetitive tasks such as container deployment, scaling, and monitoring.
Scalability: Manage containers at scale, across multiple hosts and environments.
Integration: Seamlessly integrate with CI/CD pipelines, monitoring tools, and other infrastructure components.
Prerequisites
Before you start, ensure you have the following:
Ansible installed on your local machine.
Docker installed on the target hosts.
Basic knowledge of YAML and Docker.
Setting Up Ansible
Install Ansible on your local machine:
pip install ansible
Basic Concepts
Inventory
An inventory file lists the hosts and groups of hosts that Ansible manages. Here's a simple example:
[containers] host1.example.com host2.example.com
Playbooks
Playbooks define the tasks to be executed on the managed hosts. Below is an example of a playbook to manage Docker containers.
Example Playbook: Deploying a Docker Container
Let's start with a simple example of deploying an NGINX container using Ansible.
Step 1: Create the Inventory File
Create a file named inventory:
[containers] localhost ansible_connection=local
Step 2: Create the Playbook
Create a file named deploy_nginx.yml:
name: Deploy NGINX container hosts: containers become: yes tasks:
name: Install Docker apt: name: docker.io state: present when: ansible_os_family == "Debian"
name: Ensure Docker is running service: name: docker state: started enabled: yes
name: Pull NGINX image docker_image: name: nginx source: pull
name: Run NGINX container docker_container: name: nginx image: nginx state: started ports:
"80:80"
Step 3: Run the Playbook
Execute the playbook using the following command:
ansible-playbook -i inventory deploy_nginx.yml
Advanced Topics
Managing Multi-Container Applications
For more complex applications, such as those defined by Docker Compose, you can manage multi-container setups with Ansible.
Example: Deploying a Docker Compose Application
Create a Docker Compose file docker-compose.yml:
version: '3' services: web: image: nginx ports: - "80:80" db: image: postgres environment: POSTGRES_PASSWORD: example
Create an Ansible playbook deploy_compose.yml:
name: Deploy Docker Compose application hosts: containers become: yes tasks:
name: Install Docker apt: name: docker.io state: present when: ansible_os_family == "Debian"
name: Install Docker Compose get_url: url: https://github.com/docker/compose/releases/download/1.29.2/docker-compose-uname -s-uname -m dest: /usr/local/bin/docker-compose mode: '0755'
name: Create Docker Compose file copy: dest: /opt/docker-compose.yml content: | version: '3' services: web: image: nginx ports: - "80:80" db: image: postgres environment: POSTGRES_PASSWORD: example
name: Run Docker Compose command: docker-compose -f /opt/docker-compose.yml up -d
Run the playbook:
ansible-playbook -i inventory deploy_compose.yml
Integrating Ansible with CI/CD
Ansible can be integrated into CI/CD pipelines for continuous deployment of containerized applications. Tools like Jenkins, GitLab CI, and GitHub Actions can trigger Ansible playbooks to deploy containers whenever new code is pushed.
Example: Using GitHub Actions
Create a GitHub Actions workflow file .github/workflows/deploy.yml:
name: Deploy with Ansible
on: push: branches: - main
jobs: deploy: runs-on: ubuntu-lateststeps: - name: Checkout code uses: actions/checkout@v2 - name: Set up Ansible run: sudo apt update && sudo apt install -y ansible - name: Run Ansible playbook run: ansible-playbook -i inventory deploy_compose.yml
Conclusion
Managing containerized applications with Ansible streamlines the deployment and maintenance processes, ensuring consistency and reliability. Whether you're a college student diving into DevOps or a working professional seeking to enhance your automation skills, Ansible provides the tools you need to efficiently manage your containerized environments.
For more details click www.qcsdclabs.com
#redhatcourses#docker#linux#information technology#containerorchestration#kubernetes#container#containersecurity#dockerswarm#aws
0 notes
Text
Docking Your Workflow: A Hands-On Guide to Docker Compose Installation and Examples

What is docker-compose?
It is a tool which is used to create and start Docker application by using a single command.
It simplifies the deployment of complex applications by defining their architecture in a human-readable format.
This configuration file, typically written in YAML, outlines the services, networks, and volumes needed to run your application.
Docker Compose not only simplifies the management of containers but also encourages collaboration among developers and teams
Users can activate all the services (containers) using a single command.
Docker compose features
Purpose:Orchesrating multi-container application
Configuration:YAML base configuration
Scale:Multiple containers
Networking:Built-in networking and service discovery
Dependancy:Images and compose configuration
Ecosystem:Docker Hub and private registries
How to Install Docker Compose
Prerequisites:
Before installing Docker Compose, ensure that you have Docker installed on your system.
Installation Steps:
Check the Current Release:
Visit the Docker Compose GitHub release page to find the latest stable release. Identify the version number you want to install.
Download the Docker Compose Binary:
sudo curl -L "https://github.com/docker/compose/releases/download/1.23.2/docker-compose-$(uname -s)-$(uname -m)" -o /usr/local/bin/docker-compose

Apply Executable Permissions:
Make the downloaded binary executable:
sudo chmod +x /usr/local/bin/docker-compose

Verify Installation:
Confirm the successful installation by checking the version:
docker-compose –version

Docker Compose Commands:
docker-compose build =Look for all services containing the build
docker-compose run=Run a one-time command against a service
docker-compose up=Command used to start all the services of the container.
docker Compose down=This syntax is used to stop all the services that were started.
docker-compose -f =Specify the location of a docker-compose configuration file by adding the -f flag
docker-compose start=Start existing containers for a service
docker_compose_v=To check the version of docker-compose, we use this command.
docker ps=This command is used to bring out the whole process of Docker.
docker Compose.yml=This command is used to configure application services using YAML files.
docker-compose up -d=Used to run a Docker-Compose file.
docker Compose up -d -scale=Used to scale the service of the container.
pip install -U Docker-compose= Command used to install Docker Compose using pip.
Compose step process
1 Create a Directory
Creating the Dockerfile for the app environment
defining the services in docker-compose.yml
starting the application
Running Application using Docker Compose
Example:
Follow the following example
1) Create a Directory
mkdir docker-compose-praman

2)Go to the directory
cd docker-composer-praman

3) Define docker-compose.yml file
sudo vi docker-compose.yml
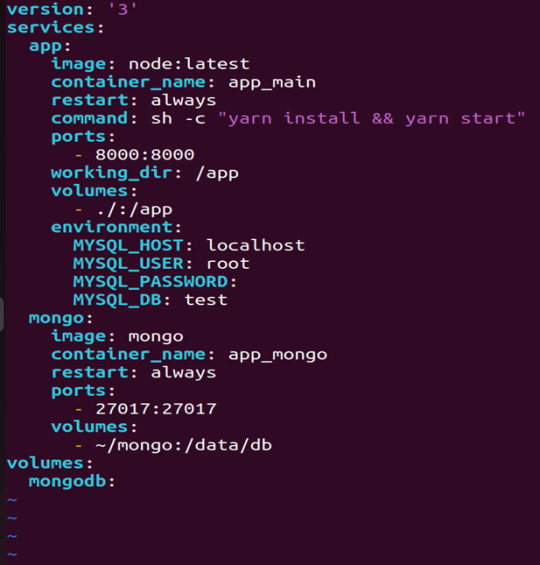
let’s dismantle the above code and understand it by piece:
version: It refers to the docker-compose version (Latest 3)
services: It defines the services that we need to run
app: It is a custom name for one of your containers
image: The image which we have to pull. Here we are using node:latest and mongo
container_name: It is the name for each container
restart: starts/restarts a service container
port: It defines the custom port to run the container
working_dir: It is the current working directory for the service container
environment: It defines the environment variables, such as DB credentials, and so on
command: It is the command to run the service
4)How to run the multi-container:
We need to build our multi-container using docker build.
docker-compose build (Command to build the docker-compose.yml)

docker-compose up (Command to run multiple containers using docker-compose)
docker-compose up -d (Command to run multiple containers using docker-compose in detached mode)
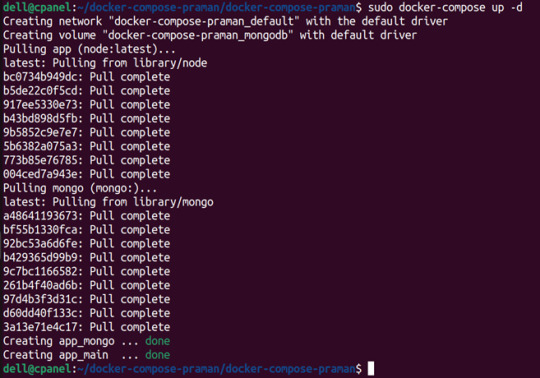
docker-compose ps (Command to list the running container services)

Sample output for running mongodb service using docker:

Docker Compose Disadvantages:
Below are the drawbacks of Docker-Compose.
1.You have to spend more time and effort, installing Docker on your server.
2.Docker-Compose requires manual updates and fails when it comes to rebooting.
3.You have to spend more time and effort, installing Docker on your server.
4. However, docker-compose is already there in your system if you have installed Docker.
Docker Compose Use Cases:
Automated testing environments-
Compose supports automated testing, which is an essential part of CI/CD as it can easily create and destroy the required testing environment
Single host deployments-
In Docker Compose, containers are designed to run on a single host as they have traditionally been focused on development and testing workflows.
Development Environments-
Compose is a fast and simple way of starting projects as it can quickly spin up new isolated development environments.
High productivity -
Docker-Compose increases productivity and reduces the time taken for each task
Security -
All the containers are isolated from each other, reducing the threat landscape
Configuration-
Docker-Compose files are written in YAML scripts hence, provide easy and quick configuration.
Credits - Sachin Auti (DevOps)
MetricsViews Pvt. Ltd.
MetricsViews specializes in building a solid DevOps strategy with cloud-native including AWS, GCP, Azure, Salesforce, and many more. We excel in microservice adoption, CI/CD, Orchestration, and Provisioning of Infrastructure - with Smart DevOps tools like Terraform, and CloudFormation on the cloud.
www.metricsviews.com
0 notes
Text
Simplifying SQL Server Deployment with Docker Compose

Introduction
Deploying Microsoft SQL Server can sometimes be a daunting task, especially for developers who just want to set up a quick and simple instance for testing or small-scale use. Docker Compose offers a straightforward solution to this problem, allowing you to define and run multi-container Docker applications with ease. In this blog post, we’ll walk through creating a docker-compose.yml file to deploy SQL Server efficiently.
Prerequisites
Before we begin, ensure you have Docker and Docker Compose installed on your system. If not, you can download and install them from the official Docker website.
Crafting the Docker Compose File
Below is a sample docker-compose.yml file designed to run Microsoft SQL Server in a Docker container:
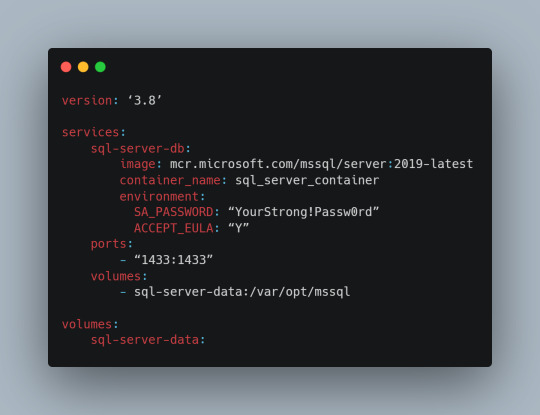
Understanding the Configuration
Let’s break down the components of this configuration file:
version: This specifies the version of Docker Compose to use, which in this case is 3.8.
services: Under this key, we define all the services (containers) we want to run.
sql-server-db: This is the name of our service.
image: This key specifies the Docker image to use. We’re using the latest version of SQL Server 2019.
container_name: We define a custom name for our container for easier reference.
environment: Here, we set necessary environment variables.
SA_PASSWORD: The password for the sa user. Ensure to replace "YourStrong!Passw0rd" with a strong, unique password.
ACCEPT_EULA: This is mandatory and must be set to Y to run SQL Server in a container.
ports: We map port 1433 on the host to port 1433 in the container, which is the default for SQL Server.
volumes: This is crucial for data persistence. We define a volume named sql-server-data mounted at /var/opt/mssql in the container.
volumes: We declare the named volume sql-server-data for use in our service.
Deploying SQL Server with Docker Compose
With the docker-compose.yml file in place, navigate to its directory in the terminal and run the command:
docker-compose up -d
This command will download the specified SQL Server image (if not already downloaded), create a container with the specified settings, and start it in detached mode.
Connecting to SQL Server
Once the container is running, you can connect to the SQL Server instance using any SQL Server client, with the server address as localhost,1433 and the sa user credentials you specified in the docker-compose.yml file.
Conclusion
Docker Compose simplifies the deployment of applications like SQL Server, making it accessible for developers at all levels of expertise. With a simple docker-compose.yml file, you can have a SQL Server instance up and running in minutes, without the hassle of manual installation and configuration. Always ensure to use strong, unique passwords and understand the licensing agreements of the software you deploy. Happy coding!
0 notes
Text
How to make Selenium testing more efficient with Docker

The reliability and compatibility of web applications across different environments are crucial. Docker, a popular containerization platform, offers a streamlined way to achieve this by providing a consistent testing environment.
In 2022, Docker accounted for 27 percent market share of the containerization technologies market. – Statista
What is Docker?
Docker is an open-source platform that automates the deployment of applications in lightweight portable containers. These containers package applications and their dependencies together, ensuring consistency across different environments.
Why to use Docker for Selenium testing
Isolation: Each test runs in a separate container, preventing interference between tests.
Consistency: The testing environment is consistent across different machines and environments.
Efficiency: Tests can be parallelized easily using Docker, reducing execution time.
Scalability: Docker allows you to scale up your testing infrastructure effortlessly.
Using Docker for application compatibility
You need to ensure that your application is compatible with different browsers (e.g., Chrome, Firefox) and different versions of those browsers. Additionally, as your application’s functionality grows, multiple tests need to be run concurrently to maintain efficiency.
Benefits of leveraging Docker
Regression testing: It is a process of testing your application to ensure that it still works correctly after changes have been made to it. By using Docker, you can create a consistent environment for regression testing, which can help you identify and fix bugs more quickly.
Parallel test execution: Docker can help you run multiple tests in parallel, which can significantly reduce the time it takes to execute all your tests. This is especially beneficial for large test suites that can take a long time to execute.
Consistent environment: Docker creates isolated environments for each test, which ensures that each test runs in a clean environment that is free of any dependencies or configurations from other tests. This can help prevent test failures caused by environmental factors.
Scalability: You can easily add or remove containers as needed. This can be helpful if you need to increase the number of tests that you are running or if you need to test on many browsers or devices.
Reduced test execution time: Docker can help reduce the time it takes to execute tests by sharing resources between containers and caching dependencies. This can be a significant benefit for large test suites that can take a long time to execute.
Setting up your environment with Docker
– Installing Docker
To get started, install Docker on your machine by following the instructions on the official Docker website (https://www.Docker.com/).
– Creating a Selenium Test Suite
Develop a Selenium test suite using your preferred programming language (Java, Python, etc.) and testing framework (JUnit, TestNG, etc.). Ensure your tests are organized and ready for execution.
-Configure Docker Compose file
Docker Compose is a tool for defining and running multi-container Docker applications. Create a Docker Compose YML file to configure your container and any other services like Selenium Grid and web browsers like Firefox, Chrome, etc.
– Example of Docker-compose.yml
version: “3” services: Chrome: image: selenium/node-chrome:latest shm_size: 2gb depends_on: – selenium-hub environment: – SE_EVENT_BUS_HOST=selenium-hub – SE_EVENT_BUS_PUBLISH_PORT=4442 – SE_EVENT_BUS_SUBSCRIBE_PORT=4443
Firefox: image: selenium/node-firefox:latest shm_size: 2gb depends_on: – selenium-hub environment: – SE_EVENT_BUS_HOST=selenium-hub – SE_EVENT_BUS_PUBLISH_PORT=4442 – SE_EVENT_BUS_SUBSCRIBE_PORT=4443
Selenium-hub: image: selenium/hub:latest container_name: selenium-hub ports: – “4442:4442” – “4443:4443” – “4444:4444”
You can expand upon this file to include more browser nodes or additional services as needed. Each browser node service should link to the Selenium-hub service to establish communication.
Navigate to the directory containing the compose file and run the “Docker compose -f Docker-compose.yml up” command.
This will start the Selenium hub and the specified browser nodes. You can then configure your Selenium test suite to connect to the Selenium hub at the specified URL http://localhost:4444 and distribute the tests among the available browser nodes.
– Configure Selenium code for execution in the remote web driver DesiredCapabilities chromeCapabilities = DesiredCapabilities.chrome(); // Set any desired capabilities here URL hubUrl = new URL("http://<selenium-hub ip>:4444/wd/hub"); // URL of the Selenium Grid prepared in container. If you have set up Docker in local, then the Selenium hub URL will be http://localhost:4444. WebDriver driver = new RemoteWebDriver(hubUrl, chromeCapabilities ); Copy
– Execute the test
When you run your tests, Selenium will route the commands to the appropriate browser node based on the desired capabilities. The tests will be executed in Docker containers.
Offer better quality software products with QA automation
Docker provides an effective solution for executing Selenium tests in a controlled and reproducible environment. By containerizing your tests, you can achieve consistency, efficiency, and scalability in your testing processes. Ensure the quality of your web applications by integrating Docker into your testing workflow.
Softweb Solutions is one of the leading providers of QA automation services. We automate testing processes to improve quality, efficiency, and scalability for businesses of all sizes. We have a team of experienced QA engineers who are experts in Docker and Selenium. We can help you set up a Docker-based Selenium environment and automate your tests. We also offer training and support to help you get the most out of Docker for Selenium testing.
Originally published at www.softwebsolutions.com on September 1st, 2023.
#QA automation services#Benefits of Test Automation#automation testing services#test automation services#qa automation
0 notes
Text
LiSa: Sandbox for Automated Linux Malware Analysis | #Malware #MalwareAnalysis #Sandbox #Linux
0 notes
Link
#autoSSL#Automation#cloud#configuration#containerization#DevOps#Docker#HTTPS#Let'sEncrypt#Linux#networking#NGINX#proxyserver#reverseproxy#Security#self-hosted#servermanagement#systemadministration#TLS#Traefik#webserver
0 notes
Text
Docker, Mullvad, Socks Proxy, and Automatic Networking Configuration
Mullvad runs their Socks proxy server on 10.64.0.1. But our wireguard is running in a container so the system does not know how to reach this IP address.
We need to tell our system how to reach this IP address via our container's IP.
To selectively route traffic via the proxy, we need to provide a .pac file to Firefox. A .pac file contains a function which decides which URL/host should be proxied. Under network settings Automatic proxy configuration URL it accepts a URL or we can specify a local file using file:////path/to/proxy.pac.
The linuxserver/wireguard image expects a wireguard configuration under /config/wg0.conf. Get your mullvad config from here https://mullvad.net/en/account/#/wireguard-config, and extract the downloaded zip into a wg folder. Rename the config you want to use to wg0.conf. If you don't have IPv6 then remove the IPv6 addresses from the wg0.conf file, otherwise the connection might fail.
Lets create the required files.
Copy the following into docker-compose.yml:
--- version: "3" services: wg: image: lscr.io/linuxserver/wireguard container_name: wg cap_add: - NET_ADMIN - SYS_MODULE environment: - PUID=1000 - PGID=1000 - TZ=Europe/London volumes: - ./wg:/config - /lib/modules:/lib/modules ports: - 51820:51820/udp - 1080:1080 #for socks proxy sysctls: - net.ipv4.conf.all.src_valid_mark=1 restart: unless-stopped
Copy the following into start.sh:
#!/bin/bash #start wg service docker-compose up -d docker exec wg curl --no-progress-meter https://am.i.mullvad.net/connected #enable nat inside the container docker exec wg iptables -t nat -A POSTROUTING -o wg+ -j MASQUERADE #get ip address of wg network wg_ip=$(docker inspect -f '{{range.NetworkSettings.Networks}}{{.IPAddress}}{{end}}' wg) echo "wg container ip is $wg_ip" #add route to mullvad socks ip sudo ip route add 10.64.0.1 via $wg_ip
And, make the script executable:
chmod 700 start.sh
Copy the following to `mullvad.pac':
const proxyList = new Set(); //add domain names below proxyList.add("mullvad.net"); //proxyList.add("anotherdomain.com"); function FindProxyForURL(url, host) { return proxyList.has(host) ? "SOCKS5 10.64.0.1:1080" : "DIRECT" }
Open Firefox's network settings and add the path to mullvad.pac file under Automatic proxy configuration URL.
file:////path/to/mullvad.pac
Now if you visit https://mullvad.net/en/check, it should be all green.
1 note
·
View note
Text
This article is part of Smart Infrastructure monitoring series, we’ve already covered how to Install Prometheus Server on CentOS 7 and how to Install Grafana and InfluxDB on CentOS 7. We have a Ceph cluster on production that we have been trying to find good tools for monitoring it, lucky enough, we came across Prometheus and Grafana. Ceph Cluster monitoring with Prometheus requires Prometheus exporter that scrapes meta information about a ceph cluster. In this guide, we’ll use DigitalOcean Ceph exporter. Pre-requisites: Installed Prometheus Server. Installed Grafana Server. Docker installed on a Server to run Prometheus Ceph exporter. It should be able to talk to ceph cluster. Working Ceph Cluster Access to Ceph cluster to copy ceph.conf configuration file and the ceph..keyring in order to authenticate to your cluster. Follow below steps for a complete guide on how to set this up. Step 1: Install Prometheus Server and Grafana: Use these links for how to install Prometheus and Grafana. Install Prometheus Server on CentOS 7 and Install Grafana and InfluxDB on CentOS 7. Install Prometheus Server and Grafana on Ubuntu Install Prometheus Server and Grafana on Debian Step 2: Install Docker on Prometheus Ceph exporter client Please note that Prometheus Ceph exporter client should have access to Ceph cluster network for it to pull Cluster metrics. Install Docker on this server using our official Docker installation guide: Install Docker CE on Ubuntu / Debian / Fedora / Arch / CentOS Also, install docker-compose. Install Docker Compose on Linux Systems Step 3: Build Ceph Exporter Docker image Once you have Docker Engine installed and service running. You should be ready to build docker image from DigitalOcean Ceph exporter project. Consider installing Git if you don’t have it already. sudo yum -y install git If you’re using Ubuntu, run: sudo apt update && sudo apt -y install git Then clone the project from Github: git clone https://github.com/digitalocean/ceph_exporter.git Switch to the ceph_exporter directory and build docker image: cd ceph_exporter docker build -t ceph_exporter . This will build an image named ceph_exporter. It may take a while depending on your internet and disk write speeds. $ docker images REPOSITORY TAG IMAGE ID CREATED SIZE ceph_exporter latest 1e3b0082e6d4 3 minutes ago 379MB Step 4: Start Prometheus ceph exporter client container Copy ceph.conf configuration file and the ceph..keyring to /etc/ceph directory and start docker container host’s network stack. You can use vanilla docker commands, docker-compose or systemd to manage the container. For docker command line tool, run below commands. docker run -it \ -v /etc/ceph:/etc/ceph \ --net=host \ -p=9128:9128 \ digitalocean/ceph_exporter For docker-compose, create the following file: $ vim docker-compose.yml # Example usage of exporter in use version: '2' services: ceph-exporter: image: ceph_exporter restart: always network_mode: "host" volumes: - /etc/ceph:/etc/ceph ports: - '9128:9128' Then start docker container using: $ docker-compose up -d For systemd, create service unit file like below: $ sudo vim /etc/systemd/system/ceph_exporter.service [Unit] Description=Manage Ceph exporter service [Install] WantedBy=multi-user.target [Service] Restart=always TimeoutStartSec=0 ExecStartPre=-/usr/bin/docker kill ceph_exporter ExecStartPre=-/usr/bin/docker rm ceph_exporter ExecStart=/usr/bin/docker run \ --name ceph_exporter \ -v /etc/ceph:/etc/ceph \ --net=host \ -p=9128:9128 \ ceph_exporter ExecStop=-/usr/bin/docker kill ceph_exporter ExecStop=-/usr/bin/docker rm ceph_exporter Reload systemd daemon: sudo systemctl daemon-reload Start and enable the service: sudo systemctl enable ceph_exporter sudo systemctl start ceph_exporter Check container status:
sudo systemctl status ceph_exporter You should get output like below if all went fine. Step 5: Open 9128 on the firewall. I use firewalld since this is a CentOS 7 server, allow access to port 9128 from your trusted network. sudo firewall-cmd --permanent \ --add-rich-rule 'rule family="ipv4" \ source address="192.168.10.0/24" \ port protocol="tcp" port="9128" accept' sudo firewall-cmd --reload Test access with nc or telnet command. $ telnet 127.0.0.1 9128 Trying 127.0.0.1... Connected to 127.0.0.1. Escape character is '^]'. $ nc -v 127.0.0.1 9128 Ncat: Version 6.40 ( http://nmap.org/ncat ) Ncat: Connected to 127.0.0.1:9128. Step 6: Configure Prometheus scrape target with Ceph exporter We need to define the Prometheus static_configs line for created ceph exporter container. Edit the file /etc/prometheus/prometheus.yml on your Prometheus server to look like below. scrape_configs: - job_name: prometheus static_configs: - targets: ['localhost:9090'] - job_name: 'ceph-exporter' static_configs: - targets: ['ceph-exporter-node-ip:9128'] labels: alias: ceph-exporter Replace localhost with your ceph exporter host IP address. Remember to restart Prometheus service after making the changes: sudo systemctl restart prometheus Step 7: Add Prometheus Data Source to Grafana Login to your Grafana Dashboard and add Prometheus data source. You’ll need to provide the following information: Name: Name given to this data source Type: The type of data source, in our case this is Prometheus URL: IP address and port number of Prometheus server you’re adding. Access: Specify if access through proxy or direct. Proxy means access through Grafana server, direct means access from the web. Save the settings by clicking save & Test button. Step 8: Import Ceph Cluster Grafana Dashboards The last step is to import the Ceph Cluster Grafana Dashboards. From my research, I found the following Dashboards by Cristian Calin. Ceph Cluster Overview: https://grafana.com/dashboards/917 Ceph Pools Overview: https://grafana.com/dashboards/926 Ceph OSD Overview: https://grafana.com/dashboards/923 We will use dashboard IDs 917, 926 and 923 when importing dashboards on Grafana. Click the plus sign (+)> Import to import dashboard. Enter the number that matches the dashboard you wish to import above. To View imported dashboards, go to Dashboards and select the name of the dashboard you want to view. For OSD and Pools dashboard, you need to select the pool name / OSD number to view its usage and status. SUSE guys have similar dashboards available on https://github.com/SUSE/grafana-dashboards-ceph Other Prometheus Monitoring guides: How to Monitor Redis Server with Prometheus and Grafana in 5 minutes How to Monitor Linux Server Performance with Prometheus and Grafana in 5 minutes How to Monitor BIND DNS server with Prometheus and Grafana Monitoring MySQL / MariaDB with Prometheus in five minutes How to Monitor Apache Web Server with Prometheus and Grafana in 5 minutes
0 notes