#Docker Compose on Ubuntu
Explore tagged Tumblr posts
Visit Tumblr Blog
Explore Tumblr blogs with no restrictions, modern design and the best experience.
Last Seen Tumblr Blogs


Fun Fact
130K people were victims of a chain letter scam that affected Tumblr in May 2011.
Text
Graylog Docker Compose Setup: An Open Source Syslog Server for Home Labs
Graylog Docker Compose Install: Open Source Syslog Server for Home #homelab GraylogInstallationGuide #DockerComposeOnUbuntu #GraylogRESTAPI #ElasticsearchAndGraylog #MongoDBWithGraylog #DockerComposeYmlConfiguration #GraylogDockerImage #Graylogdata
A really great open-source log management platform for both production and home lab environments is Graylog. Using Docker Compose, you can quickly launch and configure Graylog for a production or home lab Syslog. Using Docker Compose, you can create and configure all the containers needed, such as OpenSearch and MongoDB. Let’s look at this process. Table of contentsWhat is Graylog?Advantages of…

View On WordPress
#Docker Compose on Ubuntu#docker-compose.yml configuration#Elasticsearch and Graylog#Graylog data persistence#Graylog Docker image#Graylog installation guide#Graylog REST API#Graylog web interface setup#log management with Graylog#MongoDB with Graylog
0 notes
Video
youtube
🚨✂Remover Imágenes Docker 🚢 sin usar o Dangling colgadas 💣
🚨Borrar Imágenes #Docker Sin Usar
Te dejo esta clase 🎁 #Gratis del #Curso Multi #Tenant con #Django y #Docker
🚨🚀 ¡Próximamente! Curso donde Dominarás Multi Tenant con Django 5 y Docker 🐍🐳 🔜
#Python #dockercompose
👉 https://youtu.be/g461CaDmml4 👈
#youtube#python#docker#docker images#dangling#docker desktop#docker compose#linux#ubuntu#free#class#udemyfree#free class#clase gratis
0 notes
Text
How to Install
Looking for easy, step-by-step guides on how to install everything from software to home devices? Our "How to Install" blog provides clear, beginner-friendly instructions to help you get things up and running without the hassle. Whether you're setting up a new app, assembling tech gadgets, or configuring tools, we simplify the process for you. Each post is written with accuracy and user convenience in mind.
How to Install How to Install Printers Without CD How to Install Webcam Drivers How to Install SSH How to Install Pixelmon How to Install OptiFine How to Install Fabric How to Install Zend Framework with XAMPP on Windows How to Install Roblox on Chromebook How to Install Roblox Studio How to Install Firefox on Mac How to Install Firefox on Linux How to Install Firefox on Windows How to Install Java Step-by-Step Guide for Beginners How to Install Java on Mac Follow Full Process Ultimate Guide How to Install Java for Minecraft Easy Step Guide for How to Install VPN for Privacy How to Install VPN Server Virtual Private Network How to Install VPN on Router A Step-by-Step Guide : Complete Guide for How to Install Anaconda How to Install Anaconda on Linux Complete Guide How to Install Anaconda on Mac: A Step-by-Step Guide How to Install Anaconda on Ubuntu: A Step-by-Step Guide How to Install Anaconda on Windows How to Install npm A Step-by-Step Guide for Beginners How to Install npm on Ubuntu Step-by-Step How to Install NVM on Ubuntu Tips, and Explanations How to Install npm on Windows Solve Common Issues How to Install NVM on Windows Troubleshooting Tips How to Install npm on Visual Studio Code How to Install Node.js on Your Machine How to Install Node.js on Linux Step-by-Step Guide How to Install Node.js on Mac Step-by-Step Guide How to Install Node Modules on Angular How to Install Node.js on Ubuntu The Latest Version How to Install Node.js on Windows Get started Full Method How to Install APK File on Your Android Device Complete Guide on How to Install APK on Android TV How to Install APK on Chromebook Step by Step Process How to Install APK on iOS A Comprehensive Guide How to Install IPA on iPhone A Complete Guide How to Install APK on Windows 10 Complete Guide How to Install Git A Step-by-Step Guide for Beginners How to Install Git Bash A Complete Step-by-Step Guide How to Install Git on Visual Studio Code How to Install GitHub Simple Step-by-Step Process How to Install Git on Mac Step-by-Step Guide How to Install Git on Linux A Step-by-Step Guide How to Install Git on Ubuntu Step-by-Step Guide How to Install Git on Windows A Simple Guide How to Install Docker How to Install Docker on Linux How to Install Docker on Mac How to Install Docker Daemon Mac How to Install Docker on Ubuntu How to Install Docker Compose on Ubuntu 20.04 How to Install Docker Compose on Windows How to Install Docker on Windows How to Install WordPress How to Install WordPress on Ubuntu How to Install WordPress Plugins How to Install WordPress on Windows 10 How to Install Kodi on Firestick How to Install Exodus on Kodi How to Install The Crew on Kodi How to Install XAMPP on Mac
0 notes
Link
#Automation#cloud#configuration#containerization#deploy#DevOps#Docker#feedaggregator#FreshRSS#Linux#Monitoring#news#open-source#Performance#Privacy#RSSreader#self-hosted#Server#systemadministration#updates#webapplication
0 notes
Text
Postal SMTP install and setup on a virtual server

Postal is a full suite for mail delivery with robust features suited for running a bulk email sending SMTP server. Postal is open source and free. Some of its features are: - UI for maintaining different aspects of your mail server - Runs on containers, hence allows for up and down horizontal scaling - Email security features such as spam and antivirus - IP pools to help you maintain a good sending reputation by sending via multiple IPs - Multitenant support - multiple users, domains and organizations - Monitoring queue for outgoing and incoming mail - Built in DNS setup and monitoring to ensure mail domains are set up correctly List of full postal features
Possible cloud providers to use with Postal
You can use Postal with any VPS or Linux server providers of your choice, however here are some we recommend: Vultr Cloud (Get free $300 credit) - In case your SMTP port is blocked, you can contact Vultr support, and they will open it for you after providing a personal identification method. DigitalOcean (Get free $200 Credit) - You will also need to contact DigitalOcean support for SMTP port to be open for you. Hetzner ( Get free €20) - SMTP port is open for most accounts, if yours isn't, contact the Hetzner support and request for it to be unblocked for you Contabo (Cheapest VPS) - Contabo doesn't block SMTP ports. In case you are unable to send mail, contact support. Interserver
Postal Minimum requirements
- At least 4GB of RAM - At least 2 CPU cores - At least 25GB disk space - You can use docker or any Container runtime app. Ensure Docker Compose plugin is also installed. - Port 25 outbound should be open (A lot of cloud providers block it)
Postal Installation
Should be installed on its own server, meaning, no other items should be running on the server. A fresh server install is recommended. Broad overview of the installation procedure - Install Docker and the other needed apps - Configuration of postal and add DNS entries - Start Postal - Make your first user - Login to the web interface to create virtual mail servers Step by step install Postal Step 1 : Install docker and additional system utilities In this guide, I will use Debian 12 . Feel free to follow along with Ubuntu. The OS to be used does not matter, provided you can install docker or any docker alternative for running container images. Commands for installing Docker on Debian 12 (Read the comments to understand what each command does): #Uninstall any previously installed conflicting software . If you have none of them installed it's ok for pkg in docker.io docker-doc docker-compose podman-docker containerd runc; do sudo apt-get remove $pkg; done #Add Docker's official GPG key: sudo apt-get update sudo apt-get install ca-certificates curl -y sudo install -m 0755 -d /etc/apt/keyrings sudo curl -fsSL https://download.docker.com/linux/debian/gpg -o /etc/apt/keyrings/docker.asc sudo chmod a+r /etc/apt/keyrings/docker.asc #Add the Docker repository to Apt sources: echo "deb https://download.docker.com/linux/debian $(. /etc/os-release && echo "$VERSION_CODENAME") stable" | sudo tee /etc/apt/sources.list.d/docker.list > /dev/null sudo apt-get update #Install the docker packages sudo apt-get install docker-ce docker-ce-cli containerd.io docker-buildx-plugin docker-compose-plugin -y #You can verify that the installation is successful by running the hello-world image sudo docker run hello-world Add the current user to the docker group so that you don't have to use sudo when not logged in as the root user. ##Add your current user to the docker group. sudo usermod -aG docker $USER #Reboot the server sudo reboot Finally test if you can run docker without sudo ##Test that you don't need sudo to run docker docker run hello-world Step 2 : Get the postal installation helper repository The Postal installation helper has all the docker compose files and the important bootstrapping tools needed for generating configuration files. Install various needed tools #Install additional system utlities apt install git vim htop curl jq -y Then clone the helper repository. sudo git clone https://github.com/postalserver/install /opt/postal/install sudo ln -s /opt/postal/install/bin/postal /usr/bin/postal Step 3 : Install MariaDB database Here is a sample MariaDB container from the postal docs. But you can use the docker compose file below it. docker run -d --name postal-mariadb -p 127.0.0.1:3306:3306 --restart always -e MARIADB_DATABASE=postal -e MARIADB_ROOT_PASSWORD=postal mariadb Here is a tested mariadb compose file to run a secure MariaDB 11.4 container. You can change the version to any image you prefer. vi docker-compose.yaml services: mariadb: image: mariadb:11.4 container_name: postal-mariadb restart: unless-stopped environment: MYSQL_ROOT_PASSWORD: ${DB_ROOT_PASSWORD} volumes: - mariadb_data:/var/lib/mysql network_mode: host # Set to use the host's network mode security_opt: - no-new-privileges:true read_only: true tmpfs: - /tmp - /run/mysqld healthcheck: test: interval: 30s timeout: 10s retries: 5 volumes: mariadb_data: You need to create an environment file with the Database password . To simplify things, postal will use the root user to access the Database.env file example is below. Place it in the same location as the compose file. DB_ROOT_PASSWORD=ExtremelyStrongPasswordHere Run docker compose up -d and ensure the database is healthy. Step 4 : Bootstrap the domain for your Postal web interface & Database configs First add DNS records for your postal domain. The most significant records at this stage are the A and/or AAAA records. This is the domain where you'll be accessing the postal UI and for simplicity will also act as the SMTP server. If using Cloudflare, turn off the Cloudflare proxy. sudo postal bootstrap postal.yourdomain.com The above will generate three files in /opt/postal/config. - postal.yml is the main postal configuration file - signing.key is the private key used to sign various things in Postal - Caddyfile is the configuration for the Caddy web server Open /opt/postal/config/postal.yml and add all the values for DB and other settings. Go through the file and see what else you can edit. At the very least, enter the correct DB details for postal message_db and main_db. Step 5 : Initialize the Postal database and create an admin user postal initialize postal make-user If everything goes well with postal initialize, then celebrate. This is the part where you may face some issues due to DB connection failures. Step 6 : Start running postal # run postal postal start #checking postal status postal status # If you make any config changes in future you can restart postal like so # postal restart Step 7 : Proxy for web traffic To handle web traffic and ensure TLS termination you can use any proxy server of your choice, nginx, traefik , caddy etc. Based on Postal documentation, the following will start up caddy. You can use the compose file below it. Caddy is easy to use and does a lot for you out of the box. Ensure your A records are pointing to your server before running Caddy. docker run -d --name postal-caddy --restart always --network host -v /opt/postal/config/Caddyfile:/etc/caddy/Caddyfile -v /opt/postal/caddy-data:/data caddy Here is a compose file you can use instead of the above docker run command. Name it something like caddy-compose.yaml services: postal-caddy: image: caddy container_name: postal-caddy restart: always network_mode: host volumes: - /opt/postal/config/Caddyfile:/etc/caddy/Caddyfile - /opt/postal/caddy-data:/data You can run it by doing docker compose -f caddy-compose.yaml up -d Now it's time to go to the browser and login. Use the domain, bootstrapped earlier. Add an organization, create server and add a domain. This is done via the UI and it is very straight forward. For every domain you add, ensure to add the DNS records you are provided.
Enable IP Pools
One of the reasons why Postal is great for bulk email sending, is because it allows for sending emails using multiple IPs in a round-robin fashion. Pre-requisites - Ensure the IPs you want to add as part of the pool, are already added to your VPS/server. Every cloud provider has a documentation for adding additional IPs, make sure you follow their guide to add all the IPs to the network. When you run ip a , you should see the IP addresses you intend to use in the pool. Enabling IP pools in the Postal config First step is to enable IP pools settings in the postal configuration, then restart postal. Add the following configuration in the postal.yaml (/opt/postal/config/postal.yml) file to enable pools. If the section postal: , exists, then just add use_ip_pools: true under it. postal: use_ip_pools: true Then restart postal. postal stop && postal start The next step is to go to the postal interface on your browser. A new IP pools link is now visible at the top right corner of your postal dashboard. You can use the IP pools link to add a pool, then assign IP addresses in the pools. A pool could be something like marketing, transactions, billing, general etc. Once the pools are created and IPs assigned to them, you can attach a pool to an organization. This organization can now use the provided IP addresses to send emails. Open up an organization and assign a pool to it. Organizations → choose IPs → choose pools . You can then assign the IP pool to servers from the server's Settings page. You can also use the IP pool to configure IP rules for the organization or server. At any point, if you are lost, look at the Postal documentation. Read the full article
0 notes
Text
Hướng dẫn cài đặt Docker trên Ubuntu 22.04 chi tiết

Trong bài viết này, chúng ta sẽ cùng tìm hiểu cách cài đặt Docker trên Ubuntu 22.04, một công cụ mạnh mẽ và linh hoạt trong việc quản lý container. Docker giúp việc triển khai ứng dụng trở nên nhanh chóng, tiện lợi và tối ưu hóa tài nguyên. Nếu bạn đang sử dụng Ubuntu 22.04 và muốn thiết lập môi trường Docker để phát triển hoặc triển khai ứng dụng, hãy theo dõi hướng dẫn chi tiết dưới đây.
Giới thiệu về Docker CE
Docker CE (Community Edition) là một phiên bản mã nguồn mở của Docker, được thiết kế để dành cho cộng đồng người dùng và nhà phát triển. Đây là phiên bản Docker phổ biến nhất, phù hợp cho các dự án cá nhân hoặc các môi trường sản xuất quy mô nhỏ và trung bình.
Các tính năng chính:
Mã nguồn mở: Docker CE là một dự án mã nguồn mở, cung cấp quyền truy cập vào mã nguồn của Docker, cho phép cộng đồng đóng góp, kiểm tra và cải thiện phần mềm.
Đa nền tảng: Docker CE hỗ trợ nhiều hệ điều hành, bao gồm Linux, Windows và macOS, giúp đảm bảo tính linh hoạt khi triển khai ứng dụng trên các môi trường khác nhau.
Containerization: Docker CE cho phép tạo ra các container độc lập, chứa đầy đủ môi trường cần thiết để chạy một ứng dụng, giúp tránh các xung đột về môi trường hoặc phụ thuộc khi triển khai.
Quản lý hình ảnh: Docker CE cung cấp khả năng tạo và quản lý các hình ảnh Docker. Mỗi hình ảnh là một bản sao của một ứng dụng cụ thể, bao gồm tất cả các phụ thuộc của nó.
Docker Hub: Docker CE tích hợp với Docker Hub, bạn có thể tải lên, chia sẻ và truy cập hàng ngàn hình ảnh từ cộng đồng.
Docker Compose: Docker CE đi kèm với Docker Compose, một công cụ cho phép định nghĩa và quản lý nhiều container như một dịch vụ duy nhất, giúp dễ dàng triển khai các ứng dụng phức tạp.
Orchestration: Hỗ trợ các tính năng quản lý và điều phối container, như Docker Swarm để quản lý nhiều container trên nhiều host.
Các bước cài đặt Docker trên Ubuntu 22.04
Mặc định gói cài đặt đã có sẵn trong repo của ubuntu, nhưng đó không phải là bản mới nhất. Dưới đây là cách để bạn tải Docker phiên bản mới nhất
Bước 1: Cập nhật hệ thống
sudo apt update
Bước 2: Cài đặt các gói phụ thuộc
sudo apt install apt-transport-https ca-certificates curl software-properties-common
Bước 3: Thêm khóa GPG cho kho lưu trữ Docker
curl -fsSL https://download.Docker.com/linux/ubuntu/gpg | sudo gpg --dearmor -o /usr/share/keyrings/Docker-archive-keyring.gpg
Bước 4: Thêm kho lưu trữ Docker vào nguồn APT
echo "deb [arch=$(dpkg --print-architecture) signed-by=/usr/share/keyrings/Docker-archive-keyring.gpg] https://download.Docker.com/linux/ubuntu $(lsb_release -cs) stable" | sudo tee /etc/apt/sources.list.d/Docker.list > /dev/null
Bước 5: Cập nhật lại danh sách gói
sudo apt update
Bước 6: Kiểm tra kho lưu trữ Docker
apt-cache policy docker-ce
Bước 7: Cài đặt Docker phiên bản mới nhất
sudo apt install docker-ce
Bước 8 (Nếu cần): Nếu bạn muốn user mà bạn đăng nhập sử dụng Docker chứ không chỉ mỗi tài khoản root
sudo usermod -aG docker ${USER}
Kiểm tra sau khi cài đặt Docker trên Ubuntu 22.04
Sau khi cài đặt Docker CE xong ta cũng cần kiểm tra xem Docker đã chạy chưa và đang dùng version bao nhiêu
sudo systemctl status docker
sudo docker version
Tổng kết
Docker CE tích hợp Docker Compose, Dockerfile, và nhiều công cụ khác để cung cấp một giải pháp toàn diện cho việc quản lý container. Với Docker CE, bạn có thể dễ dàng tạo, triển khai, và quản lý các ứng dụng container hóa, đồng thời tận dụng sự hỗ trợ mạnh mẽ từ cộng đồng. Điều này giúp cho Docker CE trở thành lựa chọn hàng đầu cho các nhà phát triển, nhóm phát triển nhỏ, và cả những người mới bắt đầu tìm hiểu về công nghệ container.
Nguồn: https://suncloud.vn/cai-dat-docker-tren-ubuntu
0 notes
Text
Docker is an open-source platform for developing, shipping, and running applications. It is designed to make it easier to create, deploy, and run applications by using containers. With Docker, developers can package their applications into standardized units called containers, which can then be run on any computer, regardless of the operating system or hardware. Docker Compose is a tool that allows you to define and run multi-container Docker applications.
With Docker Compose, you can use a YAML file to define the services, networks, and volumes for your application, and then use a single command to build and run all of the containers for your application. This makes it easy to manage and deploy complex applications that require multiple containers, such as web applications that use a database, a message queue, and a caching service. In this tutorial, you’ll install and use Docker Compose on Ubuntu 24.04.
Start by updating the Ubuntu packages in the package manager cache to the latest available versions using the following command Read more...
#cloud web hosting#ssd hosting provider#low cost cloud vps#best cheap servers#affordable vps#best cheap vps
0 notes
Text
#linux#linux memes#linuxposting#technically#technology#consourseci#ubuntu#docker#open source#linux tutorial#hostnextra#nginx
1 note
·
View note
Text
The new ImageShare

ImageShare is my lightweight web app for uploading and sharing images, originally created as a replacement for the Nintendo 3DS Image Share service. It has gone through a lot of code updates and migrations over the last few years to keep it compatible with aging web browsers, and now I've rolled out another update.
The new features
ImageShare still allows you to choose an image from your device, click Upload, and get a QR code linking to the image that you can easily scan with another nearby device. It's still entirely server-side PHP, so it loads quickly, even on low-end and legacy web browsers that can no longer connect to image upload services directly.
The app previously used Imgur for all image uploads, but that API isn't always reliable, so ImageShare now fully supports ImgBB as an alternative platform. You can select which service to use from the main upload page. For security reasons, images uploaded anonymously through ImgBB are deleted after two minutes, which should be long enough to save the image after scanning the QR code.
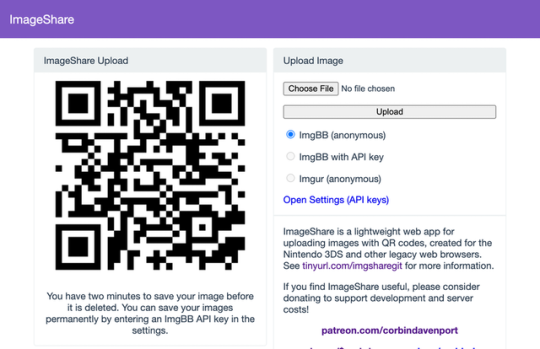
There's also a new option to use ImgBB with your own account, instead of uploading anonymously, by entering an API key in the ImageShare settings. This allows images to be saved permanently to your ImgBB account (unless you delete them later), and the images are always accessible through the ImgBB site on another web browser.
I've wanted to add authenticated image uploads for a long time, so the functionality could be closer to uploading screenshots on an Xbox or PlayStation console, but it wasn't easily doable with Imgur. Just like before, images uploaded from a Nintendo 3DS console have the game title saved with the image when it's available.

The downside is that the new API key feature doesn't work on the Nintendo 3DS Browser (and possibly the Wii U Browser, I haven't checked). As far as I can tell, Nintendo blocks any kind of permanent storage in that browser, even the simple cookies used to store the API key.
ImageShare also now has improved support for other legacy web browsers: it fully works in Netscape Navigator 6 from 2001, and possibly earlier versions. It also now has a proper icon when pinned to the Start menu on Windows 10 Mobile, and there are some more fixes for older iOS devices.

I've taken it as a challenge to support as many old web browsers and devices as possible, at least as long as it remains practical. ImageShare also now uses the goQR.me API to generate QR code images, because the deprecated Google API previously in use has stopped working entirely.
Self-hosted ImageShare
I've also done a lot of work to make ImageShare as easy to set up on a home server or production site as possible. The dev instructions are now more detailed, and more features that were previously hard-wired in the code are now optional when setting up an ImageShare instance. It's still a Docker Compose application, so it works on Windows, Mac, and Linux hosts.
The server configuration for ImageShare supports an Imgur API key, an ImgBB API key, or both. If you set up both options, the user can choose which option they want (the ImgBB option with a custom key is always available). For example, only the ImgBB option is enabled on the main server right now (I think Imgur blocked the server's IP for too many requests, so I'm giving it a break). Plausible Analytics is also now easily configurable, with reporting for page views, basic device and browser information, upload events, and so on.
I'm not aware of any other ImageShare instances, but now is as good a time as any to set one up!
The open future
ImageShare has required a lot of work to stay functional on the Nintendo 3DS and other legacy platforms. I've gone through three hosting services: first Heroku, then DigitalOcean's App Platform, then an Ubuntu VPS through Digital Ocean. After that last migration, I reworked it to run in Docker, which has made development and troubleshooting much simpler. That has all ensured ImageShare remains functional on legacy browsers through non-secure HTTP connections, while also supporting newer devices with HTTPS.
I'm not sure how long image hosting platforms will continue working with the current infrastructure, and I do not want to deal with hosting user content. There's also the issue where the main supported device, the Nintendo 3DS, can't save settings on the browser side. I'm thinking about how best to handle the project's future with those problems.
ImageShare might eventually morph into a minimal web server that runs on a computer on your home network, which would be less vulnerable to rate limiting by APIs (or could just dump images directly to a computer). Another option would be improving the self-hosted setup and publishing ImageShare to Docker Hub, where it could be installed on any computer or server with Docker in one command. This is already a popular option for NextCloud, Plex, and other local server software, so it would probably work well for ImageShare.
I don't have any plans to shut down the current ImageShare site, unless all the image hosting APIs stop working and I don't have any options left. ImageShare has already outlived the Nintendo service it was initially designed to replace, and I'd like to keep that going.
You can learn more about ImageShare from the GitHub repository, and you can try it out from theimageshare.com. If you want to help keep this service running, please consider joining my Patreon or donating through PayPal and Cash App.
1 note
·
View note
Text
コード生成AIのデモ
モノづくり塾のサーバーで稼働しているCode Llamaベースのコード生成AIアプリケーションを動かした様子を動画にしました。 動画の内容は、 塾のダッシュボードからコード生成AIアプリケーションを開く コード生成を依頼する 生成されたコードを実際に動かす というものです。 言語モデルはCode Llamaに日本語追加学習を行ったELYZA社のモデル。llama-cpp-pythonを使いstreamlitでWeb UIを作っています。Dockerizeされているのでリポジトリからクローンしてdocker-composeで即稼働開始できます。 サーバーはCore i5 13400搭載の自作PCでUbuntu Server 22.04で動いています。 ブラウザを動かしているPCは6年ほど前のCore…

View On WordPress
0 notes
Text
Installare Docker Compose Su Ubuntu
Installare Docker Compose Su Ubuntu
Guida Installazione di Docker Compose su ubuntu 20.04 Installare Docker Compose su Ubuntu 20.04 è il tutorial che tratterò oggi. Docker Compose è ancora un altro utile strumento Docker. Consente agli utenti di avviare, eseguire, comunicare e chiudere i contenitori con un unico comando coordinato. In sostanza, Docker Compose viene utilizzato per definire ed eseguire applicazioni Docker…

View On WordPress
1 note
·
View note
Photo

How To Install Docker Compose on Ubuntu 18.04? ☞ http://on.edupioneer.net/7046f443a6 #Docker #Ubuntu
1 note
·
View note
Link
#Automation#configure#containerization#Docker#Install#Linux#mediaserver#Monitoring#movies#NZB#open-source#Plex#PVR#Radarr#self-hosted#Setup#Sonarr#Streaming#systemadministration#torrent#Usenet
0 notes
Photo

How To Install Docker Compose on Ubuntu 18.04? ☞ http://on.edupioneer.net/7046f443a6 #Docker #Ubuntu
1 note
·
View note
Text
Docker-Engine und Docker-Compose auf Linux Ubuntu und Debian installieren (Anleitung) Mit Docker kommt eine quelloffene Software für die Entwicklung und Bereitstellungen von Anwendungen in einer Container-Umgebung. In dieser Anleitung installieren wir für Linux-Distributionen, die Docker-Engine und Docker-Compose für aktuelle Ubuntu und Debian Versionen. Die folglich bereitgestellte Container-Umgebung ermöglichst es dir, die unterschiedlichen Anwendungen von der System-Infrastruktur isoliert zu trennen. Anders als bei Virtualisierungsumgebungen sind Container in der Praxis deutlich performanter, da die Systemressourcen vom Host effizienter verwendet werden und Container noch dichter auf der Hardware vom Hostsystem gepackt werden...[Weiterlesen]
#Docker#Installation#Tutorial#Docker Compose#Linux#Debian#Ubuntu#Fachinformatiker#Container#Containerplattform#Hostsystem#Server#Informatik#Hosting#Rechenzentrum
0 notes