#download files from lwc
Explore tagged Tumblr posts
Visit Tumblr Blog
Explore Tumblr blogs with no restrictions, modern design and the best experience.
Last Seen Tumblr Blogs


Fun Fact
Tumblr Inc. has $15.1M in annual revenue.
Text
Enabling CSV data uploads via a Salesforce Screen Flow
This is a tutorial for how to build a Salesforce Screen Flow that leverages this CSV to records lightning web component to facilitate importing data from another system via an export-import process.
My colleague Molly Mangan developed the plan for deploying this to handle nonprofit organization CRM import operations, and she delegated a client buildout to me. I’ve built a few iterations since.
I prefer utilizing a custom object as the import target for this Flow. You can choose to upload data to any standard or custom object, but an important caveat with the upload LWC component is that the column headers in the uploaded CSV file have to match the API names of corresponding fields on the object. Using a custom object enables creating field names that exactly match what comes out of the upstream system. My goal is to enable a user process that requires zero edits, just simply download a file from one system and upload it to another.
The logic can be as sophisticated as you need. The following is a relatively simple example built to transfer data from Memberpress to Salesforce. It enables users to upload a list that the Flow then parses to find or create matching contacts.
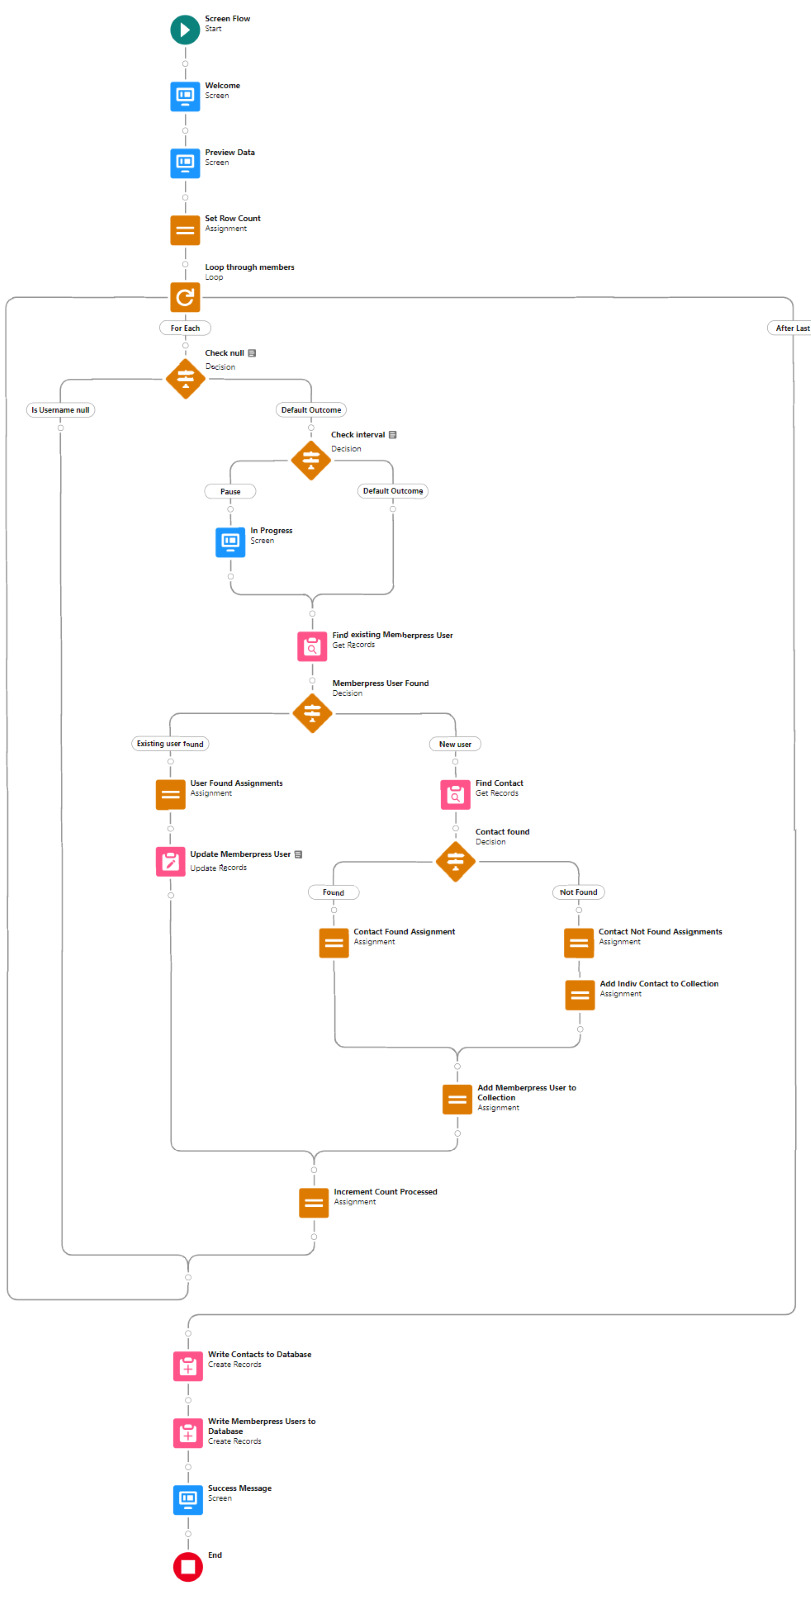
Flow walkthrough
To build this Flow, you have to first install the UnofficialSF package and build your custom object.
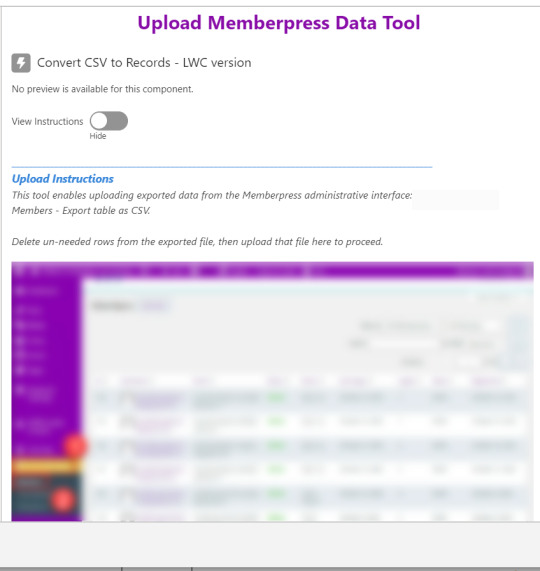
The Welcome screen greets users with a simple interface inviting them to upload a file or view instructions.

Toggling on the instructions exposes a text block with a screenshot that illustrates where to click in Memberpress to download the member file.
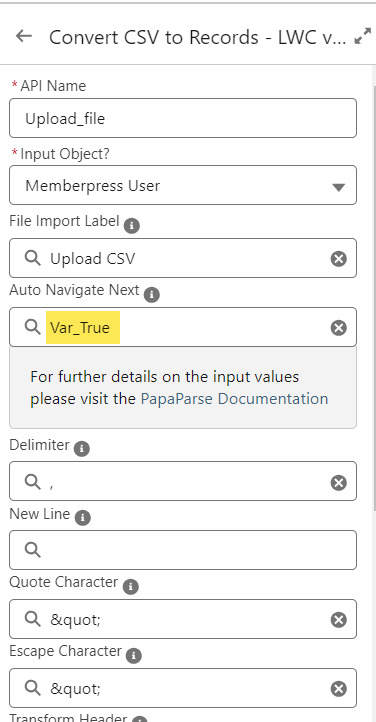
Note that the LWC component’s Auto Navigate Next option utilizes a Constant called Var_True, which is set to the Boolean value True. It’s a known issue that just typing in “True” doesn’t work here. With this setting enabled, a user is automatically advanced to the next screen upon uploading their file.
On the screen following the file upload, a Data Table component shows a preview of up to 1,500 records from the uploaded CSV file. After the user confirms that the data looks right, they click Next to continue.

Before entering the first loop, there’s an Assignment step to set the CountRows variable.

Here’s how the Flow looks so far..

With the CSV data now uploaded and confirmed, it’s time to start looping through the rows.
Because I’ve learned that a CSV file can sometimes unintentionally include some problematic blank rows, the first step after starting the loop is to check for a blank value in a required field. If username is null then the row is blank and it skips to the next row.

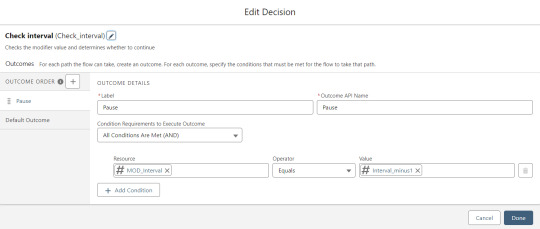
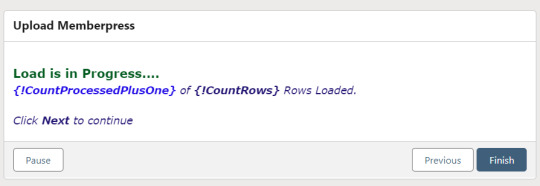
The next step is another decision which implements a neat trick that Molly devised. Each of our CSV rows will need to query the database and might need to write to the database, but the SOQL 100 governor limit seriously constrains how many can be processed at one time. Adding a pause to the Flow by displaying another screen to the user causes the transaction in progress to get committed and governor limits are reset. There’s a downside that your user will need to click Next to continue every 20 or 50 or so rows. It’s better than needing to instruct them to limit their upload size to no more than that number.

With those first two checks done, the Flow queries the Memberpress object looking for a matching User ID. If a match is found, the record has been uploaded before. The only possible change we’re worried about for existing records is the Memberships field, so that field gets updated on the record in the database. The Count_UsersFound variable is also incremented.

On the other side of the decision, if no Memberpress User record match is found then we go down the path of creating a new record, which starts with determining if there’s an existing Contact. A simple match on email address is queried, and Contact duplicate detection rules have been set to only Report (not Alert). If Alert is enabled and a duplicate matching rule gets triggered, then the Screen Flow will hit an error and stop.

If an existing Contact is found, then that Contact ID is written to the Related Contact field on the Memberpress User record and the Count_ContactsFound variable is incremented. If no Contact is found, then the Contact_Individual record variable is used to stage a new Contact record and the Count_ContactsNotFound variable is incremented.

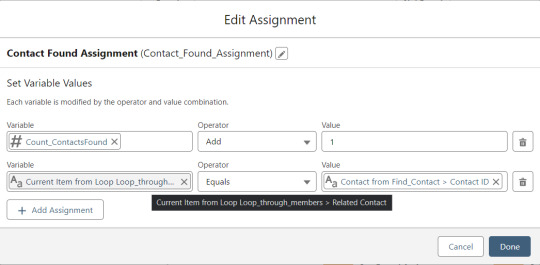

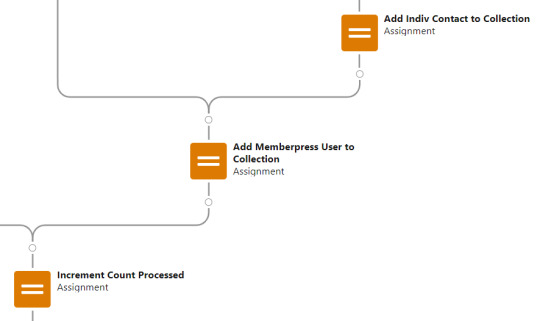
Contact_Individual is then added to the Contact_Collection record collection variable, the current Memberpress User record in the loop is added to the User_Collection record collection variable, and the Count_Processed variable is incremented.


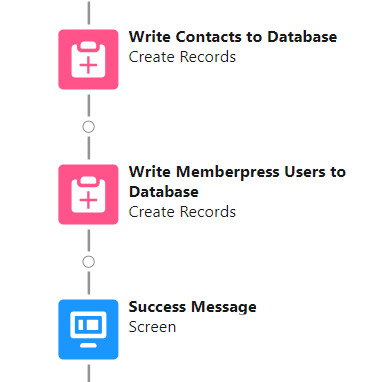
After the last uploaded row in the loop finishes, then the Flow is closed out by writing Contact_Collection and User_Collection to the database. Queueing up individuals into collections in this manner causes Salesforce to bulkify the write operations which helps avoid hitting governor limits. When the Flow is done, a success screen with some statistics is displayed.

The entire Flow looks like this:
Flow variables
Interval_value determines the number of rows to process before pausing and prompting the user to click next to continue.
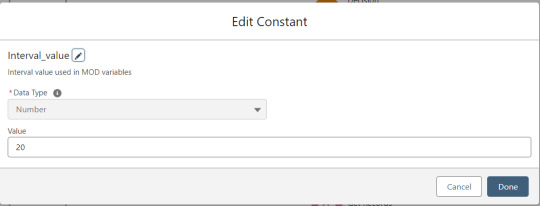
Interval_minus1 is Interval_value minus one.
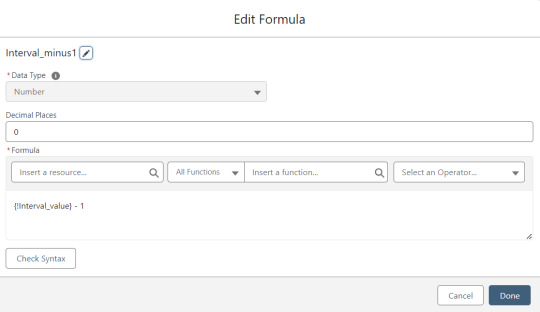
MOD_Interval is the MOD function applied to Count_Processed and Interval_value.

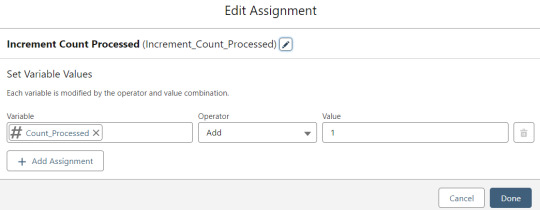
The Count_Processed variable is set to start at -1.

Supporting Flows
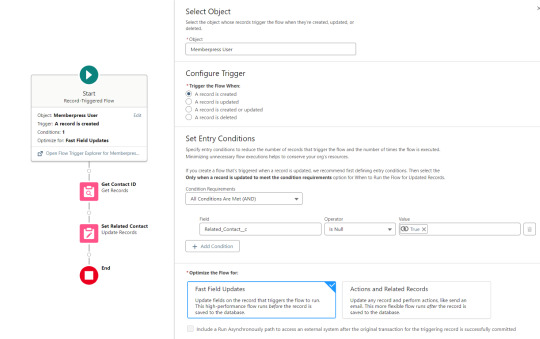
Sometimes one Flow just isn’t enough. In this case there are three additional record triggered Flows configured on the Memberpress User object to supplement Screen Flow data import operations.
One triggers on new Memberpress User records only when the Related Contact field is blank. A limitation of the way the Screen Flow batches new records into collections before writing them to the database is that there’s no way to link a new contact to a new Memberpress User. So instead when a new Memberpress User record is created with no Related Contact set, this Flow kicks in to find the Contact by matching email address. This Flow’s trigger order is set to 10 so that it runs first.
The next one triggers on any new Memberpress User record, reaching out to update the registration date and membership level fields on the Related Contact record

The last one triggers on updated Memberpress User records only when the memberships field has changed, reaching out to update the membership level field on the Related Contact record


0 notes
Text
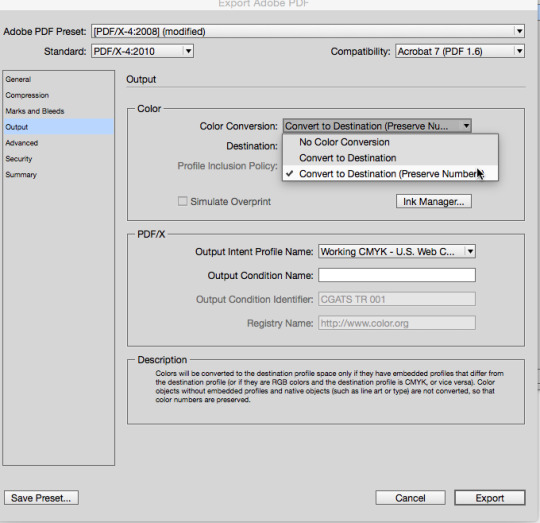
Iso Coated V2 300 Eci Download Mac

How to Install ICC Color Profiles Mac OSX. Video tutorial for installing profiles in Mac OSX. The process of 'installing' an ICC color profile is nothing more than pasting (or drag and drop) into a specific folder in the operating system. Your printing software looks in that folder when it comes time to print. Plastic coated acid and lignin.
Iso Coated V2 300 Eci Download Mac Download
Iso Coated V2 300 Eci Download Mac Os
Iso Coated V2 Eci
Iso Coated V2 Profile
ECI allows to bundle the profiles into installers, but this needs and individual permission from ECI. ECI uses a non free license. The ECI Offset 2009 package contains. ISO Coated v2 (ECI) ISO Coated v2 300% (ECI) PSO LWC Improved (ECI) PSO LWC Standard (ECI) PSO Uncoated ISO12647 (ECI) ISO Uncoated Yellowish; SC Paper (ECI) PSO MFC Paper (ECI.
Here you can download file ISOcoatedv2eci. 2shared gives you an excellent opportunity to store your files here and share them with others. Join our community just now to flow with the file ISOcoatedv2eci and make our shared file collection even more complete and exciting.
The ECI offset profile ISOcoatedv2300eci. Icc is based on the characterization dataset “FOGRA39L.txt” applicable to for the following reference printing conditions according to the international standard ISO 12647-2:2004/ Amd 1: Commercial and specialty offset, paper type 1 and 2, gloss or matt coated paper, positive.
The ECI offset profile ISOcoatedv2eci.icc is based on the characterization dataset “FOGRA39L.txt” applicable to for the following reference printing conditions according to the international standard ISO 12647-2:2004/ Amd 1: Commercial and specialty offset, paper type 1 and 2, gloss or matt coated.
You can retrieve all important documents, information and colour profiles.
Iso Coated V2 300 Eci Download Mac Download
Do you need technical information, manuals or colour profiles? The desired folder is just a click away, to download from the comfort of your own computer.
Guideline
Color profiles (.icc) – sheet-fed printing
Download ISO Coated V2 (ECI) Commercial and specialty offset, paper type 1 and 2, gloss or matt coated paper, positive plates, tone value increase curves A (CMY) and B (K), white backing.
Download ISO Coated V2 300 Paper types 1 and 2, gloss and matte coated, 60 L/cm, Fogra39L, Total dot area 300%
Download PSO Coated V3 Paper type 1, Premium coated paper, 60-80 L/cm, Fogra51 (M1)
Download PSO Coated NPscreen ISO12647 (ECI) Commercial and specialty offset, paper type 1 and 2, gloss or matt coated paper, positive plates, non periodic screening, 20 μm, tone value increase curves F (CMYK), white backing.
Download PSO Uncoated ISO12647 (ECI) Commercial and specialty offset, paper type 4, uncoated white paper, positive plates, tone value increase curves C (CMY) and D (K), white backing.
Download PSO Uncoated V3 (Fogra 52) Paper type 5+, woodfree uncoated white paper, 52-70 L/cm, Fogra52 (M1)
Download ISO Uncoated Yellowish Commercial and specialty offset, paper type 5, uncoated yellowish paper, positive plates, tone value increase curves C (CMY) and D (K), white backing.
Color profiles (.icc) – heat-set web printing
Iso Coated V2 300 Eci Download Mac Os
Download PSO LWC Improved (ECI) Commercial and specialty offset, improved LWC tone value increase curves B (CMY) and C (K), white backing.
Iso Coated V2 Eci
AdobeRGB1998.icc eciRGB_v2.icc ProPhoto.icm sRGB Profile.icc
PSOcoated_v3.icc PSOuncoated_v3_FOGRA52.icc CoatedFOGRA39.icc eciCMYK.icc ISOcoated_v2_300_eci.icc ISOcoated_v2_eci.icc ISOnewspaper26v4_gr.icc ISOnewspaper26v4.icc ISOuncoatedyellowish.icc PSO_Coated_300_NPscreen_ISO12647_eci.icc PSO_Coated_NPscreen_ISO12647_eci.icc PSO_LWC_Improved_eci.icc PSO_LWC_Standard_eci.icc PSO_MFC_Paper_eci.icc PSO_SNP_Paper_eci.icc PSO_Uncoated_ISO12647_eci.icc PSO_Uncoated_NPscreen_ISO12647_eci.icc SC_paper_eci.icc UncoatedFOGRA29.icc WAN-IFRAnewspaper26v5_gr.icc WAN-IFRAnewspaper26v5.icc
PDFX-ready_PSOcoatedV3_sRGB_CS6-CC_V26.csf PDFX-ready_PSOuncoatedV3(FOGRA52)_sRGB_CS6-CC_V26.csf PDFX-ready_ISOcoatedV2_300_sRGB_CS6-CC_V26.csf PDFX-ready_PSOuncoated_sRGB_CS6-CC_V26.csf PDFX-ready_PSO-LWC-Standard_sRGB_CS6-CC_V26.csf PDFX-ready_ISOnewspaper26v4_sRGB_CS6-CC_V26.csf Zeitung WAN-IFRAnewspaper26v5.csf Monitor Color.csf
Iso Coated V2 Profile
PDFX-ready_X1a_abCS4_V1.4.joboptions PDFX-ready_X4-CMYK_CS6-CC_V26d.joboptions Smallest File Size.joboptions
1 note
·
View note
Text
How to download files from Lightning Community using LWC
[Blogged] - How to download files from Lightning Community using LWC via @sfdc_panther Link - #Salesforce #AskPanther #SFDCPanther #LightningWebComponent @Salesforce @Trailhead @ApexHours @SalesforceDevs

Hi Everyone,
In this post, I am going to show you how to download and Preview the files from Lightning Community using Lightning Web Component.
Before we get started, let’s discuss the Object Structure of the files to know how the files get stored into Salesforce.
Content Document: – Represents a document that has been uploaded to a library in Salesforce CRM Content or Salesforce Files.
View On WordPress
#content document in salesforce#content version in salesforce#download files from lightning community#download files from lightning component#download files from lightning web component#download files from lwc#download files using lwc#files in salesforce#How to download files from Lightning Community using LWC#how to preview files using lwc#preview files using lightning web component
0 notes
Photo

Download Indy Lopez - Club Beatz 221 for free now!
Artist: Indy Lopez Show: Indy Lopez – Club Beatz 221 Quality: 320 Kbps 48000 Khz Genre: House, Deep House, Tech House Source: RSS
Discover more Indy Lopez live sets & radioshows here | Listen or download more Club Beatz episodes HERE
Indy Lopez – Club Beatz 221 Tracklist
Indy Lopez Presents “Club Beatz” Discover the latest House, Tech-House, Deep-House and enjoy the exclusives BEATZ that Indy’s play at the best clubs around the world on this amazing podcast for clubbers and music lovers.
1 Martin Ikin & Biscits ft. Anelisa Lamola – Ready 2 Dance (Instrumental) Ultra Music 2 Space Jump Salute – Want It – Street Tracks 3 Tenzella – Love Strut (Original Mix) Snatch! Raw 4 Tenzella – The LWC (Original Mix) Snatch! Raw 5 Rawkey – So Seductive (Original mix) Dark zone Records 6 Luke Stanger – Slave To The Rave (Kadenza Remix) Kukushka Records 7 Golf Clap – That Life – Country Club Disco 8 Wh0 – Out Of Time ft. Clementine Douglas (Bad Intentions Remix) Wh0 Plays 9 Sonickraft, Vanilla Ace – Dangerous (Extended Mix) Solotoko 10 Jamek Ortega – That Feeling – Agape Music 11 Espinal & Nova – Just What I Want (Original Mix) Exit 32 12 Mattheu – Vibe Sub Terra (Original mix) Ambivertal 13 Kill Your Heroes ft. Dave Giles II – Locked In (Darius Syrossian Remix) Snatch! Records 14 Ecco – Delicious (Original Mix) Kiss My Beat
The podcast Indy Lopez – Club Beatz is embedded on this page from an open RSS feed. All files, descriptions, artwork and other metadata from the RSS-feed is the property of the podcast owner and not affiliated with or endorsed by EDMliveset.com.
Follow us on: Facebook, Twitter, Instagram, Reddit & VK
0 notes
Photo

Listen or download Indy Lopez - Club Beatz 221 for free now!
Artist: Indy Lopez Show: Indy Lopez – Club Beatz 221 Quality: 320 Kbps 48000 Khz Genre: House, Deep House, Tech House Source: RSS
Discover more Indy Lopez live sets & radioshows here | Listen or download more Club Beatz episodes HERE
Indy Lopez – Club Beatz 221 Tracklist
Indy Lopez Presents “Club Beatz” Discover the latest House, Tech-House, Deep-House and enjoy the exclusives BEATZ that Indy’s play at the best clubs around the world on this amazing podcast for clubbers and music lovers.
1 Martin Ikin & Biscits ft. Anelisa Lamola – Ready 2 Dance (Instrumental) Ultra Music 2 Space Jump Salute – Want It – Street Tracks 3 Tenzella – Love Strut (Original Mix) Snatch! Raw 4 Tenzella – The LWC (Original Mix) Snatch! Raw 5 Rawkey – So Seductive (Original mix) Dark zone Records 6 Luke Stanger – Slave To The Rave (Kadenza Remix) Kukushka Records 7 Golf Clap – That Life – Country Club Disco 8 Wh0 – Out Of Time ft. Clementine Douglas (Bad Intentions Remix) Wh0 Plays 9 Sonickraft, Vanilla Ace – Dangerous (Extended Mix) Solotoko 10 Jamek Ortega – That Feeling – Agape Music 11 Espinal & Nova – Just What I Want (Original Mix) Exit 32 12 Mattheu – Vibe Sub Terra (Original mix) Ambivertal 13 Kill Your Heroes ft. Dave Giles II – Locked In (Darius Syrossian Remix) Snatch! Records 14 Ecco – Delicious (Original Mix) Kiss My Beat
The podcast Indy Lopez – Club Beatz is embedded on this page from an open RSS feed. All files, descriptions, artwork and other metadata from the RSS-feed is the property of the podcast owner and not affiliated with or endorsed by EDMliveset.com.
Follow us on: Facebook, Twitter, Instagram, Reddit & VK
0 notes
Photo

Download Kryder - Kryteria Radio 287 for free now!
Artist: Kryder Show: Kryder – Kryteria Radio 287 Quality: 320 Kbps 48000 Khz Genre: House Source: RSS
Discover more Kryder live sets & radioshows HERE | Listen or download more Kryteria Radio episodes HERE
Kryder – Kryteria Radio 287 Tracklist
Fresh from rocking Mexico, Kryder’s back home and ready to bring us a brand new Kryteria Radio. Taking the groove to the next level, this week’s show features music from the likes of Sander Van Doorn, Michael Calfan, SØNIN, Raffa FL, Tom Staar, KREAM, and a ton of others. There’s also one of those ID’s, and the latest Sosumi and Kryteria grooves. Groove, you make my soul complete.
01. Kryder & Natalie Shay – Rapture [BLACK HOLE] 02. Kryder & DEADLINE – You & I [BLACK HOLE] 03. Sander Van Doorn – What You Want [DOORN] 04. SWACQ – Pursuit [STMPD] 05. KREAM – Take Control (Francisco Lozano Remix) [MUSICAL FREEDOM] 06. Cat Dealers feat. Amanda Collis – Hypnotized [ARMADA] 07. Marco Carpentieri – That Bass [HYSTERIA] 08. Punctual – The Step (VIP Mix) [POLYDOR] 09. Chapter & Verse – Lights Go Out [NYX] 10. Bebe Rexha – Sacrifices (Gorgon City Remix) [WARNER] 11. Michael Calfan ft. Richard Judge – Phase Me [HEADROOM] 12. ID – ID [UNKNOWN] 13. SIDEPIECE – Acrobatic [INSOMNIAC] 14. Angelo Sika – 3AM [SOSUMI] 15. Raffa FL – Lose Control [CRIMINAL HYPE] 16. Tenzella – The LWC [SNATCH RAW] 17. Chaya – Calling (Cristoph Remix) [LOVING ALLIANCE] 18. Chicane – Offshore (CYA Remix) [UNKNOWN] 19. Tom Staar & Ferry Corsten feat. Darla Jade – Glow [ARMADA] 20. Tim van Werd – Who You Are [PROTOCOL] 21. SØNIN – Circles [ANJUNABEATS] 22. gardenstate & GVN – Take Me There [ANJUNABEATS] 23. Stevie Krash, Kremerk & Versus ft. Nino Lucarelli – Breakthrough [KRYTERIA]
The podcast Kryder – Kryteria Radio is embedded on this page from an open RSS feed. All files, descriptions, artwork and other metadata from the RSS-feed is the property of the podcast owner and not affiliated with or endorsed by EDMliveset.com.
Follow us on: Facebook, Twitter, Instagram, Reddit & VK
0 notes
Photo

Listen or download Kryder - Kryteria Radio 287 for free now!
Artist: Kryder Show: Kryder – Kryteria Radio 287 Quality: 320 Kbps 48000 Khz Genre: House Source: RSS
Discover more Kryder live sets & radioshows HERE | Listen or download more Kryteria Radio episodes HERE
Kryder – Kryteria Radio 287 Tracklist
Fresh from rocking Mexico, Kryder’s back home and ready to bring us a brand new Kryteria Radio. Taking the groove to the next level, this week’s show features music from the likes of Sander Van Doorn, Michael Calfan, SØNIN, Raffa FL, Tom Staar, KREAM, and a ton of others. There’s also one of those ID’s, and the latest Sosumi and Kryteria grooves. Groove, you make my soul complete.
01. Kryder & Natalie Shay – Rapture [BLACK HOLE] 02. Kryder & DEADLINE – You & I [BLACK HOLE] 03. Sander Van Doorn – What You Want [DOORN] 04. SWACQ – Pursuit [STMPD] 05. KREAM – Take Control (Francisco Lozano Remix) [MUSICAL FREEDOM] 06. Cat Dealers feat. Amanda Collis – Hypnotized [ARMADA] 07. Marco Carpentieri – That Bass [HYSTERIA] 08. Punctual – The Step (VIP Mix) [POLYDOR] 09. Chapter & Verse – Lights Go Out [NYX] 10. Bebe Rexha – Sacrifices (Gorgon City Remix) [WARNER] 11. Michael Calfan ft. Richard Judge – Phase Me [HEADROOM] 12. ID – ID [UNKNOWN] 13. SIDEPIECE – Acrobatic [INSOMNIAC] 14. Angelo Sika – 3AM [SOSUMI] 15. Raffa FL – Lose Control [CRIMINAL HYPE] 16. Tenzella – The LWC [SNATCH RAW] 17. Chaya – Calling (Cristoph Remix) [LOVING ALLIANCE] 18. Chicane – Offshore (CYA Remix) [UNKNOWN] 19. Tom Staar & Ferry Corsten feat. Darla Jade – Glow [ARMADA] 20. Tim van Werd – Who You Are [PROTOCOL] 21. SØNIN – Circles [ANJUNABEATS] 22. gardenstate & GVN – Take Me There [ANJUNABEATS] 23. Stevie Krash, Kremerk & Versus ft. Nino Lucarelli – Breakthrough [KRYTERIA]
The podcast Kryder – Kryteria Radio is embedded on this page from an open RSS feed. All files, descriptions, artwork and other metadata from the RSS-feed is the property of the podcast owner and not affiliated with or endorsed by EDMliveset.com.
Follow us on: Facebook, Twitter, Instagram, Reddit & VK
0 notes
Link
Find out how you can easily refresh view of record page. Understand Promises and use it in your LWC component. Post contains introduction to promises, code examples and use cases. Ready-to-use Lightning Component with Lightning Datatable, Pagination and Search logic on the client-side. Step by Step Email Reminders configuration by Process Builder and Workflow Rule. A Short guide through Salesforce DX Create custom type for your LWC lightning datatable Learn how to use Custom Metadata to control invoking different contexts of Apex Triggers. Create simple form with LWC divided into sections Easy way to save, update, publish and unpublish knowledge articles by Apex. How we can display files in the Salesforce Community and allows community users to download it. Check how can your protect your forms from being filled by bots. Create Single Page Application with Lightning Web Components. Check out how to enable self-register for your users in Salesforce Community Salesforce to Salesforce Single Sign-On (SAML) Add a Single Sign-On possibility to your Salesforce environment. Salesforce to Salesforce REST API connection Connect your Salesforce org with another Salesforce org or do connection within the same enviroment. Use REST API callouts and Apex code. Salesforce to Google REST API Integration Connect your Salesforce org with Google. Use REST API callouts and Apex code. Learn how to dynamically assign multiple approvers in Approval Process using Apex, when you’re not able to use Queue or static assignments. How to navigate to created record Learn how to navigate to record created with quick action Custom validation with lightning:recordEditForm Let’s learn how to make custom validation with great tool lightning:recordEditForm Design Patterns in Apex – Abstract Factory Abstract factory provided an interface, which is responsible for creation related objects without specifying their class. Using Hierarchy Custom Setting to bypass Validation Rules for profiles or users. It’s usefull, easy to configure and manage. This is a work-around that helps you get Dependent Picklist values that correspond to a particular Controlling Field value. Design Patterns in Apex – Builder The Builder is a design pattern designed to provide a flexible solution to various object creation problems in object-oriented programming. Ant Migration Tool - Full Guide Ant Migration is a tool provided by Salesforce. It’s used to migrating metadata between local files and Salesforce environment (org). How to detect “Log in to Community as User” in Apex? The question is “How we can detect that current user is log in to the community on behalf of contact?”
0 notes
Link
We follow Salesforce’s official recommendation to use Visual Studio Code (VSCode for short) for Salesforce development. Immediately, our first question is – what are Top 10 VSCode Extensions For Salesforce development to boot up the working efficiency? I have spent some time compiling this top 10 best VSCode Extensions for Salesforce, and extra best VSCode extensions for Salesforce. I hope it adds value to you! In case you don’t know what VSCode is, it is the Salesforce recommended code editor. It’s free, open-sourced, and running across platforms – Windows, Linux, and MacOS. You can download it on the official site. Top 10 VSCode Extensions For Salesforce DevelopersThe extensions in the list are in the order of importance according to my personal view. Salesforce Extension PackThis extension pack is developed by Salesforce. It’s a one-stop-shop for Salesforce development, providing features for interacting with Salesforce orgs, developing with Apex, Aura components, LWC, Visualforce, and so on. This extension pack uses Salesforce CLI behind the scene, which in turn requires Java Development Kit (JDK). Therefore, you need to have both of them installed as prerequisites. Extension pack indicates that it is a combination of multiple extensions, including: Salesforce CLI Integration – This extension allows VSCode to interact with Salesforce CLI to provide core functionality.Apex – This extension implements an Apex Language Server to provide features such as Apex syntax highlighting and code IntelliSense.Apex Interactive Debugger – This extension allows VSCode to use the real-time Apex Debugger to diagnose code logic.Apex Replay Debugger – This extension allows VSCode to download the Alex debug logs and replay for debugging purposes.Lightning Web Components – This extension enables LWC development features. It uses the HTML language server from VSCode.Aura Components – This extension enables Aura component development features. It also uses the HTML language server from VSCode.Visualforce – This extension enables the Visualforce pages development features. It uses both the Visualforce Language Server and the HTML language server from VSCode.Prettier – Code formatterA Code formatting tool was a long waiting feature in Salesforce and Prettier came to fill in this gap. In VSCode, we can even enable the auto-formatting when saving files. I have created a detailed step-by-step post (video included) to walk you through how to configure Prettier in VSCode. Apex PMDPMD is a static code analysis tool. If you don’t know what it means, you can listen to the PMD podcast episode in the SalesforceWay Podcast I had with Robert Soseman, the author of Apex PMD. Apex PMD is also the name of the VSCode plugin. It enables VSCode to use PMD to detect and notify issues in your Apex code. The plugin includes a default setting which works plug-and-go and facilitates you to get familiar with this tool. Salesforce Package.xml GeneratorWhen interacting with Salesforce traditional orgs (sandbox and production), a package.xml file can be used to indicate what meta-data files are used for the communication. This extension allows you to use VSCode UI to select metadata files, and then automatically generate the package.xml file content for you. It saves the hassle of remembering what metadata file types map to what XML format. A really neat tool. Settings SyncSettings Sync allows you to store in and retrieve your VSCode settings from Github. It uses GitHub Gist to store your settings, including: All extensions and configurationsSetting filesKeybinding fileSnippets foldersWorkspace foldersWhen you need to sync settings among multiple computers or have a new computer, Setting Sync extension can drastically save your time. Note – A VSCode built-in Settings Sync feature is in preview at the time of writing. We need to see whether it can replace the extension or not. TabNineTabNine is an all-language autocompleter. It uses deep learning to prompt code completion suggestions. It is zero configuration and works out-of-box. What I can say is – this plugin is amazing. It works without any configuration needed. Install it and see the amazing suggestions appear in the VSCode code suggestion! Give it a try for several days, you will get addicted to it :). TabNine has features including: reads the .gitignore to determine which files to index in the project folderuses the VSCode mnemonic completion engine to suggest long variable namesIs highly responsive – produces a list of suggestions typically in less than 10 milliseconds.TabNine offers client versions for popular editors such as VSCode, Vim, Emacs, IntelliJ, and so on. GitLensVSCode comes with a default Git tool that allows you to do common Git actions such as staging, unstaging, and committing. If you need to quickly glimpse into the code line and see who, when and why(the commit message) a line or code snippet was changed, GitLens, an open-source free extension is a right choice for you. GitLens offers powerful features for you to better understand code. ESLintIt’s easy to stress the importance of this extension. If you use JavaScript (LWC, Aura?), you need ESLint. ESLint statically analyzes JavaScript code to quickly find problems. It is the JavaScript version of PMD if you will :). Auto Rename TagAs Salesforce developers, we often work with markup languages, such as XML, HTML. Auto Rename Tag extension automatically rename paired tags, so we don’t need to edit twice the opening and closing tag. Bracket Pair Colorizer 2Bracket Pair Colorizer 2 extension does one simple job and does it well – colorize matching brackets so they are easily identified. Note – Both Bracket Pair Colorizer and Bracket Pair Colorizer 2 exist. Despite having the same bracket parsing engine, Version 2 greatly increases speed and accuracy. If you don’t have a setting file from version 1 or you are new to this extension, you should stick to version 2. Other Best VSCode Extensions For SalesforceBest VSCode extensions for Salesforce don’t stop with the Top 10 list. These are the other ones I consider add great values to the development too. Let’s check what they. Live ShareIf you are a Salesforce developer, chances are you are working in a team and need to collaborate with mates with the same codebase. A similar analogy is the google doc collaborative feature. When you start a collaborative session, others can join and view the context of the workspace in their VSCode editor. This means they can read the code without having to clone a repo or install any dependencies your code relies on. Moreover, they can use rich language features, such as Go to Definition or Peek, to navigate within the code. Code Spell CheckerThis tool underlines common word spelling errors both in your code and in the comments and gives fix suggestions. PolacodeThis tool allows you to take fancy-looking code snippet pictures in VSCode. Check how it works as demonstrated below. Trailing SemicolonThis extension allow you to append semicolon to the end of current line without moving the cursor. Think about how many times you need to add/remove semicolons? VSCode Great IconsWhat this extension does all is to change the default ugly-looking icons into modem ones. You spend 5+ hours per day with VSCode, you deserve a better UI :). VimI save the last slot for Vim extension, not because it’s the least useful but because of its specialty. If you are a vim user, the first thing you aks when touching any new editor is – “Does it support vim key”? Vim extension in VSCode does an amazing job. It simulates most of the commonly used vim commands. Wrap up on Top 10 VSCode Extensions For Salesforce developmentHere you go, the Top 10 VSCode Extensions For Salesforce development and the extra best VSCode extensions for Salesforce! What’s your thought? Any extension that is more important than the ones on the list? Leave comments below and let’s chat :)!
0 notes
Link
The Lightning Component modern framework is a User Interface framework to develop dynamic web apps for mobile and desktop devices. As is the case with each release, the latest Spring’20‘ release is packed with rich features including, the newly added Lightning Component features! Currently, Spring’20 release is under the pre-release program. last week Sandboxes was upgraded, as a result, your organization now gets the look and feel of Spring’20 release. In case you have not read the entire 523 pages of Salesforce Spring’20 release notes, check out Spring’20 release quick summary and the Top 10 Lightning Experience Gems of Salesforce Spring’20 Release! written by me. I combed through the release notes and highlighted the added capabilities to the Lightning Component features. Believe me, it was hard to stop at just five! To kick things off, here is my take on the coolest Lightning Component features from Spring’20 release. 1. Increase Productivity with Local Development for Lightning Web Components (Beta):- Lightning Web Components now offers Local Development so that you can build component modules and view your changes live without publishing your components to an org. Our new Salesforce CLI plugin lwc-dev-server configures and runs a Lightning Web Components-enabled server on your computer. You can access the local development server from the command line and the Lightning Web Components Extension for VS Code. 2. Style Lightning Web Components with Custom Aura Design Tokens:- A Lightning web component’s CSS file can use a custom Aura token created in your org or installed from an unmanaged package. Tokens make it easy to ensure that your design is consistent and even easier to update it as your design evolves. Create a custom Aura token in the Developer Console by creating a Lightning Tokens bundle. For example, this tokens bundle has a custom Aura token called myBackgroundColor. <aura:tokens> <aura:token name="myBackgroundColor" value="#f4f6f9"/> </aura:tokens> Custom Aura tokens aren’t new, but now you can use them in a Lightning web component’s CSS file by using the standard var() CSS function. Prepend –c- to the custom Aura token. // myLightningWebComponent.css color: var(--c-myBackgroundColor); 3. Navigate Users to a Record’s Create Page with Default Field Values:- Use the new lightning/pageReferenceUtils module or lightning:pageReferenceUtils Aura component to build navigation links in your components that prepopulate a record’s create page with default field values. Prepopulated values can accelerate data entry, improve data consistency, and otherwise make the process of creating a record easier. 4. The @track Decorator Is No Longer Required for Lightning Web Components:- No more guessing about whether to use @track to make a field reactive. All fields in a Lightning web component class are reactive. If a field’s value changes and the field is used in a template or in a getter of a property that’s used in a template, the component rerenders and displays the new value. Click here to read more. 5. Use Components in Lightning Communities with Lightning Locker Disabled:- To enable components installed from a managed package to run in a community that has Lightning Locker disabled, in the component’s configuration file, use the lightningCommunity__RelaxedCSP tag. Add lightningCommunity__RelaxedCSP in the new <capabilities> tag of your Lightning web component’s configuration file. <capabilities> <capability>lightningCommunity__RelaxedCSP</capability> </capabilities> Additional enhancements worth noting! 1. Smarter Source Tracking for Lightning Web Components in Scratch Orgs: – Salesforce command-line interface (CLI) now tracks changes to Lightning web components in a scratch org. The CLI output lists any changes and alerts you to any conflicts between your local project and a scratch org. 2. Lightning Base Components: Open Source: – Base components for the Lightning Web Components framework are now open source. Explore the source code and customize base components for your own apps. What are your favorite Spring’20 release note gems? Care to share? –> You can download release notes in HTML format!, for PDF file. Note: – I am grateful to Conga and Resco.net for sponsoring my blog. Related 6x Salesforce MVP | Solution Architect | Author of 7 books at Packtpub Publishing and Apress | 4x Dreamforce Speaker | Salesforce Coach | Co-host of AutomationHour.com
0 notes
Link
This blog post is Part 2 of the blog post series on Building Real-Time TV Dashboards with Salesforce Data, Platform Events & a Raspberry Pi. Part 1 – The Intro Part 2 – Salesforce Setup Part 3 – Raspberry Pi Setup Let’s get started with the Raspberry Pi setup. The idea is to have the Dashboard running on the Pi. This can be done in various different ways but for the sake for this project we will be hosting and running the dashboard on the Raspberry Pi. We will be building the Dashboard using the LWC OSS (Lightning Web Components Open Source) Framework. Pro Tip (Optional but totally worth trying out): Setup SSH and VNC on the Pi for super easy remote development and remote control. Step 0: Install the OS (Skip this step if you already have the OS installed) I am using Raspbian OS on my Pi and I set it up using NOOBS – New Out Of the Box Software and it makes the installation very easy. Here is a comprehensive step by step guid on installing the OS using NOOBS – https://www.raspberrypi.org/help/noobs-setup/2/ Step 1: Disable the Screensaver This is an important step because by default the PI’s screen keeps blanking out every 15 mins. As we will be having a standalone realtime dashboard running on the PI, we need to have our screensaver disabled. Easiest way to get this done is by installing xscreensaver. In the Terminal, run the following command to install it. This might take a few minutes $ sudo apt-get install xscreensaver Once installed, go to Preferences option in the main desktop menu. You should find the screen saver application. Launch it and search for the option to disable it completely. Step 2: Install Node.js Run the following commands in the Terminal Update your system package list sudo apt-get update Upgrade all your installed packages to their latest version sudo apt-get dist-upgrade Download the latest version of Node.js curl -sL https://deb.nodesource.com/setup_12.x | sudo -E bash - Install it sudo apt-get install -y nodejs To check if the installation was successful, run the following command and it should return the version number of Node.js node -v Step 3: Create LWC App The Dashboard Interface is an LWC App. So, the goal is to have an LWC App running on the Raspberry Pi and it is totally up to you on how and where you build the LWC app. As long as there is an LWC App to be run on the Pi, you can either develop it on the Pi or develop it somewhere else(like your local machine) and migrate it to the Pi. For example, I developed it on my local machine and pushed it to the Pi via version control(bitbucket) so that I could maintain a backup and also sync code changes between my system and the pi. Feel free choose which ever way you are comfortable with and make sure you have Node.js installed as it is required to develop and run LWC Apps. 3.1 Create tv-dashboard LWC App On the command line/terminal, run command: npx create-lwc-app tv-dashboard When prompted about the application details, fill in the details as following Package name for npm: Press Enter to accept the default Description: Type the app description or press Enter to accept the default Author: Type your name or press Enter to accept the default Version: Press Enter to accept the default License: Press Enter to accept the default Who is the GitHub owner of the repository ( https://github.com/OWNER/repo): Type in your GitHub owner name or leave it blank and press Enter What is the GitHub name of the repository ( https://github.com/owner/REPO): Type in your GitHub repo name or Press Enter to accept the default Select a package manager: Use your arrow keys to select npm press Enter Use TypeScript or JavaScript: Use your arrow keys to select JavaScript press Enter Use custom Express server configuration: Enter y to install the server and press Enter Once the application is created, you will see the following message: Created conference-app in /YOUR/FILE/STRUCTURE/tv-dashboard. Checkout the `scripts` section of your `package.json` to get started. 3.2 Install A Few Packages Open command line/terminal Navigate to the directory containing the tv-dashboard application cd tv-dashboard Run the following command: npm install jsforce dotenv socket.io chart.js @salesforce-ux/design-system But, what are these applications and why do we need them? jsforce – JavaScript library to interact with Salesforce Orgs and APIs dotenv – To store our Salesforce credentials as environment variables in a .env file and reference them in or app socket.io – JavaScript library that enables real-time bidirectional event-based communication. We are using this to communicate our platform events from the LWC Server to LWC Frontend(charts). Works in a pub-sub model. chart.js – JavaScript library to create simple and beautiful HTML5 charts using canvas elements @salesforce-ux/design-system – Salesforce Lightning Design System (SLDS) – CSS framework to make our app beautiful 3.3 Create the .env file and declare our salesforce credentials as environment variables Open the tv-dashboard application folder Create a file with .env (with a leading period) as file name. Make sure that you are creating this folder in the root folder i.e., tv-dashboard Add the following the content into the .env file .env SF_LOGIN_URL=https://login.salesforce.com SF_USERNAME=YOUR_USERNAME SF_PASSWORD=YOUR_PASSWORD SF_TOKEN=YOUR_SECURITY_TOKEN Make sure to update the above placeholder values with your data SF_USERNAME: Your Salesforce Org’s username. SF_PASSWORD: Your Salesforce Org’s password. SF_TOKEN: Your Salesforce Org’s security token. 3.4 Update lwc-services.config.js to use the Lightning Design System SLDS In the tv-dashboard application folder, open the scr folder Open the file lwc-services.config.js Add the following in the resources section of your config { from: 'node_modules/@salesforce-ux/design-system/assets', to: 'dist/resources/assets' } 3.5 Add LWC Express Server Code In the tv-dashboard application folder, open folder server Open the file index.js Add the following code at the beginning of the file (before the line module.exports) src/server/index.js console.log(`Running server on port ${PORT}`)); // Start backend server server.listen(PORT, openDashboard); function openDashboard() { console.log(`Running socket server on port ${PORT}`); if (npm_lifecycle_event === 'serve') { console.log('Launching Dashboard!!'); exec( 'chromium-browser --noerrdialogs --kiosk http://0.0.0.0:3002 --incognito --disable-translate' ); } } 3.6 EDIT Client INDEX.html to add SLDS Stylesheet In the tv-dashboard application folder, open folder client Open the file index.html Replace the file content with the following code /src/client/index.html 3.7 Edit Client INDEX.js to use Synthetic Shadow DOM for the app and components to be able to use SLDS In the tv-dashboard application folder, open folder client Open the file index.js Add the following code at the beginning of the file content import '@lwc/synthetic-shadow'; 3.8 Create LWC Chart Component for visualising Opportunity Count By their Stage In the tv-dashboard application folder, open the folder my Create a folder named opportunitiesByStage Inside opportunitiesByStage folder, create a file opportunitiesByStage.html with the following content /src/client/modules/my/opportunitiesByStage.html Inside opportunitiesByStage folder, create a file opportunitiesByStage.js with the following content /src/client/modules/my/opportunitiesByStage.js import { LightningElement, api, track } from 'lwc'; export default class opportunitiesByStage extends LightningElement { @api sobject = ''; @api socket; @track socketInitialized = false; @track chartInitialized = false; chart; //object to keep track of the number of opportunities per stage chartData = {}; chartConfig = { type: 'doughnut', data: { datasets: [ { data: [], backgroundColor: [ '#3296ED', '#9D53F2', '#E287B2', '#26ABA4', '#77B9F2', '#C398F5', '#4ED4CD' ] } ], labels: [] }, options: { responsive: true, elements: { arc: { borderWidth: 0 } }, legend: { position: 'right', labels: { usePointStyle: true } }, animation: { animateScale: true, animateRotate: true } } }; async renderedCallback() { if (!this.socketInitialized && this.socket) { this.initializeSocket(); } if (!this.chartInitialized && this.socketInitialized) { await this.initializeChart(); } } initializeSocket() { //bind the onSocketEvent method to the 'cdc' socket event to update the chart with new incoming data this.socket.on('cdc', this.onSocketEvent.bind(this)); this.socketInitialized = true; } //initialize chart with chart.js async initializeChart() { await require('chart.js'); const ctx = this.template .querySelector('canvas.chart') .getContext('2d'); this.chart = new window.Chart(ctx, this.chartConfig); this.chartInitialized = true; } onSocketEvent(data) { const { changeType, entityName } = data.ChangeEventHeader; // check to make sure the change event is for the configured sobject and the record event is CREATE if ( this.sobject.toLowerCase() !== entityName.toLowerCase() || changeType !== 'CREATE' ) { return; } //update the chartData to increment the corresponding opportunity stage counter this.chartData[data.StageName] = this.chartData[data.StageName] + 1 || 1; //sort chartData in descending order let sortable = Object.entries(this.chartData); sortable.sort(function(a, b) { return b[1] - a[1]; }); //update chartData with sorted data this.chartData = Object.fromEntries(sortable); //add the updated data to the chart object this.chart.data.labels = Object.keys(this.chartData); this.chart.data.datasets[0].data = Object.values(this.chartData); //update the chart to reflect latest data this.chart.update(); } } 3.9 Create an LWC Component to view Chatter Announcements In the tv-dashboard application folder, open the folder my Create a folder named chatterAnnouncement Inside chatterAnnouncement folder, create a file chatterAnnouncement.html with the following content /src/client/modules/my/chatterAnnouncement.html Inside chatterAnnouncement folder, create a file chatterAnnouncement.html with the following content /src/client/modules/my/chatterAnnouncement.js 12 ? hour - 12 : hour; hour = this.formatNumber(hour); min = this.formatNumber(min); sec = this.formatNumber(sec); this.time = `${hour}:${min} ${ap}`; const months = [ 'January', 'February', 'March', 'April', 'May', 'June', 'July', 'August', 'September', 'October', 'November', 'December' ]; const days = [ 'Sunday', 'Monday', 'Tuesday', 'Wednesday', 'Thursday', 'Friday', 'Saturday' ]; const curWeekDay = days[today.getDay()]; const curDay = today.getDate(); const curMonth = months[today.getMonth()]; const curYear = today.getFullYear(); this.date = `${curWeekDay}, ${curDay} ${curMonth}, ${curYear}`; this.dateTime = `${this.date} • ${this.time}`; } formatNumber(num) { return num < 10 ? '0' + num : num; } } 3.10 Edit the App Component to add the Chart and the Chatter Announcements Components and also subscribe to our Socket.io server In the tv-dashboard application folder, open the folder app Open the file app.html and replace its content with the following /src/client/modules/my/app.html Open the file app.js and replace its content with the following code to initialise and subscribe to the backend socket server /src/client/modules/my/app.js { console.log('socket connected!'); this.socketReady = true; }); } async closeSocket() { this.socket.close(); this.socket = null; } } Step 4: Run The Dashboard We run the dashboard on chromium in kiosk mode, this helps show the in dashboard full screen. You can run the dashboard using the following command npm run build && npm run serve If you are developing, making code changes and would like for them to reflecting in real time, use the command npm run watch Note: Only the npm run serve command launches the Dashboard automatically. When using the npm run watch command, you would need manually view the app in the browser. Once you run the dashboard, start creating some Opportunities and Chatter Announcements in your org and you will see the Dashboard update in real-time! Step 5 (Optional): Auto Launch the Dashboard on Raspberry Pi Startup 5.1 Change the LWC Dashboard App Folder Permissions This wouldn’t be necessary if you are created everything on the pi. But when I used Git to sync code, I came across a the EACCESS Permission error and this following terminal command took care of the error. sudo chown -R pi:pi ABSOLUTE_PATH_TO_LWC_APP_FOLDER Make sure to replace the ABSOLUTE_PATH_TO_LWC_APP_FOLDER with the actual absolute path of your Dashboard LWC App folder. To get the absolute path, right click your Dashboard LWC App folder and Select Copy Path(s) 5.2 Create a executable shell script file Open the tv-dashboard folder Create a file with name run.sh and add the below as its content run.sh #!/bin/bash cd ABSOLUTE_PATH_TO_LWC_APP_FOLDER npm run build && npm run serve Make sure to replace the ABSOLUTE_PATH_TO_LWC_APP_FOLDER with the actual absolute path of your Dashboard LWC App folder. To get the absolute path, right click your Dashboard LWC App and Select Copy Path(s) 5.3 Edit the Raspberry Pi Autostart Script Open Terminal Run the following command sudo nano /etc/xdg/lxsession/LXDE-pi/autostart Add the following line to the file @lxterminal --command "ABSOLUTE_PATH_TO_SHELL_SCRIPT_FILE" Make sure to replace the ABSOLUTE_PATH_TO_SHELL_SCRIPT_FILE with the actual absolute path of the shell script created(in the previous step) inside the Dashboard LWC App folder. To get the absolute path, right click the shell script file that you created(in the pervious step) inside the Dashboard LWC App and Select Copy Path(s) Hit Control+S to Save Then Control+X to Exit the editor And… that is it! We learnt how to go about Build Real-Time TV Dashboards with Salesforce Data, Platform Events & a Raspberry Pi. We’ve scratched the surface with just 2 components and here is the tv-dashforce GitHub Project that not only contains the components created in this blog post but also different chart components along with Twitter Live Stream, Clock, Weather and Holidays. Make sure to check it out! GitHub Project- https://github.com/Minerva18/tv-dashforce This can also be done in another way where, we can host the Dashboard LWC App on the cloud like Heroku/AWS/Google etc. and use the URL to show the Dashboard LWC app via chromium kiosk mode on the Raspberry Pi. Raspberry Pi Resources https://www.raspberrypi.org/ What is a Raspberry Pi? https://www.raspberrypi.org/help/what-%20is-a-raspberry-pi/ Raspberry Pi Documentation and Setup Guides https://www.raspberrypi.org/documentation/ Installing OS https://www.raspberrypi.org/documentation/installation/noobs.md SSH Setup Guide https://www.raspberrypi.org/documentation/remote-access/ssh/ VNC Setup Guide https://www.raspberrypi.org/documentation/remote-access/vnc/ Screensaver https://www.raspberrypi.org/documentation/configuration/screensaver.md Securing your Raspberry Pi https://www.raspberrypi.org/documentation/configuration/security.md LED warning flash codes https://www.raspberrypi.org/documentation/configuration/led_blink_warnings.md The post Build Real-Time TV Dashboards with Salesforce Data, Platform Events & a Raspberry Pi – Part 3 – Raspberry Pi Setup appeared first on Minerva18.
0 notes