#how to preview files using lwc
Explore tagged Tumblr posts
Visit Tumblr Blog
Explore Tumblr blogs with no restrictions, modern design and the best experience.
Last Seen Tumblr Blogs


Fun Fact
The “We are the 99%” Tumblr blog became the slogan for the Occupy Wall Street movement.
Text
Accelerate LWC Development With Salesforce’s Local Development Server

Tired of constantly deploying and refreshing your UI every time you update your Lightning web components (LWCs)?
With Local Dev (beta), you can streamline your workflow by developing your LWCs while previewing them in real-time directly within your Lightning app or Experience Cloud site.
Note: Before you begin make sure that you have the latest version of the CLI command, run “sf update”.
Step 1: Install the Local Dev Plugin To begin, install the Local Dev Plugin using one of the following commands based on your environment:
For Production or Scratch orgs:
sf plugins install @salesforce/plugin-lightning-dev
OR
sf plugins install @salesforce/plugin-lightning-dev@latest
For Sandbox environments:
sf plugins install @salesforce/plugin-lightning-dev@prerelease
Step 2: Enable Local Dev
Navigate to Setup in Salesforce.
In the Quick Find box, type Local Dev.
Select Local Dev and enable the feature.

Step 3: Enable Local Dev for Your Scratch Org
To configure Local Dev for a scratch org:
Open your SFDX project.
Locate the config/project-scratch-def.json file.
In the settings section of the file, add the following key “enableLightningPreviewPref”: true

Step 4: Preview
Use Local Dev to run a preview of the following types of Salesforce projects.
Lightning Experience apps (desktop and Salesforce mobile app)
LWR Sites for Experience Cloud
To preview your application, use the following steps:
Run the command below in the CLI to start the guided setup: sf lightning dev app
Alternatively, if you want to bypass the guided steps, you can directly use the following command in the VS Code terminal: sf lightning dev app — target-org — name — device-type — device-id — flags-dir
Replace the placeholders with the appropriate values for your project. This will launch the application preview.
Guided Steps When Running the Command sf lightning dev app:


Step 4: Build an LWC Component and Experience the Real-Time Magic of Local Dev (Beta).
Start by creating a Lightning Web Component (LWC).
Embed the LWC into any Lightning app. For now, you can add it to any page in the Sales App.
Make changes to your LWC, such as modifying the HTML, CSS, or JavaScript. As soon as you save your code, you’ll experience the power of Local Dev (Beta), with changes reflected in real-time on the UI.
Notice how quickly the LWC updates, without needing to deploy your code or refresh the page. The changes are applied instantly!
Considerations and Limitations:
LWCs automatically update for the following changes only.
1. Basic HTML revisions: Changing component attributes, like in our case
lighting-button variant=”neutral” to variant=”brand”
Get More info: https://www.kandisatech.com/blog-details/accelerate-lwc-development-with-salesforces-local-development-server
#Salesforce#salesforcepartner#Lightning#LWC#SalesforceDevelopment#salesforcelightning#SalesforceLWC#LWCDevelopment#usa#uk#salesforceconsultant
2 notes
·
View notes
Text
Enabling CSV data uploads via a Salesforce Screen Flow
This is a tutorial for how to build a Salesforce Screen Flow that leverages this CSV to records lightning web component to facilitate importing data from another system via an export-import process.
My colleague Molly Mangan developed the plan for deploying this to handle nonprofit organization CRM import operations, and she delegated a client buildout to me. I’ve built a few iterations since.
I prefer utilizing a custom object as the import target for this Flow. You can choose to upload data to any standard or custom object, but an important caveat with the upload LWC component is that the column headers in the uploaded CSV file have to match the API names of corresponding fields on the object. Using a custom object enables creating field names that exactly match what comes out of the upstream system. My goal is to enable a user process that requires zero edits, just simply download a file from one system and upload it to another.
The logic can be as sophisticated as you need. The following is a relatively simple example built to transfer data from Memberpress to Salesforce. It enables users to upload a list that the Flow then parses to find or create matching contacts.
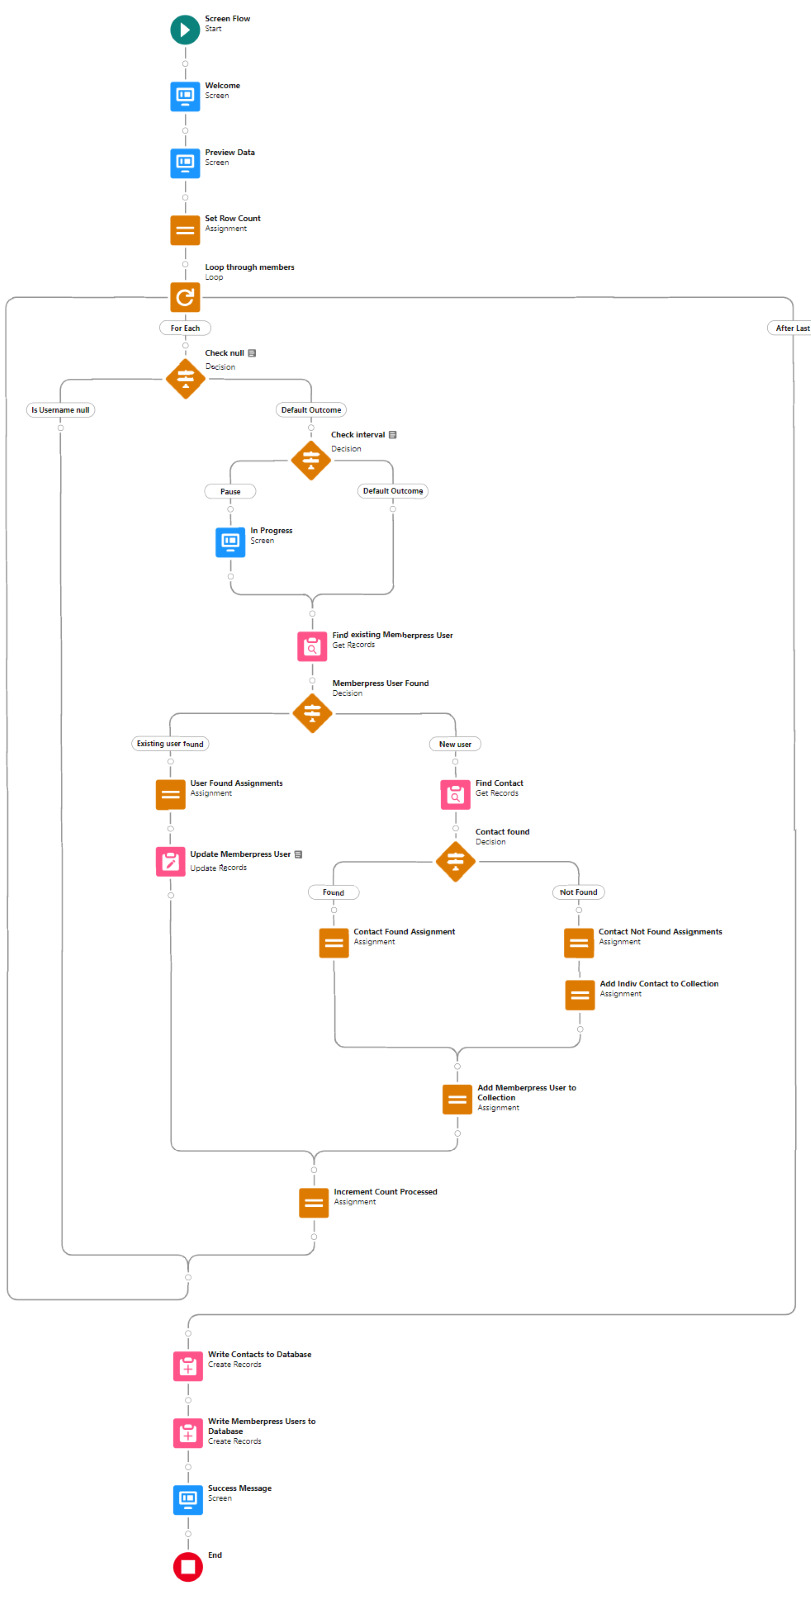
Flow walkthrough
To build this Flow, you have to first install the UnofficialSF package and build your custom object.
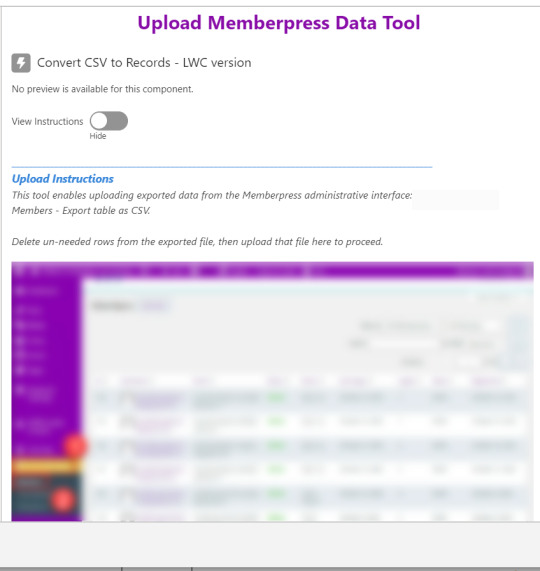
The Welcome screen greets users with a simple interface inviting them to upload a file or view instructions.

Toggling on the instructions exposes a text block with a screenshot that illustrates where to click in Memberpress to download the member file.
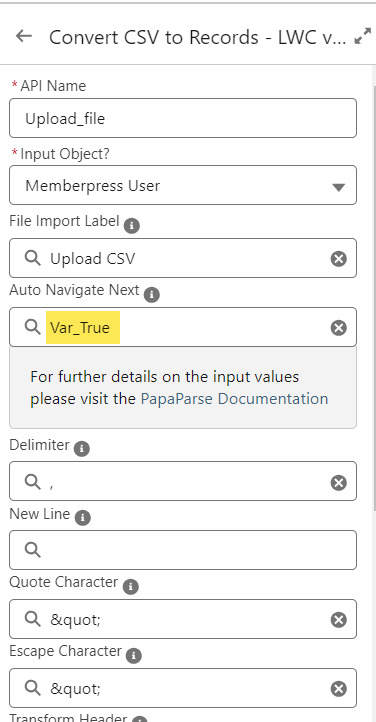
Note that the LWC component’s Auto Navigate Next option utilizes a Constant called Var_True, which is set to the Boolean value True. It’s a known issue that just typing in “True” doesn’t work here. With this setting enabled, a user is automatically advanced to the next screen upon uploading their file.
On the screen following the file upload, a Data Table component shows a preview of up to 1,500 records from the uploaded CSV file. After the user confirms that the data looks right, they click Next to continue.

Before entering the first loop, there’s an Assignment step to set the CountRows variable.

Here’s how the Flow looks so far..

With the CSV data now uploaded and confirmed, it’s time to start looping through the rows.
Because I’ve learned that a CSV file can sometimes unintentionally include some problematic blank rows, the first step after starting the loop is to check for a blank value in a required field. If username is null then the row is blank and it skips to the next row.

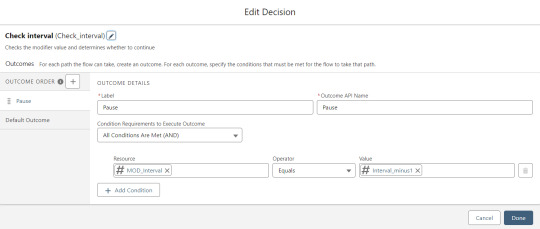
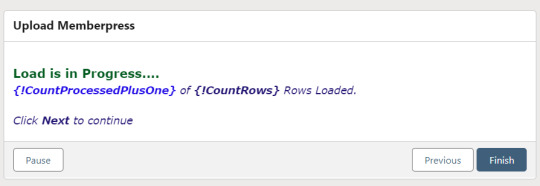
The next step is another decision which implements a neat trick that Molly devised. Each of our CSV rows will need to query the database and might need to write to the database, but the SOQL 100 governor limit seriously constrains how many can be processed at one time. Adding a pause to the Flow by displaying another screen to the user causes the transaction in progress to get committed and governor limits are reset. There’s a downside that your user will need to click Next to continue every 20 or 50 or so rows. It’s better than needing to instruct them to limit their upload size to no more than that number.

With those first two checks done, the Flow queries the Memberpress object looking for a matching User ID. If a match is found, the record has been uploaded before. The only possible change we’re worried about for existing records is the Memberships field, so that field gets updated on the record in the database. The Count_UsersFound variable is also incremented.

On the other side of the decision, if no Memberpress User record match is found then we go down the path of creating a new record, which starts with determining if there’s an existing Contact. A simple match on email address is queried, and Contact duplicate detection rules have been set to only Report (not Alert). If Alert is enabled and a duplicate matching rule gets triggered, then the Screen Flow will hit an error and stop.

If an existing Contact is found, then that Contact ID is written to the Related Contact field on the Memberpress User record and the Count_ContactsFound variable is incremented. If no Contact is found, then the Contact_Individual record variable is used to stage a new Contact record and the Count_ContactsNotFound variable is incremented.

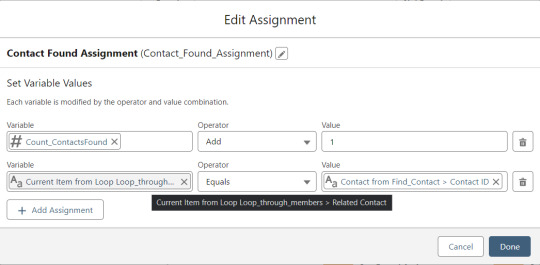

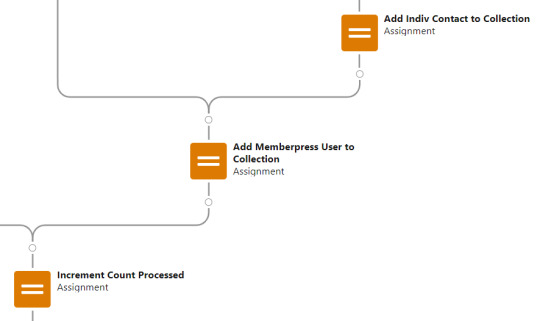
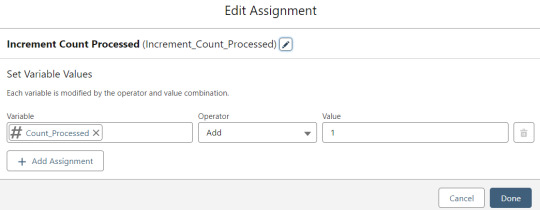
Contact_Individual is then added to the Contact_Collection record collection variable, the current Memberpress User record in the loop is added to the User_Collection record collection variable, and the Count_Processed variable is incremented.


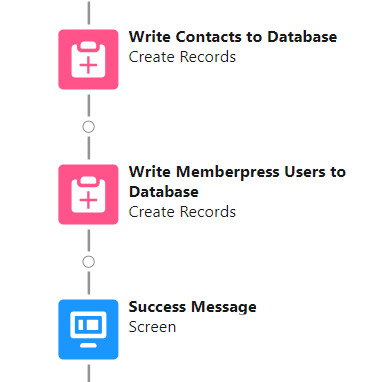
After the last uploaded row in the loop finishes, then the Flow is closed out by writing Contact_Collection and User_Collection to the database. Queueing up individuals into collections in this manner causes Salesforce to bulkify the write operations which helps avoid hitting governor limits. When the Flow is done, a success screen with some statistics is displayed.

The entire Flow looks like this:
Flow variables
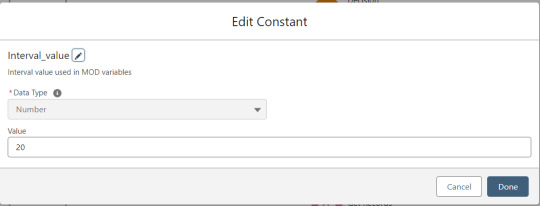
Interval_value determines the number of rows to process before pausing and prompting the user to click next to continue.
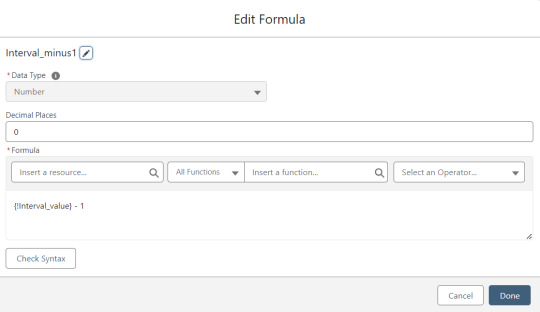
Interval_minus1 is Interval_value minus one.
MOD_Interval is the MOD function applied to Count_Processed and Interval_value.

The Count_Processed variable is set to start at -1.

Supporting Flows
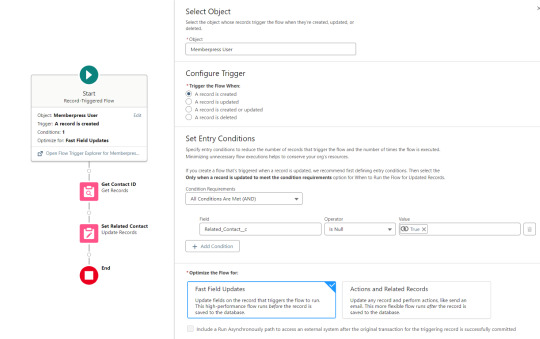
Sometimes one Flow just isn’t enough. In this case there are three additional record triggered Flows configured on the Memberpress User object to supplement Screen Flow data import operations.
One triggers on new Memberpress User records only when the Related Contact field is blank. A limitation of the way the Screen Flow batches new records into collections before writing them to the database is that there’s no way to link a new contact to a new Memberpress User. So instead when a new Memberpress User record is created with no Related Contact set, this Flow kicks in to find the Contact by matching email address. This Flow’s trigger order is set to 10 so that it runs first.
The next one triggers on any new Memberpress User record, reaching out to update the registration date and membership level fields on the Related Contact record

The last one triggers on updated Memberpress User records only when the memberships field has changed, reaching out to update the membership level field on the Related Contact record


0 notes
Text
How to download files from Lightning Community using LWC
[Blogged] - How to download files from Lightning Community using LWC via @sfdc_panther Link - #Salesforce #AskPanther #SFDCPanther #LightningWebComponent @Salesforce @Trailhead @ApexHours @SalesforceDevs

Hi Everyone,
In this post, I am going to show you how to download and Preview the files from Lightning Community using Lightning Web Component.
Before we get started, let’s discuss the Object Structure of the files to know how the files get stored into Salesforce.
Content Document: – Represents a document that has been uploaded to a library in Salesforce CRM Content or Salesforce Files.
View On WordPress
#content document in salesforce#content version in salesforce#download files from lightning community#download files from lightning component#download files from lightning web component#download files from lwc#download files using lwc#files in salesforce#How to download files from Lightning Community using LWC#how to preview files using lwc#preview files using lightning web component
0 notes
Link
Introducing Salesforce Code Builder Over the past three years or so, there have been huge improvements to developer productivity on the Salesforce Platform. Everything from Scratch Orgs, the Salesforce CLI, Salesforce Extensions for Visual Studio Code, to source tracking, source control, and Lightning Web Components has made existing Salesforce developers more productive while also making the platform easier to learn. However, there has also been a remaining gap; many developers are unable to use these great new features because they’re only available on desktop-based tools. Today, that changes. We are thrilled to introduce Code Builder, a web-based development environment fully optimized for Salesforce development and powered by Microsoft’s Visual Studio Codespaces. Code Builder is a full-featured version of Visual Studio Code running completely in the browser and backed by a powerful cloud-hosted developer environment. In just one click, you have a full environment without any setup or configuration. Code Builder comes with everything you need to build applications on the Salesforce Platform, including Salesforce Extensions, the Salesforce CLI, Git integration, and it’s authenticated to your current Salesforce org. What’s really amazing about Code Builder is that it isn’t just a lightweight editor that runs in the browser – every instance of Code Builder is backed by its own powerful Virtual Machine. This means Code Builder will allow you to do everything from simple code edits, to Lightning Web Component development and advanced Apex debugging. It also includes support for Node.js and Java, all without leaving the browser. A familiar, modern experience Code Builder brings to your browser the same interface, capabilities, and features as VS Code on desktop, and in a way that is completely tailored to Salesforce development. For existing users of VS Code, you can switch between either product without missing a beat. Code Builder comes setup for Salesforce development, with great productivity tools like ESLint and Prettier, along with rich code-editing features for all Salesforce languages and programming models. For those that have never used VS Code, but are familiar with Developer Console or Workbench, we want you to be comfortable as well while also bringing the latest productivity features to the web. Going forward, learning Salesforce development and tooling won’t be different depending on where you build – you pick the environment that is most comfortable for you and the tools will be the same. Lightning Web Components For the first time, developers can now write, debug, and deploy Lightning Web Components directly from the browser. Code Builder provides LWC developers with modern development features like code completion, inline documentation, refactoring, linting, and much more. Apex Previously, Apex developers had the choice of using the powerful VS Code Extensions or the light-weight Developer Console. Depending on your choice, you had a different set of capabilities available. For example, the Developer Console doesn’t provide rich code completion, refactoring, or debugging capabilities. With Code Builder, the choice of where you work no longer means giving up features. You can do everything in Code Builder, including using the rich Apex debugging capabilities. Org metadata Where you can access only a small subset of metadata in Developer Console, Code Builder provides access to the full metadata of an org. Using the Org Browser you can open any metadata type for inspection and editing. Once you make changes to your metadata, the change is saved instantly to your org. Application Lifecycle Management Code Builder isn’t just for working against a single org either. You can connect to or create multiple orgs of any type, like sandboxes and scratch orgs. All from within a single Code Builder instance. This means that Code Builder isn’t limited to the simple editing of org metadata. You can use it to script deployments between multiple orgs and test changes in scratch orgs. It also comes with source control integration so you can more easily adopt source-driven development. SOQL queries One of our goals with Code Builder is to consolidate the web-based builder experiences into a single, modern, and consistent tool. The first tool we have brought over from Workbench (and improved) is a SOQL Query Builder. This tool empowers anyone who needs to write and execute SOQL queries to do so with an easy to use graphical interface while also allowing for editing the query syntax directly for more advanced features. A powerful developer environment Code Builder isn’t just about what you can do in the browser, it’s also a powerful cloud-hosted developer environment. This means you can access the command line to run tools like the Salesforce CLI and save files to the disk which are persisted for the next time you come back. You can install any VS Code extension or customize the color theme. This is your environment to do with as you please. Build how you want, from where you want You may be asking if this means you’ll no longer need Visual Studio Code on the desktop. The answer is up to you. The great thing about Code Builder is that it runs all of the same extensions that desktop VS Code runs. This means everything we build for the desktop is now on the web. For you, it means you can choose where you want to work without sacrificing functionality. For some developers, they will mostly use VS Code on their desktop; others will work exclusively in the browser with Code Builder. Sometimes you might want to use the desktop as your primary environment, but maybe you’d like to try out some preview features. For that you could spin up a Code Builder instance and try them out without worrying about disrupting your primary environment. Lastly, Code Builder isn’t just for writing code – it’s for everyone who builds on the platform. If you want to use a visual tool to create SOQL queries and never write a line of code, then Code Builder is for you! But it also means you could use VS Code on the desktop. The SOQL Query Builder and all other features will be available as VS Code extensions that will come preinstalled in Code Builder, but can also be installed in VS Code to use on your desktop. In short, this means that no matter what type of building you’re doing, you can choose to work exclusively in the browser, use the desktop-based VS Code alone, or use both. And you won’t have to make a choice based on which feature is available where. This is a unified path forward for all developer tooling at Salesforce. The future of Salesforce web tools You might be wondering, does this mean we say goodbye to the Developer Console? We know you love the speed and simplicity of the Developer Console, but you also want the ability to build more productively, with code completion, refactoring, and powerful debugging. With Code Builder, every Salesforce developer can build better using the latest Platform features, while enjoying the full power of a modern IDE, preloaded with all of our tooling innovations over the past few years. And it’s instantly available in your browser – no setup or configuration required! Over the next year or so, we’ll provide builders and developers a unified experience, bringing the features they love from Developer Console and Workbench into Code Builder and desktop VS Code. Going forward, desktop and web tools for Salesforce will get all the same features. Excited about the SOQL Query Builder, but prefer to build on desktop VS Code? No problem! Everything built for the browser will be available on the desktop, and vice versa. Code Builder is in Pilot June 25, 2020 with a limited group of customers. If you’re interested in learning more, please reach out to your Account team at Salesforce… but we also want to hear from you directly. What does your ideal Salesforce developer experience look like? Take this survey to help inform our Developer Tooling roadmap. We deliver new releases for VS Code Extensions, the Salesforce CLI, Local Development, and more, on a weekly basis. What we do is also publicly available on GitHub, so open an issue and let us know how you feel! Finally, be sure to join us Thursday, June 25 at TrailheaDX, where you’ll be able to see Code Builder in action at the Unlock Developer Productivity with Modern, Open Tooling episode. We can’t wait to see you there! About the authors Nathan Totten is the product manager for Salesforce Developer Tools & Experiences. Claire Bianchi is the product manager for Code Builder and the Salesforce CLI.
0 notes
Link
Over the past three years or so, there have been huge improvements to developer productivity on the Salesforce Platform. Everything from Scratch Orgs, the Salesforce CLI, Salesforce Extensions for Visual Studio Code, to source tracking, source control, and Lightning Web Components has made existing Salesforce developers more productive while also making the platform easier to learn. However, there has also been a remaining gap; many developers are unable to use these great new features because they’re only available on desktop-based tools. Today, that changes. We are thrilled to introduce Code Builder, a web-based development environment fully optimized for Salesforce development and powered by Microsoft’s Visual Studio Codespaces. Code Builder is a full-featured version of Visual Studio Code running completely in the browser and backed by a powerful cloud-hosted developer environment. In just one click, you have a full environment without any setup or configuration. Code Builder comes with everything you need to build applications on the Salesforce Platform, including Salesforce Extensions, the Salesforce CLI, Git integration, and it’s authenticated to your current Salesforce org. What’s really amazing about Code Builder is that it isn’t just a lightweight editor that runs in the browser – every instance of Code Builder is backed by its own powerful Virtual Machine. This means Code Builder will allow you to do everything from simple code edits, to Lightning Web Component development and advanced Apex debugging. It also includes support for Node.js and Java, all without leaving the browser. A familiar, modern experience Code Builder brings to your browser the same interface, capabilities, and features as VS Code on desktop, and in a way that is completely tailored to Salesforce development. For existing users of VS Code, you can switch between either product without missing a beat. Code Builder comes setup for Salesforce development, with great productivity tools like ESLint and Prettier, along with rich code-editing features for all Salesforce languages and programming models. For those that have never used VS Code, but are familiar with Developer Console or Workbench, we want you to be comfortable as well while also bringing the latest productivity features to the web. Going forward, learning Salesforce development and tooling won’t be different depending on where you build – you pick the environment that is most comfortable for you and the tools will be the same. Lightning Web Components For the first time, developers can now write, debug, and deploy Lightning Web Components directly from the browser. Code Builder provides LWC developers with modern development features like code completion, inline documentation, refactoring, linting, and much more. Apex Previously, Apex developers had the choice of using the powerful VS Code Extensions or the light-weight Developer Console. Depending on your choice, you had a different set of capabilities available. For example, the Developer Console doesn’t provide rich code completion, refactoring, or debugging capabilities. With Code Builder, the choice of where you work no longer means giving up features. You can do everything in Code Builder, including using the rich Apex debugging capabilities. Org metadata Where you can access only a small subset of metadata in Developer Console, Code Builder provides access to the full metadata of an org. Using the Org Browser you can open any metadata type for inspection and editing. Once you make changes to your metadata, the change is saved instantly to your org. Application Lifecycle Management Code Builder isn’t just for working against a single org either. You can connect to or create multiple orgs of any type, like sandboxes and scratch orgs. All from within a single Code Builder instance. This means that Code Builder isn’t limited to the simple editing of org metadata. You can use it to script deployments between multiple orgs and test changes in scratch orgs. It also comes with source control integration so you can more easily adopt source-driven development. SOQL queries One of our goals with Code Builder is to consolidate the web-based builder experiences into a single, modern, and consistent tool. The first tool we have brought over from Workbench (and improved) is a SOQL Query Builder. This tool empowers anyone who needs to write and execute SOQL queries to do so with an easy to use graphical interface while also allowing for editing the query syntax directly for more advanced features. A powerful developer environment Code Builder isn’t just about what you can do in the browser, it’s also a powerful cloud-hosted developer environment. This means you can access the command line to run tools like the Salesforce CLI and save files to the disk which are persisted for the next time you come back. You can install any VS Code extension or customize the color theme. This is your environment to do with as you please. Build how you want, from where you want You may be asking if this means you’ll no longer need Visual Studio Code on the desktop. The answer is up to you. The great thing about Code Builder is that it runs all of the same extensions that desktop VS Code runs. This means everything we build for the desktop is now on the web. For you, it means you can choose where you want to work without sacrificing functionality. For some developers, they will mostly use VS Code on their desktop; others will work exclusively in the browser with Code Builder. Sometimes you might want to use the desktop as your primary environment, but maybe you’d like to try out some preview features. For that you could spin up a Code Builder instance and try them out without worrying about disrupting your primary environment. Lastly, Code Builder isn’t just for writing code – it’s for everyone who builds on the platform. If you want to use a visual tool to create SOQL queries and never write a line of code, then Code Builder is for you! But it also means you could use VS Code on the desktop. The SOQL Query Builder and all other features will be available as VS Code extensions that will come preinstalled in Code Builder, but can also be installed in VS Code to use on your desktop. In short, this means that no matter what type of building you’re doing, you can choose to work exclusively in the browser, use the desktop-based VS Code alone, or use both. And you won’t have to make a choice based on which feature is available where. This is a unified path forward for all developer tooling at Salesforce. The future of Salesforce web tools You might be wondering, does this mean we say goodbye to the Developer Console? We know you love the speed and simplicity of the Developer Console, but you also want the ability to build more productively, with code completion, refactoring, and powerful debugging. With Code Builder, every Salesforce developer can build better using the latest Platform features, while enjoying the full power of a modern IDE, preloaded with all of our tooling innovations over the past few years. And it’s instantly available in your browser – no setup or configuration required! Over the next year or so, we’ll provide builders and developers a unified experience, bringing the features they love from Developer Console and Workbench into Code Builder and desktop VS Code. Going forward, desktop and web tools for Salesforce will get all the same features. Excited about the SOQL Query Builder, but prefer to build on desktop VS Code? No problem! Everything built for the browser will be available on the desktop, and vice versa. Code Builder is in Pilot June 25, 2020 with a limited group of customers. If you’re interested in learning more, please reach out to your Account team at Salesforce… but we also want to hear from you directly. What does your ideal Salesforce developer experience look like? Take this survey to help inform our Developer Tooling roadmap. We deliver new releases for VS Code Extensions, the Salesforce CLI, Local Development, and more, on a weekly basis. What we do is also publicly available on GitHub, so open an issue and let us know how you feel! Finally, be sure to join us Thursday, June 25 at TrailheaDX, where you’ll be able to see Code Builder in action at the Unlock Developer Productivity with Modern, Open Tooling episode. We can’t wait to see you there! About the authors Nathan Totten is the product manager for Salesforce Developer Tools & Experiences. Claire Bianchi is the product manager for Code Builder and the Salesforce CLI.
0 notes
Link
We follow Salesforce’s official recommendation to use Visual Studio Code (VSCode for short) for Salesforce development. Immediately, our first question is – what are Top 10 VSCode Extensions For Salesforce development to boot up the working efficiency? I have spent some time compiling this top 10 best VSCode Extensions for Salesforce, and extra best VSCode extensions for Salesforce. I hope it adds value to you! In case you don’t know what VSCode is, it is the Salesforce recommended code editor. It’s free, open-sourced, and running across platforms – Windows, Linux, and MacOS. You can download it on the official site. Top 10 VSCode Extensions For Salesforce DevelopersThe extensions in the list are in the order of importance according to my personal view. Salesforce Extension PackThis extension pack is developed by Salesforce. It’s a one-stop-shop for Salesforce development, providing features for interacting with Salesforce orgs, developing with Apex, Aura components, LWC, Visualforce, and so on. This extension pack uses Salesforce CLI behind the scene, which in turn requires Java Development Kit (JDK). Therefore, you need to have both of them installed as prerequisites. Extension pack indicates that it is a combination of multiple extensions, including: Salesforce CLI Integration – This extension allows VSCode to interact with Salesforce CLI to provide core functionality.Apex – This extension implements an Apex Language Server to provide features such as Apex syntax highlighting and code IntelliSense.Apex Interactive Debugger – This extension allows VSCode to use the real-time Apex Debugger to diagnose code logic.Apex Replay Debugger – This extension allows VSCode to download the Alex debug logs and replay for debugging purposes.Lightning Web Components – This extension enables LWC development features. It uses the HTML language server from VSCode.Aura Components – This extension enables Aura component development features. It also uses the HTML language server from VSCode.Visualforce – This extension enables the Visualforce pages development features. It uses both the Visualforce Language Server and the HTML language server from VSCode.Prettier – Code formatterA Code formatting tool was a long waiting feature in Salesforce and Prettier came to fill in this gap. In VSCode, we can even enable the auto-formatting when saving files. I have created a detailed step-by-step post (video included) to walk you through how to configure Prettier in VSCode. Apex PMDPMD is a static code analysis tool. If you don’t know what it means, you can listen to the PMD podcast episode in the SalesforceWay Podcast I had with Robert Soseman, the author of Apex PMD. Apex PMD is also the name of the VSCode plugin. It enables VSCode to use PMD to detect and notify issues in your Apex code. The plugin includes a default setting which works plug-and-go and facilitates you to get familiar with this tool. Salesforce Package.xml GeneratorWhen interacting with Salesforce traditional orgs (sandbox and production), a package.xml file can be used to indicate what meta-data files are used for the communication. This extension allows you to use VSCode UI to select metadata files, and then automatically generate the package.xml file content for you. It saves the hassle of remembering what metadata file types map to what XML format. A really neat tool. Settings SyncSettings Sync allows you to store in and retrieve your VSCode settings from Github. It uses GitHub Gist to store your settings, including: All extensions and configurationsSetting filesKeybinding fileSnippets foldersWorkspace foldersWhen you need to sync settings among multiple computers or have a new computer, Setting Sync extension can drastically save your time. Note – A VSCode built-in Settings Sync feature is in preview at the time of writing. We need to see whether it can replace the extension or not. TabNineTabNine is an all-language autocompleter. It uses deep learning to prompt code completion suggestions. It is zero configuration and works out-of-box. What I can say is – this plugin is amazing. It works without any configuration needed. Install it and see the amazing suggestions appear in the VSCode code suggestion! Give it a try for several days, you will get addicted to it :). TabNine has features including: reads the .gitignore to determine which files to index in the project folderuses the VSCode mnemonic completion engine to suggest long variable namesIs highly responsive – produces a list of suggestions typically in less than 10 milliseconds.TabNine offers client versions for popular editors such as VSCode, Vim, Emacs, IntelliJ, and so on. GitLensVSCode comes with a default Git tool that allows you to do common Git actions such as staging, unstaging, and committing. If you need to quickly glimpse into the code line and see who, when and why(the commit message) a line or code snippet was changed, GitLens, an open-source free extension is a right choice for you. GitLens offers powerful features for you to better understand code. ESLintIt’s easy to stress the importance of this extension. If you use JavaScript (LWC, Aura?), you need ESLint. ESLint statically analyzes JavaScript code to quickly find problems. It is the JavaScript version of PMD if you will :). Auto Rename TagAs Salesforce developers, we often work with markup languages, such as XML, HTML. Auto Rename Tag extension automatically rename paired tags, so we don’t need to edit twice the opening and closing tag. Bracket Pair Colorizer 2Bracket Pair Colorizer 2 extension does one simple job and does it well – colorize matching brackets so they are easily identified. Note – Both Bracket Pair Colorizer and Bracket Pair Colorizer 2 exist. Despite having the same bracket parsing engine, Version 2 greatly increases speed and accuracy. If you don’t have a setting file from version 1 or you are new to this extension, you should stick to version 2. Other Best VSCode Extensions For SalesforceBest VSCode extensions for Salesforce don’t stop with the Top 10 list. These are the other ones I consider add great values to the development too. Let’s check what they. Live ShareIf you are a Salesforce developer, chances are you are working in a team and need to collaborate with mates with the same codebase. A similar analogy is the google doc collaborative feature. When you start a collaborative session, others can join and view the context of the workspace in their VSCode editor. This means they can read the code without having to clone a repo or install any dependencies your code relies on. Moreover, they can use rich language features, such as Go to Definition or Peek, to navigate within the code. Code Spell CheckerThis tool underlines common word spelling errors both in your code and in the comments and gives fix suggestions. PolacodeThis tool allows you to take fancy-looking code snippet pictures in VSCode. Check how it works as demonstrated below. Trailing SemicolonThis extension allow you to append semicolon to the end of current line without moving the cursor. Think about how many times you need to add/remove semicolons? VSCode Great IconsWhat this extension does all is to change the default ugly-looking icons into modem ones. You spend 5+ hours per day with VSCode, you deserve a better UI :). VimI save the last slot for Vim extension, not because it’s the least useful but because of its specialty. If you are a vim user, the first thing you aks when touching any new editor is – “Does it support vim key”? Vim extension in VSCode does an amazing job. It simulates most of the commonly used vim commands. Wrap up on Top 10 VSCode Extensions For Salesforce developmentHere you go, the Top 10 VSCode Extensions For Salesforce development and the extra best VSCode extensions for Salesforce! What’s your thought? Any extension that is more important than the ones on the list? Leave comments below and let’s chat :)!
0 notes
Link
Just a few weeks ago we announced that we open sourced Lightning Web Components – which is a core UI technology for building applications on the Lightning Platform. Now developers can leverage the same framework plus their gained skills for building performant and reusable web applications on Salesforce and other platforms. This blog post will give you an overview of the major differences that you will discover between building Lightning Web Components (LWC) on Lightning Platform compared to their open source version. Tooling The first notable difference is tooling. For developing on Lightning Platform you’d use something like the Salesforce Extensions for Visual Studio Code for building Lightning web components and Salesforce CLI for deploying them to an org. In the future, there will also be cool enhancements like LWC Local Development (register here for a recording of our preview webinar). Building with LWC Open Source is different. First, there is no official IDE support. So while you can pick and choose your IDE, you won’t get things like code completion, automated imports, and so forth for LWC (besides the standard JavaScript and HTML features that an IDE offers). This can be a bit more time consuming when you start, so keep the LWC Open Source documentation site bookmarked. At the same time you can use the same general purpose tools like Prettier, ESLint, or Jest. Second, you can choose your tooling. You can decide to build your own toolchain, for example using custom webpack or rollup.js based projects to build and compile your LWC projects. Or you can use lwc-create-app, which is an open source tool that bundles common development activities like project local development, creating production builds, unit testing and more, into the single npm dependency lwc-services. It follows (mostly) the pattern of other popular UI framework tools like Vue CLI or create-react-app, so if you’ve developed with those frameworks, you’ll be familiar with the experience. To get started is simple: you must have node 10.x (the current LTS version) installed on your computer. Then run this command: npx lwc-create-app your-app-name After the guided wizard experience you’ll have a complete project scaffolding, where you can directly start the exploration by running npm run watch. When you look at our LWC Recipes OSS sample application you’ll see the different pre-defined scripts and more. It’s a fast start, so give it a try! Pre-build UI components Another notable difference between building Lightning web components on the Lightning Platform or on Open Source is the availability of Base Lightning Components. These pre-build components are not available on Open Source. The simple reason behind this is that LWC represents the core technology to build Lightning Web Components. And Base Lightning Components are Lightning web components that are built using LWC, with some special flavor related to leverage certain specific functionality of running on Lightning Platform. They are not part of the core framework. However, using LWC Open Source in combination with the CSS (framework) of your choice makes it really easy to build your own UI components. We did that here here with the ui modules in LWC Recipes OSS. Depending on your CSS needs you’ll have to make decisions about Shadow DOM, which you can read more about below. Data access On the Lightning Platform it is relatively simple to access data — you either use Apex or pre-defined Lightning Data Service methods to access data within your Salesforce org. It is different for LWC Open Source. LWC is a UI framework and doesn’t come with any data connectors. You have to define yourself how you want to access data from whatever API that you want. For connecting to APIs you can pick and choose what you need — from standard XHR requests to using the Fetch API (like we did here in LWC Recipes OSS) or any of your preferred npm packages that does that for you. This also means that you will have to handle all the things like authentication, authorization etc. on your own, as you would have to do with other UI frameworks. What is different compared to other UI frameworks (and also to the Lightning Platform) is that you can leverage the @wire decorator to build your own declarative data access. This is super useful when you want to hide the complexity of data access by using a simple decorator, and at the same time, make use of the caching capabilities of the wire-service. The package on GitHub also contains a playground with several examples on how to build your own implementation (and a rollup.js config if you don’t use lwc-services, but want to run your own project setup). Shadow DOM When you look at the different specifications that make up a “web component”, two may stand out: Custom Elements and DOM. Custom Elements, which is the ability to have your own HTML tags like rendered, is essentially the same on Lightning Platform and Open Source. The difference is that you can run your own namespace on LWC Open Source (we used three namespaces in the Recipes sample app). A more significant difference is there when it comes to the DOM — more specifically, the Shadow DOM definition. On the Lightning Platform, we use a synthetic version of Shadow DOM. This creates a virtual DOM just like React does. A virtual DOM represents an in-memory representation of the DOM, which allows us to patch the DOM behavior. This is because we have to support many old browser versions that don’t fully support native Shadow DOM. While the synthetic version behaves the similarly as the native version, you’ll notice two differences: in your browser markup you don’t see the shadow-root tag on Lightning Platform, while on the Open Source version you’ll see it. hello recipe on LWC OSS hello recipe on Lightning Platform The other difference is that because native Shadow DOM is enabled out-of-the-box for Open Source, you can’t just use a global stylesheet that then allows to cascade styles across inheriting Lightning web components. Everything is truly encapsulated, which is one of the huge benefits. You will have to rethink your CSS strategy when it comes to building Lightning web components, or if you want to reuse components that you built and styled on Lightning Platform. On the other side, you can choose with LWC Open Source to use synthetic shadow as an easier way to interoperate with existing UI if needed. Debugging This is closely related to tooling. If you follow the Salesforce Developer blog, you likely read my post about how to debug your Lightning web components. The same techniques apply to LWC Open Source, with some minor differences. Within a Salesforce org, you can switch between the minified version of your LWC code and a non-minified version by enabling debug mode. For LWC Open Source, it all depends with which parameters you build your code. Using lwc-services this is determined by the mode flag (or a custom webpack config). In watch mode, for local development, you’ll see the code as is. If you create a webpack production build, everything is minified. LWC code in webpack development build What’s also different (but at the same time similar) is the location of your LWC code in the Resources view. Typical for webpack, your local code is accessible (only in watch mode) based on your project structure. In a production build, everything is bundled up into dedicated app.js files, based on webpacks heuristics. Source code in webpack production build And now? You now learned about the main notable differences that you should be aware of if you develop LWC Open Source, and/or if you also develop on Lightning Platform. There are many things to explore for the Open Source version, like how to build your own custom wire adapters, how to share code between LWC projects, how to securely access APIs and so on. We’ll cover some of these topics — and more — in upcoming blog posts. For now, head to lwc.dev and create your first app using lwc-create-app (soon to be renamed to create-lwc-app, with some cool enhancements). Then clone the LWC Recipes OSS repo and play with the different recipes. And if you’re deep into JavaScript (or want to be), check out the source code of the LWC framework itself! About the author René Winkelmeyer works as Principal Developer Evangelist at Salesforce. He focuses on enterprise integrations, Lightning, and all the other cool stuff that you can do with the Salesforce Platform. You can follow him on Twitter @muenzpraeger.
0 notes
Link
A lot has changed with Salesforce developer tooling over the past few years. As I mentioned at TrailheaDX a few months back, we have shipped hundreds of releases of our developer tools since they were first released less than three years ago. If you haven’t tried out the Salesforce Extensions for Visual Studio Code in a while, it might be a good time to jump back in. In this post, I’ll share some of the latest updates to the VS Code tools as well as some updates on other Salesforce IDEs. Develop against any org Many of you may not have realized, but you can use VS Code to work against all orgs – not just scratch orgs. You can develop against your sandboxes or DE orgs just as you have always done with other tools. In the past year we have released many features that make this experience great. Org management Several releases back we introduced UI for authorizing, creating, and switching orgs in your project. This makes it easier for you to work with multiple orgs on the same project or quickly create a scratch org to test a new feature. Simply click on the Org Browser button in the menu bar (shown with the red arrow) and you will see the menu for the various org actions. Deploy On Save Many developers prefer to have their work save immediately to their org instead of doing deployments at various stages. This can be helpful when working on UI components where you need to test out various styling changes or behaviors or while you are trying to debug some behavior in an Apex class. Enabling Deploy on Save in your project is straightforward: simply update your .vscode/settings.json file with the config "salesforcedx-vscode-core.push-or-deploy-on-save.enabled": true. Going forward, when you save a file it will be automatically deployed to the org. It will also queue up deployments in case a deployment is currently running and batch the next deployment if multiple saves have occurred before the current deployment. Org Browser When working directly against your org you need a way to retrieve the metadata you are working with. You have always been able to use the CLI or do a retrieve if you have a package.xml file, but there hasn’t been a way to retrieve metadata from the UI in Visual Studio Code. I am happy to share that as of today, you can now use the Org Browser tab to browse and retrieve metadata from your org. Once enabled, you can browse through all the metadata in your org and click on the button next to each metadata item to retrieve the source locally. This is just the first release and we will continue to enhance this feature with more capabilities such as the ability to retrieve all metadata of the same type or create a package.xml file. Let us know what you think by commenting on this Github Issue or creating a new issue if you encounter a bug. NOTE: To enable this feature you need to go to the VS Code settings and enable Org Browser. Also, for now this feature only works against non-scratch orgs – it will automatically hide when you are authenticated against scratch orgs. Diff against org It is often the case in your development process that you need to understand what has changed in an org or with your local code. This could be because you are working against multiple orgs that are at different stages in the release cycle or that you make changes to metadata in the org UI while also doing work on your local machine. In order to better understand where changes have occurred, we are introducing the ability to diff source changes against your org. Initially, this feature will work with Lightning Web Components, Aura, Apex, and Visualforce files, but we will expand to more metadata over time. Additionally, in the first preview release you will only be able to diff single files, but that is something we hope to improve later on as well. This feature will be released in the next week or two, so keep an eye out. Lightning Web Components Visual Studio Code is already the most popular editor amongst web developers today. Developers love it because it offers a rich set of features such as code completion, refactoring, and more that make writing HTML, Javascript, and CSS enjoyable and productive. In addition to the built-in features that make VS Code amazing, there are hundreds of great extensions available from the community that will let you tailor VS Code to meet your exact needs. Finally, Salesforce ships an extension specifically for LWC development that adds many great features specific to developing LWC on the Salesforce Platform. HTML code completions When editing the HTML of a Lightning web component, you will see full code completion for elements, attributes, and values that include inline documentation. Javascript code completions For LWC Javascript files you get code completion for your org’s schema, static resources, custom labels, and other LWC components. ESLint integration LWC provides out of the box support for ESLint to help ensure you write compatible and maintainable code. You will see error messages when you write unsupported code that will cause errors when running in your org and you will see warnings that will help ensure your code is consistent and maintainable. Lightning Explorer The Lightning Explorer allows you to browse through all UI components in your project — LWC and Aura — as well as the build in components. You can browse the properties of the components and for the global components you can click to open the documentation for each item in the Component Library making it easy to find documentation and samples for building your LWC apps. NOTE: This feature is in preview so to enable it you will need to enable the “Lightning Explorer” option in Settings. General productivity Apex refactoring Refactoring is a common task for any developer as you maintain your application. VS Code now supports several ways of refactoring and quick-fixes for your Apex code such as rename variable, extract local variable, extract constant, and declare missing methods. Simply right-click on variables or methods and you will see the menu to perform various refactorings. Code formatting Keeping your code consistent between various developers makes maintaining your application significantly easy and helps new team members more easily read unfamiliar code. At Salesforce we have adopted Prettier in many of our projects and are standardizing on Prettier for Salesforce Platform development. We recently even added Prettier to the Developer Console. Prettier now supports all Salesforce languages and frameworks such as Aura, LWC, and even Apex. Prettier will help you keep your code consistent and avoid all those arguments about code formatting based on personal preferences. See the documentation on how to setup Prettier with your project today or just create a new project using the Salesforce CLI and it will include the default Prettier configuration for Salesforce. Coming soon I have written before about how we keep our roadmap up to date on Github. We strongly believe that developer tools are best built in the open with the end-users involved in providing feedback at every step of the way. If you haven’t commented on a Github issue or created a feature request I would encourage you to do so. We prioritize what gets built by the feedback we get from our customers. There are a few exciting features that we are currently working on that will make your development experience with VS Code even better. Conflict detection on Deploy/Retrieve A common problem when developing in a Sandbox is that multiple developers or admins can be working on the same metadata or code. This inevitably leads to conflicts. While we believe the best way to deal with this is to use source tracking with a version control system like Git, we understand that not every team is ready to adopt that model yet. For this reason, we are currently working on tools that will detect conflicts when you do a deploy or retrieve from your org. Initially this feature will work against Apex, LWC, Aura, and Visualforce but we will expand it to work against all metadata in the future. We aim to ship the first of this feature in the next few months, but please let us know what you would like to see and how you would use this feature at your company by commenting on this Github Issue. SOQL Language features Today, when writing SOQL in VS Code we don’t provide code completion for other advanced language features that developers have come to expect from modern tooling. To remedy this, we are currently working on writing a full-featured SOQL Language Server that will provide code completion for SOQL keywords, objects, and fields to make it much easier to write queries both inside of Apex classes or anonymous files or by itself in a .soql file. You can see the spec and leave feedback on this Github Issue. Additionally, we aim to deliver more advanced SOQL tooling sometime in the future to help you more easily view results and work with data inside of VS Code. More details about those future tools can be found here. Performance updates One of the common complaints about using VS Code and the Salesforce CLI is that it is sometimes slow compared to other tools. One of the reasons for this is that long ago we made the decision to standardize all operations on the Metadata API. There are some benefits to this in terms of consistency, but there are also performance implications. The Metadata API is subject to queues in operations and at times the operations can back up and cause slow deployments. We have several efforts underway to improve this — one of which is working to make the Metadata API faster and more consistent. The other is on the tooling side. We are currently working on changing how single metadata operations for deploy/retrieve and push/pull are handled. Instead of using the Metadata API for these actions, we will use the Tooling API when there is only a single metadata type involved. While this won’t solve every performance issue, this will solve a big one when developers are using Deploy on Save – essentially each save will take less than a few hundred milliseconds so every save when doing Deploy on Save will generally use the Tooling API and feel basically instantaneous. I know this won’t solve every issue, so please continue to let us know how these issues are impacting you by commenting on this Github issue or by creating a new issue. LWC Local Development At TrailheaDX we teased LWC Local Development. This new feature will allow you to render your Lightning Web Components on your local machine without deploying them to the org. This means your time from saving to seeing the results will be almost instant. LWC Local Development will allow you to connect to org data through LDS or by calling Apex classes and will eventually support virtually every aspect of UI development related to LWC entirely on your local machine. You will see rich error messages when you make a mistake so you can quickly make the needed fixes without having to wait for a deployment to fail. The aim here is to dramatically increase the speed at which developers can write, test, and debug the UI applications. We will ship the beta of LWC Local Development sometime in the next few months. MavensMate Finally, I wanted to discuss MavensMate. MavensMate has been a great utility for the Salesforce developer community and we all appreciate the work that Joe Ferraro and others have put into the tool over the years. As you probably know, Joe discontinued working on MavensMate more than two years ago and recommended everyone migrate to the Salesforce Extensions for VS Code. Most people have already made the migration, but we know many of you were still using MavensMate. If you were one of those people still using MavensMate, you noticed last week that it completely stopped working. The reason for this is because a serious security vulnerability was found in the software. Joe and the other project maintainers rightfully decided that rather than leave the users of this software — and the organizations where they work — vulnerable to a security compromise, that the correct course of action would be to disable the software entirely. They reached out to the Salesforce security team and disclosed the vulnerability. Because there was no way to fix the issue remotely or push out an update to MavensMate automatically, they concluded the only way to protect users was to revoke the application’s access to Salesforce APIs. They worked with Salesforce security to disable the Connected App and revoke all security tokens. This had the consequence of completely and permanently disabling MavensMate, but was the only way to ensure that users were secure. I want to thank Joe for creating MavensMate and for the people that have been keeping it going for the past few years. MavensMate was an invaluable tool that pushed the Salesforce Developer platform forward. I also want to thank Joe and Charles Jonas for responsibility disclosing the issue to our security team and working to ensure that our mutual users were kept safe and secure. For those of you that were still using MavensMate, we hope that you will find the Salesforce Extensions for Visual Studio Code to be a productive replacement. I would encourage you to try it out, even if you have before. If there is anything you think is lacking, please let us know by opening a feature request on Github. Force.com IDE As a reminder, if you are still using the Force.com IDE, that product will be complete discontinued in about three months on October 12, 2019. We will no longer provide support or any updates after that date. Additionally, the download links and documentation will be taken offline at that time. I highly recommend starting your transition to the Salesforce Extensions for VS Code as soon as possible. You can find a guide on migrating from the Force.com IDE to VS Code on our docs site. As always, please continue to let us know what we can do to help you be more productive on the Salesforce Platform and thanks for reading!
0 notes
Link
A lot has changed with Salesforce developer tooling over the past few years. As I mentioned at TrailheaDX a few months back, we have shipped hundreds of releases of our developer tools since they were first released less than three years ago. If you haven’t tried out the Salesforce Extensions for Visual Studio Code in a while, it might be a good time to jump back in. In this post, I’ll share some of the latest updates to the VS Code tools as well as some updates on other Salesforce IDEs. Develop against any org Many of you may not have realized, but you can use VS Code to work against all orgs – not just scratch orgs. You can develop against your sandboxes or DE orgs just as you have always done with other tools. In the past year we have released many features that make this experience great. Org management Several releases back we introduced UI for authorizing, creating, and switching orgs in your project. This makes it easier for you to work with multiple orgs on the same project or quickly create a scratch org to test a new feature. Simply click on the Org Browser button in the menu bar (shown with the red arrow) and you will see the menu for the various org actions. Deploy On Save Many developers prefer to have their work save immediately to their org instead of doing deployments at various stages. This can be helpful when working on UI components where you need to test out various styling changes or behaviors or while you are trying to debug some behavior in an Apex class. Enabling Deploy on Save in your project is straightforward: simply update your .vscode/settings.json file with the config "salesforcedx-vscode-core.push-or-deploy-on-save.enabled": true. Going forward, when you save a file it will be automatically deployed to the org. It will also queue up deployments in case a deployment is currently running and batch the next deployment if multiple saves have occurred before the current deployment. Org Browser When working directly against your org you need a way to retrieve the metadata you are working with. You have always been able to use the CLI or do a retrieve if you have a package.xml file, but there hasn’t been a way to retrieve metadata from the UI in Visual Studio Code. I am happy to share that as of today, you can now use the Org Browser tab to browse and retrieve metadata from your org. Once enabled, you can browse through all the metadata in your org and click on the button next to each metadata item to retrieve the source locally. This is just the first release and we will continue to enhance this feature with more capabilities such as the ability to retrieve all metadata of the same type or create a package.xml file. Let us know what you think by commenting on this Github Issue or creating a new issue if you encounter a bug. NOTE: To enable this feature you need to go to the VS Code settings and enable Org Browser. Also, for now this feature only works against non-scratch orgs – it will automatically hide when you are authenticated against scratch orgs. Diff against org It is often the case in your development process that you need to understand what has changed in an org or with your local code. This could be because you are working against multiple orgs that are at different stages in the release cycle or that you make changes to metadata in the org UI while also doing work on your local machine. In order to better understand where changes have occurred, we are introducing the ability to diff source changes against your org. Initially, this feature will work with Lightning Web Components, Aura, Apex, and Visualforce files, but we will expand to more metadata over time. Additionally, in the first preview release you will only be able to diff single files, but that is something we hope to improve later on as well. This feature will be released in the next week or two, so keep an eye out. Lightning Web Components Visual Studio Code is already the most popular editor amongst web developers today. Developers love it because it offers a rich set of features such as code completion, refactoring, and more that make writing HTML, Javascript, and CSS enjoyable and productive. In addition to the built-in features that make VS Code amazing, there are hundreds of great extensions available from the community that will let you tailor VS Code to meet your exact needs. Finally, Salesforce ships an extension specifically for LWC development that adds many great features specific to developing LWC on the Salesforce Platform. HTML code completions When editing the HTML of a Lightning web component, you will see full code completion for elements, attributes, and values that include inline documentation. Javascript code completions For LWC Javascript files you get code completion for your org’s schema, static resources, custom labels, and other LWC components. ESLint integration LWC provides out of the box support for ESLint to help ensure you write compatible and maintainable code. You will see error messages when you write unsupported code that will cause errors when running in your org and you will see warnings that will help ensure your code is consistent and maintainable. Lightning Explorer The Lightning Explorer allows you to browse through all UI components in your project — LWC and Aura — as well as the build in components. You can browse the properties of the components and for the global components you can click to open the documentation for each item in the Component Library making it easy to find documentation and samples for building your LWC apps. NOTE: This feature is in preview so to enable it you will need to enable the “Lightning Explorer” option in Settings. General productivity Apex refactoring Refactoring is a common task for any developer as you maintain your application. VS Code now supports several ways of refactoring and quick-fixes for your Apex code such as rename variable, extract local variable, extract constant, and declare missing methods. Simply right-click on variables or methods and you will see the menu to perform various refactorings. Code formatting Keeping your code consistent between various developers makes maintaining your application significantly easy and helps new team members more easily read unfamiliar code. At Salesforce we have adopted Prettier in many of our projects and are standardizing on Prettier for Salesforce Platform development. We recently even added Prettier to the Developer Console. Prettier now supports all Salesforce languages and frameworks such as Aura, LWC, and even Apex. Prettier will help you keep your code consistent and avoid all those arguments about code formatting based on personal preferences. See the documentation on how to setup Prettier with your project today or just create a new project using the Salesforce CLI and it will include the default Prettier configuration for Salesforce. Coming soon I have written before about how we keep our roadmap up to date on Github. We strongly believe that developer tools are best built in the open with the end-users involved in providing feedback at every step of the way. If you haven’t commented on a Github issue or created a feature request I would encourage you to do so. We prioritize what gets built by the feedback we get from our customers. There are a few exciting features that we are currently working on that will make your development experience with VS Code even better. Conflict detection on Deploy/Retrieve A common problem when developing in a Sandbox is that multiple developers or admins can be working on the same metadata or code. This inevitably leads to conflicts. While we believe the best way to deal with this is to use source tracking with a version control system like Git, we understand that not every team is ready to adopt that model yet. For this reason, we are currently working on tools that will detect conflicts when you do a deploy or retrieve from your org. Initially this feature will work against Apex, LWC, Aura, and Visualforce but we will expand it to work against all metadata in the future. We aim to ship the first of this feature in the next few months, but please let us know what you would like to see and how you would use this feature at your company by commenting on this Github Issue. SOQL Language features Today, when writing SOQL in VS Code we don’t provide code completion for other advanced language features that developers have come to expect from modern tooling. To remedy this, we are currently working on writing a full-featured SOQL Language Server that will provide code completion for SOQL keywords, objects, and fields to make it much easier to write queries both inside of Apex classes or anonymous files or by itself in a .soql file. You can see the spec and leave feedback on this Github Issue. Additionally, we aim to deliver more advanced SOQL tooling sometime in the future to help you more easily view results and work with data inside of VS Code. More details about those future tools can be found here. Performance updates One of the common complaints about using VS Code and the Salesforce CLI is that it is sometimes slow compared to other tools. One of the reasons for this is that long ago we made the decision to standardize all operations on the Metadata API. There are some benefits to this in terms of consistency, but there are also performance implications. The Metadata API is subject to queues in operations and at times the operations can back up and cause slow deployments. We have several efforts underway to improve this — one of which is working to make the Metadata API faster and more consistent. The other is on the tooling side. We are currently working on changing how single metadata operations for deploy/retrieve and push/pull are handled. Instead of using the Metadata API for these actions, we will use the Tooling API when there is only a single metadata type involved. While this won’t solve every performance issue, this will solve a big one when developers are using Deploy on Save – essentially each save will take less than a few hundred milliseconds so every save when doing Deploy on Save will generally use the Tooling API and feel basically instantaneous. I know this won’t solve every issue, so please continue to let us know how these issues are impacting you by commenting on this Github issue or by creating a new issue. LWC Local Development At TrailheaDX we teased LWC Local Development. This new feature will allow you to render your Lightning Web Components on your local machine without deploying them to the org. This means your time from saving to seeing the results will be almost instant. LWC Local Development will allow you to connect to org data through LDS or by calling Apex classes and will eventually support virtually every aspect of UI development related to LWC entirely on your local machine. You will see rich error messages when you make a mistake so you can quickly make the needed fixes without having to wait for a deployment to fail. The aim here is to dramatically increase the speed at which developers can write, test, and debug the UI applications. We will ship the beta of LWC Local Development sometime in the next few months. MavensMate Finally, I wanted to discuss MavensMate. MavensMate has been a great utility for the Salesforce developer community and we all appreciate the work that Joe Ferraro and others have put into the tool over the years. As you probably know, Joe discontinued working on MavensMate more than two years ago and recommended everyone migrate to the Salesforce Extensions for VS Code were released. Most people have already made the migration, but we know many of you were still using MavensMate. If you were one of those people still using MavensMate, you noticed last week that it completely stopped working. The reason for this is because a serious security vulnerability was found in the software. Joe and the other project maintainers rightfully decided that rather than leave the users of this software — and the organizations where they work — vulnerable to a security compromise, that the correct course of action would be to disable the software entirely. They reached out to the Salesforce security team and disclosed the vulnerability. Because there was no way to fix the issue remotely or push out an update to MavensMate automatically, they concluded the only way to protect users was to revoke the application’s access to Salesforce APIs. They worked with Salesforce security to disable the Connected App and revoke all security tokens. This had the consequence of completely and permanently disabling MavensMate, but was the only way to ensure that users were secure. I want to thank Joe for creating MavensMate and for the people that have been keeping it going for the past few years. MavensMate was an invaluable tool that pushed the Salesforce Developer platform forward. I also want to thank Joe and Charles Jonas for responsibility disclosing the issue to our security team and working to ensure that our mutual users were kept safe and secure. For those of you that were still using MavensMate, we hope that you will find the Salesforce Extensions for Visual Studio Code to be a productive replacement. I would encourage you to try it out, even if you have before. If there is anything you think is lacking, please let us know by opening a feature request on Github. Force.com IDE As a reminder, if you are still using the Force.com IDE, that product will be complete discontinued in about three months on October 12, 2019. We will no longer provide support or any updates after that date. Additionally, the download links and documentation will be taken offline at that time. I highly recommend starting your transition to the Salesforce Extensions to VS Code as soon as possible. You can find a the guide on migrating from the Force.com IDE to VS Code on our docs site. As always, please continue to let us know what we can do to help you be more productive on the Salesforce Platform and thanks for reading!
0 notes