#download files from lightning web component
Explore tagged Tumblr posts
Visit Tumblr Blog
Explore Tumblr blogs with no restrictions, modern design and the best experience.
Last Seen Tumblr Blogs


Fun Fact
The most popular pages on Tumblr are about Minecraft, GIFs, and David J. Peterson.
Text
Speed Redefined: Discover The Power Of The IPhone 15'S A16 Chip
In the ever-evolving landscape of smartphone technology, Apple has consistently pushed the boundaries of innovation with each new iteration of its iconic iPhone series. With the highly anticipated release of the iPhone 15, Apple enthusiasts and tech aficionados alike are eagerly awaiting the next leap forward in mobile performance. At the heart of this excitement lies the groundbreaking A16 chip, poised to redefine speed and efficiency in ways that were once unimaginable.
Unveiling the A16 Chip: Powerhouse of Performance
The iPhone 15 introduces the revolutionary A16 chip, meticulously designed to deliver unparalleled speed and responsiveness. Building upon the success of its predecessors, the A16 chip represents a culmination of years of research and development aimed at optimizing performance across all facets of the iPhone experience. From seamless multitasking to immersive gaming and beyond, the A16 chip sets a new standard for mobile processors, ensuring that every interaction with the iPhone 15 is as fluid and intuitive as possible.
Harnessing the Power: What Makes the A16 Chip Special?
At its core, the A16 chip is engineered with cutting-edge technology that enhances both speed and efficiency. Utilizing advanced manufacturing processes and a sophisticated architecture, the A16 chip boasts significant improvements in processing power and energy efficiency compared to its predecessors. This translates into faster app launches, smoother graphics rendering, and enhanced battery life — all critical components of the iPhone 15 experience.
Performance Boost: Redefining Mobile Computing
With the iPhone 15 powered by the A16 chip, users can expect a quantum leap in performance across various applications and tasks. Whether you're editing high-resolution photos, streaming immersive augmented reality experiences, or engaging in intensive mobile gaming, the A16 chip ensures that every action is executed with lightning-fast precision. This level of responsiveness not only enhances productivity but also elevates the overall user experience to unprecedented heights.
Gaming Like Never Before: Graphics Reinvented
For avid gamers, the iPhone 15's A16 chip delivers a game-changing experience. Equipped with enhanced graphics capabilities and optimized performance, the A16 chip enables console-quality gaming on a mobile device. From intricate textures to fluid animations and real-time effects, the iPhone 15 transforms gaming into a visually stunning and immersive adventure. Whether you're battling rivals in competitive multiplayer games or exploring vast virtual worlds, the A16 chip ensures that every frame is rendered with uncompromising detail and realism.
Future-Proof Connectivity: Embracing 5G with the iPhone 15
Beyond its formidable processing power, the iPhone 15 harnesses the full potential of 5G connectivity, further enhancing speed and reliability. With support for ultra-fast download speeds and low latency, the combination of the A16 chip and 5G technology ensures seamless streaming, swift downloads, and lag-free online experiences. Whether you're streaming high-definition content, participating in video calls, or downloading large files on the go, the iPhone 15's A16 chip and 5G connectivity redefine what's possible in mobile communication.
Designed for Efficiency: Optimizing Battery Life
Despite its unparalleled performance capabilities, the A16 chip is designed with energy efficiency in mind. Through intelligent power management and optimization algorithms, the iPhone 15 maximizes battery life without compromising on performance. This means you can enjoy extended usage times throughout the day, whether you're browsing the web, watching videos, or tackling work-related tasks. With the A16 chip, the iPhone 15 strikes the perfect balance between power and efficiency, ensuring that you stay connected and productive for longer periods.
The Future of Mobile Innovation: iPhone 15
As we look ahead to the future of mobile technology, the iPhone 15 stands as a testament to Apple's unwavering commitment to innovation and excellence. With its groundbreaking A16 chip, the iPhone 15 not only redefines speed and performance but also sets a new benchmark for what a smartphone can achieve. Whether you're a tech enthusiast, a creative professional, or simply someone who appreciates cutting-edge technology, the iPhone 15 promises to elevate your mobile experience to extraordinary heights.
Embrace the Power of iPhone 15
In conclusion, the iPhone 15's A16 chip represents a monumental leap forward in mobile computing. With its unmatched processing power, enhanced graphics capabilities, and seamless integration of 5G technology, the iPhone 15 is poised to revolutionize how we work, play, and connect in the digital age. Whether you're upgrading from a previous iPhone model or experiencing the magic of Apple's ecosystem for the first time, the iPhone 15 invites you to explore a world of limitless possibilities. Discover the power of the A16 chip and redefine what's possible with the iPhone 15 — the future of mobile innovation is here.
0 notes
Text
Reddit's Seal of Approval: The Very Best VPN Companies for 2024
In today's electronic grow older, world wide web safety is actually more crucial than ever before. With cyber risks growing, it is actually critical to guard your online activities coming from prying eyes. One of one of the most successful ways to secure your personal privacy and also safety online is by utilizing a Digital Personal Network (VPN). And when it concerns picking the best VPN solution for 2024, there's absolutely no better spot to transform than Reddit's theinscribermag.com Tape of Approval.
Why Reddit's Seal of Approval Matters
Reddit is actually understood for being actually a center of know-how as well as proficiency on a wide variety of subjects, including innovation as well as cybersecurity. When Redditors highly recommend a service or product, you could be sure that it has been thoroughly vetted as well as checked by a community of proficient individuals. Therefore when it pertains to VPN solutions, obtaining Reddit's Green light is actually a notable endorsement.
What Brings in a VPN Solution the Best?
Before our experts dive into the best VPN solutions for 2024, allow's first understand what criteria bring in a VPN stand out coming from the remainder. Below are some vital variables to think about when examining VPN services:
Security and File Encryption: An excellent VPN ought to use military-grade security to protect your information coming from hackers as well as various other harmful entities.
Speed and also Performance: An excellent VPN need to not reduce your web connection substantially, allowing you to search, flow, and download with no lag.
Server Network: The very best VPN services possess a large web server network spread all over various countries, providing you loads of options for bypassing geo-restrictions.
Privacy Plan: Seek a VPN service provider that has a meticulous no-logs plan to make certain that your online tasks stay private as well as anonymous.
User-Friendly User interface: An user-friendly and also straightforward interface creates it simple for even beginners to establish as well as utilize the VPN with no hassle.
youtube
The Best VPN Solutions for 2024
Now that we've covered what creates a VPN solution fantastic permit's look at a number of the most effective VPN services advised through Reddit for 2024:

ExpressVPN
ExpressVPN is regularly positioned as one of best vpn reddit the greatest VPN services on Reddit every year. With its own durable safety and security components, lightning-fast speeds, and also easy to use user interface, it's not a surprise that ExpressVPN has gained Reddit's Seal of Approval for 2024.
youtube
youtube

NordVPN
NordVPN is actually yet another best opponent in the world of VPN solutions, along with its considerable server network, strong file encryption procedures, and budget-friendly rates strategies. Redditors praise regarding NordVPN's stability as well as performance, making it a prominent selection for those hoping to shield their on the internet activities.
CyberGhost
CyberGhost is actually understood for its uncomplicated applications as well as great consumer assistance, creating it a best choice for amateurs that are actually new to utilizing VPNs. With its own tough pay attention to privacy and protection, CyberGhost has actually got

0 notes
Text
Enabling CSV data uploads via a Salesforce Screen Flow
This is a tutorial for how to build a Salesforce Screen Flow that leverages this CSV to records lightning web component to facilitate importing data from another system via an export-import process.
My colleague Molly Mangan developed the plan for deploying this to handle nonprofit organization CRM import operations, and she delegated a client buildout to me. I’ve built a few iterations since.
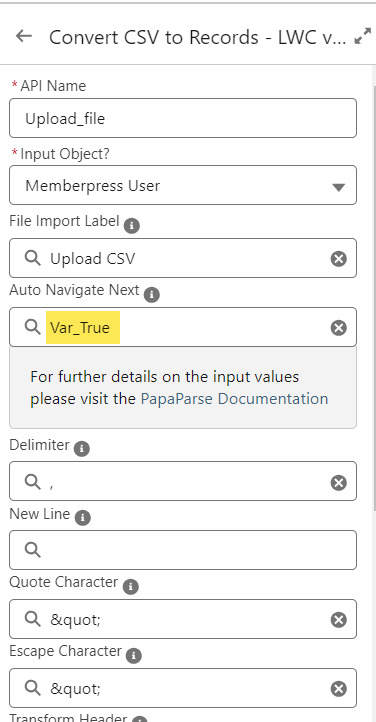
I prefer utilizing a custom object as the import target for this Flow. You can choose to upload data to any standard or custom object, but an important caveat with the upload LWC component is that the column headers in the uploaded CSV file have to match the API names of corresponding fields on the object. Using a custom object enables creating field names that exactly match what comes out of the upstream system. My goal is to enable a user process that requires zero edits, just simply download a file from one system and upload it to another.
The logic can be as sophisticated as you need. The following is a relatively simple example built to transfer data from Memberpress to Salesforce. It enables users to upload a list that the Flow then parses to find or create matching contacts.
Flow walkthrough
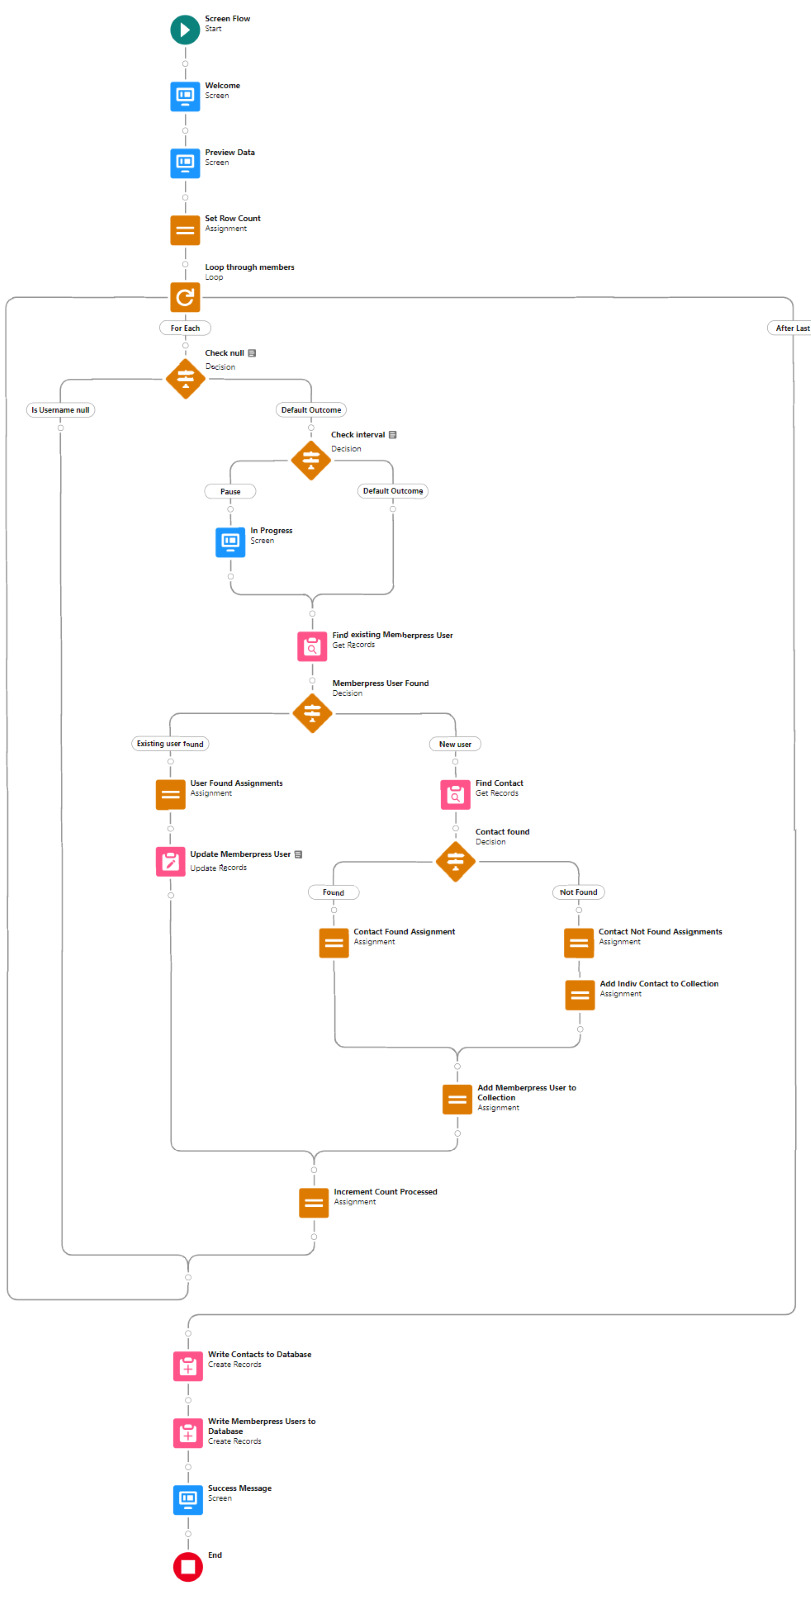
To build this Flow, you have to first install the UnofficialSF package and build your custom object.
The Welcome screen greets users with a simple interface inviting them to upload a file or view instructions.

Toggling on the instructions exposes a text block with a screenshot that illustrates where to click in Memberpress to download the member file.
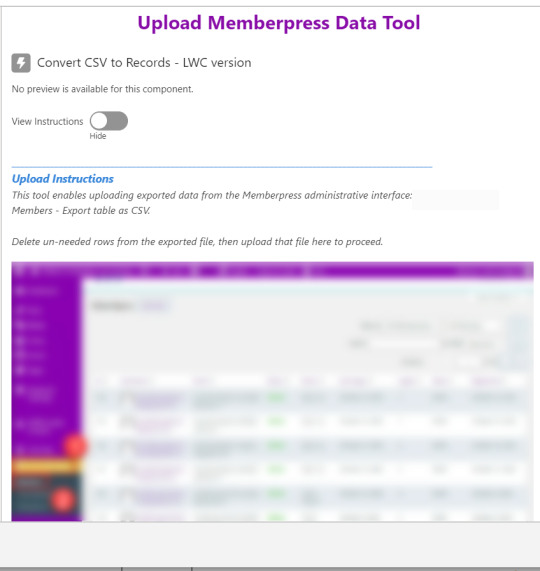
Note that the LWC component’s Auto Navigate Next option utilizes a Constant called Var_True, which is set to the Boolean value True. It’s a known issue that just typing in “True” doesn’t work here. With this setting enabled, a user is automatically advanced to the next screen upon uploading their file.
On the screen following the file upload, a Data Table component shows a preview of up to 1,500 records from the uploaded CSV file. After the user confirms that the data looks right, they click Next to continue.

Before entering the first loop, there’s an Assignment step to set the CountRows variable.

Here’s how the Flow looks so far..

With the CSV data now uploaded and confirmed, it’s time to start looping through the rows.
Because I’ve learned that a CSV file can sometimes unintentionally include some problematic blank rows, the first step after starting the loop is to check for a blank value in a required field. If username is null then the row is blank and it skips to the next row.

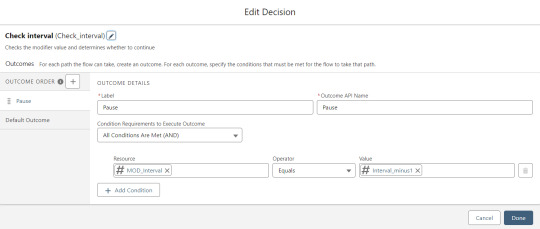
The next step is another decision which implements a neat trick that Molly devised. Each of our CSV rows will need to query the database and might need to write to the database, but the SOQL 100 governor limit seriously constrains how many can be processed at one time. Adding a pause to the Flow by displaying another screen to the user causes the transaction in progress to get committed and governor limits are reset. There’s a downside that your user will need to click Next to continue every 20 or 50 or so rows. It’s better than needing to instruct them to limit their upload size to no more than that number.


With those first two checks done, the Flow queries the Memberpress object looking for a matching User ID. If a match is found, the record has been uploaded before. The only possible change we’re worried about for existing records is the Memberships field, so that field gets updated on the record in the database. The Count_UsersFound variable is also incremented.

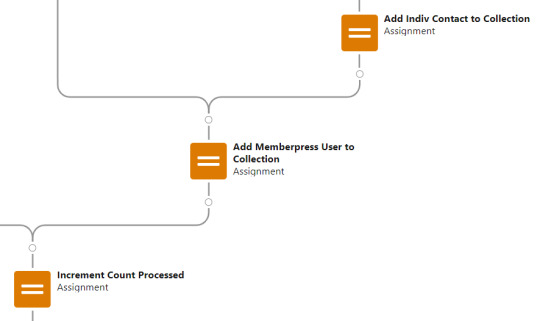
On the other side of the decision, if no Memberpress User record match is found then we go down the path of creating a new record, which starts with determining if there’s an existing Contact. A simple match on email address is queried, and Contact duplicate detection rules have been set to only Report (not Alert). If Alert is enabled and a duplicate matching rule gets triggered, then the Screen Flow will hit an error and stop.

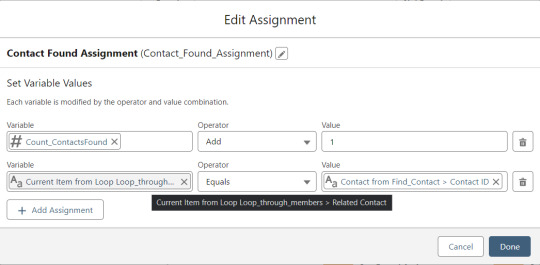
If an existing Contact is found, then that Contact ID is written to the Related Contact field on the Memberpress User record and the Count_ContactsFound variable is incremented. If no Contact is found, then the Contact_Individual record variable is used to stage a new Contact record and the Count_ContactsNotFound variable is incremented.


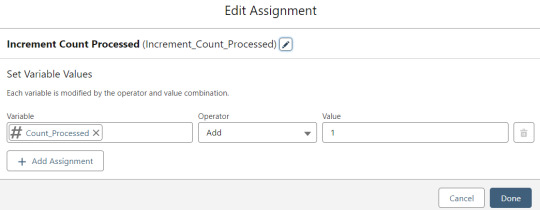
Contact_Individual is then added to the Contact_Collection record collection variable, the current Memberpress User record in the loop is added to the User_Collection record collection variable, and the Count_Processed variable is incremented.


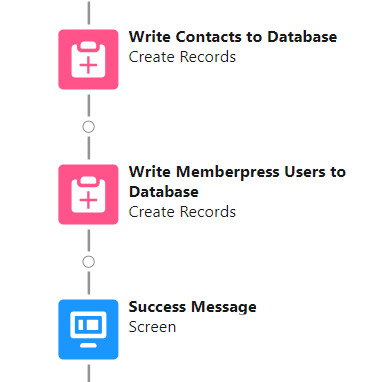
After the last uploaded row in the loop finishes, then the Flow is closed out by writing Contact_Collection and User_Collection to the database. Queueing up individuals into collections in this manner causes Salesforce to bulkify the write operations which helps avoid hitting governor limits. When the Flow is done, a success screen with some statistics is displayed.

The entire Flow looks like this:
Flow variables
Interval_value determines the number of rows to process before pausing and prompting the user to click next to continue.
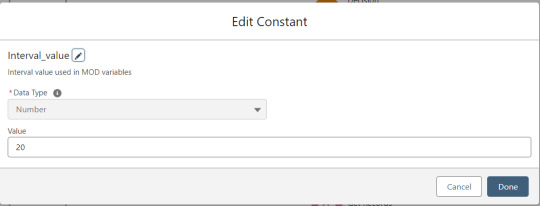
Interval_minus1 is Interval_value minus one.
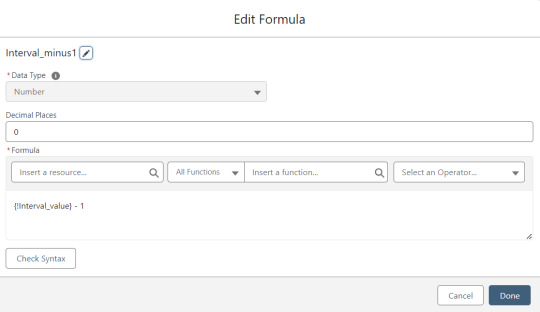
MOD_Interval is the MOD function applied to Count_Processed and Interval_value.

The Count_Processed variable is set to start at -1.

Supporting Flows
Sometimes one Flow just isn’t enough. In this case there are three additional record triggered Flows configured on the Memberpress User object to supplement Screen Flow data import operations.
One triggers on new Memberpress User records only when the Related Contact field is blank. A limitation of the way the Screen Flow batches new records into collections before writing them to the database is that there’s no way to link a new contact to a new Memberpress User. So instead when a new Memberpress User record is created with no Related Contact set, this Flow kicks in to find the Contact by matching email address. This Flow’s trigger order is set to 10 so that it runs first.
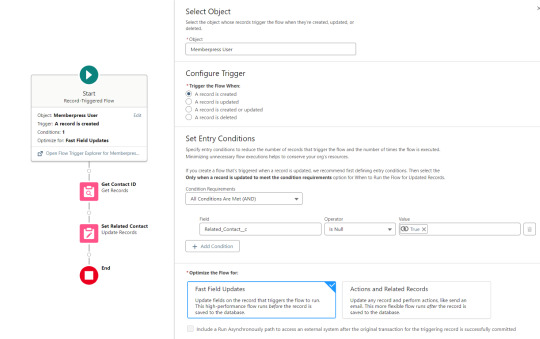
The next one triggers on any new Memberpress User record, reaching out to update the registration date and membership level fields on the Related Contact record

The last one triggers on updated Memberpress User records only when the memberships field has changed, reaching out to update the membership level field on the Related Contact record


0 notes
Text
How to Increase Website Loading Speed in Magento 2
The article was initially published in WebMeridian blog.
OK Google, How to Increase Page Speed of Website
In 2021, speed is the name of the game, and every eCommerce site wants to increase its traffic.
More traffic equals more revenue.
Many users complain that Magento 2 is slow, but nothing could be further from the truth. You just haven’t taken the necessary speed up steps.
Magento 2 has the capability to increase speeds substantially, so you’ll have more traffic. It’s normal to focus on social media marketing, sales and even website design, but many lose sight of the ball when it comes to site performance.
If you want to impact potential shoppers and visitors to your site, you need to make a strong impression with lightning-fast speeds.
Below we will explore ways to increase website loading speeds.
Effective Ways to Increase Website Loading Speed in 2021
Google has made it no secret that page speed is a component that they use when ranking any website.
A website should not take more than three seconds to load, or the user plummets’ satisfactory experience. For a website to rank high, it is essential that you make sure the page speed is within Google’s standards.
There is another side of the coin to consider: if the page should end up exceeding three seconds, it will not rank as well. Basically, you must find the sweet spot with speed. Not too fast and not too slow to meet Google’s rather stringent standards.
Speed Up Magento 2 Website
You have several options when it comes to ways to increase website load speed. Below we will look closely at ways to speed up a Magento 2 website.
Optimise Time to First Byte (TTFB)
With Magento 2, to increase speeds you’ll want to optimise the TTFB. If you are scratching your head and wondering what exactly is the TTFB, well it stands for time to the first byte and is the time that it takes for a browser to successfully download the HTML of a web page.
The result of a slow speed is that the user is left with nothing but a blank screen which is unsatisfactory and a major cause of a user navigating away from the website without ever making a purchase.
While the process is occurring, the tail end of the website is working on the HTML out and striving to effectively send it to the user’s browser. Basically, the skeletal HTML file like a mirror of the actual page and other files like the JavaScript and the CSS files are working to load later.
Correctly the TTFB might seem easy with Magento 2 but every time a customisation update occurs, the code starts to back up and the website ends up becoming slower. To effectively speed up the TTFB to its full potential you’ll need to examine the Magento codebase.
If you lack any programming skills, then you should use an online monitoring tool to help you or turn into a professional.
Consider a Content Delivery Network (CDN) Plan
The online service referred to as a content delivery network (CDN) is a regional service to transfer things like HTML, images, and CSS/JS files, which are commonly referred to as static content. The servers provide fast and efficient delivery.
You can use a multitude of servers to reach many areas of the globe quickly and efficiently.
Setup Varnish
The program Varnish works by caching content. It is often referred to as an HTTP accelerator. The program stores files and file fragments within its memory, so when it needs them it has rapid access, which lowers response time.
If you are good with code, you can even write caching policies using Varnish’s C code language. It is efficient with both large and small servers too.
Take the time to examine the caching options in your Magento store. Pick those you need and click on the enable option and then Submit Page Cache. This will lower the server’s response time and total page load time.
How to Improve the Page Speed
Page load speed matters when it comes to gaining rank with a search engine like Google. It is a crucial component of the ranking algorithms, so you’ll need to take steps to optimise.
Your Host
The hosting package that you invest in matters. You want to seek out quality because the host is like a storage bin. It holds your data and website content to ensure fast upload speeds for things like video, text, and images.
Optimise Images
If your images are not optimised, then you can experience a dramatic slowdown in speeds that can be as significant as 80 percent in some instances. Clearly, images occupy a great deal of space on the host and are well known as being ‘heavy’.
To gain acceptable speeds, you’ll have to go the extra step by making sure the images are optimised to increase website loading speed.
On your eCommerce website, you probably have lots of product photos. Yes, they slow your site down and impact Magento’s speed, but they are necessary for any lucrative sale site. You must optimise the images to gain better speeds. Interesting, this is one thing that many overlook in their quest for speed.
Here are a few tricks to gain more incredible speed:
Compress the images.
Use an Image Optimiser module
Ensure that the store’s logo is either an SVG or PNG format
Check to see if the images of your products are all JPEG formats.
Optimise CSS Delivery
When optimising CSS, you need to remember that there are thousands of codes on every web page. They must undergo compression to help speed up the website. One of the best ways to achieve this is to eliminate unnecessary characters. You can also deduct line breaks which reduce the file size. If you compress the files, then things will speed up.
Go one step further and enable Gzip to reduce the HTML and CSS size, which are sent out to visitors.
CSS & JavaScript
Use the YUI Compressor to compress both JavaScript and CSS.
Remember, once compressed, the code is hard to see, but you’ll save around 20 to 30 per cent capacity.
You’ll discover that when you work with a Magento website, you’ll end up using CSS & JavaScript frequently. Merge the CSS & JavaScript and minify by going to the backend through configure, developer and finally to JavaScript Settings.
Update the Latest Version of Magento 2
How to improve page load speed?
Firstly, what version of Magento are you running?
One of the best ways you can push for more incredible speeds is simply to update to the latest version of Magento 2. Every time Magento takes the time to release a new version, you can be assured that its performance is better. It will have numerous tweaks that help improve things.
Constantly update to gain greater speeds.
Use a Good Theme
When it comes to themes, pick a lightweight and fast one out of Magento themes. It will improve the load spreading of Magento, which benefits your site to become a win/win situation.
Minify JS & CSS Scripts
Minify redirects create even more HTTP requests which can slow things down substantially, and the Google bot will develop the pace of a snail, so avoid excessive redirects if possible.
Key Takeaways
In today’s highly competitive online marketplace, you must rank high on a search engine to score the first page.
People are notoriously lazy and will usually not move on to another page if they don’t find what they want in the top search results. One of the ways to score that much-desired spot is to increase website load speeds.
In summary, carry out the following:
Enable flat products along with categories to relieve the MySQL queries.
Implement CDN — you’ll find Magento 2 support.
Enable caching.
Merge CSS & JS to enhance the user’s experience.
Avoid overloading the website with images that are unnecessary or excessively high quality.
Pay attention to CMS updates.
With Magento 2, things have never been easier. Our team of Magento experts is here to help. Please contact us today to learn more.
#website loading speed#magento website development#magento web development#magento migration services#seo
1 note
·
View note
Text
How To Mix Video And Audio Recordsdata
In relation to minimize and join audio recordsdata (i.e., MP3) to computer systems, I usually use audio editing software functions as a result of I need to use the full potential of the computer, whereas on the smartphone you can use free audio cutter applications. MP3 Cutter Joiner Free, is the right music service for audio reducing. You may minimize a small piece of your favorite monitor to make use of because the background music in your shows, exhibitions & movement pictures or welcome theme for websites. In spite of everything, they're moreover acceptable for environments equivalent to inns, casinos, purchasing malls and other retail conditions. Magic_M4A_to_MP3_Converter_dow (@Magic_M4A_to_mp3 merge files. Ez softmagic websites - ezsoftmagic, Audio recorder. FormatFactory free download. 2. Extract Audio Information from A number of Recordsdata. A few of the audio recordsdata could come from video, which it is advisable extract them from the video information first. The function to get the audio joiner online information out from the video have to be an essential one. Pluses: The perfect thing is you can perform two operations in a single; to be extra specific, when merging the recordsdata, you'll be able to select totally different input file codecs or when splitting information, you can set the output information to have a distinct extension. Because of the Direct-To-Disk splitting and merging assist, the program doesn't create temp files, thus saving house in your disk.
Cute Video Audio Merger Free Version can merges audio and video file right into a single video file. Free MP3 Joiner - Drag and drop (and can even convert quite a lot of audio file kinds). • Automated mode of Break up. MP3 Splitter Joiner and analysis, the MP3 file you simply uploaded to ‘Auto. Mode ‘, after which mechanically select one of the best ways to divide for you. A very good MP3 converter for changing into a member of audio information. works fairly fast, with out errors. The processing tempo of Fre MP3 Joiner is remarkably good, as it took it beneath 5 seconds to merge 21 minutes of audio. Click on the File" button to open the drop-down menu and choose the Add Information…" option to open Windows Explorer and manually choose the audio files for merging. The program additionally supports drag and drop to easily add audio recordsdata. I might use Winamp to do that. Create a playlist of information you need to merge into one, choose Disk Writer output plugin, choose filename and you're performed. The file you're going to get will be right MP3 file and you'll set bitrate etc. All in all, Free MP3 Cutter Joiner is a practical gadget that offers you two highly efficient functions to work together with your MP3 recordsdata. Most of us have had the necessity to extract a portion of an MP3 file sooner or later - or to affix a variety of ones collectively - shortly and without issues. If that's your case, Free MP3 Cutter Joiner will surely become useful to you. Best of all, every features are provided totally free of value. Despite the fact that the editor is fairly superior, one massive drawback is that you could only work with one file at a time. So you probably have multiple MP3s that you want to reduce individually after which join collectively, you may should edit them here first and then go back to another tool like MP3Cut and be part of them together. Also, if you must remix something that will probably be longer than 5 minutes, you can do it in components after which use the opposite website to join them together. Direct WAV MP3 Splitter is a simple to make use of quick tool to split or reduce MP3 and WAV recordsdata. Direct WAV MP3 Splitter is a fast automated WAV and MP3 cutter. Our audio track splitter can quick and quickly cut up larger MP3 or WAV files with out recompression. MP3 cutter means that you can quick break up, cut or trim MP3 or WAV files and save results into new information. Direct WAV MP3 Splitter can works as an computerized MP3 splitter. A build-in audio participant let you hear, playback with adjustable pace and then break up it with automatic monitor numbering. 1. Obtain and set up this MP3 merger in your LAPTOP or Mac and click on "Add File" to decide on the MP3 information you wish to merge. You may also choose to load a folder of MP3 audios by "Add File" > "Add Folder". => You possibly can share your audio files in multiple audio codecs. Click on the Add tracks button to select the music information to merge. The web app then displays the selected tracks as in the snapshot directly under.

With superior know-how, this system will cut and process the audio file at a lightning-fast speed while preserving almost a hundred% original audio high quality. Besides MP3 codecs, it additionally helps a number of other audio file formats equivalent to MP3, FLAC, WAV, WMA, AAC, AIFF, M4A, M4R, AU, MKA, APE, OGG, AC3, and many others. Get a free version right here to have a strive before buying it.

1 note
·
View note
Text
IOS Programs Tend To Be Grabby With Your Own Personal Knowledge Than Android Programs
The Q kinda slipped by though everyone covered the launch of the Nexus 7. The Nexus Q is actually a $299 field that avenues content to your house entertainment system. From korean-based creator Huge Cell comes a fascinating new strategy RPG that works classic roleplaying components with a board game environment that is vivacious together. Unfortunately, together with the comparative insufficient interest given to iOS games, E3 can be a little annoying, for dedicated hardcore iOS gamers. This is the kind of game where you are able to also monetize in- through spectacular amounts app expenditures. Do You Need To Fund Any Content?: the sport is free, nevertheless you do need to pay for more packages/ When I described more questions. There's http://maquillage-virtuel.info/ is possible to discover in Furious Birds Proceed. The Jenga style lets you race a slam to beat into blocks and pigs along. The Fight Cats comes with a stamina system which requires just how much you're able to enjoy the overall game before having to delay. That which you have not stated will be the great docking method with the applications and also the bionic that are not blame for schooling thru google towards the system that is android. I've been glued towards the sport all weekend trying to top my highscore 375, of 3. Exp3D can be obtained like a download free on Google Play, of course, if you are not bad enough you can play through the entire game for-free - however you will must 100% each degree to advance further. Likewise visiting the Rift, EVE: Valkyrie is actually a fast-paced dogfight occur the EVE: Online universe. The sport listing had five unique games: Lost Letter, Letter Pop, Letter Capture, Phrase Traffic and Jumble. Simply titled God Affect 2, this touch video science recreation that is hefty places players inside the sneakers of the vengeful god pouring piping hot lightning upon the world's evil people. The plot of Angry Chickens is fairly straightforward, and you'll be treated why the chickens are so furious to some shortcut scene that identifies when you start the Android beta. I believe the Nexus 7's principal target would be to legitimize the Android drugs and kick at start advancement within this industry. The introduction of Xbox One and ps 4 went console hardware sales up over 50% in comparison to December 2012. Incorporating the like Callofduty and twin stick video shooters like Geometry Wars of online competitive FPS is Andriy Pidvirnyy's awesome new multiplayer shoot 'em up Neon Battleground. The overall game is pretty straightforward, however it executes well, as operate is controlled by the aim incredibly well, and also the gameplay doesn't get overly -complicated. A combination cooperation between Game Companies and Splendid Games, RunBot can be by incorporating multiple recreation models into one easy experience a visually stunning endless athlete that provides a satisfying number of selection,. Everytime i got I was restarted by an update. The greatest problem was no computers online for days. have a peek at this web-site 'll not be uninteresting to determine if this establishes to become EAis chosen submission approach for games on Android from below on out; while these last two releases have been free to play, they havenot associated with-app acquisitions by any means. In most of the overall game processes, movement across the court is actually rapidly, perhaps the apparently more reasonable Professional difficulty function. I might rather examine a good iOS guide from you when compared to a shitty one-sided ashell android one. Look no further than Asphalt 8: a well liked game game among users, Flying if you should be into racecar driving. Load-up the sport in your iPhone, go to Produce, once you are satisfied with your ranges, and you there you will see your created level packs. It's the video game that produces a new perspective to a vintage classic, or exactly about the next new zombie sport. The sport plays just as well on the Pixi whilst the much more pricey iPhone, and the spotlight is the amazing, site informed highscore method. Restart the game and you'll have three lifestyles that are new for you really to employ to perform the amounts within the game. The Activities video podcast includes some behindthescenes vids and 2 of the trailers, However you will find more goodies if you check out what is while in the free iTunes Movie Trailers app that Apple puts out. Though they may not have every Android software out there, they truly possess a reliable offering. Presenting multilevel sport patterns where real-world troubles are solved by children through the use of algebra skills, and earn their online area to be built by rewards. I have cleared all quantities with angry birds until a brand new type arrives and that I desperetely desired a brand new game. The cable/satellite client option may go away if all moves nicely in 2015 and you will be able to just pay for a Go” selection. When customers go shopping using a thorough set of games around the Android Marketplace, Jewelry Solitaire 3 is not fundamentally the best option. I also experienced the originality and overall humor of the attention to also tiny details, and the beast world, such as the game audio, the wonderful animations, along with the ever changing clickable things you will find everywhere. Adjustments are only a little unusual simply because of the way MFI controllers are laid out (looking to make use of the Siri Distant for anything other than confirming that the emulator works is actually an idiot's errand). A prolific publisher, LeVitus has created or co -created over 75 preferred computer books with increased than two million copies sold worldwide in several languages. The sport has incredible audio layout, the associated sound files along with both musically.
2 notes
·
View notes
Text
How to download files from Lightning Community using LWC
[Blogged] - How to download files from Lightning Community using LWC via @sfdc_panther Link - #Salesforce #AskPanther #SFDCPanther #LightningWebComponent @Salesforce @Trailhead @ApexHours @SalesforceDevs

Hi Everyone,
In this post, I am going to show you how to download and Preview the files from Lightning Community using Lightning Web Component.
Before we get started, let’s discuss the Object Structure of the files to know how the files get stored into Salesforce.
Content Document: – Represents a document that has been uploaded to a library in Salesforce CRM Content or Salesforce Files.
View On WordPress
#content document in salesforce#content version in salesforce#download files from lightning community#download files from lightning component#download files from lightning web component#download files from lwc#download files using lwc#files in salesforce#How to download files from Lightning Community using LWC#how to preview files using lwc#preview files using lightning web component
0 notes
Text
Yandex Thunderbird

Yandex Thunderbird Free
Yandex is a technology company that builds intelligent products and services powered by machine learning. Our goal is to help consumers and businesses better navigate the online and offline world. Since 1997, we have delivered world-class, locally relevant search and information services. Additionally, we have developed market-leading on-demand transportation services, navigation products,.
Yandex to Thunderbird tool provides Pause and Resume button. The user can use Pause option to stop the ongoing Backup process. After that, select Resume button to resume the previous action from where it was stopped. Moreover, naming convention option also offered by this Yandex Mail Backup software to manage the backup of mailbox data.

You can access Yandex.Mail via third-part clients, such as Microsoft Outlook, Mozilla Thunderbird or The Bat. To set up a client for your mailbox: Log in to Yandex.Connect via the web interface at least once and accept the user agreement. Go to the Yandex.Mail Help page and follow the.
Firefox Developer Edition. Get the Firefox browser built just for developers. Check out the home for web developer resources. Firefox Reality. Explore the web with the Firefox browser for virtual reality. Donate your voice so the future of. Quantum is Mozilla's project to build the next-generation web engine for Firefox users, building on the Gecko engine as a solid foundation. Quantum will leverage the fearless concurrency of Rust and high-performance components of Servo to bring more parallelization and GPU offloading to Firefox. The latest Firefox engine: Firefox Quantum Firefox Quantum was a revolution in Firefox development. In 2017, we created a new, lightning fast browser that constantly. Download Mozilla Firefox, a free web browser. Firefox is created by a global not-for-profit dedicated to putting individuals in control online. Get Firefox for Windows, macOS, Linux, Android and iOS today! Get Firefox, a free web browser backed by Mozilla, a non-profit dedicated to internet health and privacy. Available now on Windows, Mac, Linux, Android and iOS. Quantum firefox android.
Why Choose Advik Email Backup Wizard?
There is not a single excuse to deny this opportunity to choose this solution. This Email Backup Software is loaded with dozens of useful functions. The very first reason is that you can save or download your emails to a local drive. However, the software does offer you to choose various file formats in which you want to archive emails. You got email filtration, selective folder backup/conversion/migration, live status, progress log, etc. Hit the download button and download email folders to pc using this all in one backup solution.
Middleware got its name because the first middleware typically acted as a mediator between an application front-end, or client, and a back-end resource - e.g., a database, mainframe application or specialized hardware device - from which the client might request data. But today's middleware operates well beyond this scope. Using middleware allows users to perform such requests as submitting forms on a web browser, or allowing the web server to return dynamic web pages based on a user’s profile. Common middleware examples include database middleware, application server middleware, message-oriented middleware, web middleware, and transaction-processing monitors. Middleware is a computer software that provides services to software applications beyond those available from the operating system. It can be described as 'software glue'. Middleware makes it easier for software developers to implement communication and input/output, so they can focus on the specific purpose of their application. Middleware download.
Advik Email Backup Wizard is one of the ultimate solutions I had ever used. This software helped me to transfer emails from Yahoo to Gmail account directly. Yes, no manual tricks, no configuration. It does work as a backup utility as well as email migration utility.
You need not to search for any other program to backup emails. Take the help from Advik Email Backup Tool now or never. This wonderful application will help to backup almost all types of email accounts. 5 Out of 5 star.
Hi all
I a trying to add my Yandex account to thunderbird but I cannot get it to work.I activated application password in my yandex account so that part is covered.The problem comes when logging in through Thunderbird, it opens a browser window for me to login, the problem is that because of cookie settings it doesn't let me go forward in that authentication (see attachment). I guess the yandex website requires certain settings to work because it rejects my login. Because of this I cannot make it work.
I tried changing th default browser for Thunderbird but the settings in mac does't seem to help.I changed the settings from the below to TRUE but still cannot open the page in another browsernetwork.protocol-handler.warn-external.httpnetwork.protocol-handler.warn-external.https
Any ideas on how to go around this?
Yandex Thunderbird Free
Thank you in advance!
0 notes
Text
Cs6 Design Standard Mac Download

Searching for an InDesign CS6 download link? Adobe InDesign is a software developed by Adobe Systems for layout and design of brochures, booklets, magazines, newspapers, books and other products intended for printing. In this article, I will go over the primary features of the Adobe InDesign CS6 version and provide download links for Mac and Windows.
Cs6 Design Standard Mac Download Free
Cs6 Design Standard Mac Download Windows 10
Adobe Cs6 Design Standard Mac Download
Download Adobe Cs6 For Mac
Integration with Illustrator and Photoshop. Adobe InDesign CS6 provides a unified design environment that doesn’t interrupt the creative process when switching from Illustrator or Photoshop to another program. Accordingly, since the information in the alpha channel when importing PSD is saved, picture masking and text flow control around graphics are available.
Design Standard Cs6 Mac. Here we've put together a complete set of adobe cs6 direct download links for all the new products (windows and mac os) design standard cs6 multilanguage is not available! This is not compatibile with macos 10.15 and higher. Adobe photoshop cs6 dmg for mac free. download full version. Adobe Design Standard CS6 Mac Product delivery: Digital (Download link from Adobe, Serial number & Instruction) Will be displayed after payment on website. License category: Full version (retail license) License works World Wide. Design Standard CS6 for Mac - Full Version - Download Legacy Version Version Full Operating Systems Supported Mac OS System Requirements Multicore Intel processor with 64-bit support Mac OS X v10.6.8 or v10.7 2GB of RAM (8GB recommended).
Another advantage is the ability to read documents in PDF format. To facilitate the transfer to InDesign, it includes support for publications collected in QuarkXPress and PageMaker.
Digital publishing. When creating a document, now it is possible to indicate not just the printing and web purposes but the digital printing one as well. This feature was introduced in order to simplify the process of converting from one medium or device specifications to another.
Since the old document model of Adobe had to be updated to optimize the program’s workflow, the introduction of this feature wasn’t unexpected. Plenty of designers and Adobe’s active users have been waiting for it. This is exactly the function that distinguishes the program from other InDesign alternatives.
Wide typographic possibilities. If you download InDesign CS6, you will get the whole nine yards. Their routine is brightened by such original items as the new technology of switching off and placing hyphenations in the text – Single-and Multi-line Composer.
Optical margin alignment, which corrects the location of certain characters in the text, taking into account their perception by the eye; displaying the properties of individual characters on a standard unified palette and displaying the tab position in the text with a vertical line makes it easier to accurately set these controls.
Adobe Animate for Mac. 57,758 downloads Updated: October 19, 2020 Trial. Review Free Download specifications 100% CLEAN report malware. Comprehensive and advanced authoring environment designed to help you develop rich, interactive multimedia content for digital platforms. Adobe animate free download mac. About: Adobe Animate 2020 v20.5 free. download full. Design interactive animations for games, TV shows, and the web. Bring cartoons and banner ads to life. Create animated doodles and avatars. And add action to eLearning content and infographics. With Animate, you can quickly publish to multiple platforms in just about any format.
Compressor 4 free download mac. Rich file formats support. InDesign CS6 enables export in JPEG, EPS, INX, INDD and other digital formats. The latest InDesign versions offer the Publish Online tool that is meant for publishing the final documents on various web resources.


Text frame fitting. Designers often have a hard time dealing with the text frame options. To facilitate this process, the program provides flexible width column options. This feature enables users to effortlessly manage the number and width of columns by modifying the size of the text frame. As soon as you achieve the set numbers, the columns will be added automatically. If the file has accomplished the maximum column width, the column will be eliminated.
View how to how buy InDesign at the most affordable price.
InDesign CS6 System Requirements
The same as other free Adobe software, Adobe InDesign CS6 download and installation will go easy on your computer. The program doesn’t have high system requirements and can be installed even on low-powered PCs. Get acquainted with all the requirements below.
InDesign CS6 for Windows
ProcessorIntel Pentium 4 or AMD Athlon 64 processorOperating systemMicrosoft Windows XP with Service Pack 3 or Windows 7 with Service Pack 1. Adobe Creative Suite 5.5 and CS6 applications also support Windows 8 and Windows 8.1RAM1 GB of RAM (2 GB advisable)Hard disk1.6 GB of available hard-disk space for installation; extra free space is required during installation (unable to install on removable flash storage devices)Monitor resolution1024 x 768 display (1280 x 800 advisable) with the 16-bit graphics adapterAdditionalAdobe Flash Player 10 software required to export SWF files Certain features in Adobe Bridge depend on a DirectX 9 – robust graphics adapter with at least 64 MB of VRAM

InDesign CS6 for Mac
ProcessorMulticore Intel processorOperating systemMac OS X v10.6.8 or v10.7. Adobe Creative Suite 5, CS5.5, and CS6 applications support Mac OS X v10.8 or v10.9 when installed on Intel-based systemsRAM1 GB of RAM (2 GB advisable)Hard disk2.6 GB of available hard-disk space for installation; extra free space is required during installation (unable to install on a volume that uses a case-sensitive file system or on removable flash storage devices)Monitor resolution1024 x 768 display (1280 x 800 advisable) with the 16-bit graphics adapterAdditionalAdobe Flash Player 10 software required to export SWF files
Freebies for InDesign CS6
InDesign is known for the support of fonts downloaded from various third-party resources. Take a closer look at the following bundle of free fonts, install and experiment with them. The fonts are aimed at enhancing your brochures, booklets and other printing products.
Ann Young
Hi there, I'm Ann Young - a professional blogger, read more
Our Most recent Adobe CS6 Design Standard Student and Teacher Edition for Mac (Download) Is Going to Make Your Life Even better
The moment you bought your first Adobe CS6 Design Standard Student and Teacher Edition for Mac (Download) it is likely you believed it was likely to help save you both time and expense, after all that was in fact the entire point behind getting a item in the first place. While it is true that those early on models did make an impact and made your life a little easier, at Adobe we thought that this simply is not adequate. You deserved a product which was not only going to save you effort, but would definitely make your life far better.
Cs6 Design Standard Mac Download Free
List Price : $449.00 You Save

: Check Cheap Price Check Offer listing
Although there are plenty of similar Adobe CS6 Design Standard Student and Teacher Edition for Mac (Download) currently available, we feel that what we did is taken the most beneficial components of all of the different products on the market and used them to develop our most recent model. One thing that we did notice with the amount of the various other items in the marketplace is that they try to amaze you with extensive displays of 'exclusive' functions that they have incorporated.
Cs6 Design Standard Mac Download Windows 10
Our hottest Adobe CS6 Design Standard Student and Teacher Edition for Mac (Download) comes with a unique number of features, but instead than filling it up with a several worthless options, we dedicated to adding only those that our consumers let us know they wanted. We then focused on ensuring each of these attributes performed properly, so that you will finally have the ability to choose the one merchandise that was made with just one idea in mind which is to spare no expense to make Your Life simply that small amount better than it was.
Adobe Cs6 Design Standard Mac Download
Adobe Creative Suite 6 Design Standard Student and Teacher Edition software combines industry-standard tools for professional print design and digital publishing. Create eye-catching images and graphics at lightning speed with innovative painting and drawing tools and dozens of creative effects in Adobe Photoshop and Illustrator. Lay out top-quality print pages with exquisite typography in Adobe InDesign. Also in InDesign, produce highly designed eBooks with support for the latest EPUB standards, and deliver media-rich publications for iPad and other tablet devices as easily as creating pages for print. Achieve exceptional quality and precise control with high-performance software that streamlines routine design and production tasks.
Feature
Download Adobe Cs6 For Mac
Breakthrough image editing in Photoshop - Deliver eye-catching results with the industry standard in digital imaging. Enjoy creative freedom and precise control.
Video editing in Photoshop - Edit video in Photoshop to include in your digital publishing projects. Quickly combine clips and stills using transitions, audio, and effects, such as pan and zoom.
Distinctive vector graphics in Illustrator - Create top-quality vector artwork for any project, from logos to illustrations for advertising, packaging, signage, and more.
Professional page layout in InDesign - Lay out, preflight, and produce stunning page layouts with intuitive design software that offers precise control over typography and built-in tools for creative effects.
Tablet publications in InDesign - Use InDesign to create media-rich publications for iPad and other tablet devices. Add interactive elements such as pan and zoom, slide shows, audio, and video. Upload to Adobe Digital Publishing Suite for distribution.
0 notes
Text
How to Use Tailwind on a Svelte Site
Let’s spin up a basic Svelte site and integrate Tailwind into it for styling. One advantage of working with Tailwind is that there isn’t any context switching going back and forth between HTML and CSS, since you’re applying styles as classes right on the HTML. It’s all the in same file in Svelte anyway, but still, this way you don’t even need a <style> section in your .svelte files.
If you are a Svelte developer or enthusiast, and you’d like to use Tailwind CSS in your Svelte app, this article looks at the easiest, most-straightforward way to install tailwind in your app and hit the ground running in creating a unique, modern UI for your app.
If you like to just see a working example, here’s a working GitHub repo.
Why Svelte?
Performance-wise, Svelte is widely considered to be one of the top JavaScript frameworks on the market right now. Created by Rich Harris in 2016, it has been growing rapidly and becoming popular in the developer community. This is mainly because, while very similar to React (and Vue), Svelte is much faster. When you create an app with React, the final code at build time is a mixture of React and vanilla JavaScript. But browsers only understand vanilla JavaScript. So when a user loads your app in a browser (at runtime), the browser has to download React’s library to help generate the app’s UI. This slows down the process of loading the app significantly. How’s Svelte different? It comes with a compiler that compiles all your app code into vanilla JavaScript at build time. No Svelte code makes it into the final bundle. In this instance, when a user loads your app, their browser downloads only vanilla JavaScript files, which are lighter. No framework UI library is needed. This significantly speeds up the process of loading your app. For this reason, Svelte applications are usually very small and lightning fast. The only downside Svelte currently faces is that since it’s still new and doesn’t have the kind of ecosystem and community backing that more established frameworks like React enjoy.
Why Tailwind?
Tailwind CSS is a CSS framework. It’s somewhat similar to popular frameworks, like Bootstrap and Materialize, in that you apply classes to elements and it styles them. But it is also atomic CSS in that one class name does one thing. While Tailwind does have Tailwind UI for pre-built componentry, generally you customize Tailwind to look how you want it to look, so there is less risk of “looking like a Bootstrap site” (or whatever other framework that is less commonly customized). For example, rather than give you a generic header component that comes with some default font sizes, margins, paddings, and other styling, Tailwind provides you with utility classes for different font sizes, margins, and paddings. You can pick the specific ones you want and create a unique looking header with them. Tailwind has other advantages as well:
It saves you the time and stress of writing custom CSS yourself. With Tailwind, you get thousands of out-of-the-box CSS classes that you just need to apply to your HTML elements.
One thing most users of Tailwind appreciate is the naming convention of the utility classes. The names are simple and they do a good job of telling you what their functions are. For example, text-sm gives your text a small font size**.** This is a breath of fresh air for people that struggle with naming custom CSS classes.
By utilizing a mobile-first approach, responsiveness is at the heart of Tailwind’s design. Making use of the sm, md, and lg prefixes to specify breakpoints, you can control the way styles are rendered across different screen sizes. For example, if you use the md prefix on a style, that style will only be applied to medium-sized screens and larger. Small screens will not be affected.
It prioritizes making your application lightweight by making PurgeCSS easy to set up in your app. PurgeCSS is a tool that runs through your application and optimizes it by removing all unused CSS classes, significantly reducing the size of your style file. We’ll use PurgeCSS in our practice project.
All this said Tailwind might not be your cup of tea. Some people believe that adding lots of CSS classes to your HTML elements makes your HTML code difficult to read. Some developers even think it’s bad practice and makes your code ugly. It’s worth noting that this problem can easily be solved by abstracting many classes into one using the @apply directive, and applying that one class to your HTML, instead of the many. Tailwind might also not be for you if you are someone who prefers ready-made components to avoid stress and save time, or you are working on a project with a short deadline.
Step 1: Scaffold a new Svelte site
Svelte provides us with a starter template we can use. You can get it by either cloning the Svelte GitHub repo, or by using degit. Using degit provides us with certain advantages, like helping us make a copy of the starter template repository without downloading its entire Git history (unlike git clone). This makes the process faster. Note that degit requires Node 8 and above.
Run the following command to clone the starter app template with degit:
npx degit sveltejs/template project-name
Navigate into the directory of the starter project so we can start making changes to it:
cd project-name
The template is mostly empty right now, so we’ll need to install some required npm packages:
npm install
Now that you have your Svelte app ready, you can proceed to combining it with Tailwind CSS to create a fast, light, unique web app.
Step 2: Adding Tailwind CSS
Let’s proceed to adding Tailwind CSS to our Svelte app, along with some dev dependencies that will help with its setup.
npm install tailwindcss@npm:@tailwindcss/postcss7-compat postcss@^7 autoprefixer@^9 # or yarn add tailwindcss@npm:@tailwindcss/postcss7-compat postcss@^7 autoprefixer@^9
The three tools we are downloading with the command above:
Tailwind
PostCSS
Autoprefixer
PostCSS is a tool that uses JavaScript to transform and improve CSS. It comes with a bunch of plugins that perform different functions like polyfilling future CSS features, highlighting errors in your CSS code, controlling the scope of CSS class names, etc.
Autoprefixer is a PostCSS plugin that goes through your code adding vendor prefixes to your CSS rules (Tailwind does not do this automatically), using caniuse as reference. While browsers are choosing to not use prefixing on CSS properties the way they had in years past, some older browsers still rely on them. Autoprefixer helps with that backwards compatibility, while also supporting future compatibility for browsers that might apply a prefix to a property prior to it becoming a standard.
For now, Svelte works with an older version of PostCSS. Its latest version, PostCSS 8, was released September 2020. So, to avoid getting any version-related errors, our command above specifies PostCSS 7 instead of 8. A PostCSS 7 compatibility build of Tailwind is made available under the compat channel on npm.
Step 3: Configuring Tailwind
Now that we have Tailwind installed, let’s create the configuration file needed and do the necessary setup. In the root directory of your project, run this to create a tailwind.config.js file:
npx tailwindcss init tailwind.config.js
Being a highly customizable framework, Tailwind allows us to easily override its default configurations with custom configurations inside this tailwind.config.js file. This is where we can easily customize things like spacing, colors, fonts, etc.
The tailwind.config.js file is provided to prevent ‘fighting the framework’ which is common with other CSS libraries. Rather than struggling to reverse the effect of certain classes, you come here and specify what you want. It’s in this file that we also define the PostCSS plugins used in the project.
The file comes with some default code. Open it in your text editor and add this compatibility code to it:
future: { purgeLayersByDefault: true, removeDeprecatedGapUtilities: true, },
Tailwind 2.0 (the latest version), all layers (e.g., base, components, and utilities) are purged by default. In previous versions, however, just the utilities layer is purged. We can manually configure Tailwind to purge all layers by setting the purgeLayersByDefault flag to true.
Tailwind 2.0 also removes some gap utilities, replacing them with new ones. We can manually remove them from our code by setting removeDeprecatedGapUtilities to true.
These will help you handle deprecations and breaking changes from future updates.
PurgeCSS
The several thousand utility classes that come with Tailwind are added to your project by default. So, even if you don’t use a single Tailwind class in your HTML, your project still carries the entire library, making it rather bulky. We’ll want our files to be as small as possible in production, so we can use purge to remove all of the unused utility classes from our project before pushing the code to production.
Since this is mainly a production problem, we specify that purge should only be enabled in production.
purge: { content: [ "./src/**/*.svelte", ], enabled: production // disable purge in dev },
Now, your tailwind.config.js should look like this:
const production = !process.env.ROLLUP_WATCH; module.exports = { future: { purgeLayersByDefault: true, removeDeprecatedGapUtilities: true, }, plugins: [ ], purge: { content: [ "./src/**/*.svelte", ], enabled: production // disable purge in dev }, };
Rollup.js
Our Svelte app uses Rollup.js, a JavaScript module bundler made by Rich Harris, the creator of Svelte, that is used for compiling multiple source files into one single bundle (similar to webpack). In our app, Rollup performs its function inside a configuration file called rollup.config.js.
With Rollup, We can freely break our project up into small, individual files to make development easier. Rollup also helps to lint, prettify, and syntax-check our source code during bundling.
Step 4: Making Tailwind compatible with Svelte
Navigate to rollup.config.js and import the sveltePreprocess package. This package helps us handle all the CSS processing required with PostCSS and Tailwind.
import sveltePreprocess from "svelte-preprocess";
Under plugins, add sveltePreprocess and require Tailwind and Autoprefixer, as Autoprefixer will be processing the CSS generated by these tools.
preprocess: sveltePreprocess({ sourceMap: !production, postcss: { plugins: [ require("tailwindcss"), require("autoprefixer"), ], }, }),
Since PostCSS is an external tool with a syntax that’s different from Svelte’s framework, we need a preprocessor to process it and make it compatible with our Svelte code. That’s where the sveltePreprocess package comes in. It provides support for PostCSS and its plugins. We specify to the sveltePreprocess package that we are going to require two external plugins from PostCSS, Tailwind and Autoprefixer. sveltePreprocess runs the foreign code from these two plugins through Babel and converts them to code supported by the Svelte compiler (ES6+). Rollup eventually bundles all of the code together.
The next step is to inject Tailwind’s styles into our app using the @tailwind directive. You can think of @tailwind loosely as a function that helps import and access the files containing Tailwind’s styles. We need to import three sets of styles.
The first set of styles is @tailwind base. This injects Tailwind’s base styles—mostly pulled straight from Normalize.css—into our CSS. Think of the styles you commonly see at the top of stylesheets. Tailwind calls these Preflight styles. They are provided to help solve cross-browser inconsistencies. In other words, they remove all the styles that come with different browsers, ensuring that only the styles you employ are rendered. Preflight helps remove default margins, make headings and lists unstyled by default, and a host of other things. Here’s a complete reference of all the Preflight styles.
The second set of styles is @tailwind components. While Tailwind is a utility-first library created to prevent generic designs, it’s almost impossible to not reuse some designs (or components) when working on a large project. Think about it. The fact that you want a unique-looking website doesn’t mean that all the buttons on a page should be designed differently from each other. You’ll likely use a button style throughout the app.
Follow this thought process. We avoid frameworks, like Bootstrap, to prevent using the same kind of button that everyone else uses. Instead, we use Tailwind to create our own unique button. Great! But we might want to use this nice-looking button we just created on different pages. In this case, it should become a component. Same goes for forms, cards, badges etc.
All the components you create will eventually be injected into the position that @tailwind components occupies. Unlike other frameworks, Tailwind doesn’t come with lots of predefined components, but there are a few. If you aren’t creating components and plan to only use the utility styles, then there’s no need to add this directive.
And, lastly, there’s @tailwind utilities. Tailwind’s utility classes are injected here, along with the ones you create.
Step 5: Injecting Tailwind Styles into Your Site
It’s best to inject all of the above into a high-level component so they’re accessible on every page. You can inject them in the App.svelte file:
<style global lang="postcss"> @tailwind base; @tailwind components; @tailwind utilities; </style>
Now that we have Tailwind set up in, let’s create a website header to see how tailwind works with Svelte. We’ll create it in App.svelte, inside the main tag.

Step 6: Creating A Website Header
Starting with some basic markup:
<nav> <div> <div> <a href="#">APP LOGO</a> <!-- Menus --> <div> <ul> <li> <a href="#">About</a> </li> <li> <a href="#">Services</a> </li> <li> <a href="#">Blog</a> </li> <li> <a href="#">Contact</a> </li> </ul> </div> </div> </div> </nav>
This is the header HTML without any Tailwind CSS styling. Pretty standard stuff. We’ll wind up moving the “APP LOGO” to the left side, and the four navigation links on the right side of it.

Now let’s add some Tailwind CSS to it:
<nav class="bg-blue-900 shadow-lg"> <div class="container mx-auto"> <div class="sm:flex"> <a href="#" class="text-white text-3xl font-bold p-3">APP LOGO</a> <!-- Menus --> <div class="ml-55 mt-4"> <ul class="text-white sm:self-center text-xl"> <li class="sm:inline-block"> <a href="#" class="p-3 hover:text-red-900">About</a> </li> <li class="sm:inline-block"> <a href="#" class="p-3 hover:text-red-900">Services</a> </li> <li class="sm:inline-block"> <a href="#" class="p-3 hover:text-red-900">Blog</a> </li> <li class="sm:inline-block"> <a href="#" class="p-3 hover:text-red-900">Contact</a> </li> </ul> </div> </div> </div> </nav>
OK, let’s break down all those classes we just added to the HTML. First, let’s look at the <nav> element:
<nav class="bg-blue-900 shadow-lg">
We apply the class bg-blue-900 gives our header a blue background with a shade of 900, which is dark. The class shadow-lg class applies a large outer box shadow. The shadow effect this class creates will be 0px at the top, 10px on the right, 15px at the bottom, and -3px on the left.
Next is the first div, our container for the logo and navigation links:
<div class="container mx-auto">
To center it and our navigation links, we use the mx-auto class. It’s equivalent to margin: auto, horizontally centering an element within its container.
Onto the next div:
<div class="sm:flex">
By default, a div is a block-level element. We use the sm:flex class to make our header a block-level flex container, so as to make its children responsive (to enable them shrink and expand easily). We use the sm prefix to ensure that the style is applied to all screen sizes (small and above).
Alright, the logo:
<a href="#" class="text-white text-3xl font-bold p-3">APP LOGO</a>
The text-white class, true to its name, make the text of the logo white. The text-3xl class sets the font size of our logo (which is configured to 1.875rem)and its line height (configured to 2.25rem). From there, p-3 sets a padding of 0.75rem on all sides of the logo.
That takes us to:
<div class="ml-55 mt-4">
We’re giving the navigation links a left margin of 55% to move them to the right. However, there’s no Tailwind class for this, so we’ve created a custom style called ml-55, a name that’s totally made up but stands for “margin-left 55%.”
It’s one thing to name a custom class. We also have to add it to our style tags:
.ml-55 { margin-left: 55%; }
There’s one more class in there: mt-4. Can you guess what it does? If you guessed that it seta a top margin, then you are correct! In this case, it’s configured to 1rem for our navigation links.
Next up, the navigation links are wrapped in an unordered list tag that contains a few classes:
<ul class="text-white sm:self-center text-xl">
We’re using the text-white class again, followed by sm:self-center to center the list—again, we use the sm prefix to ensure that the style is applied to all screen sizes (small and above). Then there’s text-xl which is the extra-large configured font size.
For each list item:
<li class="sm:inline-block">
The sm:inline-block class sets each list item as an inline block-level element, bringing them side-by-side.
And, lastly, the link inside each list item:
<a href="#" class="p-3 hover:text-red-900">
We use the utility class hover:text-red-900 to make each red on hover.
Let’s run our app in the command line:
npm run dev
This is what we should get:

And that is how we used Tailwind CSS with Svelte in six little steps!
Conclusion
My hope is that you now know how to integrate Tailwind CSS into our Svelte app and configure it. We covered some pretty basic styling, but there’s always more to learn! Here’s an idea: Try improving the project we worked on by adding a sign-up form and a footer to the page. Tailwind provides comprehensive documentation on all its utility classes. Go through it and familiarize yourself with the classes.
Do you learn better with video? Here are a couple of excellent videos that also go into the process of integrating Tailwind CSS with Svelte.
youtube
youtube
The post How to Use Tailwind on a Svelte Site appeared first on CSS-Tricks.
You can support CSS-Tricks by being an MVP Supporter.
How to Use Tailwind on a Svelte Site published first on https://deskbysnafu.tumblr.com/
0 notes
Text
Bulk Email Marketing is cheapest marketing

Were you aware that over 70% of all internet customers at intervals the united states have completed acquisitions as a results of electronic mail advertising? Bulk email marketing is a very powerful and efficient marketing tool that should be a necessary a part of any marketing plan for any corporation or organization. By definition, this kind of promotion is classed as "the management of mailing lists and targeted digital communications with a various subscriber base". In different words, it's the bulk delivery of electronic newsletters, promotions, ads and company bulletins to be used within both business-to-business likewise as business-to-consumer industries. a popular a well-liked increasingly promotion and is progressively used by little and huge companies alike in favor of attracting potential companies. corporations love it since it's cheap is a solution that delivers results and is a good way to focus on to target number of potential clients with the objective of changing as many of them as possible.
With this at heart, bulk email marketing normally employs distinctive software that captures piece of email addresses from the bulk list and by design sends a solitary message to each entry, so sustaining opt-in inventory upkeep is important to success. For all those not intimate an "opt-in" catalog, it is the kind on the web page that prospects key information into (stuff similar to "name" along with "email address"). when the information is "captured" via the opt-in form, it's stored in an exceedingly file (bulk list) used for that specific web site. sure bulk electronic mail software programs will then be wont to transmit each recipient a novel e-mail message with no different recipients' names or email address. once you send electronic message piece of email to the majority email directory, that note is habitually sent to each person thereon catalog, therefore bulk email. Devoted code like this makes causing these emails an excellent deal easier and fewer long. Usually, the appliance is managed by method of a 3rd party or is downloaded to your computer for private use. "Constant Contact" is an example of a third-party piece of email management system that can deal with sending bulk emails to likely customers. the bulk of the time it really is simply easier to contract out this sort of service and frees you up to target a lot of necessary components like client service. Bulk email service provider in india sanchar tech.

The program (software) is that the backbone of the majority email promoting strategy. It will build, then dispatch associate e-mail to common e-mail addresses, each contacts and listing, and forward newsletters to your subscribers. In essence, everything with a reputation and digital address is victim. It permits for the management of mailing lists likewise as targeted communications to a various base of subscribers. For this reason, specializing in an inventory of opt-in recipients can probably be thought of because of the key to the present variety of campaign's triumph.
One of the foremost attention-grabbing aspects of bulk email promoting is that it is started to dispatch associate email marketing campaign to your potential customers at anytime day or night. This adds up to extending your scope into your consumer base economically and with efficiency. Also, the appliance will for good erase all sent copies from "Sent Items" folder once causing for avoiding duplicate piece of email copies. for instance, variety of platform options incorporate associate opt-out selection that mechanically processes your removal necessities, scotch you the long means that of manually eradicating them on an individual basis from your email address lists.
Another issue to contemplate is that the free bulk emailing package that's out there within the on-line world. This code extracts communication from the actual path as well as temporary worker folders, saved webpages, and so on. If you're very industrious and desire saving some the dollars, you'll be able to use a bulk emailing code that you'll be able to transfer for free of charge. However, this a lot of usually than not means that putt up with another person's advertising in your emails that square measure sent to your purchasers. detain mind - if it's "free", there's presumably a catch. Then again, a number of this code truly provides associate choice to send each plain text email likewise as hypertext mark-up language email by the method of "lightning speed while not victimization your ISP's SMTP server".
No self-respecting article on bulk emailing would be comprehensive devoid of mentioning the "S" word. that is right SPAM. The term SPAM originates with the notorious canned goods and is employed as a equivalent word meant for unsought piece of email, or unsought bulk e-mail (UBE). even though bulk email promoting does not mechanically represent spam, several spam campaigns square measure launched victimization this actual method. the excellence here would be the opt-in record. This list provides you consent to email people WHO have requested additional information or signed up for your account. If bulk email is unsought and sent to recipients WHO didn't conform to receive it, it's typically thought of spam. as result of spamming is against the law in most states, however causing out bulk emails is totally satisfactory, it is vital to know the distinction between them.
To recap, bulk email promoting usually could be terribly efficient and economic thanks to increasing the reach of any business into their consumer base and an honest code application is crucial for a positive outcome. Spamming is wicked, however, bulk emailing is entirely okay. companies of all styles and sizes can exploit bulk email marketing because more sales for one reason and that is as a result of it works! though it's typically viewed as a right away promoting tool used by large agencies, a bulk email ought to be thought of by little companies and individuals likewise. for tiny corporations trying to urge ahead, bulk email promoting is that the method within which to travel.
Sanchar tech best bulk email service provider in india visit website: https://sancharsms.in/
#bulk#Bulk Email Marketing#sanchar sms#Bulk SMS Service Provider in india#bulk email service in jaipur
0 notes
Text
Showbox Android Consulting-- What The Heck Is That?
List of many popular smartphone applications
Google Pixel 4a.
The Google Drive suite are a group of applications that are all straight incorporated right into Google Drive. The apps include Google Docs, Google Slides, Google Sheets, Google Photos, as well as Google Keep along with the actual Google Drive application itself. These apps focus largely on office use for slide shows, files, as well as spread sheets but also work for note taking, supporting your photos, and also keeping whatever file you can think of. The most effective component is that they're all cost-free unless you require greater than 15GB of storage space on Google Drive. It's a basic key-board that does not have way too many frills.
The application offers a few other things as well, such as potential credit cards that you might receive based upon your credit history. It's a basic, very easy means to look into your credit report as well as begin repairing points if required. Credit Karma is not 100% accurate, however it offers you an excellent concept of what's taking place. If a brand-new account was opened in your name, the alerts likewise allow you understand. In Addition, Intuit (owner of Turbo Tax) bought Credit scores Fate for $7.1 billion in very early 2020 so there may be some modifications to the application progressing.
Similar to any kind of social media network, you need to make use of personal privacy setups download showbox to limit just how much information you and also your kids are sharing. Youngsters can publish things without reviewing or modifying it initially. There have actually even been records of online killers making use of the app to target younger individuals. And also in 2019, TikTok paid millions to work out with federal regulatory authorities who charged it breached children's privacy law.
totally free applications will make your life app-solutely very easy.
The desktop computer and also mobile apps are simple enough to configuration as well as the UI is practical. There is a professional variation with some added features, however the free variation does the basics simply great. Feedly is just one of the most effective information apps out there and also one that you need to absolutely try out. It's an RSS viewers which suggests you can subscribe to tons of different websites and also obtain information from all of them at once. It additionally has support for podcasts, YouTube networks, and also more.
Top 5 performance-killing applications you need to remove today.
1Password makes it possible for you to utilize facility, multi-character passwords that you do not need to remember. You'll only need to remember the one you make use of to log into the application. You can store credit card details, profile type filling information, and also exclusive notes. And on the apple iphone 5s and newer, you can use your fingerprint with Touch ID to visit. It might be one of the most important application you have on your iPhone.

Google Maps as well as Waze
What apps are trending?
iPhone and Android are two different systems, so it's natively impossible to get Android apps on iPhone (iPhone 7 and iPhone 6S). And Android apps are mainly designed for Android phones. Also, you cannot install applications that are not authorized and owned by Apple.
Or you can utilize your phone calls or social media fans to discover buddies currently on the application. Several kids on Tik Tok like to produce video clips, yet lots of people don't publish themselves-- they just use the application to locate as well as adhere to material developers.
How do I find the apps on my phone?
However, the iPhone 11 does not come with AirPods. Instead, the iPhone 11 comes with a brand new charger and EarPods with a lightning connector in the box, according to Apple.
Facebook Lite is one of the largest winners in the upgraded checklist; it is up 6 places in the last 18 months and has increased its overall variety of downloads. The visibility of Messenger in the third setting reinforces the control that Facebook's empire has more than the smart device application marketplace.
A Lot Of Popular Service Applications Trending in 2020
It looks like there's going to be a Pixel 4a to appeal to those on a tighter budget plan, together with a strike hole front cam, 3.5 mm earphone socket and a solitary camera on the back. There's a discussion over whether there will be a Pixel 4a and also a Pixel 4a XL.
A social networking application by Google, it works essentially like the Facebook app. There is a timeline where you can see the most recent updates from your pals and also those you adhere to.


Reddit is the greatest time destroyer on the web as well as having a mobile variation makes it also worse. Before you know it, your children will certainly be grown as well as you'll question what happened to your life. On the apple iphone, you can search all feeds, or select one sub-Reddit to spend your time in. Visit to your account to see your registrations, surfing history, saved articles, upvotes, and also much more. You can also sit in on awesome AMAs from anywhere, including, you know, the commode.
0 notes
Link
Recomended Products

Microsoft Authorized Refurbishers (MAR) are recognized as the leaders in custom refurbished computers. MAR products are customized to meet the ideal functionality requirements for every type of buyer, including…
– Home Desktops for daily tasks such as web browsing, composing email, and consuming media.
– Business Class workstations that handle robust multi-tasking and document creation across multiple monitors.
– Multimedia and Gaming PC’s to support rich graphics, high frames per second & crisp sound while running intense games and software.
The Microsoft Authorized Refrubisher’s process to custom tailor every PC starts by assembling the upgraded components that set these products apart from standard retail computers. Configuration is based within a Dell Optiplex chassis and motherboard which ensures universal compatibility for any action and component requiring the Dell structure. Next comes the brain of the system in an Intel i5 processor to provide the overall speed of the computer. From there, a meticulous matching process ensures both the storage drive and memory reach maximum reliability, compatibility and consistent performance. Every upgraded part is either new or thoroughly tested through advanced diagnostic steps to perform like new. Then it’s a fresh installation of the latest release of Microsoft Windows 10, fully updated and free of any annoying and unnecessary bloatware. After inspection and a final white-glove finishing treatment, the computer is boxed with heavy-duty foam-insulated packaging for shipment to arrive in flawless condition, ready to work perfectly right out of the box!
POWERFUL PROCESSOR – Configured with Intel’s top of the line Core i5 series processor so you can expect lightning fast, reliable and consistent performance for an exceptional PC experience. POWERFUL PROCESSOR – Configured with Intel’s top of the line Core i5 series processor so you can expect lightning fast, reliable and consistent performance for an exceptional PC experience. SUPERIOR STORAGE AND MEMORY – Customized with ample hard drive space to store apps, games, photos, music and movies. Loaded with plenty of DDR3 RAM to zip through multiple tasks in a hurry and outperform the competition in any situation. POWERFUL PROCESSOR – Configured with Intel’s top of the line Core i5 series processor so you can expect lightning fast, reliable and consistent performance for an exceptional PC experience. POWERFUL PROCESSOR – Configured with Intel’s top of the line Core i5 series processor so you can expect lightning fast, reliable and consistent performance for an exceptional PC experience. SUPERIOR STORAGE AND MEMORY – Customized with ample hard drive space to store apps, games, photos, music and movies. Loaded with plenty of DDR3 RAM to zip through multiple tasks in a hurry and outperform the competition in any situation. BUILT IN CONNECTIVITY – Stay connected to the internet with installed wireless capable technology and integrated network card. Play your favorite music files with stereo sound. Easily connect to large and multiple monitors through onboard DisplayPort technology. POWERFUL PROCESSOR – Configured with Intel’s top of the line Core i5 series processor so you can expect lightning fast, reliable and consistent performance for an exceptional PC experience. POWERFUL PROCESSOR – Configured with Intel’s top of the line Core i5 series processor so you can expect lightning fast, reliable and consistent performance for an exceptional PC experience. SUPERIOR STORAGE AND MEMORY – Customized with ample hard drive space to store apps, games, photos, music and movies. Loaded with plenty of DDR3 RAM to zip through multiple tasks in a hurry and outperform the competition in any situation. POWERFUL PROCESSOR – Configured with Intel’s top of the line Core i5 series processor so you can expect lightning fast, reliable and consistent performance for an exceptional PC experience. POWERFUL PROCESSOR – Configured with Intel’s top of the line Core i5 series processor so you can expect lightning fast, reliable and consistent performance for an exceptional PC experience. SUPERIOR STORAGE AND MEMORY – Customized with ample hard drive space to store apps, games, photos, music and movies. Loaded with plenty of DDR3 RAM to zip through multiple tasks in a hurry and outperform the competition in any situation. BUILT IN CONNECTIVITY – Stay connected to the internet with installed wireless capable technology and integrated network card. Play your favorite music files with stereo sound. Easily connect to large and multiple monitors through onboard DisplayPort technology. WINDOWS 10 LATEST RELEASE – A new installation of the latest Microsoft Windows 10 Operating System software, free of bloatware commonly installed from other manufacturers. As Microsoft’s latest and best OS to date, Windows 10 will maximize the utility of each PC for years to come. Optional software such as Anti-Virus and Office 365 can also be easily downloaded through the Microsoft Windows App Store. POWERFUL PROCESSOR – Configured with Intel’s top of the line Core i5 series processor so you can expect lightning fast, reliable and consistent performance for an exceptional PC experience. POWERFUL PROCESSOR – Configured with Intel’s top of the line Core i5 series processor so you can expect lightning fast, reliable and consistent performance for an exceptional PC experience. SUPERIOR STORAGE AND MEMORY – Customized with ample hard drive space to store apps, games, photos, music and movies. Loaded with plenty of DDR3 RAM to zip through multiple tasks in a hurry and outperform the competition in any situation. POWERFUL PROCESSOR – Configured with Intel’s top of the line Core i5 series processor so you can expect lightning fast, reliable and consistent performance for an exceptional PC experience. POWERFUL PROCESSOR – Configured with Intel’s top of the line Core i5 series processor so you can expect lightning fast, reliable and consistent performance for an exceptional PC experience. SUPERIOR STORAGE AND MEMORY – Customized with ample hard drive space to store apps, games, photos, music and movies. Loaded with plenty of DDR3 RAM to zip through multiple tasks in a hurry and outperform the competition in any situation. BUILT IN CONNECTIVITY – Stay connected to the internet with installed wireless capable technology and integrated network card. Play your favorite music files with stereo sound. Easily connect to large and multiple monitors through onboard DisplayPort technology. POWERFUL PROCESSOR – Configured with Intel’s top of the line Core i5 series processor so you can expect lightning fast, reliable and consistent performance for an exceptional PC experience. POWERFUL PROCESSOR – Configured with Intel’s top of the line Core i5 series processor so you can expect lightning fast, reliable and consistent performance for an exceptional PC experience. SUPERIOR STORAGE AND MEMORY – Customized with ample hard drive space to store apps, games, photos, music and movies. Loaded with plenty of DDR3 RAM to zip through multiple tasks in a hurry and outperform the competition in any situation. POWERFUL PROCESSOR – Configured with Intel’s top of the line Core i5 series processor so you can expect lightning fast, reliable and consistent performance for an exceptional PC experience. POWERFUL PROCESSOR – Configured with Intel’s top of the line Core i5 series processor so you can expect lightning fast, reliable and consistent performance for an exceptional PC experience. SUPERIOR STORAGE AND MEMORY – Customized with ample hard drive space to store apps, games, photos, music and movies. Loaded with plenty of DDR3 RAM to zip through multiple tasks in a hurry and outperform the competition in any situation. BUILT IN CONNECTIVITY – Stay connected to the internet with installed wireless capable technology and integrated network card. Play your favorite music files with stereo sound. Easily connect to large and multiple monitors through onboard DisplayPort technology. WINDOWS 10 LATEST RELEASE – A new installation of the latest Microsoft Windows 10 Operating System software, free of bloatware commonly installed from other manufacturers. As Microsoft’s latest and best OS to date, Windows 10 will maximize the utility of each PC for years to come. Optional software such as Anti-Virus and Office 365 can also be easily downloaded through the Microsoft Windows App Store. CUSTOM TAILORED FOR A SECURE START – Configured to tackle all the most commonly needed tasks right out of the box – Browse the internet, stream movies & music, complete homework, store photos, and much more. All custom produced computers are backed by a 90 day warranty and 90 day tech support to ensure a smooth, easy and secure introduction.
0 notes
Photo

WordPress Image Optimization Made Easy With WP Compress
Agencies that build and host dynamic, high-volume, high-traffic WordPress websites are tasked with delivering fast loading speeds for their clients.
Their clients might be eCommerce websites, community websites, or membership websites with:
massive amounts of images that keep changing
many concurrent visitors
many simultaneous transactions
All these images can be hard to maintain and can significantly slow down the loading of the website. For clients, though, faster loading speeds mean credibility.
Fast-loading sites keep customers satisfied, supporting conversions and sales. A fast, responsive site will reduce the number of abandoned shopping carts and, perhaps most importantly, lead to higher search engine rankings.
But images use a lot of bandwidth, which in turn slows down webpage loading speeds. Research has shown that:
65% of a webpage weight is composed of images.
47% of users move on if a website takes more than 3 seconds to load.
Here is the hard truth: images are an indispensable part of your content, but they can hurt website performance if you're not careful.
The Solution: Image Optimization Plugins
Image optimization used to take a long time, but not anymore. WordPress image optimization plugins optimize your images by automatically compressing your images and using smaller versions for your website. They maintain the original quality of the image and deliver the image in the right format, resolution, dimensions, and size.
What to Look for When Choosing Image Optimization Plugins
Here are some questions and prompts to keep in mind while selecting an image optimization plugin.
Image Compression
A good image optimization plugin will compress your images to reduce the file size. A superior image optimizer does it live, on the fly, when visitors are on the page.
Does it offer compression while preserving the quality of the images?
Can you determine your own optimization settings?
Can you set your own compression levels?
How does it prevent over-compression?
Does it save original image files?
Can it do compression on autopilot?
Does it offer WebP files?
Performance and Back-End
An optimization plugin is only as good as the performance gains it delivers!
Does it offer cloud storage services?
Does it work with a reputable CDN?
How much website space does it save you?
Does it vastly improve image loading speed and website loading times?
Quality
You want to be sure that compression and optimization won't ruin the quality of your images.
Does it compress a high percentage of the image size?
What kind of file size is left afterwards?
Does it save original files in the cloud?
Management
Consider the admin interface of your optimization plugin—an easy-to-use plugin will be used more and so will work better.
Does it offer features like a centralized dashboard to manage the client’s websites?
Does it offer personalized monthly reports?
WP Compress Image Optimization
WP Compress fulfills all these requirements for an excellent image optimization plugin.
What Is WP Compress?
WP Compress is an image optimization plugin for WordPress. There are two versions of WP Compress:
Local Version: Performs compression locally, optimizes images locally, and saves on website storage space on the local server.
Live Version (the main version): Compression is done live, with up to 333x faster image load speeds of up to 7 milliseconds!
Once a visitor is on the page, it is automatically optimized on the fly, loading fast for existing visitors and new visitors. This means higher conversion rates and lower bounce rates, with fast speeds helping keep users on the page.
Using a top-rated CDN in the background, WP Compress makes websites available to users at lightning-fast speeds.
WP Compress is focused on the needs of agencies that build and host websites. A single WP Compress account can be used on unlimited websites.
Live compression means every time a new visitor comes to the website, it is instantly optimized and made available to them in up to 7 milliseconds, even when there are already other visitors on the website.
Under the Hood of WP Compress
WP Compress consists of the following components:
plugin component that can be downloaded on all the websites your agency manages
cloud storage service for original images
centralized management portal where you can configure the optimization of all websites your agency manages
WP Compress Features
Incredible image optimizations paired with the following advanced features will give you 333x faster image loading speeds.
Cloud Processing
All your images are securely compressed, resized, and saved in the cloud so as not to use up your local server resources, while saving on storage space and ensuring faster loading speeds. Only optimized images are loaded on your server.
Adaptive Images
Adaptive images are responsive images that are properly sized to be viewed on different kinds of devices. WP Compress generates and loads these images based on the actual devices they will be viewed on. This, combined with adaptive images and automated WebP delivery, is a combination that results in up to 333x faster image loading speeds of 7 milliseconds, with especially noticeable effects on mobile devices.
WebP
You can generate WebP images for each of your optimized images. Just toggle Generate WebP image, and it will be created and served to web browsers that support the WebP format.
Lazy Loading
Lazy loading ensures that only pictures that are currently visible on the user device are loaded. This saves bandwidth for users and is one of the many methods that WP Compress uses to bring websites to users at lightning-fast speeds.
Automatic Resizing
Once images have been compressed, they are automatically resized.
Intelligent Compression
The WP Compress algorithm is designed to prevent over-compression in order to maintain the original quality of the image.
Unlimited Cloud Backups
Backups of original images are always safe (and offloaded to the cloud to save server space).
Top-Rated CDN
Customers will be able to access client websites anywhere in the world in seconds. Whether they're in Brazil, Oslo, Madrid, or Johannesburg, they will all have the same loading speeds.
Say your client is based in New York, and their customer is based in Rio de Janeiro. Their customer will access the website content not from a server in New York but from a cloud server in their own city.
To make this happen, WP Compress uses a highly reputable global content delivery network, meaning that the pages and images are accessed from the cloud server closest to the location of the customer.
Agency Features
A lot of thought has gone into how hosting management works. And since WP Compress is made with agencies in mind, it comes equipped with tools that enable you to easily manage multiple websites.
Centralized Management
You can remotely manage all websites from a central portal to configure settings, bulk compress, and view reports.
Monthly Quotas
The agency can assign monthly quotas to each client’s website based on hosting plans they already have.
Custom Branded Reporting
You can generate and send detailed reports for each website account, such as a web report, email report, or PDF report. Also, you can put your own logo on the report.
Hide From WordPress
You can fully hide WP Compress from your clients’ websites and take credit for lightning-fast load times.
How to Get Started With WP Compress
Using WP Compress is completely effortless once it's set up. Just paste in your API keys to activate, hit start, and optimization is always done automatically. You don't need to lift a finger.
Now I will show you how to set up and use WP Compress.
1. Register for a WP Compress Account
Go to the portal, sign up, and you will be sent a confirmation email. After you've confirmed your email, you will be asked to log in, and you’ll be taken to your dashboard.
2. Add a New Website
Click Add a Website and you will be taken to this screen. You need to have a WordPress website for you to link to WP Compress. You also need to select a maintenance plan.
(Note that a free WordPress.com account will not work with WP Compress because it doesn't allow plugin downloads.)
3. Install the Plugin
Click Download Plugin to download the WP Compress plugin. Go to your WordPress site and upload and install the plugin. (See our complete guide to installing plugins for help with this step.) Alternatively, you can find and install the WP Compress plugin from the built-in plugin search engine in your WordPress admin pages.
4. Get Your API Keys
When you click Next Step, you will be assigned API keys. Copy this key to the clipboard—you'll need to paste it into the WP Compress admin page on your WordPress site.
5. Connect Your WordPress Site to WP Compress
Now you can link the WP Compress plugin on your WordPress site to the WP Compress management portal. Simply select WP Compress from the admin menu and paste your API keys to connect, and then press Start.
6. That's It!
From now on, your images will be automatically optimized when viewed by visitors coming into your website and will be delivered at lightning speed from a global CDN.
Using the Local Version of WP Compress
If you prefer to use the local version, which optimizes on your local server, here's a screenshot of the image optimization settings you can choose from:
I'll explain some of these settings below.
Optimization Level
When compressing images, you can choose from three optimization settings:
Lossless: There will be no loss of image quality, but only limited compression.
Intelligent: This is the recommended setting—a balance between quality and compression.
Ultra: Choose this setting if you want images to be compressed into tiny sizes and don't mind a significant reduction in quality.
Resize Image
Assign a maximum size for images. Any images larger than this will be shrunk to fit.
Autopilot Mode
If you don’t want to manually compress every time new images are loaded, turn on autopilot mode and let WP Compress look after detecting and compressing new images. However, if you want to compress images manually, you can turn off autopilot mode and handle compression of each image individually from the Media Library.
Here's what you'll see in the Media Library for images that have been successfully compressed:
Compression Reports
WP Compress offers some reports to make it easy to see the benefit that your clients are getting from image optimization and compression. Let’s take a look at the report below.
This shows that WP Compress is achieving a high compression rate—reducing images to about 10% of their original size.
Note: You do have the option to choose delivery of your website content from a CDN.
Reports for Clients
As an agency, you can generate and send detailed reports for each website account. This can be a web report, email report, or PDF report. Also, you can put your own logo on the report.
Conclusion and Next Steps
After testing WP Compress, I can conclude that it delivers on its promises. It is very easy to install and simple to use. Once I installed it, everything was done automatically and effortlessly.
For the live version, I created a website and loaded it with images. It significantly reduced my image files down to 10% of their original sizes. Talk about website weight loss! The images also maintained their original quality.
The same applied for the local version. You still save upwards of 75% disk space on your local server, and your newly light pages will load up to 4x faster.
I highly recommend the agency features like monthly quotas because they fit with clients' website care plans. You don't need to revamp how your services are structured.
Finally, you should consider adding WP Compress to the package of services you offer to clients.
You can learn more about WP Compress on the plugin's website
by Franc Lucas via Envato Tuts+ Code https://ift.tt/2Pn1x3S
0 notes
Text
Magento 1 to Magento 2 Migration – The Benefits, Reasons, and Process

Out of 209,904 Magento’s live online stores, there are just 56,134 sites that have migrated to Magento 2 (as on 15/11/2019). And the rest of the 153,770 merchants using the Magento Commerce Platform are at risk of running onto an unsupported software starting June 2020.
Magento 1.x is rounding off its support on 30th June 2020, and those who fail to implement Magento 1 to Magento 2 migration won’t receive security updates anymore.
A CMS without support is prone to vulnerabilities. With an increase in the number of web skimming (Magecart) attacks, such web stores will face the risk of getting hacked and infected with code that steals customers’ payment details.
This is the reason that some of the leading eCommerce businesses such as Tile Giant, Pino’s, Land Rover, and many others have already upgraded to Magento 2 because they understood that a simple upgrade could change their fate.
The common thing among them was:
They did not leave things for tomorrow and embraced the change that promised long-term success.
The Upsides of Magento 2 Migration
The major reason behind the reluctance to upgrade from Magento 1 to Magento 2 is that the key business decision-makers feel that this shift would make no difference. It is like changing adjacently placed seats with no difference in the experience at all.
Which is not TRUE!
Because as compared to Magento 1, the new version offers a host of benefits that could make a significant difference in the long run.
Let us have a look at some of the most important benefits of migrating to Magento 2.
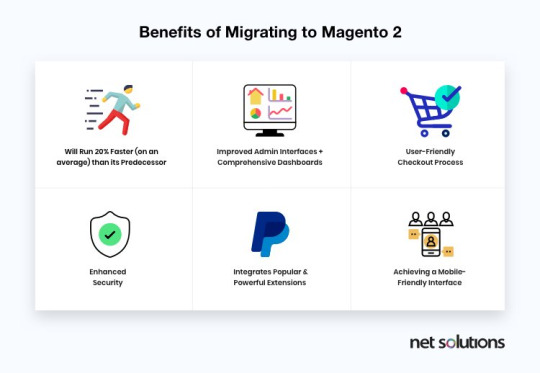
1. Improved Performance and Scalability
There’s no doubt that Magento 2 performs superior to Magento 1 in all cases. It accompanies an improved indexer that helps in increasing its query performance speed. Moreover, Magento 2 uses Varnish Cache, the prominent HTTP accelerator technology which makes it simple to cache requests.
This makes it simple for more than one admin user to create as well as edit eCommerce products’ information without data conflicts in Magento 2. Magento 2 has enhanced performance and scalability because it:
Improves web pages for faster delivery
Boosts server response times for all website activities
Enhances proficiency of backend operations
Enhances database flexibility and scalability to deal with peak loads
How Migrating to Magento 2 Reduced the Page Load Time of ‘Graham & Green’ eCommerce store by 43.5%
Graham & Green, the British furniture company, ran their eCommerce operations on Magento Commerce 1 for years. Their website was not responsive and did not work well on mobile devices.
But in the year 2018, they planned to embark upon a Digital Transformation journey, thus decided to migrate to Magento Commerce 2 with an aim to create a bespoke customer journey for ordering Made-to-Order (MTO) products like custom sofas.
They first launched their mobile site on October 15, 2018, during the peak time of the Black Friday sales season. Their visitors witnessed a great site speed, which alone revolutionized the entire customer experience. The average page load times were down to a staggering 43.5 percent year-over-year, making the buying experience lightning fast.

2. Enhanced Security
Magento 2 has put a considerable focus on security, and subsequently, has more secure information handling. With its main focus on securing user details and offering a secured checkout process, this new version will fulfill every crucial requirement of an advanced eCommerce website development.
Following are the ways you will witness enhanced security by migrating to Magento 2:

Password: Magento 2 helps to enhance password security by using SHA-256 hashing algorithms within its password management system.
2-Factor Authentication: Magento 2 platform offers an incredible 2-Factor Authentication extension, which gives an additional layer of protection.
Dynamic Backup Plan: To further enhance the security, eCommerce store owners may have a proper backup of Magento files by downloading them with an FTP client. This incorporates having an hourly offsite backup plan and downloadable backups. A backup plan guarantees that the eCommerce store doesn’t get any interference in the service if it gets hacked or crashes.
Unique Admin URL: The unique admin URL of Magento store offers a strong protection layer by making it harder to approach for the hackers.
Optimal Development Environment: Magento 2 makes the development procedure quicker and simpler with Magento DevBox Beta, which is another development environment option.
3. Improved Checkout Process
Magento 2 platform gives a simple and safe checkout to your eCommerce site. It offers an approach to recognize visitors as their guests. This eradicates the login or registration form that is required for users to continue the checkout process.
Also, it offers an active shipping rate as per country, region, or postal code. In Magento 2, you can easily integrate the convenient payment method into the checkout procedure.
There are several payment options available that include Paypal and Braintree. You can make your own particular favored payment modules with easy integration with any merchant checkout platform.
Magento 2 checkout process comprises the order summary where you can see a summary of your shipping information. These features help reduce the checkout hassle and enhance customer experience.
It even reduces the checkout time, thereby boosting your website’s conversion rate while reducing cart abandonment.
How Cabinets.com Reduced the Average Time on Checkout by 8 Sec Using Magento 2
Cabinet.com, a successful US company dealing with kitchen cabinets, launched Kitchen Resource Direct, one of the first companies to sell cabinets online. They launched their brand initially on Magento Open Source and gradually shifted to Magento Commerce 1 in the year 2014.
However, in today’s dynamic digitized world, Cabinets.com aimed to offer homeowners and professional contractors a large selection of competitively-priced, customizable products. Thus, in 2017, they decided to implement Magento 1 to Magento 2 migration.
One of the vital results that they achieved with this migration was a seamless Magento Commerce 2 checkout process, which reduced the average checkout time by 8 seconds.

4. Advanced Reporting
When it comes to succeeding in your eCommerce business, reporting is very crucial. The new advanced reporting features, located in Magento Admin, offer 20 reports through its web interface. This feature gives you insight into three critical areas, such as:
Orders: the number of orders, AOV, and taxes and shipping fees collected
Customers: the number of registered accounts
Products: the number of products orders and which product sells best
The reporting is dynamic and real-time, offering you the metrics that you need for better management of your eCommerce business.

5. Mobile-friendly and Responsive Design
Magento 2 offers mobile-friendly and responsive designs for delivering the perfect checkout experience to its customers.
The Magento 2 admin panel is touchscreen-friendly and makes it easy to deal with your store via mobile phones or tablets. It makes your site engaging, easy to use, and easy to navigate irrespective of the device in use and its resolutions.
3 Key Components of Magento 1 to Magento 2 Migration
Magento 2 upgrade comprises three major components, which include:
1. Data
By leveraging the Magento 2 Data Migration Tool, an eCommerce platform can securely create a path for moving data to Magento 2 without dropping packets on the way. But remember that data-migration is a time-intensive process. Thus, it’s important to ponder upon all the factors before hiring a Magento Developer. It’s not a simple CSV export from Magento 1 and then import into Magento 2. There are different steps need to be followed that we have discussed below in the blog.
Key Data elements: Product Information, Customer and Order Data, Promotional Data, and Store Configurations
2. Extensions
The Magento community has already validated and updated the major extensions for Magento 2. The good news is that the extensions are readily available on the Magento marketplace.
The following is the list of extensions available in Magento 2:
Customer Segmentation
Abandoned Cart Email
SEO Suite Ultimate
3. Themes & Customizations
Newer and innovative technologies are designed to give eCommerce merchants the ability to personalize the shopping experience and deliver performance in turn. To achieve that level of optimization, changes to themes and customizations are required. The following is the list of themes available in Magento 2:
Rope Responsive Theme
Couture Fashion Responsive Theme
Minimalism Theme
Instagram Theme
Modern Print Store Theme
The Magento 1 to Magento 2 Migration Process
To migrate successfully and avoid issues, it is vital that you thoroughly plan and test your migration. The following diagram explains the workflow followed for the much-talked-about Magento upgrade. An expert Magento Developer can create a custom path to pave the way to a successful migration.
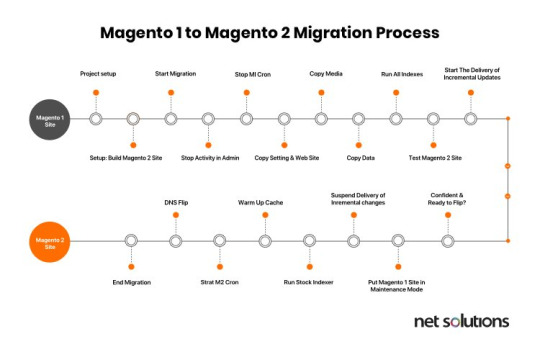
Doing it yourself isn’t that easy, but still, here’s how to do it.
Step1: Setup Magento 2 Instance
Download Magento 2 from https://www.magentocommerce.com/download without the sample data.
Extract the downloaded data and follow the setup wizard to install the platform.
Now, you have Magento 2 setup with an empty database. The data will be migrated in the database of this Magento 2 instance.
Step 2: Download the Data Migration Tool
Open the command line in the root folder of Magento 2. Download the data migration from Magento 1 to Magento 2 tool in the newly set up Magento 2, by following the command:
composer require Magento/data-migration-tool
The version of the data migration tool must match the version of the Magento 2 codebase, which can be found in the composer.json file present in the root of the Magento 2 directory.
For example, for Magento version 2.3.3 the command would be:
composer require Magento/data-migration-tool:2.3.3
You will be prompted for the public key and your private key for authentication.
To get these key values, login to your Magento eCommerce account. Once you log in, browse through “My Accounts”. Now, click on the developer’s link on the left menu and then click on security keys. Here, you can easily locate your keys.
After filling in these details, a new folder called “data migration tool” will be created within the extension /vendor/magento/.
Alternatively, you can also download the data migration tool from Github. The link to which is: https://github.com/magento/data-migration-tool
Step 3: Configuring the Data Migration Tool
Once you have the required data migration tool, you will need to move on with its configuration.
Here’s how to do it:
Under the data-migration-tool/etc folder you can find additional sub-listed folders, i.e.,
ce-to-ce: includes configuration files and scripts for migrating data from Magento 1 CE to Magento 2 CE
ce-to-ee: includes configuration files and scripts for migrating data from Magento 1 CE to Magento 2 EE
ee-to-ee: includes configuration files and scripts for migrating data from Magento 1 EE to Magento 2 EE
Now, enter the directory for which you are performing the migration (for example: ce-to-ce in the case of migrating data from community edition to community edition).
Next, enter the directory with the Magento 1 version name. For instance, if you are doing the migration for Magento 1.9.0.1 version then you should enter the folder 1.9.1.0.
Also, make a copy of the file map.xml.dist and rename it to map.xml, in this folder. (Use of this file is explained in the migration step).
Check out - https://pastebin.com/aejcsMwp
Now you may make a copy of the file config.xml.dist and rename it to config.xml, in this folder. Open this file and make the following changes to it:
a. Required Values:
Under source, enter the Magento 1 database details, and in the destination enter the Magento 2 database details.
Crypt_key value can be found in local.xml file which is located in the Magento 1 instance directory at: app/etc/local.xml in tag.
b. Optional Values:
If you don’t have a prefix set for the Magento 1 and Magento 2 tables, then you can leave the “1” source prefix, and “2” source prefix fields empty.
Database mapping between your Magento 1 and Magento 2 databases is performed through mapping files which are located in:
/vendor/Magento/data-migration-tool/etc/
These files are used for changing the table names, field names, ignoring tables and fields and transferring data of the field to the Magento 2 format.
We need to remove the .dist extension of these files to make use of these mappings.
After removing the .dist from file names, we need to change these file names (removing the .dist) in the config.xml file under the “options” tab.
Here you can see the location of the files that need to be renamed.
Check Out - https://pastebin.com/C09182na
It should look like this now:
Check out - https://pastebin.com/U48sVTeq
Step 4: Provide the Prerequisites
Before you start your migration, you must do all of the following:
You need to stop all the current activities in Magento 1 before moving ahead with Magento migration.
Stop all the cron jobs running on Magento 1 version and put the site on maintenance mode. The purpose of this is to stop all the activities that make any changes in the database. We need to make sure that there is no activity in the database once the data migration process starts.
Open ports in your firewall so that the migration tool can communicate with databases, and the databases of Magento 1 and Magento 2 can communicate with each other.
Migrate your theme to Magento 2 theme structure.
Migrate all your Magento extensions and customizations from version 1 to 2.
In the event of unexpected issues that might cause redundancy, we advise you to create a backup of your Magento 1.x database.
Step 5: Migrate the Websites
Now we will migrate the eCommerce store and system configuration like tax settings, payment gateways, shipping, etc.
For this, we need to run the following command in the Magento 2 instance:
bin/magento migrate:settings [-r|–reset] {}
[-r|–reset] is an optional argument that starts the migration from the beginning.
{} is the absolute path to config.xml file and is a required field
The command should be:
sudo bin/magento migrate:settings /var/www/magento2/vendor/magento/data-migration-tool/etc/ce-to-ce/1.9.0.1/config.xml
Once it is done you will see the “migration complete” status.
Next, you will need to run the data migration command:
bin/magento migrate:data [-r|–reset] {}
The command should be:
udo bin/magento migrate:data /var/www/magento2/vendor/magento/data-migration-tool/etc/ce-to-ce/1.9.0.1/config.xml
This command checks the consistency of tables and fields between Magento 1 and Magento 2. If any issue exists, then an error message will appear with a list of all tables and fields that are not mapped.
For example, you face an extension tables error and a particular custom field goes missing in one of the tables. So, to fix this problem you need to install the Magento 2 version of the extensions in the Magento 2 instance so that the missing tables are in the Magento 2 instance database as well.
You can also ignore the tables and fields by adding their entries in map.xml file After making the entries, the corresponding tables and fields will be ignored and will not be migrated to the Magento 2 database.
Run the migration command again to verify that the issues are fixed.
The data migration is completed once you get the migration complete message.
After the migration is completed, if there are any new changes in the database, such as new orders are placed, or new reviews are added, then you can migrate that data by executing the following command:
bin/magento migrate:delta [-r|–reset] {}
The command should be:
sudo bin/magento migrate:delta /var/www/magento2/vendor/magento/data-migration-tool/etc/ce-to-ce/1.9.0.1/config.xml
This command can be stopped by pressing ctrl + C, or else it will keep on running.
Now your database is successfully migrated to Magento 2.
Flush your Magento 2 cache, and re-index all Magento 2 re-indexers, then thoroughly test your new Magento 2 site.
Bingo! You are almost done and ready to be an active part of the Magento 2 powered businesses.
After migrating from Magento 1 to Magento 2, all you are left with is the need to copy the media files from Magento 1 to Magento 2.
Challenges of Migrating from Magento 1 to Magento 2
The journey of Magento 1 to Magento 2 migration is no cakewalk. There are many challenges that might make it a roller coaster ride. Some of which include:
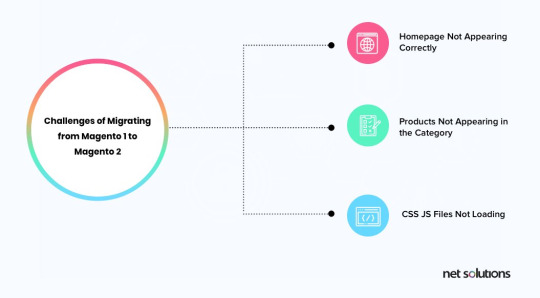
Homepage Not Appearing Correctly
If your Magento 1 version has a custom layout set for the home page, there are chances that the home page will not appear correctly after migration.
Solution: You either need to create a custom layout in Magento 2, or you can go to the Magento 2 admin panel and change the layout for your home page.
Products Not Appearing in the Category
The category-wise distribution of the products on your eCommerce store is likely to go haywire.
Solution: Re-index all the indexers. In Magento 2, you need to go through the command line because it can’t be done from the admin panel like it was done in Magento 1.
CSS JS Files Not Loading
This is yet another issue that many eCommerce stores have reportedly faced after Magento 1 to Magento 2 migration.
Solution: Flush your cache and then deploy the static content. (If you are still facing a problem after removing the cache, then manually remove all the subfolders from the cache folder.
All in All Magento 2 is a Preferred Choice to Make
So, the countdown has begun. With 56,134 sites already running on Magento 2, it is your time to take this much-awaited decision. It is a step that will make the entire eCommerce experience a seamless one both for the users and the business alike.
This change is inevitable, so why whine about it and wait for June 2020. Instead, reach out to the Magento development experts who can assist you with Magento 1 to Magento 2 migration owing to their technical background.
After all, today is always better than tomorrow!
Original Source - https://www.netsolutions.com/insights/how-to-migrate-from-magento-1-to-magento-2/
0 notes