#drywall coverage tips
Explore tagged Tumblr posts
Visit Tumblr Blog
Explore Tumblr blogs with no restrictions, modern design and the best experience.
Last Seen Tumblr Blogs


Fun Fact
Women make up for the other 50% of Tumblr’s audience.
Text
Insurance Tips for Water-Damaged Drywall: What Zephyrhills Homeowners Need to Know

Dealing with drywall damage is hard enough—don’t let insurance confusion make it worse. If you need to repair water damaged drywall, knowing your policy details can save you time and money.
As water damage restoration specialists, we help Zephyrhills homeowners navigate claims with less stress.
What Insurance Typically Covers:
Sudden and accidental water leaks (burst pipes, roof leaks)
Appliance malfunctions (washing machine, water heater, A/C overflow)
Storm-related water intrusion if the roof or structure was damaged
Costs related to mold remediation, if caught early
Tips for Filing:
Document damage with date-stamped photos
Contact your provider before making major repairs
Keep receipts for repairs and restoration
Work with licensed pros to support your claim
Need help with both the fix and the paperwork? Contact PuroClean Zephyrhills for insurance-savvy water damage restoration.
#water damage insurance#drywall coverage tips#Florida home insurance#storm damage claims#water damage restoration
0 notes
Text
Pro tip for apartment living:
Get a tub of pre-mixed joint compound, a spackle knife, some 120-grit sanding blocks, an N-95 mask, a decent paint brush, and a utility knife. These things are all relatively cheap and can be found at most any hardware store. Just have them on hand in a closet or under your sink.
Then, when you inevitably have some chipped paint, or a nail hole from hanging photos, or those no-drill photo hanging solutions rip a big chunk of paint off when you try to remove them...you'll be ready.
Save as big a paint chip from the damaged wall as you can and take it to any hardware store that does custom paint mixing. Have them match that chip. This won't be super cheap, but you can use it for as long as you have that apartment, and on move-out too to increase your chances of getting that deposit back.
Now you have everything you need to patch that spot so well your landlord will never know anything happened.
Instructions under the cut.
1. Put on your mask. Trust me, you do not want to breathe in the drywall dust. Carefully cut away any excess hanging bits of paint or drywall with your utility knife.
2. Seal the exposed area with a thin coat of your paint. A brush made for it is best, but honestly you can use most any brush for this. I have a 1/2 inch paint brush that I use for almost everything, it came in a pack of brushes for like $3 at Michael's. Let this dry overnight! This will help avoid paint bubbling later.
3. Use your spackle knife to apply a thin layer of joint compound over the spot you need to fix and about an inch around it. This stuff needs to be applied sparingly! Only put a thin layer! If it doesn't fully fill in the spot, let it dry completely before putting down another layer. I like to use a color changing joint compound that goes on neon pink and turns white when it's fully dry, so no guess work for me. Try to get this as smooth as possible, but it doesn't need to be perfect. Err on the side of too much coverage. A little bump is better than a groove!
4. It's been a bit of waiting for things to dry, so once the spot is fully spackled and your final layer is completely dry, put your mask back on. Then use your 120 grit sand paper to sand the area smooth. Clean up that dust immediately, BEFORE you take your mask off! You don't want it lying around and again, you don't want to breathe it in!
5. Wipe down the area with a damp paper towel to remove any residual dust. Let dry completely.
6. Use your custom mixed paint to paint over the joint compound patch so it matches the wall around it. You can use a paint roller or sponge for this for the most seamless match, but if your patch is smooth, it won't matter a ton.
Voila! Nothing ever happened.
12 notes
·
View notes
Text
How to Protect Your Home from Hurricane Flood Damage
Hurricanes bring powerful winds, heavy rains, and the devastating threat of flooding. For homeowners in hurricane-prone regions, protecting your home from flood damage is critical not just for your property’s value but also for your family’s safety and peace of mind. Flood damage from hurricanes can be severe and costly, but with the right preparation and protection measures, you can reduce the risk and mitigate the impact. Here’s how to safeguard your home against hurricane flood damage.
Understand the Risks
Hurricane flooding comes in several forms:
Storm surge: A rise in sea level pushed by hurricane winds, often causing rapid and deep flooding along coastlines.
Heavy rainfall: Hurricanes dump intense rain over short periods, leading to flash flooding and overwhelmed drainage systems.
River and creek flooding: Rising water levels upstream can overflow into residential areas even miles inland.
Each type of flooding requires specific protective strategies.
Top Strategies to Protect Your Home from Hurricane Flood Damage
1. Install Flood Barriers and Shields
Flood barriers, such as modular panels or aluminum flood shields, can seal doors, windows, and other vulnerable openings to keep water out. These barriers are designed for quick installation and can be custom-fitted to your home’s specifications.
2. Elevate Electrical Systems and Appliances
Hurricane flooding can cause electrical hazards. Raise circuit breakers, outlets, HVAC units, and appliances above the expected flood level to prevent damage and reduce the risk of fire or electrocution.
3. Seal Basements and Foundations
Apply waterproof coatings and sealants to basement walls and foundations to reduce water seepage. Installing a sump pump with battery backup can also help remove any water that does enter.
4. Landscape for Flood Management
Grade your yard to direct water away from your home’s foundation. Incorporate rain gardens, swales, or permeable surfaces to improve drainage and reduce runoff.
5. Use Flood-Resistant Building Materials
During renovations or repairs, choose materials designed to withstand water exposure, such as tile, concrete, pressure-treated wood, and closed-cell foam insulation. Avoid drywall and untreated wood in areas prone to flooding.
6. Maintain Gutters and Drainage Systems
Clear debris from gutters, downspouts, and drains regularly to ensure water flows away from your home effectively. Consider installing gutter guards or extending downspouts to reduce pooling near your foundation.
7. Create an Emergency Flood Plan
Prepare your family and property for quick evacuation and flood response:
Know evacuation routes and shelters.
Store important documents in waterproof containers.
Have sandbags or other temporary barriers ready.
Develop a communication plan.
Additional Tips for Hurricane Season
Keep insurance policies updated and understand what flood coverage you have.
Secure outdoor furniture, tools, and loose items that could become flood debris.
Stay informed with reliable weather alerts and local emergency instructions.
Conclusion
Hurricane flood damage can be devastating, but with proactive measures, you can significantly reduce the impact on your home and family. From installing flood barriers and elevating utilities to smart landscaping and emergency planning, these strategies form a comprehensive defense against rising waters. Protect your home before the next storm hits—because preparedness is the best protection.
0 notes
Text
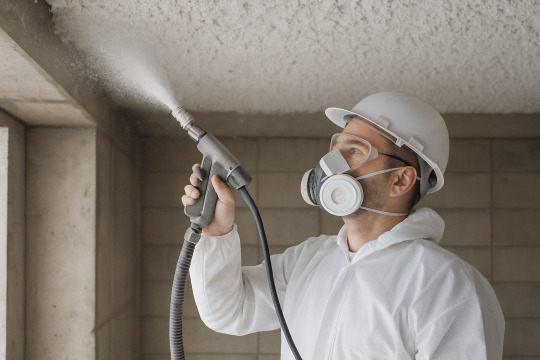
Tips for Acoustic Spray Paint Seamless Blending with Textured Surfaces
The designers and contractors often seek out materials that deliver both performance and visual appeal for architectural finishes. One such innovation that has gained traction in modern interiors is Acoustic Spray Paint—a unique solution that not only enhances acoustic performance but also blends seamlessly into complex surface textures.
However, the effectiveness of Acoustic Spray Paint depends significantly on how well it's applied, especially when dealing with textured or irregular surfaces. Whether it's an exposed ceiling with rough concrete or a feature wall with undulating curves, achieving a uniform, flawless finish requires the right approach and attention to detail.
In this article, we’ll explore professional tips and techniques to ensure that your application of Acoustic Spray Paint results in a smooth, consistent, and aesthetically pleasing finish across any textured surface.
Understanding the Material: What is Acoustic Spray Paint?
Before we delve into application techniques, it’s crucial to understand what Acoustic Spray Paint is. Unlike conventional paint, this innovative product is designed with sound-absorbing microfibers or granular additives. It works by dampening noise levels, reducing reverberation, and improving overall acoustic comfort in a space.
Ideal for commercial settings like offices, auditoriums, hotels, and even high-end residences, Acoustic Spray Paint combines functionality with a clean, minimalist look—especially appreciated in open-plan or industrial-style interiors.
But here's the catch—its effectiveness is not just about the material itself. Proper application is key, particularly when dealing with textured or non-uniform surfaces.
Tip 1: Surface Assessment is Key
Not all surfaces are created equal. Textured substrates can range from lightly stippled drywall to deeply grooved wood panels or raw concrete. Before applying Acoustic Spray Paint, thoroughly inspect the surface. Look for the following:
Loose debris or dust
Surface cracks or holes
Variations in texture depth
Each of these factors can impact the adhesion and uniformity of the Acoustic Spray Paint. Addressing them early helps prevent issues like patchy application, inconsistent absorption, or flaking.
Tip 2: Prepare Like a Pro
Once you've assessed the surface, the next step is preparation. Proper prep work lays the foundation for a seamless blend.
Here’s how to prepare different types of textured surfaces:
Concrete or Plaster: Clean the surface with a stiff brush and mild detergent. Use a bonding primer if needed.
Wood: Sand lightly to remove splinters or high spots. Make sure the surface is clean and dry.
Drywall with Textured Paint: Wipe clean, patch holes, and prime.
Priming is especially important. A compatible primer creates a uniform base and ensures the Acoustic Spray Paint adheres properly, even over uneven textures.
Tip 3: Choose the Right Nozzle and Spray Technique
One of the most overlooked aspects of applying Acoustic Spray Paint is the equipment setup. Spray nozzles come in various sizes, and the right one depends on both the paint's viscosity and the surface texture.
For fine textures, a narrower nozzle provides better control.
For rough surfaces, a wider nozzle helps cover deeper crevices.
Keep a consistent spray distance—usually between 12 to 18 inches. Move the spray gun in a steady, overlapping motion to avoid streaks or thin spots. Practice on a test patch if needed before tackling the actual surface.
Remember: It’s not just about coverage, but also maintaining the acoustic properties of the paint. Uneven or overly thick layers may compromise performance.
Tip 4: Work in Layers
Trying to get complete coverage in one pass is a common mistake. Instead, build up the coating with multiple thin layers. This approach allows the Acoustic Spray Paint to settle naturally into the surface texture without overloading certain areas.
Wait for each layer to dry as per the manufacturer’s instructions. Typically, a drying time of 4-6 hours between coats is ideal, but this may vary based on humidity and ventilation.
Working in layers not only ensures better adhesion but also enhances the visual uniformity of the finish—especially important when blending across varied textures.
Tip 5: Blend with Adjacent Surfaces
In many applications, the area receiving Acoustic Spray Paint is part of a larger design composition. Whether it’s a partial wall treatment or ceiling paneling, ensuring a seamless blend with adjacent surfaces is critical.
Use painter's tape to mask off transition areas. Feather the edges of your spray to create a gradient that visually integrates with surrounding materials. You may even consider custom tinting the Acoustic Spray Paint to match other surfaces, as some manufacturers offer color-matching services.
For ceilings, be especially cautious of corners and edges where shadows can exaggerate uneven finishes. Smooth blending here gives a more polished and professional look.
Tip 6: Environmental Considerations
Applying Acoustic Spray Paint in uncontrolled environments can lead to poor results. Temperature and humidity affect drying times, paint flow, and adhesion.
Ideal temperature: 15°C to 30°C (59°F to 86°F)
Humidity: Below 60% for optimal results
Avoid application during rainy or highly humid days. Always ventilate the space well during and after spraying to allow fumes and moisture to dissipate.
Tip 7: Maintenance and Touch-ups
Once applied, Acoustic Spray Paint is relatively low maintenance. However, textured surfaces can trap dust more easily. Regular vacuuming with a brush attachment or gentle dry dusting is usually enough.
For minor touch-ups, lightly sand the area and reapply using a small sprayer or touch-up brush. Always use the same batch or make sure the color match is verified, especially if the product has aged or discolored over time.
Final Thoughts
The beauty of Acoustic Spray Paint lies in its dual purpose—it enhances both the visual and auditory experience of a space. When applied correctly, especially on textured surfaces, it creates a smooth, elegant finish that blends effortlessly with your design language while offering superior acoustic control.
So, whether you're retrofitting an old space or designing a new one from scratch, these practical tips will help you get the most out of Acoustic Spray Paint. It's more than just a product—it's a performance-driven design tool that, when used right, can truly transform the way a space looks, sounds, and feels.
0 notes
Text
Experts for TV Wall Mount and TV Installation Services
Wall mounting your TV is more than a space-saving hack — it's a stylish upgrade that enhances both your viewing experience and home aesthetic. Choosing a professional TV installation service ensures your wall mount TV is secure, positioned for optimal viewing, and free from tangled wires. Whether you’re building a home theater or just want to reclaim your floor space, expert help can make all the difference.

Why Hire a Professional TV Installation Service Provider
Employing a professional for your TV installation is about more than just assistance with heavy lifting. Professionals understand just how high to mount your TV, what angle will work best in your room, and how to make it all look clean and uncluttered. Safety is also a huge advantage — no more risking wobbly brackets or crashing screens. Trained technicians use proper tools, secure mounting systems, and cable management techniques that protect your wall and devices.
Trying to handle a wall mount TV setup yourself? That often leads to trouble. DIY work can lead to a ruined wall, a skewed screen, or uncovered wiring. More seriously, if the TV topples over or is smashed, you may lose your warranty. Without experience and proper equipment, an easy task can be costly in no time.
How to Choose the Right TV Installation Service Provider In (Australia)
Begin by doing research on companies with good reputations. Find positive reviews, proper certifications, and insurance coverage. Better service providers are also transparent with their pricing and provide guarantees if anything goes wrong. Some of them provide free consultations, so you already know what to expect before any work is done.
Types of Wall Mounts and Setup Options
Not all wall mounts are created equal. There are three main types:
Fixed mounts hold the TV flat against the wall for a minimalist look.
Tilting mounts allow you to tilt the TV up or down, perfect for upper positions.
Full-motion mounts provide a high level of flexibility, allowing you to pull the TV out and swivel it to various angles — ideal for open rooms or corner installations.
Ensure your selected mount is compatible with the size and weight of your TV. Look at the VESA pattern — a standard for all that will allow the mount holes on your TV to fit the bracket. Mounting a screen that supports your screen size is essential for long-term safety.
Accessories like high-speed HDMI cables, power surge protectors, and soundbar brackets can enhance your setup. If you’re building a complete media area, consider hiding cables inside the wall or using cable management sleeves for a cleaner finish.
What to Expect from a Professional TV Installation Service Provider In (Australia)
Most services begin with a consultation. The professional will evaluate your space, determine the type of wall (drywall, brick, concrete), and talk about your wishes. Next, they'll choose the appropriate tools, mount, and accessories to do the job correctly.
Once ready, the installer carefully measures and marks the mounting points. They drill pilot holes, secure anchors, and double-check alignment with a level. After that, the TV is mounted, cables are hidden or organized, and all connections are tested.
Finally, the system is powered up and fully tested. Technicians check the signal, adjust tilt or swivel if needed, and ensure everything looks and works perfectly. The result? A seamless installation with zero guesswork.
Tips for Maintaining and Upgrading Your Wall-Mounted TV
Keep your wall-mount TV clean using a microfiber cloth — avoid harsh chemicals that could damage the screen. Every few months, check that the mount is still tight and the cables are secure. If you’ve got kids or pets, these checks are even more important for safety.
Thinking of upgrading your setup? As TVs become smarter and more streamlined, an updated model can provide you with enhanced performance or aesthetics. You can also upgrade with features such as a soundbar, a gaming system, or smart lighting to take your home entertainment system to the next level.
A professional TV installation service can help expand or upgrade your setup without disrupting your current layout.
Real-World Success Stories
One family upgraded their living room by wall-mounting a 65-inch TV and adding in-wall cable management. Before the installation, the space looked cluttered with visible wires and a bulky stand. Afterward, it became a sleek, minimal entertainment center that guests immediately noticed.
In another case, a renter wanted a temporary yet safe mount that wouldn’t damage the wall. Their technician recommended a no-drill mounting solution, keeping the landlord happy while delivering a modern, cozy setup. The result? A perfect balance of style and practicality.
Final Thoughts
A wall mount TV is not just a fashionable upgrade – it's an intelligent one. By hiring a reputable TV installation company, you have your screen installed securely, your cables concealed, and your viewing experience maximized. Avoid the stress of DIY errors, and spend on a solution that looks good, performs optimally, and lasts longer.
#TVInstallation#HomeTheaterSetup#WallMountTV#ProfessionalInstallation#TVMountingService#HomeEntertainment#CableManagement#DIYvsPro#AVInstallation#LivingRoomUpgrade#AustraliaTVInstallation#TVMountTypes#TechUpgrade#SmartHomeSetup#HomeImprovement
0 notes
Text
Paint-for-walls-ceilings
Paint for Walls and Ceilings: Transforming Spaces with Color and Finish
When it comes to interior design and home improvement, few things are as transformative and cost-effective as a fresh coat of paint. Choosing the right paint for walls and ceilings is essential—not just for aesthetics, but also for achieving long-lasting results that suit the purpose and mood of each room. With the right paint type, finish, and color, your walls and ceilings can set the tone for your entire space.
Choosing the Right Paint for Walls
Walls are the most visible surfaces in any room, and the paint you choose plays a major role in defining the room's overall style. The most common types of paint for walls are water-based (latex) and oil-based. Water-based paints are more popular for interiors due to their low odor, quick drying time, and easier cleanup.
The finish of wall paint is just as important as the color. Matte and eggshell finishes are great for living rooms and bedrooms, offering a soft look that hides imperfections. Satin and semi-gloss finishes are more durable and easy to clean, making them ideal for high-traffic areas like hallways, kitchens, and bathrooms.
When selecting paint colors, consider the natural light in the room. Light tones can make small rooms feel more open, while deeper shades add drama and coziness. Accent walls, created using a bold color or a unique texture, can also add personality and depth.
Selecting Paint for Ceilings
Ceilings are often overlooked in design, but they have the potential to make a big impact. The most common choice for ceilings is a flat or matte white paint, which helps diffuse light and conceal surface flaws. These finishes are ideal because they don’t reflect much light, allowing the ceiling to visually recede and make the room feel taller.
However, ceilings don't always have to be white. Using a subtle tint that complements your wall color can create warmth and cohesion. In creative spaces or modern homes, bold ceiling colors or even patterned ceiling designs can make a striking statement.
Tips for a Smooth Paint Job
To get the best results from your paint for walls and ceilings, preparation is key. Clean all surfaces thoroughly, repair any cracks or holes, and apply primer when necessary—especially if you're covering dark colors or painting over fresh drywall.
Using quality brushes or rollers and applying paint in even, consistent strokes will help prevent streaks and uneven coverage. Don’t forget to use painter’s tape to protect trims and corners for a clean, professional-looking finish.
Final Thoughts
Choosing the right paint for walls and ceilings is about more than just color—it's about creating the right atmosphere, enhancing architectural features, and ensuring durability. With careful selection and proper application, your paint can bring harmony, brightness, and style to every room in your home.
0 notes
Text
Buying a House After Fire Damage
Buying a House After Fire Damage: What You Need to Know Before Making an Offer
Buying a fire-damaged house can be an excellent investment opportunity, but it also comes with risks. Whether you’re looking for an affordable home, a renovation project, or an investment property, it’s essential to understand the extent of the damage, the cost of repairs, and potential challenges before making an offer.
In this guide, we’ll explore what to consider when buying a fire-damaged house, how to assess repair costs, and key steps to take before finalizing the purchase.
Why Buy a Fire-Damaged House?
A house that has suffered fire damage might seem like an unusual purchase, but it can offer several advantages:
✔ Lower Purchase Price – Fire-damaged homes are often listed at a discounted price, making them more affordable than similar homes in the area. ✔ Potential for Profit – If you plan to renovate and resell, restoring a fire-damaged house can increase its value significantly. ✔ Customization Opportunities – Since the home will likely need repairs, you can redesign and renovate it to suit your preferences.
However, before you make an offer, it’s important to weigh the risks and challenges involved. What Happens After a House Fire? After a house fire, the house suffers a lot of damage. In the first step, we will assess the damage caused by the fire.

Step 1: Assess the Extent of Fire Damage
Not all fire-damaged homes are the same—some have minor smoke and cosmetic damage, while others may require major structural repairs. Understanding the level of damage is crucial before making a purchase.
Types of Fire Damage:
🔥 Superficial Damage – Minor smoke, soot, and cosmetic issues that require cleaning and repainting. 🔥 Moderate Damage – Some areas need drywall replacement, electrical rewiring, or new flooring. 🔥 Severe Damage – Structural damage affecting walls, roof, foundation, or support beams, which may require major reconstruction.
📌 Tip: Always hire a fire damage inspector or contractor to assess the home’s condition before making an offer.
Step 2: Hire a Professional Home Inspector
A standard home inspection is not enough for a fire-damaged property. You’ll need a specialized fire damage inspector to evaluate:
✔ Structural Integrity – Are the foundation, walls, and roof still stable? ✔ Smoke and Soot Damage – Can the odors and stains be cleaned effectively? ✔ Electrical and Plumbing Systems – Have the wires and pipes been damaged by heat or water? ✔ Mold and Water Damage – Was water used to extinguish the fire? Has mold developed as a result?
A professional assessment will help determine if the home is worth the investment or if the repairs will be too costly.
Step 3: Calculate Repair and Restoration Costs
Before committing to a fire-damaged home, you need a clear estimate of repair costs.
Common Home Fire Damage Repair Costs:
Smoke and Soot Cleanup: $2,000 – $6,000
Drywall Replacement: $1,500 – $7,000
Roof Repairs: $5,000 – $20,000
Electrical System Repair: $3,000 – $10,000
Plumbing Repairs: $2,000 – $8,000
Structural Repairs: $10,000 – $50,000+
📌 Tip: Get quotes from multiple contractors, electricians, and restoration companies before finalizing your budget.
Step 4: Check If the Home Is Insurable
Many insurance companies are reluctant to cover fire-damaged homes, or they may charge higher premiums due to the increased risk.
Steps to Get Insurance for a Fire Damage Property:
✔ Check the Home’s Fire History – If previous claims were filed, insurance companies may view the home as high-risk. ✔ Request a Quote from Multiple Insurers – Some companies specialize in insuring previously damaged homes. ✔ Consider High-Risk Home Insurance Programs – If standard insurance isn’t available, look into state-run FAIR (Fair Access to Insurance Requirements) Plans.
Before purchasing, ensure that you can get adequate insurance coverage at a reasonable rate.
Step 5: Understand Permits and Legal Requirements
Renovating a fire-damaged home may require special permits and compliance with local building codes.
What to Check Before Buying:
✔ Permit Requirements for Repairs and Renovations – Some cities require inspections before rebuilding electrical, plumbing, and structural elements. ✔ Zoning and Code Violations – If the home doesn’t meet current building codes, you may need expensive upgrades. ✔ Historical or HOA Restrictions – If the home is in a historic district or governed by a homeowner’s association (HOA), there may be limits on how you can restore or remodel the property.
Consult with local building authorities and contractors before purchasing.
Step 6: Secure Financing for the Purchase
Traditional mortgage lenders may be hesitant to finance fire-damaged homes. However, several options are available:
Financing Options:
🏡 FHA 203(k) Loan – A government-backed loan that allows homebuyers to purchase and renovate a damaged home with a single mortgage. 🏡 Home Renovation Loans – Private lenders offer renovation loans specifically for fixer-upper properties. 🏡 Cash Purchase – If possible, buying the home in cash may be easier than securing a mortgage for a fire-damaged property.
📌 Tip: Discuss your financing options with a mortgage lender who specializes in renovation loans.
Step 7: Negotiate a Fair Price
Since fire-damaged homes require repairs, sellers are often willing to negotiate. Use your repair estimates and inspection reports to justify a lower offer.
Negotiation Tips:
✔ Factor in repair costs when making an offer. ✔ Request seller concessions (e.g., covering closing costs or providing a renovation credit). ✔ Ensure all necessary permits and documentation are in place before finalizing the purchase.
📌 Tip: Work with a real estate agent experienced in fire-damaged properties to help negotiate the best deal. Contact us now to Sell Fire Damaged House Connecticut.
Final Thoughts: Should You Buy a Fire-Damaged Home?
Buying a house after fire damage can be a great investment—but only if you take the right steps.
✅ Hire a fire damage inspector to assess the home’s condition. ✅ Calculate repair costs and compare them to the home’s potential value. ✅ Ensure you can obtain insurance and financing before committing. ✅ Understand local building codes and renovation requirements. ✅ Negotiate a fair price based on the necessary repairs.
With careful planning and the right resources, a fire-damaged home can be transformed into a safe, beautiful, and valuable property. Whether you're flipping it for profit or making it your dream home, taking the right approach will help you make a smart and informed purchase.
🔥 Thinking about buying a fire-damaged home? Get expert advice from real estate professionals and fire damage specialists before making your decision!
Reach out for Assistance After a House Fire!
#What Happens After a House Fire#What Happens After a Fire#Fire Damage Property#Buying a House After Fire Damage#Home Fire Damage Repair
1 note
·
View note
Photo

1. Assessing Your Walls Before Removal Before starting, it’s essential to determine what type of texture you’re dealing with. Some types of textured walls are easier to remove than others. Common textures include: Knockdown – A flattened, stucco-like texture. Popcorn – A bumpy, rough texture often found on ceilings. Orange Peel – A light texture resembling the skin of an orange. Skip Trowel – A hand-applied texture with overlapping layers. Painted vs. Unpainted Textured Walls Removing the texture will be more difficult if the wall has been painted. You may need additional steps, to remove textured walls that have been painted using chemical solutions or sanding. Also Read: Modern Farmhouse Dining Room Decor Ideas 2. Tools and Materials Needed To ensure a smooth and damage-free process, gather the following tools: Spray bottle or garden sprayer for wetting the texture Scraper or putty knife for removing the texture Sandpaper or sanding block to smooth out rough areas Joint compound (drywall mud) for skim coating if needed Drop cloths and plastic sheeting to protect floors and furniture Gloves and safety goggles for protection Having these tools on hand will make the process easier and help prevent wall damage. 3. Best Ways to Remove Textured Walls Method 1: Wet Scraping (Best for Unpainted Textures) Fill a spray bottle or garden sprayer with warm water. Lightly spray a small section of the textured walls and let it soak for about 10–15 minutes. Use a wide scraper or putty knife to gently remove the softened texture. Repeat in sections until the entire wall is smooth. Tip: Avoid over-soaking the wall, as too much water can damage the drywall underneath. Method 2: Dry Scraping (For Tougher Textures) Use a scraper or drywall knife to chip away at the texture. Work in small sections and apply gentle pressure to prevent gouging the wall. Sand down any remaining rough patches. This method is more labor-intensive and can create a lot of dust, so wearing a mask is recommended. Method 3: Skim Coating (For Smoothing Out Textured Walls) If scraping isn’t an option, skim coating is a great alternative. This method involves applying a thin layer of joint compound over the textured walls to create a smooth finish. Mix the joint compound until it has a creamy consistency. Use a drywall knife to spread a thin layer over the textured surface. Let it dry completely, then sand it smooth. Repeat if necessary until the wall is completely smooth. You May Also Like: Why Linen Curtains Are Your Must-Have Investment for 2025? 4. How to Remove Textured Walls That Have Been Painted Removing textured walls with paint is trickier since the paint acts as a sealant, making it harder for water to penetrate. Here’s how to do it: Lightly sand the wall – This breaks the seal of the paint, allowing water or stripping agents to work. Use a chemical paint stripper – Apply it evenly and follow the instructions for best results. Wet scrape or skim coat – Once the paint is softened, proceed with wet scraping or skim coating. If the paint is glossy or oil-based, professional assistance may be required for removing textured walls without damage. 5. Alternative Solutions Instead of Removal If completely removing the texture isn’t an option, consider these alternatives: Painting Over Textured Walls If you like the texture but want a fresh look, consider repainting. Use the best paint roller for textured walls to ensure even coverage. Choose light colors for a softer look or dark shades for depth and contrast. Can You Wallpaper Over Textured Walls? Yes, but the surface needs preparation. Light textures can be covered with heavy-duty wallpaper, but rougher textures may require a skim coat first. How to Fix Textured Walls If only certain areas are damaged or uneven, apply a small amount of joint compound, sand it smooth, and repaint it for a seamless finish. 6. Cleaning and Prepping for a Smooth Finish Once the textured walls are removed, proper cleaning is essential before painting or decorating. How to Clean Textured Walls Use a damp sponge or microfiber cloth to remove dust and debris. For stubborn grime, mix mild soap with warm water and gently wipe down the walls. If repainting, apply a primer first to create a smooth base. Read More: National Margarita Day 2025: Celebrate with the Perfect Margarita 7. Final Touch: Decorating Smooth Walls Now that your walls are smooth, it’s time to enhance your home decor with stylish accessories that bring warmth and elegance to your space. Thoughtfully chosen decor elements can make a significant impact on the overall aesthetic. Soft Furnishings for a Cozy Touch Curtains – Opt for lightweight linen curtains from All Cotton and Linen to add softness and sophistication to your newly smoothed walls. They allow natural light to filter in while maintaining a cozy ambiance. Wall Art & Mirrors – A statement mirror or framed artwork can break the monotony of plain walls and create visual interest. Mirrors also reflect light, making the room appear more spacious. Wall-mounted Shelves – Install floating shelves to showcase decorative pieces, books, or indoor plants, enhancing the charm of your space. Linen Tablecloth – While updating your walls, don’t forget the surrounding areas. All Cotton and Linen offers beautifully crafted linen tablecloths that complement a refined home setting. By integrating these elements, your newly smooth walls will seamlessly blend with an inviting and stylish home interior. Removing textured walls can be a time-consuming task, but with the right methods, tools, and patience, you can achieve a smooth finish without damaging the surface. Whether you choose wet scraping, dry scraping, or skim coating, the key is to work carefully and prepare your walls properly. If full removal isn’t an option, painting or wallpapering over the texture can be effective alternatives. And once your walls are smooth, don’t forget to enhance your space with high-quality home decor from All Cotton and Linen. By following these steps, you can transform your walls and give your home a modern, updated look! Source link
0 notes