#edit: for example i just changed some variable names. but this one loop is still using an old name
Explore tagged Tumblr posts
Visit Tumblr Blog
Explore Tumblr blogs with no restrictions, modern design and the best experience.
Last Seen Tumblr Blogs


Fun Fact
25% of US internet users with an annual income of $80-100K use Tumblr.
Text
i fucking give up on vba. use same method as before, doesnt work for some reason. does excel tell you what the error is? of course not it just stops program execution with zero warning.
#tütensuppe#to the point where you first have to actually find WHERE it stops executing!#edit: for example i just changed some variable names. but this one loop is still using an old name#so ots trying to loop over a nonexisting array.#it QUIETLY STOPS EXECUTING without telling me that the object doesnt exist. what the fuck
0 notes
Text
Shipping Bin Tutorial For RPG Maker MV (RMMV)!
The tutorial is under the cut due to it being long! Everything you need to create a shipping bin like Stardew Valley, Rune Factory, Harvest Moon, etc. Is right here!
So this took a lot of trial and error, but! It appears to be working just fine, and it can definitely probably be edited and changed if you’re more skilled with javascript, but given that I’m an amateur, it’s not going to be spectacular. This is meant as the barebones really and to explain the basics to others who either are new to javascript or have spent countless hours trying to make a shipping bin for people!
Required: 3 Variables, 1 common event/event
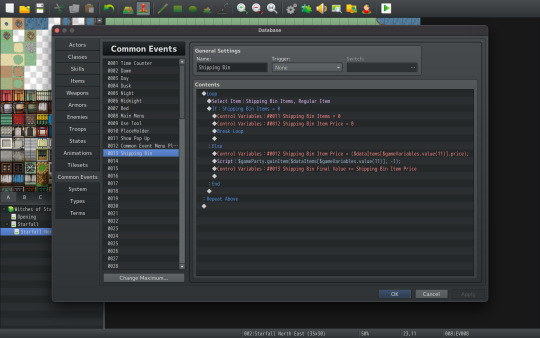
This image is what I will be referencing to for the entire post! So what you want to do is either have a common event page or event page open (I prefer common event as it’s easy to add to multiple events if I wish).
We will first begin with the loop command under our flow control.

This is what will allow us to use the select item command under the message section over and over without having to enter and exit repeatedly. It’s more or less for an aesthetic reason, and it keeps us from frustrating our players! After the loop, we will create the select item option. This is where our first variable comes in!
For all intents, we will be using the variable numbers I used, but feel free to use any variable you want! This first variable (#11), I named Shipping Bin Item. This is where the item ID will be stored every time the player adds something to the bin. You can choose whether your shipping bin will be able to hold Regular Items, Hidden Items, or Key Items, but for this tutorial, mine will be set to regular items! This is so you can set things like Tool Items or one of a kind items to key/hidden, so the player cannot sell them!
So far you should have:
Loop
Select Item: Shipping Bin Item, Regular Items
Now we add the If else statement! For our player to either hit escape or to have zero items in their inventory, we want it so they cannot get anything from it. So we should have
If: Shipping Bin Items = 0
This is where the other two variables will occur. They may seem confusing right now, but it’ll be explained shortly!
Control Variables: 11 Shipping Bin Items = 0 Control Variables: 12 Shipping Bin Items Price = 0
This will set values to 0 and make sure something silly doesn’t happen that gives your player extra gold when they shouldn’t have it.
After we do this, we will break the loop so that the player can exit!
So in total, our event should look like this
Loop Select Item: Shipping Bin Item, Regular Items If: Shipping Bin Items = 0 Control Variables: 11 Shipping Bin Items = 0 Control Variables: 12 Shipping Bin Items Price = 0 Break Loop
Else:
Now this is where the javascript comes in! For anyone using other versions of rpg maker, these script codes may vary if using older or newer versions of rpg maker. However, it should be easily to find these script codes either in forums or google!
To start, we will set our variable to some script!

When you click on Control variables under the game progression tab on page one, you will have the option to set it to constants, variables, etc. What we want is the button option of script. This will allow us to write our own script that we cannot always normally do with the predefined options rpg maker gives us!
But Screeny! What do we type there? Well, I’ll tell you!
We need to set our second variable (12 for this example) to Shipping Bin Item Price first. After which, we need to write some script that will tell us what the item price is. With select item set up, the game is already storing the item ID to variable 11, and it will change every time our player selects an item to put in the shipping bin.
If you have not set up items, don’t worry! If you add items later, it should still work with this! All you need to do is set a price base in the database for it! Then the game will later read the price with our line of code we’re adding.
Anything involving data for items can usually be found with ($dataItems[x]) with x being the id number. However, since we need to check all items, it would be a cluster of chaotic else ifs to check every single item ID, so we can instead set x to a variable! For this we will type ($dataItems[$gameVariables.value(11)]). What this is doing is saying that the item is equal to the value of Variable 11. You can use this for a lot of things such as item ids and item price! Which what we need next is exactly that! Typically, to find an item price, we would say $dataItems[x].price, but since we’re using a variable, we will need to use the variable in the x again! This gives us:
($dataItems[$gameVariables.value(11)].price);
So this is what we write in the script field on the variable! Now is the actual script.

For our script line, we will need the script command that can be found on page three under the “Advanced” tab. This is going to be long again, but this is how we control what items the player loses. Again, this is simplified, but we will set it up so that the entire party will lose 1 of each item they click. You can most likely change this with variables and allow the player to choose the quantity they want, but again, this is the simple version!
So we’re going to use $gameParty.gainItem which seems weird, but sometimes the lose item function will not remove an item and actually stop at 1 of the item. We will then use the information from above, without the price of the item, so: ($dataItems[$gameVariables.value(11)]. After which, we will use , -1 to signify the player is gaining a negative of an item, which actually subtracts from player inventory! All together, you’ll have:
$gameParty.gainItem($dataItems[$gameVariables.value(11)], -1);
And the last step is the easiest! The third variable (13 for this example) we need is Shipping Bin Final Value. This will add up all of the items price values that are set in the database for a grand total value of all items added! Create a control variable for Shipping Bin Final Value and set it to Add. Then click the variable and select Shipping Bin Item Price. This adds all the values to it, and now we are finished! Our completed script should look like this:
Loop Select Item: Shipping Bin Item, Regular Items If: Shipping Bin Items = 0 Control Variables: 11 Shipping Bin Items = 0 Control Variables: 12 Shipping Bin Items Price = 0 Break Loop
Else:
Control Variables: 12 Shipping Bin items Price = ($dataItems[$gameVariables.value(11)].price); Script: $gameParty.gainItem($dataItems[$gameVariables.value(11)], -1) Control variables: 13 Shipping Bin Final Value += Shipping Bin Item Price
Now you can add this to your shipping bin event and it’s ready to use! You can also set up events like a bed where when the player sleeps, their gold amount will change += to Shipping Bin Final Value every night. Then you can reset all three variables to make sure that the player doesn’t have gold left in variable 13 that they add to from the day before!
#RPG Maker#RPG Maker MV#rpg maker mv tutorial#rpg maker tutorial#long post#rpg maker javascript#rpg maker mv javascript#shipping bin tutorial#rpg maker mv shipping bin#rpg maker mv shipping bin tutorial
12 notes
·
View notes
Text
Fandom Userscript Cookbook: Five Projects to Get Your Feet Wet
Target audience: This post is dedicated, with love, to all novice, aspiring, occasional, or thwarted coders in fandom. If you did a code bootcamp once and don’t know where to start applying your new skillz, this is for you. If you're pretty good with HTML and CSS but the W3Schools Javascript tutorials have you feeling out of your depth, this is for you. If you can do neat things in Python but don’t know a good entry point for web programming, this is for you. Seasoned programmers looking for small, fun, low-investment hobby projects with useful end results are also welcome to raid this post for ideas.
You will need:
The Tampermonkey browser extension to run and edit userscripts
A handful of example userscripts from greasyfork.org. Just pick a few that look nifty and install them. AO3 Savior is a solid starting point for fandom tinkering.
Your browser dev tools. Hit F12 or right click > Inspect Element to find the stuff on the page you want to tweak and experiment with it. Move over to the Console tab once you’ve got code to test out and debug.
Javascript references and tutorials. W3Schools has loads of both. Mozilla’s JS documentation is top-notch, and I often just keep their reference lists of built-in String and Array functions open in tabs as I code. StackOverflow is useful for questions, but don’t assume the code snippets you find there are always reliable or copypastable.
That’s it. No development environment. No installing node.js or Ruby or Java or two different versions of Python. No build tools, no dependency management, no fucking Docker containers. No command line, even. Just a browser extension, the browser’s built-in dev tools, and reference material. Let’s go.
You might also want:
jQuery and its documentation. If you’re wrestling with a mess of generic spans and divs and sparse, unhelpful use of classes, jQuery selectors are your best bet for finding the element you want before you snap and go on a murderous rampage. jQuery also happens to be the most ubiquitous JS library out there, the essential Swiss army knife for working with Javascript’s... quirks, so experience with it is useful. It gets a bad rap because trying to build a whole house with a Swiss army knife is a fool’s errand, but it’s excellent for the stuff we're about to do.
Git or other source control, if you’ve already got it set up. By all means share your work on Github. Greasy Fork can publish a userscript from a Github repo. It can also publish a userscript from an uploaded text file or some code you pasted into the upload form, so don’t stress about it if you’re using a more informal process.
A text editor. Yes, seriously, this is optional. It’s a question of whether you’d rather code everything right there in Tampermonkey’s live editor, or keep a separate copy to paste into Tampermonkey’s live editor for testing. Are you feeling lucky, punk?
Project #1: Hack on an existing userscript
Install some nifty-looking scripts for websites you visit regularly. Use them. Ponder small additions that would make them even niftier. Take a look at their code in the Tampermonkey editor. (Dashboard > click on the script name.) Try to figure out what each bit is doing.
Then change something, hit save, and refresh the page.
Break it. Make it select the wrong element on the page to modify. Make it blow up with a huge pile of console errors. Add a console.log("I’m a teapot"); in the middle of a loop so it prints fifty times. Savor your power to make the background wizardry of the internet do incredibly dumb shit.
Then try a small improvement. It will probably break again. That's why you've got the live editor and the console, baby--poke it, prod it, and make it log everything it's doing until you've made it work.
Suggested bells and whistles to make the already-excellent AO3 Savior script even fancier:
Enable wildcards on a field that currently requires an exact match. Surely there’s at least one song lyric or Richard Siken quote you never want to see in any part of a fic title ever again, right?
Add some text to the placeholder message. Give it a pretty background color. Change the amount of space it takes up on the page.
Blacklist any work with more than 10 fandoms listed. Then add a line to the AO3 Savior Config script to make the number customizable.
Add a global blacklist of terms that will get a work hidden no matter what field they're in.
Add a list of blacklisted tag combinations. Like "I'm okay with some coffee shop AUs, but the ones that are also tagged as fluff don't interest me, please hide them." Or "Character A/Character B is cute but I don't want to read PWP about them."
Anything else you think of!
Project #2: Good Artists Borrow, Great Artists Fork (DIY blacklisting)
Looking at existing scripts as a model for the boilerplate you'll need, create a script that runs on a site you use regularly that doesn't already have a blacklisting/filtering feature. If you can't think of one, Dreamwidth comments make a good guinea pig. (There's a blacklist script for them out there, but reinventing wheels for fun is how you learn, right? ...right?) Create a simple blacklisting script of your own for that site.
Start small for the site-specific HTML wrangling. Take an array of blacklisted keywords and log any chunk of post/comment text that contains one of them.
Then try to make the post/comment it belongs to disappear.
Then add a placeholder.
Then get fancy with whitelists and matching metadata like usernames/titles/tags as well.
Crib from existing blacklist scripts like AO3 Savior as shamelessly as you feel the need to. If you publish the resulting userscript for others to install (which you should, if it fills an unmet need!), please comment up any substantial chunks of copypasted or closely-reproduced code with credit/a link to the original. If your script basically is the original with some key changes, like our extra-fancy AO3 Savior above, see if there’s a public Git repo you can fork.
Project #3: Make the dread Tumblr beast do a thing
Create a small script that runs on the Tumblr dashboard. Make it find all the posts on the page and log their IDs. Then log whether they're originals or reblogs. Then add a fancy border to the originals. Then add a different fancy border to your own posts. All of this data should be right there in the post HTML, so no need to derive it by looking for "x reblogged y" or source links or whatever--just make liberal use of Inspect Element and the post's data- attributes.
Extra credit: Explore the wildly variable messes that Tumblr's API spews out, and try to recreate XKit's timestamps feature with jQuery AJAX calls. (Post timestamps are one of the few reliable API data points.) Get a zillion bright ideas about what else you could do with the API data. Go through more actual post data to catalogue all the inconsistencies you’d have to catch. Cry as Tumblr kills the dream you dreamed.
Project #4: Make the dread Tumblr beast FIX a thing
Create a script that runs on individual Tumblr blogs (subdomains of tumblr.com). Browse some blogs with various themes until you've found a post with the upside-down reblog-chain bug and a post with reblogs displaying normally. Note the HTML differences between them. Make the script detect and highlight upside-down stacks of blockquotes. Then see if you can make it extract the blockquotes and reassemble them in the correct order. At this point you may be mobbed by friends and acquaintainces who want a fix for this fucking bug, which you can take as an opportunity to bury any lingering doubts about the usefulness of your scripting adventures.
(Note: Upside-down reblogs are the bug du jour as of September 2019. If you stumble upon this post later, please substitute whatever the latest Tumblr fuckery is that you'd like to fix.)
Project #5: Regular expressions are a hard limit
I mentioned up above that Dreamwidth comments are good guinea pigs for user scripting? You know what that means. Kinkmemes. Anon memes too, but kinkmemes (appropriately enough) offer so many opportunities for coding masochism. So here's a little exercise in sadism on my part, for anyone who wants to have fun (or "fun") with regular expressions:
Write a userscript that highlights all the prompts on any given page of a kinkmeme that have been filled.
Specifically, scan all the comment subject lines on the page for anything that looks like the title of a kinkmeme fill, and if you find one, highlight the prompt at the top of its thread. The nice ones will start with "FILL:" or end with "part 1/?" or "3/3 COMPLETE." The less nice ones will be more like "(former) minifill [37a / 50(?)] still haven't thought of a name for this thing" or "title that's just the subject line of the original prompt, Chapter 3." Your job is to catch as many of the weird ones as you can using regular expressions, while keeping false positives to a minimum.
Test it out on a real live kinkmeme, especially one without strict subject-line-formatting policies. I guarantee you, you will be delighted at some of the arcane shit your script manages to catch. And probably astonished at some of the arcane shit you never thought to look for because who the hell would even format a kinkmeme fill like that? Truly, freeform user input is a wonderful and terrible thing.
If that's not enough masochism for you, you could always try to make the script work on LiveJournal kinkmemes too!
64 notes
·
View notes
Text
GSoC logs (June 7–21)
To brief you into what I’m upto, The project is to develop an extension to oCIS that provides Jupyter notebook support in the ownCloud Infinite Scale platform(oCIS). Essentially, a user can preview Jupyter notebooks in the pheonix client itself and open it in SWAN. ** **
oCIS is a collection of services working together. Any extension we build is essentially a service and is similar to those residing in oCIS monorepo and built with go-micro.
Some services have a UI. Some don’t (Eg. thumbnails, wopiserver). These UIs are extended from ownCloud/web(pheonix) the client of oCIS written in Vue.js.
Find my project proposal here.
Jun 1
Synced all repos and ran ocis and phoenix.
Ocis isn’t running.
Okay, let’s try the ocis-simple flavour as mentioned in the docs.
Following https://owncloud.dev/ocis/development/extensions/ Inside ocis-extension-workshop/ocis
TAGS=simple make generate build cd ocis make build
Build failed.
Not generating build in ocis/ocis/
“Error - make: *** No rule to make target ‘build’. Stop.” - ???
cd into ocis/ directory and make build
"error":“unable to register services: rgrpc: grpc service usershareprovider could not be started, : error loading the file containing the shares: error decoding data from json: json: cannot unmarshal object into Go struct field jsonEncoding.shares of type string”
https://github.com/owncloud/ocis/issues/83 HARD TO FOLLOW. CONFUSED IF I NEED OCIS_SIMPLE AT ALL
Tried following the instructions anyway - FAILED AGAIN
make: *** No rule to make target 'build’. Stop.
https://github.com/owncloud/ocis/issues/177#issuecomment-758545224 Nooo
Check through rest of issues to see what happened to ocis-simple.
Found nothing. ASSUMPTION: ocis-simple is dead. Enough with ocis-simple. Try to work with all of ocis. June 2
Wait, I can build my own ocis-simple. Unlimited power!!
ocis-simple starts the same services as:
bin/ocis micro bin/ocis web bin/ocis hello bin/ocis reva
So kill all the other services.
./bin/ocis kill glauth && ./bin/ocis kill graph && ./bin/ocis kill graph-explorer && ./bin/ocis kill idp && ./bin/ocis kill ocs && ./bin/ocis kill onlyoffice && ./bin/ocis kill proxy && ./bin/ocis kill settings && ./bin/ocis kill storage-authbasic && ./bin/ocis kill storage-authbearer && ./bin/ocis kill storage-frontend && ./bin/ocis kill storage-gateway && ./bin/ocis kill storage-groupsprovider && ./bin/ocis kill storage-home && ./bin/ocis kill storage-metadata && ./bin/ocis kill storage-public-link && ./bin/ocis kill storage-sharing && ./bin/ocis kill storage-users && ./bin/ocis kill storage-users-provider && ./bin/ocis kill store && ./bin/ocis kill thumbnails && ./bin/ocis kill webdav
That’s really long.
Failed terribly.
Some of those services need others to work.
Trying to kill one by one with my intuitive priority list. This is madness.
What exactly is idp? What’s ldap?
Something to do with auth.
Okay, let’s work with ocis itself.
Why isn’t it building suddenly? Look through commits afterwards.
Login failing. “Invalid credentials” Anything to do with this? https://github.com/owncloud/ocis/issues/1887
"Unexpected HTTP response: 500. Please check your connection and try again.“ message in client and in logs - {“level”:“error”,“service”:“glauth”,“error”:“{"id”:“go.micro.client”,“code”:408,“detail”:“context deadline exceeded”,“status”:“Request Timeout”}”,“handler”:“ocis”,“username”:“idp”,“binddn”:“cn=idp,ou=sysusers,dc=example,dc=org”,“src”:{“IP”:“127.0.0.1”,“Port”:50212,“Zone”:“”},“time”:“2021-06-02T19:46:13+05:30”,“message”:“Login failed”} {“level”:“error”,“service”:“idp”,“error”:“ldap identifier backend logon connect error: LDAP Result Code 49 “Invalid Credentials”: ”,“time”:“2021-06-02T19:46:13+05:30”,“message”:“identifier failed to logon with backend”} {“level”:“info”,“service”:“proxy”,“method”:“POST”,“path”:“POST”,“from”:“[::1]:44172”,“time”:“2021-06-02T19:46:28+05:30”,“message”:“access-log”} {“level”:“error”,“service”:“glauth”,“error”:“{“id”:“go.micro.client”,“code”:408,“detail”:“context deadline exceeded”,“status”:“Request Timeout”}”,“handler”:“ocis”,“username”:“idp”,“binddn”:“cn=idp,ou=sysusers,dc=example,dc=org”,“src”:{“IP”:“127.0.0.1”,“Port”:50220,“Zone”:“”},“time”:“2021-06-02T19:46:33+05:30”,“message”:“Login failed”} {“level”:“error”,“service”:“idp”,“error”:“ldap identifier backend logon connect error: LDAP Result Code 49 “Invalid Credentials”: ”,“time”:“2021-06-02T19:46:33+05:30”,“message”:“identifier failed to logon with backend”} {“level”:“info”,“service”:“proxy”,“method”:“POST”,“path”:“POST”,“from”:“[::1]:44172”,“time”:“2021-06-02T19:47:07+05:30”,“message”:“access-log”} {“level”:“error”,“service”:“glauth”,“error”:“{“id”:“go.micro.client”,“code”:408,“detail”:“context deadline exceeded”,“status”:“Request Timeout”}”,“handler”:“ocis”,“username”:“idp”,“binddn”:“cn=idp,ou=sysusers,dc=example,dc=org”,“src”:{“IP”:“127.0.0.1”,“Port”:50256,“Zone”:“”},“time”:“2021-06-02T19:47:12+05:30”,“message”:“Login failed”} {“level”:“error”,“service”:“idp”,“error”:“ldap identifier backend logon connect error: LDAP Result Code 49 “Invalid Credentials”: ”,“time”:“2021-06-02T19:47:12+05:30”,“message”:“identifier failed to logon with backend”}
Okay, so IDP let’s you authenticate to ocis. It uses OpenID Connect. (Read about it later.)
Okay, I should dig into what’s going on in authentication.
June 3
cd into ocis/ directory and make build
"error":“unable to register services: rgrpc: grpc service usershareprovider could not be started, : error loading the file containing the shares: error decoding data from json: json: cannot unmarshal object into Go struct field jsonEncoding.shares of type string”
Retry - failed
Retry after syncing. - failed
There was a recent release, following release notes instructions. - failed again
Last straw - delete /var/tmp/ocis altogether
make generate && cd ocis && make build
Yaay. build happened with couple warnings. Okay, fixed. Ocis is up and running.
Trying to setup ocis-hello. Okay, there’s this boilr thingy to bootstrap an ocis-extension template.
You’ve waited enough. Go watch the snyder cut.
I have newfound respect for flash.
I might have underestimated the frontend part. There’s a markdown example in the docs.
Checked markdown app in phoenix. Didn’t understand much. We’ll see.
June 5
I now have a vague idea about some important services in ocis. A big picture.
Trying to setup ocis-hello.
Trying to install boilr.
Installation failed. Some sort of $GOPATH issue.
Okay, turns out my go installation wasn’t properly done.
Followed https://golang.org/doc/install
boilr installation failed again. boilr: command not found
I’m losing interest in this. Let’s just try working on ocis-hello fork until I figure this out.
Both produces same code, and I guess I can just replace all variable names.
June 6
Enough. Setup ocis-hello already.
New issues.
looping state after login - UNSURE why it’s happening.
Okay, only happens randomly. But why?
“Authentication failed” on trying http://localhost:9100/#/hello bc I wasn’t redirected.
“Missing config” feedback.
Copied example.json to config.json in ocis-hello/config
make clean && make generate build
Rerun ocis-hello
Still not redirecting to http://localhost:9100/#/hello, so manually trying.
Still Authentication failed
Try yarn build again. still nothing.
Wait, it’s not supposed to redirect to localhost:9100.
Meet with GSoC admins at CERN, Andrie. Andrei? -* Reasons to fail -
Fail to deliver code
Fail to contact mentors
A summerised blog post at the end of period. * Tomorrow starts the coding period. Everything has to go well.
Week #1 ( June 7-13 )
Jun 09
Following configuration-with-ocis.md. How did I miss that.
Okay, added respective config in ocis proxy and phoenix. - Failed.
Rerun with phoenix from ocis monorepo itself. After changing config. - failed again.
Should I add ocis-hello in apps property of web-config? Nop.
June 10
Ping the api with postman.
So the service is actually working. Atleast the http api.
Not sure if the grpc api is working. Is there some client like postman or curl for a grpc api?
There are tools in vscode. And this https://github.com/fullstorydev/grpcurl
Okay, no requests are received at hello-server.
But hello.js is served at localhost:9200/hello.js
Is the proxy working right?
Jun 11
Meet with mentors.
Need to work on my communication skills.
Lukas mentioned a mistake in the config docs. It was in the proxy config. Makes sense now.
I forgot what he said. Should’ve recorded the whole thing ;_;
Oh, there’s an issue.
Okay, still not working.
Even hello.js not served now.
Week #2 (June 14-20)
June 15 - Tuesday
I was finally able to set up ocis-hello.
The proxywasn’t picking up the config.
Had to start it seperately like so,
sudo PROXY_CONFIG_FILE=/home/anaswaratrajan/cern/owncloud/ocis/proxy/config/proxy-example.json ./bin/proxy
Have to submit the project report for primy. Great. Perfect timing.
Achachan’s adiyanthiram. Pooja and stuff going on this whole week.
Fixed ocis-hello - a typo in web-config
June 16 - Wednesday
Customised ocis-hello working clone to ocis-jupyter
Pending college assignments. Is there no end to this? Will resume saturday.
Nop. Have to finish now or I’ll fail 404 and 472. And there’s no hope with 404 if I fail once.
Why isn't draw-io running again? mediaviewer is working. wait, markdown also not working. I thought they came with pheonix without need for further setup.
June 17 - Thursday
I woke up at 10. But that’s alright.
started a fresh remote repository ocis-jupyter and committed everything so far.
How do I add a new file type ipynb. Wait, I don’t need to. Phoenix offers ways to do that. I just need to specify it in the appinfo object. Cool.
How do I add new file actions - Open in SWAN, Open for preview. Again specify in appinfo.
It seems I’m extending the appinfo object in the web-runtime.
So appinfo and other objects in app.js is being appended to the main objects in web-runtime.
Wait, appended? What’s it called when objects are merged together with Object.assign?
Okay, all apps inside phoenix seem to be doing the same.
Not just appinfo, some other objects as well, okay, what exactly is web-runtime?
I’m able to add new file menu actions but in the sidebar, they just appear as “Open in OCIS-JUPYTER”
Why is this happening?
Let’s dig into web-runtime.
That was a bad idea. I should get their help.
Just look into existing apps in phoenix.
Files app and markdown-editor seems understandable.
Why isn’t draw-io running? Low priority check later.
Read more into docs.
Binged on ~20 episodes of tokyo ghoul. Are you mad? You’ll die with no sleep.
Ocis is huge.
June 18
Reading docs again.
Going through web-runtime again.
I can’t add multiple file actions “Open in SWAN” and “Open in Preview”
Both coming up as “Open in ocis-jupyter”.
So these are file actions.
Trying to make sense of the codebase.
Going through some js fatigue. Okay, idk anything. Yet. ;_;
I had a good run playing horses in my mind.. Beach house is depressing.
Switch to daft punk for some days.
Going through web-runtime. I’m probably wasting time with this.
See how file handlers work again.
Binged on the next 2 seasons.
Arima kills himself. Ending was dripping cheesy.
Okay, back to file handlers, =services to checko ut =>
Markdown editor, wopiserver, draw-io, thumbnails, media-viewer, onlyoffice* Wait, not thumbnails, it doesn’t have a UI. So it accesses the files from ocis directly. Interesting
That sounds like the right way. But let’s see how the other services are doing it from pheonix itself.
Draw-io isn’t running for some reason, eventhough it’s inside phoenix itself. I should probably ask. Nop.
June 19
What’s with the routes list inside appInfo.extensions?
It has sth to do with the sidebar.
I should check on it later and focus on file han
Went through files-app. No luck understanding.
Thumbnails -
Okay so, It takes a webdav urls and gives back thumbnails to those files?
What exactly is webdav? Okay the definition sounds confusingly similar to WOPI protocol.
https://www.cs3mesh4eosc.eu/sites/default/files/2020-10/d3.1_cs3mesh4eosc.pdf
* This sort of explains everything.
0 notes
Text
GSoC logs (June 7–21)
To brief you into what I’m upto, The project is to develop an extension to oCIS that provides Jupyter notebook support in the ownCloud Infinite Scale platform(oCIS). Essentially, a user can preview Jupyter notebooks in the pheonix client itself and open it in SWAN. ** **
oCIS is a collection of services working together. Any extension we build is essentially a service and is similar to those residing in oCIS monorepo and built with go-micro.
Some services have a UI. Some don’t (Eg. thumbnails, wopiserver). These UIs are extended from ownCloud/web(pheonix) the client of oCIS written in Vue.js.
Find my project proposal here.
Jun 1
Synced all repos and ran ocis and phoenix.
Ocis isn’t running.
Okay, let’s try the ocis-simple flavour as mentioned in the docs.
Following https://owncloud.dev/ocis/development/extensions/ Inside ocis-extension-workshop/ocis
TAGS=simple make generate build cd ocis make build
Build failed.
Not generating build in ocis/ocis/
“Error - make: *** No rule to make target ‘build’.
cd into ocis/ directory and make build
"error":“unable to register services: rgrpc: grpc service usershareprovider could not be started, : error loading the file containing the shares: error decoding data from json: json: cannot unmarshal object into Go struct field jsonEncoding.shares of type string”
https://github.com/owncloud/ocis/issues/83 HARD TO FOLLOW. CONFUSED IF I NEED OCIS_SIMPLE AT ALL
Tried following the instructions anyway - FAILED AGAIN
make: *** No rule to make target 'build’. Stop.
https://github.com/owncloud/ocis/issues/177#issuecomment-758545224 Nooo
Check through rest of issues to see what happened to ocis-simple.
Found nothing. ASSUMPTION: ocis-simple is dead. Enough with ocis-simple. Try to work with all of ocis.
June 2
I can try to make ocis-simple.
ocis-simple starts the same services as:
bin/ocis micro bin/ocis web bin/ocis hello bin/ocis reva
So kill all the other services.
./bin/ocis kill glauth && ./bin/ocis kill graph && ./bin/ocis kill graph-explorer && ./bin/ocis kill idp && ./bin/ocis kill ocs && ./bin/ocis kill onlyoffice && ./bin/ocis kill proxy && ./bin/ocis kill settings && ./bin/ocis kill storage-authbasic && ./bin/ocis kill storage-authbearer && ./bin/ocis kill storage-frontend && ./bin/ocis kill storage-gateway && ./bin/ocis kill storage-groupsprovider && ./bin/ocis kill storage-home && ./bin/ocis kill storage-metadata && ./bin/ocis kill storage-public-link && ./bin/ocis kill storage-sharing && ./bin/ocis kill storage-users && ./bin/ocis kill storage-users-provider && ./bin/ocis kill store && ./bin/ocis kill thumbnails && ./bin/ocis kill webdav
Failed terribly.
Some of those services need others to work.
Trying to kill one by one with my intuitive priority list.
What exactly is idp? What’s ldap?
Something to do with auth.
Okay, let’s work with ocis itself.
Why isn’t it building suddenly? Look through commits afterwards.
Login failing. “Invalid credentials” Anything to do with this? https://github.com/owncloud/ocis/issues/1887
"Unexpected HTTP response: 500. Please check your connection and try again.“ message in client and in logs - {“level”:“error”,“service”:“glauth”,“error”:“{"id”:“go.micro.client”,“code”:408,“detail”:“context deadline exceeded”,“status”:“Request Timeout”}”,“handler”:“ocis”,“username”:“idp”,“binddn”:“cn=idp,ou=sysusers,dc=example,dc=org”,“src”:{“IP”:“127.0.0.1”,“Port”:50212,“Zone”:“”},“time”:“2021-06-02T19:46:13+05:30”,“message”:“Login failed”} {“level”:“error”,“service”:“idp”,“error”:“ldap identifier backend logon connect error: LDAP Result Code 49 “Invalid Credentials”: ”,“time”:“2021-06-02T19:46:13+05:30”,“message”:“identifier failed to logon with backend”} {“level”:“info”,“service”:“proxy”,“method”:“POST”,“path”:“POST”,“from”:“[::1]:44172”,“time”:“2021-06-02T19:46:28+05:30”,“message”:“access-log”} {“level”:“error”,“service”:“glauth”,“error”:“{“id”:“go.micro.client”,“code”:408,“detail”:“context deadline exceeded”,“status”:“Request Timeout”}”,“handler”:“ocis”,“username”:“idp”,“binddn”:“cn=idp,ou=sysusers,dc=example,dc=org”,“src”:{“IP”:“127.0.0.1”,“Port”:50220,“Zone”:“”},“time”:“2021-06-02T19:46:33+05:30”,“message”:“Login failed”} {“level”:“error”,“service”:“idp”,“error”:“ldap identifier backend logon connect error: LDAP Result Code 49 “Invalid Credentials”: ”,“time”:“2021-06-02T19:46:33+05:30”,“message”:“identifier failed to logon with backend”} {“level”:“info”,“service”:“proxy”,“method”:“POST”,“path”:“POST”,“from”:“[::1]:44172”,“time”:“2021-06-02T19:47:07+05:30”,“message”:“access-log”} {“level”:“error”,“service”:“glauth”,“error”:“{“id”:“go.micro.client”,“code”:408,“detail”:“context deadline exceeded”,“status”:“Request Timeout”}”,“handler”:“ocis”,“username”:“idp”,“binddn”:“cn=idp,ou=sysusers,dc=example,dc=org”,“src”:{“IP”:“127.0.0.1”,“Port”:50256,“Zone”:“”},“time”:“2021-06-02T19:47:12+05:30”,“message”:“Login failed”} {“level”:“error”,“service”:“idp”,“error”:“ldap identifier backend logon connect error: LDAP Result Code 49 “Invalid Credentials”: ”,“time”:“2021-06-02T19:47:12+05:30”,“message”:“identifier failed to logon with backend”}
Okay, so IDP let’s you authenticate to ocis. It uses OpenID Connect. (Read about it later.)
Okay, I should dig into what’s going on in authentication.
June 3
cd into ocis/ directory and make build
"error":“unable to register services: rgrpc: grpc service usershareprovider could not be started, : error loading the file containing the shares: error decoding data from json: json: cannot unmarshal object into Go struct field jsonEncoding.shares of type string”
Retry - failed
Retry after syncing. - failed
There was a recent release, following release notes instructions. - failed again
Last straw - delete /var/tmp/ocis altogether
make generate && cd ocis && make build
Build happened with couple warnings. Okay, fixed. Ocis is up and running.
Trying to setup ocis-hello. Okay, there’s this boilr tool to bootstrap an ocis-extension template.
I might have underestimated the frontend part. There’s a markdown example in the docs.
Checked markdown app in phoenix. Didn’t understand much. We’ll see.
June 5
I now have a vague idea about some important services in ocis. A big picture.
Trying to setup ocis-hello.
Trying to install boilr.
Installation failed. Some sort of $GOPATH issue.
Okay, turns out my go installation wasn’t properly done.
Followed https://golang.org/doc/install
boilr installation failed again. boilr: command not found
I’m losing interest in this. Let’s just try working on ocis-hello fork until I figure this out.
Both produces same code, and I guess I can just replace all variable names.
June 6
New issues.
looping state after login - UNSURE why it’s happening.
Okay, only happens randomly. But why?
“Authentication failed” on trying http://localhost:9100/#/hello bc I wasn’t redirected.
“Missing config” feedback.
Copied example.json to config.json in ocis-hello/config
make clean && make generate build
Rerun ocis-hello
Still not redirecting to http://localhost:9100/#/hello, so manually trying.
Still Authentication failed
Try yarn build again. still nothing.
Wait, it’s not supposed to redirect to localhost:9100.
A summerised blog post at the end of gsoc period.
Week #1 ( June 7-13 )
Jun 09
Following configuration-with-ocis.md.
Added respective config in ocis proxy and phoenix. - Still failing.
Rerun with phoenix from ocis monorepo itself. After changing config. - failed again.
Should I add ocis-hello in apps property of web-config? Nop.
June 10
Ping the api with postman.
So the service is actually working. Atleast the http api.
Not sure if the grpc api is working. Is there some client like postman or curl for a grpc api?
There are tools in vscode. And this https://github.com/fullstorydev/grpcurl
No requests are received at hello-server from pheonix only Other clients are able to send requests.
hello.js is served at localhost:9200/hello.js
Is the proxy working right?
Jun 11
Meet with mentors.
Need to work on my communication skills.
Lukas mentioned a mistake in the config docs. It was in the proxy config. Makes sense now.
I forgot what he said. Should’ve recorded the whole thing ;_;
Oh, there’s an issue.
Okay, still not working.
Even hello.js not served now.
Week #2 (June 14-20)
June 15 - Tuesday
I was finally able to set up ocis-hello.
The proxy wasn’t picking up the config.
Had to start it seperately like so,
sudo PROXY_CONFIG_FILE=/home/anaswaratrajan/cern/owncloud/ocis/proxy/config/proxy-example.json ./bin/proxy
Fixed ocis-hello - a typo in web-config
June 16 - Wednesday
Customised ocis-hello working clone to ocis-jupyter
Why isn't draw-io running again? mediaviewer is working. wait, markdown also not working. I thought they came with pheonix without need for further setup.
June 17 - Thursday
started a fresh remote repository ocis-jupyter and committed everything so far.
How do I add a new file type ipynb. Wait, I don’t need to. Phoenix offers ways to do that. I just need to specify it in the appinfo object. Cool.
How do I add new file actions - Open in SWAN, Open for preview. Again specify in appinfo.
It seems I’m extending the appinfo object in the web-runtime.
So appinfo and other objects in app.js is being appended to the main objects in web-runtime.
Wait, appended? What’s it called when objects are merged together with Object.assign?
Okay, all apps inside phoenix seem to be doing the same.
Not just appinfo, some other objects as well, okay, what exactly is web-runtime?
I’m able to add new file menu actions but in the sidebar, they just appear as “Open in OCIS-JUPYTER”
Why is this happening?
Let’s dig into web-runtime.
That was a bad idea. I should get their help.
Just look into existing apps in phoenix.
Files app and markdown-editor seems understandable.
Why isn’t draw-io running? Low priority check later.
Read more into docs.
Ocis is huge.
June 18
Reading docs again.
Going through web-runtime again.
I can’t add multiple file actions “Open in SWAN” and “Open in Preview”
Both coming up as “Open in ocis-jupyter”.
So these are file actions.
Trying to make sense of the codebase.
Going through some js fatigue.
Going through web-runtime. I’m probably wasting time with this.
See how file handlers work again.
Okay, back to file handlers, services to checkout =>
Markdown editor, wopiserver, draw-io, thumbnails, media-viewer, onlyoffice* Wait, not thumbnails, it doesn’t have a UI. So it accesses the files from ocis directly. Interesting
That sounds like the right way. But let’s see how the other services are doing it from pheonix itself.
Draw-io isn’t running for some reason, eventhough it’s inside phoenix itself. I should probably ask. Nop.
June 19
What’s with the routes list inside appInfo.extensions?
I should check on it later and focus on file han
Went through files-app. No luck understanding.
Thumbnails -
Okay so, It takes a webdav url to a file and gives back thumbnails
What exactly is webdav? Okay the definition sounds confusingly similar to WOPI protocol.
https://www.cs3mesh4eosc.eu/sites/default/files/2020-10/d3.1_cs3mesh4eosc.pdf
* This sort of explains everything.
0 notes
Text
Week 5a - Development: Unicorns Rage!
Objective
This week I set out a number of large tasks to bring this game into fruition and meet as close as possible to my overall vision. Being that the design sprint challenge 2 is based on asteroids, I really wanted to play on the style and twist the concept.

Goals
Now that I have developed a greater understanding of GDevelop and its events system, I set forth newer challenges in comparison to the last design challenge;
Mechanic: Particle Beam
Global Variables: Health, Mana, Level Timers, High Scores
Character Selections: Choice of coloured Unicorns
Scenes: Title, Character Select, Win/Lose, HighScore, 3 Levels
Mechanic: Rotations Without Gravity to Recharge Mana
Mechanic: Different Moves
Dynamic Screen: Destroyed Planet with Partices and Debris Loop
Sounds: Self Voiced Effects for Spawns, Attacks and Enemy
Mechanic: Random Enemy Spawner
Mechanic: Multi-Directional Player Movement
Challenges and Solutions
To establish a playtestable game I encountered an array of problems. Learning from my previous experiences with the last challenge, I didn’t move on to the next challenge until I had a solution for what I was presently working on. At the very minimum, almost every mechanic I introduced was solely playtested 20 times, some a lot more so.
Mechanic: Multi-Directional Player Movement
Challenge
The overall goal for this game was that the player would rotate in different directions around asteroids and attack enemies while spinning. Then as another asteroid would move closer by force, the player could jump to the other asteroid.
After at least 50 playtests and a multitude if different event condition structures I found that for every degree the player rotated around an asteroid, of any direction, the move which would be set at a certain point of a sprite, accross any animation or frame, would start 2 degrees behind the intended point and continue to start further behind for every additional degree the player rotated.
After countless hours of searching the internet and many feeble attempts to rectify this, changing points, conditions, instances, etc, I discovered that, unfortunately Gdevelop is limited in its point system and there wasn’t a solid way around this.
Solution
To have the moves with decent effect, I had to introduce multi directional movement of the player. However, I did not scrap the idea of rotating around the asteroids, I used it in a different and unique way.
I accomplished the multi directional movement by simply adding the multi directional movement behaviour to the player.
Mechanic: Particle Beam
Challenge
The challenge with this particular mechanic was directional. Initially, I created a rainbow object to fire only once while rotating around asteroids, as mentioned above, unfortunately it was not possible and a lot of time was lost to attempting to fix this.
Once I had decided to move forward with a different idea, it was easy enough to create a particle attack in any direction and angled correctly to player angle and direction.
The challenge that I faced later down the track was changing the particle colours to link to the player selected unicorn as I intended to have the particle effects match the colour of the player.
Solution
I created the basis of the moveset for one player and toward the end of production, duplicated the effects and scenes and linked the correct effects to player colour.


Global Variables: Health, Mana, Level Timers, High Scores
Challenge
I had only used variables based on objects prior to this design sprint. Global variablkes were easy enough to traverse, however, in my rush I duplicated instances but did not chage the string conditions correctly, resulting in health being affected for a mana altering instance for example.
Solution
I combed the events page for each scene intricately to double check each condition and instance aligned as intended. After many play through tests I had the system working as expected.

Character Selections: Choice of coloured Unicorns
Challenge
I left this particular inclusiomn until the very end of production. The reason being, I felt that by creating the game with the basic player first, I could replicate the scenes and change the player based on character.
Because I chose to have differing move colours, this resulted in having to comb through a long events page for my first character and ensuring I changed the events to meet the character of choice, ie collisions, particles, behind the scenes objects, forces, etc.
I also duplicated every scene and added the colour behind the name then playtested through each colour to ensure it all linked up correctly and so I could identify sections I missed.
A number of hours were spent editing the inital sprite to be a basic white, so that each following character frame was easier to paintbucket all with the desired hex colour. In total I edited 80 frames then duplicated in the root file path for each coloured player. Days were spent on this, shout out to the animaters yet again! hard hard work.
Solution
To save time, after doing one player colour, I thought “maybe I could do ctrl-F to find and replace each item”, to my surprise, this is a feature in Gdevelop, which shaved hours of my production! Once the first round of colours were done, I simply had to ctrl-F “pink” (example) and replace with “Blue” and every event updated instantly with no error. I still double checked for my own sanity!

Scenes: Title, Character Select, Win/Lose, HighScore, 3 Levels
Challenge
Creating multiple scenes to link the players selection.
Due to leaving the player choice to last, I sillyly did not consider how many scenes I would end up having to make. I believe final count was 37, drastically increasing the size of the game and making, in actuality, 6 individual games.
Solution
Rather than delete scenes and comnb back through all events at the end of production (for a tenth time each page, minimum), Ive noted that I should instead create the sprites, animations, points etc first, then upon level design use the built in “OR” condition for collisions such as “If Enemy is collision with, BlueMove or RedMove or YellowMove etc - do 10+ score, delete enemy, etc”.
Then upon beginning of the scene I could have used global variables to indicate which player colour was selected and created the correct player upon startup of each level based on the Global Variable.
This method could drastically reduce the amount of scenes and events required and I have definitely learnt my lesson.

Mechanic: Rotations Without Gravity to Recharge Mana
Challenge
Since scrapping the intial movement system, I wanted to keep the concept of the unicorn rotating around an asteroid as if caught by gravity and in certain directions I wanted to see the unicorn change its z order to give the effect the game is 3d, so moving in front and behind the asteroid upon rotation.
This was one of the hardest tasks for this design sprint.
Gravity became an issue and upon removing it, it affected other asteroids, resulting in having to revisit all asteroids again.
Rotations, flipping the sprite became a series of issues for all other coding, resulting in again, revisiting all other completed areas to double check where I had created problems. I also struggled with having the unicorn perform a perfect circle around the asteroid, resulting in oval rotations.
Z Layering, finding a simple way to alter the layer, using variables and hidden sprites this was accomplished, but I had to move the objects out of screen as hidden objects still created their effect on the player even if they werent on the asteroid, so moving them out of screen and back each time the player was on a specific asteroid as to not collide during normal play.
Solution
Firstly, I created a perfect circle on screen, had the asteroid and circle move with eachother regardless of force, added a “Tip” point on the circle and had the circle rotate in a direction at a normal speed. I then used variables to determine when the player was on which asteroid, example being that if RShift was held down when at asteroid one, the player variable “Asteroid” changed its string to “One” when the variable “Asteroid” was set to “One” it then triggered the player to move to the CircleOne point “Tip” and rotate with the circle around the asteroid. This initially worked, though the player would circle the asteroid in an oval shape.
I revisited the player points for all animations and found the middle axis at the very base of each animation and moved the “Center” and “Origin” points to that location. I “showed” the circle at the start of screen and tested the player movement, it worked perfectly!
Some asteroids had to also trigger which animation, this way the player would be facing the correct direction the background circle was rotating in. Forces woud lag or glitch the player if they were going to fast round the circle, this was easily fixed by slowing down the rotation and asteroid forces.
Though this was a difficult feat, I managed to create four different asteroid rotations with player interactivity!


Mechanic: Different Moves
Challenge
The main challenge with the different moves was bringing my inital vision to life. Ie the colour scheme based on player and the “Bane of The Horn” move, which I wanted to explode from the player “Center” point outward in 360 degrees. I found this effect worked as intended but when enemies collided with the particles the collision events would not trigger. I later found that the reason being was that they needed to collided with the actual sprite object, not just the particles.
Solution
To combat the collision problem above, I decided to add another hidden rotating circle behind the player that moved as the player moved. Then creating the “Bane of The Horn” move at the player circle point “Tip” this created distance between the player and the object and it rotated swiftly around the player, meaning that collisions were extended around the player and hitting their mark.

Dynamic Screen: Destroyed Planet with Partices and Debris Loop
Challenge
Firstly, the planet image was a challenge to edit with piskel, this tooka lot of time loading between edits, even when I attempted to use the paint all bucket to remove the white (I painted in a seperate program) as to limit the area I had to erase. Once that was surpassed I wanted to have the planet in the background getting smaller each level, but also displaying a fire effect, like it was burning from the core.
Lastly, I wanted to have a rotating loop of debris of sprites from my previous design sprint, as if to say the last game was on the same planet and the unicorn destroyed it. Though the setup of the debris loop took time, once filled with sprites I felt there were too many gaps between objects.
Solution
The debris loop took time, creating multiple points on a large circle and many object sprites, then the event conditions to move them to those points at the start of the scene. This worked, leaving gaps between these objects as they rotated around the circle and rotated themselves as they looped. My solution to this was to add a textured particle using the asteroid sprite and adding it to each point as well, this created an asteroid field like effect as the circle rotated.
Though the debris loop is a background element, Im really proud of how it turned out.
Sounds: Self Voiced Effects for Spawns, Attacks and Enemy
Challenge
I wanted to play with the idea of including sounds this time around as my last design challenge I didnt.
I am not exactly equipped with a sound studio so my laptop microphone was the way to go. I took my grunts and typical frustration sounds while developing the game and hitting roadblocks and utilised them as enemy spawning sounds.
I also created little sounds for player attacks. Though these oddly when converted, became robotic on level 3.
Solution
I will need to revisit the robotic sounds and rerecord.
Mechanic: Random Enemy Spawner
Challenge
The sprites I opted to use for this game I acknowledge Craftpix.net and gamerart2d.com as my main sources.
There wasn’t really too much of a challenge establishing a random spawner for each individual enemy I incorporated into the game. The challenge ensued more in creating an enemy move while rotating and from a distance.
Solution
I tackled this obstacle by playtesting through many possibilities. I ended up settling on an “Elf” enemy move that deducts mana from the player when the elf is facing the player in its rotation and force, shooting a particle effect toward the player.
I added a hidden object in the center of each level so when enemies collided with the border, they were forced back toward that object and so on.

In Closing
This game brought a multitude of challenges, I eventually found solutions or new ways to incorporate my intial vision without sacrificing too much.
The game is not exactly perfect, but I am very proud of what I have produced. The above is only some of the many challenges and solutions I had with the development of Unicorns Rage, however the aforementioned is the bigger of the tasks and learnings during this design sprint!
Next, feedback and playtesting!
Sprite Acknowledgement
https://www.gameart2d.com/freebies.html
https://craftpix.net/freebies/
Unicorns Rage! Playtest Link
This link will take a while to load, once loaded it operates fine :)
https://games.gdevelop-app.com/game-de5f335c-4ad8-4256-ad78-03999ce704c7/index.html
0 notes
Text
Ghost Trail Effect
Research:
Flash and Quicksilver - These two character’s are superheroes from the DC and Marvel universes respectively and both possess the ability to run at extraordinary speeds; in there cinematic representations they both have a similar trail effect similar to what I’m hoping to achieve. The effect that is used for these two characters is meant to show just how fast the characters can move, this generally results in the effect being short lived and subtle, while I want mine to be a bit more pronounced. Both of their runs have a heavy motion blur effect that creates the trail, the Quicksilver run seems closer to what I have in mind because it doesn’t seem like one smooth blur like The Flash’s, instead it seems like a line of staggered images which also happens to leave a blue wave through the air, which I personally prefer over the orange lightning.
Processes:
Material Instances - Material instances in Unreal are used to change a material without having to incur the penalties of having to recompile the material when it’s changed. Regular materials can’t be changed or edited without being compiled and this must happen before gameplay, however material that have been instanced can be changed without paying that same cost, some can even change based off of in-game events, such as an object that blackens and chars as it is burned.
As attractive as a low cost, editable material may be, you need to remember that you can’t change every feature of a material without actually specifying which parts of the original material you want to be editable within the instance and designate them as parameters. This is called parameterising a Material.
Inside of the Material Editor, parameters are seen as a data node. In a technical sense its a named valued that serves to send data to the Material Instance. These materials are exposed within the either the material instance editor or within different scripts/blueprints, which then allows you to edit them. For an example, if you wanted a material that could change colour whenever you wanted, you’d use a Vector Parameter as the input for the Base colour and you’d then be able to change the numerical values of this Parameter inside either the Material Instance editor or another kind of Blueprint and you’d be able to do this without even having to recompile.
In Unreal Engine 4, there are four different types of Material Instances, these being a Material Instance Constant which is only calculated prior to runtime and Material Instance Dynamic which can be calculated and edited at runtime.
A Material Instance Constant is an instanced Material that calculates only once, prior to runtime. Though this means that the material has no chance of changing during gameplay, you can still take advantage of the fact that the material will not have to compile. For instance, the example given on Unreal’s website is if you have a variety of cars in a game, all with their own paint jobs that you know won’t be changing during gameplay, you could create a master Material that represents the generic car paint, then create Material Instance Constants to represent the variations for different types of car, such as different colours, varying levels of metallicity , glossiness and most other variables.
A Material Instance Dynamic is an Instanced Material that can be calculated during gameplay, this means that as you play a script can used to change the properties of a Material using the parameters placed inside the Material Blueprint without any compiling. These types of Material Instances are very versatile and can be used in many different ways, from showing different levels in an environment to changing paint jobs and to blending different skin textures in response to facial expressions.
youtube
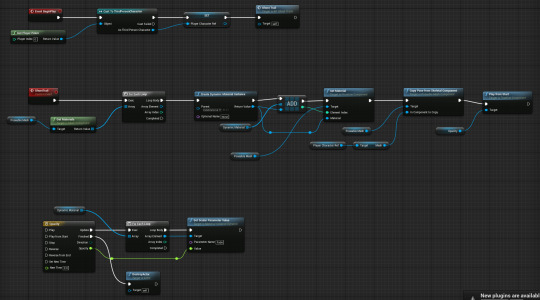
Coding The Trail - This piece of code determines the material, pose and life span of the Ghost Trail, it starts by casting to the player and creates an actor variable from the data it receives from the cast, this’ll be used in the future to create the Ghosts’ poses. Next I used a custom event as a type of portal to keep the blueprint from getting to long and from this custom event it led into an “For Each Loop” node with a “Get Materials” node, the target of this node is a Poseable mesh which has the Skeletal Mesh from the player character as well as the materials; this Poseable mesh will become the ghosts that make up the ghost trail.
Next is a “Create Dynamic Material Instance,” this is because we want the material to eventually lose opacity and disappear, meaning we it to change during gameplay. After creating the Material Instance, the Material Instance is added to an array, this is because we’ll need an array to assign the correct material to the correct ghost. The Material is now set on the Pose that will be a ghost. I added a node that copied the skeletal pose from the player and transferred it to the Poseable Mesh before finally caused the Ghosts to spawn on the player position this being a SpawnActor node with the GetworldTransform of the player mesh.
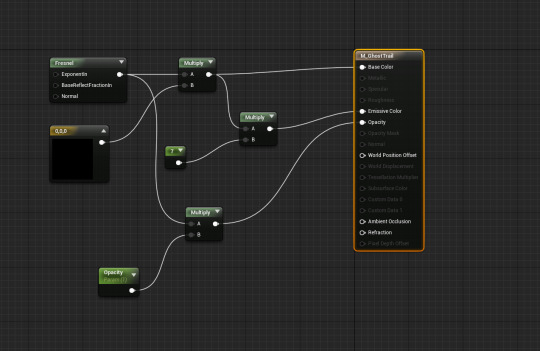
Now the Ghosts were spawning, I wanted them to have a material instead of the being the default Unreal texture, so I created a Material with a Fresnel effect being the only visible part, the other parts being completely invisble. (Fresnel is a term to describe how the light you see reflects at different intensities based off the angle you are viewing them form, in practical terms, a Fresnel effects appears around the edges of an object.) The blueprint multiplies the fresnel effect with an RGB vector, this combination determines the effects colour and then that colour is multiplied by an integer to determine how visible it is. Finally the Fresnel effect is multiplied by a Parameter which will allow up to change the opacity of the effect from a blueprint.
I chose a fresnel effect mostly because of the tutorial I was watching, I’d preferred it be a trail of characters that look like the player character with a descending opacity.
Next I wanted the trails to despawn because too many actors would quickly fill up the memory, so I added a timeline that I used to determine how long they should be alive, I settled on half a second.
At this point the ghosts only spawned after a button press, but I wanted the effect to be automatic, but everything I tried failed; If an event tick was added, no matter how large the delay, the engine would crash after the first actor was spawn and the same thing happened with a retriggerable delay. This is where my inability to comprehend Portuguese caught up to me, because there is another tutorial by the same person explaining how to create an automatic spawning system. After about an hour of messing with a crashing engine, I eventually found the video.
The way it works is that you place notifications along the player animations’ timelines, which act like key frames, and inside the code you reference them as an executable, this executable then casts to the player whenever the animation hits certain points and spawns the ghost.
Lastly, code wise, I added the opacity part of the code, which just uses the previously mentioned timeline to decrease the material’s opacity to zero over half a second. To make sure it was fading the oldest ghost first, I used the Dynamic Mesh array and a “For Each Loop” node. This would check the array I made before, so the ghosts had a gradual fading trail.
Two last things, Firstly I began to mess with the materials, so I made the trail entirely made of player characters which create a nice, surreal look and then I took that player character material, copied it and removed a lot of different parts and gave it a fade, like the fresnel effect and it created a white trail as if the character was turning into vapour.
Secondly, I made the trail area triggered by using a trigger box, I did this because I only wanted some areas of my environment to have this effect and I needed to test that it worked.
0 notes
Text
In the years since I wrote this, I have gotten much more bullish about pure functional programming, even in C/C++ where reasonable:
http://gamasutra.com/view/news/169296/Indepth_Functional_programming_in_C.php
The real enemy addressed by inlining is unexpected dependency and mutation of state, which functional programming solves more directly and completely. However, if you are going to make a lot of state changes, having them all happen inline does have advantages; you should be made constantly aware of the full horror of what you are doing. When it gets to be too much to take, figure out how to factor blocks out into pure functions (and don.t let them slide back into impurity!).
As an additional confirmation of the point of the article, a couple years later when I was working on the Doom 3 BFG edition release, the exactly predicted off-by-one-frame-of-latency input sampling happened, and very nearly shipped. That was a cold-sweat moment for me . after all of my harping about latency and responsiveness, I almost shipped a title with a completely unnecessary frame of latency.
To make things more complicated, the .do always, then inhibit or ignore. strategy, while a very good idea for high reliability systems, is less appropriate in power and thermal constrained environments like mobile.
John Carmack September 26, 2014
-----------------------------------------------------------------------------------------------------------------------------
From: John Carmack <[email protected]> Date: Tue, Mar 13, 2007 at 4:17 PM Subject: inlining code
This is going to be an unusual email -- I want to talk about coding style. I'm not going to issue any mandates, but I want everyone to seriously consider some of these issues. I'm not talking about petty things like spaces around operators, bracing styles, or pointers by type or variable (although we probably should settle that one), but about larger organization of code. There aren't any silver bullets, but months can be shaved off of a development project with a few percent improvement in productivity.
This email was getting too long, so I am going to follow up with some other thoughts later. I have a lot of general things to discuss, but there is a specific tactical direction that I want to advocate.
A year ago I was involved in a discussion about writing extremely reliable software for aerospace applications, as I have been several times over the years. Typically I am there to rail against the people that talk about using threads and an RTOS for such things, when a simple polled loop that looks like a primitive video game is much more clear and effective. However, this particular discussion brought up a new wrinkle for me:
>Indeed, if memory serves (it's been a while since I read about this)... > >The fly-by-wire flight software for the Saab Gripen (a lightweight >fighter) went a step further. It disallowed both subroutine calls and >backward branches, except for the one at the bottom of the main loop. >Control flow went forward only. Sometimes one piece of code had to leave >a note for a later piece telling it what to do, but this worked out well >for testing: all data was allocated statically, and monitoring those >variables gave a clear picture of most everything the software was doing. >The software did only the bare essentials, and of course, they were >serious about thorough ground testing. > >No bug has ever been found in the "released for flight" versions of that >code. > > Henry Spencer > [email protected]
Now, a great deal of stuff that goes on in the aerospace industry should not be emulated by anyone, and is often self destructive. Most of you have probably read various popular articles about the development process that produces the space shuttle software, and while some people might think that the world would be better if all software developers were that "careful", the truth is that we would be decades behind where we are now, with no PC's and no public internet if everything was developed at that snail's pace.
This particular anecdote seemed to have some practical value, so I decided to give it a try. The flight control code for the Armadillo rockets is only a few thousand lines of code, so I took the main tic function and started inlining all the subroutines. While I can't say that I found a hidden bug that could have caused a crash (literally...), I did find several variables that were set multiple times, a couple control flow things that looked a bit dodgy, and the final code got smaller and cleaner.
After living with the code in that style for quite some time, I haven't found any drawbacks to it, and I have started applying the general approach to my code at Id. In lots of places there is a choice between organizing code a few ways:
------- style A: void MinorFunction1( void ) { } void MinorFunction2( void ) { } void MinorFunction3( void ) { } void MajorFunction( void ) { MinorFunction1(); MinorFunction2(); MinorFunction3(); } --------- style B: void MajorFunction( void ) { MinorFunction1(); MinorFunction2(); MinorFunction3(); } void MinorFunction1( void ) { } void MinorFunction2( void ) { } void MinorFunction3( void ) { } ---------- style C: void MajorFunction( void ) { // MinorFunction1 // MinorFunction2 // MinorFunction3 }
I have historically used "style A" to allow for not prototyping in all cases, although some people prefer "style B". The difference between the two isn't of any consequence. Michael Abrash used to write code in "style C", and I remember actually taking his code and converting it to "style A" in the interest of perceived readability improvements.
At this point, I think there are some definite advantages to "style C", but they are development process oriented, rather than discrete, quantifiable things, and they run counter to a fair amount of accepted conventional wisdom, so I am going to try and make a clear case for it. There isn't any dogma here, but considering exactly where it is and isn't appropriate is worthwhile.
In no way, shape, or form am I making a case that avoiding function calls alone directly helps performance.
An exercise that I try to do every once in a while is to "step a frame" in the game, starting at some major point like common->Frame(), game->Frame(), or renderer->EndFrame(), and step into every function to try and walk the complete code coverage. This usually gets rather depressing long before you get to the end of the frame. Awareness of all the code that is actually executing is important, and it is too easy to have very large blocks of code that you just always skip over while debugging, even though they have performance and stability implications.
C++ is no friend of this goal, with operator overloading, implicit constructors, and so on. A lot of things done in the name of flexibility are somewhat misguided, and at the root of a lot of development problems. Games, with the continuously recurring real time tic structure, also have some goals and constraints that encourage a programming style somewhat different than, say, a content creation application or transaction processor.
If something is going to be done once per frame, there is some value to having it happen in the outermost part of the frame loop, rather than buried deep inside some chain of functions that may wind up getting skipped for some reason. For example, our usercmd_t generation code is buried off of asyncServer, and it really should be in the main common loop. Related to this is a topic of hardware versus software design -- it is often better to go ahead and do an operation, then choose to inhibit or ignore some or all of the results, than try to conditionally perform the operation. The usercmd_t generation relates to this (and other messes related to the interaction with game over bindsets), where the usercmd_t are only generated when they "need to be".
The way we have traditionally measured performance and optimized our games encouraged a lot of conditional operations -- recognizing that a particular operation doesn't need to be done in some subset of the operating states, and skipping it. This gives better demo timing numbers, but a huge amount of bugs are generated because skipping the expensive operation also usually skips some other state updating that turns out to be needed elsewhere.
We definitely still have tasks that are performance intensive enough to need optimization, but the style gets applied as a matter of course in many cases where a performance benefit is negligible, but we still eat the bugs. Now that we are firmly decided on a 60hz game, worst case performance is more important than average case performance, so highly variable performance should be looked down on even more.
It is very easy for frames of operational latency to creep in when operations are done deeply nested in various subsystems, and things evolve over time. This can lay hidden as a barely perceptible drop in input quality, or it can be blatantly obvious as a model trailing an attachment point during movement. If everything is just run out in a 2000 line function, it is obvious which part happens first, and you can be quite sure that the later section will get executed before the frame is rendered.
Besides awareness of the actual code being executed, inlining functions also has the benefit of not making it possible to call the function from other places. That sounds ridiculous, but there is a point to it. As a codebase grows over years of use, there will be lots of opportunities to take a shortcut and just call a function that does only the work you think needs to be done. There might be a FullUpdate() function that calls PartialUpdateA(), and PartialUpdateB(), but in some particular case you may realize (or think) that you only need to do PartialUpdateB(), and you are being efficient by avoiding the other work. Lots and lots of bugs stem from this. Most bugs are a result of the execution state not being exactly what you think it is.
Strictly functional functions that only read their input arguments and just return a value without examining or modifying any permanent state are safe from these types of errors, and the nice ability to formally speak about them makes them a good ivory tower topic, but very little of our real code falls into this category. I don't think that purely functional programming writ large is a pragmatic development plan, because it makes for very obscure code and spectacular inefficiencies, but if a function only references a piece or two of global state, it is probably wise to consider passing it in as a variable. It would be kind of nice if C had a "functional" keyword to enforce no global references.
Const parameters and const functions are helpful in avoiding side effect related bugs, but the functions are still susceptible to changes in the global execution environment. Trying to make more parameters and functions const is a good exercise, and often ends in casting it away in frustration at some point. That frustration is usually due to finding all sorts of places that state could be modified that weren't immediately obvious -- places for bugs to breed.
C++ object methods could be thought of as almost-functional, with an implicit overwriting assignment on return, but with larger objects that contain lots of variables you don't have much awareness of what is modified by the method, and again, there is no guarantee that the function isn't running off and doing something horribly global, like parsing a decl.
The function that is least likely to cause a problem is one that doesn't exist, which is the benefit of inlining it. If a function is only called in a single place, the decision is fairly simple.
In almost all cases, code duplication is a greater evil than whatever second order problems arise from functions being called in different circumstances, so I would rarely advocate duplicating code to avoid a function, but in a lot of cases you can still avoid the function by flagging an operation to be performed at the properly controlled time. For instance, having one check in the player think code for health <= 0 && !killed is almost certain to spawn less bugs than having KillPlayer() called in 20 different places.
On the subject of code duplication, I tracked all the bugs (problems that surfaced after I thought everything was working correctly) I fixed for a while, and I was quite surprised at how often copy-paste-modify operations resulted in subtle bugs that weren't immediately obvious. For small vector operations on three or four things, I would often just past and modify a few characters like this:
v[0] = HF_MANTISSA(*(halfFloat_t *)((byte *)data + i*bytePitch+j*8+0)); v[1] = HF_MANTISSA(*(halfFloat_t *)((byte *)data + i*bytePitch+j*8+1)); v[2] = HF_MANTISSA(*(halfFloat_t *)((byte *)data + i*bytePitch+j*8+2)); v[3] = HF_MANTISSA(*(halfFloat_t *)((byte *)data + i*bytePitch+j*8+3));
I now strongly encourage explicit loops for everything, and hope the compiler unrolls it properly. A significant number of my bugs related to things like this, and I am now rethinking even two dimensional cases where I commonly use discrete _X, _Y or _WIDTH, _HEIGHT variables. I find that much easier to read than a two element array, but it is difficult to argue with my data on how often it made me screw up.
Some practical Matters ---
Using large comment blocks inside the major function to delimit the minor functions is a good idea for quick scanning, and often enclosing it in a bare braced section to scope the local variables and allow editor collapsing of the section is useful. I know there are some rules of thumb about not making functions larger than a page or two, but I specifically disagree with that now -- if a lot of operations are supposed to happen in a sequential fashion, their code should follow sequentially.
Enclosing pages of code inside a conditional or loop statement does have readability and awareness drawbacks, so leaving that code in a separate function may still be justified, but in some cases it is still possible to move the code to another place where its execution wouldn't be conditional, or just execute it at all times and inhibit the results in some way with a very small conditional block. An execute-and-inhibit style usually takes more absolute time, but it reduces the variability in frame times, and eliminates a class of bugs.
Inlining code quickly runs into conflict with modularity and OOP protections, and good judgment must be applied. The whole point of modularity is to hide details, while I am advocating increased awareness of details. Practical factors like increased multiple checkouts of source files and including more local data in the master precompiled header forcing more full rebuilds do need to be weighed. Currently I am leaning towards using heavyweight objects as the reasonable break point for combining code, and trying to reduce the use of medium sized helper objects, while making any very lightweight objects as purely functional as possible if they have to exist at all.
To sum up:
If a function is only called from a single place, consider inlining it.
If a function is called from multiple places, see if it is possible to arrange for the work to be done in a single place, perhaps with flags, and inline that.
If there are multiple versions of a function, consider making a single function with more, possibly defaulted, parameters.
If the work is close to purely functional, with few references to global state, try to make it completely functional.
Try to use const on both parameters and functions when the function really must be used in multiple places.
Minimize control flow complexity and "area under ifs", favoring consistent execution paths and times over "optimally" avoiding unnecessary work.
Discussion?
John Carmack
0 notes
Text
New Coder: Getting Started and Finding Your Path
You've decided it's time to learn how to code, so the next step is to find some resources and start programming your first masterpiece. Hopefully, you've decided that my advice on which language to choose was useful, and you're going to start with either Python, Go or PowerShell. There are a number of ways to learn, and a number of approaches to take. In this post, I'll share my thoughts on different ways to achieve success, and I'll link to some learning resources that I feel are pretty good.
How I Began Coding
When I was a young lad, my first foray into programming was using Sinclair BASIC on a Sinclair ZX81 (which in the United States was sold as the Timex Sinclair 1000). BASIC was the only language available on that particular powerhouse of computing excellence, so my options were limited. I continued by using BBC BASIC on the Acorn BBC Micro Model B, where I learned to use functions and procedures to avoid repetition of code. On the PC I got interested in what could be accomplished by scripting in MS-DOS. On Macintosh, I rediscovered a little bit of C (via MPW). When I was finally introduced to NetBSD, things got interesting.
I wanted to automate activities that manipulated text files, and UNIX is just an amazing platform for that. I learned to edit text in vi (aka vim, these days) because it was one tool that I could pretty much guarantee was installed on every installation I got my hands on. I began writing shell scripts which looped around calling various instantiations of text processing utilities like grep, sed, awk, sort, uniq, fmt and more, just to get the results I wanted. I found that often, awk was the only tool with the power to extract and process the data I needed, so I ended up writing more and more little awk scripts to fill in. To be honest, some of the pipelines I was creating for my poor old text files were tricky at best. Finally, somebody with more experience than me looked at it and said, Have you considered doing this in Perl instead?
Challenge accepted! At that point, my mission became to create the same functionality in Perl as I had created from my shell scripts. Once I did so, I never looked back. Those and other scripts that I wrote at the time are still running. Periodically, I may go back and refactor some code, or extract it into a module so I can use the same code in multiple related scripts, but I have fully converted to using a proper scripting language, leaving shell scripts to history.
How I Learned Perl
With my extensive experience with BASIC and my shallow knowledge of C, I was not prepared to take on Perl. I knew what strings and arrays were, but what was a hash? I'd heard of references but didn't really understand them. In the end—and try not to laugh because this was in the very early days of the internet—I bought a book (Learn Perl in 21 Days), and started reading. As I learned something, I'd try it in a script, I'd play with it, and I'd keep using it until I found a problem it didn't solve. Then back to the book, and I'd continue. I used the book as more as a reference than I did as a true training guide (I don't think I read much beyond about Day 10 in a single stretch; after that was on an as-needed basis).
The point is, I did not learn Perl by working through a series of 100 exercises on a website. Nor did I learn Perl by reading through the 21 Days book, and then the ubiquitous Camel book. I can't learn by reading theory and then applying it. And in any case, I didn't necessarily want to learn Perl as such; what I really wanted was to solve my text processing problems at that time. And then as new problems arose, I would use Perl to solve those, and if I found something I didn't now how to do, I'd go back to the books as a reference to find out what the language could do for me. As a result, I did not always do things the most efficient way, and I look back at my early code and think, Oh, yuck. If I did that now I'd take a completely different approach. But that's okay, because learning means getting better over time and ��� this is the real kicker — my scripts worked. This might matter more if I were writing code to be used in a high-performance environment where every millisecond counts, but for my purposes, "It works" was more than enough for me to feel that I had met my goals.
In my research, I stumbled across a great video which put all of that more succinctly than I did:
youtube
In the video (spoiler alert!) CheersKevin states that you don't want to learn a language; you want to solve problems, and that's exactly it. My attitude is that I need to learn enough about a language to be dangerous, and over time I will hone that skill so that I'm dangerous in the right direction, but my focus has always been on producing an end product that satisfies me in some way. To that end, I simply cannot sit through 30 progressive exercises teaching me to program a poker game simulator bit by bit. I don't want to play poker; I don't have any motivation to engage with the problem.https://www.youtube.com/watch?v=mvK0UzFNw1Q
A Few Basics
Having said that you don't want to learn a language, it is nonetheless important to understand the ways in which data can be stored and some basic code structure. Here are a few things I believe it's important to understand as you start programming, regardless of which language you choose to learn:
ItemDefinitionscalar variablea way to store a single value, e.g. a string (letters/numbers/symbols), a number, a pointer to a memory location, and so on.array / list / collectiona way to store an (ordered) list of values, e.g. a list of colors ("red", "blue", "green") or (1,1,2,3,5,8).hash / dictionary / lookup table / associative arraya way to store data by associating a unique key to a value, e.g. the key might be "red", and the value might be the html hex value for that color, "#ff0000". Many key/value pairs can be stored in the same object, e.g. colors=("red"=>"#ff0000", "blue"=>"#00ff00", "green"=>"#0000ff")zero-based numberingthe number (or index) of the first element in a list (array) is zero; the second element is 1, and so on. Each element in a list is typically accessed by putting the index (the position in the list) in square brackets after the name. In our previously defined array colors=("red", "blue", "green") the elements in the list are colors[0] = "red", colors[1]="blue", and colors[2]="green".function / procedure / subroutinea way to group a set of commands together so that the whole block can be called with a single command. This avoids repetition within the code.objects, properties and methodsan object can have properties (which are information about, or characteristics of, the object), and methods (which are actually properties which execute a function when called). The properties and methods are usually accessed using dot notation. For example, I might have an object mycircle which has a property called radius; this would be accessed as mycircle.radius. I could then have a method called area which will calculate the area of the circle (πr²) based on the current value of mycircle.radius; the result would access as mycircle.area() where parentheses are conventionally used to indicate that this is a method rather than a property.
All three languages here (and indeed most other modern languages) use data types and structures like the above to store and access information. It's, therefore, important to have just a basic understanding before diving in too far. This is in some ways the same logic as gaining an understanding of IP before trying to configure a router; each router may have a different configuration syntax for routing protocols and IP addresses, but they're all fundamentally configuring IP ... so it's important to understand IP!
Some Training Resources
This section is really the impossible part, because we all learn things in different ways, at different speeds, and have different tolerances. However, I will share some resource which either I have personally found useful, or that others have recommended as being among the best:
Python
Book: Learn Python The Hard Way
Book: Python Programming for the Absolute Beginner
Book: Think Python, 2nd Edition: How to Think Like a Computer Scientist
Online: Python For Everybody, @Coursera (Note: 7-day free trial, then $$ required)
Online: Python @Codecademy
Online: Kirk Byers' Python for Network Engineers
The last course is a great example of learning in order to accomplish a goal, although perhaps only useful to network engineers as the title suggests. Kirk is the author of the NetMiko Python Library and uses it in his course to allow new programmers to jump straight into connecting to network devices, extracting information and executing commands.
Go
Go is not, as I think I indicated previously, a good language for a total beginner. However, if you have some experience of programming, these resources will get you going fairly quickly:
Book: The Go Programming Language
Online: A Tour of Go
Online: Effective Go
Online (Slack): Gophers Slack Channel
As a relatively new, and still changing, language, Go does not have a wealth of training resources available. However, there is a strong community supporting it, and the online documentation is a good resource even though it's more a statement of fact than a learning experience.
PowerShell
Book: Learn Windows PowerShell in a Month of Lunches, 3rd Edition
Online: Getting Started With Microsoft PowerShell (featuring inventor of PowerShell, Jeffrey Snover. Microsoft Virtual Academy has other free training material there as well)
Online: Microsoft Script Center Learning Resources (a collection of good resources)
eBooks: Some free PowerShell eBooks (free reference material, though not necessarily tutorials)
General: Anything from Ed Wilson / Teresa Wilson (aka The Scripting Guys) is usually a good resource.
Parting Thoughts
Satisfaction with learning resources is so subjective, it's hard to be sure if I'm offering a helpful list or not, but I've tried to recommend courses which have a reputation for being good for complete beginners. Whether these resources appeal may depend on your learning style and your tolerance for repetition. Additionally, if you have previous programming experience you may find that they move too slowly or are too low level; that's okay because there are other resources out there aimed at people with more experience. There are many resources I haven't mentioned which you may think are amazing, and if so I would encourage you to share those in the comments because if it worked for you, it will almost certainly work for somebody else where other resources will fail.
Coincidentally a few days ago I was listening to Scott Lowe's Full Stack Journey podcast (now part of the Packet Pushers network), and as he interviewed Brent Salisbury in Episode 4, Brent talked about those lucky people who can simply read a book about a technology (or in this case a programming language) and understand it, but his own learning style requires a lot of hands-on, and the repetition is what drills home his learning. Those two categories of people are going to succeed in quite different ways.
Since it's fresh in my mind, I'd also like to recommend listening to Episode 8 with Ivan Pepelnjak. As I listened, I realized that Ivan had stolen many of the things I wanted to say, and said them to Scott late in 2016. In the spirit that everything old is new again, I'll leave you with some of the axioms from RFC1925 (The Twelve Networking Truths) (one of Ivan's favorites) seem oddly relevant to this post, and to the art of of programming too:
(6a) (corollary). It is always possible to add another level of indirection. (8) It is more complicated than you think. (9) For all resources, whatever it is, you need more. (10) One size never fits all. (11) Every old idea will be proposed again with a different name and a different presentation, regardless of whether it works. (11a) (corollary). See rule 6a.
The post New Coder: Getting Started and Finding Your Path appeared first on Computer Systems Design.
from Computer Systems Design http://ift.tt/2rUwCgR
0 notes