#email from localhost using PHP
Explore tagged Tumblr posts
Visit Tumblr Blog
Explore Tumblr blogs with no restrictions, modern design and the best experience.
Last Seen Tumblr Blogs


Fun Fact
Average visit duration of Tumblr.com is 10 mins and 25 secs.
Text
How to send email from localhost using PHP

In this tutorial, we will learn how to send an email from localhost using PHP and Gmail. In the PHP web application, mail() function used to send the mail. But mail() function will not work in the localhost environment. In this tutorial, we will send an email from the localhost system using PHP and Gmail.
In this tutorial, we will use PHPmailer to send email from the localhost using PHP. The PHPmailer library provides the way to send an email from localhost with the SMTP server using PHP. We will use the Gmail account as an SMTP server to sending the email from localhost. Before using the Gmail SMTP server we need to configure the setting in our Gmail account.
Click: https://phpgurukul.com/how-to-send-email-from-localhost-using-php/
Login into your google account.
Go to the security page.
<?php
use PHPMailer\PHPMailer\PHPMailer;
use PHPMailer\PHPMailer\Exception;
require ‘vendor/autoload.php’;
$mail = new PHPMailer;
if(isset($_POST[‘send’])){
// getting post values
$fname=$_POST[‘fname’];
$toemail=$_POST[‘toemail’];
$subject=$_POST[‘subject’];
$message=$_POST[‘message’];
$mail->isSMTP(); // Set mailer to use SMTP
$mail->Host = ‘smtp.gmail.com’; // Specify main and backup SMTP servers
$mail->SMTPAuth = true; // Enable SMTP authentication
$mail->Username = ‘[email protected]’; // SMTP username
$mail->Password = ‘Your_Gmail_Password’; // SMTP password
$mail->SMTPSecure = ‘tls’; // Enable TLS encryption, `ssl` also accepted
$mail->Port = 587; // TCP port to connect to
$mail->setFrom(‘[email protected]’, ‘Your_Name’);
$mail->addReplyTo(‘[email protected]’, ‘Your_Name’);
$mail->addAddress($toemail); // Add a recipient
// $mail->addCC(‘[email protected]’); // Set CC Email here
// $mail->addBCC(‘[email protected]’); // Set BCC Email here
$mail->isHTML(true); // Set email format to HTML
$bodyContent=$message;
$mail->Subject =$subject;
$bodyContent = ‘Dear’.$fname;
$bodyContent .=’<p>’.$message.’</p>’;
$mail->Body = $bodyContent;
if(!$mail->send()) {
echo ‘Message could not be sent.’;
echo ‘Mailer Error: ‘ . $mail->ErrorInfo;
} else {
echo ‘Message has been sent’;
}
}
?>
Explanation of the above code
Include the PHPMailer library and create an instance of this class.
Set SMTP credentials (host, username, password, and port).
Specify sender name and email ($mail->setFrom('[email protected]', 'Your_Name')).
Set recipient email address ($mail->addAddress($toemail)).
Set email subject ($mail->Subject).
Set the body content of the email ($mail->Subject =$subject;).
Use the mail->send() method of PHPMailer class to send an email.
Here is the Full code with HTML Form and PHP Code
<?php
use PHPMailer\PHPMailer\PHPMailer;
use PHPMailer\PHPMailer\Exception;
require ‘vendor/autoload.php’;
$mail = new PHPMailer;
if(isset($_POST[‘send’])){
// getting post values
$fname=$_POST[‘fname’];
$toemail=$_POST[‘toemail’];
$subject=$_POST[‘subject’];
$message=$_POST[‘message’];
$mail->isSMTP(); // Set mailer to use SMTP
$mail->Host = ‘smtp.gmail.com’; // Specify main and backup SMTP servers
$mail->SMTPAuth = true; // Enable SMTP authentication
$mail->Username = ‘[email protected]’; // SMTP username
$mail->Password = ‘Your_Gmail_Password’; // SMTP password
$mail->SMTPSecure = ‘tls’; // Enable TLS encryption, `ssl` also accepted
$mail->Port = 587; // TCP port to connect to
$mail->setFrom(‘[email protected]’, ‘Your_Name’);
$mail->addReplyTo(‘[email protected]’, ‘Your_Name’);
$mail->addAddress($toemail); // Add a recipient
// $mail->addCC(‘[email protected]’);
// $mail->addBCC(‘[email protected]’);
$mail->isHTML(true); // Set email format to HTML
$bodyContent=$message;
$mail->Subject =$subject;
$bodyContent = ‘Dear’.$fname;
$bodyContent .=’<p>’.$message.’</p>’;
$mail->Body = $bodyContent;
if(!$mail->send()) {
echo ‘Message could not be sent.’;
echo ‘Mailer Error: ‘ . $mail->ErrorInfo;
} else {
echo ‘Message has been sent’;
}
}
?>
<!DOCTYPE html>
<html lang=”en”>
<head>
<meta charset=”utf-8">
<meta name=”viewport” content=”width=device-width, initial-scale=1, shrink-to-fit=no”>
<title>How to send email from localhost using PHP</title>
<link rel=”stylesheet” href=”https://fonts.googleapis.com/css?family=Roboto|Courgette|Pacifico:400,700">
<link rel=”stylesheet” href=”https://stackpath.bootstrapcdn.com/bootstrap/4.5.0/css/bootstrap.min.css">
<link rel=”stylesheet” href=”https://maxcdn.bootstrapcdn.com/font-awesome/4.7.0/css/font-awesome.min.css">
<script src=”https://code.jquery.com/jquery-3.5.1.min.js"></script>
<script src=”https://cdn.jsdelivr.net/npm/[email protected]/dist/umd/popper.min.js"></script>
<script src=”https://stackpath.bootstrapcdn.com/bootstrap/4.5.0/js/bootstrap.min.js"></script>
<style>
body {
color: #000;
background: #fcda2e;
font-family: “Roboto”, sans-serif;
}
.contact-form {
padding: 50px;
margin: 30px auto;
}
.contact-form h1 {
font-size: 42px;
font-family: ‘Pacifico’, sans-serif;
margin: 0 0 50px;
text-align: center;
}
.contact-form .form-group {
margin-bottom: 20px;
}
.contact-form .form-control, .contact-form .btn {
min-height: 40px;
border-radius: 2px;
}
.contact-form .form-control {
border-color: #e2c705;
}
.contact-form .form-control:focus {
border-color: #d8b012;
box-shadow: 0 0 8px #dcae10;
}
.contact-form .btn-primary, .contact-form .btn-primary:active {
min-width: 250px;
color: #fcda2e;
background: #000 !important;
margin-top: 20px;
border: none;
}
.contact-form .btn-primary:hover {
color: #fff;
}
.contact-form .btn-primary i {
margin-right: 5px;
}
.contact-form label {
opacity: 0.9;
}
.contact-form textarea {
resize: vertical;
}
.bs-example {
margin: 20px;
}
</style>
</head>
<body>
<div class=”container-lg”>
<div class=”row”>
<div class=”col-md-8 mx-auto”>
<div class=”contact-form”>
<h1>Get in Touch</h1>
<form method=”post”>
<div class=”row”>
<div class=”col-sm-6">
<div class=”form-group”>
<label for=”inputName”>Name</label>
<input type=”text” class=”form-control” id=”inputName” name=”fname” required>
</div>
</div>
<div class=”col-sm-6">
<div class=”form-group”>
<label for=”inputEmail”>Email</label>
<input type=”email” class=”form-control” id=”inputEmail” name=”toemail” required>
</div>
</div>
</div>
<div class=”form-group”>
<label for=”inputSubject”>Subject</label>
<input type=”text” class=”form-control” id=”inputSubject” name=”subject” required>
</div>
<div class=”form-group”>
<label for=”inputMessage”>Message</label>
<textarea class=”form-control” id=”inputMessage” name=”message” rows=”5" required></textarea>
</div>
<div class=”text-center”>
<button type=”submit” class=”btn btn-primary” name=”send”><i class=”fa fa-paper-plane”></i> Send</button>
</div>
</form>
</div>
</div>
</div>
</div>
</body>
</html>
PHP Gurukul
Welcome to PHPGurukul. We are a web development team striving our best to provide you with an unusual experience with PHP. Some technologies never fade, and PHP is one of them. From the time it has been introduced, the demand for PHP Projects and PHP developers is growing since 1994. We are here to make your PHP journey more exciting and useful.
Website : https://phpgurukul.com
0 notes
Text
Gophish Setup Guide: Launching Phishing Campaigns
Phishing Scenario : CASE 1 - Breaking news
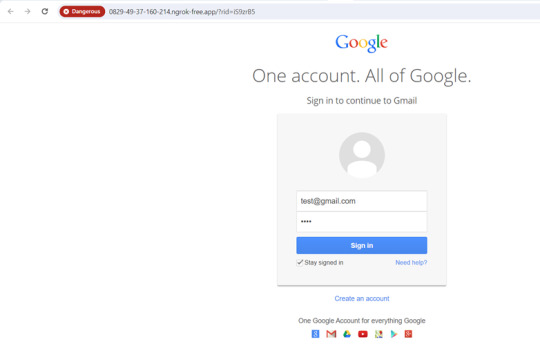
Objective: The objective of this phishing campaign is to lure employees into clicking a malicious link disguised as breaking news from the company. The landing page masqueraded as a Gmail sign-in page, prompting users to enter their login credentials. This page was designed to steal users' email account credentials.
Install Gophish framework
Make the required changes in the config.json file
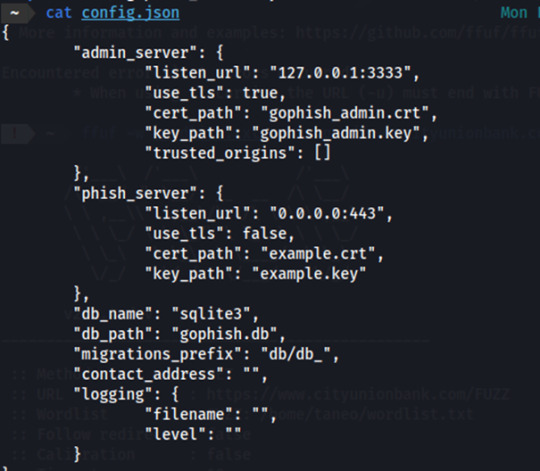
Launch Gophish and our first step would be to set up the sending profile by which we will send out phishing emails.
Let’s assume that the target company is using Gmail server
(When setting up the sending profile in Gophish using a Gmail account, you have to enable 2FA and give app access to Gophish)
Since our target company is using Gmail server, we will use Gmail email on our phishing campaign so we have set host as smtp.gmail.com:587. After creating the sending profile, we have to test if the sending profile works by sending a test email.
We're using the email address [email protected] as our designated Gmail account for sending phishing emails. Make sure to include the password that was generated when granting Gophish access to this Gmail account. After configuring the sending profile, we can test it by sending a test mail.

This is what the test mail will look like:

Email Template
The next step involves integrating an email template for the phishing campaign. We can opt for a pre-made template, for example, here we use a Breaking News email template, for initial testing. We can incorporate a tracking image within the emails to monitor various engagement metrics, including email opens, clicks, and receipt statuses. It also has an option where we can add a link which will redirect the victim to the landing page. On the landing page we can proceed to request for more valuable information from the user.

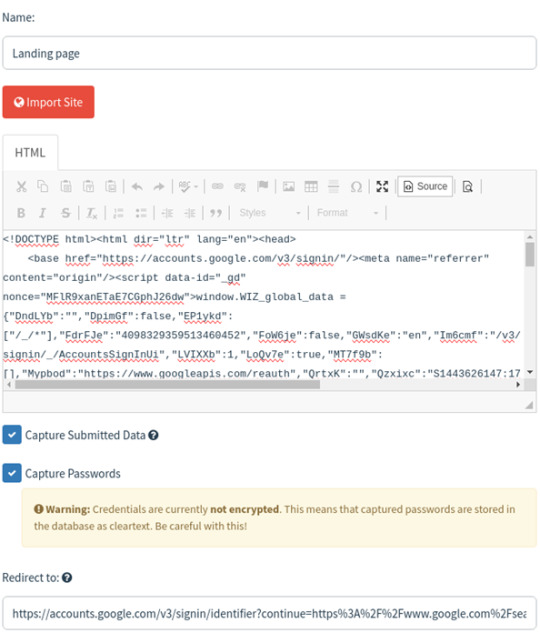
Landing Page
In the third step, set up a landing page where targets will be directed after clicking a link in the email. This landing page plays a crucial role in the phishing campaign, as it's where you can capture sensitive information like passwords. Gophish defaults to using http://0.0.0.0:80 for the landing page, but we can customize it to look like a legitimate login page or other enticing content to attract targets. We'll need to specify a redirect page where users will be sent after submitting their credentials.
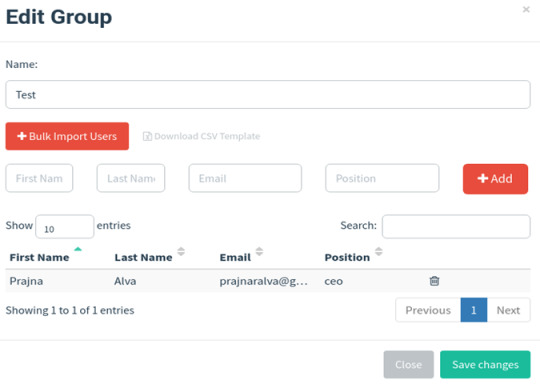
In the User & Groups section, you'll need to input the email addresses of your targets. Gophish framework requires you to provide the first name, last name, email address, and the rank of each target individual on the user groups page. You can also upload target details from a CSV file stored on your local system using import feature.
Install and set up Ngrok:
Install ngrok via Apt with the following command:
curl -s https://ngrok-agent.s3.amazonaws.com/ngrok.asc \
| sudo tee /etc/apt/trusted.gpg.d/ngrok.asc >/dev/null && echo "deb https://ngrok-agent.s3.amazonaws.com buster main" \
| sudo tee /etc/apt/sources.list.d/ngrok.list && sudo apt update && sudo apt install ngrok
Run the following command to add your authtoken to the default ngrok.yml configuration file.
ngrok config add-authtoken 2crm6P5lWlbTm4rwoGqn0QSHhPA_6nf7WmMJFKXVSD2SgBohF
Create an index.html page for the landing page and launch python http server in the port 8001
• python3 -m http.server 8001
Note: Verify in the browser if it's actually accessible.
We can also use other login page cloning techniques like built in gophish cloner, or Github projects (we used), Custom or by using third party clones (ex-goclone).
If it's a php file use the following command instead:
• php -S localhost:8001 -t .
Launch ngrok :
ngrok http http://localhost:8001/

Use the URL under forwarding and paste it on the Gophish URL section in the campaign page shown below:
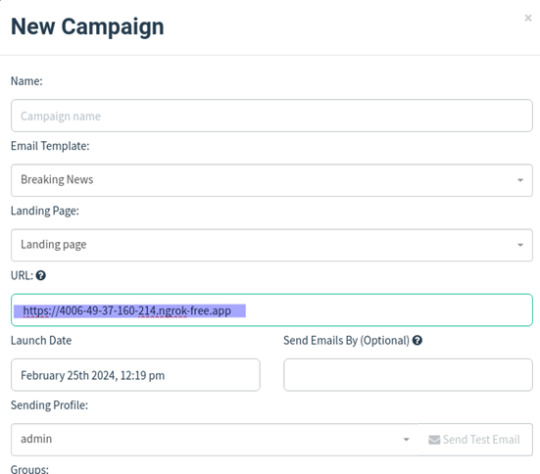
Creating Gophish Campaign:
Go to the Campaigns section.
Choose the right email and landing page templates.
Enter the landing page server URL.
Select the target group.
Start the campaign and monitor its progress.

Once we click on the link we are directed to the landing page, where we can enter our credentials.
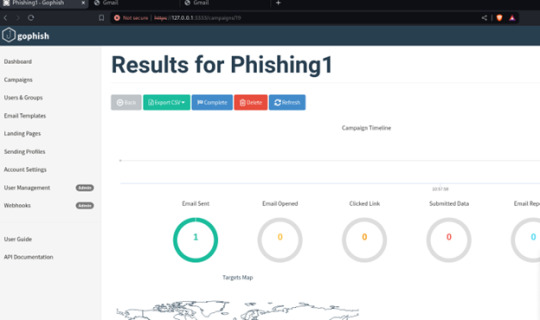
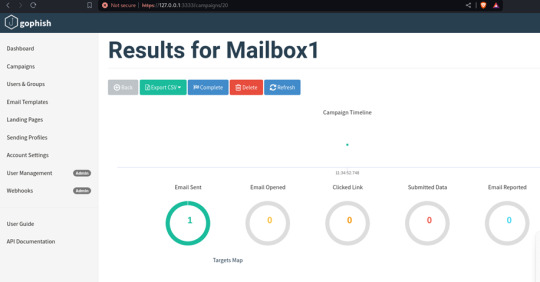
You can find all the phishing reports related to a specific campaign on the Dashboard in the Gophish framework. Here, you can see details such as sent emails, opened emails, clicked links, submitted data, and any emails reported as phishing by the targets. This page provides a comprehensive overview of the ongoing phishing campaign.
Phishing scenario: Case 2 - Password Reset Campaign
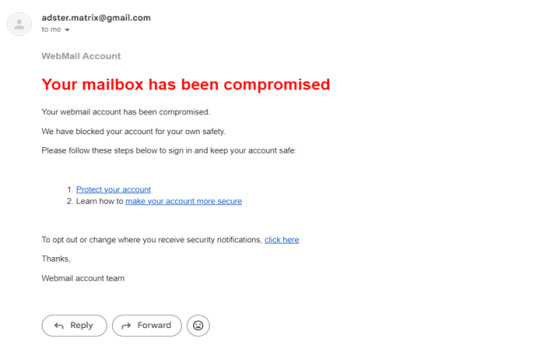
The aim of this phishing campaign is to trick users into divulging their login credentials by pretending to offer account protection in response to a fake mailbox compromise.

Users received an urgent email claiming their mailbox was compromised. They were directed to a phishing landing page disguised as a password reset portal.
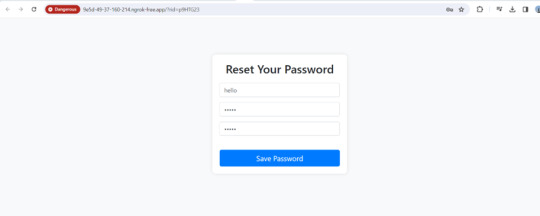
Upon clicking the link, Users were redirected to a fake password reset page resembling the email service provider's design, where they were prompted to enter their login credentials.
3 notes
·
View notes
Text
Dairy Farm Shop Management System Using PHP and MySQL

The Dairy Farm Shop Management System (DFSMS) is a web based application that can be accessed over the web. This system can be used to automate the workflow of dairy shop and their invoices.
The project has been planned to be having the view of distributed architecture, with centralized storage of the database. The application for the storage of the data has been planned. Using the constructs of MySQL Server and all the user interfaces has been designed using the PHP technologies. The database connectivity is planned using the “MySQL Connection” methodology. The standards of security and data protective mechanism have been given a big choice for proper usage. The application takes care of different modules and their associated reports, which are produced as per the applicable strategies and standards that are put forwarded by the administrative staff.
Click: https://phpgurukul.com/dairy-farm-shop-management-system-using-php-and-mysql/
Project Modules
DFSMS is a web-based application which manages the products of dairy shop. It has one module i.e. admin who manages all the functions of the dairy shop.
Admin Features :
Dashboard: In this section, admin can see all detail in brief like Total listed categories, companies, products and also see the sales.
Category: In this section, admin can add new categories and edit, delete old categories.
Company: In this section, admin can add new companies and edit, delete old companies.
Product: In this section, admin can add new products and edit old products.
Search: In this section, admin can search for a product then add the product into the cart and generate invoice /receipt.
Invoices: In this section, admin can view all generated invoices/receipts.
Reports: In this section, admin can generate two reports, one is B/w date and another one is for sales.
Admin can also update his profile, change the password and recover the password.
How to run the Dairy Farm Shop Management System Project (DFSMS)
1. Download the zip file
2. Extract the file and copy dfsms folder
3.Paste inside root directory(for xampp xampp/htdocs, for wamp wamp/www, for lamp var/www/html)
4. Open PHPMyAdmin (http://localhost/phpmyadmin)
5. Create a database with name dfsms
6. Import dfsms.sql file(given inside the zip package in SQL file folder)
7.Run the script http://localhost/dfsms
*********************Admin Credential*********************
Username: admin Password: Test@123
PHP Gurukul
Welcome to PHPGurukul. We are a web development team striving our best to provide you with an unusual experience with PHP. Some technologies never fade, and PHP is one of them. From the time it has been introduced, the demand for PHP Projects and PHP developers is growing since 1994. We are here to make your PHP journey more exciting and useful.
Email: [email protected] Website : https://phpgurukul.com
0 notes
Text
Perfex CRM Nulled php Script 3.2.1

Download Perfex CRM Nulled PHP Script for Free – Empower Your Business Looking to supercharge your business operations with a full-featured client relationship management system? Perfex CRM nulled php Script is the perfect solution for startups, agencies, freelancers, and small to mid-sized companies. This dynamic CRM platform helps you manage customers, projects, invoices, and much more—all under one powerful dashboard. And the best part? You can download it for free right here on our website. What is Perfex CRM Nulled PHP Script? Perfex CRM is a high-performance customer relationship management solution developed using CodeIgniter framework. It’s widely recognized for its intuitive interface, feature-rich environment, and flexibility. Whether you’re looking to automate billing, manage leads, or streamline project workflows, Perfex CRM delivers an exceptional experience without the hefty price tag. Why Choose Perfex CRM Nulled PHP Script? By downloading the Perfex CRM nulled php Script, you gain unrestricted access to premium features at no cost. This nulled version has been unlocked to provide complete freedom over your CRM system. Perfect for testing, development, or full business deployment, it’s a game-changer for those who seek high functionality without premium licensing costs. Technical Specifications Script Type: PHP (CodeIgniter Framework) Database: MySQL File Size: ~120 MB Version: Latest updated version License: Nulled (no license key required) Outstanding Features and Benefits Project Management with Milestones and Tasks Automated Invoice and Billing System Lead Management and Conversion Tracking Client Portal for Better Communication Fully Customizable Dashboards Multi-language and RTL Support Advanced Reporting and Analytics Professional Proposal Templates Email & SMS Integration for Notifications Real-World Use Cases Businesses across various industries trust Perfex CRM nulled php Script for daily operations: Digital Agencies: Seamlessly manage client tasks, campaigns, and deadlines. Freelancers: Stay organized with invoices, projects, and client communication in one place. Startups: Leverage a cost-free CRM that scales as you grow. Consultants: Track billable hours and generate custom reports with ease. How to Install Perfex CRM Nulled PHP Script Download the zip file from our website. Extract the contents to your web hosting server or localhost environment. Create a new MySQL database and import the included SQL file. Set up the configuration file with your database details. Access the installation wizard and follow on-screen instructions. Within minutes, you’ll be ready to launch your CRM portal and start managing your business like a pro. Frequently Asked Questions (FAQs) Is this the full version of Perfex CRM? Yes. The Perfex CRM is a complete, unrestricted version featuring all modules and tools available in the original paid script. Do I need a license key to activate it? No license key is required. The script has been pre-modified to work without activation. Can I use it for client projects? Yes. Many developers use nulled scripts for client demos and internal projects. However, for production and compliance, always consider purchasing the original license. Is it safe to use? Our uploaded files are thoroughly scanned and verified. Still, it's recommended to test in a local or staging environment first. Download Now – Start Managing Smarter There’s never been a better time to empower your team and streamline operations. The Perfex CRM nulled php Script offers an enterprise-grade CRM experience—without the enterprise costs. Download it now and explore all the tools you need to elevate your business. Looking for more tools? Don’t forget to check out elementor nulled pro to enhance your WordPress design capabilities. And if you're working with sliders or need stunning visual effects, Slider Revolution NULLED is an excellent addition to your toolkit.
0 notes
Text
MySQL insights: Database Management for Beginners and Experts
Databases form the backbone of every online application, from social media platforms to e-commerce stores. MySQL stands out as one of the most widely used relational database management systems (RDBMS) globally. Whether you are a beginner looking to learn MySQL or an expert seeking advanced database management techniques, this blog will provide valuable insights into MySQL's capabilities, features, and best practices.
What is MySQL?
MySQL is an open-source relational database management system (RDBMS) that organizes data into tables. Developed by MySQL AB and now owned by Oracle Corporation, MySQL is widely used for managing structured data efficiently. It is known for its reliability, scalability, and ease of use, making it the preferred choice for small businesses, startups, and large enterprises alike.
Why Choose MySQL?
Open-Source & Free: MySQL is open-source, meaning it is free to use and modify.
High Performance: It is optimized for speed and handles large amounts of data efficiently.
Scalability: MySQL can scale from small applications to large enterprise solutions.
Secure: Features like encryption, authentication, and access control make MySQL a secure choice.
Cross-Platform Support: Runs on multiple operating systems, including Windows, Linux, and macOS.
Integration with Popular Technologies: Works seamlessly with PHP, Python, Java, and more.
MySQL Installation Guide
To install MySQL on your system, follow these steps:
Download MySQL: Visit the official MySQL website and download the latest version for your OS.
Run the Installer: Open the installer and follow the setup wizard instructions.
Configure MySQL: Choose the server type and set a root password.
Start MySQL Server: Use the MySQL Workbench or command line to start the MySQL service.
MySQL Basic Commands for Beginners
If you are new to MySQL, here are some essential SQL commands to get started:

Advanced MySQL Techniques
1. Indexing for Performance Optimization
Indexing is crucial for improving the speed of database queries. Without indexes, MySQL scans the entire table, which slows down performance.
CREATE INDEX idx_users_email ON users(email);
2. Using Joins to Combine Data from Multiple Tables
Joins help retrieve data from multiple related tables efficiently.

3. Stored Procedures for Automation
Stored procedures help automate complex queries and improve efficiency.

4. MySQL Replication for High Availability
Replication allows data to be copied from one server to another, ensuring high availability and load balancing.

START SLAVE;
Common MySQL Errors & Troubleshooting
Error: Access Denied for User 'root'@'localhost' Solution: Reset MySQL root password using the command line.
Error: MySQL Server Has Gone Away Solution: Increase the max_allowed_packet size in the MySQL configuration file.
Error: Table Doesn't Exist Solution: Check the table name and ensure it exists in the database.
MySQL vs Other Database Management Systems

Best Practices for MySQL Optimization
Use Indexing Efficiently to speed up queries.
Normalize Your Database to avoid redundancy.
Avoid Using SELECT* to reduce unnecessary data load.
Regularly Backup Your Database to prevent data loss.
Monitor Performance Metrics using MySQL Workbench.
Future of MySQL in Database Management
With the rise of cloud computing, MySQL continues to evolve. Cloud-based solutions such as Amazon RDS, Google Cloud SQL, and Azure Database for MySQL make it easier to deploy and manage databases at scale. New features like JSON support, improved indexing, and machine learning integration further solidify MySQL’s position as a leading database solution.
Conclusion
MySQL remains a powerful and versatile database management system for both beginners and professionals. With its ease of use, scalability, and extensive community support, it continues to be a preferred choice for web developers, data analysts, and businesses worldwide. By mastering MySQL’s features and best practices, you can build high-performance applications that handle data efficiently.
0 notes
Text
How to Develop a Website Using PHP
How to Develop a Website Using PHP
In today's digital era, websites play a crucial role in business growth and online presence. One of the most widely used server-side scripting languages for web development is PHP (Hypertext Preprocessor). It is open-source, easy to learn, and widely supported by web servers and databases. This guide will walk you through the step-by-step process of developing a website using PHP.

Why Choose PHP for Web Development?
Before diving into the development process, let’s explore some key reasons why PHP is a great choice for website development:
1. Open-Source: PHP is free to use, making it cost-effective for developers.
2. Cross-Platform Compatibility: Runs on Windows, Linux, and macOS without compatibility issues.
3. Database Support: Easily integrates with MySQL, PostgreSQL, and other databases.
4. Scalability: Suitable for both small websites and large-scale web applications.
5. Large Community Support: Extensive documentation and active developer communities for troubleshooting and learning.
Prerequisites for PHP Web Development
To develop a website using PHP, you need the following tools:
1. Text Editor or IDE: VS Code, Sublime Text, or PHPStorm.
2. Local Server: XAMPP, WAMP, or MAMP for running PHP scripts.
3. Database System: MySQL or PostgreSQL for data storage.
4. Web Browser: Chrome, Firefox, or Edge for testing the website.
Step-by-Step Guide to Developing a Website Using PHP
1. Setting Up Your Development Environment
To begin developing a PHP website, follow these steps:
· Install XAMPP (or WAMP/MAMP) to create a local server.
· Using the XAMPP Control Panel, launch Apache and MySQL.
· Navigate to htdocs in the XAMPP directory to store PHP project files.
2. Creating the Project Structure
Organizing your files properly enhances maintainability. A typical PHP project structure:
project-folder/
│-- index.php
│-- config.php
│-- assets/
│ ├── css/
│ ├── js/
│ ├── images/
│-- includes/
│ ├── header.php
│ ├── footer.php
│-- pages/
│ ├── about.php
│ ├── contact.php
│-- database/
│ ├── db_connect.php
3. Writing Your First PHP Script
Create an index.php file and add the following code:
<?php
echo "Welcome to My PHP Website!";
?>
Save the file and access it in the browser by navigating to http://localhost/project-folder/.
4. Connecting PHP with MySQL Database
To manage dynamic content, connect PHP with a MySQL database.
Create a Database
1. Open phpMyAdmin from XAMPP.
2. Create a new database, e.g., my_website.
3. Add a users table with fields id, name, email, and password.
Database Connection Code (db_connect.php)
<?php
$servername = "localhost";
$username = "root";
$password = "";
dbname = "my_website";
$conn = new mysqli($servername, $username, $password, $dbname);
if ($conn->connect_error) {
die("Connection failed: " . $conn->connect_error);
}
?>
5. Creating a User Registration System
A simple user registration form using PHP and MySQL.
Registration Form (register.php)
<form method="POST" action="register.php">
<input type="text" name="name" placeholder="Full Name" required>
<input type="email" name="email" placeholder="Email" required>
<input type="password" name="password" placeholder="Password" required>
<button type="submit" name="register">Register</button>
</form>
Handling User Registration (register.php)
<?php
include 'database/db_connect.php';
if(isset($_POST['register'])) {
$name = $_POST['name'];
$email = $_POST['email'];
$password = password_hash($_POST['password'], PASSWORD_BCRYPT);
$sql = "INSERT INTO users (name, email, password) VALUES ('$name', '$email', '$password')";
if ($conn->query($sql) === TRUE) {
echo "Registration successful!";
} else {
echo "Error: " . $conn->error;
}
}
?>
6. Implementing User Login System
Login Form (login.php)
<form method="POST" action="login.php">
<input type="email" name="email" placeholder="Email" required>
<input type="password" name="password" placeholder="Password" required>
<button type="submit" name="login">Login</button>
</form>
Handling Login Authentication (login.php)
<?php
session_start();
include 'database/db_connect.php';
if(isset($_POST['login'])) {
$email = $_POST['email'];
$password = $_POST['password'];
$result = $conn->query("SELECT * FROM users WHERE email='$email'");
$user = $result->fetch_assoc();
if(password_verify($password, $user['password'])) {
$_SESSION['user'] = $user;
echo "Login successful!";
} else {
echo "Invalid credentials!";
}
}
?>

7. Adding Navigation and Styling
· Use Bootstrap or CSS frameworks to improve UI.
· Include a header.php and footer.php for better navigation.
8. Deploying the PHP Website
Once development is complete, deploy your PHP website using:
· Shared Hosting with cPanel for easy management.
· Cloud Hosting (AWS, DigitalOcean) for high performance.
· Domain & SSL Certificate for a secure and professional website.
Conclusion
Developing a website using PHP is an efficient way to create dynamic and interactive websites. By following this step-by-step guide, you can build a PHP-based website from scratch, implement database interactions, user authentication, and deploy your project successfully. Start your PHP development journey today and create powerful web applications!
#web development#seo services#web designing#social media marketing#graphic design#digital marketing#digitalmarketing#marketing#digitalindia#seo
1 note
·
View note
Text
How to Install XAMPP for Windows 10 - XAMPP WordPress For Beginners
To install XAMPP on Windows 10 and set it up for WordPress, follow these steps:
Step 1: Download XAMPP
Go to the official XAMPP website.
Click on the "XAMPP for Windows" button.
Once the installer is downloaded, locate the .exe file (usually in the Downloads folder).
Step 2: Install XAMPP
Double-click the .exe file to start the installation process.
Choose the components you want to install. For WordPress, you need at least Apache, MySQL, and PHP. These are selected by default, so you can leave them as is.
Choose the installation folder (default is usually fine).
Click "Next" and follow the prompts.
During installation, the installer may ask if you want to start the XAMPP Control Panel. Leave it checked and click "Finish."
Step 3: Start Apache and MySQL
Open the XAMPP Control Panel (it should have opened automatically, or you can search for it in the Start menu).
Click the "Start" button next to Apache (this will run the web server).
Click the "Start" button next to MySQL (this will start the database server).
Make sure both Apache and MySQL show "Running" in green.
Step 4: Install WordPress
Download the latest version of WordPress from the official WordPress website.
Extract the WordPress ZIP file.
Move the extracted folder (the WordPress folder) into the htdocs folder of your XAMPP installation (usually located at C:\xampp\htdocs).
Step 5: Create a Database for WordPress
Open your browser and go to http://localhost/phpmyadmin/.
In the phpMyAdmin dashboard, click on "Databases."
Create a new database for WordPress. Give it a name (e.g., wordpress_db) and click "Create."
Step 6: Configure WordPress
Open your browser and go to http://localhost/wordpress (or the folder name you chose).
The WordPress installation screen should appear.
Select your language and click "Continue."
On the next screen, enter your database details:
Database Name: The name you created (e.g., wordpress_db).
Username: root (default for XAMPP).
Password: Leave this blank (default for XAMPP).
Database Host: localhost (default).
Table Prefix: Leave as wp_ unless you want to change it.
Click Submit and then Run the Install.
Step 7: Complete the WordPress Setup
Fill in the site details (site title, admin username, password, and email).
Click "Install WordPress."
Once the installation is complete, you’ll see a success message. You can now log in to your WordPress dashboard at http://localhost/wordpress/wp-admin.
Final Notes
To stop your server, go to the XAMPP Control Panel and click "Stop" for Apache and MySQL.
If you need to make your local WordPress site public, you'll have to configure port forwarding or use a tool like Local by Flywheel or XAMPP for public access.
#installxampp#xamppforbeginners#xamppwindows10#wordpressinstallation#localserversetup#runwordpresslocally#xamppwordpress#webdevelopment#phpdevelopment#wordpressforbeginners#tutorial2025#localwordpress#xamppsetup#installingwordpress#wordpresssetup#beginnerfriendly#xamppguide#developmenttutorial#learnwordpress#wordpresslocally
0 notes
Text
Custom PHP Development: Leveraging MySQL for Database Management

In the realm of web development, the combination of PHP and MySQL has proven to be a powerful duo. Custom PHP development, when paired with the robust capabilities of MySQL for database management, allows developers to create dynamic, scalable, and efficient web applications. This article explores how custom PHP development can leverage MySQL to build effective database-driven websites and applications.
The Synergy of PHP and MySQL PHP (Hypertext Preprocessor) is a widely-used open-source scripting language that is especially suited for web development. It is embedded within HTML and interacts seamlessly with databases. MySQL, on the other hand, is a reliable and fast open-source relational database management system (RDBMS) known for its performance and scalability.
Together, PHP and MySQL form a formidable partnership in custom web development, offering numerous advantages:
Ease of Integration: PHP scripts can easily connect to MySQL databases using built-in functions.
Flexibility: Both PHP and MySQL are highly flexible, making them suitable for a wide range of applications from simple blogs to complex enterprise solutions.
Cost-Effectiveness: Being open-source, they provide a cost-effective solution for businesses.
Setting Up the Environment Before diving into custom development, you need to set up your development environment:
1. Install PHP: Ensure that PHP is installed on your server. You can download it from the official PHP website.
2. Install MySQL: Download and install MySQL from its official site. During installation, configure the root password and other settings as needed.
3. Web Server: Install a web server like Apache or Nginx. Many developers prefer to use XAMPP or WAMP for an all-in-one solution that includes Apache, MySQL, and PHP.
Connecting PHP to MySQL The first step in leveraging MySQL in custom PHP development is to establish a connection between PHP and MySQL. Here’s a basic example using PHP’s MySQLi (MySQL Improved) extension:
```php
<?php
$servername = "localhost";
$username = "username";
$password = "password";
$database = "database_name";
// Create connection
$conn = new mysqli($servername, $username, $password, $database);
// Check connection
if ($conn->connect_error) {
die("Connection failed: " . $conn->connect_error);
}
echo "Connected successfully";
?>
```
In this script, `mysqli` is used to connect to the MySQL database. The script checks the connection and prints a success message if the connection is successful, or an error message if it fails.
Creating and Managing Databases Once connected, the next step is to create and manage databases. Here’s how you can create a database and a table using PHP:
```php
<?php
// Create database
$sql = "CREATE DATABASE myDatabase";
if ($conn->query($sql) === TRUE) {
echo "Database created successfully";
} else {
echo "Error creating database: " . $conn->error;
}
// Use the database
$conn->select_db("myDatabase");
// Create table
$sql = "CREATE TABLE Users (
id INT(6) UNSIGNED AUTO_INCREMENT PRIMARY KEY,
firstname VARCHAR(30) NOT NULL,
lastname VARCHAR(30) NOT NULL,
email VARCHAR(50),
reg_date TIMESTAMP
)";
if ($conn->query($sql) === TRUE) {
echo "Table Users created successfully";
} else {
echo "Error creating table: " . $conn->error;
}
$conn->close();
?>
``` This script first creates a database named `myDatabase`. It then creates a table named `Users` with columns for ID, first name, last name, email, and registration date.
Performing CRUD Operations CRUD (Create, Read, Update, Delete) operations are fundamental to any database-driven application. Here’s how to perform these operations using PHP and MySQLi:
Create: Inserting Data
```php
<?php
$sql = "INSERT INTO Users (firstname, lastname, email) VALUES ('John', 'Doe', '[email protected]')";
if ($conn->query($sql) === TRUE) {
echo "New record created successfully";
} else {
echo "Error: " . $sql . "<br>" . $conn->error;
}
?>
```
Read: Retrieving Data
```php
<?php
$sql = "SELECT id, firstname, lastname, email FROM Users";
$result = $conn->query($sql);
if ($result->num_rows > 0) {
while($row = $result->fetch_assoc()) {
echo "id: " . $row["id"]. " - Name: " . $row["firstname"]. " " . $row["lastname"]. " - Email: " . $row["email"]. "<br>";
}
} else {
echo "0 results";
}
?>
```
Update: Modifying Data
```php
<?php
$sql = "UPDATE Users SET lastname='Smith' WHERE id=1";
if ($conn->query($sql) === TRUE) {
echo "Record updated successfully";
} else {
echo "Error updating record: " . $conn->error;
}
?>
```
Delete: Removing Data
```php
<?php
$sql = "DELETE FROM Users WHERE id=1";
if ($conn->query($sql) === TRUE) {
echo "Record deleted successfully";
} else {
echo "Error deleting record: " . $conn->error;
}
?>
```
Advanced Techniques in Custom PHP and MySQL Development To further enhance your custom PHP development, consider incorporating the following advanced techniques:
Prepared Statements Prepared statements are used to execute the same statement repeatedly with high efficiency and security. They help prevent SQL injection attacks:
```php
<?php
$stmt = $conn->prepare("INSERT INTO Users (firstname, lastname, email) VALUES (?, ?, ?)");
$stmt->bind_param("sss", $firstname, $lastname, $email);
// Set parameters and execute
$firstname = "Jane";
$lastname = "Doe";
$email = "[email protected]";
$stmt->execute();
echo "New records created successfully";
$stmt->close();
?>
``` Object-Oriented Programming (OOP) Approach Using an object-oriented approach can help in structuring your code more effectively:
```php
<?php
class Database {
private $servername = "localhost";
private $username = "username";
private $password = "password";
private $dbname = "myDatabase";
public $conn;
public function __construct() {
$this->conn = new mysqli($this->servername, $this->username, $this->password, $this->dbname);
if ($this->conn->connect_error) {
die("Connection failed: " . $this->conn->connect_error);
}
}
public function insertUser($firstname, $lastname, $email) {
$stmt = $this->conn->prepare("INSERT INTO Users (firstname, lastname, email) VALUES (?, ?, ?)");
$stmt->bind_param("sss", $firstname, $lastname, $email);
$stmt->execute();
$stmt->close();
}
// Additional CRUD methods...
public function __destruct() {
$this->conn->close();
}
}
$db = new Database();
$db->insertUser("Alice", "Smith", "[email protected]");
?>
``` Conclusion Custom PHP development, when combined with MySQL for database management, offers a versatile and powerful solution for creating dynamic, data-driven websites and applications. By leveraging the synergy between PHP and MySQL, developers can build robust, scalable, and secure applications tailored to specific business needs. From setting up your environment and connecting PHP to MySQL, to performing CRUD operations and employing advanced techniques, the potential for innovation and customization is vast. As you continue to explore and implement these tools, you'll unlock new possibilities for delivering exceptional web experiences.
Also Read: 10 Best Web Development Languages for Your Project in 2024
0 notes
Text
Using PHP to develop web services
A web service is a software system that provides functionality over the web using HTTP protocols. It is essentially a remote procedure call (RPC) that is invoked by a client application. Web services are typically stateless and highly scalable.
PHP is a popular programming language that can be used to develop web services. It is a server-side language that is well-suited for developing dynamic and interactive web applications.
To develop a web service in PHP, you will need to:
Choose a web service framework. There are a number of PHP web service frameworks available, such as Laravel, Symfony, and Lumen. These frameworks provide a number of features that can help you to develop web services more efficiently, such as routing, authentication, and error handling.
Create a web service endpoint. A web service endpoint is the URL that clients will use to access your web service. You can create a web service endpoint by creating a new PHP file and defining a route for it in your web service framework.
Write the web service code. The web service code is the code that will be executed when a client calls the web service endpoint. This code will typically perform some kind of operation, such as retrieving data from a database or sending an email.
Return the results of the web service call. The results of the web service call can be returned in a variety of formats, such as JSON, XML, or HTML.
Here is a simple example of a PHP web service that returns a list of users:
PHP<?php // Require the Laravel web service framework require 'vendor/autoload.php'; // Define the web service route Route::get('/users', function() { // Get the list of users from the database $users = DB::table('users')->get(); // Return the list of users in JSON format return response()->json($users); });
To call this web service, you would simply make a GET request to the following URL:http://localhost/users
The web service would then return a JSON response containing a list of all of the users in the database.
PHP web services can be used to develop a wide variety of applications, such as:
REST APIs
SOAP APIs
XML-RPC APIs
JSON-RPC APIs
If you want to learn PHP from scratch must checkout e-Tuitions to learn PHP Language online, They can teach you PHP Language and other coding language also they have some of the best teachers for there students and most important thing you can also Book Free Demo for any class just goo and get your free demo.
#php#phpdevelopment#php programming#php script#php framework#learn php#learn coding#coding#learn coding online
0 notes
Text
How to check Email and username availability live using jquery/ajax, PHP and PDO

In this tutorial, We will learn how to How to check Email and username availability live using jQuery/ajax and PHP-PDO.
Click : https://phpgurukul.com/how-to-check-email-and-username-availability-live-using-jquery-ajax-php-and-pdo/
File Structure for this tutorials
index.php (Main File)
config.php (Database Connection file)
check_availability.php (Used to check the Email and User availability)
Create a database with name demos. In demos database, create a table with name email_availabilty Sample structure of table email_availabilty
CREATE TABLE IF NOT EXISTS `email_availabilty` (
`id` int(11) NOT NULL,
`email` varchar(255) NOT NULL,
`username` varchar(255) NOT NULL
) ENGINE=InnoDB AUTO_INCREMENT=5 DEFAULT CHARSET=latin1;
2. Create a database connection file
config.php
<?php
//DB Connection
define(‘DB_HOST’,’localhost’);
define(‘DB_USER’,’root’);
define(‘DB_PASS’,’’);
define(‘DB_NAME’,’demos’);
// Establish database connection.
try
{
$dbh = new PDO(“mysql:host=”.DB_HOST.”;dbname=”.DB_NAME,DB_USER, DB_PASS,array(PDO::MYSQL_ATTR_INIT_COMMAND => “SET NAMES ‘utf8’”));
}
catch (PDOException $e)
{
exit(“Error: “ . $e->getMessage());
}
3. Now Create an HTML form index.php
<?php
include_once(“config.php”);
?>
<table>
<tr>
<th width=”24%” height=”46" scope=”row”>Email Id :</th>
<td width=”71%” ><input type=”email” name=”email” id=”emailid” onBlur=”checkemailAvailability()” value=”” class=”form-control” required /></td>
</tr>
<tr>
<th width=”24%” scope=”row”></th>
<td > <span id=”email-availability-status”></span> </td>
</tr>
<tr>
<th height=”42" scope=”row”>User Name</th>
<td><input type=”text” name=”username” id=”username” value=”” onBlur=”checkusernameAvailability()” class=”form-control” required /></td>
</tr>
<tr>
<th width=”24%” scope=”row”></th>
<td > <span id=”username-availability-status”></span> </td>
</tr>
</table>
4. Jquery/ajax script where you pass variable to check_availability.php page. put this in index.php inside head.
<script>
function checkemailAvailability() {
$(“#loaderIcon”).show();
jQuery.ajax({
url: “check_availability.php”,
data:’emailid=’+$(“#emailid”).val(),
type: “POST”,
success:function(data){
$(“#email-availability-status”).html(data);
$(“#loaderIcon”).hide();
},
error:function (){}
});
}
function checkusernameAvailability() {
$(“#loaderIcon”).show();
jQuery.ajax({
url: “check_availability.php”,
data:’username=’+$(“#username”).val(),
type: “POST”,
success:function(data){
$(“#username-availability-status”).html(data);
$(“#loaderIcon”).hide();
},
error:function (){}
});
}
</script>
5.check_availability.php page in this page you will check the availability of email or email.
<?php
require_once(“config.php”);
//code check email
if(!empty($_POST[“emailid”])) {
$uemail=$_POST[“emailid”];
$sql =”SELECT email FROM email_availabilty WHERE email=:email”;
$query= $dbh -> prepare($sql);
$query-> bindParam(‘:email’, $uemail, PDO::PARAM_STR);
$query-> execute();
$results = $query -> fetchAll(PDO::FETCH_OBJ);
if($query -> rowCount() > 0)
echo “<span style=’color:red’> Email Already Exit .</span>”;
else
echo “<span style=’color:green’> Email Available.</span>”;
}
// End code check email
//Code check user name
if(!empty($_POST[“username”])) {
$username=$_POST[“username”];
$sql =”SELECT username FROM email_availabilty WHERE username=:username”;
$query= $dbh -> prepare($sql);
$query-> bindParam(‘:username’, $username, PDO::PARAM_STR);
$query-> execute();
$results = $query -> fetchAll(PDO::FETCH_OBJ);
if($query -> rowCount() > 0)
echo “<span style=’color:red’> Username already exit .</span>”;
else
echo “<span style=’color:green’> Username Available.</span>”;
}
// End code check username
?>
PHP Gurukul
Welcome to PHPGurukul. We are a web development team striving our best to provide you with an unusual experience with PHP. Some technologies never fade, and PHP is one of them. From the time it has been introduced, the demand for PHP Projects and PHP developers is growing since 1994. We are here to make your PHP journey more exciting and useful.
Website : https://phpgurukul.com
1 note
·
View note
Text
How To Make Your Own Website and Monetize it?

By following up with me in less than twenty-four hours, you will be ready to launch a Website that will undoubtedly earn you thousands of dollars every month! How to generate the money? Well, the website that we make will be offering SAAS service.
What is a SAAS service?
A SAAS (Software As A Service) service is essentially an online software or service that you pay to use.
For example, Mailchimp.com, which is a SAAS service, provides email marketing services that you pay for.

A SAAS service is anything you pay for to get an online service.
Now you can be the owner of a SAAS service, you will have your own Website, and people will subscribe to your service and pay you monthly recurring payments.
Let’s say you have 100 customers who use your SAAS service, and your service costs about $10 a month; you’d make $1000 per month!
All you have to do is sit at home and watch your passive income develop on your computer screen. It’s a fantastic and easy way to earn money.
How to get a SAAS service?

“How can I get my own SAAS service or software?” you might be wondering. The good news is that you don’t have to create one, learn to program, or even employ a programmer to do so.
You can simply buy it Online for $40–$60. You can buy software from a website called codecanyon
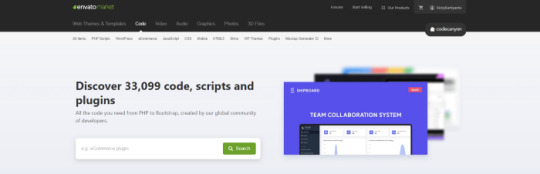
You can simply visit the website, click on the php scripts and search for SAAS and choose what kind of SAAS service that you preferred.
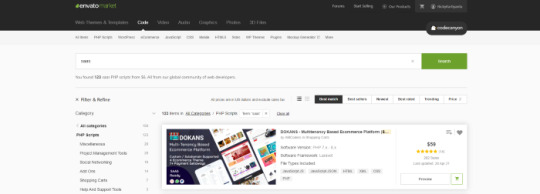
There are several types of SAAS applications available for purchase. Discount networks, accounting and billing software, email marketing systems, and employee management software are only a few examples. Take your time browsing the services and choose the one you like best, the one that fits you and you feel that you can be successful with.
Hosting Your Service
After you’ve created your SAAS service, the next move is to host it and make it public. To host it online, you’ll need a domain name and a server.
Now it is sounds hard since you don’t have any technical background in this term. Don’t worry, it is actually a simple and easy steps.
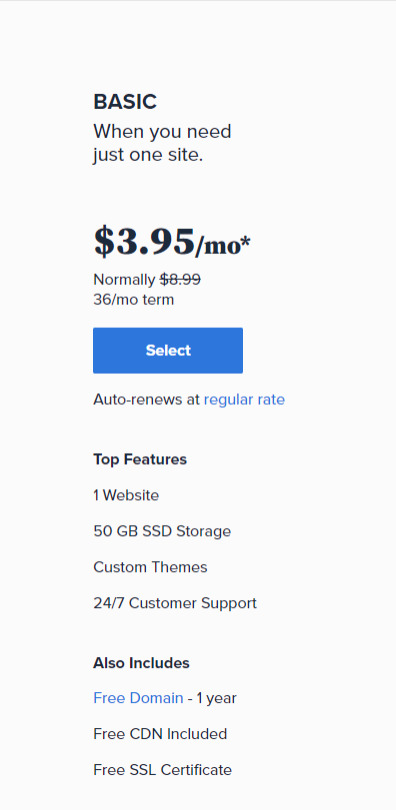
First you need a VPS server, you can visit and buy a cheap one from Bluehost. its only $3,95 permonth with and they give you free domain for 1 year! Check the price below. Buy the “LAMP” administration.
So What is VPS server? We do what we call “online hosting” when we want to publish a PHP page, script, or some other web application. This basically means uploading the files and database to a public server so that it can be accessed over the internet. On simple word, the place where you put the file is from VPS server.
In this tutorial we will used the shared server from Bluehost. Shared server only means that your server will be host with others website.
Now everything is ready, the only things that matter is how to install it. Let get to it.
Getting Started
After having your own server and domain on Bluehost, you need to connect them. Your VPS Server can be accessed now your Bluehost profile, but of course, we don’t want to access our website though an IP! we want to use our domain name. So simply, we are going to map the domain name to our VPS IP, so then we access the VPS and the WordPress website through both the domain and the IP.
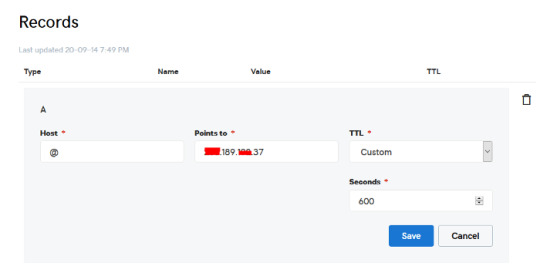
Configure your DNS Records
Simply open DNS management zone in your Domain Provider and edit the main A record.
Than we need to create MySQL database for the application. So Let’s Create one. Connect to your VPS server using any SSH client like putty. and Let’s start!
Just open Putty and enter the Server IP or Name, and Press Open. It will ask you to login, just enter “root” as the user, then enter your password which is sent to you by email.
Note: while typing the password, putty will now show it for security reasons, but It’s there, just type it!
What’s nice, is that we have MySQL installed already as part of the LAMP Stack, but we need to create a database and a user for out application.
Note: Every MySQL statement must end in a semi-colon (;)
To get started, log into the MySQL root (administrative) account by issuing this command:
mysql -u root -p
You will be prompted for the root password, just write or paste it and press Enter.
First, create a separate database that your PHP application will use. You can call this whatever you want, but we will be using TestDb in this guide to keep it simple. Create the database by running this command:
CREATE DATABASE TestDb DEFAULT CHARACTER SET utf8 COLLATE utf8_unicode_ci;
Next, we are going to create a separate MySQL user account that we will use exclusively to operate on our new database. Creating one-function databases and accounts is a good idea from a management and security standpoint. We will use the name DbUser in this guide. Feel free to change this if you’d like.
We are going to create this account, set a password, and grant access to the database we created. We can do this by typing the following command. Remember to choose a strong password here for your database user:
CREATE USER 'DbUser'@'localhost' IDENTIFIED BY 'enter_a_custom_password_here';GRANT ALL ON TestDb.* TO 'DbUser'@'localhost';
You now have a database and user account, each made specifically for Your PHP application. We need to flush the privileges so that the current instance of MySQL knows about the recent changes we’ve made:
FLUSH PRIVILEGES;
Exit from it by typing :
EXIT;
Upload The Script Files To The Server.
To upload the files, you need an application called WinSCP.
It is a free tool and you can download it from here.
Connect to Your VPS Server using WinSCP, and Update the PHP Files to the server to this path: “/var/www/html”
In most cases, the files would be zipped, so we need to extract them.
Again to Putty SSH CLient and Let’s install the unzip utility using the following command:
sudo apt-get install unzip
Clear putty screen to make in clean using the following command:
clear
Change directory to /var/www/html using the following command:
cd /var/www/html
Unzip the “.zip” file using the following command:
unzip YOURFILENAME*.zip
*Note: the file name may be different in your case, so replace YOURFILENAME with your file name.
Now, Move the latest folder content to the upper directory so it can be accessed directly -> use WinSCP Just copy all the files inside “YOURFILENAME” folder and paste them directly in html folder.
Configure Apache to Publish PHP Website
Well Done, Now your files are uploaded and placed in the html folder, we just need to configure apache so we can our Publish PHP Website and access our script using our domain name. To do so, open WinSCP again and navigate to this directory: /etc/apache2/sites-available/
Now, create a new empty file and name it “yourdomain.conf” . You can replace “Scriptname” with any name you want
Open yourdomain.conf Then copy and paste the content below into the file and save.
<VirtualHost *:80> ServerAdmin admin@YOUDOMAINNAME DocumentRoot /var/www/html ServerName YOUDOMAINNAME ServerAlias YOUDOMAINNAME <Directory /var/www/html/> Options +FollowSymlinks AllowOverride All Require all granted </Directory> ErrorLog ${APACHE_LOG_DIR}/error.log CustomLog ${APACHE_LOG_DIR}/access.log combined </VirtualHost>
Replace with your own domain, in my case its “YOURDOMAINNAME”
Enable your script configuration in apache and restart the service.
Now simply, run the following commands to finish the setup:
sudo a2ensite yourdomain.conf sudo a2enmod rewrite sudo systemctl restart apache2.service
ALMOST DONE!
Connect to MySQL Database.
Open your web browser now and navigate to your server name.
Continue the setup by entering the database info and your admin login information. In our example, the database name is TestDb and the user is DBUser with the password set.
That simple!
Setup cronjobs.What are cronjobs?
cron is a Linux utility which schedules a command or script on your server to run automatically at a specified time and date. A cron job is the scheduled task itself. Cron jobs can be very useful to automate repetitive tasks.
For example, you can set a cron job to delete temporary files every week to conserve your disk space. Some PHP web applicaitons, may require you to set up a cron job to perform certain functions.
Setup cronjobs.
To setup cronjobs, you need to add all required jobs to the server. This depends on your script, so if you bought a script from code canyon, the script owner should provide the cronjobs.
To do this, open WinSCP and got to /etc Open crontab file using the editor And paste all the jobs from your script to this folder. (cronjobs are listed in the app documentation)
Make sure each job is on a line and an empty line in the end.
Secure with a Free SSL.
SSL certificates are used within web servers to encrypt the traffic between the server and client, providing extra security for users accessing your application. Let’s Encrypt provides an easy way to obtain and install trusted certificates for free.
Connect to your Server using Putty SSH client. and Let’s Start!
Install the Let’s Encrypt Client
Let’s Encrypt certificates are fetched via client software running on your server. The official client is called Certbot.
First, add the repository to install Certbot:
sudo add-apt-repository ppa:certbot/certbot
You’ll need to press ENTER to accept.
Then, Update the package list to pick up the new repository’s package information:
sudo apt-get update
Install Certbot’s Apache package:
sudo apt install python-certbot-apache
Certbot is now ready to be used.
Set Up the SSL Certificate
Generating the SSL certificate for Apache using Certbot is quite straightforward. The client will automatically obtain and install a new SSL certificate that is valid for the domains provided as parameters.
Simply run the following command: (change the domain)
sudo certbot --apache -d YOUR_DOMAIN_NAME
You will be asked to provide an email address for lost key recovery and notices, and you will be able to choose between enabling both http and https access or forcing all requests to redirect to https. It is usually safest to require https, unless you have a specific need for unencrypted http traffic.
That’s it!
Test your website now and it should be SSL encrypted.
This tutorial I used are originated and made by Hasan By H-educate, you can check his link Here : https://h-educate.com/ or check his youtube on H-educate.
Other tips to make money online, check here : https://ricky-kartiyanta.medium.com/
Cheers!!
#website#saas solutions#saas#monetize#passive income#business#workfromanywhere#easy money#gettingrichfromhome
2 notes
·
View notes
Text
Online Course Registration Free Download

Online Course Registration System is Web-based registration software that helps you to register courses online. It is ideal for schools, educational camps, corporate training programs, and online training programs. It also provides time to time current status information related to courses. It can help for the student need to register by giving necessary details, for the desired course.
Click: https://phpgurukul.com/online-course-registration-free-download/
Project Modules
This Project Divided into two modules
Admin
Student
Admin:
Admin will register the student and provide username; password and pincode.Pincode will be used when a student enrolls for the course. Admin can manage session, semester, departments, course, students, students log Admin Panel. Admin can also add/ delete latest news and updates related to students.
Student:
Student can log in with valid reg no and password provided by admin. Student can enroll for any course and can printout of the registered course.
Online Course Registration System Installation Steps
1. Download and Unzip the file on your local system. 2. Copy onlinecourse and Put this file inside the root directory 3. Database Configuration
Database Configuration
Open PHPMyAdmin Create Database onlinecourse Import database onlinecourse.sql (available inside the zip package) Open Your browser put inside browser “http://localhost/onlinecourse”
****Login Details for admin****
Username: admin
Password: Test@123
****Login Details for Student****
Reg No.:10806121
Password: Test@123 Student Pincode for enroll Course Student: 822894
PHP Gurukul
Welcome to PHPGurukul. We are a web development team striving our best to provide you with an unusual experience with PHP. Some technologies never fade, and PHP is one of them. From the time it has been introduced, the demand for PHP Projects and PHP developers is growing since 1994. We are here to make your PHP journey more exciting and useful.
Email: [email protected] Website : https://phpgurukul.com
0 notes
Text
How to Set Up a Local Server on Mac for Beginners #NotADeveloper #WordPress
Let’s start by inserting a disclaimer, I am not a developer or coder in any way. I am not “tech savvy” or futuristic. I can work a computer enough to get online and manage my daily tasks or watch youtube videos. Oh ,and of course email. But l wanted to learn more about what Landon and Cliff do, to enter their world and understand their nerd talk. So they walked me through setting up a local server running WordPress on my mac laptop, and I took notes. Stay tuned for more blogs to come, including setting up divi builder (the fun stuff)! It was difficult to understand at some points, and others straight up made no sense, but alas! We made it through and I am here to share that experience. Sharing it with the hope that someone out there like me, can find this useful and motivating. Or the rest of you smarties find it amusing!
First things first, download WordPress. This is a commonly used CMS or content management system where you can login in to your site and make changes etc.

Once you download WordPress, you will want to move the file into your Sites Folder in Finder. (You can check for the download on your desktop or in Finder under downloads.) This is located in the Home folder. ( the one with the little house next to it.) If this folder does not yet exist, just right click and create a new one.

Once you add the WordPress download (drag and drop the folder here), you can rename if you’d like. Here in my test run, I named it “HairByKelseyAnn”. This can keep you more organized if you want to create multiple sites. (This will be talked about in another blog post to come. For now, let’s just stick with one!)

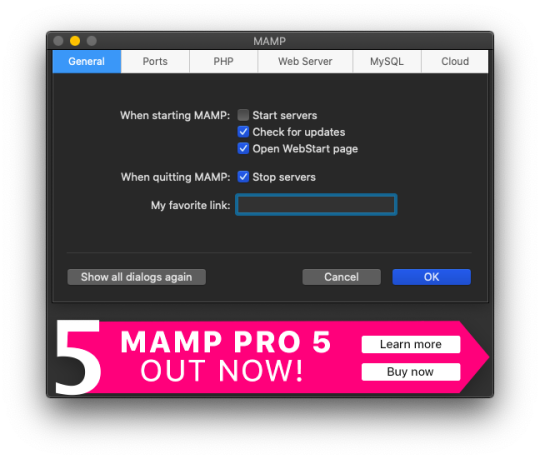
Next, download MAMP (”Stands for "Mac OS X, Apache, MySQL, and PHP." MAMP is a variation of the LAMP software package that can be installed on Mac OS X. It can be used to run a live web server from a Mac, but is most commonly used for web development and local testing purposes” Description from techterms.com) In this case, we are using it for testing purposes. You can download MAMP (I downloaded MAMP instead of MAMP pro because it’s free) Once you have that downloaded, open it up . If you are having trouble finding it, or any applications, hit command key (⌘) and the space bar at the same time. This will pull up a search bar so you can just type in MAMP and hit enter.

Once you have MAMP open, there are two ways to get to your preferences. You can either select MAMP in the top bar of your computer (next to the apple in the top left corner) or you can hit command key (⌘) and comma(,) at the same time. You will get a drop down like in the image below.
Select the Web Server tab, and this is where you make your document root to the folder you created. (Hit select and add the folder you created from your WordPress download.) This is basically creating a starting point for your localhost server so it knows what files to work from.
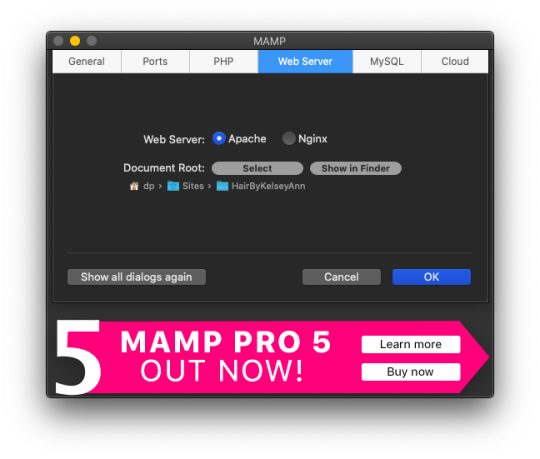
After you have your document root folder linked, click ok and it will bring you back to the “home screen”. At this point, you can click Start Servers.

Open a new tab or window, and go to- http://localhost:8888/phpMyAdmin From here you will click the database tab and create new. I chose to name my new DB the same name as the other folders I created. (This is where you create a custom database that WordPress will use. This is highly advanced and you should not find yourself here, beyond initial creation. )

After you have created your DB (DataBase), go to http://localhost:8888/ and follow through the WordPress setup. This is where you are setting up the foundation for your site.
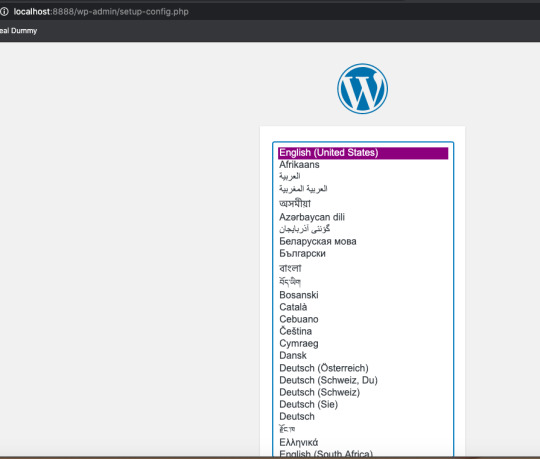
Once you get to this screen (see below) your DataBase Name should be the same as the DB name you previously created a local host file for. Username and Password set to “root” This is a general password for WordPress to login. This is not your personal account or information. Submit this, and on the next screen, click Run the Installation.

The next page will ask you for your Site name and username/ password. This is your personal information. Do Not Share! There is a checkbox asking if you want to discourage search engines ( Google, Yahoo, Bing, etc) from finding your site. You want to check this box because you are only trying to build your website on your computer (For now!). Launching your website to “go live” is separate documentation. This is for building your “rough draft” so you make sure your site is perfect before you let the world see it. After you submit this, you should have this screen.

At this point, you have set up a local server (YAY!) and created the skeleton of a WordPress website, on your computer. From here you can see my next blog post on how to customize and what your different sidebar tabs can do.
Setting up a local host on your computer gives you the ability to work on your website without being connected to the internet. The link below is how you can visualize your saved changes. (Refresh the page to see new changes made)
http://localhost:8888/
Below is the link to your WordPress dashboard. This is where you can start to mess around with themes and layouts. You can end here, or you can download the divi theme builder to really customize your site. Divi builder makes it easier to see the layout and customize as you’re looking at your site.
http://localhost:8888/wp-admin/index.php
Be sure to have your server turned on in MAMP to access your site!
I hope that you enjoyed this article and found it useful! Ideal Dummy is all about sharing knowledge and educating people on how to manage their websites. Or just computer knowledge in general! This is a tech savvy era, and we are here to help! So from one beginner to another, you can do it!
For more information, check out our website.
Written and Documented By: Kelsey Ann
#idealdummy#wordpress#computer#localhost#serversetup#localserver#software development#phpmyadmin#MAMP#macintosh#mac#database#website build#education#computer education#developers & startups#beginner#technology#kansascity
1 note
·
View note
Text
How to Send Mail from Localhost XAMPP Using Gmail
Localhost refers to the local computer or server that is used for testing and development purposes. It allows developers to create and test websites or web applications on their own machines before deploying them to a live server. XAMPP, which stands for Cross-Platform, Apache, MySQL, PHP, and Perl, is a popular software package that provides a complete web development environment. It includes all the necessary components, such as a web server, a database server, and a scripting language, to set up a local server environment quickly and easily. In this blog we will learn how to send mail from localhost XAMPP using gmail.
Why need to send mail from localhost?
When developing a website or an application, it is often necessary to incorporate email functionality, such as sending registration confirmations, password reset links, or notifications to users. However, testing email functionality on a local development environment can be challenging since local servers usually do not have built-in email services. This is where the need to send mail from localhost arises. By configuring a local server like XAMPP to send emails, developers can simulate the email sending process and ensure that their code works correctly before deploying it to a live server.
Why use Gmail for sending emails?
One of the most popular and reliable ways to send emails from a local server is by utilizing Gmail’s SMTP (Simple Mail Transfer Protocol) server. Gmail offers a secure and straightforward method to send emails programmatically using SMTP. By leveraging Gmail’s SMTP server, developers can take advantage of Gmail’s robust email infrastructure, ensuring that their emails are delivered successfully to the recipients’ inboxes. In this blog, we will explore the process of setting up XAMPP to send emails using Gmail and demonstrate how to write a PHP script that utilizes Gmail’s SMTP server to send emails from a localhost environment.
Steps to Send Mail From Localhost XAMPP Using Gmail:
Step 1: Open XAMPP Installation Directory
Step 2: Go to C:\xampp\php
Step 3: open php.ini file
Step 4: Find [mail function] by using search (You can search using ctrl + f) More Info: https://www.evrig.com/blog/how-to-send-mail-from-localhost-xampp-using-gmail/
0 notes
Text
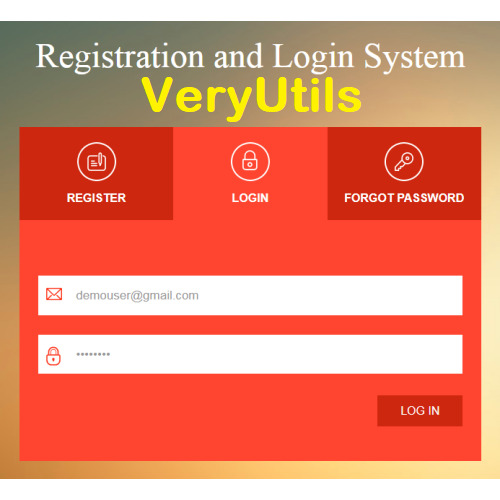
VeryUtils PHP Login and User Management is an User Registration and Login and User Management System
VeryUtils PHP Login and User Management is an User Registration and Login and User Management System With Admin Panel which written by PHP and MySQL source code. This is a mini PHP Project for User Registration and Login and User Management System. This project includes two modules. One is User module and second one is admin panel. VeryUtils User management is an important part of any web application where users accounts are created to give restricted access. Users are allowed to register their account and login to access their account. The users are also managed by administrator to allow certain roles or update users info.
So if you're looking for solution to build secure user management system then you're here right place. This PHP Login Script implements functionality to manage user operations like user registration, user email verification, login, password reset and edit profile. PHP Login Script also creates Admin panel to manage users at admin end to create new user, edit existing users details and delete user.
User authentication is very common in modern web application. It is a security mechanism that is used to restrict unauthorized access to member-only areas and tools on a site.
VeryUtils PHP User Management System is a powerful PHP script that offers a secure user management system. The application is a great way to build your website, allowing your users to register an account and build restricted access to certain users. We offer great support and it's very easy to install. It's powered by MYSQL and PHP.
VeryUtils PHP Login Script is a user management system allowing the registration and administration of users to your website. The script can easily be dropped in to an existing website allowing you to protect pages by adding a couple of lines of PHP code at the top of a page. You can also protect sections of pages. Secure your web pages dependant on user login status (logged on /off), user's group membership status or whether you are logged on as the administrator. The example pages and scripts (login, registration, forgotten password, etc.) can be customized to fit neatly in to your own site. The script can now log every users move!
The administration panel allows you to administer your users and change various site settings. As an admin you can add, edit or delete users. It is built on PHP source code and is highly customizable.
The script comes with great support from the creators including comprehensive detailed instructions, a comments section where we can answer your queries both prior to and after purchase and a dedicated forum to allow users of the script to share ways of utilising and even modifying the script for their own needs.
VeryUtils User Login and Registration features:
User registration with email verification.
User Login with remember password.
Forget password and reset password.
User profile.
User profile edit and save.
VeryUtils PHP Login and User Management Admin Panel features:
Admin login.
Admin password reset.
Admin profile.
Dashboard with users stats.
Users list.
Add new user with role.
Edit and save user.
Delete user.
Easy to install! Start protecting your website pages in minutes!
User Demo, https://veryutils.com/demo/user-registration-and-login-system-with-admin-panel/loginsystem/ Username: [email protected] Password: Test@123
Admin Demo, https://veryutils.com/demo/user-registration-and-login-system-with-admin-panel/loginsystem/admin Username: admin
Password: Test@123
How to run the User Registration and Login and User Management System With admin panel Project?
Download the zip file.
Extract the file and copy loginsystem folder.
Paste inside root directory(for xampp xampp/htdocs, for wamp wamp/www, for lamp var/www/html).
Open PHPMyAdmin ( http://localhost/phpmyadmin ).
Create a database with name loginsystem.
Import loginsystem.sql file (given inside the zip package in SQL file folder).
Run the script http://localhost/loginsystem (frontend, user panel)
Credential for user panel: Username: [email protected] Password: Test@123
User Module In user Module, user can register himself. After Registration, user can login with own email id and password. If user forgot own password than user can request for password using own email id. User Module has User Registration, User Login, Forgot Password functions.
Note: Forgot password will not work on localhost.
For admin Panel http://localhost/loginsystem/admin (backend, admin panel)
Credential for admin panel: Username: admin Password: Test@123
Admin Panel Admin can manage all registered users. Admin can update the user information and delete the user. Admin can change own password. Admin Panel has Admin Login, Manage users, Edit user information, Change Password (admin) functions.
If you encounter any problem, please feel free to let us know, we are glad to assist you asap.
0 notes
Link
Check If User (Username And Email) Exists In MySQL Database Using Ajax, Javascript, HTML And PHP Web Program XAMPP Localhost/Server (phpMyAdmin) This is a web based application that checks if username and email exists in local mysql database using XAMPP Localhost. To query from the database am using php server side programming language. If the requested data is found in the database, the script displays the results on a webpage using ajax and javascript requests without refreshing the webpage. FILES This web based program/Application has the following files. checkusernameandemailajax.htmlmysqldatabaseconnection.phpactionpage.phpmydb.sql checkusernameandemailajax.html SOURCE CODE [code lang="html"] Check If User (Username And Email) Exists In MySQL Database Using Ajax, Javascript, HTML And PHP Web Program XAMPP Localhost/Server (phpMyAdmin) Database Result Will Appear Here //Function for checking if username already exists in the database. function checkUname(uname) var xhttp; if (uname != "") xhttp = new XMLHttpRequest(); xhttp.onreadystatechange = function() if (this.readyState == 4 && this.status == 200) document.getElementById("demo").innerHTML = this.responseText; ; xhttp.open("GET", "actionpage.php?uname=" + uname + "&uemail=" + '' , true); xhttp.send(); //Function for checking if email already exists in the database. function checkEmail(email) var xhttp; if (email != "") xhttp = new XMLHttpRequest(); xhttp.onreadystatechange = function() if (this.readyState == 4 && this.status == 200) document.getElementById("demo").innerHTML = this.responseText; ; xhttp.open("GET", "actionpage.php?uname=" + '' + "&uemail=" + email , true); xhttp.send(); [/code] mysqldatabaseconnection.php SOURCE CODE [code lang="PHP"] [/code] actionpage.php SOURCE CODE [code lang="PHP"]
0 notes