#epoxy resin tutorial
Explore tagged Tumblr posts
Visit Tumblr Blog
Explore Tumblr blogs with no restrictions, modern design and the best experience.
Last Seen Tumblr Blogs


Fun Fact
Tumblr has 16.74 million mobile monthly users in the US.
Text
youtube
In this video, I’ll guide you through creating a stunning diorama of a meteor impact on the moon’s surface. This detailed tutorial covers every step, from preparing the base to crafting the crater and embedding the meteor for a realistic effect. Using materials like epoxy resin, plexiglass, silicone mold-making rubber, and resin pigments, you’ll learn how to bring this cosmic scene to life.
#jedrek29t#resinart#epoxyresin#resin#epoxy#tutorial#diy#howto#making#craft#impact#meteor#diorama#lamp#nightlamp#fire#Youtube
6 notes
·
View notes
Photo


(via 10 Things I Have Learned While Working With Resin)
2 notes
·
View notes
Text

How to Make an Epoxy Resin River Table With 3D Fish Stickers - NO Painting and NO Sanding! DIY


#家具デザイン研究室#resinProject#resinrivertable#resintray#EpoxyResinProject#ResinArtist#ResinMixing#diy#Resinace#Epoxy#FishinResin#resin#FishStickers#rivertable#ResinFishStickers#resinart#buzzingfish#resintable#jedrek29t#tutorial#epoxyresinrivertable#resincraft
0 notes
Text
Non-Toxic Polymer Clay Jewelry Business in India
Non-Toxic Polymer Clay Jewelry Business in India Introduction The handicraft world welcomed a brave little thing — polymer clay. Polymer clay is the type of medium that has captured the attention of both the artists and the aspiring entrepreneurs alike, with its versatility and endless possibilities and it is a business in its own right. Using polymer clay to make jewellery, these enterprising…
#apply resin on polymer clay#basic polymer clay tutorial#diy polymer clay earrings#epoxy resin art jewelry#how to apply resin on polymer clay#how to use polymer clay#jewelry#polymer#polymer clay#polymer clay beginners#polymer clay charms#polymer clay diy#polymer clay for beginners#polymer clay jewelry#polymer clay jewelry making#polymer clay tutorial#resin jewelry#small business ideas#small business owner#uv resin jewelry for beginners
0 notes
Text
youtube
#resin color palette#resin art#diy videos#color palette#customized art#resin crafts#diy palette#handmade gifts#art supplies#resin inspiration#epoxy resin art#personalized gifts#custom resin palette#resin diy#resin shorts#crafty feelings#creative art#art lovers#resin ideas#handmade with love#craft tutorial#resin creations#gift for artist#paint palette#how to#diy#resin art for beginners#easy resin art#resin art video#customized gift
0 notes
Text
Resin Art 🇪🇨 (Letter Keychans Tutorial)
Llaveros de resina 🇪🇨!, de mis diseños ya publicados, les traigo un video tutorial!
#arte#creative inspiration#creative process#epoxy#epoxy art#epoxy resin#handcrafted#handmade#manualidades#content creation#resin keychain#resin jewelry#tutorial
0 notes
Link
FULL VIDEO COMING SOON which will answer all questions. If you are impatient, please check out this video which is a full tutorial of the same technique with different colors https://youtu.be/y9ioIrHSjNk?si=HU0aen0GyCW2cEIZ Materials used: Mixed Media Girl Artist Resin https://mixedmediagirl.com/product/artist-resin-for-epoxy-resin-art-by-mixed-media-girl/ Pinata and Ranger Alcohol Inks https://www.amazon.com/dp/B01IQA5AT6?linkCode=ssc&tag=onamzmixedm03-20&creativeASIN=B01IQA5AT6&asc_item-id=amzn1.ideas.2LG19YLV5DVGO&ref_=aip_sf_list_spv_ons_d_asin Silicone mold https://www.amazon.com/dp/B08JYS8D3K?linkCode=ssc&tag=onamzmixedm03-20&creativeASIN=B08JYS8D3K&asc_item-id=amzn1.ideas.M6O88JZASTU5&ref_=aip_sf_list_spv_ofs_mixed_d_asin 100-ounce plastic bowl https://www.amazon.com/dp/B08QRGK56R?linkCode=ssc&tag=onamzmixedm03-20&creativeASIN=B08QRGK56R&asc_item-id=amzn1.ideas.2LG19YLV5DVGO&ref_=aip_sf_list_spv_ofs_mixed_d_asin
#crosspost#Resin and Alcohol Ink Bowl#Mixed Media Girl#FULL VIDEO COMING SOON which will answer all questions. If you are impatient#please check out this video which is a full tutorial of the same technique with different colors https://youtu.be/y9ioIrHSjNk?si=HU0aen0GyC#youtube#zapier#ivys queue#2024-02-18T06:32:35Z#epoxy resin#alcohol inks#resin art#mixed media#art tutorial#art materials#resin craft#diy art#art techniques#craft supplies#mixed media art#art resin#resin pour#art video#art creation#art project#art supplies#crafting#epoxy art#art creation process#resin mold
1 note
·
View note
Text
#ring#resin ring#resin#uv resin ring#flower ring#resin art#ring making#resin tutorial#making resin rings#epoxy resin#resin rings#uv resin#how to make a clear resin ring#diy resin flower ring#wedding ring#pressed flower botanical ring#how to make a resin and rhinestone ring#handmade ring#resin rings with flowers#handcrafted ring#casting a resin ring#glow ring#diy resin and rhinestone ring#how to make a resin ring#resin rhinestone ring#Rounded ring#Pressed flower ring#Resin flower ring#Dried flowers resin#Real flower in resin
0 notes
Text

I've noticed in the selfship community we don't talk a lot about ita bags and other DIY fan culture things much! To some extent it makes sense, as it might feel strange to some to have a lot of merch of someone you're viewing as a partner? But I've personally found it fun and wanted to share some video tutorials and inspiration for anyone else that might want a craft or project to dedicate to their f/o or comfort character!
links in this post go to tutorials/videos/templates!

Bags for displaying official or fanmade pins, keychains, and merch! There's a million ways to do this, but here's a couple to use as jumping off points.
using a standard premade ita bag!
using a nicer bag!
Making an ita bag out of a cheap PVC tote bag!


"But I can't afford merch/there's no official merch/etc!"
No problem, lets talk about how to diy that too!
You can use shrink plastic to make your own keychains!
You can also make pins in lots of different ways!
Using epoxy stickers
Using hot glue
Using a traditional can badge without a button maker
There are also Etsy sellers who will make custom badges from art as long as you have permission by the artist! If you have your own fanart, or can ask an artist you've commissioned, this would also be an accessible way while still looking more "official."
Finally, I believe these are usually used on Uchiwa fans (see later section), but I've used these paper letters alone as ita bag decorations! Name boards combine the letters or kanji of a character's name (or a different word relevant to the character) with their picture!
youtube

Do you have one standout badge that you'd like to highlight on your bag, or maybe you just want to make it into a keychain? Rosettes are great for that, and there's a million ways to make them. Here's a few!
1, 2, 3 , 4


Do you have paper goods such as photo cards or mini prints that need a safe but stylish way to be stored and displayed? Photo card holders are the way to go! There's a lot of different styles people like to use:
Resin Deco method
Lace and Ribbon method
Fake Cream (Decoden) method
Sticker method


Tutorials for photo cards do exist, and I will link them, but it's worth noting that it's a lot of work and the quality you get depends a ton on the quality of your printer. If you have access to an art printer, these will turn out great! If you're using a regular printer, however, you may be unsatisfied with the quality. Buying prints from small artists or having regular photos printed would be other alternatives.
Photo card tutorial focused on drawn art
Photo card tutorial focused on photos

Fans that are often printed with your favorite idol to use at concerts! While it originates there, people have started making them for their fictional favorites as decor too. You can create a full size fan (they sell blanks on amazon) or create a mini keychain version for an ita bag!


These can be quite complicated, but you can make your f/o as a plushie! Especially great for f/os who have no official plush merch.
This tutorial goes very fast, but it looks easy enough. This is only one example tutorial. There's also this pattern you can work with if you mostly understand sewing.
A more approachable plush like project would be these felt "plushies"!
You can also buy plushie bases like these , and then all that's left is the face, hair, clothes, etc.! You would probably approach it like in this video but the style would be up to you. I love how this creator embroiders faces!


I hope this gives you all some ideas to work with! 🩷
#self shipping#self ship#yumeship#yumeshipping#f/o stuff#f/os#fictional other#self ship art#self ship ideas#oshikatsu#yumedanshi#selfship#f/o community#mine
592 notes
·
View notes
Note
if you absolutely cant find a way to ship to western countries in your budget but you still want to sell what you make, maybe you could sell guides online on how to make your little dirk charms? similar to how people sell sewing patterns
Wow, I didn't think about that. Although this is also a way? I don't have a simple answer to this at the moment In fact, the process is very simple (in my personal opinion). To be honest, I don’t think it’s worth turning into a paid tutorial. Basically I make the 3D model myself and then print it out and turn it into an epoxy resin part. You can walk through all the processes in one sentence :P

I thought I could sell the 3D model files, but the possibility of the virtual files being stolen and circulated for free is too high. I don’t want to see the things I worked so hard to be sold by others in large quantities without authorization :P
No, I'm not being negative about it, it's just that sometimes business requires careful planning and making sure the customer is truly satisfied (or even has a smooth shopping experience). I don’t want to just take orders casually when I see money. That kind of business mentality is really bad.
7 notes
·
View notes
Text
youtube
In this video, I’ll show you how to preserve a wasp in epoxy resin and turn it into a stunning jar-shaped sculpture using a lathe. This detailed tutorial walks you through every step, from preparing the resin mold to shaping and polishing the final piece.
#jedrek29t#resinart#epoxyresin#resin#epoxy#making#tutorial#diy#craft#howto#jar#make#wasp#bee#Youtube
2 notes
·
View notes
Note
if you want to attach something to a piece thatll no doubt melt/burn during firing… example my friend loves flowers and ik i could do flower presses but would there be any way to incorporate the actual flower? or... ig these are 2 diff things. 1: is there a way to make a piece with flowers (dried or not)? 2: would it be possible use epoxy sculpt over a finished piece to attach something that wouldnt have been able to be fired? like attaching a glass doll eye to a finished ceramic piece with an epoxy sculpt or something else. (google hant been helpful and i dont know anyone who has clay knowledges). ty much for reading
as far as I know, there’s no way for a flower to survive the kiln.
you’re right, you can use them to press into the clay, and even add colour to make them look lifelike, like Hessa Al Ajmani does


one other suggestion that doesn’t incorporate the actual flower is to use an overglaze decal like Lindsay Dyck


you can buy them on Etsy, I’m pretty sure I’ve seen pressed flower designs before.
you could try using a food safe resin after the piece is fired? I don’t have any experience with resin unfortunately, but apparently it can bond to ceramic.
hmm orrrr you could use air dry clay? here’s a tutorial from Mud & Bloom. I know it’s not the same but it depends on what you want to do with the piece

50 notes
·
View notes
Text
How I made little Haarlep


A few days ago I posted about my latest finished crochet project for my good friend @tavyliasin, and I wanted to share how I made them! This is for people who would also like to make a little Haarlep (Raphael, Karlach, or any other character with horns for that matter), those who are curious how I did it, and I just love to yap about my projects. When I started this project I had only been crocheting for about 8 months, and it really pushed me to step out of my comfort zone, try new things, and learn a whole lot. I took the time to explore, experiment, and try again if needed. And man, did I learn from little Haarlep.
Note that this isn't a tutorial; I have made mistakes, oversights, and stumbled against problems. I will try my best to list these here, but if you have any questions about the listed patterns I advise you to head over to the linked etsy store to ask the creator of said pattern. But if you have any questions specifically regarding this project I'll try my best to answer them as best as I can. There are also some parts of little Haarlep where I didn't use a pattern at all, and either freehanded it, or did a load of guesswork.
Now, let's get started!
Used patterns:
Body: Doll base Amigurumi Body Version 3 by TheLoftyLoop
Wings: Kawaii Bat by ZeroGravityCrochet (I have also used this pattern for my Batstarion plushie)
Horns: Horns (3 sizes) by KnottedLovebymima
Used Materials:
Body: Katia Bambi #312 (3x)
Hair: Twister Solid XL Black #105 (1x)
I had bought the yarn for the hair and horns in a local yarn shop, and have thrown away the labels a long time ago. Once I have found them again I will list them here as well.
Polymer stuffing
PLA filament (optional)
Small chains which were part of a jewelry repair kit.
Soft silver RVS rings, 1,5 x 7,0 millimeters
Epoxy Resin (optional)
Gold and orange pigment powder
Gold glitter
Red embroidery thread
Used tools:
Crochet needles (3,0 millimeters and 3,5 millimeters)
Knitting markers
Yarn scissor
Yarn needles
Row counter (optional although it literally saved my life)
3d printer (Optional)
Silicone half circle mold
Pliers (x2)
Cutting pliers
Mini hand drill
Instant glue
Tweezers (optional)
Step-by-step guide:
First, I needed to know what the hells I was getting myself into. For that I have used several references on Haarlep. I have used these as a guidelines for the entirety of the project. The screenshots have been provided by @tavyliasin.


Then, I made a list every single part of the doll I needed to make.
Body
Tail
Wings
Horns
Ears
Eyes
Face
Harness
Hair
The body


For the body I have used the 3,5 millimeter crochet needle because I wanted the stitches to be as tight as I could. I had ignored the advised crochet hook size on the label of the yarn because of this. Although I quickly found out that the yarn itself was too large for this pattern as well, resulting in the doll becoming bigger and longer than I initially expected. But this is not necessarily a mistake because that would mean that there would be more to cuddle!
The head ended up being way too long though, so after I finished the body I folded the part of the head that was too long and stitched it on the back of the head.
The Tail

I didn't use a pattern for the tail, instead I made a magic ring with 6 single crochet stitches, and increased the stitch each time I felt like I should make the tail wider. For this I also used the 3,5 mm needle.
The wings

I used my trusty 3,5mm needle for this part as well. I already had a pattern for a bat plushie, which I had used to make the wings. From there I diverged from the pattern, and created a bigger 'spiral' so to speak by adding 3 more rounds.
If you are using this pattern, I diverged from the guide from row 5:
r5.1: 5dc, inc.
r5.2: 6dc, inc.
r5.3: 6dc, inc.
After that I followed the pattern again, and diverted from it once more to add more single crochet stitches to each 'spike' of the wings, making them more bulky and longer.
The ears

I also didn't follow any pattern for the ears, I just made a triangle of single crochets (again, with my 3,5mm needle), and stitched the points of the ears to one another to make them more pointy and give them more depth. Then I attached them on the side of the head with *only* the base of the triangles. This is because I was going to add the hair and horns later on, and I didn't want the ears to get in the way of them.
The eyes.


I worked with resin before, and still had some. I mixed a small amount of epoxy resin with gold and orange pigment powder, and golden glitters. I poured it in a half circle silicone mold I have with various sizes. After it had cured I tested which size I liked the most for the doll, and used those for the eyes.
Next was the application, glueing the eyes directly on the head would be a surefire way for them to detach in the near future. So at first I tried to use these screw eyes by hanging them over the mold as the resin cured, so I could simply sew them in. But that didn't work as the resin swallowed the entirety of the screw, and the thread I hung them over the mold with. The 'eyes' were still semi-transparent even though I used a lot of pigment, so I could easily see the ends of the screws inside the eyes. So this was a failure.
On my second try I didn't mess with the resin as it cured at all, and used even more pigment powder just to be sure it wouldn't be transparent. This time, I used a small hand-drill to create 2 holes on each side of the half-circle, as close to the edge as I could. Then I drilled another 2 holes on the flat side where the end of the first 2 holes ended, making a little tunnel. I took some tweezers and stuffed and pulled the thread through the tunnels until I could pull it through. I tied them on each end, and superglued the knots for extra security.
Once everything was dry I sew the eyes directly on the spots I wanted them to be. But I wasn't too happy with the result, in all honesty...

... So I gave Haarlep some eyelids. Sure, they still look quite bug-eyed, but I decided to trust the process.
The horns (and a nose!)

I had completely forgotten to photograph any of my progress from when I was done with the eyes t'ill the horns were already finished. I had also decided to give Haarlep a little nose (which I made out of a magic circle with 10 single crochets, 2 rows of increases, and 3 rows of decreases).
In the original pattern there are 3 sizes available, and I used size 1 and 2 for the horns on this doll. The yarn I used for this was quite thin, but I made the mistake to use the 3,5 mm needle *again*. Which is why I could see directly through all the stitches, and see all the polymer filling within. I admit that the horns were about my least favourite part of this project, and I was struggling to get through them (no hate to the creator of the pattern at all, as it was a very well-written pattern! I just didn't enjoy making these because of some Morb-problems). So I was not ready to do it all over again. Instead, I noticed I had a lot of yarn I used for the horns left, so I used that as filling so the large holes in each stitch wouldn't be noticeable.
The Hair

Again, I forgot to take any pictures of this process, so I'll have to write down what I did. I used the Twister solid XL yarn for this.
First I gave Haarlep a much-needed hairline to map out where I wanted his hairdo to start and finish. For each 'strand' of hair I repeated one of 2 processes whether I wanted it to curl or not.
(fun fact, the 'curly' hairs are based on a very simple pattern a friend of mine created to make toys for her cat!)
Curls:
Chain (make it as long as you want depending on how long you want it to be, but for this project I used in between 8-15 chains per strand), single crochet in the 2nd chain stitch from the end of your chain. 3 single crochets in every chain (I did this for about 3-6 chain stitches). Than I did a bunch of single crochets in every chain until I reached the end of the chain. Then I put another single crochet in the 2nd chain, and put 1 single crochet per chain stitch until you reach the end, tie and cut your yarn on both ends. I kept about 15-20 centimeters of yarn on the end that's the furthest away from the curl so I could use that to sew the strand of hair directly onto the head.
You can also put 2 single crochets per chain, or more than 3 depending on how curly you want your strand of hair to be.
Straight strand:
Follow the same steps as the curls, but just keep adding single crochets per chain stitch after you've made your chain, and repeat this twice.
I then worked in layers when attaching each strand of hair onto the head, I added one or two rows of "hair" starting from the neckline. Once I sew in those strands I sew about 3-5 centimeters of hair directly onto the head (the point that's the furthest away from the curl/the part of the strand that's attached to the head). This is so if the hair on the doll moves it wouldn't go out of place, and you wouldn't see any bald spots. This way I also wouldn't have to make countless of strands and add too much hair.
I have no idea how I can explain this properly without pictures, so if anyone reading this really wants to know how I did it I'll recreate the steps mentioned above.


I also added some sideburns to give Haarlep's hair a bit more of a finished look. After I was completely done with the hair (checked that I had not left any bald spot unchecked) I attached their ears on their lower horns using a piece of the same yarn I have used for the body.
The Harness
This was arguably my favourite part of this entire project! I really enjoyed making this as I could use several types of materials into this. I wanted to make the harness without having to directly attach it to Haarlep's body, so that it could be tight enough for it to stay attached. Bit first I had to start with the basics.

The undies! I freehanded the underwear as well, which goes as follows:
I started with the front, and made a chain that reached the diameter of Haarlep's body. From there I worked down, adding a single crochet per chain stitch. And at each end of the row I made a decrease. I used knitting markers to attach the underwear on the body as I made it to get as much of an accurate fit as possible. I kept going until I reached the hind, which is where I had to "split" the underwear to accommodate the tail. At first I went to the left, making every row very small until it reached 3/4 of the top of the tail (while making sure it could reach the front side of the underwear). I then made a chain that went around the entire top of the tail, and kept going until I reached the other side of the underwear, and attached my chain on it. I did the same stitching as I did on the other side of the tail, except in reverse until I reached the rest of the underwear. From there I finished up the underwear by securing all sides of the underwear to each other using the same yarn so it would seamlessly fit across the doll's waist.


I have no idea how to write a comprehensive tutorial and/or a pattern. So again, if you don't understand how I did this from the text I wrote please send me a message. I'll draw how I did this instead, and edit it into this post.
Next was the harness itself. I used a chain with a double crochet per chain stitch, and measured the chain against the body as I made it. I started out from the middle (the back strap that divides on the shoulders, to the front of the chest where it splits. I made several different sizes of "straps", always making a pair. I then attached every strap on a chainmail ring (the soft silver RVS rings), and kind of worked my way from there. I opened each ring with 2 pliers, slid on the end of each strap in place, and closed the ring with the pliers again. This was very much a 'trust the process' type of work for me.

If I couldn't secure the strap just yet I held them in place with a knitting marker (see shoulders).
For the shoulder pads I only used a chain to make the straps that go under the arms, and almost followed the same steps as I did when creating the underwear. Start with a chain (except smaller, like 5 or 6 chain stitches), do a round of single crochets, decrease at the ends of the rows, a round of single crochets, etc. Until I got a tiny rounded triangle, which I attached to the shoulder chain.
Next, I wanted to create the spikes that go on top of the shoulder pads. At first I wanted to make the tiniest studs using some embroidery thread. But I recently acquired a 3d printer! And as I already was using metal in the harness, I wanted those studs to match.
So I created a simple design on Tinkercad.com using a simple cone, printed 10 of them (using a 0,25mm nozzle and neutral white PLA filament), and painted them silver. Then I figured that I could drill a little hole in it with the same small hand drill I used on the resin, but turns out that cured PLA filament is quite hard, and brittle at the same time. So I went back to Tinkercad, and designed a cone with a hole in it that would allow a larger needle to go through it. I made the cone 0,5x0,5 millimeters.


After that was done I painted them silver again. Below you also see the shoulder pads, which is the only picture I have of them before I attached them to the doll.

I used 5 studs per shoulder pad, and sewed them directly onto the pads with black thread. After I secured them with a tiny drop of instant glue so they wouldn't shift. I could've created another hole that ran opposite of the one already going through the cone, but I think that it would've made the integrity of the inner (teeny tiny) supports within the cone too vulnerable.
After that was done I attached the shoulder pads around the arms and the harness.


For the final touches I attached the small chains from the jewelry kit, mirroring the references I found. I simply opened them with the pliers, hooked them through a stitch in the harness, and closed them. I actually had run out of these chains, and literally dismantled a necklace as I wasn't going to wait around and buy another jewellery kit or a whole spool of necklace chains when I was so close to the end. And I'm glad I did, because my patience had run out after I had been working on little Haarlep since August 2024.
And with that, they were done!

As soon as I was done I made pictures, and sent Haarlep on their way to Lia along with some snacks and a few other bits and bops. This project was such a challenge, but very much a welcome one. I had started learning how to crochet in december 2023, and truly went out of my comfort zone, and learned so much about crocheting techniques, trusting the process, and Frankensteining several patterns into one.
If you have any questions regarding this project, or if I can clear up anything mentioned here I'd love to help to the best of my abilities! Other than that, thank you for reading this and following the journey of creating the most intricate and hardest crocheting project I have made so far. And it was a joy to make. But it will most likely not be the last one, and not the hardest as I have no plans of quitting crocheting anytime soon. Who knows I'll surprise myself with the next Baldur's Gate 3, or other fandom project I'll decide to undertake.
#my art#my crochet#crochet plushie#crochet project#crochet guide#baldur's gate 3#bg3#baldur's gate 3 haarlep#bg3 haarlep#baldur's gate 3 fanart
5 notes
·
View notes
Text


So I wanted to get back into making dolls, and really like having them be posable. In the olden days I used to make them with sculpey and pipe cleaners. Which kinda works but also they pose like Gumby so bleah.
So I scoured youtube and blogs, looking for tutorials on how to make tiny ball joints and things. Watched a lot of excruciating tutorial videos on sculpting ball joints and then making molds of them and then casting custom ball joints with some kind of mysterious resin/epoxy blend and got really discourage.
Then I stepped on some legos. And it dawned on me.
Lego makes tiny ball joints. They are even sturdy enough to do stop motion with!
So, now I’ve got this little experimental guy. Obviously I can’t bake polymer clay onto plastic legos, so we’re trying out this 2 part epoxy clay called Magic Sculpt.
So far he needed his hip rebuilt once because the first version made him stuck doing permanent squats. And then I shattered his femur on accident making him do some sweet dance moves.
Now I just need to sculpt some microscopic hands and feet and a face for the next phase. Going to attempt a little Teldryn Sero doll so I can hide his poor dumb face when I screw it up. Also because eventually I want to build a little miniature bar and fill it with random characters and every bar needs mercenaries hanging around.
3 notes
·
View notes
Text
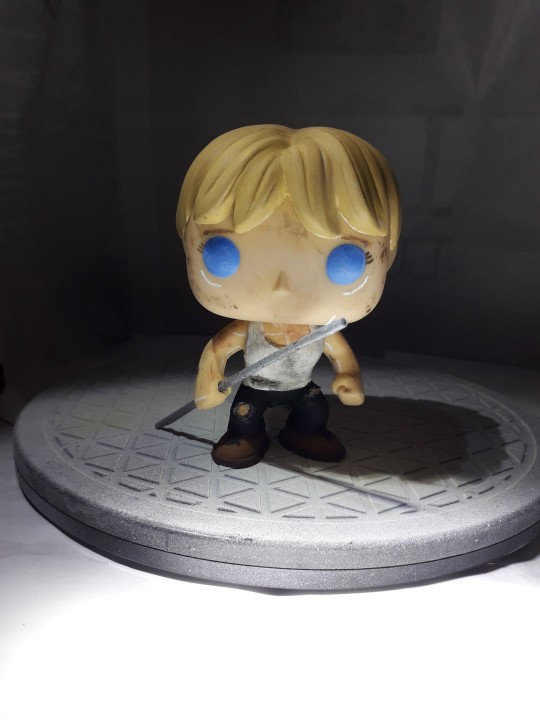
How to Build Your Own 'Augmented Super Wife Supersoldier From The Future' Funko Pop.
A Semi-Coherent Guide By RC.
This is a long one. A loooooooong one.
I meant to do this like two and a half years ago, but in the spirit of keeping this fandom's head above water, and the fact I'm at the hospital (nothing serious!) with nothing to do for the next couple of hours, I'm doing it now.
So if, like me, you are still bitter that Grace and Dani didn't get official Funkos, or official *anything* due to manufacturer short-sightedness, why not say 'fuck it' and build yer own?
This rambling tutorial will attempt to demonstrate how to build Grace from the 'when they start to kill me, run' scene.
Like, literally that bit 😋.
Anywho. Let's do this!
You will need:
- Funko Pop DIY (female)
- Polymer clay (eg. Sculpy, Fimo, CosClay). I'd advise against cheapo no-name alternatives purely because in my experience the baking times/temperatures stated are absolute garbo. Also, polymer clay will give off quite gnarly fumes while curing, so better to use a trusted source. But if cheapo's all ya got, it's all ya got.
Other modeling materials you might consider instead of polymer clay include...
Epoxy clay (eg. Milliput, Apoxie Sculpt, The Army Painter 'Green Stuff', even something like J-B Weld or similar 2 part plumber's/repair putty).
Plain ol' air drying clay (eg. DAS, FimoAir, Gedeo).
You could even whip up a batch of 'cold porcelain', or an oven cure salt dough from ingredients you probably already have at home. Make sure you clear coat any salt dough creations properly after curing as over time ambient moisture may mess with it.
Each option above has its own pros and cons. Do your research if you aren't sure. Me? I used Fimo.
*ahem* Carrying on...
- Masking tape
- Hobby knife
- Pin vice
- Kebab skewer (wooden), or styrene rod
- Paint brushes
- Primer (plus dust mask if you're using a rattle can indoors)
- Sandpaper (around 400 grit oughta do it but you could probably go 200 either side of that and get a good result)
- Acrylic paints (optional: Posca PC-1MR pens in black and white for fine detail).
- Crafter's heat gun, or a hairdryer
- Varnish/clear coat.
Optional extras: Airbrush, spray booth/cardboard box, rotary tool, oven thermometer, artist's/cake decorating turntable, UV resin, silver leafing pen, jeweller's files, jeweller's wire, acetone, superglue or 5 minute epoxy, a lil piece of sponge, pearl mica powder, scavenged Funko Pop head 😈.
Step One: Grab your Funko DIY and separate the head from body using heat to soften the vinyl enough to wangle it off the neck post. Shoving it in a mug of hot water for a few minutes should do the trick. Make sure to dry out the head as much as possible. Last thing you want is mould growing inside it. This is Terminator, not The Last Of Us 😉. Alternatively you could use your heat gun/hairdryer, but I explain in Step Six why the water bath approach is a better option (imho) at this early stage.
(You are giving this entire thing a quick read through before you start, right? I dunno about the rest of you but I like to have at least a basic idea of the work ahead before I get stuck in. Saves finding out you're missing a necessary tool/material at an inopportune moment and all).
Stop rambling, RC. Sorry. It's easier to be succinct when you haven't lost half your photos 🤦♀️. Moving on...
If you don't wanna attempt to sculpt the hair yourself you can, as I did, take a kitbashing approach instead of using the supplied DIY head. Grab one of the many commercially available Funkos with a decent approximation of the hairstyle you want and then go Step One on em. Buy 'pre-loved', buy BNIB, dig one out of a dumpster, steal one from your lil cousin, it doesn't matter. Procure as your time/budget/situation dictates. Improvise where necessary.
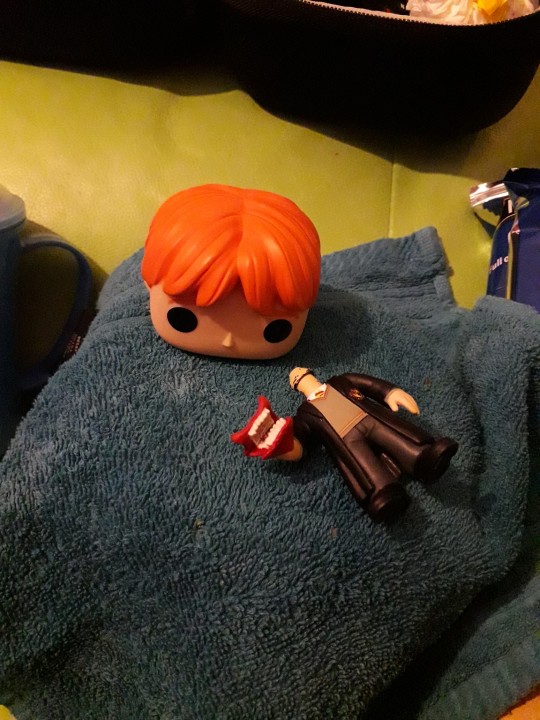
Sorry, Ron. I need your floppy hair. I do not need your clothes.
Or your boots. Or your motorcycle.
...😋
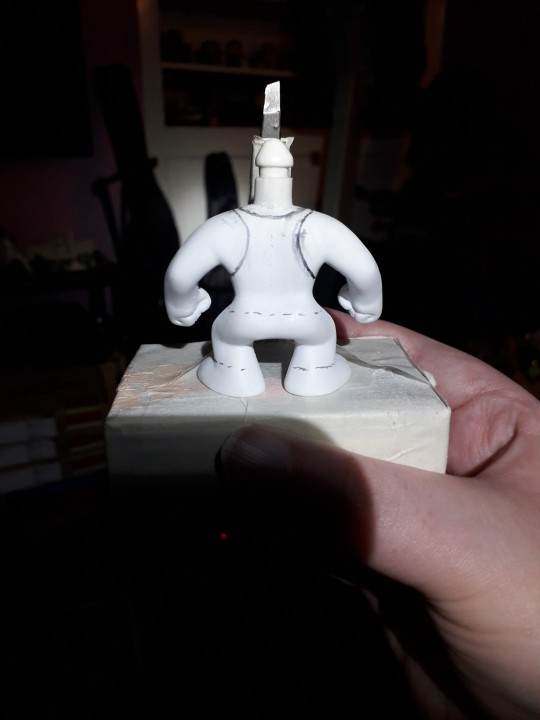
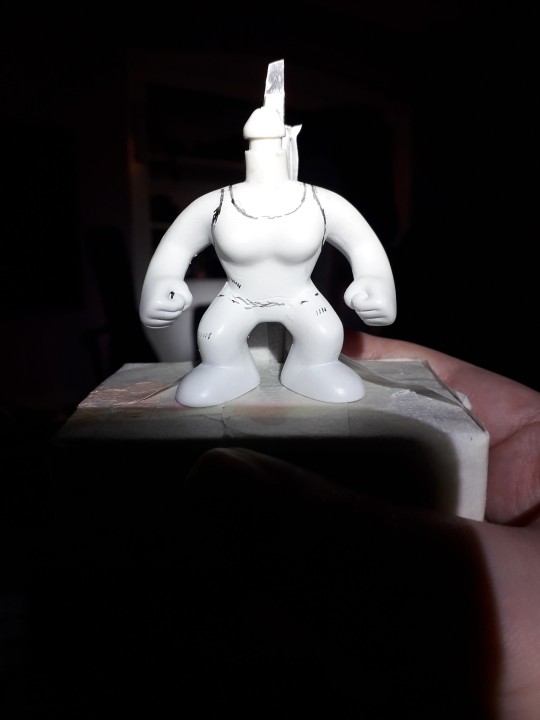
Step Two: Take the body of the Funko DIY and mark out the position of the tank top and the cuffs of the jeans. These will be used as guides for when you add the clay.
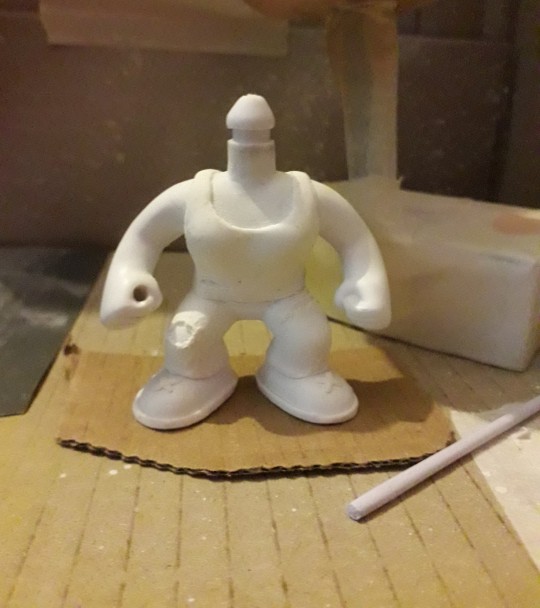
At this point I used a pin vice to drill the hole thru the fist for the rebar. If you're a crazy person you could use a rotary tool with an appropriately sized bit attached.
To make the rebar I fashioned a mould from a drinking straw and filled it with UV resin. Because I'm awkward. A wooden kebab skewer, or some hobbyist's styrene rod (eg. Evergreen Scale Models) would work just as well. Just cut it to size, paint it silver and you're golden. I used a metallic leafing pen. You use whatever you've got handy. Doesn't have to be shiny. A flat grey acrylic would work just fine.
Use jeweller's files and sandpaper to make small adjustments to the hand hole and rebar respectively in order to get a good press fit. There's always glue if you overdo it 😉. But don't add the rebar to the model just yet, as you're gonna need room to manoeuvre for the next bit.
Step Three: How do you make it look like your figure is wearing clothes when you don't have much real estate to work with?
You fake it, that's how.
You do not need to model an entire set of clothes! It's an arse ache, and we're all about working smarter not harder on the RC channel.
So, take your modeling compound of choice, roll a chunk of it out to the desired thickness, and then cut into strips, say 2-3mm wide. Use your best judgement here.
Now, using the jeans as our example, wrap a strip around the bottom of the leg where the cuff would sit. Cut off any excess and blend out the join. Just give it a lil rub and it's like it was never there. Like magic! You should have a nice defined edge at the bottom, just above the foot. Now see the top edge of your lil clay strip? Well, you wanna start pushing and flattening the clay to blend the edge right out so it fades back into the body.
Repeat for the other leg, and the bottom of the tank top. The straps are relatively simple, tho the bits that pass under the arms can be fiddly due to lack of space. Use a hobby knife to shape and crisp up those edges and then blend out the extraneous edge. Same thing with the neckline.
Run a strip around each foot to form the soles of the boots, and a lil 'x' on the top of the feet to give the impression of laces.
For the rips in the clothing you can simply gouge out a little of the clay. If there isn't any on that part of the model (the knee for example) roll out a little wormy dealie (for you North of the Border fans 😉), position it as needed, blend out the edges, then gouge as required.
If you're playing on hardcore mode, this might be the time to start piling clay on the Funko DIY head and sculpting the hair. You may prefer to leave it til the head's re-attached tho. It depends on the material you're using. If you don't think it'll stand up to a bit of manhandling while pushing the head back onto the body, save this step til that bit's done.
Cure according to the clay manufacturer's instructions. The vinyl will not melt at the temperatures required to cure polymer clay, but if you don't wanna risk it or you don't wanna use your food oven to cook plastic, with all the gnarly fumes and stuff, I've given you plenty of air dry and/or non toxic alternatives. Consistent temperature is key with polymer clay. Undercooked, it's quite brittle. An oven thermometer comes in handy here if you've got one.
Step Four: Primetime!!! Some like to brush on primer, which is fine if you're painting a fence or throwing gesso on a canvas. Not so fine if you're painting a figurine imho. I mean, unless it's Cassandra from Doctor Who. A good rattle can of spray paint is what you want ideally, but again, it's about what you can afford/wangle/manage with your crafting space, so feel free to ignore me and brush away!
First rule of Primer Club: several light coats are better than one heavy coat. Second rule of Primer Club: knock each coat back a lil with sandpaper before applying the next one. Third rule of Primer Club: sit your rattle can in a warm water bath for five minutes before shaking it up to improve flow.
You can get primer specifically for plastics but while I would recommend it, it's not absolutely necessary.
A scavenged head may need masking off if the base colour already matches the skin colour of your character. Save yourself a bit of painting innit. You can get really tight, clean edges against the hairline with a hobby knife. If the hairstyle, hair colour, and skin colour match straight outta the box? Congrats! Why are you even reading this? 😜.
That thing in the background is a portable spray booth (that other thing is a turntable). A cardboard box is also a portable spray booth if you want it to be. Only thing it doesn't have is an extractor fan. So put on a dust mask, and open a window or work outside.
The DIY figure comes primed outta the box, so if you're using the DIY head and are planning on sculpting the hair after re-attachment you don't need to prime it. Unless you want to.
Step Five: Time to paint that shizz. You don't need me to walk you thru this bit, right?
Right?...
Masking is your friend if you don't trust your ability to freehand with a brush. If you're masking over a part you've already painted and are afraid of pulling the paint off, you can knock the level of tack on the tape down by sticking it to yourself (or your clothes) a couple of times before applying it. Some prefer to add a light layer of clear coat to 'lock in' the underlying paint. It's like a real life 'save point'. Some people do both. Some use masking fluid. Some use silly putty/blu-tac/plasticine. Play around, see what works. You do you.
I painted Grace's eyes blue coz Grace is extra and so am I. I threw a lil bit of pearl powder in there to add a subtle shimmer, as I thought going full metallic blue might be a bit too extra.
Lady Funkos have eyelashes. Don't forget the eyelashes.
(I nearly forgot the eyelashes).
A fine tipped Posca pen comes in handy here if you've got one.
Ditto the eyebrows, tho those aren't just for the ladies obvs.
For Grace's augmentation scars, again I recommend a Posca pen but a brush will do.
DO NOT PAINT THE NECK POST. Don't even varnish the neck post. Keep that bitch masked up until you're ready to reattach the head. Like, you can get away with painting the very bottom if you're worried the bare plastic will show even with the head attached, but that's it. Any more will be making a rod for your own back.
You have a choice now. Whether to weather your figure. I chose to add that extra level of detail as it made sense to me. Use a combination of dark washes, dry brushing, and/or sponge stipling to add dirt, blood etc. If ya want.
When you're happy with your paint job, give everything (except the neck post!!!!) a couple of layers of clear coat.
Step Six: When it comes to reattaching the head you probably don't wanna be dunking anything in water by this point, just in case. So we're gonna soften the neck post (and around the base of the head if necessary) with hot air instead. Use a hairdryer if you don't have a heat gun. DO NOT use an industrial or decorator's heat gun for the love o' god. That shit's meant for stripping paint, not gently warming vinyl figurines. It'd be like using a nuke to shake a cherry tree, and you'd likely burn yourself. A hairdryer is more than capable of doing the job.
Why did we not use the hairdryer for Step One? To be honest there's nothing stopping you if that's what you wanna do, but as you don't have direct access to the bits that need softening at that point you will have to wait for the heat to penetrate. You could be doing other things in that time by letting a water bath do the work for you.
Now, however, you do have direct access, so you'll probably find you only need to blast the hot air for 10 seconds or so.
Step Seven: So, you've got the head re-attached, and your paint job is finished and clear coated. That means it's time to add the rebar. If you went a bit too far with the drilling or sanding now's the time to get your glue on. As an final extra touch you can spiral some thin jeweller's wire around the length of the rebar to make it look more rebar-y. I didn't do this bit as the wire I had in my possession at the time was too thick for my tastes.
But whether you opt for that or not, congratulations on making your very own Grace Funko Pop!
I'm still planning on making security guard and future war versions of Grace, and at least one version of Dani. Yeah, I've been saying that for the last two years, but it's still absolutely happening, trust me.
Anyway. That'll do it. If you have any questions, or you need further explanations or recommendations etc. y'all know where to find me.
8 notes
·
View notes
Note
hello! i’ve been following you for quite a while now, i’d just like to say it’s been such a treat to watch you go along!! your designs are so beautiful and elegant, it’s just perfect! hope you’re feeling better from the burnout, please rest as much as you can <33
i’ve always wanted to begin trying my hand at the kind of jewelry that you make because of you, i hope that’s okay to say! would it be alright to ask what kind of work it’s called? so far i’ve only seen wire and uv resin jewelry, but i saw on your twitter you use epoxy! are there different terms for it? if it’s not too much of a bother, would it be alright to ask for tutorials from youtube (or any other source) that got you started? you’re an inspiration <3 have a good day, bili ka halo-halo ang inet sa pinas 😭
Hello hello! I'm so sorry it took me so long to answer this 😭 and as for the tutorial thing, I had to develop my method on my own because I only have access to epoxy resin and it's the easiest way for me personally to do my art!! Idk yet if I will make a tutorial but I'll be thinking about it since it's a very tedious process. And yes ampota tanginang inet dito stay hydrated ka rin anon!!
2 notes
·
View notes