#esp32 buy
Explore tagged Tumblr posts
Visit Tumblr Blog
Explore Tumblr blogs with no restrictions, modern design and the best experience.
Last Seen Tumblr Blogs


Fun Fact
The “We are the 99%” Tumblr blog became the slogan for the Occupy Wall Street movement.
Text
Breaking in a new easel. Give me your worst oil painting ideas.
#doesn't have to be hlvrai despite the fact thats all ive done lately#bonus points if its dumb but it also doesnt have to be#I still have a part 2 for the crucifixion in mind among other rancid ideas but I want a bigger canvas for those#also looking into ideal translucent painting surfaces for something that could be backlit cus oil on glass is apparently a pain#ive been thinking about using coloured EL Panels for some spooky stuff#also yet another dumb printed sculpture idea had me buying esp32 chips and LEDS last week#looking forward to the struggles of soldering
5 notes
·
View notes
Text
#Espressif#esp wifi module#esp32 wroom 32d#esp 32 wroom 32d#esp wroom32d#buy electronic components online#electronic components online in india#buying electronic components online#buy electronic components online india
1 note
·
View note
Text
just placed an order with jlcpcb for my first every custom-make circuitboard
fingers crossed I didn't screw anything up, because that's over 150 components I'll be soldering to it
1 note
·
View note
Text
My goal going in was USB debugging my esp32-s3 without buying an additional probe.
Now my goal is to unbrick the esp32.
@foone I feel like you'll know this feeling.
79 notes
·
View notes
Text

Another 2022-present portable computer thing. This is a 1991 Corvallis Microtechnologies PC5-L. It's a ruggedized, waterproof handheld MS-DOS computer meant for industrial applications. It ran on Ni-Cd batteries and they died so now it runs on AA's I got two of them for $50 on eBay during one of those months when i impulse buy obscure electronics as a form of escapism This thing is an absolute brick. You could murder someone by hitting them on the head with this, and it would work fine afterwards. Here's pictures of its organs for anyone curious:


That thick red wire around the screen PCB is a heater. Yep there's a setting to heat up the LCD so it doesn't get sluggish or shatter when you decide to leave it in the freezer. The thing runs on a little system-on-chip thing, which is interesting to see coming from the early 90's. Iirc the datasheet says it's capable of analog video out as well as driving the LCD, but I haven't poked around enough to enable it. Might be cool to hook it up to a TV. I did, however, open those 512k storage modules and I saw some unpopulated footprints on the boards. So I ordered some of the same chips, and at some point I'mma try soldering them on and see if it recognizes the extra space. They came with two voltmeter modules, which I couldn't get to work, so I took one of the casings and made it into a USB and WiFi adapter using an ESP32 running Zimodem, since this thing has RS232 ports on the top. I also made my own charging adapter, since they didn't come with one. I see that internal PCMCIA slot, and I tried putting a CF card adapter in, and tried installing the drivers, but it didn't work. I'm not good at DOS tbh, and I know nothing of what this slot is for. I might come back to it later. I did all of this in 2022-23 and haven't messed with it since. Except to use it to talk to my Kaypro 4 '84:

More on that one later. I love portable computers !!!!!
101 notes
·
View notes
Note
Hi, I'm a junior in university right now working towards my bachelor's in electrical engineering and I've since realized I have no idea wtf I'm doing. Do you have some resources on how to begin designing electric circuits and programming in C? You seem like you know what you're doing
So I've thought about this a good bit and what helped me learn both times was hands on practice so I'd see about getting a cheap breadboard kit like this:
But probably not this one exactly, you can get something similar for way cheaper.
As for specific literature for circuitry I don't have a recommendation but I can recommend picking varying difficulties of diy projects that require circuitry at the beginning to get comfortable and bringing that comfortability to your school projects.
For using C with circuitry I'll say the best path is definitely buying a cheap esp32 board, something based on the c3 would probably be cheapest. There is tons of documentation on how to use these boards and I've found that PlatformIO + VS code/vscodium is a very good setup for programming these boards.
19 notes
·
View notes
Text
It works!*
So I (FINALLY) put the final touches on the software for my robot PROTO! (Listen, I am a software person, not a coming-up-with-names person)
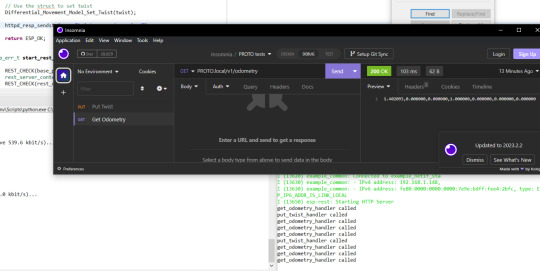
Basically, it is a ESP32 running him. He takes HTTP messages. Either GET odometry, or PUT twist. Both just being a string containing comma separated numbers
Odometry is the robots best guess based on internal sensors where it is (Since PROTO uses stepper motors, which rotates in tiny tiny steps... it is basically counting the steps each motor takes)
Twist is speed, both in x,y and z directions, and speed in angular directions (pitch, roll and yaw). This is used to tell the robot how to move
Now, since PROTO is a robot on two wheels, with a third free-running ball ahead of him, he cannot slide to the side, or go straight up in the air. You can TRY telling him to do that, but he will not understand what you mean. Same with angular movement. PROTO can turn left or right, but he have no clue what you mean if you tell him to bend forward, or roll over.
The software is layered (Which I use a BDD diagram to plan. I love diagrams!)
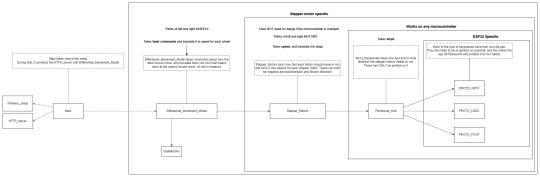
Basically PROTO gets a twist command and hands that over to the Differential_Movement_Model layer.
The Differential_Movement_Model layer translate that to linear momentum (how much to move forward and backwards) and angular momentum (how much to turn left or right). combines them, and orders each wheel to move so and so fast via the Stepper_Motors layer.
The Stepper_Motors turns the wanted speed, into how many steps each stepper motor will have to do per second, and makes sure that the wanted speed can be achieved by the motors. It also makes sure that the wheels turn the right way, no matter how they are mounted (In PROTO's case, if both wheels turn clockwise, the right wheel is going forward, and the left backwards.). It then sends this steps per second request down to the Peripheral_Hub layer.
The Peripheral_Hub layer is just a hub... as the name implies, it calls the needed driver functions to turn off/on pins, have timers count steps and run a PWM (Pulse-width modulation. It sends pulses of a particular size at a specific frequency) signal to the driver boards.
Layering it, also means it is a lot easer to test a layer. Basically, if I want to test, I change 1 variable in the build files and a mock layer is build underneath whatever layer I want to test.
So if I want to test the Stepper_Motors layer, I have a mock Peripheral_Hub layer, so if there are errors in the Peripheral_Hub layer, these do not show up when I am testing the stepper motor layer.
The HTTP server part is basically a standard ESP32 example server, where I have removed all the HTTP call handlers, and made my own 2 instead. Done done.
So since the software works... of course I am immediately having hardware problems. The stepper motors are not NEARLY as strong as they need to be... have to figure something out... maybe they are not getting the power they need... or I need smaller wheels... or I will have to buy a gearbox to make them slower but stronger... in which case I should proberbly also fix the freaking cannot-change-the-micro-stepping problem with the driver boards, since otherwise PROTO will go from a max speed of 0.3 meters per second, to most likely 0.06 meters per second which... is... a bit slow...
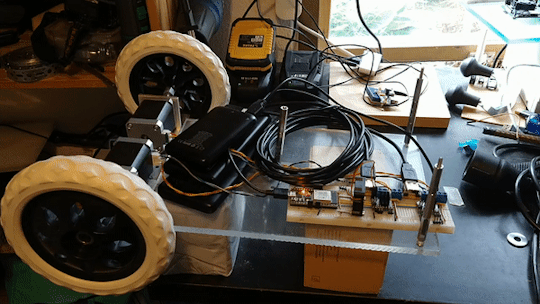
But software works! And PROTO can happily move his wheels and pretend he is driving somewhere when on his maintenance stand (Yes. it LOOKS like 2 empty cardboard boxes, but I am telling you it is a maintenance stand... since it sounds a lot better :p )
I have gone over everything really quickly in this post... if someone wants me to cover a part of PROTO, just comment which one, and I will most likely do it (I have lost all sense of which parts of this project is interesting to people who are not doing the project)
129 notes
·
View notes
Text
met with the interim therapist yesterday
she now agrees that i have made a good faith effort with the new p.a. and that it is reasonable to try to find someone else
she also put our work on hold indefinitely
next week i need to do something but i am not sure what or how
--
[not sure if this should have a trigger warning, but my enthusiasm for certain kinds of technology is only loosely moderated]
i ordered an open source watch
it is on the proverbial slow boat from china
i tend to burn through watches quickly
so it makes sense to get a somewhat modular one that i can maintain myself (that is my lame excuse to buy a new toy)
it will also be my first experience with e-ink
it is based on an sbc (single board computer) that i have used before, so i can go into the open source code to add my own mods (the board, esp32, can be be programmed to be a controller board for a printer or other cnc machine) (speaking of printers, i need to print a case for the watch) (later, if the need is great, i can mill a case from an aluminum blank)
the watch has wifi, so there is a lot i can do with it
it is a new toy that should give us plenty of new puzzles to be solved
3 notes
·
View notes
Text

🚨 Schneider XACA201 Emergency Stop Switch! ⚡
Looking for a reliable Emergency Stop (E-Stop) Switch for your industrial operations? The Schneider XACA201, available at Xon Electronics, is your go-to solution for safety and control in critical situations. 🌐 Shipped worldwide including the USA, India, Australia, Europe, and more!
🔧 Specifications:
Type: Pendant Station E-Stop
Current Rating: 10A
Voltage Rating: Up to 600VAC
Mushroom-head red emergency stop pushbutton
Material: Impact-resistant plastic
Mounting Style: Handheld pendant
Manufacturer: Schneider Electric
⭐ Key Features:
Instant machine shutdown in emergencies
High visibility & easy-to-activate pushbutton
Rugged build for industrial environments
Ergonomic handheld design
Compliant with global safety standards
🏭 Applications:
Overhead cranes & hoists
Conveyor belts & assembly lines
Lifting equipment
Factory automation & control systems
🛒 Available now at Xon Electronics!
Buy Now: https://www.xonelec.com/mpn/schneider/xaca201
Learn More: https://www.xonelec.com/blog/esp32-wroom-32e-embedded-wifi-modules-by-espressif
#EmergencyStopSwitch #SchneiderElectric #XACA201 #XonElectronics #IndustrialSafety #EStopSwitch #AutomationSafety #CraneControls #FactoryAutomation #WorldwideShipping
0 notes
Text
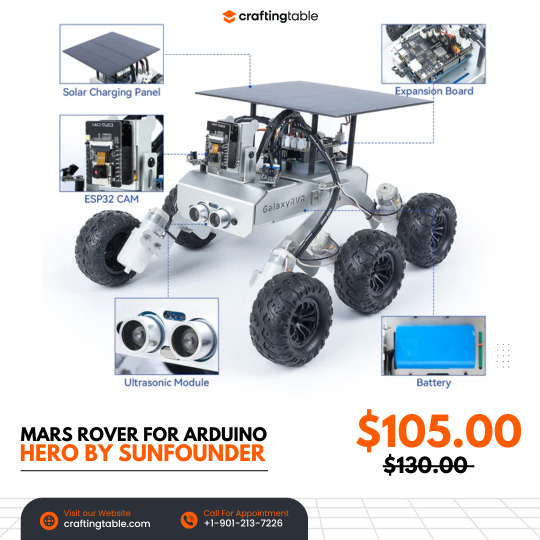
GalaxyRVR is an easy-to-use robot that works with Arduino Uno R3 and lets you experience what it’s like to explore Mars. It’s built strong with metal parts and has a smart wheel system to move smoothly over sand, rocks, grass, and even mud. It uses solar power to charge and has a camera (ESP32-CAM) that shows you what it sees in real time through an app. You can drive it from anywhere! It also has sensors to avoid obstacles and bright lights so it can explore in the dark too. The kit comes with helpful videos and guides, and there's an online community ready to help, making it perfect for beginners who want to build and explore. Buy Now
0 notes
Text
WIRELESS MODULE with BLE and WiFi – ESP32-C3-DevKitM-1 The ESP32-C3-DevKitM-1 from Campus Component is a low-power, cost-effective solution for IoT developers. It combines WiFi and Bluetooth LE connectivity in a compact design. Featuring robust security features and efficient processing capabilities, this board is suitable for smart home devices, health monitors, and industrial IoT systems. It supports Espressif’s ESP-IDF framework.
0 notes
Text
Taking a look back over the documentation that has been released, it seems fairly simple to do. If you have a Home Assistant setup and are willing to buy suspiciously cheap electronics from Alibaba, here's what I've found.
This really covers all the effort for the work done by the official Home Assistant team. Section 2 covers the back end portion of the tech in the most depth, outside of visiting the various GitHub pages linked. Seems like the majority of the work was sponsored by Nabu Casa, the owners of Home Assistant, and subsequently released as open source programs. I trust Nabu Casa to have not bundled anything weird in, but make that determination for yourself.
This is the How-To guide using a $13 ESP32 Arduino based speaker/microphone. Unfortunately, this device is sold out at this point and I am skeptical if it will ever get a wholesale re-release. Other ESP32 based boards may work but may also require deviation from the printed guide.
This is a second project, based on a different but still out of stock speaker/microphone combo.
All in all, it seems much more viable than I assumed it was given my info from a few years ago. Wake words have been figured out, the intention system made by Nabu Casa allows for custom instructions, and it can all be hosted locally assuming you have access to one of 2 now out of stock boards.

🥹
113K notes
·
View notes
Text
How I buy my webcams and how it ended...
Webcams, how not to buy them, but I'm stupid and learning
Because I have holiday now due to chrismas and I posted nothing in the last month, I decided to make a comment about how I chose my webcams - and it's not a guide or an advice. It's rather more a funny story. I wanted to see the birds on my feeder. So I decided to buy some webcams. Cheap, with network access.
Step 1: ESP32 webcam
I bought some webcams based on ESP32, which is able to connect to my WLAN. Sounds good, bought three of them. Installed an USB hub and 5m USB cables to support them with power. But there was a problem very soon. The connection from the webcams to my WLAN wasn't good, so I replaced it with three WLAN mesh routers (Huawei WIFI AX3). The network quality did not increase so much. Next step was to use external antennas with the ESP32 webcams. To do this, a little bridge is to solder on the PCB board. In 603 circuit format. I'm too old for this sh*t, so I messed up one of the ESP32 cams, it was broken. I configured one of my servers to record the stream via ffmpeg32. Works... okayish. But not really usable outdoors.
Step 2: more ESP32 webcam
There were some offers with ESP32 webcams and external antennas. But when I read the comments about these, they said "yes, antenna included, but not with the soldered bridge to use it, have to make it by myself". So no gain. Finally I found a guy on ebay who offers ESP32 with external antennas and soldered bridge. Doubled the price, but worth great. I bought four of them. Fairly good WLAN connection.
Step 3: The rats are coming... nightsight and better images
Now, there is the bird feeder, the webcams and recording the stream. But then, some new guests are showing up. Rats. From where are they coming? How often? I needed answers to take action against them, because I don't want to contribute to a rat problem in our neighborhood. The ESP32 webcams can only make shots at daytime (and not very good). I needed something to monitor the night. Next step was to buy some webcams with nightsight. I chose 2 x Denver WCT6000 WLAN (but it seems not to be an actual webcam anymore, now it's maybe the WCT8026W). Yeah, installed... but... they are running on batteries (change 8 x AA batteries every 3-4 days), the SD-card (32 GB) was enough to record about 2 days and - most important - the WLAN wasn't really a WLAN. You can connect an app to the webcam via instant-WLAN, but you can't connect the webcams WITH the WLAN. On the plus side: The wildlife camera has (aside nightsight) a pretty good image resolution, the stream has a higher framerate (>20 frames per second, the ESP32 had 6 frames per second) and I could it use outdoors. But nevertheless, I placed the cams at serveral locations and could track the rats and what they are doing when. So I could perform some optimizations with the placement of the birdfeeder, but there was no real solution. Even the city (or the neighbor where the rats are coming from) wouldn't do anything. After all, the wildlife camera was nice, but not a real solution.
Step 4: Reolink 510D webcam
On the road to perfection, the next step was to combine all my knowledge. I need nightsight, outdoor, high resolution, high fps rate and additionally I don't want this WLAN connection anymore. Too much disconnects, not stable. Wires are the way to go! I shifted to webcams from Reolink and I decided to take six of Reolink 510D. Great decision. I removed the USB-Hub with the USB-cables and replaced it with a POE switch, connected to my LAN. Now, I could remove the mesh WLAN routers. Finally, I build a camera pole on my terrace for the webcams and printed three connectors for the Reolink to attached the flat end to the round pole. I installed datarhei streamer on my webserver, so I could see the result via internet (and VLC connected directly).
Step 5: webcam Reolink RLC810wa
Just a few month later, I switched the webcams to 4 x Reolink RLC810wa. I would say, there is a real reason about it. It has increased nightsight (up to 15m instead of 2m), it has a higher resolution (which I don't need, I have to reduce the resolution because of the bandwith). Yeah. They are black. That was the reason. I'm some kind of happy at the moment.
webcam conclusion
The sequence of buying one thing after another may be some kind of logic. But the real step is, that you learn with every new iteration new problem, you have to solve, but you didn't thought about them. So I upgraded from cheap to a fairly high level of money, which left a lot of hardware behind me. I paid too much at the end - regarding the now outdated hardware. Most important, that nobody in my peer group could talk about this to me in detail. They had no knowledge about this, even if they have webcams for their bird feeder or other use cases. But one of my kinks is "privacy". There are too many webcams out in the world, which NEEDS a connection to the manufacturers server, look at "Ring" e.g. I had a Ring doorbell and I was yelling about the question "share your ring webcam with your neighbors". To this point, I was willing to set it up for my use, but thinking about THIS quesiton alone, I was healed from all f*cking company app bindings and so on. So I needed webcams. which can exists in my personally controlled realm and networks and have no dependencies on the outer world, escpecially companies. Nah... merry chrismas and a happy new year 2025. Read the full article
0 notes
Text
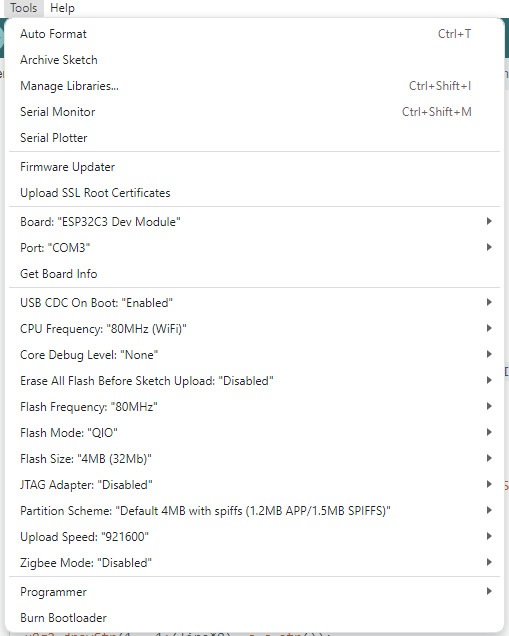
ESP32-C3 BLE / WiFi dev board with 0.42-inch OLED notes
I got some ESP32-C3 dev boards with built-in OLED screens for a Halloween costume project, and I've been troubled by the lack of documentation and general information about both the ESP32-C3 platform and the board, so here are some notes for future hackers:
OLED type is SH1106, not SSD1306, as seen in some forum posts and even in the blurry screenshot that accompanies these boards. Specifically, the U8G2 constructor for this board is U8G2_SH1106_72X40_WISE_F_HW_I2C(). With the SSD1306 driver, the screen pixels are shifted to the left and there's a column or two of corrupted data on the right-hand-side of the OLED screen.
Apparently the ESP32-C3 chip cannot measure its supply voltage internally, something that even ATtiny chips can do :(
Proper Arduino configuration is:
(CPU frequency and partition setup are of course configurable).
I'm not sure yet if I2C is actually hardware-offloaded here, but the pins are apparently non-default, with SDA=5, SCL=6. At least the display speed doesn't change at all when changing the I2C frequency. I don't have the equipment to measure this, but so far it looks like I2C clock speed is ignored. Anyway, I can get about 73 FPS, or about 11ms per frame draw on the built-in 72x40 OLED.
But overall, looks like a nice dev board, and it's neat that it's powered by a RISC-V microcontroller. Perfect for hobby projects that don't need many pins.
Buy the board here.
0 notes
Text
Fixed my bike for the 50th time, also computers blow dicks
I love shit that does complex thing with simple building blocks. I have a degree in an engineering (adjacent) field, and while I utilize the skills and knowledge I acquired almost daily, what I learn time and again as I get more experience is that stuff that do one thing good are better than stuff that do many thing okay.
Usually people call it the KISS principle (keep it simple, stupid), but in this day and age I think "return to monke" fits better. Why?
Fuck computers.
This coming from a lady that works with them all the time, has her own home lab server/website/home automation/media streamer/whatever, runs arch (btw) on all her computers, and whose first instinct to solve random issues is to grab an arduino or ESP32-based board. Fuck 'em. At least, when a business tries to push one on me, fuck them in particular.
I control my arduino, I can't control some junk computer control unit in my vehicle, Xbox, air conditioner, toaster, whatever, they all universally suck! Hobbyists like me use computers to refine control of a project and make it more hackable. Corpos add computers to abstract control away from the user (really, the OWNER of the device) and make it harder to diagnose and repair.
That's why I love my motorcycle. It was made in 1981, and has exactly ONE transistor (it has electronic points, not a mechanical sparker) and the rest of the electronics is just cleverly designed relay logic and solid state components arranged in the correct order. The most complicated part is the turn signal flasher, because it relies on the signal bulbs having the right resistance to be part of a resistor divider, so no LED light upgrades, but for different reasons than a standard thermal based flasher.
The ENTIRE wiring schematic is one page! For a whole-ass motorcycle!
Anyway, I had an issue where the neutral light would sometimes come on by itself. It's a green light on the gauge cluster that let's me know the bike is in neutral, and when it's lit, it also powers a safety relay, that allows the bike to be started. It was an odd problem, sometimes it would go away, often it depend on how fast I was accelerating (more acceleration = more brighter.)
Were this a modern bike, I would be worried that whatever bullshit computer is buried in the chassis was failing, and at any point the thing could just die while I'm driving, but on my bike, I knew the issue was likely a simple exposed wire. Because the wiring diagram has ACTUAL information instead of "cable runs from computer module A to module B. Oh, what's it do? Go fuck yourself" I knew that the light turning on wasn't going to kill me, and the worst that could happen is I wear out the safety relay from repeated cycling.
Lo and behold, an exposed wire!


Clean it real good, seal it up, tape it up, and bam, no more flashy lights!
I love being able to start and finish a repair so simply, and not have to futz around for hours to figure out shit. I wish everything I buy could be this dumb.
Tl;dr: return to monke. Everything is better when it's simpler. It's better to have a thing done the dumb way by a we'll-build machine than have a piece of software try to fudge it's way to something vaugly correct. By God this bike will outlive me if I can help it.
This meme has made me feel more feelings than the ones that cracked my egg and turned me into a girl. I could rant for HOURS about how computers have ruined everything, not even from the psych "Facebook rots your brain" angle, they suck on in a technical aspect too:

0 notes
Text
Liked on YouTube: Cheap and Easy to Use ESP32 Screen!
Cheap and Easy to Use ESP32 Screen! There is an ESP32 with a built in 320 x 240 LCD display with a touch screen called the "ESP32-2432S028R", since this doesn't roll of the tongue, I propose it should be renamed the "Cheap Yellow Display" or CYD for short. This display is only about $15 delivered so I think it's really good value. It's my favorite device to build projects with at the moment! --------------------------------- Links: --------------------------------- CYD Github Page (inc links to buy) : https://ift.tt/FRV273v --------------------------------- My Discord: --------------------------------- Come hang out and talk about the CYD or any project you are working on! https://ift.tt/Q60bz2H --------------------------------- Github Sponsorship: --------------------------------- I have set up a Github Sponsorship page, it's similar style thing to patreon. Github sponsorships help support videos like these plus the open source projects I create. https://ift.tt/ltgJQT4 Some people have said they would prefer a once off way of supporting the channel, here is a Paypal link if you would prefer that! https://ift.tt/t9zN1pR via YouTube https://www.youtube.com/watch?v=0AVyvwv0agk
0 notes