#faceup tutorial
Photo


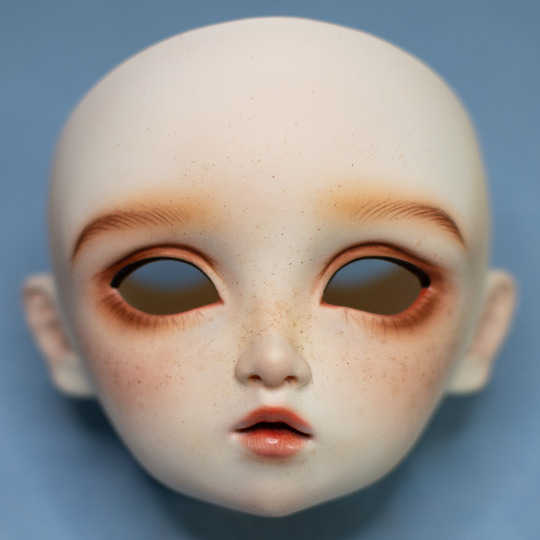
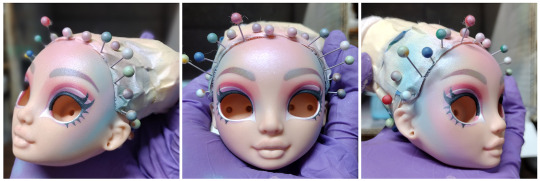
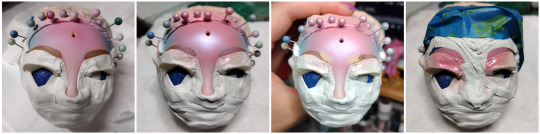
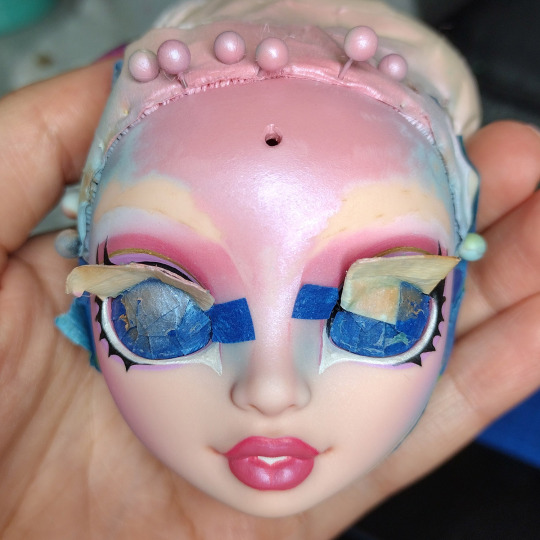
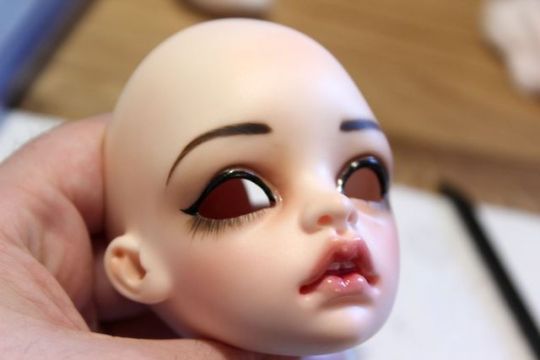
So, in May I attended PNW BJD Expo and did a faceup presentation/demo. For that I took exhaustive step by step photos of the faceup on my Megu and made a whole Powerpoint presentation on it. You can read it if you want! But be warned that the notes are speaker notes and not proofread at all, haha.
#bjd#dolls#custom dolls#legit bjd#glace dolls#faceup#bjd faceup#faceup tutorial#volks#super dollfie#megu#volks megu
207 notes
·
View notes
Note
Hello!! Your Copia doll is coming along beautifully! The paint is so realistic. Like his bottom lip has texture I have no idea how you do it! Your project got me really curious about doll work myself!! 🫣 but I have no idea where to begin. I have a few questions to start out with-
1. Could you summarize the overall process? What are the general steps from start to finish?
2. What general materials do you need?
3. What paint do you use? What brushes/applicators do you use? How did you achieve those softer/blended contour lines, like in skin tone? If that makes sense. I see some others’ projects that you can clearly see paint lines or the texture of the paint they used, but your Copia almost looks airbrushed!! :0
4. How does putting in the hair work?
5. Where do you buy your base doll? And as far as the reveal in the ~bonus picture~, did he come anatomically correct or was that something you had to add? 👀
6. Where do you recommend buying supplies?
Thank you in advance! 🙏 and happy customizing!
Long Post Incoming���💀💀💀💀
Thanks for all the fantastic questions! Whether you work on playline vinyl dolls like Monster High or Resin Ball Jointed Dolls, the process is the same. The only difference between them is that with the vinyl dolls you are painting the eyes on yourself. Resin Popia has inset glass and resin eyes.
My tag #Resin Popia BTS has all my Behind the Scenes stuff and progress photos.
All the questions answered below the cut!
1. Could you summarize the overall process? What are the general steps from start to finish?
I will be uploading some vids soon. Try this one first tho.
When you do a faceup, it is a collaboration between you and the sculptor. The sculpture does most of the work. You are bringing the deep parts of the sculpture deeper and the forward parts more forward.
Basically this:
photograph and disassemble doll
wash doll pieces with dawn dish soap and warm water. dry all parts I want to paint.
three coats of Mister Super Clear UV Cut (MSC) sealant on each piece, with a 20 min dry time between coats.
deep freckle/blood vessel texture (optional) with red, blue,brown waterey gouache, spray MSC
dark reddish pink chalk pastel pigments in the deep creases/crevices, areas of blood flow. Correct work with kneaded eraser.
after every layer of pigment that I like, I do another spray of MSC.
lighter pinks or tans (based on skin tone references) on things I want to bring forward (brows, nose tip, cheekbones), another pass in the deep areas, new color on the lips. spray seal
Detail with fine lines under eyes, line texture on lips, wrinkles, lower eyelashes. Check references and experiment. A touch of green in the deepest part of the skull on either side of the nose. You know, where you get sinus headaches.
Pray to Satan and cry as I add eyebrows and hair details with gouache. I start by mapping the brows out with dark chalk pastel then do hairstroke lines with gouache. Personally I am super heavy -handed with my brushes, I need to work on that.
When happy, 2 final coats of MSC
Add Vallejo gloss varnish to water lines of eyes and lips.
2. What general materials do you need?
FYI I have been in this hobby for about 7 years. I have only had to replace Mister Super Clear cans and respirator cartidges in that time. Everything else I have used for nearly a decade. And also used them for other projects!
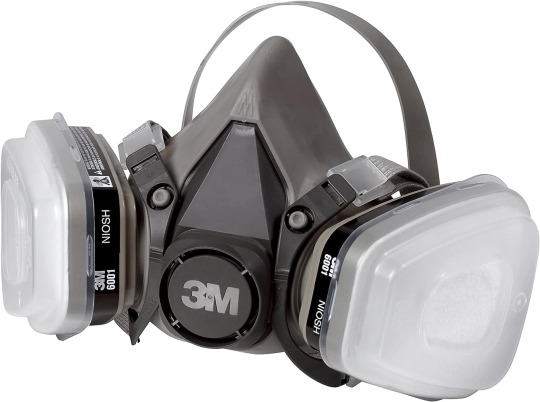
#1 item you need: a proper serious respirator. You will be at risk of inhaling toxic chemicals when you work with sealants or do any sort of dry sanding. Please please please invest in this item.
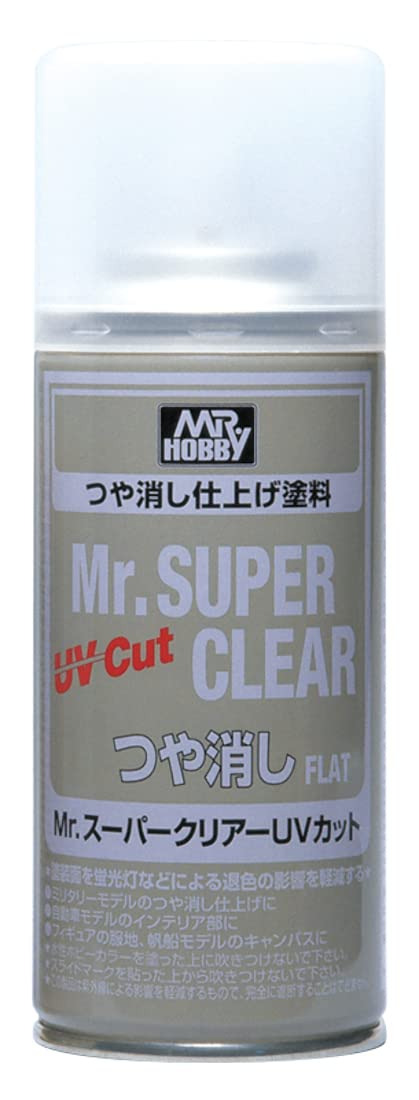
Mr. Super Clear UV Cut sealant spray. This gives the resin or vinyl a toothy surface to apply pastel pigments, watercolor pencil, and gouache paint on. The techniques will not work without this surface.
The sealant also behaves like skin, which is made up of several layers of matte cells So the pigment you apply to the resin is suspended in layers just like real skin.
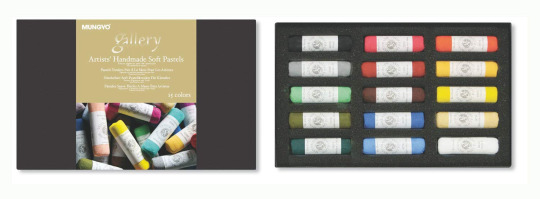
Chalk Pastels I like the mungyo hand-rolled chalk pastel just because when you use a razor to scrape off some pigment it crushes up and mixes better. But any chalk pastel will do. The Xanthi video I will link later has a great idea of just buying a few chalks at a time, because to be honest I don't use all of my chalk.
Small nylon brushes.
A fan brush
A tooth brush (for skin texturing/freckles)
Crappy dollar store makeup brushes (for pigment powders)
Kneaded Erasers
White cloth gloves
ceramic dish for a palette
Some people use watercolor pencils, but I never got the hang of them. I prefer just using brushes. Everyone has their own thing they do.
Paint recs in Next Question
3. What paint do you use? What brushes/applicators do you use? How did you achieve those softer/blended contour lines, like in skin tone?
Goache paint dries flat and matte. It's basically opaque watercolor. I use a damp q-tip to remove it if I make a mistake.
Winsor-Newton is great. I am pleasantly surprised by Arteza's gouache. I have used the same gouache tubes for seven years. You put like a raindrop sized bit on a ceramic dish, that's it. And you can reconstitute gouache endlessly with just a little water.
The trick is to never EVER EVER use true black. nothing is true black unless it's makeup. I use gouache paint on Resin Popia's eye makeup but then soften it with black pastel powder to make it richer.
If you use true black it looks like mud or holes. Dark purples, browns, and greens.
Also don't be afraid to be a bit louder with the colors, the sealant mutes them a lot. Just work slowly and take breaks.
4. How does putting in the hair work?
For resin dolls, you need to make a wig. They are a PITA to make, but it's possible! Check out Mozekyto for how to make wigs. (I'll have more recommended videos further down this post.) Vinyl playline dolls you can reroot, but some people prefer wigs.
5. Where do you buy your base doll? And as far as the reveal in the ~bonus picture~, did he come anatomically correct or was that something you had to add? 👀
The same techniques can use used on vinyl dolls like Rainbow High, Monster High etc. You can get them at goodwill, big box stores, and on ebay. Lots of people sell old toy dolls.
Resin Ball Jointed Dolls are a lot more expensive, so I have spent several years slowly building up my collection. I love vinyl and resin dolls equally.
I bought my base doll from Alice Collections acbjd.com they are a vendor of many resin dolls. I absolutely love Resinsoul.
My favorite doll companies (find them on Alice Collections!) are IslandDoll, Resinsoul, Dollmore, MyouDoll, DollLeaves, 5StarDoll.
Resin Popia is MSD "Mini Super Dollfie" size aka 40cm-52cm. He's 52 cm. SD (Super Dollfie) is around 60-65cm.
I have owned dolls that were considered "prestige artist dolls" in the past, but I always end up selling them because they are so precious I'm afraid to ruin them so they just become dollar signs to me instead of something I love. I'd say $300 would get you a gorgeous resin doll and some clothes for them. Saving up for a doll you really really love is worth it in the end. People also sell used dolls on Instagram. Just please make sure to check the COAs.....
Important Note: I am a Pro-Artist legit BJD collector. AliExpress, Etsy, and Ebay have bootleg dolls that yes, are significantly cheaper, but that is because they steal from the artists that did 99% of the work (and spent tons of their own money) to develop the doll's appearance and engineering. If one cares about supporting artists they should consider the ramifications of purchasing these recasts and propagating the bootleggers. (Especially since a large part of the artist BJD community is from Russia and Ukraine, who have been lately hard hit by war and YET are still making beautiful art for the world to enjoy) I am not pro-bullying though, I am Pro-Education so if anyone wants to have a private, frank conversation about recasts in the BJD hobby feel free to message me.
One silly thing that happened once was I purchased a legit IslandDoll Bru (IslandDoll is always on sale TBH) that was actually cheaper than its recast on ebay. There are a lot of sales during Chinese holidays (11/11, Lunar New Year, Fall Festival) and you usually get a lot of extras like free eyes, beautiful carrying cases, incredible boxes, etc. Resinsoul, the "cheap" BJD company often gives you a gorgeous carrying case for your doll.
Ok enough with the disclaimers now onto doll d!cks haha
Resin dolls are usually realistic when it comes to parts. Realistic in the fact that they add something there...something simple but it's there. Resin Popia has option parts made of silicone that are actually from an action figure company called TB League. Look up "TB League Option Parts" on Ebay. The figures are 1/6 scale making the parts scary and massive at 1/6 scale but funnily enough they make sense at 1/4 scale.
IDK why i got em, I just wanted to have some fun with this doll.
6. Where do you recommend buying supplies?
If you can get to a local hobbyshop that sells models (like miniatures and wargaming figures) please support them first! As vital spaces for geek culture they need all of our support. You can get tiny brushes, Model Paints and sometimes even the sealant from them. Just call ahead they can work something out for you!
Chalk Pastels, Gouache paints I get from art supply stores and as a last resort, Amazon. I use these supplies in other art projects and you will quickly get addicted to gouache painting, i'm sure of it!
Great Videos/Resources
Xanthi's Minimalist Supply List
Xanthi's Male Realistic Faceup (I watch this one so much)
Youtube Channels I like: Enchanterium, Dollymotion, Dollightful, Lomi's Playground, Xanthi
This Book is Great: How to Rock at BJD Faceups
I am answering your additional questions in the comments if you have any! I am @anamelessfool
#bjd copia#toy customization#dollblr#doll customization#bjd tutorial#bjd faceup#q&a#legit bjd#resin popia bts
35 notes
·
View notes
Text

Sneak peek for next week's video!! A tutorial for painting doll lips. I'm still editing it but super excited with how it's coming out so far! It will be out next Thursday.
#dollulus#youtube#lips#doll diy#doll tutorials#painting dolls#doll faceups#doll customs#custom dolls#rainbow high#ainsley slater
1 note
·
View note
Text
Hi, kids,
Remember it's okay to not want to do your hobby as a job. It's okay to not want to sell the things that you make. It's okay if you want to make art without taking commissions.
It's fine to completely lose enjoyment in something if you're doing it for money. It's fine to say, "I don't like doing this when I have to do it," and to just never do it.
You don't need to make your hobbies pay for themselves. You don't need to turn professional or semi-professional. You can love the freedom of starting something when you want, working on it when you want, and finishing it (or not finishing it) when you want. If you find that taking that away makes you not love the thing, that's just a lesson that you've learned. It's not a failing. It doesn't mean you're not dedicated to your art or your craft. It doesn't mean you're not doing it right.
Not everything needs to be a business. Not everything needs to have financial worth.
While we're at it, you don't need to be good at a hobby to want to do it. You don't need to have a goal of improving. If you get a guitar and you love playing it, but never get beyond cowboy chords and 4-chord songs, you're still valid. You don't have to be the best in the world to have it have worth. Your grandma's chicken enchilada recipe isn't going to rank in the top 100 enchiladas ever, but you still love them and enjoy them and they taste great. Maybe your doll faceup isn't going to look like a youtube tutorial's did, but if you liked making it, that doesn't matter.
But it's also totally fine to do things just for the response you get from other people. If you're only updating that fic because you have nine dedicated readers who want to know how it ends, that doesn't mean you're not dedicated to the story.
"This is just something I like doing," is enough. It doesn't need to be a job, or something you're good at, or a labor of love, or an otherworldly calling from a holy being. You can just make things. You can just do things. It's okay.
11K notes
·
View notes
Text
DEAR NEW PEOPLE: When I started faceups I sucked so bad. Turns out, I -didn't- suck so bad, it was the materials I was using. Using gouache paint instead of acrylic will change your world. Even with paint retarder acrylic is impossible to wipe off, gouache paint will come off with a bit of water. (I learned this from partyt1ems faceup tutorials. He gives a lot of hints and tips that helped me and now one of my dolls has actually kept her faceup and I love her because I painted her!)
~Anonymous
28 notes
·
View notes
Text
My activity on here is pretty sporadic, so no one was probably wondering this, but if anyone was wondering why I haven't been very active lately, it's because I got consumed by a new hobby:
Doll Customizing.
I decided to try my hand at it, and it was so fun, I now have six WIPs. someone help.
Some pictures of two of my WIPs:
Frankie Stein redesign that took a life of its own. My first custom: just a reroot and faceup.
Will probably make them a new outfit later.


A fanart custom: Flandre Scarlet from Touhou Project. My fifth WIP, second faceup. Made using a secondhand Howleen Wolf with nasty hair (she was the only small doll I had that I was willing to customize; the only other one is a River Styxx in great shape that I want to keep as-is.)
Outfit made by frankensteining raddollclothes (Requiem Art)'s Looking Glass Lolita and Meido Dresses patterns.
Found a few tutorials online for making the mop cap and did some math to resize it. (Cut out a 6.5" [radius] circle from white cotton, stitched in elastic ribbon 1" inside the edge all the way around, making sure the length of the elastic was a little bit less than the circumference of the doll's head. Sewed the ends together by hand.)
Still working on her wings.
#dolls#doll custom#doll customization#doll customising#monster high#frankie stein#flandre scarlet#touhou#touhou flandre
33 notes
·
View notes
Text
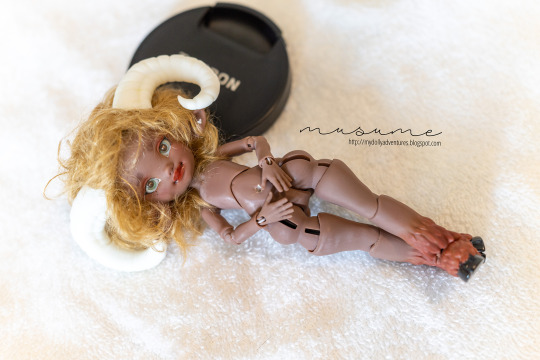
WIP Unicorn Bella
Some WIPs of the recent unicorn Rainbow High commission. For full behind the scenes, you can visit my Patreon. /selfpromotion
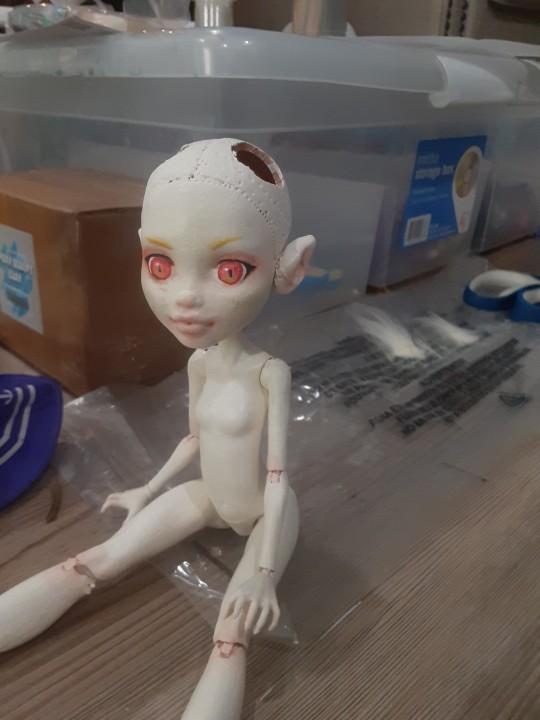
Started off with a Pacific Coast Bella Parker. Funny how after awhile eyeless dolls are no longer off putting.

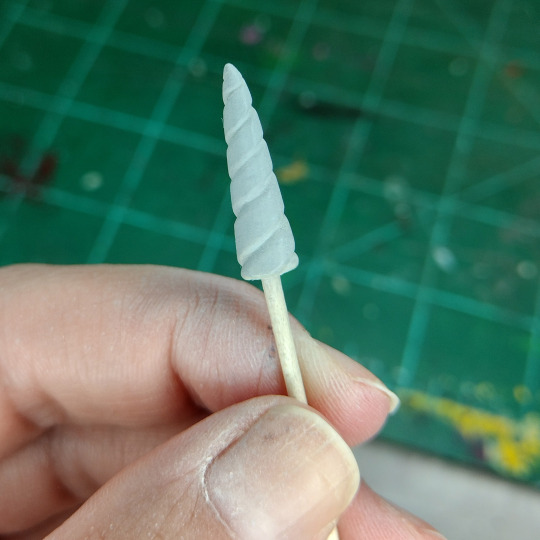
Time for unicorn horn making with Apoxie Sculpt:

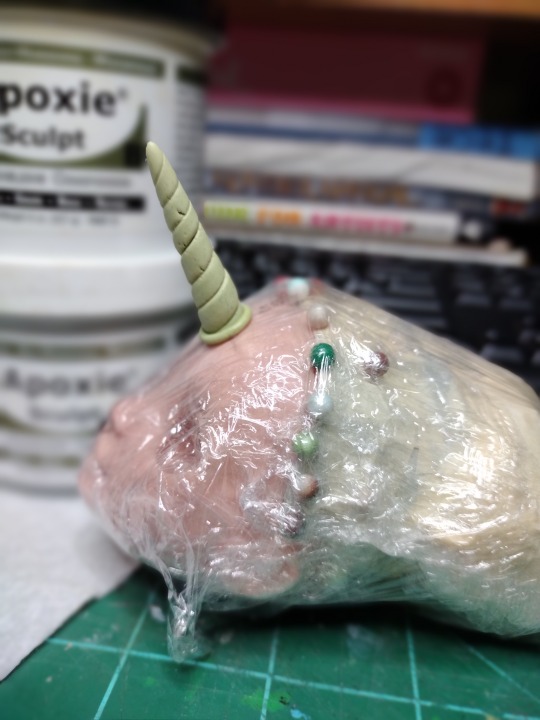

(featuring my own Bella as a model)
Commissioner felt it was too long so it was cut down a bit:
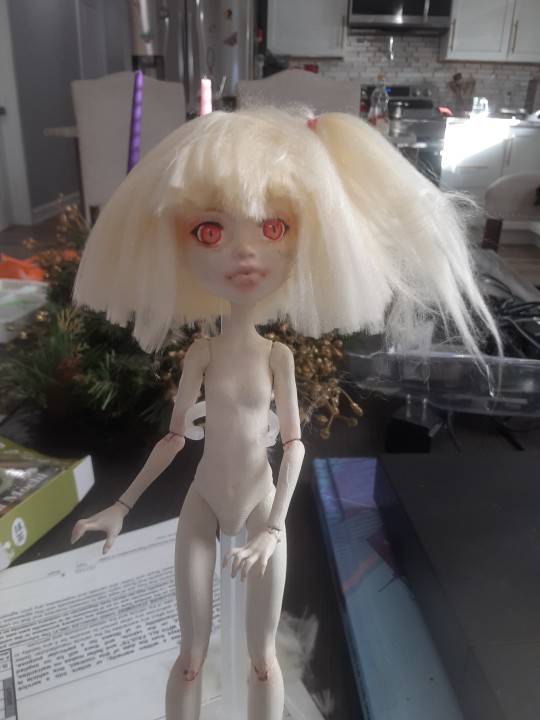
Starting the face up with watercolor pencils:


Began adding thinned acrylic paint and some light blushing:
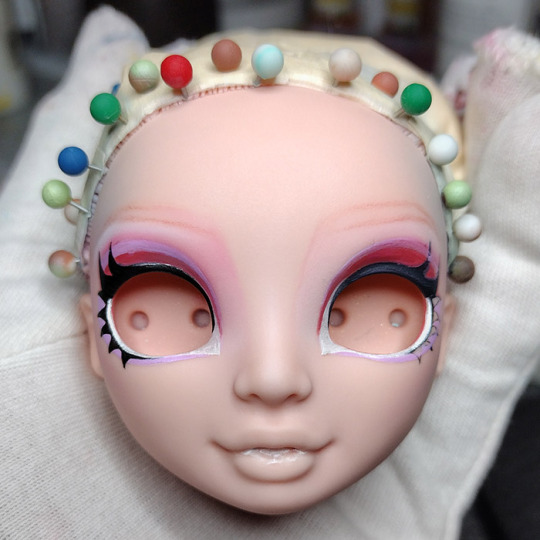

But it turned out I hated the eye makeup. Not so much the colors, but the order in which they were layered. So I decided to wipe it all off and start over.
But first, I wanted to test out reinserting the eyes and see how much damage that would cause:

Surprisingly, not that much! Felt better about the durability of the paint.
I also decided to smooth and round out the eyes a bit in hopes it would facilitate reinsertion next time:

Yeah?
Anyway, back to the faceup:
I planned (and tried) just using soft/ chalk pastels for the gradient effect, but it was going to take forever and use up too many precious MSC layers which would probably end up in cracking around the eyes. So airbrush times:

Not bad so far.
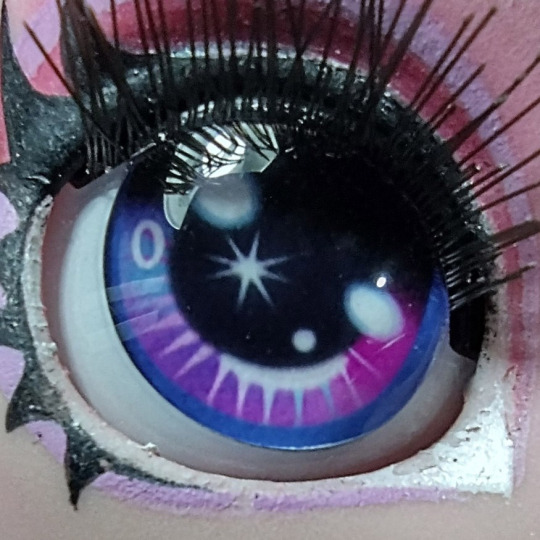
At this point, the eye makeup was pretty much finished so I decided to reninsert the eyes at this time and mask them:

The problem isn't so much the eyes themselves, but the eyelashes which get in the way.
Pique photography skillz:

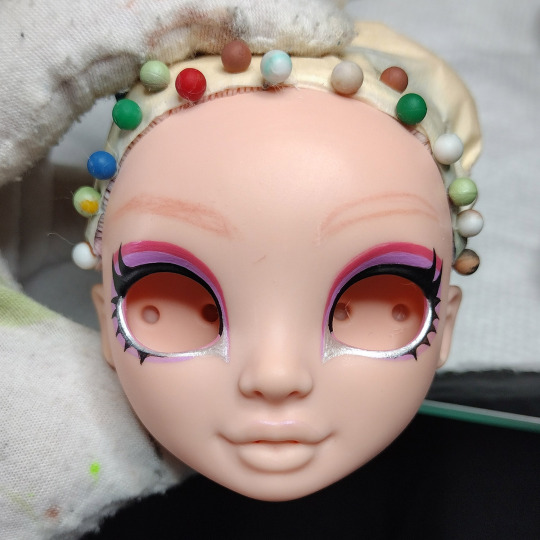
And then I thought, "Huh, I sure am close to finishing this doll up. But you know what I should do? I should try to do a simple soft gradient to her inner eyebrows!":
"Oh, that's not working. The airbrush isn't enough. I'll lightly sand and buff the inner brows first."

"I can fix this."

"I swear I can fix this."


Anyway, lots of tears and screaming were involved.
But then, I had a little mishap with some rubbing alcohol right at the end and some of the paint around the horn bubbled up a bit. Can't be seen too well in photos but could definitely be seen and felt in person:

More tears and screaming and flipping of tables.

At this point I was using the absolute last drops of custom mixed paint. Could absolutely not afford anymore mistakes.
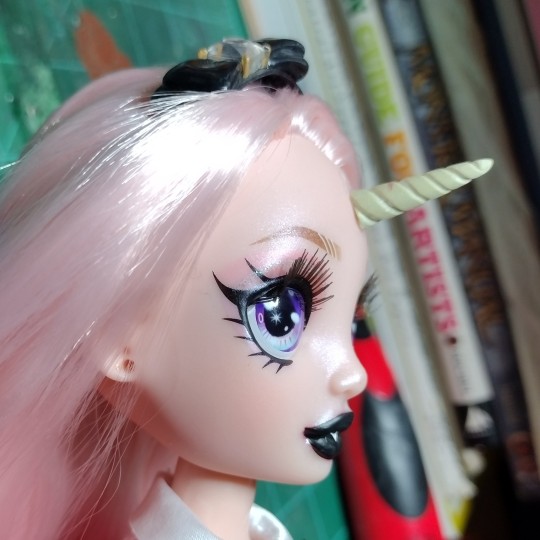
And thankfully there weren't!
Finished it off with a light dusting of glitter:

And that's how you repaint a Rainbow High doll.* 🙃
------
*not an actual tutorial
142 notes
·
View notes
Text
youtube
Today I'm showing you how I pack a BJD head with faceup~
Since I had to send my client's doll heads back after I completed their faceups, I thought I'll record a tutorial on how I pack doll heads to avoid faceup rubbing and damage during shipment. If you ever need to send a head with a faceup out, I hope this tutorial and my tips/know-hows are helpful in keeping your doll's faceup safe~
7 notes
·
View notes
Text
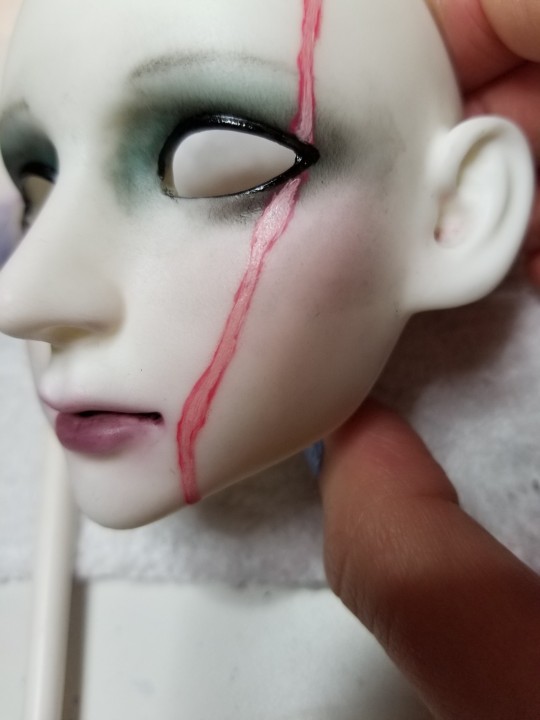
I just wanted to post a silly scar tutorial for how i personally do scars on my bjds 👍
1. Do a mockup to get a good idea of where you want your scar, use reference images if you need to! The specific scar kind that I'm trying to follow is a hypertrophic one, so the scar itself is raised up
2. Do the rest of the faceup, the scar looks the best if added on with the rest of your acrylic paint/finishing touches
3. Get red paint (any shade will do), a pale flesh tone (if doing this on a paler doll, otherwise get one closer to your dolls skin tone), and a few colors of watercolor pencil (i used a reddish brown, a brown, a pink and a white) as well as a soft pastel in a color you might use to shade the doll (I used a warm light brown)
Onto painting!
First I traced the scar shape roughly with my reddish brown watercolor pencil and then painted over it with 2 thin coats of red acrylic paint. My paint is very cheap so i did it in pretty thin layers to work with it the best
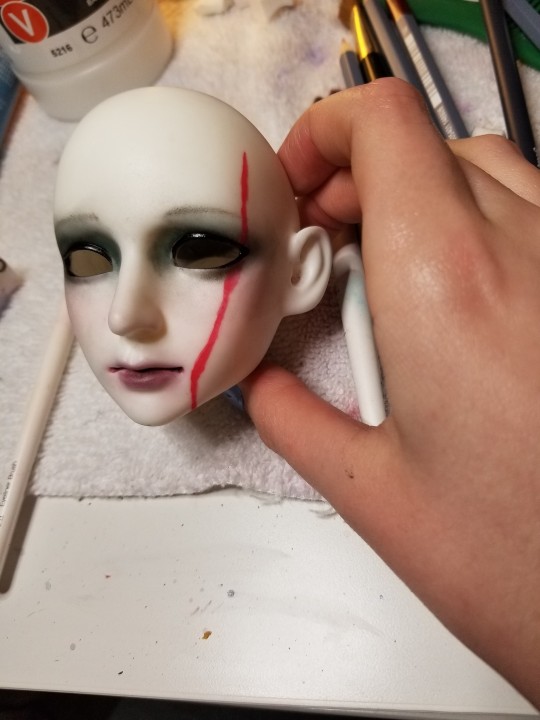
Then i mixed my close to skin color (the shade i used was called portrait pink, this doll is white resin but i figured this would work fine) with a tiny bit of my red paint and painted over the red, leaving a thin line of the red on the outside. It's not a huge deal if you cover up the edge in some parts because you can always outline it again :)

^ it's very faint bc it's wet and i was working in thin coats but you can see a few areas that it covered the red I had on there before
Then i added a bit of this mix to some white to SLIGHTLY lighten it, then covered my coat with that, again leaving a slight line of the peach color around the edge

^ first pic is after showing how i have it layered and the second is just a further away pic of it
Then i used my reddish brown watercolor pencil to re establish the red boundaries and to add a bit of texture to it!

After all of this has dried, I began working on the lines that make it a hypertrophic scar, starting with using a brown pencil to make horizontal lines

Using a shade i would use to add shadows to this doll, I went over the scar a BIT to make it a bit less red and a bit more skin colored. No clue if this actually did anything, but i feel it slightly neutralized it

^ holding the color i used by the head
I then added in MORE lines with the reddish brown pencil i used for outlines and added some lines with the pink pencil in between these darker lines to help simulate some light hitting the scar and to make it look more raised

Then added gloss and it's all done :)
After the gloss dried, here's how it looked:
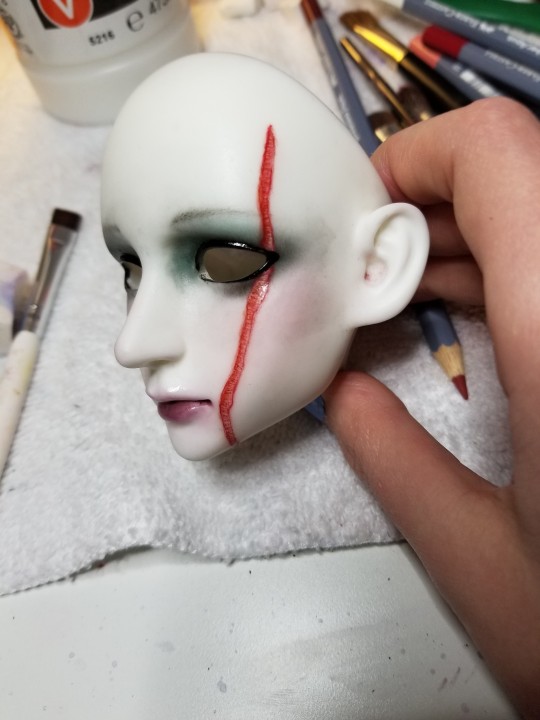
^ the gloss tends to make it a bit darker red but it turned out well!
For further reference, here's the mockup i did of it with the colors I used in the digital mockup for the scar

Text transcript:
Red dot -> Red line
Peach dot -> cover red with peachy color minus a small line
Lighter peach dot-> slightly lighter color
Brown dot -> watercolor pencil, add lines going <-->
Slightly darker brown dot -> add shading by doing larger lines and blurring over (this was mainly what i did for the digital mockup not irl)
Light pink dot (with arrow leading from the word darker back to the brown dot)-> watercolor pencil, add lighter shades between darker lines
#twist rambles#bjd posting#posting this mainly as a hey. heres how i do this so i can reference it later#idk if this is helpful to ANYONE but i just um. did not wanna carve into my dolls resin (like my other scarred doll has) or do mod podge#to make it raised
4 notes
·
View notes
Text
There are tutorials in the book I have on how to do this style of faceup:
(img source nena on doa)
and I’m like hahahahaa no thanks....
I know that’s the original style but no.
8 notes
·
View notes
Note
I only own BJDs, but honestly I feel like I learn more about faceups and different techniques from MH repaints than I do from channels that post BJD faceups. I think it’s because there’s not many channels that post faceup tutorials for free, they all want to make a dim out of every bit of info they have. I can’t seem to find any BJD channels that post faceups tutorials with english commentary, and the few that do, you can't really see a thing.
(((2nd "unberied" confession of the day))) 🙏
7 notes
·
View notes
Text


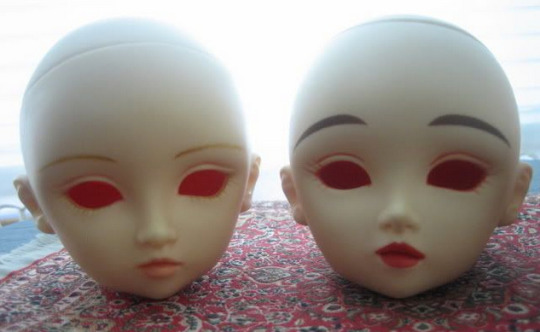
Not dead, really! Just been buckled down trying to finish up the draft of the contemporary romance I've been working on. I also have been working on some heads. Painted these three over the last week. I think I need to darken Xander's eyebrows (left, black hair), and Max needs different lashes (I ordered some more, just waiting on them to get here). I used Naomi Camlux's faceup tutorial, here - https://naomicamlux.wordpress.com/2023/10/28/soft-tone-glass-skin-faceup-tutorial/
I also ordered some different brushes to do eyebrows, as mine were too wide, giving everyone very fat eyebrows.
I am thinking about wiping Max when I get back from my trip this weekend and trying Naomi's sun-kissed skin tutorial on him.
Sculpts are:
Logan Dolls Djinn (black hair)
Flynn's Doll Leo (brown hair, tongue out)
Ringdoll Muscovado (no body)
1 note
·
View note
Text
So...
I did it again.
I was so happy with the way Neia came out that I decided to try again with an NPC character from my current D&D campaign. It'd be a great way to practice everything that I did with Neia and try some new techniques!
Lemme tell you right now.
This was a doozy!
Instead of starting with a plan like I did for Neia, I decided to jump straight in. This was my first mistake.
These images are from the second time I decided to sculpt her ears. The first time was not nearly as good as I hoped, so I guess it’s a good thing that I didn’t take any pictures of it. Even after all that sculpting and tons of sanding, I still don’t think the ears came out as good as Neia’s did. But eventually I got it to “good enough.”

After so much sanding (like, sanding her whole body sanding) I felt ready to start painting her. Somehow, painting her was just as frustrating as the sculpting part. I also ended up doing this part twice.
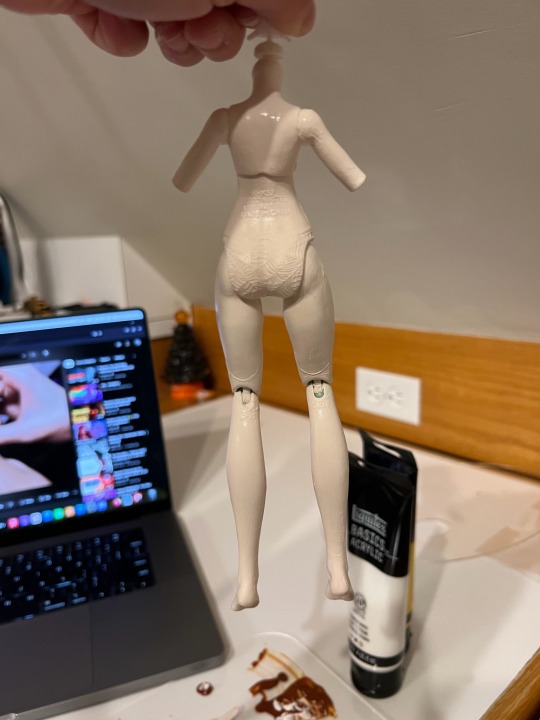
I’m a normal human being, with normal human hobbies.
I don't remember what I was watching while I painted her, but I know it was a doll video I was using as a tutorial. After a layer of gesso and a few layers of paint, I finally got her body to the skintone shade I wanted her to be.
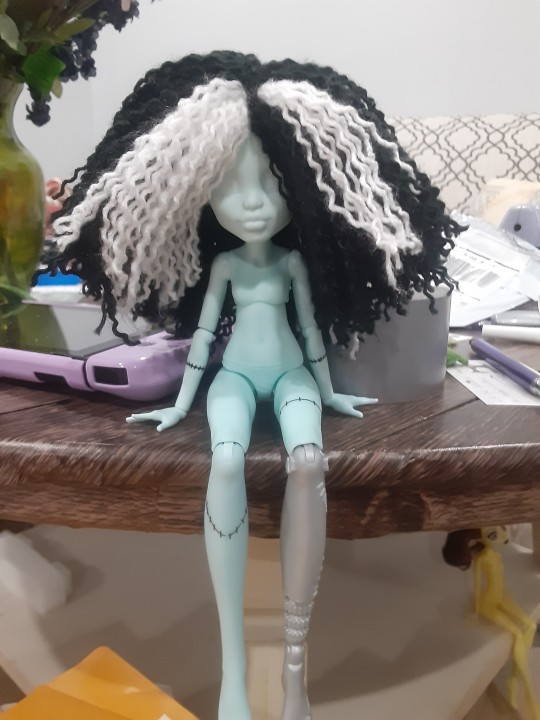
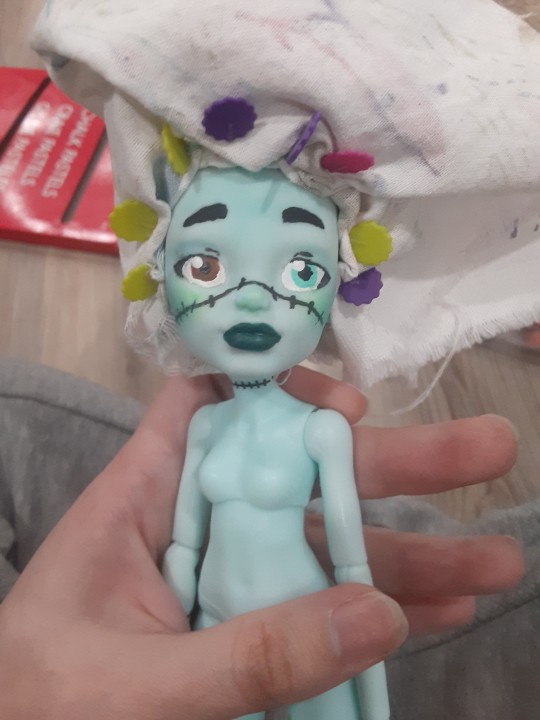
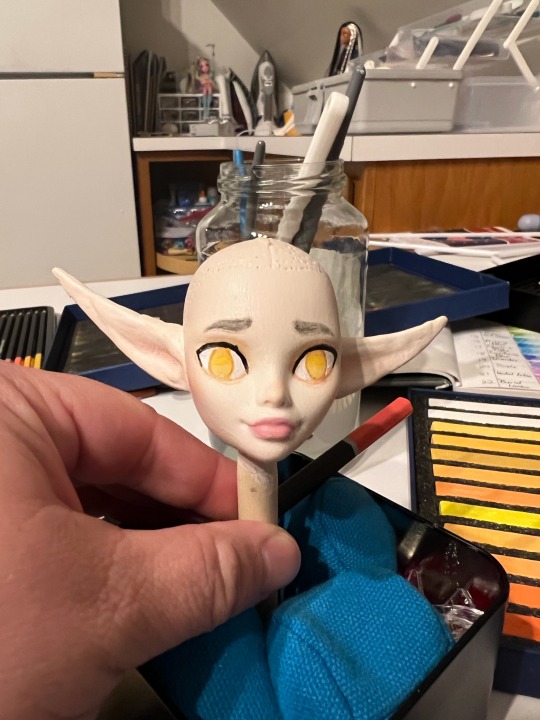
I tried doing the faceup and ended up hating the way it looked, so it was around this time I finally decided a plan was a good idea. Why did I wait this long? I do not know. Things got significantly easier when I actually had a plan so I'm going to chalk it up to hubris that made me think I didn't need one. I was able to get through the faceup using my plan, which was a huge relief! Even the hair (I tried the yarn weft method this time) came out great, though it's not styled in this picture.


(Don't mind Lagoona, she's going to be next.)
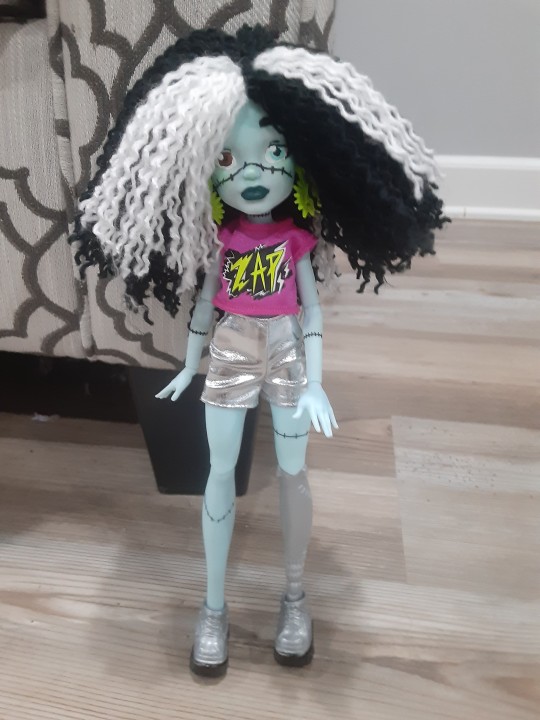
Finally, she was starting to come together. I didn't take any pictures of the clothing process mostly because I forgot to. Once I reached that stage, I just really wanted her to be done. A lot of things went wrong during this particular doll, but at the end of the day...
She was completely worth it.


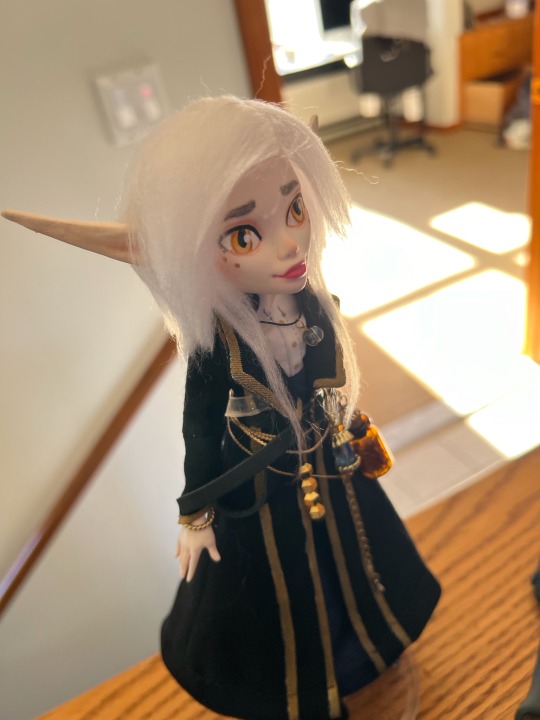
Meet Briar...
Known as The Woman who Fell From the Sky, she has no real memory of where she came from or who she was before her "fall." All she knows is that her husband was reincarnated, and she will do anything to find him. No matter how long it takes....
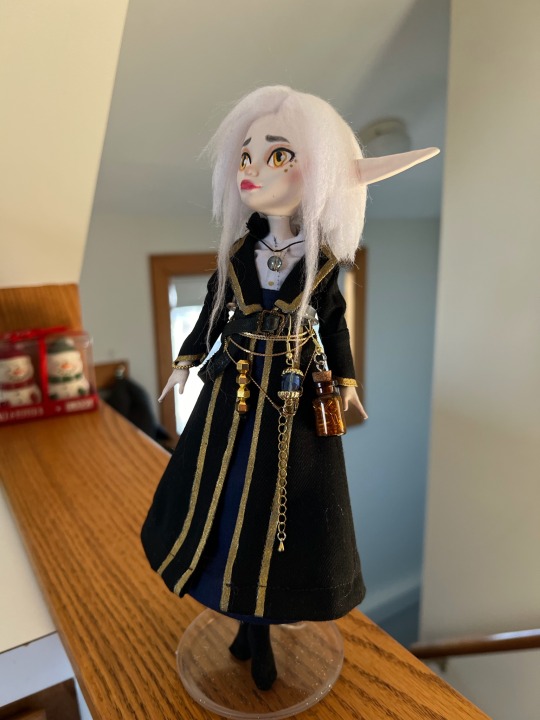
Despite everything that went wrong, I am still really happy with how she came out. Just like Neia, I'm just glad to see my character immortalized in a completely different way. And I hope you like her too! Seriously, thanks so much for liking and reblogging Neia as much as you all did. It really means a lot to me. I can't wait to share the next one with you and this time, I'm going in with a plan.
Thanks for the support!
#artists on tumblr#art#dungeons and dragons#dnd character#ooak doll#monster high ooak#ooak#doll custom
1 note
·
View note
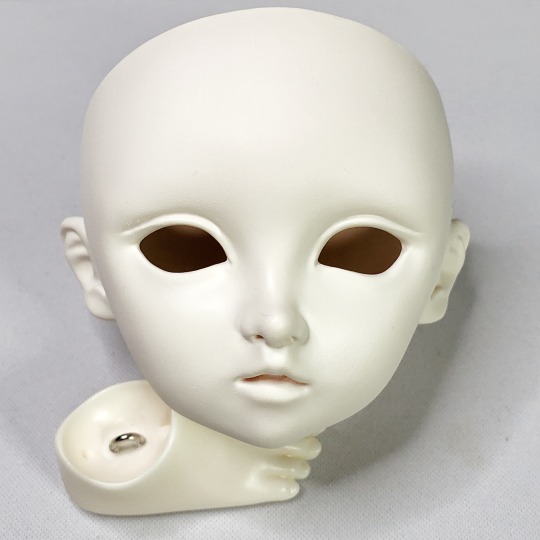
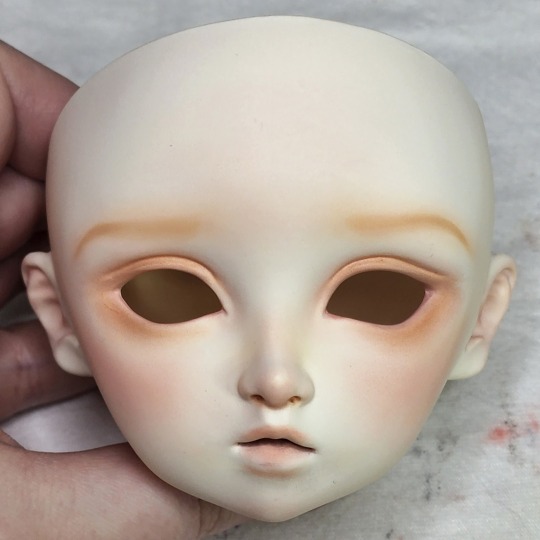
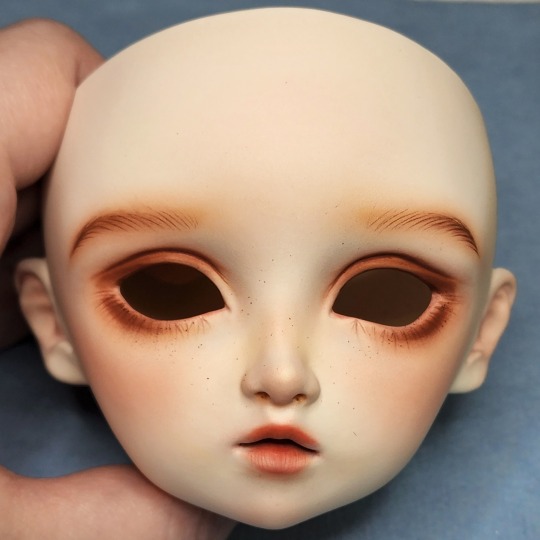
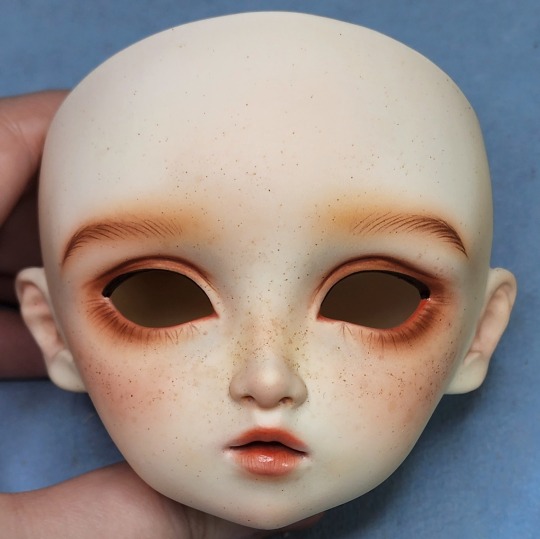
Photo


(via Natural Girl Face Up Tutorial – there be dolls)
I am happy to bring to you this awesome tutorial by @izasfaceups
It is a wonderful step by step tutorial with plenty of pictures and tips to help newbies and maybe inspire the more seasoned bjd owner as well!
60 notes
·
View notes
Text
Assembling my Frappzilla Poppy! I named her Sandy, and there is a large post in my blog with a lot of information (tutorial included) that I hope you'll find useful.
More at: https://bit.ly/3GPAOEK
#frappzilla bloom#artist bjd#ball jointed doll#mydollyadventures#tutorial#doll repaint#bjd faceup#bjd hobby
18 notes
·
View notes
Text
The "Big BJD FAQ" Google docs is a lifesaver. It's making me actually want to try doing customization of my own dolls! I've been in the hobby for 11 years or so, and this whole time I've been too scared to try a mod because I felt that it was the sort of thing only elite crafters could do and the tutorials I found intimidated me. But I realized I'm not that scared to "ruin" a doll when there's so much potential for cool stuff I could do, and worst case, I send it out to a professional to repair whatever I mess up! 🤣 If I'd be shelling out for a faceup and shipping anyways, I might as well try it myself first. At least, that's the thought. We'll see if I'm brave enough to go through with it.
~Anonymous
16 notes
·
View notes
Last Seen Blogs

poet-and-leather
Fernando

rngrmyk
You want fries with that...?
klepto-krow
i'm in blackbright aitch e double hockeysticks

reshop-commander
Reshop Commander