#ffxiv tutorial
Explore tagged Tumblr posts
Visit Tumblr Blog
Explore Tumblr blogs with no restrictions, modern design and the best experience.
Last Seen Tumblr Blogs


Fun Fact
69% of Tumblr users are millennials.
Text
Virtual Photography Guide: Composition (Part 2)
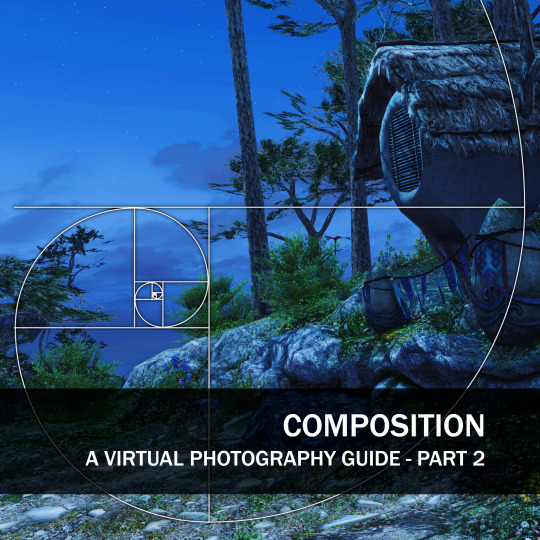
Let's continue exploring composition with a few more guidelines used in real-life photography, together with some FFXIV examples!
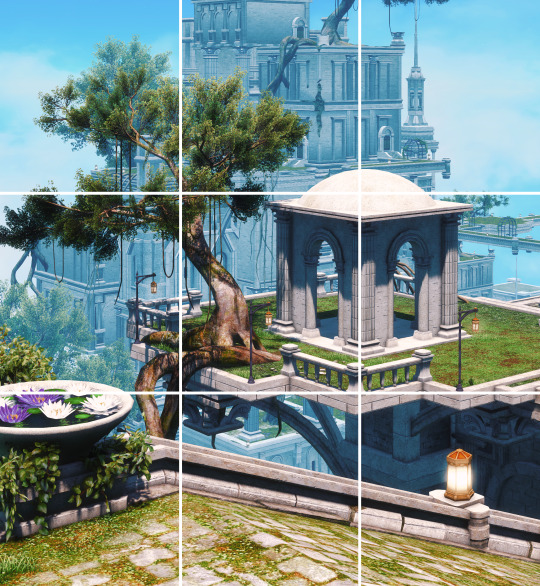
Rule of Thirds
The Rule of Thirds involves dividing the viewport into a 3x3 grid by drawing two horizontal lines and two vertical lines, resulting in nine equally sized rectangles. According to the rule, placing key elements of interest along these gridlines or at their intersections create harmonious compositions and draws the viewer's eye in a visually pleasing and balanced way:
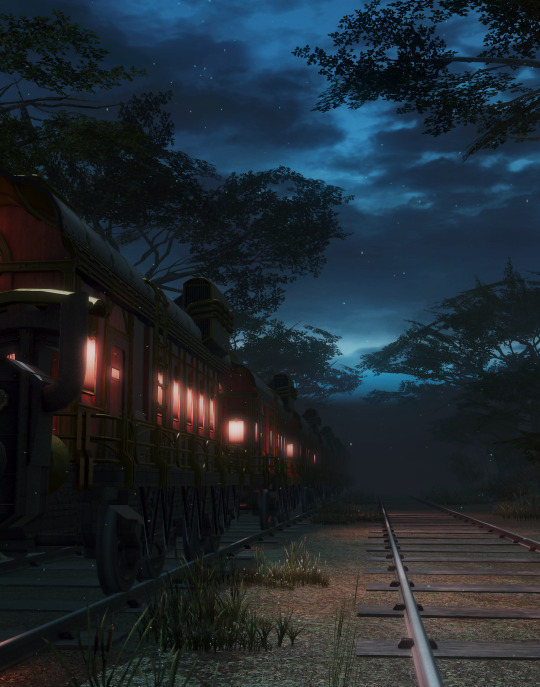
Rule of Odds
The Rule of Odds suggests that using an odd number of elements, such as three or five, tends to be more visually interesting and engaging compared to an even number. The Rule of Odds can be used to create a sense of asymmetry, tension, and visual flow:

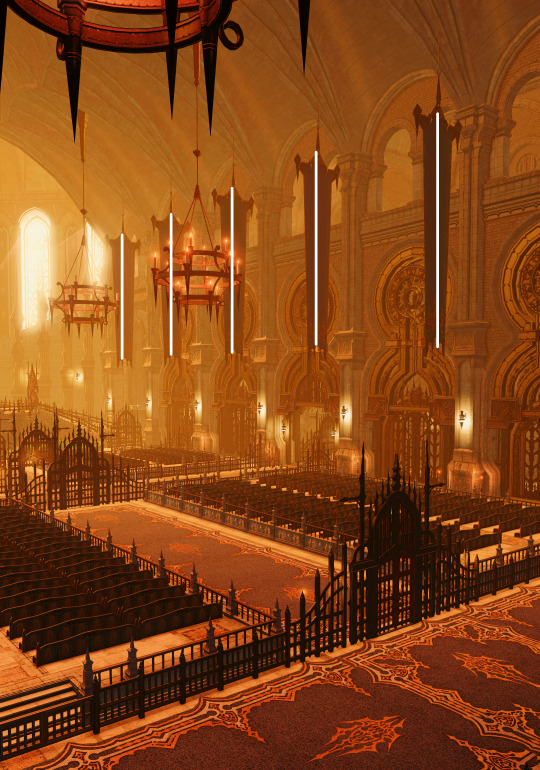
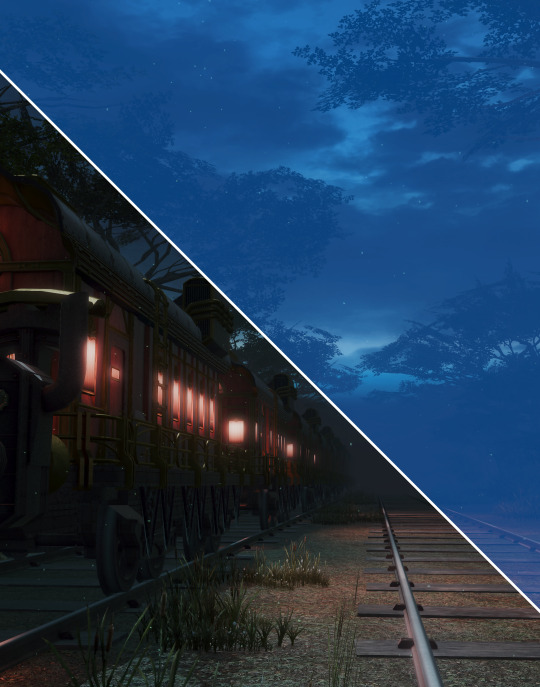
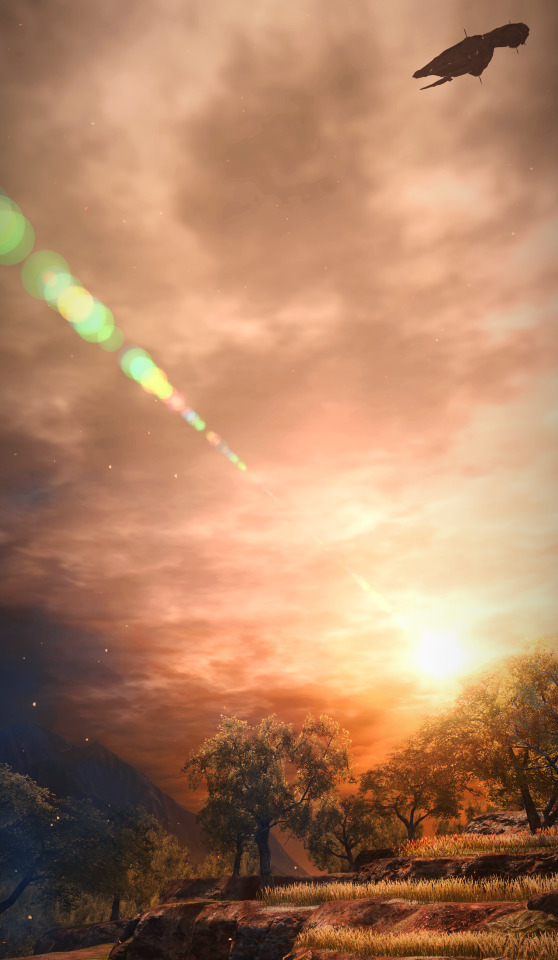
Rule of Space
The Rule of Space emphasizes leaving empty space or room within the frame, specifically in the direction that the subject or elements are moving or looking towards. It adds a sense of direction or movement and allows the viewer to engage with the image more effectively:
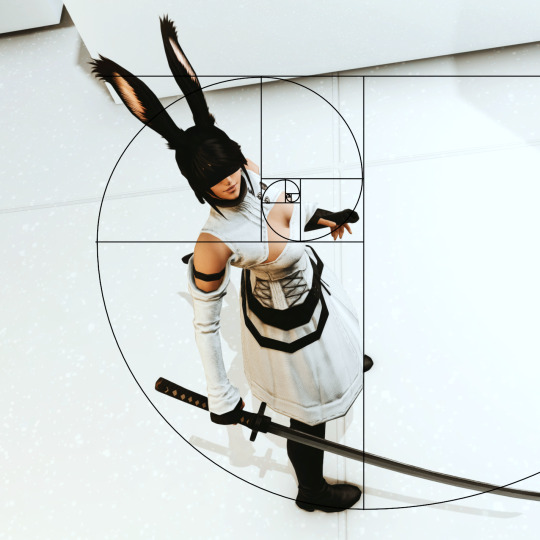
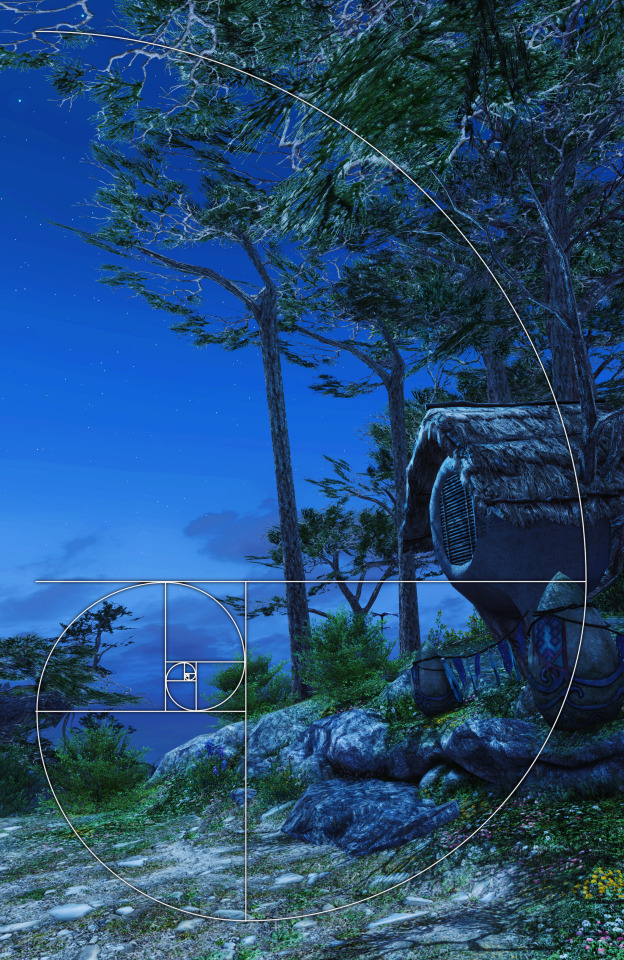
Golden Ratio
The Golden Ratio, also known as the Divine Proportion or Phi (Φ), is a mathematical concept and compositional guideline used in various art forms. It is a ratio of approximately 1.618:1 and is considered aesthetically pleasing to the human eye. In photography, dividing the frame into sections based on the Golden Ratio and positioning important subjects or focal points along these divisions creates a visually appealing and balanced composition. That way, compositions that feel harmonious and naturally pleasing:
So there you have it! while not comprehensive, these guidelines may help create shots that are engaging and pleasing to the eye.
You can now find this and all the previous guides and reference materials in our Discord server, Sights of Eorzea. Come check it out!
470 notes
·
View notes
Text
How to make Tattoos/Skin Textures for Final Fantasy 14
Hi there! I made a video about this a long time ago, essentially it is still the same work flow even though the Textools UI has changed a little bit with the Dawntrail update. Please mind that the video is a little old, recorded with a free software and I personally have zero editing skills. From experience and from what other creators told me it helped them a lot so I would like to bring it to more people and share my wisdom. This is a "beginners guide" for now, I can and will expand on it if necessary. You're always welcome to ask me questions. Join my discord or send me a dm! Let's start with what we need to make a tattoo/skin texture:
- Textools - Final Fantasy 14 with subscribtion - Substance Painter - Any Photo editor (Photopea is a free Photoshop online clone) - Not required but it could help: my videos
Step 1
Open your fbx in Substance Painter by clicking "Open" then "New" or Ctrl + N, with the following settings: PBR Metallic Roughness (Starter Assets) Resolution 2048 You can find the Bibo+, Gen3 and TBSE .fbx file here!
Step 2
Import your assets by dragging and dropping them into the Asset Library, then set them to "Texture" and import into your preferred Asset Library Category.
Step 3
Drawing: You can draw directly onto the 3D model and on the UV/2D planes. For that create a paint layer, select your brush, set your color in "base color". Assets: You can drag and drop your assets onto the 3D model, then select "Base color". This will project the asset in 3D. You can change the projection properties on the right under your layer selection or by right clicking in either of the windows. You can also create a "Paint Layer" and drag and drop the asset into the "Base color" slot. This will replace the fill color with the asset. Please make sure to make linework have a transparent background before using your assets.
Step 4
Whenever you're done arranging your tattoos/textures, it is time to export. Export with the following settings: - Output template: Document channels + Normal + AO (With Alpha) - Size: 2048 is more than enough for skin textures in FF14!! 4096 is almost overkill but will result in better quality, if you're a Mare user, please don't blast others with a 4k tattoo/skin texture unless it's really necessary - Padding: Dilation + Transparent
Step 5
Export the Skin Diffuse Material from Textools by selecting Character then choose your Characters race and gender. Midlanders share their skin material with Miqote and Elezen.
Step 6
Open a photo editor of your choice, open the skin Diffuse png and your Substance Painter Export. Adjust the layers if needeed so your tattoo/skin texture is above the skin texture. Export as png.
Step 7
Replace the Skin Diffuse png with the one you've just created, save to FFXIV to apply your changes to the game files and then launch the game to check the results!
If you have any questions please don't hesitate to DM me here or on discord @arimaemae
#ffxiv tattoos#tutorial#guide#skin texture#tattoo guide#ffxiv tutorial#ffxiv#ffxiv oc#final fantasy xiv#ff14#final fantasy 14#texture
14 notes
·
View notes
Text
FF14 Battle Portrait Tutorial
For the past few weeks I was trying to find a way to recreate the battle portrait from FF14 as there was a few characters that I want to see in that style but don't officially have one yet. I think I got it down more or less (see image below) so I thought it's a good time to share what I did.

First of all, I made a few files that would help make life a little easier. They can be grabbed here .
Note: I did use Reshade to do a bit of work at the screenshot stage to help speed up the process but the same effect can be recreated in Photoshop with a vanilla screenshot. There are a lot of tutorials on how to do comic/cartoon effect in photoshop and those would make good bases to work off of.
Step 1: Take the screenshot with the PortraitBase Shader on. I usually take two screenshots. One with "Comic" on and one with it turned off. This is so that I have more to work with if needed.


Step 2: Drag all the screenshots into photoshop and remove the background. In photoshop, arrange the layer so that the screenshot with the Comic lines visible is on top of the one with the effect off.
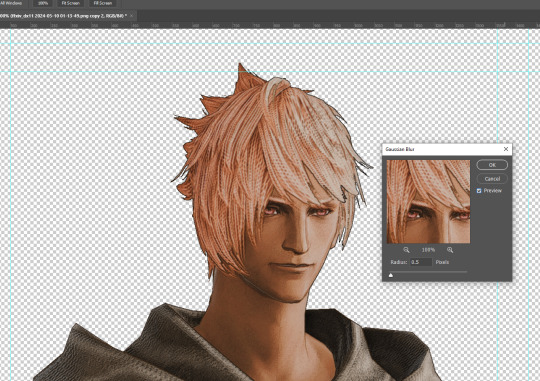
Step 3: Duplicate the the layer with the "comic" effect and apply Blur->Gaussian blur (radius 0.5)
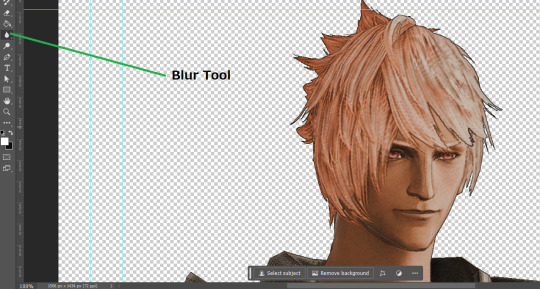
Step 4: Take a look at the hair. In Eric's case, It still doesn't look blur enough to me so I used the blur tool and blurred it a bit more
Step 5: Create a new layer above the layer in the previous step and use the brush tool to start outlining the edges. Where to outline is up to you but the idea is to make edges defined so that it looks more like a drawing.

Step 6: Duplicate the outline layer and then hide that layer. Step 7: Merge everything under the outline layer. Step 8: Drag and drop the "Texture.png" into the project and Clip it to your character layer. Set the blending of the texture to "soft light". Step 9: Drag and drop the "stroke Texture.png" into the project and Clip it to your character layer. Adjust the size till you are happy then set the blending to "overlay". Step 10: Adjust the opacity settings of both texture layers until it looks good to you.
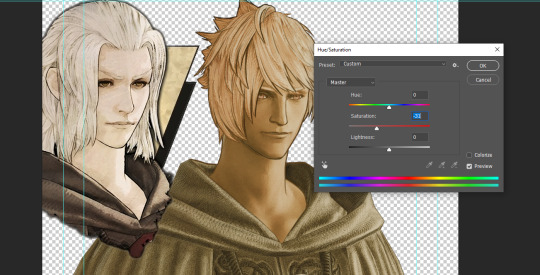
Step 11: Click on your character layer and go to image->Adjustments->Hue/Saturation (note: you will see I dragged in the official Hades portrait as a point of reference to work off of). Adjust the saturation till you are happy.
Step 12: Go to image->Adjustments->Color Balance and adjust the color till you are happy. In this example, since Eric is also wearing the Sophist robe, I tried to match that color to Hades' Sophist robe color.
Step 13: Once you are happy, drag the "Template.png" into the project and scale that to the size you want. Make sure it is completely covering the character. If it's not, you can just use paint more of it with the brush tool to extend it till it covers everything.

Step 14: Hide the "template.png" layer and select your character layer. Use the magic wand tool to select the outside of the character.
Step 15: With the selection still selected, click on the "Template.png" layer and press delete on your keyboard. You should now be left with a blank in the shape of your character.

Step 16: Drag the"Template.png" layer to be below your character layer. Then click on your character layer and clip it.
Step 17: Click on the "Template.png" layer and add a 2px stroke and shadow to it.
Step 18: Drag "Back_Deco.png" into the project and place it behind your character. Scale it till you are happy with it.
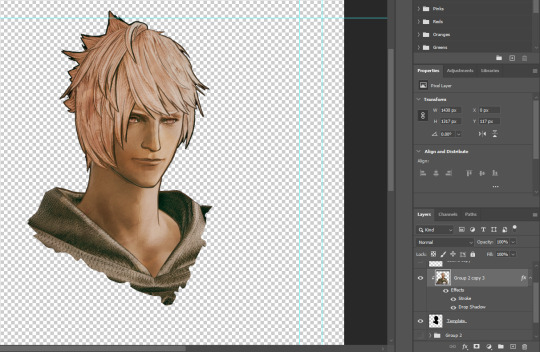
And that's it! Now you can recreate portraits for any NPCs that you want (in theory). A lot of it is also fine tuning to what you want but this should at least give you a decent base to work off of :)
2K notes
·
View notes
Text

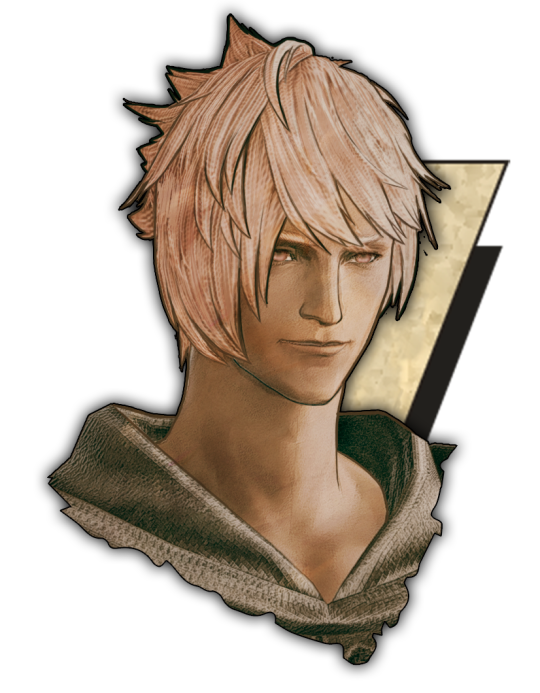
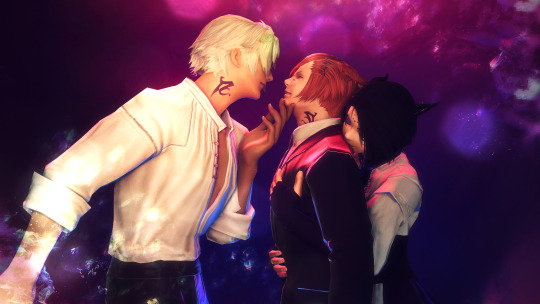
—the crux of you
✦ partner piece ✦ series ✦ details below the cut!


#ffxiv#final fantasy xiv#ff14#final fantasy 14#ffxiv art#aymeric de borel#warrior of light#wolmeric#aymeric x wol#aureia malathar#art tag#hi hello this took me ALL OF MAY#it's done wooooooohooooooo#ty to rue for getting me screenshot refs of aymeric's impossible armour (what is with this gear like SERIOUSLY what is with it)#and to han for helping with the tiles/reflection situation#you're the best! <3 <3#i wanted to do something for aureia and aymeric that encapsulated their whole relationship#it doesn't work out in the end#ishgard was simpler for them#the war with garlemald tears them apart#idk aaaaaa there's something about having the happy ishgard section in the rain/snow after a storm#(yes the snow is there you can't really see it lmao it's supposed to be slushy snow/rain)#and then the dawn of an end when they reach the ghimlyt dark#i watched an art tutorial in april that was like - “reflections are an easy way to add instant drama”#and I said “oh really?? CHALLENGE ACCEPTED”#i don't think this is what the art teacher actually meant hahahaha
88 notes
·
View notes
Text
WoL Magic Cards Tutorial!
I'd made a custom Magic: the Gathering card of Johnny recently, and shared it in the Seafloor discord, and since there was a lot of interest in the concept I figured a tutorial might be nice so we have something to do while we wait for plugins to come back. Here goes!

Download CardConjurer This is the tool I use to make custom cards. It's just a web app developed by a college student; he got DMCA'd by WOTC so it's not hosted on the internet anymore, but you can still run it locally.

Just unzip the contents somewhere, and then run launcher.exe when you're ready. It should open up the app in a browser tab.
2. Navigate to the Card Creator


3. Pick out a Frame
Enter this search box on the right. We're going to be using the Nickname ("Godzilla") frames. These give us a small subtitle box below the card name that indicates what the Magic card's actual name is.
If you want to create a custom card instead, use the Borderless frames.

In the menu below, you should see the different colors of the borderless frames. You'll have to add three of these elements to the card: the text box, the card name, and the power/toughness box. Do them in that order, by clicking each element and then Add Frame to Card. If your card is legendary (or if you feel like it), use the Crown option rather than just Title.

You'll have to choose the correct color. If your chosen card is monocolor or >=3 colors, this is very easy since you can just choose that color or gold, but for two-color cards the process is slightly more involved. First, add the color that goes on the left using the Add Frame to Card button, and then add the right color using the Add Frame to Card (Right Half) button. Use the gold power/toughness box.
If any of the card elements get out of order, you can reorder them using the layers controls at the bottom of the page.

4. Import the card text

Navigate to the Import/Save tab, and type in the name of the real card you're putting your OC over. Select the specific version of it using the dropdown afterwards.
(For some reason, Firefox suggests completing this field with my credit card information. I think it knows more about Magic than it's letting on.)
After the card is imported, navigate back to the Frame tab, and click Load Frame Version. This will force the text on the card to fit into the frame set that's currently selected in the bar on the right, which should still be the Nickname ("Godzilla") from earlier.

We should have something closely resembling the real card in the editor, now.

5. Make it yours!
First off, go to the Art tab, and upload your image. Once it shows up, you can adjust it by clicking the actual card in the editor. Clicking and dragging pans it around, shift+clicking scales, and ctrl+click rotates.

Next, pop over to the Set Symbol tab and remove it, since this is your own card and isn't from a Magic set.

And now, go over to the Text tab to finish this off! Start by entering your card name into the Nickname tab.

If your chosen card name is too long and ends up clipping the mana cost, you can reduce the width of the text box with the Edit Bounds menu until it fits.
Next, go to Rules Text to update the name if the card refers to itself. I changed all instances of "Vadrik" to "Johnny". Since this card is really just to look at and not to play with, I also renamed the Day/Night mechanic to fit the Black Mage flavor even better. Feel free to get creative!

You can use {flavor} to add flavor text as well. I added the {lns} commands after some words to add line breaks to make the text blocks look better.
You can also edit the typeline in the Type tab, if the creature type doesn't match your WoL. Johnny is already a Human Wizard though, so I didn't have to do that. Technically this would be a mechanical change of the card, but since these aren't real cards anyway I think it's a valid concession to make. Just don't go abusing it if you actually end up printing these out LOL
6. Download the card image
Finally, head back over to Import/Save, scroll all the way to the bottom, and hit Download you card.

And you're done! There's obviously a lot more that's possible with CardConjurer, and tons of avenues for creativity. If you end up following this tutorial, or creating any other FFXIV-related MTG cards, I would really love to see them!

143 notes
·
View notes
Text
youtube
i've gotten a couple common questions now about how i do my camera stuff in gpose, so i hope this can answer questions for anyone else that's curious to do it themselves!
51 notes
·
View notes
Text
what, I wonder, is worse to be the only living thing alone on a dead planet
or to be as I exist half-dead, yet breathing alone avoided by all warmth and life
#Imayo Mikomori#FFXIV#Screenshots#I got that teardrop tutorial and followed it#and screamed many curses at how finicky they are to pose#but OH so worth it#and yet you almost can't tell they're even in her eyes LOL
127 notes
·
View notes
Text

Goin' Gatherin'
vvv close-up vvv
#Final Fantasy XIV#FFXIV#X'vahl Tia#ffxiv gpose#X'vahl and two of his best girls#(at the moment...)#practicing some more with these face bones#and with some more dynamic poses#since I tend to go much more subtle with my gpose story sets#I'd like to do some more experimenting with this though#none of this was without help from from-eorzea's expression tutorials and poses
64 notes
·
View notes
Text
What programs do people use for advanced gposing? I'm looking to get into it more thoroughly
#i would also appreciate tutorials if you have em#personal#ffxiv#ff14#gpose#final fantasy 14#final fantasy xiv#gpose programs#ff14 gpose#ffxiv gpose
21 notes
·
View notes
Text
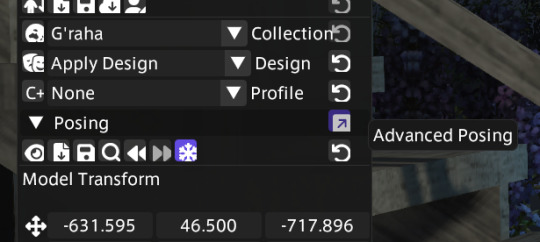
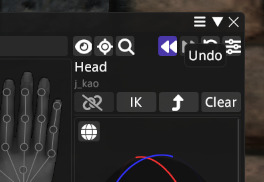
How to Get Expressions from Emotes in Brio
I only recently started using Brio, but have found it to have a lot of options that Anam(nesis) did not. One thing I've been struggling with, though, is posing all of those facial bones to get the expression that I want.
Fortunately, there's an easy way to grab expressions from emotes! Brio has every emote in the game, and the expressions and animations from cutscenes, as well as the weapon animations. You can even load in animations like the "finger pointing conversation" animation, or the "handing over an item" animation.
But I'm getting ahead of myself. Let's start at the beginning.
Here's our boy, with his intimidating array of bones. Even with the nice interface Brio gives us, that's a lot of bones to pose, especially in the face.
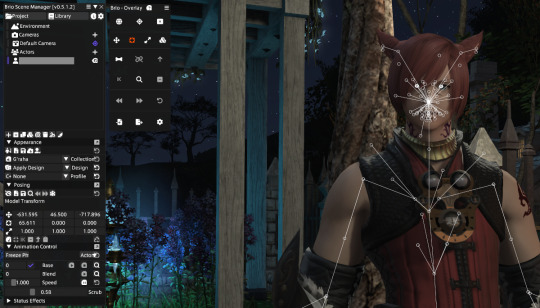
I could either spend all day playing with these, or I can use Brio to load an emote, freeze him, and save the facial expression. Really, we can do that. But how?
First, let's turn off those visual bones so we can see what we're doing.

Hit that eye icon right under the Posing arrow. Poof! Much better.

Now, look towards the bottom of the Brio window. You'll see an Animation Control tab. Let's click on the arrow and show the whole animation panel if it isn't open already.
On the right side of the window, you'll see what looks like a magnifying glass. Let's click on the top one.
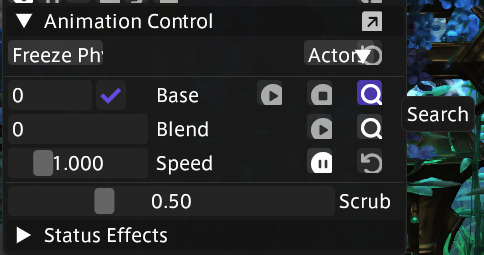
A big, intimidating window will open up. That's ok! That's your list of animations and it's looooong. There are hundreds in there. You could easily spend hours going through them all to see what they are, since a lot of them don't really tell you, they're just numbers. Some won't work on your character. Some will make your character vanish (like the porting animations, just use the reset if that happens - I'll show you how further down.)
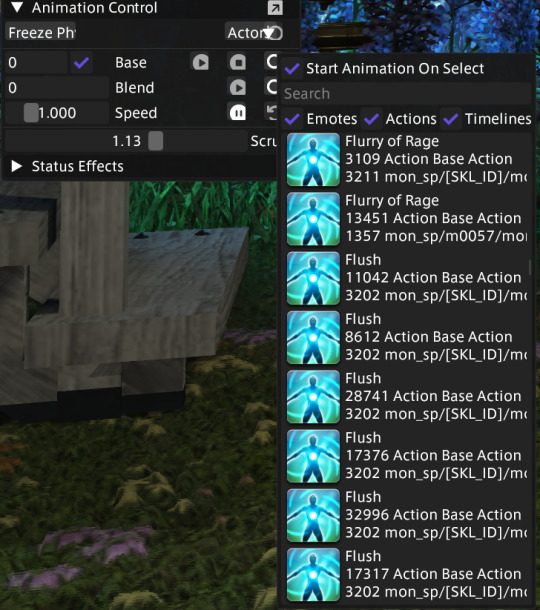
Wow, that's a lot, I know. Let's make life a little easier and filter out a bunch of them for this tutorial. You can always go back later and figure out which ones are the good ones!
Uncheck Actions and Timelines at the top of the list.

That's a lot better. I think I'll use "Think" for this tutorial. As soon as I double click on it, our boy starts thinking.
Now, watch him move around for a while and find a facial expression you want to use. Once you do, hit the freeze button, right under Posing. It looks like a snowflake:

Our boy stops moving. I like this expression (really, I do!) so I'm going to save it.
*Note, you can just randomly hit the freeze button and see if you get a good expression that way, too.
Now let's go to the Save button under Posing and save the whole thing.
What? But you said we were saving the expression!
We'll get there, promise.
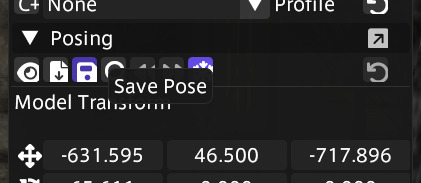
Save it somewhere that will be easy to find later.
Now, let's reset him. On my PC, the Actor button and Reset button overlap. Make sure you're hitting the right button.
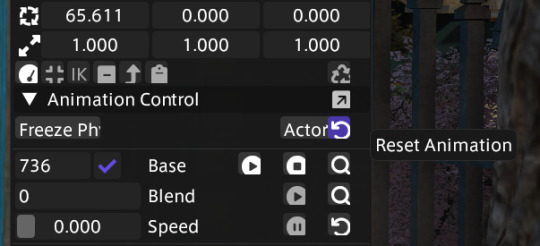
Now he's back in a default idle animation.

Now it gets interesting.
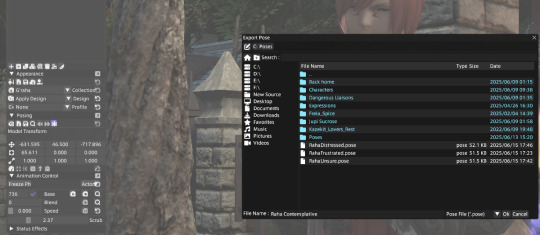
Let's go to Import Pose.

Now choose Import Expression.

Now hit Import.
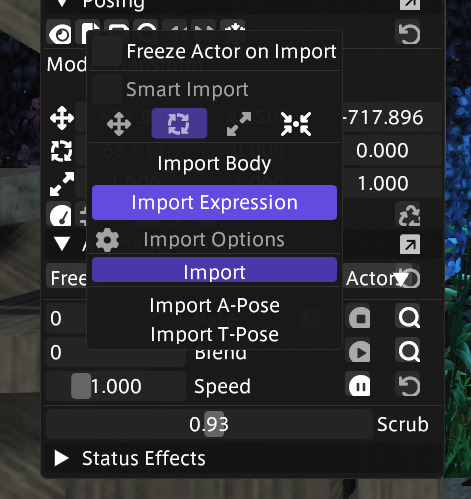
If you don't see your new pose in the library, click on Browse for File:

Now you can go to where you put your new pose and double click on it.

Yay, my new expression loaded! But the neck and head position are a little - wonky. This is pretty typical, and I've found that they almost always need a little adjusting, sometimes a lot of adjusting.
That's ok - we can fix it!
We want to slide and rotate his head and neck so that they are aligned in a neutral position. That way, when you load it next time, you can pose his body however you like and it will be easy to use the expression.
First, freeze him again. It will make posing him easier.
There are a number of ways to choose bones to pose in Brio - I know of at least 3. This one is visually easiest for me, but use what works best for you.
To use mine, open the advanced posing window.
Look familiar? It does look a lot like Anam.

Choose the "head" bone by clicking on the round circle inside his head on the left side of the window. (The middle outline showing armor is for posing clothing and hair.) Once that little circle in his head on the left is highlighted, let's get his head turned to look at us so we can see how far out of alignment it is.
You can reposition his head by using either the rotating gizmo and sliders in the advanced window:
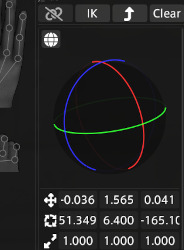
Or the sliders in the Posing window:
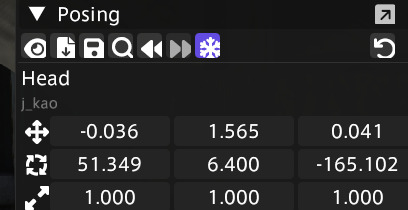
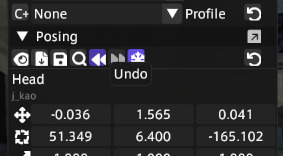
Don't be afraid to use those top sliders. If things go bad, guess what? There's an undo button! It's the best feature in Brio, I think.
I've turned his face to look at the camera and now I know where I need to adjust him. He's at a bit of a diagonal angle so I'm going to straighten him up.

Better - but be sure to check all angles.
Aha! The back is not quite straight. Keep playing with it until it's lined up how you want it. Sometimes you'll find that it looks good from the front, but their chin is almost in their neck from the side.

Once you have it where you want it, save it again. I like the whole pose, so instead of overwriting the old pose, I'm going to give it a new name for the expression-only version. Use the exact same process that you used to save the first pose.

And there it is! Now we have a custom expression taken from an emote that can be loaded on demand. I've found that you can get multiple expressions from a single emote - and it saves you from posing each facial bone every time you want to show emotion.
Now that we have the expression, we can import a body pose to go with it. You use the same import we used above, choosing "Import Body" instead of "Import Expression."
This is our new expression, combined with the body pose I used with Ava pulling Estinien by the ear:
It's usually best if you load your expression and then load the body pose.
*Note, you can save that combined pose up there and load the whole thing next time by choosing "Import Expression" and "Import Body." It will load both at the same time from the same pose.
There you go, enjoy!!
11 notes
·
View notes
Text
Happy Pride from the Chorus!
#ffxiv#karoiseka#and three makes a chorus#thancred#g'raha#ty to sif for the lighting tutorial!#and Kyren for the gshade preset#aetherweaver for Karo's out fit#emmermods for karo's hair#serphentius for Than's shirt#and of course Mia V from bluesky for the pose prompt!#seriously this was so much fun to put together!#Happy Pride!#bisexual#poly trio
19 notes
·
View notes
Text
You can now search all the guides and filter by category in the Sights of Eorzea Discord!
Come take a look!
189 notes
·
View notes
Text
New Game+ Tutorial
"I don't remember this part of the story." "It's been so long since I played X expansion." "What happened during that raid again?" "Who was this character?" "I story skipped the MSQ/job quests so I don't know what happened and who these people are!"
There's answers to this, friends. Not only is the game's own Unending Journey (in inn rooms, or as furnishing in your FC or private rooms/homes) able to replay many cutscenes, and there's the completed quest log, but there are places online, such as Garland Tools and the FFXIV Game Script, that keep most (not all) of the quest text handy.
But if you want to relive those quests, and/or get the side dialogues and replay (or first time play!) the experiences, as of Shadowbringers 5.1 there's a feature called New Game+ to allow that.
New Game+ (or NG+) will let you replay past questlines, at your current level (which makes it go pretty fast in a lot of cases). There is No experience or rewards to gain through this feature--no using it to level alt jobs. It purely exists to allow experiencing, or re-experiencing, completed content.
Once defeating the Ultima Weapon and Lahabrea at level 50 in ARR's finale of 2.0, you can go to Vesper Bay and find the Wistful Whitebeard.
More info and images below the Keep Reading cut...
(image taken from gamesconsolewiki and their article on this feature.)
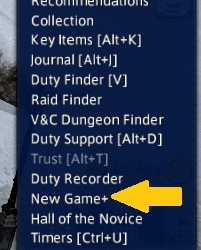
Once you've unlocked the feature by talking to him, you get a new menu option in your Duty menu (the exclamation point icon), right between Duty Recorder and Hall of the Novice.
Once you select the feature it brings up a menu of options; it usually defaults to Main Story Quests, but I also have a paused replay under "Suspend" in progress. There are also options that match other quest interfaces, like your Journal or the Unending Journey; Chronicles of a New Era for raids and trials, Side Story for quests like Hildibrand, the Scholasticate, Role Master Quests, Void Quests, and Chronicles of Light (story important side quests, like Tales of the Dragonsong War, Tales from the Shadows, Tales of Newfound Adventure). Tank, Healer, DPS, Crafting, and Gathering quests also have their own categories.

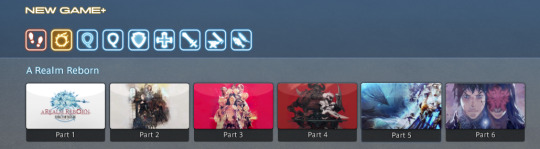
Each Expansion MSQ is broken into parts; usually 2 parts for the x.0 main expansion, and then 2 parts for the patches. They're only available after x.0 or the patch stories are complete.
Also notice the "Help" icon in the top right of the NG+ overlay; it opens a pretty comprehensive guide, divided into menu sections, about how the feature works.
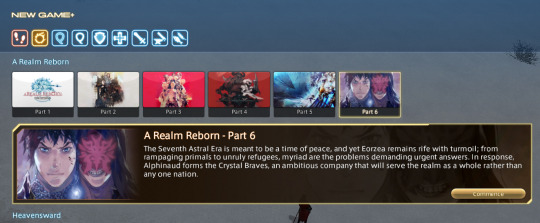
ARR is split into 6 parts, and I do think 2.0 could use a rework in how they're split but for now, I'm selecting Part 6 to look for specific side dialogues that only exist in this timeframe.
Selecting Part 6 opens the description; the Crystal Braves have just been formed, to help the Scions with the turmoil still facing the realm--from refugees, to Garlemald's continuing threat, to primals and Ascians.
Once you do, the NG+ quest info shows up, usually around where ever you keep your MSQ quest marker. I hide my MSQ tracker once it's done, so NG+ fits in that same spot in the upper left for me.
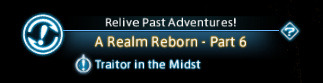
It tells me to "Relive Past Adventures!", which expac and part I'm in, and which quest is my starting point in this case, "Traitor in the Midst", the start of the Ivy spy plotline in Patch 2.4.
From here it progresses as if I am back in that patch and on those quests, but without any experience or rewards. Aeryn's in her current level 90 appearance and skills, making it easy to skip past and handle level 45-50 enemies in these zones.
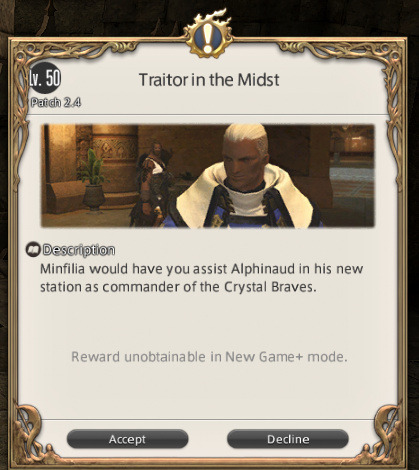
So long as I am in NG+, I cannot do current quests, plots, or other content; I can't complete new current level duties (duties new in NG+ itself are fine), I can't access the MB, my retainers, or the Unending Journey. I can manually Suspend my current playthrough, or performing some of these actions (like duties) will automatically suspend my NG+ playthrough. You also cannot start NG+ while doing certain things (like some quests, such as leves).
This also will not let you play through the start of other city-states, only your original starter town. Solo duties will let you choose their difficulty immediately, without having to fail them first like in normal play.
If I want to drop my NG+ save before I've finished the replay--maybe I found the info and screenshots I wanted--I can delete the save.
This is an extremely helpful feature that can be used to replay events and quests, either for the fun of it, or because you want to find specific dialogue or lore information that only exists in a specific point in game. Maybe you want to visit old friends lost along the way, or take new screenshots of your WoL as they are post-fantasia.
Maybe it's just been a few years, and you've found you've forgotten some things and want to remember how the story actually went, especially knowing what you know now.
70 notes
·
View notes
Text
FFXIV - The Limitless Blue (Hard) - Vapor Bubbles
I actually want to explain and show how this works, because many players will simply destroy these bubbles under the wrong conditions and get their party very damaged.
The ONLY time you want to destroy these bubbles, is during rain only, no thunderstorm, just rain.
These bubbles act like lightning rods during Windcaller, and it helps mitigate the thunder off the party. Example below (view full image)

See how the lightning strikes the vapor bubbles and instantly downs them? Without those bubbles, the entire party becomes victim of the full thunder strike, and it CAN spell disaster and cause party wipes if not careful.
This is to show that this mechanic is NOT solely in Extreme, but Hard as well.
Lots of the XIV community destroy these bubbles because "adds" but it's very important to remember that these bubbles MITIGATE the thunder from the party.
#ffxiv#final fantasy xiv#ff14#final fantasy 14#Bismarck#Heavensward#The Limitless Blue#Guide#Tutorial#Advice#Gamig
12 notes
·
View notes
Text
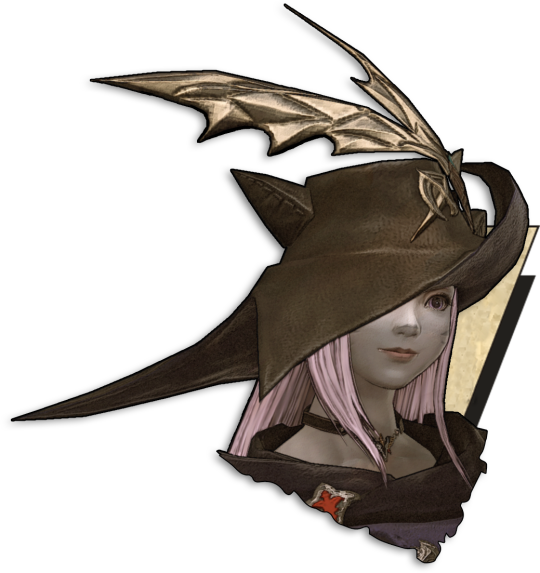
big hat
tutorial by @twitter-sakuranokaze (thank you for sharing :D)
#i ended up painting over most of her hair; it just wanted to make PIXELATED LINES#endwalker spoilers in the tutorial#ehriyu#ff#ffxiv#gpose#?
20 notes
·
View notes
Text

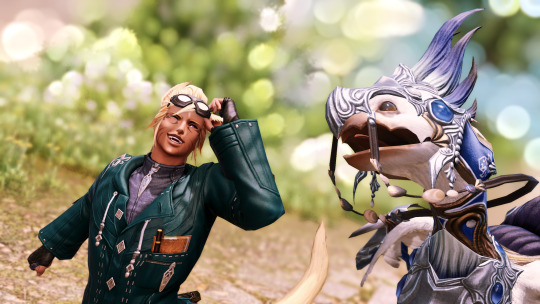
Spent the day getting my Twintania minion
#ffxiv#final fantasy xiv#ffxiv oc#gpose#ffxiv gpose#ffxiv wol#audrey valentine#hyur midlander#if anyone needs help w/ the tutorial stages#some of them are hard I'll admit- really just the odin one and the final stage#the rest are pretty snoozy#took me maybe 2 hours to finish? not even
8 notes
·
View notes