#ava tutorials
Explore tagged Tumblr posts
Visit Tumblr Blog
Explore Tumblr blogs with no restrictions, modern design and the best experience.
Last Seen Tumblr Blogs


Fun Fact
12.7% of mobile users access Tumblr.
Text
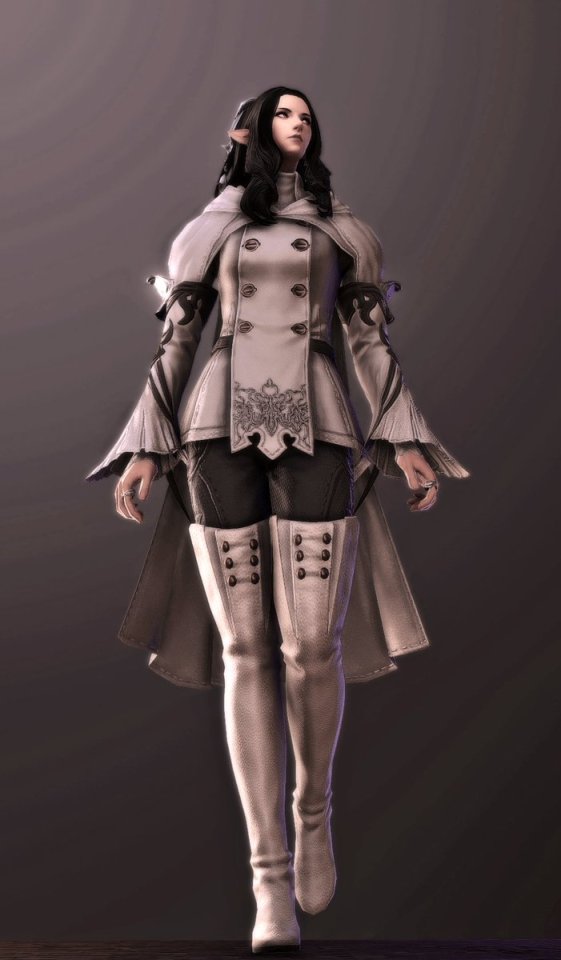
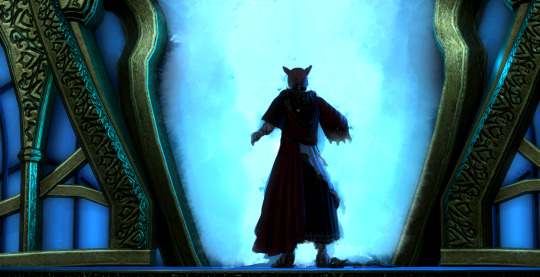
How to Get Expressions from Emotes in Brio
I only recently started using Brio, but have found it to have a lot of options that Anam(nesis) did not. One thing I've been struggling with, though, is posing all of those facial bones to get the expression that I want.
Fortunately, there's an easy way to grab expressions from emotes! Brio has every emote in the game, and the expressions and animations from cutscenes, as well as the weapon animations. You can even load in animations like the "finger pointing conversation" animation, or the "handing over an item" animation.
But I'm getting ahead of myself. Let's start at the beginning.
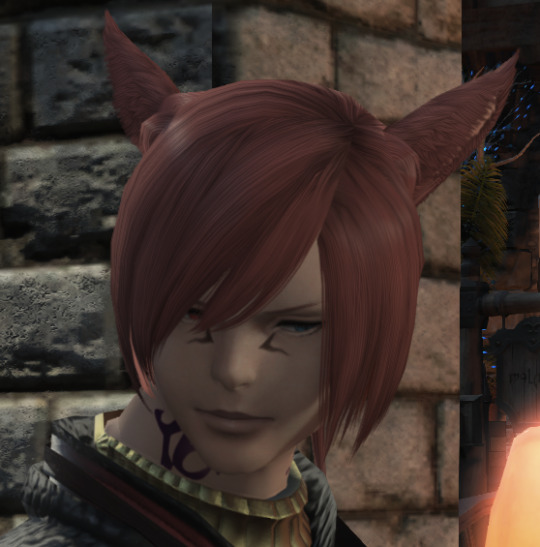
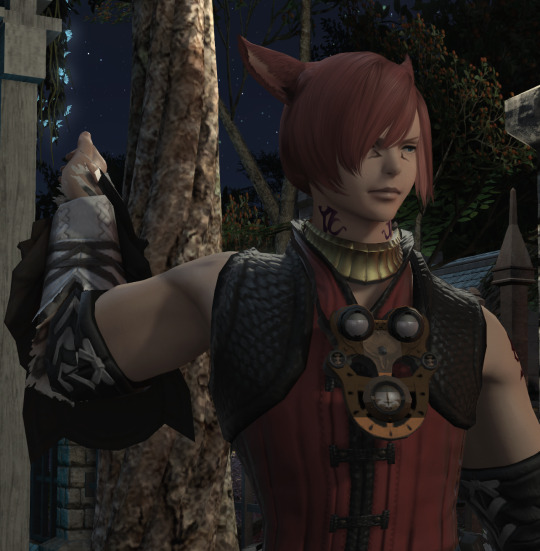
Here's our boy, with his intimidating array of bones. Even with the nice interface Brio gives us, that's a lot of bones to pose, especially in the face.
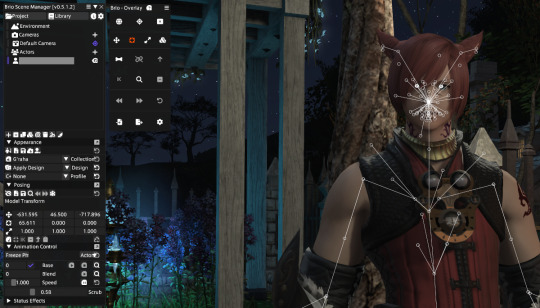
I could either spend all day playing with these, or I can use Brio to load an emote, freeze him, and save the facial expression. Really, we can do that. But how?
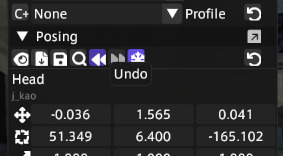
First, let's turn off those visual bones so we can see what we're doing.

Hit that eye icon right under the Posing arrow. Poof! Much better.

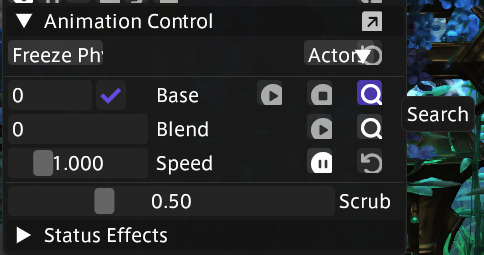
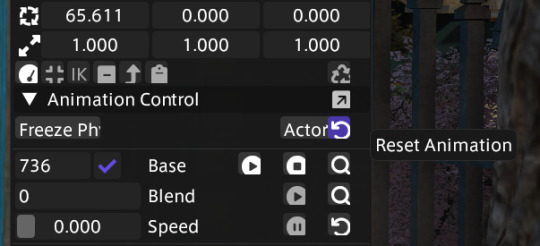
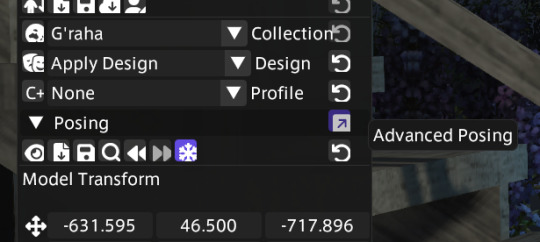
Now, look towards the bottom of the Brio window. You'll see an Animation Control tab. Let's click on the arrow and show the whole animation panel if it isn't open already.
On the right side of the window, you'll see what looks like a magnifying glass. Let's click on the top one.
A big, intimidating window will open up. That's ok! That's your list of animations and it's looooong. There are hundreds in there. You could easily spend hours going through them all to see what they are, since a lot of them don't really tell you, they're just numbers. Some won't work on your character. Some will make your character vanish (like the porting animations, just use the reset if that happens - I'll show you how further down.)
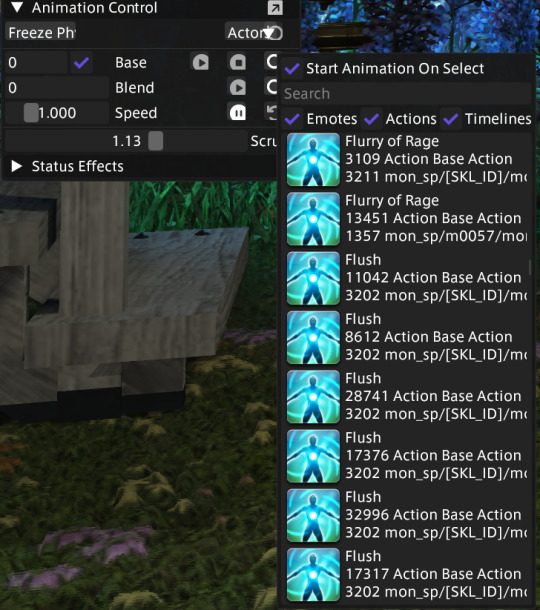
Wow, that's a lot, I know. Let's make life a little easier and filter out a bunch of them for this tutorial. You can always go back later and figure out which ones are the good ones!
Uncheck Actions and Timelines at the top of the list.

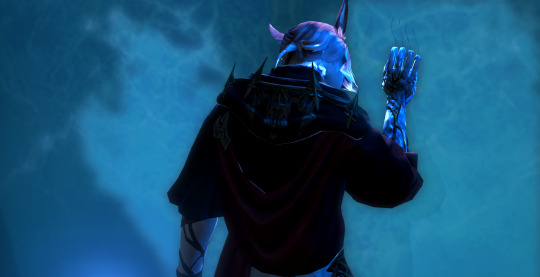
That's a lot better. I think I'll use "Think" for this tutorial. As soon as I double click on it, our boy starts thinking.
Now, watch him move around for a while and find a facial expression you want to use. Once you do, hit the freeze button, right under Posing. It looks like a snowflake:

Our boy stops moving. I like this expression (really, I do!) so I'm going to save it.
*Note, you can just randomly hit the freeze button and see if you get a good expression that way, too.
Now let's go to the Save button under Posing and save the whole thing.
What? But you said we were saving the expression!
We'll get there, promise.
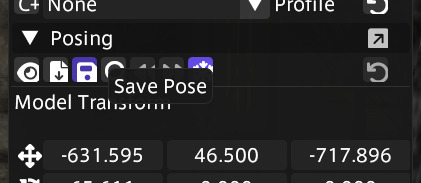
Save it somewhere that will be easy to find later.
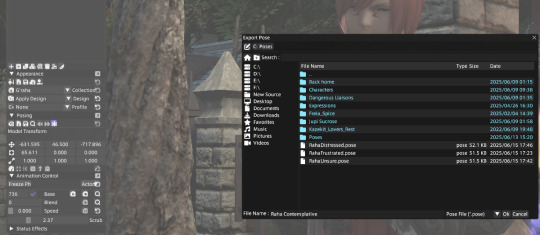
Now, let's reset him. On my PC, the Actor button and Reset button overlap. Make sure you're hitting the right button.
Now he's back in a default idle animation.

Now it gets interesting.
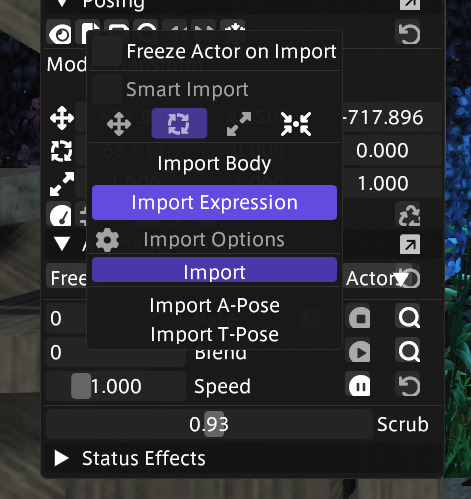
Let's go to Import Pose.

Now choose Import Expression.

Now hit Import.
If you don't see your new pose in the library, click on Browse for File:

Now you can go to where you put your new pose and double click on it.

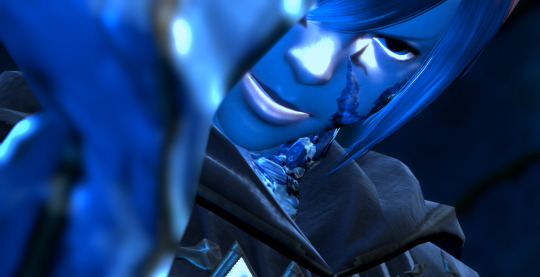
Yay, my new expression loaded! But the neck and head position are a little - wonky. This is pretty typical, and I've found that they almost always need a little adjusting, sometimes a lot of adjusting.
That's ok - we can fix it!
We want to slide and rotate his head and neck so that they are aligned in a neutral position. That way, when you load it next time, you can pose his body however you like and it will be easy to use the expression.
First, freeze him again. It will make posing him easier.
There are a number of ways to choose bones to pose in Brio - I know of at least 3. This one is visually easiest for me, but use what works best for you.
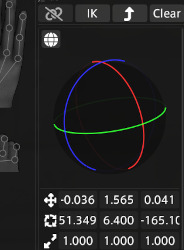
To use mine, open the advanced posing window.
Look familiar? It does look a lot like Anam.

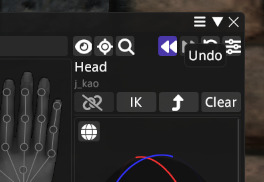
Choose the "head" bone by clicking on the round circle inside his head on the left side of the window. (The middle outline showing armor is for posing clothing and hair.) Once that little circle in his head on the left is highlighted, let's get his head turned to look at us so we can see how far out of alignment it is.
You can reposition his head by using either the rotating gizmo and sliders in the advanced window:
Or the sliders in the Posing window:
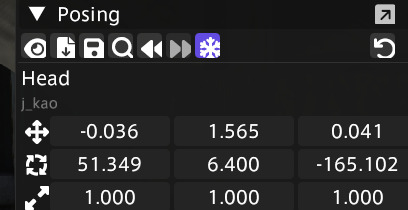
Don't be afraid to use those top sliders. If things go bad, guess what? There's an undo button! It's the best feature in Brio, I think.
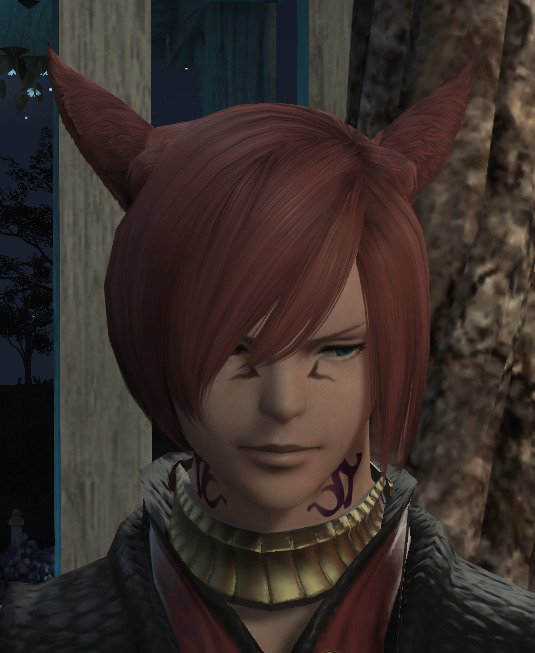
I've turned his face to look at the camera and now I know where I need to adjust him. He's at a bit of a diagonal angle so I'm going to straighten him up.

Better - but be sure to check all angles.
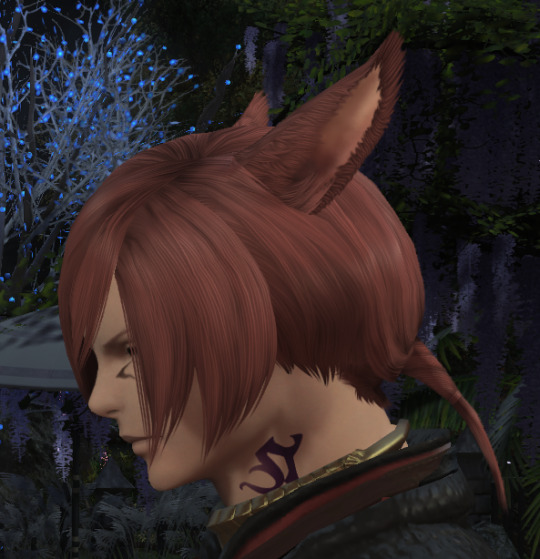
Aha! The back is not quite straight. Keep playing with it until it's lined up how you want it. Sometimes you'll find that it looks good from the front, but their chin is almost in their neck from the side.

Once you have it where you want it, save it again. I like the whole pose, so instead of overwriting the old pose, I'm going to give it a new name for the expression-only version. Use the exact same process that you used to save the first pose.

And there it is! Now we have a custom expression taken from an emote that can be loaded on demand. I've found that you can get multiple expressions from a single emote - and it saves you from posing each facial bone every time you want to show emotion.
Now that we have the expression, we can import a body pose to go with it. You use the same import we used above, choosing "Import Body" instead of "Import Expression."
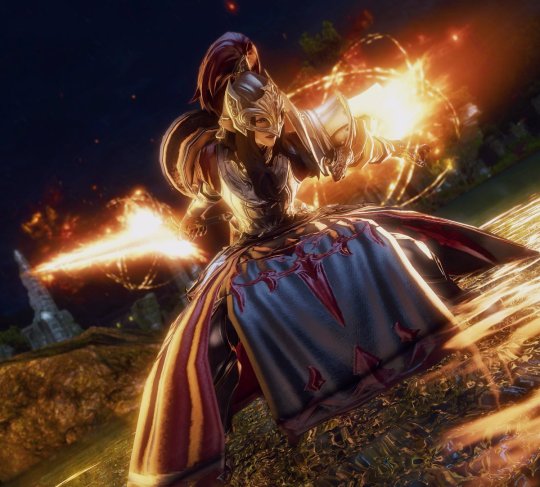
This is our new expression, combined with the body pose I used with Ava pulling Estinien by the ear:
It's usually best if you load your expression and then load the body pose.
*Note, you can save that combined pose up there and load the whole thing next time by choosing "Import Expression" and "Import Body." It will load both at the same time from the same pose.
There you go, enjoy!!
11 notes
·
View notes
Text
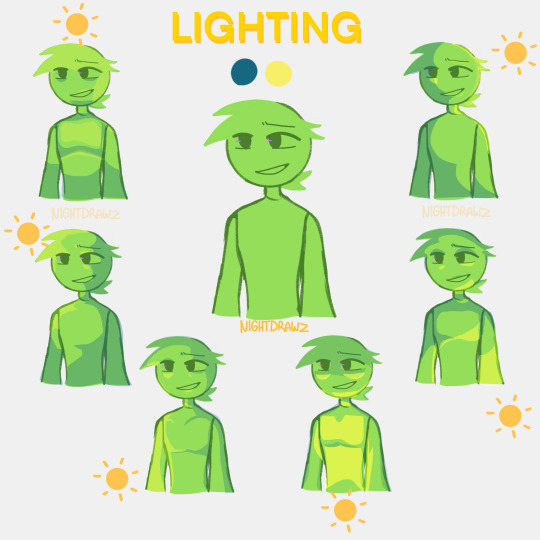
#Adding my tutorials tag so I have a permanent copy of this #fantastic lighting tutorial
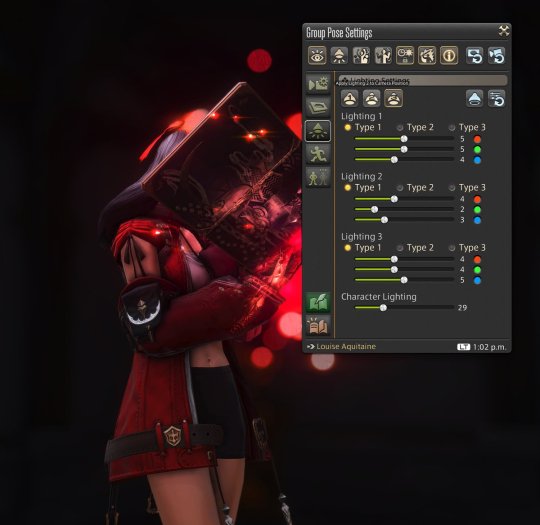
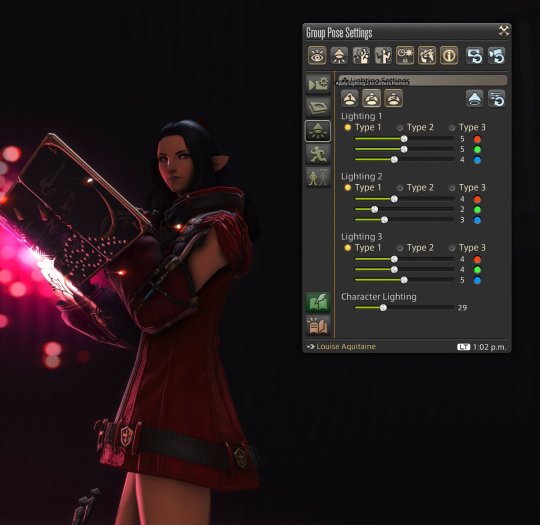
Starter GPose: Lighting 101 - GPose controls
It's hard to overstate how important lighting is for photography in general- and the same applies to gpose shots.
This is a huge topic, so let's start with the basics!
GPose Controls
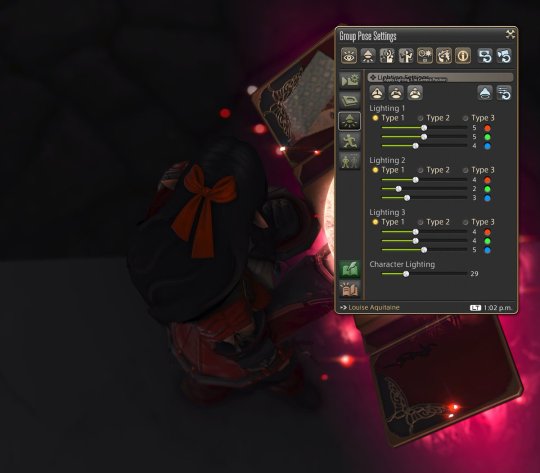
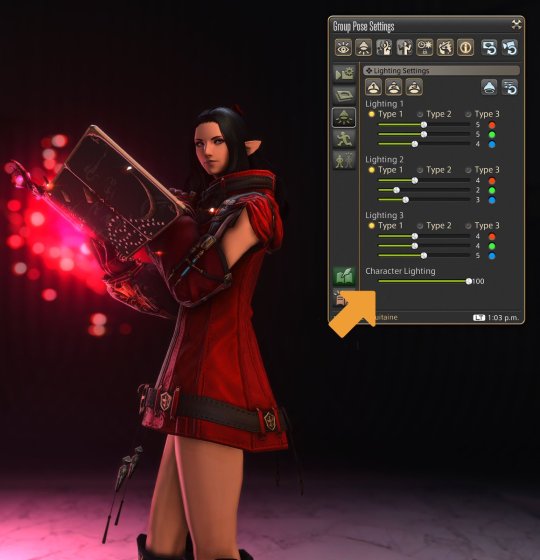
There are 3 different kinds of lighting control available when in gpose: Global, Character, and Points.
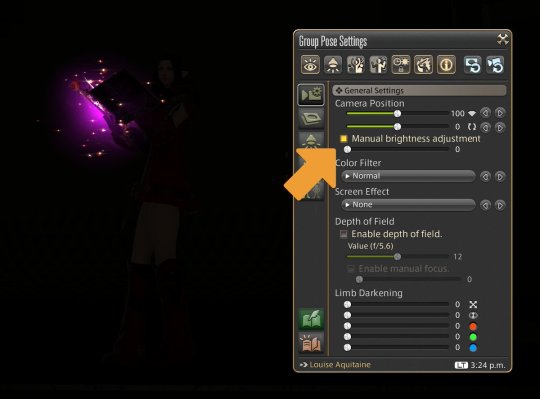
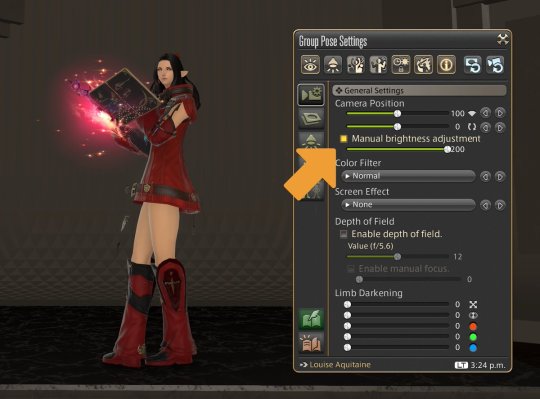
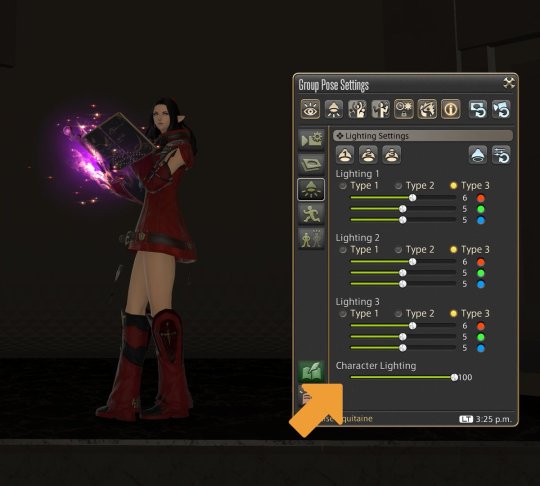
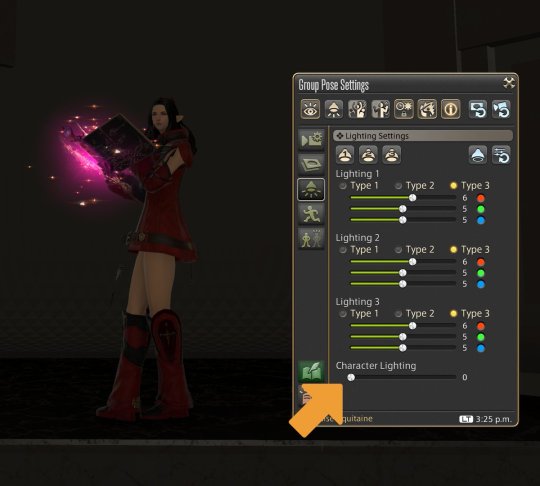
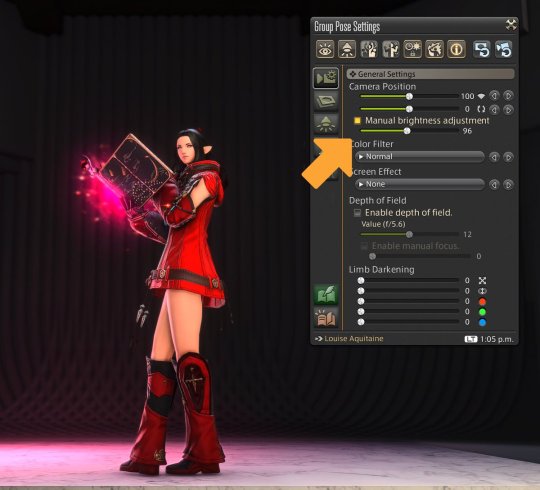
Global illumination is controlled by the manual brightness adjustment slider. This is equivalent, in real-life photography, to exposure. Character lightning has no real-life equivalent, but may be thought of as a brightness control that only influences characters and similar entities (minions, NPCs, and enemies, for example.)
GPose also gives you 3 point light sources that can be used to emulate the 3-point lighting traditional method for illuminating a subject.
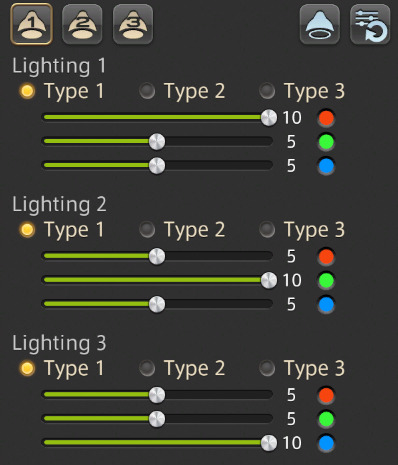
Positioning a source isn't exactly intuitive: A source is placed exactly where the camera is at the moment it is toggled. So to place it you need to move the camera to the desired position, and then enable it by toggling its button.
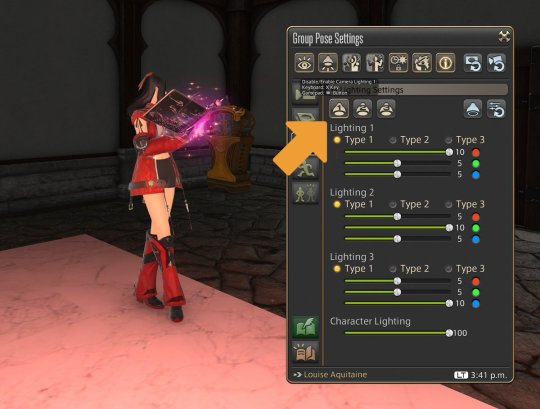
Oddly enough, these points do NOT project shadows. (in fact, a great deal of 'glowy' elements don't, like weapons and armor.) But you can use this fact for great effects!
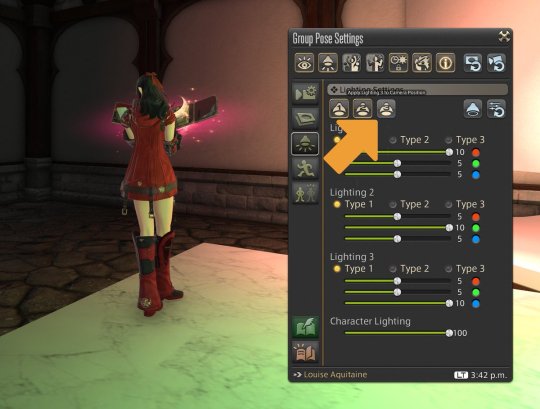
You can, for example, create shots with perfect dark backgrounds by strategically placing gpose light points behind objects that do not block the emitted light. You can learn more about this technique here:

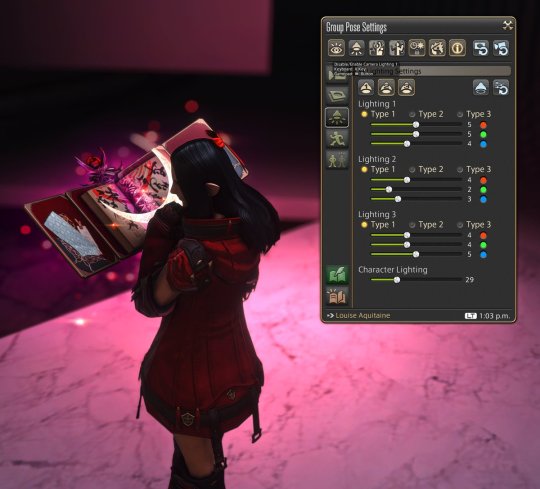
Ok, so where was I? Oh, right- lighting!
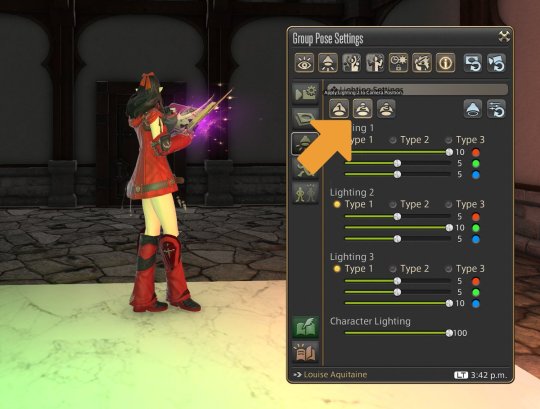
Let's play around with what we just learned then. Here's a default setup for a scene: Notice that the ceiling light *do* project shadows, but it's kinda low-res. So let's set ambient light to zero and control the shades ourselves.
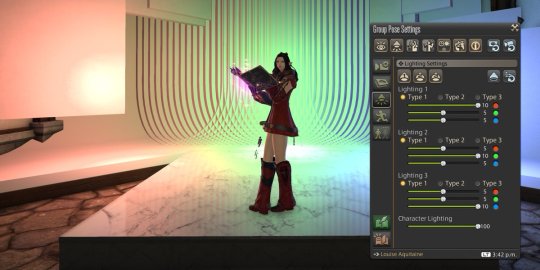
Some rotation and gshade filters from Neneko Colors for better luminance, color, and model shades. It's better - but still looks pretty flat.
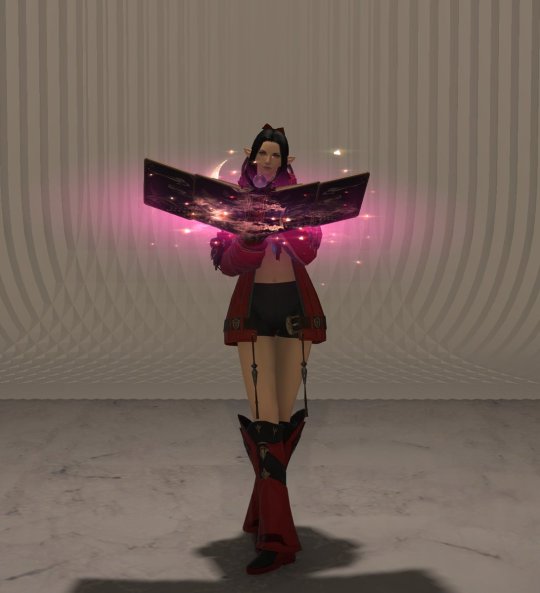
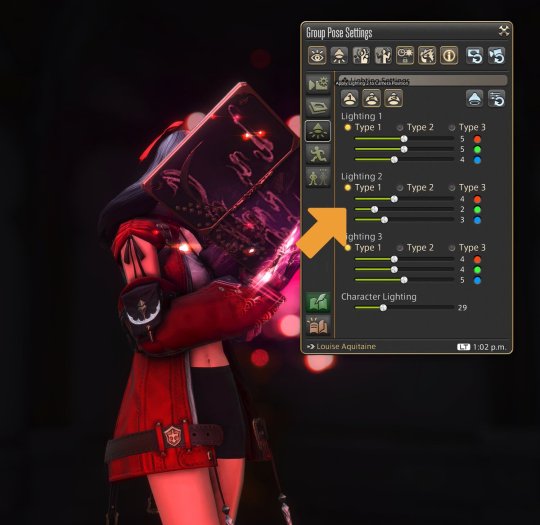
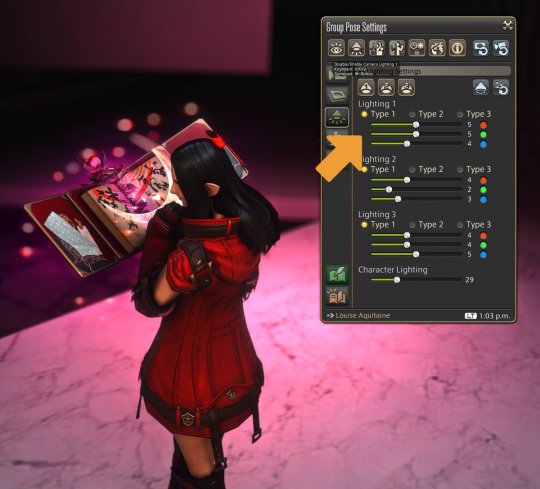
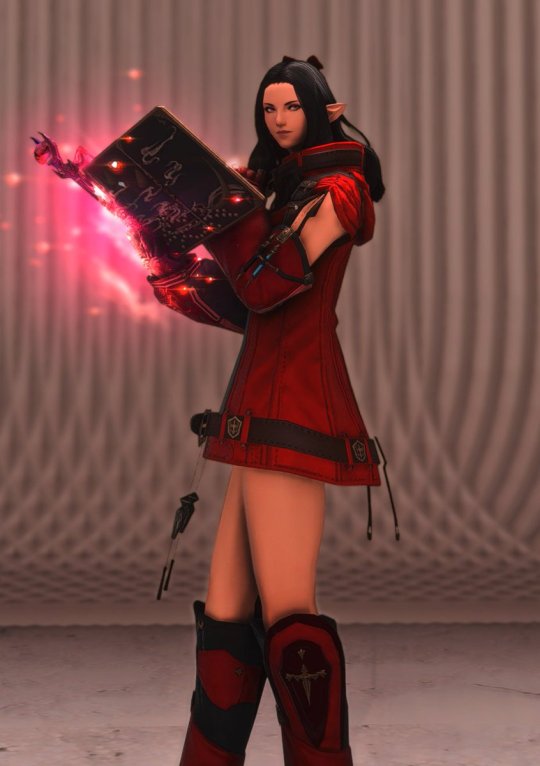
We want to pop the character out, so let's add some highlights and rim lights. First, the hair: let's give it a lustrous shine. Camera up top and a slightly bluish point.
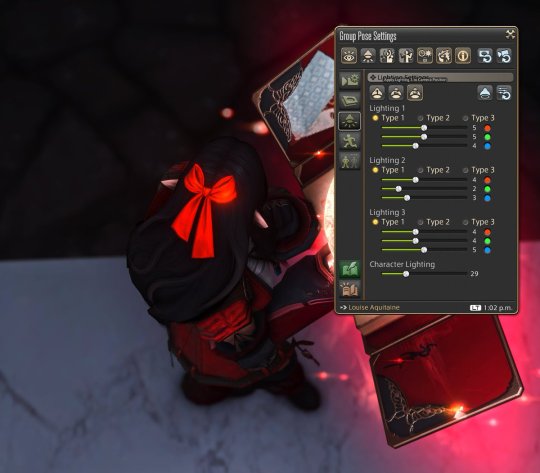
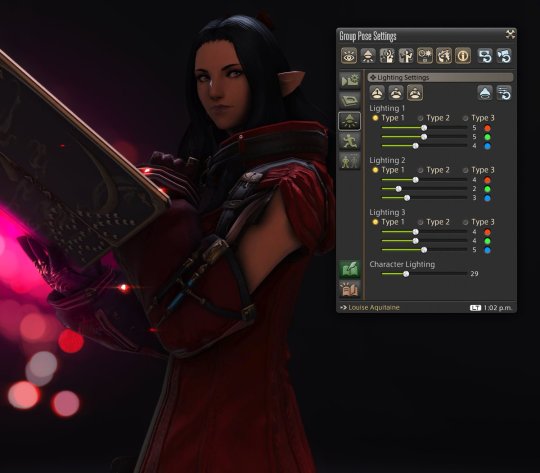
Now the weapon. Remember that the item itself doesn't emit light? so let's place another point with the same tone as the weapon to illuminate Louise. To her left and behind her, slightly distant so as to project on her legs as well.
And finally, a directional key light to help illuminate her face.
Her model is still too dark, so let's use the character lighting control to help with that.
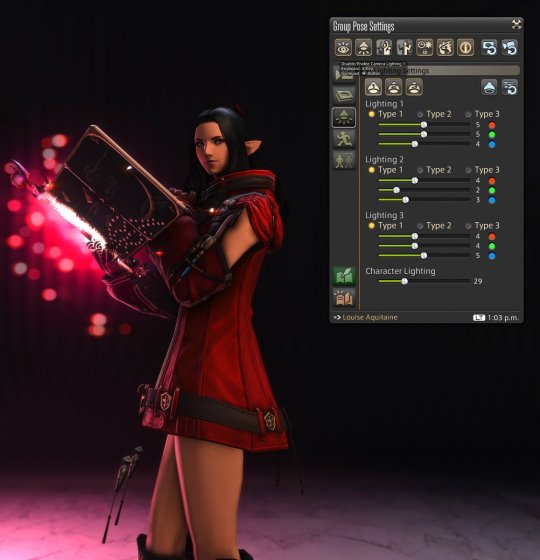
Now let's make the whole scene a bit brighter. Change the brightness adjustment slider to manual mode, and bring it up as needed.
This should be a good point to compare the initial setup with our results so far, showing how much basic gpose lighting can enhance a shot.

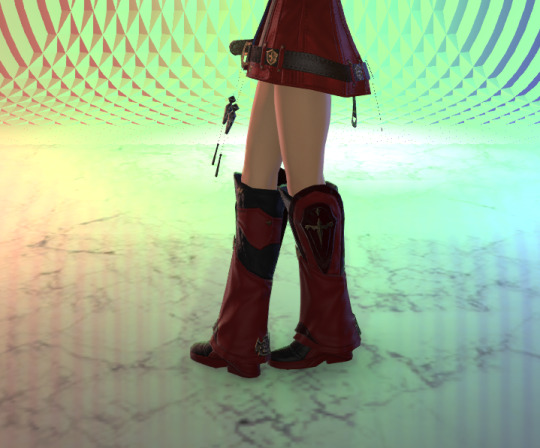
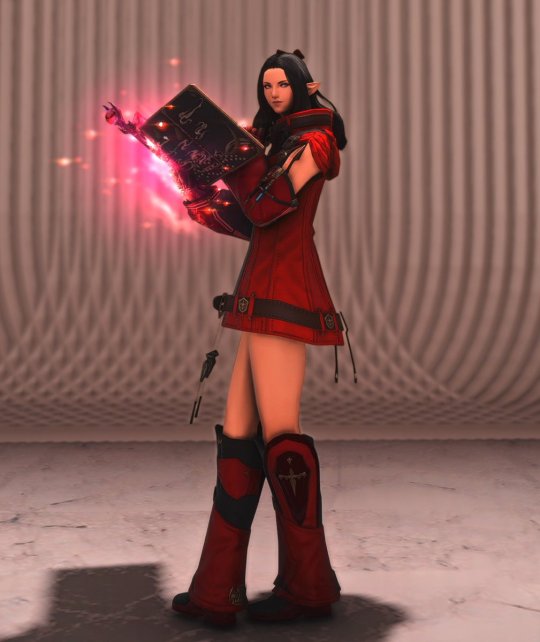
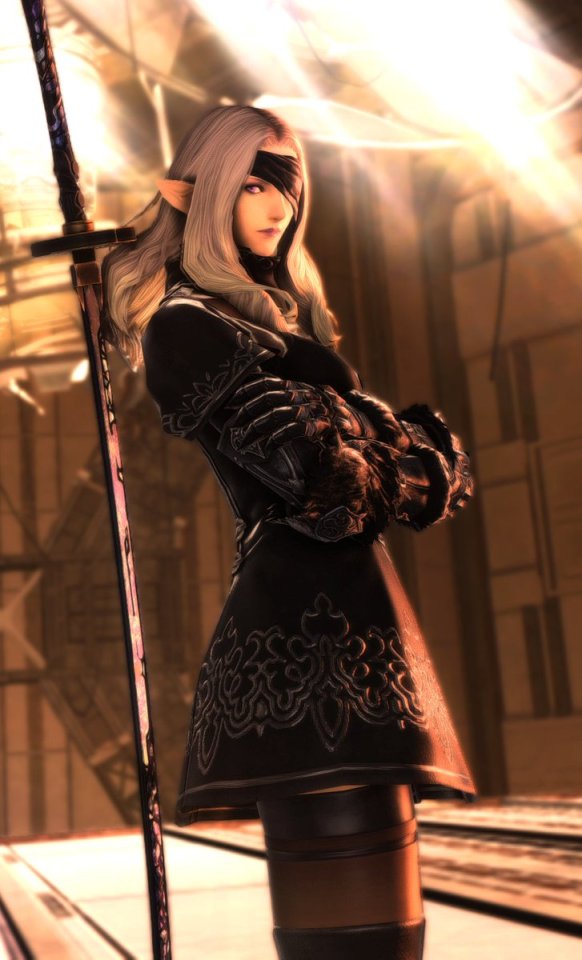
Now that you know how it's done, it's easy to see how some of my poses were set up! Here's one with a yellow source top-right, an orange source bottom-right, and a dim white source to the left of Louise:
Or this one: A very bright white source to the left (and a bit to the front), and a dim bluish/purplish source to the bottom right. Notice how much Louise pops out of the scene.
Next, I'll talk about exterior shots, fixture light sources, and other neat things.
(This guide is part of a series that I'm migrating from Twitter since Tumblr offers much better options for formatting and editing, and taking the opportunity to also update images and references. Let me know if you have any questions!)
1K notes
·
View notes
Text

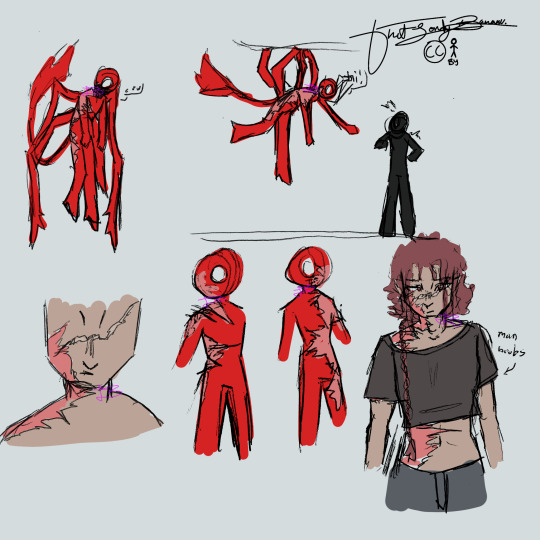
wire tutorial for a friend
#shoutout to data and ava for thinking this was a poem. my tendencies#machinery#art tutorial#idk how else to tag this
19K notes
·
View notes
Text
tutorial on how to make gifs, pause to read if needed! 🫶
#how to#tutorial#marvel cinematic universe#marvel mcu#mcu#marvel movies#gifset#my gifs#gifs#movie gifs#the avengers#james buchanan barnes#bucky barnes#congressman barnes#john walker#us agent#ghost mcu#ava starr#bob thunderbolts#bob reynolds#robert reynolds#sentry#the void#bucky x reader
43 notes
·
View notes
Text
Guys I'm alive again
I kinda died for a second because school+life+gardening=no social lol
Anyways
Have a ting
Also! I have another blog where I'm gonna start posting AVA/AVM stuff, @askchodark
Probs not gonna show since there's nothing there yet
Ima go reblog this to over there lol
Also is an asks page so go do that :P
Ok bye-
#tlbart#pen and ink#traditional art#digital art#alan becker#the dark lord#ava#ok but i did traditional AND digital#ill do a tutorial later#not rn#im in class while writing this#ok bye
26 notes
·
View notes
Text
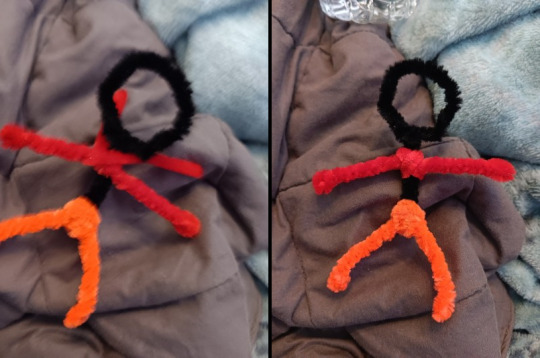
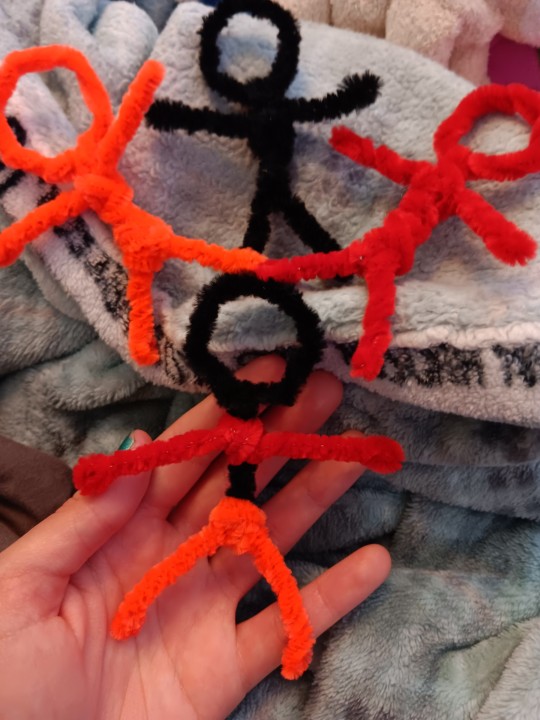
Pipe cleaner stick figures!!!
Hollow head edition
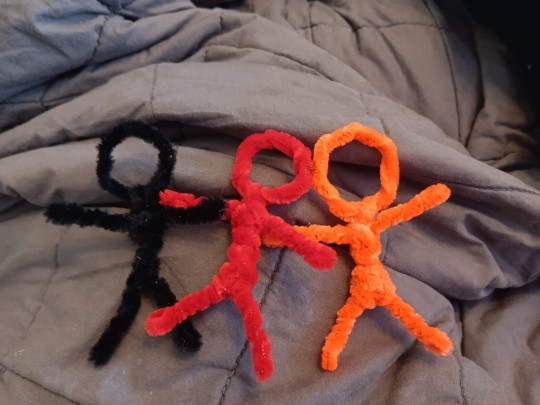
(If you're wondering why I don't have Victim, it's because I can't find grey pipe cleaners)
I have not yet figured out how to make the solid heads, I'll make another post with them when I do. Currently experimenting with puff balls.
Details below the cut!!!
Full disclaimer, I'm not good at writing tutorials so hopefully the pictures help
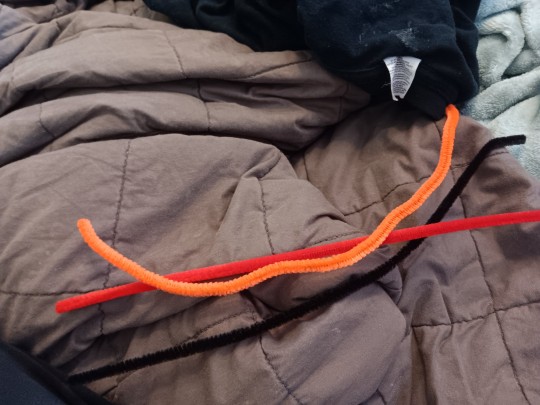
You're gonna need 3 pipe cleaners, I'm using 3 different colors for easier visibility
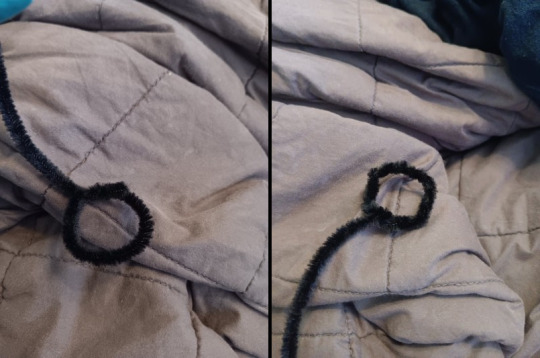
Start by figuring out what size head your stick figure is going to have, and twist the end around in a loop
Twist some of the excess back around the loop for thickness and stability
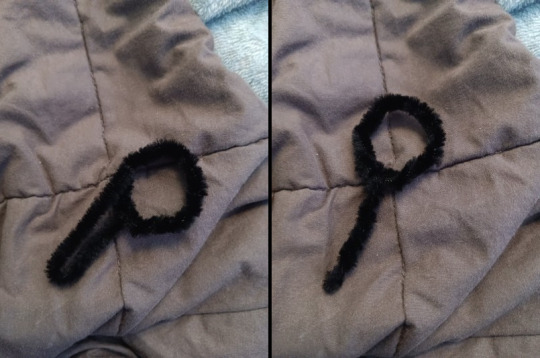
Fold the excess back over to make the torso, make it a little bigger than the size you actually want
Twist the torso pieces around itself for stability. If you have extra, wrap it back around the head/neck for extra stability. There still should be a tiny hole at the bottom where it was folded over
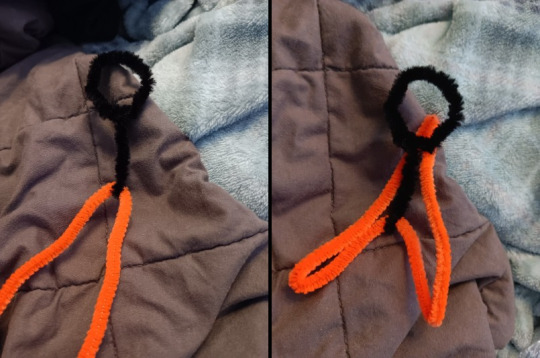
Insert a second pipe cleaner in the hole at the bottom of the torso, and fold both halves into legs
Like the torso, twist the halves of the legs together for stability. Then you can either curl the extra around the torso for stability or clip it off, up to you
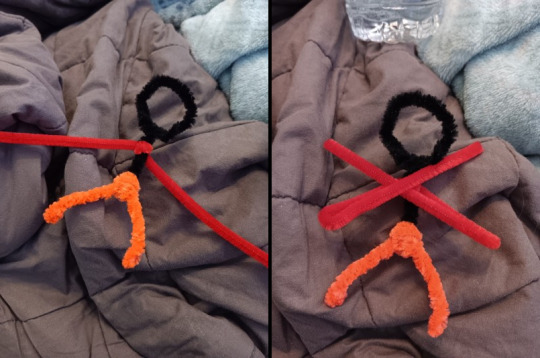
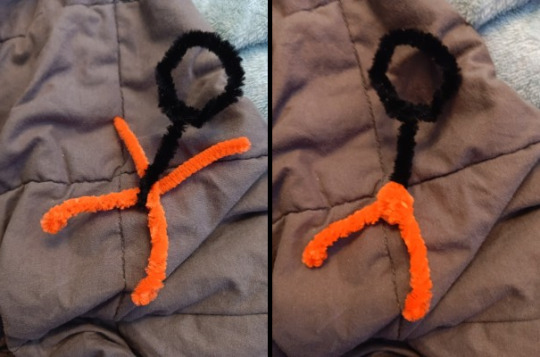
Twist a third pipe cleaner around the upper torso, and repeat the steps used for the legs
And voila, you've got a small pipe cleaner hollow head!
Feel free to use this tutorial to make your own Chosen, Dark, Second, or any OCs!
#animator vs animation#ava#my work#the choson one#ava the chosen one#ava the dark lord#ava the second coming#crafts#pipe cleaners#tutorial
73 notes
·
View notes
Text
Tutorial art!! And hcs
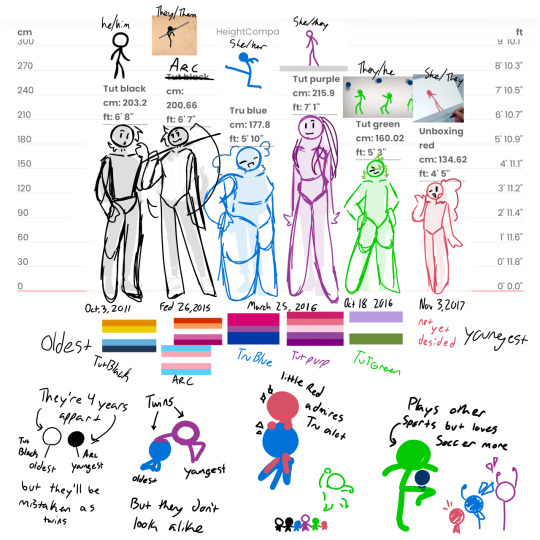
#animator vs animation#animation vs minecraft#alan becker#ava#avm#Alan Becker tutorials#tutorial blue#tutorial purple#tutorial green#tutorial black
25 notes
·
View notes
Text
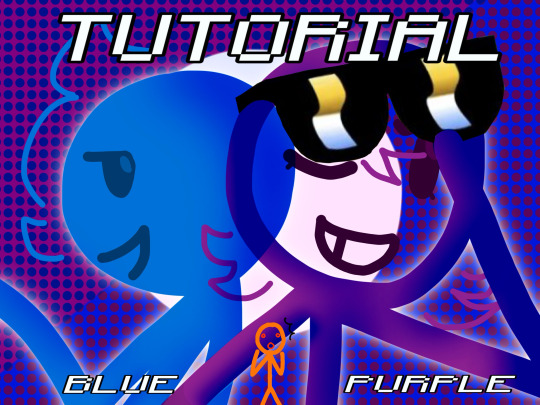
Yall know tutorial blue and purple right? (Check on Alan Beckers tutorial channel)
Kook sticks!!!!!
youtube
This this is the video btw
25 notes
·
View notes
Note
you are my favorite artist!! i really admire your coloring style, and how soft the lighting makes it feel despite being on-model. you have any tips? on the topic of lighting, i also ADORE your shading!! :3
You have no idea how happy this made me (ノω・、)
You are such a sweet heart
(≧◡≦) ♡
I tried my best explaining and understanding the question!
(My english isn’t the best)
A heads up: i explained more than i needed to!
First i wanted to show how i color
There are 4 simple steps
Base
Shadows
Light
Details
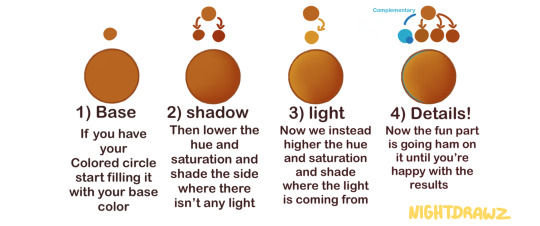
Before i color i decide where the light is coming from, so I’d know what im doing with light and shadows
-
Now with the actual shading and lighting
It’s actually just 2 easy steps, for me atleast
I’d say my shading&lighting is kinda lazy..
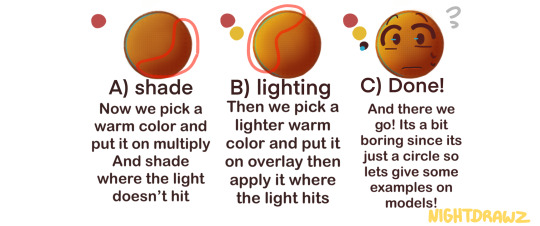
I know it hard to see it, so how about we actually use it on a model or two
Examples:
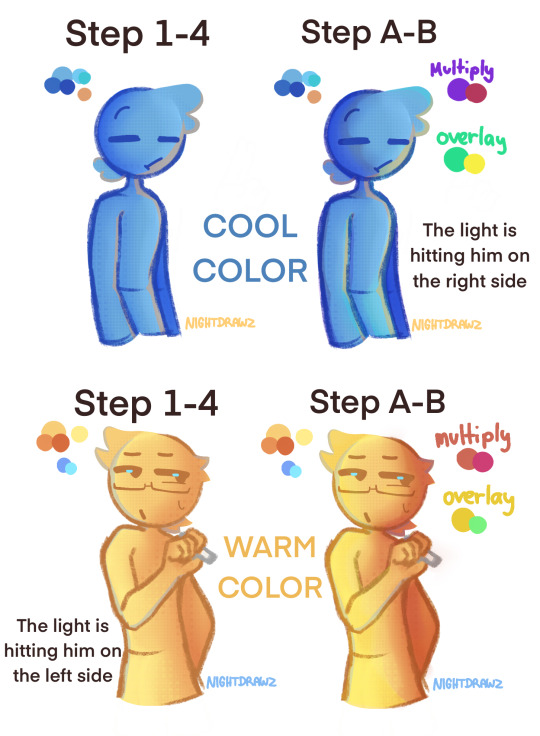
I used blue and yellow as an example to show what it looks like with warm and cool colors :p
You can see how it changes when you add shading and lighting (tho you cant see the light that much…)
For blue i gave him for shading analogues colors that means the colors are neighbors on the color wheel, the same with yellow.
Its good to know a bit of color theory! It can help! (Im also learning)
-
Next lighting&shading refrences
How they look when the light source moves
(Ignore the laziness…)
Its good to have a real reference to help you
You can see how it can changes green depending where the light source is coming from, it can change a mood.
And thats it!
This is how i shade and do lighting! (Plus color)
Thank you for reading me ramble about colors ( ˙▿˙ )
#its 3am and i finally finished it#me rambling#im not an expert#i will slumber now#goodnight!#alan becker#animation vs animator#animation vs minecraft#ava fanart#avm fanart#lighting and shading#tutorial#procreate#art#my art#artists on tumblr#asks#here you go anon#nightdrawz
60 notes
·
View notes
Text

babes listen I just found this poem and it gives me such TCO vibes?????? like, idek how to make gifsets but if I did I would make one so hard
#animator vs animation#ava the chosen one#my laptop is an octogenarian in computer years so even a tutorial wouldnt help#but god help me i can VISUALIZE IT
24 notes
·
View notes
Text
ok I know I’m busy and everything but I NEED to draw AvG in Slay The Princess now I’m sorry-
17 notes
·
View notes
Text
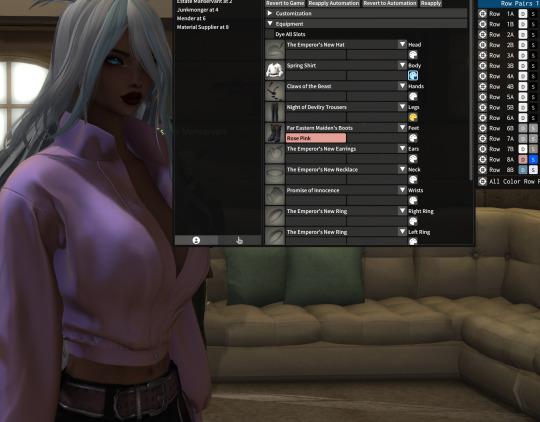


#using FFXIV Mods Tips post
I really don't think a lot of folks understand just how much you can do with Glamourer's advanced colors.
If you're using Glamourer, it's that little paint palette icon next to your gear. It opens that intimidating looking window to the right. No worries, you're only going to use about 3% of that window. All you care about is the row that affects your clothing color. I don't know what the other rows do. Maybe they're there to cheer you on. It's usually pretty easy to tell which row is giving you color. In this case, it's row 8A. If your shirt is orange and that row has orange in it, BOOM! There you go. Sometimes there are a lot of colors in a lot of rows, which makes it harder to figure out, but there's a cheat. If you can't tell which row is the main color for your piece of clothing, mouse over the icon in front of "row". It will highlight the item in game for you so you know what it changes! It's really obvious, too. Ok, so, with the basics out of the way, you can use this to get velvet, silk, satin and even iridescent colors. For example, this blouse is a YAB* refit of Heartthrob. It's one of my favorites and I use it a lot.
You'll see D and S in the boxes for the colors. One is for Diffuse, one is for Specular. Unless you're making mods, those things don't really matter to you. It's more important that you understand one is the base color, one is the light that reflects off of it. Now that you understand that, maybe you can get an inkling of the fun you can have! HAHA!
Seriously, though, you can change the look and feel of the fabric by playing with these colors. Make the base dark and the highlight slightly lighter and you'll get a velvety look. More light and you get silk, more light on the highlight and you get satin. But we're not done yet! You may notice my screenshots are using base colors and highlights that have no business being together. I'm sure somebody is blowing a whistle somewhere. But look at the effect! An aqua base with a pink highlight does, indeed, make it look iridescent. Imagine black with red, or purple with pink. I was just messing around with it to show you and used a dark blue with lavender as the highlight and got this gorgeous dusty lilac satin.

All I did was change the second color to a darker aqua and I get a velvety, dark blue-green feel. The sky is the limit, have fun!!

*YAB is a specific body style and scaling. If you're curious, ask, and I'll explain all of that, too. Feel free to message me privately if you're concerned about being seen talking about mods. I keep my character's main info unknown on purpose, and feel free writing about this. I've noticed many mod users that post images use nicknames for their characters, which is one wise way to go about it, while others are ok out in the open (these tend to use less glaringly obvious mods.) I, however, am a giant nervous chicken, and will keep using a nickname.
4 notes
·
View notes
Text
Will these two losers ever have a NormalTM conversation about shots, or I am just giving them their own personalized sexting language?
#t boy ava au#this time with christmas themed shots#tempted once again to hunt down a tutorial for embeddibg images in ao3
12 notes
·
View notes
Text
I wanna draw Genin!Ava with this hairstyle so bad but my braid drawing skills are NON EXISTANT-


Links: O || O
1 note
·
View note
Text
Hello!! :D

I like puppets and I like Undertale!!
Welcome!!
Stop motion requests: CLOSED (I need to finish the million ones I've already gotten but THANK YOU!)
Currently working on: Alphys!!
Name's MimoRobo but you can call me Mimo
I like pizza!! 🍕 And this thing :D
I love STOP MOTION!!!! :DD
I draw a lot but mostly traditional, I'm trying to improve in digital art too!
I'm into Undertale/Deltarune, Minecraft, AvA, Ninjago, Star Wars
Ask box is always open for anything unless I feel overwhelmed and close it for a bit!! Just know I take AGES to answer stuff XD
Tags I use:
#stop motion
#felt guys - anything with the felt puppets
#felt characters - a showcase of a new puppet!
#tinytale/#tiny doodles
#campfire - a sort of checkpoint, use it as an excuse to stuff a bunch of random animations/pictures together
#request done! - any drawing request I get!
#fanart - :DD
#pizza/#not pizza - anything with my lil blorbo creature, depending on if there's pizza or not-
#pizza draws - mah art :D
A little QnA under here:
Some frequently asked questions:
How long does it take you to animate?
No concrete answer here, but around 1 - 2 hours? Plus, minus for longer/shorter animations!
Can you make (insert character) as a puppet?
Making puppets takes ages and I really need to be motivated to do it, yes of course I'd love to make certain characters!! BUUUT I'd like to focus on the main characters I want to make at the moment!
How do you make your puppets?
Well uh... I really don't know how to make tutorials and with how different all the puppets are I don't think it'd be really possible, I made one once but maybe one day I'll make a proper something for this...
Thank you all, and have a nice day!!

Original pinned post!! :D
#intro post#pinned post#stop motion#felt guys#undertale#hello!!#welcome again everyone!! :D#and if ur new then just welcome in general!#finally made a proper intro thingy!!#not sure if i should add direct links to all the finished characters#they're all in the felt characters tag tho so it should be easy to find a specific one!#yes i DO have a tag system!!!#hopefully this will organise things a bit more#again#have a nice day!!#:D
221 notes
·
View notes
Text

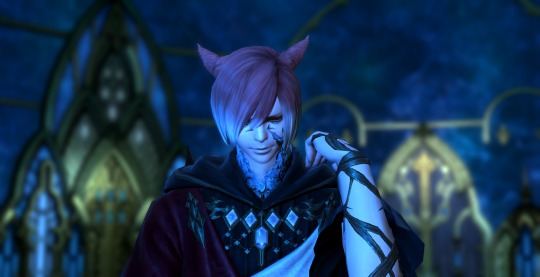
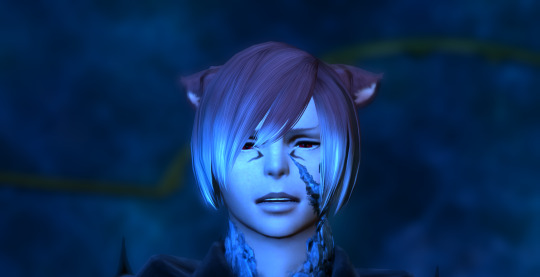
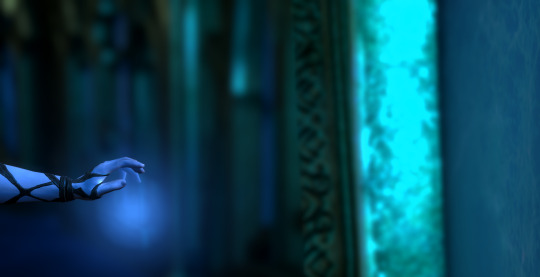
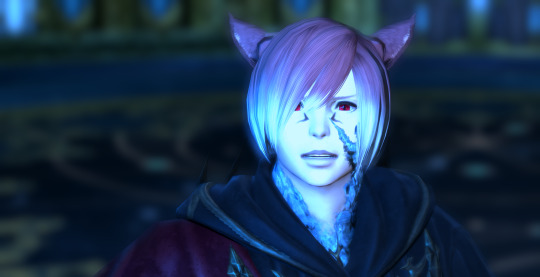


Jealousy I'm leaning into Raha using the scrying mirror a little too much. Initially it's to make sure she's okay, if she's showing any signs of lightsickness (at least that's what he tells himself) And then he happens to scry when Hades is with her aaaaaaaaaaaaaaaaaaaaand then he sees something he really didn't want to see By the time we get to "And ruin your budding relationship?" Johnathan Bailey just puts a delicious little amount of venom into that line I wanted to give him something to be genuinely jealous of - I may add a ittle fic blurb to this later - I would have with it but I have no confidence in writing in his voice so....*melts through the cracks in the crystal tower* ALSO, A MASSIVE SHOUTOUT TO @ava-wol on her posing tutorial, it helped immensely with making this, I didn't have to look at those scary brio bones once.
#gposers#ffxiv#ffxiv fanfiction#final fantasy xiv#g'raha tia#graha tia x wol#wolgraha#wol x g'raha#ffxiv wol#crystal exarch#post-shadowbringers#soft angst#ffxiv writing#my writing#ffxiv oc#ffxiv fic#ffxiv gpose#miqo'te#ffxiv miqo#ffxiv miqo'te#ghostsbetweenus
55 notes
·
View notes