#for 2-spheres (which are like. normal spheres in 3d)
Explore tagged Tumblr posts
Visit Tumblr Blog
Explore Tumblr blogs with no restrictions, modern design and the best experience.
Last Seen Tumblr Blogs


Fun Fact
Total funding amounts to $125.3M.
Note
Ahem hello. what is the hairy ball theorem actually used for? As in, is it useful for some further thing, or is it just kind of a funny proof that exists? I’m not sure how to phrase this but let me know what uve got. Also if u could make any one new unit of high school math what would you wanna teach the teens and why?
so the hairy ball theorem, like most silly-sounding math things, an abstraction of things we've already observed. in this case, the simplest thing that the hairy ball theorem tells us is that on any spinning spherical object, there will always be a point on it where some quantity subject to that spinning is zero. if we start spinning a ball, there are two points on the surface of that ball that have an instantaneous velocity of zero: the points that are on the axis of its rotation.
this kind of thing can then be expanded to looking at the propagation of electromagnetic waves in space - if a particular wavefront forms a sphere, there has to exist at least one point on that sphere where the electric and magnetic field magnitudes are zero. there's also applications of it to meteorology (if all the wind on the surface of the planet is idealized to the planet's surface, there has to be a cyclone somewhere) and computer graphics (that's why ray tracing took so long to develop, because perfect spheres reflect and scatter light in a weird way in a way that is described by the hairy ball theorem.)
if i could add one new unit of high school math, i would make it a unit on number systems and number sense in algebra 1. i think one of the biggest reasons students feel like they get left behind in algebra and further courses is because they are taught that numbers are hard, immutable things, rather than what they are, which is mutable, malleable, and able to be split in infinitely many ways. that cascades down into not truly fathoming what the equality principle of any given operation is, and thus leads to an incomplete and unintuitive understanding of what algebra really is.
#asks#mathemagics#math rambles#the hairy ball theorem is so fascinating to me because poincare had no fucking idea the kind of shit he was cooking when he first proved it#for 2-spheres (which are like. normal spheres in 3d)#since then we've continued to expand abstract geometry into more and more dimensions and that shit is still holding true as far as we know
10 notes
·
View notes
Note
Hey! I love your art so much 💖 I wanted to ask what program you use for 3D modelling?
aw thank you!! :3
and to answer your question i’m going to warn you this is going to be kinda long because i’m gonna use this post as an excuse to show my 3D models that aren’t awful (sorry lol).
i actually use two different programs, both for different purposes, but you don’t need to get both, it really depends on which kind of modeling you want to do.
1) the first is called Nomad Sculpt on the iPad, you do have to pay for it unfortunately but it’s definitely one of the best modeling apps for the iPad. i know Blender is free but my computer is really old and doesn’t run the program very well, and at this point i’ve already gotten used to nomad sculpt.
anyway tho, i use it for art-related things like the obvious 3D models, but recently i’ve been playing around with just making scenes to use as references for my drawings. they’re not anything impressive, most of the time i actually use it to make little figurines to print and turn into earrings/little friends that sit in my room just for fun.
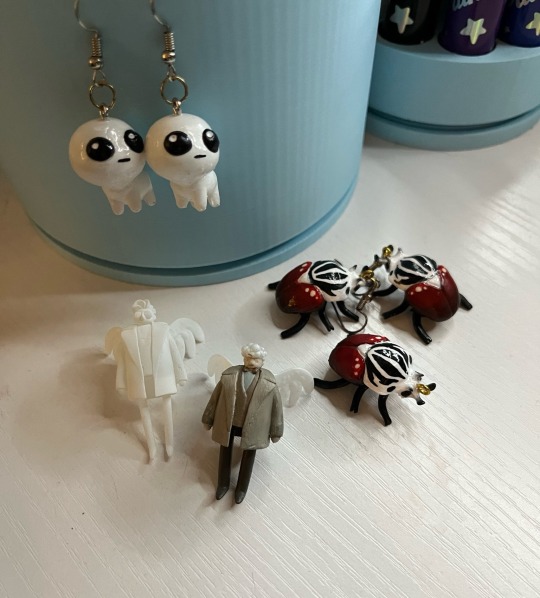
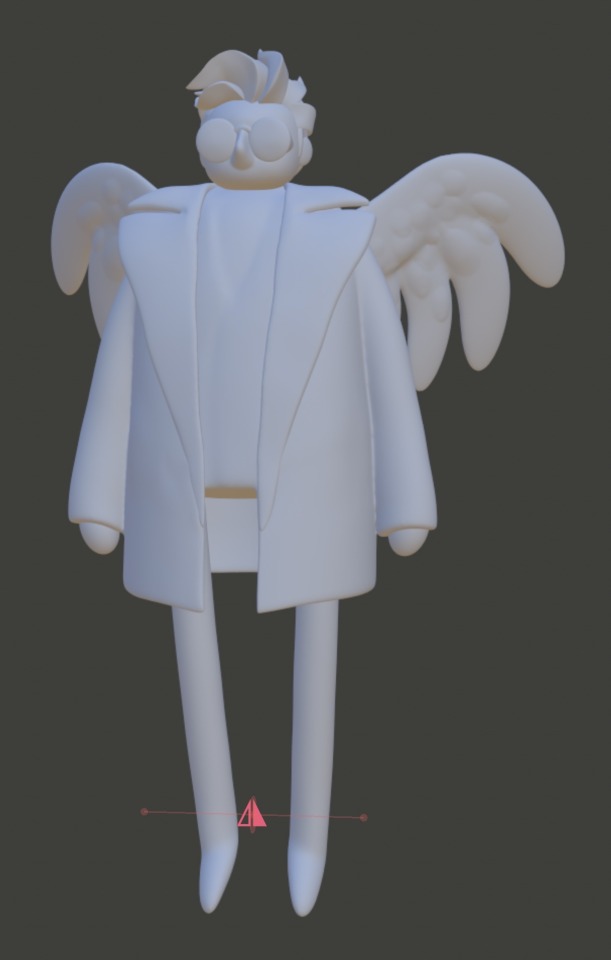
i’m gonna show this first bc they look cooler once they’re printed and colored (also you can tell i printed mini crowley and aziraphale when my sonadow hyperfixation started bc i never actually painted crowley) (he’s just kinda sitting there oops).
the little red guys are actually my favorite bugs (goliath beetles), i made them about a year ago but i still wear them like every day.
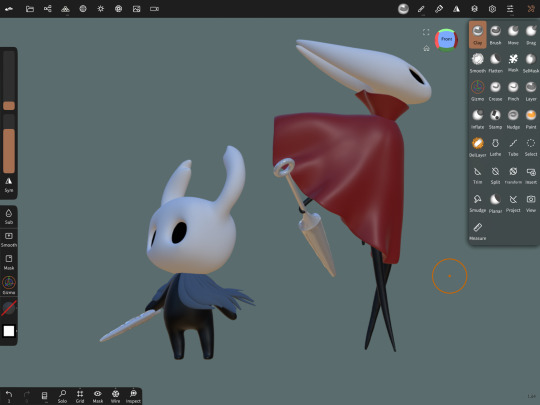
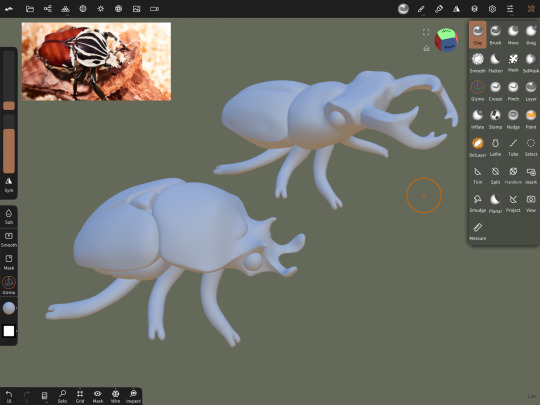

and here’s what they look like in the app, it’s a little intimidating but once you get used to it it’s actually kinda fun just playing around and seeing what you can do.
2) the second program i use is Shapr3D (also for the iPad, but i think they made an update where you can run it on windows/mac). you also have to pay for this as a subscription which sucks, i’m only able to use it since the engineering program i’m in pays for it.
Shapr3D is one of the many CAD software programs out there, but it’s nice bc it’s very beginner friendly and very easy to use. CAD is mainly for architecture/engineering but i honestly think more 3D artists should give it a try. it’s really nice once you get the hang of it and (i’m probably biased bc i’m a student) i honestly prefer it over just normal modeling software because i feel like you can be a lot more creative with it.
right now for my engineering class, our semester final is to design and present something that’s functional, and we can either explain the math behind it or just 3D print it and demonstrate how it works, and i’m making a functional mini model of “the rack” trap from Saw III (i’m not psychotic i swear i’ve just had a Saw hyperfixation for 5 years).
i’m definitely gonna post it when it’s finished just bc i’m already excited with how it’s turning out, but for now here’s a couple at-home projects i’ve done:
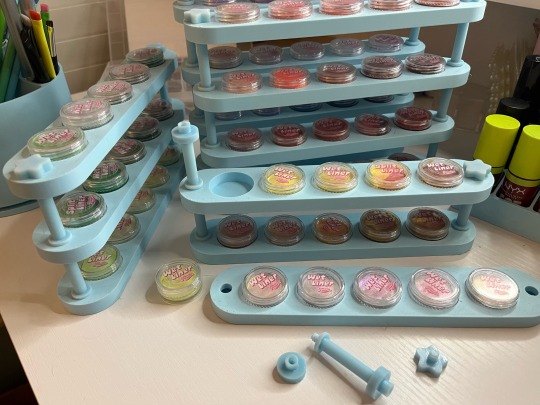
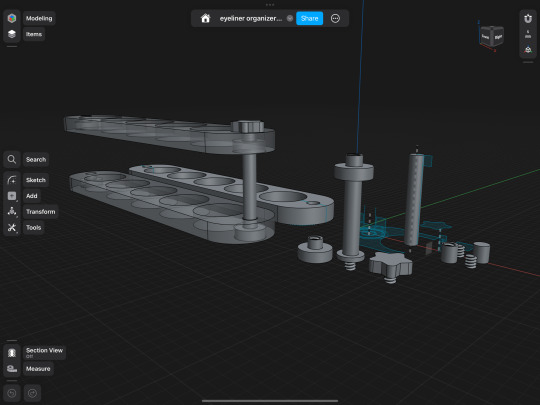
(above) i have a bunch of wet liners and i designed a stackable holder thingy with bolts between the shelves and a little cute star screw to fasten it at the top.

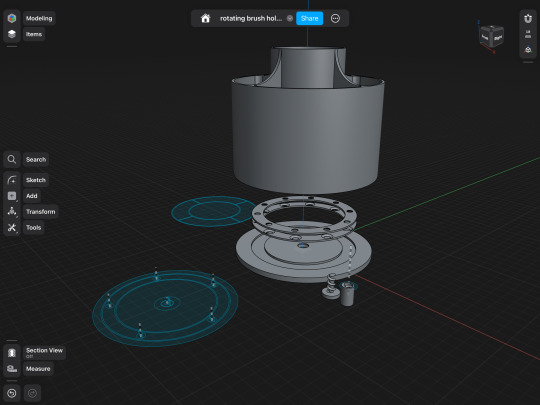
(above) i also made a few rotating brush holders at home (bc the ones that actually rotate are like $40 for some reason) by buying a set of small sphere bearings at home depot for like $5 (that’s what those little metal things are inside the third one, i took it apart bc i don’t know how to put a video and a picture in the same post) (just pretend they’re spinning rn).
anyway that’s all!! if you actually read this whole thing i love you so much bc engineering and design is one of my special interests so thanks for letting me tell you about the silly things i’ve made :3
#asks#3d art#3d model#engineering#infodump#special interest#ermmmmm not sure what else to tag#this was just a really long post lol#bugs#good omens#autism creature
79 notes
·
View notes
Text
The Millennium Prize Problems are a set of 7 mathematical problems that each have a one million dollar prize if you are the first to find a correct solution of the problem. (simplified, very bad) Explanations for all of them in the bottom, but feel free to reblog as to why your favourite is the best
The Riemann Hypothesis: For the following equation,
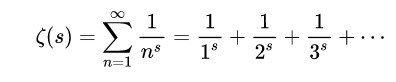
The Hypothesis states that all non-trivial zeroes lie on the n=1/2+ti line, where t is a real number, and i is the imaginary unit
Yang-Mills Theory and the Mass Gap Hypothesis: The Yang-Mills Theory explains the "Standard Model". Which is the behaviour and interactions between elementary particles, such as quarks, gluons, and leptons. It however does not explain the interactions in the nucleus. To prove it you must prove that the Yang-Mills theory holds true for any "compound simple gauge group", and the mass of all particles predicted by it must be greater than 0(mass gap)
The P vs. NP Problem: In computer programming, P problems are anything can be solved by a turing machine(computer) in a "polynomial"(ie: ax^2+bx+c) amount of computation time (considered to be easily solvable, though not all P problems have a known solution etc etc). NP problems are problems, that while not solvable in a polynomial amount of time, a solution is able to be verified in a polynomial amount of time. The definitions of these are a bit fuzzy, and P vs NP asks if there's a fundamental difference between the two at all.
Navier–Stokes equations: These equations predict the movement of viscous newtonian fluids (almost all fluids you can think of that dont have debate over "is it a solid or a liquid" so not like, jello, jam, ketchup, shaving cream whatever). This asks if for any fluid in three dimensions, a "smooth"(differentiable at all points) solution to the equations can always be found
The Poincaré conjecture: In topology, the conjecture states that for any finite 3d topological space, where every loop in the space can be tightened to a point, it's necessarily topologically identical to a 4 dimensional sphere (A normal sphere is a 3d sphere, however it's a 2 dimensional topological space, as loops can only be placed on the "flat" surface, see photo below)

The Birch and Swinnerton-Dyer conjecture: Elliptic curves(see photo below) are defined by y^2=x^3+ax+b. Some of them have an infinite amount of rational solutions, and some only have a finite amount, and this conjecture states that there is an associated function, that when it equals 0, there's infinite rational solutions, and when it is not 0, it's finite.

The Hodge Conjecture: "The answer to this conjecture determines how much of the topology of the solution set of a system of algebraic equations can be defined in terms of further algebraic equations." (im gonna be honest i have no idea, i lifted this definition straight from the clay mathematics institute)
The pointcaré conjecture has actually been solved, it's the only one on the list that has, but dont let that influence your decision
32 notes
·
View notes
Text
19th's Steam Next Fest Impressions Jun 2025 Edition - Day 3
Day 1/Day 2
Aeromachina
youtube
A 3d Metroidvana Action Platformer
In a post human-extinction sci-fi setting, you play as one of those airplane furries, exploring a military facility and fighting other robots… there's not much plot in the demo. It's just "we're putting you in a training simulation."
Thankfully it doesn't need it. The base systems are enough of a hook.
Combat is extremely lite DMC style. You won't be using a really big moveset, but you'll use both melee and guns to air juggle enemies and strafe around attacks. It all comes pretty intuitively.
The base kit felt like a well tuned 3d platformer. The first upgrade you get is a glider, and it really opens up your movement options. You get that really satisfying momentum building of chaining a dash into a jump into a glide to cover a huge amount of space. The game has got the schmovement.
The game has plenty of hidden stuff and backtracking, paying more than lipservice to the metroidvania tag. The only issue is that enemies respawn when you leave the room, versus either the dark souls style of respwaning at saves, or waiting until the player is several rooms away. It can make backtracking annoying. But otherwise a really promising title.
Escape Velocity
A Portal-like about Demoman grenade jumping.
You're an ant guy in a bomb factory that, after an attack by an enemy planet, and is falling apart. Escape using your trusty grenade launcher.
The core restriction the player faces is that they cannot jump. If you want air, your only choice is launching yourself with a bomb or a pre-existing launcher in the environment. I do like that there's a built in indicator that shows what the arc of your jump is going to be. For something normally fiddly like a rocket jump, this is a really good quality of life feature.
The main obstacles are spheres of "antigold," bombs that detonate in contact with either living things or gold, for some reason. Thankfully your boss handed out shitty gold plated trophies instead of healthcare, so there's plenty to toss around to clear the way.
There's also ultrasteel, which has to be melted by a special acid. In practice, it's the same "bring x object to y obstacle," but you can't carry this one, so you have to rely on pipes and launchers.
Right now the game is at a kind of crossroads. It can aim to be a dense puzzler, creating much trickier rooms to figure out, or it could lean into being a platformer, asking for more precise use of the grenade jump. Right now, it's not asking enough in either aspect. It's too easy.
Still has a lot of good potential though.
NODE: The Last Favor of the Antarii
youtube
A programming puzzle platformer.
The year is 2035, and a long abandoned soviet nucelar site suddenly goes active, flooding the surrounding environment with radiation. It's severe enough to be fatal for any human personell, the EMP waves it sends off disable most drones trying to approach the building.
To get around this, they send in a semi-autonomous robot meant for a mars mission, already designed to handle the cosmic radiation interference in space. But they still need to use a minimal delayed input system to actually transmit orders.
In practice, that involves a system of programming moves ahead of time. move forward 5.8 seconds. jump. brake. hit the "use" option top activate the elevator. turn, etc. This involves an inherent amount of trial and error, especially since you can't see too far ahead, but it's ameliorated by each platforming segment being relatively short.
There's some mystery and bigger ideas going on with the narrative. Few seem to have known about this plant even existed, and no one knows why it's melting down now. Alongside that is some themes of free will and AI personhood, with the titular NODE being an autonomous robot capable of communicating and acting on their own, but still reliant on orders. It seems there might be plot branches based on their dialogue choices.
I really hope this game sticks the landing.
Mina the Hollower
youtube
Zelda by way of Castlevania from the devs of Shovel Knight.
The plot is simple so far. You play as the titular Mina the Hollower, one who "studies the secrets of the earth." Years ago she built 6 generator towers on the island of Ossex, and now she's been called back as they've stopped working. Also there are monsters and a revolt happening. It seems there will be a non-linear "tackle the towers in any order" thing going on.
Game plays like you'd expect a combination of castlevania and zelda. You have a choice of main arms for primary melee, so there's a bit of variance going on: a chargeable hammer, a rapid fire set of daggers, and a morning star whip. (Considering the coverage you get I do not understand why you wouldn't choose the latter.) Aside from that you have ammo limited sidearms that are projectiles. The first one you get is an axe you throw in an arc.
The main movement gimmick is the ability to burrow into the ground and launch yourself up in the air. This is used both for platforming challenges and a good amount of secret placement, sliding into otherwise missable slots in the wall. No complaints here.
The main complaint is that the game relies on verticality… but it's still sticking to it's faux-NES guns. So there are times where the verticality is ambiguous. Hitting airborne enemies can sometimes be finicky, and some ledges it's hard to tell at a glance whether they're above or below. These are problems that solve themselves quickly, but it's still mildly annoying.
Still, it seems that Yacht Club games has kept their usual level of polish. Probably will be a lot to check out here.
Echomnesia
Is it incomprehensible because it's a mysterious story?
Is it incomprehensible because it's poorly written?
Is it incomprehensible because it was poorly translated from Russian?
Perhaps all three?
I finished it, so I'm putting it up here.
No more notes.
Baby Steps
youtube
The sequel to QWOP and Getting Over It.
You play as a bumbling Large Adult Son who zapped into Some Other Place and have to guide him home, controlling his legs one at a time.
I was not expecting this game to be open world. Or at least to allow me to go so far off the beaten path. I'm not sure if that combines well with this sorta frustration game. I can see someone who wants to see everything chafing hard against the inherent movement restrictions.
I really liked Breath of The Wild's climbing because you needed to get really intimate with the level geometry to find stable rest points. I'm getting a bit of that feeling here too, looking for ideal foot placement to get through uneven ground.
The game is funny up until the moment characters start talking, then all the humor saps away.
Kleopatra
An...abstracted rail shooter RPG?
You play as the imperial agent Hatori, hunting down the rebel Espada in the lawless moon city of Kleopatra. It's Cyberpunk. So far not much "deeper" going on in the demo, save for some vaguely implied history near the start, but it might expand later.
Combat shows three cards on the field, split into head and body. Click them to attack them. Body shots do less damage, but each body shot increases the chance of a headshot actually landing. Each character has a progress bar for their attacks, and you need to press the dodge button in time as they fill. Use the katana button to stagger the opponents, slowing down their bar. Kill everyone within a time limit.
Juggling all that kinda made my hand start to cramp.
There's something interesting and arcadey here, but I still need practice to fully wrap my head around it.
Of course, as I'm writing this, I noticed the steam page say that the characters and backgrounds were AI generated and human edited. Which is... great.
Interesting concept though.
#19th's steam next fest impressions#Aeromachina#Escape Velocity#NODE: The Last Favor of the Antarii#Mina the Hollower#Echomnesia#Baby Steps#Kleopatra#Youtube
1 note
·
View note
Text
How to Make a Reflective Metal Texture in Unity?
Creating a reflective metal texture in Unity is crucial for developers aiming to achieve realistic, polished metal surfaces in their projects. In Unity, reflective materials require precise adjustments to shaders and material properties, but with the right steps, you can create a surface that mimics the shiny, reflective nature of metal. This article will guide you through the process of creating a reflective metal texture in Unity, focusing on key elements like surface smoothness, metallic properties, and environmental reflections.

Preparing the Scene and Materials
Before diving into the technical process of creating a reflective metal texture, you should prepare your scene in Unity. Set up a basic 3D object (such as a sphere or cube) where you will apply the reflective material. Unity’s Standard Shader or the more advanced HDRP Shader will be essential in achieving the desired metallic look.
1. Creating a New Material
Start by creating a new material. Right-click in the Project panel, go to Create and select Material. You can then name this material something like "MetalReflective." With the material selected, head over to the Inspector window.
2. Selecting the Shader
To create a reflective effect, Unity's Standard Shader is a good starting point. Set the Shader drop-down to Standard. You will see several properties in the material, including Albedo, Metallic, Smoothness, and Normal Map. These will be the key controls to make your metal reflective.
Adjusting Metallic and Smoothness Settings
For metals, the metallic property is the primary factor in creating the reflective look. Metals typically have a high metallic value, while non-metallic materials like wood or plastic are set to a lower value.
1. Metallic Property
Set the metallic slider to 1 (fully metallic) to simulate a pure metal surface. Unity’s metallic workflow is based on the assumption that a value of 0 represents non-metallic surfaces, while a value of 1 represents a fully reflective, metallic surface.
2. Smoothness Property
The smoothness property controls how glossy or rough the metal surface appears. For a reflective, polished metal, set the smoothness value to a high number (close to 1). This will make the surface highly reflective and shiny. Lower smoothness values simulate more rugged, duller metallic surfaces.

Adding Reflections
To achieve accurate reflections, it’s important to have proper environmental reflection maps in your scene. Reflections are what gives metals their polished, mirror-like appearance. There are a few ways to handle reflections in Unity, depending on whether you are using the Standard Rendering Pipeline or the HDRP.
1. Reflection Probes
Reflection probes are essential tools for capturing the environment and creating accurate reflections. To use Reflection Probes, create one in your scene by right-clicking in the Hierarchy and selecting Light > Reflection Probe. Position the probe in the center of your scene, or wherever your metal object is located.
Next, go to the Inspector window of the Reflection Probe and set it to Baked or Real-time depending on the needs of your scene. The real-time option will update reflections dynamically, which is ideal for interactive environments.
2. Skybox Reflections
If you are using a Skybox in your scene, Unity can automatically generate reflections from the Skybox texture. In the material properties, make sure that the Environment Reflections toggle is enabled and the Reflections Source is set to Skybox. This will automatically use the Skybox to generate environmental reflections for your metal texture.
Adding Normal Maps for Surface Detail
To make your reflective metal texture more realistic, adding normal maps can enhance the surface detail. Normal maps simulate small surface imperfections like scratches or dents, which are crucial for achieving a more natural, complex reflection.
1. Importing a Normal Map
Find or create a suitable normal map for your metal texture. If you’re using a pre-made texture, you can often find normal maps that correspond to it. Once imported, assign the normal map to the Normal Map slot in your material’s Inspector window. This will add surface detail to your reflective metal and allow light to interact with the surface more realistically.
2. Adjusting the Strength
After applying the normal map, you can adjust its strength using the Normal Map slider in the material’s settings. A value of 1.0 gives a strong effect, while lower values make the surface smoother and less bumpy.
Fine-Tuning the Reflective Effect
At this point, you’ll have a reflective metal material, but it may still need some fine-tuning to achieve the right look. The following properties will help refine your material:
1. Albedo Color
Although metals typically have a metallic finish, you can still tweak the Albedo color to give your material a slight tint. Most metals have a natural color: gold has a yellow hue, copper has a reddish tone, and silver has a cooler, bluish shade. You can adjust the Albedo color to match the specific type of metal you’re trying to create.
2. Fresnel Effect
The Fresnel effect controls the way light reflects off a surface depending on the angle of view. For metals, this is especially important, as they typically show a more pronounced reflection at shallow angles. Unity’s Standard Shader includes a basic Fresnel effect through the smoothness and metallic properties. However, if you want more control over the effect, you can create a custom shader using Unity’s Shader Graph or write one manually in HLSL.
3. Environmental Lighting
The overall lighting in your scene will heavily affect how the reflective metal looks. Ensure that you have appropriate light sources, such as directional lights or point lights, to illuminate the metal surface. The reflections on the metal will change depending on the light's position, intensity, and color, so adjusting these elements can significantly alter the material's appearance.
Using Advanced Shaders (HDRP and URP)
For more advanced rendering features, such as physically-based rendering (PBR), you may want to switch to Unity’s HDRP (High Definition Render Pipeline) or URP (Universal Render Pipeline). These pipelines offer more accurate rendering of reflective materials, including improved lighting models, real-time reflections, and post-processing effects.
1. HDRP
In HDRP, you can create more complex reflective metals using the Lit Shader. This shader is designed for high-quality rendering and supports advanced features such as subsurface scattering, anisotropic reflections, and clear coat effects. Using HDRP can result in much more detailed and realistic reflective metals compared to the standard pipeline.
Common Issues and Troubleshooting
As you work with reflective metal textures in Unity, you may encounter some common issues. Here are a few troubleshooting tips:
1. Lack of Reflections
If your metal surface isn’t reflecting the environment correctly, ensure that reflection probes are set up properly in your scene. You should also check that environment reflections are enabled in your material settings.
2. Overly Blurry Reflections
If the reflections are too blurry or too sharp, adjust the smoothness property. A lower smoothness value will create a more diffused, less reflective surface, while higher smoothness values produce sharper, clearer reflections.
Creating a reflective metal texture in Unity requires a mix of material properties, shaders, and environment settings. By understanding the key factors like metallic and smoothness values, reflections, and normal maps, you can craft a realistic and visually striking metal surface for your projects. Whether you’re using the Standard Shader or the HDRP pipeline, Unity provides powerful tools to simulate the complex interactions of light with metal surfaces. If you’re looking to enhance your designs further, download high-quality 3D models and textures from the Relebook website to elevate your Unity projects to the next level.
FAQ
How do I make my reflective metal less shiny?
You can reduce the shine by lowering the smoothness property of your material. This will make the surface appear rougher and less reflective.
Can I create a reflective metal without using reflection probes?
Yes, you can use a Skybox reflection or other environmental textures, but Reflection Probes will provide more accurate reflections, especially in dynamic scenes.
How can I make my metal texture look like gold or copper?
Adjust the Albedo color of the material to match the desired hue (yellow for gold, red for copper) and fine-tune the reflectivity using the metallic and smoothness properties.
1 note
·
View note
Note
Hullo! Don’t know if this has been asked/answered before, but if it isn’t a bother how did you get started drawing transformers characters (assuming you remember ofc)? I’ve got a couple that I really want to be able to draw more often but there’s something about mechs that my hands just do not like. Any advice or suggestions would be greatly appreciated!
First off, I'm so sorry about how much time this took to answer. I had some issues figuring out how to go about explaining everything, but hopefully, this helps at least a bit.
I hyperfixated on Optimus Prime when I was like... 8?? I was really young, and that hyperfixation is still with me, so my brain sort of forced me to draw him and burned the process into my memory.
I, of course, started out by just copying other people's art. Very badly, might I add. It looked all fucked up and flat and the shading was off, if there even was any. But it was a start, and that's the important part.
You're gonna improve overtime, you'll figure things out and get to a point where the shapes you draw the most often, no matter how complicated, come naturally to you without much thought. If you draw something enough times, you'll understand how everything is spaced out, how the angles work, they way shadows and perspective mess with it, and you'll be able to draw it without any guidelines. But that's besides the point.
The key thing to remember about anything is that, when you really think about it, it's not much more than a bunch of boxes and spheres. Everything can be broken down into basic shapes, which is especially true for mecha, because they tend to be made up of blocky, symmetrical shapes. Yes, even Bayverse designs.
I'm gonna show you my process through this step-by-step. The way I draw differs greatly depending on whether I'm including line art in the final thing, like in this case. With that being said:
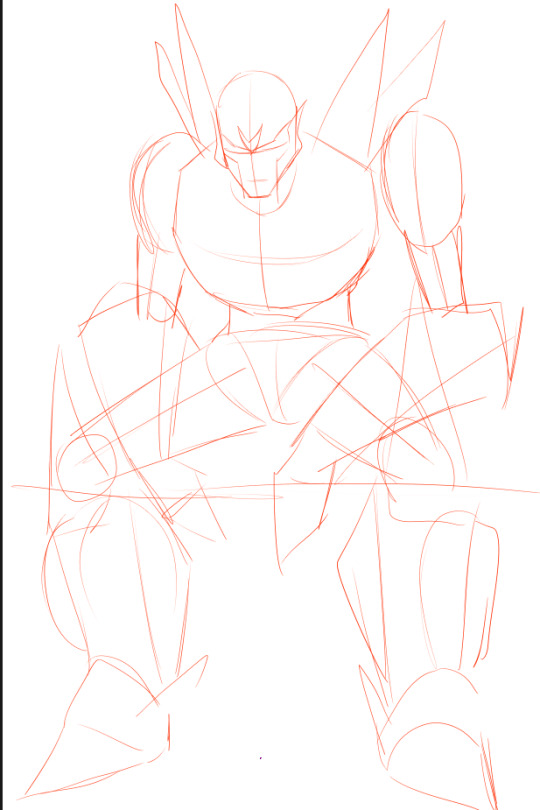
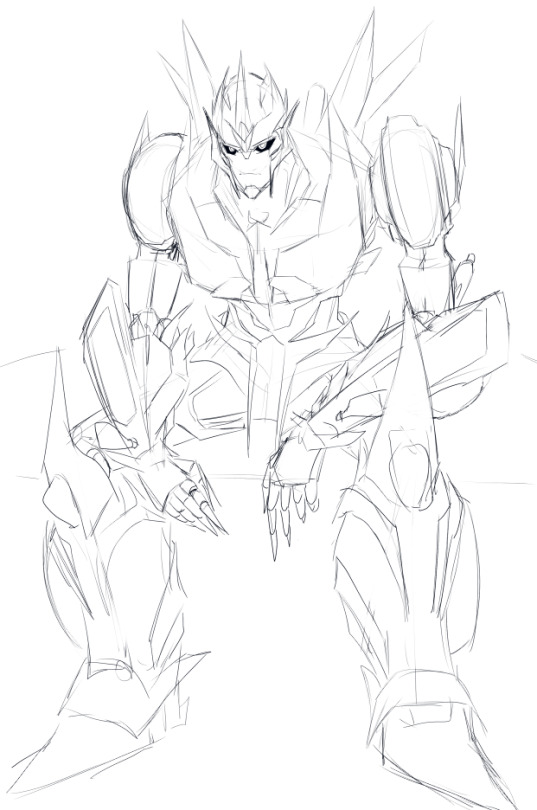
Step 1: basic shapes/sketch.
My slight redesign of TFP Arcee is gonna be helping us here.
I start off by putting down the basic shapes, which usually means boxes and circles. Remember, mecha are 3D objects. So is their armor. It wraps around their bodies while itself also being a three dimensional thing. Try to avoid making it look paper thin. Make it thick.
Next, I add in the actual details. The jump from picture 1 to 3 might seem daunting, but it's not. Arcee's forearm is a cuboid with some weird edges. Nothing difficult. The car door sits on the outer side, with its wider side facing outwards and slightly up, and a small ridge curving around the general shape of the arm and angling downwards. You can see this on the opposite arm. Her arms work similarly to Knockout's.

Step 2: Putting down flat colors and basic shading.
Flat colors → an Overlay or Soft Light layer for some nice colors → a Multiply layer with one block of shadow that gradually fades in. The last one helps you start and offers you a direction while you're zoomed in and shading small details.

Step 3: actual shading + light source:
The perfectly drawn and absolutely straight red arrow is the light source. You can see that it's pointing down at the metal, sort of from the side, meaning it's gonna hit the most on the inner side of Arcee's leg. The front part will be darker, but given the angle of the light source, still not completely dark.
I wanted the top half of her body to be really obscured by the shadows, so the legs and arms are lighter in comparison, while her midsection, chest and shoulders are very dark. In the next step, this will make her eyes, and therefore her face, stand out more.

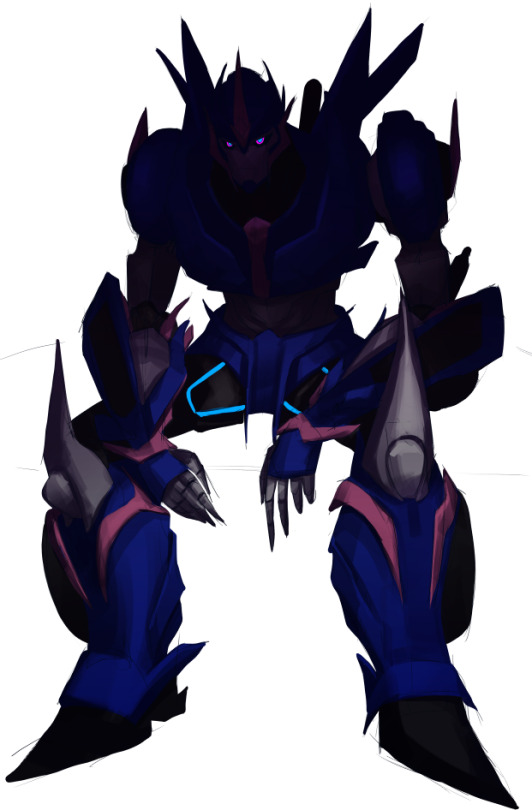
Step 4: Light
I used a Normal layer here with a purple that sat somewhere in the middle of the saturation/brightness levels, meaning it's not bright enough to seem out of place.
Going back to what I said in the first half of Step 3, the brightest spots on Arcee's body will face up and inwards.
After that, I used a Screen layer to 1, add a glow effect around her bio lights, and 2, traced thin lights along the edges of the parts that are being hit by the light source. Also added a darker background, and something for her to sit on.


Please remember that you can start with easier designs. G1, for example, are very boxy and with little details. Great for learning how to work with 3D shapes and perspective.
#asks#drawing tutorials#yeetdraws#the full version of this drawing is coming soon btw!!#transformers#transformers prime#tfp#tfp arcee#arcee
38 notes
·
View notes
Text
Week 8 - Digital Iteration
The focus for this week was experimenting and developing our CAD skills specifically with 3ds max. This was achieved through a series of steps that helped me to better understand the program somewhat. However I ended up finding that my own research into tutorials was most beneficial.
Watching Andrew Simpson's video on the development of a razor, its clear the importance of the design process of testing out lots of different elements and ideas to best create a solution. It was informative to hear about the ways different materials effected the weight and ergonomics of the product and is something to always have in mind. Andrew talks about low-fidelity and high-fidelity as different levels of the model making quality. This is in context to an explanation about how the design process isn't always linear with the development of quality and sometimes lower quality models can be made after higher quality models to test out different ideas.
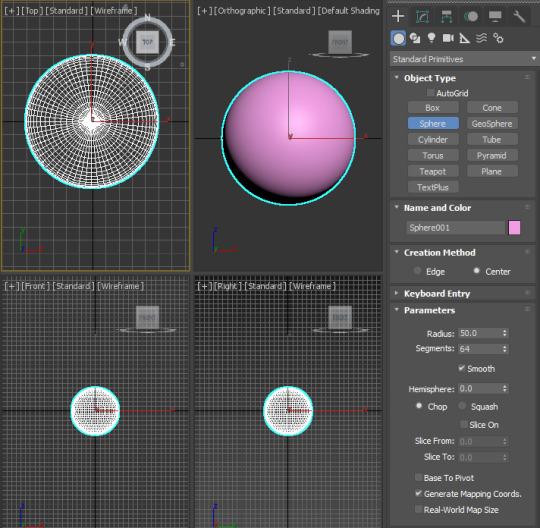
Part 1 "The introduction":
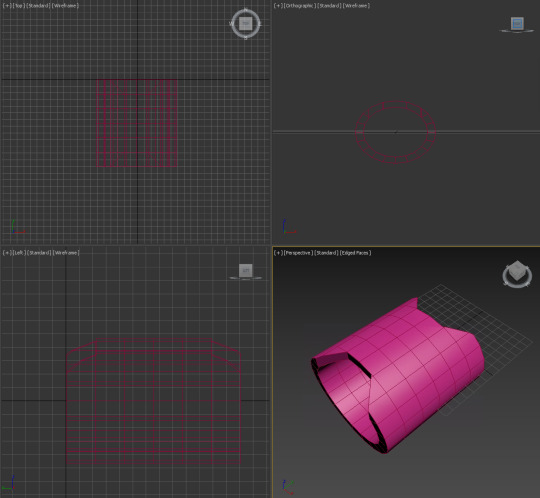
For the first part of this task, we made a simple sphere (done with the sphere tool) which we then played around with in order to explore the effects of the different tools available on 3ds. Personally I find there to be an initially overwhelming amount of different commands that made it difficult to work with. It was interesting seeing what some of them did, but frustrating trying to figure out how to do anything you wanted to achieve. This process was a lot of trial and error, just throwing myself into the depths of this program.
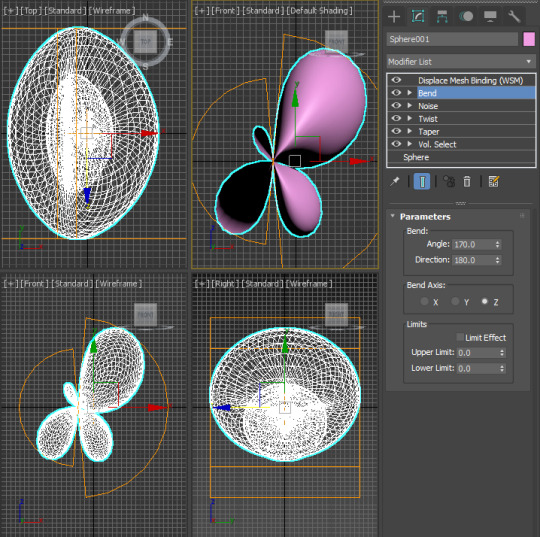
Part 2 "The learning":
Part 2 is where I really took the initiative on figuring out how to make even the most basic of things I could normally create in a few seconds on other CAD programs. I started out creating a bottle like shape, trying to use everything I had learnt from my experimentation of the different tools with the sphere. The result was something very organic and asymmetrical. Fairly happy with this as a basis, and it definitely looks wieldable so that's nice too.

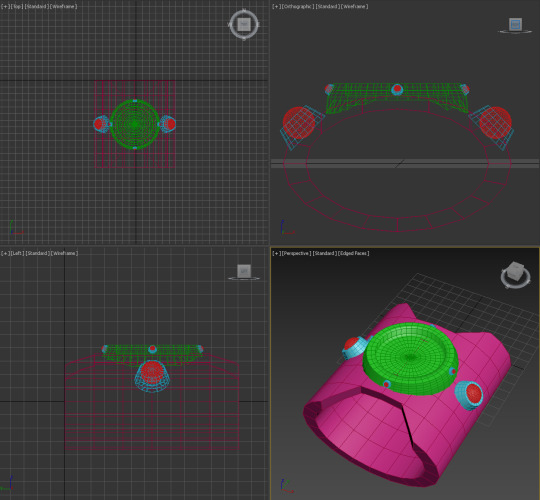
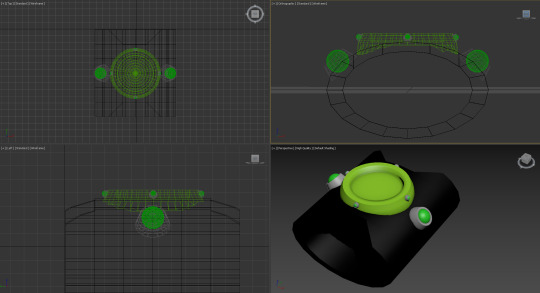
I wanted to move onto something that looked like it had more intention and structure behind it. I ended up looking through numerous youtube tutorials that better explained the process of making different kinds of objects. I would highly recommend just following a tutorial like this as it helped me a great deal to better understand the specific tools which are actually helpful for average tasks. I ended up following a tutorial to create an omnitrix which I thought of as a complex shape that would require a diverse use of tools to further my learning. I figured out how to properly warp shapes how I wanted to as well as combining/subtracting new parts to add to the form. I also finished the design by adding more fitting colours and am really happy with both how it turned out, and how much I learned from the process. Its very evident the difference in level of intentional design between the bottle and the omnitrix as a result of the research done for it.


7 notes
·
View notes
Text
today -
1. i mostly finished an 8-wig order that’s been driving me nuts for the past few weeks :D still need to trim and curl them all (cries) but the wigs themselves are finished which is the bulk of the work, downhill from here. so im gonna make some stock wigs today and hopefully replenish my bank account a bit. i get ch/ess payment on the 31st too so that will help as well, then i think next week we should be able to buy our new 3d resin printer which im hype about. hype and scared ill fuck it up somehow lol
2. in slightly weird news, there is a row of bruises in the crease of my inner thigh and im a bit freaked out by them... praying 4 no blood cancer... i think the actual, slightly ridiculous reason, is that i shaved everything last week and became itchy in that entire triangle area, and scratched my inner thighs too much, and bruised them :/ im a bit annoyed at myself for this but i have enjoyed being very smooth this past week + i am considering doing it more lol. the itchiness is bad though... i could wax instead...
3. ocado is coming any minute, i booked an extremely early delivery bc im awake at extremely early times atm, and im very excited
4. i was explaining to ben the other day my theory that if i could get rid of the ocd id be almost entirely “normal”, and he agrees w/ me less about this than ana does lol. ana more or less agrees w/ me that the OCD is the Only Big Issue atm + that if i can make some real headway on it then ill be in a really good position to live a life that im satisfied w/
ben on the other hand is much more cautious about my optimism i think - he thinks the ED is still a problem too and that i need to engage w/ it rather than either ignoring it or hoping/expecting that dealing w/ obsessions + compulsions will naturally improve the ED also
my feeling is that i dont see how an improvement on obsessive / compulsive thinking + behaviours wouldnt improve obsessive + compulsive behaviours re: bodily dissatisfaction, as well as the more typical spheres i deal w/ them in (fires, plugs, food, germs, ben generally). like is it so different? my feeling is that whilst there are non-overlapping features there’s a lot of overlap too and that i dont see the point in making the Food Shit and the Obsessive Shit into two entirely different things - that feels like both entirely not how anybody’s mind works + also not like sensible logically, bc i think there’s a lot of the same mechanisms at work. you feel bad, you obsess, you perform some kind of relieving behaviour (perhaps starving, etc), and you’re reassured for a little bit. like: this is the same thing lol!
however i do agree w/ him that the areas that dont overlap (e.g. my long-term misery w/ my body, my inability to value myself for areas outside of appearance, my refusal to let him see me naked in the light, the way that i was brought up wrt thinking about food and weight and appearance etc) needs some work. i think it’s actually harder for me to imagine a life in which i dont experience some kind of body dysmorphoa than a life w/o obsessive compulsive behaviours to be honest?? like at least the more general obsessions feel crazy, and im like “lol that’s crazy!” even whilst adhering to the stupid rules ive made up, but to act as tho ED behaviours aren’t culturally sanctioned and celebrated is just not stupid, bc they are, and i dont see a meaningful distinction btwn diet culture (aka “normal” behaviour wrt food) and “eating disorders” other than the weight of the person in question. and i guess i find it hard to imagine myself being able to separate myself entirely from the weight of public perception and judgement.
i think i can probably still make some headway - but i think i imagine it being more of a problem, and im not sure what “work” or “engagement” ben is imaginine, bc i have no idea either to be honest. i think probably, and i hate saying this, bc it’s gonna suck, it’s gonna be things like ... letting him see me naked lmfao :( like literally 10y in and im still like :) lights off :) so ridiculous
#i LOVE sex w/ ben too and it is so good and fulfilling which is another reason why im annoyed i cant seem to get over the bodily hatred#like everything is great except i still dont like being looked at#not specific to sex i dont like ever being looked at
3 notes
·
View notes
Text
WHAT IS THE LOONAVERSE? PART 1 – THE SCIENCE
LOONA is special among K-pop for its immersive storyline. These girls are not just k-pop idols performing a song, they also perform a story and that story is what we call the Loonaverse.
So, What is the Loonaverse? In a few words: The world and story that LOONA inhabits.
Yeah. Duh. But what is it?
Well… it’s complicated.
The Loonaverse is a fictitious story that borrows elements from real science and fantasy to build its world but also uses allegories, metaphors, allusions and other literary devices to tell its story. Our job as spectators (and specifically us theorizers) is to look beyond those devices to understand the message they are trying to send. In this post I’ll attempt to explain the science of the Loonaverse: parallel universes, time loops and the mobius strip.

PHYSICS VS FICTION
The Loonaverse can be described as the physical universe where the characters of LOONA live and where the events of the story happen.
By physical universe I mean that literally: its own universe. There are multiple theories that explain the existence of multiverses; from infinite universes theories to bubble theories to parallel universes to daughter universes; all incredibly interesting readings and all with fundaments in real physics.
On the other hand, the Loonaverse is a fiction story. Created by the creative minds of the people working in BlockBerry Creative (The company LOONA is under) and specifically by Jaden Jeong (who is a polarizing figure amongst Orbits). As a fiction story it is undeniable that the Loonaverse takes elements form science fiction and fantasy to build its story so going hard into the nitty gritty physics of how it works is ambitious at best and purposelessly time consuming at worst (though if you are interested in the nitty gritty of multiverse theory by all means go read about it, is mind-blowing). Nah, for the purposes of this (really not that long once we get to it) theory, we’ll focus only on a few key science related aspects:

MATHEMATICAL UNIVERSES
This particular multiverse theory debates whether math is a tool used by us to describe our universe or a fundamental truth of the universe itself. If it were the latter, then the possibility of multiple universes with vastly different mathematical structures is possible. This implies a different set of physics working in those universes. Basically: physics and mathematics themselves may work differently in different universes: It is as simple as is sounds. (Yeah, 2+2 may = fish in another universe, or flying is possible and even normal).

Using this admittedly long explanation for a constant in science fiction and fantasy, we now have a physics approved explanation for all the odd things that happen in the Loonaverse: super powers, climbing in air, destroying the moon, walking in the moon and most importantly: time disruptions.
SPACE/TIME RELATIVITY
So… time is weird. Physicist can’t decide what exactly is time. Is it a dimension? A physical force of the universe? An illusion we humans use to perceive existence? Does it even exist at all? We’ll just assume it does and use Einstein’s theory of relativity to explain it.
So… The universe is composed of a 4-dimensional fabric called space-time. (Like, picture an actual tablecloth). When anything with mass falls into that tablecloth it creates a bend, that bend is what we call gravity. This gravitational pull modifies both how space and time are perceived. Everything close to that gravitational pull will move at exponentially slower time than anything outside of it. In simpler terms: Time varies depending of your relationship with another object. But if gravity can modify the way time is perceived, so can speed. The explanation for this is long and complicated and involves a difficult choice between speed not being absolute for anything except that light has an absolute speed and those two statements don’t match. But Einstein, being the clever guy he was, came up with Time dilation: The faster you move the slower time moves for you.
A simpler way to understand all this is to just watch the movie Interstellar. They did a really good job of conveying Einstein’s theory.
Of course, physics haven’t been able to prove the possibility of moving through time backwards, only forward. But hey! We are dealing with a different universe where the laws of math and physics don’t abide by Einstein’s theories. Well let’s unify science and fiction and talk about time travel.
TIME DONUTS AND THE MOBIUS STRIP
Yeah, we finally got here.
The Mobius Strip. The one constant in the Loonaverse is the Mobius Strip. It’s importance has been confirmed by BlockBerry Creative and you’d be hard pressed to find any theory that doesn’t include it somewhere. So, What is a Mobius strip?
Also called the twisted cylinder, it is geometrical shape that has one side, one curve and it’s non orientable, forming a loop on its own. The properties of the mobius strip come into play in the sense that if you were to travel through it, you would go through you starting point once but from the opposite side of the strip before returning to your original starting position.

Here’s a 3D model of the thing: https://www.thingiverse.com/thing:239158
Curious things: If you were to cut down a Mobius strip through the middle you would end up with long mobius. If you were to cut it twice at 1/3 the size each cut, you would end up with one long ass loop and one shorter loop that surrounds it.
Here’s a video that shows that: https://www.youtube.com/watch?v=XlQOipIVFPk&ab_channel=ThinkTwice

Okay one more schiency term to explain:
Time donuts (not really called that way) is a time travel/time machine theory that claims that a donut like vaccum that envelopes a sphere of matter and surrounded by a strong gravitational pull would create a void where time/space would collapse into itself, crating a sort of time loop where the closer you move to the sphere the bigger the gravitational pull to the point where you could even start going backwards. Here, space/time is the time machine (yeah, trippy). The physics to this theory are quite debatable at best but it is a theory nontheless, and perfect one for our purposes.
A new time-machine model with compact vacuum core by Amos Ori: https://arxiv.org/pdf/gr-qc/0503077.pdf

IT ALL COMES TOGETHER
Okay I read all this sciency stuff and I still don’t get it: How do all this relates to the Loonaverse? Well, my patient reader, all this science mumbo jumbo helps us understand the main conflict of the Loonaverse: escaping a never-ending time loop.
The theory states that the Loonaverse happens in a parallel universe where the laws of physics don’t abide to our own. In this universe the girls (LOONA) inhabit a space (moon maybe) that moves through time inside of a Mobius Strip, which itself envelopes a large dense sphere of mass, thus creating a time loop. The closer the girls get to the sphere the slower time moves to the point it may go backwards. Because they move through time in a Mobius Strip, the amount of time it takes them to re start the loop is long (though I am not sure how long). In the mean time they will go though their starting point but in the opposite side of the loop.

This means the girls are essentially trapped in a never-ending loop. Think Groundhog Day, Palm Springs, Russian Doll, Happy Death Day; and if time loop movies have taught us anything is that time loops kinda suck after a while.
But this also gives us the tools to possibly escape this loop. Our physics don’t abide in this universe, there are super powers, and mirror images and the possibility of escaping if we understand how it all works in the first place.
With all this science talk, doesn’t that make the Loonaverse a ScyFi story? Well… No.
Science Fiction as a genre uses technological and/or scientific advances to investigate and/or explain a human reality. It usually comes in the form of a warning (Brave New World) or as an exploration of what makes us human (Blade Runner). Science Fiction explores the possibilities of humanity in a technologically advanced future. Because the story LOONA tells us doesn’t explore the possibilities of a technologically ridden future or focuses on our relationship with these advancements, it cannot be called ScyFi.
TLDR:
The Loonaverse is the world and story that LOONA inhabits. It borrows form real life science and fantasy elements to better tell its story. It exists in a universe where the laws of physics differ from ours and where there is a set time loop in the form of a Mobius Strip, which the girls are trying to escape.
REMEMBER: This is all my interpretation of some very complex theories, theories I am unabashedly morphing to my will to fit a certain narrative (like scyfi and fantasy often do). Also, I didn’t come up with the idea of escaping the time loop, it’s kinda the oldest theory out there. It may even be confirmed by BlockBerry Creative. I am just explaining it the way it makes sense to me.

Next: How does all this science help explain the narrative conflict of the characters in the Loonaverse?
#loona#loonaverse#loona theory#loonatism#heejin#hyunjin#haseul#yeojin#vivi#kim lip#jinsoul#choerry#yves#chuu#go won#olivia hye
84 notes
·
View notes
Text
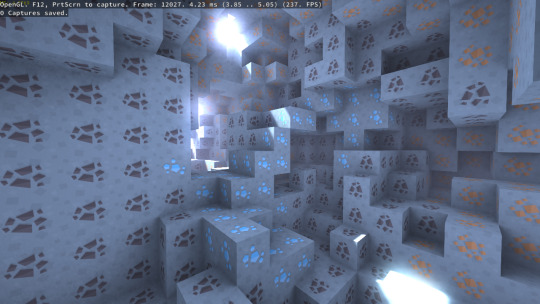
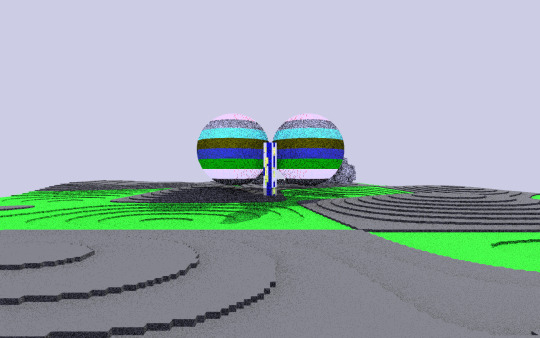
Irregularly-sized voxel raytracing.
Just made a tumblr account because peer pressure but I figure I'll post a bit about my current project here because why not?
With the advent of games like Teardown and the recent public demo of Atomontage, voxel raytracing/raymarching is rapidly entering the public eye. Inspired by these sorts of projects, I started working on voxel raytracers of my own a while back, with varying degrees of success.
These projects were satisfying due to the general graphical fidelity, but they were all things people had done before. So I decided I wanted to make something that nobody had done before. At least, not quite like this. Enter: Irregular voxel raytracing.
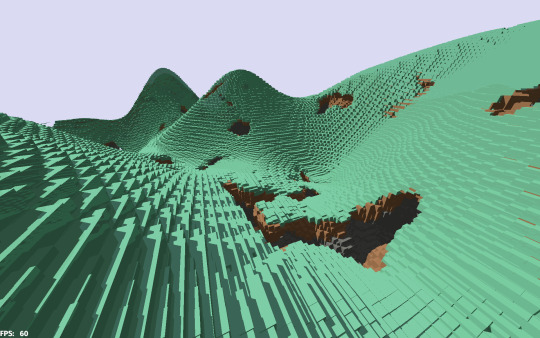
This technique differs from most forms of voxel raytracing in that the voxels are, well, irregular. They're not the static, solid cubes you're used to seeing. And as a result, they have a more natural, somewhat unique aesthetic.
I've been really getting into the Rust programming language lately and trying to use it for most projects, so for this I used the Bevy engine. The voxels are stored in a simple 3D texture and the rendering itself is a simple fullscreen quad with a shader for the actual rendering. It's currently just one pass, and since adding new passes and stuff to Bevy is a bit of a pain, I don't have any temporal or screen-space anti-aliasing, and also all shadows and reflections are perfectly hard.
At world generation, the landscape is generated such that each block contains two values: 8 bits for density and 8 bits for type. To calculate this, I get a perlin heightmap and subtract the Y position of each voxel from it, and clamp the resulting value between 0.0 and 1.0. From there, I use a distance-based Worley noise to cut random spheres of gradually decreasing size from the landscape. This leads to decent cave generation that still works with the density value workflow.
The resulting value is multiplied by 255, truncated, and used as the 8-bit density value. A material value is also included, which basically just takes how deep from the heightmap the current voxel is to choose between grass, dirt, and stone. And there you go, a decent world generation!

But there's a little issue with this: An empty voxel has a density value of 0, but the type value is unused. So to compensate, I use that value as a distance variable. I simply iterate over the finished landscape a certain number of times (currently 16), each time checking the 6 neighboring voxels and increasing its value if it has no solid neighboring voxels and is equal or less than all surrounding voxels. This gives an estimate of how many DDA steps it would take to reach a solid voxel.
So now that the data's been generated, I can get to actually rendering it. The shader that I use simply takes the current camera position, plus its forward, up, and right vectors, as well as the voxel texture. The ray origin is just the camera position, and the position on-screen is easily used to calculate a ray direction with the directions:
vec3 rd = normalize(screenCoord.x * cam_right + screenCoord.y * cam_up + cam_focal_length * cam_forward);
In the actual voxel raymarching algorithm, I use a branchless DDA based on this shadertoy. When it hits an empty voxel, it continues to march with that DDA without sampling the voxel texture for the specified amount of steps in that voxel's second value. Otherwise, it samples the value to either test if it's a solid voxel or an empty one, and acts accordingly.
My initial idea involved using a surface nets or marching cubes type algorithm calculated at runtime to smooth the voxels out at irregular angles. However, this proved to be more difficult and performance-intensive than it was worth. So, instead, when it hits a solid voxel, it samples the 6 neighbor voxels to see if they have any value. This results in 3 sets of values: top/bottom, right/left, and front-back. I then generate two separate lookup tables based on the density value, as follows:
float mins[4] = float[](
0.5 - density / 2.0,
0.0,
1.0 - density,
0.0
);
float maxes[4] = float[](
0.5 + density / 2.0,
density,
1.0,
1.0
);
Then, for X, Y, and Z, it uses a solid object as 1 in the negative direction and 2 in the positive direction to index into these arrays and calculate the min/max bounds of an AABB within the current voxel. I then trace that AABB using the original ray. If it hits, then the voxel's material, as well as the ray distance to the AABB and the normal it hit are all returned.
My current algorithm uses one initial ray, plus a shadow ray to the sun and one reflection+shadow ray for some nice shadows and reflections.
And that's how I made my voxel renderer! I'll likely upgrade this, or move onto other projects for voxel rendering that allow for complex global illumination and soft shadows and reflections. I'm proud of what I've managed to do here. And who knows, maybe I'll be able to use this to make something cool! Regardless, thanks for reading!
4 notes
·
View notes
Photo
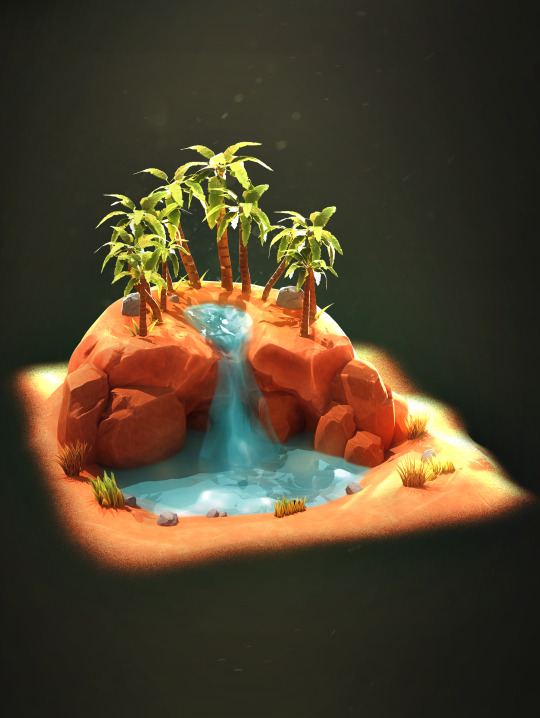

ASSET ASSIGNMENT - DIORAMA
My task for this month was to create a diorama environment. I have never created an environment before, so I had to do things a little differently to what I’m used to.
My overall plan was to get this successfully displayed in real-time, in marmoset toolbag. I like marmoset because you can export your scenes into unreal engine if desired.
I went with a more agile development approach as opposed to a heavily structured one.
My diorama theme is an oasis. As a kid, I always remembered characters in the desert hallucinating an oasis when they’re on the brink of insanity. I find those really cool so I decided to make my own.
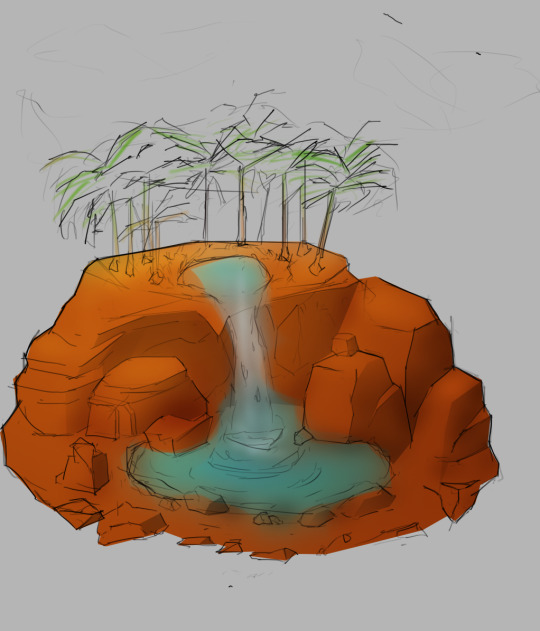
Concept/Blockout Stage

I originally drew some really rough and dirty concepts just to plot down the ideas in my mind. This would be the equivalent to my silhouette stage, seeing which shape I preferred.
As opposed to drawing entirely different shapes, I decided to iterate on an initial design.
1 - A floating small oasis with a pond and trees around it. Ommari said it looked like a piece of poo and I could see that too so I changed it.
2 - The shape of the oasis base was change to make it look less like a floating island.
3 - The pond in the oasis was turned into a waterfall instead of being on full land.
4 - I liked the idea of a waterfall so decided to expand on this, instead of it leaving into nothing, I created a second floor, for the waterfall to expand into a bigger pond.
After my rough concept was complete, I tried drawing a detailed concept, but I struggled getting the forms down as my rough concept was too vague as to its structure. This is when I decided to create my block out. I had no intention of it looking nice, I just wanted to project my idea in a 3D space to assist me in the placement of my polished assets as well as assist me in drawing my polished concept.

Modelling and Development Stage
After I did my blockout and progressed on my polished concept, I could finally plan out what I needed to make. From the concept I knew I needed
Trees(multiple variants)
Rocks(multiple variants)
Water(pond)
Waterfall
Small plants(multiple variants)
It doesn’t seem like a lot but it would be a lot of rocks. Fortunately I knew I could save time by rotating rocks into certain positions and scaling them so they look different. Making rocks themselves too wasn’t really difficult. This also applied to the trees. The water however, will be the biggest challenge as I have never even explored the idea of real-time water.
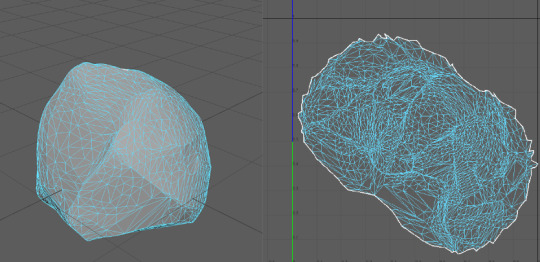
I started with a simple rock to get the terrain workflow down. I used zbrush to sculpt a sphere into a rock shape. I made use out of the TRIM brush and MALLET brush.
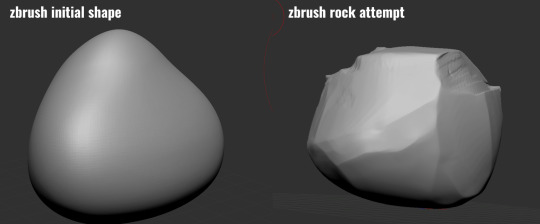
I then decimated the rock to have a lower polycount and uved it in maya. I just used spherical project and then unfolded it and optimised it., then I scaled it to fill out the most of the UV.
After this, I went into substance painter to texture my rock, I used smart materials to save time. Originally my rock had a more realistic and gritty texture but I decided to change it into something more stylised.

I used the smart material “leather stylised” and changed the colours to resemble desert terrain. I liked how it turned out so I saved my modifications as a new smart material so I could just drag and drop every time I had a new object to texture.
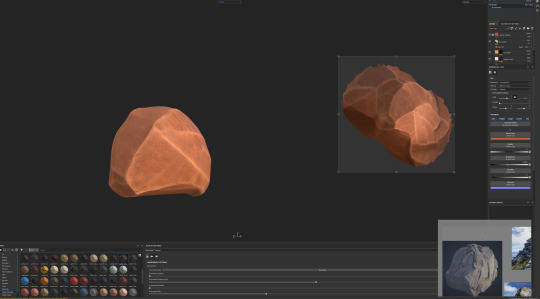
I made 2 more rocks. I wanted to see if the rocks could be combined from being separate into one big structure relatively seamlessly. I decided to test this in marmoset, see if I can get it looking how I wanted.

This was test 1. I used 2 rocks for this and scaled up one of them. I think the two small rocks looks decent. However I needed to make separate meshes for larger rocks as the sharpness loss was apparent on the big rock.
The process was the same for all rocks really, sculpt > decimate > uv > bake > smart material. The only difference was when I had to model the big ground base. I used my blockout as a reference in zbrush.

Disclaimer: The varying aesthetics in my rendered screenshots are me switching between high performance mode and high graphics mode in marmoset. Unless stated otherwise.

For the water, I simply created a flat plane with a blue albedo texture. I then created a height and normal map.

I used these maps to create the water depth effect.
Pictured Below: Raw Albedo > Height and Normal Map applied > Refraction Transparency mode enabled.

I made some modifications and additions to my design, re-using the rock assets and rotating them to make them unique.
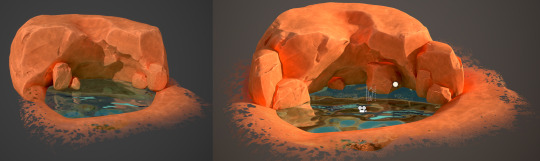
I tried creating a waterfall, I imported my scene into maya then made a plane then soft selected and stretched the corners to my desired placements.

I then applied the same water material to the waterfall as a test. I don’t think it looks good enough so I’ll work on it later on.
For the trees, I use the maya spline tool to create a curved cylinder as the based. I then created the

I created the grass using small planes shaped to the shape of grass. I also recycled those assets to use in the grass bushes and cloned them using MASH commands. I used the grass as a final touch to add more detail and variety to the roots of the trees.
Final Changes
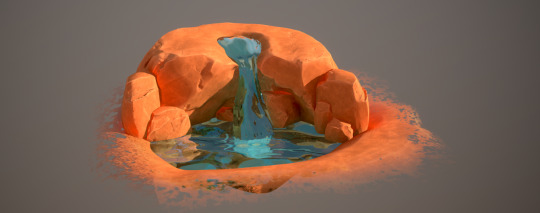
Eventually I decided to make the switch from Marmoset toolbag 3 to marmoset toolbag 4. This means that my whole lighting setup was altered and I had to re do it. However it gave me the opportunity to dabble in ray tracing lighting mixed with real time. Certain problems like the rocks being heavily illuminated were fixed, I also was able to create a different type of lighting setup. I also changed the opacity settings of the water. My new setup up highlights my model in a better and clear way in my opinion. I also did some minor scaling changes and rock placement changes.

3 notes
·
View notes
Text
Week 2 - Analysis of 3 Artworks

Age of Reason (2018) - Oil and acrylics on canvas
Over the past few years, Loribelle Spirovski got the name of one of the most talented painters on the contemporary art scene. In 2018, she presented a series of paintings entitled “Be Still” and today we are going to examine one of them.
The human form is a central theme for many Spirovski’s pieces and “Age of Reason” is not an exclusion. In the picture, we see a two-headed male figure. Stylistically, the composition is divided into two parts: a half-empty body and a highly detailed facial part. The body is defined only by thin delicate brushstrokes and practically becomes part of a strict background - a narrowing room, made in the manner of Francis Bacon. The heads are shown not entirely and are enclosed in simple geometric shapes. The general color palette consists of muted tones; the most striking detail is the blue line forming the torso.
Apparently, the depicted figure is not a reflection of a real person, but rather of an internal state. This may be evidenced by the fact, that Spirovski started her artistic path as a hyper-realist painter, but eventually, her curiosity led to exploring the ability of paint to capture not only the physical appearance of objects but also what could be hidden underneath. This portrait differs from most that were created by Spirovski: there is no eye contact with the character and therefore direct dialogue. Nevertheless, the effect the painting creates is no less powerful.
The name of the painting may help us to unravel the idea behind this work. It is unlikely that the artist referred to the philosophical movement; rather, she implies a period of consciousness in an individual's life. This term is often associated with children who are just entering this period, but here we see an adult person at the peak of his abilities. Hence we face a paradox: why does the inner world of a mature formed person look more like a Rubik's cube? However, this is the whole point: Spirovsky is trying to convey that it is normal sometimes to feel incomplete and full of doubts. Human nature is multifaceted and paradoxical, it is difficult to predict and even more difficult to program. Nevertheless, there is something that is familiar to everyone: sometimes all we need is to withdraw into ourselves and stay in silence.
_________________________________________________
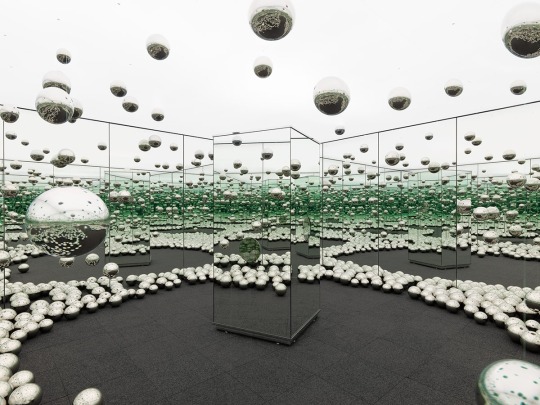
Let’s Survive Forever (2017) - Physical installation
“Let’s Survive Forever” is one of the famous Yayoi Kusama’s Infinity Mirror Rooms, first exhibited at New York's David Zwirner Gallery in 2017. The installation is a brightly lit room, the walls of which are covered with mirrors. This time, the conventional for Kusama polka dot motifs acquire volume and adorn the ceiling and floor in the form of polished metal spheres. Thanks to this solution, Kusama surpassed herself, being able to really bring the number of reflections to infinity. An additional effect of displacement and refraction creates a mirrored column in the center of the chamber

The central object of the exposition is the viewer himself, immersed and gradually dissolving into an endless illusion. The spheres are like hundreds, thousands of eyes fixed in his direction, reducing and distorting his figure.

The origins of Kusama's obsession with repetition and multiplying of forms originate in her attempts to combat obsessive images and fears. However, in the modern context, we can interpret the work as a commentary on mass selfie-hysteria and life online, where personality is lost among a myriad of digital copies.
One must appreciate the genius of Kusama: she proved that even using the simplest visual means, incredible results can be achieved.
_________________________________________________

Multi-Love (2017) - Music Video/ Video Game
In 2015, a psychedelic rock band Unknown Mortal Orchestra released their third album “Multi-Love” the brightest work in which became the same name song. Later on, UMO presented a colorful surreal music video directed by multimedia artist and musician Lionel Williams. It also was uploaded as an interactive video game letting everyone explore this peculiar 3d-world.
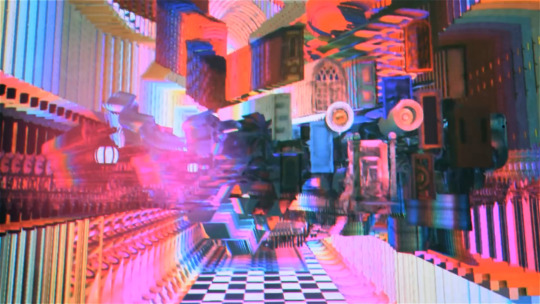
Indeed, this work barely reminds us of the common virtual environments: instead of the habitual indoor/outdoor space, we see a set of collage-like textures multiplying and overlapping each other. It's hard to determine the borders and size of it and all experience looks rather like a hallucination. At first glance, one could have the impression that this bizarre computer-generated effect doesn’t have a certain logic behind it. However, later we can notice that these multiplying images rigorously follow the movement of a camera. Thus, almost all objects in the scene play the role of brushes, manipulating which the user has a chance to create an infinite number of compositional patterns.
The video itself doesn’t bear a certain narrative that would follow or complement the song's lyrics. Williams, a musician himself, is rather interested in visualizing sound providing the user with a sort of synesthetic experience. Captured by an idea of mystical sensationalism, his main endeavor is to portray a multidimensional reality.
1 note
·
View note
Quote
Week 7 Studio Tutorial Exercise – A3 Sketching Drills
REFLECTION
During this tutorial:
From the last lesson...After understanding and completing the task of the Wassily armchair last week, I found the drawing of the cube this lesson with 2 vanishing points was really intuitive and I’m pretty amazed at how much faster I got within a lesson. Also having watched Chapters 5 and 6 from the video series Sketching for Product Design and AEC by Kevin Henry, I really liked drawing insights from the video along with the lesson exercise.
I enjoyed... The first activity near the end, being drawing straight lines over and over again, it eventually made it very therapeutic once I took my time and worked out a way to smoothly execute the lines. I also enjoyed having different people sitting around me, it made the class really funny with all the banter, whilst we kept on completing each exercise. I also liked the freedom of creating your own bottle at the end, I thought I would make it as weird and inefficient as possible thinking that it would look cool when I started toning the bottle at the end.
I found difficult... The perspective drawing with 2 vanishing points with extra shapes like a cylinder and with different stationary points. I found that I was confused in which lines belonged to each vanishing point. I still am unsure at times but I'll keep working at it
Next time... I think I'll take my time in completing exercises instead of trying to rush through them. I also realised I was pretty sketchy in my perspective drawings especially compared to my really neat friend Dorcas. I would like to work on having minimal strokes of the pencil so that my overall product outline is neat with the correct defined line weights, to overall help me communicate my ideas.

Drawing straight lines:
I first I was wobblier then expected, I thought because I could draw well that I knew how to draw straight lines. Previously in high school, I learnt to be really free in my strokes in order to have really smooth strokes but I realised it didn't mean they were straight.
Learnt:
To use a pacer for consistency rather than a normal 2B pencil for this drill. That I needed to relax my body and place my palm down on the page. I think my hand was a little sweaty for some reason so I placed another folded paper under it to allow less friction and overall smoothness in my lines.
That D R I L L S are actually the most repetitive but W O R T H while tasks.

Connecting 20 dots and then another 20
Learnt:
I realised it was better to keep your eye on the next dot rather than focusing on the line itself, to ensure accuracy.


Circle perspectives:
Looking at how the eye level/plane affects the dimensions and distortion of a circle. I've attached some images that I thought were helpful in my future practice of this exercise.

3-dimensionality of a circle to a sphere.
I was cool to see how 2 lines could trick your eye to think something was 2d to 3d.


Planes and Line Weights:
Understanding the minimal lines needed to construct a product. Also taking note of types of lines when communicating objects in 3- dimensions.
Types of lines I discovered:
Contour: Light lines that define the 3 dimensionalities of the product
Ghost: Scaffolding lines
Construction/plane: Normally straight lines that drive back to the vanishing points in order to give a reference guide to the construction of the product.
Outlines: Darkened outlines to define the overall shape and structure of the product.

Perspective drawing with 2 vanishing points
Doing multiple cubes and 3-dimensional structures was difficult in adjusting to the right perspective.
I will still be experimenting with this.

Bottle ending task...
It was interesting for me to try to tone a combination of common bottle designs in one, It made me think about where the light was coming from and was challenging.
But what I most liked is how Max taught us how to make the product ‘pop’ as such. In this case, by adding a shaded rectangle background in the back made the bottle push out as well as the name ‘so extra’.
3 notes
·
View notes
Note
Hi! I'm kinda having a hard time understanding the Green-Ostrogadski theorem/Divergence theorem and I'm wondering if you can help?
OH this is a lot of fun and by fun I mean an absolute nightmare, and it gets very long because trying to explain the bits of how to calculate it and then what the calculation of the parts means and how it fits in with physics/a geometric picture and then math as a whole, so let’s go under the cut.
So we’re going to go with this

as our formulation, same as Wikipedia does, and actually talk about what every bit of that specifically means and how to visualize it; “memorize it and then just do it” usually cuts it for getting through problems but knowing what it means helps with not writing the wrong thing down before taking a crack at the equation.
Let’s start with what is F? it’s some kind of vector field, it needs to be reasonably smooth enough so that you can differentiate it. It’s going to come, in the 3-D case, with an x (or maybe called i), y (j), and z (k) component: ie F(x,y,z)=f(x,y,z)x+g(x,y,z)y+h(x,y,z)z. The nabla/upside-down triangle is the divergence, which means you apply the x derivative to the x part, y derivative to the y part, and z derivative to the z part, and then add them together. So
$\nabla\cdot F(x,y,z)=d/dx f(x,y,z)+d/dy g(x,y,z)+d/dz h(x,y,z)$
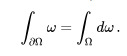
(they are partial derivatives, so you hold all other variables as fixed as you take the derivative in the one you want to take, as ya do) and now you have something that F(x,y,z) used to be a function that produced a vector and now it’s something that produces a scalar and you can just integrate that sum like you’d normally integrate something in 3D. Usually this is stupidly easy to calculate and then it’s going to be pretty easy to integrate back.
V and dV are the boundary of the object and the volume (so probably given in dxdydz and then boundary values, or get getting told “it’s a ball” and then you probably want to do spherical coordinates so r^2sin(theta)dr dtheta dphi). But that’s the space you’re doing the integral over. That one should be provided pretty easily in terms of equations/bounds of x, y, and z. Volume integrals are easy to do, they’re just three integrals in three different variables. It becomes a surface integral over the boundary of the surface when you switch to the right side of the equation. dS can be pretty annoying to calculate if you’re not given it or if it’s not for something super simple like a sphere/square/rectangle and setting up the integral involves taking partial differentials of the equation of the surface and/or parametrizing and first of all you’re usually going from the surface integral to the volume integral and secondly I’m assuming you know how to do that because it takes a bit long to explain. (this is a fairly straightforward page that talks about it/ ask me about surface integrals if you want me to try to get into it?) But yeah, that’s usually why the divergence theorem is used to go from surface integral to volume integral because the volume integral is easier to do, UNLESS you’re using the 2D version in which case it’s *so* much easier to do a path integral because that’s just along a path, but then tbh you’re using Green’s Theorem and there’s a picture at the very bottom about infinitesimal squares canceling each other out that is just the picture of what’s happening. But we’re in 3D so we’re looking at surfaces and volumes.
So now we’ve got the left side and the concept of “so we’re going from volume to surface or surface to volume” and the question becomes why? The punch line of what is happening is “for well-behaved functions, everything that is happening inside the shape can be determined by what is happening on the boundary of the shape.” This is actually a really common theme in mathematics and it doesn’t come from nowhere – so many differential equations that people try to solve, like for example the heat equation, you are given boundary conditions only and those determine the behavior of the function over the entire domain. In fact, you’re usually given boundary conditions and the derivative of the function in the space and asked to come up with the function, that’s the setup of pretty much every initial value problem, and you can just….do that. Because when functions have derivatives they Behave In Predictable Ways. The entire field of ODE’s/PDE’s is about Doing That. But the Divergence Theorem in particular has a cool physics interpretation that specifically makes it easier to picture.
Alright let’s move on, what’s that n? The n is the unit normal vector to the surface. It’s pretty much the right angle going out, Wolfram Alpha has a really good picture:
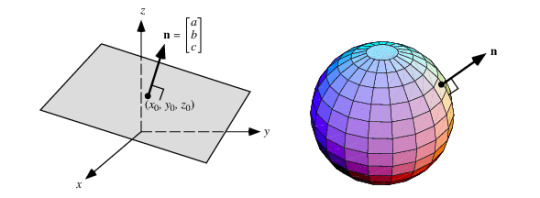
We want it normalized (ie length 1) so that it doesn’t contribute any “noise” to the overall integral, after all, what we care about is the field F, and this is just defining a surface so you make sure that you’re looking at what happens with F over the right shape. The way that you calculate the normal vector is if you can write the surface as an equation s(x,y)=z, then N=[ds/dx, ds/dy, -1], and n=N/|N|. (and if you haven’t done vectors in a while, length of N=|N|=sqrt(N-dot-N)=sqrt((ds/dx)^2+(ds/dy)^2+1).) This is going to be useful because:
The dot product! The dot product is what answers the question of “how much are these two vectors going in the same direction”. [a, b, c] (dot) [x, y, z]=ax+by+cz – and note that this is just a number, you don’t have to care about components of vectors in a direction. It’s a scalar. Which is great because dotting [nabla] with F also gave us something scalar instead of vector-valued, so you can tell that the equation makes sense.
We care about F dotted with the normal vector instead of just F integrated over the whole boundary because the only thing that actually matters at the boundary is what is happening in the same or opposite direction/if stuff is going in or out, not stuff going sideways. So by taking F[dot]n you’re just calculating what’s flowing in or out of the surface. Because n points out, it’ll be positive if F is also flowing out and negative if F is pointing in.
Now that we know how to do absolutely everything on either side,
What does this mean re the physical picture? Well, it’s pretty much a conservation law. The easiest way to think of it is with fluid flow. Take your favorite fluid, water maybe, and picture it flowing a whole bunch. Make it as weird and turbulent as you want. Add sources (so throw some hoses in there) or sinks (so throw some drains in there.) The vector field F is the velocity – so speed and direction – of the fluid at any point. The divergence of F basically gives the strength of what’s going on (that’s just Newtonian, force = mass* acceleration, and acceleration is the derivative of velocity, which gives you an intuition about why the derivative of F matters). Your volume is any shape that you drop into the fluid. The Divergence Theorem basically says that it doesn’t matter what weird stuff or eddies or currents or sources or sinks are happening inside your shape, the only thing that matters to characterize what is going on is watching the velocity of the fluid on the boundary of your shape and that tells you everything you need to know. Which kind of makes sense, the stuff flowing in or out should tell you how much is entering or leaving from the inside. Or what direction and how fast it’s all going on the inside. And if it’s doing any weird stuff in forward and backward directions, that bit cancels out, there’s a net flow conservation. Your liquid has to move in a way that makes sense and the places where it appears or disappears are going to be accounted for by how much is going in or out of the boundary. You can also do the same thing with heat flow or electric current, but fluid is the easiest way to picture it. The divergence theorem is stating “fluid can’t appear or disappear for no reason, we can tell overall what’s going on, on average because integrals mean average, inside a shape and whether or not there are spots where fluid is draining or being inserted into the shape by looking at how much and in which direction it flows across the boundary of the shape.” It’s divergence/derivative/nabla for everything inside because of how velocity relates to acceleration, it’s dotted with the normal vector on the surface because that’s exactly measuring the flow inside or out. This is one of the few times where physics is a lot more elegant than math and tbh the physics explanation is the thing that should be listened to, and it’s just that the equations make sense for any differentiable fields F you stick in. That’s what’s really going on. The physics of fluid flow. Conservation of matter.
There’s actually a larger mathematical context for the Divergence Theorem, and two other theorems that are usually taught, namely Green’s Theorem and Stokes’ Theorem. Green’s Theorem goes like:

and Stokes’ Theorem goes like:
That thing that you see on the right side is actually the generalized exterior derivative which kinda involves a thing called wedge product and is just overall a bitch. But it does work in pretty much the most general cases/now just in a bunch of dimensions and on manifolds. If you’re a physics student they will be explained via a drawing on a chalkboard one time that is of little lines circling and cancelling each other out (although for Green’s it’ll be 2D with the arrows circling the boundary), like this
as if that makes the “proof” of why only the boundary matters, and then Just Memorize Them And Use Them When You’re Told To For These Specific Physics Problems That Use Them. The Divergence Theorem is then just a special case of Stokes’ Theorem. (Actually so is Green’s Theorem, but Green’s Theorem is used often enough that it’s usually memorized/explained separately. Also Green’s Theorem comes up independently in Complex Analysis in a way that the others don’t.) The cool thing about Stokes’ Theorem is basically it can be used in any dimension/topology, as long as certain smoothness conditions are satisfied, so it’s nice and general. But those are the other two versions of the theorem that come up a bunch.
There are a lot of really good examples of working through the divergence theorem both ways here: http://www-users.math.umn.edu/~nega0024/docs/2263_S14/GaussExamples.pdf and I would highly recommend just reading through them? They’re great, straightforward, and give you a sense of getting used to the calculations.
Khan Academy also has some pretty solid resources of a video of a person doing problems/examples with it here, if watching a thing helps: https://www.khanacademy.org/math/multivariable-calculus/greens-theorem-and-stokes-theorem/divergence-theorem/v/3-d-divergence-theorem-intuition covers it pretty thoroughly. They do a nice drawing on their little video chalkboard describing the whole fluid flow thing.
Lemme know whether or not that makes sense? It’s A Lot, and I’m more than happy to go into different/more detail.
#bob-newby-superhero#the math fandom#sorry this took me so long to answer the divergence theorem is p ugly#and typing things up on tumblr that are math is fairly hard#I hope I gave a solid intuition?#please let me know because I want to fix any holes I've left
4 notes
·
View notes
Text
Geometry wars 3 dimensions cover

#GEOMETRY WARS 3 DIMENSIONS COVER FULL#
#GEOMETRY WARS 3 DIMENSIONS COVER SERIES#
#GEOMETRY WARS 3 DIMENSIONS COVER FREE#
Scores can get a bit ridiculous as you go, due primarily to the potential for the score multiplier to increase without limit.
#GEOMETRY WARS 3 DIMENSIONS COVER FULL#
Once a level is open you can play it as often as you like, chasing after a full three-star rating and a spot above your friends scores on the leaderboard. Each level has a set of score targets to aim for, with rewards ranging from one to three stars, and if you don’t earn enough stars the section’s boss fight remains locked until you go back and improve a bit. One level may see you with only a single life, smart bomb, and bonus ability to reach the maximum high score, while the next might be a score attack with infinite lives but limited time, or a battle in an arena that’s gradually getting smaller and smaller until there’s no place left to dodge. Each level is its own variation on the Geometry Wars theme, with different goals, enemy mixes, and individual leaderboards. The main mode of Geometry Wars 3 is Adventure, which strings 50 levels together one after the other with six boss fights interspersed along the journey. It says something about the effectiveness of the level design that the best arenas are the ones that are mostly flat, with all the action happening on a single (non-sphere) surface. The familiar claw ship and the hundreds of enemies swarming the arena surface all travel the same way, making the 3D levels serve the purpose hiding encounters around the curve of the world and while providing a nice bit of eye-candy. Bullets fly as if the world was flat, wrapping around sharp corners or up the curves of a sphere, traveling as if there’s no 3D bending to the arena. Levels can be set on spheres, cubes, whatever a peanut-shape is called, or even on the traditional rectangular surface given a slight bit of warping at the edges. While the twin-stick shooting is set on a plane, same as normal for the genre, that plane isn’t likely to be flat this time around.
#GEOMETRY WARS 3 DIMENSIONS COVER SERIES#
Geometry Wars 3 is an arena shooter wrapped around a series of 3D objects. For those curious as to how it stacks up to its forerunners, though, I can say that just because GW3 is easily the weakest entry in the series, that doesn’t mean it’s a bad game. For the sake of this review I’ll be approaching GW3 mostly from the latter perspective, because every game element feels like it’s been re-thought from the ground up to present the series to a new audience.
#GEOMETRY WARS 3 DIMENSIONS COVER FREE#
There’s two ways to view Geometry Wars 3– either as a new game in the Geometry Wars series, or as its own individual game, free from expectations based on previous series entries. After all this time waiting a new Geometry Wars is a real treat rather than simply the latest game in the series, and if Geometry Wars 3: Dimensions is more a franchise rebuild than a true sequel it’s still a fun little twin-stick shooter. Geometry Wars: Retro Evolved 2 came out a little over six years ago and how on earth have six years gone by since then!? Still, it beats getting bludgeoned with annual sequels, so it’s hard to complain too much.
0 notes