#fuse bead patterns
Text

Yokune Ruko perler bead pattern!
Free to use; reblogs appreciated!
#utau#yokune ruko#perler bead patterns#perler beads#ruko yokune#utauloid#ruko#hama beads#hama bead patterns#fuse beads#fuse bead patterns#perler
130 notes
·
View notes
Text
i had to make them, i HAD to
#red vs blue#rvb#locus#rvb locus#samuel ortez#felix#rvb felix#isaac gates#listen. LISTEN. ik the greys for the locus and felix is too light#I KNOW!!!!!!#but there aren't enough shades of grey in perler beads that i can get#so its either too light OR it looks really messy#doing locus' helmet was a pain in the ass#until i actually looked at the season 15 version of his helmet and i figured it out#i also did the pattern at 1 am last night because i spent the day before agonizing over how to do it#again. its the lack of extra shades of grey or ability to go into a lot of detail#BUT#i still like how they turned out regardless#perler beads#fuse beads#hayden shut up
27 notes
·
View notes
Photo


beady-faces: pink + blue, orange + cyan, yellow + fuchsia, green +blue
it’s Freebie Friday! digital graphics posted every Friday at 3pm EST, free for non-commercial use, completely tile-able 🙂☹️ fun for borders, collage decor, backgrounds, anywhere you need to jazz-up space!
please credit w/link: internetbee.neocities.org/graphics
🐝 A Bee 2022 [art tag] [links]
fused beads: me (i’m listing these as earrings in my shop, stay tuned!)
#Freebie Friday#A Bee art#art#background#creative commons#decoration#digital#digital art#free to use#graphic design#pattern#repetition#tile#fused beads#perler beads#smile#frown#faces#smiley face#frowny face#moods#emoticons#emojis#pixel art
29 notes
·
View notes
Text


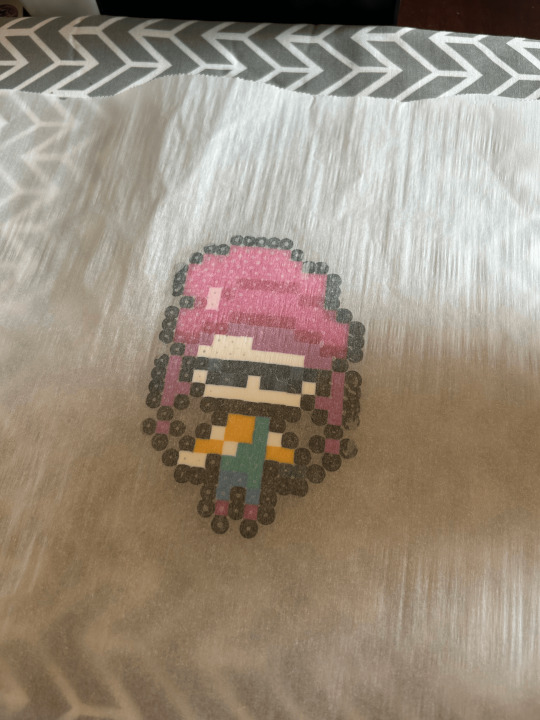
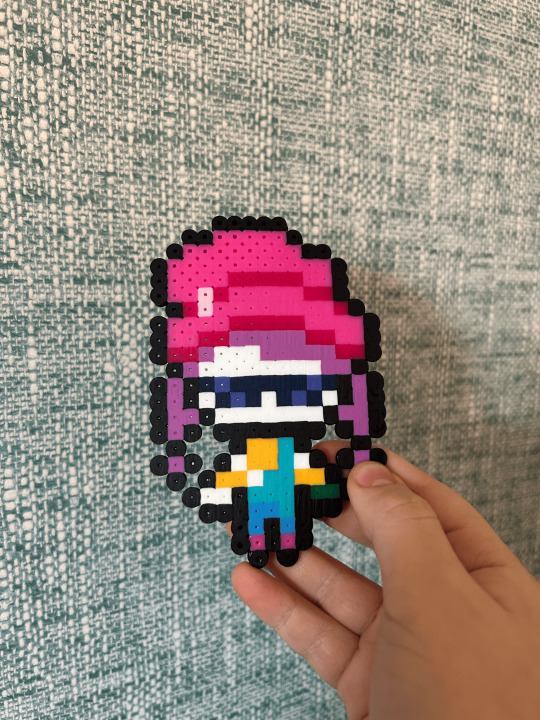
I'm gonna make the High On Life logo sticker thingy with Perler Beads!! I used
^ to turn the picture into a pattern (well a few variations actually). Feel free to use these if you want! Just credit me (I just wanna see what you make)
Original art belongs to Squanch Games (idk exactly who, please lmk)
#perler beads#fuse beads#high on life#high on life game#neons arts and crafts#perler pattern#minors dni#minors do not interact
7 notes
·
View notes
Text
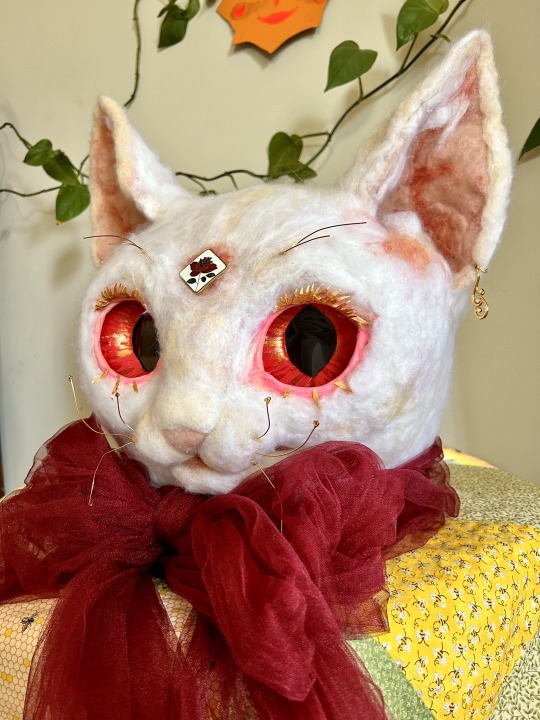
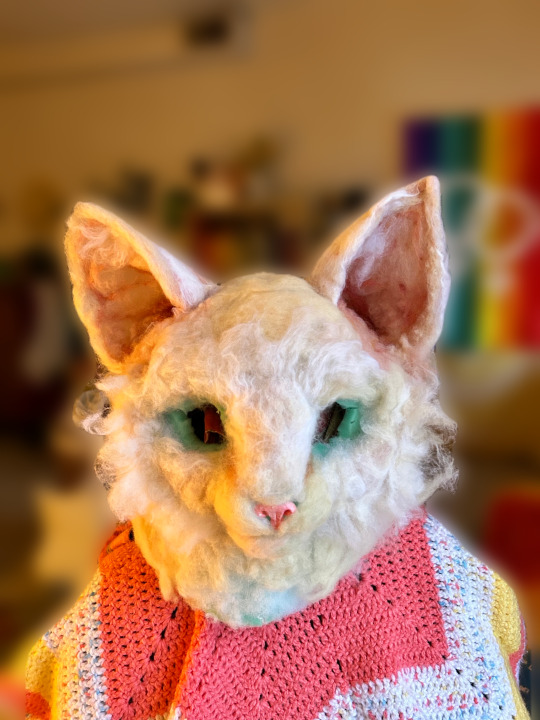
Hello! this will be a quick process post so that you can see how I needlefelted a fursuit head!

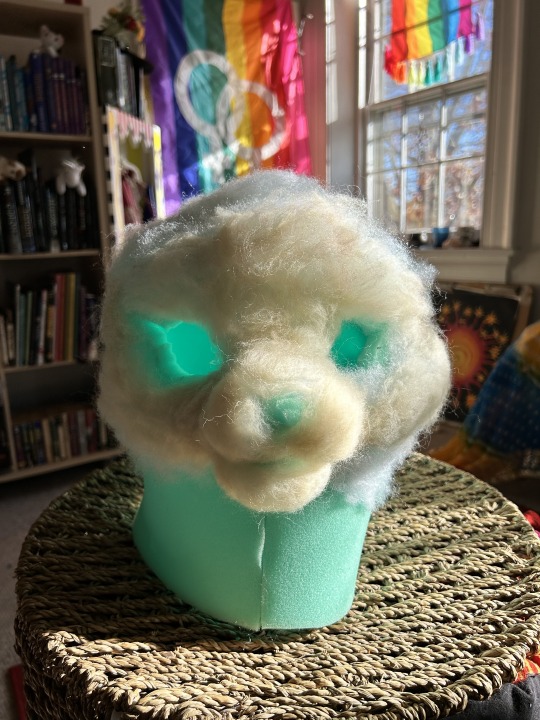
I began by following the "bucket head" tutorial by Matrices, then added a layer of polyfill so that I wouldn't use as much of my merino wool. This is how I typically make a doll head, my "core wool" is often polyfill because it really likes to clump together and fuse.
Overall, this project took about two months of my spare time. This is the first fursuit head I have made, but not my first needlefelt project.
I would really like to encourage other people to try making masks this way! You can do any kind of subtle color with wool and the wool fiber is very cheap. If you wanted to make a fursuit head with the entirety of starry night flowing over it, or a head with tons and tons of complex colors, I think wool might be the best material. I also did not need to know how to pattern or sew in order to make this-- it was sculpture rather than sewing, which I am bad at.
The rest under the cut!

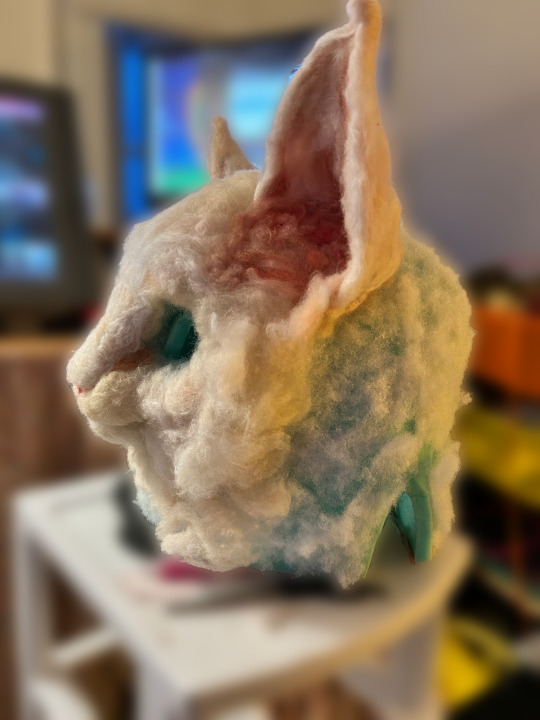
Another angle where you can see that I am building up the structure of the head.
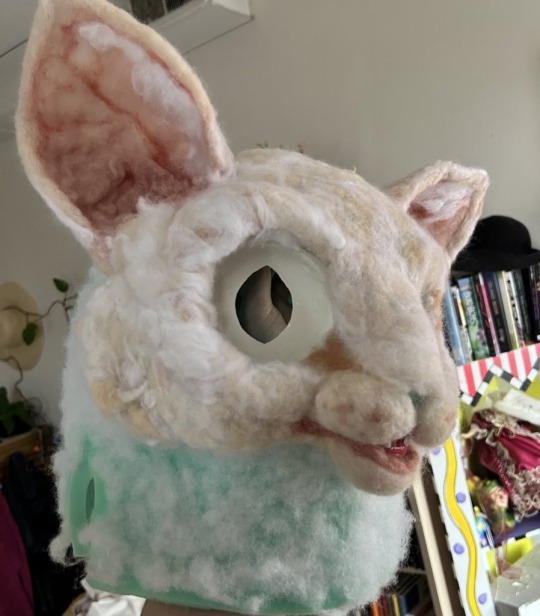
I then made the ears, which are translucent because they're felted, just like real ears!

I wasn't happy yet with the proportions at this point, so I spent a lot of time figuring that out and deciding where and how I'd be placing the eyes.
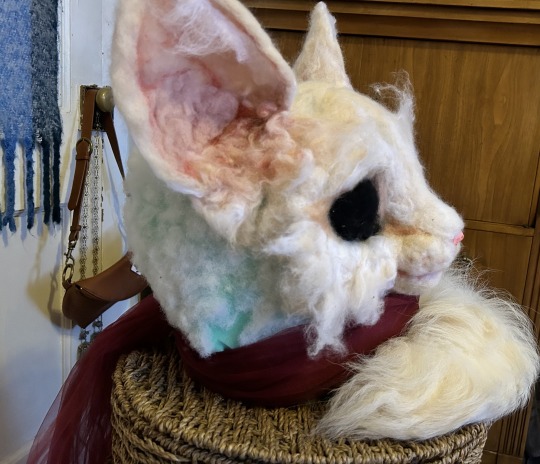
I made a pair of sculpey follow-me eyes by using a little soy sauce dish as a concave circular mold and tried a foam clay nose and teeth. The sculpey eyes could be more successful, they took a lot of shaving and adjusting to get right and they eventually cracked from the strain I'd put them through while making them more shallow. For a while, I intended to make wefts of white wool to use on the sides of the head, but I ended up preferring a domestic shorthair head shape because it reads the most clearly as a cat vs any other animal.
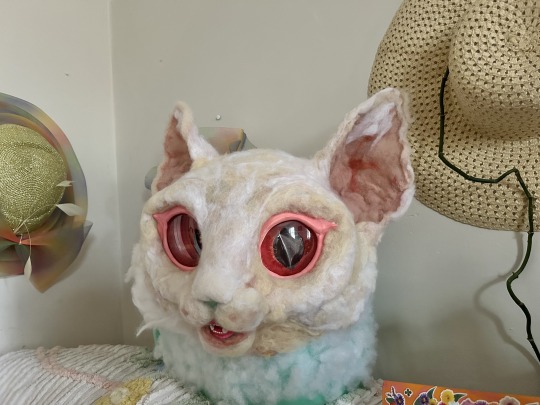
I originally intended to have the eyes behind clear plastic domes and used "shaker domes" that people use to make greeting cards to cover the eye, but in the end they made the eyes too dull. I made foam clay housing for the eyes and painted it pink with acrylic paint. I used stick-on car window tint to create the pupils. My visibility inside the head is really good!
Finally, after fiddling, one of the eyes was deeper than the other and I had to re-set both to account for it. I added spot glitter on top of the acrylic paint on the eye using some gold watercolor paint I had, which was silly because I'll need to wash the head at some point. I will probably seal the eyes before washing and hope for the best. I intend to spot clean the head until it absolutely needs to be washed, at which point I'll remove some pieces or find a way to protect them while soaking the head in a cool dr. bronner's bath.
I glued down a layer of felt fiber on top of the foam clay "tear ducts" and then felted new fiber over the tear duct skin and cheeks to blend them into the face. I also removed the teeth and closed her mouth because I didn't have time to adjust the teeth as much as I wanted before the con that my friends and I attended. I would like to modify this head so that she can open and close her mouth.
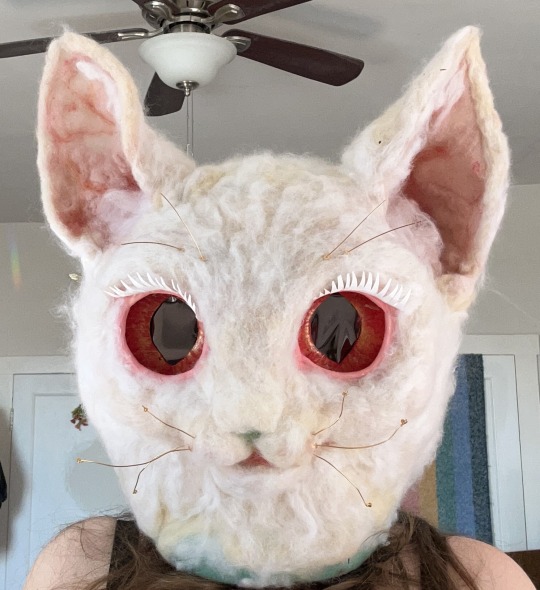
Lastly, I added wire whiskers with little glass beads looped onto the ends and paper eyelashes that I also watercolored and sealed, like the insides of the eyes. Like I said before, it's gonna be a problematic wash, but I'm confident I'll figure it out, and I can always repair her or replace her lashes if something goes wrong.
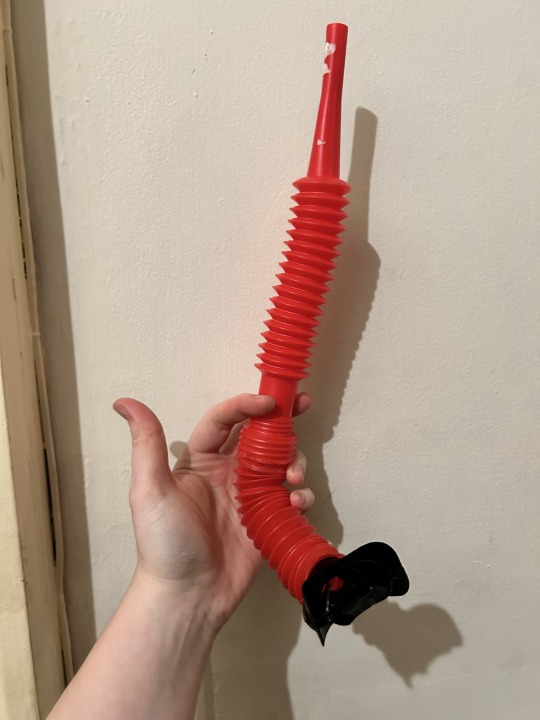
Last thing, to keep the inside of the head nice and cool and prevent fogging since in the end I closed the mouth and had sealed eyes, I made a snorkel out of a snorkel mouthpiece fitted into two collapsible auto funnels.
I would say that realistically this entire project cost me less than $150. I had some materials lying around, like the wire and the beads and the sculpey.
I added two ear vents on either side of the head so that I had options on where to feed the snorkel out. If you look at the other pictures on the blog of me wearing the head, you mostly can't even see the snorkel mouth. However, it was a little problematic to let go of the snorkel to talk. it would be perfect for a silent suiter, but I'm lucky that so many people wanted to talk to me. I'd like to try and replace the snorkel mouth with something I can talk in, but I'm not sure what to use. It should be something that can create a seal to keep my breath out of the head. it's possible that I will be able to make something with a painter's mask.
I hid the "seam" between the head and my body with two yards of tulle tied into a big bow and sewn down onto the neck so that it wouldn't move around.
I hope that if you try making something similar you'll show it to me!
319 notes
·
View notes
Text
More pixel coaches (and how I make them!)
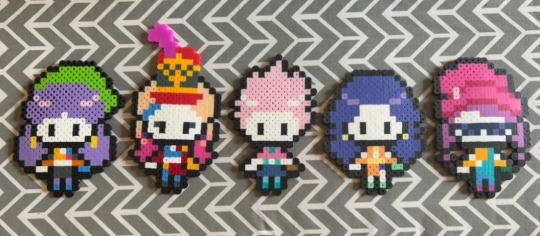
From left to right: Niki (Soy Yo), Moxie (Hollaback Girl), Maps, Fun, and Talk Extreme
I wasn’t going to stop after 100! People have been big fans of these little things and wanted to know how I make them. So I took pictures of the process of creating them. (The full process is under this cut.)
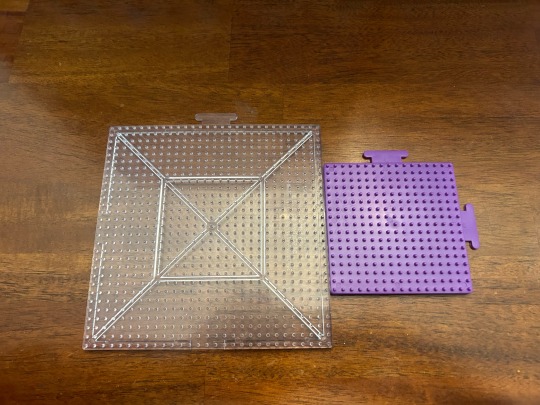
I use Perler beads to make these coaches. They can be found in just about any craft store, or on the official website. I use a large square 29x29 pegboard, although occasionally I connect smaller 17x17 pegboards if the design needs more space, like what I did here with Moxie.

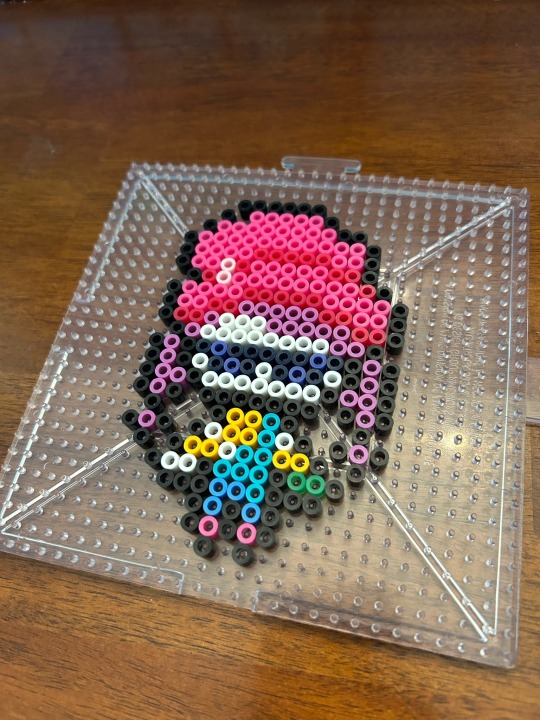
Every design starts out with this simple base right here:
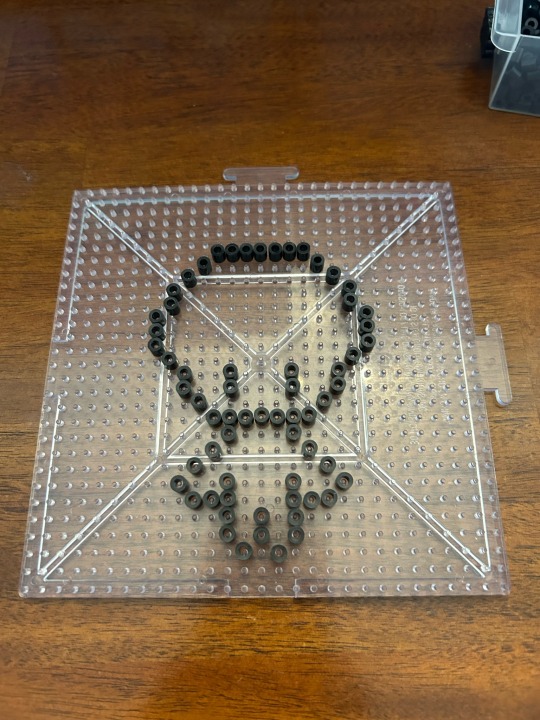
Then I figure out who I want to make and look up references. I choose the color palette from the images and pull out some colors that I might use. Sometimes these can change.
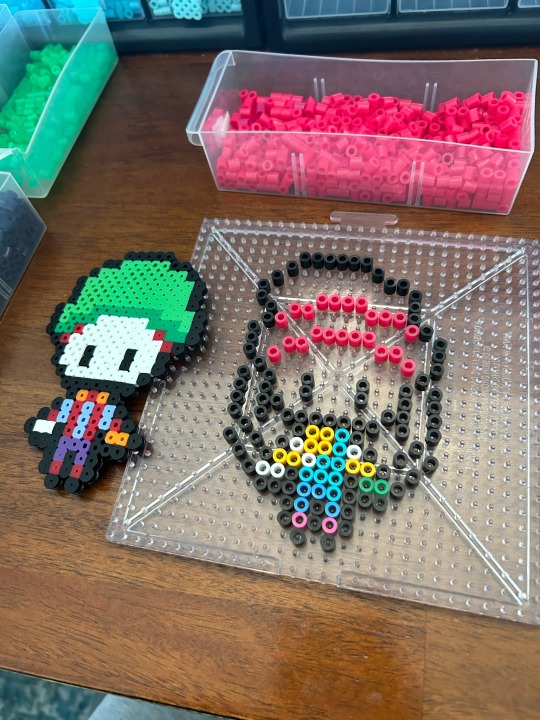
Next, I change the outline of the base, adding and removing beads to shape it into a new figure. Once that’s done, I begin to add color, beginning with the outfit. I outline certain parts that will be filled in with color. Sometimes I look back at previous coaches for help— for example, I looked at Troublemaker for help for the beanie.
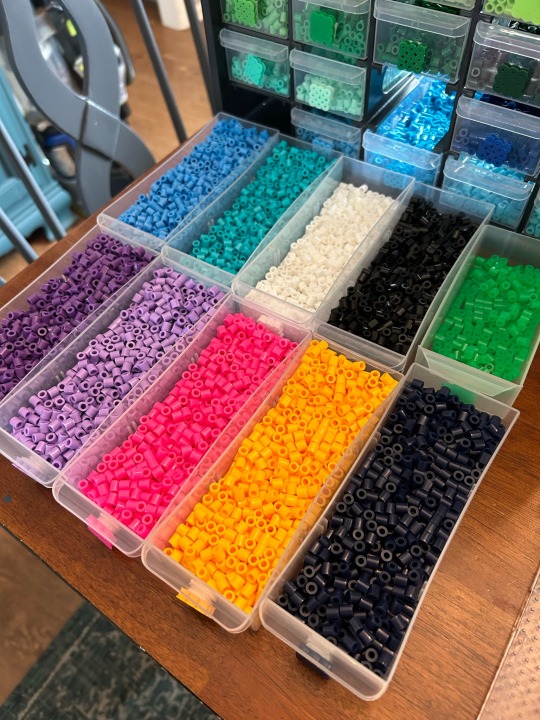
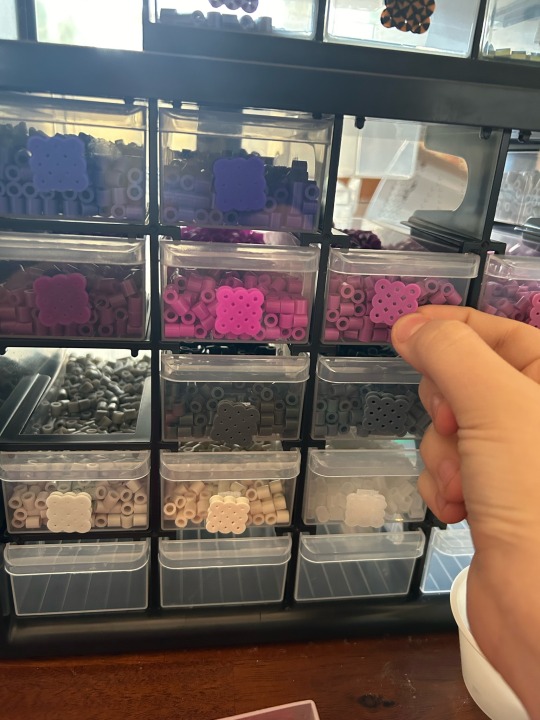
Once the colors are all set, I do one last look-through and change aspects that I feel need changing. For example, I decided to change Talk Extreme’s hair color, since I believed that there was another color that looked more like the original. The way my storage system works lets me take color samples directly off the storage drawers (they’re held there with the power of Velcro) and compare them to the design in front of me. I recommend making a color key for your perler beads, it’s very useful!
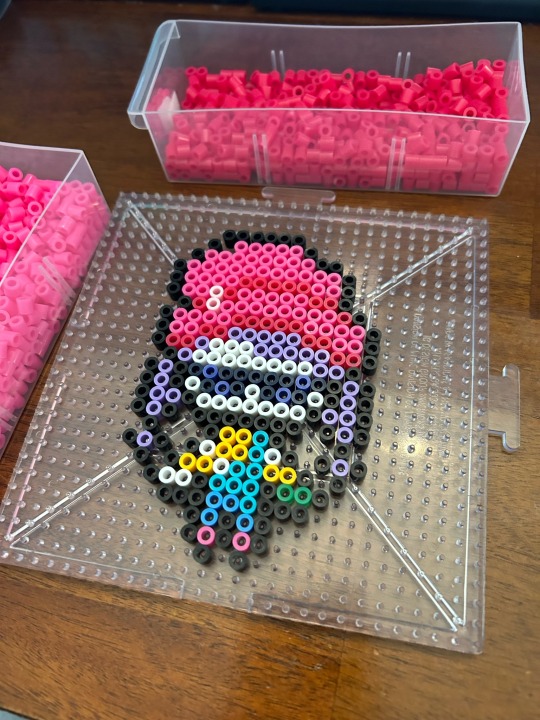

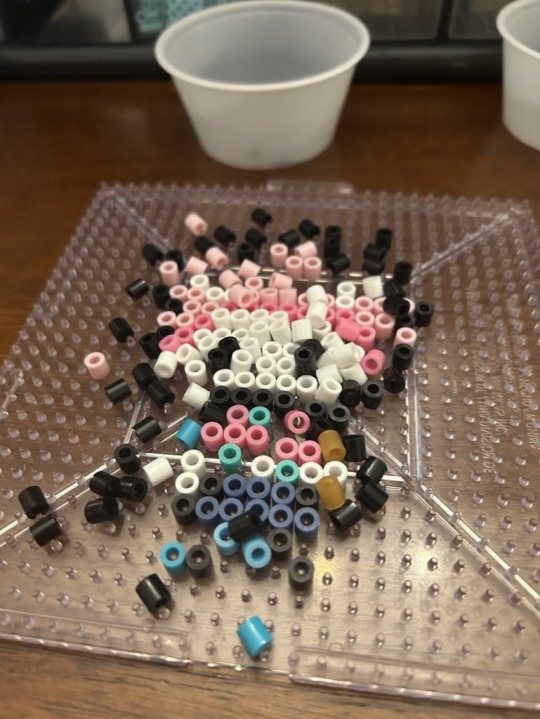
(A brief note: it's important to be aware of what your hands and/or sleeves are doing around the board. Accidents can happen, such as when I dropped my phone onto the pegboard and messed up a 90% done Maps…)
Once the design is finalized, it's time to fuse the beads. I use parchment paper and a basic clothes iron on a normal, non-steam heat setting. It's important to iron in slow circles so that every bead gets melted properly. Certain colors also melt more quickly than others. Once the design starts to show through the paper and the beads' holes become small, it's time to peel the design off the paper and flip it over in order to iron the other side. The back side doesn't need as much time as the front, since the beads are already hot. Depending on the size and complexity of the design, ironing can take 2-5 minutes.
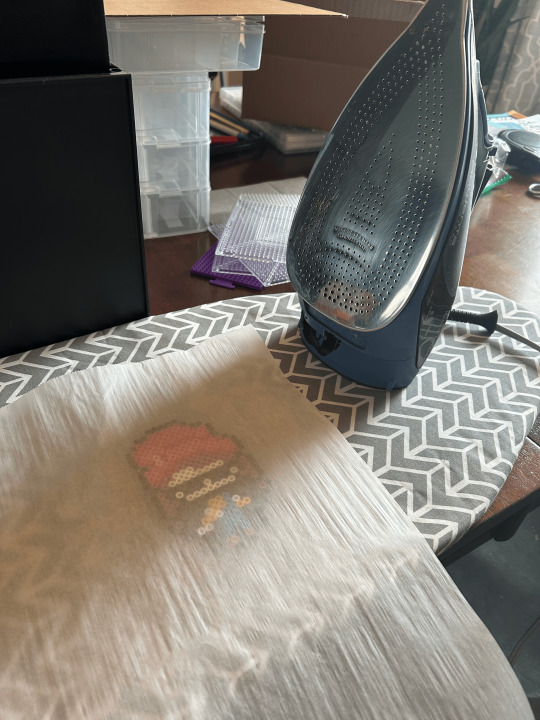


When that side is done, I peel it off, and congratulations, it's done! It's pretty hot, though, so I set it down to cool. Once the plastic has cooled down to a reasonable temperature, it's ready to display.
And that's how it's done! The full process can take from 20 mins to almost an hour. I might make digital versions of some of the coaches to use as references for people to make them at home. Who would you want the pattern for the most?
I'll be saving these all under the tag #pixel coaches, so if you want to see who I've already made, check that tag out!
#just dance#just dance fanart#perler beads#perler bead creations#tutorial#pixel coaches#very happy with how this turned out
40 notes
·
View notes
Text


I found this site for Kandi patterns and discovered a lot of ones that would be good for menhera. I would highly recommend looking around as these could be good for accessories. These are all intended for pearler/fuse beads, but they also have patterns for kandi/pony beads
bandaid
heart syringe
cutter
pill
22 notes
·
View notes
Text
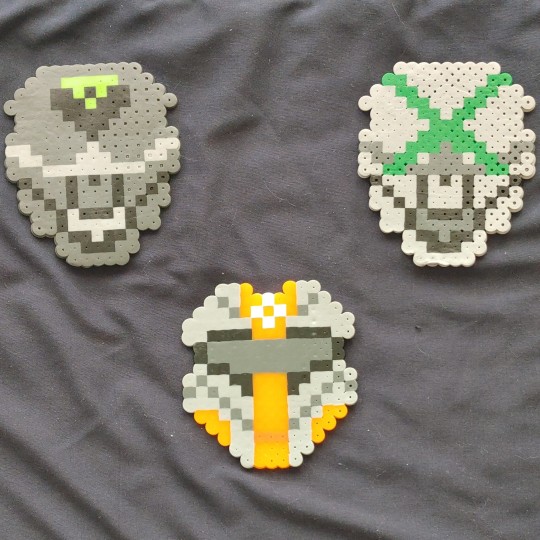
Beadsprite Shop: Interest Check
Checking the interest of a Fuse Bead Creation shop with my items. I have both a tumblr poll in this post and a slightly more detailed survey linked.
All items would be my own patterns & designs. I would like to offer both the physical beadsprites and PDF digital downloads of the patterns for making your own. Prices are yet to be determined, but would vary from <$10 for small items, to potentially over a hundred for larger, complex items.

The survey:
You can see more examples in my main blog's perler tag!
Thank you for your interest! Reblogs would be appreciated <3

56 notes
·
View notes
Text

Rainbow Divination
Rainbowmancy is not only the act of magic, but, much like in witchcraft, divination is also a part of it. (If you want it to be, anyway, you can do whatever you want forever!) Here are some different techniques for using rainbows in divination.
Reading Rainbows: When there is an actual rainbow in the sky, you could read the signs to divine. Look at the rainbow and consider the place on the horizon, depth of colour, full arc or just partial, beginning and end, etc.
Existing Decks: There are many decks available through either the creators or your local witchy/bookstore that have rainbow themes and symbolism. Some examples: Prism Oracle, Secret Language of Colour (I recommend!), Spectrowhirl Tarot, SoulSpace Oracle, Queer Tarot, Holographic RWS, Sacred Creators Oracle, Rainbow Tarot, Tarot at the End of the Rainbow.
Stone Scrying: What is says on the tin, scrying in rainbow stones, or if you have a quartz crystal, they sometimes can have rainbow inclusions which work really well.
Water Scrying: Take a glass or white bowl or cup and fill it with water. Add a few drops of coloured ink. Alcohol ink, writing ink, or acrylic inks work just fine. Look at how it flows, what patterns it makes, what symbols do you see? For meanings you could make your own dictionary, which I recommend, or use a tasseomancy (tealeaf reading) guide to get you started.
Rainbow Scyphomancy: This technique was generously shared with me by Nova. Scyphomancy means divination with a cup or goblet. With rainbow scyphomancy the white cup is first filled with water and then emptied. Drops of food colouring are added, and the cup is turned over three times, each one in a different direction, lastly the cup is swirled three times. The colours will spread over the white surface, which can then be read much in the same way as tasseomancy.
Paint Chips: These come in every shade and colour, so would be great for making your own deck. Write keywords or draw symbols on them the meanings of which match the colours.
Pendulum: A pendulum in one of the rainbow crystals for example. Or nowadays you have rainbow pendulums made from different crystals, either fused together, or beads stacked on top of each other (often called "chakra pendulum". We'll get into chakra's in the next bit). A small galaxy jar on a chain, or a small bottle filled with coloured sand, sugar, salt, or resin, will also make a great pendulum.
Crystal Casting Oracle: An osteomancy method using rainbow cystals, or crystals in each colour of the rainbow. Before I mentioned that my favourite combination is garnet, carnelian, citrine, aventurine, turquoise, sodalite, and amethyst. I use tumbled stones of these to cast on divination grids or mats. Much like charm casting. Each stone has their own meaning depending on where they land.
Encaustic Art: This is an art technique where coloured beeswax is heated on a small painting iron and then pressed to wood, or a special shiny paper. Artists can use this to create beautiful and intricate paintings, often of landscapes. This same technique, however, can also be used for divination. By intuitively adding colours and moving the painting iron, a layered painting can be made. The wax will pool, swirl, and leave open spots, making an interesting painting which you can see symbols, figures, and natural features, which can then be interpreted.
[Part of a Rainbowmancy series, masterpost here]
12 notes
·
View notes
Text

Hatsune Miku Nyanko perler bead pattern!
Free to use; reblogs appreciated!
#vocaloid#hatsune miku#perler bead patterns#perler beads#miku hatsune#nyanko#kitty cat#project diva#perler#hama beads#hama bead patterns#fuse beads#fuse bead patterns
59 notes
·
View notes
Text


i've decided, since i don't have enough things going on, to make the scavengers out of perler beads! up first was krok and spinister!
#transformers#maccadam#mtmte#scavengers#krok#spinister#fuse beads#idfk#i've made patterns for the others but only really had time to make two today#my plan is to make fulcrum next#then probably misfire#perler beads
7 notes
·
View notes
Note
i have never wanted to convert an image into a perler project more than i want to convert your pokemon in mundane clothes. and the lil buizel i love them sm! would you be okay with someone doing that? it would essentially be copying it down into a more pixel-y pattern to then use for fusing beads. just to have or put on a necklace not to sell
yeah go ahead!!!!
19 notes
·
View notes
Text
Does anyone have any patterns or ideas for agere 'themed' perler beads projects? Please send them my way if you have some or know where I can find any.
(perler beads are those plastic beads you fuse together with an iron, so it looks like Pixel art)
#agere#sfw agere#cglre#sfw interaction only#sfw cglre#pet regression#age regression#chronically ill regressor#pet regressor#perler beads#fuse beads
8 notes
·
View notes
Text
This is a plant runner:
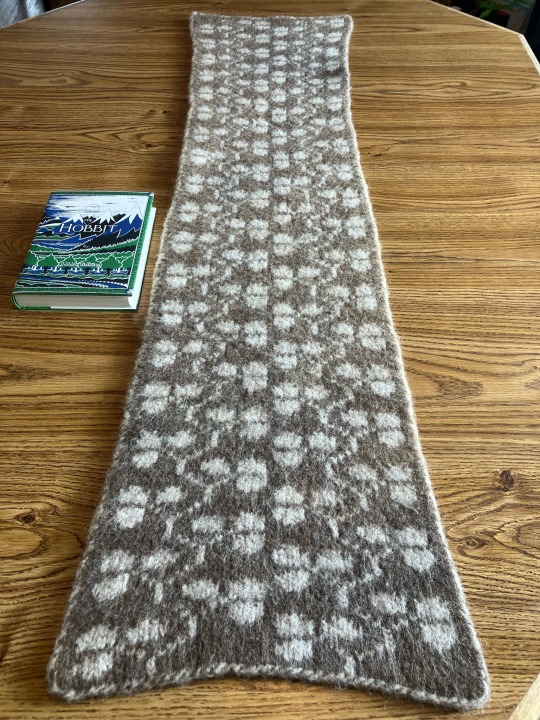
I made it a few years ago. It’s double knit, which is a knitting technique where you cast on stitches that you intend to be on the front of the piece alternating with stitches that you intend to be on the back of the piece and use two balls of yarn in alternating knits and purls to keep some stitches in the front and let som drift to the back, so that you’re basically knitting a giant pocket. You can switch the front and back yarn to make a reversible color pattern.

It’s also felted. Felting is when you take 100% wool yarn and use agitation, heat, or friction to induce the fibers to fuse together, essentially shrinking it on purpose. This makes a much stiffer and sturdier fabric that holds its shape and is more watertight.
This happened because I wanted a plant runner and I thought, “Why don’t more people make double-knit, felted plant runners? I’ve never seen a pattern for one, but it makes so much sense! Double knitting is super flat even with color work, so the pots will be stable, and felted wool is so waterproof that water actually beads on it, so it’ll help with spills. Plus it won’t felt any more in a delicates bag with cold water on a delicate cycle, so I’ll be able to machine wash it. This is a great idea - I’m gonna try it!”
Well, I found out why more people don’t do this, because it was a pain in the neck to make. Because I was shrinking it, it had to be larger than I wanted the finished piece; because it was double knit, I had to do twice as much knitting to get the front and back done; and because of the color work, I had to pay attention to what I was doing the whole time. Most of the time when I’m knitting rectangles like this, I only have to repeat the pattern 3-4 times and it internalizes to the point where I start having an intuitive sense of what to do next and start only having to glance down occasionally to check where I am. I can do complex cables with the TV on and watch the screen most of the time - I’ve knit simpler stuff with an ebook open on a propped screen reading as I go. This thing I had to keep looking at the entire time. Between the double knitting and the leaf pattern, I had to constantly watch what I was doing. This thing took forever! If I calculated out the hours I spent on this as money, there no way I’d spend even a fraction of it on a *plant runner.*
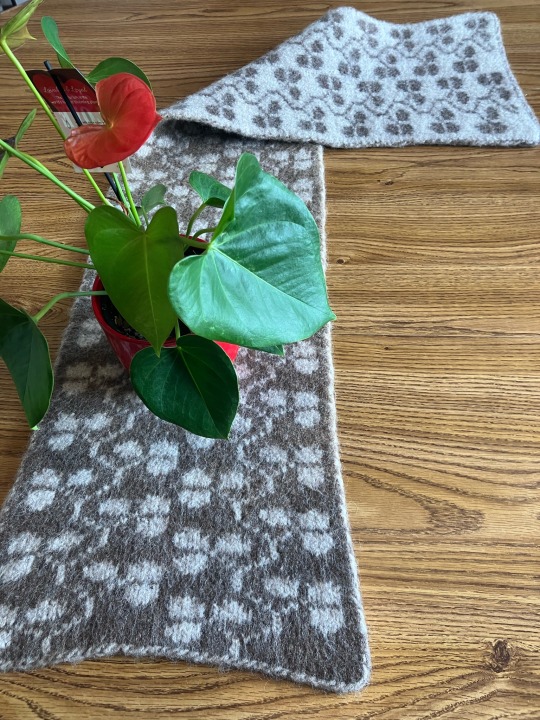
And yet … I had barely finished it when I was already thinking about making another one. You see, I was right. This really does make a fantastic plant runner. It catches the dirt and dried leaves that fall off the plants and keeps them from messing my table, water does bead on it so it protects my table from spills beautifully, and the plant pots sit very stably on it. It’s great!
But I used a kind of wool that comes in several different colors, but is all undyed - it’s from white or brown sheep. I was worried the darkest and lightest colors - that cream that you think of when you hear undyed wool and a dark chocolate brown - would be too much contrast and I went with the second darkest and lightest (a heathered dark brown and an oatmeal off-white). But I forgot how fuzzy wool gets when felted like this and I want a second crack at it with the higher contrast colors to make the pattern pop more. (This is one of the rare cases where the pattern is actually slightly more distinct in photographs than irl.) There’s even a small voice that I think of as, “That is the craft-devil talking,” whispering that I should try it out again with wool yarn that comes in actual colors and see what it looks like as green-and-something.
Fortunately, everyone I know seems to be having babies at the same time, so it’ll probably be 3-5 years before I make anything for myself that isn’t a quick, weekend project between yet another baby blanket.
But every time I wash it, there is that craft-devil. Whispering.
22 notes
·
View notes
Text
Pixelart Real Life Mediums
Intro

Gif from here
Pixelart is great and all but you can't easily put it on your desk to show off your pixel prowess.
but you're in luck because theres quite a few mediums you can use that'll work for pixelart!
and i've compiled a list for you, just pick any chapter that interests you !
If theres any mediums you think should be on the list then please say so!
HAMA & Perler Beads (Iron-fusible-beads)
One way to make your pixelart come to life is through Hama-beads also known as Perler-beads!

[a photo of ironing beads in icecream containers and a spool of string in a cardboard box]
Other names for these beads include "Fuse-beads", "Thermo-beads", "Iron-beads", "Iron-fusible-beads". Hama and Perler actually refer to the company they're from..
Hama-beads are small beads of plastic that are then placed onto Hama-pegboards as seen from their factory tour video here. what we're interested in is the Square pegboards.
In Denmark these beads are often found in any bookstore, i do not know how easily they're obtainable in other countries, i would recomend checking any of your local arts and crafts stores or stopping by the HAMA or Perler website.
Square pegboards follow the pixelgrid unlike other pegboards, a square pegboard is *Often* 30 x 30 beads/pixels, i recomend buying square pegboards that can snap together to make a bigger pegboard. like shown bellow.

[a set of 4 square HAMA pegboards interlocked to create a bigger "pixelgrid"]
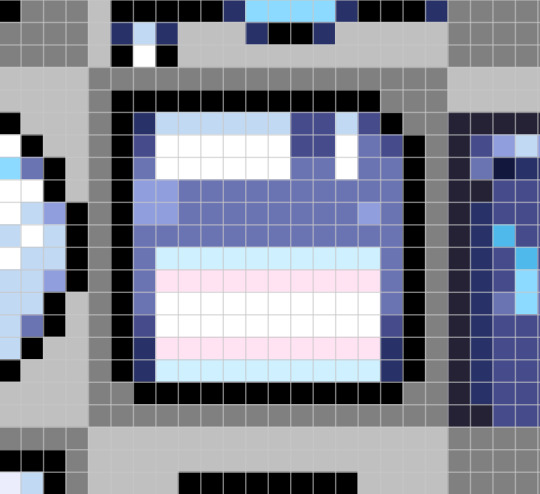
In Aseprite you can activate "Visible Pixel Grid" to make it easier to see where to place your beads on your pegboard
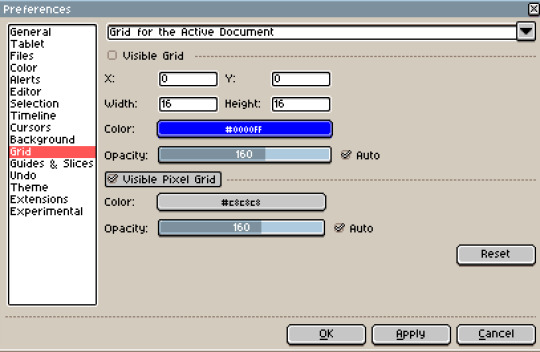
1 [Aseprites Properties tab in the Grid, Visible Pixel Grid is marked as active]
2 [a Pixelart rendition of a floppy disk, the writable part of the floppy disk has the coloration of the transgender pride flag]
Once you're done you simply place a parchment paper over the beads and iron the beads.
i recommend placing an even and heavy weight over the beads and afterward ironing the otherside aswell. a book and a dumbell works wonders for this if you have it :>
Extra stuffz
Oh actually another thing about these beads i thought i'd throw in too, Theres an Artist on Twitter that draws pixelart that looks like beads @iws_nbs_tmr or 鰯(いわし) on Dotpict
since i'm Waaaaaaayyy to shy to DM them to ask if i can show it off, i tried making my own bead pixelart inspired by them, it was a lotta fun i'd recommend you try it too !
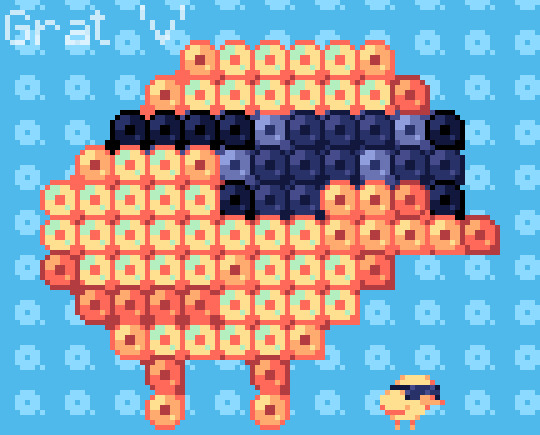
[A baby chick with sunglasses on inspired by how 鰯(いわし) draws pixelart that looks like ironing beads]
Cross Stitching + Embroideries
Cross Stitching is a lot like pixelart, its a way to sew, the pixels in this form takes a form of X formed stitches on a fabric
heres an exsample of a painting made with cross stitching, artist unknown


1 [a cross stitch painting of a tree with loose leaves]
2 [a zoomed in photo of the X cross stitching]
as you can see cross stitching can also *break* the pixelgrid by making lines of string connecting the pixelart like pictured above, i'm not the police so you break the pixelgrid as much as you like :>
Extra Stuffz
theres also a big pixelartist by the name of 8pxl
who also makes lots of cross stitching of their own pixelart like here
they're on Tumblr, Twitter, Instagram & more
鰯(いわし) earlier mentioned in the thermal beads chapter also makes pixelart that looks like cross stitchings like here
Mosiacs + LEGO Mosiacs
""A mosaic is a pattern or image made of small regular or irregular pieces of colored stone, glass or ceramic, held in place by plaster/mortar, and covering a surface."" - Wikipedia
some people also use LEGO like Here
as mosiacs are rarely exsactly pixelart as the pieces can be differing shapes, but some are made with pure squares like pixels! like bellow

a work by Invader looks somewhat like a squid, it's made of square pixelart like pieces
This Photo is taken from Wikipedia
Mosiacs may be expensive and hard to get, but if this interests you i'd recomend searching online!
Paper Crafts & Paper Minecraft
Minecraft Papercrafts
Did you ever try making paper Minecraft? i sure did! and had a blast doing it
Paper Minecraft is made through printing out flat connected textures on printer paper, like here, theres a big Guide to Minecraft Papercrafts Here
a Program fit for lowpoly is a good way to prototype your idea, here Crocotile3D is shown
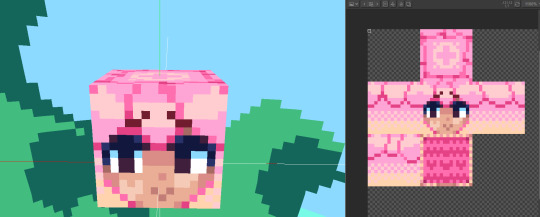
[Crocotile3D showing a head with pink hair with the texture panel on the side]
printing out the texture and taping them together to make a block just like Paper Minecraft, i recomend putting those tabs found on the print out minecrafts too like here
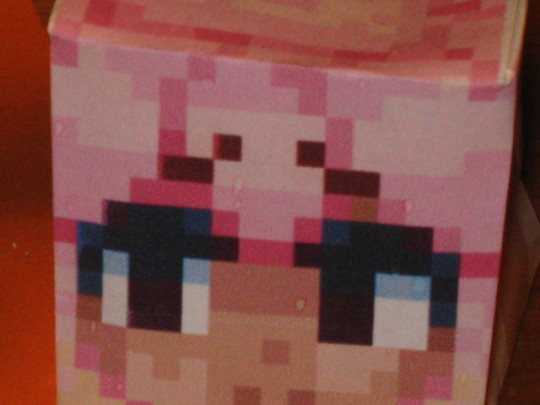
[a close up image showing the head from the previous image]
Simple printouts
Another way to bring your pixelart to life through paper is by just printing it out, and placing cardboard feet on them, something like how they did in the Outro to OK KO
youtube
[a youtube video displaying OK KO's outro, theres print outs of the characters from the show, with cardboard feet so they don't fall over]
I Highly recomend laminating your printouts, so they're a little more resistant to moisture, especially for wetter climates

[a few different papercraft printouts laminated and placed into snow, a Keyboard, Grat, and Beefette are shown]
I also use paper printout photos for my website
Other Smaller Entries
Cardboad cutouts
If you've got money to burn why not get a cardboard cutout of your pixelart? it's great if you've got an OC or a Main character for a game and you want something eye catching for your stand!
Fonts
You can make custom fonts for your documents or birthday cards, a pixelart font maker i'd recomend is BitFontMaker2
Board Games
Franek a pixelartist is making a board game with their pixelart, i've also seen people remake the classic cards you buy, redrawin the queen or king and such.
Shirts, Mugs, And Such
Theres tons of places you can go to get your own printouts on mugs or shirts, Spreadshirt is what i've used before and the quality is alright but theres also people that use Redbubble, you can also use Redbubble as an store for your items too, like here.
but i'd check your options with other stores as yours before choosing it
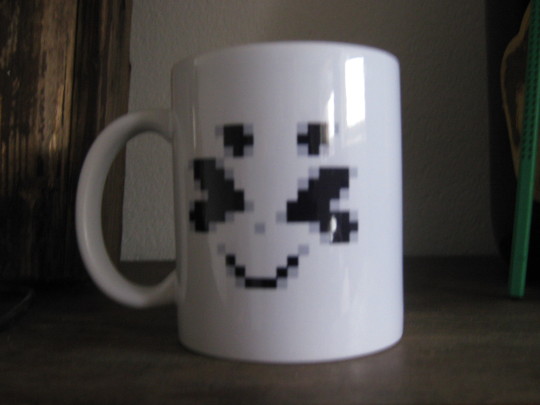
[a Mug with a >x) face on it]
Graph paper
You can also draw pixelart on Graph paper thats the paper with small squares instead of just plain lines, it was also used for sketching pixelart before making it on the computer. Brandon James Greer's video on the subject
Mini Monitor LED's and backpacks
Theres tons of different LED apperal where you can program your own pixelart on it, its a good way to show off your pixelart, theres also cosplayers with TV heads that use pixelart for faces
Anything else?
if theres anything i've missed me feel free to comment and i'll look into it and add it here :o
Farewell

Gif Source by @slitherpunk
Thats all the mediums i've found out about so far, thats bound to be more so please let me know if any are missing!
if you wanna check out any of my other stuff then i'm on pretty much everywhere*
Check out my Twitch! i make plugins and web apps to make viewing the best i can!, and i'm always happy to talk to anyone stopping by! so stop by why don't-cha! Blep
My Tutorials are also posted on my Newgrounds[www.twitch.tv] and Tumblr so if you'd rather read them there !
if you want updates on Me or any content i make i'm active on Twitter & Mastodon
And first time a donation link but like don't bother, i make tutorials because i find them fun and rewarding, blep :>

[a cat sticking up their hand as to say something with the text "I have a silly thing to say" the cat also has hair like Grat does]
Sources + Extra-Reading
"Show your workings"
Gif found from Jilf
Note: All photos are Made / Photographed by me unless specified otherwise
■ HAMA & Perler beads
HAMA's website
Perler's website
HAMA's Youtube Channel for the factory video
misc wikipedia link.
Wikipedia on Fuse_beads
鰯(いわし) for inspiration for the bead drawing
Their Twitter
Their Dotpict
■
◆ Cross Stitching + Embroideries
Wikipedia about Cross stiching
16pxl or 8pxl links
Their LinkTree
Their Tumblr
Their Twitter
Their Instagram
Example embroidery by them
鰯(いわし)/ @iws_nbs_tmr
Their Dotpict
Their Twitter
Cross Stitch-like pixelart example
◆
◀ Mosiacs
Wikepedia about Moisaics
Image source for the Mosiacs photo
Invader an anonymous Mosiac artist
Example of LEGO mosiacs by @KupoGames
◀
▣ Paper Crafts & Paper Minecraft
Planetminecraft blog with Minecraft Papercraft examples
The Ultimate Guide to Minecraft Papercrafts by Instructables
How to make the minecraft sniffer out of paper by The mushroom king
OK KO Let's by Heroes - Extended Credits
Wiki how to Laminate Paper
Grat's Website featuring paper printouts
▣
▲ Other Smaller Entries
BitFontMaker2 by pentacom
Franek
Their Mastodon
Their Twitter
Their Instagram
Example of a pixelart board game
MimzyyMay
MImzyy's Twitch
Example of a Redbubble store
Brandon James Greer
Their YT channel
Example of Graph paper for pixelart
▲
Various Finfin Gifs Sourced from Tumblr
Finfin Breaking & Entering
Finfin Explode
Writing Finfin
10 notes
·
View notes
Photo


I must repost this wonderful collection of works Brazilian-Mexican artist Fefe Talavera.
From small shells and Amazonian beads, Brazilian-Mexican artist Fefe Talavera strings together elaborate masks that fuse ancient mythologies and contemporary urban culture. The mixed-media works are part of an ongoing series that embellish expressive faces with stripes, symmetries, and various geometric patterns. Sometimes spanning upwards of ten feet or featuring a long tuft of straw, the masks are an amalgam of colour, motif, and material that blur cultural boundaries and the tenuous distinction between humanity and nature.
The São Paulo-based artist tells that the series “developed when my government opened the doors to cattle ranchers, when forest fires began, putting an end to Indigenous tribes, exotic animals, and trees,” and initial iterations used açaí seeds, shells, and mirrors to explore birth and death through a mystical lens.
“When we looked at our reflection in the work, we would be seeing ourselves with respect and love, and it is this look that we should have with the Amazonia,” she says.Currently, Talavera is working on a larger-scale piece using 20,000 beads.
(From Colossal - see the links in comments)
16 notes
·
View notes
Last Seen Blogs

sidebycide
V.empiric Beings Only 7-19-1995 & Extra’s! ( Duhhb

airbornesummoner
Hops so mad, they say I fly

misformasubi
Masubi

kevin-jones-painter
Untitled

b-okay
safe space 🌻