#game maker studio 2
Text
there's like a buncha shit that's not shown here that ive done but the thing i did today was enemies so thats what everyone gets to see
#lily does game dev#game maker studio 2#idk id tag this with more things but like shrugs!#its been ages since ive posted any progress shit
49 notes
·
View notes
Text
Dev log? Is that a dev log you say?
That's right! the first Clementine's Sweet Tooth dev log ever!
well as you may know, My files got corrupted BUT I was able to re do (almost) everything!! and some extra things have been added
collision bugs have been fixed
art COMPLETELY changed
a creepy basement has been added... ?
here's the old one for you to compare! (ew it looks horrible)
but although I did a lot, the development has been slow due to personal life issues
with all that out of the way, I have BIG things coming soon, so keep tuned!
#clementine's sweet tooth#charlotte lomm#clementine#game project#arthur wood#plum butterscotch#juniper caramel#dev log#game maker studio 2#game development#indie games#gamedev#game dev stuff#game dev update
18 notes
·
View notes
Text


Another peek at the new cat generator! Now including medium fur-lengths and easier to read side-stats.
5 notes
·
View notes
Text
How to code: I typed this essay out for someone on discord and I'm reusing it here incase I need to copy and paste it
Alright so I suggest you start with learning the basics of coding logic on Scratch. Scratch uses blocks instead of you having to type in code so it will be easier to learn the basics of how code works and what different commands do as you have all the commands in a nice little menu. It's easy to pick up and you can do quite a lot with it. Not enough to make a game worthy to be on steam, but it isn't limiting if you're starting out and making small games in 2D. I personally didn't use any tutorials and just figured it out from 7 years of me putting blocks together and seeing what works. Don't do what I did. Look up tutorials for what each individual block does and what potential it holds. I also suggest looking into the code of other scratch games and seeing how they work. On the website version there's the ability to remix other people's projects so you could use that as a learning tool by adding to and re-imagining an already existing game, essentially modding it. Here's the website, you'll be thankful you learned how to code starting with this: https://scratch.mit.edu/. I also found that a modded version called "turbowarp" is useful for bigger scratch projects, but the extra features it holds may be overwhelming for a total beginer. Here's it just in case: https://turbowarp.org/.
Once you have learned the basics with scratch, I suggest learning python as it will help in the transition from scratch blocks to code. Python uses text just like every other programming language, but is simple to understand if you know scratch as the commands are very similar. There's tables and cheat sheets on the internet comparing python code to the scratch block it represents. I wouldn't recommend you try pygame though as that is awful and unoptimised for making anything that isn't a simple high score like game. Godot is what I use and it's programming language is very similar to python. Godot is straightforward once you get the hand of it and there's plenty of tutorials online. I wouldn't recommend unity as it's a greedy corporation, I don't know about unreal but I don't want to have to install the epic games player to test it out and game maker studio 2 is rubbish. What I did was have the idea for the game I wanted to make, nothing too ambitious game design wise, and made a prototype by searching for the specific thing I wanted to create. Walking tutorials, button tutorials, tutorials on a specific node, there's loads for godot and if you learn by frankensteining what you've learned from a variety of tutorials, then you would be applying your knowledge and it'll stick better than just mindlessly following a single tutorial. That worked for me as I've only been using godot for about 9 months and I already know a decent amount (at least in the genre of game that I'm making). If you get stuck on something, ask on a forum website or discord. I find the official godot discord very useful for when I can't find a tutorial specific enough or when I've encounted a bug that I don't know how to fix. Don't expect this to be quick to learn. Don't rush learning how to code, master the basics and it'll help you down the line with more complex things.

I was also asked a similar question from someone else. I think these 2 paragraphs are a little better:
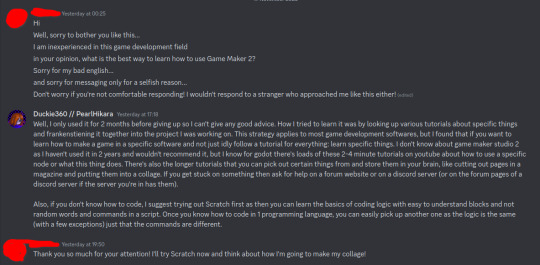
I hope this helps someone out there. Maybe. Possibly.
#coding#programming#game development#game dev#scratch#python#godot#godot engine#game maker studio 2#game maker studio
2 notes
·
View notes
Text
I finally have something big to show off.
I made a little rpg dialogue code test between oliver and a pink square.
4 notes
·
View notes
Text
Updated walk cycle for one of my main side characters. In the game, characters can follow u around!
#saint warners angels#saintwarnersangels#indie rpg#indie game dev#story based rpg#indie game#indie dev#16 bit games#game maker studio 2#walk cycle
3 notes
·
View notes
Text
im make game
youtube
me testing movement
youtube
i add bg
youtube
hehe rooms
1 note
·
View note
Text
Notes on 3D Game Development in Game Maker Studio 2
Note: Originally published on r/gamemaker. Edited slightly to suit the new context.
Hello, this is Garrett Thompson, sole member of Act-Novel. Reality Layer Zero partially released recently, and so I felt that now was a good opportunity to go into a bit of technical depth on the project. Specifically, I wanted to write about how I made an engine primarily designed for 2D game development (Game Maker Studio 2) more amenable to 3D game development.
Game Maker 3D is sort of a niche topic, but if you're interested in doing some experimentation yourself, consider this a quick top-down look at how your project might end up being organized. I should note that I'm far from the only person doing this, and I may not be the most qualified to speak about it since I'm still learning things all the time, but I can share what I know, at least. First, though, I'd like to address a question that might be on your mind.
Why use Game Maker for this?
Granted, there are tons of engines out there that are much better at doing 3D than GM. You could simply download Unity or Unreal and develop inside of those very fully-featured 3D engines with very little start-up cost. On the other end of the effort spectrum, you could also simply cobble together your own engine from libraries and hotglue.
GM represents a kind of middle-ground between those two approaches, though. A lot of the basic math, graphics, and data structures stuff is handled for you, but you've got to implement the higher-level stuff-- 3D collisions, shaders, lighting, etc-- on your own. In some ways, that's a pain, but I find it also tends to keep your code simple enough that you can reasonably understand every little piece of it, which isn't always a case in a more fully-featured engine. In other words, you get many of the benefits of cobbling together your own 3D engine with fewer of the headaches.
For my project in particular, there's also a lot of 2D heavy lifting to be done-- I swear I spent about half a year just programming menus-- and that's certainly one area where the features offered by Game Maker offer more of a helping hand. The actual "3D" part of the code is, as you'll see later, not too complex, so the engine not having out-of-the-box solutions (to my knowledge) for 3D collisions or physics isn't too big of a set-back. In other words, whether Game Maker is going to act as more of a help or a hindrance is going to mainly depend on the project you're trying to make. That's largely true for both 2D and 3D-- although admittedly Game Maker's help-to-hindrance ratio for 2D games is probably substantially higher on average (versus 3D games).
So, with my obligatory Game Maker apologia out of the way, let's get into the specifics.
How do I even 3D?
The absolute basics of 3D are probably...
- Construct a polygonal primitive.
- Set-up a 3D camera.
There are already a number of tutorials for the camera bit. For learning both at once, I think I used this one. The GM documentation has a lot of good information here, too. Writing another how-to guide for this kind of thing would be, I think, somewhat redundant, so I won't do it!
However, what I will do is offer some insight for how to go from "I have a 3D camera rendering a polygonal plane to my screen" to "I have a way of reasonably making a 3D game."
How do I make a 3D scene?
Unless you want to construct all of your geometry in code (which, I mean, you're free to do if you want to), you'll probably want to use a 3D modeling tool for this (e.g. Blender). However, just modeling the scene won't be enough to get Game Maker to know how to render it. At some point you're going to have to *convert* that model to the internal vertex buffers that it expects. Fortunately, some smart people in the Game Maker community have written scripts to do just that. I believe I'm still using this one, even though more comprehensive solutions exist. I'm sure you can find one that suits your preferences with a quick Google search. You can also write your own, if you're handy with Blender extensions or the equivalent for your 3D modeler of choice.
Something I recommend before you get into modeling, though, is to organize all of the textures that will appear in your scene into one organized texture sheet (of power-of-two size, e.g. 256x256, 1024x1024, 2048x2048). Then, map the UV's of your model to the textures on this sheet. This will make it much simpler to tell GM what textures to put where whenever your model actually shows up in-game. You *can* combine meshes that use different texture sheets at runtime, but it's a bit of a bother, and why solve a problem with code when you can solve it with data?
Note: You can animate basically anything in the game by swapping out its texture at runtime with the next frame in a frame sequence. This is how I'm animating character sprites in 3D-- there's a 3D plane with a texture of one frame, but then that texture gets swapped with the next frame in the sequence, and so on. You can do this with a shader if you want to be, like, super-optimal with it, but it seems to also be mostly fine to just do it with the "separate texture pages" option checked in the sprite editor of the texture you want to use.
On the engine side, you can load the model inside of a game object, throw that game object into a room, and presto! In theory, everything should show up as you expect. In practice, though, sometimes you end up just seeing a black screen. This could be an issue with the camera position, or the scale of the model, or maybe you forgot to submit the vertex buffer in the Draw event, or really a million different other things. Maybe the model you're trying to load doesn't actually have any data in it?
Once you've got pixels drawing, though, you might be struck with a desire to make the scene more interactive. You *could* place game objects individually in the room editor, guessing about where everything should go and manually setting the Z-value of each in the instance creation code... but that sounds just awful, doesn't it?
So, what I ended up doing to make this process more visual and intuitive was to just treat Blender as a level editor in addition to a modeling tool. I duplicated the file I was using for the scene mesh model, combined all of the separate pieces into one "LevelMesh" object, and then started placing other objects (represented by default polygonal primitives-- cubes in this case) with descriptive names like "InteractableZone0", "Signpost8", "NPC2", and so on. The individual names for each unique object will be important later.
There's an intermediate step between setting up the scene in Blender and having it work in GM, which is, again, a data-conversion step. This time, instead of converting the data to a vertex buffer, it's being converted to JSON. If you're not familiar with JSON (how did you get this far in the post?), it's just a simple notation for objects (JavaScript Object Notation) that's remarkably similar to the struct syntax in GM. E.g. a JSON representation of a scene in Blender might look something like this (simplified for explanatory reasons):
"Scene": {
"LevelMesh": {
"baseName": "LevelMesh",
"x": 0.0,
"y": 0.0,
"z": 0.0
},
"InteractableZone0": {
"baseName": "InteractableZone0",
"x": 20.0,
"y": 40.0,
"z": 1.1111
},
"NPC0": {
"baseName": "NPC0",
"x": 42.0,
"y: 111.0,
"z": -22.8
}
}
You should definitely write (or borrow) an extension that converts your scene to JSON "automatically", since you'll probably have to tweak the positions of things and you'll want that process to be reasonably painless. The export script in this tool works splendidly, but the asset it's associated with (MMK) is dreadfully expensive if you're only using it for that purpose, and there's probably a cheaper solution floating around out there if you look for it. It doesn't have to be a special Game Maker JSON format-- just vanilla JSON will work fine.
Once you've got a JSON representation of your scene ready to go, you can load it into GM using the json_decode function. With the resulting ds_map in-hand, you can start generating instances.
In your room's creation code, load the map, step through it in a loop, and then each time you come across a new JSON object, create "some instance" according to the name (probably serialized as a "baseName" field) of the object. You'll probably want to create an engine-side ds_map that contains relationships between baseName strings and GM objects, e.g."InteractableZone0": obj_interactableZone3D, "NPC0": obj_characterController "LevelMesh": obj_exteriorScene
You can instantiate each of these according to the data in the scene JSON-- create them at the position specified, with the scale specified, and with any other encoded data you care about.
After instantiating each instance, you can configure them how you want to directly via their unique instance id, returned from the call to instance_create.
This... isn't exactly how I do things. Instead, I use a top-level "scene config" class to orchestrate the instantiation and configuration of each instance in a manner that's consistent, repeatable, and far less verbose. This might be a little bit too much engineering effort for a prototype, though, so you're free to bypass doing something similar if you wish.
--
So, with this, you've got a scene loaded, rendering, and with game objects instantiated inside of it, in the positions that you want them to be in, and configured how they ought to be. There's *probably* one major thing for you left to do, which warrants its own section of this post-- how do you get a character walking in here?
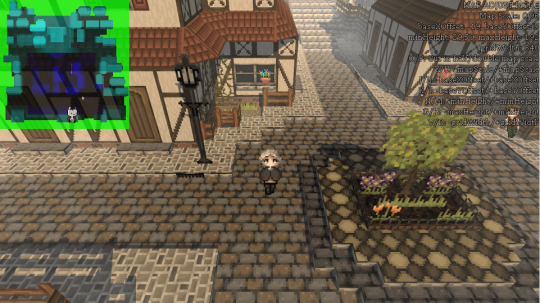
Height and Collisions
Movement in 3D is basically just movement in 2D, but with a z-axis. Thus, assuming you already know how to get a character moving around in 2D, doing it in 3D is just that, plus figuring out what your height (or z-value) ought to be.

More RGB than your custom PC.
At a glance: the left image contains height data (blue) of a scene, as well as the camera-restricted zone data (green) to keep the camera from moving out of bounds (this requires custom camera movement code, but it's pretty simple). The right image is the scene's collision map, where the red is "collision" and the black is... actually an "alpha" channel in the real collision map. You can technically put all three together in the same image, but in testing I found it was more efficient to treat the collision map as a separate image and use GM's built-in collision testing code (note: select "precise" on the image's collision settings).
The blue channel of the height-map on the left can be generated in Blender with a little bit of fiddling. The green channel, I added myself in GIMP. I also painted the collision map over the height map in GIMP, but exported it as a separate image.
The basic "high level" idea is that, for the height map, the "100% blue (i.e. a blue value of 255) areas represent the maximum height of the map (where the maximum height is defined "somewhere" in code), and 0% represents the minimum height (also defined "somewhere"). Every value between 0 and 255 is normalized at runtime to between 0 and 100, and then normalized again to somewhere between the minimum and maximum height. This is broadly the process we use to figure out the height (z-coordinate) of the ground at a given x/y coordinate.
You can do this with surface_getpixel, but that's excessively slow, so it's better to use a buffer. Once again, somebody already wrote code to enable this. Every time you need to figure out the height of a certain coordinate (e.g. how high-up the player character ought to be), you can just ask the height map in the buffer. But, wait, how do you know which pixel in the buffer to check?
The height-map and the 3D scene are not necessarily 1:1 scale. Unfortunately, this means that you'll have to "align the height-map" with the 3D scene manually. Personally, I wrote a tool that allows me to do this at runtime, and to then print the alignment information (e.g. height map x/y origin, scale) to the console. This process is a little bit tedious, and can sometimes result in things being ever-so-slightly off, but with enough fine-tuning you can get it "close enough" pretty consistently.
Top-left: The height map, and a sprite representing the player's absolute and relative x/y coordinates. Top-right: The map's current config information and adjustment controls.
The silver lining to this is that you can reuse the height-map configuration for the collision map, assuming the two images are 1:1, so you only need to get the map aligned once.
(Note: There might be better ways to do this. I'd love to hear about them.)
To keep the camera behaving, you're basically checking the same height-map buffer, but checking for green instead of blue, and checking for any value above 0 (since "camera movement" zones are binary-- either it's allowed or it isn't).
One downside of this single-height-map-based approach is that, naively, it doesn't support going under or over things, but there's actually nothing besides memory constraints stopping you from having multiple height maps for multiple different Z-values and just switching between them based on the player's current Z-position. You might be able to do something similar with collision maps to facilitate mechanics like, say, jumping, but I don't know for sure since I haven't tried doing that!
Always More to Do
With all of this done, you can now, potentially, pilot a player character around a 3D scene. Needless to say, that's still far away from what most games probably want to accomplish. You may not even be done fiddling with the lower-level 3D stuff by the time you've done all of this-- I didn't even get into implementing distance fog or lights and shadows (although that, too, can be done in Game Maker). There's also getting all of this to play nicely with however many UI surfaces you want to spin-up, and not to mention optimizing it to run reasonably-well on non-development hardware (hint: use vertex_freeze).
Nevertheless, this should serve as a pretty good foundation for anyone who's curious about GM3D. I'm sure many programmers can see a reasonable path forward from here on pushing this foundation through to actual full-on "game" status.
If I have instead only managed to dissuade you from investigating GM3D, I hope I have at least instilled a newfound sense of respect in you for early-3D game programmers, who doubtlessly had to jump through similar technical hurdles to get their projects up and running all those many years ago. Except they did it in C. And on calculator hardware. Without the internet! Yeesh!
#3D#reality layer zero#game maker studio 2#gms2#indiedev#indie games#programming#blender#technical#gamedev
0 notes
Text
27 notes
·
View notes
Text
youtube
I ended up re-designing and coding new Special Weapons, as well as adding a Spin Jump + Wall Jump. The Spin/Wall Jump specifically just make Battle Doll feel a LOT more in line with how my brain thinks she should control/play (which feels Great imo).
20 notes
·
View notes
Text
banner art by @/m0thzie on instagram!!
What is "Clementine's Sweet Tooth"?
"Clementine's Sweet Tooth" is an horror RPG created on the moment only by the brazillian artist @daffodilldoodles on Game Maker Studio 2.
What is this project about?
This game is about Charlotte Lomm De Oliveira, who starts working in a bakery called "Clementines Sisters Bakery", a place in the middle of nowhere. You can't really say what it is, but there is something suspect about that bakery, and by talking to your co-workers, you will try unravel the secrets about the place.
What will be posted on this blog?
It will be posted official art, development updates, answers of questions and reblogs of fanart if fans make
When is the game releasing?
At the moment, the project doesn't have a release date.
Does this game has a official discord server?
Clementine's Sweet Tooth now has it's own server! and YOU can join HERE!!
12 notes
·
View notes
Text


Meow 🐾
1 note
·
View note
Text

pm2 is a great wholesome game with nothing problematic whatsoever and i am a great dad btw
#also shout out to that time when i was going for the crime boss ending annd did a lil too good with my stats#and so my daughter ended up usurping Lucifer and becoming the queen of hell#which good for her#it is ungodly the amount of hours i have sunk into this game#one of my fav games#first played it on an old website when i was younger#it was pirated and you couldn't save your game and i don't think you could even go past age 14#probably gave my school's computer tons of viruses lol#pm2#princess maker#princess maker 2#dia's doodles#video game fanart#studio gainax#digital art#cartoon art
25 notes
·
View notes
Text
Cars and Saws - devlog #1
Hello dear human beings!

Firstly I would like to say that I will now have this new blog "coffepixelgames" dedicated to posting devlogs of my games, future games and games from other developers as well.
The "coffepixel" blog will only be for sharing arts.
Lets go to what matters.
I would like to share my newest little project called Cars and Saws.

The game consists of controlling a car while capturing coins and gasoline. When the gas runs out, it's game over.
If you go back to my old publications, you will see that in Click on the cookie I was unable to make a button to turn the music and sound effects off and on, in this new project I managed to do it! It was a way I found to do it, I don't know if it's the right way but it worked. Another thing to learn was how to save your game score so you don't lose your high score.


For now that's it. I plan to add more things to the game to make it fun like new cars.
It is only available on GX games but will soon be available on itchio.
Until next time guys!
3 notes
·
View notes
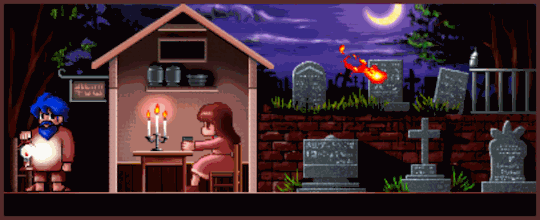
Text
If the room looks off, thats because these are old sprites. I am using them as placeholders for the room layout before redrawing them.

2 notes
·
View notes
Text
Still lots to be done but this is the near finished version of the main characters house! I gotta fix that sofa on the left tho…
#saintwarnersangels#Saint warners angels#indie game#indie rpg#story based rpg#indie game dev#indie dev#game maker studio 2
3 notes
·
View notes
Last Seen Blogs

msformel
MS Formel

gangotrifullara
Untitled

benries
In Lehman's Terms
nobodieshero-main
I've had enough of adventure. I want to go home.

thinkup-infooh
Thinkup_Infooh