#geometric tutorial
Explore tagged Tumblr posts
Visit Tumblr Blog
Explore Tumblr blogs with no restrictions, modern design and the best experience.
Last Seen Tumblr Blogs


Fun Fact
Total funding amounts to $125.3M.
Note
Hi, sorry to be a bother but do you have a tag for posts explaining how you draw/colour? I think I remember seeing one of your posts on shading/colouring technique and I can’t seem to find it, your art is so pretty and the way you use colour makes me speechless every time.

thank you both!! I usually have it under "tutorial" tag, but I'll repost this one and add onto it :>
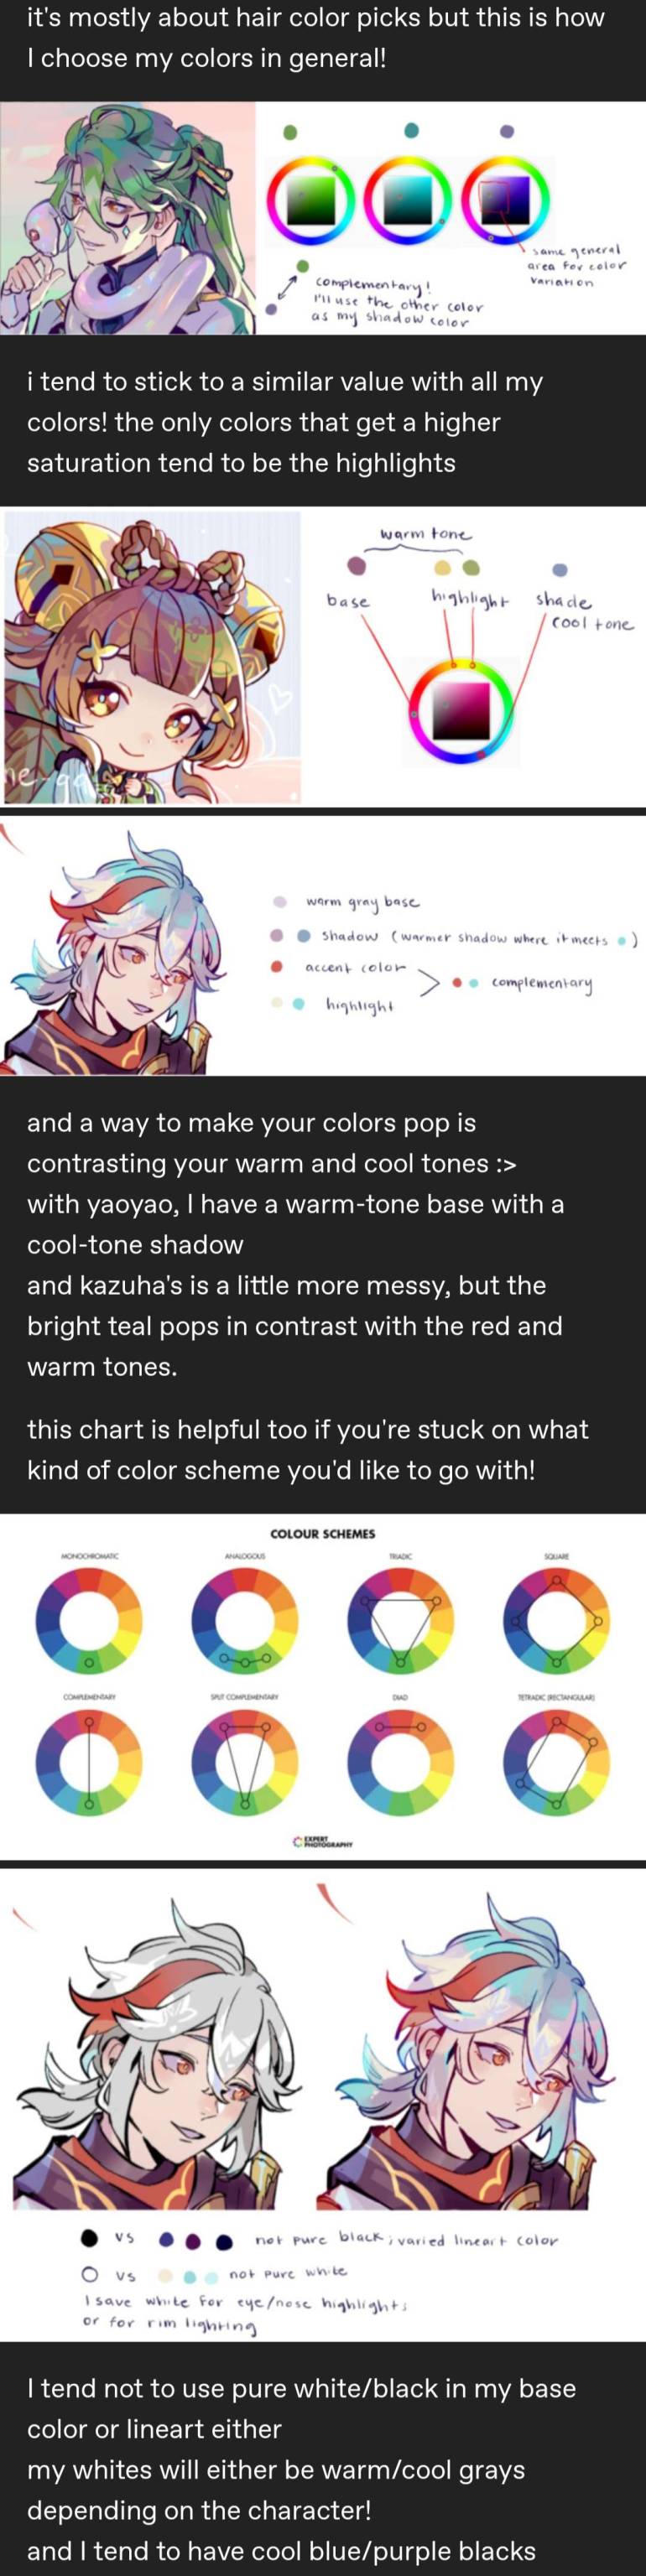


hopefully that helps!! I've mostly been eyeballing colors nowadays but layer modes can also help you pop your saturation or lighting/shading :> just be sure to pay attention to how bright your colors are overall, the method I use to make the colors feel vibrant is to pair it next to a more muted color/one that contrasts it on the color wheel
530 notes
·
View notes
Text

The tumbling blocks quilt pattern, also known as cubework, creates a 3D optical illusion using geometric shapes and contrasting colors, potentially with a history rooted in ancient mosaic floor designs and possibly even signaling routes on the Underground Railroad.
Piecing tumbling blocks quilts remains among quilters' favorite challenges, arranging the colors to form the elusive blocks and sewing the sharp-toothed diamonds together. The Tumbling Blocks quilt is one of the earliest quilt patterns, featuring geometric forms of light and dark that tumble across the quilt.
What it is:
Optical Illusion: The pattern uses a repeating arrangement of fabric pieces to create the illusion of three-dimensional cubes or blocks.
Geometric Shapes: It typically involves triangles and diamonds sewn together to form the blocks.
Color Contrast: The use of contrasting light and dark fabrics is key to achieving the 3D effect.
Variations: Common variations include Cubework, Disappearing Blocks, Golden Cubes, and Stair Steps.
#crafts#gifts#decor#sewing#quilting#briar rose quilts#bedding#shopping#quilters of tumblr#holiday#optical illusion#geometric shapes#color contrast#blocks#cubes#art quilt#quilting as art#quiltblr#quilt pattern#quilt tutorial#textile art#fabric art#embroidery#patchwork#quilts#quilt#tumbliing blocks#tumbling blocks quilt
11 notes
·
View notes
Text

#black and grey ink butterfly tattoo by diogo rocha#28 beautiful black and grey butterfly tattoos#black & grey ink butterfly tattoos | tattooblend#blackwork butterfly tattoo by miss voodoo#blackwork butterfly tattoo by sandra cunha#rose tattoo tutorial#blackwork geometric butterfly tattoo by tom tom#blackwork tattoo#realism tattoo stencil tutorial#how to shade a tattoo black and gray#blackwork tattooing#mandala tattoo sleeve#blackout tattoo
1 note
·
View note
Text
Stop Wasting Time on Pattern Designs - Try This Instead
Tired of spending hours on pattern designs? Stop wasting time and try this game-changing trick!
Discover how to create stunning pattern designs in Adobe Illustrator using generative AI.
Whether it's scroll patterns, Greek design patterns, or stained glass designs, we've got you covered. From floral and tile designs to cool Indian and Mexican patterns, learn how to design your own sewing pattern online for free. Perfect for quilt pattern designers and surface pattern design lovers.
Let's make your designs stand out effortlessly!
#PatternDesign #AdobeIllustrator #CreativeTips #genarativeai #genaratepattern #beta #illustrator #adobe
#pattern#graphic design#graphicdesigntricks#tutorial#kreatkro#graphicdesigntips#textile#handmade#geometric#geometry#tapestry#tiles#clothes#floral#flower
1 note
·
View note
Text
cw: poorly executed accents, technological inaccuracies
previous
Over the week between Laswell requesting you go off your scent blockers and the charity event, the barracks slowly carries lingering traces of sun-ripened berries and arid soil, your natural scent. The team is entranced. It hasn't escaped any of them how well your scent compliments theirs. You and Gaz smell like all the best parts of springtime. Simon's sharp acidic scent is tempered by your sweetness. When you and Soap are together, it's hard not to picture seaside picnics. And when Price is in the room with you, the others are remembering crisp, cozy autumn days.
Your natural scent grows as the blockers work their way out of your system, as does your control over it. "How'd ya learn that, Ren?" Price asks one night, back to you as he stirs his tea. As soon as you picked up on his steps, the strawberry sweetness in the air decreased.
The couch creaks as you shift to face him, turning away from the dossiers on the low table in front of you. "After I presented, Dad used ta pull me inta the kitchen for lessons. He told me ta picture my scent like the dials on an equalizer. Taught me how I could ground myself ta turn the volume down on any particular smell. Especially how I could dampen things like fear. And, of course, how to project certain scents."
Your eyes leave his face, looking at the wall instead. "Being an omega in the service is hard, so I used the blockers because conscious scent manipulation takes a bunch of energy, and I wanted ta focus my energy on the job." You drop your voice and whisper, "And I didn't want ta spend all my energy on something that essentially soothed an alpha's ego."
He comes over and sits with you. "Well, if ya choose, after this op, ya don't need ta go back on 'em. Ya don't gotta protect me and Ghost." He grins and bumps your shoulder, and if he's hoping that you off your blockers means the pack can have a proper scenting, he gives nothing away.
The night of the op finds you in a fancy hotel room somewhere in St. James, several floors above the charity event. You're set up into adjoining rooms: one for you and one for the rest of the team. The other room will serve as the communication hub while you and Gaz - because Price saw how your scent was affecting Soap, the doe eyes he turned on you when you weren't paying attention, and didn't trust him to be able to focus on the op if he were at your side - go to the auction to find Arella.
You'd gone shopping with Adam several days before, under Kate's orders to get appropriate attire. The dress he put you in is more extravagant than anything you would ever have selected, but after a few quick photos to Kate who deemed it perfect, it was off the rack and in your hands. Strapless with a fitted bodice with enough structure to hold you and a skirt that flowed like water, except because it's steel grey, it moves more like liquid metal. There's a sizable slit, up to your thigh but is mostly hidden in the folds of silky fabric, which allows you quick access to the tiny holster you strapped there.
Fashion was never something you were interested in, so Adam took it upon himself to find some simple YouTube makeup tutorials, then made sure you had all the necessary products. You were annoyed about the hassle with the makeup, so Adam made sure the hair tutorial was simple yet elegant and didn't require a mountain of products to pull off.
Though you were going in without scent blockers, Kate didn't plan to risk you, even with the support of a beta, to an alpha's teeth. She had Adam buy the most intricate collar necklace you'd ever seen. Geometrically structured with metal rods, it seemed more like a piece of art than a piece of jewelry. When you draped it across your neck and collarbone, it prevented an alpha from getting his teeth on your scent gland but still allowed you to project your scent unencumbered.
Being undercover didn't allow for the traditional communication hardware, so the boys had come up with an ingenious pair of earrings whose large geometric wrap both matched the necklace and served as an earpiece. They also fitted a mic into the structure of your necklace. The whole task force would be with you all night.
When you finish getting dressed and fixing both hair and makeup to the best of your ability to follow Adam's selected videos, you knock on the door between the room you'd been assigned and where the rest of your pack task force is preparing. You need both your escort and your comms before you head for the lift.
An hour later and you're on your second circuit of the room, Gaz at your elbow, holding your drink. There will be some expectation to drink while you're here, but Price had taught you ways to make it look like you were drinking or as though you did not need a refill during those trainings at the pubs around base. Static crackles in your ear and you hear Price's baritone come through as if he were standing beside you. You've practiced not reacting when the comms go off, but you're still a little startled. "No sign of Arella yet, but Spinner's on the far side a' the room, left a' the bar but looking out on the dance floor."
Neither you nor Gaz is in a position to see him, so Gaz lightly takes your hand and guides you toward the balcony door with a hand low on your back. It allows you both to get quick glimpses of the man, older, polished, and with a petite blonde dressed in ice white standing very close. Though you're too far to see any potential mating mark, she's wearing a collar necklace not dissimilar to yours.
"I think Spinner's got an omega with him," you say. "I might be able ta get information from her if I get her alone. "
"Appreciate the initiative, Ren," price rumbles, "but she's not our priority. Technically, neither's Spinner, but it's good ta keep eyes on 'im just in case." He pauses momentarily before coming over the comms again with, "Not going ta tell ya not to talk ta her if the situation arises, but stay on mission."
"Copy that, Captain," you respond.
Waiting for Arella gets frustrating especially as you watch people continually approach Spinner, who's taken up residence at a high top table on the outskirts of the party. You snatch the champagne flute from Gaz's hand and quickly tip the contents back. Squaring your shoulders, you look at him and say, "Dance wi' me." For a moment all he does is look at you, and you can't read the emotion in his eyes. You power through and tell him, "If we're dancing, we can get closer ta Spinner's table and pick up snatches of conversation. "
Pulling back, you search his face. "I know ya've got the hardware on yer phone ta clone Arella's device with some prolonged exposure, but is it possible fer it ta pick up short bursts a' data off other phones it's near?"
Gaz looks at you in awe. "Ren, that's brilliant! Cap, ya hear that suggestion?"
"Affirmative," Price replies, "but I'll be damned if I understand it."
"Just get the systems on yer end ready fer a massive data dump. It's gunna be fragmentary. Laswell's analysts are gunna have a hell of a time going through it. We may need ta send them some whiskey and good cigars, but honestly, if this pans out even a little bit, we'll be able to get a ton a' information on the kinds of people Spinner's meeting with. Maybe Arella's is not the only one who's dirty."
Once they get to go ahead from Price, Gaz pulls you close and takes to the dance floor. You'd learned how to dance once, long ago, but it's clear this man is trained. He waltzes you through the crowd near to the edge where Spinner's settled, and you hope to hell this idea works.
next
an: this is sort of what I envisioned for Ren's necklace, but more modernist straight lines
series masterlist | main masterlist
~~
taglist: @sirbonesly @z-wantstowrite @thriving-n-jiving @cecelia97 @theycallmevalen @boogeysmoth @cryingpages @riley13 @luxylucylou @lucienofthelakes @ilyztwo @chaosundcoffee @lostintransist @thegreyjoyed @honestlymassivetrash @thebumbqueen @maliamaiden @mordacioust @bina-passion-fruit @kittygonap @wanderingoperator @ghost-is-my-bbg @wolfbc97
#cod#poly!141#poly!141 x reader#tf 141#tf 141 x reader#omegaverse#omegaverse 141#omegaverse tf 141#a/b/o#a/b/o 141#a/b/o tf 141#john price#simon riley#johnny mactavish#kyle garrick#nerdygirl says#fierce wars and faithful loves
541 notes
·
View notes
Note
Do you have any advice or tips with drawing? Any will help me I hope you have a good day
I think it would help to analyze references in the beginning, to build up a visual library

I was taught at university to first see the general masses, the silhouette. This method is called “general to particular”. And due to this stage, it is much easier for you to perceive the image, the composition as a whole, rather than running straight away to draw eyes, hands or other details
Starting with a silhouette also helps to create character designs in the future ✍️

Then you can already outline the construction, the middle forms. Again without small details, but you can leave a hint of them with the help of auxiliary lines.
I don't really work with tone so much at this stage, I just showed you how you can even use it to outline light shading (also common masses)

It also helps to do chopped, rough construction with a couple lines. I would generally advise practicing confidence in hand movements and understanding of general shapes. How clean your sketches are will help you navigate more easily in the future. And general shapes affect mostly how you can stylize body parts, how you understand their construction based on simple geometric shapes. It's a mistake to think that working with a reference is a one-to-one repetition of the original image. Artists use some kind of distortion of proportions, changing details or a little pose based on experience to make a character or work more dynamic

And then you can go into detail 💅
--------
I mean, already as in my experience I say that repeating or re-learning the base, which is lines, shapes, improves your drawing skill.
Because the faster you get through sketches, the faster you can move on to other stages of drawing, and still make fewer fundamental mistakes
And if you want to study anatomy, plastic anatomy would be the way to go for artists. I worked up my anatomy by looking at books and tutorials from the authors belowotome ↓


The authors of this book post tutorials using 3D models on Pinterest and ArtStation
I realized for myself that I am not a classical artist, that learning from the works and books of old academic masters is boring and not interesting to me. My approach is to analyze not only nature, but also 3d models. Analysis of 3d models helps with understanding of shapes in space, light shading and “what are occlusions” for game rendering ↓

Like this :D. But this is already relatively my old work and now I can do better, but I'm lazy
I hope my tips were helpful 🗣️
133 notes
·
View notes
Note
hi goat! do you have any tips/ideas on making 4t2 items look less plasticky? would new textures work or is it maybe something with the shading? or maybe it's the rounded edges on everything....
hi anon! I know you sent this a while ago. Thanks for waiting. I do indeed sometimes retexture TS4 converted objects.
I am no expert! But! Here's what I usually do:

For this tutorial, I will be using @janika31's 4t2 conversion of the Siten-Ze Reclaimed Wood Sofa.
It has the rounded edges you speak of (typical of TS4 objects) and a texture that could be considered 'plasticky' too.

What you will need to do first is open SimPE. We need to be able to look at this mesh nice and close!
When the mesh is opened in SimPE, go to the 1. Geometric Data Container and click on it 2. find the main object in the Models list (sofa) and make sure it's checked 3. Export the object.

You'll need to load said object into a 3D Modeling program in order to look at it.
I like UVMapper, because it's free (well the free version is anyway lol) and it's very easy to use.


While you're in SimPE, extract a texture or two from the original object. You will need them. Light or white recolors will be useful.

With the object loaded into UVMapper, this is what it looks like!
UV map of the object on the left, object (with no texture) on the right.

Add the texture in.
UVMapper is going to be our main working area. Other than an image editing program like Photoshop or Gimp. You'll need that too.


Let's get a good look at this base texture - we can see it has the wood parts of the couch, the main couch texture and some pillows.
If you find UV maps helpful (I do!) you can extract one from your 3D program.
With UVMapper, I needed to make sure that I've specified the size of the image so the UV map will match. This texture is 512 x 1024.

Now for the fun part! You should be able to copy in the base texture as a new layer, and then delete everything that is not the wood part on the UV map.
I've actually missed the foot of the couch here, but I will fix it.

If you're not already working with a white texture, make one. I like to use @pooklet's Primer and Time Bomb for this.
This white texture is very important as it will serve as the shadow and highlight that the new wood texture will be sandwiched in between.

With the new white texture created, when loaded into UVMapper and displayed on our couch, it looks like this. ^

This rounded edge here, this is a problem area!
With retexturing clay hairs, we want a rounded or 'bumped out' part of the mesh to be highlighted, to give the illusion of shine on hair.
But in objects, especially wood ones that we'd prefer to not look like plastic, we want the opposite effect; this shine should be reduced.
This is pretty easy to remedy in your image editor! But first:

Remember how I talked about how the white base texture was going to sandwich the wood texture? Here's what that means (layers):
1 The white base texture, Normal, 100% opacity
2 Our wood texture. This is something lifted from a Maxis endtable?
3 The white base texture, Multiply, 100% opacity
4 The white base texture, Overlay, 22% opacity
5 The white base texture, Soft Light, 22% opacity*
Optional layers: 1) another white base texture, Multiply, 100% opacity if this is a dark recolor, as it will add more depth 2) the base texture, but in an orange or yellowy color Multiply, 100% opacity (when this is added, it will help when a warm recolor looks too ashy)
*these percentages of how opaque the layer is are arbitrary. They work for me, do what works for you.
Okay! Back to the 'problem area'

This highlight here ^ on the rounded arm of the couch; if you don't want it, here is what I would do:


Locate where that highlight is in the texture. Found it!

Here's how to REDUCE that shine:
1 Locate your base white wood texture layer, Normal opacity.
Notice how the whiter part of this texture, when layered as I've described (Multiply 100%, Overlay 22%, Soft Light 22%) translates as shiny when it's laid on an object.
The way to make that appear less shiny is to make it less white. Less white means less of that shine that can read as artificial aka plasticky. When you make that more grey than white, more of the background wood can show through the semi-transparent layers.
2 Take that noticeably white part of the base texture and make it grey! Copy a chunk of the greyer texture, paste it on, blend in or erase the edges to make it look smooth. Merge the layer.
3 Change your Normal white base layer (now edited to be greyer in that one specific spot) and copy that as 3 new layers: Multiply 100%, Overlay 22%, Soft Light 22%. With the wood texture underneath all of them. Base, wood, Multiply, Overlay, Soft Light, in that order.

Before...

...after! it's subtle okay

The same kind of sandwiching method with image layers can apply to the cushions too.

There! A method for retexturing TS4 conversions that helps them not be as plastic looking. 😊
One last tip before you go off and try retexturing conversions yourself: @pforestsims's Easy Shine Removal kit for SimPe. A must if you're looking maintain that matte look.
Let me know if you have any questions!
132 notes
·
View notes
Text
Five years ago I thought it would be a neat idea to try and make my favourite trinket of all time (3D wire mandala). So I found myself some copper wire, beads, a set of pliers and began tinkering. 5 years later, I make these wonderful multi-purpose pieces for lovely people all over the world full-time, and I couldn't be happier.
The ingredients for making a 3D wire mandala:
122.5 inches of electroplated copper wire (gold, silver, black)
14 funky beads (8mm size)
7 pieces of banding wire (22 gauge)
A one step looper and bent-nose pliers
and a lot of patience.. XD The next step in my small shop journey is to transition from selling on Etsy to my own website. Don't get me wrong, Etsy has been amazing for me as someone who wanted to open their own handmade shop but didn't know where to start, however, it is now time for me to spread my wings and (hopefully) fly. fingers crossed
Use code TUMBLR at checkout for a special discount just for discovering my work on here! PLUS checkout using PayPal and receive a FREE Spring Bloom Orbi-Loop with your purchase. (yes, I ship worldwide too!) Finally, don't forget to follow me as I am preparing a full-fledge tutorial (for free) to teach others how to make this on their own! It'lI be such a fun at-home craft project that I hope others will enjoy as much as I do!
PS: Sorry if this isn't blaze worthy. Just had a few extra credits available from Tumblr.
PPS: Style in video is Purple Nova (silver wire/standard size)
#artists on tumblr#dopamine decor#handmade gift ideas#my art#small artist#transforming jewellery#fidgettoys
176 notes
·
View notes
Text
How I deal with shapes


@spadefish @kobothesmall So for shapes, the way I work with them is from studying how things break down individually, instead of following a broader ruleset for character design that you see a lot in tutorial posts (the triangle, square, circle theorem basically).
The way shapes work in humans is different from other animals (which also differ from each other), which is different from objects. The same shape can be used for different goals depending on what you're drawing. So there's no one size fits all, and especially in styles that have a bit more of realism going on, those shapes will behave differently than extremely cartoony styles.
Process wise, a lot of it ends up happening in my head than in the canvas, because I spent years dealing with this shape philosophy of "just bang your head for each thing you're drawing", which I understand is very tedious to some people, but I love studying individual things vs following tutorials because it teaches me 1. how that thing works in a context 2. gives me a new book to my visual library which I can pull from, which is often what happens! That, and a lot of it is just staring at references too. Still, I'll try to draw something up for this.
There are 2 ways to approach shape design. You either start with the shapes and then apply a concept to it, or you start with a concept and apply shapes to it. The former is much harder to do without practice (and also comes more in concept art which is rough, unfinished and meant to be done and redone dozens of times by design). So, I tend to do the latter: I start with a concept of what I want. This can be as simple as "I just want a character that's fat/standing" or more abstract like "I want a character that feels like a river/I want this to feel like an outburst".
Let's start with a concrete concept: I want a design that looks like a pacman frog, and just a standing pose that isn't too stiff.
I grab some pacman frog references, and sometimes if the pose is complex, I'll find references for that too. Pacman frogs are pretty pudgy, and their legs aren't that long compared to most frogs, even when unfolded, and their faces have a nice triangle-ish forehead with a nice shape for the mouth.

The result is that i use large shapes for most of the body. Curves contrast with sharper lines, giving the sense of something geometric but still organic. The line of action here helps me pose these shapes in a way that gives some movement to something as simple as standing (and you'll gain a lot of mileage from learning how to rotate shapes! this is how you're able to position them in different ways and create more dynamic poses).
For something more abstract, like a crouched pose meant to be angry, I take some references when i can and start doing something like this:

Note that these shapes seem weird because I'll have a naked fullbody wip below any clothed characters to have some anatomical guidance, but for actual final shapes and silhouette, what matters is the final elements, and that includes clothes! so i try to build shapes that emphasize this droopy, closed off feeling. This sketch isn't even that good really, there's plenty of errors, but I hope it gives an idea of whats going on.
I hope this weird rambly nonsense helped LOL
259 notes
·
View notes
Text
Needle Lace Resources
This is a very long post, so I'm including a cut.
Tutorial-like Things, Others' Work
An overview of the stages of needle lace (specifically learning from Alençon, I believe. They link to a documentary type of video on Alençon lace): https://www.taixtile.com/needle-lace-first-steps/. This blog has links to other resources (one link is broken, if I recall correctly).
A very approachable first project, I think. From a lace maker who has done very cool illustrations with lace, Maggie Hensel-Brown: https://youtu.be/OLuRpJ96p4Q?si=gqBWqYxa755gFozr
This channel has videos of the stages of needle lace making. They specifically demonstrate Irish lace, I believe. But the stages are very similar to or the same as the stages in Alençon lace. https://youtu.be/dZVagIFCnLc?si=d8lRnPsmz5iTM0Z_
Pierre Fouché has a video about making dense filling stitches and even doing short rows to makes curves (something I tried but did not yet succeed at): https://youtu.be/DK5cMQND3b8?si=qySmT9yaoTcpsUV9 He also does really cool bobbin lace illustrations by constructing patterns in cell-like units.
An embroiderer tries needle lace in two videos. In one of them she tries different styles from different places: https://youtu.be/eTO7dA4oyl4?si=VInx35kql115bIIo https://www.youtube.com/watch?v=A9Wa6-Qf5xw
Example of a different style of needle lace. Unsure what it is exactly. Some sort of cut work or reticella, idk: https://youtube.com/shorts/7DFogWC3tDI?si=uju74sPFbRj3_wrn
Sampler directions: https://youtu.be/oDKBfjDYBnU?si=shQYvaT4kAZD7BgV
Again, a more geometric style of needle lace. I don’t know the particulars of this style (styles?), since I’ve mostly been looking into styles similar to Alençon because I’m aiming for more illustration-like lace. This channel has multiple videos demoing and explaining that process: https://youtu.be/gJd6mkrsUCQ?si=AfVIiwljHvfismrX https://www.youtube.com/watch?v=R6dk721UwW4
Not so much instructions but video of a very skilled lacemaker working on a project: https://youtu.be/01H2GdEXLrs?si=2suFHSG4Kwa6Yl2m
Another lacemaker's work on their blog. I don’t know if they do as much lace making as they do other needle arts https://www.robesdecoeur.com/blog/needlelace-my-work-so-far
A lacemaker's work... the site is older and kind of tricky to navigate. Like. there's no home button, as far as I can tell. Album of their work: https://www.lacemakerslace.oddquine.co.uk/album/index.html Home page, I think: https://www.lacemakerslace.oddquine.co.uk/
Useful/Interesting Things to Know
Alençon lace -- specific French style from the Alençon region, which has a history of point lace and a current institution dedicated to preserving the skills and producing lace. This is the style that I was looking at examples of to try and learn from.
Search terms like different styles of lace that I’m not qualified to talk about but you can look into and do research on: Battenburg, point de gaze (very very fine work, like gauze)… More to be added as I learn about them.
The terms "needle lace" and "point lace" are both used to refer to lace made with a needle. I'm unclear on if there are subtle distinctions between them or if it's simply a matter of location. But having versions of a search query for both terms should help find more results than just using one.
Encyclopedia of Needlework by Therese De Dillmont is an excellent resource to learn how to do different stitches. It seems these stitches mostly come from Irish lace, according to the book. HTML copy of book available on Project Gutenberg here: https://www.gutenberg.org/files/20776/20776-h/20776-h.htm I recommend using ctrl+f to search for "lace stitch" on the page. The end of each chapter in the HTML version seems to have a link to the Table of Contents that is at the end of the entire document. It has chapters for plenty of other needle arts, so it's a good resource all around.
If you want to find examples of needle lace, look on Wikimedia Commons! Using a variety of search terms will help you find more material for inspiration/observation than otherwise
If you want to design your own needle lace depicting objects, it might be worth looking at stained glass to see how larger shapes are broken up into smaller shapes that still feel complete.
You can use multiple colors! Let yourself use multiple colors, like stained glass!
Thoughts from the Learning Process So Far (some terminology used here, look them up so you know what the actual definitions are, but I’ll define what I mean by them)
Tacking vs Couching... I'm unsure about the actual definitions so I may be using them wrong here. In the videos I’ve seen tacking seems to be making a stitch that runs along the way the cordonnet will run. Couching seems to be just when the thread that secures the cordonnet comes up through the backing and goes down through the backing at the same point. With these definitions… Tacking went faster for me than doing couching, but it feels a lot less secure and precise for the form of lace I’m making. Unless I made the tacking stitches perpendicular to the cordonnet's path, the outline cord moved too much due to tension. If it's perpendicular and not a very short stitch, it might get in the way of your filling stitches or binding off stitches. Which might be fine, since you pull them out anyways. But it would also mean more holes in the backing, and at some point the holes are too close together and might tear the backing and pattern. I don't like that. Couching—much, MUCH more tedious for me because I’m not practiced at making the needle come up in exactly the right spot. but it feels more secure to me. The outline seems to be less affected by tension as you work. And I took some shortcuts for couching that helped. I don’t couch the doubled cord, instead I whip stitch back over the already-secured cord. I might make a post to demonstrate what I mean. It kind of messes with the shape/placement of my cordonnet, but for the sake of my impatience I’m willing to sacrifice the precise shape.
Backing material... To use fabric in backing like the instructions usually say, or not? Idk. For me, it’s hard to find the right hole for the couching stitches when I can't see my pattern from the back. It took a lot of trial and error until I got a feel for how to predict where my needle would come up. I don't like the way the poke-and-check method of stitching the cordonnet down tends to rip the pattern up (at least, with my easy-to-access materials. Probably better with better materials and more practice. Using my thumb to find approximately the right spot helped, but not enough). So I just used a sandwich of tape/paper/tape as my backing. If you're willing to fuss around with fabric in your backing, it might make it easier to remove the couching threads after you're done, and when I tried. The directions I've seen usually say to use a backing of doubled-up fabric, clay paper (I'm unsure what this is. might be a thicker paper than cardstock, or it might be paper made to contain clay particles. Probably more like the first option), and contact paper. My last attempt at making a backing used notebook paper (or other type of paper) with packaging tape on both sides to provide a smooth surface and structure. I think it worked fairly well, and I didn't have to figure out where to buy contact paper (or figure out exactly what contact paper was).
#lace making#fiber arts#needle lace#instructions#tutorials#information#resources#my post#i will make this cleaner/easier to read later
117 notes
·
View notes
Text
Gamer girl gets transmigrated into a farm boy Chapter 2 [<<Prologue | <Chapter 1 || Chapter 3>>] Ao3 link
-
This dream… has been going on for a while. For hours now. And it's getting kind of… boring. Sure, it had been amazing to start with, taking the reins of the cart and steering it away from the farm and into the open road, but after a while, after a couple of hours…
It's just hills and farm fields as far as the eye can see. There's a few spots of trees here and there, some other farmsteads, a few actual orchards, but nothing particularly exciting. Definitely nothing worth wasting a perfectly good lucid dream on.
Also, Van's ass is starting to get numb.
Even the automatic driving function doesn't help with the tedium - if anything, it makes this whole thing that much more boring, really. He doesn't need to focus at all, which leaves time for his mind to wander, which is… all it does, really.
He can still see the white text floating about - it tells him which Pebbles by the road are suitable slingshot ammunition and that a Fallen Branch is somehow Lvl. 1, which should mean there is some combat to be had. It's been pretty peaceful so far, however. Aka boring.
It had been that way in Age of Tales too, though - everything started quietly until the Incident. This is still in the tutorial section - though at least the tutorial had helpfully skipped the slow travel portions of this mission. Not so here.
Wonder at what point could he stop enjoying the dream and start worrying about having been for real isekaied into Katie's favourite game, Van glances over his shoulder at the back of the cart. Mr. Gylcross is fast asleep on top of some oilcloth, using a sack of grain for a pillow, snoring peacefully. Deeming the guy well and truly out, Van looks forward and then calls, under his breath, "Open menu?"
Nothing.
"Okay, uh. System?"
That gets him a window, white and shining, blinking into existence in front of him. It's geometrically perfect as though drawn with a ruler, and now that he looks at it, he's pretty sure the font is Arial. Cool.
Though Katie is pretty sure you're not supposed to be able to read stuff in your dreams, Van can read the menu just fine, just like he's been able to read the other System windows.
[Character] [Inventory] [Missions] [Journal]
It's pretty much exactly as it was at the start of Age of Tales, including the greyed out options that had to do with class selection and later events. No Magic tab, no Lore tab, no Bestiary or Herbarium or Military Strategy… he doesn't even have the Crafting tab active yet.
Still, seeing the list fills Van's heart with gleeful excitement, and he hits the Character tab first. It opens up his Equipment and beside it his Status screen, just like in the game.
In Age of Tales, the player character could equip five articles of clothing - a hat, shirt, jacket, trousers and shoes - with up to five accessories - anything from capes and gloves to magic rings and amulets - and four weapons. Currently Van is wearing three clothing items - Rough Tunic, Lvl.1, Rough Woollen Trousers, Lvl. 1 and Peasants Wooden Sandals, Lvl. 1. His belt isn't categorised as an Accessory item, but as a Backpack item - Workman's Leather Belt, Lvl. 1, which gives him extra three Inventory slots on top of the four he has without any equipment. All of those extra inventory slots are taken by his weapons: Simple Knife, Lvl. 1, Shepherd's Sling, Lvl. 1, and 14 x Basic Stone Ammunition, Lvl. 1.
It's all exactly like it is in Age of Tales.
"Do I have eidetic memory or something? This is kind of trippy," Van murmurs, rubbing his chin with his free hand, the other still holding the reins. The System seems a bit… stiff. "Hey, System? Can you answer questions? Or talk at all?"
No answer.
"No AI assist?" Van asks hopefully. "Mods, administrator? Spiritual guidance? Anything?"
Nope, apparently not.
Oh well, at least he has a System, Van muses, and then looks at the Stats screen.
[Farmboy] [Van] [Lvl. 1 Commoner]
[Status:] [Constitution: 10] [Strength: 10] [Dexterity: 1] [Intelligence: 1] [Wisdom: 10] [Charisma: 1] [Luck: 1]
… Ah, right. Katie had a build in mind for Van, and the stat points were allocated in the character creation, so she'd maxed out the essential for an early Paladin build and left everything else to… rot, basically. Which was fine, since in the early game it was easy to level up… plus she cheated. Gold duplication glitch plus travelling potions salesman equals 99 Draught of Memory Potions at lvl. 1 - aka, exp boosters.
It had been a fun run, though. Van had beaten the first mini boss and all of Valthor's Minions in Westbrook with a rake in one hand and pot lid in the other, wearing nothing but his undies. The cutscene after the battle was hilarious - though sadly, Van's streaking did not translate over to Valthor's side of things, and the game forced Van back in his starter gear as the Big Bad spied on his minions' defeat with a scrying mirror.
It was a travesty, honestly. The game just refused to let Katie show Valthor Van's massive tits.
Shaking his head sadly, Van closes the character screen and investigates the rest. The Inventory is pretty much exactly as he expects it - with the belt full and the apple sitting in his pocket, he has three open inventory slots left - and so is the Missions - which only has the trip to town in it.
His Journal though…
1st day.
Woken up by Ms. Gylcross, asked to get the cart ready - did. Josel helped, gave me some Slingshot Ammunition. Breakfast was good. Ms. Gylcross gave me an Apple.
Heading to town with Mr. Gylcross.
… Shakespeare Van is not. Or rather Van's System, because he sure as hell didn't write any of that.
And just as he thinks it, the entry changes before his eyes and completely rewrites itself.
1st day.
I woke up in Van's body in a pile of hay, on a hayloft, in the Gylcross farm, inside Age of Tales! What's up with that?! Like, is this Isekai? Have I been Transmigrated? System, help!?
Thank god it's still the tutorial and Age of Tales dialogue kinda sucks, because no one noticed anything weird. This starter NPC, Janelle, came in when I was just about to jump down the hayloft and gave me the beginner mission, told me to get a cart ready for a shopping trip. In the game it's supposed to teach you how to interact with quest items. Here…
Here I can see levels of people and items, just floating there, in the air! It's like something out of mmorpg! Pretty cool. Also, my boy Van is Stronk, son! Also, bigger than Big Boy Josel. Sorry, Josel. You were cute and then you died. Rip.
Anyway, I got the cart ready and Josel got the horse and gave me some Slingshot Ammunition, so that's cool…
Van isn't sure whether to be amazed or creeped out.
The rest of the entry goes on like that - exactly as Katie would've written a diary entry back when she used to write diaries, when she was thirteen. It details the morning, ending with…
…and now my boy Van is getting a bruised butt from driving a cart, wagon… thing. Whatever. I've been Transmigrated into another world - into the world of Age of Tales! All my Isekai dreams are coming to life!
Van closes the tab slowly, staring right ahead for a moment. He's shivering, breaking out in cold sweat. Katie thinks he might be dissociating.
The town of Westbrook is finally visible in the distance, columns of smoke rising from the chimneys and the town's church spire rising above all the other rooftops.
By the end of the tutorial chapter it would be on fire, as the Incident began.
Van swallows and turns to look over his shoulder at Mr. Gylcross. "Sir," he calls, his voice dry and thready, and clears his throat to try again. "Mr. Gylcross, we're here."
The farmer lets out a guttural snort and coughs himself awake. "What's that?" he asks, his impressive moustache twitching from side to side. "Ah, yes, yes - here we are. Straight to the market, Van, if you please."
"Right," Van says, and lets his body run on automation for the rest of the way.
The town of Westbrook is a perfectly quaint, vaguely medieval, vaguely European town, with vaguely Tudor houses and a vaguely gothic church. There's English ivy growing over a lot of the houses, and little colourful signs advertising the item shop and the smithy, and the only inn in town is the second biggest building in Westbrook, of course. The marketplace is right in front of it, full of colourful stalls, painted carts of traveling salespeople, and a milling crowd. There's happy chatter in the air and the sun is shining beautifully.
It's all very picturesque. The only thing missing is the merry background music.
Van is probably still dissociating.
Thank god for the autorun feature.
"Ah, here we are," Mr. Gylcross says and points. "Just over there, Van - bring the cart around the fountain - yes, good."
Van parks the cart - is that what it's called when it's something drawn by a horse? - beside a stall full of empty crates. Mr. Gylcross hops down with a cheerful, "Drakner, my good man, how are you?"
As the farmer approaches the buyer, Van clumsily gets off the cart and tries to stretch his stinging behind. Bell the workhorse is leaning towards the fountain, and there's a mission prompt.
[Tend to Bell the Workhorse, Lvl. 1.] [Bell the workhorse has been working hard and needs to be cared for. Get the Bucket and some Water for her and wipe her down.] [Quest reward: 5 exp.]
[Prepare items?] the System asks and Van selects yes. His body picks up a bucket from the cart, fills it from the fountain and holds it up for Bell to drink from before grabbing a rag to wipe the worst of the sweat off her.
Bell rewards him by trying to steal the apple from his pocket, just as the System informs him the quest is complete. Well, 5 exp is still something.
"Van, come here and help me with this," Mr. Gylcross calls and there's another mission prompt.
[Unload the grain, Lvl. 1.] [Mr. Gylcross has sold his excess grain to the travelling merchant, Mr. Drakner. Unload the grain sacks from Mr. Gylcross' cart into Mr. Drakner's cart.] [Quest reward: 5 exp, 2 silver pieces.]
[Prepare items?] is Van's favourite System feature, he decides, and continues to daze off as his body does the work, grabbing the grain sacks and piling them up in the buyer's cart.
"Damn, you're one a big blighter," the buyer says, peering up at him. "What's Gylcross' here feeding you? Say, why don't you come work for me - with a big fella like you around, I won't even need guards!"
Van looks at him. The buyer is a short man, very short - but not thick or bearded enough to be a dwarf. He kind of looks the part, though, with a heavy dark brown coat embroidered with copper-coloured thread and fastened with big, elaborately decorated metal buttons. His hair is cut short, though, and his face is almost clean shaven, aside from his impressive sideburns.
Van reads the floating text above the short man's head.
[Travelling Merchant] [Gavin Drakner] [Lvl. 25 Spy.]
… Huh.
"I'll pay you fair wages - I'll even throw in some gear, free of charge," says Gavin Drakner the spy and sticks out his hand. "What do you say - fancy a life on the road? Sword at your side, wind in your hair - there's nothing like it!"
"Hey, none of that," Mr. Gylcross says. "Van's contracted until the end of the harvest, and I need him. Those fields don't plough themselves!"
Drakner laughs. "With this one, I doubt you even need a horse - or the plough!" the man chortles and waves a hand disarmingly. "Ah, I'm just messing with you. Van, was it? Unusual name."
Yeah, well, the game wouldn't let Katie name him Brick Shithouse and naming her character Dump Truck just didn't appeal as much. So, Van - it sounded vaguely medieval, like, Van Gogh or Van Hoenheim or something.
… Actually, she almost named him Ice-Cream Van - she even picked him a hair that looked like caramel vanilla soft serve. It had amused her to no end, but in the end it's probably a good thing the name didn't stick.
The hair did, though.
"Well, if you ever need employment, big man, remember the name, Gavin Drakner!" the spy says, clapping Van on the lower arm - because he can't reach his shoulder. Then the man turns away. "Gylcross, good to see you, pleasure doing business…"
Mr. Gylcross parts ways with Drakner the Spy and turns to Van. "Now that that's over with, take the cart away - let's not get in people's way more than we have to, eh? I have some business to do in town, I shouldn't need you for a bit, so - here."
The man hands Van five round silver coins.
[Quest Trip to Town, Lvl 2 complete! You gain 15 exp and 3 silver pieces!] [Quest Unload the Grain, Lvl. 1 complete! You gain 5 exp and 2 silver pieces!!]
Nice. Love it when quests stack.
"Advance on your salary," Mr. Gylcross says and winks, his moustache twitching. "Spend it wisely, my boy."
"Yes, sir," Van says, eying the worn coins in his wide palm. "I will, sir."
"Good, good," Mr. Gylcross nods. "I'll come get you once I need you. Now, off you go. Make sure Bell gets some rest."
"Yes, sir."
Van lets the autorun take care of the cart and horse, leading them to what looks a lot like a horse and cart parking lot behind the inn. After securing the cart and the horse and getting Bell some hay to munch the automation wears off and Van is left with five silver pieces and an existential crisis.
This dream has gone on for way too long, and it's way too elaborate, and he's going to freak out if he stops to think about it.
So he's not going to think about it.
Considering the silver pieces, Van closes his fingers around them and decides he's going to put this world to a test. It might not be allowed, the same as time skips weren't a thing, but… what would it hurt, to check it out?
-
The gold bar duplication glitch requires three things. One, a gold bar. Two, the fortune teller NPC. And three, a candlestick from the inn.
You set the candle stick on the fortune teller's desk just so that the flame hits the fortune teller's hand during certain animation. Then you select, [I would like to hear my fortune,] and try to pay with the gold bar. The fortune teller rejects the payment because for some reason fortune tellers just doesn't accept gold bullion, and, because aside from being the highest form of currency gold bar is also an item, an animation plays with the NPC handing the gold bar back.
If her hand hits the candle flame while holding the gold bar, she will drop it. If you just happen to simultaneously have the shop menu open, and if you happen to accept the trade of one gold bar back on the exact moment the fortune teller drops the gold bar, well… you're left with two gold bars, one in your inventory and the other on the floor.
And in game, you could go this as many times as you wanted, with the rate of about 4 gold bars per minute for a nice sum of 24 000 gold pieces per hour. Which bought you 24 Draught of Memory potions. Each of which boosted your exp gain by 300%.
Yeah, Van was almost a lvl. 100 right out of the tutorial.
The hardest part of using the glitch is turning five silver pieces into a gold bar. Sadly, there's no glitch for that - for that, you have to gamble.
In every inn of Age of Tales, there are three games you can play. One is a game that's basically Poker re-skinned and given as a new name - Vist. The second is a game of Yahtzee, though they just call it Dice. And last is Echo, which is basically just Memory. Each game is affected by different stats - Charisma and Intelligence help you with Vist, Luck helps you with Dice and Intelligence and Wisdom help you with Echo.
The trick is, having Wisdom above 10 gives you an auto buff during tasks that require concentration. It slows time for you. With high Wisdom and a good eye, you could easily win every round of Echo.
Van's Wisdom is technically above 10 - and Katie got pretty good at Echo, playing it for hours on end to get that one gold bar.
With that in mind, Van heads for the inn - and is nearly bowled over by the warm, smoky atmosphere and the smell of stew hanging thick in the air. The inn is much like the rest of the town of Westbrook, a near perfect copy from the game - but it's a whole different experience, seeing it through Van's eyes. The welcoming warmth and light, the atmosphere - the door he can only barely fit through…
In the game he's never hit his head on the door frame, but here he has to duck below it - only to then immediately bang his forehead on a ceiling beam.
"Ow - sonnofa-!"
"Oh, no - are you okay there, man?" the innkeeper calls, looking worried. "That was quite the resounding knock your noggin made there!"
"... Yeah," Van groans, rubbing at his head and checking his hand. No blood. "I'm alright."
"You want something to drink? I can bring you an ale."
"No, thank you, I'll just sit down for a moment," Van answers, rubbing his forehead and looking around. He has to slouch to keep his head from banging on every ceiling beam along the way - they're all on the exact height to, well, beam him right across the forehead.
Van had felt big before, walking in the crowd, taller than anyone else - but now he feels uncomfortably big, too big for this space. It's like being in a miniature house or something - the tables are a bit too low and the chairs all look too small for him. It's kind of cool, though.
And then Van finds what he's looking for.
"You want to play a game of chance, big man?" the hooded local gambler asks and motions to the chair across from them. "Please do take a seat."
[Lady Luck's Acolyte] [Kerly Accomo] [Lvl. 16 Gambler.]
Van sits. The chair creaks pitifully beneath his weight. "I'll try a game of Echo," he says, leaning his elbows carefully on the table between them. "I bet two silver coins."
"Very well," Accomo says and takes out a deck from a wide sleeve with flourish. "If you can beat me, you gain double your stake. If I beat you, you will lose your stake. That seems fair, yes?"
"Yeah," Van says and puts the coins on the table, sliding them over.
There's every chance this wouldn't work. If this world is more realistic than the game, and it kind of looks like it is, then he doubts the gambler carries enough money to buy him a gold bar. Still… it could be that every shopkeeper has an endless sum of gold, just like in the game. He wouldn't know until he tried. So.
"Let's see what happens."
The gambler splits the deck to shuffle it, and there's a mission prompt.
[Game of Wit, Lvl. 1.] [You have been invited to play a game of cards. Win 10 games of Echo.] [Quest reward: 20 exp, 1 Lucky Playing Card.] [Accept?] [Yes.] [No.]
-
[<<Prologue | <Chapter 1 || Chapter 3>>]
Proofread by @nimadge, many thanks.
-
It's gonna be bit of a slow start, still getting my footing here
#original fiction#isekai#transmigration#etcetc#idk how to tag anymore#Gamer Girl Transmigrates as Farm Boy
69 notes
·
View notes
Text
I've gotten some requests on how to make my trash terrain for 6mm sci-fi or modern miniatures. So I made a little tutorial. Enjoy!

The stuff you'll need: - Plasticard - Brass rod - Air drying clay foam - Bits of 6mm miniatures

Start by making a plasticard footprint, cut into an organic shape. Can't go wrong with kidney bean!

Gather some miniatures to use in our junk pile. We're not gonna cover the whole pile with them, just sprinkle them throughout. This is a good use for your misprints and broken minis, so don't throw them misprints away; use them for terrain.

The trash pile needs a "spine" of brass rod. Attach the brass rod with some glue and let it dry. If you don't give the plasticard a sturdy spine, the plasticard will bend and curl as the glue dries and you'll be super sad.

This is the kind of clay to use. Its super light and dries rubbery, not brittle like regular clay.

Attach some clay blobs onto the plasticard with glue and smooth them out. You'll need less clay than you think because the miniatures are gonna go into it and make it expand.

Sink your miniatures into the clay. I like to add cut up rectanlges of platicard to help cover the edge where it isn't smooth. Let the whole thing dry overnight.

Prime it black.

I usually paint it in sections. Base coat with a dark color. I'm going with purple, but you could brown or blue or gray too.

Free hand some geometric shapes with black. The shapes should be of very irregular. You can let the lines be messy at this step, we're just mapping out the freehand portion. Color in some of the shapes with black to imply negative space.

Base coat the shapes between the black lines in a couple different colors. I mix a little orange into the purple to make a warm brown. I base some of the shapes with a gray blue. A few others I pick out by mixing green or grey with the purple. This is the step where we want our lines to be (relatively) neat and tidy. Let the shapes expand a bit beyond their black line borders from the previous step.

Add another layer to the shapes to raise the intensity. Some shapes get more coverage than others, to make it more random.

More layers, mixing in more orange into the purple. I brighten the slate blue by adding a light pink.

Finish with some highlight layers. This is done by adding light pink to the blues/oranges/greens.

Add some dots of random colors in the remaining black space.

Go around the whole pile like so, until you cover the whole dang thing.

Then paint the miniatures in it. I paint the miniatures a bit brighter and with different colors than the freehand to make them stick out. And there you go. Trash time! Thanks for reading!
255 notes
·
View notes
Text

The Antique Tile Quilt Block is a classic and elegant pattern that has been cherished by quilters for generations. Known for its timeless appeal and geometric beauty, this quilt block is a favorite among both beginner and experienced quilters. Whether you are looking to create a vintage-inspired quilt or add a unique touch to your next project, the Antique Tile Quilt Block is an excellent choice.
https://creative.craftsforlove.com/quilt/antique-tile-quilt-block/?fbclid=IwY2xjawJ-ejNleHRuA2FlbQIxMABicmlkETFYZ2lCdmhZb0FzbVNUbDlPAR6pO8OXvSL6pRQKpXIdBEqw4LE5-FVby_dud959Qyehguj8LYSeXk4Po7M8lA_aem_q5X6b_DdjBCpV-1XOp4Ryw
#crafts#gifts#decor#sewing#quilting#briar rose quilts#bedding#shopping#quilters of tumblr#holiday#antique tile quilt block#classic quilt block#quilt block#quilt block pattern#block pattern#geometric block#geometric quilt block#creative#craftsforlove#antique tile#tile quilt block#quilt#quiltblr#art quilt#quilting as art#fabric art#patchwork#quilt tutorial#quilt pattern#textile art
2 notes
·
View notes
Note
hello!! i love your art so much, your colors are beautiful and your characters are just so 👁️👁️ and i adore seeing them on my dash :)
i had a question about how you do the details on your fabrics: how do you keep the patterns on clothes on a body looking so,,, clean and readable while also making it make sense on the form under it?
like the cape/sleeve(? idk what it is but it looks cool as hell) on the magnolia commission pattern looks so cool and it's still readable on the fabric (like, if i wanted i could probably do a silly sketch of it) BUT ALSO it seems to make sense with the folds so it doesn't just look unnatural and stiff?
i'm so sorry this is kind of a long ask but like. would you be down to talk about your process for patterns on clothing? it's cool if you're not, that's totally fair, just figured i'd ask
have a wonderful day!!
OOOH Thank you so much for the ask!! I wanna do a more in depth tutorial, but I tend to make patterns in two different ways, with one being fully hand-drawn and the other playing with mesh transforms or the... Uh, liquify CSP tool? Let me find examples

This is an example of a fully hand-drawn pattern. No trickery here- Only trying to eyeball everything. It's kinda a lot of work to draw it manually, but it's the more convenient option if the character I'm drawing doesn't have files for the patterns, or if the files are a bit too different from my usual style, as they could potentially not look great with my linearted or painted style
And then- For cases such as Nolia's cloak, I did the entire pattern as a separate file, then placed it using Photoshop's mesh transform!

Here's a WIP file from when I placed all the patterns after finishing the lineart, where you can see them in full contrast. I tend to keep my patterns in different files- The black parts here are not joined with the base color of the cloth, so I can bring nice highlights and texturing when they're meant to be golden inlays, for example. Now, the Photoshop mesh transform is a bit finnicky to use, and I don't have any proper step by step of it- I could potentially record how I do it someday. But let's take the humble cylinder and demonstrate it quickly:

So, the mesh warp tool is the one on the right- You can see these sort of blue lines creating a mesh. I'm sure CSP has it in it's pro level or something? Correct me if I'm wrong. You play around with the different sections, move it to the right place, and put it on the cylinder. This is a very simplified form. You can make many subsections to your meshes (that's 3x3- you can have stuff such as 20x20) for when you have multiple folds.

And then you can just shade your pattern accordingly so it fits the volume of the drawing, and- ta-daa!
This is by no means an easy method. Sometimes you can get away with the Liquify tool (which CSP has and it's very decent), which I've used when the pattern in question was over a simpler surface with few folds. It takes some practise to use that well, and it isn't gonna be the best for complex ones, but it's also an option. Let me do a lil compilation of some patterns I've done and which tools I used for each!
The tool I use highly depends on the time I have, the level of finish for the drawing, and so on. CSP's liquify is probably the fastest but gives simpler results, drawing them manually works better with some styles and more organic/less geometrical patterns, the mesh tool takes a bunch of time but it's great for small repeating patterns that are meant to be very precise or geometrical.
If people would be interested in it, I may someday do a video tutorial of me doing a pattern and then putting it over a folded cloth. I do hope this can help a bit tho!!
122 notes
·
View notes
Text
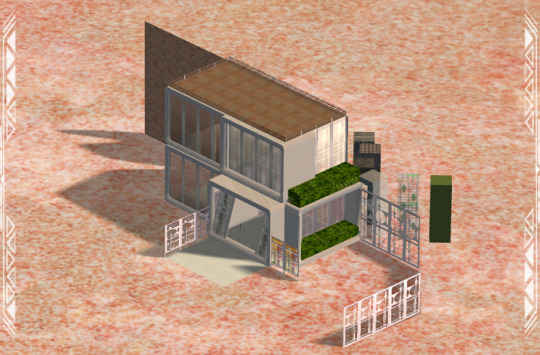
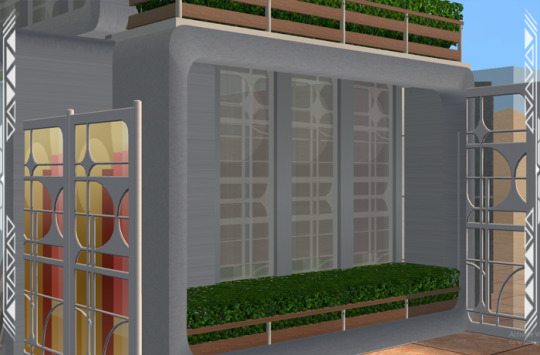
Space-O-Rama Build 001
Published: 7-19-2024 | Updated: 7-20-2024 SUMMARY “With intricate geometric patterns, delicate parabolas, and inverted inversion, Space-O-Rama glass sets a new standard that’s out of this world!” An odd mixture of low-to-mid poly items for retro-futuristic builds, inspired by the Space-o-Rama glass fences (Pets EP). There are 41 objects and a host of recolors using texture resources from PineappleForest (2022) actions from CuriousB (2010), Pixelhate, and Klevestav (2015; 2013). Many of the recolors have a weathered/distressed look.
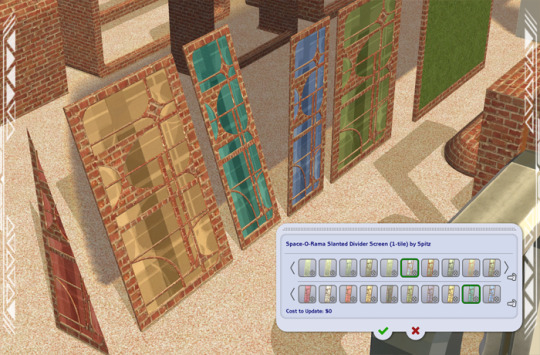

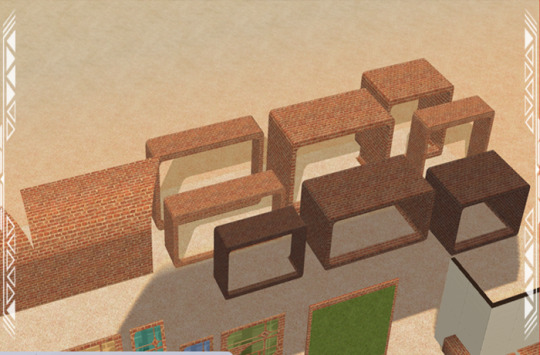
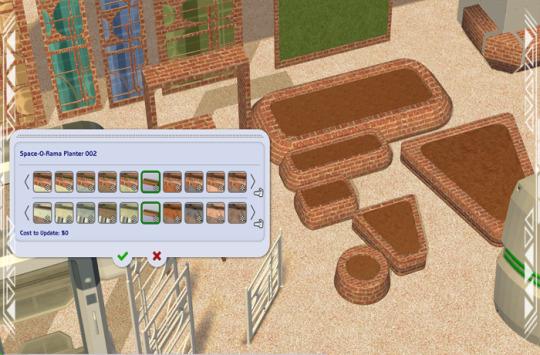

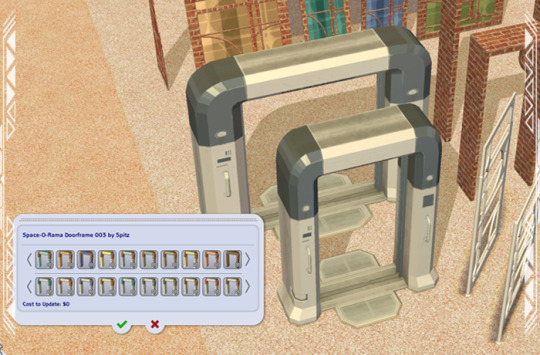
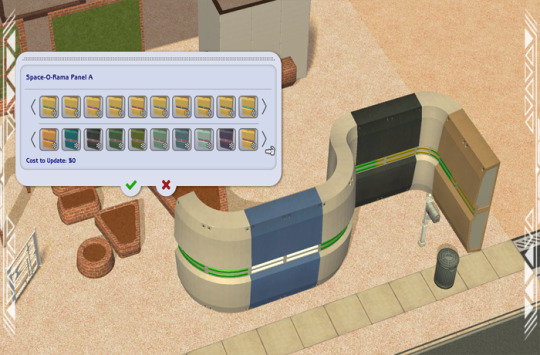
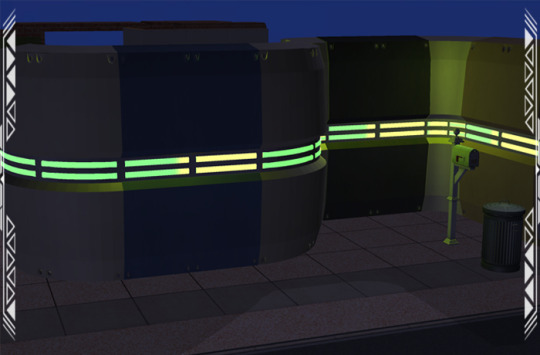
DETAILS Requires Uni, Nightlife, and Apartment Life Eps. §100-500 | Build and Buy Files with “MESH” in their name are required. You also need the BBNiche1Master (BuggyBooz, 2012), Elemental TXTR Repository, and he Graphic Glass TXTR Repository from the Repository Pack (Simmons, 2023). Additional repo pack recolors can be found on this site under these tags - #co2recolors, #ts2recolors, #ts2repo #co2repo #co2repopack. ITMES 3 Fences (~1622 poly) 5 Divider Screens (1025-1528 poly) 8 Window Boxes (Columns) (576 poly) 4 Doorframes (Deco) (92-1353 poly) 2 Door Rugs (Columns) (34 poly) –for doors 003 and 004 7 Planters (546-1092 poly) 4 Wall Accents (Columns) (8-12 poly) (3) Neon Panels A-C (1080-1521 poly) – sharp corners and some overlap (shadows look better than when the mesh is completely smooth); small gap on the side ; requires the Nightlife EP. 3 Bunker Walls (22-24 poly) – some overlap 3 Garden Panels (99 poly) *You’ll need “moveobjects on” and “grid on/off” cheats since not all parts align perfectly. DOWNLOAD (choose one) from SFS | from MEGA
7-20-2024 UPDATE : Added alternative versions of Doors 3 and 4. The texture on the top interior was distorted when the poly count (“faces”) got reduced. I recolored that part separately in black. If you want the alternative versions, manually delete old files (they are “..doorframe3-MESH” and “…doorframe4-REPO”) and replace them with these new files (“…alt2”). DOWNLOAD (choose one) ALTERNATE DOOR 3 & 4 from SFS | from MEGA CREDITS Thanks: Simmers with meshing, cloning, and fencing tutorials. Sources: Beyno (Korn via BBFonts), Sci-fi House (AiKu via Creative Commons Attribution, 2018), Space-o-Rama Divider (EA/Maxis), 4t2 Eco Living Door (Ethan, 2020), Streets of Utopia (Stonemason, 2024), SciFi Panels (Unity Fan via CCA, 2023), Scifi Gate (Stan via CCA, 2023), Bomb Rush Cyberfunk Street [fan art] (Max Staples via CCA, 2023), Modular Bunker (mats de Wind via CCA, 2020), modular Walls (detona via CCA, 2018).


139 notes
·
View notes
Text
Crotch Mending
Hello everyone! We all know the answer to this one. Where do your pants wear out the fastest?
[Audience yelling: THE CROTCH!!!]
Exactly! I've already done DIY ripstop on (almost) all the pants I own. This pair of shorts tore out above the ripstop earlier in the summer, but I replaced them with secondhand basketball shorts and forgot about them in the Tote of Doom.
Anyway, I desperately needed an easy W in the books tonight, so I pulled out whatever odd-shaped scraps of black canvas came to hand, and I patched the crotch.


I started out by sewing a box all around this rip to stabilize it. My machine has a cool diamond stitch that I use as a serger dupe, but you can do the exact same thing with a little straight stitch grid. It's just enough to lock all the OG threads in place, with enough patch showing through to relieve tension on the rip.
Also, as I've learned the hard way, I have to use polyester thread for this. I'm always a slut for cotton, but it just can't stand up to my tactical thighs. Also, long-leg boxer briefs are the key to negating the sensory input from the mends.

I proceeded to stitch this semi-geometric sorta-concentric pattern all over the patch to hold it down. The easy W was complete! But I'm a creature of momentum. My favorite words are "While I'm at it," so I did the other side too.
Final product:


I'm so pleased! I'll have to see how well they wear. Using dark grey thread rather than black was a good choice.
I hope this inspires you to try saving or reinforcing some pants. While I'm not posting a photo of proof for obvious reasons, you truly can't see crotch mending, especially when the thread matches because it's all up in your undercarriage and shadowed. Nobody's looking that closely, and if they are, kick them.
Go forth and make stuff. As @dog-of-ulthar said in his pants-mending tutorial, "The revolution starts with your ass."
#solarpunk#sewing#diy#beginner sewing#mending#patching#cj sews#it's not waste until you waste it#use it up wear it out make it do or do without
129 notes
·
View notes