#gotta limit my gifmaking
Text


It's been requested so here it is: my gif tutorial! I hope to make this very simple as I've made gif making very simple for myself with the help of .atn made by myself and others. More under the cut!
First, what you'll need.
Photoshop (here's a link to a masterlist of free photoshop resources from birdysources)
KMPlayer, to get your screencaps.
These PS actions. (My gifmaking one, and this sharpening action from insomniacgifs.)
Some understanding of how to color gifs (I'll be linking my psd shown here, as well as including the process of making one.)
Next, how to get the videos that you want to gif.
I personally source my videos from Youtube, Twitter, and streaming services. (Firefox browser is your best friend, as it doesn't black out the screen that some services have.) If a Youtube Video Downloader isn't working, or if I'm capturing my own footage, I use the Xbox Game Bar's recording feature (windows + alt + r) to capture footage. There's also applications like OBS Studio. For Twitter, I use twittervideodownloader.com
Now, making the gif.
I use Photoshop CC 2018, but any PS with a timeline will work. But first, we gotta take our screencaps. Open your video in KMPlayer, and press alt+v. This will open up this second screen

These are my settings, with an easily accessible folder that I save my frames to. Find the scene you want to clip, and hit start & play your video, then stop when you have the frames you want.
Next up we're going to open up Photoshop. I changed my keyboard shortcuts so all I've got to do is hit ctrl+alt+o, but for you guys, you gotta go to File -> Scripts -> Load Files Into Stack

Select your screencaps of the scene you want to gif. Now that Tumblr allows gifs up to 10MB, the amount of caps you want is totally up to you. I stick to around 45-50, but sometimes there's a scene I need that's up to 150+ caps, and it still fits under the size limit. It all depends on the dimensions and coloring of your gif. I'm loading up 51 frames as the sharpening .atn deletes the final frame of your gif once it reverts back to frames, so I'll have an even 50 framed gif.
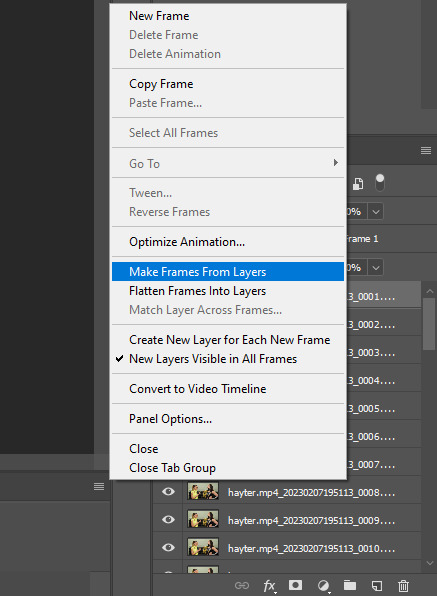
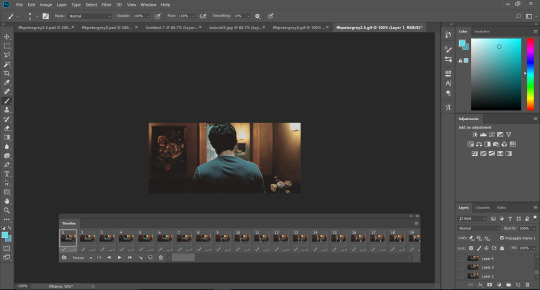
Your PS should look like this. Here comes the gif making itself. You want to hit Create Frame Animation at the bottom, where your timeline is. If your timeline isn't already open, click your Window tab up top, and find timeline in the dropdown.

After you hit Create Frame Animation, you want to Make Frames From Layers, which you'll find when you click the three lines on your timeline.
Then, reverse your frames.
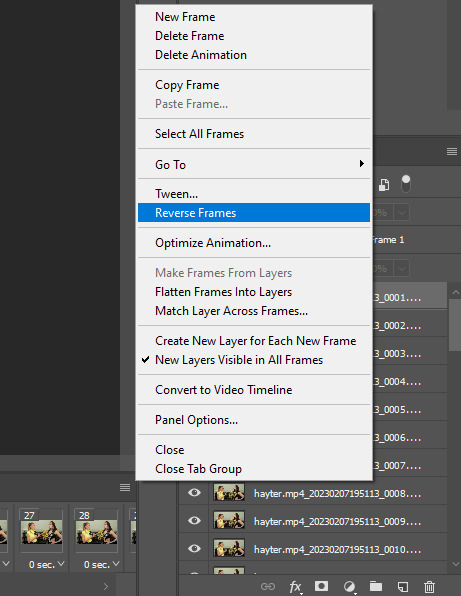
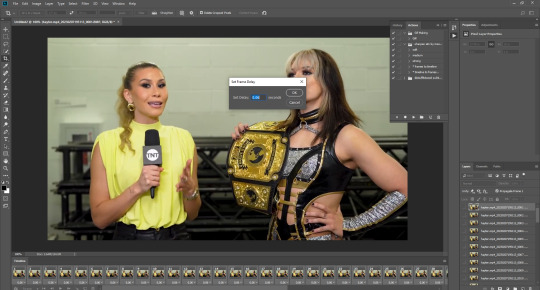
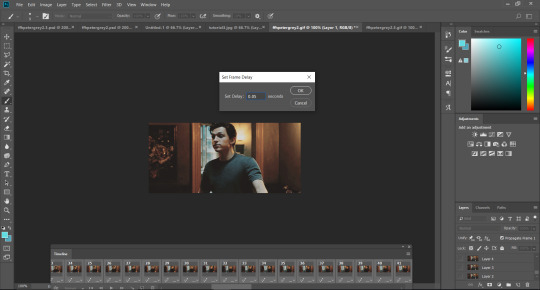
Finally, Select All Frames, click the arrow on the frames, and change the frame delay to .06 seconds.
Way to go! You've made a gif! Now, if you're like me, you'll get tired of having to do that over & over when making a gifset. So, I recorded and uploaded an .atn, which means all you gotta do is load up your frames, hit play on the .atn, and your gif is good to go. I'll link it again so you don't have to lose your place in the tutorial.
So you've made your gif, now what? Now we crop, sharpen, color, and save for the web. Let's get to it.
Tumblr dimensions can be tricky, but they're easy to remember. (I even made a little graphic for it!)

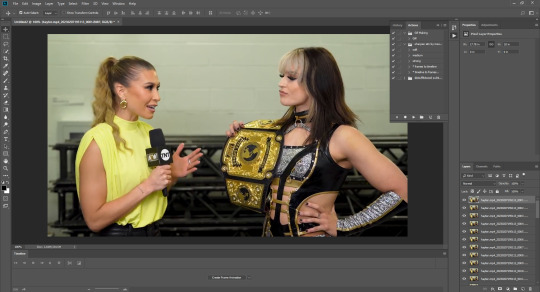
For my tutorial, my Jamie gif will be 268 x 268 :)

Here is my unsharpened, unedited gif of Jamie Hayter. I believe this clip was snagged from YouTube, but it's been awhile since I saved it. I use insomniacgifs' gif sharpening atn, as I hate manually sharpening gifs. So let us run that real quick. (I'll be using the Strong option. Don't forget to delete the final frame.)
Onto coloring! The example I whipped up for this tutorial is super simple, so let's go!
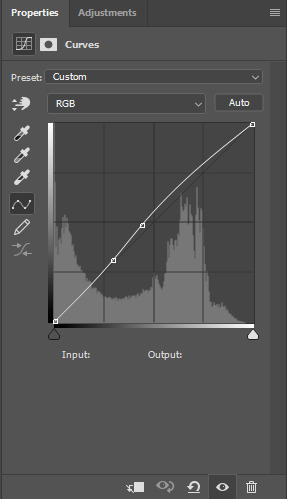
I typically edit the curves first. I'm not sure why, just something I picked up from my photo journalism class back in HS.

Next, I add a little brightness. (+10)

Then, I mess with Selective Color, just a bit. (Neutrals, Black +10. Blacks, Black +5.)
Now, I don't know exactly what Channel Mixer does, but it's fun. Here's my settings.


Some Saturation (+5)

And lastly, I edit the Color Balance!

Aaaaand here's my final product! I also uploaded this as a PSD for you to save and use yourself!

Once your gif is all done, we need to save it properly. File -> Export -> Save for Web (Legacy). Here are my settings.

Note: Make sure your looping options is set to forever so your gif doesn't loop once and freeze!
And that's it! I hope this helped, and if you have any questions, my ask box is open!
#tutorial#gif tutorial#photoshop tutorial#wweedit#wrestlingedit#aewedit#*tutorial#keyara.gif#she's here!!#long post
206 notes
·
View notes
Note
Hey there, Jamie! First I gotta say that I love all your sets and I’m really glad you’re giffing again. ❤︎ Then I’d ask something: I’m someone who likes to gif unpopular shows/movies and it’s obviously really discouraging when I feel like I have no one to share my creations with. Have you ever felt like this? And since tumblr hasn’t been helping us gifmakers and even popular stuff (unless they’re popular *this* week) don’t make notes/don’t get to the people who would actually enjoy seeing our creations, what do you think I could use as motivation to keep on doing it? I know it’s kind of a dumb question but I LOVE the process of creating the sets, and then I post and feel this overwhelming drop of my energy, like: see? It’s worthless, what you do. And it always gets me in the end… :( sorry for being dramatic about it, I just thought you’d be the right person to ask because you’re such a lovely person to your anons :,) anyway, I’m wishing you a good time while giffing and nice days ahead! Xxx 💐
hi anon!! first off, i don't think you're being dramatic at all!! no matter how much i love giffing - and i really do love it - it is still so discouraging to post a set you're proud of and then get pretty much no notes. gifmaking is art! i know it feels so impostor-y to say it, but it's true! it is an art! and when you make art and share it with the world, you want it to be appreciated! i don't think there's anything dramatic or wrong with that. i feel like that a lot, honestly. i'm making a gifset as we speak that i know is gonna get like 30 notes, maximum. and it makes me sad because i'm putting a lot of work into it and it's going to look pretty and that isn't going to make a single difference in how popular it ends up being.
i don't think that's a dumb question at all. i am going to tell you something so arrogant and self-obsessed that pretty much everyone who sees this is going to laugh at me for the rest of my life: my main motivation for giffing at this point is literally just seeing pretty stuff on my blog. every time i finish a set, i go look at it on my blog and think, "wow, this looks lovely on my blog!" the more time i spend on tumblr, the more i think of my blog as a scrapbook of the things i love, and when i make a gifset, it's another addition to that scrapbook. and i love being able to go back and look at a gifset i made and think "wow, i made something beautiful for something that i really enjoy!" and sure, i'll still get a bit bummed about the note count (a set i posted a few days ago literally only has 5 notes right now), but i still get to have it on my blog and i still think it's beautiful.
you mentioned that you love the process of making your gifs. i'm glad! that is the thing you have really gotta hold onto. even if your audience is limited, this is your art. this is something that you made, because you love it. you have really gotta let that fuel you, because unfortunately for all artists, public opinion changes with the wind and validation comes and goes quicker than anything else. i hate it. i hate it for me and for you and for every other artist just trying to put their work out there. but we have really gotta let our own love of creating be the thing that motivates us.
i'm glad you came to me to ask this question, anon. i hope i helped a little bit ♡ also for the record you can always tag me in your creations, even if i'm not in the fandom or if we aren't mutuals! i would love to see & appreciate your work ♡ and if you don't think your creations are reaching an audience that is out there, my #1 tip to you is this: join or start a sourceblog! i have a bit of a problem when it comes to starting sourceblogs (as you may have noticed) but it actually really does help. it also motivates me more knowing that there is an audience out there and i can reach more of them with a sourceblog. it's definitely not for everyone but if you're interested, i say go for it!
if you wanna talk more or have more questions for me, my askbox and dms are always open!! sending you lots of love and i hope you have a wonderful day/evening ♡
3 notes
·
View notes
Note
hi dani, hope you're having a good one. your gifs are so vibrant and hq! if you don't mind sharing, what's your process?
i appreciate the compliment! i first started making gifs back during my glee fandom days in 2011 so i have been doing this for a while lmao, but here's my general process (under a cut because it got long as hell):
i'm gonna assume you know the general giffing process for this - if you need me to help you out with screencaps, lmk! just make sure whatever you use is 1080p. i torrent to get the best possible quality, which is its own tutorial, but there's plenty of those out there.
open up whatever you use to make gifs - i use adobe photoshop cc that i definitely legally got - and go into file -> scripts -> load files into stack and select all the pictures.
once you've done that, go to the window tab and check "timeline" to add the timeline window to your workspace and click "create video timeline, then click the three small boxes in the bottom left to convert it to a frame animation. then go to the hamburger menu in the top right and click "make frames from layers". this will actually put the frames in reverse, so go to the same menu and click "reverse frames". from here i go the same menu AGAIN, click "select all frames", then change the frame delay to 0.05.
now it's time to crop! for the best quality, make sure your image size matches that of tumblr's. tumblr's image width is 540px, if you're doing two images side by side it's 268px, and i do not recommend doing three side by side because things get weird. the height can be whatever you want.
sharpening is another aspect of getting those gifs as crisp as possible. there are many ways to get a good sharpen, but the way i do it, you have to convert your timeline back to video timeline, so click the little icon in the bottom left:

then select all your layers, right click, and select "convert to smart object". then, with that layer selected, go to filter -> sharpen -> smart sharpen, then use these settings:

duplicate that sharpened layer, then go to filter -> blur -> gaussian blur, with these settings:
then take the layer that has both the sharpen and the blur, and set the opacity to 50%.
now it's time to colour! i have the same general process to colour all my gifs, sometimes with an added selective colour layer if i really want to amp up or turn down a certain colour. but all of them can be found under layer -> new adjustment layer. first is a curves layer to brighten up the whole thing

then another, different curves layer to add some contrast:

then a vibrance layer set to pretty high, around 80-100% but i play it by ear because the next layer is actually a gradient map set to soft light with 50% opacity to add some more contrast and tone down the vibrancy a bit

now, in order, i mess around with a selective colour layer (generally i only touch the red, yellow, white, black, and neutral colours, unless there's something i really wanna specifically bring out like the cyans/blues/greens in a lot of the arcane gifs) and for this there's no real system. you just gotta play it by ear depending on the scene. next, do the same with a colour balance layer. i usually top it off with a levels layer to add just a tiny bit more contrast, but that isn't entirely necessary as you can do the same by amping up the blacks in the selective colour layer.
once you're done colouring, go to file -> save for web. make sure to set the looping to "forever", and keep an eye out for the file size. luckily for newer gifmakers, the size limit is a whole 10MB now (though sometimes it'll cap out at something like 9.8 so stay on the safe side). it used to be a LOT smaller, iirc it was 500KB when i first started. if your gif is over size, you're gonna have to just cut out some frames by playing with the edges on the timeline window, since cutting down the colours will affect quality.
you're actually not quite done here - after you've saved it, close your file and then open the gif you just made. it'll default open in frame animation, and you'll see that the delay on the frames is actually 0.07 now. it's something that happens during the conversion to video timeline. select all frames and change that delay back to 0.05 since 0.07 is actually a noticeably slower and less smooth gif. save that the same way you did before, and NOW you're done! thanks for sticking around! happy giffing!
5 notes
·
View notes
Text
Any advice for novice gif makers/people who want to start making gifs
I promised @md-drawz yesterday that I would get to answering this so let’s goo.
I’m afraid all I have is random thoughts and I might be repeating things from this post but just to say, I’m always happy to answer questions and help people with whatever. I haven’t done any tutorials yet but I’ve been thinking of doing a walkthrough of a set or something, so anyway the ask box is open.
I think the most important piece of advice for beginners is to take it easy. I learned to gif years ago but then neglected it for a while before getting back into it this year, and let me tell you I’ve had to relearn and learn a lot and even with a base knowledge it was overwhelming. There might be an urge to try every little trick and effect but I think it’s better to just a) focus on the basics at first and then b) do it step by step. Experiment with lots of different things, sure, but there’s no need to do every single thing for just one gifset. And then just learn when to let it go! Knowing when a gifset is done can be tricky. I usually have a set goal but there’s always more to be done, except then you’ll never post it and move on to the next one.
And that’s another thing, lots of practice. I think making gifs is one of those things that you really just have to do in practice and find your own style, so to say. After a while you’ll learn what scenes to look for, what your ideal process is, all that. It is going to take time but as long as you’re doing it for fun that shouldn’t be an issue.
Another piece of advice, do do it for fun. Making gifs can take up a lot of time and surprisingly much effort so your heart’s gotta be in it. Lord knows it’s not worth chasing notes on tumblr lol and I think making stuff for other people can be fun when it’s a request or something, but there is a limit. I suppose I make gifs because I have all these thoughts about Glee that I want to get out, and sometimes writing doesn’t suffice. And even though I do it for fun that doesn’t mean it doesn’t get exhausting at times - I think I’m a bit overdue for a break lol. But because of the effort involved I’ve decided I won’t do anything I can’t commit to, if not 100%, at least a good 80%.
These are just random thoughts lol but like I say I do want to help people get into giffing because I think it really is such a fun hobby so if there are any specific questions or stuff I’m happy to answer. Lastly, I prepared a quick something while working on my latest set. This is to illustrate one of my points, about taking it easy and learning the basics before diving headfirst into all the intricacies that gifmakers more prolific than I am could go on and on about.
So for example, colouring. Colouring is a biiig big topic and, imo, tricky to get the hang of. I mostly tend to avoid situations where I have to do a lot oops, but I also advise to just go down the easy road and build your knowledge and skills gradually. With this Santana gif, I really didn’t do much in terms of colouring and decided that was good enough because I had 25 other scenes to get to.
It’s not anything amazing, but it’s not anything complicated. And let me tell you, brightness/contrast (and exposure) is doing A LOT of the heavylifting here which takes less than a minute to adjust. On another day I might get bogged down in the details of colouring, but I generally find it’s good to prioritize and go, right, I could spend another 10 hours going over all the scenes and finetuning, or I could say “good enough”. Hardly feels like an actual piece of advice lol but hope it helps someone.
Alright apologies for the chaos, but hopefully there’s at least a little something in there that could be useful for anyone wanting to get started.
#gif asks#kinda#what else do i tag as#gif advice#very chaotic 2am advice but still#basically don't be a perfectionist#even though that hurts lol
3 notes
·
View notes
Note
I had no idea you could somehow save certain actions in ps! 😱 can you explain how you do that? 💖
Absolutely, Sophie! ❤ Always happy to talk Photoshop ♡\( ̄▽ ̄)/♡
Note: there are limits to what Photoshop Actions can record. It’s great for stuff like applying filters or moving layers, but can’t do stuff like replicate brush strokes or freehand selections. Also, actions will replicate your steps very precisely, so I often use shortcuts like Alt + ] or Alt + [ (select 1 layer up/down) instead of clicking on a specific layer to make actions more reusable (more on that later).
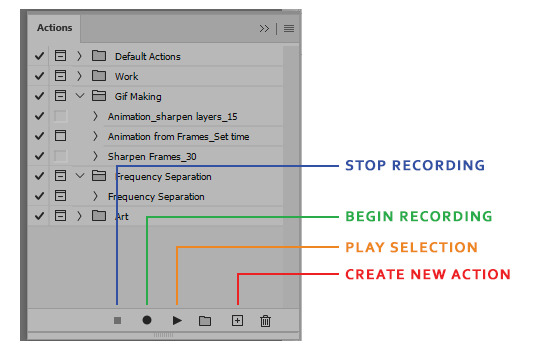
You can open the Actions panel by going to Windows > Actions. Photoshop usually has some default actions already preloaded (I’ve never used these but they’re there lol).
(Rest of the tutorial under the cut because it’s kind of long)
1. When you want to make a new action, you’ll first have to click Create New Action and give it a name:

There’s also a few other options on the creation pop up:
Set: actions can be sorted into folders! You can move them around afterwards just like layers and groups.
Function Key: You can assign your action it’s own keyboard shortcut, provided it doesn’t conflict with a preexisting one.
Color: idk, give it a pretty color? 😅
2. When you’re ready, hit Record:

The Record button will be red as long as you’re recording. You can stop with the Stop button at any time and resume by pressing Record.
The steps it recorded will show up under the action dropdown. You can also click each individual step’s dropdown toggle to see specific details. For example, one of the steps I recorded was to apply Smart Sharpen to a layer, and it tells you the exact settings used.
3. Recording your steps:
So for this example, I imported Video Frames to Layers, and trimmed it down to 30 frames I want to use. Here’s what I want to record for my example action:
Resize the gif to 540px in width
Apply Smart Sharpen to each layer
You can record much, much more (seriously, I’ve seen actions that took Photoshop 15+ minutes to run from start to finish) but I’m going to keep it short so this gif doesn’t run too long.
Here’s what the Layers panel and the Actions panel look like side by side while I’m recording this example action:
So as you can see, I use the shortcut Alt + ] instead of just clicking on the layer. Why? If you click on a layer, Photoshop will record the step as “select Layer 66″ (or whatever the layer happens to be named). Then if you try to use the action again on another set and you don’t have a Layer 66, the action won’t be able to proceed. When you use Alt + ] you can see in the gif above that the step is recorded as “Select Forward Layer” instead of with a specific layer name. This was, you can reuse the Action over and over.
Important Note:
Think of actions like instructions you’ve written for a robot. It will follow those directions to the letter and not know how to swerve around obstacles. So we gotta anticipate them.
For example: the Sharpen Frames action I have specifically applies Smart Sharpen to 30 layers. So what happens if I have less than 30 layers?
Let’s say I have 25 layers that need sharpening. You actually do not need to run the action from start to finish. You can tell it to begin playing at a specific step instead of at the very beginning:

You can also toggle specific steps on or off:

And that’s most of the basics! If you have a lot of repetitive steps in your gifmaking process, Actions are a really convenient way to save time. Hope that helps!
Phlearn on YouTube also has a great tutorial about making actions [here].
18 notes
·
View notes
Note
Omg yes!! There are cc who just make stage gifs always and I'm like at awe with how not only do they like, make them really crisp but can make them different colors than usual like huge respect!
Oohh yes! Adding some text can make a set look a bit fancy because not only fun coloring in whatever style but add some cool looking text and you're good. Ngl I went through like 13 text packs from one person and had fun picking them out and playing around with them! Coloring is super fun! I kinda figured what my "style" is, Granted its not consistent coloring (which I have no clue how to do lol) but nonetheless, it be enjoyable. Some stuff I am limited since whole photopea is great, it doesn't use a timeline which I think is key to many aspects of some gif making tricks (some you can do but you need to do extra steps. Others not so much) seeing how much you have grown makes me feel proud! Like look at you!! I bow down to you
Jzjajdjsjsh oof, I now always save my gifs when I at least make colorings because then I can at least have that if the program crashes. BUT YES TO THST! idk if it is because I am stubborn or what, but once I am committed with an idea I keep going until I tried everything lol. If it flops, it flops lol but oohhh will do! I may pop in and send a message to you *sips tea* but also, happy late holidays to you love!!
also with the framing???? i saw a tutorial floating around about altering the gif to actually follow the person but it seems like so much work i can never ajdlfkjadsf if jun keeps going out of frame so be it </3
yeah!! idk if i have a specific coloring style either ajfkdlj it changes every few months. and ahhhhhh yeah i haven't tried photopea myself but ya know for it being free it's pretty nice! and thank you hehe you as well excited to see where you grow with gifmaking <3
yeah unfortunately with like. everything crumbling around tumblr LMAO you really gotta just make gifs for the pure enjoyment of it bc honestly what's the point otherwise ajfldkdjasf at this point i'm like idrc if my set flops, i made it and that's what matters :D
and it's the last day of 2021 (at least for me as i'm late replying to this ask ajfdkldjf)!!!!! happy holidays and new years to you and hope 2022 treats you well <3333333
2 notes
·
View notes
Text
how to apply psds and adjust colouring for gifs
*** DISCLAIMER: i am only a basic user of photoshop and have been using it for less than a year. i rely on other creators’ psds and adjust the colouring within them. this tutorial is for beginners to learn how to apply psds to gifs and to adjust the colouring to their liking.***
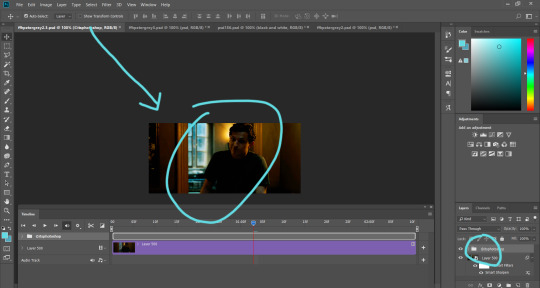
how to get gifs to go from this:
to this:

please see these resources on how to gif if you do not know already or need more information: X X X
i use photoshop cc extended 2018 (downloaded from here)!
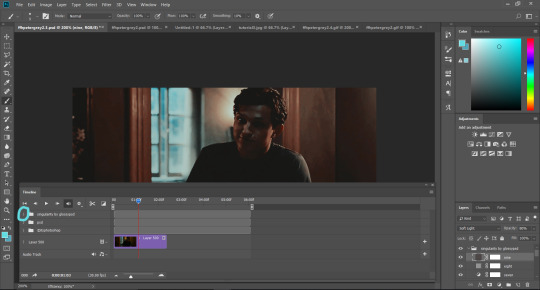
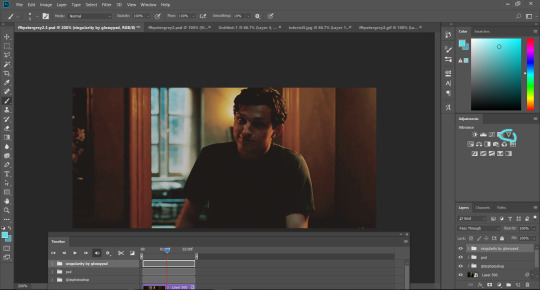
1. after you have converted your frames into a smart object as one layer within your timeline and smart sharpened it, open up a psd file you would like to use. for this example, i’m using itsphotoshop’s base psd.


2. next, drag your the psd folder (under layers) over to your gif’s window and onto the gif itself. see how i do it in this video. the psd folder will now appear in the layer section of your gif.

3. let’s take a closer look at the gif and zoom in a little.
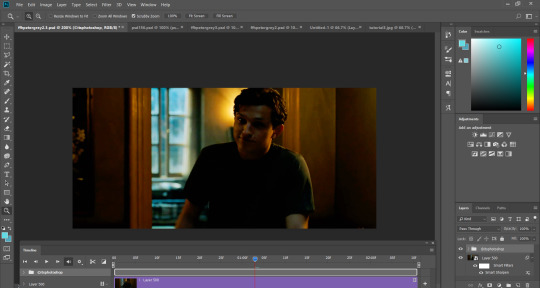
my gif’s brighter, but not enough. i’m going to use another psd and drag it onto the gif. this time, i’m using selenapastel’s psd #156.
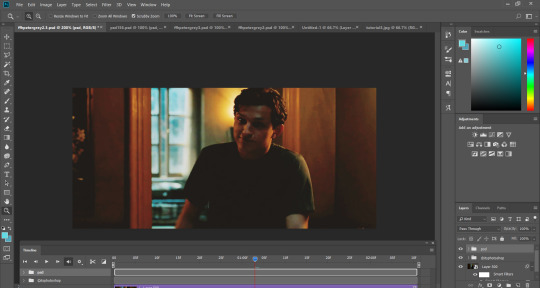
4. an improvement, but it still looks too dark and i’m not feeling the yellowish vibe... i’m going to add another psd to this - using glossypsd’s singularity psd.
now it lacks yellow because it’s heavy on grays and it’s darker than i wanted. there’s also something else...

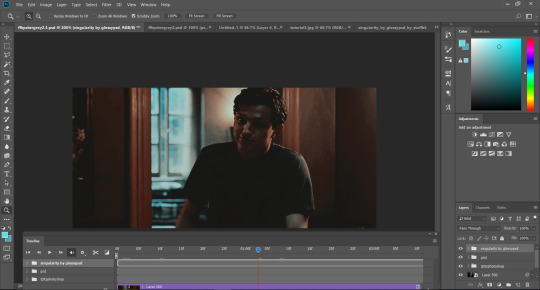
right when peter shrugs his shoulders, it’s as if the lights dimmed. something is up with the psd’s colouring within the folder. also, there’s a flash of gray at the end, meaning the psd went over the gif itself.
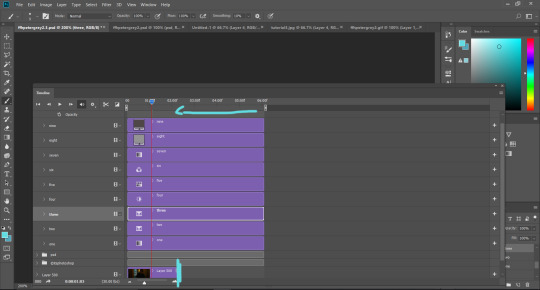
5. go back to your gif. we’re going to zoom out of the timeline. slide it to the left until you can see all the psds and gif layer’s stop points.


and now we see that the psd files overrun the gif layer. how do we fix this???
6. click on the arrow beside the psd file you want to adjust (in this case, the singularity psd). you will now see a breakdown of all the layers in the psd file.

that glitch when peter shrugged his shoulders was because the gray layers didn’t start from the beginning. drag the beginning of the files to the start of the gif.
7. if you scroll down or increase the size of your timeline box, you notice the overrun of all the files within singularity psd over the gif layer.
we gotta fix the overrun of the psd files by shortening it to the end of the gif layer. drag each individually to the left until it reaches the end of the gif.
once i finished shortening them all, all the other psds shortened as well since the singularity psd was the problematic child in this situation - but we good now!
8. now back to colouring! i won’t adjust the base psd and the second psd that i used (i like them as is), but i’ll adjust the singularity psd. what i do when i adjust is turn on/off the layer visibility of the layers under the layers section on the bottom right hand corner (they look like eyes).
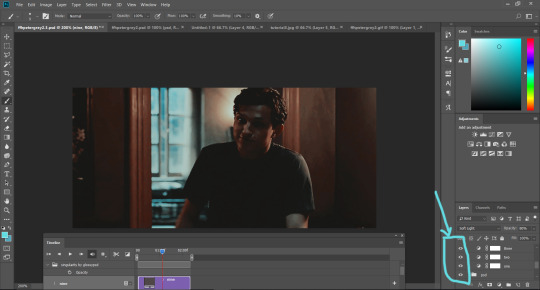
9. i turned off the first layer, which is a gradient map, and it brightens the gif without it. i like it, so i will decide to delete the layer.

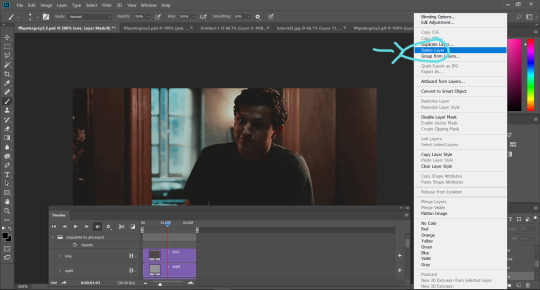
to delete the layer, you can either press delete on your keyboard or right click the layer and click ‘delete layer’. i try to delete unnecessary layers as much as possible to keep it under the 3mb limit (the more layers and editing, the more space and data it will take).
i keep doing this until i end up with the layers labelled as five, seven, eight, and nine.
sidenote: you can also play with the opacity of the layers and psds. notice how the preset opacity of this layer was at 14%.

as an example, if i adjust it to 100%, it’l look like this:

aaAaaAand i’m keeping the opacity at 14%!!
10. so, we’re here:

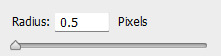
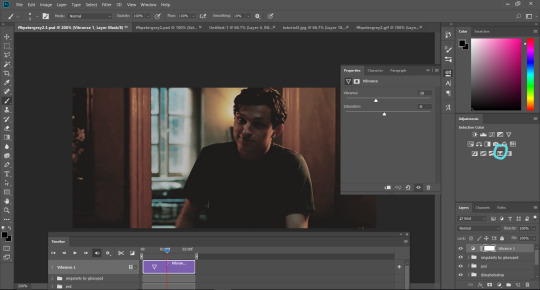
but i want a softer look to it. i’m going to use the adjustments (above the layers box). i’m a basic beginner hoe, so i tend to use vibrance, brightness/contrast, and selective colouring. other ones i use are levels, curves, and exposure, but i won’t be using them for this tutorial.
vibrance:
click on ‘vibrance’ (the upside down triangle). often with adjustments in general, i just drag the arrows to my liking. i’m going to drag the vibrance level down to see what it’s like.

this is starting to become what i envisioned - a more softer look to it! i adjust the vibrance and saturation and end up with -28 vibrance and -8 for saturation.
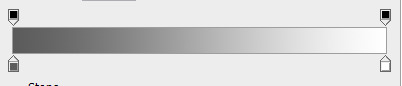
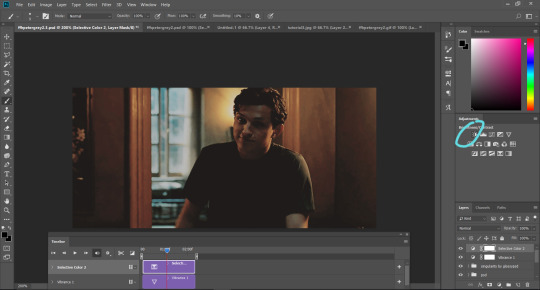
selective colour:
click on ‘selective colour’ (second last icon on the third row; looks like four triangles in one rectangle).
because this scene/gif is mostly yellow and brown colours, especially for what i want to adjust, i will adjust the yellows and the reds. play with the adjustments in any order and you’ll begin to see what you like.
for the reds, i ended up here:

for the yellows:

brightness/contrast:
we’re almost done! click on ‘brightness/contrast’ (first icon in the first row with the sun).
i want the gif a little brighter and adjust the contrast a bit:

i think we’re good to go!
11. to export it as a gif, go under ‘file’ > ‘export’ > ‘save for web legacy’!
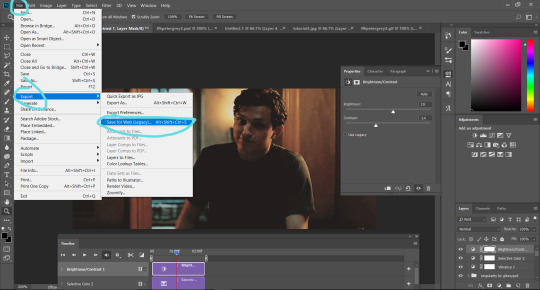
12. wait for it to finish exporting. when it’s finally finished, make sure to have the settings that you want.
these are my default settings:

ensure it’s GIF and that the animation looping is on ‘forever’. for my gif settings, i prefer to use selective pattern with transparency on (these settings depend on preference).
oH NO!!! my gif is over 3mb!!! do not fret!!! we will fix that in a moment. just save the gif once your settings are good!
13. find the saved gif file in your computer and drag the file into photoshop. it will open it with all the frames displayed like so:
14. delete the frames you don’t want to make it less than 3mb! a rule of thumb is that for each frame, it’s about 0.1mb. my gif is around 5mb right now, so i’ll have to delete around 20 frames (1 frame = 0.1mb * 10 = 1mb and we have to get rid of 2mb so 0.1 * 20 = 2mb).
to delete frames, click on the beginning frame of what you want to delete, hold down the shift key, and then click on the ending frame of the section you want to get rid of. press the trash button.
continue this process until you have the gif under 3mb. to see if it’s under 3mb, export the gif to see how much mb it will be!

15. last, but not least, your gif may be at a speed you don’t want. highlight all the frames by clicking on the first frame, holding down the shift key, and clicking on the last frame of the gif.
then, click the arrow on the bottom right hand corner of any frame and select ‘other’ for the frame delay.

the gif was originally at 0.03 frame delay. the optimal frame delay time is 0.05, but it depends on the quality of the video and what your preference is. generally, it ranges from 0.04-0.08. i decide to go with 0.05!
lastly, export the gif and voila!
upon completion of this tutorial, i realize some of the pictures may be unclear, so let me know if you have any questions!! feel free to message or send me an ask! also check out my resources side blog!
again, i want to reiterate that i am NOT an expert with photoshop, so i may not be able to answer all your questions. if i can’t, i’ll try my best to find an answer and if not, there are many great gifmakers on here who are willing to help!
233 notes
·
View notes
Photo

lmaoo i found this pretty interesting so figured i may as well make a post about it. it being me trying to figure out how to make a gif with 0 experience, looking at 0 tutorials, and using absolutely none of the programs/capabilities typically used.
just me, my screen recorder, gimp, and kdenlive ;D a lot of me reflecting/rambling below the cut.
the first gif: first off i needed to just figure out how to even make a gif in gimp, because fuck paying for photoshop. lots of just dumb googling here and this took me the longest because most of it was just research. basically you have to split out all the frames (i used ffmpeg) and import them in as layers.
for a while i tried looking at scripting usages for gimp, but none were really updated/worked. at this point idk if i’m invested enough to do anything about it but it’d be pretty neat if i could hack some shit up
this was also where i found out about the 255 color limit on gifs, which led me to find out about hacks for true rgb gifs. the stuff about having different map indexes per frame to mix a pseudo-rgb effect actually sounds super interesting to me but with what i have that sounds like it’d be a huge pain in the ass to do. like maybe if i had a good chunk of time to experiment with that i would but i don’t sooooooo nah lmao.
the ONLY good thing i think gimp has is the optimization for gifs option where it will remove parts of each frame that didn’t change from the previous frame, which greatly reduces the file size and i think it actually helps a bit with the 255 color index since you can factor transparency into the dithering.
on a side note, i just found it funny seeing the dithering algorithms mentioned here because i’ve written my own dithering algorithms for some graphics coursework back in college. kinda like “ey i actually know what this is and how it’s calculated and the tradeoffs and shit” kinda thing lmao
the second gif: trying to add filters within gimp. even more annoying because you can only apply filters to one layer at a time because gimp fucking sucks. none of the scripts i found that claimed to automate that worked, mainly because i think the scripts are outdated with the version of gimp i have. and the GAP api which would have solved all my problems is also broken for the gimp version i have.
so basically ctrl-c ctrl-v 60+ times for each filter change lmao
the third gif: looked into vapoursyth because i’ve heard a lot about it for sharpening/denoising. ran away once i noticed it’d fuck up my python installation. i have python 3.6 for various reasons and upgrading to 3.7 would break many things so i’m not too keen on changing that
so basically i went back to my shit video editor friend kdenlive and messed around with all the filters in there. it actually has a lot of fucking filters and it was kinda fun actually figuring out what they all did for once. better than editing 60+ layers individually in gimp, that’s for sure, just do it at the video level and then make minor adjustments in gimp later.
overall: i think i actually like the middle gif the best. it doesn’t have any sharpening but i had a little too much fun applying all the random ass filters i could find for the third gif lmaooo. like i’m pretty sure i just applied filters that just undid a previous filter and then i did that like 843248392 times.
my next steps will probably be to actually get video files instead of screen recording but i’m also lazy... but with what i have i really gotta ensure the quality at the video level lmao.
part of me is kinda considering getting at least a trial for photoshop just to see how much smoother the experience goes there because even though i’ve only used gimp i can 100% tell you it’s absolutely not what you want if you wanna be an actual gifmaker lmao. or maybe i just need to find more and better hacks around it.
idk. i’ll keep trying. i’m still determined to promote the loving junhui agenda with more gifs but also it’s just a cool experience to kinda hack your way around this stuff. there’s actually a fair bit of software engineering involved in some aspects of it, more than i realized anyways, which also adds to that interest for me from a programmer’s perspective.
anyways if you actually read this. i’m impressed. feels like a fucking diary entry honestly, but i also kinda like logging first-experiences like this in this way.
3 notes
·
View notes
Text
July 2019 Pond LiveChat Recap
We had a great time chatting with @crispychrissy today! Thank you so much, Chrissy, for joining us!
This month, to make up for not having a chat in June, we chatted for two hours about some issues related to posting your works on Tumblr. Chrissy talked to us about making our own gifs, we discussed giving credit to gifmakers, how to make a Keep Reading cut, and much more!! A rundown of the chat, as well as general Pond news, is below the cut!
[Editor’s Note: For ease of understanding, the tags you put at the bottom of a post with a # will be called #hash-tags, while the tags you use to notify another Tumblr user that you’ve posted something will be called @mention-tags.]
Q: What programs do you use to make gifs? Are they free, or do you have to buy them?
Chrissy: Well, there is a free one I used back when I started called GifCam. It's easy to set up (it's just an exe) and there's a little learning curve, but it's easier than what I do now. I currently use a screen capture program that came with my $1500 graphics card along with Sony Vegas. If anyone wants GifCam, I can send it to them.
Q: And are you watching via Netflix or some other way?
C: Yes, I use Netflix. I have the first 6 seasons on DVD along with 12 and 13, so for bloopers and deleted scenes I have to use the DVD's. For current episodes, I have YouTube TV, and use the screen capture option with that.
Tumblr has a 3MB limit on file size, so it’s really hard. The amount of frames you can fit in a sub-3MB gif depend on so many factors. Colors in the scene, movement, FPS (frames per second), and length. A low FPS gif looks pretty choppy, while a high FPS gif is smooth as butter.
Q: So that's why some gifs seem to go on forever, and others are quick things.
C: Yes. I can make a really long gif of something that's really really tiny, but if you want it to fit into the pixels of a Tumblr post, it limits how long they can be.
Q: And I guess that's also why some gifs I find from Google and try to put into a post won't animate right. If they're too big, I guess Tumblr stops them?
C: Yes. Tumblr just freezes the image instead of animating it. When you save it, check the file size.
C: So this is an example of the brightness and colors of a gif affecting the size. Since there's so much brightness and color, the more the gif has to render, meaning the bigger the size. This worked out to be only 35 frames, which is like... really small, but the gif itself came out to be 2.83 MB.
Q: Are websites that come up when I Google "gif maker" worth my time and effort?
C: Only if you don't mind a stupid watermark from the company.
Q: About giving credit to gifmakers....any thoughts?
C: Well, all my gifs have "cc" in the bottom right corner, that's how I give myself credit if they're used. Not everyone knows the "cc" gifs are mine, but I do. I offer my gif making services to anyone if they need a specific gif made for a story or otherwise, not limited to SPN. I've made porn gifs, ones from YouTube, and from other shows. If it exists, I can gif it.
Tumblr's search feature is... well, it's not perfect, but it'll help give you a quick gif and give credit to the author. When someone uses a gif I've posted, it gives me a notification, which is awesome, but annoying if it gets reposted a crap ton. It also links the person back to the original post and who posted it.
Q: Some folks seem to think that if they grab a gif from Google, just saying they found it on Google is giving credit. I know this isn't the case. (I mistakenly thought that pasting the link to the image would allow folks to click through to where I found it, but discovered last night that's not the case.) If I found a gif on Google that was yours and used it, and provided a link to the page where Google found it, would that be enough, do you think?
C: Sometimes a reverse image search can be helpful, but it mostly doesn't work with gifs.
That would be fine for me. Like I said, I have "cc" in the corner so that's me marking the gif as one of mine. I can't control where someone reposts them or uses them.
There's a difference between reposting it to a site like Pinterest or using my gif on a LiveJournal post and saving it and reuploading it like it's yours and without giving me credit. One is malicious, the other isn't. I have a problem with the latter.
Q: I started looking at where Google finds gifs last night, and noticed that sites like gfycat have whole pages of gifs, and just citing that page might not be enough. (And trying to find where Google found them many times leads to a Tumblr blog that’s now gone.)
C: Google finds gifs all over the place. Someone can take my gif from Tumblr and reupload it to a bunch of different websites, all which would show up in a Google search. It's hard to find the original poster when it happens. Yeah, people delete their pages, but the gif stays. If you get to that point, just say, “Gif found on Google, unable to find original post"
Q: Speaking of finding gifs, how does the search function work on Tumblr? Is it just whatever the post was tagged with or the first 5 tags like regular searches or something else entirely?
After some discussion, we all decided that the gif search uses whatever #hash-tags are on a post where a gif is used, and then makes that gif searchable by that #hash-tag. So, if you make a post about chronic pain and use a gif of the Winchesters hugging, that gif will then show up in the gif search under #chronic pain. Also, popularity of the gif ensures it shows up at the top of the search. As people stop using a gif, it eventually falls out of the search results.
Q: Going back to file sizes...Do the dimensions of the source video (like watching Netflix/YouTube in full screen vs in a smaller window) impact the size of the gif, specifically with GifCam?
C: Now, that's a HUGE reason why I switched the way I make gifs. Netflix has a set streaming rate, which is only optimized at full screen. So the smaller you make the window to get it to fit into the size of the gif, the more degraded the image is. (Some confusion was expressed, so she continued to explain it further.) Netflix likes to run as big as possible. It wants as many pixels it can get to show you an image. If you minimize the window, it kind of freaks out and has to quickly scramble to make everything smaller so the video keeps playing. It does that by squishing everything down, making the image look weird. It might not be too noticeable when you look at it, but when you make gifs, they're gonna come out lookin all wonky.
Q: So, you have to make the Netflix window smaller in order to capture the images with the gif-making software? The gif-making software can't capture full screen?
C: GifCam will record the gif based on the window size. You gotta squish the window down to make it a reasonable size to fit on Tumblr. Other programs, which you might have to pay for, might be able to capture full screen and do the squishing for you. (Side note: during this discussion, Chrissy gave us some examples, and in showing them to us, revealed that a good gif size for Tumblr is around 410-430 wide, 230-250 high.)
After that, we moved on to other topics that had been brought up in the Pond survey a while back.
How to make a Keep Reading cut and when you should use it.
Note: Although this worked for one person on the app, it doesn’t seem to work for all, and we’re not sure why. There are too many variables to determine the root cause for why it doesn’t always work.
Q: "When should I give someone credit for being a beta (for example: I bounced ideas with someone for a minute or two but they didn’t technically beta read it; I can’t decide between X and Y (with no context), pick one)"
A: Always mention anyone who helped you. You don’t have to say they beta-read your story, but at least mention that they helped, even if they didn’t know it! Gratitude is always a good thing!! Writing takes a village, and being thankful for help is courteous, kind, caring, and helps you to make friends that will be the same right back to you.
How do I add my masterlist for my blog description?
Note: Chrissy pointed out that if you change your bio by hitting “edit appearance” instead of “edit theme” the link will break, so be careful where you add this! These things and more can be found in the Pond FAQ list!!
Q: The facts on search issues (re: links, tags, and anything else that keeps a fic from being “searchable”)
A: A lot of testing and research went into trying to figure this out, and we still probably don’t have it all figured out, but we learned some interesting things!
Most importantly, since we have a lot of smut writers, if you use the #hash-tag #NSFW on your post, your post will NOT show up in any searches!!
Adding an external link should not cause your post to be unsearchable, but that’s not guaranteed. According to Tumblr’s own help pages, “some links may cause posts to be hidden from recent search results.” Since spambots use external links in their posts, this will always be something that could possibly interfere with your post being searchable.
According to Tumblr: “Blogs that have been either self-flagged or flagged by us as “explicit” per our old policy (before December 17, 2018), will not show up in search. Users under 18 are still not allowed to click through to see the content of these blogs. If you think your blog has been erroneously marked as explicit, you can file an appeal by following these instructions.”
When you are searching for your post, make sure you are looking at Most Recent posts, not Most Popular!
Some things to know about searching:
There are two ways to search a blog. If you use the search box at the top, then your results will have a URL like this: https://spnfanficpond.tumblr.com/search/big-fish-chat
However, that is not the only way you can search your blog. If you look at a post, and click on one of the tags on that post, your results will have a URL like this:
https://spnfanficpond.tumblr.com/tagged/big-fish-chat
The first search will look through all of the text in a post to find the words you’re searching for. The second search will only look for posts with that specific tag. If a blog doesn’t have a search box in its theme, you can type these searches in manually, and they will still work.
You can also do these searches manually through all of Tumblr. Keep this in mind when you’re doing your general Tumblr search and check the URL of your results, because... “search” & “tagged” look at #hash-tags differently!
(This is so confusing, we know.)
“Search” will look through 20 #hash-tags. “Tagged” will only look through 5 #hash-tags. So, put your most important #hash-tags in your first 5!!
Q: Can you talk about xkit?
A: xkit is awesome and we should all bow down to the xkit guy because he fixes things when Tumblr poops on the carpet. Seriously. It’s only for use on desktop, but it makes Tumblr so much easier to manage.
xkit is an extension for your browser. Look for New xkit, and download that. Once you have xkit loaded, click on the xkit icon near the top right of your screen. When the xkit window pops up, click on Get Extensions. We could suggest a list of the best extensions, but they’re all seriously awesome. Blacklist seems to be the most common, as it filters out posts you don’t want to see based on tags and text. Auto Tagger, Activity+, Outbox, One-Click Postage, and Quick Tags are all ridiculously useful for everyday blogging. The whole thing is super easy to learn and use, and you can’t break anything while you’re learning. Some extensions, like Blacklist, may slow your computer down when you’re surfing your dash because they essentially surf it ahead of you and manipulate it. If you start seeing problems, you can disable any extensions you decide you don’t want to use, anymore.
Seriously, it’s freaking awesome.
Great talk, guys! If you have ideas for topics, please let us know!!

General Pond Updates and Reminders
What we’ve got cooking up next:
We’re working on setting up the discord server. We’re still learning the ins and outs and all the options available. More options means more discussion among the admins and decisions to be made, so please be patient! We’re getting there!
Reminders:
Angel Fish Award nominations are accepted all month long! No need to wait to tell us how much you liked a fellow Fish’s work! IF YOU HAVE SENT IN A NOMINATION, BUT HAVE NOT RECEIVED A PRIVATE MESSAGE CONFIRMING WE RECEIVED IT, WE DIDN’T GET IT. Be sure to use Submit instead of Ask!
Don’t forget to submit your stories to be posted to the blog! When your stories are on the blog, then they are easier to nominate for Angel Fish Awards!
SPNFanFicPond Season 14 Weekly Episode Challenge - Now that the season is over, we will be reposting each prompt list through the summer months! Remember, there’s no deadline for submissions!
Say hi to June’s New Members!
Check the Pond CALENDAR to see when Big Fish will be in the chat room and other Pond and SPN events are happening! Know of something that’s not on the calendar, send us an ask or submission with the deets info details! The calendar offers a lot of features, such as showing you when things are in your own timezone! Since we’re an international group, that’s a definite plus!!
We don’t have a topic or speaker set up for August’s event, yet, so if there’s something you want to talk about, or someone you want to talk to, LET US KNOW!
9 notes
·
View notes
Note
hey I rly love ur gifs they're so crisp and clear and I rly aspire to become a gifmaker like u!!!
oh thank u so much!! it means a lot to me :-(
hmm.. 90-100 frames seems like a lot but it depends on your gif width/height size! it’s definitely reasonable if you’re doing a gif that’s 268x180 or a small height like that, but when i do 268x268 i think the max i can usually get away with is 70-80 frames and for 268x350 it’s about 50-60 frames.. hopefully that gives u a good idea! honestly the Best way to cut down on size imo is just to cut out excess frames :-( sometimes u just gotta sacrifice them.. or split your gif into two gifs…
other than that the two main ways that i’ve found to help increase your resolution and also decrease your gif size are through coloring and topaz!! as for coloring.. your goal is to decrease the number of vastly different colors in your gif so that when you hit that save for web and devices and it converts it to 256 colors it doesn’t turn into a grainy mess! so my main advice is just use selective color to increase the black% on your blacks and decrease the black% on your whites, and then use hue/saturation to wipe out any undesirable tones and create similar colors throughout your gif if that makes sense? and for topaz.. personally i dont even touch topaz clean because it scares me but depending on the scene you’re giffing topaz denoise can make a HUGE difference in decreasing the gif size and increasing the quality of the gif since you’re taking out noise and evening out the colors.. so i would definitely use topaz denoise if you see a lot of grain/noise in your gif even before you hit save for web!
i hope this helps a little… the coloring part is really hard to explain so if that makes 0 sense u can tell me that and maybe i can make a very short video to explain what the fuck i mean fjdsfkd but happy gifmaking !! :D
6 notes
·
View notes
Last Seen Blogs
schaduwtuin
Schaduwtuin
ilblogdellestorie
STORIES

bespokebodyart
Bespoke Body Art

paolalopezfeliu
Pao

proxnsxas
melodramatic Victorian appropriating dumbass