#graphiql api testing tool
Explore tagged Tumblr posts
Visit Tumblr Blog
Explore Tumblr blogs with no restrictions, modern design and the best experience.
Last Seen Tumblr Blogs


Fun Fact
Celebrities use Tumblr as well.
Video
youtube
Nodejs GraphQL API Project Tutorial for Microservice Developers | #graph... Full Video Link https://youtu.be/DXPxXJ7Qy7g Hello friends, new #video on #nodejs #graphql #api #microservices #tutorial for #api #developer #programmers with #examples is published on #codeonedigest #youtube channel. @java #java #aws #awscloud @awscloud @AWSCloudIndia #salesforce #Cloud #CloudComputing @YouTube #youtube #azure #msazure #restapi #nodejs #api #restapitutorial @codeonedigest #codeonedigest #graphqltutorial #graphql #javascript #graphqltutorialforbeginners #graphqlapireact #graphqlapicalls #graphqlapiproject #graphqlapinodejs #graphqlnodejstypescript #graphqlnodetypescript #graphqlnodejsreact #graphqlnodejsexpress #graphqlnodejsexpressexample #graphqlnodejsreact #nodejsgraphqlreact #graphqlserver #graphqltutorialapollo #graphqlapollo #graphqlapolloserver #graphqlapollotutorial #graphqlapollonodejs #apollographqlnodejs #api
#youtube#nodejs#graphql#nodejs tutorial#graphql tutorial#graphql schema#graphql query resolver#graphql resolver#graphql api#graphql server#graphql apollo server#apollo server#graphiql tool#graphiql api testing tool
1 note
·
View note
Text
Understanding GraphQL
Before diving into Spring GraphQL, it's essential to grasp what GraphQL is. Developed by Facebook in 2012, GraphQL is a query language for APIs that allows clients to request only the data they need. Unlike RESTful APIs, where the server defines the data structure, GraphQL enables clients to specify the exact data requirements, reducing over-fetching and under-fetching of data.
Key Features of GraphQL:
Declarative Data Fetching: Clients can request specific data, leading to optimized network usage.
Single Endpoint: All data queries are handled through a single endpoint, simplifying the API structure.
Strong Typing: GraphQL schemas define types and relationships, ensuring consistency and clarity.
Introducing Spring GraphQL
Spring GraphQL is a project that integrates GraphQL into the Spring ecosystem. It provides the necessary tools and libraries to build GraphQL APIs using Spring Boot, leveraging the robustness and familiarity of the Spring Framework.
Why Choose Spring GraphQL?
Seamless Integration: Combines the capabilities of Spring Boot with GraphQL, allowing developers to build scalable and maintainable APIs.
Auto-Configuration: Spring Boot's auto-configuration simplifies setup, enabling developers to focus on business logic.
Community Support: Backed by the extensive Spring community, ensuring continuous updates and support.
Setting Up a Spring GraphQL Project
To start building with Spring GraphQL, follow these steps:
1. Create a New Spring Boot Project
Use Spring Initializr to generate a new project:
Project: Maven Project
Language: Java
Spring Boot: Choose the latest stable version
Dependencies:
Spring Web
Spring for GraphQL
Spring Data JPA (if you're interacting with a database)
H2 Database (for in-memory database testing)
Download the project and import it into your preferred IDE.
2. Define the GraphQL Schema
GraphQL schemas define the structure of the data and the queries available. Create a schema file (schema.graphqls) in the src/main/resources/graphql directory:
graphql
Copy code
type Query {
greeting(name: String! = "Spring"): String!
project(slug: ID!): Project
}
type Project {
slug: ID!
name: String!
repositoryUrl: String!
status: ProjectStatus!
}
enum ProjectStatus {
ACTIVE
COMMUNITY
INCUBATING
ATTIC
EOL
}
This schema defines a Query type with two fields: greeting and project. The Project type includes details like slug, name, repositoryUrl, and status. The ProjectStatus enum represents the various states a project can be in.
3. Implement Resolvers
Resolvers are responsible for fetching the data corresponding to the queries defined in the schema. In Spring GraphQL, you can use controllers to handle these queries:
java
Copy code
import org.springframework.graphql.data.method.annotation.QueryMapping;
import org.springframework.stereotype.Controller;
@Controller
public class ProjectController {
@QueryMapping
public String greeting(String name) {
return "Hello, " + name + "!";
}
@QueryMapping
public Project project(String slug) {
// Logic to fetch project details by slug
}
}
In this example, the greeting method returns a simple greeting message, while the project method fetches project details based on the provided slug.
4. Configure Application Properties
Ensure your application properties are set up correctly, especially if you're connecting to a database:
properties
Copy code
spring.datasource.url=jdbc:h2:mem:testdb
spring.datasource.driverClassName=org.h2.Driver
spring.datasource.username=sa
spring.datasource.password=password
spring.jpa.hibernate.ddl-auto=update
These settings configure an in-memory H2 database for testing purposes.
5. Test Your GraphQL API
With the setup complete, you can test your GraphQL API using tools like GraphiQL or Postman. Send queries to the /graphql endpoint of your application to retrieve data.
Benefits of Using Spring GraphQL
Integrating GraphQL with Spring Boot offers several advantages:
Efficient Data Retrieval: Clients can request only the data they need, reducing unnecessary data transfer.
Simplified API Management: A single endpoint handles all queries, streamlining the API structure.
Strong Typing: Schemas define data types and relationships, minimizing errors and enhancing clarity.
Flexibility: Easily add or deprecate fields without impacting existing clients, facilitating smooth evolution of the API.
Conclusion
Spring GraphQL empowers developers to build flexible and efficient APIs by combining the strengths of GraphQL and the Spring Framework. By following the steps outlined above, you can set up a Spring GraphQL project and start leveraging its benefits in your applications
0 notes
Text
The Strength and Beauty of GraphQL in Use

The Strength and Beauty of GraphQL in Use
Facebook developed GraphQL as a major problem-solver for more efficient mobile data loading in 2012 and released it as an open-source solution three years later. Since that time, it mistakenly associates with PHP only and lacks trust given the Facebook's reputation (if you know what I mean). However, a recent Netflix case that finds GraphQL as a game-changer to power the API layer and increase the scalability and operability of the studio ecosystem attracts attention. This specification already gained popularity — given State of JavaScript 2019 Report, 50.6% of respondents have heard of GraphQL and would like to learn it. However, The New York Times, Airbnb, Atlassian, Coursera, NBC, GitHub, Shopify, and Starbucks are already among the GraphQL users. We decided to dwell on the beauty, strength, and some constructions of GraphQL in its scalability, performance, and security aspects and tell about our use cases for a banking sphere and a platform of commercial targeting. See the list of useful toolkits added in the end as a bonus.
GraphQL: the Beans Spilled
GraphQL is a convenient way of communication between a client and a server first. Sometimes one can see it as an opponent to REST API given the main difference that GraphQL brings to the table — only endpoint to fetch the data by one call from multiple sources. Meanwhile, we are to provide the space for consideration whether this specification is relevant to particular tasks or REST API is the silver bullet for your case.
Both REST and GraphQL APIs are stateless, supported by any server-side language and any frontend framework, exchange the data through the JSON. But the one and the only endpoint containing the query expression to define the data that should be returned creates the what-you-see-is-what-you-get principle to optimize the work. Let's deep dive into the specification's main advantages and disadvantages.
Performance and Security
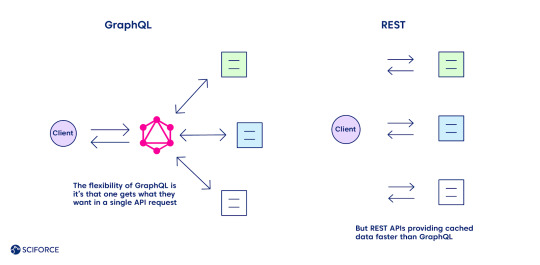
The flexibility of GraphQL is its main advantage over REST, as one gets what they want in a single API request. Define the structure of the information to receive back, and it goes back in the format requested, no under-fetching or over-fetching.
Meanwhile, caching seems to be one of the GraphQL downsides compared to REST (see the complete list of all the pros and cons further). REST APIs use the HTTP caching mechanism, providing cached data faster. It leverages its community-powered and time-tested feature, leaving GraphQL behind at the moment.
Security is another area of improvement for GraphQL while comparing it with REST, which boasts of a more mature system. The latter leverages HTTP authentication, JSON Web Tokens (JWT), or OAUth 2.0 mechanisms.
Pros and Cons: All Things Considered
Unlike REST API, GraphQL has detailed documentation and supports the function of nested queries that contributes to the principle "no over fetching and under fetching data," which happened while using the first specification. Query and mutation are the joint GraphQL operations. Thus, the CRUD (create, read, update, delete) model is not relevant for GraphQL as the create operation executes through the query command (other ones are implemented with mutations).
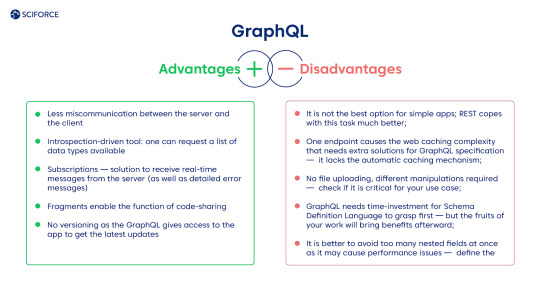
Advantages
Less miscommunication between the server and the client.
Introspection-driven tool: one can request a list of data types available.
Subscriptions — solution to receive real-time messages from the server (as well as detailed error messages).
Fragments enable the function of code-sharing.
No versioning as the GraphQL gives access to the app to get the latest updates.
Disadvantages
It is not the best option for simple apps; REST copes with this task much better.
One endpoint causes the web caching complexity that needs extra solutions for GraphQL specification — it lacks the automatic caching mechanism.
No file uploading, different manipulations required — check if it is critical for your use case.
GraphQL needs time-investment for Schema Definition Language to grasp first — but the fruits of your work will bring benefits afterward.
It is better to avoid too many nested fields at once as it may cause performance issues — define the architecture of the query beforehand.
Our Use Cases with GraphQL
GraphQL provides developers with higher scalability of the system that applies in any sphere. We want to share our experience of functions diversification for a commercial targeting platform and solving the banking application's two-fold task.
The Platform for a Commercial Targeting
GraphQL became a convenient solution for one of our clients who needed to develop a platform for commercial targeting, providing a straightforward approach for searching the potential customers in any national institution or facility. Using it, the client can direct the ads straight to the audience of interest using geolocation data and a set of filters. The platform consists of two primary services: one for geo-based consumers extraction based on PlaceIQ dataset usage and one for attribute-based (consumers identity graph) with consumer dataset. The project can be extended by adding the missing residential dataset to retrieve residents at requested addresses. Also, the services could be wrapped into the REST API to provide the ability to trigger them using web requests.
Risk Reduction and Resilience Boosting Financial Platform
An average bank encounters no more than 100K transactions a day. Moreover, it also faces malicious actions and the risk of cyberattack. One of our clients needed to empower their software platform to encounter higher transaction pressure and provide a higher risk-management system to avoid financial crimes. As a result, we have developed a solution that stands for the high amount of transactions and provides the reports while detecting anomalies based on the transactions' data in real-time.
GraphQL: Useful Toolkit
Check out the growing GraphQL community to find the latest updates on this solution. There are many horizontally and vertically developed solutions for GraphQL client, GraphQL gateway, GraphQL server, and database-to-GraphQL server. Add some of the tools that you enjoy using while working with GraphQL in comments to this blog.
GraphQL's servers are available for languages like JavaScript, Java, Python, Perl, Ruby, C#, Go, etc.
Apollo Server for JavaScript applications and GraphQL Ruby are some of the most popular choices.
Apollo Client, DataLoader, GraphQL Request, and Relay are among popular GraphQL clients. Graphiql, GraphQL IDE, and GraphQL Playground for IDE's respectively.
Some handy tools:
GraphQL Bindings — to use GraphQL API's as modular buildings blocks
GraphQL Docs — to generate GraphQL documentation in a simple way
GraphCMS — GraphQL-based CMS
GraphQL Network for easy debugging
GraphQL Voyager — to visualize data relations
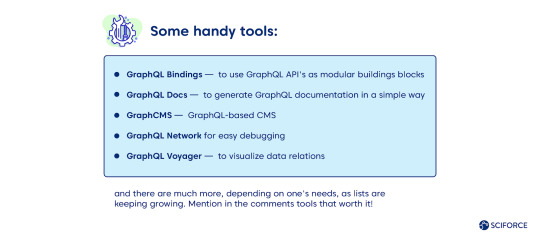
and there are much more, depending on one's needs, as lists are keeping growing. Mention in the comments tools that worth it!
0 notes
Text
Introduction to Apollo Client With React for GraphQL

GraphQL has been getting popular recently and is likely to replace the Rest API. In this tutorial, we will use Apollo Client to communicate with GitHub's GraphQL API. We will integrate Apollo Client with ReactJS, but you can use it with several other client platforms as well.
This tutorial does not cover how to start a React project, but you can use create-react-app to get started.
Once we have the react app ready to go, the next thing is to install the required modules.
Installing Modules
The following line installs all the required modules.
npm install apollo-client-preset react-apollo graphql-tag graphql --save
Now we can provide our component with a client.
Providing a Client to a Component
You can provide a client anywhere in your React component hierarchy. However, it is always a good practice to provide the component, wrapping your whole application, with the client.
import React from 'react'; import ReactDOM from 'react-dom'; import App from './App'; import { ApolloProvider } from 'react-apollo'; import { ApolloClient } from 'apollo-client'; import { HttpLink } from 'apollo-link-http'; import { InMemoryCache } from 'apollo-cache-inmemory'; const token = "YOUR_TOKEN"; const httpLink = { uri: 'https://api.github.com/graphql', headers: { authorization: `Bearer ${token}` } }; const client = new ApolloClient({ link: new HttpLink(httpLink), cache: new InMemoryCache() }); ReactDOM.render(<ApolloProvider client={client}><App/></ApolloProvider>, document.getElementById('root'));
Above you can see that we defined the uri for GitHub and also used a specific token for headers. You should be using your own token generated from GitHub. So don't forget to replace it with YOUR_TOKEN.
For this example, we defined the API token on the client side. However, you should not reveal your API token publicly. So it is always good to keep it on the server abstracted from the client side.
Notice that we have wrapped the <App/> component with ApolloProvider and used the client variable we created for the client prop.
GraphiQL Application
Before diving into the queries, I want to point out that there is a very handy tool called GraphiQL for testing your GraphQL queries. Before proceeding, make sure that you have downloaded it.
Once you open GraphiQL, you need to set the GraphQL Endpoint and HTTP Headers.
GraphQL Endpoint: https://api.github.com/graphql
Header Name: Authorization
Header Value: Bearer YOUR_TOKEN
Of course, you need to replace YOUR_TOKEN with your own token. Do not forget to include the Bearer in front of your token when defining the Header Value.
If you do not want to download an application, you can also use the online GraphQL API Explorer for GitHub.
GraphQL Queries
Unlike a REST API with several end-points, the GraphQL API has only one end-point, and you only fetch what is defined by your query.
The documentation of GitHub's GraphQL API gives you more insight.
Also, the best part of the GraphiQL application is that it gives you access to documentation for queries right inside the application. You can see the sidebar on the right named Docs.
Let's start with the simplest query:
query{ viewer{ login } }
This query returns you the login information of the viewer. In this case, the viewer is you since you used your own API token.
In this tutorial, I will not give detailed information on queries. You can always refer to the documentation and try queries on GraphQL tools to see if you are getting the correct data.
Let's use the following query for the rest of the tutorial.
query($name: String!){ search(query: $name, last: 10, type: REPOSITORY) { edges { node { ... on Repository { id name description url } } } } }
This query searches for the last 10 repositories matching the specific input string, which we will define in our application.
It returns the id, name, description, and url for each result.
Using the GraphQL Query in a React Component
We need to import the two modules below to our React component to be able to define the query within the component and then pass the results to the component as props.
import gql from 'graphql-tag'; import { graphql } from 'react-apollo';
Here we assigned our query to a constant variable, but we haven't defined the name parameter yet.
const repoQuery = gql` query($name: String!){ search(query: $name, last: 10, type: REPOSITORY) { edges { node { ... on Repository { id name description url } } } } } `
Now we wrap our component with the graphql HOC (Higher Order Component) in order to define the query parameters, execute the query, and then pass the result as props to our component.
const AppWithData = graphql( repoQuery, { options: { variables: { name: "tuts" } } } )(App)
Below is the final version of our component.
import React, { Component } from 'react'; import gql from 'graphql-tag'; import { graphql } from 'react-apollo'; class App extends Component { render() { return ( <div> </div> ); } } const repoQuery = gql` query($name: String!){ search(query: $name, last: 10, type: REPOSITORY) { edges { node { ... on Repository { id name description url } } } } } ` const AppWithData = graphql( repoQuery, { options: { variables: { name: "tuts" } } } )(App) export default AppWithData;
Note that we do not export the actual App component but the wrapped component, which is AppWithData.
Check the Data in the Console
Let's go ahead and add {console.log(this.props)} to the render method of your component.
class App extends Component { render() { console.log(this.props) return ( <div> </div> ); } }
When you check the console of your browser, you will see there are two object logs.
Inside each object, you will see the data property. This is provided to our component through the graphql HOC.
Notice that the first log has the loading: true property inside data, and the second log has loading: false and a new object named search, which is exactly the data we wanted to get.
Display the Data
Let's write some JSX to display the fetched data.
Since the search object is not initially there, we cannot directly try to render it. Therefore, first we need to check if we fetched the data and the search object is ready to be used.
In order to do that, we will simply use the loading information provided inside the data property.
If loading is true then we simply render the Loading text, otherwise the data itself.
class App extends Component { render() { return ( <div> {this.props.data.loading === true ? "Loading" : this.props.data.search.edges.map(data => <ul key={data.node.id}> <li style=><a href={data.node.url}>{data.node.name}</a></li> <li>{data.node.description}</li> </ul> )} </div> ); } }
I used the ?: ternary operator for basic inline conditional expressions. If loading is true we display Loading, and if it is false, we use the map function to iterate through our data array to display the information inside the <ul> and <li> elements.
This is just a basic example. You can use a regular if-else statement and return different results for your render method.
You can check the Apollo-Client-with-React repository, clone it on your computer, and play around.
P.S. Don't forget to replace the token variable with your own API token for GitHub.
Conclusion
We covered how to get started with Apollo Client for React. We installed the required modules, set up the client, and then provided it to our component at the top of the component hierarchy. We learned how to test GraphQL queries quickly before implementing them in our actual application. Finally, we integrated the query into a React component and displayed the fetched data.
via Envato Tuts+ Code https://ift.tt/2wqXsnX
0 notes
Text
STAR Apps: A New Generation of Front-End Tooling for Development Workflows
Product teams from AirBnb and New York Times to Shopify and Artsy (among many others) are converging on a new set of best practices and technologies for building the web apps that their businesses depend on. This trend reflects core principles and solve underlying problems that we may share, so it is worth digging deeper.
Some of that includes:
Visual consistency: Presented as a design system (not to be confused with a pattern library or style guide) often built with libraries like styled-components and tools like Storybook.
Internal consistency: Created with static typing tools like TypeScript.
Data manipulation: These work with GraphQL-speaking clients like Apollo.
Data representation: Displayed with a library for reusable components and behaviors, like React.
Naming things is hard, and our industry has struggled to name this new generation of tooling for web apps. The inimitable Orta Theroux calls it an Omakase; I slimmed it down and opted for a simpler backronym pulled from letters in the tooling outlined above: STAR (Design Systems, TypeScript, Apollo, and React).
STAR apps are not "yet another front-end stack." They involve additional opinions and constraints. As such, STAR apps aren’t necessarily easy, either. They have a learning curve. A solo developer may find STAR apps unnecessarily verbose because they front-load communication overhead. STAR apps are more about product team workflow than they are about any specific technology.
However, we find that companies upon companies are finding this stack to be a worthwhile investment. We should ask why.
Context: From LAMP to MEAN
The LAMP stack was identified in 1998 by Michael Kunze to describe the combination of Linux, Apache, MySQL, and PHP as predominant open source technologies to write a full web server. In this model, all rendering and logic was done on the server side, and the role of JavaScript was extremely limited. To this day, this is the most common website architecture due to the popularity of long established frameworks like WordPress, which powers 30% of the Internet.
In the ensuing 20 years, the growth of the web platform (JavaScript in particular), led to a evolution of the "front end" discipline, as a complement to "back end" server-side concerns. Through a combination of Atwood’s Law and Metcalfe’s predictions on the triumph of the web over native platforms, these efforts culminated in a re-imagining of the monolithic architecture to straddle both front and back ends. One prominent encapsulation of this was the MEAN stack, coined by Val Karpov in 2013, to offer "full-stack" JavaScript alternatives, including MongoDB (for NoSQL data storage), Express and Node (to write web servers), and Angular (for writing reactive user interfaces).
What’s changed
However, in the last five years, multiple trends have chipped away at the MEAN stack and the ideal of the full-stack JavaScript monolith:
Instead of every developer writing bespoke endpoints, APIs have become an economy of their own with companies like Stripe, Twilio and Zapier growing purely through the strength of their APIs.
The acquisition of Firebase and launch of AWS Lambda in 2014 — and the subsequent serverless revolution — has made the concept of doing your own undifferentiated server management and reliability engineering far less appealing.
As for proprietary backends, it was clear that not all backend environments were going to be written in JavaScript, particularly with the continuing strength other language frameworks, including Rails, Laravel and .NET, and emerging languages like Go. Even the creators of Express.js and Node.js wound up abandoning JavaScript development altogether.
This has meant that the product engineer’s stack and primary work has shifted even more toward the front end over what was envisioned by the MEAN stack. Chris has described this as a phenomenon that gives extraordinary powers to front-end developers because of the trend toward front-end tooling for what's traditionally been considered back-end territory. Front-end engineering has also evolved, mostly by incrementally adding a constraint layer on top of what we already use — adding a design philosophy, types, schemas, and component structure to how we make our apps.
Why all this change? Stop changing things!
The truth is that we now live in a world where product and business needs now have requirements to bring web app (including mobile web) engineering on par with Android, iOS, and desktop native app development, while our disparate web development tools are still woefully inadequate in comparison to those tightly scoped ecosystems. It’s not that there’s anything inherently wrong with older toolsets or that the new ones are perfect. Instead, the changes can be seen as responses to the underlying needs of product teams:
Stronger types: Type-checking isn’t a panacea, nor does it replace the need for tests, but it does enable better tooling and increase code confidence. TypeScript and GraphQL do this for clients and APIs, as Chris Toomey of thoughtbot has shown. Lauren Tan of Netflix has taken this idea even further to propose a full end-to-end Strongly Typed Graph.
Integrated designer/developer workflows: A reliance on manual code tests and design reviews doesn’t scale. Design systems now are comprehensive documentation on the how and why of reusable components across an organization. Brad Frost has shown how to set up "workshop" and "storefront" environments for a style guide and design system workflow using Gatsby. Design tools, like Sketch and Framer, have even begun to tightly integrate React and design into streamlined workflows. TypeScript and GraphQL both also offer tightly coupled self-documenting features with TSDoc, GraphiQL, and related IDE integrations.
Optimized for change: As product teams embrace iterative agile sprints and split testing, it is increasingly important to use flexible paradigms that embrace incremental adjustments. Dan Abramov of the React team calls this "second order" API design — robustness to changing requirements. Design Systems and React make it easy to compose reusable components at breakneck pace, with TypeScript dramatically shortening feedback loops. Adam Neary of Airbnb shows a wonderful example of refactoring and iterating with React and Apollo GraphQL in production.
Note that "product teams" in this article primarily refer to product engineering teams, though it is often the case that product design and product management are co-located or have heavy, frequent input. Engineering workflows must explicitly take them into account as a result.
Remaining frontiers
Believe it or not, I am being descriptive, rather than prescriptive; I’m not recommending that everybody throw out their code and start writing STAR apps. Rather, I am observing and calling out what I see as a trend where great product teams are all converging on this new pattern. And they just may be on to something.
However, I don’t believe the evolution has reached its conclusion. There are still too many important aspects of modern web app development that need broader consensus, which has resulted in a hodgepodge of custom or one-off solutions and checklists. A big one is performance. The average amount of JavaScript shipped on desktop and mobile has doubled in the last five years. All the wonderful web app engineering in the world will be for nothing if the user navigates away before it loads. The traditional solution has been (often hand-rolled) server-side rendering that's later managed by frameworks like Next.js and After.js. However, this does still require running and managing a server, so static rendering solutions like Gatsby and React-Static have become popular to render apps straight to static markup to be lazily rehydrated later (the last piece of the JAMstack). Progressive Web App technology and patterns help make subsequent loads even faster and serve as a viable alternative to native experiences.
To be continued...
As this story continues to unfold, I believe that a lot more exploration and experimentation needs to happen to smooth the learning curve for more teams to adopt STAR app workflows. In fact, I am learning about it myself in the open at STAR Labs and invite you to tag along. If you have experiences to share or questions to ask, I am all ears.
The post STAR Apps: A New Generation of Front-End Tooling for Development Workflows appeared first on CSS-Tricks.
😉SiliconWebX | 🌐CSS-Tricks
0 notes
Text
Discovering GraphQL
Through this article, we are going to see what GraphQL is and how we can use it. It is going to be a really simple introduction to get our hands on this tool.
Introduction
REST has become the standard for exposing data from a server and designing web APIs. It undeniably offers good advantages and functionalities.
Unfortunately, client applications rarely stay simple. Each one has specific requirements and thus needs different data from our system. To satisfy that need, we will add endpoints or add nested objects and probably deliver irrelevant data. Working and maintaining multiple endpoints could be difficult and as a platform grows, the number of endpoints will increase. Clients will need to ask for data from different endpoints increasing the number of HTTP requests. They will get too much or not enough information. They won't have exactly what they asked for.
GraphQL offers a solution to these problems.
What is GraphQL?
GraphQL is a query language and a server-side runtime for executing queries. GraphQL isn't tied to any specific database or storage engine. It was created by Facebook. It gives clients the power to ask for exactly what they need, nothing more, nothing less.
While typical REST APIs require loading from multiple URLs, GraphQL APIs get all the data we need in a single request.
GraphQL APIs are organized in terms of types and fields, not endpoints. GraphQL uses types to ensure applications only ask for what is possible and provide clear and helpful errors.
The GraphQL layer takes place between the client and one or more data sources. It receives the requests of the client and fetches the necessary data according to the instructions received.
Many different programming languages support GraphQL. Here, we are going to use JavaScript with Node.js.
Basic terminology
Before getting our hands dirty, let's have an overview of the different terms related to the components of GraphQL.
Query
A Query is a read-only operation made against a GraphQL Server. They are similar to GET requests and they allow to ask the server for the data that a client needs.
We write a GraphQL Query as we would declare a JSON object. GraphQL Queries support nested fields. In return, clients will have a JSON result.
Mutation
A Mutation is a read-write operation requested to a GraphQL Server. In REST APIs, they would correspond to POST, DELETE and PUT.
Resolver
A Resolver is a link between an operation and the code responsible for handling it. It provides a way to interact with databases through different operations. It tells GraphQL how and where to fetch the data corresponding to a given field.
Type
A Type defines the shape of response data that can be returned from the GraphQL Server.
Scalar
A Scalar is a primitive Type, such as a String, Int, Boolean or Float.
Field
A Field is a unit of data we can retrieve from an object.
Argument
An Argument is a set of key-value pairs attached to a specific field. Arguments can be of many different types.
Input
Input Types look exactly the same as regular object types. They define the shape of input data that is sent to a GraphQL Server.
Schema
A Schema manages queries and mutations, defining what is allowed to be executed in the GraphQL Server. It defines what each Query or Mutation takes as input, and what each query or mutation returns as output. It describes the complete set of possible data that a client can access.
Interface
An Interface is an abstract type that includes a certain set of Fields that a Type must include to implement the Interface. It stores the names of the Fields and their Arguments, so GraphQL objects can inherit from it.
Implementation
A GraphQL Schema may use the term implements to define how an object inherits from an Interface.
Connection
A Connection allows to query related objects as part of the same call.
Node
Node is a generic term for an object.
Edge
An Edge represents connections between nodes. Every Edge Field has a Node Field and a Cursor Field. Cursors are used for pagination.
A simple example
Now we saw some theoretical notions, let's try to put them into practice by making a very straightforward example. As we said earlier, we are going to use JavaScript, Node.js and Express.js to reach our goal.
We are going to make a really simple API that returns us the name of a band and its albums when we pass the band's id to the main query. We are going to use MusicGraph API for this.
In the end, we are going to be able to make a request like so:
{ artist(id: "string) { name, albums { title, format, year } } }
Let's create a package.json file like so:
{ "name": "simple-app", "version": "1.0.0", "description": "", "main": "index.js", "scripts": { "start": "node ./index.js", "watch": "nodemon --exec npm start" }, "nodemonConfig": { "ignore": [ "test/*", "docs/*" ], "delay": "2500" }, "author": "", "license": "ISC", "dependencies": { "dotenv": "^4.0.0", "express": "^4.16.2", "express-graphql": "^0.6.11", "graphql": "^0.12.3", "node-fetch": "^1.7.3" }, "devDependencies": { "nodemon": "^1.14.7" } }
package.json file
As we can see, in our dependencies, we have Express.js, as we said, but also Express GraphQL and GraphQL.js. Express GraphQL will help us to create a GraphQL HTTP Server with Express while GraphQL.js is a reference implementation of GraphQL for JavaScript.
We also have some dependencies like Dotenv that lets us load environment variables from a .env file, node-fetch that brings window.fetch to Node.js and nodemon that watches for any changes in our application.
Our index.js file is going to be filled with the following code:
const express = require('express') const graphqlHTTP = require('express-graphql') const app = express() const schema = require('./schema') app.use('/graphql', graphqlHTTP({ schema, graphiql: true })) app.listen(4000) console.log('Now listening to port 4000...')
index.js file
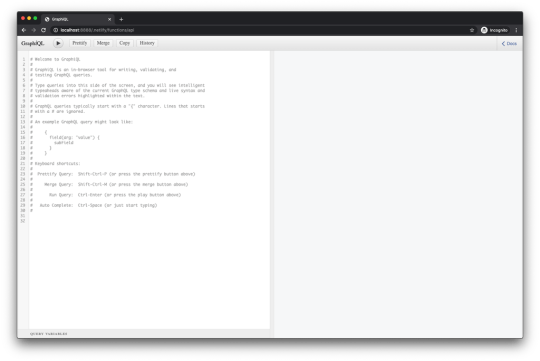
As we can notice here, we create our server and mount Express GraphQL as a route handler. We also set the graphiql option to true. It means that GraphiQL, which is an in-browser IDE for exploring GraphQL, will be presented to us when the GraphQL endpoint is loaded in a browser.
There is also a mention of a file called schema.js, which, obviously, represents our Schema. Let's take a look at it!
const fetch = require('node-fetch') require('dotenv').config() const { GraphQLSchema, GraphQLObjectType, GraphQLInt, GraphQLString, GraphQLList } = require('graphql') // Defining the Album field const AlbumType = new GraphQLObjectType({ name: 'Album', description: 'Album type', // Defining Fields fields: () => ({ title: { type: GraphQLString, resolve: json => json.title }, format: { type: GraphQLString, resolve: json => json.product_form }, year: { type: GraphQLInt, resolve: json => json.release_year } }) }) // Defining the Artist field const ArtistType = new GraphQLObjectType({ name: 'Artist', description: 'Artist type', // Defining the Fields fields: () => ({ name: { type: GraphQLString, // Name Field resolver resolve: json => json.data.name }, albums: { // Defining a GraphQLList filled with object AlbumType type: new GraphQLList(AlbumType), // Albums Field resolver resolve: (parent, args) => fetch( `http://api.musicgraph.com/api/v2/artist/${parent.data.id}/albums?api_key=${process.env.API_KEY}&limit=100` ) .then(data => data.json()) .then(json => json.data.filter(d => d.product_form === "album")) } }) }) // Defining our Schema module.exports = new GraphQLSchema({ query: new GraphQLObjectType({ name: 'RootQuery', description: 'The main query', // Defining the Fields fields: () => ({ artist: { type: ArtistType, args: { id: { type: GraphQLString } }, // Resolver - fetching data from MusicGraph API then returning a JSON object resolve: (root, args) => fetch( `http://api.musicgraph.com/api/v2/artist/${args.id}?api_key=${process.env.API_KEY}` ) .then(res => res.json()) } }) }) })
schema.js file
With the first lines we include a few things that we need from GraphQL.
Then, we define the Album Field and the Artist Field. Finally, we define our Schema before we export it.
Let's go to localhost:4000/graphql and try the following query:
{ artist(id: "82047b8d-738e-4225-8ad9-76fe6f2a486c") { name } }
The result should be the following one:
{ "data": { "artist": { "name": "Depeche Mode" } } }
Now, the next query:
{ artist(id: "82047b8d-738e-4225-8ad9-76fe6f2a486c") { name, albums { title, format, year } } }
And the result should be:
{ "data": { "artist": { "name": "Depeche Mode", "albums": [ { "title": "Depeche Mode - Singles Box 5", "format": "album", "year": 2016 }, { "title": "Songs of Faith and Devotion: Live", "format": "album", "year": 2015 }, { "title": "Live in Berlin Soundtrack", "format": "album", "year": 2014 }, { "title": "Songs of Faith and Devotion (Remastered)", "format": "album", "year": 2013 } ... ] } } }
A little more
Mutation
Of course, in our example, we didn't play with a Mutation because it is not really appropriate. However, a Mutation could be set up this way:
export default new GraphQLSchema({ query: QueryType, mutation: MutationType }) const MutationType = new GraphQLObjectType({ name: 'Item Mutations', description: 'A simple mutation', fields: () => ({ ...itemMutations }) }) const itemMutations = { addItem: { type: ItemType, args: { input: { type: new GraphQLNonNull(ItemInputType), } } }, resolve: (root, {input}) => { const newItem = await new Promise((resolve) => { setTimeout(() => resolve(Object.assign(input, { id: random.uuid(), })), 100); }) return newItem } } const ItemInputType = new GraphQLInputObjectType({ name: 'ItemInputType', fields: () => ({ name: { type: GraphQLString, }, }), })
And it could be used like so:
mutation { addItem(input: { name: "Foo" }) { id, name } }
Subscriptions
Subscriptions are a way for the server to push data itself to interested clients when an event happens. This is how GraphQL deals with real-time communication.
To achieve this, we need GraphQL subscriptions to implement subscriptions in GraphQL and subscriptions-transport-ws that works with a WebSocket connection, which will remain open between the server and subscribed clients.
First, we need to create a PubSub instance like so:
import { PubSub } from 'graphql-subscriptions' const pubsub = new PubSub()
Then we could do the following thing:
const ITEM_ADDED_TOPIC = 'newItem'; export default new GraphQLSchema({ query: QueryType, mutation: MutationType, subscription: SubscriptionType }) const MutationType = new GraphQLObjectType({ name: 'Item Mutations', description: 'A simple mutation', fields: () => ({ ...itemMutations }) }) const itemMutations = { addItem: { type: ItemType, args: { input: { type: new GraphQLNonNull(ItemInputType), } } }, resolve: (root, {input}) => { const newItem = await new Promise((resolve) => { setTimeout(() => resolve(Object.assign(input, { id: random.uuid(), })), 100) }) pubsub.publish(ITEM_ADDED_TOPIC, { itemAdded: newItem }) return newItem } } const SubscriptionType = { itemAdded: { subscribe: () => pubsub.asyncIterator(ITEM_ADDED_TOPIC) } }
We now have to set up the server like so:
import { execute, subscribe } from 'graphql' import { createServer } from 'http' import { SubscriptionServer } from 'subscriptions-transport-ws' const server = express() const ws = createServer(server) ws.listen(PORT, () => { console.log(`GraphQL Server is now running on http://localhost:${PORT}`) new SubscriptionServer({ execute, subscribe, schema }, { server: ws, path: '/subscriptions', }) }) server.use('/graphiql', graphiqlExpress({ endpointURL: '/graphql', subscriptionsEndpoint: `ws://localhost:${PORT}/subscriptions` }))
Caching
Caching could be achieve with Dataloader. It will avoid unnecessary multiple requests.
Using Dataloader could be achieved like so:
... const DataLoader = require('dataloader') ... const fetchArtist = id => fetch(`http://api.musicgraph.com/api/v2/artist/${args.id}?api_key=${process.env.API_KEY}`) .then(res => res.json()) app.use('/graphql', graphqlHTTP(req => { const artistLoader = new DataLoader(keys => Promise.all(keys.map(fetchArtist))) return { schema, context: { artistLoader } graphiql: true } }))
And then...
module.exports = new GraphQLSchema({ query: new GraphQLObjectType({ name: 'RootQuery', description: 'The main query', // Defining the Fields fields: () => ({ artist: { type: ArtistType, args: { id: { type: GraphQLString } }, resolve: (root, args, context) => context.artistLoader.load(args.id) } }) }) })
Conclusion
Through this small article, we took a look at GraphQL and we got our hands on some theoretical and practical notions. We saw that GraphQL is a query language and how to quickly set up simple GraphQL Server.
One last word
If you like this article, you can consider supporting and helping me on Patreon! It would be awesome! Otherwise, you can find my other posts on Medium and Tumblr. You will also know more about myself on my personal website. Until next time, happy headache!
0 notes
Text
Building Serverless GraphQL API in Node with Express and Netlify
I’ve always wanted to build an API, but was scared away by just how complicated things looked. I’d read a lot of tutorials that start with “first, install this library and this library and this library” without explaining why that was important. I’m kind of a Luddite when it comes to these things.
Well, I recently rolled up my sleeves and got my hands dirty. I wanted to build and deploy a simple read-only API, and goshdarnit, I wasn’t going to let some scary dependency lists and fancy cutting-edge services stop me¹.
What I discovered is that underneath many of the tutorials and projects out there is a small, easy-to-understand set of tools and techniques. In less than an hour and with only 30 lines of code, I believe anyone can write and deploy their very own read-only API. You don’t have to be a senior full-stack engineer — a basic grasp of JavaScript and some experience with npm is all you need.
At the end of this article you’ll be able to deploy your very own API without the headache of managing a server. I’ll list out each dependency and explain why we’re incorporating it. I’ll also give you an intro to some of the newer concepts involved, and provide links to resources to go deeper.
Let’s get started!
A rundown of the API concepts
There are a couple of common ways to work with APIs. But let’s begin by (super briefly) explaining what an API is all about: reading and updating data.
Over the past 20 years, some standard ways to build APIs have emerged. REST (short for REpresentational State Transfer) is one of the most common. To use a REST API, you make a call to a server through a URL — say api.example.com/rest/books — and expect to get a list of books back in a format like JSON or XML. To get a single book, we’d go back to the server at a URL — like api.example.com/rest/books/123 — and expect the data for book #123. Adding a new book or updating a specific book’s data means more trips to the server at similar, purpose-defined URLs.
That’s the basic idea of two concepts we’ll be looking at here: GraphQL and Serverless.
GraphQL
Applications that do a lot of getting and updating of data make a lot of API calls. Complicated software, like Twitter, might make hundreds of calls to get the data for a single page. Collecting the right data from a handful of URLs and formatting it can be a real headache. In 2012, Facebook developers starting looking for new ways to get and update data more efficiently.
Their key insight was that for the most part, data in complicated applications has relationships to other data. A user has followers, who are each users themselves, who each have their own followers, and those followers have tweets, which have replies from other users. Drawing the relationships between data results in a graph and that graph can help a server do a lot of clever work formatting and sending (or updating) data, and saving front-end developers time and frustration. Graph Query Language, aka GraphQL, was born.
GraphQL is different from the REST API approach in its use of URLs and queries. To get a list of books from our API using GraphQL, we don’t need to go to a specific URL (like our api.example.com/graphql/books example). Instead, we call up the API at the top level — which would be api.example.com/graphql in our example — and tell it what kind of information we want back with a JSON object:
{ books { id title author } }
The server sees that request, formats our data, and sends it back in another JSON object:
{ "books" : [ { "id" : 123 "title" : "The Greatest CSS Tricks Vol. I" "author" : "Chris Coyier" }, { // ... } ] }
Sebastian Scholl compares GraphQL to REST using a fictional cocktail party that makes the distinction super clear. The bottom line: GraphQL allows us to request the exact data we want while REST gives us a dump of everything at the URL.
Concept 2: Serverless
Whenever I see the word “serverless,” I think of Chris Watterston’s famous sticker.
Similarly, there is no such thing as a truly “serverless” application. Chris Coyier nice sums it up his “Serverless” post:
What serverless is trying to mean, it seems to me, is a new way to manage and pay for servers. You don’t buy individual servers. You don’t manage them. You don’t scale them. You don’t balance them. You aren’t really responsible for them. You just pay for what you use.
The serverless approach makes it easier to build and deploy back-end applications. It’s especially easy for folks like me who don’t have a background in back-end development. Rather than spend my time learning how to provision and maintain a server, I often hand the hard work off to someone (or even perhaps something) else.
It’s worth checking out the CSS-Tricks guide to all things serverless. On the Ideas page, there’s even a link to a tutorial on building a serverless API!
Picking our tools
If you browse through that serverless guide you’ll see there’s no shortage of tools and resources to help us on our way to building an API. But exactly which ones we use requires some initial thought and planning. I’m going to cover two specific tools that we’ll use for our read-only API.
Tool 1: NodeJS and Express
Again, I don’t have much experience with back-end web development. But one of the few things I have encountered is Node.js. Many of you are probably aware of it and what it does, but it’s essentially JavaScript that runs on a server instead of a web browser. Node.js is perfect for someone coming from the front-end development side of things because we can work directly in JavaScript — warts and all — without having to reach for some back-end language.
Express is one of the most popular frameworks for Node.js. Back before React was king (How Do You Do, Fellow Kids?), Express was the go-to for building web applications. It does all sorts of handy thing like routing, templating, and error handling.
I’ll be honest: frameworks like Express intimidate me. But for a simple API, Express is extremely easy to use and understand. There’s an official GraphQL helper for Express, and a plug-and-play library for making a serverless application called serverless-http. Neat, right?!
Tool 2: Netlify functions
The idea of running an application without maintaining a server sounds too good to be true. But check this out: not only can you accomplish this feat of modern sorcery, you can do it for free. Mind blowing.
Netlify offers a free plan with serverless functions that will give you up to 125,000 API calls in a month. Amazon offers a similar service called Lambda. We’ll stick with Netlify for this tutorial.
Netlify includes Netlify Dev which is a CLI for Netlify’s platform. Essentially, it lets us run a simulation of our in a fully-featured production environment, all within the safety of our local machine. We can use it to build and test our serverless functions without needing to deploy them.
At this point, I think it’s worth noting that not everyone agrees that running Express in a serverless function is a good idea. As Paul Johnston explains, if you’re building your functions for scale, it’s best to break each piece of functionality out into its own single-purpose function. Using Express the way I have means that every time a request goes to the API, the whole Express server has to be booted up from scratch — not very efficient. Deploy to production at your own risk.
Let’s get building!
Now that we have out tools in place, we can kick off the project. Let’s start by creating a new folder, navigating to fit in terminal, then running npm init on it. Once npm creates a package.json file, we can install the dependencies we need. Those dependencies are:
Express
GraphQL and express-graphql. These allow us to receive and respond to GraphQL requests.
Bodyparser. This is a small layer that translates the requests we get to and from JSON, which is what GraphQL expects.
Serverless-http. This serves as a wrapper for Express that makes sure our application can be used on a serverless platform, like Netlify.
That’s it! We can install them all in a single command:
npm i express express-graphql graphql body-parser serverless-http
We also need to install Netlify Dev as a global dependency so we can use it as a CLI:
npm i -g netlify-cli
File structure
There’s a few files that are required for our API to work correctly. The first is netlify.toml which should be created at the project’s root directory. This is a configuration file to tell Netlify how to handle our project. Here’s what we need in the file to define our startup command, our build command and where our serverless functions are located:
[build]
# This command builds the site command = "npm run build"
# This is the directory that will be deployed publish = "build"
# This is where our functions are located functions = "functions"
That functions line is super important; it tells Netlify where we’ll be putting our API code.
Next, let’s create that /functions folder at the project’s root, and create a new file inside it called api.js. Open it up and add the following lines to the top so our dependencies are available to use and are included in the build:
const express = require("express"); const bodyParser = require("body-parser"); const expressGraphQL = require("express-graphql"); const serverless = require("serverless-http");
Setting up Express only takes a few lines of code. First, we’ll initial Express and wrap it in the serverless-http serverless function:
const app = express(); module.exports.handler = serverless(app);
These lines initialize Express, and wrap it in the serverless-http function. module.exports.handler lets Netlify know that our serverless function is the Express function.
Now let’s configure Express itself:
app.use(bodyParser.json()); app.use( "/", expressGraphQL({ graphiql: true }) );
These two declarations tell Express what middleware we’re running. Middleware is what we want to happen between the request and response. In our case, we want to parse JSON using bodyparser, and handle it with express-graphql. The graphiql:true configuration for express-graphql will give us a nice user interface and playground for testing.
Defining the GraphQL schema
In order to understand requests and format responses, GraphQL needs to know what our data looks like. If you’ve worked with databases then you know that this kind of data blueprint is called a schema. GraphQL combines this well-defined schema with types — that is, definitions of different kinds of data — to work its magic.
The very first thing our schema needs is called a root query. This will handle any data requests coming in to our API. It’s called a “root” query because it’s accessed at the root of our API— say, api.example.com/graphql.
For this demonstration, we’ll build a hello world example; the root query should result in a response of “Hello world.”
So, our GraphQL API will need a schema (composed of types) for the root query. GraphQL provides some ready-built types, including a schema, a generic object², and a string.
Let’s get those by adding this below the imports:
const { GraphQLSchema, GraphQLObjectType, GraphQLString } = require("graphql");
Then we’ll define our schema like this:
const schema = new GraphQLSchema({ query: new GraphQLObjectType({ name: 'HelloWorld', fields: () => ({ /* we'll put our response here */ }) }) })
The first element in the object, with the key query, tells GraphQL how to handle a root query. Its value is a GraphQL object with the following configuration:
name – A reference used for documentation purposes
fields – Defines the data that our server will respond with. It might seem strange to have a function that just returns an object here, but this allows us to use variables and functions defined elsewhere in our file without needing to define them first³.
const schema = new GraphQLSchema({ query: new GraphQLObjectType({ name: "HelloWorld", fields: () => ({ message: { type: GraphQLString, resolve: () => "Hello World", }, }), }), });
The fields function returns an object and our schema only has a single message field so far. The message we want to respond with is a string, so we specify its type as a GraphQLString. The resolve function is run by our server to generate the response we want. In this case, we’re only returning “Hello World” but in a more complicated application, we’d probably use this function to go to our database and retrieve some data.
That’s our schema! We need to tell our Express server about it, so let’s open up api.js and make sure the Express configuration is updated to this:
app.use( "/", expressGraphQL({ schema: schema, graphiql: true }) );
Running the server locally
Believe it or not, we’re ready to start the server! Run netlify dev in Terminal from the project’s root folder. Netlify Dev will read the netlify.toml configuration, bundle up your api.js function, and make it available locally from there. If everything goes according to plan, you’ll see a message like “Server now ready on http://localhost:8888.”
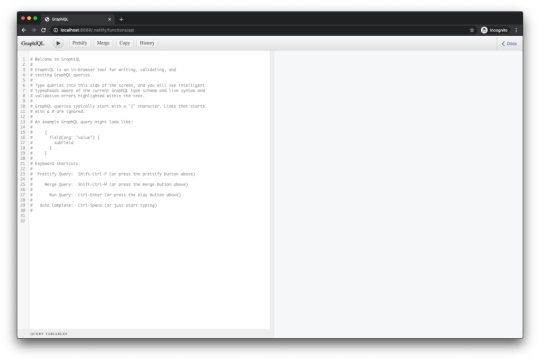
If you go to localhost:8888 like I did the first time, you might be a little disappointed to get a 404 error.

But fear not! Netlify is running the function, only in a different directory than you might expect, which is /.netlify/functions. So, if you go to localhost:8888/.netlify/functions/api, you should see the GraphiQL interface as expected. Success!
Now, that’s more like it!
The screen we get is the GraphiQL playground and we can use it to test out the API. First, clear out the comments in the left pane and replace them with the following:
{ message }
This might seem a little… naked… but you just wrote a GraphQL query! What we’re saying is that we’d like to see the message field we defined in api.js. Click the “Run” button, and on the righth, you’ll see the following:
{ "data": { "message": "Hello World" } }
I don’t know about you, but I did a little fist pump when I did this the first time. We built an API!
Bonus: Redirecting requests
One of my hang-ups while learning about Netlify’s serverless functions is that they run on the /.netlify/functions path. It wasn’t ideal to type or remember it and I nearly bailed for another solution. But it turns out you can easily redirect requests when running and deploying on Netlfiy. All it takes is creating a file in the project’s root directory called _redirects (no extension necessary) with the following line in it:
/api /.netlify/functions/api 200!
This tells Netlify that any traffic that goes to yoursite.com/api should be sent to /.netlify/functions/api. The 200! bit instructs the server to send back a status code of 200 (meaning everything’s OK).
Deploying the API
To deploy the project, we need to connect the source code to Netlfiy. I host mine in a GitHub repo, which allows for continuous deployment.
After connecting the repository to Netlfiy, the rest is automatic: the code is processed and deployed as a serverless function! You can log into the Netlify dashboard to see the logs from any function.
Conclusion
Just like that, we are able to create a serverless API using GraphQL with a few lines of JavaScript and some light configuration. And hey, we can even deploy — for free.
The possibilities are endless. Maybe you want to create your own personal knowledge base, or a tool to serve up design tokens. Maybe you want to try your hand at making your own PokéAPI. Or, maybe you’re interesting in working with GraphQL.
Regardless of what you make, it’s these sorts of technologies that are getting more and more accessible every day. It’s exciting to be able to work with some of the most modern tools and techniques without needing a deep technical back-end knowledge.
If you’d like to see at the complete source code for this project, it’s available on GitHub.
Some of the code in this tutorial was adapted from Web Dev Simplified’s “Learn GraphQL in 40 minutes” article. It’s a great resource to go one step deeper into GraphQL. However, it’s also focused on a more traditional server-full Express.
If you’d like to see the full result of my explorations, I’ve written a companion piece called “A design API in practice” on my website.
The reasons you need a special GraphQL object, instead of a regular ol’ vanilla JavaScript object in curly braces, is a little beyond the scope of this tutorial. Just keep in mind that GraphQL is a finely-tuned machine that uses these specialized types to be fast and resilient.
Scope and hoisting are some of the more confusing topics in JavaScript. MDN has a good primer that’s worth checking out.
The post Building Serverless GraphQL API in Node with Express and Netlify appeared first on CSS-Tricks.
Building Serverless GraphQL API in Node with Express and Netlify published first on https://deskbysnafu.tumblr.com/
0 notes
Text
Building Serverless GraphQL API in Node with Express and Netlify
I’ve always wanted to build an API, but was scared away by just how complicated things looked. I’d read a lot of tutorials that start with “first, install this library and this library and this library” without explaining why that was important. I’m kind of a Luddite when it comes to these things.
Well, I recently rolled up my sleeves and got my hands dirty. I wanted to build and deploy a simple read-only API, and goshdarnit, I wasn’t going to let some scary dependency lists and fancy cutting-edge services stop me¹.
What I discovered is that underneath many of the tutorials and projects out there is a small, easy-to-understand set of tools and techniques. In less than an hour and with only 30 lines of code, I believe anyone can write and deploy their very own read-only API. You don’t have to be a senior full-stack engineer — a basic grasp of JavaScript and some experience with npm is all you need.
At the end of this article you’ll be able to deploy your very own API without the headache of managing a server. I’ll list out each dependency and explain why we’re incorporating it. I’ll also give you an intro to some of the newer concepts involved, and provide links to resources to go deeper.
Let’s get started!
A rundown of the API concepts
There are a couple of common ways to work with APIs. But let’s begin by (super briefly) explaining what an API is all about: reading and updating data.
Over the past 20 years, some standard ways to build APIs have emerged. REST (short for REpresentational State Transfer) is one of the most common. To use a REST API, you make a call to a server through a URL — say api.example.com/rest/books — and expect to get a list of books back in a format like JSON or XML. To get a single book, we’d go back to the server at a URL — like api.example.com/rest/books/123 — and expect the data for book #123. Adding a new book or updating a specific book’s data means more trips to the server at similar, purpose-defined URLs.
That’s the basic idea of two concepts we’ll be looking at here: GraphQL and Serverless.
GraphQL
Applications that do a lot of getting and updating of data make a lot of API calls. Complicated software, like Twitter, might make hundreds of calls to get the data for a single page. Collecting the right data from a handful of URLs and formatting it can be a real headache. In 2012, Facebook developers starting looking for new ways to get and update data more efficiently.
Their key insight was that for the most part, data in complicated applications has relationships to other data. A user has followers, who are each users themselves, who each have their own followers, and those followers have tweets, which have replies from other users. Drawing the relationships between data results in a graph and that graph can help a server do a lot of clever work formatting and sending (or updating) data, and saving front-end developers time and frustration. Graph Query Language, aka GraphQL, was born.
GraphQL is different from the REST API approach in its use of URLs and queries. To get a list of books from our API using GraphQL, we don’t need to go to a specific URL (like our api.example.com/graphql/books example). Instead, we call up the API at the top level — which would be api.example.com/graphql in our example — and tell it what kind of information we want back with a JSON object:
{ books { id title author } }
The server sees that request, formats our data, and sends it back in another JSON object:
{ "books" : [ { "id" : 123 "title" : "The Greatest CSS Tricks Vol. I" "author" : "Chris Coyier" }, { // ... } ] }
Sebastian Scholl compares GraphQL to REST using a fictional cocktail party that makes the distinction super clear. The bottom line: GraphQL allows us to request the exact data we want while REST gives us a dump of everything at the URL.
Concept 2: Serverless
Whenever I see the word “serverless,” I think of Chris Watterston’s famous sticker.
Similarly, there is no such thing as a truly “serverless” application. Chris Coyier nice sums it up his “Serverless” post:
What serverless is trying to mean, it seems to me, is a new way to manage and pay for servers. You don’t buy individual servers. You don’t manage them. You don’t scale them. You don’t balance them. You aren’t really responsible for them. You just pay for what you use.
The serverless approach makes it easier to build and deploy back-end applications. It’s especially easy for folks like me who don’t have a background in back-end development. Rather than spend my time learning how to provision and maintain a server, I often hand the hard work off to someone (or even perhaps something) else.
It’s worth checking out the CSS-Tricks guide to all things serverless. On the Ideas page, there’s even a link to a tutorial on building a serverless API!
Picking our tools
If you browse through that serverless guide you’ll see there’s no shortage of tools and resources to help us on our way to building an API. But exactly which ones we use requires some initial thought and planning. I’m going to cover two specific tools that we’ll use for our read-only API.
Tool 1: NodeJS and Express
Again, I don’t have much experience with back-end web development. But one of the few things I have encountered is Node.js. Many of you are probably aware of it and what it does, but it’s essentially JavaScript that runs on a server instead of a web browser. Node.js is perfect for someone coming from the front-end development side of things because we can work directly in JavaScript — warts and all — without having to reach for some back-end language.
Express is one of the most popular frameworks for Node.js. Back before React was king (How Do You Do, Fellow Kids?), Express was the go-to for building web applications. It does all sorts of handy thing like routing, templating, and error handling.
I’ll be honest: frameworks like Express intimidate me. But for a simple API, Express is extremely easy to use and understand. There’s an official GraphQL helper for Express, and a plug-and-play library for making a serverless application called serverless-http. Neat, right?!
Tool 2: Netlify functions
The idea of running an application without maintaining a server sounds too good to be true. But check this out: not only can you accomplish this feat of modern sorcery, you can do it for free. Mind blowing.
Netlify offers a free plan with serverless functions that will give you up to 125,000 API calls in a month. Amazon offers a similar service called Lambda. We’ll stick with Netlify for this tutorial.
Netlify includes Netlify Dev which is a CLI for Netlify’s platform. Essentially, it lets us run a simulation of our in a fully-featured production environment, all within the safety of our local machine. We can use it to build and test our serverless functions without needing to deploy them.
At this point, I think it’s worth noting that not everyone agrees that running Express in a serverless function is a good idea. As Paul Johnston explains, if you’re building your functions for scale, it’s best to break each piece of functionality out into its own single-purpose function. Using Express the way I have means that every time a request goes to the API, the whole Express server has to be booted up from scratch — not very efficient. Deploy to production at your own risk.
Let’s get building!
Now that we have out tools in place, we can kick off the project. Let’s start by creating a new folder, navigating to fit in terminal, then running npm init on it. Once npm creates a package.json file, we can install the dependencies we need. Those dependencies are:
Express
GraphQL and express-graphql. These allow us to receive and respond to GraphQL requests.
Bodyparser. This is a small layer that translates the requests we get to and from JSON, which is what GraphQL expects.
Serverless-http. This serves as a wrapper for Express that makes sure our application can be used on a serverless platform, like Netlify.
That’s it! We can install them all in a single command:
npm i express express-graphql graphql body-parser serverless-http
We also need to install Netlify Dev as a global dependency so we can use it as a CLI:
npm i -g netlify-dev
File structure
There’s a few files that are required for our API to work correctly. The first is netlify.toml which should be created at the project’s root directory. This is a configuration file to tell Netlify how to handle our project. Here’s what we need in the file to define our startup command, our build command and where our serverless functions are located:
[build]
# This command builds the site command = "npm run build"
# This is the directory that will be deployed publish = "build"
# This is where our functions are located functions = "functions"
That functions line is super important; it tells Netlify where we’ll be putting our API code.
Next, let’s create that /functions folder at the project’s root, and create a new file inside it called api.js. Open it up and add the following lines to the top so our dependencies are available to use and are included in the build:
const express = require("express"); const bodyParser = require("body-parser"); const expressGraphQL = require("express-graphql"); const serverless = require("serverless-http");
Setting up Express only takes a few lines of code. First, we’ll initial Express and wrap it in the serverless-http serverless function:
const app = express(); module.exports.handler = serverless(app);
These lines initialize Express, and wrap it in the serverless-http function. module.exports.handler lets Netlify know that our serverless function is the Express function.
Now let’s configure Express itself:
app.use(bodyParser.json()); app.use( "/", expressGraphQL({ graphiql: true }) );
These two declarations tell Express what middleware we’re running. Middleware is what we want to happen between the request and response. In our case, we want to parse JSON using bodyparser, and handle it with express-graphql. The graphiql:true configuration for express-graphql will give us a nice user interface and playground for testing.
Defining the GraphQL schema
In order to understand requests and format responses, GraphQL needs to know what our data looks like. If you’ve worked with databases then you know that this kind of data blueprint is called a schema. GraphQL combines this well-defined schema with types — that is, definitions of different kinds of data — to work its magic.
The very first thing our schema needs is called a root query. This will handle any data requests coming in to our API. It’s called a “root” query because it’s accessed at the root of our API— say, api.example.com/graphql.
For this demonstration, we’ll build a hello world example; the root query should result in a response of “Hello world.”
So, our GraphQL API will need a schema (composed of types) for the root query. GraphQL provides some ready-built types, including a schema, a generic object², and a string.
Let’s get those by adding this below the imports:
const { GraphQLSchema, GraphQLObjectType, GraphQLString } = require("graphql");
Then we’ll define our schema like this:
const schema = new GraphQLSchema({ query: new GraphQLObjectType({ name: 'HelloWorld', fields: () => ({ /* we'll put our response here */ }) }) })
The first element in the object, with the key query, tells GraphQL how to handle a root query. Its value is a GraphQL object with the following configuration:
name – A reference used for documentation purposes
fields – Defines the data that our server will respond with. It might seem strange to have a function that just returns an object here, but this allows us to use variables and functions defined elsewhere in our file without needing to define them first³.
const schema = new GraphQLSchema({ query: new GraphQLObjectType({ name: "HelloWorld", fields: () => ({ message: { type: GraphQLString, resolve: () => "Hello World", }, }), }), });
The fields function returns an object and our schema only has a single message field so far. The message we want to respond with is a string, so we specify its type as a GraphQLString. The resolve function is run by our server to generate the response we want. In this case, we’re only returning “Hello World” but in a more complicated application, we’d probably use this function to go to our database and retrieve some data.
That’s our schema! We need to tell our Express server about it, so let’s open up api.js and make sure the Express configuration is updated to this:
app.use( "/", expressGraphQL({ schema: schema, graphiql: true }) );
Running the server locally
Believe it or not, we’re ready to start the server! Run netlify dev in Terminal from the project’s root folder. Netlify Dev will read the netlify.toml configuration, bundle up your api.js function, and make it available locally from there. If everything goes according to plan, you’ll see a message like “Server now ready on http://localhost:8888.”
If you go to localhost:8888 like I did the first time, you might be a little disappointed to get a 404 error.

But fear not! Netlify is running the function, only in a different directory than you might expect, which is /.netlify/functions. So, if you go to localhost:8888/.netlify/functions/api, you should see the GraphiQL interface as expected. Success!
Now, that’s more like it!
The screen we get is the GraphiQL playground and we can use it to test out the API. First, clear out the comments in the left pane and replace them with the following:
{ message }
This might seem a little… naked… but you just wrote a GraphQL query! What we’re saying is that we’d like to see the message field we defined in api.js. Click the “Run” button, and on the righth, you’ll see the following:
{ "data": { "message": "Hello World" } }
I don’t know about you, but I did a little fist pump when I did this the first time. We built an API!
Bonus: Redirecting requests
One of my hang-ups while learning about Netlify’s serverless functions is that they run on the /.netlify/functions path. It wasn’t ideal to type or remember it and I nearly bailed for another solution. But it turns out you can easily redirect requests when running and deploying on Netlfiy. All it takes is creating a file in the project’s root directory called _redirects (no extension necessary) with the following line in it:
/api /.netlify/functions/api 200!
This tells Netlify that any traffic that goes to yoursite.com/api should be sent to /.netlify/functions/api. The 200! bit instructs the server to send back a status code of 200 (meaning everything’s OK).
Deploying the API
To deploy the project, we need to connect the source code to Netlfiy. I host mine in a GitHub repo, which allows for continuous deployment.
After connecting the repository to Netlfiy, the rest is automatic: the code is processed and deployed as a serverless function! You can log into the Netlify dashboard to see the logs from any function.
Conclusion
Just like that, we are able to create a serverless API using GraphQL with a few lines of JavaScript and some light configuration. And hey, we can even deploy — for free.
The possibilities are endless. Maybe you want to create your own personal knowledge base, or a tool to serve up design tokens. Maybe you want to try your hand at making your own PokéAPI. Or, maybe you’re interesting in working with GraphQL.
Regardless of what you make, it’s these sorts of technologies that are getting more and more accessible every day. It’s exciting to be able to work with some of the most modern tools and techniques without needing a deep technical back-end knowledge.
If you’d like to see at the complete source code for this project, it’s available on GitHub.
Some of the code in this tutorial was adapted from Web Dev Simplified’s “Learn GraphQL in 40 minutes” article. It’s a great resource to go one step deeper into GraphQL. However, it’s also focused on a more traditional server-full Express.
If you’d like to see the full result of my explorations, I’ve written a companion piece called “A design API in practice” on my website.
The reasons you need a special GraphQL object, instead of a regular ol’ vanilla JavaScript object in curly braces, is a little beyond the scope of this tutorial. Just keep in mind that GraphQL is a finely-tuned machine that uses these specialized types to be fast and resilient.
Scope and hoisting are some of the more confusing topics in JavaScript. MDN has a good primer that’s worth checking out.
The post Building Serverless GraphQL API in Node with Express and Netlify appeared first on CSS-Tricks.
Building Serverless GraphQL API in Node with Express and Netlify published first on https://deskbysnafu.tumblr.com/
0 notes
Text
STAR Apps: A New Generation of Front-End Tooling for Development Workflows
Product teams from AirBnb and New York Times to Shopify and Artsy (among many others) are converging on a new set of best practices and technologies for building the web apps that their businesses depend on. This trend reflects core principles and solve underlying problems that we may share, so it is worth digging deeper.
Some of that includes:
Visual consistency: Presented as a design system (not to be confused with a pattern library or style guide) often built with libraries like styled-components and tools like Storybook.
Internal consistency: Created with static typing tools like TypeScript.
Data manipulation: These work with GraphQL-speaking clients like Apollo.
Data representation: Displayed with a library for reusable components and behaviors, like React.
Naming things is hard, and our industry has struggled to name this new generation of tooling for web apps. The inimitable Orta Theroux calls it an Omakase; I slimmed it down and opted for a simpler backronym pulled from letters in the tooling outlined above: STAR (Design Systems, TypeScript, Apollo, and React).
STAR apps are not "yet another front-end stack." They involve additional opinions and constraints. As such, STAR apps aren’t necessarily easy, either. They have a learning curve. A solo developer may find STAR apps unnecessarily verbose because they front-load communication overhead. STAR apps are more about product team workflow than they are about any specific technology.
However, we find that companies upon companies are finding this stack to be a worthwhile investment. We should ask why.
Context: From LAMP to MEAN
The LAMP stack was identified in 1998 by Michael Kunze to describe the combination of Linux, Apache, MySQL, and PHP as predominant open source technologies to write a full web server. In this model, all rendering and logic was done on the server side, and the role of JavaScript was extremely limited. To this day, this is the most common website architecture due to the popularity of long established frameworks like WordPress, which powers 30% of the Internet.
In the ensuing 20 years, the growth of the web platform (JavaScript in particular), led to a evolution of the "front end" discipline, as a complement to "back end" server-side concerns. Through a combination of Atwood’s Law and Metcalfe’s predictions on the triumph of the web over native platforms, these efforts culminated in a re-imagining of the monolithic architecture to straddle both front and back ends. One prominent encapsulation of this was the MEAN stack, coined by Val Karpov in 2013, to offer "full-stack" JavaScript alternatives, including MongoDB (for NoSQL data storage), Express and Node (to write web servers), and Angular (for writing reactive user interfaces).
What’s changed
However, in the last five years, multiple trends have chipped away at the MEAN stack and the ideal of the full-stack JavaScript monolith:
Instead of every developer writing bespoke endpoints, APIs have become an economy of their own with companies like Stripe, Twilio and Zapier growing purely through the strength of their APIs.
The acquisition of Firebase and launch of AWS Lambda in 2014 — and the subsequent serverless revolution — has made the concept of doing your own undifferentiated server management and reliability engineering far less appealing.
As for proprietary backends, it was clear that not all backend environments were going to be written in JavaScript, particularly with the continuing strength other language frameworks, including Rails, Laravel and .NET, and emerging languages like Go. Even the creators of Express.js and Node.js wound up abandoning JavaScript development altogether.
This has meant that the product engineer’s stack and primary work has shifted even more toward the front end over what was envisioned by the MEAN stack. Chris has described this as a phenomenon that gives extraordinary powers to front-end developers because of the trend toward front-end tooling for what's traditionally been considered back-end territory. Front-end engineering has also evolved, mostly by incrementally adding a constraint layer on top of what we already use — adding a design philosophy, types, schemas, and component structure to how we make our apps.
Why all this change? Stop changing things!
The truth is that we now live in a world where product and business needs now have requirements to bring web app (including mobile web) engineering on par with Android, iOS, and desktop native app development, while our disparate web development tools are still woefully inadequate in comparison to those tightly scoped ecosystems. It’s not that there’s anything inherently wrong with older toolsets or that the new ones are perfect. Instead, the changes can be seen as responses to the underlying needs of product teams:
Stronger types: Type-checking isn’t a panacea, nor does it replace the need for tests, but it does enable better tooling and increase code confidence. TypeScript and GraphQL do this for clients and APIs, as Chris Toomey of thoughtbot has shown. Lauren Tan of Netflix has taken this idea even further to propose a full end-to-end Strongly Typed Graph.
Integrated designer/developer workflows: A reliance on manual code tests and design reviews doesn’t scale. Design systems now are comprehensive documentation on the how and why of reusable components across an organization. Brad Frost has shown how to set up "workshop" and "storefront" environments for a style guide and design system workflow using Gatsby. Design tools, like Sketch and Framer, have even begun to tightly integrate React and design into streamlined workflows. TypeScript and GraphQL both also offer tightly coupled self-documenting features with TSDoc, GraphiQL, and related IDE integrations.
Optimized for change: As product teams embrace iterative agile sprints and split testing, it is increasingly important to use flexible paradigms that embrace incremental adjustments. Dan Abramov of the React team calls this "second order" API design — robustness to changing requirements. Design Systems and React make it easy to compose reusable components at breakneck pace, with TypeScript dramatically shortening feedback loops. Adam Neary of Airbnb shows a wonderful example of refactoring and iterating with React and Apollo GraphQL in production.
Note that "product teams" in this article primarily refer to product engineering teams, though it is often the case that product design and product management are co-located or have heavy, frequent input. Engineering workflows must explicitly take them into account as a result.
Remaining frontiers
Believe it or not, I am being descriptive, rather than prescriptive; I’m not recommending that everybody throw out their code and start writing STAR apps. Rather, I am observing and calling out what I see as a trend where great product teams are all converging on this new pattern. And they just may be on to something.
However, I don’t believe the evolution has reached its conclusion. There are still too many important aspects of modern web app development that need broader consensus, which has resulted in a hodgepodge of custom or one-off solutions and checklists. A big one is performance. The average amount of JavaScript shipped on desktop and mobile has doubled in the last five years. All the wonderful web app engineering in the world will be for nothing if the user navigates away before it loads. The traditional solution has been (often hand-rolled) server-side rendering that's later managed by frameworks like Next.js and After.js. However, this does still require running and managing a server, so static rendering solutions like Gatsby and React-Static have become popular to render apps straight to static markup to be lazily rehydrated later (the last piece of the JAMstack). Progressive Web App technology and patterns help make subsequent loads even faster and serve as a viable alternative to native experiences.
To be continued...
As this story continues to unfold, I believe that a lot more exploration and experimentation needs to happen to smooth the learning curve for more teams to adopt STAR app workflows. In fact, I am learning about it myself in the open at STAR Labs and invite you to tag along. If you have experiences to share or questions to ask, I am all ears.
The post STAR Apps: A New Generation of Front-End Tooling for Development Workflows appeared first on CSS-Tricks.
STAR Apps: A New Generation of Front-End Tooling for Development Workflows published first on https://deskbysnafu.tumblr.com/
0 notes
Text
A Front End Developer’s Guide to GraphQL
No matter how large or small your application is, you’ll have to deal with fetching data from a remote server at some point. On the front end, this usually involves hitting a REST endpoint, transforming the response, caching it, and updating your UI. For years, REST has been the status quo for APIs, but over the past year, a new API technology called GraphQL has exploded in popularity due to its excellent developer experience and declarative approach to data fetching.
In this post, we’ll walk through a couple of hands-on examples to show you how integrating GraphQL into your application will solve many pain points working with remote data. If you’re new to GraphQL, don’t panic! I’ll also highlight some resources to help you learn GraphQL using the Apollo stack, so you can start off 2018 ahead of the curve.
GraphQL 101
Before we dive into how GraphQL makes your life as a front end developer easier, we should first clarify what it is. When we talk about GraphQL, we're either referring to the language itself or its rich ecosystem of tools. At its core, GraphQL is a typed query language developed by Facebook that allows you to describe your data requirements in a declarative way. The shape of your result matches the shape of your query: in the example below, we can expect to receive back an object with a currency property and a rates property containing an array of objects with both currency and rate keys.
{ rates(currency: "USD") { currency rates { currency rate } } }
When we talk about GraphQL in a broader sense, we’re often referring to the ecosystem of tools that help you implement GraphQL in your application. On the backend, you’ll use Apollo Server to create a GraphQL server, which is a single endpoint that parses a GraphQL request and returns data. How does the server know which data to return? You’ll use GraphQL Tools to build a schema (like a blueprint for your data) and a resolver map (just a series of functions that retrieve your data from a REST endpoint, database, or wherever else you choose).
This all sounds more complicated than it actually is — with Apollo Launchpad, a GraphQL server playground, you can create a working GraphQL server in your browser in less than 60 lines of code! 😮 We’ll reference this Launchpad I created that wraps the Coinbase API throughout this post.
You’ll connect your GraphQL server to your application with Apollo Client, a fast and flexible client that fetches, caches, and updates your data for you. Since Apollo Client isn’t coupled to your view layer, you can use it with React, Angular, Vue, or plain JavaScript. Not only is Apollo cross-framework, it’s also cross-platform, with React Native & Ionic supported out of the box.
Let’s give it a try! 🚀
Now that you’re well-versed in what GraphQL is, let’s get our hands dirty with a couple of practical examples that illustrate what it’s like to develop your front end with Apollo. By the end, I think you’ll be convinced that a GraphQL-based architecture with Apollo can help you ship features faster than before.
1. Add new data requirements without adding a new endpoint
We’ve all been here before: You spend hours building a perfect UI component when suddenly, product requirements change. You quickly realize that the data you need to fulfill these new requirements would either require a complicated waterfall of API requests or worse, a new REST endpoint. Now blocked on your work, you ask the backend team to build you a new endpoint just to satisfy the data needs for one component.
This common frustration no longer exists with GraphQL because the data you consume on the client is no longer coupled to an endpoint’s resource. Instead, you always hit the same endpoint for your GraphQL server. Your server specifies all of the resources it has available via your schema and lets your query determine the shape of the result. Let’s illustrate these concepts using our Launchpad from before:
In our schema, look at lines 22–26 where we define our ExchangeRate type. These fields list out all the available resources we can query in our application.
type ExchangeRate { currency: String rate: String name: String }
With REST, you’re limited to the data your resource provides. If your /exchange-rates endpoint doesn’t include name, then you’ll need to either hit a different endpoint like /currency for the data or create it if it doesn’t exist.
With GraphQL, we know that name is already available to us by inspecting our schema, so we can query for it in our application. Try running this example in Launchpad by adding the name field on the right side panel!
{ rates(currency: "USD") { currency rates { currency rate name } } }
Now, remove the name field and run the same query. See how the shape of our result changes?
Your GraphQL server always gives you back exactly the data you ask for. Nothing more. This differs significantly from REST, where you often have to filter and transform the data you get back from the server into the shape your UI components need. Not only does this save you time, it also results in smaller network payloads and CPU savings from loading and parsing the response.
2. Reduce your state management boilerplate
Fetching data almost always involves updating your application’s state. Typically, you’ll write code to track at least three actions: one for when the data is loading, one if the data successfully arrives, and one if the data errors out. Once the data arrives, you have to transform it into the shape your UI components expect, normalize it, cache it, and update your UI. This process can be repetitive, requiring countless lines of boilerplate to execute one request.
Let’s see how Apollo Client eliminates this tiresome process altogether by looking at an example React app in CodeSandbox. Navigate to `list.js` and scroll to the bottom.
export default graphql(ExchangeRateQuery, { props: ({ data }) => { if (data.loading) { return { loading: data.loading }; } if (data.error) { return { error: data.error }; } return { loading: false, rates: data.rates.rates }; } })(ExchangeRateList);
In this example, React Apollo, Apollo Client’s React integration, is binding our exchange rate query to our ExchangeRateList component. Once Apollo Client executes that query, it tracks loading and error state automatically and adds it to the data prop. When Apollo Client receives the result, it will update the data prop with the result of the query, which will update your UI with the rates it needs to render.
Under the hood, Apollo Client normalizes and caches your data for you. Try clicking some of the currencies in the panel on the right to watch the data refresh. Now, select a currency a second time. Notice how the data appears instantaneously? That’s the Apollo cache at work! You get all of this for free just by setting up Apollo Client with no additional configuration. 😍 To see the code where we initialize Apollo Client, check out `index.js`.
3. Debug quickly & painlessly with Apollo DevTools & GraphiQL
It looks like Apollo Client does a lot for you! How do we peek inside to understand what’s going on? With features like store inspection and full visibility into your queries & mutations, Apollo DevTools not only answers that question, but also makes debugging painless and, dare I say it, fun! 🎉 It’s available as an extension for both Chrome and Firefox, with React Native coming soon.
If you want to follow along, install Apollo DevTools for your preferred browser and navigate to our CodeSandbox from the previous example. You’ll need to run the example locally by clicking Download in the top nav bar, unzipping the file, running npm install, and finally npm start. Once you open up your browser’s dev tools panel, you should see a tab that says Apollo.
First, let’s check out our store inspector. This tab mirrors what’s currently in your Apollo Client cache, making it easy to confirm your data is stored on the client properly.
Apollo DevTools also enables you to test your queries & mutations in GraphiQL, an interactive query editor and documentation explorer. In fact, you already used GraphiQL in the first example where we experimented with adding fields to our query. To recap, GraphiQL features auto-complete as you type your query into the editor and automatically generated documentation based on GraphQL’s type system. It’s extremely useful for exploring your schema, with zero maintenance burden for developers.
Try executing queries with GraphiQL in the right side panel of our Launchpad. To show the documentation explorer, you can hover over fields in the query editor and click on the tooltip. If your query runs successfully in GraphiQL, you can be 100% positive that the same query will run successfully in your application.
Level up your GraphQL skills
If you made it to this point, awesome job! 👏 I hope you enjoyed the exercises and got a taste of what it would be like to work with GraphQL on the front end.
Hungry for more? 🌮 Make it your 2018 New Year’s resolution to learn more about GraphQL, as I expect its popularity to grow even more in the upcoming year. Here’s an example app to get you started featuring the concepts we learned today:
Go forth and GraphQL (and be sure to tag us on Twitter @apollographql along the way)! 🚀
via CSS-Tricks http://ift.tt/2ik0IYJ
0 notes