#gulpfile
Explore tagged Tumblr posts
Visit Tumblr Blog
Explore Tumblr blogs with no restrictions, modern design and the best experience.
Last Seen Tumblr Blogs


Fun Fact
The average Tumblr user visits about 67 pages every month.
Text
I hate developer tools man why is it called a gulpfile
3 notes
·
View notes
Text
my gulpfile keeps disappearing
gulp
3 notes
·
View notes
Text
[SOLVED] Setting up sass and Browsersync with Gulp
My folder structure is as follows:
index.html css - styles.css sass - categories - sass partial(s) - styles.scss gulpfile.js package.json
This task is for running sass and browsersync with gulp: Goes into gulpfile.js
// gulp var gulp = require('gulp'); // sass var sass = require('gulp-sass'); var autoprefixer = require('gulp-autoprefixer'); // browsersync var browserSync = require('browser-sync'); var reload = browserSync.reload; // define browsersync task gulp.task('browser-sync', function() { browserSync({ server: { baseDir: "." } }); }); // define browser reload task gulp.task('bs-reload', function () { browserSync.reload(); }); // // define styles task gulp.task('styles', function () { gulp.src('sass/**/*.scss') // compile SASS to CSS .pipe(sass({ outputStyle: 'compressed', includePaths: ['node_modules/susy/sass'] }).on('error', sass.logError)) // add vendor prefixes .pipe(autoprefixer({ browsers: ['last 30 versions'], cascade: false })) // save the file to the css directory .pipe(gulp.dest('css')) // send output to all browsers .pipe(browserSync.stream()); }); // run tasks: type gulp in browser gulp.task('default', ['browser-sync'], function(){ gulp.watch("sass/**/*.scss", ['styles']); gulp.watch("*.html", ['bs-reload']); });
Type 'gulp' on terminal and voila
0 notes
Text
Jestの導入
パッケージインストール
$ npm install --save-dev jest babel-jest ts-jest
jest
絶対必要
babel-jest
babelを使う場合必要
ts-jest
TypeScriptのコードをテストをするなら必要
+babel
babelを使う場合は、以下も必要
$ npm install --seve-dev @babel/core @babel/preset-env
+TypeScript
TypeScriptを使う場合は、以下も必要
$ npm install --save-dev @babel/preset-typescript
babelの設定ファイル
プロジェクトルートにbabel.config.jsを作成
// babel.config.js module.exports = { presets: [ [ '@babel/preset-env', { targets: { node: 'current'}}], '@babel/preset-typescript', // TypeScriptを使う場合 ], };
設定ファイル
Jestの設定は以下のいずれかで設定できる。
独立ファイルに定義
package.jsonに定義
コマンドで直接指定
詳細な設定項目はJestConfig公式見た方が良さげ。
1. 独立ファイルに定義する場合。
プロジェクトルートにjest.config.jsに以下を定義
// jest.config.js module.exports = { // トランスパイルを行なった上でテストを実行してくれるよ��になる transform: { '^.+\\.js$' : '<rootdir>/node_modules/babel-jest', '.*\\.(ts)$' : '<rootdir>/node_modules/ts-jest', // TypeScriptをテストする場合 }, moduleFileExtensions: ['js', 'ts'] // テスト対象の拡張子を列挙する };
babel-jestは.babelrc、ts-jestは.tsconfig.jsonを参照してトランスパイルを行うらしい...?
2. package.jsonに定義
// package.json一部 { "name": projectName, ... "jest": { "verbose": true } }
3. コマンドで直指定
適当に設定ファイルを作成する。
// test-config.json { "verbose": true }
以下コマンドで設定ファイルを指定する。
$ jest --config=test-config.json
package.jsonに色々追記
// package.json { "scripts": { "test": "jest", "test-with-coverage": "jest --coverage" }, }
$ npm run testでテスト
$ npm run test-with-coverageでカバレージをつけられる
gulpでタスク化
パッケージのインストール
$ npm install --save-dev gulp gulp-jest [email protected]
gulpfileの作成
プロジェクトルートにgulpfile.jsを作成。
// gulpfile.js const gulp = require('gulp'); const jest = require('gulp-jest').default; var testTarget = 'src/' gulp.task('jest', function () { return gulp.src(testTarget).pipe(jest({ "preprocessorIgnorePatterns": [ "<rootdir>/dist/", "<rootdir>/node_modules/" ], "automock": false })); });
$ gulp jestでテストを実行できる。
jest({...})で指定している設定項目に関しては、JestConfig公式を参照。
注意
$ npm install --save-dev gulp gulp-jest jest-cliで、落っことしたらエラーを吐かれた話。
// package.json一部 { "dependencies": { "@babel/core": "^7.10.3", "@babel/preset-env": "^7.10.3", "jest": "^26.1.0" }, "devDependencies": { "babel-jest": "^26.1.0", "gulp": "^4.0.2", "gulp-jest": "^4.0.3", "jest-cli": "^26.1.0" } }
各パッケージのバージョンが上の状態だと、gulp jest実行時にエラーを吐かれる。
// エラーログ [11:12:29] Starting 'jest'... [11:12:29] 'jest' errored after 34 ms [11:12:29] TypeError: Cannot read property 'runCLI' of undefined
ここを参考にすると、どうやら、jest-cliのダウングレードが必要らしい。 以下で解決。
$ npm remove jest-cli $ npm install --save-dev [email protected]
参考
Jest公式
JestConfig公式
JestCLIのオプション
gulp-jest
この頃流行りのJestを導入して軽快にJSをテストしよう(Qiita)
Cannot read property 'runCLI' of undefined in gulp-jest(Stack Overflow)
0 notes
Text
sass
sassの導入メモ
tree
. ├── gulpfile.js ├── package-lock.json ├── package.json └── src ├── index.html ├── css │ └── sample.css └── sass └── sample.scss
installとか
// npmの初期化 $ npm init -y // gulp ローカルインストール $ npm install gulp --save-dev // gulp-sass ローカルインストール $ npm install gulp-sass --save-dev
gulpfile
gulpfile.js
// モジュールの読み込み var gulp = require("gulp"); var sass = require("gulp-sass"); // タスクを作成 // gulp.task("タスク名", 実行される処理) gulp.task("sass", function () { return ( gulp.src("src/sass/**/*.scss") // 取得するファイル .pipe(sass({ outputStyle: "expanded" })) // コンパイル時のオプション .pipe(gulp.dest("src/css")) // 保存先 ); }); gulp.task("sass-watch", function () { return gulp.watch("src/sass/**/*.scss", function () { return ( gulp.src("src/sass/**/*.scss") .pipe(sass({ outputStyle: "expanded" }).on("error", sass.logError)) .pipe(gulp.dest("src/css")) ); }); });
操作
$ gulp sassで単発コンパイル $ gulp sass-watchで監視
0 notes
Text
Designing And Building A Progressive Web Application Without A Framework (Part 2)
Designing And Building A Progressive Web Application Without A Framework (Part 2)
Ben Frain
2019-07-25T14:00:59+02:002019-07-25T12:06:45+00:00
The raison d’être of this adventure was to push your humble author a little in the disciplines of visual design and JavaScript coding. The functionality of the application I’d decided to build was not dissimilar to a ‘to do’ application. It is important to stress that this wasn’t an exercise in original thinking. The destination was far less important than the journey.
Want to find out how the application ended up? Point your phone browser at https://io.benfrain.com.
Read Part One of Designing And Building A Progessive Web Application Without A Framework.
Here is a summary of what we will cover in this article:
The project set-up and why I opted for Gulp as a build tool;
Application design patterns and what they mean in practice;
How to store and visualize application state;
how CSS was scoped to components;
what UI/UX niceties were employed to make the things more ‘app-like’;
How the remit changed through iteration.
Let’s start with the build tools.
Build Tools
In order to get my basic tooling of TypeScipt and PostCSS up and running and create a decent development experience, I would need a build system.
In my day job, for the last five years or so, I have been building interface prototypes in HTML/CSS and to a lesser extent, JavaScript. Until recently, I have used Gulp with any number of plugins almost exclusively to achieve my fairly humble build needs.
Typically I need to process CSS, convert JavaScript or TypeScript to more widely supported JavaScript, and occasionally, carry out related tasks like minifying code output and optimizing assets. Using Gulp has always allowed me to solve those issues with aplomb.
For those unfamiliar, Gulp lets you write JavaScript to do ‘something’ to files on your local file system. To use Gulp, you typically have a single file (called gulpfile.js) in the root of your project. This JavaScript file allows you to define tasks as functions. You can add third-party ‘Plugins’, which are essentially further JavaScript functions, that deal with specific tasks.
An Example Gulp Task
An example Gulp task might be using a plugin to harness PostCSS to process to CSS when you change an authoring style sheet (gulp-postcss). Or compiling TypeScript files to vanilla JavaScript (gulp-typescript) as you save them. Here is a simple example of how you write a task in Gulp. This task uses the ‘del’ gulp plugin to delete all the files in a folder called ‘build’:
var del = require("del"); gulp.task("clean", function() { return del(["build/**/*"]); });
The require assigns the del plugin to a variable. Then the gulp.task method is called. We name the task with a string as the first argument (“clean”) and then run a function, which in this case uses the ‘del’ method to delete the folder passed to it as an argument. The asterisk symbols there are ‘glob’ patterns which essentially say ‘any file in any folder’ of the build folder.
Gulp tasks can get heaps more complicated but in essence, that is the mechanics of how things are handled. The truth is, with Gulp, you don’t need to be a JavaScript wizard to get by; grade 3 copy and paste skills are all you need.
I’d stuck with Gulp as my default build tool/task runner for all these years with a policy of ‘if it ain’t broke; don’t try and fix it’.
However, I was worried I was getting stuck in my ways. It’s an easy trap to fall into. First, you start holidaying the same place every year, then refusing to adopt any new fashion trends before eventually and steadfastly refusing to try out any new build tools.
I’d heard plenty of chatter on the Internets about ‘Webpack’ and thought it was my duty to try a project using the new-fangled toast of the front-end developer cool-kids.
Webpack
I distinctly remember skipping over to the webpack.js.org site with keen interest. The first explanation of what Webpack is and does started like this:
import bar from './bar';
Say what? In the words of Dr. Evil, “Throw me a frickin’ bone here, Scott”.
I know it’s my own hang-up to deal with but I’ve developed a revulsion to any coding explanations that mention ‘foo’, ‘bar’ or ‘baz’. That plus the complete lack of succinctly describing what Webpack was actually for had me suspecting it perhaps wasn’t for me.
Digging a little further into the Webpack documentation, a slightly less opaque explanation was offered, “At its core, webpack is a static module bundler for modern JavaScript applications”.
Hmmm. Static module bundler. Was that what I wanted? I wasn’t convinced. I read on but the more I read, the less clear I was. Back then, concepts like dependency graphs, hot module reloading, and entry points were essentially lost on me.
A couple of evenings of researching Webpack later, I abandoned any notion of using it.
I’m sure in the right situation and more experienced hands, Webpack is immensely powerful and appropriate but it seemed like complete overkill for my humble needs. Module bundling, tree-shaking, and hot-module reloading sounded great; I just wasn’t convinced I needed them for my little ‘app’.
So, back to Gulp then.
On the theme of not changing things for change sake, another piece of technology I wanted to evaluate was Yarn over NPM for managing project dependencies. Until that point, I had always used NPM and Yarn was getting touted as a better, faster alternative. I don’t have much to say about Yarn other than if you are currently using NPM and everything is OK, you don’t need to bother trying Yarn.
One tool that arrived too late for me to appraise for this application is Parceljs. With zero configuration and a BrowserSync like browser reloading backed in, I’ve since found great utility in it! In addition, in Webpack’s defense, I'm told that v4 onwards of Webpack doesn’t require a configuration file. Anecdotally, in a more recent poll I ran on Twitter, of the 87 respondents, over half chose Webpack over Gulp, Parcel or Grunt.
I started my Gulp file with basic functionality to get up and running.
A ‘default’ task would watch the ‘source’ folders of style sheets and TypeScript files and compile them out to a build folder along with the basic HTML and associated source maps.
I got BrowserSync working with Gulp too. I might not know what to do with a Webpack configuration file but that didn’t mean I was some kind of animal. Having to manually refresh the browser while iterating with HTML/CSS is soooo 2010 and BrowserSync gives you that short feedback and iteration loop that is so useful for front-end coding.
Here is the basic gulp file as of 11.6.2017
You can see how I tweaked the Gulpfile nearer to the end of shipping, adding minification with ugilify:
Project Structure
By consequence of my technology choices, some elements of code organization for the application were defining themselves. A gulpfile.js in the root of the project, a node_modules folder (where Gulp stores plugin code) a preCSS folder for the authoring style sheets, a ts folder for the TypeScript files, and a build folder for the compiled code to live.
The idea was to have an index.html that contained the ‘shell’ of the application, including any non-dynamic HTML structure and then links to the styles and the JavaScript file that would make the application work. On disk, it would look something like this:
build/ node_modules/ preCSS/ img/ partials/ styles.css ts/ .gitignore gulpfile.js index.html package.json tsconfig.json
Configuring BrowserSync to look at that build folder meant I could point my browser at localhost:3000 and all was good.
With a basic build system in place, files organization settled and some basic designs to make a start with, I had run-out of procrastination fodder I could legitimately use to prevent me from actually building the thing!
Writing An Application
The principle of how the application would work was this. There would be a store of data. When the JavaScript loaded it would load that data, loop through each player in the data, creating the HTML needed to represent each player as a row in the layout and placing them in the appropriate in/out section. Then interactions from the user would move a player from one state to another. Simple.
When it came to actually writing the application, the two big conceptual challenges that needed to be understood were:
How to represent the data for an application in a manner that could be easily extended and manipulated;
How to make the UI react when data was changed from user input.
One of the simplest ways to represent a data structure in JavaScript is with object notation. That sentence reads a little computer science-y. More simply, an ‘object’ in JavaScript lingo is a handy way of storing data.
Consider this JavaScript object assigned to a variable called ioState (for In/Out State):
var ioState = { Count: 0, // Running total of how many players RosterCount: 0; // Total number of possible players ToolsExposed: false, // Whether the UI for the tools is showing Players: [], // A holder for the players }
If you don’t really know JavaScript that well, you can probably at least grasp what’s going on: each line inside the curly braces is a property (or ‘key’ in JavaScript parlance) and value pair. You can set all sorts of things to a JavaScript key. For example, functions, arrays of other data or nested objects. Here’s an example:
var testObject = { testFunction: function() { return "sausages"; }, testArray: [3,7,9], nestedtObject { key1: "value1", key2: 2, } }
The net result is that using that kind of data structure you can get, and set, any of the keys of the object. For example, if we want to set the count of the ioState object to 7:
ioState.Count = 7;
If we want to set a piece of text to that value, the notation works like this:
aTextNode.textContent = ioState.Count;
You can see that getting values and setting values to that state object is simple in the JavaScript side of things. However, reflecting those changes in the User Interface is less so. This is the main area where frameworks and libraries seek to abstract away the pain.
In general terms, when it comes to dealing with updating the user interface based upon state, it’s preferable to avoid querying the DOM, as this is generally considered a sub-optimal approach.
Consider the In/Out interface. It’s typically showing a list of potential players for a game. They are vertically listed, one under the other, down the page.
Perhaps each player is represented in the DOM with a label wrapping a checkbox input. This way, clicking a player would toggle the player to ‘In’ by virtue of the label making the input ‘checked’.
To update our interface, we might have a ‘listener’ on each input element in the JavaScript. On a click or change, the function queries the DOM and counts how many of our player inputs are checked. On the basis of that count, we would then update something else in the DOM to show the user how many players are checked.
Let’s consider the cost of that basic operation. We are listening on multiple DOM nodes for the click/check of an input, then querying the DOM to see how many of a particular DOM type are checked, then writing something into the DOM to show the user, UI wise, the number of players we just counted.
The alternative would be to hold the application state as a JavaScript object in memory. A button/input click in the DOM could merely update the JavaScript object and then, based on that change in the JavaScript object, do a single-pass update of the all interface changes that are needed. We could skip querying the DOM to count the players as the JavaScript object would already hold that information.
So. Using a JavaScript object structure for the state seemed simple but flexible enough to encapsulate the application state at any given time. The theory of how this could be managed seemed sound enough too – this must be what phrases like ‘one-way data flow’ were all about? However, the first real trick would be in creating some code that would automatically update the UI based on any changes to that data.
The good news is that smarter people than I have already figured this stuff out (thank goodness!). People have been perfecting approaches to this kind of challenge since the dawn of applications. This category of problems is the bread and butter of ‘design patterns’. The moniker ‘design pattern’ sounded esoteric to me at first but after digging just a little it all started to sound less computer science and more common sense.
Design Patterns
A design pattern, in computer science lexicon, is a pre-defined and proven way of solving a common technical challenge. Think of design patterns as the coding equivalent of a cooking recipe.
Perhaps the most famous literature on design patterns is "Design Patterns: Elements of Reusable Object-Oriented Software" from back in 1994. Although that deals with C++ and smalltalk the concepts are transferable. For JavaScript, Addy Osmani’s "Learning JavaScript Design Patterns" covers similar ground. You can also read it online for free here.
Observer Pattern
Typically design patterns are split into three groups: Creational, Structural and Behavioural. I was looking for something Behavioural that helped to deal with communicating changes around the different parts of the application.
More recently, I have seen and read a really great deep-dive on implementing reactivity inside an app by Gregg Pollack. There is both a blog post and video for your enjoyment here.
When reading the opening description of the ‘Observer’ pattern in Learning JavaScript Design Patterns I was pretty sure it was the pattern for me. It is described thus:
The Observer is a design pattern where an object (known as a subject) maintains a list of objects depending on it (observers), automatically notifying them of any changes to state. When a subject needs to notify observers about something interesting happening, it broadcasts a notification to the observers (which can include specific data related to the topic of the notification).
The key to my excitement was that this seemed to offer some way of things updating themselves when needed.
Suppose the user clicked a player named “Betty” to select that she was ‘In’ for the game. A few things might need to happen in the UI:
Add 1 to the playing count
Remove Betty from the ‘Out’ pool of players
Add Betty to the ‘In’ pool of players
The app would also need to update the data that represented the UI. What I was very keen to avoid was this:
playerName.addEventListener("click", playerToggle); function playerToggle() { if (inPlayers.includes(e.target.textContent)) { setPlayerOut(e.target.textContent); decrementPlayerCount(); } else { setPlayerIn(e.target.textContent); incrementPlayerCount(); } }
The aim was to have an elegant data flow that updated what was needed in the DOM when and if the central data was changed.
With an Observer pattern, it was possible to send out updates to the state and therefore the user interface quite succinctly. Here is an example, the actual function used to add a new player to the list:
function itemAdd(itemString: string) { let currentDataSet = getCurrentDataSet(); var newPerson = new makePerson(itemString); io.items[currentDataSet].EventData.splice(0, 0, newPerson); io.notify({ items: io.items }); }
The part relevant to the Observer pattern there being the io.notify method. As that shows us modifying the items part of the application state, let me show you the observer that listened for changes to ‘items’:
io.addObserver({ props: ["items"], callback: function renderItems() { // Code that updates anything to do with items... } });
We have a notify method that makes changes to the data and then Observers to that data that respond when properties they are interested in are updated.
With this approach, the app could have observables watching for changes in any property of the data and run a function whenever a change occurred.
If you are interested in the Observer pattern I opted for, I describe it more fully here.
There was now an approach for updating the UI effectively based on state. Peachy. However, this still left me with two glaring issues.
One was how to store the state across page reloads/sessions and the fact that despite the UI working, visually, it just wasn’t very ‘app like’. For example, if a button was pressed the UI instantly changed on screen. It just wasn’t particularly compelling.
Let’s deal with the storage side of things first.
Saving State
My primary interest from a development side entering into this centered on understanding how app interfaces could be built and made interactive with JavaScript. How to store and retrieve data from a server or tackle user-authentication and logins was ‘out of scope’.
Therefore, instead of hooking up to a web service for the data storage needs, I opted to keep all data on the client. There are a number of web platform methods of storing data on a client. I opted for localStorage.
The API for localStorage is incredibly simple. You set and get data like this:
// Set something localStorage.setItem("yourKey", "yourValue"); // Get something localStorage.getItem("yourKey");
LocalStorage has a setItem method that you pass two strings to. The first is the name of the key you want to store the data with and the second string is the actual string you want to store. The getItem method takes a string as an argument that returns to you whatever is stored under that key in localStorage. Nice and simple.
However, amongst the reasons to not use localStorage is the fact that everything has to be saved as a ‘string’. This means you can’t directly store something like an array or object. For example, try running these commands in your browser console:
// Set something localStorage.setItem("myArray", [1, 2, 3, 4]); // Get something localStorage.getItem("myArray"); // Logs "1,2,3,4"
Even though we tried to set the value of ‘myArray’ as an array; when we retrieved it, it had been stored as a string (note the quote marks around ‘1,2,3,4’).
You can certainly store objects and arrays with localStorage but you need to be mindful that they need converting back and forth from strings.
So, in order to write state data into localStorage it was written to a string with the JSON.stringify() method like this:
const storage = window.localStorage; storage.setItem("players", JSON.stringify(io.items));
When the data needed retrieving from localStorage, the string was turned back into usable data with the JSON.parse() method like this:
const players = JSON.parse(storage.getItem("players"));
Using localStorage meant everything was on the client and that meant no 3rd party services or data storage concerns.
Data was now persisting refreshes and sessions — Yay! The bad news was that localStorage does not survive a user emptying their browser data. When someone did that, all their In/Out data would be lost. That’s a serious shortcoming.
It’s not hard to appreciate that `localStorage` probably isn’t the best solution for 'proper' applications. Besides the aforementioned string issue, it is also slow for serious work as it blocks the 'main thread'. Alternatives are coming, like KV Storage but for now, make a mental note to caveat its use based on suitability.
Despite the fragility of saving data locally on a users device, hooking up to a service or database was resisted. Instead, the issue was side-stepped by offering a ‘load/save’ option. This would allow any user of In/Out to save their data as a JSON file which could be loaded back into the app if needed.
This worked well on Android but far less elegantly for iOS. On an iPhone, it resulted in a splurge of text on screen like this:

(Large preview)
As you can imagine, I was far from alone in berating Apple via WebKit about this shortcoming. The relevant bug was here.
At the time of writing this bug has a solution and patch but has yet to make its way into iOS Safari. Allegedly, iOS13 fixes it but it’s that’s in Beta as I write.
So, for my minimum viable product, that was storage addressed. Now it was time to attempt to make things more ‘app-like’!
App-I-Ness
Turns out after many discussions with many people, defining exactly what ‘app like’ means is quite difficult.
Ultimately, I settled on ‘app-like’ being synonymous with a visual slickness usually missing from the web. When I think of the apps that feel good to use they all feature motion. Not gratuitous, but motion that adds to the story of your actions. It might be the page transitions between screens, the manner in which menus pop into existence. It’s hard to describe in words but most of us know it when we see it.
The first piece of visual flair needed was shifting player names up or down from ‘In’ to ‘Out’ and vice-versa when selected. Making a player instantly move from one section to the other was straightforward but certainly not ‘app-like’. An animation as a player name was clicked would hopefully emphasize the result of that interaction – the player moving from one category to another.
Like many of these kinds of visual interactions, their apparent simplicity belies the complexity involved in actually getting it working well.
It took a few iterations to get the movement right but the basic logic was this:
Once a ‘player’ is clicked, capture where that player is, geometrically, on the page;
Measure how far away the top of the area is the player needs to move to if going up (‘In’) and how far away the bottom is, if going down (‘Out’);
If going up, a space equal to the height of the player row needs to be left as the player moves up and the players above should collapse downwards at the same rate as the time it takes for the player to travel up to land in the space vacated by the existing ‘In’ players (if any exist) coming down;
If a player is going ‘Out’ and moving down, everything else needs to move up to the space left and the player needs to end up below any current ‘Out’ players.
Phew! It was trickier than I thought in English — never mind JavaScript!
There were additional complexities to consider and trial such as transition speeds. At the outset, it wasn’t obvious whether a constant speed of movement (e.g. 20px per 20ms), or a constant duration for the movement (e.g. 0.2s) would look better. The former was slightly more complicated as the speed needed to be computed ‘on the fly’ based upon how far the player needed to travel — greater distance requiring a longer transition duration.
However, it turned out that a constant transition duration was not just simpler in code; it actually produced a more favorable effect. The difference was subtle but these are the kind of choices you can only determine once you have seen both options.
Every so often whilst trying to nail this effect, a visual glitch would catch the eye but it was impossible to deconstruct in real time. I found the best debugging process was creating a QuickTime recording of the animation and then going through it a frame at a time. Invariably this revealed the problem quicker than any code based debugging.
Looking at the code now, I can appreciate that on something beyond my humble app, this functionality could almost certainly be written more effectively. Given that the app would know the number of players and know the fixed height of the slats, it should be entirely possible to make all distance calculations in the JavaScript alone, without any DOM reading.
It’s not that what was shipped doesn’t work, it’s just that it isn’t the kind of code solution you would showcase on the Internet. Oh, wait.
Other ‘app like’ interactions were much easier to pull off. Instead of menus simply snapping in and out with something as simple as toggling a display property, a lot of mileage was gained by simply exposing them with a little more finesse. It was still triggered simply but CSS was doing all the heavy lifting:
.io-EventLoader { position: absolute; top: 100%; margin-top: 5px; z-index: 100; width: 100%; opacity: 0; transition: all 0.2s; pointer-events: none; transform: translateY(-10px); [data-evswitcher-showing="true"] & { opacity: 1; pointer-events: auto; transform: none; } }
There when the data-evswitcher-showing="true" attribute was toggled on a parent element, the menu would fade in, transform back into its default position and pointer events would be re-enabled so the menu could receive clicks.
ECSS Style Sheet Methodology
You’ll notice in that prior code that from an authoring point of view, CSS overrides are being nested within a parent selector. That’s the way I always favor writing UI style sheets; a single source of truth for each selector and any overrides for that selector encapsulated within a single set of braces. It’s a pattern that requires the use of a CSS processor (Sass, PostCSS, LESS, Stylus, et al) but I feel is the only positive way to make use of nesting functionality.
I’d cemented this approach in my book, Enduring CSS and despite there being a plethora of more involved methods available to write CSS for interface elements, ECSS has served me and the large development teams I work with well since the approach was first documented way back in 2014! It proved just as effective in this instance.
Partialling The TypeScript
Even without a CSS processor or superset language like Sass, CSS has had the ability to import one or more CSS files into another with the import directive:
@import "other-file.css";
When beginning with JavaScript I was surprised there was no equivalent. Whenever code files get longer than a screen or so high, it always feels like splitting it into smaller pieces would be beneficial.
Another bonus to using TypeScript was that it has a beautifully simple way of splitting code into files and importing them when needed.
This capability pre-dated native JavaScript modules and was a great convenience feature. When TypeScript was compiled it stitched it all back to a single JavaScript file. It meant it was possible to easily break up the application code into manageable partial files for authoring and import then into the main file easily. The top of the main inout.ts looked like this:
/// <reference path="defaultData.ts" /> /// <reference path="splitTeams.ts" /> /// <reference path="deleteOrPaidClickMask.ts" /> /// <reference path="repositionSlat.ts" /> /// <reference path="createSlats.ts" /> /// <reference path="utils.ts" /> /// <reference path="countIn.ts" /> /// <reference path="loadFile.ts" /> /// <reference path="saveText.ts" /> /// <reference path="observerPattern.ts" /> /// <reference path="onBoard.ts" />
This simple house-keeping and organization task helped enormously.
Multiple Events
At the outset, I felt that from a functionality point of view, a single event, like “Tuesday Night Football” would suffice. In that scenario, if you loaded In/Out up you just added/removed or moved players in or out and that was that. There was no notion of multiple events.
I quickly decided that (even going for a minimum viable product) this would make for a pretty limited experience. What if somebody organized two games on different days, with a different roster of players? Surely In/Out could/should accommodate that need? It didn’t take too long to re-shape the data to make this possible and amend the methods needed to load in a different set.
At the outset, the default data set looked something like this:
var defaultData = [ { name: "Daz", paid: false, marked: false, team: "", in: false }, { name: "Carl", paid: false, marked: false, team: "", in: false }, { name: "Big Dave", paid: false, marked: false, team: "", in: false }, { name: "Nick", paid: false, marked: false, team: "", in: false } ];
An array containing an object for each player.
After factoring in multiple events it was amended to look like this:
var defaultDataV2 = [ { EventName: "Tuesday Night Footy", Selected: true, EventData: [ { name: "Jack", marked: false, team: "", in: false }, { name: "Carl", marked: false, team: "", in: false }, { name: "Big Dave", marked: false, team: "", in: false }, { name: "Nick", marked: false, team: "", in: false }, { name: "Red Boots", marked: false, team: "", in: false }, { name: "Gaz", marked: false, team: "", in: false }, { name: "Angry Martin", marked: false, team: "", in: false } ] }, { EventName: "Friday PM Bank Job", Selected: false, EventData: [ { name: "Mr Pink", marked: false, team: "", in: false }, { name: "Mr Blonde", marked: false, team: "", in: false }, { name: "Mr White", marked: false, team: "", in: false }, { name: "Mr Brown", marked: false, team: "", in: false } ] }, { EventName: "WWII Ladies Baseball", Selected: false, EventData: [ { name: "C Dottie Hinson", marked: false, team: "", in: false }, { name: "P Kit Keller", marked: false, team: "", in: false }, { name: "Mae Mordabito", marked: false, team: "", in: false } ] } ];
The new data was an array with an object for each event. Then in each event was an EventData property that was an array with player objects in as before.
It took much longer to re-consider how the interface could best deal with this new capability.
From the outset, the design had always been very sterile. Considering this was also supposed to be an exercise in design, I didn’t feel I was being brave enough. So a little more visual flair was added, starting with the header. This is what I mocked up in Sketch:
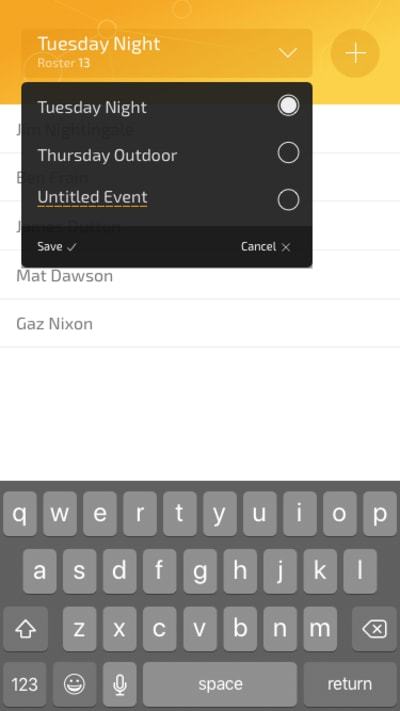
Revised design mockup. (Large preview)
It wasn’t going to win awards but it was certainly more arresting than where it started.
Aesthetics aside, it wasn’t until somebody else pointed it out, that I appreciated the big plus icon in the header was very confusing. Most people thought it was a way to add another event. In reality, it switched to an ‘Add Player’ mode with a fancy transition that let you type in the name of the player in the same place the event name was currently.
This was another instance where fresh eyes were invaluable. It was also an important lesson in letting go. The honest truth was I had held on to the input mode transition in the header because I felt it was cool and clever. However, the fact was it was not serving the design and therefore the application as a whole.
This was changed in the live version. Instead, the header just deals with events — a more common scenario. Meanwhile, adding players is done from a sub-menu. This gives the app a much more understandable hierarchy.
The other lesson learned here was that whenever possible, it’s hugely beneficial to get candid feedback from peers. If they are good and honest people, they won’t let you give yourself a pass!
Summary: My Code Stinks
Right. So far, so normal tech-adventure retrospective piece; these things are ten a penny on Medium! The formula goes something like this: the dev details how they smashed down all obstacles to release a finely tuned piece of software into the Internets and then pick up an interview at Google or got acqui-hired somewhere. However, the truth of the matter is that I was a first-timer at this app-building malarkey so the code ultimately shipped as the ‘finished’ application stunk to high heaven!
For example, the Observer pattern implementation used worked very well. I was organized and methodical at the outset but that approach ‘went south’ as I became more desperate to finish things off. Like a serial dieter, old familiar habits crept back in and the code quality subsequently dropped.
Looking now at the code shipped, it is a less than ideal hodge-bodge of clean observer pattern and bog-standard event listeners calling functions. In the main inout.ts file there are over 20 querySelector method calls; hardly a poster child for modern application development!
I was pretty sore about this at the time, especially as at the outset I was aware this was a trap I didn’t want to fall into. However, in the months that have since passed, I’ve become more philosophical about it.
The final post in this series reflects on finding the balance between silvery-towered code idealism and getting things shipped. It also covers the most important lessons learned during this process and my future aspirations for application development.

(dm, yk, il, ra)
0 notes
Text
Netlify Does Cache Invalidation For You
This is one of my favorite Netlify features. Say you’re working on a site and you change as asset like a CSS, JavaScript, or image file. Ya know, like do our job. On Netlify, you don’t have to think about how that’s going to play out with deployment, browsers, and cache. Netlify just handles it for you.
Netlify calls this Instant Cache Invalidation, part of the “rocketjuice” of Netlify.
On all the sites I work on that aren’t on Netlify, I do have to think about it (ugh). If you look at this very websites source, you’ll see a link to a stylesheet something like this:
<link href="https://css-tricks.com/wp-content/themes/CSS-Tricks-17/style.css?cache_bust=1594590986788"> rel="stylesheet"
See that ?cache_bust= stuff at the end of the stylesheet URL? Those are just gibberish characters I put into that URL manually (based on a Date() call) so that when I push a change to the file, it breaks both the CDN and people’s own browser cache and they get the new file. If I didn’t do that, the changes I push won’t be seen until all the cache expires or is manually removed by users, which is… bad. I might be fixing a bug! Or releasing a new feature! It’s extra bad because that CSS might go along with some HTML which doesn’t cache as aggressively and could lead to a mismatch of HTML and expected CSS.
I work on some sites where I change that cache-busting string by hand because I’m too lazy to automate it. Usually, I do automate it though. I recently shared my Gulpfile which I hand-wrote, and part of which deals with this cache-busting. It is work to write, work to maintain, and work to use during development. You can even read the comments on that post and see other people’s strategies for doing the same thing that are different than how I do it. Errrrrrybody be cache-busting.
Not on Netlify.
Again, you change an asset, push it up, Netlify knows it’s changed and does all the cache busting for you. So your stylesheet can be linked up like:
<link href="dont-even-worry-about-it.css" rel="stylesheet" />
The post Netlify Does Cache Invalidation For You appeared first on CSS-Tricks.
You can support CSS-Tricks by being an MVP Supporter.
Netlify Does Cache Invalidation For You published first on https://deskbysnafu.tumblr.com/
0 notes
Text
PAINLESS BUILDS WITH ELIXIR Laracasts
PAINLESS BUILDS WITH ELIXIR Laracasts
PAINLESS BUILDS WITH ELIXIR Laracasts
Laravel Elixir takes the yawn out of writing your Gulpfiles. Why spends hundreds of lines writing what can be accomplished with just a few?
Content From: https://laracasts.com/series/painless-builds-with-laravel-elixir.
View On WordPress
0 notes
Text
GulpとTypeScriptでブックマークレット開発環境を作ってみた
Bookmarkletってご存じですか? 最近ではあまり聞かないですが、ブラウザのブックマークに登録しておくと選択したらちょっと便利な機能があるやつです。例えば簡単に文字列を整形してコピーしたり、凄く単機能な拡張と思えば近いでしょうか。
作ろうと思った背景
前にも書いたように最近ちょこちょことブログをVuePressに移行しててよしぼちぼち完成だ! と思った矢先にアルファ版だったVeuPressが正式版になって同時にブログ関係のプラグインもアップデートされました。そしたら今まで進めてた移行用のものが使えなくなってしまった。
あとは、よくある他サイトのリンクをブログカードみたいなリンク表示するやつをVueのコンポーネントで実装しようと思ったらあまり上手くいかず。あとは静的に表現したかったのもあって、それならブックマークレットでOGPとかからデータ抜いてしまえ、という苦肉の策が背景です。
アプローチ
ブックマークレットの正体はJavaScriptの即時関数(無名関数とも言う)。なので、ペロっと書いてしまってちゃんと動けばそれでいいんですが、せっかくなので「ぼくのかんがえたさいきょうのブックマークレット開発環境」を作ってみることにしてみました。
それを目指すべきてんこもりの恩恵としては
Linterが効く(ESlint)
Formatterが効く(Prettier)
型(とその補完)が効く(TypeScript)
Minify(Uglify)が効く
TDDできる
これらをまとめてビルドするのはNPM Scriptで十分かと思ったんですが、せっかくなのでGulpでやることにしました。
つまり、GulpでESLintを通したTypeSciprtをコンパイル、Uglifyしてソースとは別のディレクトリに吐かせればいい。というわけですね。
Gulpとは
Gulp。ちょっと前に大流行したタスクランナー的なやつです(そのころはWebpackとかありませんでしたね)。v4が出る出るといってモタモタしてたらWebpackの登場で下火になった印象です。なので調べるとv3の情報がけっこうでます。
雑に言うとgulpfileというタスクを書いたファイルに使うプラグインと実行するタスクを書いて、コマンドから実行するやつ、という感じです。gulpfileはわりと読みやすいのが人気が出た理由でしょうか。
セットアップ
まず今回の仕様に合わせてセットアップしていきます。ここではNode.jsとyarnが入っている前提です。
$ yarn init
して適当に対話的に設定をします。
gulpに依存するものを入れていきます。
$ yarn add -D gulp gulp-eslint gulp-replace gulp-typescript gulp-uglify
ただこれだけでは全然足りないのでどんどん入れます。 次はTypeScriptまわり
$ yarn add -D typescript typescript-require ts-node
typescript-requireを入れるとGulpfileをTSで書くことが可能になります。
型定義ファイルも入れます。
$ yarn add -D @types/gulp @types/gulp-replace @types/gulp-uglify @types/jquery @types/node
jQueryは迷ったんですが、ブックマークレットでjQueryを使う方法もあるので入れておきます。
続いてESlint(+Prettier)まわり。今回はESlintの中でPrettierをかけます(最近それが良いのか分離したほうが良いのか悩んでますが、今回はこれで
$ yarn add -D eslint eslint-config-prettier eslint-plugin-prettier @typescript-eslint/eslint-plugin @typescript-eslint/parser
多分最小構成だとこれなんですが、standardとかに寄せたいのでさらに
$ yarn add -D eslint-config-standard eslint-plugin-import eslint-plugin-node eslint-plugin-promise eslint-plugin-standard
これでひとまず全部ですかね。ちなみにJestでテストを書くことも考えてたんですが、今回は割愛します。 (余裕があれば後日やる)
ディレクトリ構成はこんな感じです
├── dist │ └── sample.js ├── src │ └── sample.ts ├── gulpfile.ts ├── package.json ├── tsconfig.json └── yarn.lock
/srcディレクトリで開発し、ビルドした成果物は/distに入るようにします。
ESlint設定
とりあえず一例ですが、ESlintの設定です。さきほど入れたものからわかるように、ESlint経由でTypeScriptも対応させ、Prettierも中で動かします。
eslintrc.js
module.exports = { env: { browser: true, node: true, es6: true }, globals: { jQuery: true }, parser: '@typescript-eslint/parser', parserOptions: { sourceType: 'module', }, plugins: [ '@typescript-eslint', 'prettier', ], extends: [ 'standard', 'prettier', 'prettier/@typescript-eslint', ], rules: { // サンプルです 'prettier/prettier': ['error', { semi: false, }], 'no-eval': 'error', '@typescript-eslint/no-use-before-define': ['error', { functions: false, classes: true, variables: true }] }, }
rulesのところはサンプルですが、それ以外の設定はおおむねこんな感じでしょうか。
tsconfig
TypeScript用の設定としてtsconfig.jsonを用意する必要があります。通常は
$ tsc --init
を実行することで作られます。今回はこんな感じにしました。
tsconfig.json
{ "compilerOptions": { "target": "es5", "module": "commonjs", "removeComments": true, "strict": true, "noImplicitAny": false, "alwaysStrict": false, "baseUrl": "./src/", "paths": { "#/*": [ "*" ] }, "esModuleInterop": true } }
gulpfile
Gulpはgulpfile.jsでタスクを定義するんですが、typescript-requireを入れたのでgulpfile.tsにTypeScriptで書いていきます。
gulpfile.ts
import gulp from 'gulp' import eslint from 'gulp-eslint' import ts from 'gulp-typescript' import uglify from 'gulp-uglify' import replace from 'gulp-replace' const tsProject = ts.createProject(`tsconfig.json`) const srcDir = `src` const destDir = `dist` export default () => { return gulp .src(`${srcDir}/*.ts`) .pipe(eslint({ useEslintrc: true })) .pipe(eslint.format()) .pipe(eslint.failAfterError()) .pipe(tsProject()) .pipe( uglify({ mangle: true, compress: true, }) ) .pipe(replace(/^(.*)$/, `javascript:$1`)) .pipe(gulp.dest(destDir)) }
と、こんな感じにしてみました。tsで書いてますが、tsの要素ないですね… ちなみにGulpですが、v3まではgulp.taskとしてタスクを設定していましたが、v4からはexportのJSそのままの書き方ができます。
残念ながらこのへんの情報が少ないです。現在のv4でもgulp.taskでも書けるのでどちらでもいいのですが、どっちが良いのかイマイチわかりません。でもせっかくなので新しい書きかたでやりたいですね。
サンプルで実行テスト
こんな感じで開発環境ができたのでちゃんとできるかやってみましょう。 /srcの中にsample.tsを作って書いてみます。
sample.ts
;(() => { const title = document.title prompt(`title is`, title) })()
期待している動作は、ブックマークレットを実行したときに開いているページのタイトルを取得して、プロンプトに表示する、という動作です。 プロンプトに表示しておくのはコピー&ペーストしやすいようにですね。
ちなみに最初の行の;(() => {ってなんだ? と思うかもしれませんが、アロー関数で即時関数を作っています。
そしたらコマンドで
$ gulp
を叩きます。デフォルトタスクが走りますのでgulpfileに書いたとおり
リント + フォーマット
TypeScriptをJSに変換
JSを圧縮
最初にjavascript:という文字列を追加(ブックマークレットとして動作させるため)。
/distディレクトリに出力
が順番に実行されます。
/distを見るとsample.jsが出力されていて中身は
sample.js
javascript:!function(){var t=document.title;prompt("title is",t)}();
となっているでしょう。
これをブラウザのブックマークとして登録します。 適当なブックマークを作って、URLにsample.jsをコピー&ペーストするだけです。 そしたら適当なページを開いて実行してみます。プロンプトが表示されてページのタイトルが表示されたら成功です。
感想
実は変換まわりの設定が上手くいかずけっこうてこずりました。あとは今やTypeScriptで即時関数を作ることなんてなかったのでよくわからず苦戦しました。でもなんとかうまくいって良かったです。
本当のことを言えばテストを導入してTDDで作れるようにも考えたんですが、どのような風にテスト環境を作ったらいいのかに悩んだのでいったんテストは忘れます。おそらくJest+Puppetterが良さそうかな、と見当をつけています。
ブックマークレット自体はそんな複雑なことを書くことなんてほとんどないので、この環境はオーバーキル気味ですが、一旦環境を作ってしまえば使えるし、今さらES6以前の書き方なんて考えたくもないので結果的には良かったんじゃないかな、と思っています。
というかすでに必要なブックマークレットができてしまっ��ので無用の長物になってしまっているのは内緒です。
余談ですが、ここまでやってあらためてググってみたらほとんど同じことを考えていた人がすでに居らっしゃったようです。 TypeScriptを使ってgulpでブックマークレット開発(BoW) - Qiita
from Trial and Spiral https://blog.solunita.net/setup-developing-environment-for-bookmarklet/
0 notes
Text
Superlist - Directory WordPress Theme
https://opix.pk/blog/superlist-directory-wordpress-theme/ Superlist - Directory WordPress Theme https://opix.pk/blog/superlist-directory-wordpress-theme/ Opix.pk LIVE PREVIEWBUY FOR $60 Superlist – Directory WordPress Theme Superlist is the result of several years of active development in WordPress. Theme is trying to offer best directory experience with all out of the box bundled plugins. With the Superlist you have complete directory solution. Plugins bundled in theme: Boxes, Claims, Coupons, Currencies, FAQ, Favorites, Fields, Google Map, Google Places, Invoices, Listing Slider, Mail Templates, Notifications, Packages, Partners, PayPal, Pricing, Properties, reCAPTCHA, Reviews, Shop, Statistics, Stripe, Testimonials, Watchdogs Theme has strong focus on code quality. Everything has its own plugin and proper documentation. It is quite easy to modify theme or the plugin from the child theme because everything is properly wrapped in action or filter hook. Experienced developers will be happy to use the theme. With the good code is easier to create a great and maintable product. Predefined listing post types Business, Car, Coupon, Dating, Education, Event, Food & Drink, Hotel, Job, Pet, Property, Shoppings, Travels Custom fields Beside of predefined listing post types, you can easily define own fields to match your needs. Created field can be use for different post types, so you don’t need to recreate it for each of them. Every custom custom field is automatically added to frontend submission as well. Front end submission Theme has front end submission system for authenicated users. What does it mean? Users can post their listings into directory by logging in. They have full featured dashboad with the listings, profile and password managment. In their dashboard they can manage other stuff too like search queries, favorites, invoices, trasactions, watchdogs and so on. Users are able to see their listing views. Important notes Users can see their own images only. Registered users have subscriber role. Admin bar for subscribers is disabled. There are no agent or company specific registrations. Full Dashboard Regular WordPress users afer sign in have an access to front end dashboard. It is not needed to access WordPress admin to manage listings, check the transactions, print invoices or see the favorite and saved listings. Of course it is possible to to change the profile information (password, profile, TAX information, social connections) from the dashboard as well. Compare listings Compare listings side by side in the comparison table. See the difference between their common fields. Book listings Add a booking form to your listings and manage reservation requests. Packages & Pricing With the front end submission pricing and packages go hand in hand. You can create unlimited amount of packages and then you can assign for how long they are valid, how many listings are users able to upload and the cost of the package. From the pricing table you can link directly to package payment page. Packages offers the free and trial versions so you can offer these great packages to your users too. Important notes No recurrent payments. Transactions & Invoices After successful payment, the system will create transaction backlog for checking the payment details. The unique invoice is created too. Users are able to print the invoice from their dashboard. Administrator can set starting number for invoice ID. PayPal & Stripe & Wire Transfer In theme there is native support of well known payment gateways PayPal and Stripe. You can use PayPal account or PayPal credit card payments. There is wire transfer option too. Important notes Check if your country and currency is supported by PayPal. Statistics By using statistics plugin you can now track all search queries in filters. You can see how many searches per day has been executed, prices search, locations and categories. Listing views are tracked too. In back end you can see the overall listing views for last two weeks, 10 most popular listings and 10 most popular locations. Important notes If you are on cheap hosting, disable statistics plugin. On front end theme displays only views number. Charts are not displayed on front end. Coupons Superlist offers a way for publishing the coupons. Users are able to post their own coupons on your directory website through the front end submission system. They are able to set coupon location and category. What you CAN do Add coupons from front end. Download and print coupon images/PDF. Offer same coupon code for all. Generate random codes for signed in users. You can set max number of codes here. What you CAN NOT do Monetize posting coupons. Use coupons to purchase packages. Sell coupons. Notifications With the notification system your users will be always informed about their package status. Users will never miss the package expiration. They can follow the listing lifecycle from initial submit to final publication. Mail Templates Included mail templates plugin allows to create custom mail templates which can be used e.g. in the notification system. Do you want to add custom signature? No problem at all, just create new post linked to notification action and create your own content. Claim Listing If your business is already in directory, you have an option to claim it. Click on “Claim Listing” and fill the form. Admin will receive an email notification with your message. After that admin will get in touch with you and if everything is okay, your claim will be approved. Report Listing Did you find something what does not pass the site’s terms and conditions? Click on report and send the message to site admin who will be notified. Report will be stored in database so you will never lose user reports. Google Map With the map widget you can show all properties with the assigned GPS coordinates on the map. Widget has a lot of interesting features like: limiting an amount of listings displaying listings from certain categories, current user geolocation, display filter, map filtering, show listings from current taxonomy term od archive page and so on. Features Horizontal filter Important notes Theme implements only Google Map. Listings must be stored in the database. Listings Slider With the listings slider you can display quite simple slider showing your listings. Slider is responsive and it looks good on mobile devices. Everything what you need for that is to upload image for slider in listing and than enter listing ID in widget. Listing Detail Banner On listing detail you have several options how to present the listing. Theme has advanced Google Map support or you can use image or video for presentation. List of available options for listing detail: featured image, custom image, video, Google Map, Google Street View, Google Inside View. Video Cover This times the video presentation is the must. Theme containct great widget for promoting your website by using video. You can use mp4 or ogg format for the video with the custom title and text overlaying the presentation. If the device does not support video, not a problem, it will load the default image if set. Advanced Price Formatting & Multiple Currencies Theme allows to set default currency with the advaced formatting options. You are able to set thousands and decimal separators, currency code, currency symbol and so on. It is possible to define more that one currency which can user change when needed. Exchange rates are fetched from third party API providers. One Click Installation With the one click installation you can get the same copy of our demo site. This is the great way how to bootstrap your project and to get familiar with the theme and structure in the fast way. You can see our widget data, customizer settings and all other settings. Please be aware that you will get only image placeholders instead of original images. We reserve the right that some settings could be missing due the programming complexity. Automatic Plugin Updates Every bundled plugin is being automatically checking for a new version, so you will never miss any important update. Import listings Import property listings from your CSV/XML file into the Superlist theme with free Add-on into WP All Import plugin with support for all listing fields. Other significant features Custom listing types & fields manager Responsive layout Wide/Boxed layout Sticky/Fixed header Child theme FAQ, testimonials, pricing post types Custom POI icons font family Reviews and ratings Sorting options for listings (price, title, popularity, rating, date) Km and miles support for geolocation Get directions Advanced Google map Google geocomplete Opening hours Dark/Light submenu Prepared color combinations Extended developer documentation SASS for modular SCSS Font Awesome integration reCAPTCHA integration SEO friendly Prepared gulpfile for SASS automatization All strings are properly wrapped in translation function Retina ready Translated into English, Spanish, Portuguese, Italian, French, Danish, German, Turkish, Romanian, Russian and Slovak languages Notes: Images on our demo site are not a part of package. All settings are in customizer. All plugins used on our demo are free and bundled in the package on ThemeForest. Credits: Font family: Roboto, Font Awesome Images: Unsplash, Flickr Logo icon: The Noun Project Marker icon: The Noun Project Tags: directory, listing, listings, companies, business, real estate, event, restaurant, automotive, pet, dating, job, coupon, hotel, travel Update Log Version 2.9.1 28. February 2018 - FEATURE: multiple listing galleries - FEATURE: option to switch from select multiple to checkboxes for specific fields - FEATURE: admin email notification about purchased listing - FEATURE: taxonomy multicheck filter field supports checkboxes appearance - FEATURE: new filter field: shopping category - FEATURE: new filter field: event type - FEATURE: new filter field: travel activities - FEATURE: new filter field: food kind - FEATURE: new filter field: contract type - FEATURE: new filter field: property amenities - IMPROVEMENT: option to set default location tab - IMPROVEMENT: option to hide directions button - IMPROVEMENT: option to disable predefined filter fields - IMPROVEMENT: taxonomy filter fields respects "contains" lookup - IMPROVEMENT: mail templates pass array arguments as well - TWEAK: updated .pot catalog - TWEAK: updated Slovak translation - TWEAK: Listing Filter settings options - TWEAK: public facilities metabox is changed in favor of using in custom post types - TWEAK: property amenities filter field supports checkboxes appearance - FIX: forced to use Google API 3.31. Experimental 3.32 breaks info window functionality of the map markers. - FIX: fixed share popup New WP filters: - inventor_filter_field_type (applicable to event type, food kind, shopping category, contract type and listing category for now only) Version 2.9.0 02. November 2017 - FEATURE: listing detail banner redesign - FEATURE: FAQ metabox for custom listing types - FEATURE: Taxonomy chained select field type available in UI manager - FEATURE: option to restrict number of photos in listing gallery - FEATURE: option to restrict number of photos in listing gallery by user pacakge - FEATURE: option to randomize listing archive page by default - IMPROVEMENT: value validation of "Price" filter field - IMPROVEMENT: improved support for Facebook videos on the listing detail page - IMPROVEMENT: automatic Dribbble social URL from user nickname - IMPROVEMENT: automatic prepend of http:// to social URLs with www in the beginning - IMPROVEMENT: tooltip above "Share" button - IMPROVEMENT: tooltip above "Compare" button - IMPROVEMENT: tooltip above "Add to favorites" button - IMPROVEMENT: support for date filter fields - IMPROVEMENT: "-1" value for unlimited listings is changed to empty value - IMPROVEMENT: improved show_pending_listings_visible_to_author() function - IMPROVEMENT: "Back to my listings" button on "Delete listings" page - IMPROVEMENT: improved support for Facebook videos on the listing detail page - IMPROVEMENT: CSS improvements - TWEAK: banner template moved from theme to inventor plugin - TWEAK: removed superlist_after_listing_banner WP action in prior of inventor_listing_banner_actions - TWEAK: applied inventor_listing_banner_actions - TWEAK: applied inventor_listing_banner_title_after WP action - TWEAK: Inventor_Packages_Logic::listing_metabox_allowed() is more universal - TWEAK: User listings functionality moved from author template file to Inventor_Post_Type_User class - TWEAK: KEY changed to INDEX in the tables creation queries - TWEAK: Inventor_Post_Types::get_metabox_field_value() and Inventor_Post_Types::get_field_value() take $post_type argument - TWEAK: updated .pot catalog - TWEAK: updated Slovak translation - FIX: fixed issue at "Reset password" page - FIX: fixed filtering by custom numerical fields - FIX: fixed initial review when "Pros and Cons" fields are disabled - FIX: fixed masonry post notice - FIX: fixed listing slider navigation appearance - FIX: fixed responsive menu when its name is different from "Main Menu" - FIX: fixed Bootstrap select JS issues in repeatable metaboxes in frontend submission New WP actions: - inventor_listing_banner_title_before - inventor_listing_banner_title_after - inventor_listing_banner_meta - inventor_listing_banner_actions - inventor_author_content Version 2.8.5 28. April 2017 - FEATURE: Locations widget - FEATURE: header user menu - FEATURE: option to set marker icon by listing category instead of listing type - IMPROVEMENT: inventor_submission_steps WP filter is applied to single step submission too - IMPROVEMENT: option to show featured listings on top even if filter is filled in - IMPROVEMENT: option to set number of filter inputs in Cover widget - IMPROVEMENT: option to show filter without title nor subtitle - IMPROVEMENT: improved responsive in submission - IMPROVEMENT: hidden video controls on HTML5 video element for mobile devices - IMPROVEMENT: Google Server API key - IMPROVEMENT: automatic YouTube user URL from user nickname - IMPROVEMENT: inventor_metabox_allowed WP filter applied to social metabox - IMPROVEMENT: filter result numbers are always shown if enabled in widget settings - IMPROVEMENT: report section link takes title from its page - IMPROVEMENT: report form handle function checks if contact details were filled in - IMPROVEMENT: option to set default distance filter value - IMPROVEMENT: "nofollow" for website URL of the listing author - IMPROVEMENT: removed empty spaces from username in registration form - IMPROVEMENT: age field uses number HTML5 validation - IMPROVEMENT: users pagination - IMPROVEMENT: list of user bookings - IMPROVEMENT: list of bookings of user listings - IMPROVEMENT: option to filter bookings in admin by listing - IMPROVEMENT: "No-show" and "Completed" booking statuses - IMPROVEMENT: ability to allow booking for custom listing types - IMPROVEMENT: adds package validation date into admin users table - IMPROVEMENT: option to reply to reviews - TWEAK: priority of WP filter inventor_packages_metabox_permissions changed to 11 - TWEAK: removed deprecated mapescape library - TWEAK: map type control enabled by default - TWEAK: applied inventor_packages_metabox_permissions WP filter to default metabox permissions - TWEAK: refactored metabox permissions to a single field - TWEAK: applied inventor_packages_metabox_permissions WP filter to reviews section - TWEAK: Inventor_Post_Types::get_icon() takes $extra_html argument - TWEAK: Inventor_Post_Type_Listing::get_icon() takes $extra_html argument - TWEAK: food kind field in own metabox function Inventor_Post_Type_Food::details() - TWEAK: password value in registration form is sanitized - TWEAK: featured on top is disabled if filter is sorted - TWEAK: related listings section is hooked into inventor_listing_detail_sections WP filter instead of inventor_after_listing_detail_social - TWEAK: updated .pot catalog - TWEAK: updated Slovak translation - TWEAK: Inventor_Post_Type_User::get_users() helper takes $page argument - TWEAK: WP filter inventor_metabox_field_before_row applied to listing_map_location field - TWEAK: WP filter inventor_metabox_field_before applied to listing_map_location field - TWEAK: WP filter inventor_metabox_field_before_field applied to listing_map_location field - TWEAK: WP filter inventor_metabox_field_after_row applied to listing_map_location field - TWEAK: WP filter inventor_metabox_field_after applied to listing_map_location field - TWEAK: WP filter inventor_metabox_field_after_field applied to listing_map_location field - TWEAK: WP filter inventor_metabox_field_type applied to listing_description field - TWEAK: WP filter inventor_metabox_field_options applied to listing_dating_gender field - TWEAK: Inventor_Bookings_Post_Type_Booking::is_past() helper - TWEAK: Inventor_Bookings_Post_Type_Booking::time_until_start() helper - FIX: sticky header is disabled for mobile devices - FIX: fixed popular locations statistics table query - FIX: fixed deprecated jQuery functions - FIX: submission permission fix - FIX: masonry display accepts "show date" option for "Posts" widget - FIX: listing keyword filter lookup security fix - FIX: "Message from enquire form" refactored to "Message from enquiry form" - FIX: fixed deprecated jQuery functions - FIX: missing index bug fix - FIX: fix of json error in geolocation - FIX: fixed rendering of special property sections - FIX: admin name replaced by website name in email headers - FIX: fixed timezone issues in bookings - FIX: fix of missing colors in listing categories and listing types widgets - FIX: fixed empty value for non required taxonomy select hierarchy field type New WP filters: - inventor_filter_keyword_query - inventor_bookings_allowed_listing_post_types - inventor_submission_fields (used in single step submission) New shortcodes: - [inventor_widget_listings] - [inventor_bookings] - [inventor_bookings_manager] Version 2.8.0 31. January 2017 - FEATURE: new video tutorial: How to create custom listing types in WP admin - https://www.youtube.com/watch?v=IZeWFKhsSZU - FEATURE: simple booking functionality - FEATURE: option to show featured listings as first/on top in the list - FEATURE: sublistings/related listings (parent-child listing relationship) - FEATURE: Rich Data/Snippet formatting (Google Structured Data Testing) for Events - IMPROVEMENT: option to hide sublistings from archive pages and listings widget - IMPROVEMENT: filter automatically finds GPS coordinates if geolocation is set - IMPROVEMENT: Geolocation filter field looks up for regions only - IMPROVEMENT: .listing-column-image changed to anchor - IMPROVEMENT: option to change listing author directly in the WP admin - IMPROVEMENT: option to set image for a location - IMPROVEMENT: option to set alphabetical order of listings in widget - IMPROVEMENT: pending listings count in WP admin menu - IMPROVEMENT: responsive compare table labels - IMPROVEMENT: option to remove listing from comparison - IMPROVEMENT: inventor_google_map_ajax_ WP option is not populated if cache is not used - IMPROVEMENT: improved performance while submitting new listing using frontend submission - IMPROVEMENT: "View your changes at this url." message when listing is updated - IMPROVEMENT: removed black stripes from video cover - IMPROVEMENT: watchdogs show translated filter values of listing type, location and category - TWEAK: WP filter inventor_metabox_field_enabled applied in Dating post type - TWEAK: WP filter inventor_metabox_field_name applied to Shopping post type - TWEAK: WP filter inventor_metabox_field_type applied to Shopping post type - TWEAK: WP filter inventor_metabox_description applied to date and time metaboxes - TWEAK: helper template section-children-listings.php - TWEAK: helper function Inventor_Query::get_children_listings() - TWEAK: helper function Inventor_Post_Types::get_metabox_field_value() - TWEAK: helper function Inventor_Post_Types::is_child_listing() - TWEAK: helper function Inventor_Post_Types::is_post_listing() - TWEAK: helper function Inventor_Post_Type_Event::get_timestamps() - TWEAK: checking if metabox exists in submission process - TWEAK: inventor_metabox_field_attributes WP filter applied to property fields - TWEAK: updated .pot catalogs - TWEAK: updated Slovak translations - FIX: Undefined index in class-inventor-post-types.php fix - FIX: current listing is not shown in "Similar listings" widget - FIX: fixed German translation - FIX: fixed iteration of non-array in generic section template - FIX: responsiveness fix of boxes component - FIX: fix for search queries graphs of locations and listing categories - FIX: fixed watchdog value in admin list - FIX: changed watchdog title in admin list - FIX: minor CSS fixes and some improvements - FIX: fixed listing title and buttons visibility above map banner - TWEAK: new demo content New WP filters: - inventor_after_login_page - inventor_after_register_page - inventor_listing_featured_image New WP actions: - inventor_booking_created New WP shortcodes: - [inventor_booking_detail] Version 2.7.0 14. December 2016 - FEATURE: compare listings - FEATURE: favorite collections - FEATURE: Geolocation filter field works outside Google map too - FEATURE: similar listings option in the "Listings" widget - FEATURE: endpoints for WordPress JSON REST API - FEATURE: nightly opening hours (for example from 10:00 – 01:00 next day). - FEATURE: address in map at listing detail page - FEATURE: current location marker - FEATURE: information about missing package permissions in the metabox description - IMPROVEMENT: worstRating and bestRating in the Google Structured Data - IMPROVEMENT: video embed script is not loading if not necessary - IMPROVEMENT: pagination in author detail page - IMPROVEMENT: support of favorite listings for WordPress multisites - IMPROVEMENT: number of listing views are handled using visitor (cookie) data - IMPROVEMENT: responsive improvement - IMPROVEMENT: all listing categories displayed in the listing banner - TWEAK: Inventor_Post_Types::get_attributes() takes ignore_skipped argument - TWEAK: refactored filter form template - TWEAK: escaping field value moved from generic template to core inventor functionality - TWEAK: WP filter inventor_metabox_title takes $post_type argument - TWEAK: WP filter inventor_metabox_description takes $post_type argument - TWEAK: WP filter inventor_filter_query renamed to inventor_filter_query_ids - TWEAK: helper function Inventor_Post_Types::opening_hours_day_names() - TWEAK: helper function Inventor_Post_Types::opening_hours_for_day() - TWEAK: helper function Inventor_Price::format_price() takes $currency argument - TWEAK: Inventor_Properties_Logic::get_price_comparison() takes optional $post_id argument - TWEAK: refactored opening hours - TWEAK: updated .pot catalog - TWEAK: updated Slovak translation - TWEAK: applied inventor_listing_actions WP action - TWEAK: support for inventor_filter_query_ids - TWEAK: support for marker content in simple map - TWEAK: disabled mapescape due to new Google Maps mobile UX - TWEAK: inventor_metabox_field_enabled WP filter applied for property fields - TWEAK: support for inventor-compare plugin - TWEAK: new demo content data - FIX: fixed row/box filter switcher - FIX: fixed notice while filtering by taxonomy multicheck filter fields - FIX: element of .listing-column-bottom-title changed to prevent validation errors - FIX: single step submission minor fix - FIX: minor CSS fixes and some improvements - FIX: IE11 fix New WP widgets: - Collections New WP shortcodes: - [inventor_compare] - [inventor_favorites_create_collection] New WP filters: - inventor_statistics_timeout - inventor_google_map_use_cache - inventor_google_map_infowindow_category - inventor_listing_category_name New WP actions: - inventor_register_form_fields_before - inventor_register_form_fields_after Version 2.6.0 04. November 2016 - FEATURE: package permissions of custom metaboxes - FEATURE: single step submission available - FEATURE: Image Slider widget - FEATURE: Listing Types widget - FEATURE: inventor-ui-kit plugin - FEATURE: masonry blog display - FEATURE: masonry display in recent posts widget - FEATURE: phone field type - FEATURE: The Open Graph Protocol title and image - FEATURE: option to pick best rated listings in the Listings Widget - FEATURE: option to pick most viewed listings in the Listings Widget - IMPROVEMENT: post type argument in inventor_listing_type_icon WP filter - IMPROVEMENT: coupon number fields validation - IMPROVEMENT: refactored filter form widget fields - IMPROVEMENT: option to define chained select depth using 'chain_depth' field attribute - IMPROVEMENT: default WP user profile fields update when user edits his profile on frontend - IMPROVEMENT: single payment gateway is automatically checked as default - IMPROVEMENT: added anchor to listing title in box display - IMPROVEMENT: option to set "per row" option in the "Listing Categories" widget settings - IMPROVEMENT: automatic Instagram user URL from user nickname - IMPROVEMENT: checking of empty contact section in listing detail - IMPROVEMENT: support of image field in generic section template - IMPROVEMENT: escapes and sanitizes user's first and last name - IMPROVEMENT: forced Reply-To in inquire mail header - IMPROVEMENT: money filter field support of custom fields - IMPROVEMENT: column items in listing detail attributes are ordered from top to bottom instead from left to right - IMPROVEMENT: CSS for single step submission - IMPROVEMENT: cover color option in Cover widget settings - IMPROVEMENT: values of taxonomy multicheck field are rendered as tags in generic section - IMPROVEMENT: support for one-level menu widget in complex header area - IMPROVEMENT: automatically set Unlimited package to admin after One-Click Installation - IMPROVEMENT: improved appearance of map infowindow - IMPROVEMENT: image in the infowindow is clickable now - IMPROVEMENT: font-awesome 4.7 - IMPROVEMENT: Stripe PHP SDK v4.0.0 - IMPROVEMENT: updated Slovak translation - TWEAK: render_favorite_button function moved to favorites plugin - TWEAK: removed masonry library from inventor-testimonials plugin - TWEAK: granted upload_files permission to the contributor role - TWEAK: post type argument in inventor_listing_type_icon WP filter - TWEAK: field ID in the custom metabox section field title and content wrapper classes - TWEAK: field ID in generic section template - TWEAK: .mp4 class for video-embed-wrapper - TWEAK: form group class for each filter field - TWEAK: refactored filter form widget fields - TWEAK: helper function Inventor_Post_Types::get_icon() - TWEAK: Inventor_Metaboxes::get_for_post_type() can take array as an argument - TWEAK: Inventor_Post_Types::count_post_types() renamed to Inventor_Post_Types::count_posts() - TWEAK: Inventor_Utilities::remove_special_characters() - TWEAK: WP filter inventor_metabox_title used for user metaboxes - TWEAK: WP filter inventor_metabox_social_networks takes $post_type argument - TWEAK: WP filter inventor_metabox_field_enabled applied to user fields and general metabox - TWEAK: new demo content - TWEAK: removed demo content of 1.6.1 - TWEAK: removed demo content of 1.9.5 - TWEAK: deprecated Video Cover widget - FIX: fixed sanitization and escape callbacks of filter lookup - FIX: fixed Warning message for package listing types - FIX: fixed listing video section of mp4 files - FIX: fixed vertical align of logos in partners widget - FIX: fixed rows/grid listing display - FIX: fixed some German translations or URLs (resave your permalinks!) - FIX: "Check your package message" is visible only if inventor-packages plugin is activated - FIX: empty coupon generation fix - FIX: coupon expiration date fix - FIX: fixed map rendering in default closed toogle state - FIX: fixed accent in the Spanish translation - FIX: fixed icon anchor in the listing categories and listing types widgets - FIX: minor CSS fixes and some improvements New WP filters: - inventor_inquire_form_subject - inventor_packages_metabox_permissions New WP actions: - inventor_google_map_infobox - WARNING: Video Cover widget is deprecated, replace it with new Cover widget from inventor-ui-kit plugin Version 2.5.0 07. October 2016 - FEATURE: option to set maximum allowed number of categories per listing - FEATURE: option to set maximum allowed number of categories per package - FEATURE: option to show user address field as a country dropdown list - FEATURE: working history and experience in resume detail - FEATURE: custom fields of contact metabox are shown in listing detail - FEATURE: new customizations section: Inventor Users - FEATURE: new shortcode: [inventor_public_profile_link] - IMPROVEMENT: font-awesome 4.6.3 - IMPROVEMENT: message about maximum allowed categories before field - IMPROVEMENT: option to deselect icon of listing category - IMPROVEMENT: option to deselect icon of listing type - IMPROVEMENT: appearance and visibility options for coupons widgets - IMPROVEMENT: appended listing title to the edit page title - IMPROVEMENT: excerpt of the listing title in the listing archive - IMPROVEMENT: excerpt of the listing title in the my listings page - IMPROVEMENT: tax per item in the invoice - IMPROVEMENT: coupon icon - IMPROVEMENT: lexicon ID and listing types in the lexicon list admin table - IMPROVEMENT: zeros are shown after decimal point in the meals and drinks menu - IMPROVEMENT: author social networks in author detail page - IMPROVEMENT: automatic Facebook, Twitter and Google+ user URLs from user nickname - IMPROVEMENT: new URL to Google Polyline Utility - IMPROVEMENT: shown only enabled listing types in package restrictions - IMPROVEMENT: custom section fields allows post tags in their values - IMPROVEMENT: empty generic sections of custom metaboxes are not shown in listing detail - IMPROVEMENT: meals and drinks menu sections lexicon is not visible in the menu if food listing type is disabled - TWEAK: coupon codes moved to right sidebar in admin - TWEAK: dynamic meals and drinks metabox ID - TWEAK: "Select/Deselect All" buttons are disabled for listing categories and location - TWEAK: hook on inventor_google_map_infobox in inventor-favorites plugin - TWEAK: settings of number field types applied in filters - TWEAK: refactored code of submission steps - TWEAK: .term-tree, .has-children, .children-wrapper and .children classes for taxonomy - TWEAK: added class .listing-detail-section-subtitle to h3 element in listing sections hierarchical multicheck field - TWEAK: Inventor_Metaboxes::get_for_post_type() helper - TWEAK: Inventor_Post_Types::get_max_listing_categories() helper function - TWEAK: Inventor_Utilities::excerpt() helper function - TWEAK: Inventor_Utilities::get_countries() helper function - TWEAK: Inventor_Fields_Logic::get_field_settings() helper - TWEAK: Inventor_Post_Type_Listing::get_icon() helper function - TWEAK: Inventor_Post_Type_Listing::get_inventor_poi() is deprecated - TWEAK: new strings in .pot catalog - TWEAK: rebuild catalog - FIX: lost password URL fix - FIX: minor CSS fixes and some improvements - FIX: video banner is hidden on small mobile devices - FIX: fixed missing listing type icon in submission shortcode - FIX: fixed accent in the Spanish translation - FIX: fixed fullwidth components of boxed layout - FIX: fixed listing video banner of custom files - FIX: fixed option "1" in non-required fields - FIX: fixed slug identifier regex for new internet browser versions - FIX: fixed missing placeholder of custom text filter fields - FIX: fixed listing slider metabox bug - FIX: fixed commenting on frontend - FIX: fixed comment editation in backend - FIX: fixed German translation - FIX: fixed taxonomy separator - FIX: fixed text domains New WP filters: - inventor_notify_about_new_user Version 2.4.0 01. September 2016 - FEATURE: Russian translation - FEATURE: free WP All Import add-on for Inventor ready - FEATURE: Google Structured Data Markup of reviews in JSON-LD format - FEATURE: new header type: complex (menu in separate row) - FEATURE: new widget area: "Header" (for complex type only for now) - FEATURE: support for new listing type: Resume - FEATURE: option to apply for a job with user resume - FEATURE: list of job applicants - FEATURE: new notification type: package purchased - for admin - FEATURE: custom Meals and Drinks menu sections - FEATURE: support for YouTube and Vimeo URLs in the Listing Video Banner - FEATURE: support for YouTube and Vimeo URLs in the Video Cover Widget - FEATURE: support for custom filter fields of text type - FEATURE: option to disable file upload in reviews - FEATURE: option to disable pros and cons fields in reviews - FEATURE: option to set map type in the listing detail page - FEATURE: submission list accepts listing-type URL argument - IMPROVEMENT: settings shortcut in the inventor menu - IMPROVEMENT: lost password URL redirection to frontend page - IMPROVEMENT: location / region field moved from the bottom to top in the metabox - IMPROVEMENT: metabox and field filters applied for dating listing type fields - IMPROVEMENT: metabox and field filters applied for travel listing type fields - IMPROVEMENT: selected Inventor POI icon in admin has different color and is easier to find - IMPROVEMENT: opening hours status is not set for custom values - IMPROVEMENT: link of the taxonomy custom fields in the listing overview - IMPROVEMENT: address title is not visible if each user address field is disabled - IMPROVEMENT: improved documentation regarding predefined fields and metaboxes - IMPROVEMENT: improved documentation regarding custom fields and metaboxes - IMPROVEMENT: alt text for listing logo - IMPROVEMENT: applied inventor_metabox_field_options WP filter - IMPROVEMENT: field ID and metaboxes in the fields list admin table - IMPROVEMENT: metabox ID and listing type in metaboxes list admin table - IMPROVEMENT: listing type ID, URL slug and icon in the listing types list admin table - IMPROVEMENT: field order applies to position in predefined metaboxes - IMPROVEMENT: updated fields of resume listing type - IMPROVEMENT: support for bootstrap chained selects - TWEAK: site_url() replaced with home_url() - TWEAK: removed condition for Terms of Service - TWEAK: Inventor_Query::get_taxonomy_tree_value() helper - TWEAK: Inventor_Utilities::get_term_options() helper - TWEAK: Inventor_Query::get_listings_by_user() takes new post type argument - TWEAK: show_option_none is set to true if field is not required - TWEAK: gateway ID in the gateways array - TWEAK: removed condition for Terms of Service - TWEAK: filter sorting options in own template - TWEAK: inventor_listing_attributes filter takes optional $post_id attribute from now - TWEAK: removed loop setting for video banner - TWEAK: watchdog can be saved/deleted only by logged user - TWEAK: rebuild .pot catalogue - FIX: pricing table redirection fix - FIX: minor CSS fixes and some improvements - FIX: call to a member function save_fields() error fix - FIX: wire transfer payments need to be approved by website owner at first - FIX: fixed responsive of author detail page - FIX: fixed saving of empty fields - FIX: fixed translation domain typo for watchdogs - FIX: fixed plugin dependency - FIX: fixed claim form admin notification - FIX: fixed German translation - FIX: fixed edge cases of chain selects - FIX: fixed listing type without icon in admin dashboard listings counts table - FIX: fixed active sorting and order by filter button - FIX: fixed sidebar in author detail page - FIX: fixed condition in default package settlement New WP filters: - inventor_package_of_user - inventor_metabox_field_position - inventor_field_type_taxonomy_select_chain_depth WARNING for developers: header template was heavily refactored. You will need to rebuild your stylesheet if you are using custom CSS. Version 2.3.0 02. August 2016 - FEATURE: Romanian translation - FEATURE: listing type icon - FEATURE: listing category color - FEATURE: support for map marker category color - FEATURE: option to set listing category for specific listing types only - FEATURE: option to sort listings by date (disabled by default) - FEATURE: option to filter listings by date - FEATURE: listing category icon in the box listing template - FEATURE: listing category icon in the masonry listing template - FEATURE: new listing categories widget appearance option (cards) - FEATURE: listings counts dashboard widget in the WP admin - IMPROVEMENT: user avatar in listing author widget is a link to user profile - IMPROVEMENT: changed empty label for multicheck fields - IMPROVEMENT: INVENTOR_FIELD_TYPE_TAXONOMY_SELECT_CHAIN_DEPTH constant - IMPROVEMENT: listing directions link opens in new window - IMPROVEMENT: Google Map Widget intercepts taxonomy term - IMPROVEMENT: {listing_url} variable in submission mail body templates - IMPROVEMENT: {package} variable in submission mail body templates - IMPROVEMENT: {author} variable in submission mail body templates - IMPROVEMENT: added package column into user list in the WP admin - IMPROVEMENT: partner URL opens in new browser tab - IMPROVEMENT: support for custom empty labels of selectpickers - IMPROVEMENT: improved design of listing type pickup in submission - IMPROVEMENT: map field saves address now too instead of GPS coordinates only - IMPROVEMENT: alt attribute for gallery thumbnails at listing detail page - TWEAK: removed cmb_taxonomy_metadata library - TWEAK: Inventor_Post_Types::is_post_author() helper function - TWEAK: Inventor_Utilities::generate_hash() helper function - TWEAK: removed taxonomy-listing.php page template from theme - TWEAK: Inventor_Filter::get_price_range() replaced by Inventor_Filter::get_field_range() - TWEAK: new strings in .pot catalogues - FIX: fixed missing property in the theme's supported listing types - FIX: fix of dropdowns duplicates - FIX: social connections title is not shown in user profile if there are no social networks defined - FIX: SSL and cookie fix - FIX: user pricing table redirection fix - FIX: empty public facilities or valuation is not shown at detail page - FIX: German translation fix - FIX: Turkish translation fix - FIX: fixed empty FAQs - FIX: fixed map filtering by taxonomy fields at taxonomy archive page - FIX: fixed color in watchodgs warning message - FIX: fixed video cover width for boxed layout - FIX: fix of stretched partners logos - FIX: minor CSS fixes and some improvements New WP filters: - inventor_metabox_field_types - inventor_listing_type_icon New WP filters: - inventor_order_query_field - inventor_filter_query_field - inventor_widget_listings_query - inventor_widget_listings_order_options Version 2.2.0 01. July 2016 - FEATURE: Turkish translation - FEATURE: support for filter parameters of multiple values - FEATURE: custom user fields - FEATURE: support for custom filter fields of following types: multicheck, taxonomy multicheck, checkbox - FEATURE: calculated field: price per area unit (for property type) - FEATURE: calculated field: average price per area unit (for property type) - FEATURE: calculated field: difference between average price per area unit (for property type) - FEATURE: new custom field type: title - FEATURE: reset password page - IMPROVEMENT: youngest taxonomy child displayed in the filter while browsing its archive page - IMPROVEMENT: terms and conditions in registration form open in new tab - IMPROVEMENT: improvements in responsive navigation and for overflown submenus - IMPROVEMENT: comments count are not shown for blog posts with disabled comments - IMPROVEMENT: users can delete their own media files - IMPROVEMENT: food menu image opens in popup - IMPROVEMENT: billing details are not shown in payment form if they are disabled - IMPROVEMENT: support of shortcodes in custom filter fields of wysiwyg and textarea types - IMPROVEMENT: Inventor_Utilities::build_hierarchical_taxonomy_select_options() recognizes array as selected value - IMPROVEMENT: updated Danish translations - IMPROVEMENT: support for CMB2 2.2.2.1 - TWEAK: removed listing type prefix from field ID - TWEAK: car details and car color in own metabox functions - TWEAK: job details metabox in own function - TWEAK: meals in food and groups have own metabox function - TWEAK: listing prefix in shop metabox - TWEAK: option to override translation files more easily - TWEAK: support for custom payment gateway action - TWEAK: most recent TGMPA plugin version - FIX: Portugal translation fix - FIX: fixed listing slider in boxed layout - FIX: fixed social section title at listing detail page - FIX: fix of hidden amenities - FIX: translation fixes - FIX: minor CSS fixes and some improvements New WP filters: - inventor_filter_query_meta Update instructions: 1. Update CMB2 plugin to the most recent version (currently 2.2.2.1) 2. Update main inventor plugin 3. Update all inventor-* plugins 4. Update theme 5. For developers: change field identifiers in your custom source code from old pattern listing__ to the new one: listing_ as listing type prefix was removed from custom fields identifier. This allows you to create custom filter fields more easily. Database data will be automatically migrated, don’t worry. Version 2.1.0 08. June 2016 - FEATURE: Portugal translation - FEATURE: users widget - FEATURE: support for custom filter fields of taxonomy type - FEATURE: support for custom filter fields of radio, radio_inline and select type - FEATURE: floor plans for property listing post type - FEATURE: default location field type changed to chained selects (taxonomy_select_chain) - IMPROVEMENT: colorbox for all images - IMPROVEMENT: link to skype:username?call for Skype social network - IMPROVEMENT: link to tel:// for phone field value - IMPROVEMENT: added http:// prefix for website in listing author widget (if not set) - IMPROVEMENT: notifications for all site admins - IMPROVEMENT: fallback to generic filter field template - IMPROVEMENT: improved payment UX for anonymous users - IMPROVEMENT: little performance improvement of PayPal gateway - IMPROVEMENT: used inventor_before_listing_detail WP action instead of the_content WP filter in statistics - IMPROVEMENT: user is redirected to his listings page (if exists) after submission creation - TWEAK: new helper method Inventor_Utilities:get_site_admins() - TWEAK: Inventor_Utilities:get_after_payment_url() helper - TWEAK: public facilities and valuation in own metaboxes - TWEAK: get_site_admins moved Notifications to Inventor core plugin - FIX: reloading of Google Map location fix - FIX: redirection after payment fix - FIX: fix of blocking reviews of unregistered users - FIX: removed session id from listing views logic - FIX: Stripe button visibility changes according to agreed terms and conditions - FIX: WP admin logout fix - FIX: typo in prepare payment data fix - FIX: mapescape CSS fix - FIX: some translation fixes - FIX: minor CSS fixes and some improvements New WP actions: - inventor_before_listing_detail - inventor_after_listing_detail New WP filters: - inventor_listing_attributes - inventor_social_network_url Version 2.0.0 20. May 2016 - FEATURE: German translation - FEATURE: simple banner type - FEATURE: new submission type: pay per post - FEATURE: monetization option: pay per featured listing - FEATURE: listing types package restrictions - FEATURE: new map marker style: thumbnail - FEATURE: list of listing authors ([inventor_users] shortcode) - FEATURE: author detail page - IMPROVEMENT: empty form values are not submitted (better SEO) - IMPROVEMENT: slug is used for location and listing category filter values instead of their IDs (better SEO) - IMPROVEMENT: currency in price filter fields - IMPROVEMENT: link to author detail page from listing author widget - IMPROVEMENT: more social networks in listing author widget - IMPROVEMENT: social metabox has icons of social networks - IMPROVEMENT: support for multiple currencies in listing filter - IMPROVEMENT: support for body classes for Image Cover Widget - IMPROVEMENT: support for transparent header for Image Cover Widget - TWEAK: option for developers to filter user listings by status - TWEAK: support for inventor_submission_allowed_listing_post_types - TWEAK: map takes bounds argument (for developers) - TWEAK: new demo content - FIX: fixed default zoom of listing location at its detail page - FIX: fixed empty value of some taxonomy fields - FIX: fix of claim contact email - FIX: if field with options is required, "None" option is hidden - FIX: if ordering by rating, search result contains listings without reviews too - FIX: minor CSS fixes and some improvements New WP filters - inventor_filter_params New WP filters for custom fields: - inventor_metabox_field_before_row - inventor_metabox_field_before - inventor_metabox_field_before_field - inventor_metabox_field_after_field - inventor_metabox_field_after - inventor_metabox_field_after_row Version 1.9.5 01. May 2016 - FEATURE: no more complicated widget logic conditions, use widget visibility options - FEATURE: simple packages widget - IMPROVEMENT: sessions are disabled by default - IMPROVEMENT: support for cookie storage - IMPROVEMENT: removed "filter-" prefix from filter fields in URL - IMPROVEMENT: if filtering by distance (on map for example), closest listings have bigger order priority - IMPROVEMENT: register, inquire and claim forms preserve data if form is invalid - IMPROVEMENT: listing author widget is hidden if author profile is not set - IMPROVEMENT: map reloads markers when geocomplete location is changed - IMPROVEMENT: improved performance - IMPROVEMENT: support for Google reCAPTCHA in review form - IMPROVEMENT: choose listing type step will be skipped for single post type websites - TWEAK: inventor_metabox_field_enabled filter applies to listing_locations field too - TWEAK: price filter field use single value instead of 2 - FIX: fixed missing translation strings - FIX: fixed translation for package expiration date - FIX: fixed listing type in watchodg lookup - FIX: fixed redirection url after watchodg removal - FIX: minor CSS fixes and some improvements - FIX: map filter is hidden if map is closed on mobile devices - FIX: fixed share modal on mobile devices - FIX: opening hours for manual offset fix - FIX: reCAPTCHA toggle fix in inquire form widget settings - FIX: fixed missing date placeholder in inquire form - FIX: inquire form fix - FIX: banner type fix - New WP filters - inventor_visitor_data_storage (options: COOKIE/SESSION, default = COOKIE) - inventor_metabox_field_name - inventor_metabox_field_description - inventor_asynchronous_scripts - inventor_submission_allowed_listing_post_types Version 1.9.0 18. April 2016 - FEATURE: Danish translation - FEATURE: French translation - FEATURE: listing carousel - FEATURE: column listing display - FEATURE: option to save sessions to database - IMPROVEMENT: category and location filter fields show only children items at taxonomy archive page - IMPROVEMENT: inventor_metabox_social_networks WP filter applies for user profile too - IMPROVEMENT: support for inventor_metabox_field_default filter for custom fields - IMPROVEMENT: support for inventor_metabox_field_enabled filter for custom fields - IMPROVEMENT: support for inventor_metabox_field_attributes filter for custom fields - IMPROVEMENT: geocode request over HTTPS - IMPROVEMENT: scrolling/dragging Google Map on mobile devices - IMPROVEMENT: listing type in notification mail template - IMPROVEMENT: Google reCAPTCHA support in register form - IMPROVEMENT: support for PHP 5.3 - IMPROVEMENT: icons in submission button - IMPROVEMENT: header redesign - TWEAK: helper function Inventor_Post_Types::is_featured_listing() - TWEAK: helper function Inventor_Post_Types::is_reduced_listing() - TWEAK: reordered user address fields - TWEAK: reordered user billing fields - TWEAK: removed redundant templates and are inherited from inventor plugin now - TWEAK: removed superlist_before_card_box_detail WP action - TWEAK: removed superlist_after_card_box_detail WP action - TWEAK: used inventor_listing_actions WP action - TWEAK: returned gap between filter fields in image/video cover - FIX: fixed output of file and file list field types - FIX: breadcrumb fix for taxonomy archive page - FIX: fixed search queries graphs values - FIX: fixed missing translation strings - FIX: minor CSS fixes and some improvements - New WP filters: - inventor_filter_query_taxonomies - inventor_metabox_field_enabled - inventor_metabox_field_attributes - inventor_database_session_handler_enabled - inventor_listing_special_label - inventor_google_map_styles - WARNING: backward incompatible update: WP filter inventor_metabox_location_map_enabled removed prior to new filter inventor_metabox_field_enabled - WARNING: backward incompatible update: WP filter inventor_metabox_location_polygon_enabled removed prior to new filter inventor_metabox_field_enabled - WARNING: backward incompatible update: WP filter inventor_metabox_location_street_view_enabled removed prior to new filter inventor_metabox_field_enabled - WARNING: backward incompatible update: WP filter inventor_metabox_location_inside_view_enabled removed prior to new filter inventor_metabox_field_enabled Version 1.8.0 08. April 2016 - FEATURE: Spanish translation - FEATURE: custom lexicon manager - FEATURE: option to set custom metabox description - FEATURE: option to set custom metabox as a listing section - FEATURE: option to set custom field label position - FEATURE: metabox description in submission steps - FEATURE: support for rendering custom metabox using generic section template - FEATURE: taxonomy field types - FEATURE: Google reCAPTCHA support in inquire form - FEATURE: automatic theme updates - IMPROVEMENT: switching to child theme will not deactivate inventor plugins - IMPROVEMENT: version in enqueue styles and scripts - IMPROVEMENT: person in contact metabox - IMPROVEMENT: editing existing listing redirects to same page, not to list of user listings - IMPROVEMENT: label of submit button in the last step of submission is "Done" - IMPROVEMENT: default location of the map field is whole Earth - IMPROVEMENT: animated number in boxes widget - IMPROVEMENT: custom fields ordering - IMPROVEMENT: custom metaboxes ordering - IMPROVEMENT: dynamic items per row in pricing table archive page - IMPROVEMENT: minor CSS fixes and some improvements - TWEAK: submission system moved to own plugin inventor-submission - TWEAK: build_hierarchical_taxonomy_select_options moved to Inventor_Utilities class - TWEAK: listing categories, locations and colors moved from Inventor to Lexicon menu in WP admin - TWEAK: archive-pricing_table.php moved to inventor-pricing plugin - FIX: fixed default value of hierarchical select - FIX: reviews now update in real-time as they are approved/unapproved or even subsequently deleted - FIX: fixed default values of fields with options - New WP filters: - inventor_metabox_assigned - inventor_metabox_title - inventor_metabox_description - inventor_metabox_field_id - inventor_metabox_field_name (not each field yet) - inventor_metabox_field_default - inventor_metabox_field_type for location field - inventor_metabox_location_map_enabled - inventor_metabox_social_networks - inventor_submission_steps - inventor_poi_icons - WARNING: backward incompatible update: WP filter inventor_submission_listing_metabox_allowed renamed to inventor_metabox_allowed Update all inventor-* plugins at first and the main inventor plugin as the last one (because of submission system migration). Version 1.7.0 29. March 2016 - FEATURE: Italian translation - FEATURE: title and description extra column / condensed style in boxes widget - FEATURE: action button in boxes widget - FEATURE: option to enter number in boxes widget - FEATURE: accordion in FAQ widget - FEATURE: option to hide user billing details - FEATURE: option to show featured image of listing in its gallery - FEATURE: option to enable/disable listing banner types - FEATURE: option to set default banner type - IMPROVEMENT: PHP 7 support - IMPROVEMENT: disallowed package permissions are shown in pricing table - IMPROVEMENT: option to assign trial package to pricing table - IMPROVEMENT: widgets padding and margins refactoring - TWEAK: helper function for listing type name - TWEAK: pricing table redesigned - TWEAK: boxes widget in its own plugin - TWEAK: max listings in pricing table - TWEAK: widget logic options file for manual import available - FIX: max length of any identifier is 20 characters - FIX: hidden message in package info widget if payment page not set - FIX: fixed missing translation strings and phrases - FIX: new user registration notifications are send only to admin - FIX: fixed missing category name - FIX: fix for notifications of custom post types Recreate your previous boxes widget. Version 1.6.1 24. March 2016 - FEATURE: support for bitcoin - TWEAK: stripe PHP SDK v3.11.0 - FIX: fixed quotes in slovak translation - FIX: automatic updates fix - FIX: date and time field representation fix - FIX: typo fix - FIX: text domain fix Version 1.6.0 18. March 2016 - FEATURE listing types support for listings widget - FEATURE after payment page redirection setting - FEATURE phone in inquire form - FEATURE Google Browser API Key setting - FEATURE updated resume post type - FEATURE Slovak translation - IMPROVEMENT updated job post type - IMPROVEMENT job required skills in own listing detail section - IMPROVEMENT performance improvement (user package validation is checked every hour and when package is changed instead of at every page refresh) - IMPROVEMENT refactored listing detail sections with option to override section title - IMPROVEMENT taxonomies of disabled listing types are hidden from menu - IMPROVEMENT displayed listing type in submission creation and edit and list page - IMPROVEMENT submission works only for enabled listing post types - IMPROVEMENT removed .po and .mo files and created .pot files - IMPROVEMENT breadcrumb improvements - IMPROVEMENT improved selection of location - IMPROVEMENT location filter field supports infinite children hierarchy now - IMPROVEMENT inventor_listing_detail_sections filter takes post type argument - IMPROVEMENT better UX for package expiration date - IMPROVEMENT refactored property taxonomies - TWEAK if map has a toggle, it is open if filter is set (and wasn't closed before by user) - TWEAK render_claim_button renamed to get_claim_button (method name convention fix) - TWEAK inventor_jobs_experience_levels filter - TWEAK disabled street view, inside view and polygon location fields for resume - TWEAK PayPal SDK version 1.6.4 - FIX google map when signed in performance fix - FIX hide empty description - FIX payment gateway header radio button fix - FIX fixed missing translation strings and phrases - FIX login and registration form responsiveness fix - FIX removed unnecessary theme support of inventor plugins - FIX banner map zoom fix - FIX fixed job dependency for business post type - FIX fixed security issue when user could change his own package - FIX rating 0 rendered as empty string fix - FIX 0 views rendered as empty string fix - FIX fixed prefix of statistics tables - FIX property in supported listing post types - FIX hidden packages from page dashboard if plugin not activated - FIX fix of preserving child theme support for custom listing post types New WP actions: - inventor_listing_details_before - inventor_listing_details_after - inventor_submission_listing_created - inventor_submission_listing_updated - inventor_submission_list_row_actions New WP filters: - inventor_metabox_location_polygon_enabled - inventor_metabox_location_street_view_enabled - inventor_metabox_location_inside_view_enabled - inventor_listing_detail_section_root_dir Version 1.5.0 18. January 2016 - Old CHANGELOG truncated... Version 1.4.2 15. December 2015 - Old CHANGELOG truncated... Version 1.4.1 12. December 2015 - Old CHANGELOG truncated... Version 1.4.0 9. December 2015 - Old CHANGELOG truncated... Version 1.3.0 4. December 2015 - Old CHANGELOG truncated... Version 1.2.0 2. December 2015 - Old CHANGELOG truncated... Replace backward incompatible shortcodes in pages. Version 1.1.0 26. November 2015 - Old CHANGELOG truncated... Version 1.0.3 19. November 2015 - Old CHANGELOG truncated... Version 1.0.2 16. November 2015 - Old CHANGELOG truncated... Version 1.0.1 13. November 2015 - Old CHANGELOG truncated... Version 1.0.0 11. November 2015 - Initial Release Source
0 notes
Photo

How to Use Gulp.js to Automate Your CSS Tasks
In this article, we look at how you can use Gulp.js to automate a range of repetitive CSS development tasks to speed up your workflow.
Web development requires little more than a text editor. However, you’ ll quickly become frustrated with the repetitive tasks that are essential for a modern website and fast performance, such as:
converting or transpiling
minimizing file sizes
concatenating files
minifying production code
deploying updates to development, staging and live production servers.
Some tasks must be repeated every time you make a change. The most infallible developer will forget to optimize an image or two and pre-production tasks become increasingly arduous.
Fortunately, computers never complain about mind-numbing work. This article demonstrates how use Gulp.js to automate CSS tasks, including:
optimizing images
compiling Sass .scss files
handling and inlining assets
automatically appending vendor prefixes
removing unused CSS selectors
minifying CSS
reporting file sizes
outputting sourcemaps for use in browser DevTools
live-reloading CSS in a browser when source files change.
All the code is available from GitHub, and it works on Windows, macOS or Linux.
Why Use Gulp?
A variety of task runners are available for web projects including Gulp, Grunt, webpack and even npm scripts. Ultimately, the choice is yours and it doesn’t matter what you use, as your site/app visitors will never know or care.
Gulp is a few years old but stable, fast, supports many plugins, and is configured using JavaScript code. Writing tasks in code has several advantages, and you can modify output according to conditions — such as only minifying CSS when building the final files for live deployment.
Example Project Overview
The task code assumes Gulp 3.x will be used. This is the most recent stable version and, while Gulp 4 is available, it’s not the default on npm. If you’re using Gulp 4, refer to How do I update to Gulp 4? and tweak the gulpfile.js code accordingly.
Image file sizes will be minimized with gulp-imagemin which optimizes JPG, GIF and PNG bitmaps as well as SVG vector graphics.
Sass .scss files will be pre-processed into a browser-compatible main.css file. Sass isn’t considered as essential as it once was, because:
standard CSS now offers features such as variables (Custom Properties)
HTTP/2 reduces the need for file concatenation.
That said, Sass remains a practical option for file splitting, organization, (static) variables, mixins and nesting (presuming you don’ t go too deep).
The resulting Sass-compiled CSS file will then be processed using PostCSS to provide further enhancements such as asset management and vendor-prefixing.
Getting Started with Gulp
If you’ ve never used Gulp before, please read An Introduction to Gulp.js. These are the basic steps for getting started from your terminal:
Ensure Node.js is installed.
Install the Gulp command-line interface globally with npm i gulp-cli -g.
Create a new project folder — for example, mkdir gulpcss — and enter it (cd gulpcss).
Run npm init and answer each question (the defaults are fine). This will create a package.json project configuration file.
Create a src sub-folder for source files: mkdir src.
The example project uses the following sub-folders:
src/images — image files
src/scss — source Sass files
build — the folder where compiled files are generated
Test HTML Page
This tutorial concentrates on CSS-related tasks, but an index.html file in the root folder is useful for testing. Add your own page code with a <link> to the final stylesheet. For example:
<!DOCTYPE html> <html lang="en"> <head> <meta charset="UTF-8"> <meta name="viewport" content="width=device-width,initial-scale=1.0"> <title>Using Gulp.js for CSS tasks</title> <link rel="stylesheet" media="all" href="build/css/main.css"> </head> <body> <h1>My example page</h1> </body> </html>
Module Installation
Most Node.js modules will be installed as project dependencies so the CSS can be built on development or production servers. To install Gulp and all plugins locally, do the following:
npm i gulp gulp-imagemin gulp-newer gulp-noop gulp-postcss gulp-sass gulp-size gulp-sourcemaps postcss-assets autoprefixer cssnano usedcss
Assuming you’ re using a recent version of npm, all modules will be listed in the "dependencies" section of package.json.
browser-sync is installed as a development dependency since, it’s not required on live production servers:
npm i browser-sync --save-dev
The module will be listed in the "devDependencies" section of package.json.
Create a Gulp Task File
Gulp tasks are defined in a JavaScript file named gulpfile.js. Create it, then open the file in your editor (VS Code is the current favorite). Add the following code:
(() => { 'use strict'; /**************** gulpfile.js configuration ****************/ const // development or production devBuild = ((process.env.NODE_ENV || 'development').trim().toLowerCase() === 'development'), // directory locations dir = { src : 'src/', build : 'build/' }, // modules gulp = require('gulp'), noop = require('gulp-noop'), newer = require('gulp-newer'), size = require('gulp-size'), imagemin = require('gulp-imagemin'), sass = require('gulp-sass'), postcss = require('gulp-postcss'), sourcemaps = devBuild ? require('gulp-sourcemaps') : null, browsersync = devBuild ? require('browser-sync').create() : null; console.log('Gulp', devBuild ? 'development' : 'production', 'build'); })();
This defines a self-executing function and constants for:
devBuild — true if NODE_ENV is blank or set to development
dir.src — the source file folder
dir.build — the build folder
Gulp and all plugin modules
Note that sourcemaps and browsersync are only enabled for development builds.
Gulp Image Task
Create the src/images folder then copy some image files into it or any subfolder.
Insert the following code below the console.log in gulpfile.js to create an images processing task:
/**************** images task ****************/ const imgConfig = { src : dir.src + 'images/**/*', build : dir.build + 'images/', minOpts: { optimizationLevel: 5 } }; gulp.task('images', () => gulp.src(imgConfig.src) .pipe(newer(imgConfig.build)) .pipe(imagemin(imgConfig.minOpts)) .pipe(size({ showFiles:true })) .pipe(gulp.dest(imgConfig.build)) );
Configuration parameters are defined in imgConfig, which sets:
a src folder to any image inside src/images or a subfolder
a build folder to build/images, and
gulp-imagemin optimization options.
A gulp.task named images passes data through a series of pipes:
The source folder is examined.
The gulp-newer plugin removes any newer image already present in the build folder.
The gulp-imagemin plugin optimizes the remaining files.
The gulp-size plugin shows the resulting size of all processed files.
The files are saved to the gulp.dest build folder.
Save gulpfile.js, then run the images task from the command line:
gulp images
The terminal will show a log something like this:
Gulp development build [16:55:12] Using gulpfile gulpfile.js [16:55:12] Starting 'images'... [16:55:12] icons/alert.svg 306 B [16:55:12] cave-0600.jpg 47.8 kB [16:55:12] icons/fast.svg 240 B [16:55:12] cave-1200.jpg 112 kB [16:55:12] cave-1800.jpg 157 kB [16:55:12] icons/reload.svg 303 B [16:55:12] gulp-imagemin: Minified 3 images (saved 205 B - 19.4%) [16:55:12] all files 318 kB [16:55:12] Finished 'images' after 640 ms
Examine the created build/images folder to find optimized versions of your images. If you run gulp images again, nothing will occur because only newer files will be processed.
The post How to Use Gulp.js to Automate Your CSS Tasks appeared first on SitePoint.
by Craig Buckler via SitePoint https://ift.tt/2NIMv5w
0 notes
Photo

Upgrading to Gulp 4.0.0
Gulps better than 7-11
Back in the day we touched on some of the wonderful upsides of implementing Gulp into your workflow. If you have been following along and happened to install the latest version of Gulp, you may has noticed something horrible happen: nothing worked . I probably should’ve mentioned that the latest major update to Gulp, Gulp 4, is actually a breaking update. That's my bad. Strangely, documentation around upgrading from Gulp 3.X to Gulp 4 seems to be lagging way behind this release, with the closest thing to official documentation being some article a guy posted on Medium a while back. Interesting strategy, Gulp team. What's the Big Deal? There are a couple architectural differences with Gulp 4, for the better. Previously Gulp would allows us to hold off on executing tasks until dependent task were completed. If task C were dependent on the completion of tasks both A and B, we would represent this as such: gulp.task('default', ['A', 'B'], function() {etc}); gulp.task('A', ['C'], function() {etc}); gulp.task('B', ['C'], function() {etc}); gulp.task('C', function() {etc}); While this was an effective way of handling such a workflow, Gulp has made the process a bit cleaner and easier to digest with the additions of gulp.parallel and gulp.series . Parallel denotes tasks which should be executed in parallel, aka the same time. Series defines a linear order of how tasks should be executed. Parallels can exist inside of series, effectively resulting in a fork of tasks before moving to the next task in the series: gulp.task('A', function() {etc}); gulp.task('B', function() {etc}); gulp.task('C', function() {etc}); gulp.task('default', gulp.series('C', gulp.parallel('A', 'B'), function() {etc})); In this case, Task C forks into Tasks A and B before converging on their merry way to the rest of the series. Quick Install To get your hands on this, first uninstall your current versions of Gulp and Gulp CLI: npm uninstall gulp --save-dev npm uninstall gulp -g Then we can go ahead and reinstall Gulp as normal. Feel free to force the version: npm install gulp-cli -g npm install [email protected] -D Example Gulp File Enough with all the jargon, we both know what you came here for. let me just post what I see to be the bare minimum Gulpfile for your copy and pasting pleasure: var gulp = require('gulp'), less = require('gulp-less'), concat = require('gulp-concat'), uglify = require('gulp-uglify'), rename = require('gulp-rename'), handlebars = require('gulp-handlebars'), declare = require('gulp-declare'), cleanCSS = require('gulp-clean-css'); var paths = { styles: { src: 'src/less/*.less', dest: 'assets/css' }, scripts: { src: 'src/js/*.js', dest: 'assets/js' }, html: { src: 'views/*.hbs', dest: 'assets/' } }; function styles() { return gulp .src(paths.styles.src, { sourcemaps: true }) .pipe(less()) .pipe(rename({ basename: 'main', suffix: '.min' })) .pipe(cleanCSS({debug: true})) .pipe(concat('main.min.css')) .pipe(gulp.dest(paths.styles.dest)); } function scripts() { return gulp .src(paths.scripts.src, { sourcemaps: true }) .pipe(uglify()) .pipe(concat('main.min.js')) .pipe(gulp.dest(paths.scripts.dest)); } function templates(){ gulp.src('views/*.hbs') .pipe(handlebars()) //.pipe(wrap('Handlebars.template(<%= contents %>)')) .pipe(declare({ namespace: 'MyApp.templates', noRedeclare: true, // Avoid duplicate declarations })) .pipe(concat('templates.js')) .pipe(gulp.dest('assets/js/')); } function watch() { gulp.watch(paths.scripts.src, scripts); gulp.watch(paths.styles.src, styles); } var build = gulp.parallel(styles, scripts, templates, watch); gulp.task(build); gulp.task('default', build); Nothing crazy here: just the typical concat and minification of source files. Hopefully this helps somebody wondering why their latest Gulp installation broke their Gulpfile. Perhaps next time we'll dig down deep into the shadows of Gulp plugins to reveal secret elite legendary Gulp hacks for 1337 hax0rs only. Or not, we could do whatever honestly.
- Todd Birchard
0 notes
Text
gulp + esLint
gulp + eslint
モジュールのインストール
$ npm install --save-dev gulp gulp-eslint
gulpfileをつくる
package.jsonと同階層にgulpfile.jsを作成
var gulp = require("gulp"); var eslint = require("gulp-eslint"); var applyLintPaths = { allSrcJs: "src/**/*.js", gulpFile: "gulpfile.js" }; /** * lint */ gulp.task("lint", function() { return ( gulp.src([ applyLintPaths.allSrcJs, applyLintPaths.gulpFile ]) .pipe(eslint()) .pipe(eslint.format()) .pipe(eslint.failAfterError()) ); }); gulp.task("lint-watch", function() { return ( gulp.watch(applyLintPaths.allSrcJs, gulp.task("lint")) ); });
lintconfigを作る
// .eslintrc.json { "parserOptions": { "ecmaVersion": 6, "ecmaFeatures": { "experimentalObjectRestSpread": true } }, "rules": { "indent": ["error", 2, { "SwitchCase": 1 }], "semi": "error", "quotes": "error", "prefer-destructuring": "warn", "import/prefer-default-export": "off", "implicit-arrow-linebreak": "error", "function-paren-newline": "error", "comma-dangle": "error", "no-console": "warn", "consistent-return": "error", "no-unused-vars": "error" }, "env": { "browser": true } }
lintする
単発実行
$ gulp lint
監視
$ gulp watch-lint
0 notes
Photo

Upgrading to Gulp 4.0.0
Gulps better than 7-11
Back in the day we touched on some of the wonderful upsides of implementing Gulp into your workflow. If you have been following along and happened to install the latest version of Gulp, you may has noticed something horrible happen: nothing worked . I probably should’ve mentioned that the latest major update to Gulp, Gulp 4, is actually a breaking update. That's my bad. Strangely, documentation around upgrading from Gulp 3.X to Gulp 4 seems to be lagging way behind this release, with the closest thing to official documentation being some article a guy posted on Medium a while back. Interesting strategy, Gulp team. What's the Big Deal? There are a couple architectural differences with Gulp 4, for the better. Previously Gulp would allows us to hold off on executing tasks until dependent task were completed. If task C were dependent on the completion of tasks both A and B, we would represent this as such: gulp.task('default', ['A', 'B'], function() {etc}); gulp.task('A', ['C'], function() {etc}); gulp.task('B', ['C'], function() {etc}); gulp.task('C', function() {etc}); While this was an effective way of handling such a workflow, Gulp has made the process a bit cleaner and easier to digest with the additions of gulp.parallel and gulp.series . Parallel denotes tasks which should be executed in parallel, aka the same time. Series defines a linear order of how tasks should be executed. Parallels can exist inside of series, effectively resulting in a fork of tasks before moving to the next task in the series: gulp.task('A', function() {etc}); gulp.task('B', function() {etc}); gulp.task('C', function() {etc}); gulp.task('default', gulp.series('C', gulp.parallel('A', 'B'), function() {etc})); In this case, Task C forks into Tasks A and B before converging on their merry way to the rest of the series. Quick Install To get your hands on this, first uninstall your current versions of Gulp and Gulp CLI: npm uninstall gulp --save-dev npm uninstall gulp -g Then we can go ahead and reinstall Gulp as normal. Feel free to force the version: npm install gulp-cli -g npm install [email protected] -D Example Gulp File Enough with all the jargon, we both know what you came here for. let me just post what I see to be the bare minimum Gulpfile for your copy and pasting pleasure: var gulp = require('gulp'), less = require('gulp-less'), concat = require('gulp-concat'), uglify = require('gulp-uglify'), rename = require('gulp-rename'), handlebars = require('gulp-handlebars'), declare = require('gulp-declare'), cleanCSS = require('gulp-clean-css'); var paths = { styles: { src: 'src/less/*.less', dest: 'assets/css' }, scripts: { src: 'src/js/*.js', dest: 'assets/js' }, html: { src: 'views/*.hbs', dest: 'assets/' } }; function styles() { return gulp .src(paths.styles.src, { sourcemaps: true }) .pipe(less()) .pipe(rename({ basename: 'main', suffix: '.min' })) .pipe(cleanCSS({debug: true})) .pipe(concat('main.min.css')) .pipe(gulp.dest(paths.styles.dest)); } function scripts() { return gulp .src(paths.scripts.src, { sourcemaps: true }) .pipe(uglify()) .pipe(concat('main.min.js')) .pipe(gulp.dest(paths.scripts.dest)); } function templates(){ gulp.src('views/*.hbs') .pipe(handlebars()) //.pipe(wrap('Handlebars.template(<%= contents %>)')) .pipe(declare({ namespace: 'MyApp.templates', noRedeclare: true, // Avoid duplicate declarations })) .pipe(concat('templates.js')) .pipe(gulp.dest('assets/js/')); } function watch() { gulp.watch(paths.scripts.src, scripts); gulp.watch(paths.styles.src, styles); } var build = gulp.parallel(styles, scripts, templates, watch); gulp.task(build); gulp.task('default', build); Nothing crazy here: just the typical concat and minification of source files. Hopefully this helps somebody wondering why their latest Gulp installation broke their Gulpfile. Perhaps next time we'll dig down deep into the shadows of Gulp plugins to reveal secret elite legendary Gulp hacks for 1337 hax0rs only. Or not, we could do whatever honestly.
- Todd Birchard Read post
0 notes
Link
CSS-Tricks http://j.mp/2zWzeDq
One month ago, I launched the Front-End Checklist on GitHub. In less than 2 weeks, more than 10,000 people around the world starred the repository. That was completely unexpected and incredible!
I've been working as a front-end developer since 2011, but I started to build websites in 2000. Since then, like us all, I've been trying to improve the quality of my code and deliver websites faster. Along the way, I've been managing developers from two different countries. That has helped me to produce a checklist a little different than what I've found on around the web over the years.
While I was creating the checklist, I continuously had the book "The Checklist Manifesto: How to Get Things Right" by Atul Gawade in mind. That book has helped me build checklists for my work and personal life, and simplify things that sometimes seem too complex.
If you are working alone or in a team, individually, remotely, or on-site, I wanted to share some advice on using the Front-End Checklist and the web application that goes with it. Perhaps I can convince you to integrate it into your development cycle.
#1 Decide which rules your project and team need to follow
Every project is different. Before starting a new project, the whole team (i.e. the project managers, designers, developers, QA, etc.) need to agree on what the deliverables will be.
To help you to decide, I created 3 different levels of priority: high, medium, and low. You don't necessarily need to agree with those distinctions, but they may help order your tasks.
The Front-End Checklist app was done to facilitate the creation of personalized checklists. Change some JSON files to your liking and you are ready to start!
#2 Define the rules to check at beginning, during, and at the end of your project
You shouldn't check all these rules only at the end of a project. You know as well as I do how projects are at the very end! Too hectic. Most of the items of the Front-End Checklist can be considered at the beginning of your development. It's up to you to decide. Make it clear to your team upfront what happens when.
#3 Learn a little more about each rules
Who loves reading the docs? Not most of us, but it's essential. If you want to understand the reasons for the rule, you can't avoid reading up about them. The more you understand the why of each rule, the better developer you become.
#4 Start to check!
The Front-End Checklist app can facilitate your life as a developer. It's a live checklist, so as you complete items your progress and grade are updated live. Everything is saved in localStorage so you can leave and come back as needed.
The project is open source, so feel free to fork it and use it however you like. I'm working on making sure all the files are commented. I especially invite those interested in Pug to take a look at the views folder.
#5 Integrate automated testing in your workflow
We all dream of automation (or is it just me?). For now, the Front-End Checklist is just an interactive list, but some of the tasks can be automated in your workflow.
Take a look at the gulpfile used to generate the project. All tasks are packages you can use with npm, webpack, etc.
#6 Validate every pages before sending to QA team and to production
If you're passionate about generating clean code and care about your code quality, you should be regularly testing your pages. It's so easy to make mistakes and remove some essential code. Or, someone else on your team might have done it, but it's your shared responsibilty to be catching things like that.
The Front-End Checklist can generate beautiful reports you can send to a project manager or Quality Assurance team.
#7 Enjoy your work above all
Some people might look at such a long checklist and feel sick to their stomach. Going through such a list might cause anxiety and really not be any fun.
But the Front-End Checklist is just a tool to help you deliver higher quality code. Code that affects all aspects of a project: the SEO, the user experience, the ROI, and ultimately the success of the project. A tool that can help across all those things might actually help reduce your anxiety and improve your health!
Conclusion
The success the Front-End Checklist received in such a short time reminded me that a lot of people are really interested in finding ways to improve their work. But just because the tool exists doesn't directly help with that. You also need to commit to using it.
In a time where AI is taking over many manual tasks, quality is a must-have. Even if automation takes over a lot of our tasks, some level of quality will remain impossible to automate, and us front-end developers still have many long days to enjoy our jobs.
The Front-End Checklist is just a tool… everything depends on you. is a post from CSS-Tricks
http://j.mp/2zWpxVJ via CSS-Tricks URL : http://j.mp/2bNbLYg
0 notes
Text
The Front-End Checklist is just a tool… everything depends on you.
One month ago, I launched the Front-End Checklist on GitHub. In less than 2 weeks, more than 10,000 people around the world starred the repository. That was completely unexpected and incredible!
I've been working as a front-end developer since 2011, but I started to build websites in 2000. Since then, like us all, I've been trying to improve the quality of my code and deliver websites faster. Along the way, I've been managing developers from two different countries. That has helped me to produce a checklist a little different than what I've found on around the web over the years.
While I was creating the checklist, I continuously had the book "The Checklist Manifesto: How to Get Things Right" by Atul Gawade in mind. That book has helped me build checklists for my work and personal life, and simplify things that sometimes seem too complex.
If you are working alone or in a team, individually, remotely, or on-site, I wanted to share some advice on using the Front-End Checklist and the web application that goes with it. Perhaps I can convince you to integrate it into your development cycle.
#1 Decide which rules your project and team need to follow
Every project is different. Before starting a new project, the whole team (i.e. the project managers, designers, developers, QA, etc.) need to agree on what the deliverables will be.
To help you to decide, I created 3 different levels of priority: high, medium, and low. You don't necessarily need to agree with those distinctions, but they may help order your tasks.
The Front-End Checklist app was done to facilitate the creation of personalized checklists. Change some JSON files to your liking and you are ready to start!
#2 Define the rules to check at beginning, during, and at the end of your project
You shouldn't check all these rules only at the end of a project. You know as well as I do how projects are at the very end! Too hectic. Most of the items of the Front-End Checklist can be considered at the beginning of your development. It's up to you to decide. Make it clear to your team upfront what happens when.
#3 Learn a little more about each rules
Who loves reading the docs? Not most of us, but it's essential. If you want to understand the reasons for the rule, you can't avoid reading up about them. The more you understand the why of each rule, the better developer you become.
#4 Start to check!
The Front-End Checklist app can facilitate your life as a developer. It's a live checklist, so as you complete items your progress and grade are updated live. Everything is saved in localStorage so you can leave and come back as needed.
The project is open source, so feel free to fork it and use it however you like. I'm working on making sure all the files are commented. I especially invite those interested in Pug to take a look at the views folder.
#5 Integrate automated testing in your workflow
We all dream of automation (or is it just me?). For now, the Front-End Checklist is just an interactive list, but some of the tasks can be automated in your workflow.
Take a look at the gulpfile used to generate the project. All tasks are packages you can use with npm, webpack, etc.
#6 Validate every pages before sending to QA team and to production
If you're passionate about generating clean code and care about your code quality, you should be regularly testing your pages. It's so easy to make mistakes and remove some essential code. Or, someone else on your team might have done it, but it's your shared responsibilty to be catching things like that.
The Front-End Checklist can generate beautiful reports you can send to a project manager or Quality Assurance team.
#7 Enjoy your work above all
Some people might look at such a long checklist and feel sick to their stomach. Going through such a list might cause anxiety and really not be any fun.
But the Front-End Checklist is just a tool to help you deliver higher quality code. Code that affects all aspects of a project: the SEO, the user experience, the ROI, and ultimately the success of the project. A tool that can help across all those things might actually help reduce your anxiety and improve your health!
Conclusion
The success the Front-End Checklist received in such a short time reminded me that a lot of people are really interested in finding ways to improve their work. But just because the tool exists doesn't directly help with that. You also need to commit to using it.
In a time where AI is taking over many manual tasks, quality is a must-have. Even if automation takes over a lot of our tasks, some level of quality will remain impossible to automate, and us front-end developers still have many long days to enjoy our jobs.
The Front-End Checklist is just a tool… everything depends on you. is a post from CSS-Tricks
via CSS-Tricks http://ift.tt/2j2Nccw
0 notes