#host wordpress on cyberpanel
Explore tagged Tumblr posts
Visit Tumblr Blog
Explore Tumblr blogs with no restrictions, modern design and the best experience.
Last Seen Tumblr Blogs


Fun Fact
Tumblr was acquired by Yahoo for $1.1B in 2013.
Text
How to Host a WordPress website on Cyber Panel
Step 1: Install Cyber Panel.
If you haven't already, you'll need to install Cyber Panel on wordpress on your server. You can follow the installation instructions provided by Cyber Panel for your specific operating system.
Step 2: Access Cyber Panel.
Once Cyber Panel is installed, access the Cyber Panel control panel by navigating to the IP address or domain name of your server in a web browser, followed by :8090 (e.g., http://your-server-ip:8090). Log in using the username and password you created during the installation process.
Step 3: Create a Website.
In the Cyber Panel dashboard, click on the "Websites" tab and then click on "Create Website." Enter your domain name, select the package (or create a new one if needed), and click "Create Website."
Step 4: Install WordPress.
After creating the website, click on the domain name in the "Websites" list to open the website management page. Scroll down to the "WordPress" section and click "Install."
Step 5: Configure WordPress.
Follow the on-screen instructions to complete the WordPress installation. You'll need to enter the site title, admin username, password, and email address. Click "Install" to finish the installation.
Step 6: Access WordPress Admin.
Once WordPress is installed, you can access the WordPress admin dashboard by adding /wp-admin to your domain name (e.g., http://your-domain.com/wp-admin). Log in using the admin username and password you set during the installation.
Step 7: Customize Your Website.
Customize your website by choosing a theme, installing plugins, and adding content to your site.
Step 8: Configure Cyber Panel Settings (Optional).
You can further configure your website and server settings in Cyber Panel to optimize performance and security. Explore the various options available in the Cyber Panel dashboard.
Step 9: Launch Your Website.
Once you're satisfied with your website's setup, you can launch it for public access. Share your domain name with others to visit your WordPress site.
Please note that Cyber Panel offers advanced features and settings, so it's recommended to refer to the official Cyber Panel documentation for detailed instructions and best practices.
0 notes
Text
How to Install CyberPanel on Ubuntu 22.04 Like a Pro! – Quick Tips
CyberPanel is a user-friendly control panel that makes managing websites and servers much easier, even for beginners. It uses LiteSpeed Web Server (a fast web server) and offers features like one-click WordPress installation, automatic SSL certificates, and a simple interface. In this guide, we’ll break down every step to help you Install CyberPanel on Ubuntu 22.04 server in a way that’s easy to follow, even if you’re not an expert. Let’s dive into each step How to Install CyberPanel on Ubuntu 22.04 Like a Pro!
Why Choose CyberPanel?
Before diving into the installation process, you might wonder why you should choose CyberPanel over other control panels like cPanel or Plesk. Here are a few compelling reasons: - Open Source: It’s completely free (though there’s an Enterprise version with additional features if you’re interested). - Lightweight and Fast: Built around OpenLiteSpeed, CyberPanel is optimized for speed and performance. - Intuitive Interface: The dashboard is clean and user-friendly, even for beginners. - Advanced Features: From one-click installations of WordPress to built-in support for Git, Redis, and Docker, CyberPanel offers plenty of powerful tools. - Auto SSL: Easily install and manage SSL certificates. Sounds like the control panel of your dreams, right?
Pre-Installation Checklist
Before you can install CyberPanel on Ubuntu 22.04, there are a few things you’ll need to prepare. Don’t worry, nothing too crazy! 1. A Fresh Ubuntu 22.04 Server Make sure you’ve got a clean installation of Ubuntu 22.04. You can set this up on a virtual private server (VPS) from your favourite hosting provider. Avoid running the installation on a server that already has web services installed, as that can cause conflicts. 2. Root Access or Sudo Privileges You’ll need root access to your server, or at the very least, a user account with sudo privileges. If you don’t have this, the installation won’t work properly. 3. Server Specifications Here are the minimum recommended system specs for running CyberPanel: - 1 GB of RAM (though 2 GB is ideal for better performance) - 10 GB of free disk space (more if you plan on hosting multiple websites) - A 64-bit operating system (which Ubuntu 22.04 is) 4. Domain Name While it’s not strictly required for the installation, having a domain name handy will allow you to configure your website and apply SSL certificates more easily.
Step-by-Step Guide: How to Install CyberPanel on Ubuntu 22.04
Alright, with your server ready and your domain name in hand, let’s get into the nitty-gritty of installing CyberPanel.
Step 1: Update Your Server’s Software
Before you install anything new, it’s a good idea to make sure your Ubuntu system is up to date. This helps avoid problems later and ensures everything runs smoothly. To update your server, open your terminal (a place where you can type commands) and enter these two commands one after the other:

- The first command, sudo apt update, checks for the latest updates for your system. - The second command, sudo apt upgrade -y, installs those updates. This could take a few minutes, depending on your internet connection and the speed of your internet. Once this is done, your system will be ready for the next steps.
Step 2: Install Basic Tools
Now, we need to install some basic tools that CyberPanel needs to run properly. These tools will help us download and install other software in the next steps. Run this command in your terminal:

- wget is a tool that helps us download files from the internet. - curl is a tool that allows us to transfer data and communicate with servers. By installing these, you’re preparing your system for the main installation.
Step 3: Download the CyberPanel Installer
Next, we need to download a special script (a small program) that will help us install CyberPanel. To do this, use the following command:

This command downloads the CyberPanel installer script and saves it to a file called installer.sh on your server. Once the script is downloaded, you need to permit it to run. To do that, enter:

This command makes the script executable, which means we can run it in the next step.
Step 4: Start the Installation Process
Now that everything is set up, we can begin the actual installation of CyberPanel. This step will take a while, and you’ll be asked to make some choices along the way. To start the installation, type:

This command runs the installer script. Once it begins, you’ll see several options. Let’s walk through them: Choosing the Web Server You’ll be asked whether to install the LiteSpeed Enterprise (a paid version) or OpenLiteSpeed (a free version). Since OpenLiteSpeed is free and works well for most users, we recommend selecting it by typing: Full Installation vs. Minimal Installation Next, you’ll be asked if you want to do a Full installation or a Minimal installation. Choose Full installation, as it includes important tools like PowerDNS (for managing your domain names) and Postfix (for sending emails). Installing Memcached and Redis These are tools that help speed up your websites by caching data (temporarily storing it so it can be accessed quickly). If you plan to host websites that need fast performance, select yes when asked to install Memcached and Redis. Setting an Admin Password At the end of the installation, you’ll be asked to set a password for the admin user. This password will be used to log in to the CyberPanel dashboard. Make sure to choose a strong password and write it down somewhere safe and secure place. After answering these questions, the installation will continue and It may take several minutes to finish.
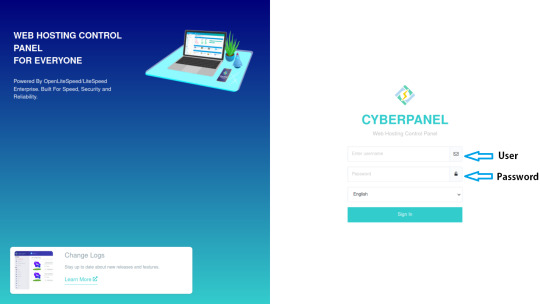
Step 5: Access the CyberPanel Dashboard
Once the installation is complete, you’ll be given a link to log in to the CyberPanel web interface. This is where you can manage your websites and server settings. To access CyberPanel, open your web browser and type in the following:

- Replace with the actual IP address of your server. - The :8090 at the end is the port number where CyberPanel runs. You might see a warning saying that the site is not secure. This is normal because the server is using a self-signed SSL certificate. You can click through the warning to access the dashboard. Log in using the admin username and the password you created during installation.
Step 6: Configure OpenLiteSpeed
After logging in to CyberPanel, you’ll need to configure OpenLiteSpeed (the web server that powers your websites). Here’s how to do it: - Access the OpenLiteSpeed Admin: From the CyberPanel dashboard, click on OpenLiteSpeed WebAdmin. You’ll be taken to the OpenLiteSpeed admin page. - Log in to OpenLiteSpeed: Use the default credentials: - Username: admin - Password: 123456 (or the one you set during installation). - Change the Admin Password: For security reasons, it’s important to change the default admin password. To do this, run this command in your terminal:

- Follow the instructions to change your password.
Step 7: Secure CyberPanel with SSL
To protect your data and ensure a secure connection to CyberPanel, we need to set up an SSL certificate. CyberPanel allows you to do this automatically using Let’s Encrypt, a free service that provides SSL certificates.

Here’s how to do it: - Log in to the CyberPanel dashboard. - Go to SSL > Hostname SSL. - Enter your server’s hostname (the name of your server or domain). - Click Issue SSL. This will install an SSL certificate, and your CyberPanel interface will now be secure.
Step 8: Create and Manage Websites
With CyberPanel installed and secured, you can now start hosting websites. Here’s an easy-to-follow guide to help you begin: - Add a New Website: In the CyberPanel dashboard, go to Websites > Create Website. Fill in the necessary information: - Domain Name: The name of your website (e.g., example.com). - Email: Your email address. - PHP Version: Choose a version that works with your site (the default should be fine). Once you’ve entered this information, click Create Website. - Set Up DNS for Your Domain: DNS (Domain Name System) is what helps people find your website online. To configure DNS, go to DNS > Create Zone. Enter your domain name and set the A (Address) record to point to your server’s IP address. - Install WordPress: CyberPanel makes it easy to install WordPress. Go to Websites > List Websites, find your domain, and click Manage. You’ll see an option to install WordPress with one click.
Step 9: Enable Backups
It’s very important to regularly back up your website to ensure you can recover it if anything goes wrong. CyberPanel has a built-in tool for scheduling backups. - Go to Backup > Schedule Backup. - Select the website that you want to take a backup. - Choose how often you want to back up (daily, weekly, etc.). - Select a destination for your backups (you can save them locally or send them to a remote server). Once this is set up, CyberPanel will automatically create backups for you.

Step 10: Optimize CyberPanel for Speed
To get the best performance from CyberPanel, you can make a few adjustments: - Enable LSCache: LSCache is a caching system that speeds up websites. Go to Websites > List Websites, find your website, and enable LSCache for faster load times. - Adjust PHP Settings: If your website uses a lot of PHP scripts (common for WordPress sites), you can tweak the settings. Go to Server > PHP > Edit PHP Configs to adjust things like memory limits. - Use Security Plugins: To keep your server secure, consider installing Security plugins such as CSF Firewall and ModSecurity help protect your server from malicious attacks and enhance your website’s overall security. Here’s how you can install them through CyberPanel: CSF Firewall: - Go to Security > Install CSF from the CyberPanel dashboard. This firewall helps protect your server by blocking unwanted traffic. - After installation, you can configure it by navigating to Security > CSF Configuration where you can add specific rules or adjust settings to secure your server. ModSecurity: - To install ModSecurity, go to Security > Install ModSecurity in the dashboard. - Once installed, it will monitor web traffic for suspicious activities and block potential threats. It’s an excellent tool for preventing attacks like SQL injections and cross-site scripting. Both security plugins work in the background to safeguard your server and websites, helping to prevent common vulnerabilities.
Step 11: Monitor Server Performance
After you’ve successfully installed and set up CyberPanel, it’s crucial to keep an eye on your server’s performance. Monitoring your server helps you spot any potential issues before they turn into bigger problems. CyberPanel comes with built-in tools to help you with this: - Real-Time Monitoring: Go to Server Status > LiteSpeed Status to see how your server is performing. This page shows you important details like CPU usage, memory usage, and active connections. - System Health Check: Under Server Status > System Status, you can check the overall health of your server. This includes key metrics such as available disk space, RAM usage, and the status of various services like MySQL and DNS. Monitoring these areas regularly ensures that your server runs efficiently and doesn’t run out of resources unexpectedly.
Step 12: Troubleshooting Common Issues
Even with a detailed guide, you may run into problems during or after installation. Here are some common issues you may face and how to fix them: Issue 1: Can’t Access CyberPanel Web Interface - If you can’t access CyberPanel at https://:8090, the most likely reason is that port 8090 is blocked. To fix this, open the port by running the following command on your server:

After that, try accessing the panel again in your browser. Issue 2: SSL Certificate Not Working - If the SSL certificate you issued using Let’s Encrypt isn’t working, try reissuing the certificate: - Go to SSL > Manage SSL in CyberPanel. - Select your domain and click Issue SSL again. This will attempt to reissue the certificate, solving most SSL-related issues. Issue 3: Website is Running Slowly - If your website is slow, you can enable LiteSpeed Cache (LSCache) for faster performance. You should also consider using CDN (Content Delivery Network) services like Cloudflare to speed up content delivery.
Final Overview
Installing CyberPanel on Ubuntu 22.04 may seem like a technical task, but with this detailed guide, even a beginner can complete the process with ease. By following each step, you will set up a robust, secure, and high-performing web hosting environment using the OpenLiteSpeed web server and CyberPanel’s powerful features. From basic installation to security measures and performance optimization, this guide ensures that your websites will run smoothly on your server. Whether you're hosting a personal website or managing multiple domains, CyberPanel offers the flexibility and tools you need to succeed, making it an ideal choice for anyone new to server management. Now, go ahead and explore the many features of CyberPanel!
FAQs
1. Is CyberPanel free to use? Yes, CyberPanel is completely free. There’s also a paid Enterprise version with more features, but the free version is more than enough for most users. 2. Can I install CyberPanel on a VPS with less than 1 GB of RAM? While it’s technically possible, it’s not recommended. CyberPanel runs much more smoothly on systems with at least 1 GB of RAM (preferably 2 GB). 3. What’s the difference between OpenLiteSpeed and LiteSpeed Enterprise? OpenLiteSpeed is the free, open-source version of LiteSpeed. LiteSpeed Enterprise offers premium features like better performance and more advanced caching options, but it requires a license. Read the full article
#cloudpanelvscyberpanel#cyberpanel#cyberpanelhosting#cyberpanelinstall#cyberpanellogin#cyberpanelvps#cyberpanelvpshosting#cyberpanelvscpanel#installcyberpanel#whatiscyberpanel
0 notes
Text
Best Hostinger VPS Hosting Review
https://themesfores.com/best-vps-hosting-review-hostinger-vps-hosting/ In this article, we will dive into the world of VPS hosting and explore one of the leading providers in the industry: Hostinger. If you are looking for reliable, affordable, and feature-packed VPS hosting solutions, Hostinger might be the perfect choice for you. In this review, we will discuss the various aspects of Hostinger's VPS hosting, including its features, pricing, pros and cons, customer reviews, and more. So let's get started! Hostinger India Review 2023 Speed: 4.6 4.6/5 Ease of use:4.6 4.6/5 Pricing: 4.1 4.1/5 Uptime: 4.5 4.5/5 Customer Support: 4.5 4.5/5 Tootal: 4.5 4.5/5 Visit Hostinger Best VPS Hosting Review: Hostinger VPS Hosting Virtual Private Server (VPS) hosting is a popular hosting solution that bridges the gap between shared hosting and dedicated servers. With VPS hosting, you get a virtualized environment that mimics a dedicated server, allowing you to have more control, resources, and flexibility for your website or application. Overview of Hostinger VPS Hosting Hostinger is a well-established web hosting company known for its affordable yet reliable hosting services. When it comes to VPS hosting, Hostinger offers a range of plans tailored to suit different needs and budgets. With their VPS hosting, you can expect high performance, excellent uptime, and a user-friendly experience. Hostinger Overview Speed VPS Hosting (Singapore) – 895 ms VPS Hosting (US) – 591.09 ms VPS Hosting (India) – 675.95 ms Uptime (02 Jan 2022 – 15-Jun 2023) VPS Hosting (Singapore): 99.95% VPS Hosting (US): 99.93% VPS Hosting (India): 99.85% Features hPanel, Free SSL, 1-click WordPress Installer, free domain for 1 year, Website Staging, Zyro Website Builder, Email Hosting Data Centers UK, USA, Singapore, India, Netherlands, Indonesia, and Lithuania. Servers Litespeed Servers Backup and Restoration Free weekly backups on all plans Daily backups on higher plans Selective restore feature available Website Migration Unlimited free migrations on all plans Security Free Let’s Encrypt SSL, 2FA, PatchStack Security, Cloudflare DNS Firewall, Bitninja Security, Malware Scanner Support Email Form, Live Chat, Knowledgebase, Video Tutorials Payment Options Visa, MasterCard, American Express, Discover, PayPal, Cryptocurrency, PayTM, Google Pay, UPI Payments in India Hosting Plans Share Hosting, WordPress Hosting, Cloud Hosting, cPanel Hosting, VPS Hosting, Minecraft Hosting, CyberPanel VPS Hosting Refund Policy 30-days money-back guarantee Pricing Starting from ₹419/mo ($4.99/mo) Visit Hostinger Features and Benefits of Hostinger VPS Hosting When it comes to VPS hosting, Hostinger has an impressive array of features that cater to the needs of both individuals and businesses. Let's take a closer look at the key features that make Hostinger stand out: High Performance and Reliability Hostinger's VPS hosting runs on high-performance hardware, including the latest Intel Xeon processors and SSD storage. This ensures fast loading times, smooth website performance, and a reliable hosting environment for your business. Scalability and Flexibility With Hostinger VPS hosting, you have the flexibility to scale your resources as your website grows. Whether you need more CPU power, RAM, or storage, you can easily upgrade your VPS plan with just a few clicks. Enhanced Security Measures Hostinger takes security seriously and provides robust security measures to protect your website from online threats. Their VPS hosting includes DDoS protection, secure FTP access, and regular backups, keeping your data safe and secure. Easy-to-use Control Panel Managing your VPS server is made easy with Hostinger's intuitive control panel. You can easily deploy applications, manage domains, monitor server performance, and perform various administrative tasks without any technical expertise. Full Root Access With Hostinger's VPS hosting, you get full root access to your server. This level of control allows you to customize your server environment according to your specific requirements. You have the freedom to install any software, configure settings, and optimize performance to suit your needs. Dedicated IP Address Each Hostinger VPS hosting plan comes with a dedicated IP address, which is particularly beneficial if you want to run applications that require a unique IP, such as an online store or a membership site. Multiple Operating Systems Hostinger supports a wide range of operating systems, including Linux distributions and Windows. Whether you're familiar with Linux or prefer a Windows environment, Hostinger has got you covered. Excellent Uptime Downtime can be detrimental to your website's success. Hostinger's VPS hosting boasts an impressive uptime guarantee, ensuring that your site remains accessible to visitors around the clock. With a reliable hosting infrastructure, you can minimize disruptions and maximize your website's availability. 24/7 Customer Support Hostinger offers round-the-clock customer support via live chat, ticketing system, and knowledge base. Their support team is knowledgeable and responsive, ready to assist you with any hosting-related queries or issues you may encounter. Different VPS Hosting Plans Offered by Hostinger Hostinger provides a range of VPS hosting plans to cater to different needs and budgets. Let's explore the options: KVM 1 ₹839 ₹ 419 Monthly 1 Cores & 4 GB RAM 50 GB SSD Storage 1 TB Bandwidth Weekly Backups Dedicated IP Address Full Root Access Apply Coupon SAVE 65% Extra Discount KVM 2 ₹1159 ₹ 579 Monthly 2 Cores & 8 GB RAM 100 GB SSD Storage 2 TB Bandwidth Weekly Backups Dedicated IP Address Full Root Access Apply Coupon SAVE 65% Extra Discount KVM 4 ₹2499 ₹ 919 Monthly 4 Cores & 16 GB RAM 200 GB SSD Storage 4 TB Bandwidth Weekly Backups Dedicated IP Address Full Root Access Apply Coupon SAVE 65% Extra Discount Hostinger Best VPS Hosting Review: Performance Lightning-Fast Speeds: One of the most crucial aspects of web hosting is speed. A slow-loading website can lead to a poor user experience and deter visitors from returning. Hostinger understands the importance of speed and has optimized their VPS hosting environment to deliver lightning-fast performance. With their cutting-edge hardware, SSD storage, and advanced caching techniques, Hostinger ensures that your website loads quickly, keeping visitors engaged and satisfied. Global Data Centers: Hostinger has a vast network of data centers strategically located around the globe. This global presence allows them to provide low-latency hosting solutions, ensuring that your website's content is delivered swiftly to visitors, regardless of their geographic location. By choosing a data center closest to your target audience, you can significantly reduce latency and improve the overall user experience. CDN Integration: To further enhance performance, Hostinger integrates with Content Delivery Networks (CDNs). CDNs store cached versions of your website's content on servers distributed worldwide. When a user accesses your site, the CDN delivers the content from the server closest to them, reducing load times and optimizing performance. Hostinger's seamless CDN integration makes it easy to boost your website's speed and deliver content efficiently. Robust Infrastructure: Hostinger invests in state-of-the-art infrastructure to ensure optimal performance for their VPS hosting. Their servers are built with the latest technologies and undergo regular maintenance and upgrades to guarantee reliability and efficiency. With Hostinger's robust infrastructure, you can expect minimal downtime and a consistently high-performing website. Pricing and Value for Money: Hostinger's VPS hosting plans are competitively priced, making them affordable for individuals and small businesses alike. Considering the features, performance, and reliability offered, Hostinger provides excellent value for money in the VPS hosting space. Pros and Cons of Hostinger VPS Hosting Pros: Affordable Pricing: Hostinger's VPS hosting plans are priced competitively, making them accessible to a wide range of users. Fast and Reliable Servers: Hostinger utilizes high-performance hardware and SSD storage, ensuring fast loading times and reliable server performance. User-friendly Control Panel: The intuitive control panel makes it easy for users to manage their VPS servers and perform administrative tasks without any technical expertise. Cons: cPanel and WHM: Hostinger has a limited number of CentOS 7 64bit with cPanel and WHM (Requires a License Purchase Additionally). Lack of Windows-based VPS Hosting: Hostinger currently doesn't offer VPS hosting with Windows operating system, limiting the options for users who specifically require Windows-based hosting. Customer Reviews and Testimonials Hostinger has received positive reviews from many satisfied customers. Users appreciate the affordability, performance, and responsive customer support provided by Hostinger. Here are some testimonials from Hostinger VPS hosting users: “I've been using Hostinger's VPS hosting for my business website, and I'm impressed with the speed and reliability. The customer support team is also very helpful.” John Doe “Hostinger offers great value for money. Their VPS hosting plans are feature-packed and affordable, perfect for small businesses like mine.” Sarah T Hostinger impressed me with amazing customer experience and effortless migration from my previous hosting provider. Jake SinclairBrand Designer Previous Next Tootal Reviews: 4.5 4.5/5 Comparison with Competitors When comparing Hostinger's VPS hosting with its competitors, it stands out for its affordability, performance, and user-friendly interface. While some competitors may offer more server locations or Windows-based VPS hosting, Hostinger's overall package makes it a strong contender in the market. Frequently Asked Questions (FAQs) 1. Is Hostinger's VPS hosting suitable for beginners? Yes, Hostinger’s VPS hosting is designed to be user-friendly and accessible even for beginners. Their control panel and intuitive interface make it easy to manage your VPS server without extensive technical knowledge. 2. Can I upgrade my VPS hosting plan in the future? Absolutely! Hostinger allows you to upgrade your VPS hosting plan as your website grows and requires more resources. You can easily scale up your CPU power, RAM, storage, and bandwidth with just a few clicks. 3. Does Hostinger offer a money-back guarantee? Yes, Hostinger offers a 30-day money-back guarantee on its VPS hosting plans. If you’re not satisfied with the service, you can request a refund within 30 days of signing up. 4. Can I host multiple websites on a Hostinger VPS server? Yes, you can host multiple websites on a Hostinger VPS server. Depending on the plan you choose, you can allocate resources to different websites and manage them separately within your control panel. 5. Does Hostinger provide customer support for VPS hosting users? Yes, Hostinger offers 24/7 customer support for its VPS hosting users. You can reach out to their support team via live chat or the ticketing system for any hosting-related queries or issues you may have. https://themesfores.com/best-vps-hosting-review-hostinger-vps-hosting/ #Hostinger #VPSHosting
1 note
·
View note
Text
How to Choose the Best VPS Hosting Provider
How to Choose the Best VPS Hosting Provider
When choosing the best VPS hosting provider, it’s important to consider several factors. Some of these factors include features, support, and pricing. The best companies will offer these as standard. Some of the companies that provide these include CyberPanel, InterServer, and A2 Hosting. Liquid Web Liquid Web is a leading provider of web hosting services. They offer a wide range of hosting…

View On WordPress
0 notes
Text
What is CyberPanel VPS Hosting? Klcweb
What is CyberPanel VPS Hosting? Klcweb
Is shared server hosting insufficient to achieve maximum success? we designed a new service targeted at large and complex eCommerce websites. Powered by LiteSpeed, CyberPanel VPS hosting helps users to perform tasks faster, more securely, and efficiently by providing full root access to customize the service. include PrestaShop, WooCommerce, Magento, and others.…

View On WordPress
0 notes
Text
How to Login to CyberPanel
How to Login to CyberPanel
CyberPanel is a great freemium hosting control panel. In this tutorial we will show you how to login to CyberPanel. Open a browser and type https://your-server-hostname:8090 Username: admin Enter the password that you set during initial setup You are done! You will be redirected to the CyberPanel Dashboard.
View On WordPress
0 notes
Text
Dành cho những ai chưa biết về máy chủ ảo VPS
Máy chủ ảo VPS là gì? Có ưu nhược điểm gì? Thông số kỹ thuật ra sao? Cùng KDATA tìm hiểu các kiến thức cơ bản về VPS mà bạn cần biết nhé!
VPS là gì?
VPS (Virtual Private Server) là máy chủ ảo được tạo bằng phương pháp phân chia một máy chủ vật lý thành nhiều máy chủ khác nhau có tính năng tương tự máy chủ riêng (dedicated server).
Mỗi VPS sẽ được trang bị một phần CPU với dung lượng RAM, dung lượng ổ HDD, địa chỉ IP và hệ điều hành riêng biệt giúp người dùng, doanh nghiệp có thể toàn quyền quản lý và khởi động lại hệ thống bất kỳ lúc nào.
Nếu doanh nghiệp, cá nhân chưa đủ kinh phí để đầu tư một máy chủ riêng hay thuê máy chủ riêng thì máy chủ ảo chính là lựa chọn phù hợp bởi giá thành của nó thấp hơn nhiều nhưng vẫn đảm bảo đầy đủ tính năng như một máy chủ vật lý.
Khi nào nên sử dụng VPS?
Hiện nay, VPS được sử dụng rộng rãi ở nhiều doanh nghiệp trong và ngoài nước. Kể cả những mô hình kinh doanh nhỏ lẻ cũng sử dụng máy chủ ảo trong việc kinh doanh.
Nhưng thường thấy nhất thì VPS được sử dụng trong:
Lưu trữ web đa dịch vụ.
Máy chủ cho game.
Phát triển platform.
Máy chủ của hệ thống Email doanh nghiệp.
Lưu trữ dữ liệu: hình ảnh, video, tài liệu,…
Chạy các chương trình truyền thông trực tiếp.
Môi trường ảo để lập trình.
Ưu và nhược điểm của máy chủ ảo VPS
Ưu điểm
Cài đặt, kích hoạt sử dụng nhanh chóng (từ 5-10 phút).
Tính năng bảo mật cao, an toàn với người sử dụng.
Quyền quản trị từ xa, cài đặt các phần mềm và ứng dụng theo nhu cầu.
Toàn quyền sử dụng các phần mềm như một máy chủ độc lập.
Giá thành rẻ hơn, tiết kiệm nhiều chi phí.
Hạn chế
Bị ảnh hưởng bởi hoạt động và độ ổn định của máy chủ vật lý tạo ra nó.
Việc dùng chung máy chủ vật lý khiến VPS của bạn bị phụ thuộc.
Năng suất làm việc đôi lúc không đạt được mức như bạn mong muốn.
Việc nâng cấp VPS có thể sẽ tốn nhiều thời gian và chi phí của bạn.
Vì sao doanh nghiệp nên sử dụng máy chủ ảo VPS?
Tính năng tương tự Server: Chuyển đổi số đang d���n đóng vai trò quan trọng trong việc điều hành, quản lý và kinh doanh thì doanh nghiệp rất cần có một hệ thống hạ tầng mạng ổn định, mạnh mẽ để thực hiện nhiệm vụ trên. Máy chủ ảo VPS sẽ đáp ứng đầy đủ tiêu chí một máy chủ (server) nhưng với chi phí tối ưu hơn rất nhiều so với việc thuê máy chủ riêng.
Miễn phí cài đặt cấu hình: Thuê máy chủ ảo VPS thì doanh nghiệp cũng không cần phải lo lắng về việc cài đặt cấu hình, các phần mềm liên quan vì đã có đội kỹ thuật chuyên nghiệp của nhà cung cấp giúp bạn rồi.
Dễ dàng nâng cấp và sử dụng: Một lợi thế khác đó là doanh nghiệp có thể thay đổi, nâng cấp cấu hình bất kỳ lúc nào chỉ trong khoảng vài phút. Dễ dàng sử dụng hệ thống điều khiển từ xa Remote Destop hoặc SSH.
Như vậy với doanh nghiệp máy chủ ảo VPS là một giải pháp máy chủ tuyệt vời. Không chỉ giúp doanh nghiệp tiết kiệm chi phí mà còn đóng vai trò quan trọng trong việc quản lý, xử lý dữ liệu. Tính bảo mật cao giúp chống rò rỉ thông tin, đảm bảo luôn ổn định trong suốt quá trình vận hành, triển khai.
Những thông số cần biết về VPS
Bạn cần nắm rõ các thông số kỹ thuật của VPS để chọn được một cấu hình phù hợp với nhu cầu:
RAM
RAM là bộ nhớ chính trong máy tính. Nếu VPS bạn định thuê có RAM càng nhiều thì khả năng truy xuất dữ liệu cũng sẽ càng tốt. Bởi khi dùng VPS, RAM sẽ xử lý các vấn đề như xử lý đoạn mã PHP với phần mềm PHP, xử lý truy xuất nhập xuất của database với MySQL, hỗ trợ đọc ghi dữ liệu,…
Hiện nay phần lớn các dịch vụ VPS đều sẽ cho phép người dùng chọn mức RAM từ 512MB đến 16GB (nếu lớn hơn 16GB thì có thể là Cloud VPS). Tùy vào lượng truy cập của khách vào website của bạn mà cần nhiều hay ít RAM.
Đối với WordPress thì bạn chỉ cần 1GB RAM là có thể sử dụng thoải mái nhé.
>>> Có thể bạn quan tâm: SWAP (RAM ảo) là gì? Khi nào cần sử dụng SWAP? Cài SWAP có tốn tài nguyên?
Ổ cứng
Ổ cứng (disk) là không gian lưu trữ được sử dụng để lưu các file cài đặt của hệ điều hành và các file của mã nguồn website mà bạn đã lưu trên đó.
Hiện nay ổ cứng chia làm 2 loại là SSD và HDD:
– HDD (Hard Disk Drive) là một loại ổ đĩa thông dụng nhất mà bạn thường sử dụng trên máy tính.
– SSD (Solid State Drive) dịch là ổ cứng bán dẫn. Đây là một loại ổ cứng để lưu trữ dữ liệu nhưng sẽ có tốc độ truy xuất dữ liệu nhanh hơn loại HDD lên tới khoảng 300 lần. Nếu test thử bạn sẽ thấy nếu HDD có tốc độ truy xuất khoảng 80Mb/s nhưng với SSD thì sẽ lên tới 400Mb/s.
VPS sử dụng ổ cứng SSD sẽ có giá đắt hơn loại ổ HDD nhưng tốc độ sẽ nhanh hơn vì vậy mà SSD được nhiều người dùng
CPU Core
CPU Core có nghĩa là lõi xử lý của CPU. Một Dedicated Server có số lượng core nhất định và nó sẽ được chia cho các VPS. Thường thì số core càng cao thì khả năng xử lý dữ liệu càng tốt.
Với các gói VPS, trung bình thì bạn chỉ được chọn từ loại 1 core đến 6 cores.
Bandwidth/Transfer
Cả hai đều mang nghĩa là băng thông. Nó có nghĩa là lưu lượng mà bạn được phép truyền tải dữ liệu đi.
IP
IP (Internet Protocol) được hiểu là số lượng địa chỉ IP mà bên nhà cung cấp sẽ cấp cho bạn. Các dãy IP sẽ được cấp chọn ngẫu nhiên.
Nếu mua thêm nhiều IP khác nhau thì những dãy IP đó sẽ có chung 1 class A và B.
Chọn hệ điều hành nào cho VPS?
Hiện nay, máy chủ ảo VPS đang được hỗ trợ bởi 2 hệ điều hành phổ biến gồm Linux và Windows. Linux được đánh giá là thân thiện với người dùng, hỗ trợ được nhiều ứng dụng hơn, nhưng phải trả phí cao hơn Windows. Nhưng nếu bạn làm việc với Dot Net hay Visual Studio thì nên chọn Windows.
>>> Xem chi tiết tại: VPS Windows và VPS Linux – Nên chọn hệ điều hành nào?
Các hệ điều hành Linux phổ biến
Hệ điều hành Debian
Debian là một phân bản khác của Linux. Nó là hệ điều hành máy tính phổ biến và có sẵn. Debian nổi tiếng với hệ thống quản lý gói APT. Debian cũng không sở hữu ứng dụng Microsoft Word, Exel mà được thay vào đó là các ứng dụng WordPerfect của Corel cùng các desktop applications tương tự.
Điểm mạnh của Debian:
– Trình cài đặt toàn diện.
– Phát hành miễn phí.
– Ổn định.
– Hỗ trợ nhiều kiến trúc phần cứng.
– Chuyển đổi dễ dàng.
Hệ điều hành Ubuntu
Tương tự Debian, Ubuntu là một bản phân phối khác của Linux. Mục tiêu của Ubuntu là cung cấp một hệ điều hành ổn định, cập nhật phiên bản thường xuyên cho người dùng.
Ubuntu tập trung vào sự tiện dụng, dễ dàng cài đặt với nhiều chức năng thường xuyên được cập nhật. Hệ điều hành này cũng có cộng đồng người sử dụng lớn nên có khá nhiều tài liệu miễn phí và được cập nhật thường xuyên. Giao diện desktop cũng thân thiện nên nếu bạn là người mới sử dụng thì nên chọn Ubuntu.
Hệ điều hành CentOS
CentOS là một bản phân phối khác của hệ điều hành Linux. CentOS bắt nguồn hoàn toàn từ bản phân phối RHEL nên CentOS là một môi trường hoàn hảo để lập trình. Về điểm này thì CentOS vượt hơn hẳn Ubuntu khi nó dễ dàng tùy chỉnh, bảo mật và ổn định rất phù hợp với doanh nghiệp.
Hệ điều hành Fedora
Fedora là một bản phân phối của Linux, được phát triển dựa trên cộng đồng Fedora Project. Bạn có thể dùng Fedora cùng với các hệ điều hành khác như Microsoft WindowsTM hay Mac OS XTM.
Ưu điểm của Fedora:
– Hoàn toàn miễn phí, đa tính năng.
– Giao diện đột phá với nhiều chức năng.
– Là một môi trường tốt để lập trình web.
– Nhanh chóng, cập nhật thường xuyên và tính khả dụng cao.
Hệ điều hành Windows Server
Windows Server là một nhánh của hệ điều hành Server của Microsoft. Windows Server được thiết kế để chia sẻ các dịch vụ với nhiều người dùng, đồng thời cung cấp sự điều hành, quản trị rộng rãi với cơ sở dữ liệu và mạng công ty.
Tóm lại nếu bạn dùng WordPress hoặc chạy web PHP thì nên chọn các hệ điều hành Linux. Hoặc cũng có thể chọn CentOS, Ubuntu thì đây cũng là hai hệ điều hành được nhiều người sử dụng.
Chọn Control Panel cho VPS
Những Control Panel có tính phí
cPanel
cPanel là control panel trên nền Linux được sử dụng phổ biến nhất hiện nay cho tài khoản web hosting.
cPanel có những ưu điểm nổi trội đó là dễ tìm hiểu, dễ sử dụng giúp bạn tiết kiệm được nhiều thời gian và chi phí. cPanel đã được thử nghiệm kỹ càng, có trình cài đặt tự động. Hơn hết là cộng đồng người dùng lớn nên có khá nhiều bài hướng dẫn để bạn tìm đọc.
DirectAdmin
DirectAdmin là phần mềm quản lý hosting trên Linux. Control Panel này cũng khá nhẹ, phù hợp với nhiều cấu hình, ít chiếm tài nguyên và chức năng cũng ít hơn cPanel nên dễ sử dụng. Giá cũng thấp hơn so với cPanel.
Control Panel này cũng sở hữu những ưu điểm nổi bật là tốc độ cao, nhẹ nên sử dụng ít tài nguyên của hệ thống. Tính ổn định cao, phân quyền khi quản lý và chi phí cũng tương đối mềm.
Plesk
Plesk là một công cụ quản trị, hỗ trợ được cho cả VPS Windows và VPS Linux. Ngoài ưu điểm này thì nó còn được người dùng đánh giá là ổn định, đáng tin cậy với nhiều hệ thống phần mềm hữu ích. Tích hợp đầy đủ các tính năng có thể quản lý các dịch vụ để vận hành website của mình.
Giao diện Plesk cũng thân thiện và dễ sử dụng. Đây cũng là control panel duy nhất tích hợp tính năng thiết kế web, giao tiện storefront SaaS và phân hệ Billing, mang lại sự tiện dụng và hiệu quả cao cho người sử dụng. Nó cũng cho phép tạo nhiều tài khoản FTP, kết hợp cấu trúc linh hoạt.
Những Control Panel miễn phí
VestaCP
Vesta CP là một control panel đơn giản. Nó có hỗ trợ Nginx mang lại hiệu suất cao hơn nhiều lần so với Apache. Với VestaCP thì Nginx chỉ làm công việc reseved proxy từ Apache cho các file tĩnh. Cách cài đặt VestaCP lên VPS cũng vô cùng dễ dàng.
aaPanel
aaPanel có thể quản lý server thông qua giao diện (GUI) đơn giản và chỉ với thao tác đơn giản thì đã có thể cài đặt được một web server chạy mô hình LNMP/LAMP. aaPanel ra đời với mục đích giúp cho việc cài đặt, quản trị vps, server web trở nên đơn giản hơn. Từ đó giúp người dùng có nhiều thời gian để tập trung phát triển ứng dụng mà không cần quan tâm nhiều tới hệ thống. aaPanel còn khá mới, hiện tại chỉ phát triển version 1.1.0 và họ sẽ update liên tục theo từng tháng.
Về chức năng thì hiện tại aaPanel chỉ hỗ trợ những chức năng đơn giản mà bất kỳ panel nào cũng có như quản lý Web, FTP, Database, File.
CyberPanel
CyberPanel là một hosting control thế hệ mới, tích hợp OpenLiteSpeed một web server mã nguồn mở của LiteSpeed Web Server EnterPrise. CyberPanel được thiết kế để cung cấp cho người dùng một web hosting control panel cực tốt về tốc độ, bảo mật và độ tin cậy cao (Speed, Security, Reliability).
Hocvps
Hocvps có ưu điểm chính là không chạy ngầm bất kì service nào nên không hề tiêu thụ tài nguyên VPS khi không sử dụng. Hocvps có nhiều tính năng nổi bật như thông tin cài đặt đơn giản, chỉ cần lựa chọn phiên bản PHP, tên miền chính và port admin là đủ. Bên cạnh đó là có thể sử dụng Nginx repo thay vì compile từ source như những script khác giúp việc cài đặt Nginx nhanh hơn, sau này có nâng cấp cũng dễ dàng hơn rất nhiều.
VPSSIM
VPSSIM hay VPS SIMPLE là một tiện ích tự động cài đặt và tối ưu Nginx – PHP – MariaDB (LEMP) cho Centos VPS. Không như những control panel khác được biết bằng ngôn ngữ PHP chạy trên trình duyệt, VPSSIM chỉ chạy trên SSH và không chạy ngầm. Vì vậy mà không hề tiêu thụ tài nguyên VPS khi không sử dụng. Điều này giúp VPS của bạn có thể dành hết công suất để phục vụ các service liên quan tới việc vận hành website.
Thuê VPS ở đâu tốt tại Việt Nam?
Hiện nay có rất nhiều nhà cung cấp dịch vụ VPS uy tín ở Việt Nam. Các doanh nghiệp có thể chọn một nhà cung cấp giá tốt, chất lượng dựa trên những tiêu chí, chẳng hạn gồm:
Uy tín, tên tuổi.
Hiệu suất và sự ổn định.
Tính bảo mật.
Giá thành.
Cam kết uptime.
Kênh giám sát tài nguyên.
Chất lượng hỗ trợ khách hàng.
Những chương trình khuyến mãi.
KDATA là một trong những nhà cung cấp dịch vụ điện toán đám mây đáp ứng đầy đủ tất cả yêu cầu trên. Dịch vụ Cloud VPS sẽ cho phép khách hàng khởi tạo máy chủ ảo theo nhu cầu hàng loạt các tài nguyên máy chủ ảo gồm:
– Bộ vi xử lý trung tâm (CPU).
– Bộ nhớ tạm thời (RAM).
– Dung lượng lưu trữ (Storage).
– Hệ thống mạng (Networks).
Hệ thống Cloud VPS của KDATA được xây dựng trên hệ thống phần cứng chính hãng hiện đại nhất từ Dell. Ứng dụng giải pháp công nghệ KVM-OpenStack đã được Amazon, IBM, Alibaba,… công nhận. Hệ thống được đặt tại Data Center đạt chuẩn Tier 3 Quốc tế của Viettel, VNPT. Dịch vụ sử dụng riêng hệ thống kết nối cáp ổn định, băng thông cao lên tới 100Gbps, đảm bảo cam kết chất lượng (SLA) 99,99% uptime. (SLA) 99,99%.
Khách hàng có thể dễ dàng khởi tạo dịch vụ chỉ sau vài cú nhấp chuột. Tất cả các nghiệp vụ quản trị, vận hành đều được thực hiện thông qua giao diện web.
Kết luận
VPS là một trong các giải pháp máy chủ đám mây được nhiều doanh nghiệp sử dụng trong quá trình chuyển đổi số. Dựa trên những thông số cơ bản của một máy chủ ảo VPS, doanh nghiệp nên xác định cấu hình tối ưu cho việc vận hành, quản lý để tiết kiệm chi phí.
0 notes
Text
Moving WordPress Site to RackNerd VPS with CyberPanel
youtube
My website https://fuhanreviews.com was on shared reseller hosting, a basic account with 1GB RAM and use of 1vCPU.
I moved to one of my beefy RackNerd VPS machines with 4 vCPU and 6GB RAM.
I noticed a massive speed improvement even for the basic site, I need to tweak the themes and images.
Pick up RackNerd VPS here: https://rcl.ink/G6F Some of RackNerd’s recent offers: – 1x vCPU Core | 25 GB SSD Cached RAID-10 Storage | 1.5 GB RAM $24.39 per year : https://link.ws/DCaYG – 2x vCPU Cores | 40 GB SSD Cached RAID-10 Storage | 2.5 GB RAM $29.50 per year : https://swiy.io/2Bpi – 4x vCPU Cores | 60 GB SSD Cached RAID-10 Storage | 4.5 GB RAM $55.89 per year: https://swiy.io/2Bpj
All of these VPS offers are hosted in LA but they have several more locations. I am based in London, UK and I have no issues with the server being in LA.
This is not a complete tutorial, it is just an update on my progress with my website with some special offers if you are interested in a cheap high-quality VPS.
If you want a complete tutorial, comment below and I will go through it with one of my other VPS servers. ————

https://furhanreviews.com


The best training to make money online even without experience: https://rcl.ink/Bea

20+ Tools – better and cheaper than ClickFunnels, unlimited hosting, webinars, videos, membership sites + free lifetime account: https://rcl.ink/K9i ======================================================
Check out my Channel Here: https://www.youtube.com/channel/UCpJpKpGc8_aJPE2S03bpH4A?sub_confirmation=1
Visit my site for more reviews and free training: https://furhanreviews.com ================================================================================ Affiliate Disclaimer: While we receive affiliate compensation for reviews / promotions on this page, we always offer honest opinion, relevant experiences and genuine views related to the product or service itself. Our goal is to help you make the best purchasing decisions, however, the views and opinions expressed are ours only. As always you should do your own due diligence to verify any claims, results and statistics before making any kind of purchase. Clicking links or purchasing products recommended on this page may generate income for this website from affiliate commissions and you should assume we are compensated for any purchases you make. ================================================================================ source
source https://aruwak.com/moving-wordpress-site-to-racknerd-vps-with-cyberpanel/
0 notes
Video
youtube
WordPress Website move to VPS with CyberPanel - My website https://fuhanreviews.com was on shared reseller hosting, a basic account with 1GB RAM and use of 1vCPU. I moved to one of my beefy RackNerd VPS machines with 4 vCPU and 6GB RAM. I noticed a massive speed improvement even for the basic site, I need to tweak the themes and images. Pick up RackNerd VPS here: https://rcl.ink/G6F Some of RackNerd's recent offers: - 1x vCPU Core | 25 GB SSD Cached RAID-10 Storage | 1.5 GB RAM $24.39 per year : https://link.ws/DCaYG - 2x vCPU Cores | 40 GB SSD Cached RAID-10 Storage | 2.5 GB RAM $29.50 per year : https://swiy.io/2Bpi - 4x vCPU Cores | 60 GB SSD Cached RAID-10 Storage | 4.5 GB RAM $55.89 per year: https://swiy.io/2Bpj All of these VPS offers are hosted in LA but they have several more locations. ------------ 🌐 https://furhanreviews.com 🚧 💰 The best training to make money online even without experience: https://rcl.ink/Bea 🧰 20+ Tools - better and cheaper than ClickFunnels, unlimited hosting, webinars, videos, membership sites + free lifetime account: https://rcl.ink/K9i ====================================================== Check out my Channel Here: https://www.youtube.com/channel/UCpJpKpGc8_aJPE2S03bpH4A?sub_confirmation=1 Visit my site for more reviews and free training: https://furhanreviews.com ================================================================================ Affiliate Disclaimer: While we receive affiliate compensation for reviews / promotions on this page, we always offer honest opinion, relevant experiences and genuine views related to the product or service itself. Our goal is to help you make the best purchasing decisions, however, the views and opinions expressed are ours only. As always you should do your own due diligence to verify any claims, results and statistics before making any kind of purchase. Clicking links or purchasing products recommended on this page may generate income for this website from affiliate commissions and you should assume we are compensated for any purchases you make. ================================================================================ >> https://youtu.be/CP58wiTsoXg
0 notes
Text
Tổng hợp phần mềm quản lý VPS Linux
Tổng hợp phần mềm quản lý VPS giúp bạn tìm được phần mềm phù hợp.
Trước khi cài đặt một phần mềm quản lý VPS. Bạn cần phải xem qua một vài lưu ý sau đã nhé:
Bạn muốn VPS của bạn chỉ một mình bạn quản lý hay có phân cấp người dùng.
Bạn có cần nhiều chức năng sẵn có hay không
Bạn có rành các câu lệnh trên Linux hay không?
Sau khi xác định được các mục đích sử dụng VPS. Chúng ta chia thành 2 loại phần mềm quản lý VPS như sau:
Một loại tối ưu, tối giản, chỉ người quản lý VPS thực hiện hoặc người quản lý VPS họ khá hiểu biết về kỹ thuật.
Một loại được cấu hình sẵn các chức năng hoạt động trên môi trường Web.
Nếu bạn không muốn cài các phần mềm quản lý VPS thì bạn có thể cài trần VPS bằng:
LAMP(Linux, Apache, MySQL, PHP) => https://doc.vsis.net/huong-dan-cai-dat-lamp-tren-centos/
LEMP(Linux, Nginx, MariaDB, PHP) => https://doc.vsis.net/huong-dan-cai-dat-lemp/
A. Phần mềm quản lý VPS tối ưu, đơn giản sử dụng câu lệnh SSH.
Nếu bạn rành SSH, bạn không muốn quản trị bằng web, hay bạn muốn tối ưu tối đa VPS. Thì chúng ta xem các công cụ sau:
Phần mềm quản lý VPS bằng VPSSIM
VPSSIM là một sản phẩm của Việt Nam, là tên gọi tắt của VPS SIMPLE – một tiện ích tự động cài đặt và tối ưu Nginx – PHP – MariaDB (LEMP) cho Centos VPS. VPSSIM không hỗ trợ các hệ điều hành khác, nên fan của Ubuntu đành bỏ qua nó.
VPSSIM được tích hợp rất nhiều chức năng thể hiện bằng những menu thân thiện và dễ hiểu, giúp bạn tiết kiệm rất nhiều thời gian và công sức khi sử dụng VPS. Với số lượng chức năng đủ để bạn không cần biết một dòng lệnh nào cũng có thể làm chủ VPS một cách dễ dàng nhất.
Do được làm bởi người Việt, nên VPSSIM có giao diện tiếng Việt, khá dễ sử dụng. Bạn không cần phải nhớ các câu lệnh như các ứng dụng khác. VPSSIM cũng khá nổi tiếng trong cộng đồng Việt Nam!
Có 1 điểm lưu ý là VPSSIM có 2 phiên bản miễn phí và trả phí. Bản miễn phí giới hạn số website trên 1 VPS là 25. Bản trả phí giới hạn theo số lượng VPS sử dụng với chi phí từ 100.000 VND cho 1 VPS tới 1.000.000 VND cho số lượng VPS không giới hạn.
Các tính năng chính của VPSSIM
Hỗ trợ cài đặt Nginx, MariaDB, PHP 7.2 và tích hợp module Google PageSpeed để tăng tốc website.
Hỗ trợ cài đặt WordPress dễ dàng và tự động cấu hình cho các plugin cache cho WordPress.
Hỗ trợ cài đặt 1 số forum như PHPBB, MyBB and SMF forum.
Tích hợp chức năng tự động giám sát hệ thống. VPSSIM sẽ tự động email thông báo khi một trong 3 dịch vụ: MySQL, Nginx hoặc PHP bị dừng trên VPS.
Tích hợp chức năng cài đặt SSL miễn phí qua Let’s Encrypt hoặc các PaidSSL (Comodo, Symantec, …) cho website.
Tích hợp các chức năng bảo mật
Tích hợp chức năng cài đặt và tạo tài khoản FTP cho từng website trên VPS. Hỗ trợ cấu hình giới hạn số file được phép upload và dung lượng cho từng tài khoản FTP như share host.
Tích hợp sẵn chức năng sao lưu website và phục hồi toàn bộ website.
Các bạn xem hướng dẫn cài đặt VPSSIM tại đây nhé https://doc.vsis.net/huong-dan-cai-dat-va-su-dung-vpssim/
Phần mềm quản lý VPS bằng HocVPS Script
HocVPS Script là một tool khác của người Việt dùng để quản lý VPS. Cũng tương tự như VPSSIM, HocVPS Script chỉ chạy trên CentOS mà không hỗ trợ các hệ điều hành khác như Ubuntu.
HocVPS Script sẽ tự động cài đặt Nginx, MariaDB, PHP 7 (kèm theo Zend Opcache để tối ưu). Ngoài ra, nó còn cài thêm phpMyAdmin để quản lý cơ sở dữ liệu và eXplorer để quản lý file trên VPS.
Các tính năng chính của HocVPS Script
Hỗ trợ cài đặt Nginx, MariaDB và PHP 7. Có update tự động cho Nginx, PHP, MariaDB.
Hỗ trợ trình quản lý File Manager eXtplorer trực tiếp ngay trên web.
Tự động cài đặt module Zend Opcache và có thể theo dõi status ngay trên web.
Sử dụng được với cả domain www và non-www, tự động redirect giúp bạn.
Theo dõi tình trạng server ngay trên web, có thể sử dụng mobile truy cập mọi nơi.
Tích hợp một số công cụ bảo mật như Fail2ban hay thay đổi cổng SSH.
Các bạn xem hướng dẫn sử dụng và cài đặt ở bài viết này https://doc.vsis.net/huong-dan-cai-dat-va-su-dung-hocvps/
Phần mềm quản lý VPS bằng LarVPS
LarVPS là một scripts để cài đặt quản lý VPS được tối ưu hóa cao. Larvps là một dạng LEMP tối ưu như hocvps hay vpssim mà chúng tôi đã giới thiệu trước đó. Do vậy Larvps chỉ cài đặt những cái cần thiết chỉ để phục vụ nhiệm vụ duy nhất là chạy Web. Larvps chỉ cài Linux + Ningix + PHP + MySQL mà thôi.
Tính năng của LarVPS gồm những gì?
Thêm, xóa Domain không giới hạn
Đổi port SSH đơn giản
Cài đặt SSL Free Let’s Encrypt tự động gia hạn
Hỗ trợ giao thức HTTP/2 và TLS 1.3
Tự động cập nhật WP theo chỉ định
Hỗ trợ CentOS 7 và 8
Hỗ trợ Nginx 1.6.1
Hỗ PHP 7.4.3
Hỗ trợ MariaDB 10.5.1
Hỗ trợ phpMyAdmin 5.0.1
Hỗ trợ Memcached trong việc tăng tốc web
Hỗ trợ Redis trong việc tăng tốc web
Hỗ trợ Fail2Ban trong việc bảo vệ VPS
Hỗ trợ tài khoản FTP và phpMyAdmin theo User kèm port bí mật cho mỗi User
Quản lý phpMyadmin với Port bí mật
Hướng dẫn cài đặt và sử dụng LarVPS được giới thiệu tại bài viết >> https://doc.vsis.net/larvps-la-gi-huong-dan-cai-dat-larvps/
Phần mềm quản lý VPS bằng EasyEngine
EasyEngine là 1 script để quản lý VPS, server chuyên phục vụ cho WordPress. Nó chạy được trên mọi hệ điều hành Linux (Ubuntu hay CentOS đều được) và cả Mac nữa. Điểm cộng của EasyEngine (EE) giúp chúng ta cài đặt 1 stack tối ưu cho WordPress. EE sử dụng web server Nginx thay vì Apache để có thể chịu được nhiều người truy cập hơn. Bạn cũng sẽ được cài đặt PHP 7 và Redis để tối ưu về tốc độ. Ngoài Redis, EE còn cấu hình cache tối ưu cho các website WordPress của bạn.
EE cung cấp nhiều câu lệnh để thêm/xoá website và quản trị cấu hình cho website, giúp cho bạn đỡ phải tự thao tác bằng dòng lệnh trên VPS nhiều.
Các tính năng chính của EasyEngine
Cài đặt WordPress, Nginx, PHP, MySQL, Redis & deps. Lưu ý là EE chỉ hỗ trợ Nginx, không hỗ trợ Apache.
Từ phiên bản 4 trở đi, chạy trên nền Docker để tách biệt từng website riêng, giảm thiểu nguy cơ bị hack toàn server.
Tích hợp với Let’s Encrypt để cung cấp miễn phí.
Quản lý cache cho WordPress tốt.
Có khả năng bắt các email để debug.
Tích hợp WP-CLI để quản lý site WordPress.
Quan trọng nhất là EasyEngine hoàn toàn miễn phí. Việc cài đặt nó cũng khá dễ dàng. Chỉ cần chạy các lệnh sau:
Các bạn xem hướng dẫn cài đặt tại đây nhé >> https://doc.vsis.net/easyengine-la-gi/
B. Cho mục đích chỉ phân quyền quản lý VPS, sử dụng quản trị qua web.
Nếu bạn sử dụng VPS với mình đích có quản lý khách hàng, có phân quyền, phân gói dịch vụ thì bạn hãy tìm hiểu các công cụ sau nhé:
Hướng dẫn cài đặt và sử dụng Cpanel/WHM
Cpane là một phần quản lý Hosting, Reseller được ưa chuộng nhất hiện nay. Cpanel đáp ứng được mọi nhu cầu nếu bạn muốn biến VPS thành cố máy kiến tiền bằng việc bán Hosting.
Chúng tôi có bài viết dành riêng cho Cpanel mời các bạn xem trực tiếp tại đây nhé ==>
Hướng dẫn cài đặt và sử dụng Plesk Panel
Cũng giống như Cpanel. Plesk Panel cũng được xây dựng để giúp bạn quản lý VPS tốt hơn trong việc chia nhỏ thành các Hosting, Reseller. Về chức năng Plesk không thua kém gì so với Cpanel. Tuy nhiên nó ra đời sau Cpanel nên ít được sử dụng hơn. Nhưng nó được ưu điểm là chi phí bản quyền rẻ hơn so với Cpanel.
Hướng dẫn sử dụng Plesk được chúng tôi viết chi tiết tại bài viết sau: https://doc.vsis.net/plesk-la-gi-huong-dan-cai-dat-plesk-panel/
Hướng dẫn cài đặt và sử dụng VestaCP
Cùng giống như Cpanel, Plesk, Direct Admin hay Sentora. VestaCP (Vesta Control Panel) cũng sinh ra để quản lý hosting trên VPS. Điều tuyệt vời là chức năng thì chả khác gì Cpanel hay Plesk nhưng nó lại là Control panel free. Nên các bạn yên tâm mà sử dụng nhé.
Hướng dẫn cài đặt VestaCP TẠI ĐÂY
Hướng dẫn cài đặt và sử dụng Sentora
Sentora cũng là một phần mềm quản lý hosting được quản lý và phân quyền được xây dựng trên nền Web như Cpanel, Plesk,.. Tuy nhiên nó ít chức năng hơn, gọn nhẹ và miễn phí.
Sentora có các chức năng sau:
Hỗ trợ nhiều người dùng
Có khả năng tạo Reseller Account
Hỗ trợ quản lý số lượng tên miền của từng tài khoản, quản lý băng thông, dung lượng, mail box
Cho phép thay đổi giao diện, brand name
Để hiểu, cài đặt thành công và sử dụng thành thạo Sentora mời các bạn xem bài viết https://doc.vsis.net/huong-dan-cai-dat-sentora/
Hướng dẫn cà đặt và sử dụng Cyberpanel
CyberPanel là một hosting control thế hệ mới, tích hợp OpenLiteSpeed một web server mã nguồn mở của LiteSpeed Web Server EnterPrise. CyberPanel được thiết kế để cung cấp cho người dùng một web hosting control panel cực tốt về tốc độ, bảo mật và độ tin cậy cao (Speed, Security, Reliability).
Tính năng của Cyberpanel
Xét cho cùng thì Cyberpanel cũng chỉ à Control Panel thôi. Nên nó cũng có đủ các chức năng cần thiết của nó.
Giao diện web hiện đại, trực quan và dễ sử dụng. Có hỗ trợ tiếng việt.
Tùy chọn OpenLiteSpeed hoặc LiteSpeed Enterprise.
Hỗ trợ LSCache.
MariaDB (tùy chọn các phiên bản 10.0, 10.1, 10.2, 10.3, 10.4).
Tự động gia hạn miễn phí SSL – Let’s Encrypt.
Tích hợp sẵn Lightweight DNS Server, Email Server (Rainloop Webmail), giao diện Command Line, FirewallD, SpamAssassin, ModSecurity,…
Cài đặt WordPress, Drupal, Magento,… chỉ trong một click chuột.
Hỗ trợ Git (Github, Gitlab).
Và nhiều thứ hay ho khác nữa….
Xem hướng dẫn cài đặt và sử dụng CyberPanel tại bài viết này https://doc.vsis.net/cyberpanel-la-gi-huong-dan-cai-dat-cyberpanel/
Trên đây là tổng hợp Các công cụ quản lý VPS để chạy web. Chúng tôi sẽ luôn cập nhật thêm các công cụ khác để giúp bạn sử dụng VPS được hiệu quả hơn.
Để luôn nhận được các bài viết, thông tin bổ ích hơn. Bạn đừng quên theo dõi chúng tôi trên:
Website: doc.vsis.net
Fanpage: https://www.facebook.com/vsisnetidc/
0 notes
Text
LiteSpeed Nedir? Özellikleri Nelerdir?

LiteSpeed Nedir? Sürümleri ve Özellikleri Nelerdir?

LiteSpeed Nedir?
LiteSpeed, sektördeki en hızlı web servislerinden biridir. LiteSpeed Web Sunucusu ve Apache (en eski web servisi ) arasındaki en büyük fark mimari tasarımın dadır. Apache işlem tabanlıdır. Her bağlantı için yeni bir işlem veya iş parçacığı oluşturur. Bu süreçleri oluşturmak çok fazla iş yükü gerektirir. LiteSpeed, mükemmel performans ve daha yüksek stabilize sağladığı bilinen bir web servisidir. Mevcut bir Apache sunucusu, işletim sistemi ayrıntılarında herhangi bir değişiklik yapmadan ve ayrıca başka bir işlem veya programı engellemeden LiteSpeed sunucusu ile değiştirilebilir. LiteSpeed mevcut web barındırma çözümünüz de herhangi bir darboğaz problemi yaşatmadan sorun çözme kapasitesine sahiptir. LiteSpeed, etkileyici özellikler ve hızlı bir web barındırma ortamı sağlayan kullanıcı dostu web yönetim konsoluna sahiptir.
Open LiteSpeed Sürümü
OpenLiteSpeed sürümü yüksek trafikli web siteleri için idealdir. Ancak, bu sürüm sadece cyberpanel ve directadmin tarafından desteklenmektedir , cpanel ve plesk kontrol paneli ile çalışmaz. Bu sürüm açık kaynak kodludur ve serbestçe kullanılabilir.
LiteSpeed Standart Sürüm
Standart sürüm, küçük ve düşük trafikli web siteleri için idealdir. CPanel, WHM ve Direct Admin gibi web barındırma kontrol panelleri ile uyumludur. Bu sürüm kişisel ve profesyonel kullanım için ücretsizdir.
LiteSpeed Kurumsal Sürüm
Kurumsal sürüm, büyük ve yüksek trafikli web siteleri için yaygın olarak kullanılır ve tüm web barındırma kontrol panelleriyle harika çalışır. Bu sürüm genellikle web hosting şirketleri tarafından müşterilerine üstün web hosting deneyimi sağlamak için kullanılır.
LiteSpeed Özellikleri:
LiteSpeed, hız ve istikrar söz konusu olduğunda mükemmeldir. LiteSpeed, Apache'ye kıyasla hızlıdır ve ayrıca PHP içeriğini kısa bir süre içinde sunucuya sunar. Bu nedenle LiteSpeed, PHP performansını geliştirdiği için WordPress, Joomla ve Drupal kullanan web siteleri için ideal bir web barındırma çözümü olarak kabul edilir. Bazı etkileyici LiteSpeed özellikleri:
Apache ile Uyumlu
LiteSpeed Apache ile uyumludur ve mod_rewrite, mod_security ve .htaccess gibi özellikler kullanılabilir. Apache yapılandırma dosyaları LiteSpeed tarafından kolayca yüklenebilir ve Apache'nin yerine kullanılabilir. LiteSpeed ayrıca tüm web hosting kontrol panelleri ile harika çalışıyor.
Mükemmel Performans ve Stabilizasyon
LiteSpeed mükemmellik sağlamak için hazırlanmış olarak web hosting platformlarının performansını ve stabilizasyonu artırır. LiteSpeed, sunucu kaynaklarının minimum kullanımını sağlamanın yanı sıra aynı anda çok sayıda istemciye hizmet verebilir. LiteSpeed’in kodu, PHP performansını artırmak ve statik web sitelerini Apache'den daha hızlı sunmak için mükemmel şekilde optimize edilmiştir. LiteSpeed ayrıca ani trafik artışlarına dikkat etme yeteneğine sahiptir ve ek olarak DDOS yönetim donanım kaynaklarına ihtiyaç duymadan DDOS saldırısını yönetmeye yardımcı olur.
Güvenlik
LiteSpeed, Apache'nin mod_security özelliği ile mükemmel bir şekilde çalışır ve ayrıca DDOS engelleme özelliğe sahiptir. LiteSpeed, istekler doğrultusunda IP başına bağlantı, bant genişliği daraltma gibi özelleştirilebilir özelliklerden oluşur. Çok fazla bağlantı veya istek bulunan IP'ler engellenir, böylece saldırganların sunucuyu mahvetmesini önler.
Uygun Fiyatlar
Bir LiteSpeed uygulamasını sunucu da barındırma kolay bir iştir ve uygun maliyetlidir. LiteSpeed'in lisans maliyeti, Apache tabanlı bir sunucuyu optimize etmek için gereken tüm donanım yükseltmelerine kıyasla daha düşüktür. LiteSpeed, güvenli ve istikrarlı bir barındırma ortamı sağlayan mükemmel özellikleri sayesinde destek maliyetlerini azaltır.
Web Uygulaması Hızlandırma
LiteSpeed standart uyumlu ESI önbellek motorundan oluşur. Bu nedenle LiteSpeed, karmaşık önbellek çözümlerini kolaylıkla uygulama kapasitesine sahiptir. Bu, bugün web yöneticileri tarafından kullanılan son derece dinamik web uygulamalarının gereksinimlerini karşılamak için gerekli bir özelliktir.
Verimli Donanım Kullanımı
Apache veya NGINX ile karşılaştırıldığında, LiteSpeed sunucusu% 98 daha az sunucu yükü ile birlikte 2x-5x daha hızlı sayfa yükleme hızı sağlar. Bu, bir donanım platformunda çok sayıda istemciyi barındırmaya yardımcı olur.
Basit Yönetim
LiteSpeed ile ilgili en iyi şey, LiteSpeed'i yönetmenin son derece basit olmasıdır. LiteSpeed, Apache yapılandırma dosyalarınızı kolayca okuyabilir ve .htaccess dosyalarını destekler. LiteSpeed'deki entegre kontrol paneli eklentileri, kolay yapılandırma ve dağıtım sağlar. Apache ile LiteSpeed arasında geçiş yapabilir ve LiteSpeed'de web sitenizin içeriğini sadece birkaç tıklamayla yönetebilirsiniz. Etiket tabanlı temizleme ve otomatik temizleme ile birlikte her hesap için önbellek kontrolünü yönetebilirsiniz.
Web Sitesi Sahipleri İçin Özel LiteSpeed Avantajları:
Sayfa yükleme sürelerini yarıya indirin Web sitenizin yanıt süresini önemli ölçüde azaltın Sunulan eş zamanlı web sitesi sayısını artırın LiteSpeed önbellek çözümleri ile hızlı web uygulamaları sunun Dahili DDOS karşıtı özelliklerle web sitesi güvenliğini artırın Dilerseniz daha önce sizin için hazırladığımız cPanel kurulumu makalemizi inceleyebilirsiniz. Read the full article
0 notes
Text
How to Install CyberPanel Hosting Control Panel on Ubuntu
How to Install CyberPanel Hosting Control Panel on Ubuntu
In this article, we are going to shows how to Install CyberPanel Hosting Control Panel on Ubuntu 20.04 | 18.04 . If you are interested to Install CyberPanel on Ubuntu then this post is ideal for you. CyberPanel is a web hosting control panel powered by OpenLiteSpeed and it uses OpenLiteSpeed HTTP server. It is a next generation hosting control platform which is built for speed, security and…

View On WordPress
1 note
·
View note
Link
Hi,
I’m very new to self hosting. I’m having this high CPU usage problem for Vultr singapore server, running Cyberpanel on Centos 8 with one wordpress site (LScache plugin enabled).
The server occasionally have a spike of CPU usage, about 80-100%. I use top and htop to identify the process. It turns out it comes from setroubleshootd. (The Selinux is set to permissive. I think cyberpanel set it up that way)
I look at the the log file in /var/log/audit/audit.log, and this is the snippet of the log:
type=SERVICE_STOP msg=audit(1598354818.895:649956): pid=1 uid=0 auid=4294967295 ses=4294967295 subj=system_u:system_r:init_t:s0 msg='unit=pdns comm="systemd" exe="/usr/lib/systemd/systemd" hostname=? addr=? terminal=? res=success'^]UID="root" AUID="unset" type=SERVICE_START msg=audit(1598354818.990:649957): pid=1 uid=0 auid=4294967295 ses=4294967295 subj=system_u:system_r:init_t:s0 msg='unit=pdns comm="systemd" exe="/usr/lib/systemd/systemd" hostname=? addr=? terminal=? res=failed'^]UID="root" AUID="unset" type=SERVICE_START msg=audit(1598354820.144:649958): pid=1 uid=0 auid=4294967295 ses=4294967295 subj=system_u:system_r:init_t:s0 msg='unit=pdns comm="systemd" exe="/usr/lib/systemd/systemd" hostname=? addr=? terminal=? res=success'^]UID="root" AUID="unset" type=SERVICE_STOP msg=audit(1598354820.144:649959): pid=1 uid=0 auid=4294967295 ses=4294967295 subj=system_u:system_r:init_t:s0 msg='unit=pdns comm="systemd" exe="/usr/lib/systemd/systemd" hostname=? addr=? terminal=? res=success'^]UID="root" AUID="unset"
I seriously don’t understand anything about this log. Can someone explain to me what this log file tells?
If you need more info, let me know. I’m very new to this, so please bear in mind.
Note: I also have other server with the same setup, but the other one don’t experience this problem.
Thank you.
Submitted August 26, 2020 at 06:43AM by masterqif https://www.reddit.com/r/webhosting/comments/igz2g7/high_cpu_usage_from_setroubleshootd_in_cyberpanel/?utm_source=ifttt
from Blogger http://webdesignersolutions1.blogspot.com/2020/08/high-cpu-usage-from-setroubleshootd-in.html via IFTTT
0 notes
Text
How to Install CyberPanel on CentOS 7 or Ubuntu 18
How to Install CyberPanel on CentOS 7 or Ubuntu 18
In this tutorial I will show you how to install CyberPanel on CentOS 7 or Ubuntu 18 server. Introduction CyberPanel is fast, modern and secure hosting control panel. You can install it on your VPS or dedicated server. CyberPanel comes in two versions – CyberPanel and CyberPanel Ent. Both of them give you better performance and reduce in resource usage. Moreover, both versions will increase speed…

View On WordPress
0 notes
Text
Cara Migrasi Ke Cyberpanel Antar Cyberpanel, dari Cpanel dan Plesk 2021
Cara Migrasi Ke Cyberpanel Antar Cyberpanel, dari Cpanel dan Plesk 2021
Migrasi antar Control Panel hosting dilakukan ketika kita berpindah layanan dari provider satu ke provider lainnya atau kita ingin mencoba control panel lainnya. Pada artikel ini kami akan memberikan tutorial Cara Migrasi Ke Cyberpanel Antar Cyberpanel, dari Cpanel dan Plesk 2021. Cyberpanel, Cpanel dan Plesk sama-sama control panel server hosting yang banyak digunakan oleh administrator server…

View On WordPress
0 notes
Text
CyberPanel là gì? Hướng dẫn cách cài đặt và quản trị CyberPanel
Vì chưa có nhiều kinh nghiệm sử dụng command line nên bạn muốn sử dụng CyberPanel cho đơn giản. Vậy CyberPanel là gì? Cách cài đặt và quản trị CyberPanel thế nào? Cùng Kdata tìm hiểu chi tiết nhé!
CyberPanel là gì?
CyberPanel là một hosting control thế hệ mới, tích hợp OpenLiteSpeed một web server mã nguồn mở của LiteSpeed Web Server EnterPrise. CyberPanel được thiết kế để cung cấp cho người dùng một web hosting control panel cực tốt về tốc độ, bảo mật và độ tin cậy cao (Speed, Security, Reliability).
Những tính năng của CyberPanel
Hỗ trợ tiếng Việt (được quản lý bởi cyberpanel.vn).
Giao diện web hiện đại, trực quan và dễ sử dụng.
Tùy chọn OpenLiteSpeed hoặc LiteSpeed Enterprise.
Hỗ trợ LSCache.
MariaDB (tùy chọn các phiên bản 10.0, 10.1, 10.2, 10.3, 10.4).
Tự động gia hạn miễn phí SSL – Let’s Encrypt.
Tích hợp sẵn Lightweight DNS Server, Email Server (Rainloop Webmail), giao diện Command Line, FirewallD,
SpamAssassin, ModSecurity,…
Cài đặt WordPress, Drupal, Magento,… chỉ trong một click chuột.
Hỗ trợ Git (Github, Gitlab).
Các phiên bản (CyberPanel Versions)
Hiện tại thì CyberPanel có 2 phiên bản: CyberPanel và CyberPanel Enterprise.
Điểm khác biệt duy nhất giữa 2 phiên bản này là đối với bản CyberPanel miễn phí thì chỉ hỗ trợ OpenLiteSpeed phiên bản opensource miễn phí. Còn CyberPanel Enterprise thì được hỗ trợ LiteSpeed web server enterprise, Nhưng có một điểm chung là chúng có thể cài được trên VPS và Server vật lý
Hiện tại, CyberPanel Ent có gói miễn phí nhưng bạn chỉ dùng được cho 1 domain thôi. Theo mình thấy thì nếu bạn nào chỉ có domain mà cần một vps, server tối ưu để chạy thì có thể dùng bản này.
Hướng dẫn cài đặt và quản trị CyberPanel
Để cài đặt, chúng ta sử dụng command sau. Đây là lệnh cài đặt phiên bản miễn phí, nó sẽ không yêu cầu nhập bất cứ license gì khi cài đặt cả.
sh <(curl https://cyberpanel.net/install.sh || wget -O - https://cyberpanel.net/install.sh)
Sau khi chạy command trên server, chúng ta tiếp tục thực hiện các bước sau:
Chọn 1 – “1. Install Cyber Panel” để cài đặt.
You are runing on root...Checking OS...Detecting CentOS 7.X...Pre-flight check completed...Process check completed... CyberPanel Installer v2.0 1. Install CyberPanel. 2. Install Addons. 3. Exit.Please enter the number[1-3]:
Phiên bản LiteSpeed để cài đặt, ở đây mình giải thích thêm là trong 2 phiên bản: OpenLiteSpeed thì miễn phí, còn LiteSpeed Enterprise thì chỉ miễn phí cho 01 domain (trường hợp muốn sử dụng hơn 1 domain thì phải mua bản quyền).
Ở đây mình sẽ chọn OpenLiteSpeed, nên bấm số 1 đê cài đặt – “1. Install CyberPanel with OpenLiteSpeed.”
CyberPanel Installer v2.0 RAM check : 97/990MB (9.80%) Disk check : 1/24GB (7%) (Minimal 10GB free space) 1. Install CyberPanel with OpenLiteSpeed. 2. Install Cyberpanel with LiteSpeed Enterprise. 3. Exit.Please enter the number[1-3]: 1
Chọn loại password mặc định cho admin, có 3 tùy chọn:
[d]fault : mật khẩu là 1234567
[r]andom: mật khẩu ngẫu nhiên
[s]et password: mật khẩu của bạn
Ở đây mình chọn d , và sẽ set lại mật khẩu sau khi cài đặt.
Please choose to use default admin password 1234567, randomly generate one (recommended) or specify the admin password?Choose [d]fault, [r]andom or [s]et password: [d/r/s] d
Một số cài đặt bổ sung khác như:
Replace JS/CSS files to JS Delivr?This may improve panel loading speed in Asia Pacific region...Please select [y/N]: NInstall Memcached extension for PHP?Please select [y/N]: yInstall LiteSpeed Memcached?Please select [y/N]: yInstall Redis extension for PHP?Please select [y/N]: yInstall Redis?Please select [y/N]: y
Cài đặt sẽ được diễn ra và kết quả sau khi cài đặt là các thông tin bên dưới.
https://ip-server:8090
Panel Username: admin
Panel Password: 1234567
MySQL Username
MySQL Password
Visit: https://ip-server:8090Panel username: adminPanel password: 1234567 Please change your default admin passwordIf you need to reset your panel password, please run:adminPass YOUR_NEW_PASSWORD If you change mysql password, please modify file in/etc/cyberpanel/mysqlPassword with new password as well Website : https://www.cyberpanel.netForums : https://forums.cyberpanel.netWikipage: https://docs.cyberpanel.net Enjoy your accelerated Internet byCyberPanel & OpenLiteSpeedCác bước cần thực hiện sau khi cài đặt
Thay đổi mật khẩu của Panel Admin
Nếu chọn mật khẩu mặc định khi cài đặt thì có thể thay đổi mật khẩu của admin bằng command sau:
adminPass
Thay đổi mật khẩu của MySQL User
Sửa file tại đường dẫn /etc/cyberpanel/mysqlPassword, thay thế bằng mật khẩu của bạn.
Truy cập tới CyberPanel
Truy cập tới đường dẫn https://ip-server:8090 với user là admin và mật khẩu bạn đã thay đổi
Cuối cùng sau khi đăng nhập thành công:
Thay đổi cấu hình CyberPanel
Thay đổi địa chỉ IP mặc định
Sửa file: /etc/cyberpanel/machineIP
Thay đổi giới hạn Upload cho PhpMyAdmin
Giá trị mặc định để upload CSDL trong PhpMyAdmin của CyberPanel chỉ là 2M (mặc định của php). Để tăng giá trị này lên, bạn vào mục Server => PHP => Basic => Chọn PHP Version 7.0
Setting các tham số như ảnh bên dưới.
upload_max_filesize
post_max_size
Rồi bấm Save Changes để lưu lại.
Truy cập vào server thông qua SSH.
Chạy lệnh để restart lại lscpd service.
sudo systemctl restart lscpd
Kết quả:
Chúc bạn thành công
0 notes