#wordpress on cyberpanel
Explore tagged Tumblr posts
Visit Tumblr Blog
Explore Tumblr blogs with no restrictions, modern design and the best experience.
Last Seen Tumblr Blogs


Fun Fact
69% of Tumblr users are millennials.
Text
How to Host a WordPress website on Cyber Panel
Step 1: Install Cyber Panel.
If you haven't already, you'll need to install Cyber Panel on wordpress on your server. You can follow the installation instructions provided by Cyber Panel for your specific operating system.
Step 2: Access Cyber Panel.
Once Cyber Panel is installed, access the Cyber Panel control panel by navigating to the IP address or domain name of your server in a web browser, followed by :8090 (e.g., http://your-server-ip:8090). Log in using the username and password you created during the installation process.
Step 3: Create a Website.
In the Cyber Panel dashboard, click on the "Websites" tab and then click on "Create Website." Enter your domain name, select the package (or create a new one if needed), and click "Create Website."
Step 4: Install WordPress.
After creating the website, click on the domain name in the "Websites" list to open the website management page. Scroll down to the "WordPress" section and click "Install."
Step 5: Configure WordPress.
Follow the on-screen instructions to complete the WordPress installation. You'll need to enter the site title, admin username, password, and email address. Click "Install" to finish the installation.
Step 6: Access WordPress Admin.
Once WordPress is installed, you can access the WordPress admin dashboard by adding /wp-admin to your domain name (e.g., http://your-domain.com/wp-admin). Log in using the admin username and password you set during the installation.
Step 7: Customize Your Website.
Customize your website by choosing a theme, installing plugins, and adding content to your site.
Step 8: Configure Cyber Panel Settings (Optional).
You can further configure your website and server settings in Cyber Panel to optimize performance and security. Explore the various options available in the Cyber Panel dashboard.
Step 9: Launch Your Website.
Once you're satisfied with your website's setup, you can launch it for public access. Share your domain name with others to visit your WordPress site.
Please note that Cyber Panel offers advanced features and settings, so it's recommended to refer to the official Cyber Panel documentation for detailed instructions and best practices.
0 notes
Text
🌀 Hướng dẫn Update Cyberpanel lên phiên bản mới nhất
🔰 Vì sao cần Update Cyberpanel
Cập nhật CyberPanel là một quá trình quan trọng để đảm bảo hệ thống của bạn luôn hoạt động ổn định, hiệu quả và được bảo mật tốt nhất. Phiên bản mới thường mang đến các tính năng mới, cải thiện hiệu năng và khắc phục các lỗ hổng bảo mật.
🔰 Lưu ý quan trọng trước khi cập nhật:
Sao lưu dữ liệu: Trước khi thực hiện bất kỳ cập nhật nào, hãy sao lưu toàn bộ dữ liệu của bạn (cơ sở dữ liệu, file, cấu hình…) để phòng trường hợp xảy ra sự cố.
Kiểm tra tài nguyên hệ thống: Đảm bảo server của bạn có đủ tài nguyên (CPU, RAM, dung lượng đĩa) để thực hiện quá trình cập nhật.
Xem qua changelog: Đọc kỹ changelog của phiên bản mới để nắm rõ các thay đổi và các vấn đề tiềm ẩn có thể xảy ra.
0 notes
Text
How to Install CyberPanel on Ubuntu 22.04 Like a Pro! – Quick Tips
CyberPanel is a user-friendly control panel that makes managing websites and servers much easier, even for beginners. It uses LiteSpeed Web Server (a fast web server) and offers features like one-click WordPress installation, automatic SSL certificates, and a simple interface. In this guide, we’ll break down every step to help you Install CyberPanel on Ubuntu 22.04 server in a way that’s easy to follow, even if you’re not an expert. Let’s dive into each step How to Install CyberPanel on Ubuntu 22.04 Like a Pro!
Why Choose CyberPanel?
Before diving into the installation process, you might wonder why you should choose CyberPanel over other control panels like cPanel or Plesk. Here are a few compelling reasons: - Open Source: It’s completely free (though there’s an Enterprise version with additional features if you’re interested). - Lightweight and Fast: Built around OpenLiteSpeed, CyberPanel is optimized for speed and performance. - Intuitive Interface: The dashboard is clean and user-friendly, even for beginners. - Advanced Features: From one-click installations of WordPress to built-in support for Git, Redis, and Docker, CyberPanel offers plenty of powerful tools. - Auto SSL: Easily install and manage SSL certificates. Sounds like the control panel of your dreams, right?
Pre-Installation Checklist
Before you can install CyberPanel on Ubuntu 22.04, there are a few things you’ll need to prepare. Don’t worry, nothing too crazy! 1. A Fresh Ubuntu 22.04 Server Make sure you’ve got a clean installation of Ubuntu 22.04. You can set this up on a virtual private server (VPS) from your favourite hosting provider. Avoid running the installation on a server that already has web services installed, as that can cause conflicts. 2. Root Access or Sudo Privileges You’ll need root access to your server, or at the very least, a user account with sudo privileges. If you don’t have this, the installation won’t work properly. 3. Server Specifications Here are the minimum recommended system specs for running CyberPanel: - 1 GB of RAM (though 2 GB is ideal for better performance) - 10 GB of free disk space (more if you plan on hosting multiple websites) - A 64-bit operating system (which Ubuntu 22.04 is) 4. Domain Name While it’s not strictly required for the installation, having a domain name handy will allow you to configure your website and apply SSL certificates more easily.
Step-by-Step Guide: How to Install CyberPanel on Ubuntu 22.04
Alright, with your server ready and your domain name in hand, let’s get into the nitty-gritty of installing CyberPanel.
Step 1: Update Your Server’s Software
Before you install anything new, it’s a good idea to make sure your Ubuntu system is up to date. This helps avoid problems later and ensures everything runs smoothly. To update your server, open your terminal (a place where you can type commands) and enter these two commands one after the other:

- The first command, sudo apt update, checks for the latest updates for your system. - The second command, sudo apt upgrade -y, installs those updates. This could take a few minutes, depending on your internet connection and the speed of your internet. Once this is done, your system will be ready for the next steps.
Step 2: Install Basic Tools
Now, we need to install some basic tools that CyberPanel needs to run properly. These tools will help us download and install other software in the next steps. Run this command in your terminal:

- wget is a tool that helps us download files from the internet. - curl is a tool that allows us to transfer data and communicate with servers. By installing these, you’re preparing your system for the main installation.
Step 3: Download the CyberPanel Installer
Next, we need to download a special script (a small program) that will help us install CyberPanel. To do this, use the following command:

This command downloads the CyberPanel installer script and saves it to a file called installer.sh on your server. Once the script is downloaded, you need to permit it to run. To do that, enter:

This command makes the script executable, which means we can run it in the next step.
Step 4: Start the Installation Process
Now that everything is set up, we can begin the actual installation of CyberPanel. This step will take a while, and you’ll be asked to make some choices along the way. To start the installation, type:

This command runs the installer script. Once it begins, you’ll see several options. Let’s walk through them: Choosing the Web Server You’ll be asked whether to install the LiteSpeed Enterprise (a paid version) or OpenLiteSpeed (a free version). Since OpenLiteSpeed is free and works well for most users, we recommend selecting it by typing: Full Installation vs. Minimal Installation Next, you’ll be asked if you want to do a Full installation or a Minimal installation. Choose Full installation, as it includes important tools like PowerDNS (for managing your domain names) and Postfix (for sending emails). Installing Memcached and Redis These are tools that help speed up your websites by caching data (temporarily storing it so it can be accessed quickly). If you plan to host websites that need fast performance, select yes when asked to install Memcached and Redis. Setting an Admin Password At the end of the installation, you’ll be asked to set a password for the admin user. This password will be used to log in to the CyberPanel dashboard. Make sure to choose a strong password and write it down somewhere safe and secure place. After answering these questions, the installation will continue and It may take several minutes to finish.
Step 5: Access the CyberPanel Dashboard
Once the installation is complete, you’ll be given a link to log in to the CyberPanel web interface. This is where you can manage your websites and server settings. To access CyberPanel, open your web browser and type in the following:

- Replace with the actual IP address of your server. - The :8090 at the end is the port number where CyberPanel runs. You might see a warning saying that the site is not secure. This is normal because the server is using a self-signed SSL certificate. You can click through the warning to access the dashboard. Log in using the admin username and the password you created during installation.
Step 6: Configure OpenLiteSpeed
After logging in to CyberPanel, you’ll need to configure OpenLiteSpeed (the web server that powers your websites). Here’s how to do it: - Access the OpenLiteSpeed Admin: From the CyberPanel dashboard, click on OpenLiteSpeed WebAdmin. You’ll be taken to the OpenLiteSpeed admin page. - Log in to OpenLiteSpeed: Use the default credentials: - Username: admin - Password: 123456 (or the one you set during installation). - Change the Admin Password: For security reasons, it’s important to change the default admin password. To do this, run this command in your terminal:

- Follow the instructions to change your password.
Step 7: Secure CyberPanel with SSL
To protect your data and ensure a secure connection to CyberPanel, we need to set up an SSL certificate. CyberPanel allows you to do this automatically using Let’s Encrypt, a free service that provides SSL certificates.

Here’s how to do it: - Log in to the CyberPanel dashboard. - Go to SSL > Hostname SSL. - Enter your server’s hostname (the name of your server or domain). - Click Issue SSL. This will install an SSL certificate, and your CyberPanel interface will now be secure.
Step 8: Create and Manage Websites
With CyberPanel installed and secured, you can now start hosting websites. Here’s an easy-to-follow guide to help you begin: - Add a New Website: In the CyberPanel dashboard, go to Websites > Create Website. Fill in the necessary information: - Domain Name: The name of your website (e.g., example.com). - Email: Your email address. - PHP Version: Choose a version that works with your site (the default should be fine). Once you’ve entered this information, click Create Website. - Set Up DNS for Your Domain: DNS (Domain Name System) is what helps people find your website online. To configure DNS, go to DNS > Create Zone. Enter your domain name and set the A (Address) record to point to your server’s IP address. - Install WordPress: CyberPanel makes it easy to install WordPress. Go to Websites > List Websites, find your domain, and click Manage. You’ll see an option to install WordPress with one click.
Step 9: Enable Backups
It’s very important to regularly back up your website to ensure you can recover it if anything goes wrong. CyberPanel has a built-in tool for scheduling backups. - Go to Backup > Schedule Backup. - Select the website that you want to take a backup. - Choose how often you want to back up (daily, weekly, etc.). - Select a destination for your backups (you can save them locally or send them to a remote server). Once this is set up, CyberPanel will automatically create backups for you.

Step 10: Optimize CyberPanel for Speed
To get the best performance from CyberPanel, you can make a few adjustments: - Enable LSCache: LSCache is a caching system that speeds up websites. Go to Websites > List Websites, find your website, and enable LSCache for faster load times. - Adjust PHP Settings: If your website uses a lot of PHP scripts (common for WordPress sites), you can tweak the settings. Go to Server > PHP > Edit PHP Configs to adjust things like memory limits. - Use Security Plugins: To keep your server secure, consider installing Security plugins such as CSF Firewall and ModSecurity help protect your server from malicious attacks and enhance your website’s overall security. Here’s how you can install them through CyberPanel: CSF Firewall: - Go to Security > Install CSF from the CyberPanel dashboard. This firewall helps protect your server by blocking unwanted traffic. - After installation, you can configure it by navigating to Security > CSF Configuration where you can add specific rules or adjust settings to secure your server. ModSecurity: - To install ModSecurity, go to Security > Install ModSecurity in the dashboard. - Once installed, it will monitor web traffic for suspicious activities and block potential threats. It’s an excellent tool for preventing attacks like SQL injections and cross-site scripting. Both security plugins work in the background to safeguard your server and websites, helping to prevent common vulnerabilities.
Step 11: Monitor Server Performance
After you’ve successfully installed and set up CyberPanel, it’s crucial to keep an eye on your server’s performance. Monitoring your server helps you spot any potential issues before they turn into bigger problems. CyberPanel comes with built-in tools to help you with this: - Real-Time Monitoring: Go to Server Status > LiteSpeed Status to see how your server is performing. This page shows you important details like CPU usage, memory usage, and active connections. - System Health Check: Under Server Status > System Status, you can check the overall health of your server. This includes key metrics such as available disk space, RAM usage, and the status of various services like MySQL and DNS. Monitoring these areas regularly ensures that your server runs efficiently and doesn’t run out of resources unexpectedly.
Step 12: Troubleshooting Common Issues
Even with a detailed guide, you may run into problems during or after installation. Here are some common issues you may face and how to fix them: Issue 1: Can’t Access CyberPanel Web Interface - If you can’t access CyberPanel at https://:8090, the most likely reason is that port 8090 is blocked. To fix this, open the port by running the following command on your server:

After that, try accessing the panel again in your browser. Issue 2: SSL Certificate Not Working - If the SSL certificate you issued using Let’s Encrypt isn’t working, try reissuing the certificate: - Go to SSL > Manage SSL in CyberPanel. - Select your domain and click Issue SSL again. This will attempt to reissue the certificate, solving most SSL-related issues. Issue 3: Website is Running Slowly - If your website is slow, you can enable LiteSpeed Cache (LSCache) for faster performance. You should also consider using CDN (Content Delivery Network) services like Cloudflare to speed up content delivery.
Final Overview
Installing CyberPanel on Ubuntu 22.04 may seem like a technical task, but with this detailed guide, even a beginner can complete the process with ease. By following each step, you will set up a robust, secure, and high-performing web hosting environment using the OpenLiteSpeed web server and CyberPanel’s powerful features. From basic installation to security measures and performance optimization, this guide ensures that your websites will run smoothly on your server. Whether you're hosting a personal website or managing multiple domains, CyberPanel offers the flexibility and tools you need to succeed, making it an ideal choice for anyone new to server management. Now, go ahead and explore the many features of CyberPanel!
FAQs
1. Is CyberPanel free to use? Yes, CyberPanel is completely free. There’s also a paid Enterprise version with more features, but the free version is more than enough for most users. 2. Can I install CyberPanel on a VPS with less than 1 GB of RAM? While it’s technically possible, it’s not recommended. CyberPanel runs much more smoothly on systems with at least 1 GB of RAM (preferably 2 GB). 3. What’s the difference between OpenLiteSpeed and LiteSpeed Enterprise? OpenLiteSpeed is the free, open-source version of LiteSpeed. LiteSpeed Enterprise offers premium features like better performance and more advanced caching options, but it requires a license. Read the full article
#cloudpanelvscyberpanel#cyberpanel#cyberpanelhosting#cyberpanelinstall#cyberpanellogin#cyberpanelvps#cyberpanelvpshosting#cyberpanelvscpanel#installcyberpanel#whatiscyberpanel
0 notes
Text
Best Hostinger VPS Hosting Review
https://themesfores.com/best-vps-hosting-review-hostinger-vps-hosting/ In this article, we will dive into the world of VPS hosting and explore one of the leading providers in the industry: Hostinger. If you are looking for reliable, affordable, and feature-packed VPS hosting solutions, Hostinger might be the perfect choice for you. In this review, we will discuss the various aspects of Hostinger's VPS hosting, including its features, pricing, pros and cons, customer reviews, and more. So let's get started! Hostinger India Review 2023 Speed: 4.6 4.6/5 Ease of use:4.6 4.6/5 Pricing: 4.1 4.1/5 Uptime: 4.5 4.5/5 Customer Support: 4.5 4.5/5 Tootal: 4.5 4.5/5 Visit Hostinger Best VPS Hosting Review: Hostinger VPS Hosting Virtual Private Server (VPS) hosting is a popular hosting solution that bridges the gap between shared hosting and dedicated servers. With VPS hosting, you get a virtualized environment that mimics a dedicated server, allowing you to have more control, resources, and flexibility for your website or application. Overview of Hostinger VPS Hosting Hostinger is a well-established web hosting company known for its affordable yet reliable hosting services. When it comes to VPS hosting, Hostinger offers a range of plans tailored to suit different needs and budgets. With their VPS hosting, you can expect high performance, excellent uptime, and a user-friendly experience. Hostinger Overview Speed VPS Hosting (Singapore) – 895 ms VPS Hosting (US) – 591.09 ms VPS Hosting (India) – 675.95 ms Uptime (02 Jan 2022 – 15-Jun 2023) VPS Hosting (Singapore): 99.95% VPS Hosting (US): 99.93% VPS Hosting (India): 99.85% Features hPanel, Free SSL, 1-click WordPress Installer, free domain for 1 year, Website Staging, Zyro Website Builder, Email Hosting Data Centers UK, USA, Singapore, India, Netherlands, Indonesia, and Lithuania. Servers Litespeed Servers Backup and Restoration Free weekly backups on all plans Daily backups on higher plans Selective restore feature available Website Migration Unlimited free migrations on all plans Security Free Let’s Encrypt SSL, 2FA, PatchStack Security, Cloudflare DNS Firewall, Bitninja Security, Malware Scanner Support Email Form, Live Chat, Knowledgebase, Video Tutorials Payment Options Visa, MasterCard, American Express, Discover, PayPal, Cryptocurrency, PayTM, Google Pay, UPI Payments in India Hosting Plans Share Hosting, WordPress Hosting, Cloud Hosting, cPanel Hosting, VPS Hosting, Minecraft Hosting, CyberPanel VPS Hosting Refund Policy 30-days money-back guarantee Pricing Starting from ₹419/mo ($4.99/mo) Visit Hostinger Features and Benefits of Hostinger VPS Hosting When it comes to VPS hosting, Hostinger has an impressive array of features that cater to the needs of both individuals and businesses. Let's take a closer look at the key features that make Hostinger stand out: High Performance and Reliability Hostinger's VPS hosting runs on high-performance hardware, including the latest Intel Xeon processors and SSD storage. This ensures fast loading times, smooth website performance, and a reliable hosting environment for your business. Scalability and Flexibility With Hostinger VPS hosting, you have the flexibility to scale your resources as your website grows. Whether you need more CPU power, RAM, or storage, you can easily upgrade your VPS plan with just a few clicks. Enhanced Security Measures Hostinger takes security seriously and provides robust security measures to protect your website from online threats. Their VPS hosting includes DDoS protection, secure FTP access, and regular backups, keeping your data safe and secure. Easy-to-use Control Panel Managing your VPS server is made easy with Hostinger's intuitive control panel. You can easily deploy applications, manage domains, monitor server performance, and perform various administrative tasks without any technical expertise. Full Root Access With Hostinger's VPS hosting, you get full root access to your server. This level of control allows you to customize your server environment according to your specific requirements. You have the freedom to install any software, configure settings, and optimize performance to suit your needs. Dedicated IP Address Each Hostinger VPS hosting plan comes with a dedicated IP address, which is particularly beneficial if you want to run applications that require a unique IP, such as an online store or a membership site. Multiple Operating Systems Hostinger supports a wide range of operating systems, including Linux distributions and Windows. Whether you're familiar with Linux or prefer a Windows environment, Hostinger has got you covered. Excellent Uptime Downtime can be detrimental to your website's success. Hostinger's VPS hosting boasts an impressive uptime guarantee, ensuring that your site remains accessible to visitors around the clock. With a reliable hosting infrastructure, you can minimize disruptions and maximize your website's availability. 24/7 Customer Support Hostinger offers round-the-clock customer support via live chat, ticketing system, and knowledge base. Their support team is knowledgeable and responsive, ready to assist you with any hosting-related queries or issues you may encounter. Different VPS Hosting Plans Offered by Hostinger Hostinger provides a range of VPS hosting plans to cater to different needs and budgets. Let's explore the options: KVM 1 ₹839 ₹ 419 Monthly 1 Cores & 4 GB RAM 50 GB SSD Storage 1 TB Bandwidth Weekly Backups Dedicated IP Address Full Root Access Apply Coupon SAVE 65% Extra Discount KVM 2 ₹1159 ₹ 579 Monthly 2 Cores & 8 GB RAM 100 GB SSD Storage 2 TB Bandwidth Weekly Backups Dedicated IP Address Full Root Access Apply Coupon SAVE 65% Extra Discount KVM 4 ₹2499 ₹ 919 Monthly 4 Cores & 16 GB RAM 200 GB SSD Storage 4 TB Bandwidth Weekly Backups Dedicated IP Address Full Root Access Apply Coupon SAVE 65% Extra Discount Hostinger Best VPS Hosting Review: Performance Lightning-Fast Speeds: One of the most crucial aspects of web hosting is speed. A slow-loading website can lead to a poor user experience and deter visitors from returning. Hostinger understands the importance of speed and has optimized their VPS hosting environment to deliver lightning-fast performance. With their cutting-edge hardware, SSD storage, and advanced caching techniques, Hostinger ensures that your website loads quickly, keeping visitors engaged and satisfied. Global Data Centers: Hostinger has a vast network of data centers strategically located around the globe. This global presence allows them to provide low-latency hosting solutions, ensuring that your website's content is delivered swiftly to visitors, regardless of their geographic location. By choosing a data center closest to your target audience, you can significantly reduce latency and improve the overall user experience. CDN Integration: To further enhance performance, Hostinger integrates with Content Delivery Networks (CDNs). CDNs store cached versions of your website's content on servers distributed worldwide. When a user accesses your site, the CDN delivers the content from the server closest to them, reducing load times and optimizing performance. Hostinger's seamless CDN integration makes it easy to boost your website's speed and deliver content efficiently. Robust Infrastructure: Hostinger invests in state-of-the-art infrastructure to ensure optimal performance for their VPS hosting. Their servers are built with the latest technologies and undergo regular maintenance and upgrades to guarantee reliability and efficiency. With Hostinger's robust infrastructure, you can expect minimal downtime and a consistently high-performing website. Pricing and Value for Money: Hostinger's VPS hosting plans are competitively priced, making them affordable for individuals and small businesses alike. Considering the features, performance, and reliability offered, Hostinger provides excellent value for money in the VPS hosting space. Pros and Cons of Hostinger VPS Hosting Pros: Affordable Pricing: Hostinger's VPS hosting plans are priced competitively, making them accessible to a wide range of users. Fast and Reliable Servers: Hostinger utilizes high-performance hardware and SSD storage, ensuring fast loading times and reliable server performance. User-friendly Control Panel: The intuitive control panel makes it easy for users to manage their VPS servers and perform administrative tasks without any technical expertise. Cons: cPanel and WHM: Hostinger has a limited number of CentOS 7 64bit with cPanel and WHM (Requires a License Purchase Additionally). Lack of Windows-based VPS Hosting: Hostinger currently doesn't offer VPS hosting with Windows operating system, limiting the options for users who specifically require Windows-based hosting. Customer Reviews and Testimonials Hostinger has received positive reviews from many satisfied customers. Users appreciate the affordability, performance, and responsive customer support provided by Hostinger. Here are some testimonials from Hostinger VPS hosting users: “I've been using Hostinger's VPS hosting for my business website, and I'm impressed with the speed and reliability. The customer support team is also very helpful.” John Doe “Hostinger offers great value for money. Their VPS hosting plans are feature-packed and affordable, perfect for small businesses like mine.” Sarah T Hostinger impressed me with amazing customer experience and effortless migration from my previous hosting provider. Jake SinclairBrand Designer Previous Next Tootal Reviews: 4.5 4.5/5 Comparison with Competitors When comparing Hostinger's VPS hosting with its competitors, it stands out for its affordability, performance, and user-friendly interface. While some competitors may offer more server locations or Windows-based VPS hosting, Hostinger's overall package makes it a strong contender in the market. Frequently Asked Questions (FAQs) 1. Is Hostinger's VPS hosting suitable for beginners? Yes, Hostinger’s VPS hosting is designed to be user-friendly and accessible even for beginners. Their control panel and intuitive interface make it easy to manage your VPS server without extensive technical knowledge. 2. Can I upgrade my VPS hosting plan in the future? Absolutely! Hostinger allows you to upgrade your VPS hosting plan as your website grows and requires more resources. You can easily scale up your CPU power, RAM, storage, and bandwidth with just a few clicks. 3. Does Hostinger offer a money-back guarantee? Yes, Hostinger offers a 30-day money-back guarantee on its VPS hosting plans. If you’re not satisfied with the service, you can request a refund within 30 days of signing up. 4. Can I host multiple websites on a Hostinger VPS server? Yes, you can host multiple websites on a Hostinger VPS server. Depending on the plan you choose, you can allocate resources to different websites and manage them separately within your control panel. 5. Does Hostinger provide customer support for VPS hosting users? Yes, Hostinger offers 24/7 customer support for its VPS hosting users. You can reach out to their support team via live chat or the ticketing system for any hosting-related queries or issues you may have. https://themesfores.com/best-vps-hosting-review-hostinger-vps-hosting/ #Hostinger #VPSHosting
1 note
·
View note
Text
Open Panel ve Open Admin Nedir?
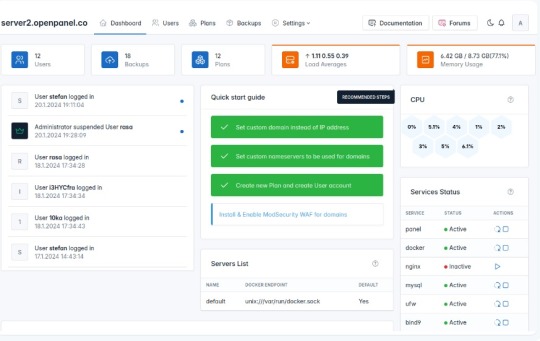
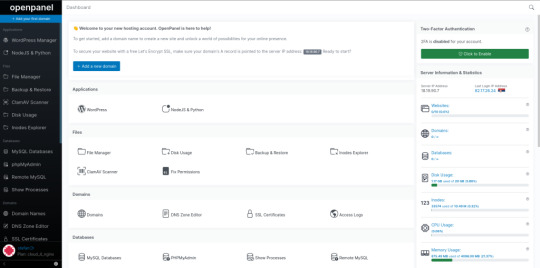
Cpanel, AApanel, Cyberpanel gibi çok çeşitli çözümlerinin yanına sağlam bir rakip geldi.İlk izlenim olarak bilgi bulunmasada sanki Sentora Panel temel alınarak geliştirilmiş gibi görünüyor.Şimdilik Beta aşamasında olsada sürekli gelişen ve umut vadeden bu yazılımı deneyebilirsiniz. Günümüzün ana bilgisayarları için özel olarak tasarlanan OpenPanel, ihtiyaçlarınızı karşılamak için bir küme oluşturmanız ve ölçeklendirmeniz gereken kapsamlı bir araç ve özellik seti sunar.OpenAdmin, kullanıcı oluşturma ve yönetme, barındırma planları oluşturma, yedeklemeleri yapılandırma ve OpenPanel ayarlarını düzenleme gibi görevleri verimli bir şekilde işleyebileceğiniz yönetici düzeyinde bir arayüz sunar. Gereksinimler Donanım Gereksinimleri İşletim sistemi ve sürümü İşlemci RAM Disk Alanı Mimari Ubuntu 22.04 veya daha yeni Minimum: 1,1 GHzÖnerilen: 2 GHz Minimum: 1 GBÖnerilen: 4 GB Minimum: 12 GBÖnerilen: 20 GB 64 bit Open Panel :(Müteri Arayüzü)OpenPanel, web ve sunucu yönetiminin karmaşıklıklarını basitleştirmeyi amaçlayan son kullanıcılar için sağlam bir arayüz sunar. Etki alanı eklemekten web sitelerinizi yönetmeye kadar, belgelerimiz arayüzde sorunsuz bir şekilde gezinmek için ihtiyacınız olan her şeyi kapsar. Open Panel
Open Admin:(Sunucu Yöneticisi Arayüzü)OpenAdmin, sunucu yapılandırmaları ve yönetimi üzerinde hassas kontrol isteyen yöneticiler için tasarlanmıştır. Belgelerimiz, sunucu ortamınızı özelleştirmenize ve güvence altına almanıza yardımcı olacak derinlemesine bilgi sağlar Open Admin
Demo:https://demo.openpanel.co/openadmin/ Ayrıntılar için : https://openpanel.co Web sunucuları Nginx Run Nginx web sunucusu hafif, açık kaynaklı bir çözümdür. Nginx web sunucusunun OpenPanel sürümü, alan adı başına önbellek hariç tutma, önbellek temizleme, URL yeniden yazma ve FastCGI önbelleğinin yapılandırılmasını sağlar. Apache Kullanıcı başına Apache web sunucusunu çalıştırın. Apache'nin .htaccess dosyaları desteği, kullanıcıların dizin başına genel yapılandırma ayarlarını özelleştirmesine ve geçersiz kılmasına olanak tanır. Kullanıcı hizmetleri Alan Adları Otomatik SSL yenilemelerine sahip etki alanı adları ekleyin, takma adlar ve alt etki alanları ekleyin (Uluslararasılaştırılmış etki alanları desteklenir), yönlendirmeler oluşturun, HTTPS'yi zorlayın ve vhost dosyalarını düzenleyin. Dosya Yöneticisi Herhangi bir yükleme sınırı olmadan aynı anda birden fazla dosyayı zahmetsizce yükleyin. Dosyaları düzenleyin, izinleri ayarlayın, dosyaları kopyalayın veya taşıyın, yeni dosyalar ekleyin ve çeşitli dosya yönetimi görevlerini gerçekleştirin. PHP sürümleri Kullanıcılar her etki alanı için farklı PHP sürümleri kullanabilir, yeni sürümler yükleyebilir, yeni etki alanları için varsayılan bir sürüm ayarlayabilir, php.ini dosyalarını düzenleyerek sınırları değiştirebilir. NodeJS ve Python NodeJS ve Python uygulamalarını zahmetsizce oluşturun ve yönetin. Proxy web siteleri bu uygulamalardan içeriği sorunsuz görüntülemek için. WP Yöneticisi Wp-admin'e otomatik giriş, seçenek düzenleme, isteğe bağlı yedekleme, hata ayıklama ve çeşitli ek işlevler gibi özelliklere sahip otomatik WordPress yükleyicisi. MySQL ve phpMyAdmin MySQL veritabanlarını ve kullanıcılarını kolayca oluşturun ve yönetin. PhpMyAdmin'e otomatik olarak giriş yapın, uzaktan MySQL erişimini etkinleştirin ve yapılandırma ayarlarını istediğiniz sınırlarla ayarlayın. SSL sertifikaları Otomatik SSL üretimi ve yenilenmesi, güncel SSL sertifikalarıyla sürekli koruma sağlayarak web sitenizin güvenliğinin zahmetsizce yönetilmesini sağlar. Nesne Önbellekleme Özel REDIS ve Memcached örneklerini kullanarak nesne önbelleği uygulayın. Bellek sınırlarını belirleyin, hizmetleri başlatın / durdurun ve günlükleri verimli bir şekilde görüntüleyin. SSH ve Web Terminali Terminale SSH üzerinden uzaktan erişin veya otomatik olarak Web Terminaline giriş yapın. Daha fazla kolaylık sağlamak için önceden yüklenmiş WPCLI ve NPM ile birlikte gelir! Sunucu ayarları Her kullanıcı, sunucu yapılandırmaları üzerinde tam kontrole sahiptir ve hizmetleri yüklemelerini veya yeniden başlatmalarını, sistem yapılandırmalarını düzenlemelerini ve diğer çeşitli idari görevleri yerine getirmelerini sağlar. Cron İşleri Planlanan eylemleri verimli bir şekilde planlamak ve yönetmek için cronjobs'u doğrudan OpenPanel arayüzünden planlayın ve düzenleyin. DNS Bölge Düzenleyicisi Etki alanlarınız için DNS bölge dosyalarını kolayca düzenleyin ve OpenPanel arabirimi aracılığıyla A, AAAA, CNAME, MX, TXT vb. Gibi çeşitli kayıtlar ekleyin. Kaynak kullanımı Gerçek zamanlı CPU ve bellek kullanımını izleyin, geçmiş eğilimleri kontrol edin ve performansı optimize etmek için sunucu yapılandırmasını gerektiği gibi ayarlayın. Ziyaretçi raporları Web sitenizin erişim günlüklerinden otomatik olarak oluşturulan, görsel olarak çekici ziyaretçi raporlarına erişin. Ziyaretçi konumlarını, erişilen sayfaları, IP'leri, hata sayfalarını ve daha fazlasını kolaylıkla keşfedin. Etkinlik günlükleri OpenPanel arabirimindeki her eylem kaydedilir ve kullanıcıların kimin ne zaman ve ne yaptığını kolayca izlemesine olanak tanır ve sunucu günlüklerini eleme ihtiyacını ortadan kaldırır. Hesap ayarları Kullanıcılar kişiselleştirilmiş bir deneyim için e-posta adreslerini ve şifrelerini değiştirebilir, 2FA'yı etkinleştirebilir, dil tercihlerini ayarlayabilir ve karanlık modu etkinleştirebilir. Sunucu yönetimi Basit sunucu dağıtımı OpenPanel'i birkaç dakika içinde yükleyin. Tek bir komutla kümenize yeni sunucular sağlayın. Kaynak kullanım yönetimi Barındırılan tüm web siteleriniz için tutarlı performans sağlamak amacıyla CPU, G / Ç bant genişliği, IOPS, nproc ve belleği kullanıcı başına sınırlandırın. Web sunucularını değiştirme Şu anda, web sunucusu olarak yalnızca Nginx desteklenmektedir, ancak LiteSpeed için yaklaşan destek yöneticilere tercih ettikleri web sunucusunu seçme seçeneği sunacaktır. Yapılandırmayı düzenle Yöneticiler, sistemi belirli gereksinimlere uyacak şekilde yapılandırma esnekliği sağlayarak panel erişimi için etki alanları belirleme, bağlantı noktalarını değiştirme ve hem OpenPanel hem de OpenAdmin arabirimleri için ayarları düzenleme yeteneğine sahiptir. Kaynak kullanım istatistikleri Gerçek zamanlı izleme ile CPU ve Bellek kullanımını, Ağı ve yükü izleyin. Hizmet Yönetimi Hizmetleri izleyin, yeniden başlatın, günlükleri görüntüleyin ve yönetici arayüzünden verimli bir şekilde ek yönetim görevleri gerçekleştirin. Akıllı Bildirimler Sunucunuzun durumu hakkında bilgi sahibi olmak için yeniden başlatma, yüksek kaynak kullanımı, web sitesi saldırıları, başarısız hizmetler ve diğer kritik durumlar gibi bildirimler alın. Terminal Komutları OpenCLI, Yöneticiler için terminal arabirimi olarak hizmet vererek, 100'den fazla kullanılabilir komuta erişimi olan çeşitli OpenPanel ayarlarının otomasyonuna izin verir. Kullanıcı arayüzü markalaşma OpenPanel'i, barındırma şirketinizin görünümünü ve hissini yansıtan renkler, logolar, yazı tipleri ve daha fazlası ile tamamen özelleştirin. Tamamen duyarlı Herhangi bir özellik sınırlaması olmadan masaüstü, tablet ve mobil cihazlarda OpenPanel'e erişin. Karanlık mod OpenPanel, kullanıcıların doğrudan arayüzden tek bir tıklamayla etkinleştirebileceği ve kullanıcı deneyimini geliştirebileceği yerleşik bir karanlık moda sahiptir. Sunucu Bilgisi Gerçek zamanlı kullanım verilerini, IP adresini, ad sunucularını ve diğer önemli sunucu bilgilerini doğrudan OpenPanel arayüzünde görüntüleyin. Gelişmiş Arama Güçlü bir arama işlevselliği ile aradığınızı hızlı ve kolay bir şekilde bulun. Çok dilli destek OpenPanel çeviriye hazır. Her oturum açma OpenPanel'i tercih ettikleri dilde görüntüleyebilir. Klavye Kısayolları OpenPanel, gelişmiş kullanıcılara odaklanarak tasarlandı ve arayüzde navigasyon hızınızı artırmak için 20'den fazla klavye kısayolu sunuyor. Kullanıcı yönetimi Hesapları askıya alma / silme OpenPanel erişimini ve web sitelerini anında devre dışı bırakmak için müşteri hesaplarını askıya alın. Artık gerekli olmadığında hesapları silin. Yükseltme / Aşağı indirme paketi Bir müşterinin paketini başka bir barındırma paketinize sorunsuz bir şekilde yükseltin veya düşürün. Özel IP adresi Kullanıcılara bir IPv4 adresi tahsis ederek web siteleri ve hizmetleri için özel bir IP sağlayın. kimliğe bürünme Bir müşterinin hesabına erişmek ve hesabınızdan ayrılmak zorunda kalmadan tam olarak ne gördüklerini görmek için otomatik giriş yapın. Kullanıcı başına Apache veya Nginx Yöneticiler her kullanıcı için web sunucusu olarak Apache veya Nginx'i seçebilir. Bu esneklik, yöneticilerin hepsi aynı sunucuda Apache ve Nginx kullanan diğer kullanıcıları kullanan kullanıcıların bir karışımını barındırmasını sağlar. Güvenlik Kullanıcı konteynerizasyonu Her kullanıcı hesabı kapsayıcıdır. Kapsayıcıların diğer kullanıcılara veya sunucu dosyalarına erişimi yoktur. Kaynak sınırlaması Yöneticiler, bağlantı noktası hızı, disk kullanımı, düğümler, web sitesi sayısı, MySQL veritabanları ve etki alanları dahil olmak üzere plan başına belirli sınırlar belirleme yeteneğine sahiptir. SSL / TLS Sertifikaları otomatik olarak şifreleyelim. Kullanıcılar yeni sertifikalar oluşturabilir ve tüm web sitesi trafiğini HTTPS'ye sorunsuz bir şekilde yönlendirebilir. ModSecurity Yöneticiler ModSecurity'yi tek bir tıklamayla etkinleştirebilir ve OWASP kural setini yapılandırabilir. Ayrıca, bireysel kullanıcılar alan adı başına ModSecurity'yi etkinleştirme veya devre dışı bırakma esnekliğine sahiptir. Güvenlik duvarı Yöneticiler (UFW) güvenlik duvarı kurallarını doğrudan yönetici arayüzünden yönetebilir. Yalnızca gerekli bağlantı noktaları kullanıcılar için açıktır ve yöneticiler bunlar üzerinde tam kontrole sahiptir. İki Faktörlü Kimlik Doğrulama Kullanıcılar, OpenPanel hesapları için İki Faktörlü Kimlik Doğrulamayı etkinleştirerek güvenliği artırabilir. Yöneticiler, herhangi bir kullanıcı için 2FA'yı uygulama veya devre dışı bırakma esnekliğine sahiptir. Sınırlı kabuk erişimi Son kullanıcılar, kapsayıcılarına kök düzeyinde erişimden kısıtlanır. Ayrıca, güvenliği artırmak için, bir kullanıcının kapsayıcısındaki tüm hizmetler farklı kullanıcı hesapları altında çalışır. IP engelleme Her kullanıcı, belirli IP adreslerini engelleyerek web sitelerine erişimi kısıtlamak için kişiselleştirilmiş bir araç sağlayarak, etki alanına özgü bir IP blok listesi yapılandırma yeteneğine sahiptir. Yönetici panelini devre dışı bırak Yöneticiler, OpenPanel'in temel işlevlerini korurken OpenAdmin arayüzünü tek bir tıklamayla zahmetsizce devre dışı bırakabilir. Ayrı hizmetler Hem OpenAdmin hem de OpenPanel, kullanıcı web sitelerinden tam bağımsızlığı koruyarak ayrı veritabanları ve web sunucuları kullanır. Özel bağlantı noktaları Yöneticiler, varsayılan bağlantı noktasını özelleştirme (ör. 2083'ten değiştirme) ve belirli tercihlere hitap etmek için dizin yolunu (ör. / Openpanel'den) değiştirme esnekliğine sahiptir. Entegrasyonlar (Yakında) WHMCS Modülü( Yakında gelmesi planlanıyor) Önde gelen web barındırma yönetimi ve faturalandırma yazılımı ile entegre edin. REST API'sı Güçlü RESTful API'mız, zaten kullandığınız 3. taraf sistemlerle entegre olmanızı sağlar. Read the full article
0 notes
Text
Litespeed Web Server , Pengertian hingga Harga Lengkap 2021
Litespeed Web Server , Pengertian hingga Harga Lengkap 2021
Ada banyak sekali Jenis Web Server yang tersedia dipasaran dan dapat digunakan dengan kelebihannya masing-masing termasuk Litespeed Web Server, Apache Ngix dan IIS yang paling banyak digunakan dengan kelebihannya masing-masing. Meskti tergolong baru, Litespeed saat ini menjadi pilihan terbaik dan paling banyak digunakan karena memliki kecepatan yang sangat baik dibandingkan dengan Apache maupun…

View On WordPress
0 notes
Text
CyberPanel 的 OpenLiteSpeed LSWS 伺服器服務無法啟動導致網站下線
CyberPanel是一個開源的Web主機控制面板,它使用 OpenLiteSpeed Web Server(簡稱LSWS)作為網頁伺服器。 CyberPanel提供了一個簡單易用的Web界面,可以讓使用者方便地管理其Web主機和網站,並提供了許多有用的功能和工具。 如果您架站使用的是 CyberPanel,而且發現 OpenLiteSpeed 無法啟動服務,這將導致您的網站無法開啟。 請參考下圖一,無論如何重新啟動 OpenLiteSpeed 服務,即使出現成功訊息,但一樣不會自動啟動。 圖一,CyberPanel 服務狀態。 解決方案:重新安裝 LSWS。 請參考下列兩行指令,只要先移動到 LSWS 下的misc目錄,執行重新安裝指令,應該就能解決LSWS無反應的問題了。 cd…

View On WordPress
0 notes
Text
How to Choose the Best VPS Hosting Provider
How to Choose the Best VPS Hosting Provider
When choosing the best VPS hosting provider, it’s important to consider several factors. Some of these factors include features, support, and pricing. The best companies will offer these as standard. Some of the companies that provide these include CyberPanel, InterServer, and A2 Hosting. Liquid Web Liquid Web is a leading provider of web hosting services. They offer a wide range of hosting…

View On WordPress
0 notes
Text
🔰 Thay đổi giới hạn kích thước tệp tải lên wordpress trong CyberPanel
Bạn đang sử dụng CyberPanel để quản lý website và từng gặp tình trạng tải lên Plugin hoặc Theme và nhận được thông báo: The uploaded file exceeds the upload_max_filesize directive in php.ini. Có nghĩa tệp bạn tải lên vượt quá kích thước tệp cho phép
Bài viết này sẽ giúp các bạn khắc phục vấn đề trên
0 notes
Text
What is CyberPanel VPS Hosting? Klcweb
What is CyberPanel VPS Hosting? Klcweb
Is shared server hosting insufficient to achieve maximum success? we designed a new service targeted at large and complex eCommerce websites. Powered by LiteSpeed, CyberPanel VPS hosting helps users to perform tasks faster, more securely, and efficiently by providing full root access to customize the service. include PrestaShop, WooCommerce, Magento, and others.…

View On WordPress
0 notes
Text
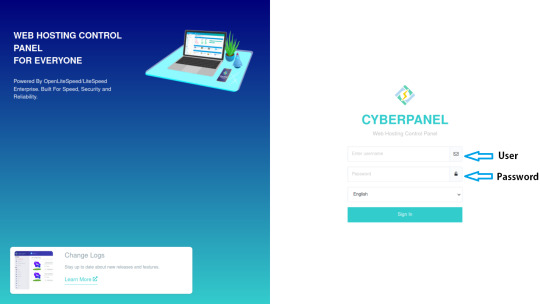
How to Login to CyberPanel
How to Login to CyberPanel
CyberPanel is a great freemium hosting control panel. In this tutorial we will show you how to login to CyberPanel. Open a browser and type https://your-server-hostname:8090 Username: admin Enter the password that you set during initial setup You are done! You will be redirected to the CyberPanel Dashboard.
View On WordPress
0 notes
Photo

Compartilharei algumas dicas para ter uma ótima perfomance mesmo rodando os anúncios do Adsense no Wordpress. No meu caso, possuo seis anúncios em cada página: Invista num tema focado em atender os padrões do Google. Não adianta ele ter uma boa aparência; a otimização precisa vir ao nível do código porque o Google faz a análise a partir dos seus robôs; Complementando o tema, alguns plugins também são importantes porque ele sozinho não conseguiria atender a todas as exigências. De todos os plugins que já testei até hoje, o WP-Rocket foi o melhor nesse sentido. Caso não tenham recursos para adquiri-lo, uma solução gratuita seria o Super Page Cache for Cloudflare (https://wordpress.org/plugins/wp-cloudflare-page-cache/). Eu uso os dois, inclusive, sendo esse último focado para as otimizações de cache; Por fim, mas não menos importante, o local onde o seu site está hospedado. Eu tento ser econômico sempre, por isso, dou prioridade as soluções gratuitas. Eu uso o CyberPanel (https://community.cyberpanel.net/docs?topic=82), que é gratuito e vem equipado com LiteSpeed, para gerenciar a minha VPS. Sobre ela, está hospedada em um servidor dos EUA onde pago cerca de R$ 45 mensais. Somando tudo, não chego a gastar R$ 70 por mês com o site. Então é totalmente possível ter um site dentro dos padrões de qualidade do Google gastando pouco para isso. (em Suprema Mídia - Criação de Sites AMP em Curitiba) https://www.instagram.com/p/ChOah6eAvuk/?igshid=NGJjMDIxMWI=
0 notes
Text
3 Cara Mudah Install Wordpress di Cyberpanel
3 Cara Mudah Install WordPress di Cyberpanel
Cara Install WordPress di Cyberpanel sangatlah mudah untuk dilakukan karena Cyberpanel sudah memiliki fitur install aplikasi WordPress pada control Panelnya. WordPress merupakan CMS yang paling banyak digunakan saat ini karena memiliki fitur yang lengkap serta Plugin yang sangat beragam baik yang gratis maupun berbayar. Hampir semua Control panel VPS telah build In aplikasi Worpress yang…

View On WordPress
0 notes