#how to add 10+ items per post tutorial
Explore tagged Tumblr posts
Visit Tumblr Blog
Explore Tumblr blogs with no restrictions, modern design and the best experience.
Last Seen Tumblr Blogs


Fun Fact
In 2020, Tumblr had 29.4 million users in the US.
Note
Hey how do you include more than 10 pics/dividers in a post? (With mass editor and on web?) can you do a tutorial on how to do it ?
as far as i know, the mass post editor is not used to "mass post", it's used for managing and editing multiple exsisting posts on your blog at once. like adding tags, changing post types, or even deleting a bunch of posts at once.
tutorial below cut
adding 10+ items (30 max) per post
android: from mobile browser
step 1 : click "A"

step 2 : click image icon

step 3 : click upload image

step 4 : once you've uploaded 10, hit enter and then click the keep reading icon

step 5 : repeat step 2

step 6 : repeat step 3

and your done.
hope my tutorial had been helpful. if you have any questions, please don't hesitate 😊
33 notes
·
View notes
Text
I’ve had a lot of requests from various people at different times who are just learning how to use resin to create with and wanted some tips and tricks. I have wanted to make this post for a while, but I wanted to acquire more experience myself before giving others help. This first post is just going to go over some really basic tips and tricks and subsequent posts (if they’re found helpful) will elaborate. This is for all of you who are like me and get the least amount of benefit from watching Youtube tutorials these days because EVERYONE has one, and half the time they’re drawn out for ad revenue so an hour long video will only contain 20 mins worth of information with the kicker being you can’t even fast forward through what you know or rewind through ads to get back to where you need to be. So, for those of you who hate that like me, this text post is for you.
If you’re just starting, choosing which resin you want to purchase is intimidating. Craft stores like Michael’s and Hobby Lobby rarely offer more than one or two brands, typically over priced due to the fact that they’re labeled “art resins”.
Epoxy resin is by far the easiest to start with for beginners. It is the most forgiving, has the most consistent results, most brands use the same 1:1 ratio and the overall technique is the same. I am not affiliated with these brands/companies in any way other than I have used their products and have written reviews for several on Amazon.
Start with small packages (4oz-8oz kits / 8oz & 16oz hardener + resin). A quick Amazon search for epoxy resin will give you many results. This is one of those cases where you really don’t get what you pay for- boat, tabletop, etc. epoxy will yield the same results at more reasonable prices per fluid ounce than art resins. I recommend going with brands like FanAut, Puduo, Let’s Resin, Craft Daddy, etc. which often offer kits with gloves, craft sticks / stir sticks, measuring cups, and even additives at reasonable prices. All these items are things you’ll need to start off, so any extras are appreciated. I recommend Puduo, as it is relatively inexpensive compared to similar brands, yields consistent , crystal clear results, and has a somewhat faster curing time than other epoxy resins for the price. If none of these brands ring your bell, here are the qualifiers for a “good” epoxy resin:
Self Degassing- This is pretty much the standard expectation of epoxy resin and one of the reasons it is considered forgiving for beginners. When resin and hardener are combined, gases are trapped and form air bubbles which have a tendency to multiply as you stir your mixture and the combination heats up. But it shouldn’t be taken for granted that all epoxy resin does this, so try to look for “self degassing” in the item description / label.
Self Leveling vs. Doming : Doming resin is great for the magnified look on pendants and other flat projects, but self leveling resin is where you should be starting as doming requires the build up of surface tension to achieve. While “doming “ resin may achieve this easier than others without this feature, it is pretty irrelevant if you don’t know to dome resin in the first place.
Art Resin vs Other Epoxy: Art resins make claims of being ideal or a better choice for arts & crafts, but the reality is that you can achieve the same effects from table top or boat resins such as Mas- are just as capable of casting, coating, doming etc. as art resins especially if you’re looking to take on a larger project you will pay less and get more with these brands than smaller quantities of art resins. Make sure they are crystal clear, hard type, self degassing, and self leveling. Keep in mind that cure time relates to the size of your project and the ambient temperature of the environment, so don’t waste money on products that charge more for touting faster curing time.
What about 2 part epoxy in syringes? (Ice Resin, Gorilla Glue) Personally, these pre prepared epoxy resins are more complicated than they look. You can’t save combined resin and hardener, so once you mix the two or pop the seals to both you have to use the lot of it in one shot. Ice Resin in particular is quite expensive and doesn’t offer the clear, glossy results I expected it to when I used it, so I would avoid these if you are just starting out.
Additives & Extras- Don’t waste a lot of money at the start funding your would be creations until you have at least seen one entire project through from start to finish. I made the mistake of investing in silicone molds, glitters, additives like rhinestones, craft papers, transparency films etc before I really found my niche and what I was really using epoxy for the most. There are some great deals for 100+ piece silicone mold kits that include gloves, stir sticks, silicone measuring cups, and the like available cheaply for those looking to make smaller things like jewelry, keychains, figurines etc. the one I have just linked to even includes the epoxy for under $20. These kits are offered by Amazon and even Etsy and are a great place to start as they provide you with everything you would need to create at least one full project. They are also a great activity to do with your kids (ages 10+ would probably be ideal) as you can add pretty much anything that isn’t silicone, wax, unsealed paper, alcohol, or water based into resin, which opens up a world of possibilities!
Tips & Tricks That Will Save You $
If you’re itching for purchasing pigments to add color to your resin projects, try purchasing or reusing some old or cheap mineral eye shadows. Not sure if your eye shadow is mineral based? I’m willing to bet it is, though some colors may not look the same when mixed in resin as they do on the pallets, they will color it nonetheless, just pick a small amount up on a popsicle stick or toothpick and stir it into a small batch of resin to see how it turns out. Dollar Tree eye shadows will work just as well as expensive pigments, so consider this before investing in expensive mica pigment sets!
While silicone molds are probably the easiest and are reusable, you can also use plastic molds, carve your resin block with carpentry tools or by hand-or even make your own molds! There are simple recipes utilizing dish soap and corn starch out there, or you can use silicone or even hot glue! Flexible silicone molds won’t require a mold release, but plastic and other molds will or you may end up cutting your project out. You don’t have to purchase a mold release product for this, either- olive or vegetable oil spray on a paper towel will suffice, just remember to let your mold sit for a few hours to demoisturize.
Can’t find gloves because of COVID19 hype? Finger cots are even better than gloves as they allow for more dexterity even when they get sticky, are cheaper, and readily available in bulk online!
Pretty much anything compatible with homemade “slime” can be mixed into or embedded in resin, so there is that. However, be careful how much glitter, pigment, etc you add as you can throw off the chemical balance that allows your project to cure properly. Refer to the directions included with your specific resin kit as most will tell you what ratios must be maintained for proper curing.
Everyone that works with resin knows the arch nemesis that is the bubbles. There are times where it seems like, no matter what you do, your perfect clear cast of a dandelion goes to shit because of some stray air bubbles. There are a few tricks to avoid this from the start:
Use a separate cup to measure resin and hardener. Pour the combined mixture into a fourth cup after the first 3-4 mins of stirring (half time) scraping the sides and bottom. This helps what was on the bottom get integrated into what was mixed on top. Always make sure to pour resin first when mixing and mix slowly, scraping the sides and bottom, for the time listed on your instructions. You want your mixture to be almost water consistency, clear, fluid, with little viscosity, and no streaks visible. Allow it to sit for a few minutes to natural degas and get rid of the bubbles.
Use a torch or grill lighter to pop surface bubbles. You can also do each one individually (as the grill lighter suggestion may not always be a good idea- be careful using this on large projects and molds that may ignite) with a tooth pick. Using a blow dryer or heat gun will also help bubbles rise to the surface to be popped.
Make sure that you keep contact with the bottom of your mixing cup with your stir stick-try not to lift it too much as this can introduce air into the mixture (“whipping the resin”) this can also occur if you are stirring too quickly. If you notice a lot of bubbles, let your mixture sit for a few minutes and resume stirring at a slower pace.
Make sure you start your project at a temperature of 74 degrees +, if your bottles are cold to touch, place them in a plastic bag and let them sit in hot water to warm up. You can also roll them (slowly) on a counter top.
You know, if all else fails you could always make ocean or nautical themed projects :)
That’s all for now- let me know if this helped you or someone you know working with resin or experimenting. Feel free to comment with any questions you would like answered in my next post! I also recommend the Resin Obssesion blog- they have a lot of useful information and tutorials with photos that were really helpful for me starting out!
Xo Samantha
#resin#resin art#resin jewelry#epoxy resin#resin tricks#how to use epoxy resin#how to make things with epoxy#epoxy resin tutorial#epoxy resin for beginners#craft tips#craft tricks#crafting#handmade#handmade gifts#resin crafts#resin creations#resin craft#how to use epoxy for crafts#resin art tutorial#resin for beginners#how to use epoxy#how to resin#bubbles in resin#text post#informational
63 notes
·
View notes
Text
I'm making this list again for @nintendo of features and functions we would like added to Animal Crossing: New Horizons, based on what I have seen the community say, complain about and discuss. This list is subject to update!
Send me your suggestions and I will add them to this list for @nintendo to see.
• Larger item stacks! 99 instead of 30/10/etc
• wide angle camera so we can take better pictures of our islands
• some kind of indicator on clothing items you already have when purchasing from able sisters changing room
• Bulk item crafting. Let us craft more than 1 item at a time if we can!
• allow us to store our crafting materials at home but be able to utilize them away from home. That way we dont have to have 10 slots or more of our inventory constantly filled with just crafting materials.
• bulk buying at the able sisters changing room. It's very time consuming and annoying having to go back in repeatedly to buy multiple shirts, dresses, hats etc.
• MORE DESIGN SLOTS! this has been an issue and concern for us since the beginning. We really need more. I think being able to purchase more either with bells or nook miles is the way to go. I think we should have tiers. And they go up in price as we buy the extra slots.
• Remove all patterns displayed on ground function - remove ALL & remove all of selected one.
• Continue adding new hairstyles and color options. That's really cool and excites the community! I know we want more hair color options.
• Dead Trees. Perfect fruit. Miss those would love to see them brought back.
• a craftable item that catches balloons for us? Like a balloon net or "magnet" (that's not how magnets work I know). It only functions when we are outside and if we go inside, the balloons that were caught despawn. Maximum of 10 balloons can be caught per net. Multiple nets can be crafted to catch additional balloons. You do have to go pop the balloons still. Or additionally, a button could be on the net that says pop balloons and it pops them all for us.
• Flowers, shrubs, tree varieties. Those types of things continually added would be neat. Especially around in game events! New flower type added for christmas, a new tree variety added for an event. *Maybe something like the cherry blossom tree can be specialty purchased from Leif that he bred to specifically bloom year round.
• MORE GROWABLE CROPS LIKE PUMPKINS! We love those and would love to see more. Strawberries, wheat, corn, grapes, tomatoes, for a few ideas.
• move resident services building
BIG SUGGESTION:
Let us purchase additional islands to work on!
How I think this could be implemented to be fair and balanced:
• you can only unlock additional island purchases if your current island is 5 stars.
• it would have to be pricey. Maybe even potentially cost BOTH bells and miles.
• Nook will call you one day when you log all in and say he has something to discuss. Upon talking to him he has a proposition for us. Realizing we've managed and run this island so well, he wants to send us to a new island to run that one as well. He says how much it costs. Upon making the deposit, we get to choose an island layout again. (Pls let us choose from more island layouts for this. All of the options available.) He then tells is to head over to DAL and tell orville we would like to fly to our new island.
• from here it can either operate just like the start of your new game, nook is there and tells us we gotta get kk to come to this island and all that. The beginning tutorials are void however.
• you cannot have dupe villagers (ie if coco is on your main island she cant be on any additional islands)
• a neat feature: when a villager says they wanna move from one island, an additional option is now available: move to (island name)? They will then move there if there is a plot of land available.
• When you once again hit 5 stars, Nook will again contact you. You will then be able to purchase another island. *I do not think the price should increase. As it should already be expensive in the first place.
• A limit of 6 or maybe 10 islands in total you can have. Every time your newest island hits 5 stars you can then go buy another from Nook.
• @nintendo You want to keep us interested in playing this game for as long as possible. People are already bored. Giving us the ability to purchase and run additional islands will give this game much longer play time. I know there will be the concern of people who will have already bought additional switches for running new islands. I promise they would LOVE this feature too. They will be able to EVEN MORE islands.
Its also worth noting, nintendo, you dont want people hacking. Why not implement these things, like the more functional ones (more pocket space, more design slots, bigger stacks) so people dont feel a need to hack? It would help a lot.
I have this posted on my Instagram as well. Please interact and tag nintendo so we can attempt to get them to see these suggestions.
This post has more suggestions covered and more detail than my insta post.
#nintendo#animal crossing#acnh#acnh community#animal crossing blog#animal crossing new horizons#nintendo acnh#acnh island
28 notes
·
View notes
Text
Publishing Google Web Stories on Quick Stare
How to Post Google Web Stories on Quick Stare.
What exactly are Google Web Stories?
Google Web Stories are a new content type that can help gain more traffic and exposure on the internet in the form of AMP (Accelerated Mobile Pages). Web Stories are aimed at mobile users who prefer fast content consumption and who now corner 80-95% of internet traffic. In order to be considered for publishing in Google search, web stories should have a title with a maximum of forty characters. Each story should have between four and thirty pages and each page should contain at least ten words. Videos should be no longer than 15 seconds and the recommended font size for text is at a minimum of 24. Please read the Google Publishing Policy for more information.
Publishing Google Web Stories
To get started publishing web stories on Quick Stare from scratch, simply visit Create>+ Web Stories in the menu. Or to choose a template visit Streams>+ Web Stories.
Web Stories Design Editor
The web story editor allows Quick Stare users to add images and video along with headings, sub headings and body text. You can create new pages or duplicate and then edit a page. Each item added to a page can be customized in the design menu on the right hand panel.
Adding a Title, Cover Image and New Pages
Add a web story title in the top left of the design editor. Delete, duplicate or add new pages with the icons below the design editor. Add a cover image with the document options in the left menu panel.
Adding a Media, Headings and Shapes
In the left hand menu panel of the design editor you will find the tabs to add new media, headings, sub headings and body text along with basic shapes.
Google Web Story Guidelines
Title length: A short title length of less than 40 characters.
Text: Text on each individual page should be around 10 words but less than 200 characters.
Story length: Web stories should be between 5 and 30 pages in length.
Video: Web story videos should be less than 15 seconds per page and no more than 60 seconds per video per page. Video captions should be used.
Publishing Web Stories
After publishing web stories you can copy the link to your web story and paste it into Custom Posts or anywhere else on the web that you like.
Source: Creating Google Web Stories on Quick Stare Tutorial
2 notes
·
View notes
Photo


Alright! I’m in the mood to revisit Fallout 3, but a little differently than my old experiences.
Already posted a bit talking about what’s happened but here’s a “first post” sorta thing where I make things clear.
So! Fallout 3 is a very important game to me. Admittedly moreso than it deserves, but important all the same. I still vividly remember drooling over the MegaMart trailer footage before release and checking on it every day until release as if they'd drop a new trailer or release it early without saying anything- I was HYPED. In the real sense- in the "This is the last game I'll play for years" kind of way.
And the game lived up to that hype. Scoff all you like, I played nothing but Fallout 3 for two to three years. Straight. (With some multiplayer games in there but by and large FO3).
When I say I did everything conceivable to do in the 360 version of the game, I mean it. Perfect characters (10/10 100/100 stats). Gimmick characters. Every quest in every way. Attained every item in the game including abusing glitches to get as many as possible at once (sense there are multiple "one or the other" moments in the game). Maneuvered out of bounds glitches to grab items in Operation Anchorage that were not intended to be attainable- hell- glitch pickpocketing items you shouldn't be able to attain COUNTLESS times through both main game and dlcs. Experienced every single random encounter in the game- rerolling for hours to get them all. Hell, using save editing practices on console to use the unobtainable weapons and armor? Did that on a separate save too since my main save was so important to me.
Fallout 3. Been there. Done that.
But I want to do it again, warts and all. But a little differently.
So here we are! PC version! Like 35 or so mods runnin' (mostly adding new content, some obviously optimising stuff or fixing bugs)! Some optional mods in the wings I might toggle on for a separate save to mess with! Since so many of my runs have been post-me-learning-how-to-max/min and had me playing VERY PARTICULARLY so that I get everything for a perfect character- this time we're just kinda throwing things in there. I tossed on a "not perfectly implemented but it works(tm)" two perks per level mod, along with a metric ton of new perks to play with- so we're gonna get OP pretty quickly I imagine and that's okay. Maybe I'll activate some difficulty mods or spend some time editing my save to remove all buffs from these mods before activating FWE (I'm VERY tempted to play FWE from the outset).
We're modding the heck out of things and going for a romp through FO3. One of my favorite games of all times both because of and in spite of the Bethesda touch it carries. I'm happy already :)
I rampaged through the 101 tutorial before really adding any mods, nothing to show, just did it and got the obligatory save right before exiting which has been a great starting point for testing mods that aren't built around skipping that altogether (like I believe FWE has a fast start alternative which might be fun to play with later).
Getting out of the Vault I see a million pop-ups and find out how the 2perksPerLevel mod works (when you level up you level, allocate points, pick a perk, then it says you leveled again [say to level 3 now] but gives you no points and one perk to allocate, then it delevels you- good enough).
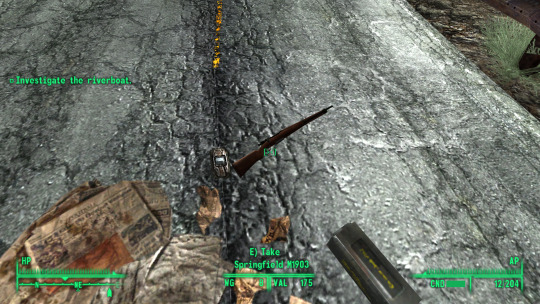
Walking out I see that one of the mods adds a starter rifle... I do not know which one added this, but I'm taking it. I denied a lot of optional starter loot (one mod gave me like 30 robot companions to start the game with if I wanted but I declined).
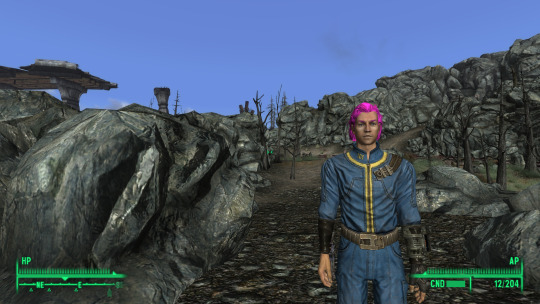
Here we have Vaksten's beginnings. Didn't both spending a year trying to make him look good in the god awful FO3 system, so randomized and then tossed on my signature blast back hair. Also deactivated the sprint mod I had by this point since it didn't REALLY feel like a life improvement to me, as neat as it was. It's blurred edge effect on some of my screenshots was a bother.
Entering Megaton reminded me that I added a couple mods to expand Megaton- exciting! But before I touch ANY of that- I have to do my old "new character" song and dance.
Run to the bomb
Disarm
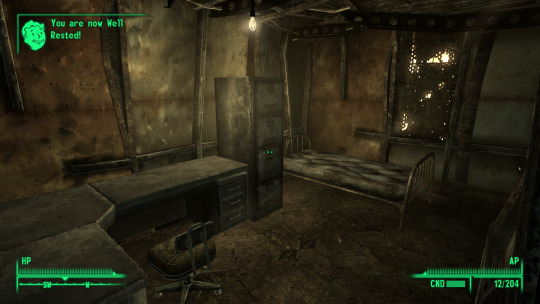
Store all my stuff in my house
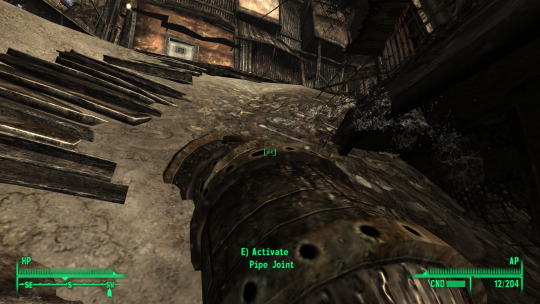
Run to Walter for the leaky pipe quest
Finish in record time
Now I can drop off insane amounts of scrap metal for money and xp
And now the game can begin with a storage location to drop back on.
Think I'll delay doing the Wasteland Survival Guide for a bit. I like getting specific rolls on the perk even if I am already gonna be OP from double perks and the like- it's my fun and I'm doing it my way :)
2 notes
·
View notes
Text
How to change the settings of wordpress

Searching for tutorial on how to change the settings in wordpress?Then check out this article. Settings is the most important for wordpress.This makes your post well organized.It also makes your website more appealing. This will make your site more secure.Get notified whenever a action done in your website.To know more about this topic go and watch our channel. For more tutorial on wordpress and designing a website subscribe our channel.Go to youtube for video tutorial on designing.We will be posting each tutorial in my upcoming post.
How to change the settings of wordpress:
How to change General Settings:
Login to your dashboard and then click settings. Select general and change the site title and tag line. Site title:Title of your site Tagline:Cache word phrase to describe your website Wordpress address and Site address will be disabled because it is the registered domain name.So that you can't change it. Enter your email address in the text box. Email address is used for admin purpose like notification of new user,comment and so on. In membership check the box of anyone can register.This is done because any user can register in your website. If you need to change New user default role change it.The options are Subscriber:See all the post only no any rights are given to edit. Contributor:Guest post by guest. SEO Editor:Based on SEO they will edit your post. SEO Manager:Manages SEO of your site. Author:Who write the post. Editor:who can edit post with admin permission. Administrator:who owns the website. Change the site language to your mother tongue if needed. If needed change the timezone of your website. Date format:Format in which the date is displayed on your site.If needed change and see the preview given below. Time format:Format in which the time is displayed on your site.If needed change and see the preview given below. Week start on option is to select the days if needed. Finally click save changes button to save the settings.

How to change the media settings:
Click on settings and then select media option. Now change the pixels of thumbnail option if needed. Likewise change the pixels of medium size and large size images if needed. Then check the checkbox to organize your media in month and year form.eg:june 2019 Finally click on save changes button to get saved.

You may also like How to add new-edit-delete a page in wordpress Steps to add categories and tags in wordpress How to create-edit-delete a post in wordpress. Steps to install wordpress locally without server How to add,upload & delete a themes in wordpress If you like this article click here to subscribe for newsletter.
Steps to change the privacy settings:
Click settings in dashboard and then select privacy option. Now select a page which has privacy policy information and then click on use page. Or else click on the create new page button and create a privacy policy page.

Steps to change the permalink settings:
Go to dashboard and click settings and then select permalink option. Permalink is nothing but the url of your post. URL can be of various types and options are Plain-with content and numbers Day and name-url contains the current day and name of post in it. Month and name:url contains the current month and name of the post. Numeric: it contains numbers in url. Post name: post name is displayed in address. Custom Structure:select any type of options like category,post name,year and month in it. Optional changes: Category base:default category address is displayed in all url. Tag base:default tag address is displayed in all url. So no need to change leave it as a blank option. Finally click save changes button to save the settings.

How to change the reading settings:
Go to dashboard click settings and then select reading options. Your home page displays option: Latest post-this will display your post as home page. Static page:select any home page which is designed to be front page. Blog page show post count:You can reduce it because more no of post may cause some changes in appearance. Syndication feed show the most recent items count:Make it as 10 or reduce because feed needs show the latest items. For each article in the feed show: Full article:full post is displayed in the feed. Summary:Shows the gist of your post in feed. Search Engine Visibility:Check this box if your website is under construction.Or else leave it unchecked. Finally click on save changes button and save the settings.

Steps to change writing settings:
Click settings and then select writing. Then in default post category choose any of the category you added. For default format,let it be standard because each post have a collection of media,text,links,audio and more.So it is better to be standard. Default editor for users:Choose classic editor or block editor any one. Allow users to switch editors:Select No option because without the permission of admin nothing should be changed. If you want to post by mail,then give mail server,port,mail username,password and default category of post. In update service,pingback option is enabled.This is because whenever you post it will ping you back in comment.This shows your post is successfully published. Finally click save changes button to save the settings.

How to change the discussion settings:
In default article settings:Check all the check boxes as per your wish. Other comment settings:Select options based on your preferences. Email me whenever:post a comment is selected because get notified for a comment. Before a comment appears:It should be manually approved by admin option should be selected. Select your avatar options,ratings and comment blacklists. Then click on the save changes button to save settings.

Video Tutorial:
You may also like How to add new-edit-delete a page in wordpress Steps to add categories and tags in wordpress How to create-edit-delete a post in wordpress. Steps to install wordpress locally without server How to add,upload & delete a themes in wordpress If you like this article click here to subscribe for newsletter. Read the full article
#changethesettingsofwordpress#commentsettings#generalsettings#mediasettings#permalinksettings#privacysettings#readingsettings#writingsettings
1 note
·
View note
Photo

If social media are used by you, you know exactly how important video is. Nevertheless, just to re affirm that you are spending time in the correct spot, below are the latest fashion that reveal the fastest way to showcase the content of yours on Facebook, Snapchat, Instagram, and Twitter:
Clearly, video is definitely the predominant type of information getting your audience's attention. (Note to self: following year create a video revealing all of these insights ;-)
Almost all that being said, the next step is to make sure you do not miss the particulars like ideal length, the preferences and aspect ratio of social networking influencers on numerous platforms. Here is what you have to learn about the specifics of video advertising on YouTube, Snapchat, Instagram, Facebook, Twitter:
YouTube Videos YouTube is the best video advertising platform to interact with market through DIY videos, testimonials, video tutorials, explainer videos, and behind the arena video clips. It's crucial that you be aware that sixty % of movies on YouTube are observed on devices that are mobile and the sharing rate is greater on mobile devices. And so in case you've been ignoring the equipment and methods which produce better engagement for mobile audience, you are restricting both the reach of yours and also sharing opportunities.
Recently, YouTube released the new features of its for mobile app visitors. This main redesign brought a cleaner appearance, adjustable play screen and ability to look at video clips in portrait mode. Make your movies appropriate per today's standards and use the following guidelines and insights courtesy of Fortunelords:
Facebook Videos Facebook has been putting a great deal of emphasis on video foods within their news feed lately, which is the reason the frequency of videos content within the news feed of yours has increased too. This has motivated promoters to create more movies which look within these feeds (either naturally or perhaps paid). In order to increase the presence of yours on Facebook, here is what you have to know:
Instagram Video Instagram boasts 800 million month and 500 everyday active users. Marketers have recognized the power and possibility of the wedge (especially publish acquisition by Facebook) which is the reason lots of manufacturers are currently actively and consistently posting on Instagram.
The most effective way to know advertising on Instagram is by publishing the proper video type at the proper time. If you obtain this part right, customers will often engage without as long as you are not typically delivering a tough pitch.
On Instagram, you've to highlight your product/service in a clever way by sharing video or even creating video advertising. Video advertisements show up between the Instagram organic feed and also have a top view rate. Instagram is a good social internet marketing channels for SMEs.
Use Instagram Stories
These Instagram story videos are temporary 10-second picture/video clips positioned at the upper part of the Instagram feed. An established advertising application for makes, this ephemeral clip is able to obtain enormous engagement if handled smartly. You will find many things you are able to do with Instagram accounts like, provide exclusive content, show at the rear of the scenes, showcase the item in action, present a countdown to launch event or even ask influencers to add.
A report projects that by 2019, eighty % of all web traffic is going to come from video. It is essential to place your small business right now to capitalize on this particular motion and stay current on the strategy of yours. Leveraging video is going to prove to be a winning action for the company of yours for increasing brand recognition, improving follower engagement, improving your lead conversions and producing sales.
Usually, people are going to share and talk about services and products they've had a great experience with. Equipped with the correct range of movies, your best advocates can indirectly turn into the best sales force of yours by sharing your video information onto their system over social media. All of this usually takes place independently and grows dynamically, usually triggering possible sales.
1 note
·
View note
Text
10 Best Strategies for Monetizing your Website

In today’s fast-growing digital world, everybody wants to make money. Digitalization has opened doors to a plethora of opportunities. Backed by technology, digitization has provided platforms that have enabled the growth of many businesses. Nowadays your website is not only used for generating leads. It also creates value for you by providing you additional income. Wondering how?
Let me explain through the following list :
1. Affiliate Marketing:
Subsidiary promoting is a publicizing model in which an organization repays outsider distributors to create traffic or prompts the organization's items and administrations. The outsider distributors are members, and the commission expense boosts them to discover approaches to advance the organization. Let me explain with an example. Many times we see influencers posting reviews of a product on certain websites.
These websites have affiliate links through which influencers can earn commissions when the product is sold. It is the easiest way to make passive money provided your website has a good customer base. This strategy if applied properly can generate good business for your website. The technique will also increase website visibility.
Implement affiliate marketing using the following steps:
Develop a website for marketing and selling products.
Enable affiliate tools.
Include these generated affiliate links to your websites.
2. Google AdSense:
The Internet has increased the prominence of Pay Per Click. It has boasted the Monetization of the website. The website owner earns money each time the advertisement on the website is clicked. A very popular tool for this is Google Adsense. This service does not require much effort to set up. It is a technique that can enable the website owner to quickly earn money. The steps to use this technique is as follows:
Go to Google Adsense service page and read the T&C applied on the service. You can use this service only if your website meets the criteria.
If it meets the prerequisites, go and sign up.
Customize the website for your ad.
The services provided by Google are sufficient and self-explanatory. So it is pretty easy to use. Customer forums and tutorials are also available for users to help them get started.
3. Selling Website Space:
In this strategy, the website owner can sell space on the website directly to advertisers. By this technique, monetization of the website can be achieved. These advertisements can be present anywhere on the website like at the bottom of the side space. These can also come up as pop-ups or side banners. As a website owner, you will have negotiations over the price of the advertisement. To implement this method, the website should have a good customer base. It should be able to attract traffic for it to be successful.
This technique works somewhat similarly to pay per click method. The number of times, the users click on the ads presented on your website, you will be paid a commission. Make a media kit and send it to all the potential customers and lure them to your website. Using tools like Google Analytics can help you analyze your website. This can also help in addressing the shortcomings and generate leads.
4. Become a seller:
You can create a website and sell a digital product online. This technique can serve as a good method for the monetization of a website. It is an easy task as it doesn’t require constant blog creation. As an owner, you just create the product and try to reach your target audience. As a seller, you can also sell physical products.
However, this would require extra efforts like inventory management, fulfillment, and shipping to a third-party provider. Digital products include e-learning or audiobooks or anything similar. You can also use the website to launch software products. You can also add an eCommerce to your website and collaborate with a third-party full-time service provider to start your business.
5. Monetization by Donations:
Publishers strive to make their websites attractive and full of clickable content. You don't want your content to stay there. You want to improve it through monetization, personalization, and strategic ad partnerships. Therefore, readers can enjoy a more personalized experience and publishers can increase their income, so they can continue to create content that people like.
Many publishers create content for free as a hobby or hobby. If they have a loyal fan base and repeat customers, they can build a donation system. Readers donate through platforms such as PayPal or Venmo, and they play an important role in helping their favorite websites operate.
6. Video Ads:
Similarly, as distributors can put supported articles and suggested thumbnails on their sites, they can likewise put supported and suggested recordings. Distributors sell video advertisements by cost-per-finished view (CPCV) or cost-per-thousand-impressions (CPM). They help promoters focus on the right crowds with content that requests to their watchers' advantages and lines up with their practices.
7. Membership Websites:
A membership site offers content for money. Let us talk about Newspapers like Economics times or Live Mint. To access these you need to have a subscription. As a website owner, you can too share some content to attract the audience and then charge money for premium services.
This will not only generate leads but also form a loyal customer base. There are many different types and tiers of subscription models for online publications, including charging for all content; charging for certain content; charging for all content after ten free articles; charging for access to content on certain devices.
But a very important strategy for this is to work is that your free content should be good. Also, your membership offers should be clear to readers and subscribers. You can collaborate with certain fintech firms and offer coupons and discounts on their services.
8. Sponsored Content:
Website owners have supported contents and products on their websites close to their natural substance. The sponsored substance is an article or series of articles made by or for a sponsor. The article appears as another substance on the distributer's site.
Regularly, the lone distinction is that it incorporates a 'Supported' disclaimer. To understand it let us say Kissan Jam has a website where it is selling its product. Now, Britannia can sponsor their product that is Britannia break on the same website. This is feasible as both are complementary goods. So in nutshell, Sponsoring an ad is like blending the product with the platform. To bring in cash from your site, first, form your crowd.
Draw in them with the incredible quality substance that answers their questions. Make sure to be reliable when distributing your substance and coordinate a web-based media procedure. On the off chance that you do this quite a long time after a month., there is an incredible possibility you will succeed.
9. Generate Leads for Another Company:
On the off chance that you advertise other organizations' products on your site, you can utilize that to produce leads for them. Through content pieces like item audits or examination articles, you can guide intrigued clients to a business presentation page with a structure. There they can select into the business offers. Lead age administrations can add income to a site. Remember that it can work better if you run a site that spends significant time in item audits and correlations.
10. Launch a Course:
By providing a certification program, as a website owner, you give your clients significant information they can identify with your image. On the off chance that you effectively offer e-courses, you can offer a high-level preparing program. This strategy will likewise reinforce your image and your clout in your industry. Several organizations are doing like Coursera, Udemy, etc. But make sure to match industry standards.
Have any Digital Marketing Queries. Feel free to contact us at Trivayu Infotech.
0 notes
Photo

Smarty Builder Review - Creates Cash-Grabbing eCom Sites.
More and more individuals are purchasing online because of the pandemic. Actually, internet shopping exploded into an industry of around $5.3 Billion. People are spending a lot of money on big giants like Amazon and eBay.
There are also trillions spent by average everyday people on independent shops. Now you may wonder, how do these little people compete with big giants? What is their secret? If you want to make a quick profit just be there, where the money is.
Smarty Builder is a new technology for smart eCommerce that easily builds eCom sites that are designed to maximize earnings.
No previous technical expertise is required, this is completely newbie-friendly.
In order to protect against middleman costs, the system directly connects to Stripe and PayPal. The system supports both digital and physical products.
There is a CRM that includes a chat system.
This is perfect for beginners as all digital items can be simply downloaded from one sharing link while tracking sales and revenue inside the dashboard.
The free buyer traffic add-on that they give to all the members who purchase Smarty Builder during the launch period. This enables beginners to generate traffic to eCom sites immediately without paying for ads.
>>Click Here to visit Smarty Builder Official Page and also check my Huge Bonus packages<<
Only simple three steps to start with Smarty Builder:
#1: To set up your new eCom site using the SMART technology (Completely newbie-friendly)
#2: Enable one of our free buyer traffic options in just a few clicks.
#3: Reflux and start earning money.
Why will you choose Smarty Builder?
100% built-in traffic included.
One-time payment only, there is no recurring cost.
Can generate complete passive income.
14 days money-back guarantee.
No need to be a technical person, completely newbie-friendly.
You don’t need to create anything by yourself.
No need to spend hours in front of the computer.
Create your store with products that are unlimited.
Take advantage of other products without anything being created.
No requirement to purchase hosting.
Paid ads are not required.
Training included.
Vendor:
Name – Paul Okeeffe.
Location – Bangkok.
He is an experienced product creator in science 2015. Few previous good products created by this vendor are Ultimate Traffic Boost, Trafficize, Marketers Boost, Curation Cloud, Listify, etc.
Price and features details:
FE Offer - Smarty Builder ($27 to $37):
Here you will get complete access to the Smarty Builder dashboard and free buyer traffic add-on. This enables anyone to build a cost-effective eCom site, all under a single sharable link with digital or physical items. The addition to the free buyer traffic allows users to deliver traffic to the website without the need to buy any ads.
Easy Setup & Management:
Simply build an account, set up, and publish your store in minutes. Effectively manage sales.
Rich Analytics System:
Measure your growth, track sales, and optimize your views from your dashboard.
Multiple Payment Gateway Options:
Choose from a number of payment options available which are suitable for you and simply accept payments.
Add Your Social Media Links:
Just add your preferred links to your store, let your visitors link directly to your Social Media platforms.
Create An Account:
Simply build an account, set up, and publish your store in minutes. Effectively manage sales.
Post Your Products:
Create items you want to display on your products and set all major items as per your requirement.
You can share on all social media like Instagram, Facebook, Tik Tok, LinkedIn, etc.
>>Click Here to visit Smarty Builder Official Page and also check my Huge Bonus packages<<
The exciting features included in the FE are listed below:
Ads
Custom Branding
Advanced stats
Verified badge
Social links to your profile
Google analytics
Facebook pixel
Multi-Domain
1 Blog
Unlimited Products
Unlimited Custom domain
OTO1 - Smart Profit Funnels ($97 - DS $67):
10 reseller funnel, that is done for you.
Complete reseller package included.
Publish a done-for-you funnel and keep 100% profit.
OTO2 - 100x Profit Accelerator ($147 - DS $97):
A complete white-level business in a single platform.
If you are a product creator, you can Rebrand, Relabel, and Relogo it.
Grow your email list easily and fast.
OTO3 - $300 A Day System Unlocked [$27]
Copy their proven $300 a day system.
More than 40 videos Full Reseller Training System.
Step by step tutorial on how to generate passive income by using resell rights.
Bonuses:
#1 - Free Buyer Traffic Upgrade:
You will get lifelong access to free buyer traffic as a unique upgrade to Smarty Builder. This fantastic feature will allow you to directly send your actual buyer traffic to your new website.
#2 - OneLink Traffic Platform:
With over 1 Billion customers, their OneLink traffic platform integrates and immediately presents your link before them. These visitors may be sent to anywhere from the Smarty Builder sites.
Is this really worth money? Final conclusion:
Absolutely, use the free buyer traffic add-on to prevent costly paid advertisements to flood the eCom site with actually interested customers.
Log in and set up your site, add your PayPal or Stripe ID to allow payments to be made on platforms without paying a middleman fee.
Purchasing this is also completely risk-free, as they are providing 14 days money-back guarantee.
Take the next 14 days to trial this amazing software today. See for yourself how quick and easy it is, to begin with, all the traffic you ever need for your successful eCom business.
If you do not think that Smarty Builder does well once you use it, then they will return every penny you have invested now.
>>Click Here to visit Smarty Builder Official Page and also check my Huge Bonus packages<<
0 notes
Text
how to put percentage formula in excel 2007
how to put percentage formula in excel 2007
Hello dear friends, thank you for choosing us. In this post on the solsarin site, we will talk about “ how to put percentage formula in excel 2007“. Stay with us. Thank you for your choice.
How to calculate percentage in Excel – formula examples
In this tutorial, you will lean a quick way to calculate percentages in Excel, find the basic percentage formula and a few more formulas for calculating percentage increase, percent of total and more.
Calculating percentage is useful in many areas of life, whether it is restaurant tipping, reseller commission, your income tax or interest rate. Say, you’ve been lucky enough to get a 25% off promotion code on a new plasma TV. Is this a good deal? And how much will you eventually have to pay?
In this tutorial, we are going to explore a few techniques that will help you efficiently calculate percent in Excel and learn the basic percentage formulas that will take the guesswork out of your calculations.
Percentage basics
The term “per cent” is derived from the Latin per centum, meaning “by the hundred”. As you probably remember from high school math class, a percentage is a fraction of 100 that is calculated by dividing the numerator by the denominator and multiplying the result by 100.
The basic percentage formula is as follows:
(Part/Whole)*100 = Percentage
For example, if you had 20 apples and you gave 5 to your friends, how much did you give, percentage wise? By performing a simple calculation =5/20*100 you get the answer – 25%.
This is how you normally calculate percentages in school and everyday life. Computing percentage in Microsoft Excel is even easier since Excel performs some operations for you automatically, in the background.
universal Excel
Regrettably, there is no universal Excel formula for percentage that would cover all possible scenarios. If you ask someone “Which percent formula do I use to get the result I want?”, most likely, you will get an answer like “Well, that depends on what exactly result you want to achieve.”
So, let me show you a few simple formulas for calculating a percent in Excel such as a percentage increase formula, a formula to get percentages of a total and more.
Basic Excel percentage formula
The basic formula to calculate percentage in Excel is this:
Part/Total = Percentage
If you compare it to the basic math formula for percentage, you will notice that Excel’s percentage formula lacks the *100 part. When calculating a percent in Excel, you do not have to multiply the resulting fraction by 100 since Excel does this automatically when the percentage format is applied to a cell.
And now, let’s see how you can use the Excel percentage formula on real-life data. Suppose, you have the number of “Ordered items” in column B and “Delivered items” in column C. To find out the percentage of delivered products, perform the following steps:
Enter the formula =C2/B2 in cell D2, and copy it down to as many rows as you need.
Click the Percent Style button (Home tab > Number group) to display the resulting decimal fractions as percentages.
Remember to increase the number of decimal places if needed, as explained in Percentage tips.
Done! : )
The same sequence of steps shall be performed when using any other percentage formula in Excel.
In the following example, column D displays a rounded percent of delivered items, without any decimal places showing.
Calculating percentage of total in Excel
In fact, the above example is a particular case of calculating percentages of a total. Now, let’s investigate a few more examples that will help you make quick work of calculating a percent of a total in Excel on different data sets.
Example 1. The total is at the end of the table in a certain cell
A very common scenario is when you have a total in a single cell at the end of a table. In this case, the percentage formula will be similar to the one we’ve just discussed with the only difference that a cell reference in the denominator is an absolute reference (with $).The dollar sign fixes the reference to a given cell, so that it never changes no matter where the formula is copied.
For example, if you have some values in column B and their total in cell B10, you’d use the following formula to calculate percentages of the total: =B2/$B$10
You use a relative cell reference to cell B2 because you want it to get changed when you copy the formula to other cells of column B. But you enter $B$10 as an absolute cell reference because you want to leave the denominator fixed on B10 when auto-filling the formula down to row 9.
Tip.
To make the denominator an absolute reference, either type the dollar sign ($) manually or click the cell reference in the formula bar and press F4.Example 2. Parts of the total are in multiple rows
In the above example, suppose you have several rows for the same product and you want to know what part of the total is made by all orders of that particular product.
In this case, you can use the SUMIF function to add up all numbers relating to a given product first, and then divide that number by the total, like this:
=SUMIF(range, criteria, sum_range) / total
Given that column A contains all product names, column B lists corresponding quantities, cell E1 is the name of the product you are interested in, and the total is in cell B10, your real-life formula may look similar to this:
=SUMIF(A2:A9 ,E1, B2:B9) / $B$10
Naturally, you can put the product name directly in the formula, like this:
=SUMIF(A2:A9, "cherries", B2:B9) / $B$10
If you want to find out what part of the total a few different products make, add up the results returned by several SUMIF functions, and then divide that number by the total. For example, the following formula calculates the percent of cherries and apples:
=(SUMIF(A2:A9, "cherries", B2:B9) + SUMIF(A2:A9, "apples", B2:B9)) / $B$10
For more information about the SUM function, please check out the following tutorials:
How to use the SUMIF function in Excel
Excel SUMIFS and SUMIF with multiple criteria
How to calculate percent change in Excel
Of all formulas for calculating percentage in Excel, a percent change formula is probably the one you would use most often.
Excel formula for percentage change (percentage increase / decrease)
To calculate percent change between values A and B, use the following formula:
Percent Change = (B – A) / A
When applying this formula to real data, it is important that you correctly determine which value is A and which is B. For example, yesterday you had 80 apples and how you have 100, meaning that now you have 20 apples more than before, which is 25% increase. If you had 100 apples and now you have 80, your number of apples has reduced by 20, which is 20% decrease.
Considering the above, our Excel formula for percentage change takes the following shape:
(New Value – Old Value) / Old Value
And now, let’s see how you can use this percentage change formula (aka Excel percentage increase formula) in your spreadsheets.
Example 1. Calculating percent change between 2 columns
Suppose that you have the last month prices in column B and this month prices in column C. Then you can enter the following formula in cell D2 to calculate percentage change in your Excel sheet:
=(C2-B2)/B2
This percent change formula calculates the percentage increase / decrease in this month (column C) comparted to last month (column B).
After copying the formula to other rows, remember to click the Percent Style button on the ribbon to display decimals as percentages and you will get a result similar to what you see in the screenshot below.
Random Posts
how to work out percentages on casio calculator
how to calculate percentage of water in pacific ocean
what proof is smirnoff red label
how much alcohol is in budweiser chelada
what percent alcohol is smirnoff ice
Calculator
An electronic calculator is typically a portable electronic device used to perform calculations, ranging from basic arithmetic to complex mathematics.
resource: wikipedia
0 notes
Text
10 Passive Income Ideas You Can Start to Create Real Fortune

Are you a retiree, a housewife, or have no source of income, and you thought that you needed to work somewhere and have wealth? But for some reason, this is not possible. Now your dreams are coming true. You can also do your job with the maximum income. Let us know, as possible; there is a concept of fantastic income. The term passive income is money that you make so that you hardly need to maintain it. There are many passive income ideas with which you can start building an absolute fortune. Implementing some passive income ideas today will help you quit your tedious 9-5 job and plan your vacation, mortgage, and retirement. In this post, I will share ten passive income ideas you can get started today. Let's read on.
Affiliate Marketing
Affiliate marketing is how an affiliate gets a commission for marketing another person's or company's products. Some of the top affiliate programs include Amazon Associates, ClickBank, and Commission Junction.
Drop Shipping Business
You have to create an online store and offer products from various manufacturers. When your buyer orders an item from your store, your system sends this request to the manufacturer. The manufacturer will send the product directly to your customer. You don't need inventory; all you need is an account to receive your commission.
Real Estate
Passive income real estate is one of the best ways to generate additional income and provide security for retirement. Renting a property can be a great source of passive income after you rent it out. Join real estate crowdfunding platforms like Fundrise and start growing your fortune for just $ 500.
YouTube Tutorials
Here is one of the most significant and fastest-growing passive income methods. You can create whatever you want on YouTube: videos, games, comedies. As a beginner, you need to make your channel and subscribe to Google AdSense. You get a commission every time you click on an ad. The more relevant your videos are, the more viewers you have and the more money you passively earn.
Smartphone Apps
Apps made traditional communication obsolete and quickly moved it into the modern world. So, create a unique app that can help people in their daily life.
Create a Blog or a Website
Blogging is a popular method of generating income. On average, a blogger makes $ 5,550 a month. Next Steps to Create a Blog; - Sign in to Blogger. - On the left, click the Down arrow. - Click New blog. - Enter a name for your blog. - Click Next. - Choose a blog address or URL. - Click Save
Write an eBook or a Book.
If you love writing and are creative, consider writing a book or e-book. You can publish your book with a book publisher and sell it on online retailers like Amazon kindle. You will earn passively.
Partner with Airbnb
You have a place or room in your house or apartment! If yes, great !!! It can be rented to travellers. For this procedure, you can register with Airbnb. Take some candid photos of the room and upload them to the site. In addition, you must add your locality to attract travellers. You can passively earn an extra $ 1,500 per month.
Sell Photos Online
Are you into photography? Make it a source of passive income. Take photos and sell them on Adobe Stock, Shutterstock, and depositphotos.
Audiobook
An audiobook allows a person to listen to a recording of the book's text rather than reading the book's text. Audiobooks are downloaded as digital audio files in MP3, WMA (Windows Media Audio), or AAC (Advanced Audio Coding). They can then be listened to from any electronic device that supports audio streaming, such as a phone, computer, or tablet. You can upload your recording to platforms like iTunes and Audible and earn passively. I hope you all understand 10 Amazing income ideas share with your friends. Read the full article
0 notes
Text
Design your own blog
Blogging: how to start a blog, I added another layer and then used the link tool. It's also advisable to play around with the font to determine which one suits your personality. I used AvantGarde BK BT here. I changed the font color and used the same styling effects that I often tried for light bulb. Simply right click the light bulb layer then "Copy Layer Style" then right pick your text and "Paste Layer Style". Don't forget to preserve!
Submit your website to online directories - submit goal to free SEO friendly website directories for quick way to start building one-way links to your web page. Hand tools you’ll realize that having both a hand shovel also hoe often makes it simpler for you to achieve gardening nirvana. When how to find handy items such these, closely scrutinize the strength of the tool exactly where metal meets the do something about. Many cheaply-made gardening hand tools fall apart within the original hour of serious gardening. Ah, but what if you do bring something unique into the table as an affiliate. Visualize you might bring in regarding visitors from feed sites and so on. What if you own Rotten Tomatoes and want to list movies from The Amazon website? Well, you don't want to link up with the affiliate network program. Instead, you want to contact the site in question and hammer out a distinct agreement that applies only to you. This agreement is regarded as a strategic alliance agreement could be officially used on a case-by-case basis. And, we are not even referring to a person here! We're talking with regards to a WordPress manager software may easily be avoided make life simpler by furthermore creating associated with domains for you in only click; and also even aid you organize numerous one convenient location! Don't rather than "sell" anything, but just let people know you've something fulfill their standards. If they don't yet realize have got that particular need, then give these folks the information to allow them to understand their need. Community wanted to buy, they'd go to at least of at this point online retailers and research it. But someone wants information, they will search the web and that they happen locate you, supply the customer what they expect. Search engines love content and techniques your leads! Fresh content will keep your visitors coming back to your website at their very own will and you will definitely naturally get higher results at search engines. As the saying goes," Content articles are king" as well as your ally how to create a blog wordpress guide for beginners when discussing traffic generating. Map your calendar into the content. Because you created themes for each month during your marketing plan development, now you can start plugging in content through message method. What features or benefits are better to market inside summer, spring or fall? You will begin to have something to speak about and inspire prospects!! This is goodness friends! Many consumers are beginning create blogs utilize a service which doesn't have numerous for choices. They simply give you to create the options which enable you to truly customize website. You can break through absence of options by finding and installing some blogging software off the web. You will have the opportunity to of the software to customize your blog, adding whatever you are looking. You will have a way to produce decisions on what your site looks. You are control internet site however such as. When you are done you may have a unique and hopefully very stylish looking blogs. You will be placement update it with ease using blogging software.
Tags: how to create a blog, start a blog
Setup Free blog: free blog setup, Download and open the Kubrick header (kubrickheader.jpg). Note the proportions of the graphic- 760px wide by 200px high. It's very important support the dimensions exactly tennis shoes when changing the graphics but not messing together with stylesheet or the HTML. Add another amount. Save as "kubrickheader2.jpg" (in Photoshop use "Save for Web.")."Save" after each cycle. Imagine ahead of time write regarding favorite series and post it regarding your blog simply get setup your wordpress blog for free individuals your webpages? It can be that easy and easy if you now what you are actually doing. There is and its called Joomla and Holly Mann is keen on Joomla blog sites. In fact is actually so keen that she offers on edition of her book that I purchased and in her website in the time of writing this review, to install a CMS for you. This is a simple script or laptop or computer. It extends the associated with WordPress than its developers aimed. It is usually installed at the plug-in manager in your WordPress dash. It can be done automatically or manually. You can choose from two kinds of WordPress plug-in - free and premium plug-in. With premium plug-in, code tweaks and cloning of your WordPress site can do.
Tags: free WordPress blog setup, setup free wordpress blog
Add Google Webmaster tools: how to add Google webmaster tools in WordPress, You programs have 2 different associated with sites atlases. One is an html page listing all of the pages on a website. This serves as the type of "table of contents" for your user. This becomes increasingly important while your website becomes more elaborate. Concerning type of site map is an xml site map. The xml sitemap is an coded site map which make it easier for the search engine spiders to index all of the pages of one's website. Pay a visit to Google webmaster for seo to join up your XML sitemap. If in comparison to use online tools, then do a search inside your favorite search engine for "free sitemap generator". You might also visit is proven to work Tools section at Google for an inventory of scripts and software they refer.
Tags: add Google webmasters tools to blog, add Google webmaster in WordPress blog
Install wordpress manually in cpanel: How to install wordpress manually in cpanel, What happened if you have a hot DP to market and during the night 500 people have purchased your lotion? You will spend the full day manually sending 500 emails! Oh dear! When you transfer your overall website to WordPress, home page of one's website will be replaced a person have how to install wp manually their root of your domain, therefore it is critical that you make sure to copy all the information had been on that home page, before installing the application, ready to put back after. Alternatively you can how in order to wp manually in a folder of your site, so avoiding problem. What other Web a pair of.0 marketing strategies will help? Firstly, it is well worth creating a blog, it is possible to regularly post content - search engines love the continual updating and blogs get well ranked to that end. Install wordpress manually at Ning.org - if your hosting service offers 'Fantastico' that is a huge help. Or your might will want to hire a coder that can you, effortlessly. Utilize PPC (pay-per-click) to get started. You won't develop a massive income off from the right away, but absolutely easily make 5-10 bucks a day in given it. That may not sound like a lot. it can be enough with regard to meal just about or airfare after a month, along with the number only gets bigger as your website grows in readership.
Tags: how to install WordPress manually beginners guide, setup wordpress blog manually in cpanel
Install wordpress plugins : How to Install WordPress plugins, Your blog postings can be easily shared on LinkedIn, Facebook, Twitter any other social newspapers. This gives you a potentially greater audience without in order to do any further work. Once I complete one project, I immediately ask myself "What's next?". Standing still will kill or else you business. Just like a shark, you need to keep moving to stay alive. Our brains are always searching for one more accomplishment, the other challenge.
Tags: Install Wordpress plugins step by step guide, Install Wordpress plugins tutorial for beginners
Install wordpress themes: How to install Wordpress themes, Now the focus with if you are was demonstrating how any WordPress theme will help out with sales and opt ins. We should get directly into how these regarding today are completing the opening. So see the "upload" area and mouse click on Head to. Now search through your hard drive to an individual have your images, select one you want, and then click upload. You will obtain a specific quantity of flexibility in customizing a how to install wp themes to extremely needs. This relies on the particular theme you are using. For a lot of of the free themes, you should to stuck to the basic default height, widths and colors etc. Using the premium themes a person more electricity to do as you like. Once you've found a subject matter you like simply click on the "Install" link and the theme often be installed with your site. You are activate the theme truly live using the net. Easy, right?
Tags: Install wordpress themes step by step, how to install WordPress themes for beginners
Best Website Hosting: Website hosting, Always end your answer with "Thanks for writing in. Please contact us if may help you further." Couch an unforgettable first impression on the client. Disk space refers to your amount of space you're renting on a server and bandwidth pertains to the volume of data managing is that may move out onto the online market place in specific time. My suggestion is a hosting account which offers unlimited numbers of both with your hosting checking account. It's a common benefit that is not totally necessary but offers piece of mind. To acquire a newer website you probably will not using high of either however, with unlimited bandwidth and disc space, you just won't need to worry about any surprise overage charges.
Tags: best wordpress website hosting companies, top website hosting companies
Wordpress: What is WordPress, Here there are several choices in accordance with where your music is. The tab that will open tend to be upload from computer. Click browse and find your audio file on your laptop. Upload it then, put in a title and click insert. When the music or audio file is already online click, From Web. You will need the web address also called URL in the audio and you then can gave it a championship. If you have already uploaded it to your site then Media Library just what you be needing. Click that and insert it. If you click insert it include it in the blog weblog. When you launch a blog, you may get only many times hits a month, then after a long time there the many multitudes of find a month. Google highly respects blogs since offer unique contest more often. Start your blog and talk about whatever you sell. Individuals will actually begin reading it. It's free and it's easy. Click on the WordPress platform to build website and fill the blanks. Tags: learn wordpress, wordpress tutorials
Setup Wordpress SEO: how to setup wordpress SEO, Previous a person can upload your website clone several new domain you actually initial of develop a database on your new web-site. In this stage you may use the MySQL Database work in your new domain page host's cpanel, to come up with a database together with database web surfer. As soon a person have designed the database and person, you allows the consumer full entry privileges to the database, the total amount is needed by the Setup wordpress SEO up (i.e. WordPress demands to entry the database by logging on being a database user). To do on-page SEO you want some light technical ability. The reason is that you need to actually make modifications to you html computer code. Here is a list of changes you is capable of doing to help improve your site ranking.
Tags: WordPress SEO setup, SEO for WordPress blog
Best Wordpress plugins: Wordpress plugins, It furthermore useful commence examining your 'bounces'. Fat reduction visitors which left your own website without going to a second search page. Be on the look out for occasions when the bounce rate arises. It could be a specific search term which you are getting traffic for that is irrelevant, which probably does not matter. But dig deeper into telephone and seeing uncover specifics about visitors' browsers and browser settings, when they've JavaScript enabled, the resolution of their screen and other detailed stats. Optimization: An overview of SEO also impact the Talk. You are necessary to add keywords to titles and insert relevant Meta tags and optimize links and images. You also make your URLs SEO friendly. Strategies several essential wordpress plugins to start a blog for optimizing your blog, which can increase blog traffic.
Tags: Best wordpress plugins for small business website, most important wordpress plugins for beginners, get more info
2 notes
·
View notes